JerseyCity Frankie
-
Posts
1,338 -
Joined
-
Last visited
Content Type
Profiles
Forums
Gallery
Events
Everything posted by JerseyCity Frankie
-
With the real Morgan seaworthy and underway again I expect to see a lot more people building her. But I can't imagine many people doing a better job than you have done! You have et the bar very high.
-
Pride of Baltimore - question of a rope
JerseyCity Frankie replied to Shura's topic in Masting, rigging and sails
Shura, Pride of Baltimore II has a facebook page, you could go there and present your question and even post your photo with the arrows. Someone there would likely know all about it. -
Gaff topsail question
JerseyCity Frankie replied to captainbob's topic in Masting, rigging and sails
On Lettie there are two tacks, and when going about one is cast off and the other is taken up and made fast. Incidentaly, Lettie G Howard is now back in New York and fully rigged for the first time in many years. She is being operated by the South Street Seaport Museum but she is also heavily involved in the Harbor School on Governors Island- Her master is a founder of the Harbor School and has folded Lettie into the curriculum there, a role for which she is very well suited. -
dry brushing
JerseyCity Frankie replied to stevetuck56's topic in Painting, finishing and weathering products and techniques
Here is my take on drybrushing: You have to think of two spectrums of the condition of the paint you are using. One spectrum is the degree to which the paint is either wet, right out of the container, or dry, where it is set up and hardened. The other spectrum is how much paint is on your brush, with one end of the spectrum being a fully charged brush ready to drip paint, the other being a brush that has given up all it has to give in terms of leaving a paint mark on a surface. In order to drybrush a surface you should have a solid base coat of one color already on the model and the color you are drybrushing over this should be different in terms of tone or vibrance, usually this color is a lighter color. Your brush should be a crappy brush, one that has seen the last of its days as a pointy neatly bristled brush. What you want is an ugly mop of a brush a signpainter would forsake, one with bristles like a bad hair day. You want to get to the far end of each of the spectrums I mentioned above. You want some paint in the bristles of this brush but you don't want that paint very wet nor do you want very much paint charging up the bristles. You get to this happy place by dipping your brush then wiping the brush on some scrap material, you wipe this mopy brush around on a scrap of cardboard or something until you got 80 to 90% of that paint out of the bristles. When the brush is hardly leaving any paint marks your just about ready to drybrush on the model. The feeling you want is that feeling you get when you have a used up felt tip magic marker that is out of ink, you can't write your name with it but you could still ruin a white linen tablecloth if you pressed hard enough. THIS is the brush you now drag across your model. Depending on where the brush exists straddling both of the two spectrums ( and it will be shifting on these spectrums as you use it) you will see for yourself how hard you need to press and in which direction you need to brush. Lightly at first and brushing in one direction, pressing hard and scribbling in all directions at the end when the paint is all but gone. Its this last stage where you get the best drybrushing effects as the paint is only adhering on the higher points of the surface you are scumbling over. -
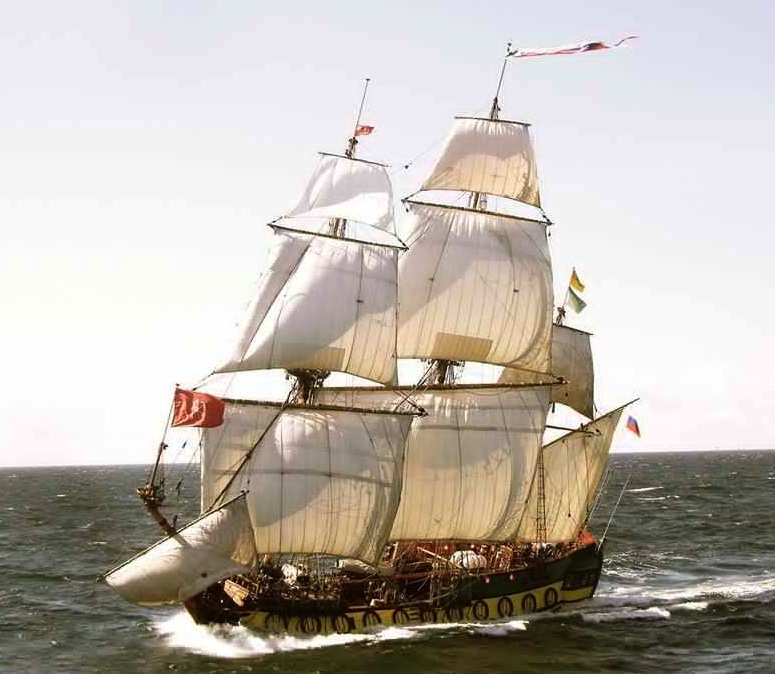
I love this photo for a lot of reasons. here it serves well to illustrate the flags position in relation to the square sails and the point of sail the ship is on. In this case the ship is being sailed as close to the wind as possible, she is trying to point in the same direction the wind is blowing from. She can't sail directly into the eye of the wind. But if she braces her yards around as far as they can go, so far that the sails are contacting the stays as is visible in the photo, she can get within six points of the eye of the wind. She is said to be "Close Hauled" and in this case she is close hauled on the starboard tack, since the wind is coming over the Starboard side. The flags as you can see are streaming aft and to port. The flags are ACTUALLY indicating a very very slightly different direction of the true wind since the speed of the ship through the water makes them behave a tiny bit differently than a stationary flag on a fixed point in the wind would behave. So if she was sailing past a rock with a flag on it, the flags on the ship and the flag on the rock would be at very slightly different angles. The one on the rock indicating the True Wind and the ones on the ship indicating the Apparent Wind.
-
A word of caution about using museum ships as a source. Some of them are in well funded museums with plenty of scholarship backing up every element aboard. But many museums lack the funding to get every detail right every day and most museum ships are in the process of being restored to whatever period the curators decided to restore the ship to. This means there are plenty of museum ships that lack all the historically correct equipment or use anachronistic equipment or materials to convey a sense of what the ship "would have looked like". Many elements on deck will be configured in ways that were designed to prevent mischief or vandalism at the hands of museum visitors or simply to allow easier maintenance or cleaning and should not be used as examples of how the ship would appear in her daily life. Further, I have seen some badly made coils in photos of really well known museum ships, coils a real first mate would not tolerate for an instant. I think its best to do all you can to understand the rig of the ship your building and be prepared to make your own decisions about how to represent the coils. Defending decisions you made about your model is a fun aspect of the hobby in my opinion.
-
Difficult to achieve that perfectly aligned row of deadeyes that way. I feel sheepish saying this though since from here I can glance across at my H.M.S. Victory where no two dedeyes are on the same horizontal line! I debated faking the job by doing as you suggest with the shrouds then gluing the other ends just above the bolsters on the trestle trees and faking up the shroud gang above them. I don't think this would be "illegal" but it would CERTAINLY be looked upon as a cheat of one degree or another. On the other hand, I often say that in Art, if nowhere else, the ends justify the means.
-
Pride of Baltimore - question of a rope
JerseyCity Frankie replied to Shura's topic in Masting, rigging and sails
If I ever get back aboard the Pride of Baltimore II I will specifically check where the lacings are made off. But I suspect they simply terminate with a knot at each end. Probably knotted to eybolts on the jaws. -
Charles W. Morgan rigging
JerseyCity Frankie replied to Ed Mostowicz's topic in Masting, rigging and sails
The Morgan is leaving Mystic for the first time since ??? on Saturday the 17th of May! I agree its hard to find stuff on whalers. On the other hand, a lot of writers agree that whalers were highly individualized in terms of the gear they carried and this means you would be afforded more artistic license rigging a whaler than if you were rigging almost any other type of ship. The Yankee Whaler by Clifford Ashley is a great book about whalers written by a remarkable man who not only has written the best book about knots ever written And was a highly accomplished artist he also sailed on a whaler as crew, so his perspective is unique and very valuable. Unfortunately The Yankee Whaler doesn't go into much detail about specific rigging details other than the tackle for the blubber hook which I suspect you already know about. -
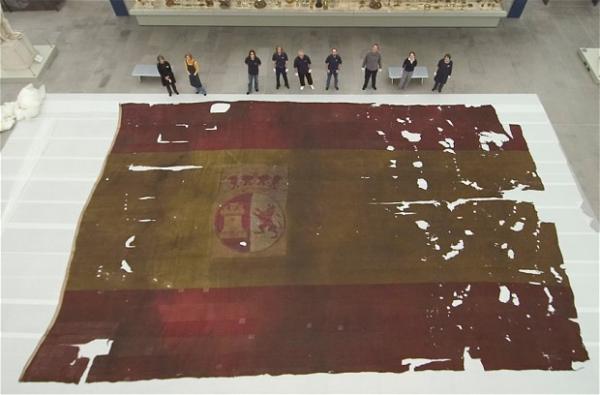
Imagine the challenges of setting and striking this flag while underway. Its easy enough to picture the Museum staff in the photo having a tough time getting a modern piece of fabric the size of this flag stowed. Now imagine its dusk on the Atlantic and you are instructed to strike this flag and stow it. IF you get it down on deck without fouling, you still have to fold it into a neat package. Look how much floor space it takes up in the photo and then picture the limited amount of space on the poopdeck of the ship.
-
http://i.telegraph.co.uk/multimedia/archive/02488/flag_2488242b.jpg I wish I could tell you more about this image. Its said to be a flag flown at tTrafalgar from the San Ildefonso. Further its said to have been flown over St Paul's Cathedral during Admiral Nelson's funeral.
-
At the most basic level I think its important to think about the thickness of the material you use to represent the lines on the ship. On an actual ship there were scores of different diameter line in use, a different thickness for different applications in the rig. Its hard to find good examples of this concept in photos, either of model or on full sized ships, since the subtle differences in diameter are lost when you view the 'big picture" of the entire rig. The rule of thumb is that the greater the forces involved, the thicker (and thus stronger) the rope in use has to be. So the shrouds and the stays are very thick in comparison to the lesser running rigging that doesn't come under as much strain. And there is a spectrum of stains involved in any ship rig and your task will be to try to understand what each individual line is used for and thus how much strain it is under and this will determine the thickness of each line. A very broad rule of thumb, one that has exceptions, is that the higher up in the rig a line is working, the thinner the rope it is made of. On your model you should be employing at the very least three different diameters of line, preferably six or eight. My advice is to start acquiring all the thicker thread you can find out there. its fairly easy to find thin thread but the intermediate and heavier threads are a challenge.
-
Pride of Baltimore - question of a rope
JerseyCity Frankie replied to Shura's topic in Masting, rigging and sails
I agree the line in the photo is lacing. however the Pride of Baltimore one was sunk in 1986 when she was blown down in a squall. It has been speculated that if the sail was bent on with less strong stuff, that it would have blown out before it caused the ship to heal over and take on water and sink. Tall Ship Down is an excellent book that contains a detailed account of the sinking AND is written by a captain of the Pride of Baltimore II. This schooner of all schooners would be very careful about how its sails were laced or seized on. I suspect that the use of lacings and seizings was arrived at after very careful consideration of the risks. I know of two schooner sailing out of New York City that use the crappiest sort of natural fiber recycling twine to lash the sails to the hoops. Good sein twine is available but far too strong. The idea is that the straw colored fuzzy recycling twine, a single strand of which is easily broken by hand, is weak enough to break in a gust of wind strong enough to make the ship heal over dangerously. The lashings are passed many times though and provide enough but not too much strength. -
Brady, in Kedge-Anchor, 1847, has mats and chafe gear all over the ship and specifically mentions covering the lanyards on the shrouds with mats. Specifically sword mats. Relevant passage on pages 129 and 235 of my copy. Here is a quote from page 129: ..." (Sword mats) are...the breadth of the dead-eye, and long enough to take in both-the lanyards are laced inside. They are hardly ever used on topmast rigging; they look heavy, and are of no use, except on the foreward shrouds and backstays."......
-
A quick note: Gorilla glue is not made from gorillas. Back to the topic: I have been curious about hide glue for a while. Dry flake Rabbit skin glue was always next to the gesso at the better art supply stores as it is used to prepare canvas for oil paintings. I knew hide glue has been used for high end wooden stringed instruments since forever- it predates all the other glues we have available and sometimes the old ways are the best. I read Donald McNarry's two books and he repeatedly mentions "Seccotine"which is a fish based glue I could never find. Until a friend from the U.K. brought me a bottle and which I have had not much time to get used to using but I will tell you what I see so far: No oder at all, Long drying time in which it is very gummy. I glued some sample pieces together alongside some pieces glued with a higher end white glue and it performs as well. I have not paid any attention to exactly how hard or brittle it is, I will have to check on that but it must be repeated that white glue stays stretchy and soft for a very long time. My bottle of Seccotine is from Lucy Coad, Hill Farm Workshop and there is a web address: www.squarepiano.co.uk
-
I would caution that actual sail twine used to sew on a bolt rope is not nearly as thick as even the finest of sewing threads would appear in scale. Modern sail twine is just a bit thicker than dental floss and although I imagine it was considerably thicker "in the old days" before nylon, it could not be sewn through any fabric if it was as thick as even the thinest rope. Having said that, I do like the way an actual sewn seam or line of stitching puckers the fabric a little, it tend to impart a texture to the fabric that adds to the organic look of a sail, even if these puckers themselves are out of scale.
-
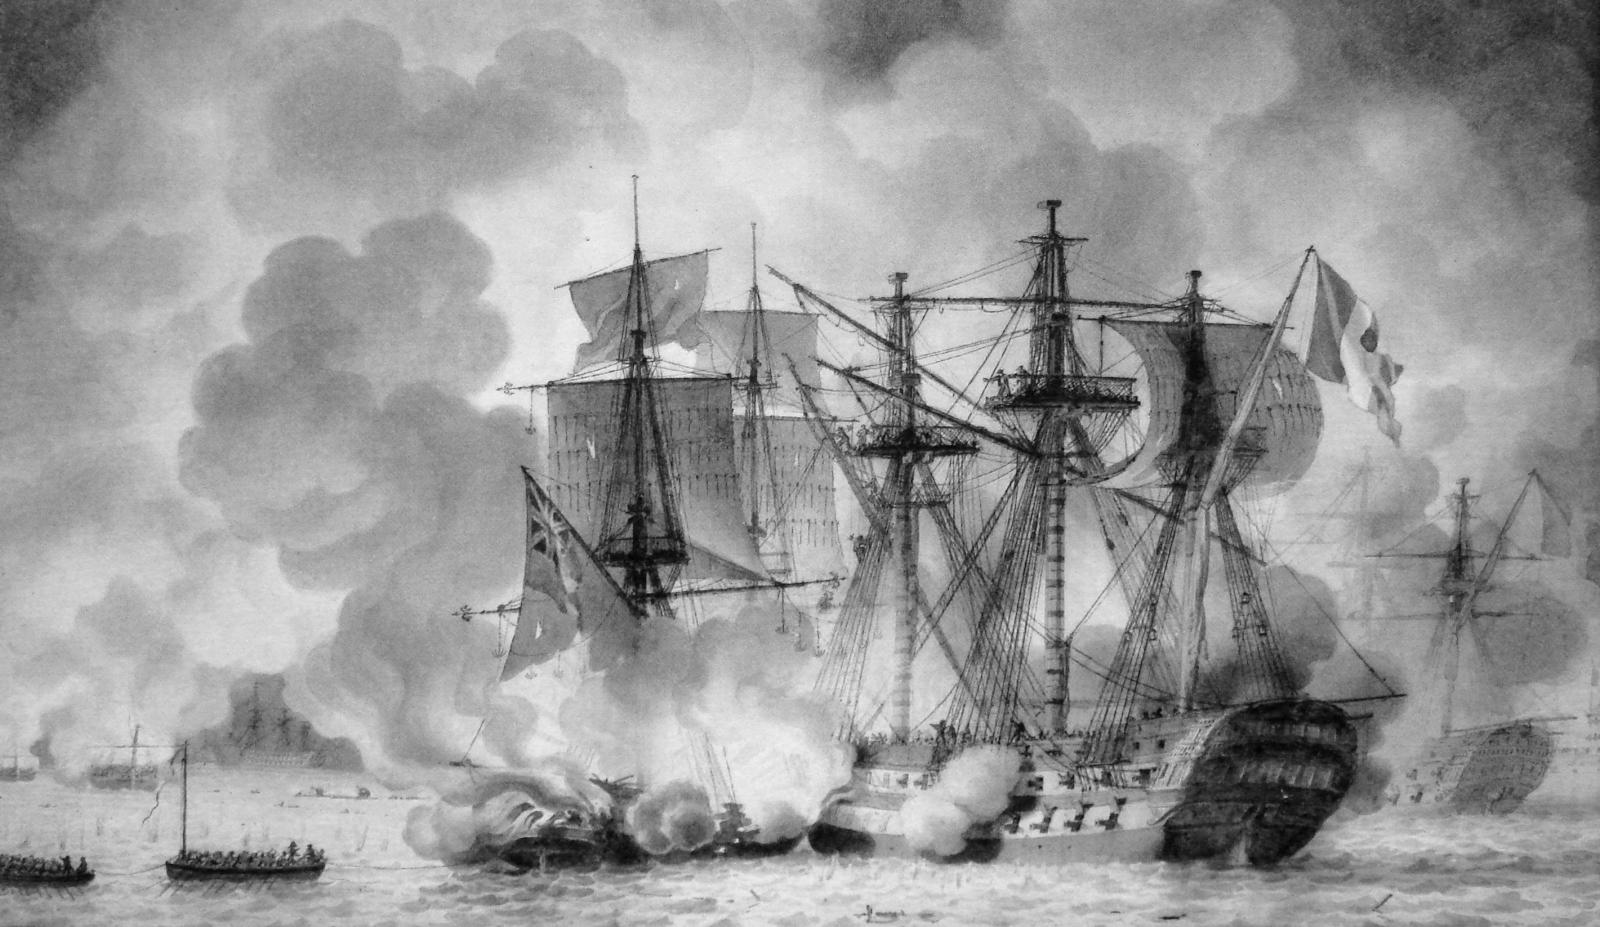
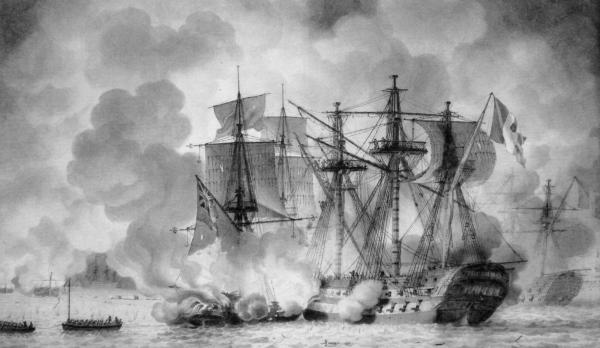
Found the link to this print on reddit.com http://upload.wikimedia.org/wikipedia/commons/a/a6/Regulus_under_attack_by_British_fireships_August_11_1809.jpg Its an image from the Battle of Basque Rodes of April 11th 1809 ( Its the anniversary!) and it depicts Cochrane's fireships attacking anchored French ships in the Basque Roads. http://en.wikipedia.org/wiki/Battle_of_the_Basque_Roads Of interest to me was the appearance of what appear to be signal lanterns seized into the mizzen shrouds in triangular patterns port and starboard on the anchored French ship. I have never seen this practice demonstrated anywhere else, its new to me and I figured it could be of interest to others as well. There is a lot of great rigging detail in this print.
- 1 reply
-
- 4
-

-
What is the name for the netting under the bowsprit
JerseyCity Frankie replied to HKC's topic in Masting, rigging and sails
I have heard modern day square rig sailors jokingly refer to this stuff as the "Cadet Strainer". -
I often wonder about the same thing. failing a LOT of Brails, I can't imagine how this could be achieved. I can imagine four or even five brails with their lead blocks but the blocks would be noticeable sitting out there on the stay, they would appear in the etchings. In order to get a man to be able to bundle the sail up close to the stay, he would need one of those knotted footropes as one sees on jibbooms to stand on. With nothing to stand on, I can't imagine the sailors able to get a neat furl on or be expected to survive the task nine time out of ten.
-
Breast Backstays are easy to miss. I don’t think I was aware of their existence for the first five years I was interested in ships. The problem is, I think, that we have rigging plans that 99% of the time shows only a view of the rig from the side, not from the front. From the side the Breast backstays, being single lines running nearly vertically and nearly parallel to the mast, blend right into the spars and standing rigging against which they are depicted. They show up quite well if you get one of those rare rigging plans that show the bow or stern view. I’m not familiar with the ship you are building but my advice is to run them in a straight line right from the masthead down to the channels. If they pass through the shrouds don’t sweat it, but I suspect their deadeyes are outboard of the chains for the shrouds and probably won’t get in the way of the lower shrouds at all.
-
From the one photo you provide here I'm saying congratulations on your work so far,the model looks great! About the lifts I have an observation or two: In actual practice the yard would often be braced to port or starboard and the lifts have to be able to lead from their point of contact to the mast in an unobstructed path to the yard arms. This means the lifts must run outboard of the shrouds and NOT pass through the shrouds. it means the lee lift would likely chafe against the front of the lee forwardmost shroud of the mast above though and this has always made me wonder at what precautions were taken to keep the lifts from chafing and damaging themselves. ( I imagine it would be the serving on the forwardmost shroud which is often seen on ship models AND baggywrinkle clapped on over that, which I have NEVER seen on a model) As has been suggested, the lifts could be on penndants with their running gear outboard of the shrouds and I have seen this idea in use( this makes the most sense to me), but most of the lifts I have seen had the falls of their tackle running at a point where they WOULD touch the shrouds when the yards were braced up all the way. I picture a topsail braced hard over to Port, the port brace is tight and its pulling the port lift down and aft ( sometimes just aft). The Starboard lift has a great lead at this point, not touching anything and not under as much strain as the Port lift would be at this point of sailing. But those Port lift tackle falls are rubbing against the first Portside t'galent shroud and by the same token the course yard lifts are rubbing against the Topmast shroud. This has never sat well with me.
-
Wow, the power of Model Ship World to get to the bottom of things is impressive. I had never head of a Fog Bouy but clearly that is what the "mystery object" is. Thanks guys.
-
Making sails from scratch for niagara
JerseyCity Frankie replied to Don Quixote's topic in Masting, rigging and sails
Your in luck in that the Niagara has tons of photos of her available on the web. Her real world present day crew are VERY professional and their dedication to period authenticity ensures the sail spar and rig configurations are period correct. The ship has a reputation within the tall ship community for maintaining a higher level of seamanship than most other tall ships. -
Correct hitch and advice on rigging a flag needed
JerseyCity Frankie replied to Gabek's topic in Masting, rigging and sails
Just an observation about flag halyards. They represent the thinnest rigging on the entire ship and no other lines in the rig are as thin. A convention of belaying plans is that the higher the point of origin of the line in question, the farther aft it will be belayed on deck. So if your flag halyard goes to the truck of the mast, it will belay farthest aft of all lines on that mast. The line is so thin its not necessary to put it on a belaying pin like the other running rigging, more often its on a very small cleat or very small pin. If you want to fly a large flag on a windy day you want the flag and its halyard to be free of any other lines as the flag is raised or lowered it has every opportunity of catching on something. As the flag moves up or down the line, it isnt tight yet and will blow off to leward and try to wrap around everything it touches so the flag halyard is best belayed well aft and outboard of everything else. -
At the stern, over the ships name there is a cruciform object in a mesh cage, it has balls at the end of each of its arms. It appears to have SOMETHING to do with ground tackle but its no anchor, what is it? Also in the same photo there is an odd asymmetric boxy object aft of the stack in the photo but looks like its to Port of the stack, or is it on an obscured ship alongside? its fairly large and its pretty high up for such a large boxy object. what is it? The same mystery cruciform object is visible in this shot of H.M.S. Courageous. Again its configured so it may be used over the side and it appears to have the balls and the steal cage.http://i.imgur.com/GVucE9B.jpg