JerseyCity Frankie
-
Posts
1,338 -
Joined
-
Last visited
Content Type
Profiles
Forums
Gallery
Events
Everything posted by JerseyCity Frankie
-
Whit is it they say is bad about beeswax? I too remember some talk about it not being suitable but now I cant remember what points were against its use.
-
Another factor would be the available roads the timber would be brought down over. A 60' tree trunk would be nearly impossible to manage. the "low hanging fruit" of trees easily within reach of any shipyard would have been exhausted quite quickly and from then on it would become more and more difficult to get lumber, suppliers having to go deeper and deeper into the hinterlands and then bring timber back over what would likely have been the entire length of most available roads. Roads that at best would be very windy very circuitous and primitive by our standards.
-
Work table height?
JerseyCity Frankie replied to rtropp's topic in Modeling tools and Workshop Equipment
Here is a photo of a commercially available Model Stand. I built mine with 2X4 legs and plywood scraps. mine has a central cylindrical column with an 18" disk mounted on it, holes drilled through the wood column every two inches. The three 2x4 legs are held in position by two triangular pieces of plywood. Measuring the angles of the cuts was the only part of the construction that could be considered difficult. The column threads vertically through the base and can be adjusted with a nail placed in whichever of the drilled holes is exactly right (the example in the photograph has an unnecessary complex and heavy threaded metal rod). I can raise the work surface as high as 60" if need be and the work surface freely rotates. The free rotation is a hand feature during those MANY Port and Starboard modeling jobs. People who have to laboriously pick up their ships and rotate them 180 degrees to glue on the other thingiie will grasp the utility of a freely rotating surface that does not obligate repeated two handed and sometimes risky manouvering of the model off and then back onto the work surface. Stained and varnished, its kind of an elegant bit of furniture. I wind up using it for all sorts of things.
-
I have read that the ponytails were covered with the skin of an eel. I am sure it made perfect sense at the time.
-
Pond Yacht rigging
JerseyCity Frankie replied to JerseyCity Frankie's topic in Masting, rigging and sails
Found this on Google books and it is relevant: https://books.google.com/books?id=_jYCAAAAQAAJ&pg=PA103&dq=Pond+Models+%C2%A0and+Pond+Yachts&hl=en&sa=X&ei=8NtZVbWuHq7IsQTHgYHADg&ved=0CC4Q6AEwAg#v=onepage&q=Pond%20Models%20%C2%A0and%20Pond%20Yachts&f=false -
I think you could apply a stiffening agent then clamp the model in a bow down vertical position. Gravity would pull the sailcloth into the billowed sail shape. I know of one case where the modeler used a plastic bag of rice draped into the sail and the weight of the rice caused the fabric to bulge. I have had great success using a fine art supply product called GAC-400 sold by a company called Golden. Designed specifically as a fabric stiffener Its a water based acrylic and it hardens in the fabric. This product works better than white glue, better than "Stiffen-It" and "Stiffen-Stuff"( two names for the same product sold at sewing stores) and ordinary laundry starch too. Check out my HMS VIctory build log, which is really mostly about how I am making the sails. Sails like the ones you describe, shaped like they are drawing wind.
-
I'm so happy to learn that McNarry's model is in a pantheon like the Naval Academy Museum. McNarry says in his 1975 book that he had built six versions of the Constitution and would do no more. I wonder if he knew where his models went after they left his hands? I hope he was told that one of his Constitution models wound up in such a collection.
-
First time rigging - being organized
JerseyCity Frankie replied to RichardG's topic in Masting, rigging and sails
I can see the value and appeal of a spreadsheet. But I am a visual person and thus I always make drawings. I wind up making numerous individual drawings of each spar, than in different color I mark the locations of the blocks on the spar, and over and around these I draw the run of the line I am charting in the sketch. Multiple sketches later, some with the mast drawn in, some in perspective and others in plan view. Multiple drawings. The act of physically drawing the lines on better sets the lines location and function in my mind and I am better able to picture the way they are going to interact on the ship. I DO first require a spreadsheet of some sort, a printed list of lines or Rigging Schedule that gives me names lengths and diameters, THEN I start sketching. I am certain I avoid surprise rigging conflicts this way and the drawings allow me to be prepared for challenges I may not have even known I was going to face.

-
Pond Yacht rigging
JerseyCity Frankie replied to JerseyCity Frankie's topic in Masting, rigging and sails
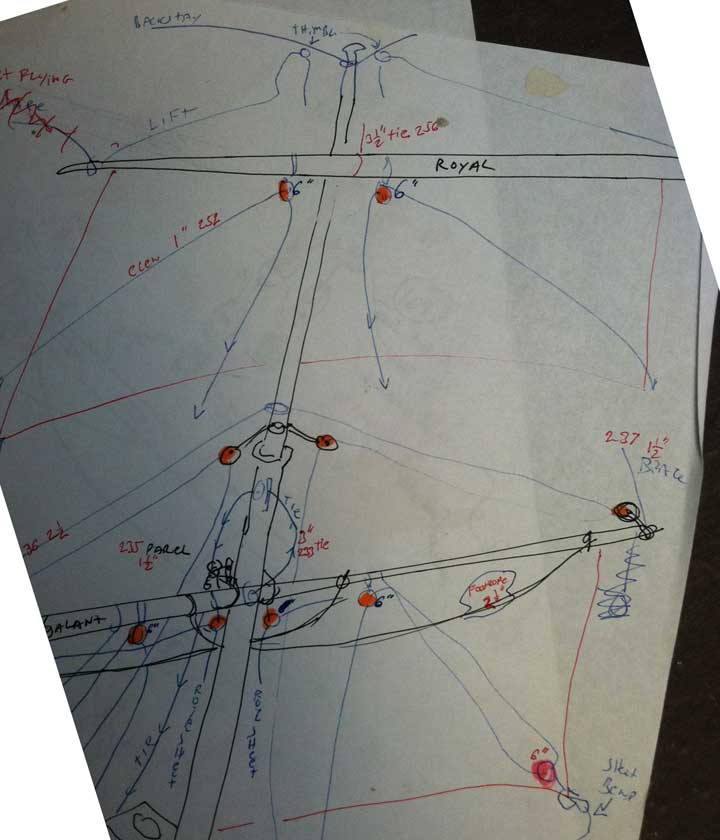
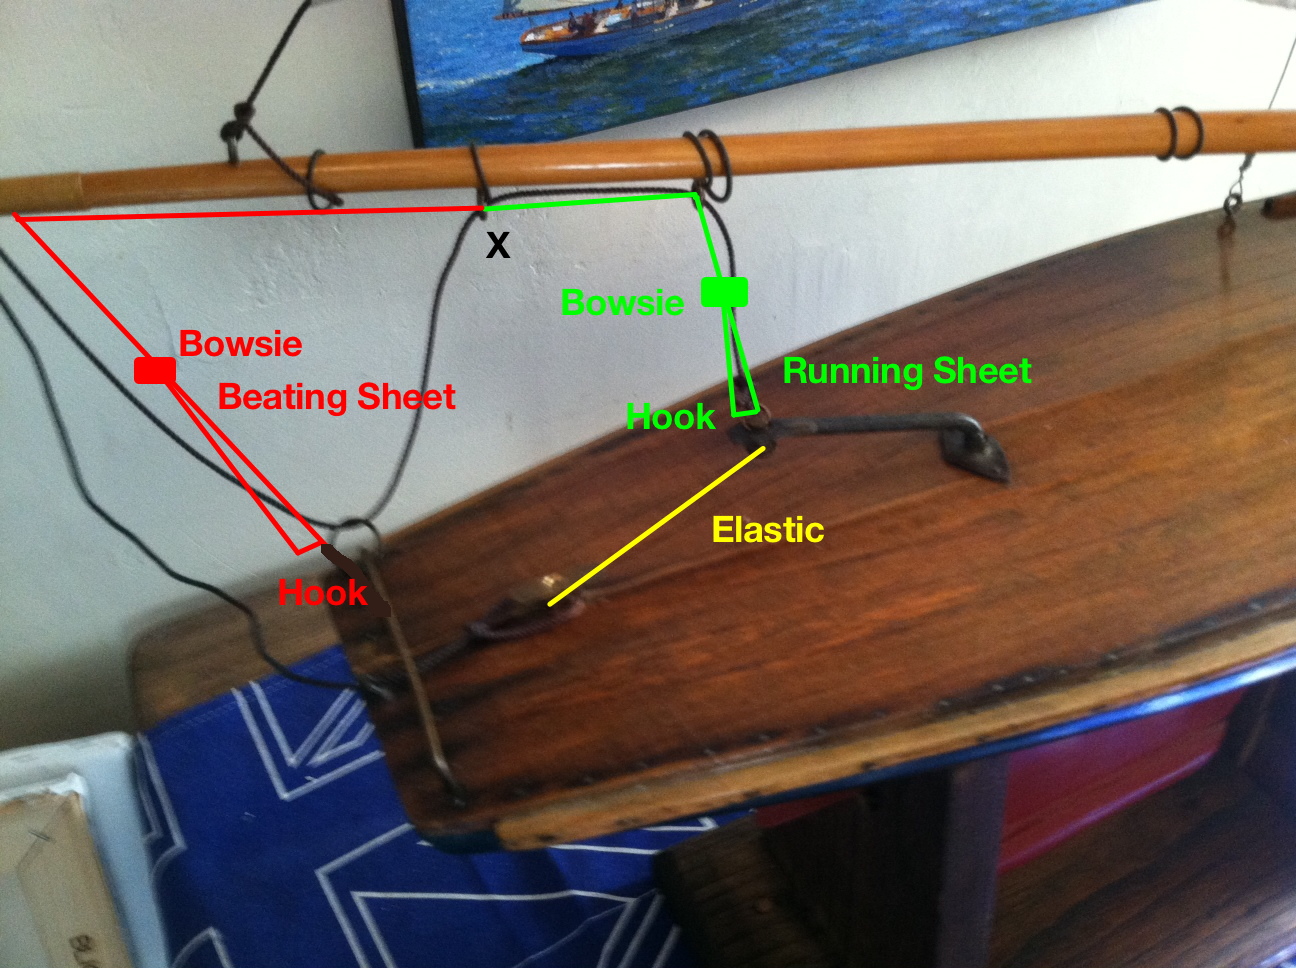
I wrote to the Central Park Yacht Club and they put me in touch with a gentleman with experience with the subject. I was touched by his generosity when he wrote back and sent along annotations on the photo I had sent him. He explains that: ......... sheet-to-tiller rig: there were *two* mainsheets, one used on going to windward and the other on the run. Both typically had hooks on the end so they could be switched. Sailing upwind, the boat sailed on balance only, tiller centered by the elastic as shown in the picture. The beating sheet ran from the end of the boom and was hooked on the ring on the main horse. Running sheet hung loose. On the run, the running sheet would be hooked to the tiller as shown, and run out so the main boom was swung out to one side or the other. The beating sheet would hang loose. The principle is that if the boom were swung to starboard, the boat would tend to turn to port. The pressure of the wind would pull on the main sheet against the elastic and give opposite helm to the rudder , thus guiding the boat. The jib would have a single sheet, adjusted with a tensioning device, let out for the run and pulled in for the beat.
-
I agree its a preventer. In light air when running before the wind its easy to have the sail get backwinded- a gybe-and have the boom swing entirely across the deck to the other side, unintentionally. To prevent this, the forward tackle of the Preventer is unhooked from its stowed position and the hook is place on a ring or an eye on or near the aftermost shroud on the leward side and taken up on. On vessels where I have seen this line, there is a cleat all the way forward under the jaws of the boom and this is where the line is tended. Now the preventer opposes the sheet and is preventing the boom from going inboard unless you let it.
- 15 replies
-
- 2
-

-
- Cutter
- Sherbourne
- (and 2 more)
-
I think a big concern should be consistency of detail rather than level of detail. If you are depicting the hinges on the gunport lids on one part of the model, something eight inches wide on the actual ship, you are now obliged to represent every other object on the ship that is eight inches or greater. In other words don't depict those gunport hinges if you don't intend to include the ironwork on the pumps. My trouble in my own models is in trying to adhere to the level of detail I decide to aim for when I begin the project, I always find myself adding detail later in the project that winds up being at a higher fidelity than details I had built earlier. In some cases this forces me to go back and tear out earlier parts of the build in order to match the new standard as I had raised the bar during the process. Following this urge to depict great and greater detail leads inevitably to frustration, you will never be able to include every detail. Nor will 99% of us ever be able to achieve levels of detail as small or as precise as can be found on some superlative models built by craftsmen who's talents and abilities outstrip our own. Also here is a conjectural rule of thumb I just invented: If it takes 100 hours to build something which includes all details which on the real ship would be 12" wide, multiply those 100 hours by 1.5 if one now wishes to depict all 6" wide components. If one wishes to include all components that are 3" wide, double the time you must allot for the project. I picked those numbers out of the air and they may be debated, but the point I am making is the time added to the overall project grows exponentially as you increase the detail. If one persists in more and more infinitesimal detail, the amount of time expands past any reasonable amount. An argument for less detail is that most models will be viewed from across the room most often. Those hinges on the gunport lids will not be visible if the model is high up on a shelf. An educated eye scanning the model from up close will look to see if such hinges are included, but only one half of one percent of the people viewing the model will have that educated eye. But YOU are one of those one half of one percent and YOU have to decide if you can live without the hinges. The words " I could have included the gunport hinges but it would have taken too much time" are never going to taste good in your mouth.
- 55 replies
-
- 16
-
-
Pond Yacht rigging
JerseyCity Frankie replied to JerseyCity Frankie's topic in Masting, rigging and sails
Yowch $57 on Amazon! But I see only $21 at Blue Jacket. Thanks for the tip! -
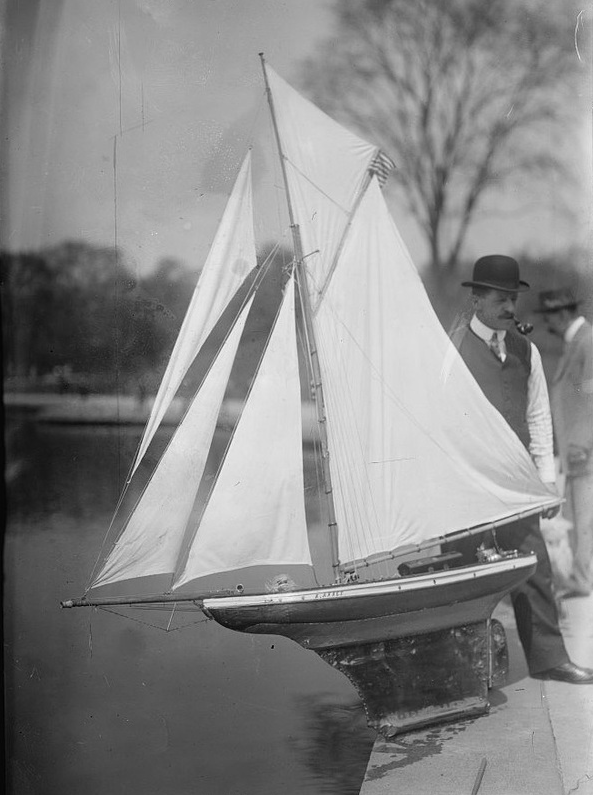
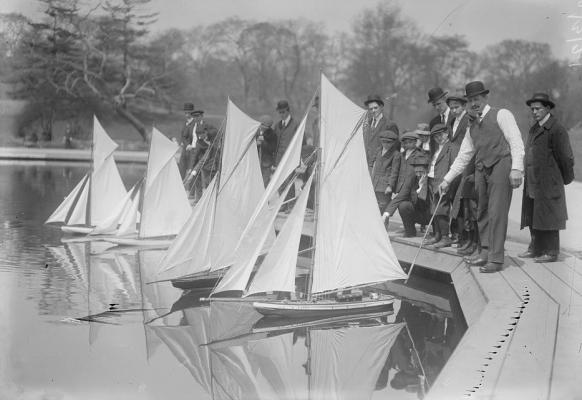
Im sifting the internet looking for information about pre-radio control Pond yacht rigging. Working rigging for sailing scale models. Before radio control, as I am sure all of you know, pond yachts reached a high degree of sophistication. Self tacking steering gear controlled by wind vanes, with a lot of complex brass hardware with elastic bands and adjustable sliders, were visible on deck and could be set by the user on shore to match the prevailing wind conditions and desired point of sail. My problem is in finding authoritative information on these mechanisms. Nearly ALL of the images I find of historic Pond Yachts, those not in actual contemporary photos, are of models that have been restored and have had their steering gear simplified, presumably by antique dealers with little working sail understanding. In most of these cases its very obvious that brass fittings remaining on deck are not rigged in a way that would have an actual effect, they have merely been mocked up to look like they function and are often left unconnected to the sails. Have any of you R.C. guys come across books or websites that deal with this aspect f the hobby? I hope there is a repository of this knowledge somewhere, it would be a shame to lose it.

-
18th and early 19th Century cutter models
JerseyCity Frankie replied to tkay11's topic in Nautical/Naval History
Going about in a cutter must have been nerve wracking! Has any other type got as much stuff going on at the tip of the bowsprit?- 42 replies
-
- 1
-
-
- Cutter
- 18th Century
- (and 4 more)
-
I wonder which ship had the largest Jeer Blocks in history? Thus, the largest blocks on a ship I should think? There is a Jeer Block stood up on end at the Mystic Seaport museum on the floor of their rigging loft display and it comes up to my chest, over 4' high.
-
At last one man had the guts to say what we have all been thinking! I agree with Andy. There is nothing wrong with saying something like "out of the box, with refinements" which is more accurate for the typical MSW "bash"
-
it could have gotten wet. If it lay over into a puddle it would have had the masts submerged and the side in the water and the irregular line of demarcation. Its a good plausible explanation.
- 10 replies
-
- 2
-
-
- finished
- restoration
- (and 1 more)
-
Oh right you are! I was confused in my recolection of the mnemonic device I use, which is this: If you are sailing on a Yawl and the main mast falls behind you, you say "YAWL look out back there" and if you are on a ketch and the mainmast falls aft, you have to KETCH it!
-
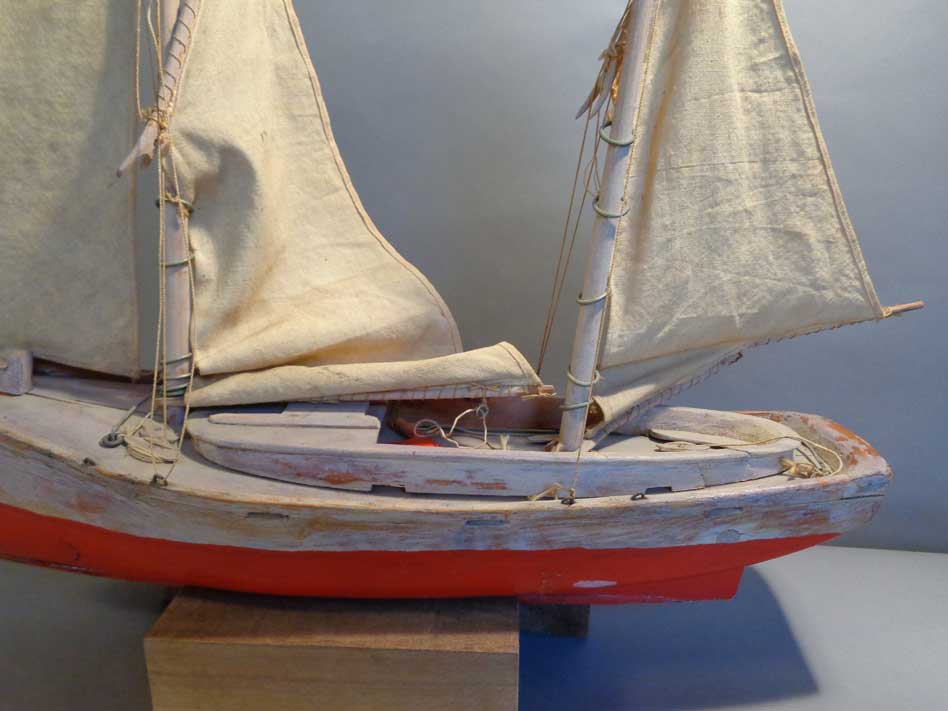
A working theory is that someone wanted to paint her white at some point and was in the act of putting on a thin coat as a base layer, right over the varnish, then got drafted into the Army. Or discovered girls. Or SOMETHING. What would make them start in on a process then stop abruptly, never to take it up again? I'm at this point less inclined (but still open to the possibility) that this is a chemical process causing the frosting, or the foxing, or the blooming, or the silvering, WHATEVER this is called. Also if its paint over varnish, why didn't it flake off? There is no chipping anywhere that I see. THe parts of intact varnish do not appear to have been exposed by the falling away of the frosted layer, I believe they look now as the always looked.
- 10 replies
-
- 2
-
-
- finished
- restoration
- (and 1 more)
-
I should add that I spent an hour cleaning everything with warm water, then warm water with a little dish soap. I will start ramping up to stronger solvents after I give this frosted coating some more consideration. I tend to think the outboard part of the cockpit coaming was intentionally painted with a more opaque yet still thin white paint, ditto the inner face of the same coaming all the way aft. The rest of it looks like chalky residue, not paint, and comes off with a scrape of the thumbnail.
- 10 replies
-
- 2
-
-
- finished
- restoration
- (and 1 more)
-
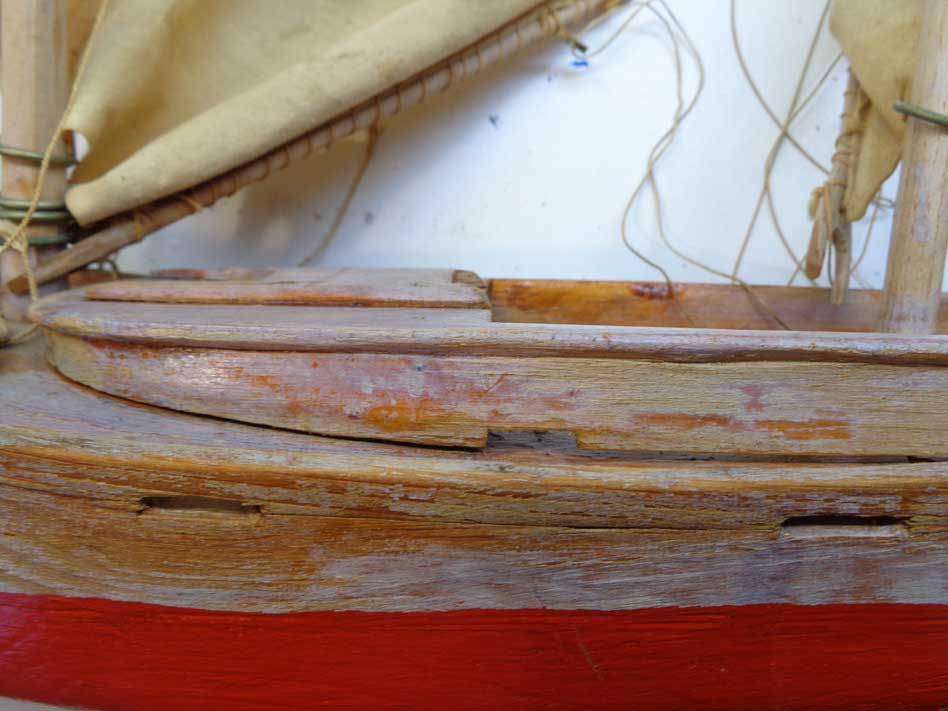
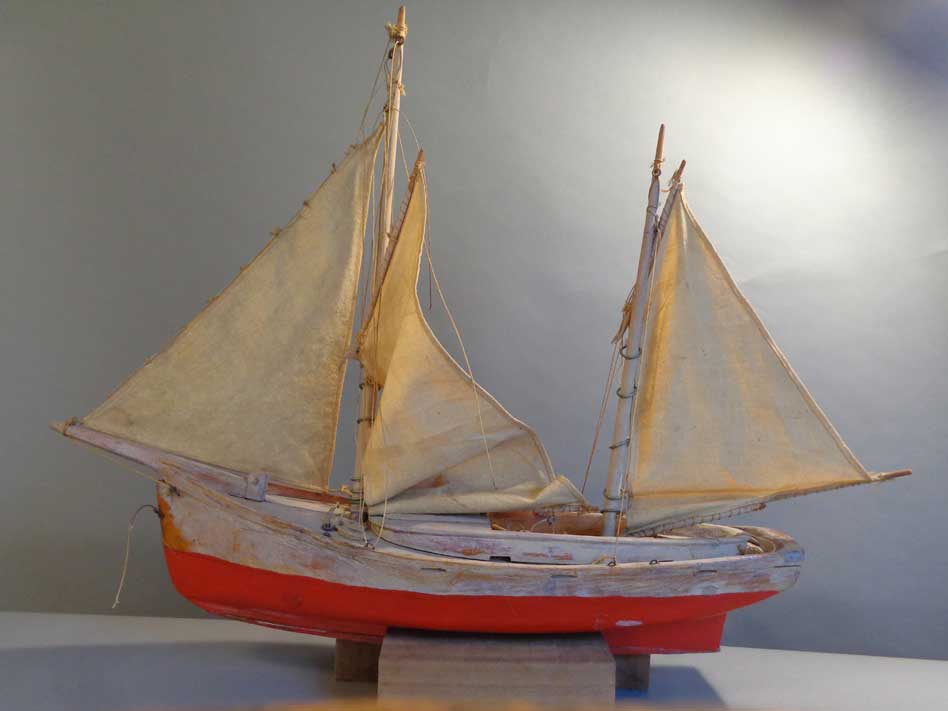
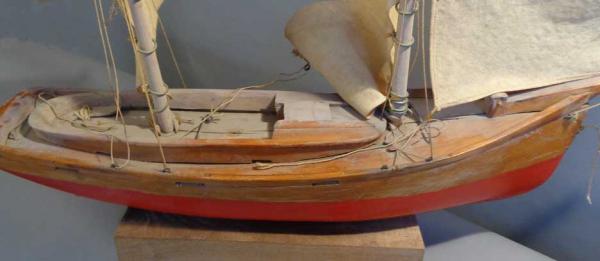
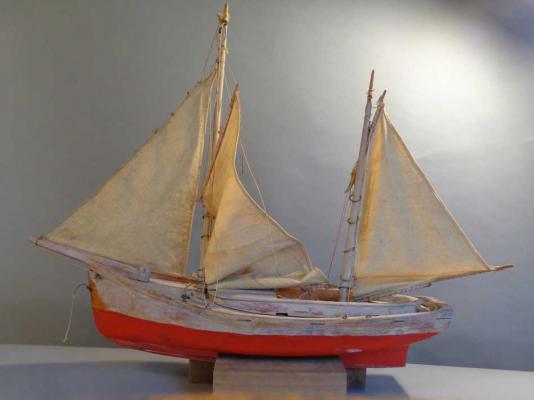
The hull is red below the waterline and that red paint is in excellent condition. The rest of the model was varnished. Then something odd happened. The Starboard side is mostly O.K. with the varnish intact but not very pretty since there was little surface prep done, no fine sanding. The Port side and most of the deck and all of the spars are covered with a chalky white translucent coating. I can't make out if its a very thin coat of white paint put on haphazardly or if its a sort of crazing of the varnish. I could imagine the varnish being ruined by premature sailing of the toy vessel before it was dry? OR I could imagine some solvent of some kind splashing the hull and spars? There is no sharp line of demarcation between the chalky and the not-chalky, but it does run on a ragged line fore and aft down the center of the hull, lapping a little more onto the Starboard side all the way aft.


- 10 replies
-
- 5
-
-
- finished
- restoration
- (and 1 more)
-
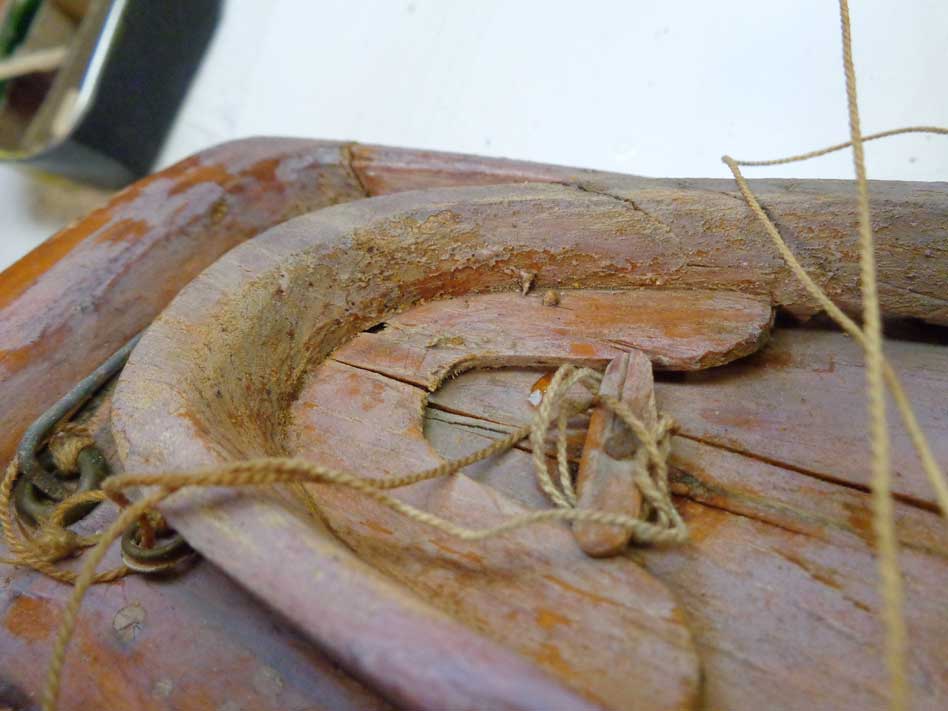
I have been asked to restore this old Pond Yacht Ketch ( Thought it was a schooner at first!) . Its a solid hull with a full keel with a lead strip attached. A decent amount of work went into the original carving and laying out but not much sanding or finessing of the various parts. No blocks but there are cleats. Oddly there is no provision for controlling the rudder, it swivels freely with no tiller or even a post piercing the deck and there is no contraption for adjusting the sails, just three horses. Mostly damage to the model is cosmetic, its not even very dirty. There is a broken boom jaw on the fore and the main boom is snapped in half in the center. The oddest thing is the condition of the varnish. I would like to hear opinions on what you fine folks think is the issue.
- 10 replies
-
- 4
-
-
- finished
- restoration
- (and 1 more)
-
Difference between a deadeye and a clump block
JerseyCity Frankie replied to Captain Al's topic in Masting, rigging and sails
....."A clump block is a block, with sheave, developed after 1840, used for fore-and-aft sail sheets. (M. A. Edson, 1977, in NRG Shop Notes Vol I, p 166)."..... I found the page you mention with the list of Edson's blocks and I see the "clump Block" there. what sets those blocks apart are their lack of sharp corners AND their thickness. Edson says on page 169 that "...it was made thicker and stronger than an ordinary block and generally was oval in shape and could be turned on a lathe"...... When tacking, an ordinary block with sharper corners can very easily hang up on a stay as you try to pull it across due to its more square shape. to allow the weather sheet to be more easily pulled over the stay in either direction when the ship goes about the best shape is a double ended cone. Underhill calls them "Bullet Blocks" and that is how I have always known them. Some of the better appointed tall ships of today have them, but they are rare in my experience. I can see why a sailor would cal them Clump Blocks though since when the ship goes about, the headsails shake and slat about in fresher breezes as they come through the eye of the wind and this can cause the sheets to whip all over the place before they are taken up on the new tack, the pendant blocks on them can CLUMP pretty hard agains the deck or anyone out there under them as they flew around. Due to their constantly being smashed around I am sure they needed to be made stronger than an average block and thus thicker. Incidentally there is no mention of Clump Blocks or Bullet Blocks in the Anatomy of the Ship Bounty by Marquard. -
Difference between a deadeye and a clump block
JerseyCity Frankie replied to Captain Al's topic in Masting, rigging and sails
Having never heard the term "Clump" block I googled it and found that there ARE definitions for the word floating around the internet, all describing an otherwise ordinary block that is "thicker" or "heavier" but I reject these as defining characteristics for a block since they are subjective. Blocks exist in many thicknesses and their thickness is not what causes them to fall into one category or another. Blocks CAN be differentiated one from another by stating their size, the number of sheaves or the shape the block takes. You can have a Rope Stropped Block or an Iron Stropped block. There are Snatch Blocks, Bullet Blocks, Topsail Sheet Blocks, Shoulder Blocks, Long tackle or Fiddle blocks. But there is no "clump" block in any of the English Language reference books I have read. My money says "Clump Block" is an artifact of translation. -
It is a great model and the workmanship is beautiful. Whenever I post a critical thing about someones model I always worry it will be taken wrong and as a result I usually don't post anything. "If you have nothing nice to say don't say anything" school of thought. But on the other hand my thinking was that if it was my model and I had taken a misstep, I would want to hear it. But I know me, and so I also know that I do not take criticisim well, no matter how it is intended.
- 52 replies
-
- 2
-
-
- model shipways
- 18th century longboat
- (and 1 more)