JerseyCity Frankie
-
Posts
1,338 -
Joined
-
Last visited
Content Type
Profiles
Forums
Gallery
Events
Everything posted by JerseyCity Frankie
-
Phantom Rigging Question
JerseyCity Frankie replied to FlounderFillet5's topic in Masting, rigging and sails
Schooner running rigging is pretty simple. The easiest to spot are the Sheets, which are what allow the crew to adjust the sails while they are set and drawing. There are a pair of sheets on each of the headsails, one for Port and one for Starboard tacks. The big lower sails will have a fairly heavy block and tackle for their sheets, attached under the Fore and Main booms and led to the centerline of the ship more or less directly under where they are attached to the booms. There are some other lines like Quarter Lifts and Downhauls. There would likely also be many other lines like Preventers and Jig Tackles but the Sheets are the more important ones. -
It would be nice to have a table showing what the diameter of line would be required for a variety of different length yards. I know modern ropes come with information on breaking strength and SOME modern line is vegetable fiber line, but I would like to see a table with it all laid out for the lazier sort of ship model builder, someone like myself for instance. Then it makes me wonder what the all up weight for a yard and all its gear and a wet canvas sail would be for given sizes. Intangible stuff like the plunging motion of the ship and the pressure of the wind would make it hard to come up with minimum safe rope diameters…..
- 4 replies
-
- 1
-

-
- cutter
- Sherbourne
- (and 3 more)
-
Are bolt ropes/earrings served?
JerseyCity Frankie replied to keelhauled's topic in Masting, rigging and sails
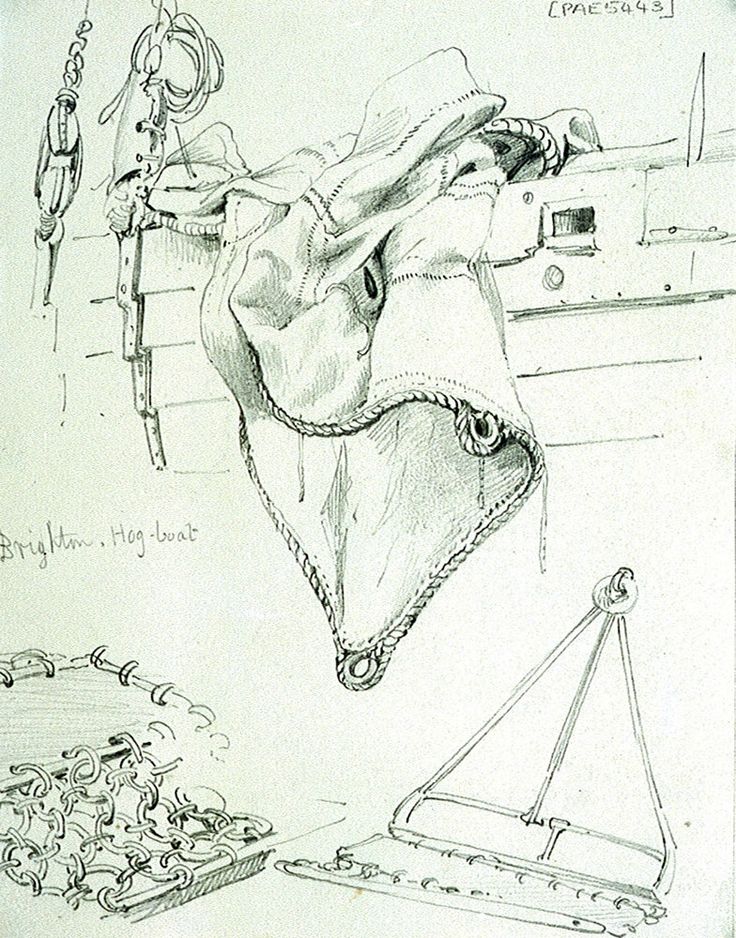
I just found this sketch made in 1829. The caption is …." A sail hanging over the side of a hog boat, Brighton, oyster dredgers (1829) by Edward William Cooke" …. I would consider a contemporary drawing like this to be an excellent primary source. Keep in mind though that an Oyster Dredger is likely under 100' overall and coastal in nature and likely the owners are not too wealthy. So the gear aboard will not be like gear on an ocean going clipper. But it does represent what an actual sail of the era looked like. Also check out the leather chafe gear laced over the shroud lanyards.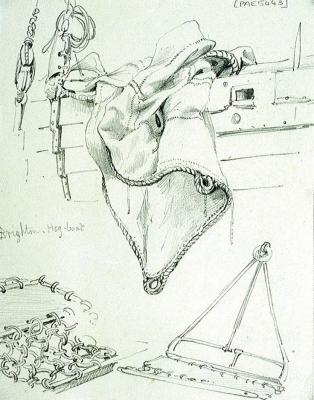
-
Mast and Spar replacements
JerseyCity Frankie replied to thomaslambo's topic in Masting, rigging and sails
Tapering square stock into a round yard with simple hand tools is not hard at all and in fact I find it fun, but I suppose if you manufacture kits you don't want to challenge your customers, people of untested wood working competence, with another task and so you err on the side of kit simplicity rather than providing square stock for the kit builder to shape themselves. I imagine if you manufacture kits, you must order dowel stock in bulk. As mentioned above, it will be hit or miss if the dowels are straight with a true grain and free of defects. You won't be able to afford to pick through the pallet of dowels, rejecting as many as half of them or even more than half of them. You have to put all but the most heinous ones into your kits. Then try to sell the rejected dowels in small bundles of "Dowel assortment" packs. As a kit manufacturer, owning and using the tooling to turn out your own custom dowel stock would likely cost a lot, take up shop space and bring with it a lot of waste woodchips to constantly be disposed of. -
Doing a bit more poking around, it looks like there were five sister ships of the reproduction Pickle, and here is some youtube video of the deck of one of the sisters, shot while underway and showing a lot of the rigging and layout: https://www.youtube.com/watch?v=bQIQttRKPmE#t=19
-
I went to the reproduction full size replica Schooner Pickle facebok page and there are some photos there, sadly the shots are all of people dressed as pirates blocking the view of the deck! There was a link though to this Russian language sister ship web page: http://www.varyag.onego.ru/suda/2/29/ where I found this image: The quality is not that good but you can see the Headsail Sheets hanging down and where they terminate. The Sheets control the sails and the SHAPE of the sails, a straight line, mostly perpendicular to the stay, will be drawn through the point in space the Clew of the sail would optimally be when the sail is set and drawing perfectly, and where that imaginary straight line intersects the cap rail of of the bullwarks is where the line would belay. I found short video on youtube taken from the replica Pickle's deck while underway and you can see the sheet for the Jib for just a very brief moment and I took a screenshot: The sheets come aboard at LEAST as far aft as the fore shrouds and much farther aft still for the Flying Jib.


-
The website has a tutorial on how to add photos to the things you are posting. You were able to upload a phot in the first post above I see. You also mention an album of photos you call 19th Century Sloops? When I do a search using this title there is nothing, is this the exact title? You should be able to simply cut and past the text of the URL into an message so people can go to the album just by clicking on it, as I have done here: http://modelshipworld.com/index.php/topic/540-how-to-add-pictures-in-your-posts-and-pms/
-
I would still love to hear more information about the model itself and the vessel it represents. Without such information there is not going to be a lot of informed speculation to offer.
-
Are bolt ropes/earrings served?
JerseyCity Frankie replied to keelhauled's topic in Masting, rigging and sails
I'm sure the long life of the ship (1869 to 1953) assured there would be an evolution of sail construction from the begging of her career to her end, with stronger and heavier gear, with more metal involved in the form of shackles and thimbles and chain towards the end. -
Are bolt ropes/earrings served?
JerseyCity Frankie replied to keelhauled's topic in Masting, rigging and sails
Longridge's book on the Cutty Sark calls for the haedsail and staysail bolt ropes seized at the corners to form eyes with metal teardrop thimbles in them. Later he mentions the square sails get the same treatment but doesn't mention metal thimbles but he includes an illustration showing a Spectacle Iron for the Clews. In Masting and Rigging of the Clipper Ship and Ocean Carrier he has illustrations showing the earings with and without metal thimbles but never served of lethered. But I don't take this is proof these important parts of the sail wouldn't get served and lethered, I feel they would. -
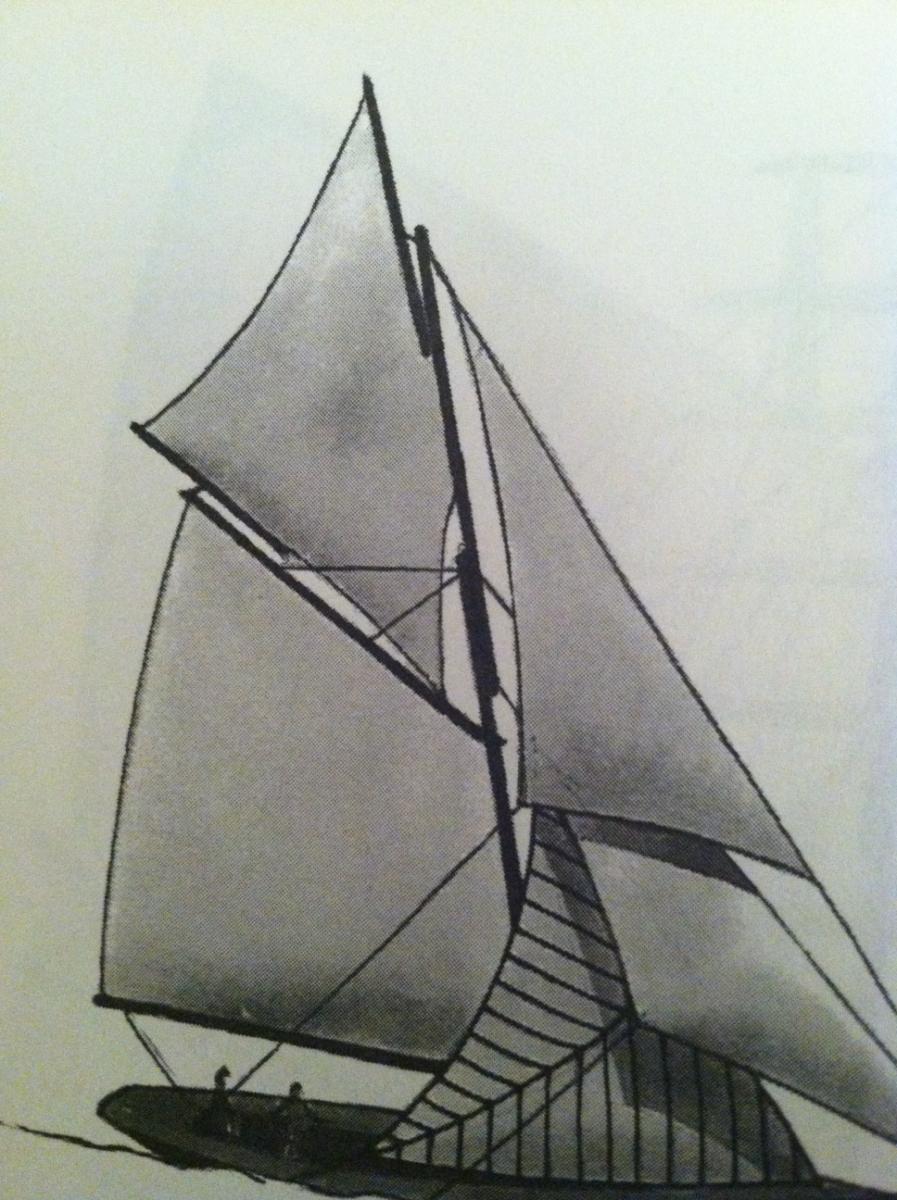
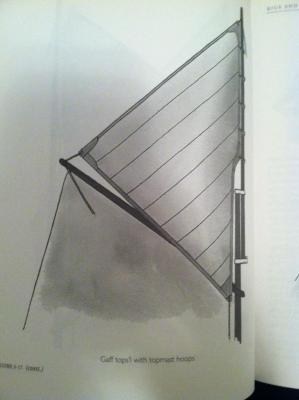
Here are two drawings of topsails. I agree with Wefalck that more information about the model and the vessel should be included. The line coming off the bottom of the sail is the Tack. The Sheet is actually the line that would hold the Clew of the sail to the end of the Mainsail Gaff. The mainsail should be laced to the Gaff and it is not in your photo. The tack of the sail should not be so far off the line of the luff of the sail as it is in the model in the photo- this is the area on your sail that is the shortest of the four sides and I think it is an error of the person who cut the sails. The luff of a gaff topsail often has a kink in it to follow the contour of the mast doubling and the gaff jaws, called a Knock I think, with the luff bellow this "kink" still running as close to the mast as possible so the tack can lead straight down to the deck and be made off as close to the foot of the mast as possible On your sail the "fourth side" has I think been misunderstood by the person who cut the sails, he or she saw the kink in the luff and interpreted it as one of four corners on a four cornered sail. The second of the two photos shows a Jackyard Topsail but I believe your sail is a Gaff Topsail. Often there are two tacks on such sails, allowing for sailing on either tack. In many cases however there is just a single tack and thus on one tack the sail would be a bit messy but still able to draw.

- 11 replies
-
- 1
-
-
- gaff rigged
- pond boat
- (and 1 more)
-
Thanks guys that was fast, the power of Model Ship World! I googled "Billings Boats Santa Maria" and after poking around and sipping coffee, I found this UK site with a set of plans on sale :http://www.worthpoint.com/worthopedia/billing-boats-santa-maria-plans-513208631 The graphic matches exactly the photos of the plans I was sent. You guys are right, this is clearly a Billings Boat model kit. Some back story on this project: I was put in touch with a man who's ship model building father had passed away and who was looking to have this uncompleted Santa Maria model finished. I was sent about eight photos of the model about 70% complete. The model had sat around for many years, as these old uncompleted models do, getting dusty, and it is time to finish the model!

-
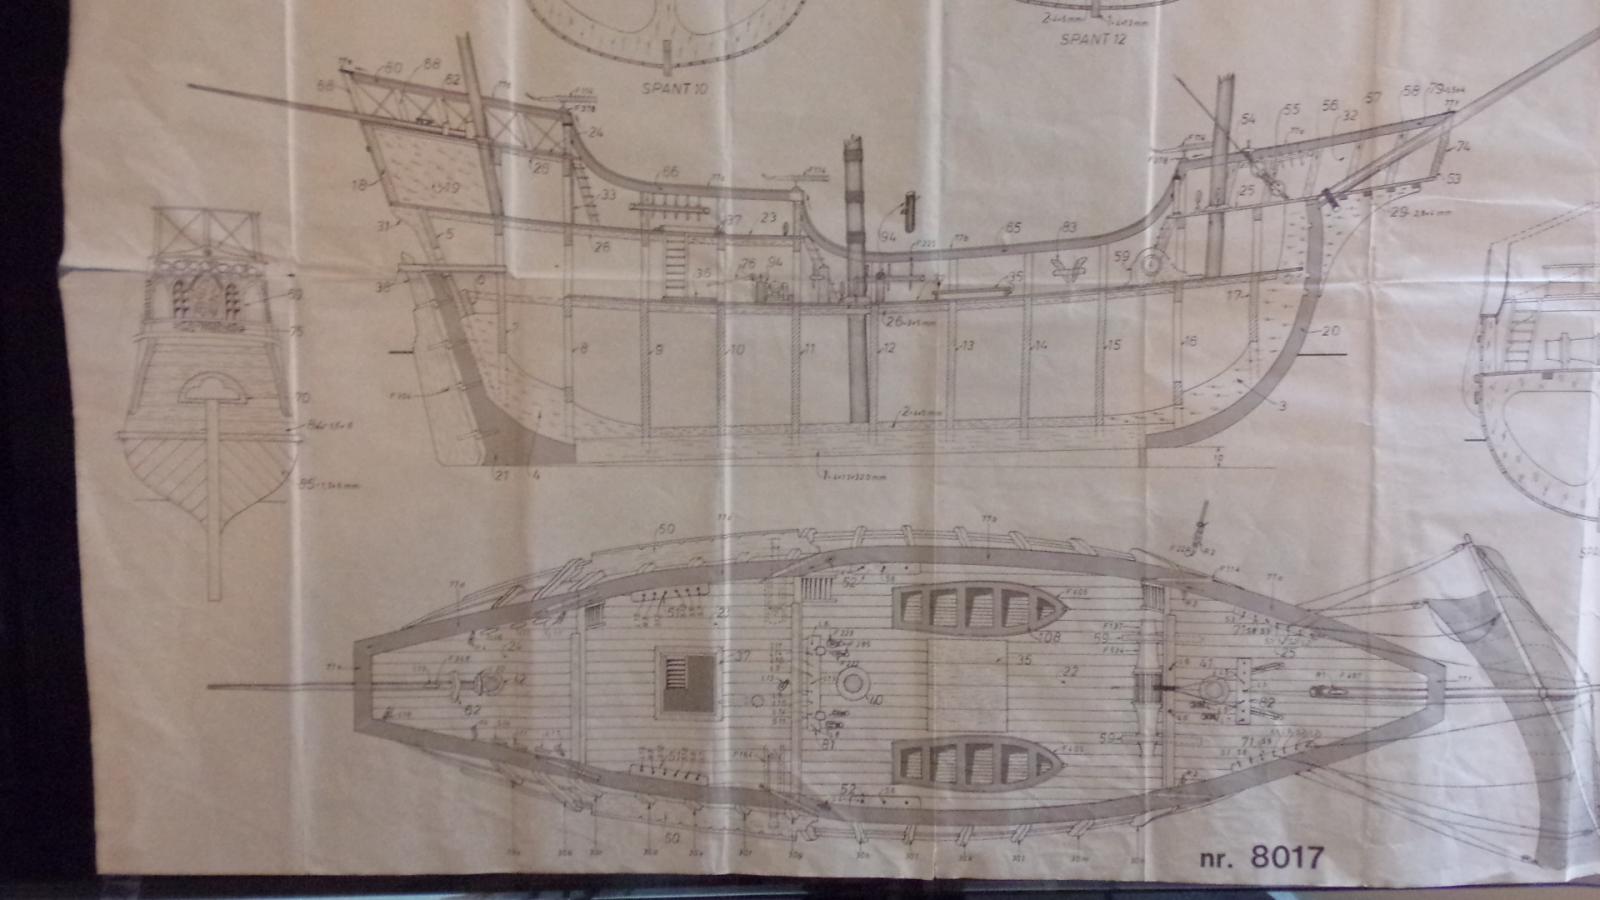
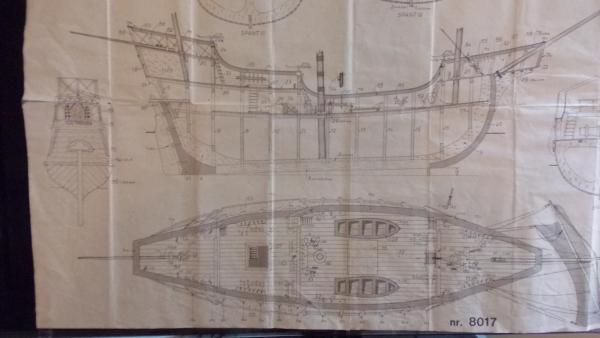
I asked for photos of the instruction sheets, assuming the manufacturers name would be found there, but nothing obvious is visible, just the cryptic legend "nr 8017"
-
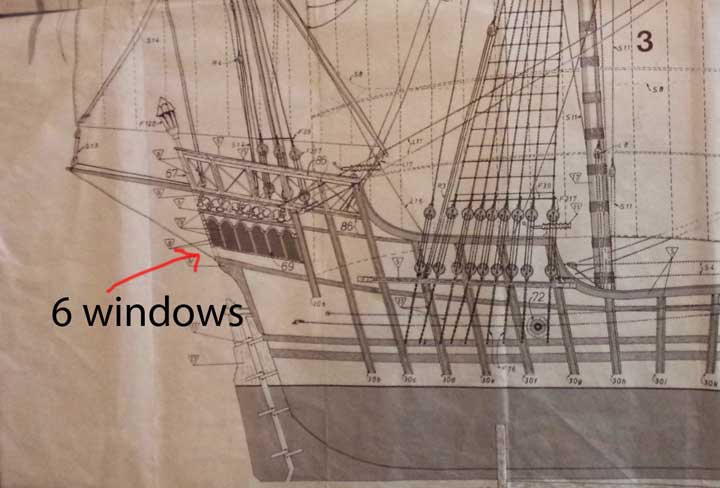
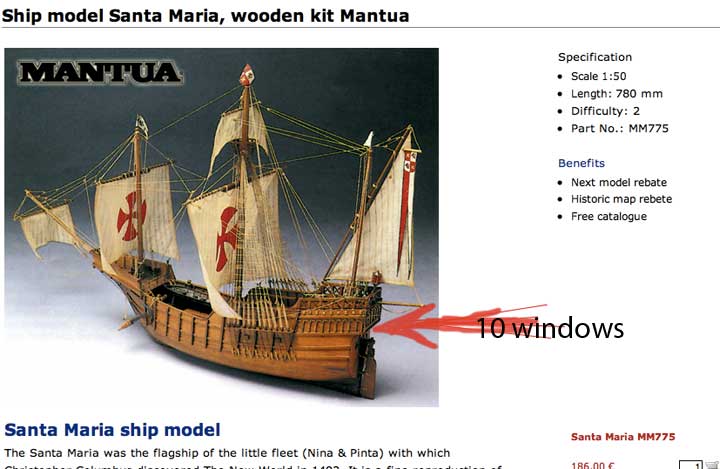
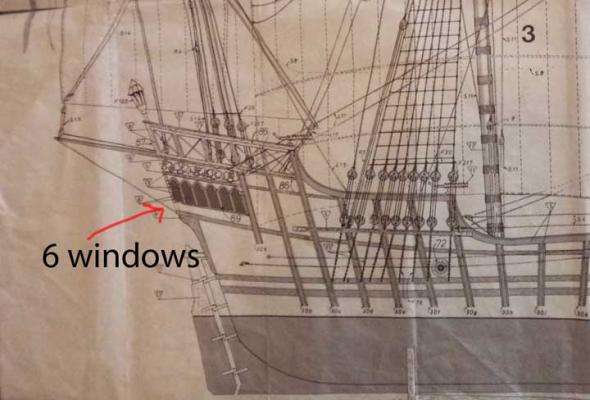
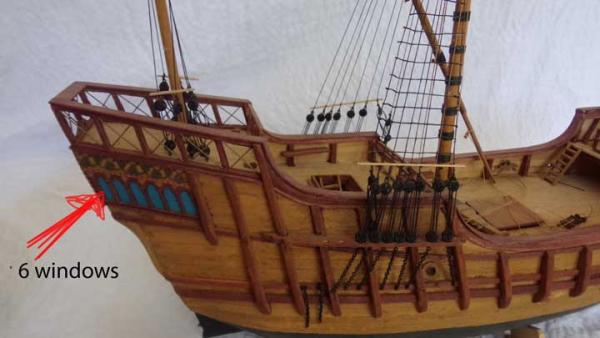
I may be asked to restore and complete this twenty year old kit of the Santa Maria. I am told it is 1:50 scale and 29" long. All I have seen is photos so far, not the actual kit. I am doing some legwork trying to figure out who made the kit and am hitting a snag. I see that Mantua has a 1:50 scale Santa Maria and I though my problem was solved until I took a closer look and could see that there is a decorative row of stern windows on all versions of the Santa Maria, and few kits agree with each other on the number of these windows. Here are three photos. One of the uncompleted ship and a shot of the plans for the uncompleted ship, each showing six decorative windows. The third photo is of a competed 1:50 scale mantua kit with ten decorative windows. Artisana Latina makes a 1:65 scale Santa Maria but with NO windows aft. Is it possible that it IS a Mantua kit but twenty years ago their kits had only six windows and now they have ten? Can anyone enlighten me on who made this kit?

-
how do you decide on what kit to build
JerseyCity Frankie replied to lionfish's topic in Wood ship model kits
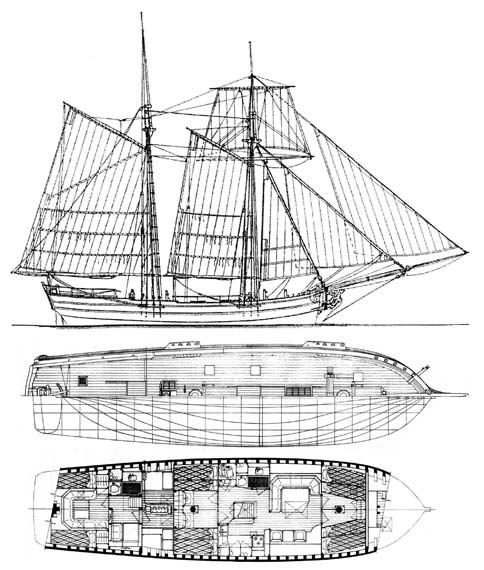
Almost a year ago I though I would be done with my HMS VIctory and at the time I was CERTAIN I wanted to build a brig of some sort. They always look good to me when I see images of them and with just two masts, more manageable. NOW almost a year later I AM almost done with HMS Victory and I have decided to build something small for a change of pace and in the mistaken assumption the small project will move faster. I narrowed it down to two vessels plus a third, none of them are brigs. Where was my enthusiasm for the brig? Its still there but for some reason, in the intervening time, my intent and intention drifted to the three new subjects. I will still make the brig at some point, maybe when the stars align properly again and I feel ready for a more ambitious project I can commit time to. The small subjects are likely to only take a little time in comparison. I did the photoshop work reducing the drafts of the hulls and cut out the blocks of wood for the hulls and all three of them are under 11" long. Two are of smaller craft I will build to 1/48 scale and the third is the barkentine Gazella, a project I had been interested in years ago but gave up on for lack of plans, but plans have magically appeared now so the project is green lit again. Will I build all three simultaniously? Probably not a good idea but this is the road I am starting down and maybe by switching between projects I can maintain enthusiasm for all three by virtue of their individual differences. -
Put three pieces of wire into your vice, make sure the three pieces are exactly the same length. At the other end, twist together the three opposite ends and chuck them into a drill or even a dremel tool. Maybe your lengths of wire are five feet long? Step back from the vice so the three strands are under just s slight bit of tension and spin the wire together using the tool. It only takes a few seconds.
-
Speaking of adding detail to the tops: I had used the kit supplied little plastic eyes (Part#40) for the ringbolts on the after end of the Fore Top. This is where the lashing for the Main Topmast Stay is made off and it turns out this ringbolt takes a lot of tension, any motion of the mainmast focuses a lot of tension right at that eye and mine pulled right out, broken off at the neck. My advice is to use a loop of wire and secure it very well to the top and discard Part#40 here.
-
I mentioned before here on MSW that the South Street Seaport Museum in New York used to get a LOT of donated unfinished model ships. I noticed that nearly all of them had construction halted at the stage of putting on the shrouds. Its the stage where you transition from working in wood to working with rigging and a lot of guys lose enthusiasm at this stage. It doesn't help when its the Victory and there are, as you say, twelve shrouds a side on the Foremast, which adds up to 48 deadeyes to deal with on just one mast! And I'm not even counting the backstays. Doing the shrouds is another one of those repetitive tasks you have to bull through, maybe the MOST repetitive tasks in the whole process. Don't let it get you down!
-
Oh I am just now noticing the artwork you linked to so I see we are talking about a cutter. In the drawing the tack appears to come down the Port side while the sail itself is on the Starboard side and I doubt this would be the case, I think its a case of the artist drawing the topsail on AFTER he drew the Peak Halyards for the mainsail. Also odd there appears to be a block and tackle at the topsail halyard and this is also unlikely in my opinion, given the size of the spar in question. Further confusion is caused-in my mind- by the slack line running from the lower end of the jackyard to the gaff peak. is this the sheet? It would not be slack with the sail set.
-
Its going to be one continuous line from the deck to the masthead then back down to the deck, with maybe twelve feet extra so people can haul on it and a knot can be worked in the other end. It will live on a pin and I am going to GUESS that one leg of the line will run aft and outboard of all the rest of the rigging, with the inner half running straight down the mast to the deck and living on another pin. The reason I say "guess" is that I am unfamiliar with the ship BUT it makes sense that the sail and its jackyard would be swayed aloft outboard and aft of all the other lines to avoid fouling on things on its way up and down. Lets not forget the sheet either, This will be attached to the after corner of the sail which will stretch, when set, to the peak of the gaff. There will be a sheave or a block at the peak of the gaff for the sheet to run through and then I will GUESS another block at the jaws of the Gaff so the sheet can lead from the gaff peak back to the mast and THEN down to the deck. There would be no way a sheet could be run with the gaff aloft, the sheet has to live on the spar OR the entire spar has to come down on deck when the lower for and aft sail is furled. If its a brailing sail the sheet likely must live on the spar. Setting the topsail is like flying a kite, the wind takes it and it wants to fly downwind so you have the tack made to the lower corner of the sail and this line stays with the sail and is struck with it when the sail comes down. When the sail goes up, the halyard and the sheet do the lifting and the Tack does the controlling, it acts as a tag line controlling the tendency of the sail to blow away like a kite.
-
All that rigging and gear on but no shrouds!? I never could have imagined THAT one. But now you could be off the hook, who could blame you for making up the shrouds-with the ratlines-off the model? Tie the shroud gang around the masthead as a single unit. Its not your fault!
- 59 replies
-
- 1
-
-
- norske lowe
- billing boats
- (and 1 more)
-
Who needs a ropewalk?
JerseyCity Frankie replied to CPT_D's topic in Modeling tools and Workshop Equipment
Its easy enough to spin up short lengths of your own using a reversible power drill but it takes a bit of time and your line will have hockels in it at some point. But on the other hand all you need is a drill. drive three hooks (or nails) within six inches of each other into a pice of scrapwood and clamp this on one end of a room. Call this board A. Have another piece of scrapwood with two hooks in it and clamp this to a chair at the other end of your room. Call this board B. Chuck a hook or bent nail into your drill. Get three pieces of thread each with a loop knot tied at each end and make sure each piece of thread is as close to the same length as you can manage, long enough to stretch across most of the room. Hook one piece of thread onto a hook at board A and the other end on the hook on your drill and stand over by the chair behind board B so as to make the line tight but not too tight. Turn on the drill and spin the thread in such a way as to make it wind tighter, not unlay and become looser. Keep the speed low and the line tight. As you spin, the line will get shorter and you must move towards Board A slightly as the tension builds. You are winding up each thread, one at a time, like a rubber band. You are trying to get them all to the same degree of tightness, you would like to get them to all have been spun exactly the same number of times. When you judge the first line is tight enough, stop the drill and KEEPING THE LINE TIGHT take the loop off the hook on the drill and put it onto one of the two hooks on Board B on the chair, sliding the chair into a position that will assure constant tension on the line. Now do the same steps with the remaining two threads. When you finish spinning up your third thread, keep it on the drill. One at a time transfer the first two lines BACK ONTO the hook on your drill not allowing either of them to untwist and KEEPING CONSTANT TENSION on all lines. You now have three very tight lines leading from the three hooks on board A onto the single hook on your drill. Now reverse the direction of the drill and start it turning in the opposite direction. The three threads will start to lay up on each other and you will feel tension leaving the three strands, in fact you will have to move back in the opposite direction as the three lines start to slacken but you want them to remain tight. Keep turning until you have rope! THis is an imprecise method and there are many pitfalls that consist mainly of dropping your guard and allowing one two or all of the lines to slacken for a nanosecond. When this happens the slack line will instantly spin up on itself and its RUINED you will have to start over with new thread. Also you may want to keep an eye on the chair, it may be pulled over by the tension of the waiting spun up threads. -
Who needs a ropewalk?
JerseyCity Frankie replied to CPT_D's topic in Modeling tools and Workshop Equipment
Its hard to keep a comprehensive inventory of all the diameters of thread you are going to eventually need. Often you will have a spool of store bought thread that is just a little too thin and another that is just a tad too thick and you will then find yourself contemplating making your own line. I doubt anyone would go to the trouble of making their own line if there was something the right thickness available commercially. But sometimes the line you make yourself looks and feels better than a similar line you got at a store.The twists will be more pronounced or the lay will be harder. -
Help With Sail Sewing Please
JerseyCity Frankie replied to mkmossop's topic in Masting, rigging and sails
This guys build log shows some of the best hand sewn sails I have seen. It breaks "the rules" about scale but the stitches DO NOT look bad at all! http://modelshipworld.com/index.php/topic/4592-scottish-maid-by-jesselee-al-150-wood/page-27 -
Help With Sail Sewing Please
JerseyCity Frankie replied to mkmossop's topic in Masting, rigging and sails
….But as I have mentioned before, sometimes theses out of scale stitches still manage to look good on a model and do not necessarily offend the eye. Something about the organic nature of woven fabric with actual stitches passed through it winds up looking right and natural.