JerseyCity Frankie
-
Posts
1,338 -
Joined
-
Last visited
Content Type
Profiles
Forums
Gallery
Events
Everything posted by JerseyCity Frankie
-
Help With Sail Sewing Please
JerseyCity Frankie replied to mkmossop's topic in Masting, rigging and sails
In full size practice the Boltrope was sewn with a stitch that went through the canvas of the sail then up through the score of the rope. The next stitch went back into the sail material. Picture the needle coming up out of the rope from one of the crevices between one of the three rope strands. Now the needle goes back down to the sail canvas for the next stitch but it follows the line of the score. When heaved tight it buries itself down in that deep score.I make a big point of explaining where exactly the "thread" goes in order to make clear that YOU CANT SEE THE STITCHES that hold the boltrope to the sail. On a full sized sail you would have to get within inches of the sail to see just a tiny bit of each of the stitches, and even then these tiny visible bits can only be seen on one side of the sail. They would certainly be completely invisible on any ship model. All this is a long way of me saying "don't sew the boltrope on, use glue". But I may as well point out that NO sail twine is visible on any sail at a distance greater than a few yards or meters and representing them on a model using real actual stitches with real thread will always look out of scale regardless upon which part of the sail the stitches are made. -
Furling a boom-footed forestaysail
JerseyCity Frankie replied to deltrott's topic in Masting, rigging and sails
This is one of those discussions I have really enjoyed, exposing me to some subtlety I had taken for granted. its quite possible I could have built a model with a headsail like America's and still not perceived the issue with getting the sail down. After all, if its on a model it MUST be a plausible configuration? Turns out: no. Since this discussion took place I have seen a few more images of America with the boom. It makes me wonder now if the most plausible explanation isnt that all the artists misunderstood what they were seeing, or followed the example of a previous drawing or painting that got it wrong and perpetuated the mistake? This is one of those threads that I think deserves better attention on Model Ship World since I believe it illustrates a great example of a research conundrum that is fun to consider. I hope more people read it and weigh in but I worry it will just vanish into obscurity. -
Splendid! It really projects the feeling of…….all I can call it is "nostalgic serenity". Like a ship in a dream where they serve plenty of ice cream and everyone is dressed in sporty red and white stripped shirts and at least one guy has a pipe in his mouth.
-
A nice material for modeling metal that would be nearly flat on the actual ship ( or an inch or less thick) is the foil wrappers found around the cork on some wine bottles. Its malleability makes it better than tin foil, its a bit thicker and the metal is often darker than the bright silver of tin foil too. Its perfect for hinges escutcheons and all sorts of bands plates or what have you.
-
Isn't it AMAZING nobody thought of the simple solution of triangular sails set on the EXISTING stays? I guess ship builders were very conservative and reluctant to try crazy new ideas. They went to all that trouble of spritsails and spritsail topsails. Which also, by the way, completely block the view directly ahead for everyone on deck. I have never done any square rigged sailing but my understanding is that you have to have some sort of headsail out on the bow or you can't go about by tacking. I don't think those spritsail topsails were providing much horsepower for the rest of the sailing operation of the ship, but without them they couldn't turn through the eye of the wind.
-
I think you are using the wrong word to describe the thing you are talking about. "pulpit" is, I think, found on the bows of modern ships and its the railed platform just big enough for a man to stand in a safe position at the bow. "Spritsail Top" is probably the more well known name for the circular platform at the base of the Spritsail Topmast I believe you are talking about. I would consult R.C. Anderson's book The Rigging of Ships in the Days of the Spritsail Topmast. Its got the words "spritsail topmast" right there in the title! It sounds pedantic to harp on the uses of one phrase or word or another, but in discussing ship history and equipment you can't avoid it, you have to add a LOT of words to your vocabulary in order to make yourself understood or in order to understand what other people are talking about. I find this whole process really enjoyable since I am kind of a nomenclature nerd. I always recommend the book The Oxford Companion to Ships and the Sea. Its 967 pages of nautical terminology with great definitions and histories of usage.
-
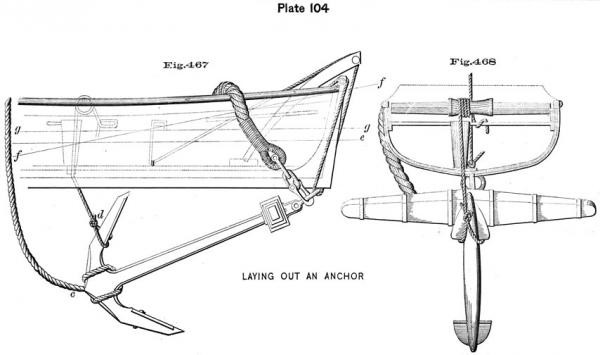
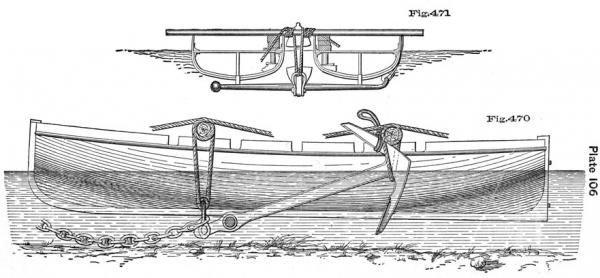
My guess is its all about Anchor Kedging. But this is just a guess. http://www.hnsa.org/resources/manuals-documents/age-of-sail/textbook-of-seamanship/carrying-out-anchors/
-
Pond Yacht rigging
JerseyCity Frankie replied to JerseyCity Frankie's topic in Masting, rigging and sails
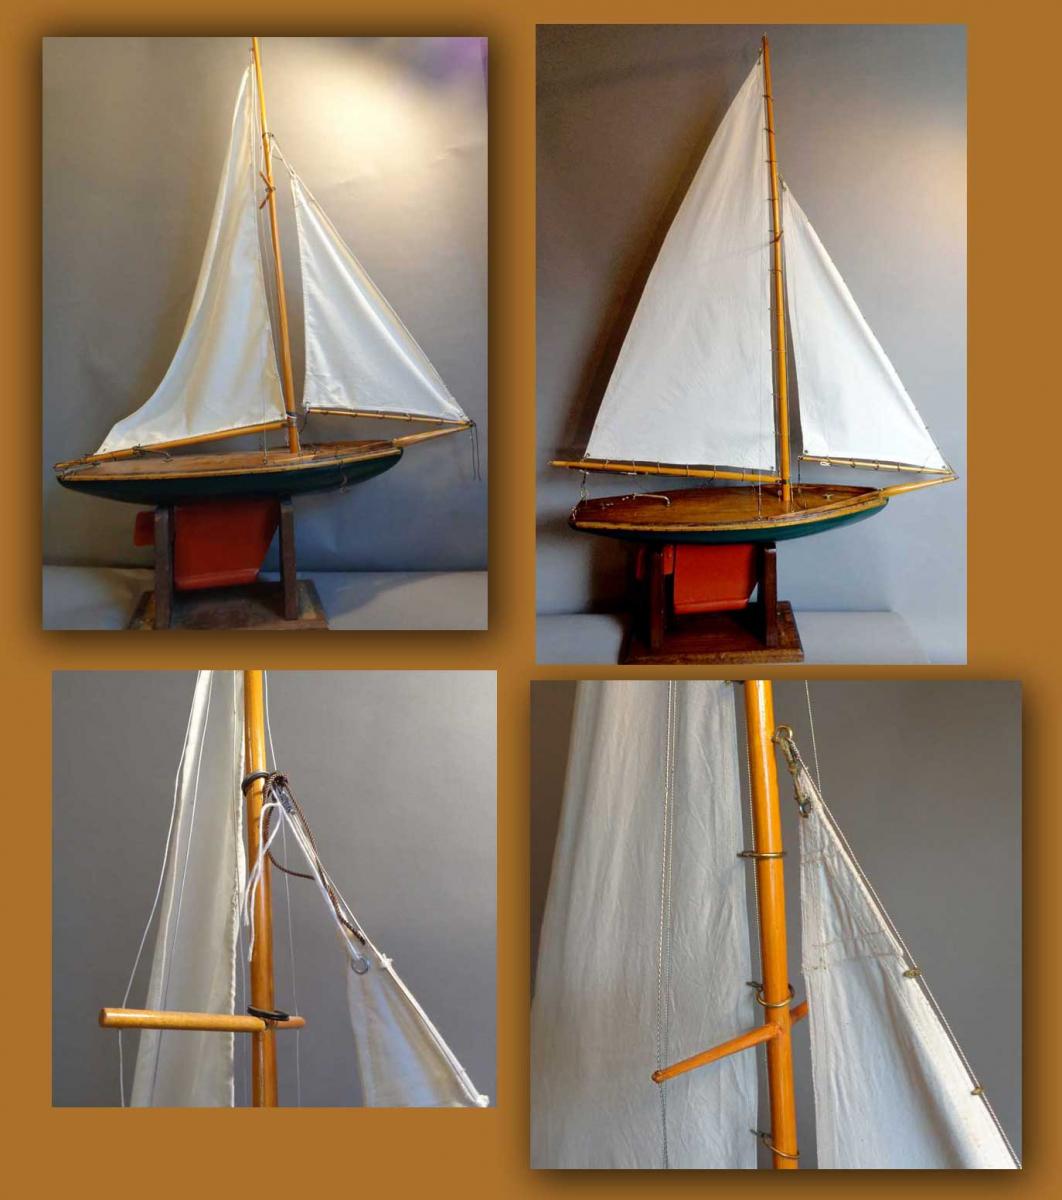
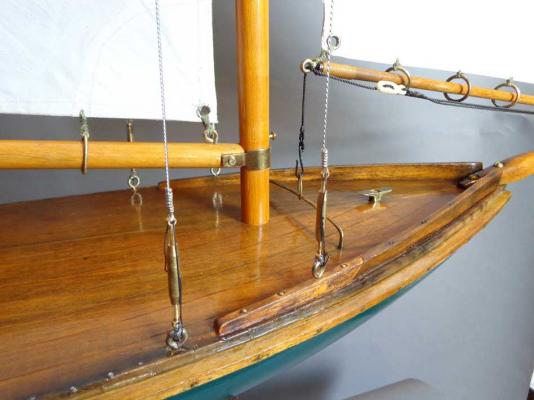
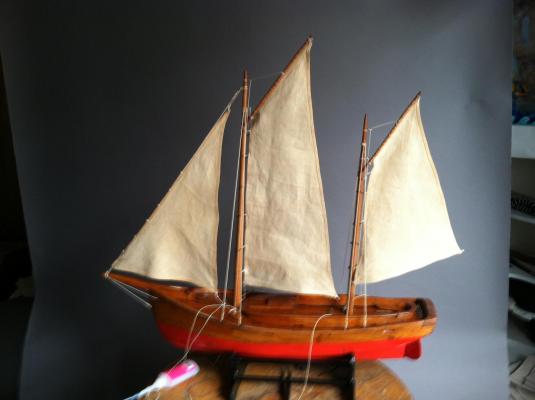
I finished the restoration work I was doing on these two Pond Yacht Models. I have a new appreciation for this type of model and plan on building one of my own now. Here are some before and after photos. ANd then just some details shots.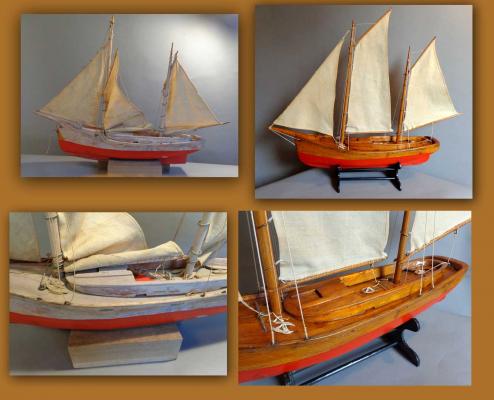

-
Attaching Sails on swift 1805
JerseyCity Frankie replied to Cabbie's topic in Masting, rigging and sails
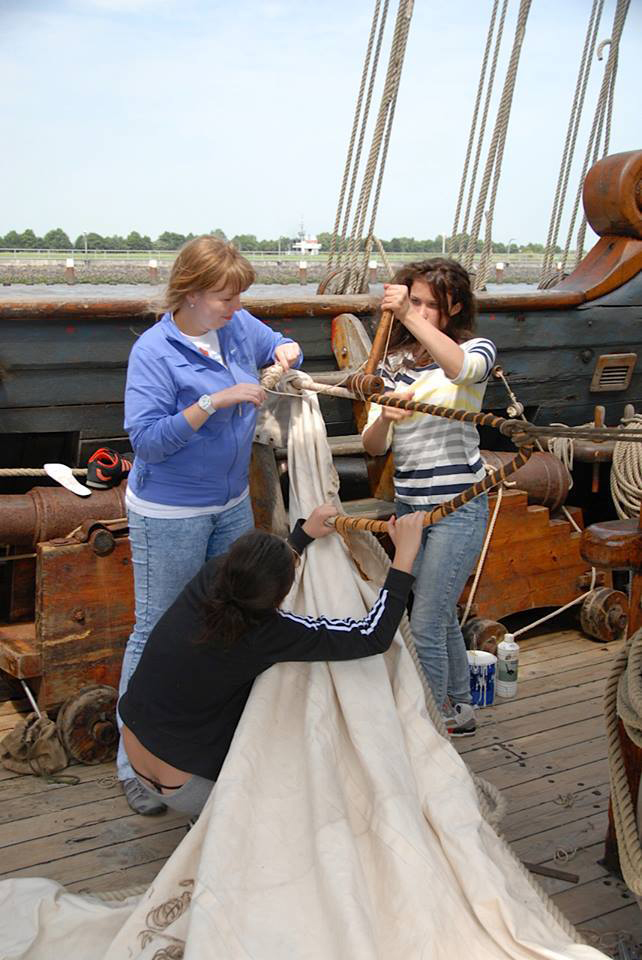
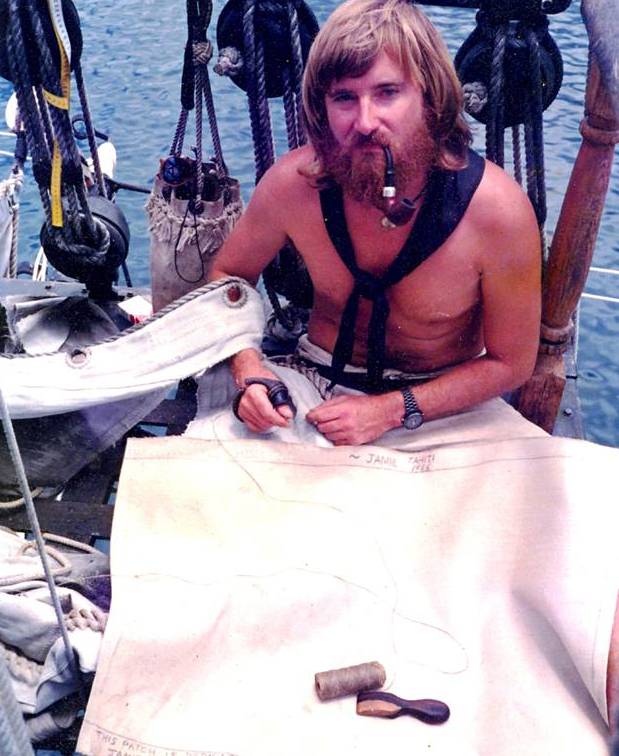
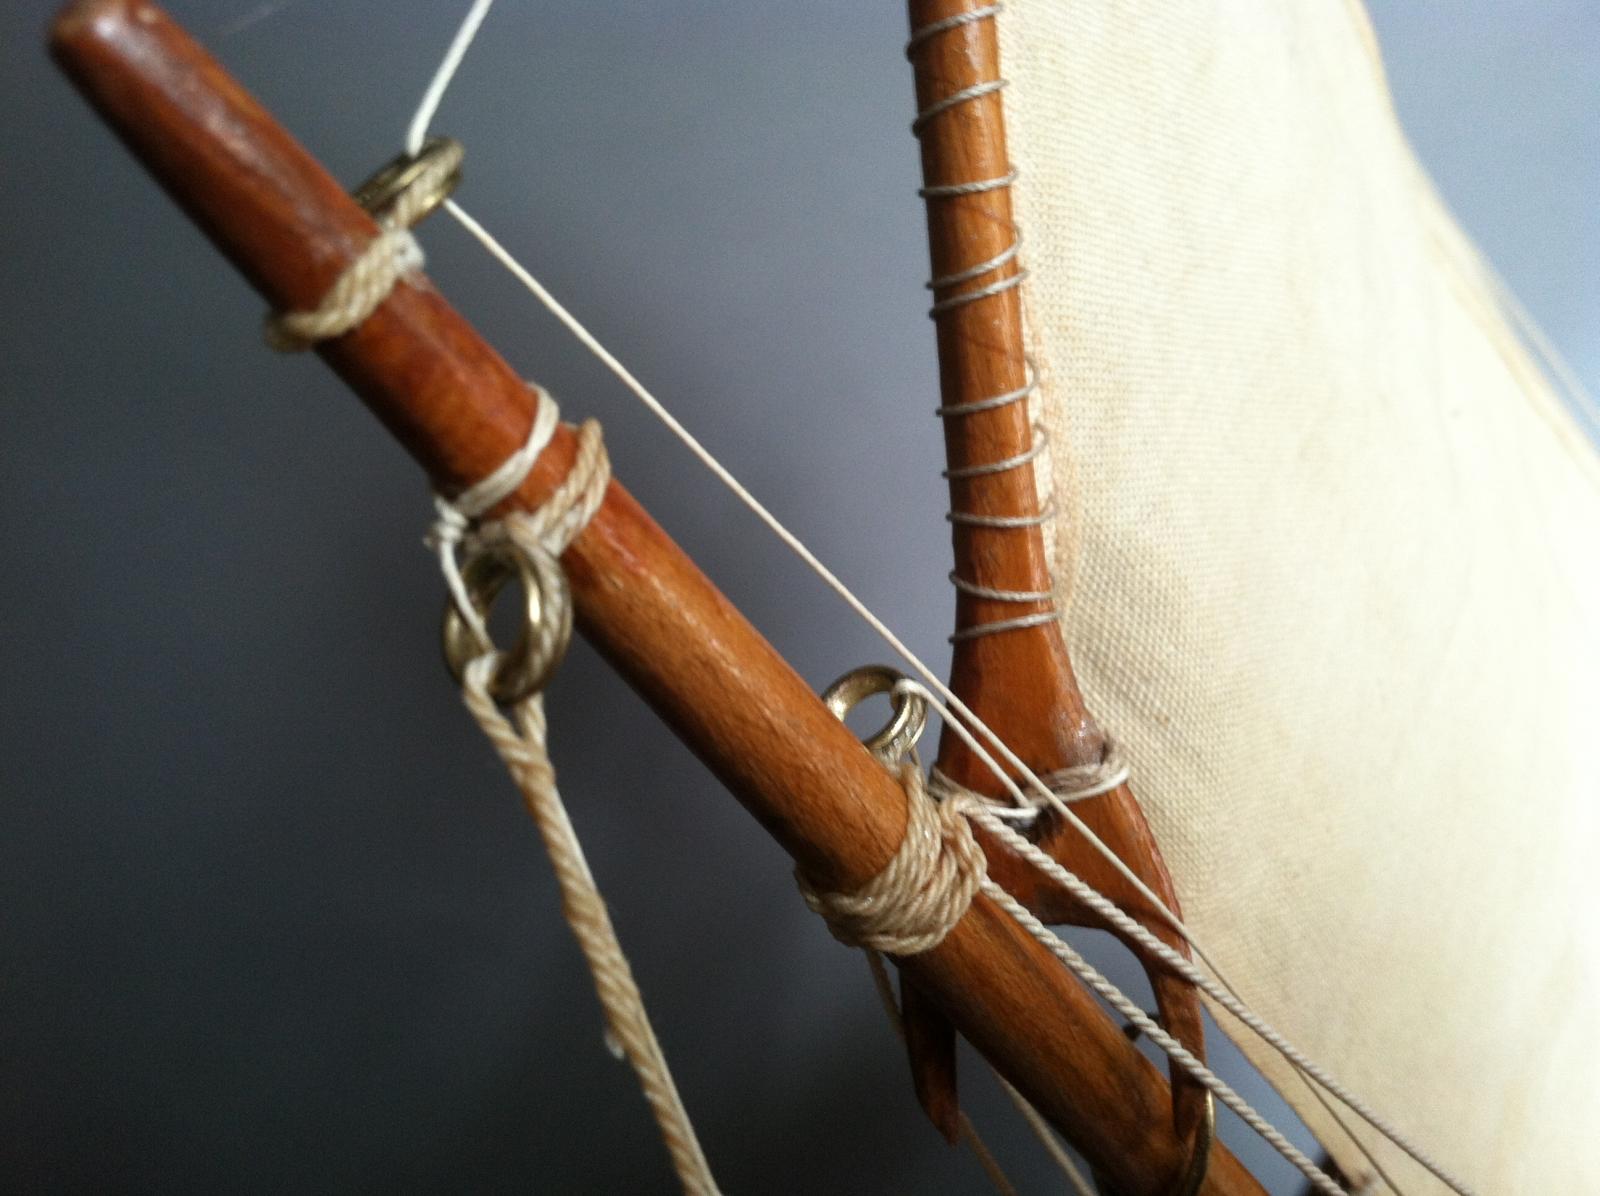
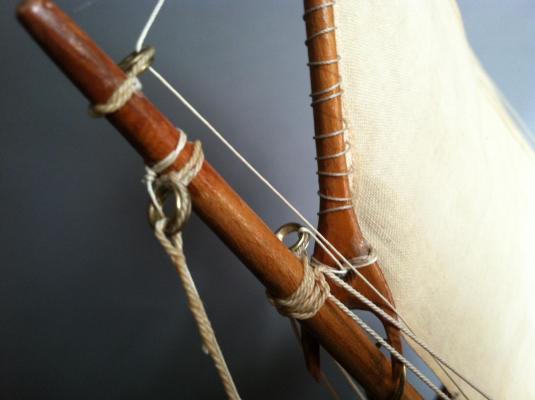
In 1805 all sails would have a boltrope sewn all around the edge of each sail, literally sewn onto the edge. Included here is a photo of some sailors sewing a boltrope onto a sail. Note the size and color of the boltrope. At points where the sail would be attached to the ship or lines attached to the sail, holes called grommets would be sewn just inside the boltrope ( a small hole made in the canvas with a ring of smaller line sewn onto the hole- as if the hole itself had its own bolt rope. Here is a photo of a sailmaker sewing grommets, you can see they are not very big. Also note they are about a foot apart from each other and very close to the boltrope. If the sail is laced onto a spar along its length, there were most often two grommets per panel of sail cloth, each panel 24" wide so grommets intended for lacing are a foot apart as can be seen in the photo. At the corners of the sail, often a grommet was not strong enough so the boltrope itself was formed into an eye and seized with small stuff to form an eye strong enough to handle the load. On a model, the gromets are too small to represent and you can simply sew through the sail material you are using with a needle and thread. Boltropes on a model are best glued on, not sewn. Sewn on model boltropes do not look realistic in my opinion since you can never get the scale of the sail twine right, but people do often sew them on though in an attempt to represent full scale practice. But look at the boltrope near the sailors arm in the second photo: even at this distance you can NOT see the sailtwine used to sew the boltrope in place, it is buried deep in each score of the boltrope. Depending on the scale of your model, you can ignore most of this information and simply glue your sails where they are supposed to go. But if you look at contemporary reproduction sailing vessels you will see the lacing is visible and even if you don't actually lace the sails on literally, it is a nice touch to wrap lacings onto the spar before you glue the sail into position and this fools the eye into believing the sail is really laced on.

-
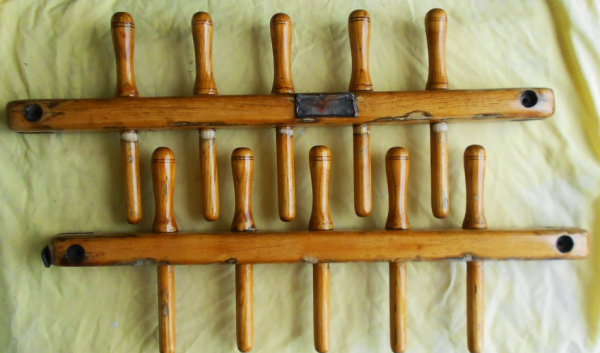
It will be a painful thing to say but I feel I should say….belaying pins too thick on top! It would be a shame to spoil all the other good detail you have going on deck there. Here are some typical wood ones off a schooner.
-
Pond Yacht rigging
JerseyCity Frankie replied to JerseyCity Frankie's topic in Masting, rigging and sails
Thanks for the link to the website! I thought I had seen them all by now but this was a new one to me. Here are some shots of the model I am restoring, one of two. THis example was likely not actually sailed. It has a lead keel but there is no rudder head, the rudder moves but does not pierce the deck. The second model, not pictured, has rudimentary self steering gear and I will put up some photos of that later as I finish work on her.
-
Sell a guy an expensive product that clearly has some hidden problems, ignore his emails and let him navigate in the dark on how to deal with the failings of the product. Then when he writes in to a forum to give an honest assessment which fairly lays out the shortcomings of the product and the customer service issues of the seemingly indifferent company, the OWNER of the company writes in anonymously pretending to be a satisfied customer to defend the product, but with some odd passive aggressive language blaming of the victim thrown in. This is NOT a good way to handle the products issues and protect the reputation of the company.
- 82 replies
-
- 17
-

-
I have never heard of blocks in lieu of deadeyes, but I love the idea and what a great detail on a model! I can't think of a good reason to want to ease shroud tension once you have it though. My understanding of the issues with shrouds is that they stretch more than the sailors would like, and more tension had to be put on them from time to time by hauling the lanyards tighter. I can't think of a reason to ease tension or to ease just one shroud, the first one, when changing tacks. I can't think of any reason anyone would want the lower masts to change in any way. I would love to hear other opinions about this.
-
I called around to Jewelry Repair and Wind instrument, Saxaphone repair specialists and they all recommended this product: http://www.metalliferous.com/Nikolas-Clear-Lacquer-12-oz/productinfo/CHM2105/called Nikolas Clear Lacquer. I am off to the city to get a can today.
-
Sail cloth problem. (moved by admin)
JerseyCity Frankie replied to Chrome's topic in Masting, rigging and sails
In my opinion there is no good reason to stick with fabric that you KNOW has a bad characteristic. By the time you are done cutting and building the sails-maybe even sewing them by hand depending on how deep you will go into the process- you will have spent too much time to realistically rationalize working with material that you KNOW is wrong. Particularly when plain white fabric is very common cheap and available. -
Googleing more I found this spec sheet on a U.S.dot Gov website: http://www.gsa.gov/portal/content/112778 …"2.02 MATERIALS A. Commercial wax or resin such as "Brasswax", or approved equal. -OR- Tung oil -OR- "Slipit" silicone coating, or approved equal: 1. A lubricant containing silicone sold in hardware stores for easing sticky windows, drawers, etc. 2. It is long-lasting, brass will darken only slightly over many years. -OR- Air-drying clear acrylic lacquer such as "Incralac" (Stan Chemical Co), or approved equal. B. Clean, potable water C. Clean, soft cloths
-
Poking around some more on the internet, Carnauba Wax rears its head again, there is mention of Carnauba in a thread on the suitability of using Beeswax to keep the lint down on thread for rigging. Carnauba is the worlds hardest wax and is used for waxing automobiles. The paste wax sold to car enthusiasts has been adulterated with some other stuff to make the Carnauba soft enough to buff on. I wonder if I couldn't melt down some raw Carnauba and dip the brass parts in the molten wax?
-
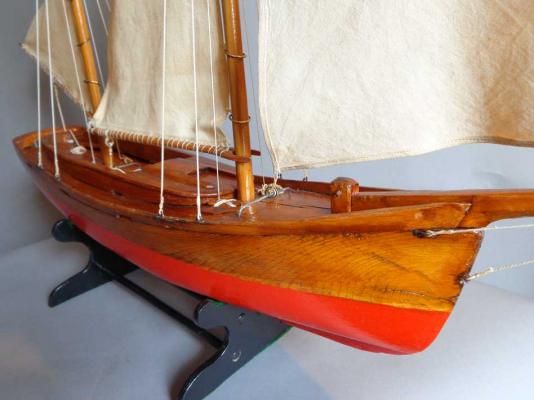
I want the bright shiny brass fittings I polished for a pond yacht model I am restoring to stay shiny for as long as possible. The brass parts fitted to the fairly dark deck stand out in beautiful contrast. How can I keep the bright shiny brass looking as shiny as possible on a model where periodic repolishing is unlikely to happen? Covering with varnish appears to be the logical solution but from what I hear, the varnish is likely to flake off. I have gleaned from online poking around that if you do all in your power to remove oils from the surface of the brass (not easy) the varnish will stick better. -Which is sound advice for any metal coating. What say you, ship model builders? I have noticed varnished brass instantly loses a lot of that initial flashing gold shine and turns slightly duller and greener, but that it stays in this state rather than gradually darkening. My guess is that the coating of varnish keeps the oxygen from contacting the metal. Is there another way to block the oxygen? I am bracing myself for the bad news I suspect is coming, that there is no fix for this problem. Having repeatedly polished the same brass fittings on full size vessels I feel if there was an easy way to avoid weekly polishing, sailors would have found it by now.
-
Furling a boom-footed forestaysail
JerseyCity Frankie replied to deltrott's topic in Masting, rigging and sails
In a nice coincidence I walked into the Hoboken Historical Museum yesterday (June 6th) and saw their exhibit on the Stephens family and low an behold a nice 1/48 scale model of the schooner yacht America, built by Abe Taubman of Jersey City, of the Taubman Plan Service, now in the collection of the Stephens Tech school of engineering. Nice surprise. Nobody at the museum cared when I explained I had just recently taken part in a discussion about the boom, which was depicted on this unrigged model. Another possible boom configuration is that there could have been a shorterboom , one that was three or four feet shorter than the entire length of the foot of the sail. If the boom was only a bit shorter and did not reach all the way to the foot of the stay, there would be enough room for the sail to come all the way down, the boom shifted a few feet forward when striking the sail. You could have your cake and eat it too. -
This has always been one of my favorite rigging questions which I bring up whenever I meet people who know about ship rigging. It always seemed unlikely to me that these huge coils would sit around on deck all the working life of the ship, seldom used. How often did the strike the lowers anyway? My guess would be during really bad weather or for repairs. The rest of the time the coil would be in the way of everything and vulnerable to rot. People say the line could have been led directly to the cable tier and this makes the most sense to me since it gets the line out of the way, out of the weather, and its still available for use.
-
New kit in the market: HMS Sirius
JerseyCity Frankie replied to Ulises Victoria's topic in Wood ship model kits
Is it just me or is the bow weird looking? Maybe I just don't know the period very well, but the headrails look insubstantial and the bowsprit looks undersized to my eye. -
Carnauba wax is the worlds hardest wax, its as hard as cement. You can buy raw carnauba at art supply stores, it comes in the form of a bag of thin flakes. Artists blend it with beeswax and raw pigment to make Encaustic paint, an ancient method that predates Oil painting. But Carnauba was discovered in South America in the early 20th century and its discovery created the whole industry of wax floor covering. Until carnauba came along there was no wax hard enough to cover a floor and stay on. Then it became the key component of automotive polish, its hardness again being what made it attractive. THe point I am making is that carnauba is likely not going to be a good wax for ship model line since you will have to dissolve it with chemicals or melt it with excessive heat. The chemicals will surely be more problematic than any acids found in beeswax!
-
Furling a boom-footed forestaysail
JerseyCity Frankie replied to deltrott's topic in Masting, rigging and sails
Now I see your point, I have a copy of The Low Black Schooner by John Rousmanire and there are scores of prints of America and many of them show her with a full length club or boom on her staysail. There is no way all that canvas could slide down to the deck if the sail was laced to the boom. As you say, it would be geometrically impossible. Unless they could cast off the Clew and slide the laced on foot of the sail forward on the spar? A crazy amount of work and also this would make raising sail that much more difficult and time consuming. I note that there are plenty of drawings and prints of America in this book showing loose footed headsails. None of the photos in the book show her with the spar. -
Naval History On This Day, Any Nation
JerseyCity Frankie replied to Kevin's topic in Nautical/Naval History
Its the anniversary of the Battle of Jutland today, May 31/June 1st. I find the battle fascinating yet exhausting. It was such a complex series of engagements, I can never keep a clear picture of what was all going on at any given time in my head. But this means that each time I read an account of the battle I have a renewed fascination. Why nobody has ever made a film about this battle is a mystery, its the only large scale multi ship dreadnaught engagement and you would think some filmmaker would have taken a crack at it long ago. thttp://en.wikipedia.org/wiki/Battle_of_Jutland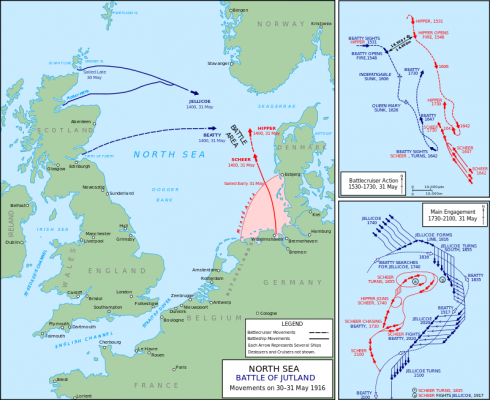
-
Furling a boom-footed forestaysail
JerseyCity Frankie replied to deltrott's topic in Masting, rigging and sails
In my experience, when the sail comes down on deck there is more canvas at the forward end then at the aft, but the aft end is basically still the same distance from the luff as it was when it was aloft. Sometimes there isn't enough room on deck and the after portion of the sail is folded over forward. The club footed staysails I have furled come down the stay on the hanks and this causes the forward part of the sail to adopt the accordion folds, the after end of the club rests on the samson post and the sail is flaked down on top in neat folds. As you say, the forward part of the sail stacks up higher since its got more canvas and all those hanks. But in the end the hanks stack together and are actually touching each other, the canvas of the luff sticks out to the side in alternating folds port and starboard. With a nice furl on, the forward part of the bundle of sail does flair upward at the stay on account of the hanks. There are fancy methods of using a portion of the sail as a skin to stretch over all the flakes, disguising the folded portion in a way much like tucking in a bed sheet over everything underneath, leaving only a seamless smooth flattened sausage shape. Two or three sail ties are put around the bundle and the club to hold it in position, or a downhaul can be tied in a daisy chain along the entire sail bundle.