texxn5
-
Posts
2,473 -
Joined
-
Last visited
Content Type
Profiles
Forums
Gallery
Events
Everything posted by texxn5
-
I realized I had one of the channels in the wrong place, so I brushed water on the glue joint to loosen it up, removed it and remounted it in the correct position. I had it too low near the gangway. Progressed on to make and mount all of the channels, upper and lower, added some of the Brittania chocks, sea steps, and port lights on port and starboard sides. Next to build will be the ladders for the anchor deck, a couple of sheaves, and some eyebolts and I should be ready to stain and varnish the deck and paint the bulwarks.


-
Hi Grant, this really looks nice. It gives me some ideas as to when I start making my 7 whaleboats.
-
Hi Dan, thanks for the kind words. Yes, this is my first wood ship. I have, however, scratch built other models from wood, so this is not really foreign to me.
-
Thanks Popeye.
-
Thanks Mark, movin' down the road.
-
Good for you Augie, I'll see what I can do about the whales, however, I really like whales I think they're really neat creatures and love to watch them. It's a tragedy the way they were slaughtered over the ages.
-
Thanks Augie, I appreciate it. Catch any fish???? Or did you go to the fish market? Maybe you got a whale?
-
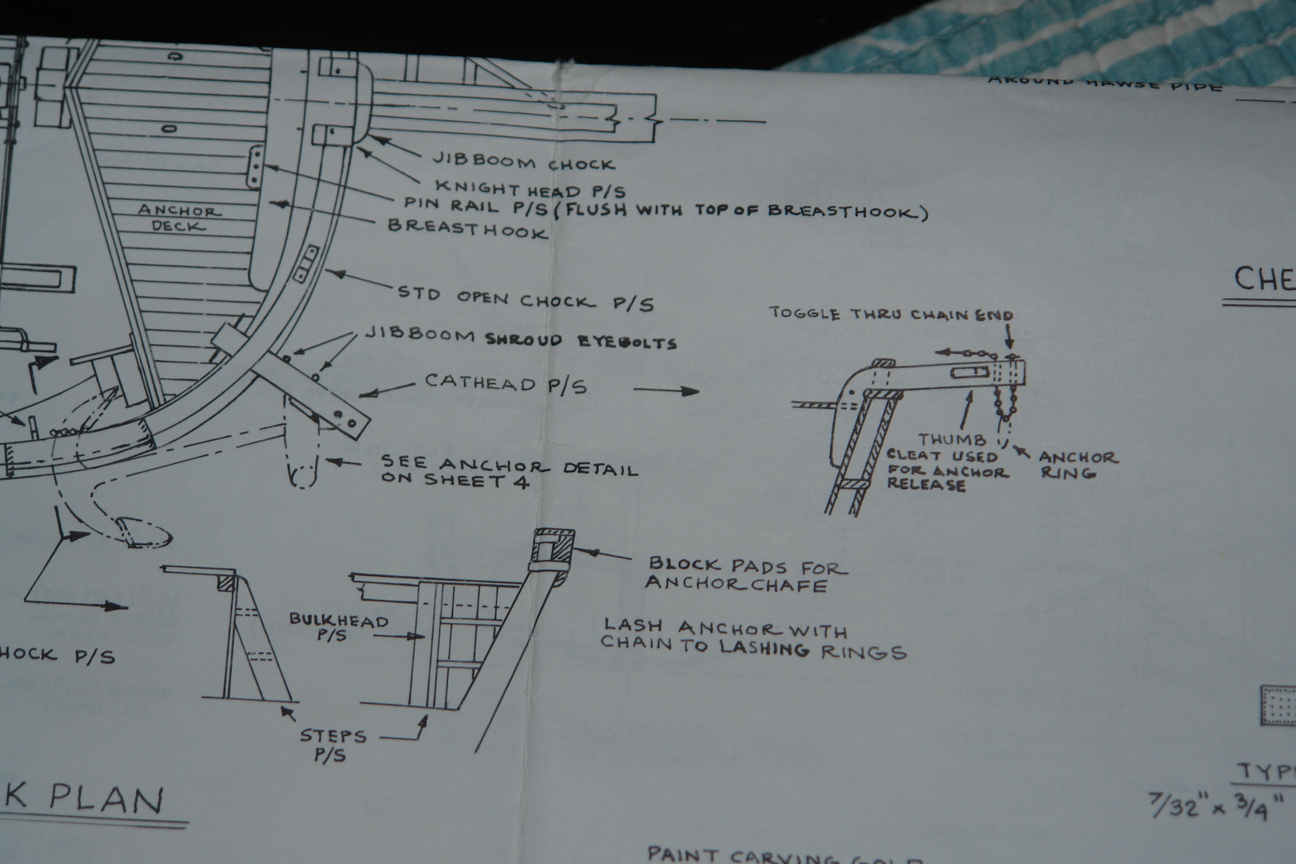
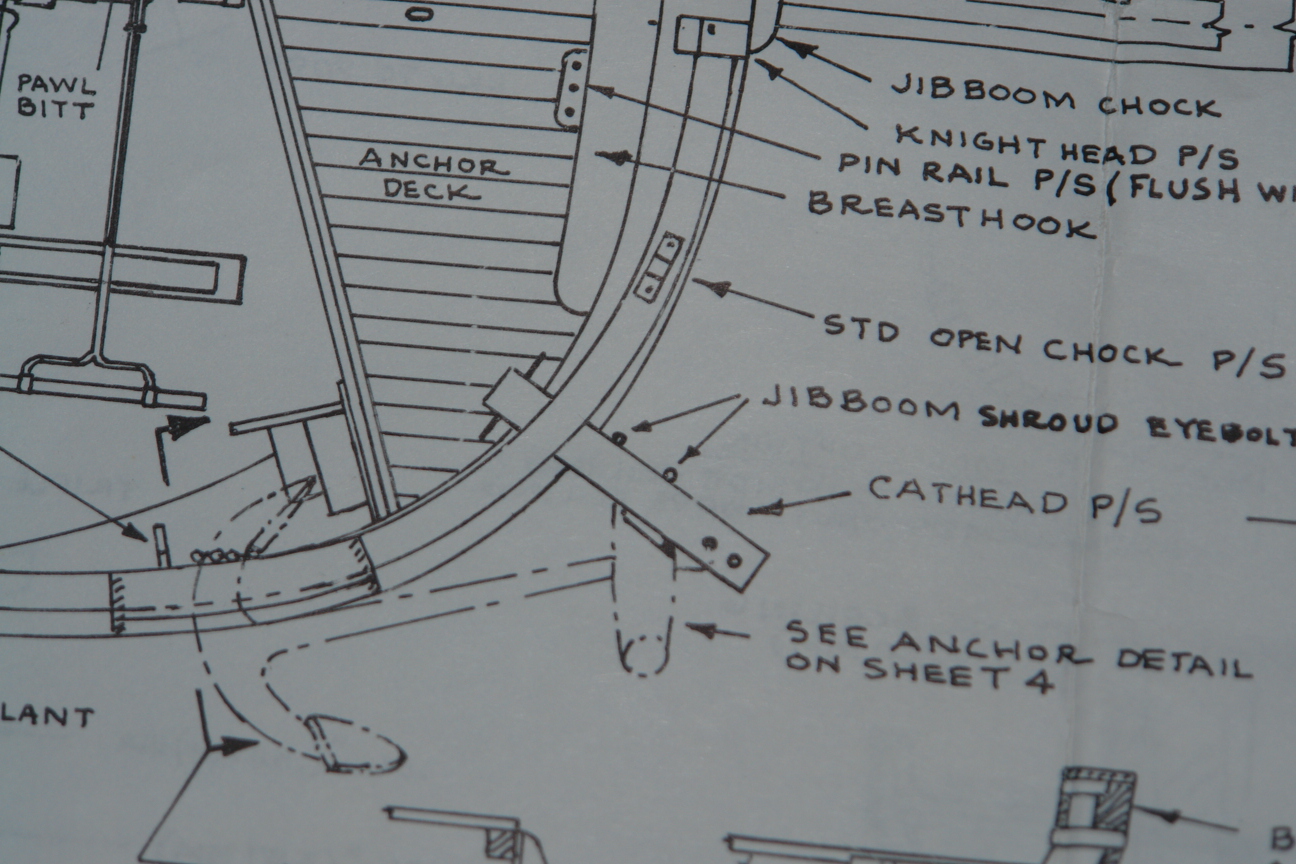
Here is a few pictures of the head rails and timbers, and the cheek knees.


- 2,250 replies
-
- 4
-

-
- model shipways
- Charles W Morgan
- (and 1 more)
-
This is a progressive set of pictures as once again the plans were vague.


- 2,250 replies
-
- 3
-
-
- model shipways
- Charles W Morgan
- (and 1 more)
-
After the pin rails, I decided to go ahead and bite the bullet and cut the bulwark for the Cutting Stage and gangway. Measure many time and finally get up the courage to cut the rails and wales and then construct and install the sheathing blocks to the starboard side of the hull.


-
Hi Popeye, yes, I am making progress, and you are right, I do not want to be rigging on the road. This ship has very many detailed structures on the deck as well as 7 whale boats that need detailing, with harpoons, and other tools used by the whaleboats for catching the whale. I have plenty of things to keep me very busy prior to even thinking about rigging. I also have the coppering on the hull to do also. If I get that done, I can start bulding mast parts and yards, but don't think I'll be there before I get back. John
-
Thanks Bob, if it's not too much trouble I'd appreciate it. Yeah, this forum is wonderful for info and help, and pictures of others builds that really help on these things.
-
Thanks Scott, thought you'd like that
-
bigpav, thanks for the kind words. I''m taking it with me and hope to work along the way. I'll be gone around 6 months. Welcome aboard.
-
Yesterday I got the Headrails and timbers and the cheek knees made and assembled. Progressed on and made up the pinrails and pins and attached to proper locations on the main rails.


- 2,250 replies
-
- 1
-
-
- model shipways
- Charles W Morgan
- (and 1 more)
-
NOTE: PICTURES FROM PAGE 13-16 HAVE BEEN LOST DUE TO A GLITCH IN THE FORUM SOFTWARE. PEOPLE INTERESTED OR NEEDING ACCESS TO THESE PHOTOGRAPHS CAN GO TO MY WEBSITE AND THEY ARE AVAILABLE IN BUILD LOG I - THE HULL, ABOUT HALF WAY DOWN THAT PAGE. ALL OF THIS LOG IS DUPLICATED ON THE WEBSITE. HERE'S THE LINK: http://www.charleswmorganmodel.com John Here is a better picture of the repair of the catheads "after" picture mentioned above

- 2,250 replies
-
- 1
-
-
- model shipways
- Charles W Morgan
- (and 1 more)
-
The guns really look good Sjors, I really like the brass. But being an old salt, I like brass as long as someone else is polishing it. RHIP!!!
-
Looking back at the photos, I just realized my picture of after is out of focus. I'll repost another one later tonight along with more progress.
-
Thanks Grant, barely in the nick of time!
-
Hi Jpett, you are right, there is a lot of assuming going on here. If I had pictures for reference it would sure help. Unfortunately, when I visit the ship next month, there won't be much to photograph because it is in a restoration and will have only been re-launched a couple of weeks. There are models in the museum, which of course I will photograph the h*** out of. Unfortunately I lost my photos from the last time I visited about 12-13 years ago. So drift we will until that time....lol.
-
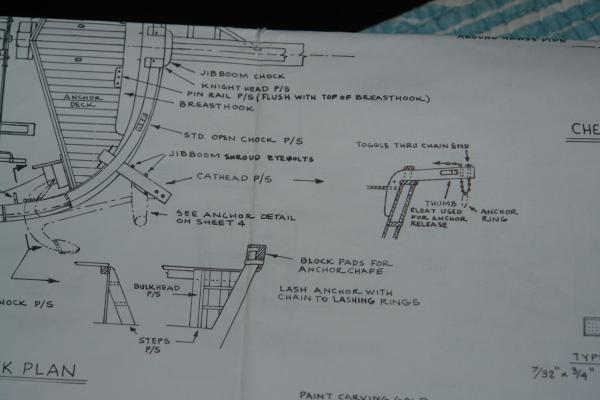
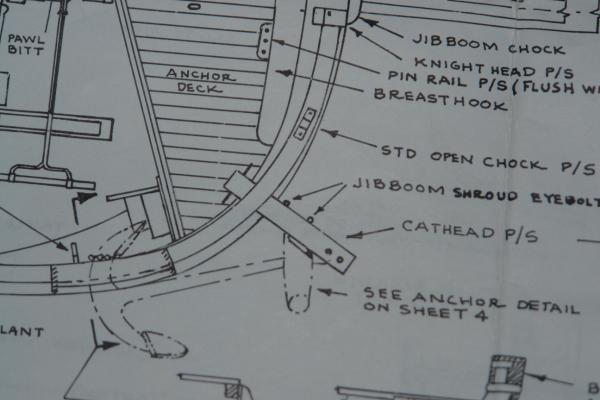
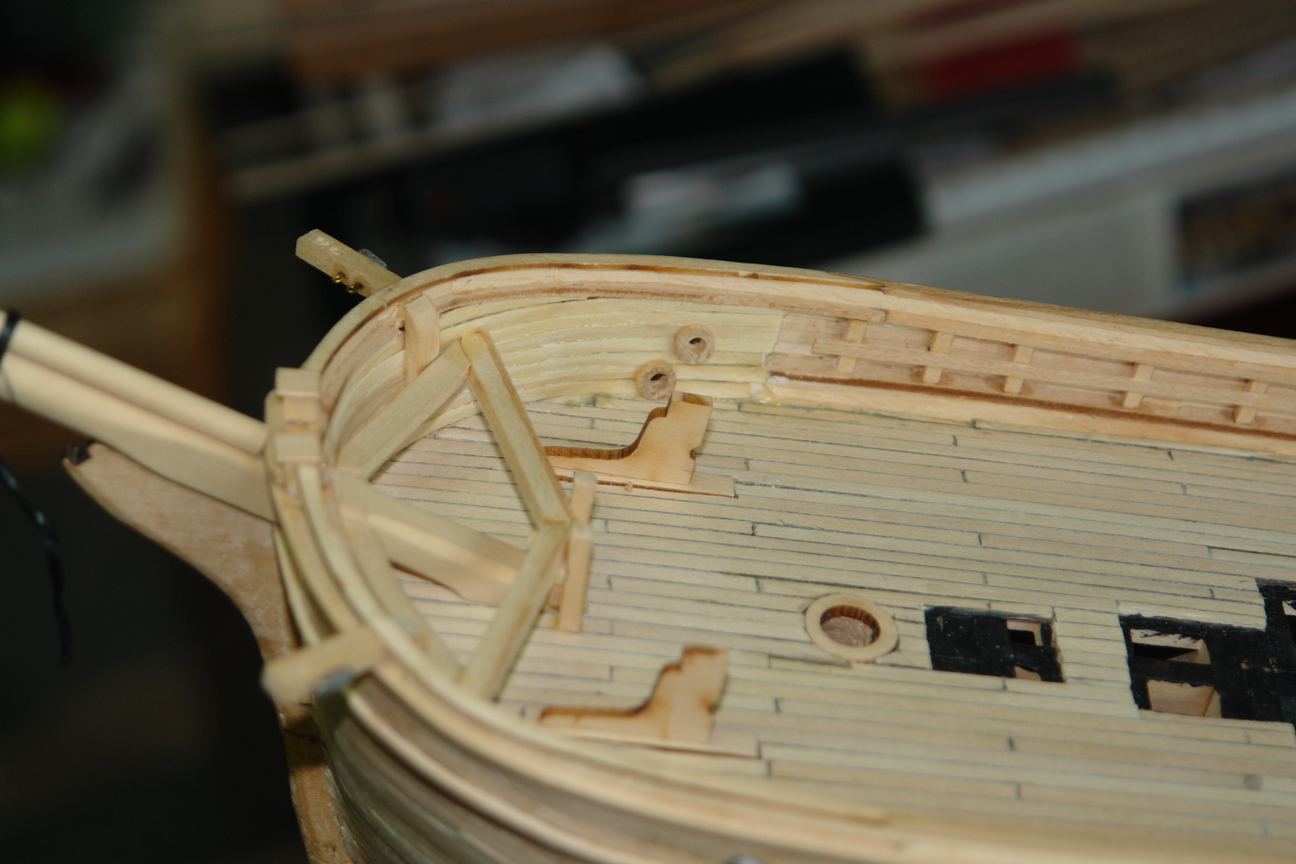
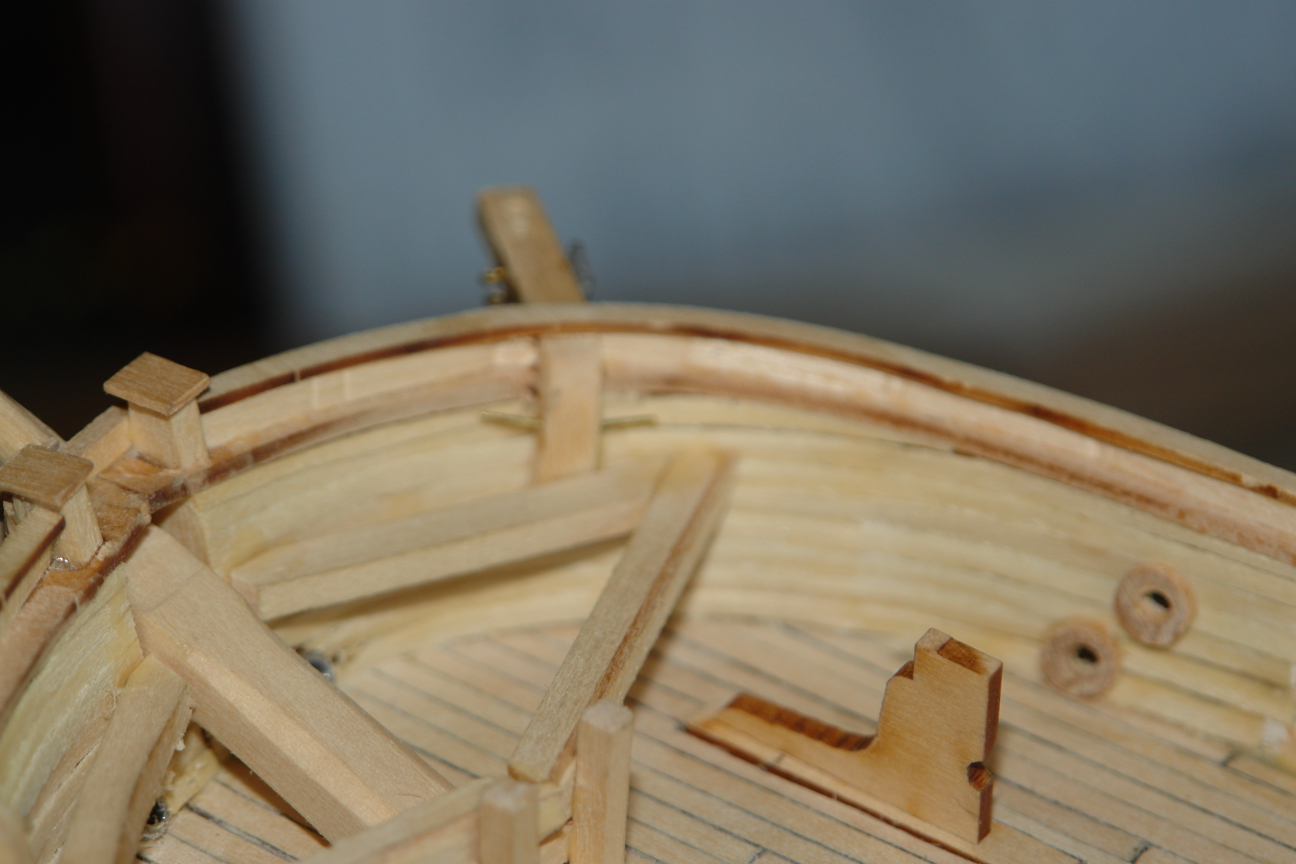
Here is the repaired catheads. First is the plans where if one looks at the drawings, the profile drawing shows only a black dot below the curve piece that attaches to the bulwark, and the overhead drawing to the left showing the bow only shows a simple line through the cathead. There is no identification of the wire. It is very easy to overlook without very careful scrutiny. I have taken college level engineering drafting, as well as designed irrigation systems, so I know how to read blueprints, yet still find details or clarification on certain items in these plans to be lacking. The next pictures show a before and after the repairs for reference. Thankfully, I discovered this before it would be real difficult to fix.