


CPDDET
-
Posts
1,193 -
Joined
-
Last visited
Content Type
Profiles
Forums
Gallery
Events
Everything posted by CPDDET
-
 Finally getting around to replacing my paint brushes. My old ones were a cheap set (10 brushes for $15) and I'm about fed up with them. At least the old set taught me what sizes I use most often so I won't throw money away on sizes I don't need. Will be going to Blick Arts for the new brushes and see they offer brushes in soft, medium and stiff synthetic bristles. Of course my cheap set isn't labeled as any of these but I'm thinking of buying soft or maybe medium. I use 80 percent Tamiya paint mixed with 10 percent thinner and 10 percent extender. This mixture works well for me. It's thin, but not too thin, so Im thinking a softer brush for a thinner consistency would work best. Any advice would be much appreciated. Dave
 -
Thank you for the compliment, Toolman. Now that camping season is about over and the RV has been put away for the winter, I can finally get back to the shipyard. Except for Sunday football, of course.
-
Pat, I can empathize with you after going through surgery myself last year. Hang in there, take care of yourself and remember, this too shall pass.
-
Hang in there, Pat. The old noggin will work it out.
-
Looks great Pat. You may not be able to work in the shipyard but I'm sure the gray matter will won't be taking any time off. Wishing you a successful surgery and a speedy recovery.
-
Let's not forget razor saws and jeweler's saws as cutting instruments
-
However, seldom will one cutting tool cover all situations. I keep a small supply of disposable scalpels on hand to use when they are the best fit for the job at hand. Cutting tools are no different than files, sand paper, paint brushes ect. The right tool for the job is best.
-
I find a scalpel blade a bit too flexible. A properly honed and stropped craft / carving / hobby knife blade works best for me.
-
As always, your outside the box ideas are ingenious. Thanks for teaching me new tricks! Wishing you a speedy recovery.
-
Thanks, Pat!
-
That's a real compliment coming from someone with your skills. Thanks!
- 389 replies
-
- 1
-

-
- bluenose
- model shipways
- (and 1 more)
-
I took the plunge some time ago and purchased a set of 3 pin vices from Starrett and never looked back. Not cheap but a quality tool.
-
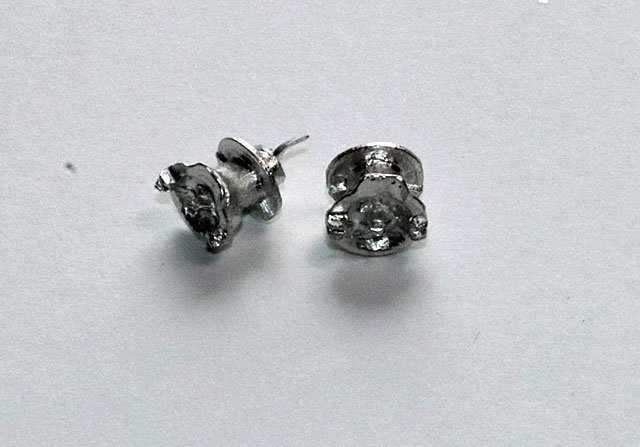
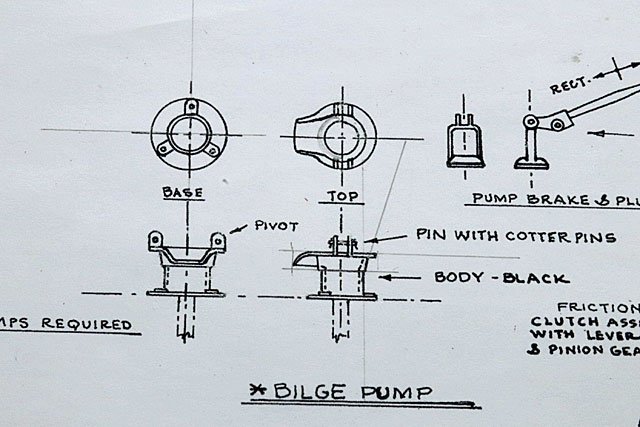
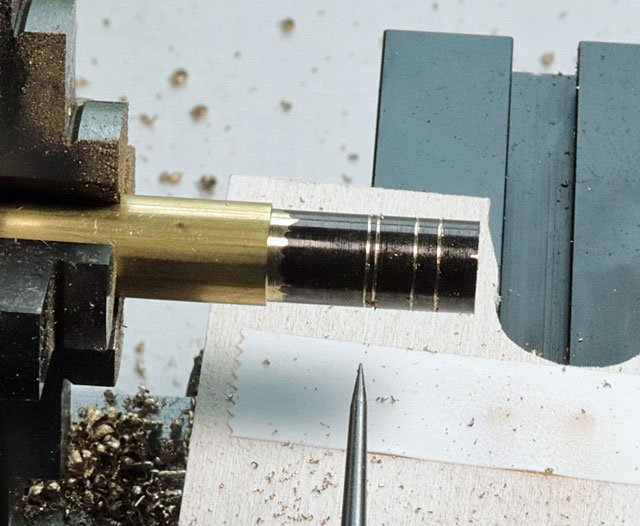
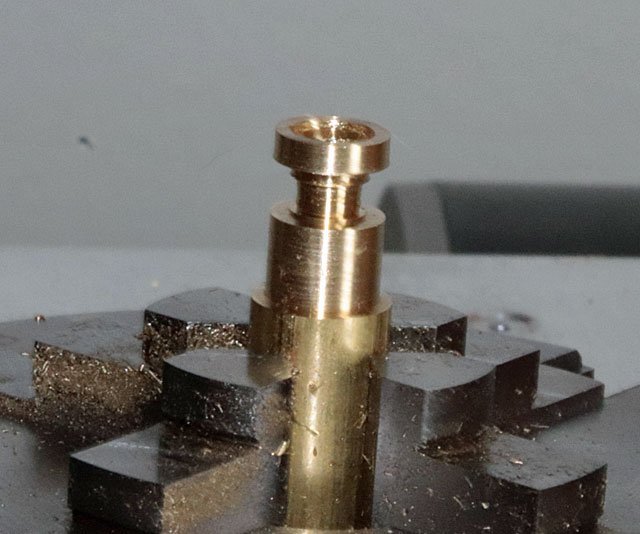
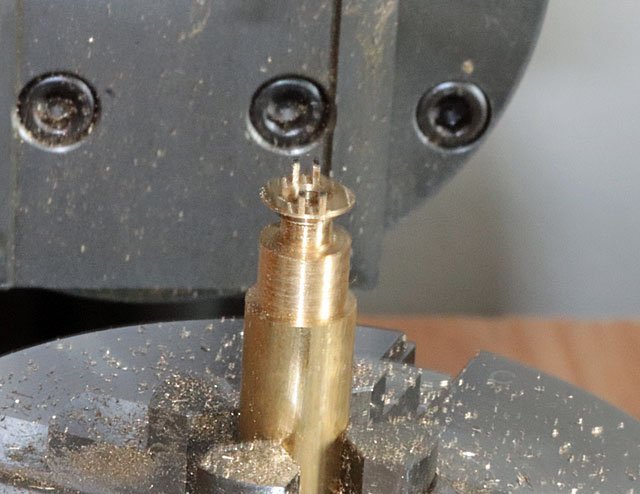
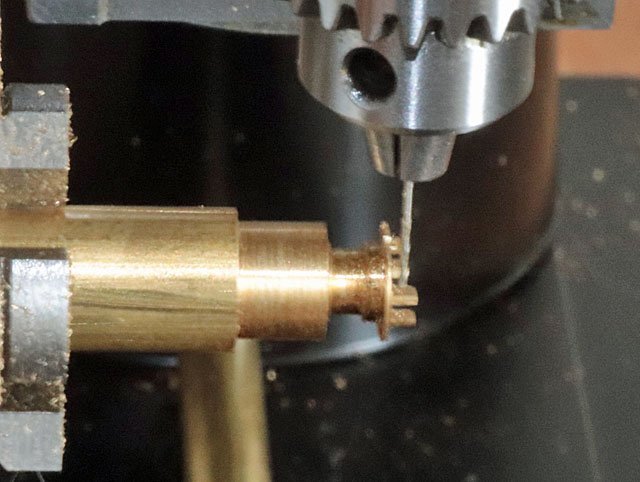
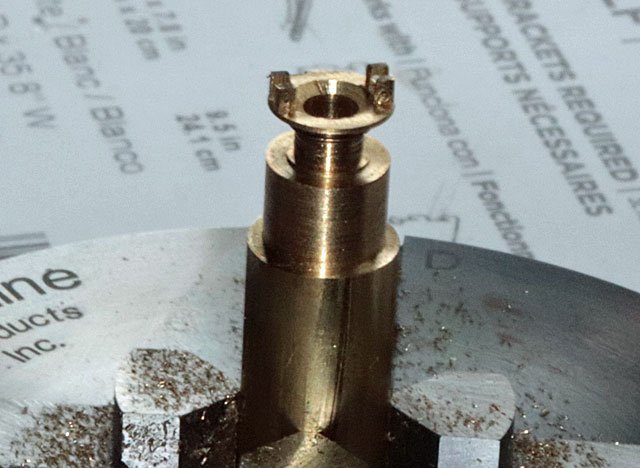
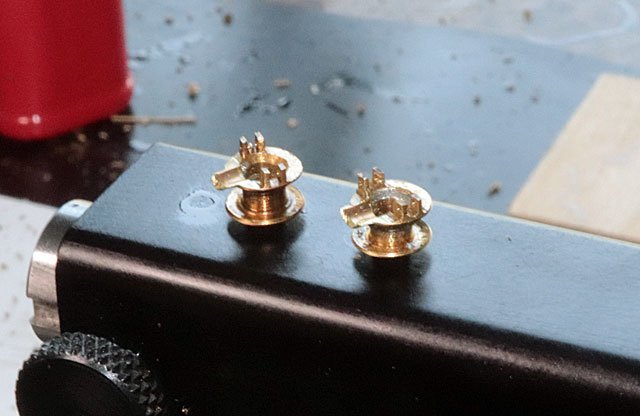
First off I have to thank Richard (AKA retiredguy) for his help and guidance in fashioning these bilge pumps. He has been more than generous in answering my question and providing assistance. As long as these took to build, it would have taken much longer and a lot more *#!?**#! without his help. Here is a pic of the pumps that came with the kit. And here is the plan drawing of the pumps Starting with a 3/8 round brass stock on the lathe I turned it down to .306 inches. Painted the surface with a black marker and scribed the different areas that needed to be fashioned. Still on the lathe I made the first cut .081 inches from the face of the piece and turned the stock down to .205 for .148 inches. Then moved .136 inches from the face and turned down to .171 inches for .093 inches. This fashioned the body of the pump. I used a #5 drill bit to create the “bowl” and a #29 drill bit to make the hole for the plunger. Then moved to the mill. I used a 3/64 inch end mill to cut the space between the 2 “ears” and then removed the unwanted material to form all 4 “ears”. Putting the chuck on a right angle bracket, I used a #76 drill bit to make the holes through the “ears”. This should be the right size for the .6 mm bolts I plan to use. This is the piece after turning and milling. I used a 5/32 end mill to create a half circle cut for the spout and used .010 thick brass to fashion the spout. I soldered the spout in place and did some filing to shape it. So here are the 2 bilge pumps with the spouts. And while they aren’t perfect, I believe they are a big improvement of the white metal ones that came with the kit. Now I will attempt to build the plungers and linkage, don’t hold your breath for the next update as this may take me awhile.

- 389 replies
-
- 5
-
-
- bluenose
- model shipways
- (and 1 more)
-
Model shop bandsaw choice?
CPDDET replied to tooter's topic in Modeling tools and Workshop Equipment
Learn something new every day! -
Model shop bandsaw choice?
CPDDET replied to tooter's topic in Modeling tools and Workshop Equipment
How would one control temp and humidity in a storage unit? -
Thanks Gagliano, your kind comments are much appreciated. But I'm still new to this hobby and trying to learn. I'm finding that each step is a build in its own right. I still struggle with the "how" to build things. I really have to slow down, think things through and ask for help before proceeding. And even then i end up remaking a part. I'm finding the bilge pumps a challenge and moving slowly on them. But it's not a hobby if we have to rush, right?
- 389 replies
-
- 1
-
-
- bluenose
- model shipways
- (and 1 more)
-
And having a multitude of ways of skinning a cat makes for a great workshop.
-
Possible. And if one had a lathe they could be made with that. But using sculpy is a pretty neat way to do it.
-
Keep us posted as I'm sure I will be using it sometime in the future.
-
Never used sculpy but wondered if one could pack it into an appropriate sized brass tube, then push it out with a dowel rod and bake. Might result in perfectly round rod? Just a thought, didn't mean to stick my nose into your more than capable build techniques.
-
While I'm far from it, I'm thinking furled sails at this point.
-
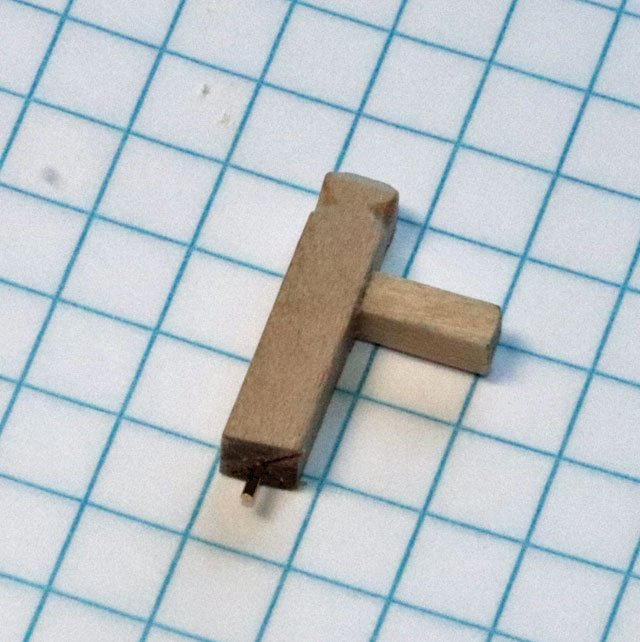
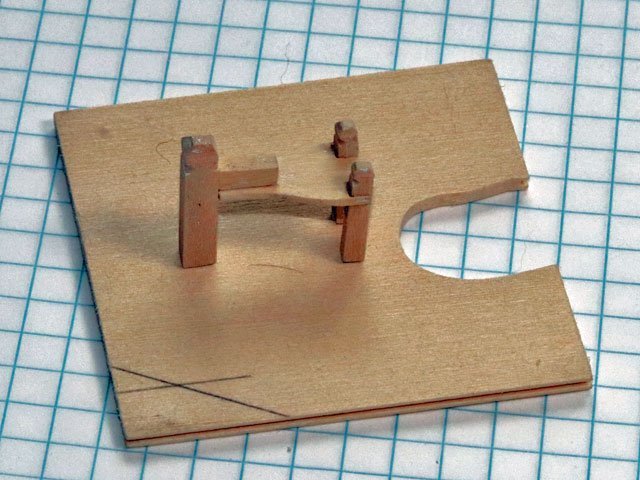
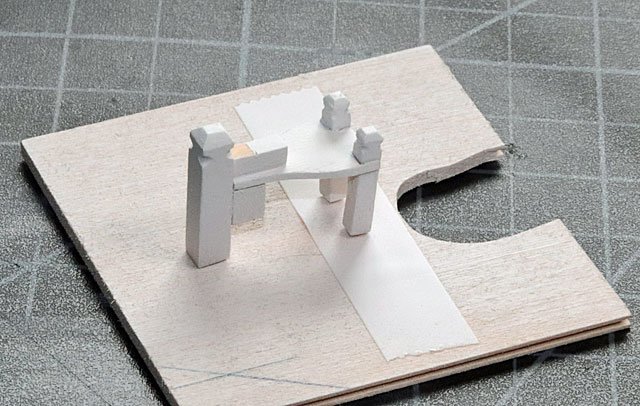
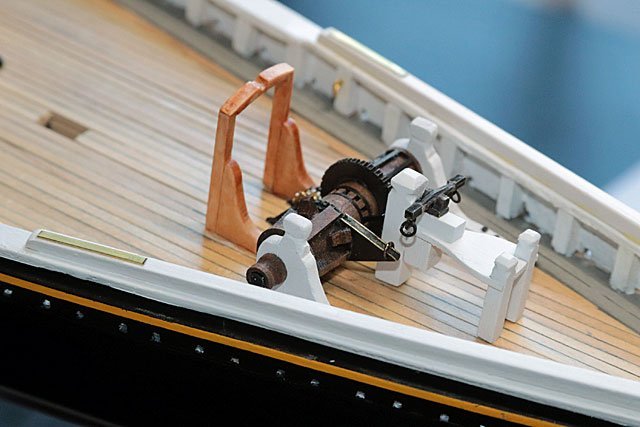
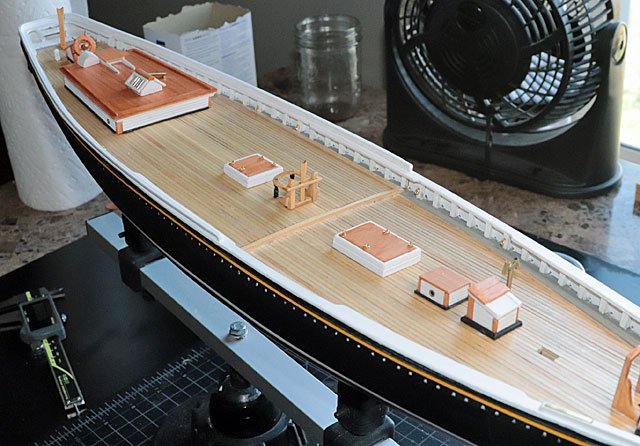
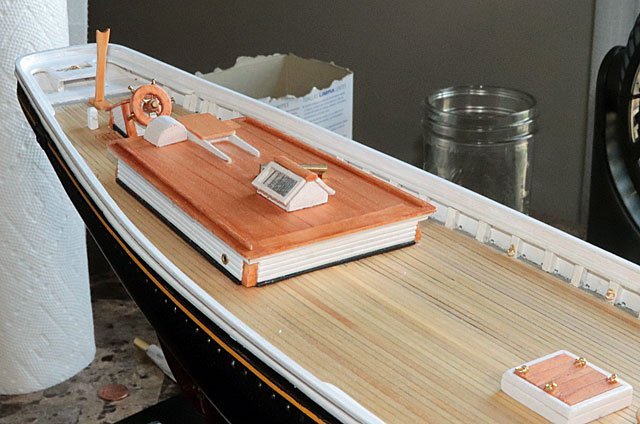
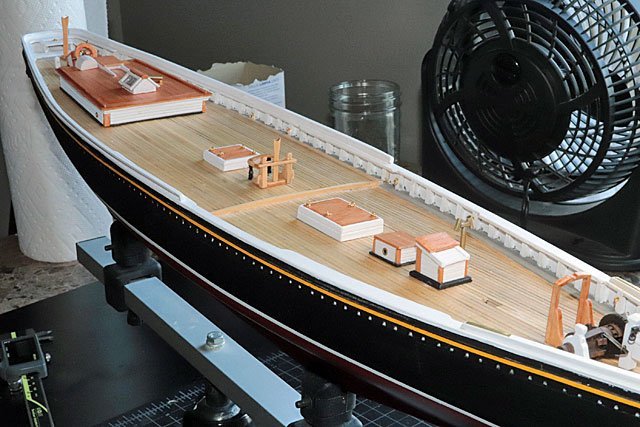
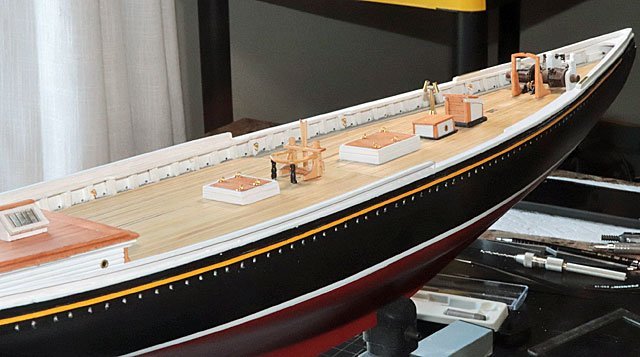
I started the samson post assembly by first fashioning the main post and the support for the brake beam. Cut the bottom of the post to fit the deck angle and added a small wire pin to help secure it to the deck Completed the rest of the assembly using some laser cut parts that came with the kit and some scratch built parts. Mounted the finished assembly on a scrap piece of wood, using the pin in the base of the main post and some double stick tape for the smaller posts. After taping off a spot to mount the brake beam I air brushed the piece. Added the brake beam and pawl and glued the assembly in place. Added the windlass, counter shaft and jumbo jib boom crutch. Still have to attach the 2 ends of the brake beam to the 2 ratchet quadrants. Not sure if I will use wire or thread coated with clear matt nail polish. That completes 99% of the deck furniture. You may notice that there are some gear assemblies near the jumbo jib boom crutch missing as well as an engine box and linkage. But I’m building the racing version and the plans state these items were removed from the deck when racing, probably to reduce weight (especially forward weight) and to lessen the chances of fouling lines during head sail changes / tacking. Now it’s on to attempt making my own bilge pumps and another boom sheet buffer.
- 389 replies
-
- 5
-
-
- bluenose
- model shipways
- (and 1 more)
-
I've found there isn't one " do it all" tool for any building process. No matter if your cutting, shaping, sawing or whatever, it takes multiple tools that do the same job in different ways. I have standard tweezers, cross lock and forceps and find them all useful at the proper time.
-
Always good to have a plan.
-
Excellent craftsmanship, Pat. Looks really nice! Dave