
HOLIDAY DONATION DRIVE - SUPPORT MSW - DO YOUR PART TO KEEP THIS GREAT FORUM GOING! (Only 72 donations so far out of 49,000 members - Can we at least get 100? C'mon guys!)
×


CPDDET
-
Posts
1,188 -
Joined
-
Last visited
Content Type
Profiles
Forums
Gallery
Events
Everything posted by CPDDET
-
 Beautiful work! You have every right to be proud of your efforts.
- 38 replies
-
- 1
-

-
- bluenose
- model shipways
- (and 1 more)
-
Looks great, Pat. The idea of using wipe on poly and lightly sanding really added a whole other dimension.
-
Thanks for the kind comments, mates! Jim, I'll PM you instead of getting off topic on this build log.
- 389 replies
-
- 1
-
-
- bluenose
- model shipways
- (and 1 more)
-
Thanks Pat. Judging by your current build you won't have any problems.
-
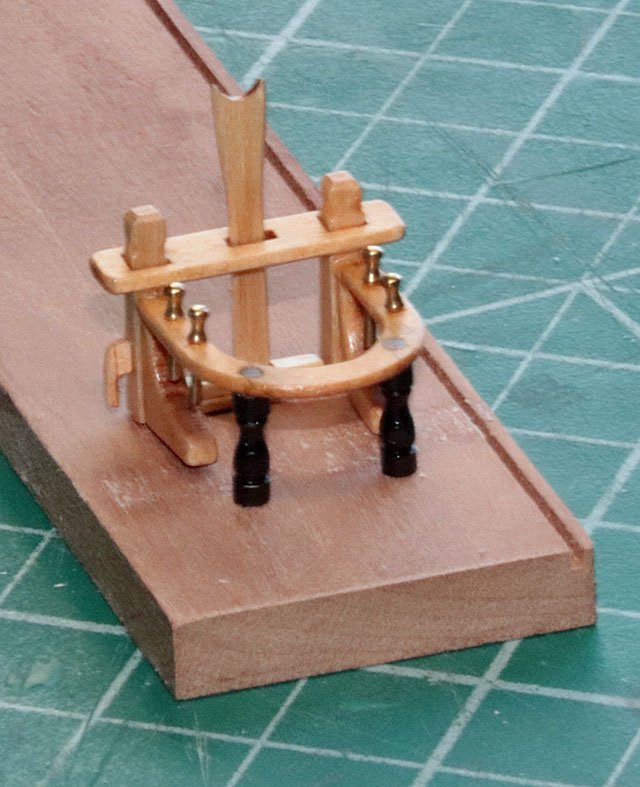
Finished up the forward hatch and the fife rail. The forward hatch was built in the same manner as the aft hatch and I used some of the kit’s laser cut parts for the fife rail. I decided to skip over both the deck pumps and the forward boom buffer as the plan, if all works out, is to make myself a present of a Sherline mill next month. The new mill, along with the lathe, should allow me to build the pumps and buffer with greater detail than the white metal pieces that came with the model. So now it’s on to the forward skylight box, companionway and smoke stack. Things are slowing down as I attempt to increase my scratch building. A very Merry Christmas to all! Dave

- 389 replies
-
- 4
-
-
- bluenose
- model shipways
- (and 1 more)
-
Much more than passable, a good job of keeping your calm and making a good recovery.
-
Just wonder if a clear matt finish coat would help cut the sheen. I use a clear matt acrylic spray over my painted parts. Of course I'm using matt finish paint as well. I find the finished look preferable to just the flat paint. Bought mine at Hobby Lobby.
-
Very nice, Pat. I like it! D
-
Thanks to all for very informative information. There are several ideas that I will add to my building process. Dave
-
The wine did the trick!
-
Always good to walk away, sip some wine and let things simmer in the back of one's mind. A solution usually pops up.
-
I'm looking forward to getting proficient with it. Over the next few days I'll attempt to make the deck pumps from a brass rod. Working on the drawing now.
- 389 replies
-
- 1
-
-
- bluenose
- model shipways
- (and 1 more)
-
Ah, linen tester! Readily available and economically priced. Thanks!
-
Nice recovery, Pat.
-
Thanks Pat, I will in interested in seeing it. D
-
Druxey, that's what I have been using but find it a bit clumsy in some situations. Thought there might be a better method I wasn't aware of. Too bad they don't make these in a smaller size. D
-
Thanks betaqdave. That will work when transferring directly to the workpiece. But how about when that divider distance needs to be translated to a decimal measurement? Using the lathe I need to dial in the measurement so I need the measurement from the plan in decimal form. Dave
-
Im wondering what tools and techniques others are using when taking measurement from ship plans. I'm slowly, very slowly, moving toward scratch building and finding taking accurate measurements from ships plans a bit clumsy. For instance: I will be making my own deck pumps for Bluenose, turing them from brass stock on a Sherline lathe. This is a small part and the lines on the plans can be quite thick. Do I measure from the outside of the line? The inside on the line? The center of the line? What tools are others using to make the very fine measurements accurately? Thanks in advance for any advice passed along. Dave
-
I'm really impressed with your progress. Crisp, clean, well defined. I'm jealous 😜. Carry on Patrick!
-
Jig was a great idea. When I did my deck o made somewhat of a mess with the graphite. Never worked with boxwood or pear but I'm sure looking forward to it. The hell with the sanding, you can do that when you feel like it. 😄😁
-
Hopefully just a glue failure and nothing more than that.
-
Looks like the block slipping isn't really a big deal. Inside planking looks very nice. Dave
-
Every time my better half gets her nails done she brings one or two of these home. Due to covid the nail tech can't reuse them. Soft sponge 120 grit great for sanding between coats or finishing. Soft enough to mold to different shapes and can be cut to any shape / size. https://www.nailwholesale.com/products/yellow-nail-buffer-4-way-grit-120.html?gclid=Cj0KCQiAhs79BRD0ARIsAC6XpaWjC9iqQV6ObSwVbVaz_rMsLazMywAO0q3sRmy3TmUoeXFfHsXFJ8UaAp6_EALw_wcB
-
Looking great, Pat! Additional sanding is in all our futures, just comes with the territory I guess.
