rowand
-
Posts
154 -
Joined
-
Last visited
Content Type
Profiles
Forums
Gallery
Events
Everything posted by rowand
-

Endeavour by Greg92 - Eaglemoss
rowand replied to Greg92's topic in - Kit build logs for subjects built from 1751 - 1800
Hi Greg, I was curious about this particular kit and will be watching your build with heaps of interest. There's plenty of experienced folk on this forum that are more than willing to help in the best way possible and I'm sure that you'll do a great job and have a lot of fun along the way. Happy modeling!! Cheers, Rowan D. -
Hi Harry, Good to see another Endeavour on the forum. I've got my chair pulled up to watch your build, happy modeling!! Cheers, Rowan D.
-
Geez Dave, my fat fingers aren't that nimble. Nice work!! Cheers, Rowan D.
-
Great work Max!! Cheers, Rowan D.
-
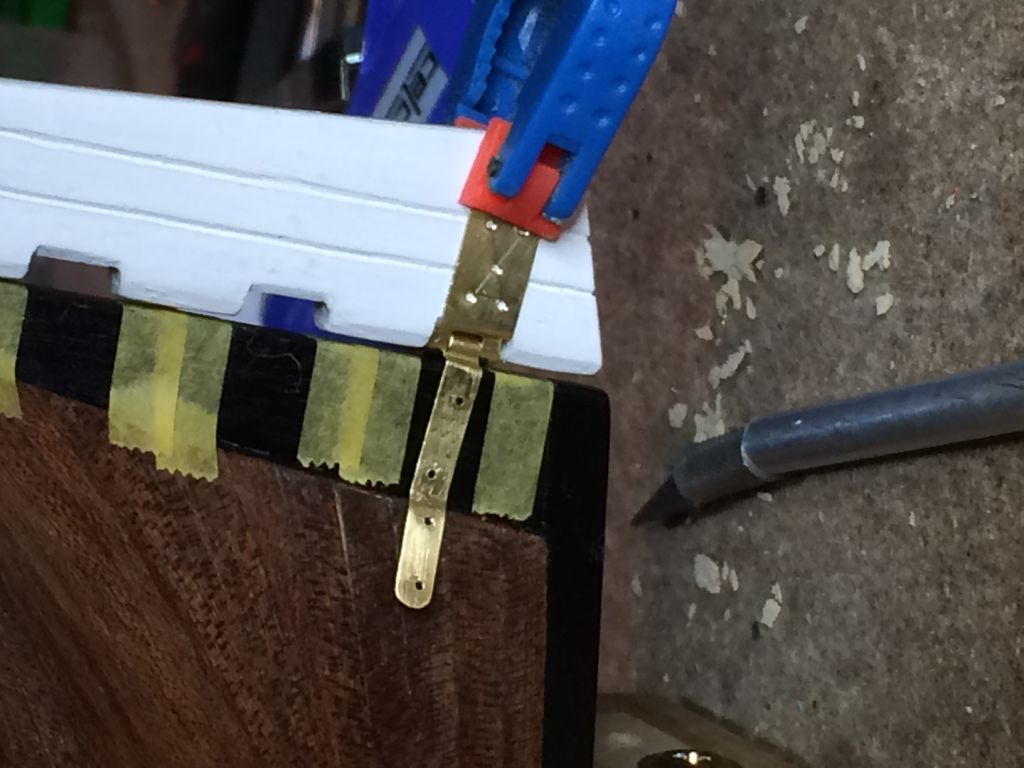
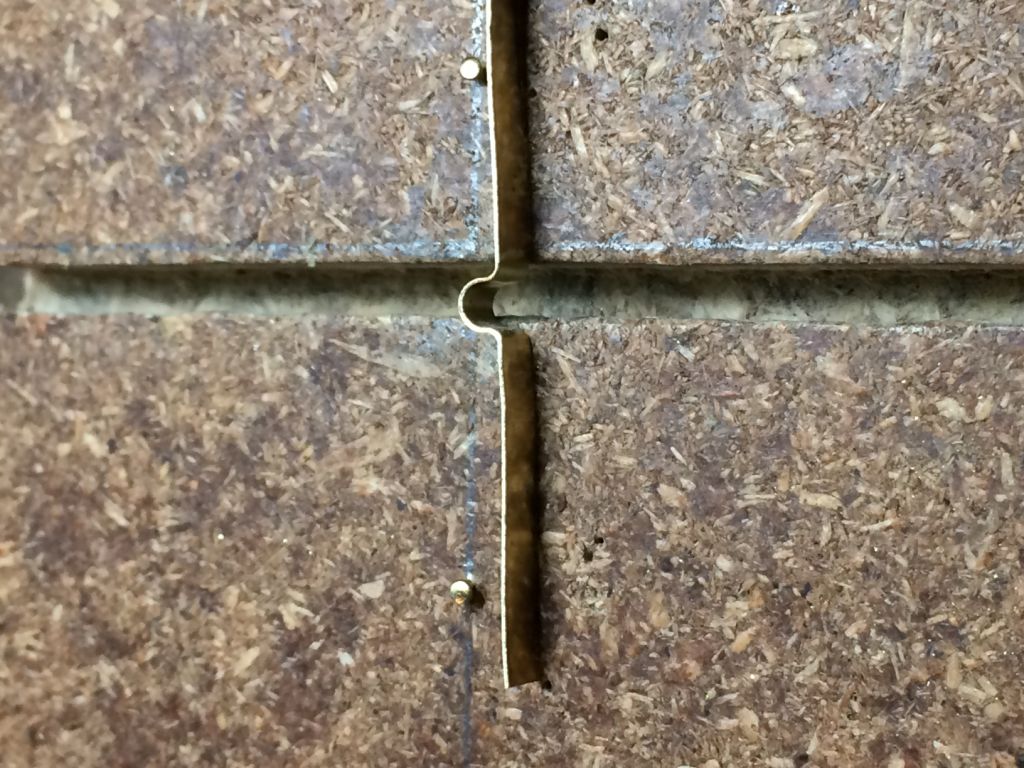
Hi Paul, I was just checking your log, you're making good progress, mine is back on the shelf for the time being. I started some work outside and need to get that finished so no activity on my build for the moment but I expect it won't be long until I can get back to it. I've been checking out the differences in the different brands of the model and we all seem to have similar issues in one way or the other but they are all looking really good as they progress. I was a bit annoyed at my kit with the rudder set-up, the AL supplied instructions showed 5 cut-outs and hinges mounting the rudder but the AL kit supplied stock was different and the rudder had four cut-outs for the hinges (with different spacing/pitch to the instructions) so I made the set of hinges rather than persevering and using the kit supplied parts. The kit supplied hinges were pre-drilled and they didn't work or fit as well as expected. It's like some parts of the kit are manufactured in another factory some where else in the world...... Cheers, Rowan D.
-
Great work Sjors, that is a beautiful model. Cheers, Rowan D.
- 1,616 replies
-
- 2
-

-
- caldercraft
- agamemnon
- (and 1 more)
-
HMB Endeavour by mikec - Eaglemoss
rowand replied to mikec's topic in - Kit build logs for subjects built from 1751 - 1800
Sensational Mike!!... Cheers, Rowan D. -
G'day Graham, You're right, I did get you mixed up with Paul, my apologies for that. Now, my confession, It's my first build and I've been at it for quite a while - I'm embarrassed to say but a bit over 5 years. I get to it when the Admiral isn't looking or when I can make time and work from my garage work bench. The advice above is great advice and I've been following it since I learnt the hard way after I made some blunders along the way and lucky to escape in other parts of the build. I also learnt to read the instructions several steps ahead (at least) just in case there is some useful information in there that relates to the step I'm working on. I troll the blogs to see what I can glean from the other builds, every build log I visit, I think is amazing, the skill levels, the eye for detail and the effort that's put into the respective builds is nothing less than awesome to me. But the message is always the same, take your time, research and plan..... the saving grace is that most of the time you might be able to go back and do it again if you don't think it's right. Have a great day and happy modeling, Cheers, Rowan D.
-
G'day Graham, with regard to your question above, clean and dry is the way to go. I made up a jig to shape the planks to the curves of the hull and hold them in shape as they dried. It was a pretty rudimentary device but it worked okay, there are some pictures of the jig on my log. I only made it big enough to hold 4 planks at a time (not on purpose) so progress was pretty slow, but that suited the time I had available. I removed the planks from the jig only when ready to use them. Your kit of the Victory looks to be a pretty solid project, even your dog looked a bit intimidated by it as you un-boxed it. Nice one and good luck with the man cave. Have a good one, Rowan D.
- 10 replies
-
- 1
-
-
- endeavour
- artesania latina
- (and 1 more)
-
Wow!!!!.......... Simply stunning Boyd. What great work you've done. Cheers, Rowan D.
-
Good stuff, Dave, that's great progress and the I think you're spot on with the idea on the steps. Cheers, Rowan D.
-
Hi Boyd, That's fantastic detail you've included into your model and it's really well done - nice work!! I'm enjoying your build log, thanks Mate. Cheers, Rowan D.
-
Hi Max, I'm there on the office job and know what you mean. By the way, it's freezing here in Melbourne - 10 degrees!! Cheers, Rowan D.
-
Hi Max, Your model is coming along nicely and you are making much faster progress than I have been. Looking forward to seeing more... Happy modeling, Cheers, Rowan D.
-
Hi Thomas, Thanks for the very kind words. Now onto some domestic chores..... Have a great day, Rowan D.
-
Hi Greg, that's a fantastic build. I can only echo the other comments and say what fine job you've done! Good onya Mate. Rowan D.
-
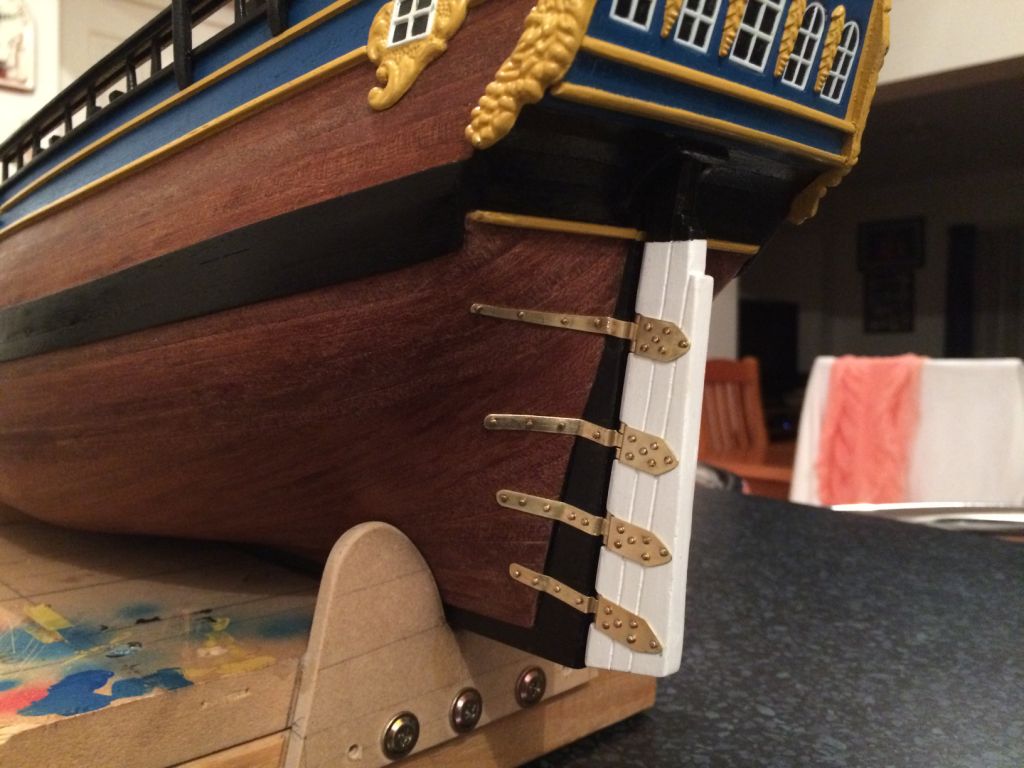
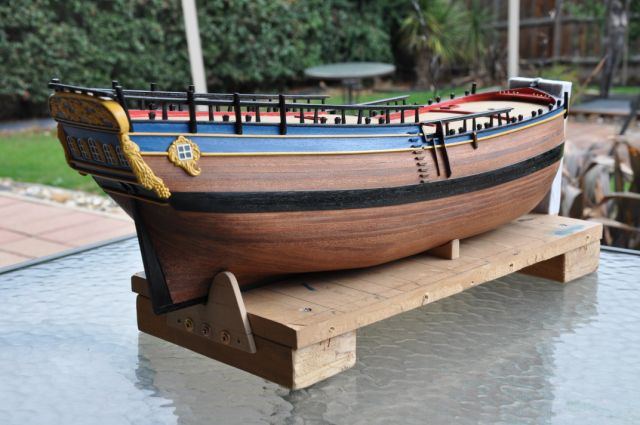
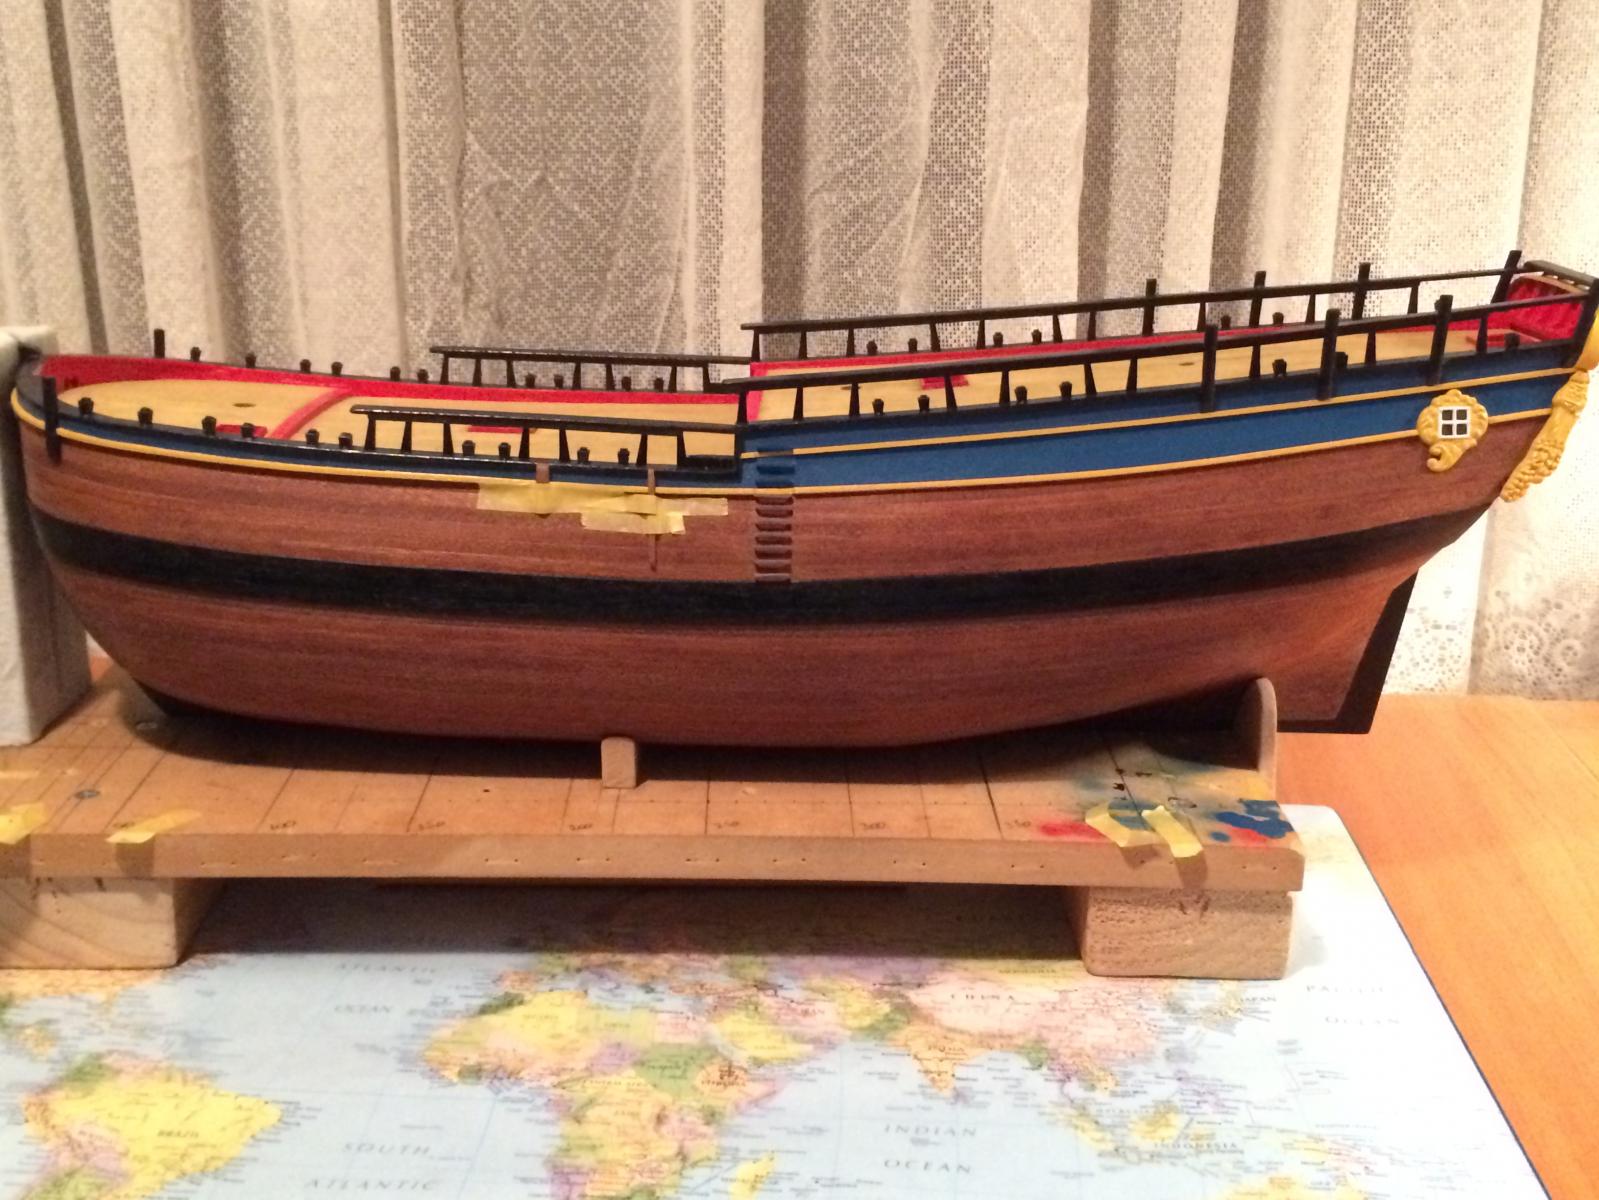
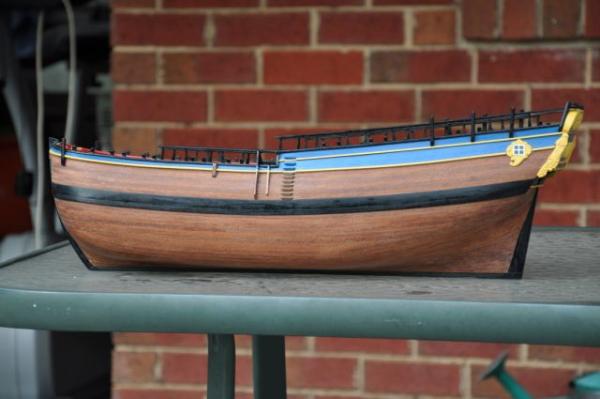
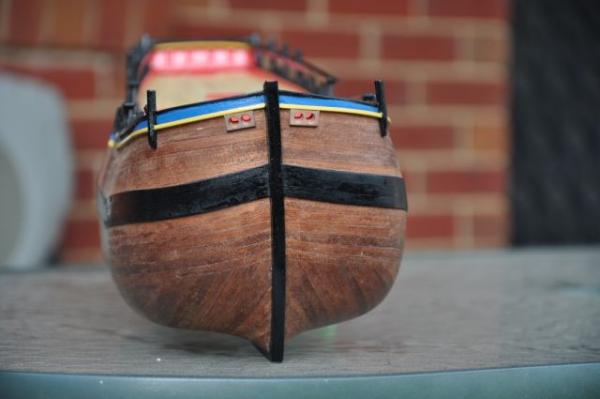
Hi All, Following on from the last couple of posts, here's some photos attached of latest progress on the model with the rudder fitted.... Have a great day, Rowan D.


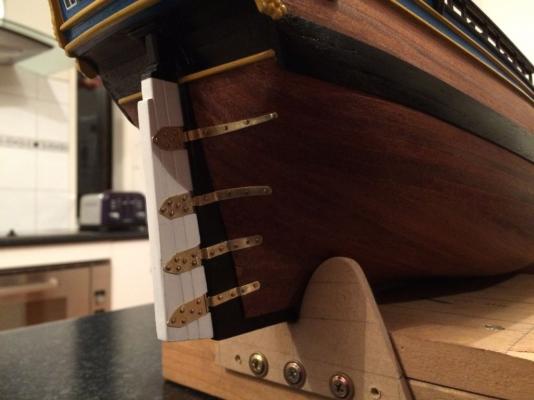
-
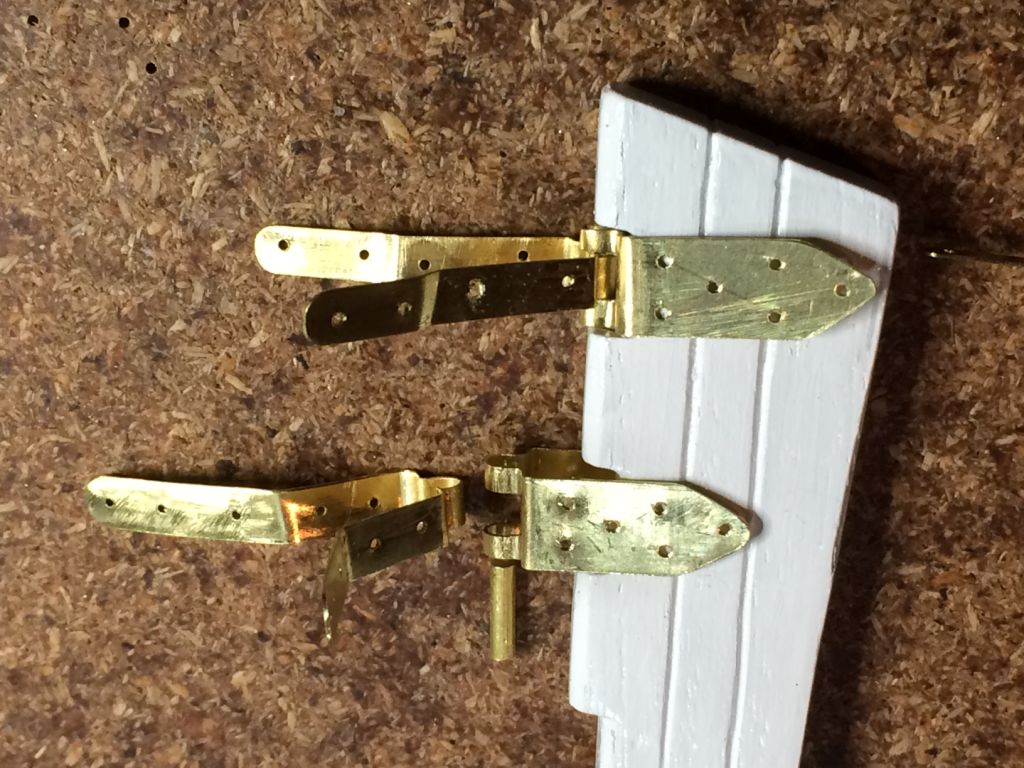
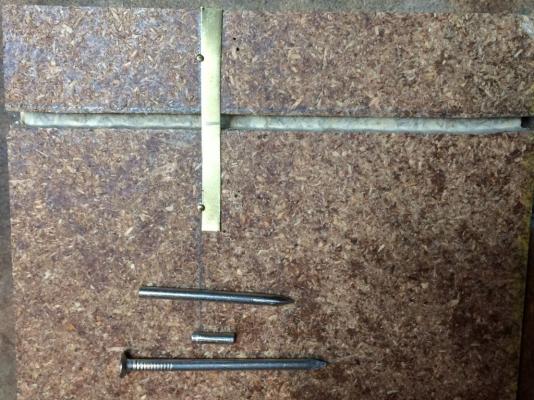
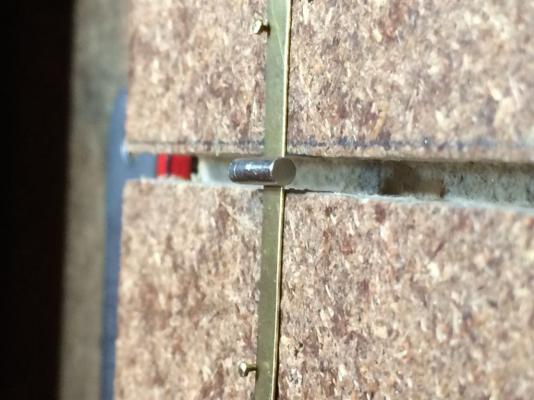
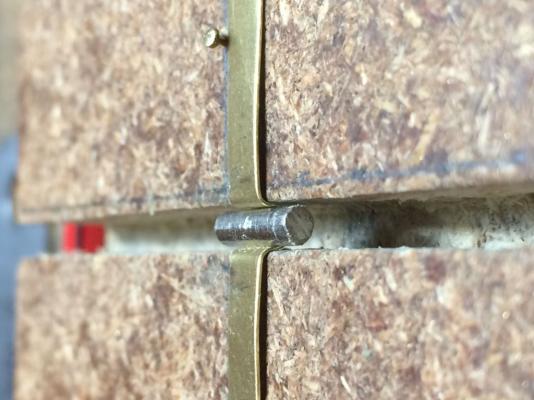
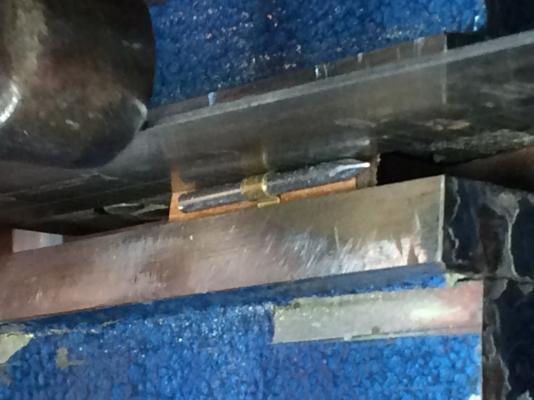
Hi Dave and All, Some photos of the rudder hinges. I "roughed" a male side of the hinge set up for the photos as I'd already made the hinge sets so it's just to show the way I did it...... It's a bit rough but I hope it's useful information. I made the hinge sets in a male & female pair for each hinge location. I used a fine file to cut the slot into the female side. The female halves are all fairly similar but the male sides are made to fit the hull contour specifically at each location. Happy modelling and have a great day. Cheers, Rowan D.


-
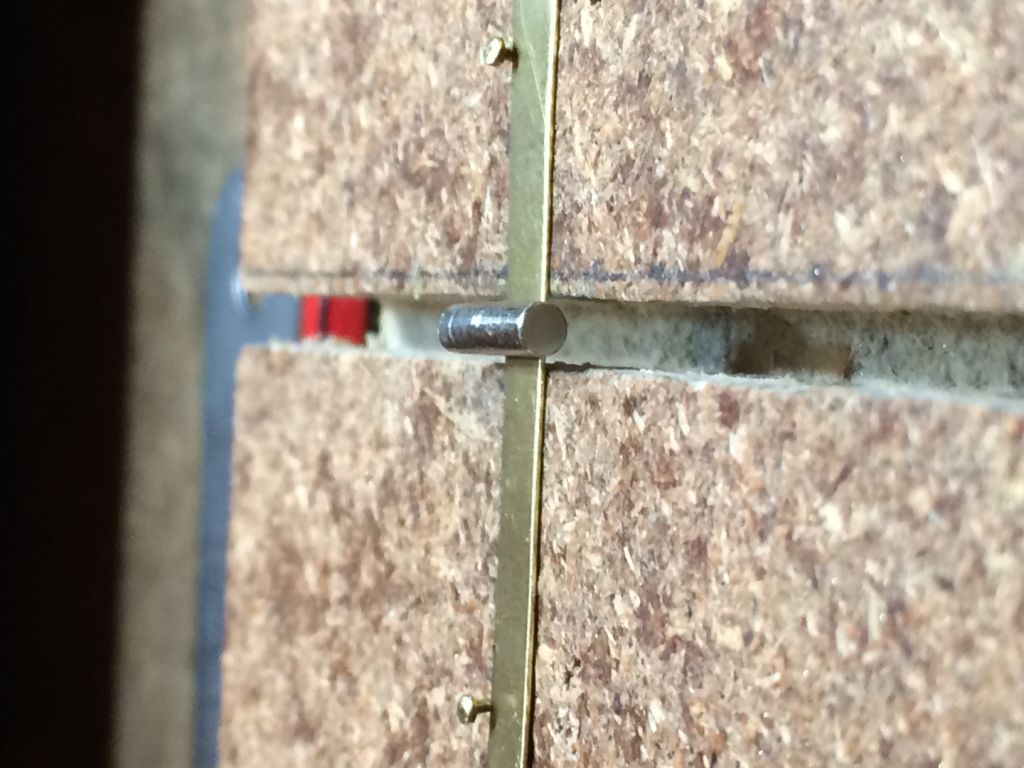
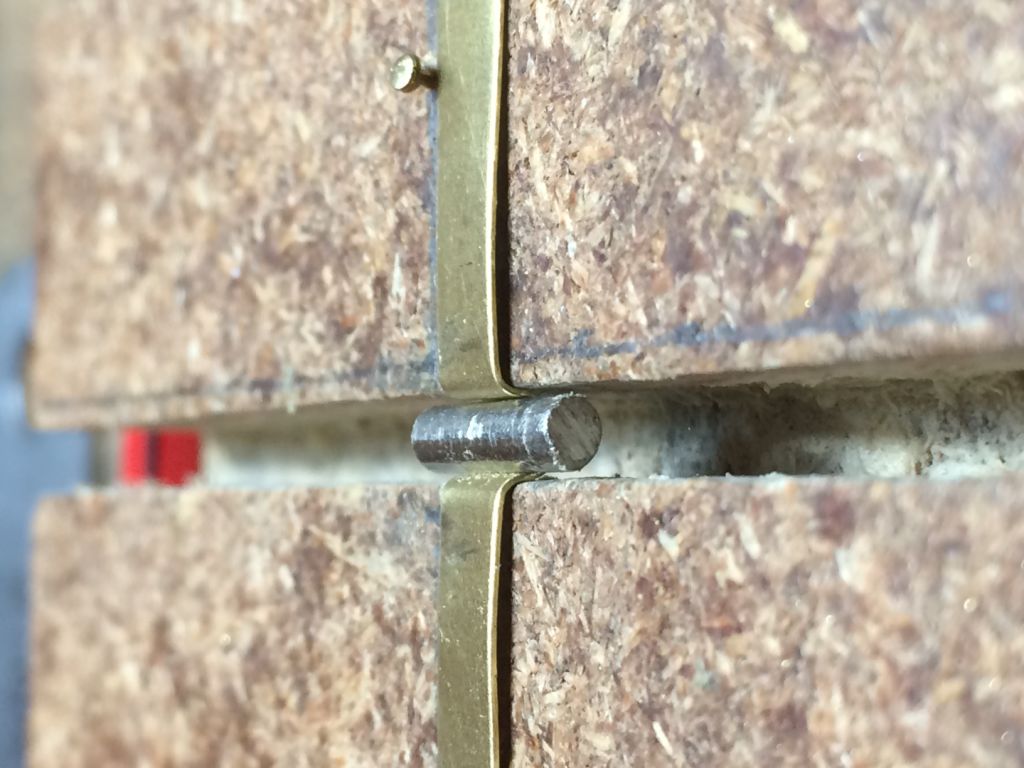
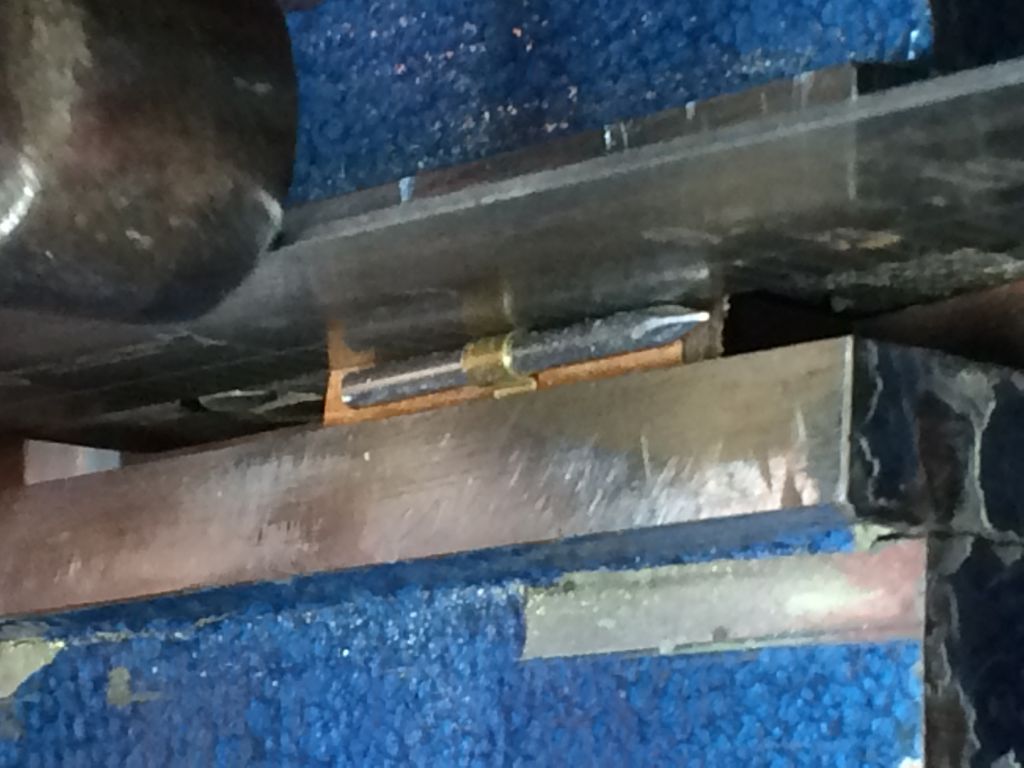
Hi Dave, I used 0.012" brass shim stock, same thickness as the kit supplied parts, using the Dremel, I routed a 3mm slot into some chipboard and used a polished 2 mm steel rod (bright steel nail cut to suit). I cut the brass into strips of desired length and width for the hinges, set the brass strip at 90 degrees to the slot in chipboard and held it in place with some very small nails that I used as guides. I measured the halfway length of the brass strip, marked it and laid the mark dead centre over the centre-line of the slot. I used the polished steel rod (nail) and laid it over the brass strip so that it pressed down into the slot in the chipboard creating the hinge pin recess. This was all ably assisted by an aluminium drift and hammer to tap the steel rod down flush with the exposed (top) surface of the brass. I had to have a couple of goes at it but got the process right and it worked out pretty well. I finished off the shaping of the hinges to get the square edge lines of the hinge pin recess by clamping some suitable scrap timber inside the hinge and holding the hinge in the vice with the steel rod in the hinge pin recess, using a steel straight edge and light taps of the hammer, tapped down each side of the outer edge along the hinge pin recess to give a better (tighter) curve of the hinge pin recess. I'll post a couple of pics up for you. I hope that all makes sense.... Have a good one, Cheers, Rowan D.
-
Hello All, I hope all your modeling projects are going according to plan and coming along nicely. A quick update. I didn't like the rudder hinges supplied in the AL kit and thought that in some respects, they lacked detail and didn't match the vessel, so after a couple of months thinking this over a lot of time procrastinating, I decided to make my own hinges. Easier said than done, but not a difficult job. I bought some brass shim stock from an engineering supplies shop nearby, made a jig to press the hinge pin recess into the hinge and then shaped the hinges and drilled the attachment holes. I'm about ready to fit the hinges to the rudder now and install it onto the hull. No drum roll, please...... Depending on time, I might manage to get this done in the next evening or two and post some before and after photos. Happy modeling and I'll update again soon, Cheers, Rowan D.
-
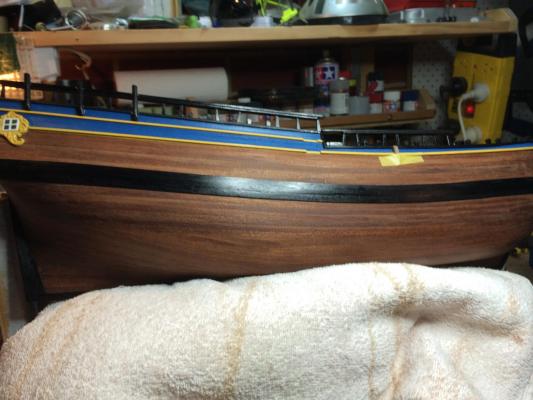
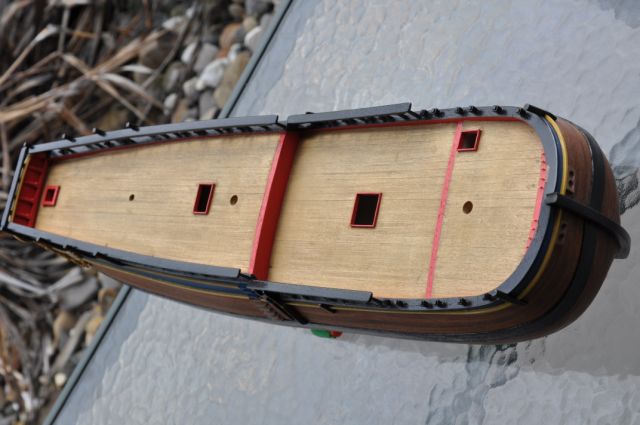
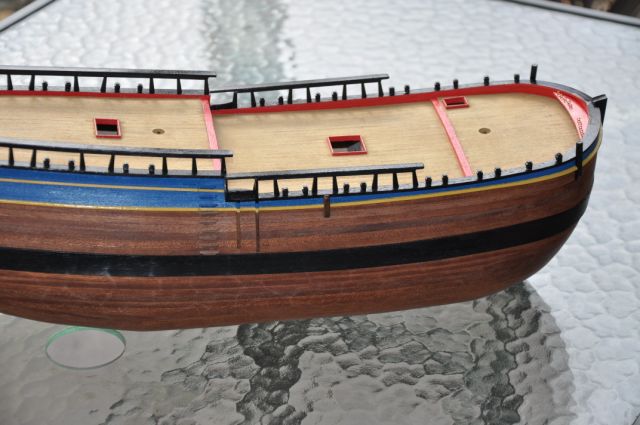
Hi All, Thank you for your kind words and encouragement. I've attached some photos of the latest progress of the model at the completion of Stage 39, hull fittings and ladders. The ladders took quite a lot of time and I'm pretty glad that part is done now. Again, I found the instructions and information lacking a little and after quite a lot of thought, I reduced the height of the ladder rungs by 0.5 mm to make them look more in scale with the model. It was a bit of a test to try and do that in a uniform manner and modified the dremmel router table with a removable fitting in order to achieve it. See what you think.... I hope all your modelling is going to plan, Cheers, Rowan D.


-
Hi Sjors/Dave, Thanks for the kind words, I have to keep the dust to minimum otherwise the Admiral will have something to say about it and we don't want that, do we? I'm hopeful of getting some more done this weekend and posting some decent photos shortly, anyway fingers crossed..... Happy modeling, Rowan D.
-
G'day Dave, I'm impressed by the amount of work you're putting into the build, it's going to be awesome, Mate!! Have a good one, Cheers, Rowan D.
-
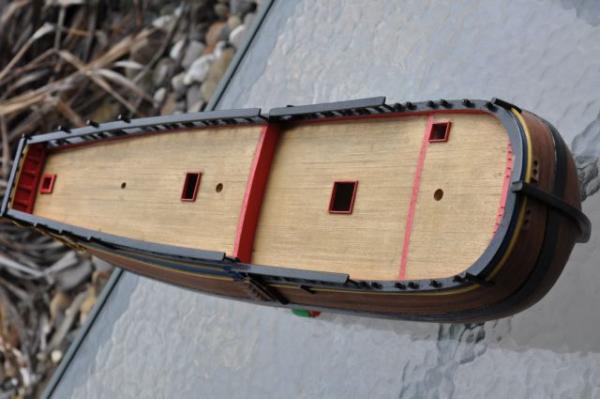
Hello Happy Modellers, Here's a couple of photos of where I'm up to. I've installed the Port side steps and have a couple of the fittings held in place by masking tape - ostensibly so I don't lose them. I wasn't happy with the steps first time around so modified them by making them smaller than what the instructions suggested and also notched out the strakes to accommodate the steps. I hope your models are going according to plan, Cheers, Rowan D.