


Katuna
-
Posts
79 -
Joined
-
Last visited
Content Type
Profiles
Forums
Gallery
Events
Posts posted by Katuna
-
-
Why, that's almost as long as a U-Boat! So I'm guessing that when you choose a model, it's based on length?
That is going to look so cool when it's finished. Fantastic work thus far!
- Canute, popeye the sailor, mtaylor and 3 others
-
 6
6
-
Looking really good. That darker gray gives it a good amount of shading. Are you going to put a light wash on it to bring the details out? I know you weren't going to weather it much.
-
Sorry to anyone that has been following this build. I have been derelict in my duties as a builder as I have not had the time to sit down at the bench since the beginning of Dec.
After staring at the oil cooler that I made from Milliput, I just wasn't happy with it. It is actually slightly larger than the original. So with that, I'm going to attack it from a different angle and make a silicone mold and use liquid resin. I'm sure it will have a better outcome. As soon as I can get two minutes to myself, I'll sit down and fab it up. Stay tuned.
-
Neato! Pew pew! Wait, wrong space movie.
- thibaultron, lmagna, Canute and 2 others
-
5
-
On 1/2/2020 at 7:58 AM, yvesvidal said:
Katuna,
I thought about placing it in the Ship Model Kits section.... after all, it is a space Vessel, very comparable to a submarine. But then, I wanted to be a good citizen on this forum and not risk the wrath of the Forum police.
In the meantime, I count on you for picking up the pace on the Trumpeter Submarine build and keeping our audience entertained with underwater topics..... 😉
Yves
Jeez buddy, thanks for the added pressure! Just kidding you. Now that the holidays are over, I'm hoping to jump back on it. I have someone on another forum that is going to laser cut a bunch of round flanges for me so I can start on the piping in earnest. I shall endeavor to pick up the torch and carry it proudly, if not slowly : )
- Canute, lmagna, popeye the sailor and 2 others
-
5
-
A tube in a tube in a tube. That should be hell for stout.
Wait, I just realized this is still on MSW. Does a "space ship" constitute a ship? Curious minds want to know.
(Yes, I know it's in the non-ship section!)
-
yves - Great choice for your "side project"! Quite the departure from your other build. Looking forward to watching this one go together. Other than the repetition, it should go together fairly quickly.
Would you be better off with a single, solid rod? you could still add the center tube to help keep it from sagging in the center. How long of a span is it?
- popeye the sailor, Canute, mtaylor and 1 other
-
4
-
The engine compartment looks fantastic. I'm amazed that, at the pace you have been going that it took you this long to hit the wall. On a project this size you need side projects to break up the monotony of the same thing over and over.
Definitely throw us a link to your other endeavors.
- TOM G, Canute, thibaultron and 5 others
-
8
-
Stop stealing my ideas! Lol! I can't build as fast as you and you keep beating me to the punch. I too have all the original Plates downloaded as well as the translated versions. How were you able to shrink them down so small and still retain some of the detail?
It's those little details that most people will never see that add the most. Keep up the terrific work.
- popeye the sailor, amateur, lmagna and 6 others
-
9
-
That came out really cool. I'm jealous! To the best of my knowledge, the pistons were paired so that two "fired" at the same time. They were 120 deg apart. I'll go check but I think 1-6, 2-5 and 3-4 were paired. Just in case you were dropping pistons in.
-
-
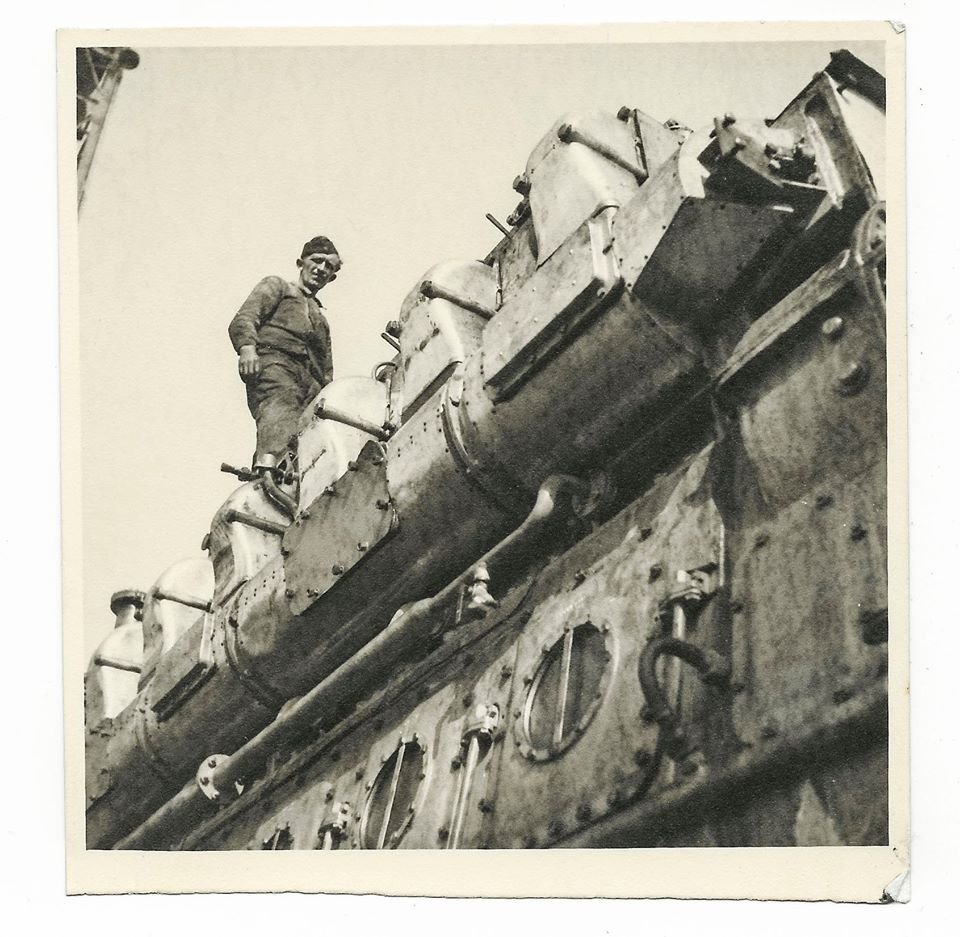
Yes, it's the Hachette kit by David. Mind blowing detail but as you said, it's only the engine room. I only posted the pic for the shaft bulkhead flange since the Stbd side will be highly visible. You'll barely be able to see the Port side.
-
For the ultimate in prototypical perfection you could hop on a plane to Laboe, visit U-995 and ask to crawl around under the deck plates in the engine room. I'm sure you could come up with a few tablespoons worth of old oil. Top that one, rivet counters!
-
"Then the bolt counters will be able to discuss weather it smells correct⚔️" Haha, I wouldn't doubt it! There's always someone living in their mothers basement that know better than anyone else.
-
I case you want to get a little more specific on the output shaft bulkhead flange, here's a pic from a German modeler on a different kit but in the same scale.
-
yves - Maybe you're seen this before but SkipperTed did a great job using the Abteilung 502 Engine Grease. It's so hard to get a convincing damp, oily machinery look but I think this method really gets it. It's an oil so it's hands off for a week while it dries but you can go back and manipulate it for a couple days after you lay it down.
-
-
Blue Pilot - Thank you very much! The support That I am receiving from this community is great. I consider my ability average at best. There are some builders that just blow your mind with the level of detail of this kit. I won't mention names because I don't want anyone looking at there builds, realizing I'm just a hack ; )
Way back in the early 80's I started on my AP license but sadly I had to walk away. Always wondered where that may have taken me. Just like this build, I've always like different. Everyone in the class ha a Continental to rebuild. I picked the Lycoming. I like a challenge. I may not succeed, but I like it anyway.
-
Haha, sorry about that! Too good not to post. One thing I really took away from the pics was the shape of the oil "pan" on the bottom. Granted, you would never see it on the Port side so I don't fault Trumpeter on that one. However, it's very apparent on the Stbd side.
I see you added the valve handles on the top of the engine. Those are missing from the kit, correct? It's been a while since I've even looked that direction.
I was really intrigued by the way that SkipperTed weathered his engine using the Abteilung 502 Engine Grime oil paint. Really looked convincing.
- Canute, CapnMac82, thibaultron and 3 others
-
6
-
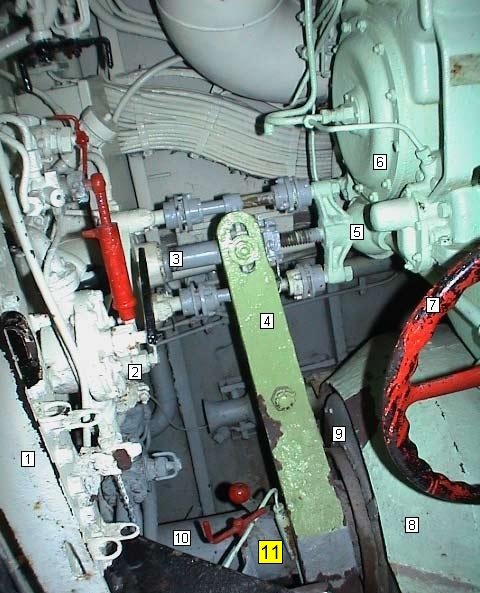
yves - Have you seen the rest of the set of photos of the engine being loaded into the engine compartment? Someone posted them on the AMP site. They would be very helpful for you in detailing the outboard side of your Stbd. engine. Lots of close up shots.
If you don't have them let me know and I'll resize them and post them here.
- popeye the sailor, mtaylor, lmagna and 4 others
-
7
-
yves - You're absolutely correct. So many parts a are just half-hearted attempts but then there' sprue after sprue of delicate tubes and pipes. But, like I said before, that's what makes it fun. To put your own level of detail into it. Even straight out of the box, if you only added some additional piping and opened the main deck slats & drain holes, you would have a fantastic model.
Oh yeah, and get rid of the damned clear hull pieces! Just mold it in styrene with the sides cut out. Grrr.
Ok, officially no more griping. I don't to be a Negative Nancy. Just think happy thoughts when I sit down at the desk. : )
-
-
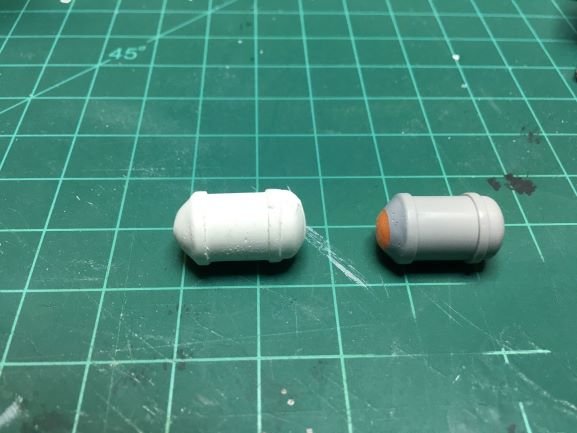
I think next time I'll try using silicone caulk with liquid resin. While it takes a bit longer, I think in the end the results will be much more satisfactory. I'm going to have to make a bunch of compressed air tanks eventually. They're all over the boat, even outside the pressure hull.
If anyone has suggestions, I'm open to them.
-
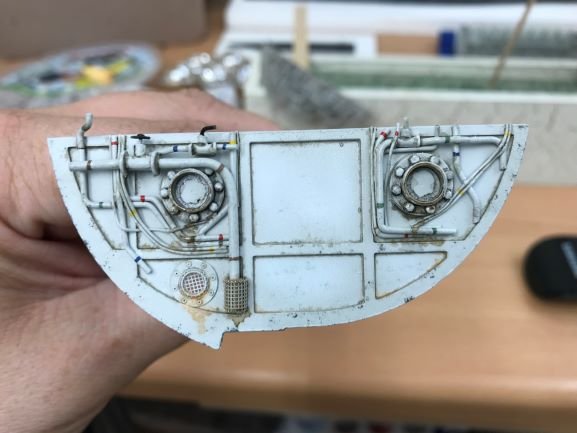
One other little thing I attempted over the weekend was to make a copy of the engine oil sump. There is only one in the kit so the near side doesn't have one. Using Blue Stuff and Miliput I tried to get a decent replica. However, the second of three attempts was the only one salvageable. I kept having an issue with core shift so the two halves were not lining up properly. The one shown below has been partially cleaned up and I can make it work. Much like the home made ribs, it will go on the Port side where, once all the piping is added, it should be unnoticeable. I still need to get it straight and fill all the dents and bubbles with Mr. Surfacer.
I still need to finish cleaning up the original. They didn't even put a bottom on it. I swear, some parts of this kit border on "toy like".
- cog, GrandpaPhil, Canute and 3 others
-
6
Moebius 2001 XD-1 DISCOVERY - Polystyrene - 1/144 - Yves Vidal - Finished
in Non-ship/categorised builds
Posted
Dubz - Ooh, that's real purdy! Always wanted to build an Eagle. That may just push me into it. Can't wait to see what the aftermarket comes up with to enhance it.