HOLIDAY DONATION DRIVE - SUPPORT MSW - DO YOUR PART TO KEEP THIS GREAT FORUM GOING! (Only 13 donations so far - C'mon guys!)
×


Tarjack
-
Posts
153 -
Joined
-
Last visited
Content Type
Profiles
Forums
Gallery
Events
Everything posted by Tarjack
-
 Hi Scott, look´s very good. I like it
 -
Hello to all I'm sorry, but I can not show the construction of the inlaid. When I did this job, I did not think it would be interesting to others. *shameonme* You have to remember, I've done the work 15 years ago. At a time, there were no or very few forums for ship modellers. And the photographing was expensive. I've done a lot of photos, but still only if a part was finished. Now looking back, it is a pity for it, but unfortunately too late to change. But I will indemnify with more pictures. I promised
-
Hi Greg, pen and ink???????........hhhhhhhrrrrrrrrrrrmmmmmmmmmmmm........... I pretend as if I have not seen now, what you've written the entire ship all visible parts are made from bone The marquetry in the floors are made of bone and ebony
-
Aye sailors, come up and see this http://www.preiserfiguren.de/showpage.php?Katalogdownload&SiteID=83 There you all find the Figures you need in every scale, painted and unpainted, have a look to the downloads This company ship´s worldwide. see ya
-
Hello David here's a little treat for the construction of the phantom. I built this model in 1985. Today it stands in the "German Museum of Technology, Berlin" About this model, I have written a book with the title: Arbeitstechniken für den Schiffsmodellbau. ISBN 3-88180-704-7 I am pleased to again and again when I see my baby being built. If you have questions about the construction, I am willing to help. Until next time


-
Deck caulking
Tarjack replied to Tarjack's topic in Building, Framing, Planking and plating a ships hull and deck
Thank you all -
Thank you all for the warm worths, too much honor for me *givemeallilikedsomuch* Have fun alltime
- 241 replies
-
- 1
-

-
- royal caroline
- yacht
- (and 1 more)
-
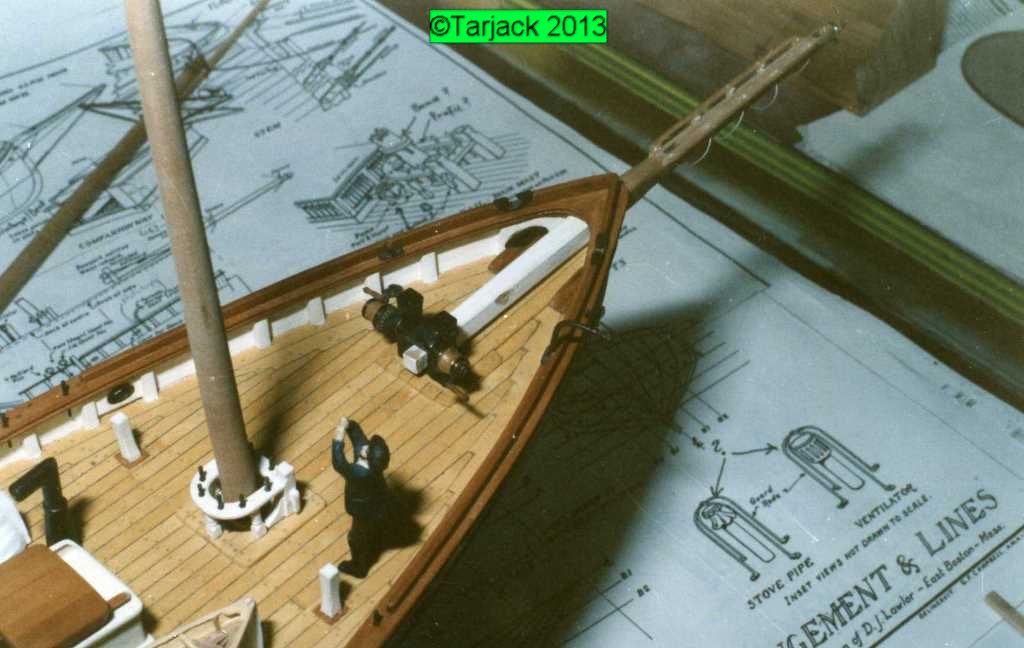
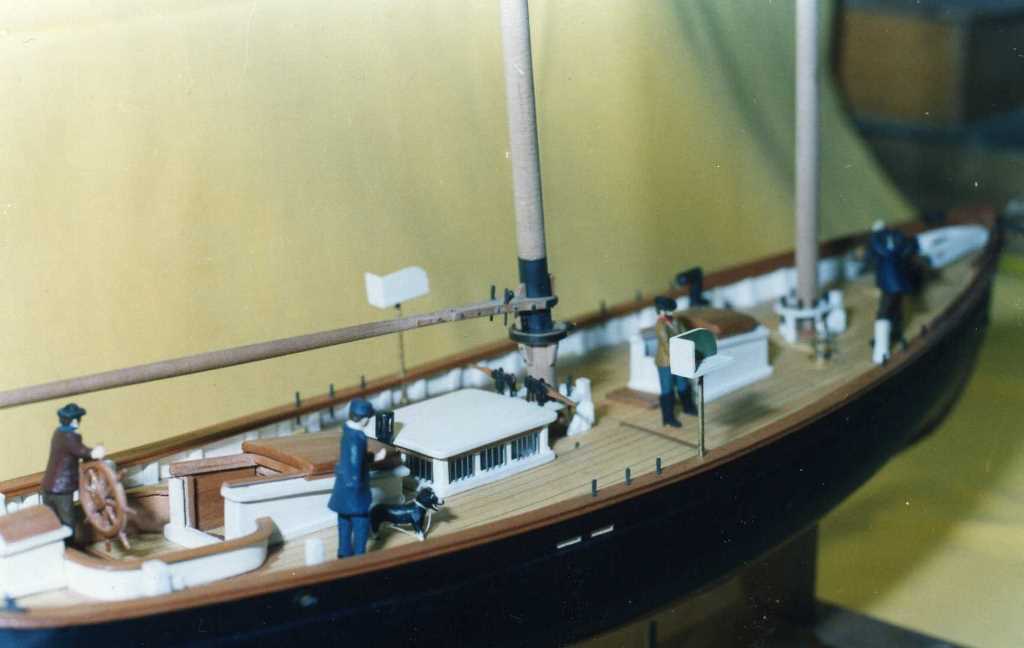
Free watch on deck After the ship was finally planked, I could attach the side pockets. Here are a few detail shots that have arisen during the progress of construction. After this work and 4 months later the pockets looks like this and five years later like this Have fun


- 241 replies
-
- 12
-
-
- royal caroline
- yacht
- (and 1 more)
-
Hallo Karl, My very greatest Respect and high esteem for this wonderful work
- 662 replies
-
- 1
-
-
- bonhomme richard
- frigate
- (and 1 more)
-
Hey people, .............. check it. This is perfect shipbuilding Cant keep my eyes from.
-
Many thanks to all. @realworkingsailor I hope the teeth have taken no harm @harvey1847 Please check the topic # 1 on there, you will find all the answer
-
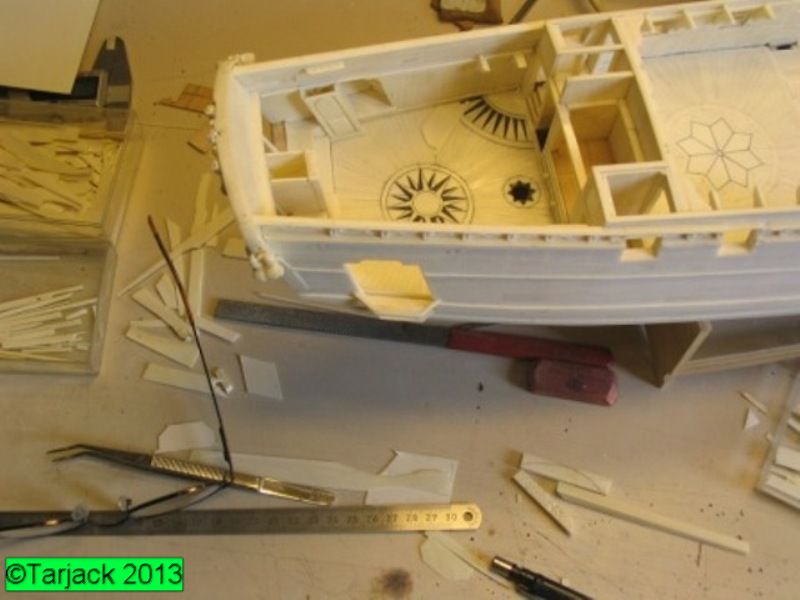
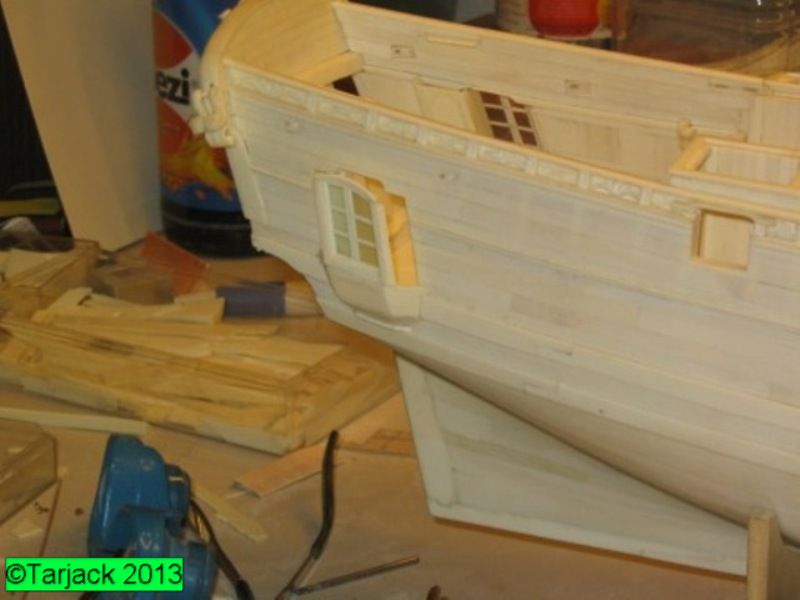
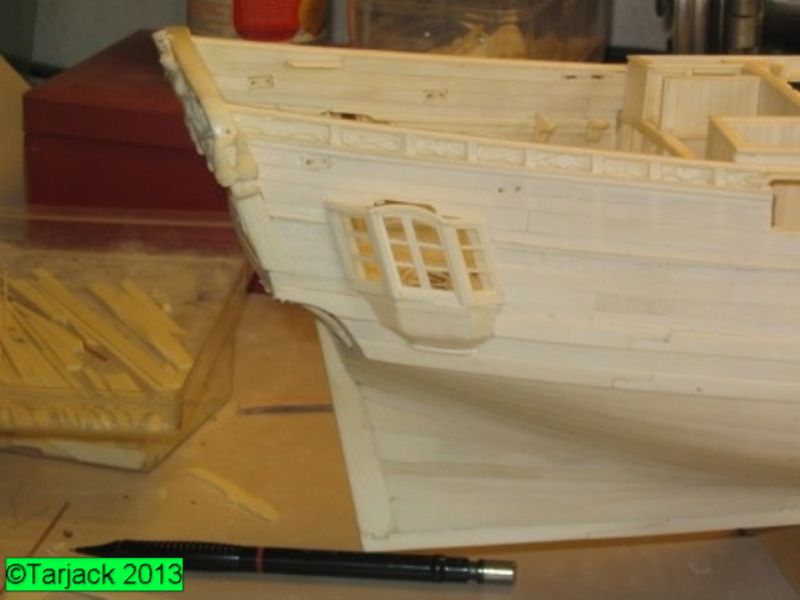
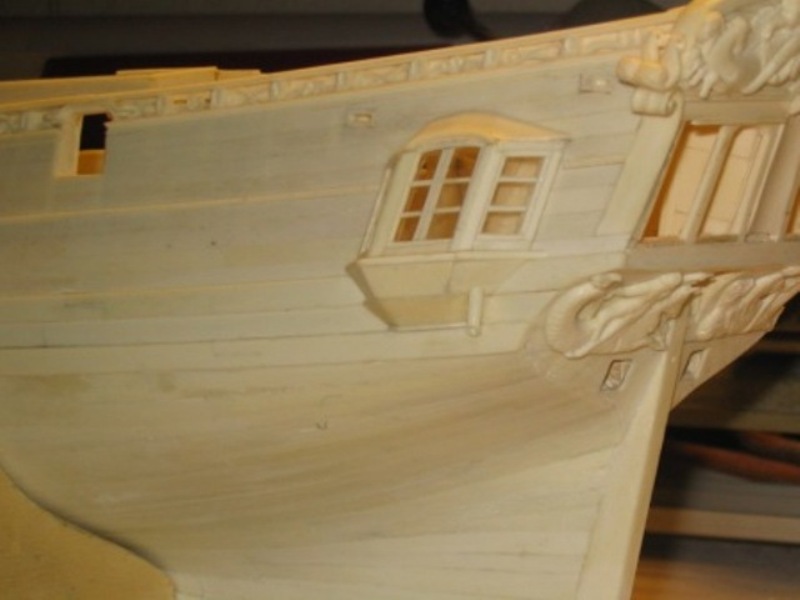
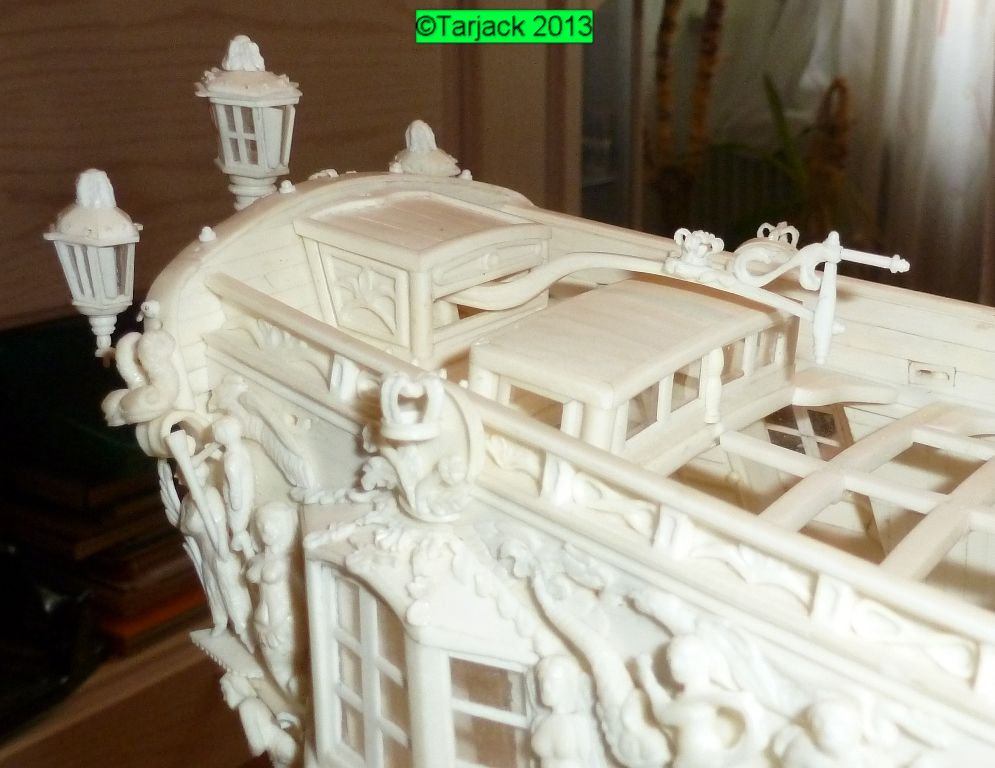
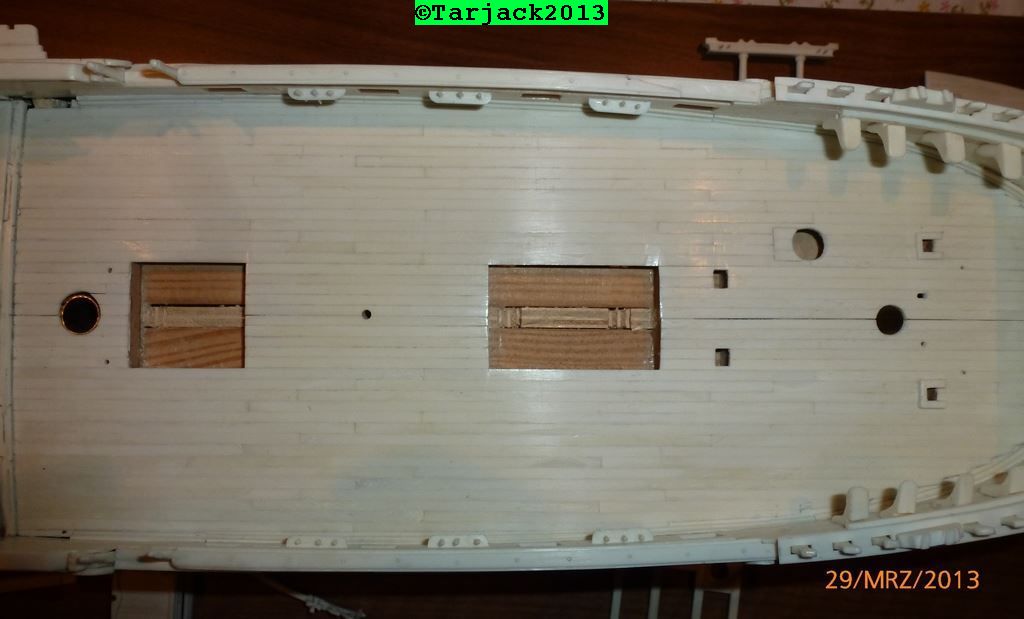
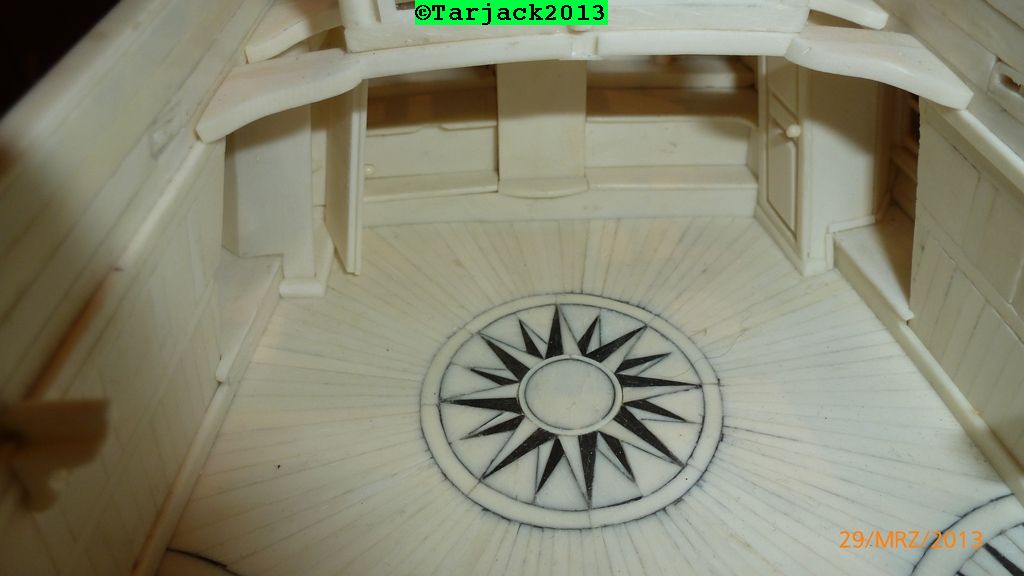
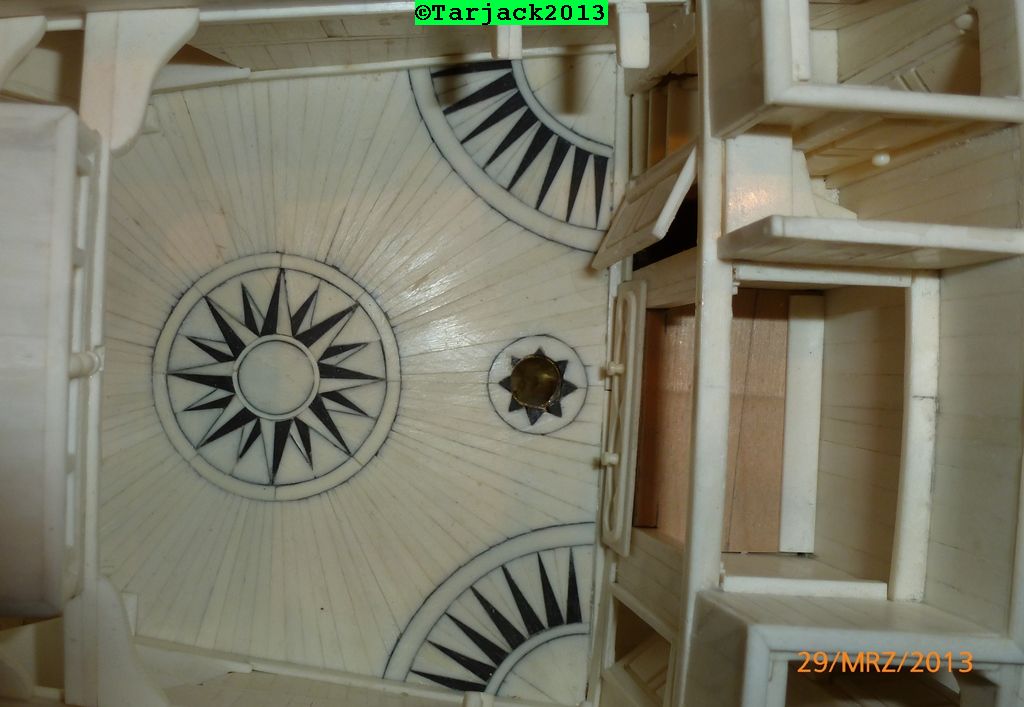
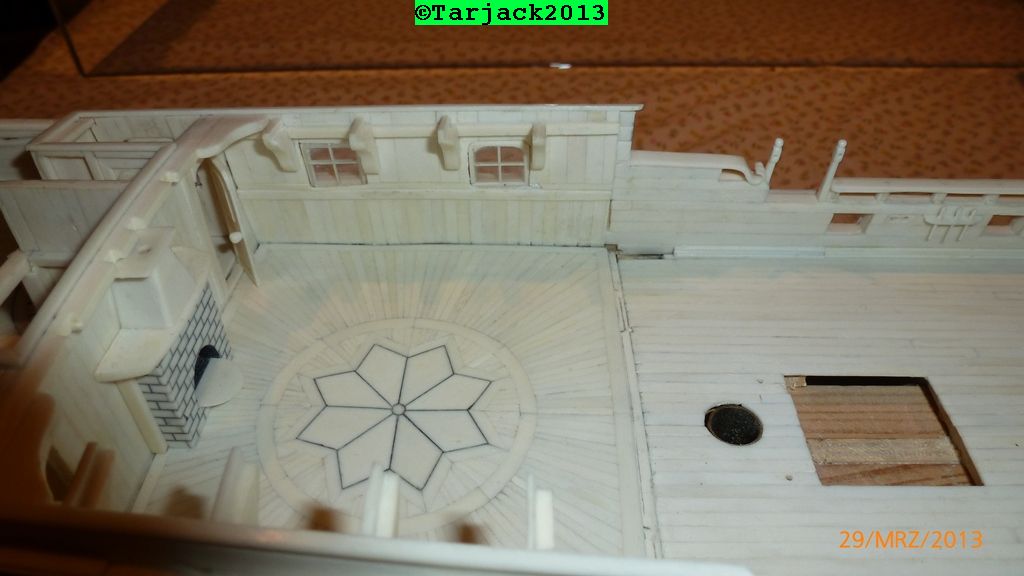
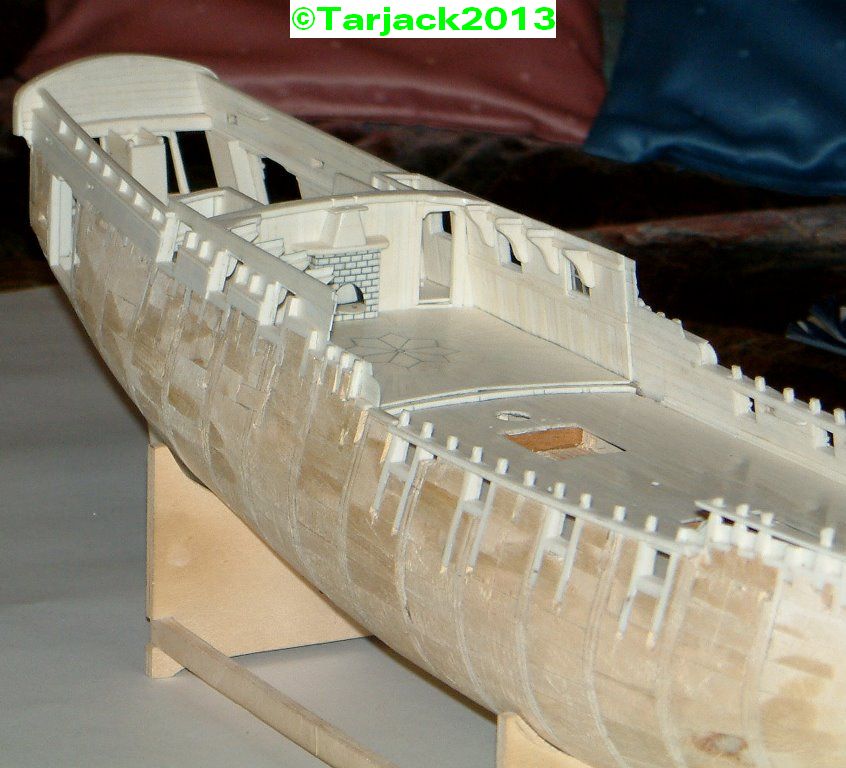
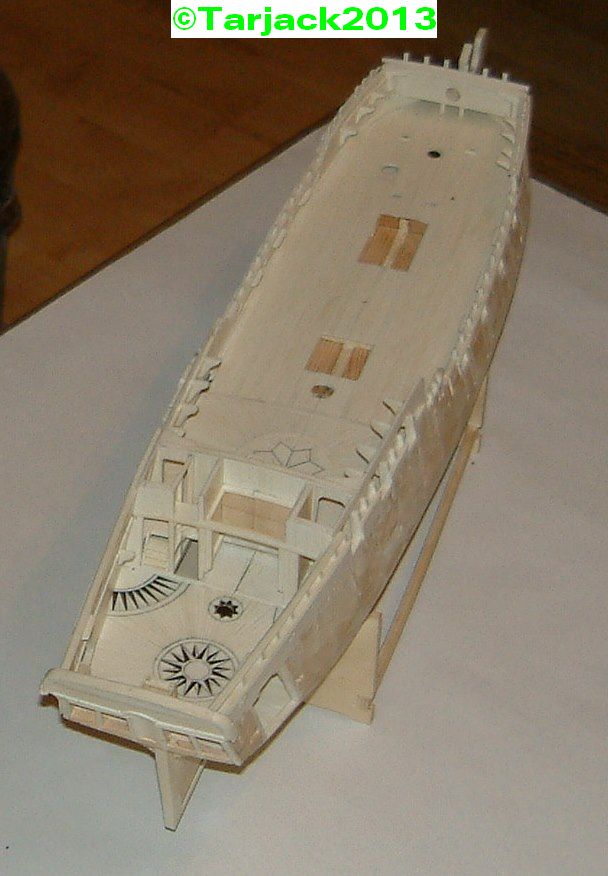
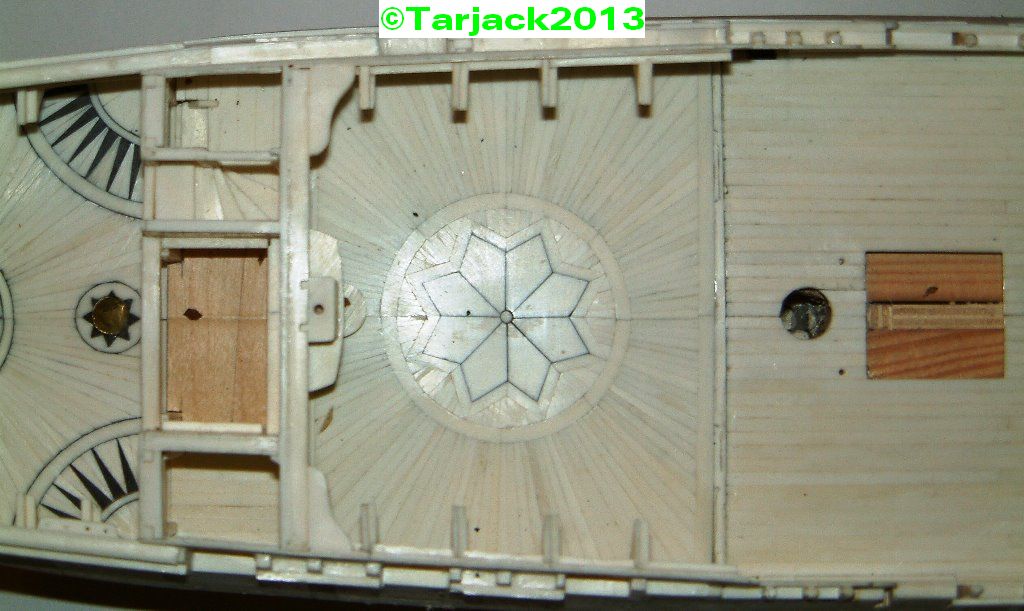
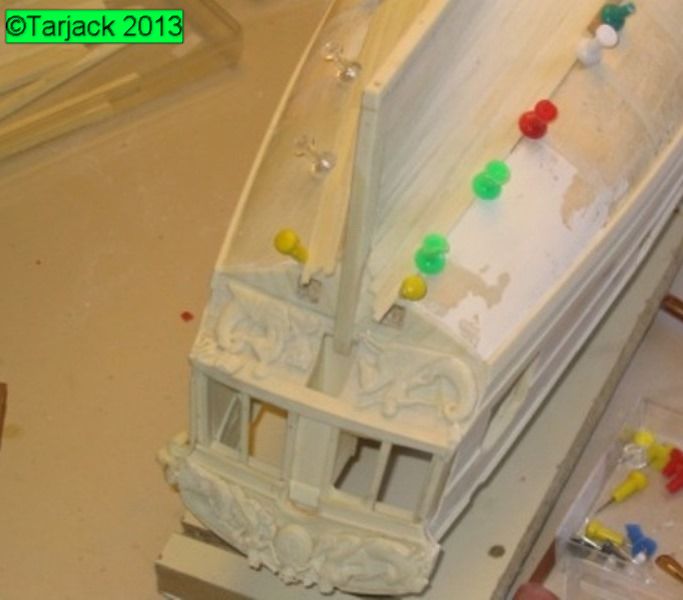
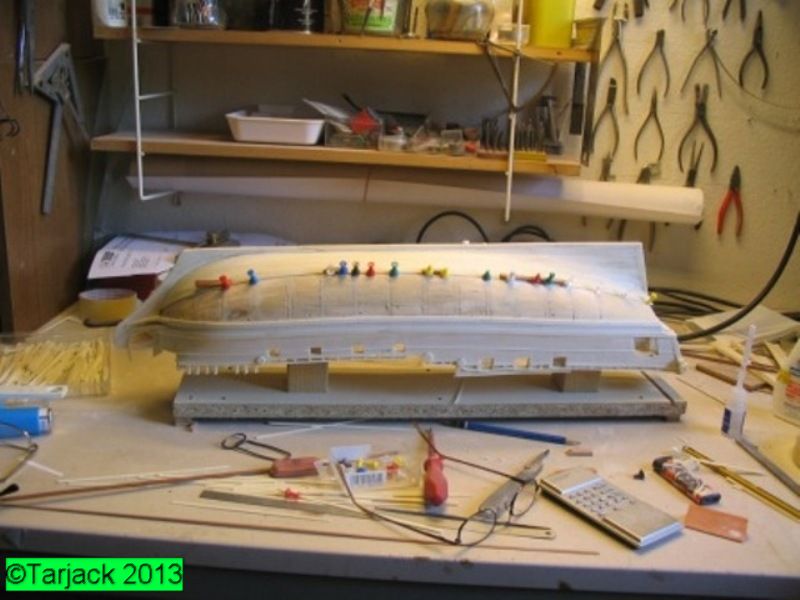
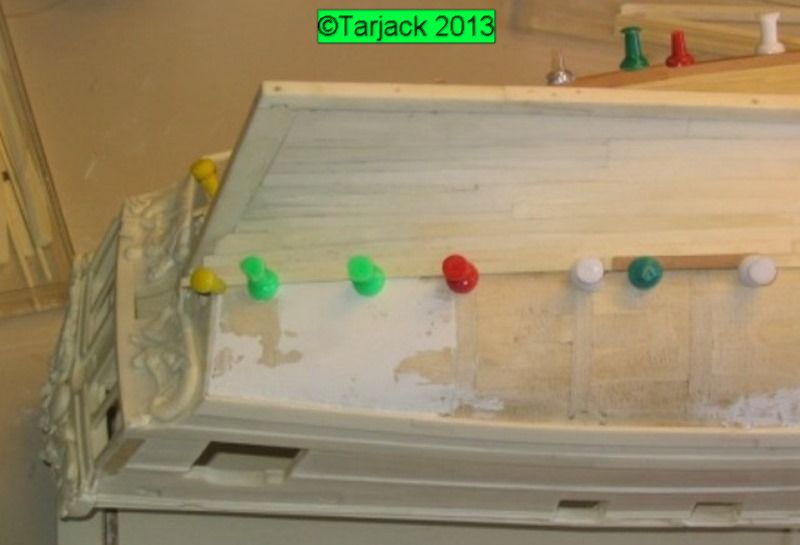
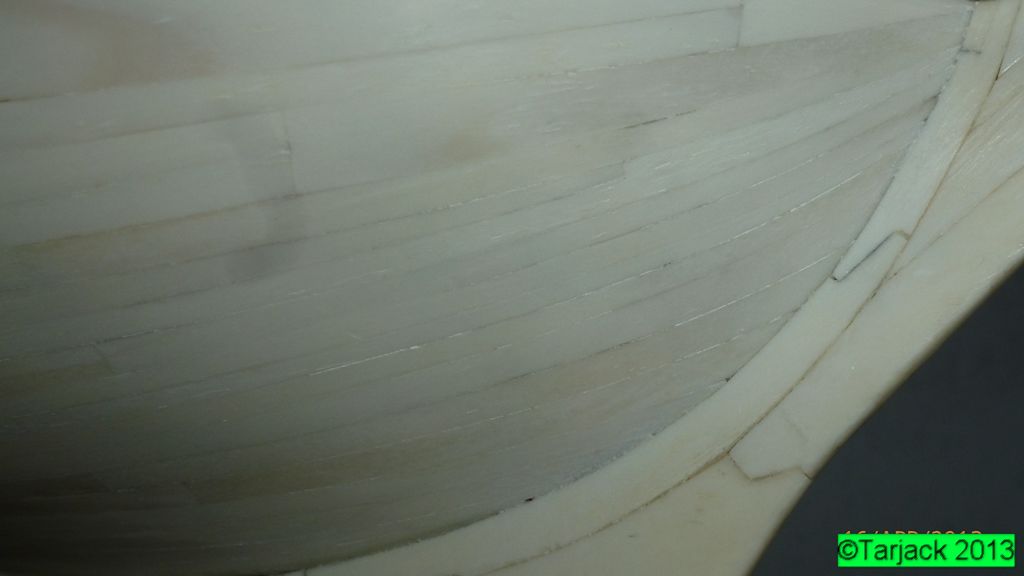
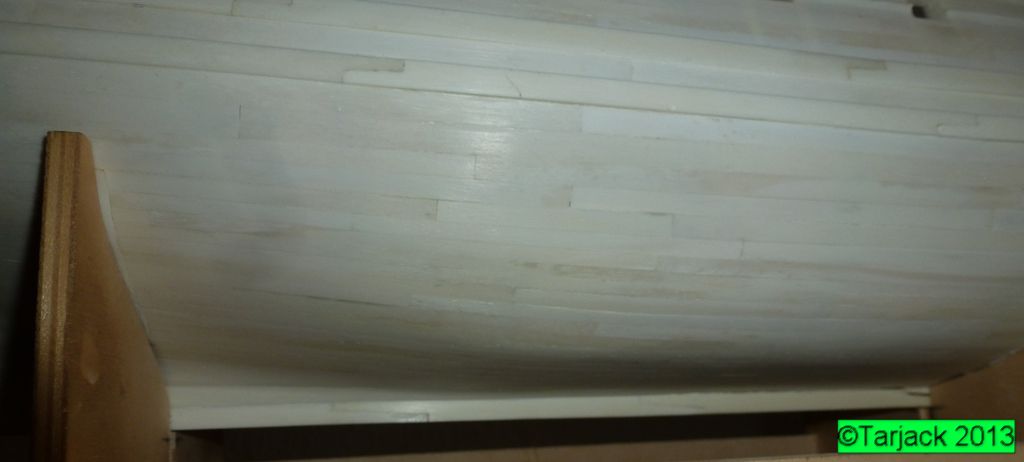
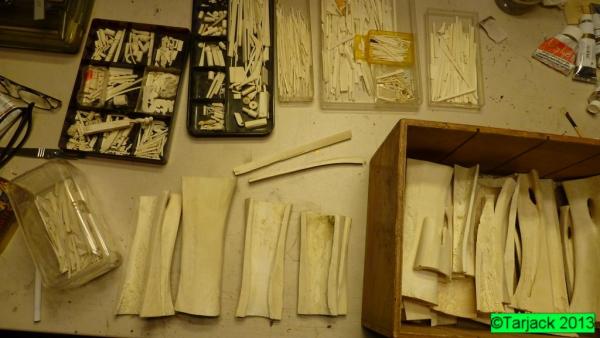
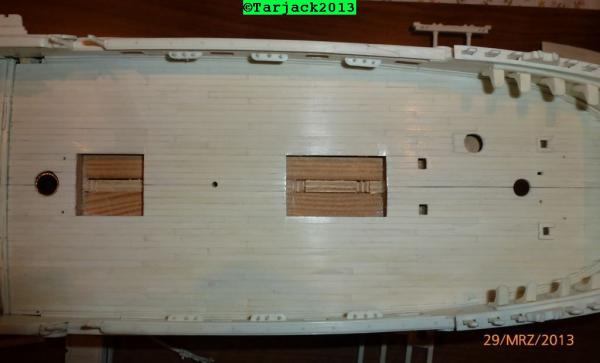
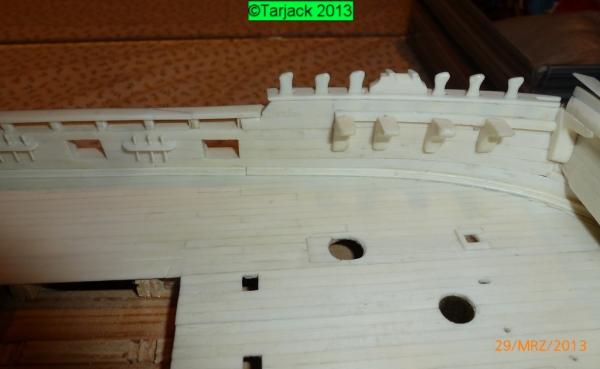
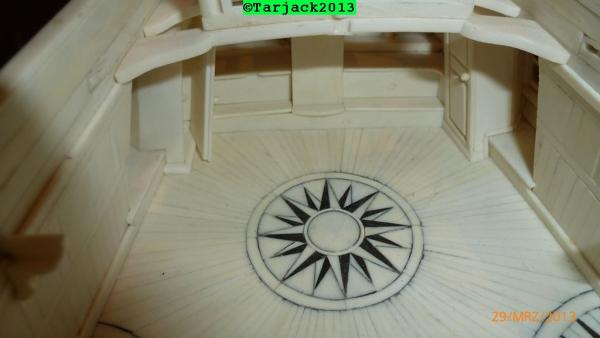
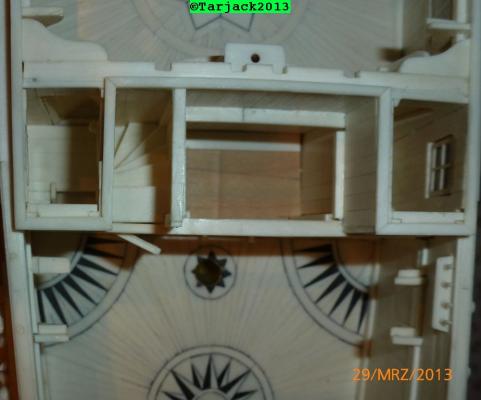
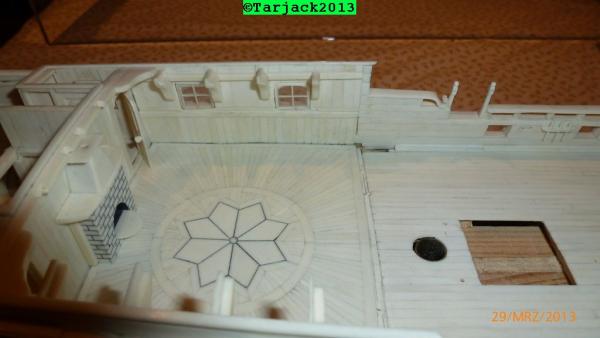
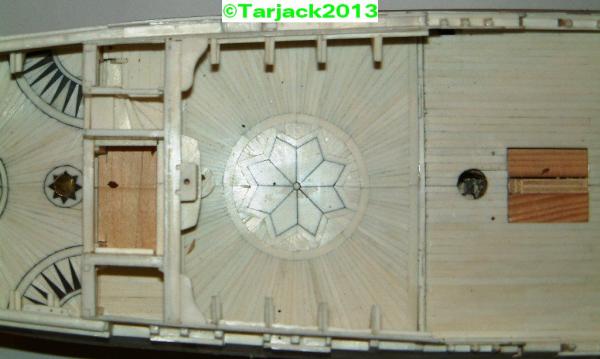
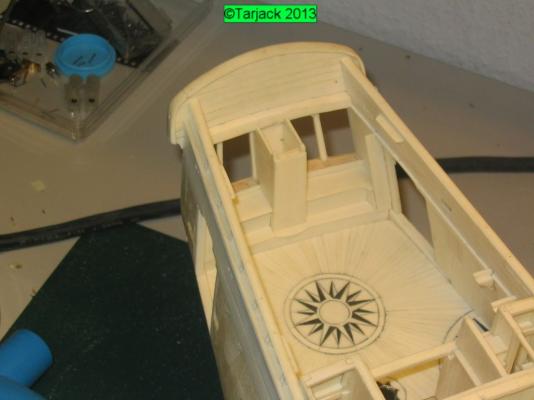
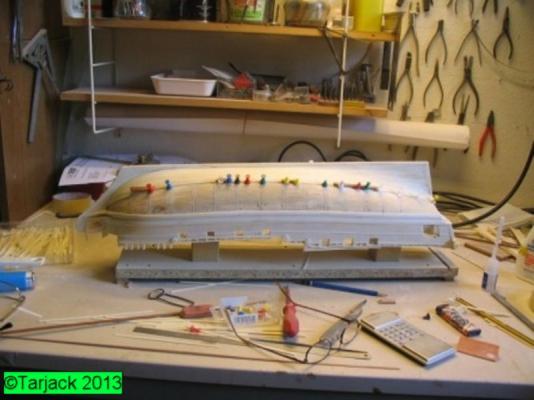
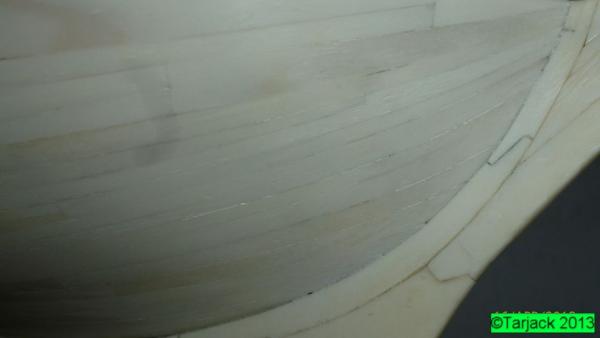
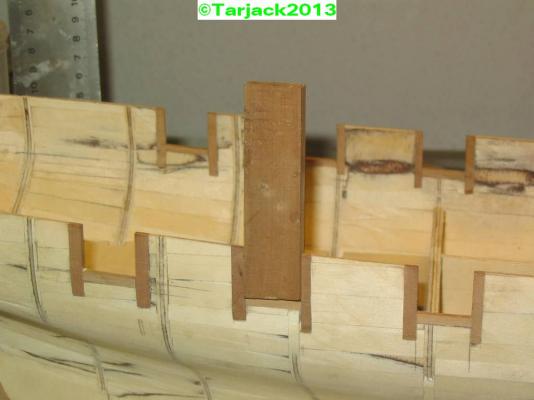
mylords and ladies, enough with wood glue, sawing and sanding ....... Bone-ahead signals the lookout. A close view of my workbench To get to the processing of the bones feeling I have made the Upper deck. So make a template from plane plywood (again wood * grmmmpf *) transferred the outline on it ;Sawing planks; (but now - from bone) ..... the sawdust was indescribable. I looked like a miller .. and also my workshop! So first all systems on standby! Extraction system built from old sucker rod and again from the beginning ......... after 2! Days. Without vacuum cleaner you should consider the bone saws. I could continue to work clean workshop after 2 days. To get an idea, just for the big deck were 15! Bone tubes processed. The usable portion of planks from a bone tube is fabulous 15 - 20% of the rest goes through the kerf and waste. Was sawn and is still a "Mödl-saw" with ordinary 2.4 hp motor; The bars on the copied template glued on top (waterproof glue). Openings for gratings; mast guides; etc. release or produce naturally. The deck is cut in half lengthwise amidships, - So the deck to fit seamlessly later- The finished deck with blank template on the plywood gluing (glue) Unless it was still quite good ... but the grind-smooth the surface-to be practiced. Luckily I had enough material to do so. The second lucky circumstance was the lively sympathy of my modeling buddies. (Augsburg and Munich modellers group) The experienced there tips and suggestions have contributed to the success of the start-up phase. The most important tool is the abrasive belt grinding of Boehler (now "Kaleas" minitool) http://www.kaleas.de//kaleas.cgi?action=show&sessionID=17508566136639363317508566〈=de&page=shop-produktliste.html&cat=32&subcat=3230&catname=Schleifen,%20Hobeln&arcode=x). The second most important "Smoothing" are glass; ... yes glass. I use a very long time after the removal of wood! the final sanding with 600 grit sandpaper, glass blades. The best glass blades obtained from slide mount. The glass in the frame can squeeze out quite easily. One can also use this laboratory glassware. Available in every medicine trade. The glass is held at an angle to the direction of pull and pulled under LIGHT pressure on the wood surface. (Practice, practice, practice, practice, and again ...... practice, practice). So that the wood surface is smooth as a babyskin And this system works amazing on bone surface! Therewith, the main question was answered: The famous smooth surface bone models. The deck in the deck cabin has received a special medallion. On the drawings in the AOTS book "Royal Yacht Caroline 1749" by Bellabarba is a highly complicated deck to see. However, the author did not mention that a carpet! is. To lay a carpet there was too profane for the model. So I incorporated a circular medallion with eight-pointed star in the center of the deck. The rest goes around the outside radiating off to the sides. The rays and the angular elements within the circle were made on the circular saw. For the rays I made a saw mask. This template is ensured that the individual strips are cut at the same angle. Thus, the interior elements are easier to see, the edges are blackened before the glue along with Plakafarbe. The curves were the first challenge in this model. (Seen after the inside., Ridiculously.) That this deck is not created in an afternoon, is obvious The deck in master cabin needed five times more time. The black elements are made of ebony. Chic ...or? The comment from my Admiralty: "will be whole model so elaborate?" Answer: No, that's nothing compared to the rest of the yet to come. Admiralty "must be?" Answer: You were such a model, so calm in the forepeak. Admiralty: "Do you want a coffee, I think it takes longer" yeah... yeah.... the very best of all wives has a humorous slant............ After the top surfaces were finished were also the side walls are covered and also the outside paneling was mounted above the mountain woods Already at that time I was absolutely overwhelmed by the bone material. One does not believe that fine tuning can be done with bones. However, any blunder is clear to see. With quasi Note arrow on the "malus operandi" as the Finn would say ... or was it the Swede? Since then helps only back to the workbench and the defective part inside the box of Memories - (at times when the hand was faster than the artisan mind). Back to the topic.


- 241 replies
-
- 9
-
-
- royal caroline
- yacht
- (and 1 more)
-
Hello boys and girls, please be patient, I'm working on the next episode of the report. (hard working for me)
-
Manufacturing of laths of an octahedral profile
Tarjack replied to Garward's topic in Modeling tools and Workshop Equipment
очень хорошо very nice idea, why i do not have it?? -
Echo by Maury S - FINISHED - Cross-Section
Tarjack replied to Maury S's topic in - Build logs for subjects built 1751 - 1800
hello greg, for limber chain see this: http://dictionary.die.net/limber%20chain regards -
Hi Greg, he is 14 years old and named Pauli and yes he is hand raised
-
Hi John, looks fine. I liked very well
-
Echo by Maury S - FINISHED - Cross-Section
Tarjack replied to Maury S's topic in - Build logs for subjects built 1751 - 1800
Hi Greg, Yes I have. But I have to look for the drawing. I show the picture as soon as I got it Be patient -
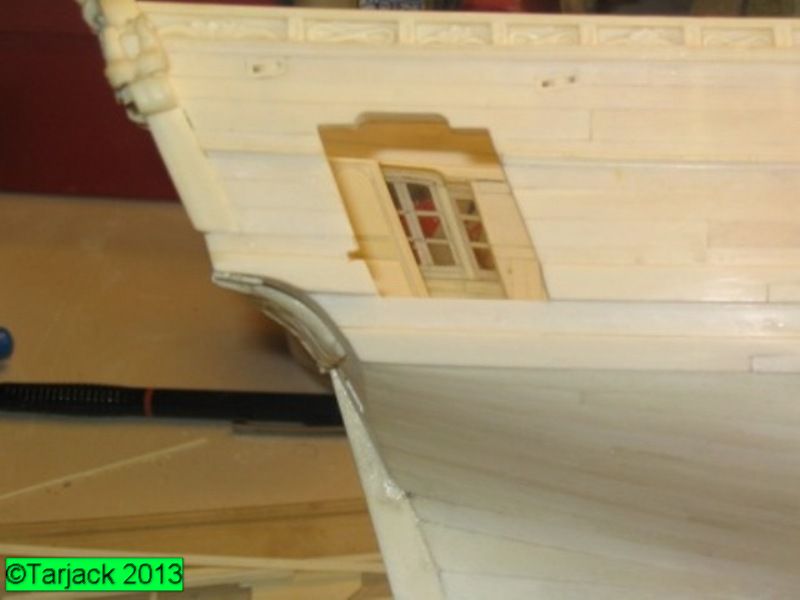
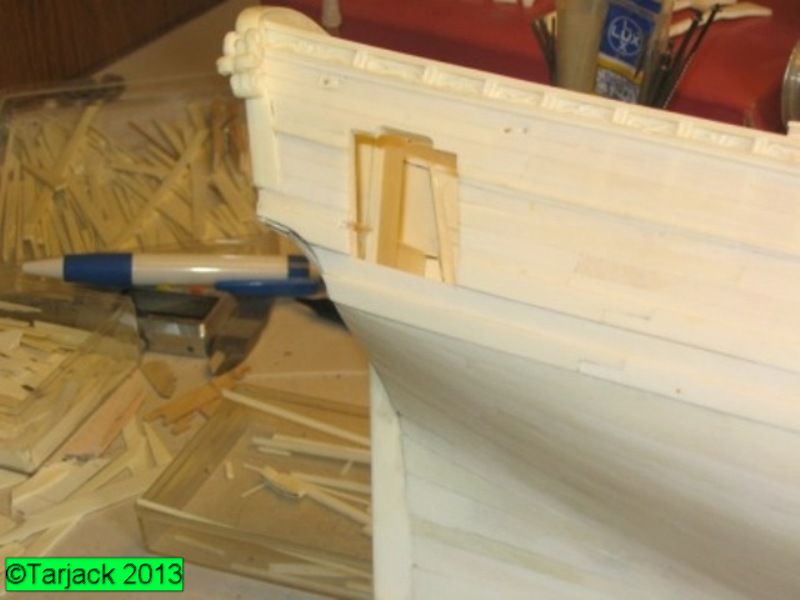
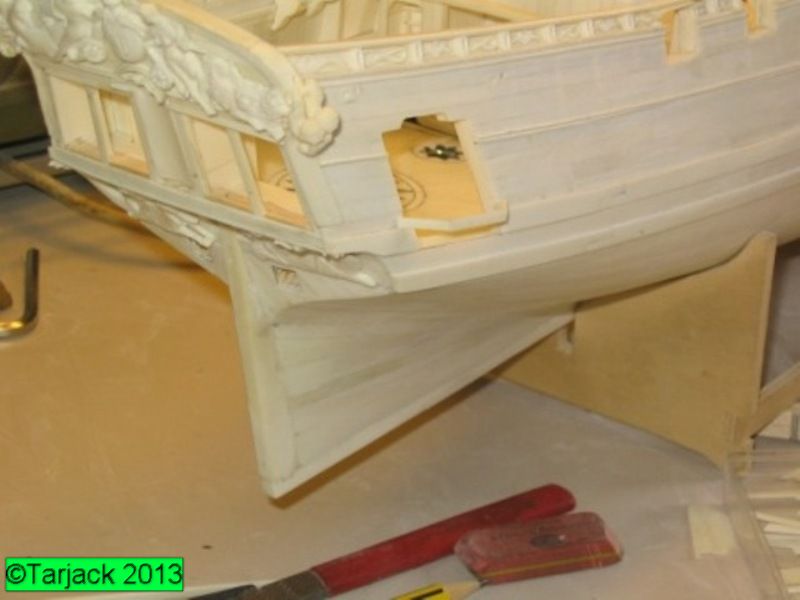
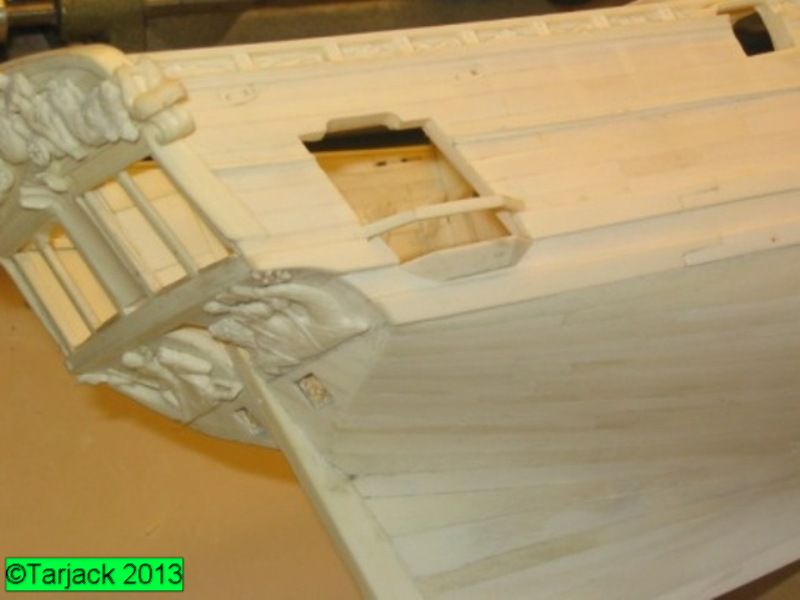
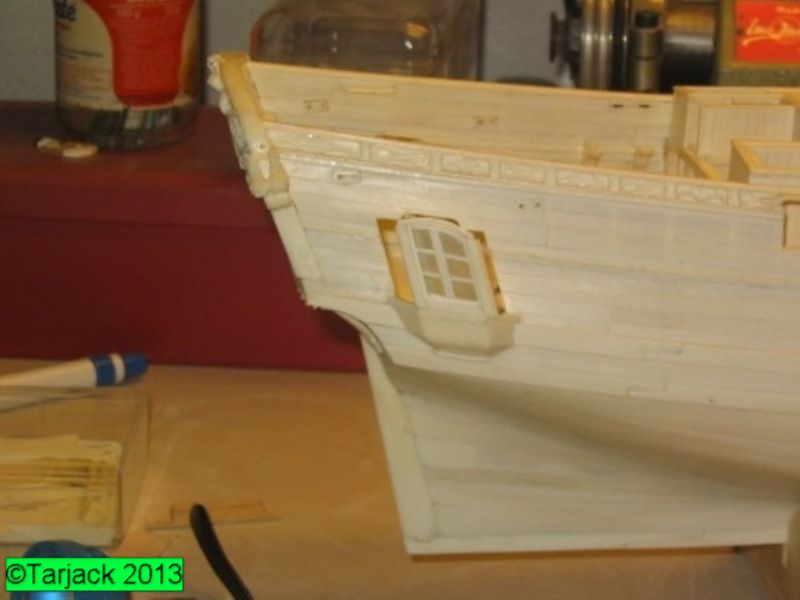
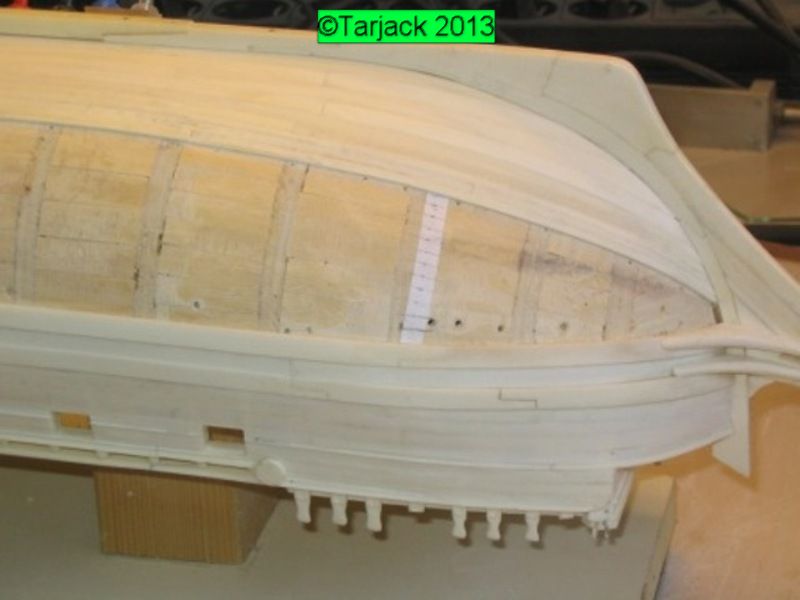
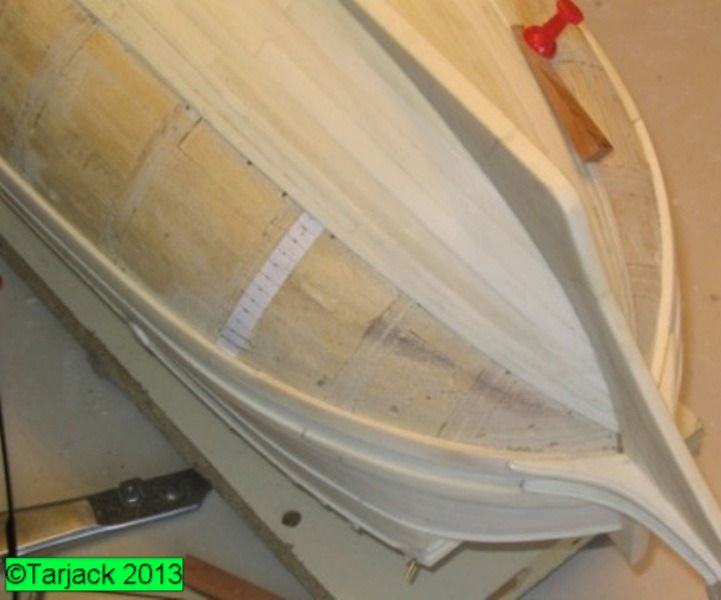
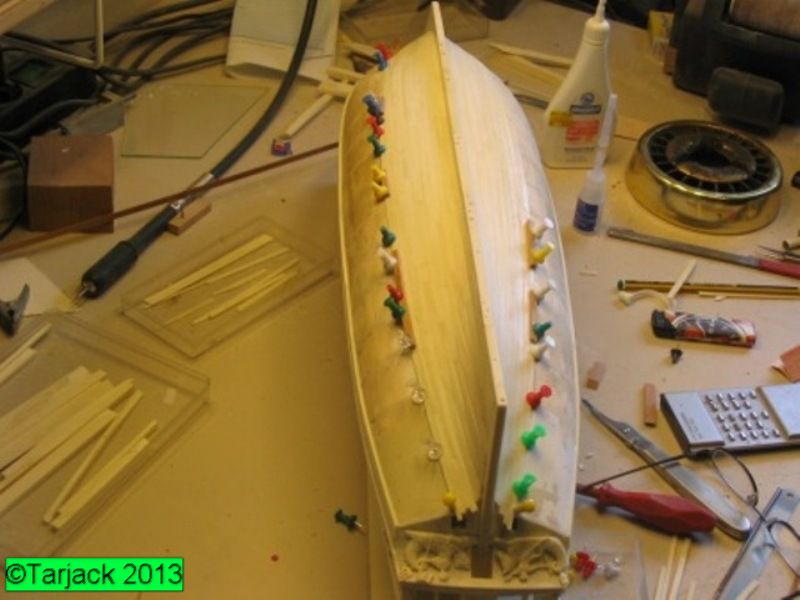
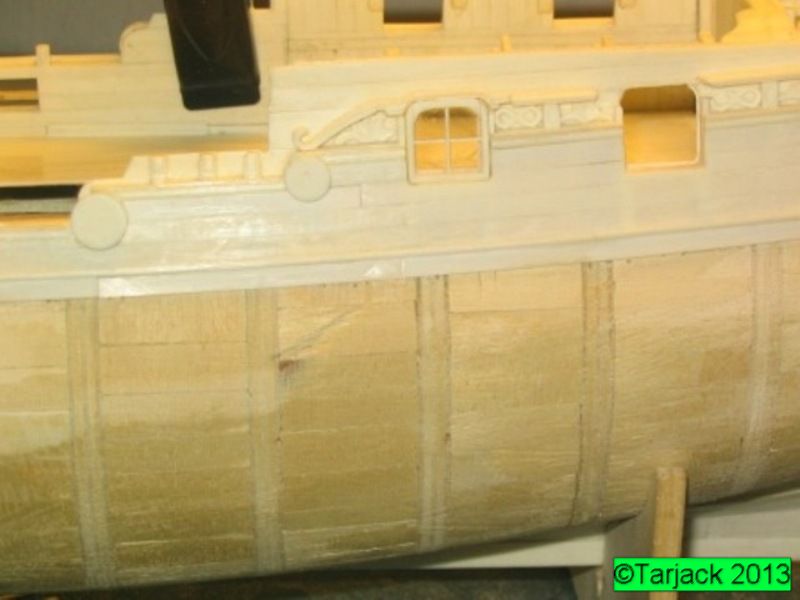
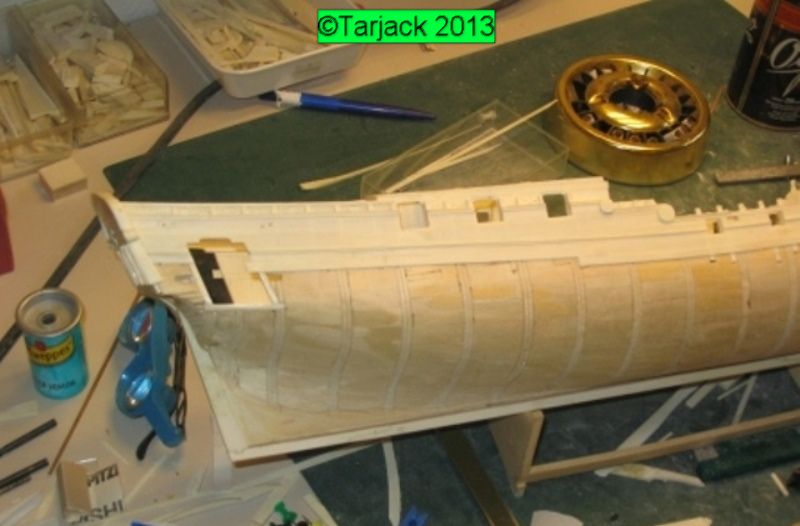
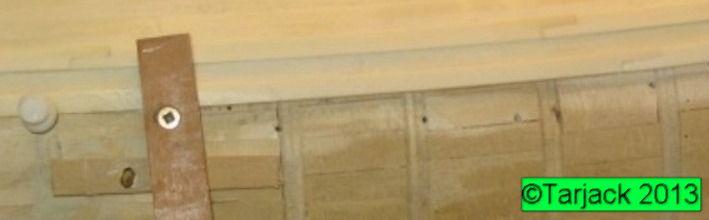
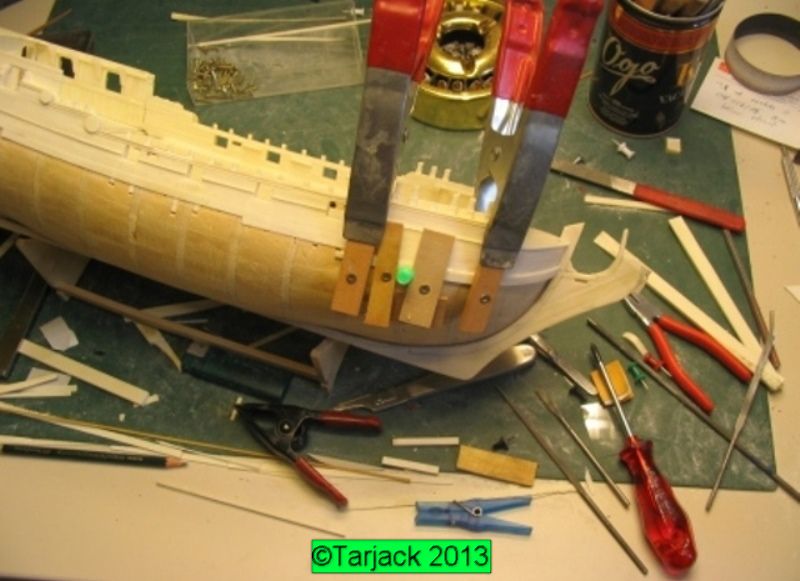
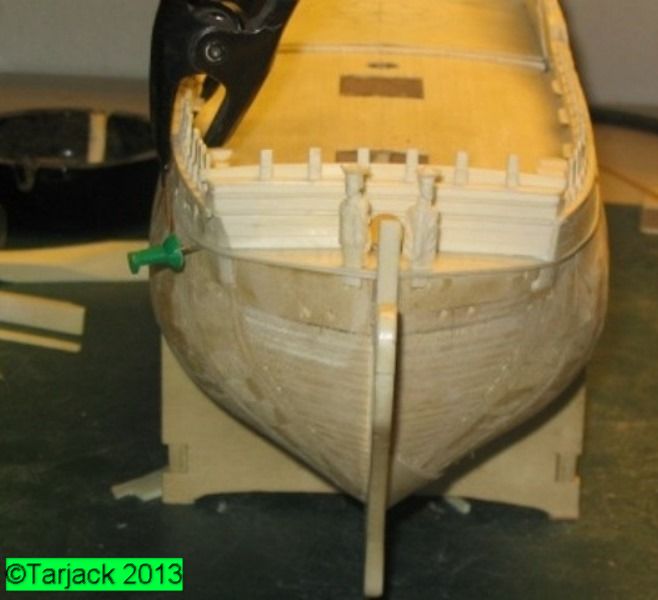
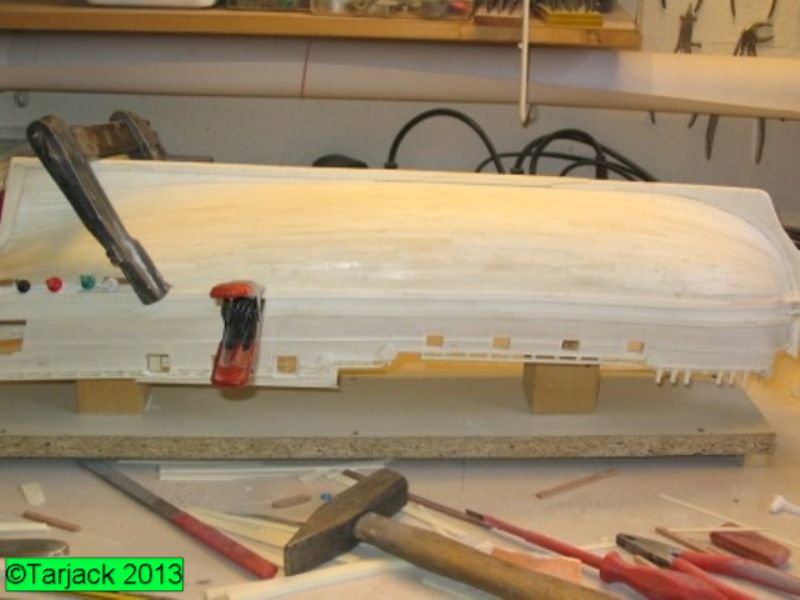
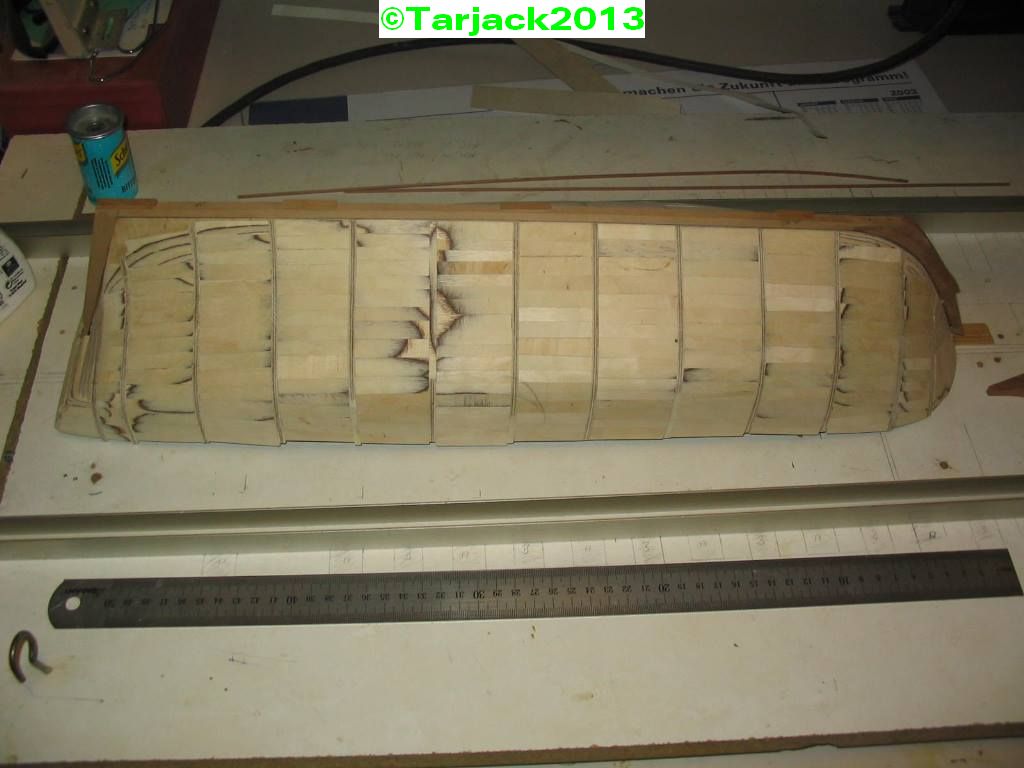
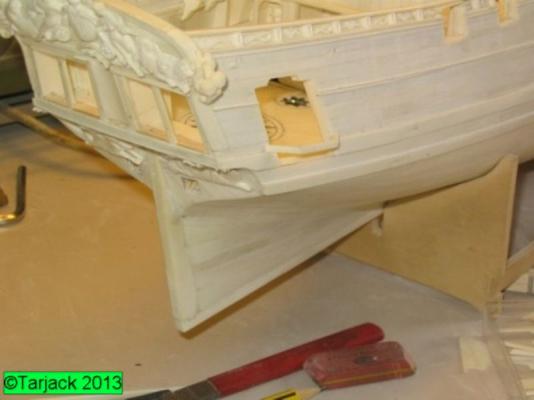
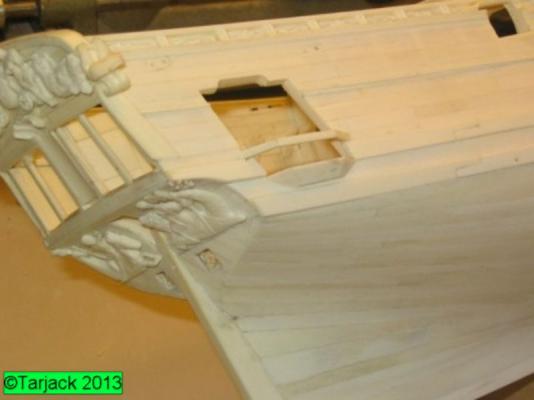
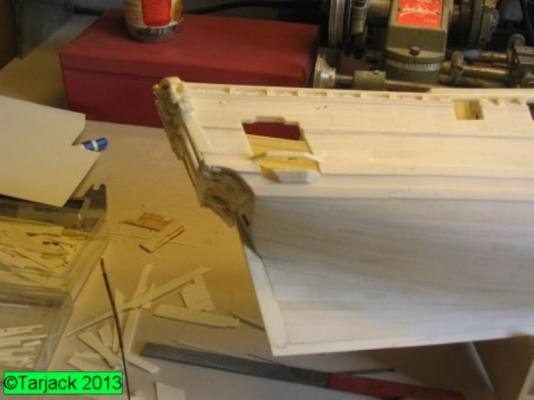
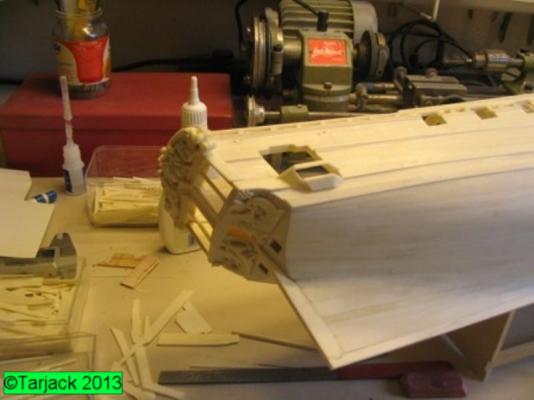
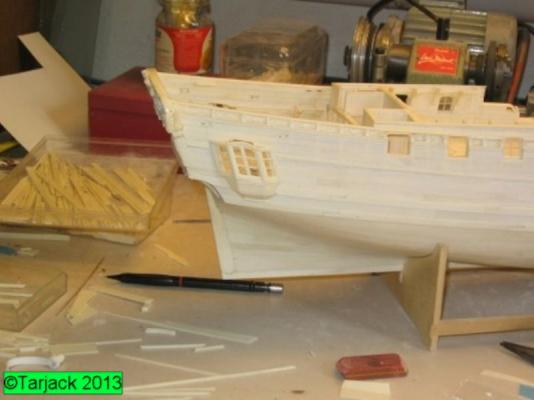
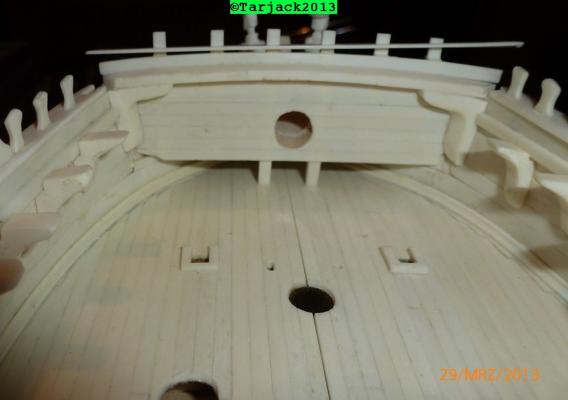
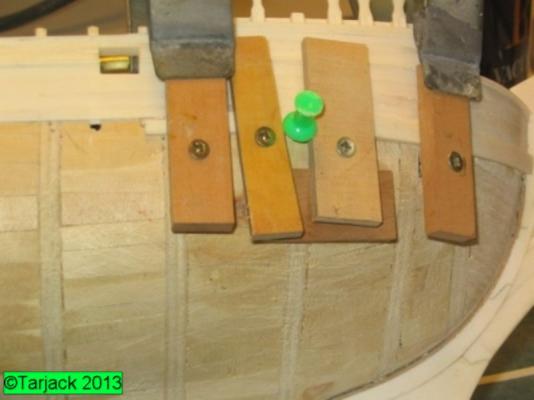
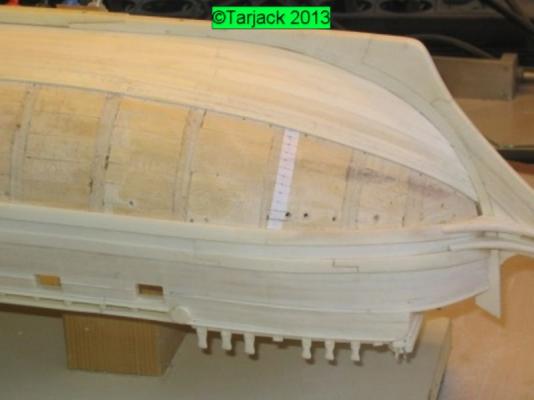
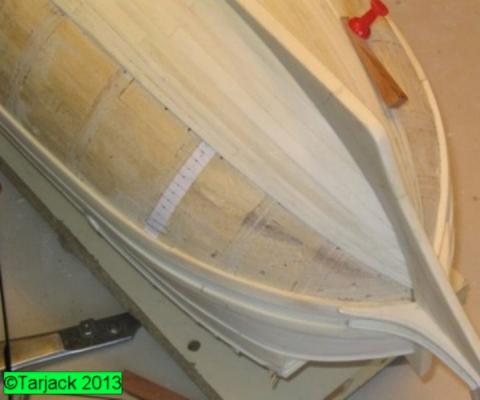
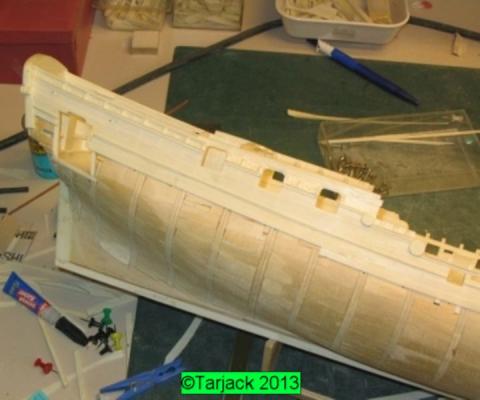
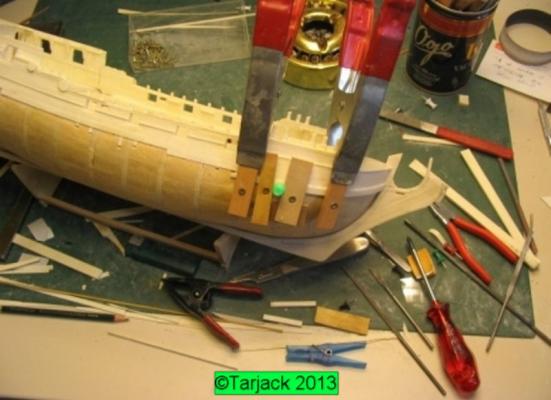
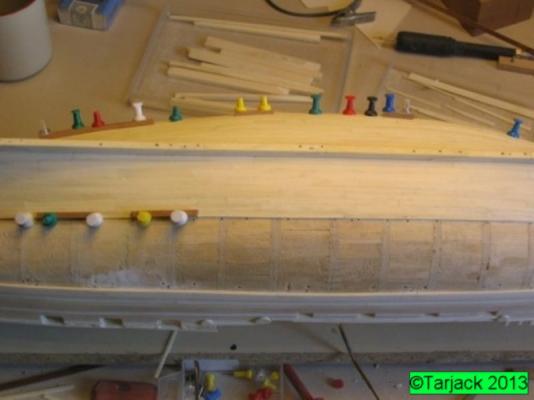
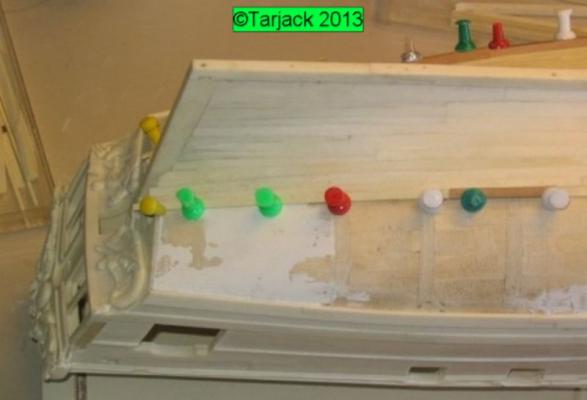
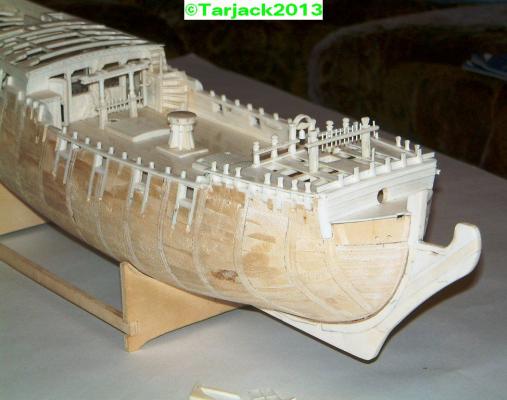
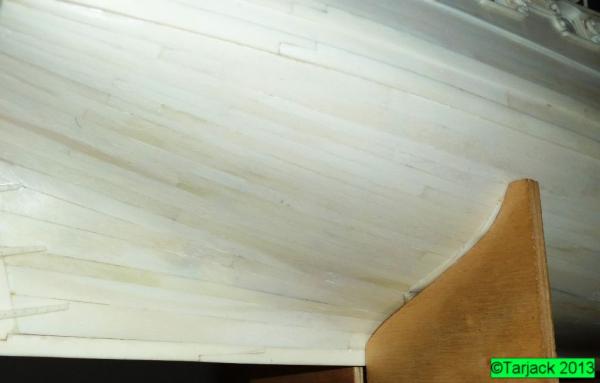
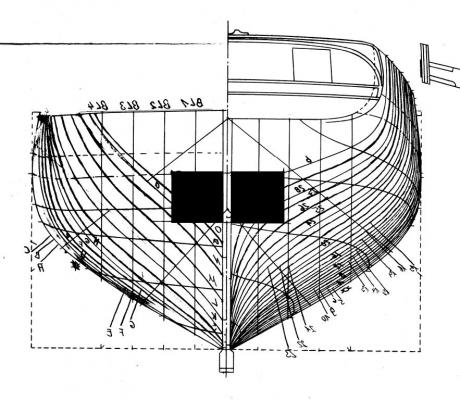
The outboard planking The outboard planking of Caroline manufacture was performed in three major sections with looooong breaks in between. During the breaks I made for Caroline equipment parts, and finished the 74 gun ship, by Boudriot M 1:50. (Current location: Deutsches Museum, Munich) Hach yes, the good old days .... I ääähmm….hehe…..digress. Caroline without Hull planks The course of wale mark on the hull; First wale install; fill the gap until the second wale with planks; second wale install - it is important to note that no gaps occur -! Some time needs (not on wale) reground the planks. After the Planks are mounted above the wales, let´s go for planking the hull. Turn the hull and care for stability. From the keel starting with the "infamous" Garboard-strake - lay the planks. So that the planks also run evenly on both sides of the Keel, i install three to four measured lath. So that the planks are fairly evenly wide, it is recommended that a "settlement" on the hull to bring. The so-called settlement is relatively easy to produce. It divides the body lengthwise into three parts, after then you will narrow ca3 mm wide strips of paper here. The distance between the keel and the lowest Wale - lower edge on the main bulkhead is measured. The distance is measured in M 1: 50 (near 1:48) divided into 4 mm intervals. 4mm at 1:50 it is a plank width of 20 cm, which is an acceptable value for this small ship. The paper strip at the main you can now stick/glue to the blank hull. Measure the strip to the other identified third positions. Divide the length by the number of strips / planks made at the main. Assign this value (eg 2.4) of the paper. The paper strip at the rear is longer, which results from the shape of the vessel and the amount of dead wood at the stern, about that later It is helpful if all 4-6 strakes attach a measured lath, I use therefor pearwood 4x4mm. So you can see, if the calculated value differs from the Plank course. The planks are then applied and correspond to the position associated works. Now it shows the incredible advantage, the solidly built body. It can be mounted on the hull all kinds of positioning devices, needles, screws, nails, clamps, etc. Nothing can harm the body I think you understand are strakes from bones significantly more stable than wood moldings. The individual planks are made - by the enforced maximum length of 18 cm - it is advisable to equalize the lengths of the scale bars. This means that the planks on the model no longer than 12 - should be 16 cm! Thus, the strakes seated properly, i have a pear help strip created. Thus, the transitions remain in the strake and you can not get a kink in the strake (and also not in the optics too * lol *) The planks taper transitions forward. Note: a maximum of 1/2 the width. Make the bends goes like this: Finished planks to the "straight" faces firmly glue. The Parts at the bow, where the planks are naturally bent, have to be cooked ... cook hot is here announced. (About 1 hour) Then can be fixed to the hull and dry the planks. (About 2 hours) the planks are then bent to retain their shape and duration can be glued. Is quite easy…… isnt?? This method also work´s with wooden planks (fruit woods), however, since it is sufficient if the planks 5 - cook 8 minutes, depending on thickness. (Not for use in walnut and oak, as well as all soft woods!) Into Walnut toxins are washed out and the tannic acid in the oak, which leads to unsightly discoloration of the individual planks / strips dissolve. Walnut and oak are immersed in water, slightly soft and can fit in a wet condition on the fuselage and secure. The same procedure due by soft wood ( pine, birch, maple, etc.) Once the strips are dry, they retain their shape and can easily be glued firmly. Iron over a round body (for colleagues who cant wait) The soaking in ammonia also work, you should just do it outdoors and the wood its natural color changed and that overall, not just on the surface. Back to the bone. The previously install wale on the bow, were not curved like the planks, but cut into shape!! From 3mm material thickness it just takes too long until the bones are "soft" boiled. In the area of dead wood on the stern section the strakes is naturally longer. There inserted strakes are attached. You can find these again are using the settlement. Using the slats can be the additional strakes exactly Mark (on the hull).. We remind that the boards should not be wider than 4 mm. If now the stern individual courses such as 7mm wide would you go as far back again to the width of 4mm. Point mark! The following plank is also created. It is applied without pressure on the hull! The resulting wedge is extended and also marked out. If the wedge is too wide, the same operation is repeated as long as until the gap is closed. The inserted planks must not be smaller than 2 mm. The tapered planks to the insertion point either. NOTE!! THERE IS NO TOP WOOD ENDS IN SHIPBUILDING. NOWHERE ON SHIP In this way, the surface is widened without the plank profile is disturbed. In the bow, the procedure reversed. This is called "lost programs". After the Mark of the planks, install them, where the two planks together max. 4mm wide are in position and attach a plank. The 4 mm are not fixed dimension, it can also for example have 2.8 mm! The decisive factor is that the planks at the end (rabbet in the stem) should not be THINNER THAN 2 mm WIDE AND ALSO NOT as the adjacent one. THIS is a homogeneous real image of a ship's planking. Three years later, the Caroline is planked ......... wasindeedtimesaysmyadmiralty! Cup of Coffee? :D This is the Upper shipyard construction supervisor


- 241 replies
-
- 11
-
-
- royal caroline
- yacht
- (and 1 more)
-
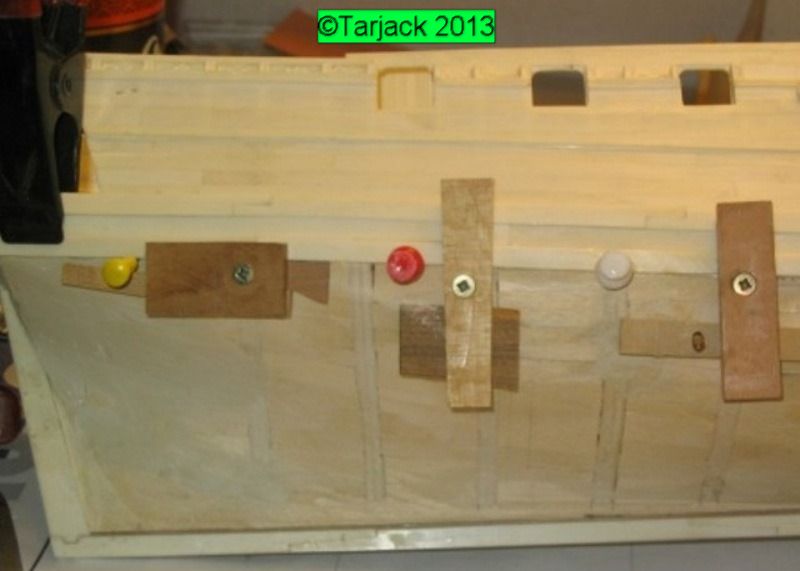
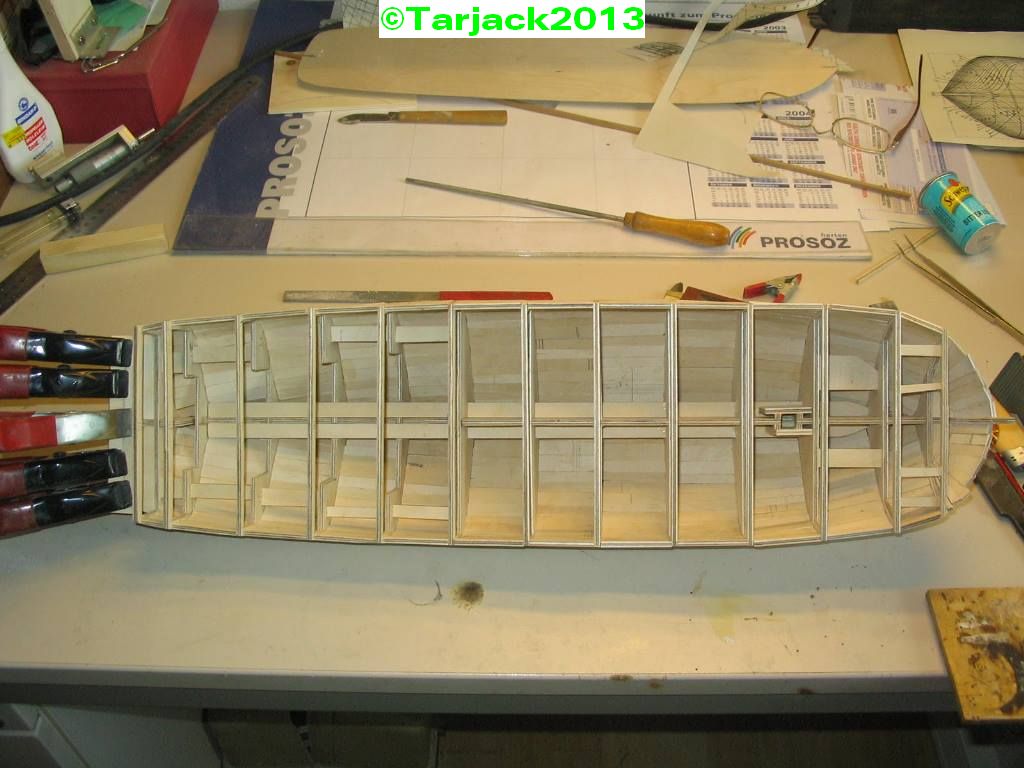
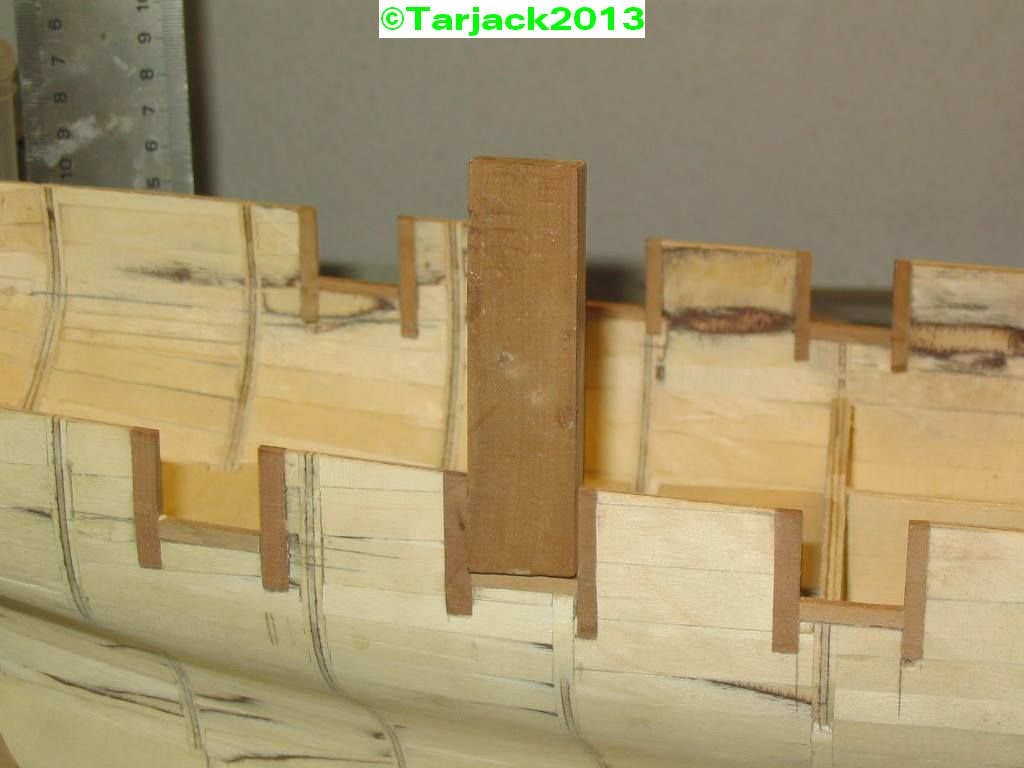
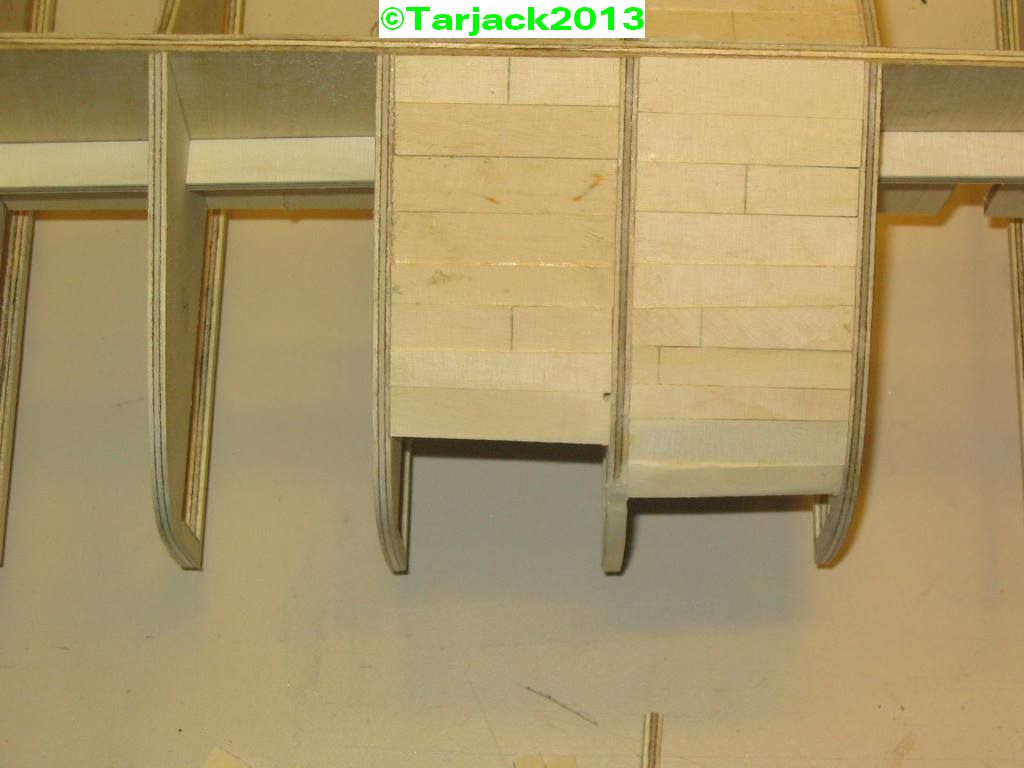
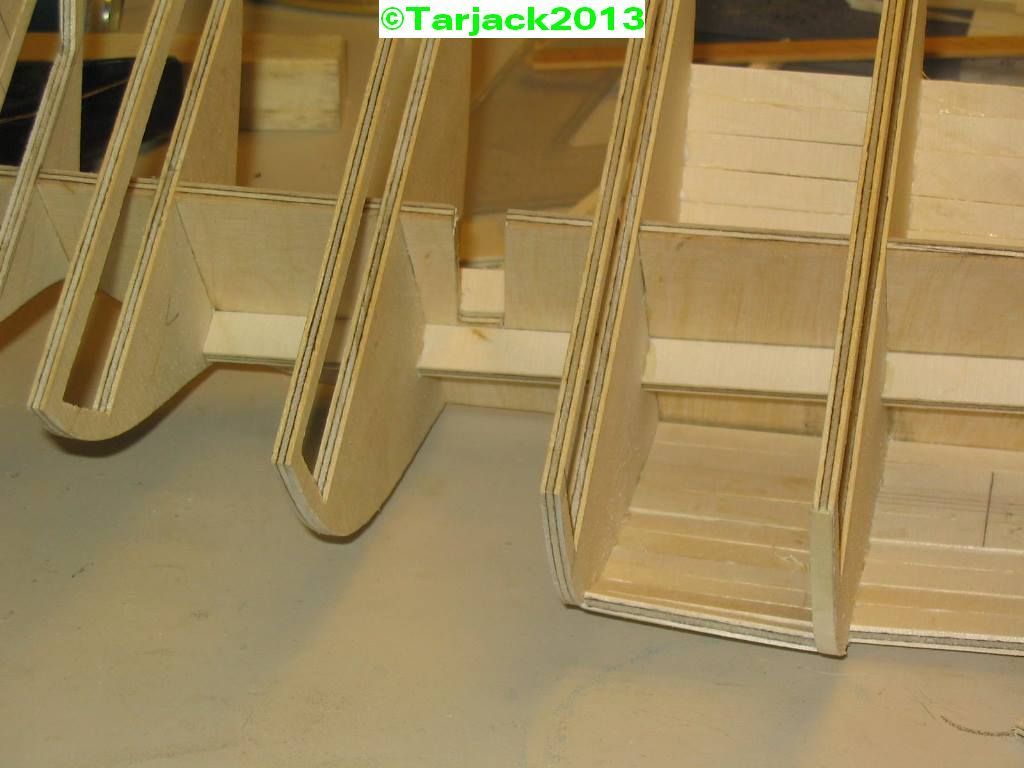
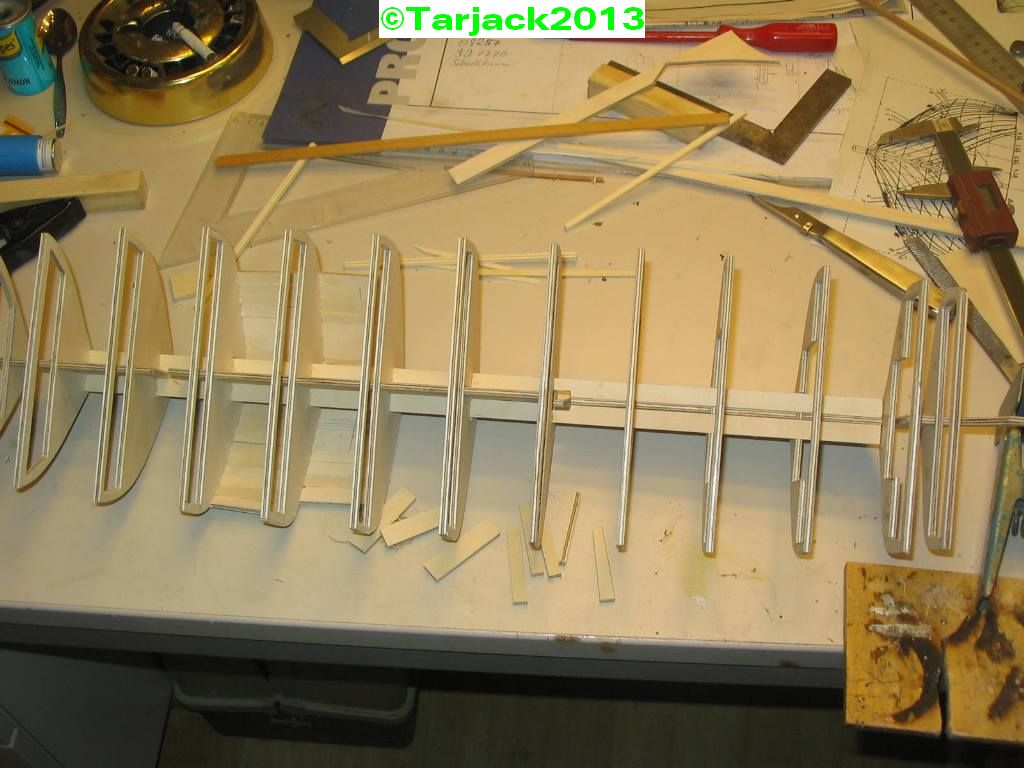
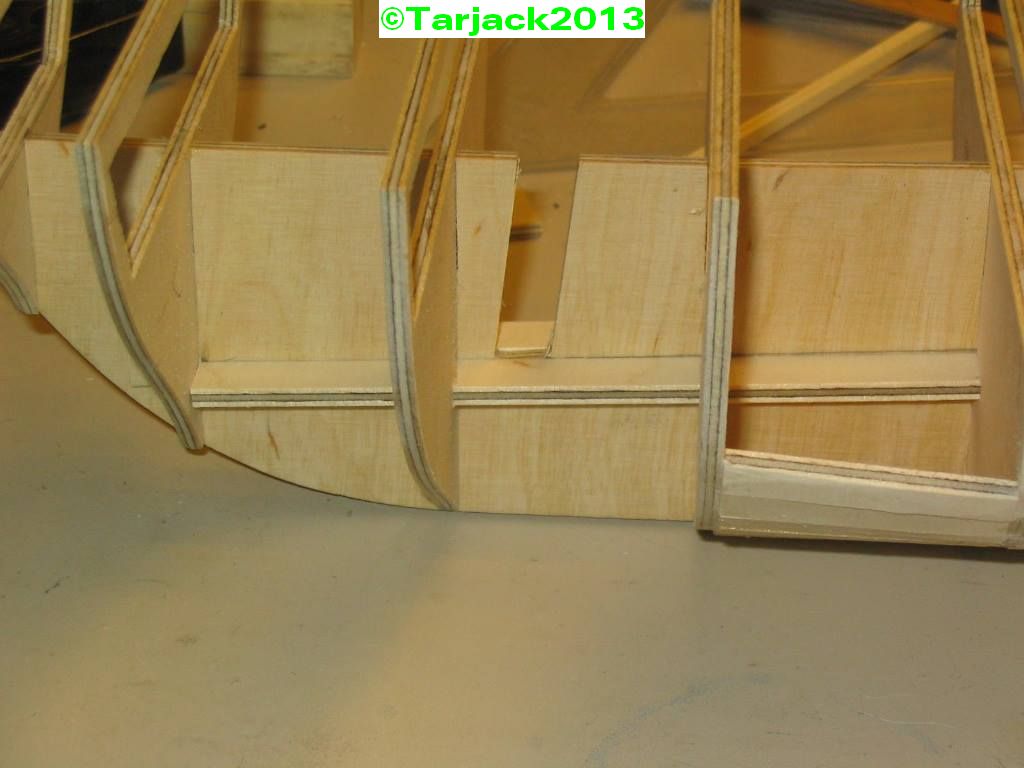
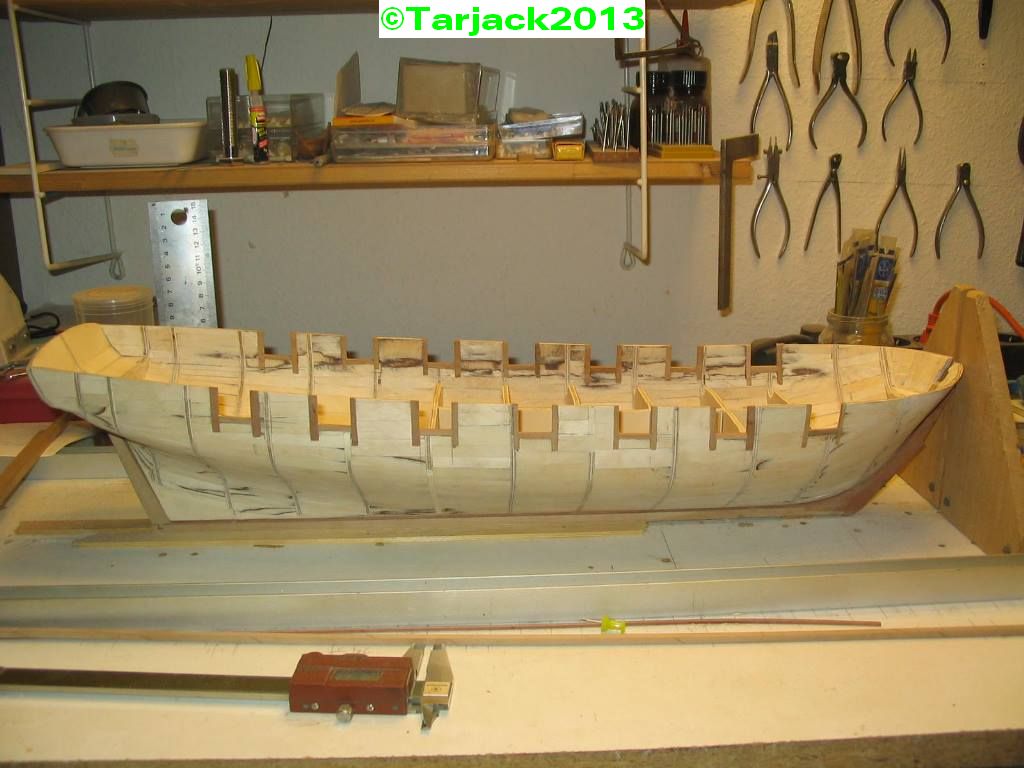
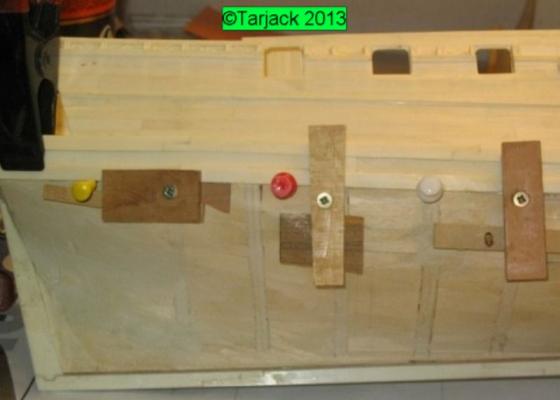
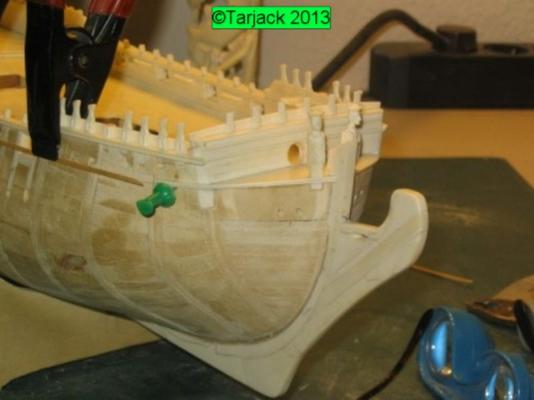
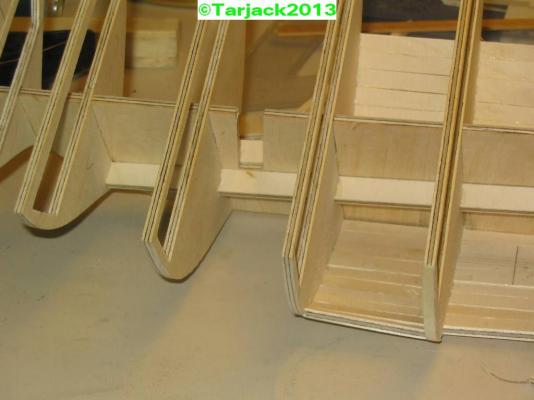
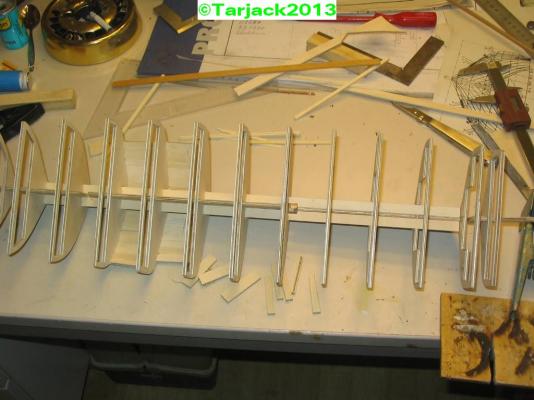
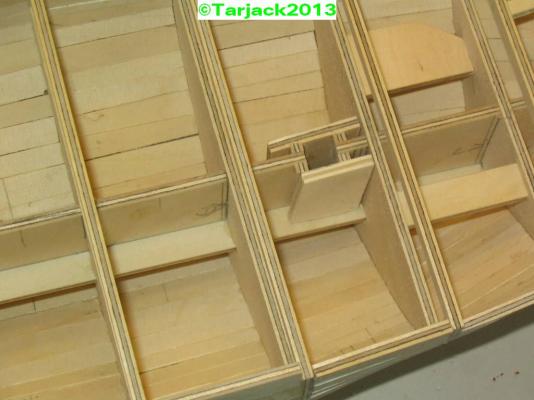
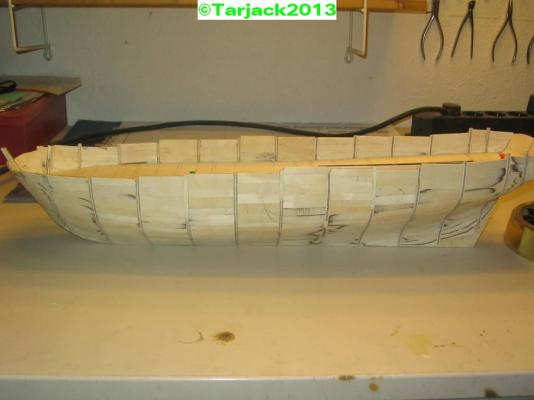
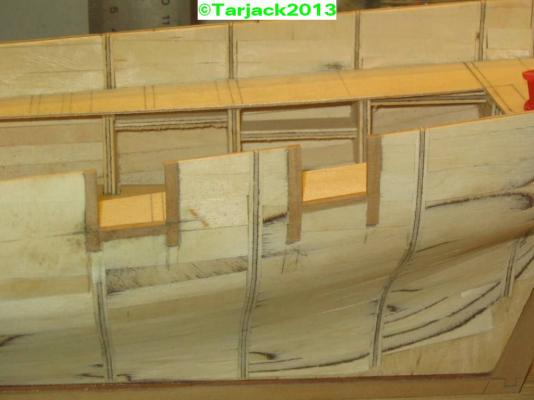
So move on. For general edification of the team and because the eternal careening permanently gets boring too, we continue the building report. I can see at the many construction report, I stand with the method of construction of a Raw hull shell rather alone. But this method imo against the dubble planking, easier, more accurate and more stable in the final result. I know that all know how frames are cut out and also that they have to be glued at right angles to the central board. Therefore, I will spare you the details of this phase of construction. The bottom edge of the interior fittings are marked out at the malls and sawed. Here you can stand on the edge and the top 1 cm. The top edge ensures the stability of the mall during raw design. For better stability of the longitudinal association I prefer a 4 square bar 2 x 2 cm. It should be noted that the bar is not too high, otherwise it in interior design (if desired) interferes. I view photos of other units built by me, as I have from the Caroline unfortunately made no images in this early construction. Material requirements: Plywood waste D = 4 - 6 mm from the hardware store about 1 square meter Waterproof wood glue; purists take Bootsleim. 2-3 middle clamps, clips, etc. So, the malls are with the middle board and the longitudinal bar firmly. Now the association is gestrakt. (Line proof ) From midship aft the rear edge of the mall is the testing edge ... from midship to the bow is the Malledge also the rear. Means the Strakkante (Testing edge) at malls has always to the main bulkhead. The Strakkanten be finally marked with black paint, it is ground during subsequent grinding of the hull is not too deep, and it would occur again dents who would have to be leveled consuming. Upon completion of the strakens go. Firstly, the plywood waste be cut in about 1 cm wide strips, regardless of length Now it's best to start amidships below to glue in the bars. The space between the ribs is measured and the strips cut to length to fit EXACTLY into the space. Glued the strips on all 4 sides. We obtain, depending on the size of the ship, a 200 - 400-fold glued hull. Midship inserting the strips is relatively easy to practice and suitable. Fore and aft but changes the shape. To save yourself a lot of grinding work in these positions, there is a little trick. The strips be cut to align them on BOTH ribs. Costs a little time and sometimes an unspeakable fumbling, however, it will save you the background feeding and ultimately much sanding. Sand the finished glued hull and check again. Note: Only grind to color marks. Now the protruding Mallen be sawed in the interior. Trempel frame or other openings are made easily; Opening mark, to anticipate the scope and saw out. The sides Trempel or Framed up and down longer and gluing the cross seated frame timbers. Do not worry when saw out the walls also hold some unsupported and should cancel something, simply glue on the part again For the frames we recommend the lower edge of the finished Trempel on the outside mark with a height marker. Thus one sees whether the line fits. And so its present the Caroline with the hull made by tarjack´s method (earliest foto ) on this point the white lady it is 12 Year under construction. So well crew, I hope you were able to decipher the text without laughing too much (my english it´s too bad) *shame*


- 241 replies
-
- 2
-
-
- royal caroline
- yacht
- (and 1 more)
-
You're welcome, druxey
-
Echo by oneslim - cross-section
Tarjack replied to oneslim's topic in - Build logs for subjects built 1751 - 1800
Just great idea....cool -
thanks for the link Greg, it was a great pleasure to listen and see this. The fotos and much more Pictures you see in the link from #17 i will present in following times here for your pleasure.
-
Echo by Maury S - FINISHED - Cross-Section
Tarjack replied to Maury S's topic in - Build logs for subjects built 1751 - 1800
hello Maury and do not forget the Limber chain. The chain is a very important part of equipment. It allows the team to keep the free flow of water That is also the reason why the removable boards are mounted on the limberway Please excuse my bad english, but i dont trust the translator -
@druxey; @modelshipwright; @jeronimo Thank´s at all for your friendly postings. @jeronimo. I think the real joke lost by translation...too bad If you understand german language read this: http://www.bolitho-und-co.de/forum/showthread.php/4373-Knochenmodell-der-HMY-Caroline-1749-M-1-50 Schöne Grüsse ins Rheinland regards