Ras Ambrioso
-
Posts
662 -
Joined
-
Last visited
Content Type
Profiles
Forums
Gallery
Events
Everything posted by Ras Ambrioso
-
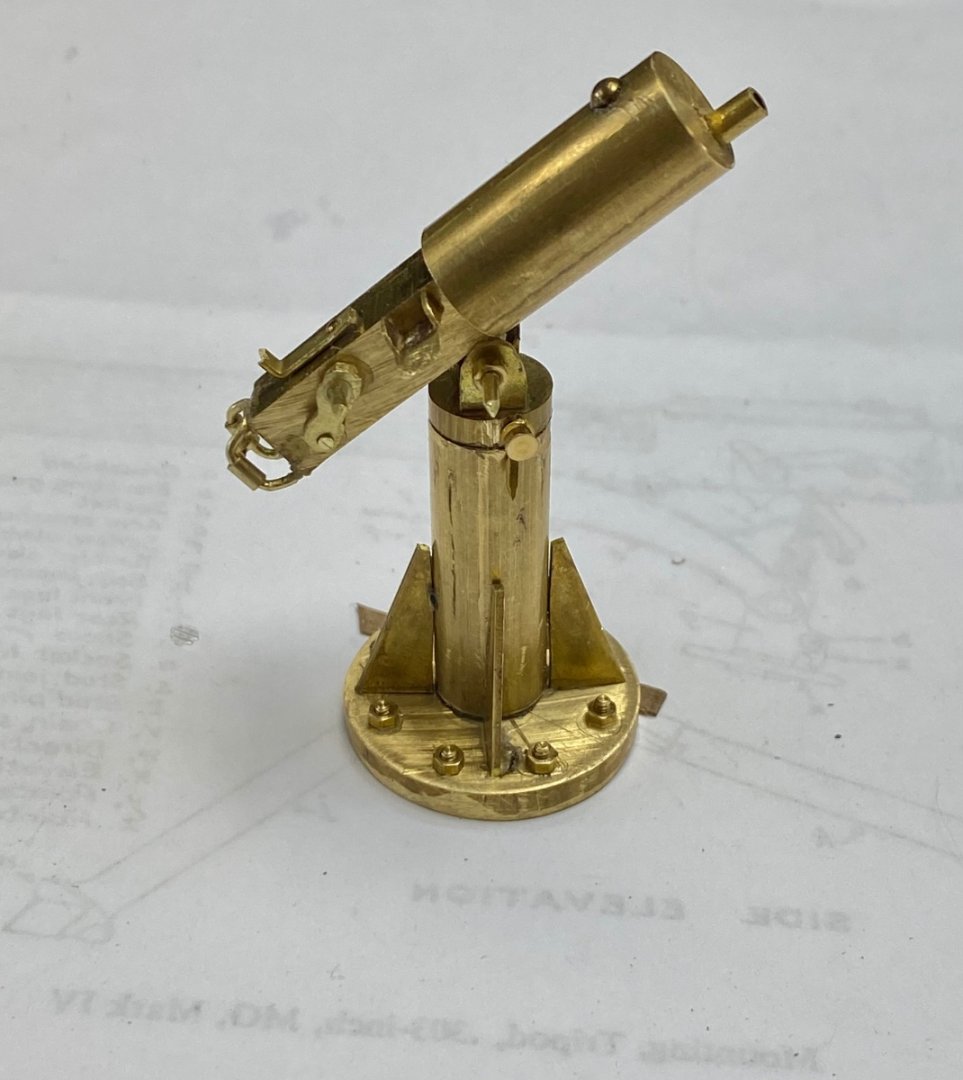
 The work on the Hotchkiss continues. Today I managed to mill the the breech after spending a great amount of time installing a Sherfield milling attachment in my Unimat lathe. Note: I have the milling tower for the Unimat, but I was having difficulties separating the drive head from the lathe bed. After removing the tension screw the base refused to come loose. After I complete this model I will try penetrating oil. Fortunately, the head managed to turn the half a degree I needed to cut the the taper in the barrel. Any better ideas?
 -
Joe100, glad to hear from you. The Goetzen is a very nice subject with a great history; from its beginning as 5000 crates, to being armed, disarmed, scuttled and later raised to still be steaming as MV Liemba. It will make a great model but, for me, at 230 feet, it will be to large at 1/64 scale which is the smallest scale I can manage on my details.
-
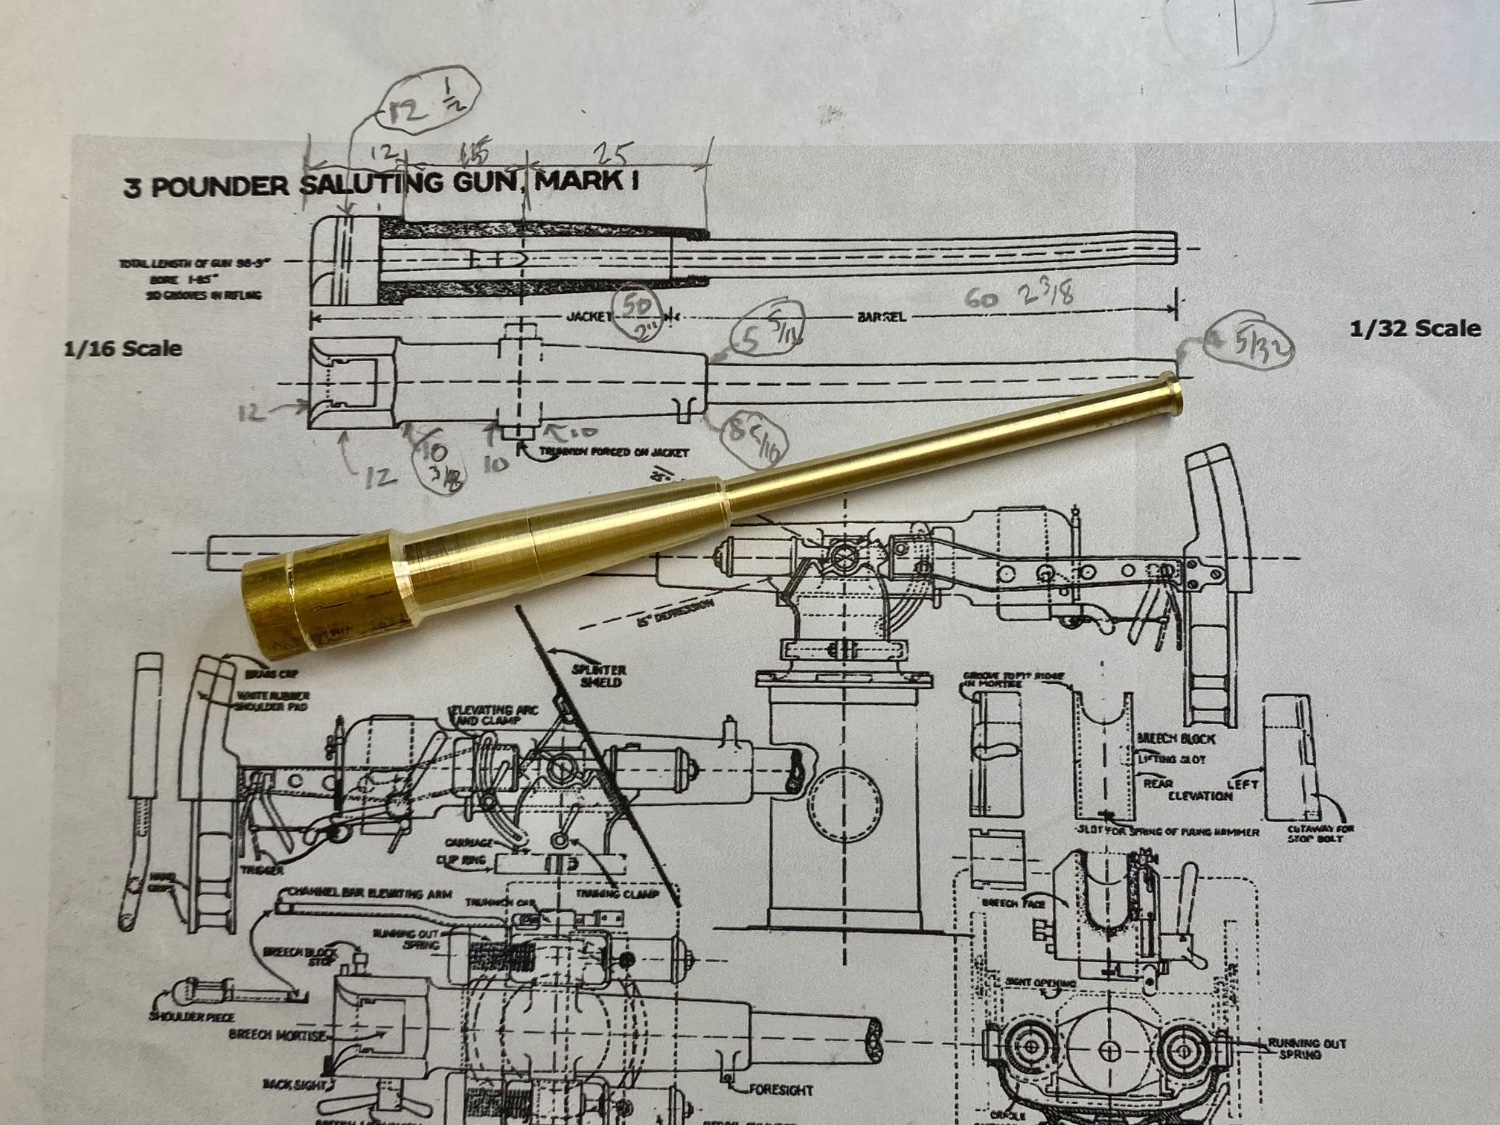
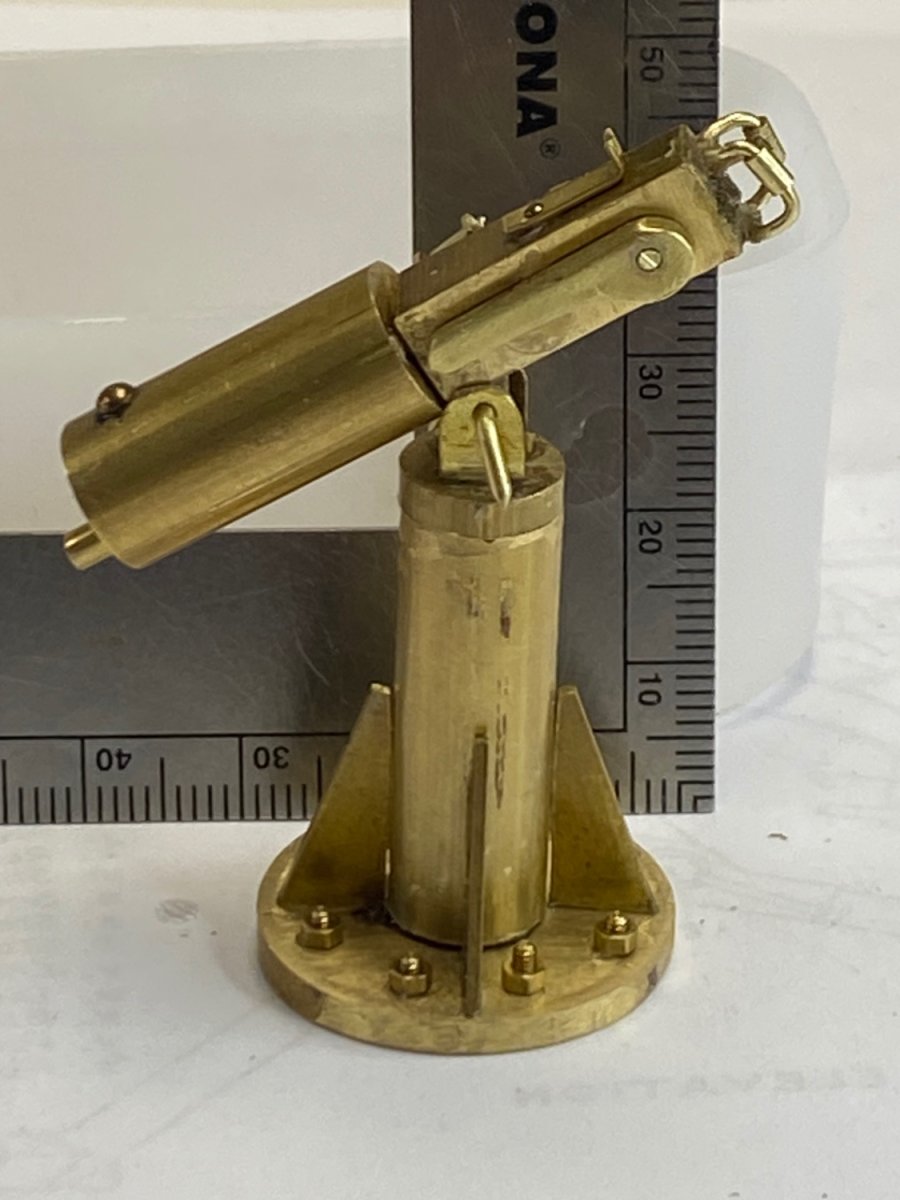
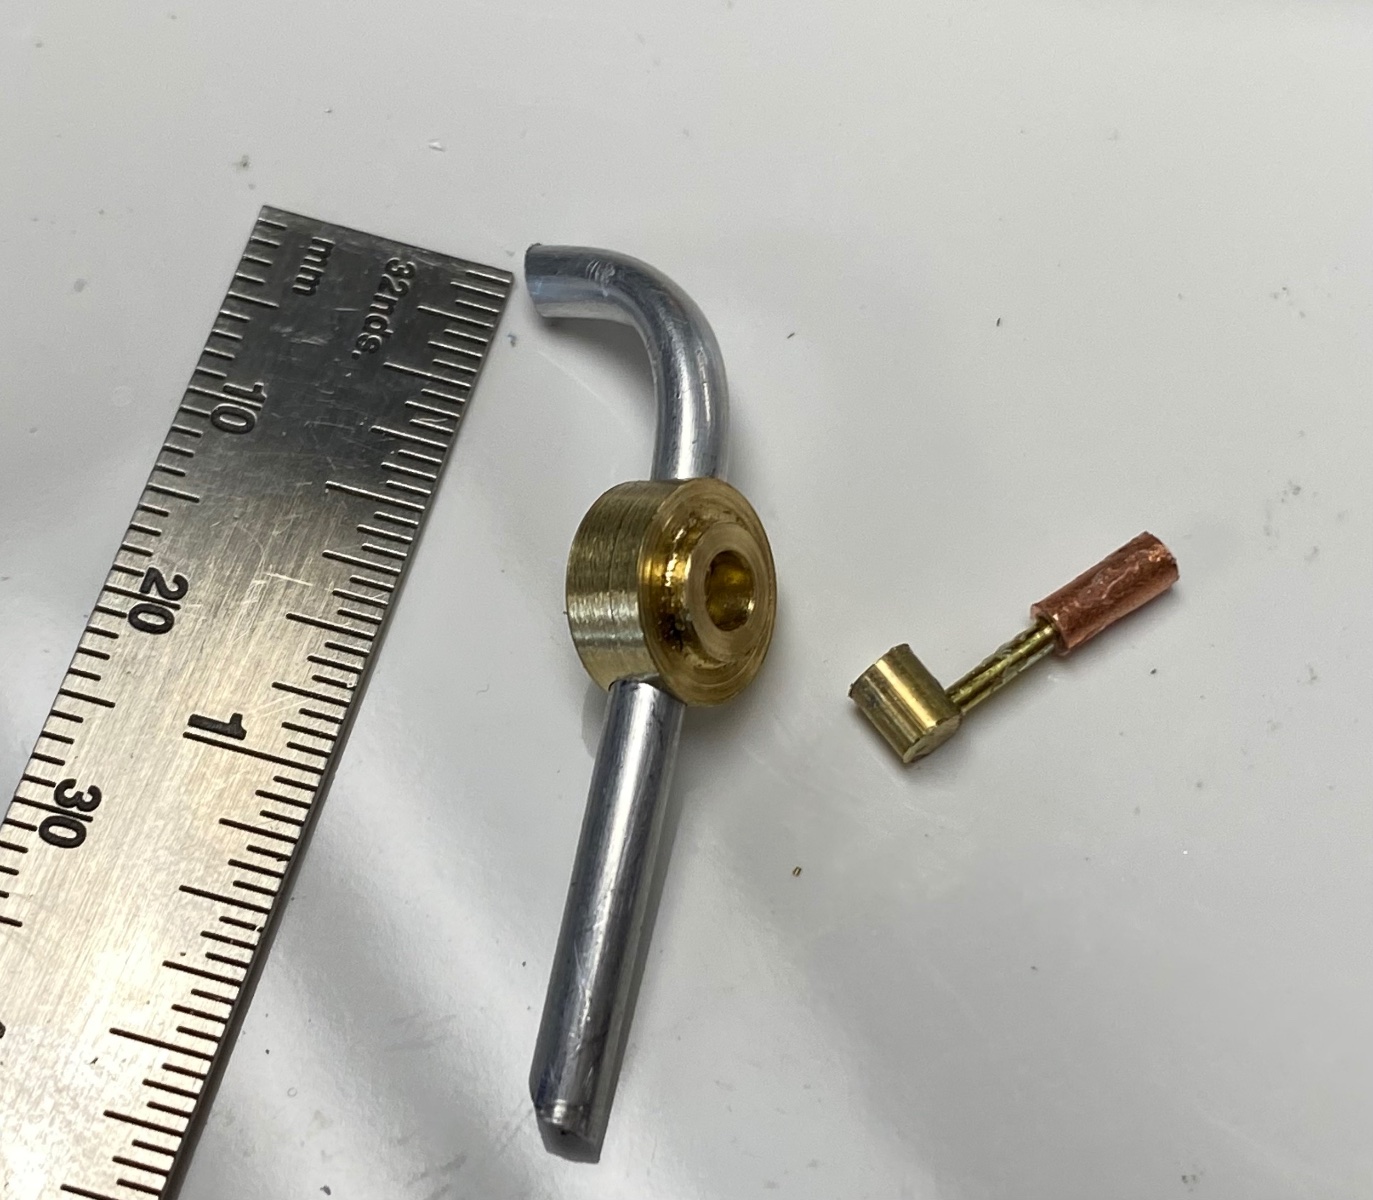
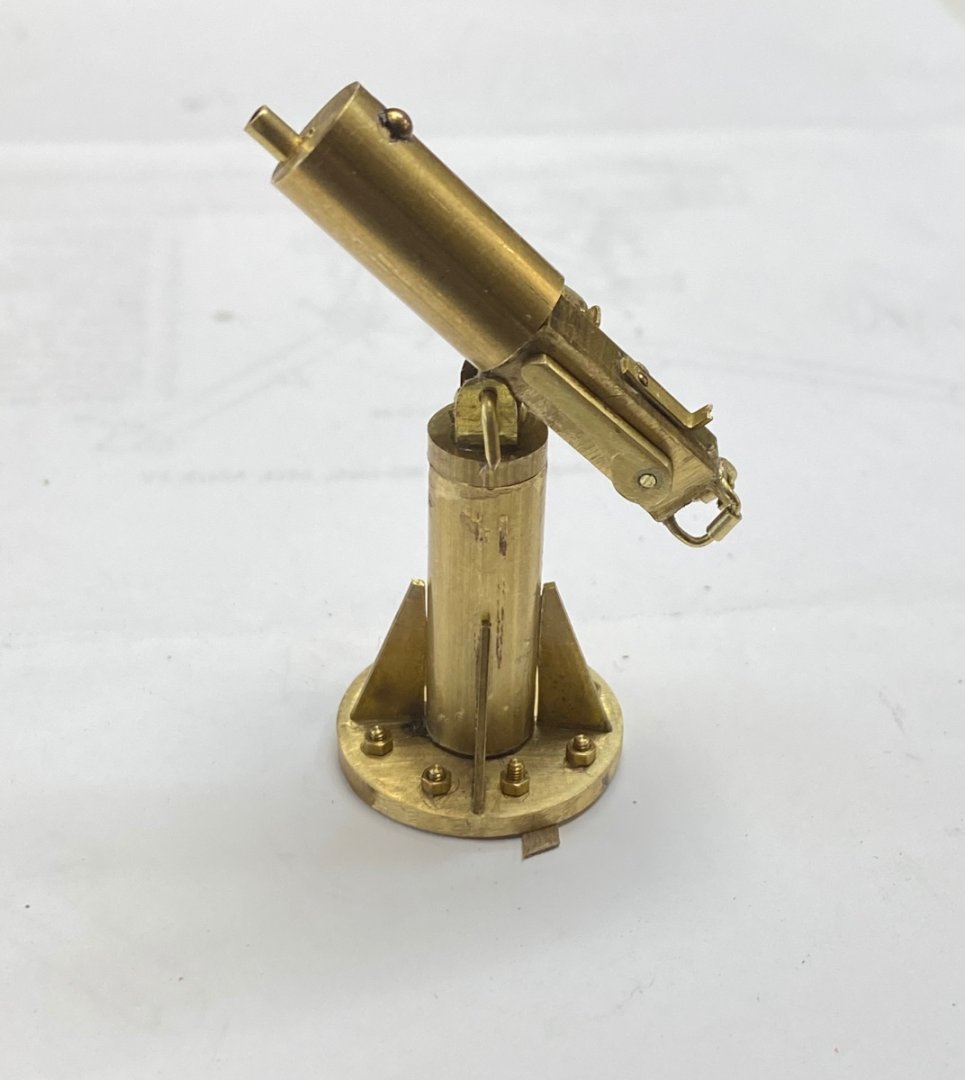
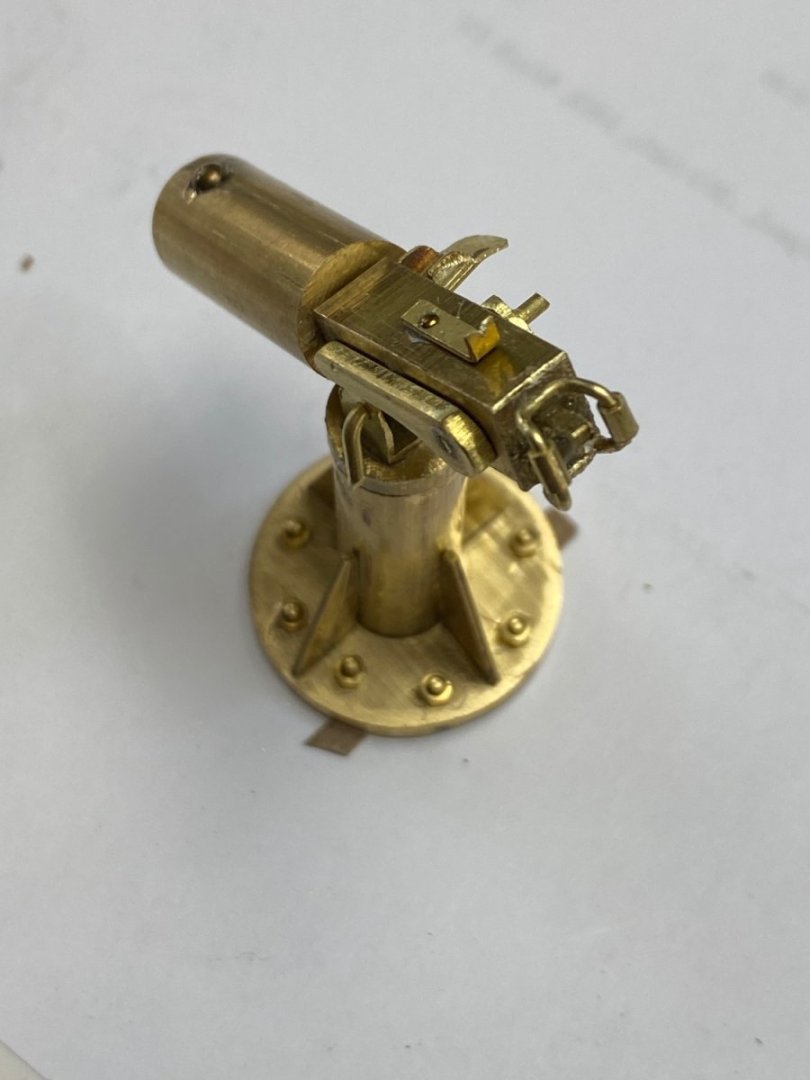
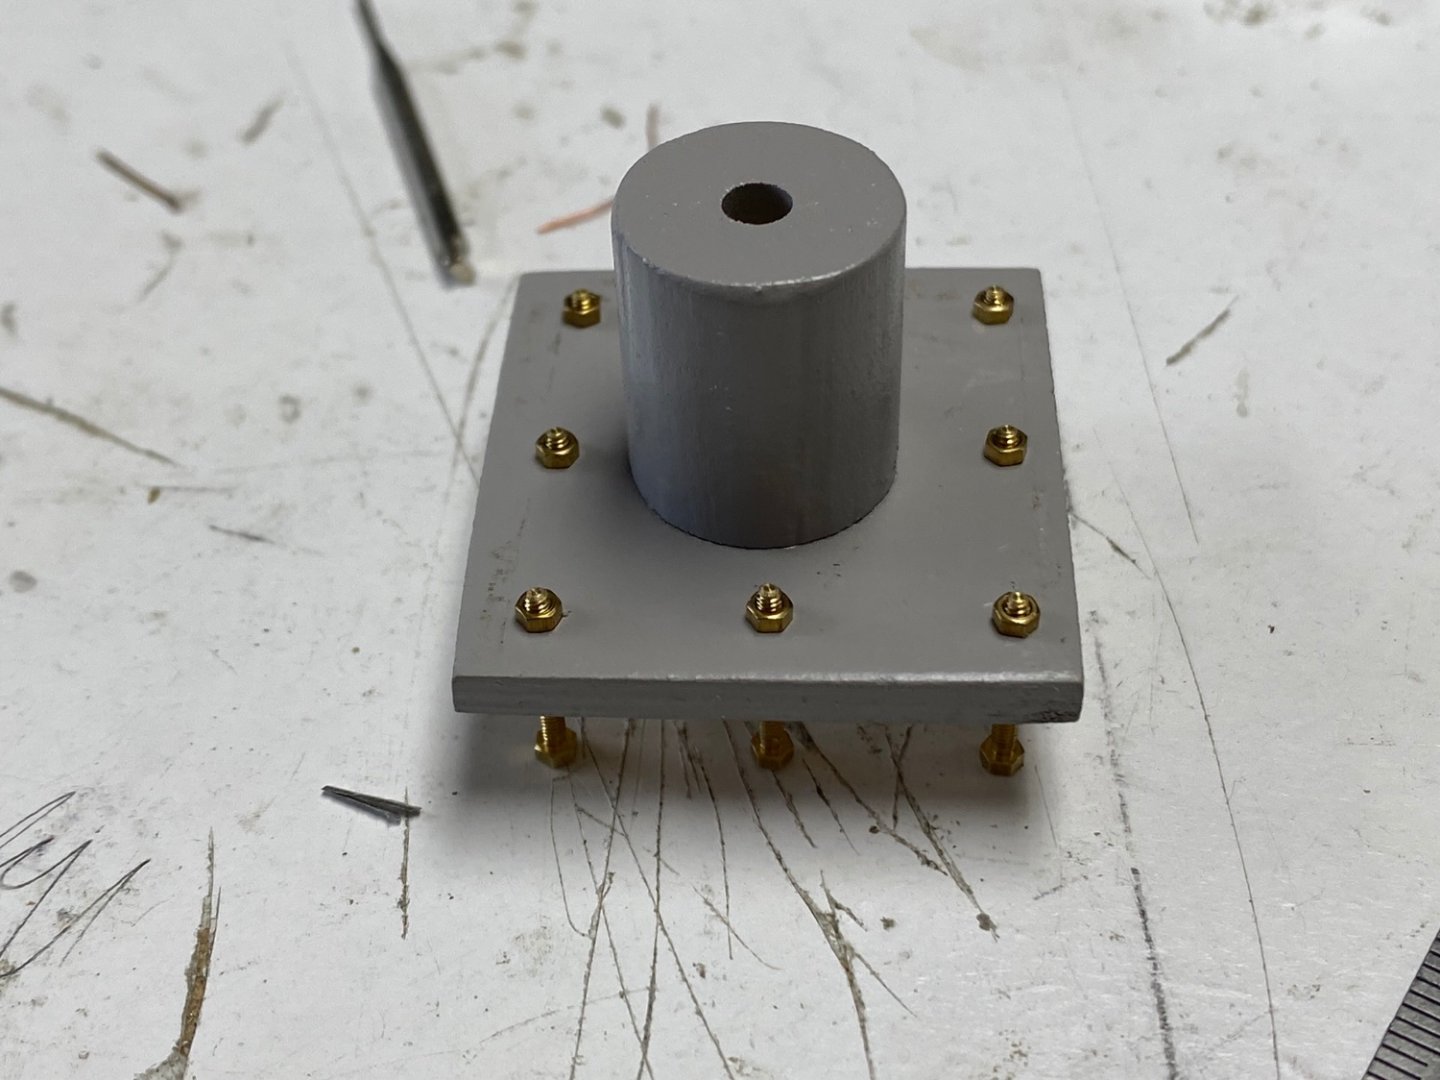
Th 3 pounder is on its way. I set up my 60 years old Unimat and had a few problems. The raw brass bar that I had for the build would not fit in the headstock opening and, when using the the 3 jaws chuck, the bar was too long, Fortunately I had the steady stand for this lathe . This allowed me to face the end of the bar and drill the centering hole. After that, the barrel, five millimeters in diameter, fit through the headstock opening and I was able to face and center the fat part of the bar. The the biggest obstacle was to rotate the headstock in order to taper the barrel and the sleeve. The headstock refused to move. It was firmly fused together. Finally, with plenty of penetrating oil, it did and following is the result. The overall length of the gun is about 102mm. The barrel taper is less than 0.5 degrees going from 5mm dia. to 4mm dia. Next comes the milling of the breech and the drilling for the trunnion.


-
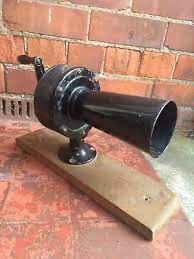
Roger , I love your method. I am an engineer soaked in thermodynamics, thus your suggestion is to be done. I will be starting the big gun in Mimi pretty soon and should be able to test your method. BTW, I have forgotten about three more pending items on Mimi: the jack staff, the bow mast and the siren. The siren will be interesting as it has a conical loudspeaker. I plan to heat a brass tube and expand it to the conical shape with a mandrel a little bigger project that my fire buckets on the Fifie. This is what the finish horn should look: Guys, thanks for following guys.
-
Thanks for the comments. I found out about mixing soldering with CA the hard way when I started an assembly and the whole thing broke up when I applied the heat. Soldering, and specially on small parts, is something that I need to practice. That is why I admire someone like Valeriy that can make it so clean.
-
Thanks Valeriy, you and Wefalk have been my inspiration to try and build super small pieces. Next, I plan to practice my soldering skills. All this brass work has been done using CA.
-
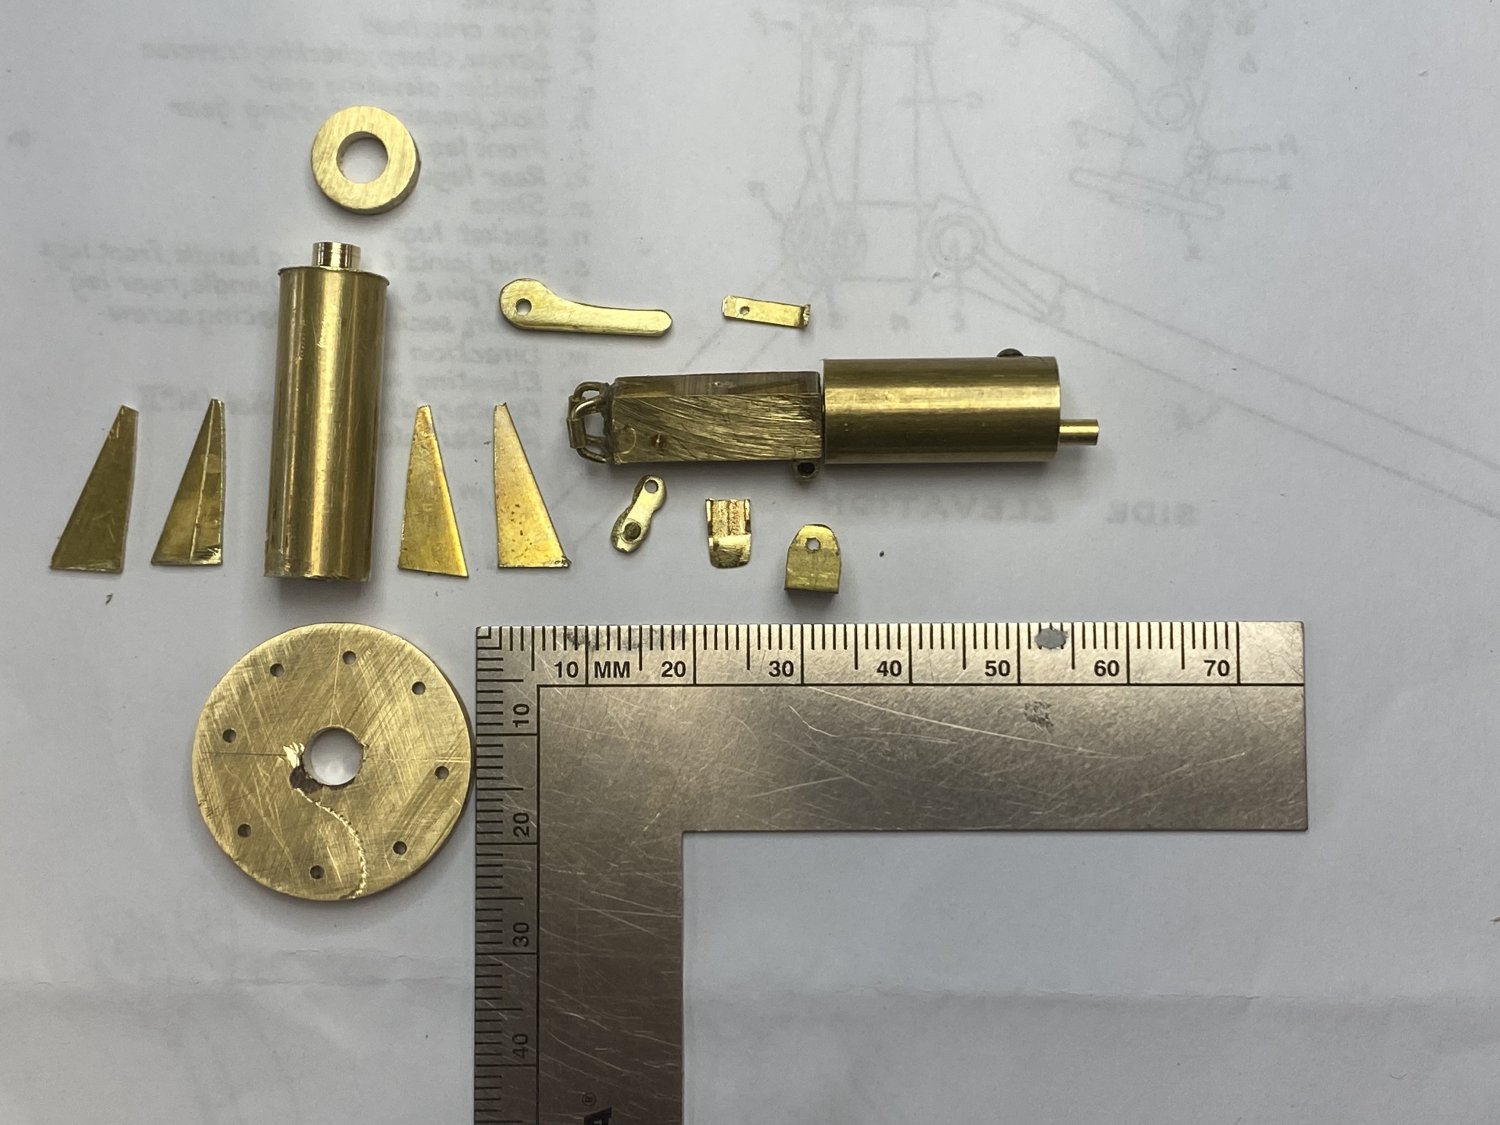
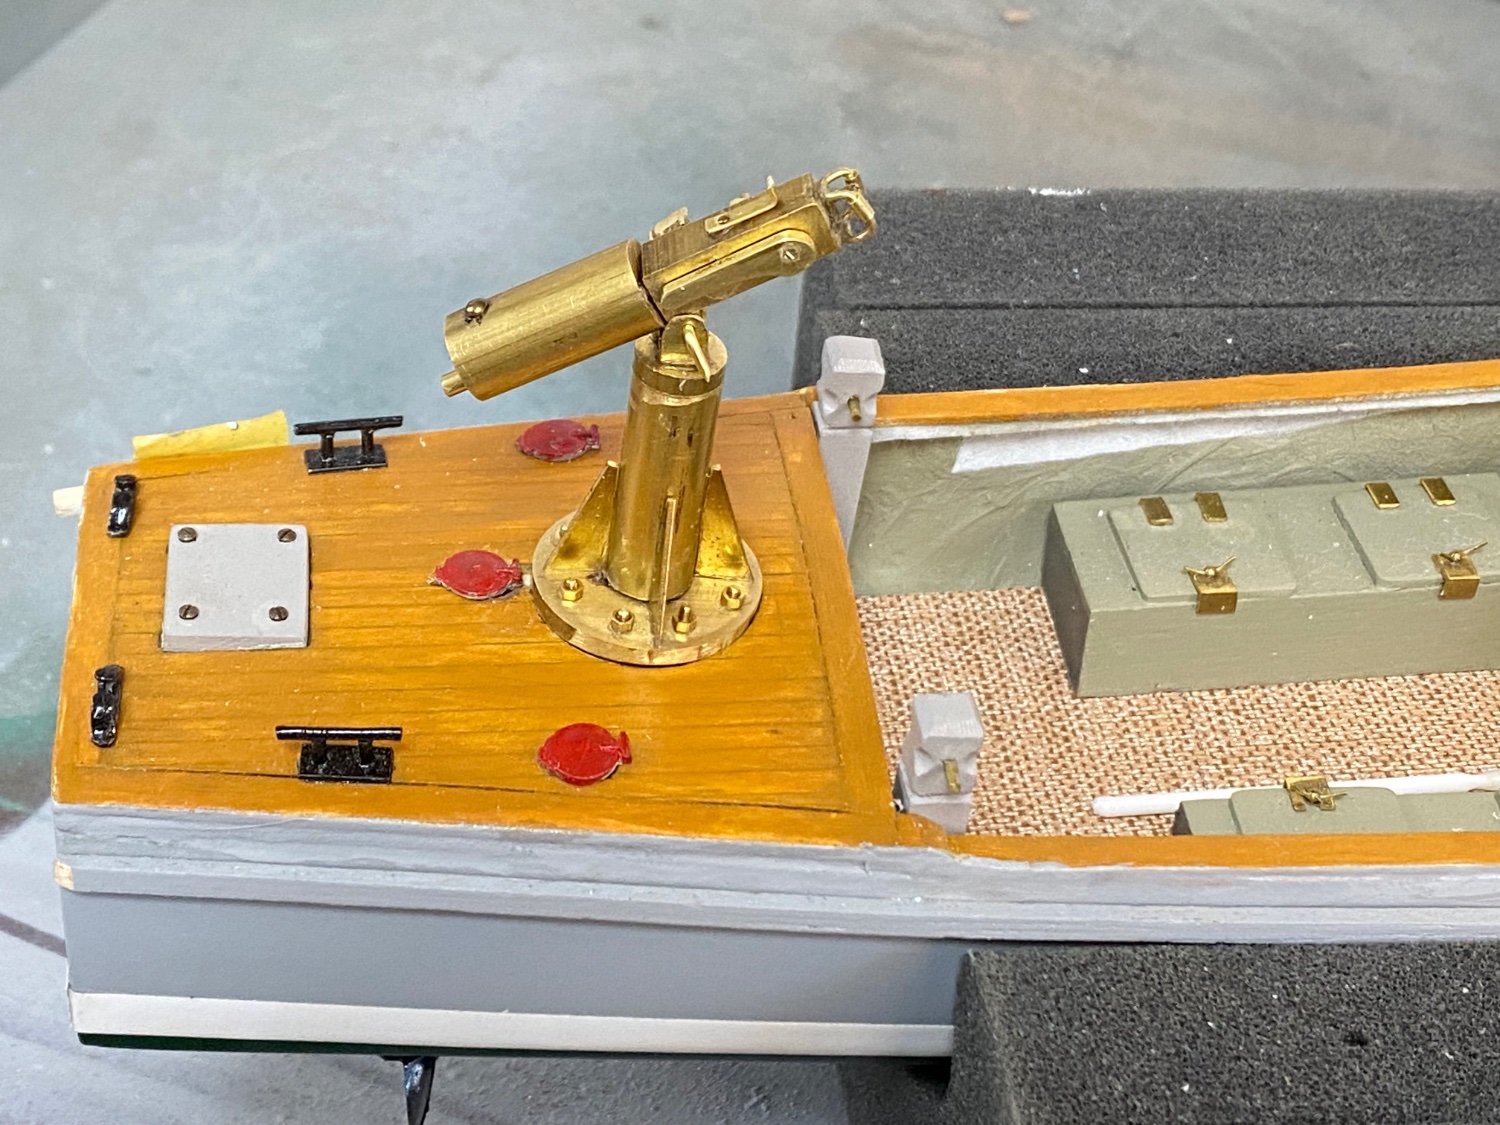
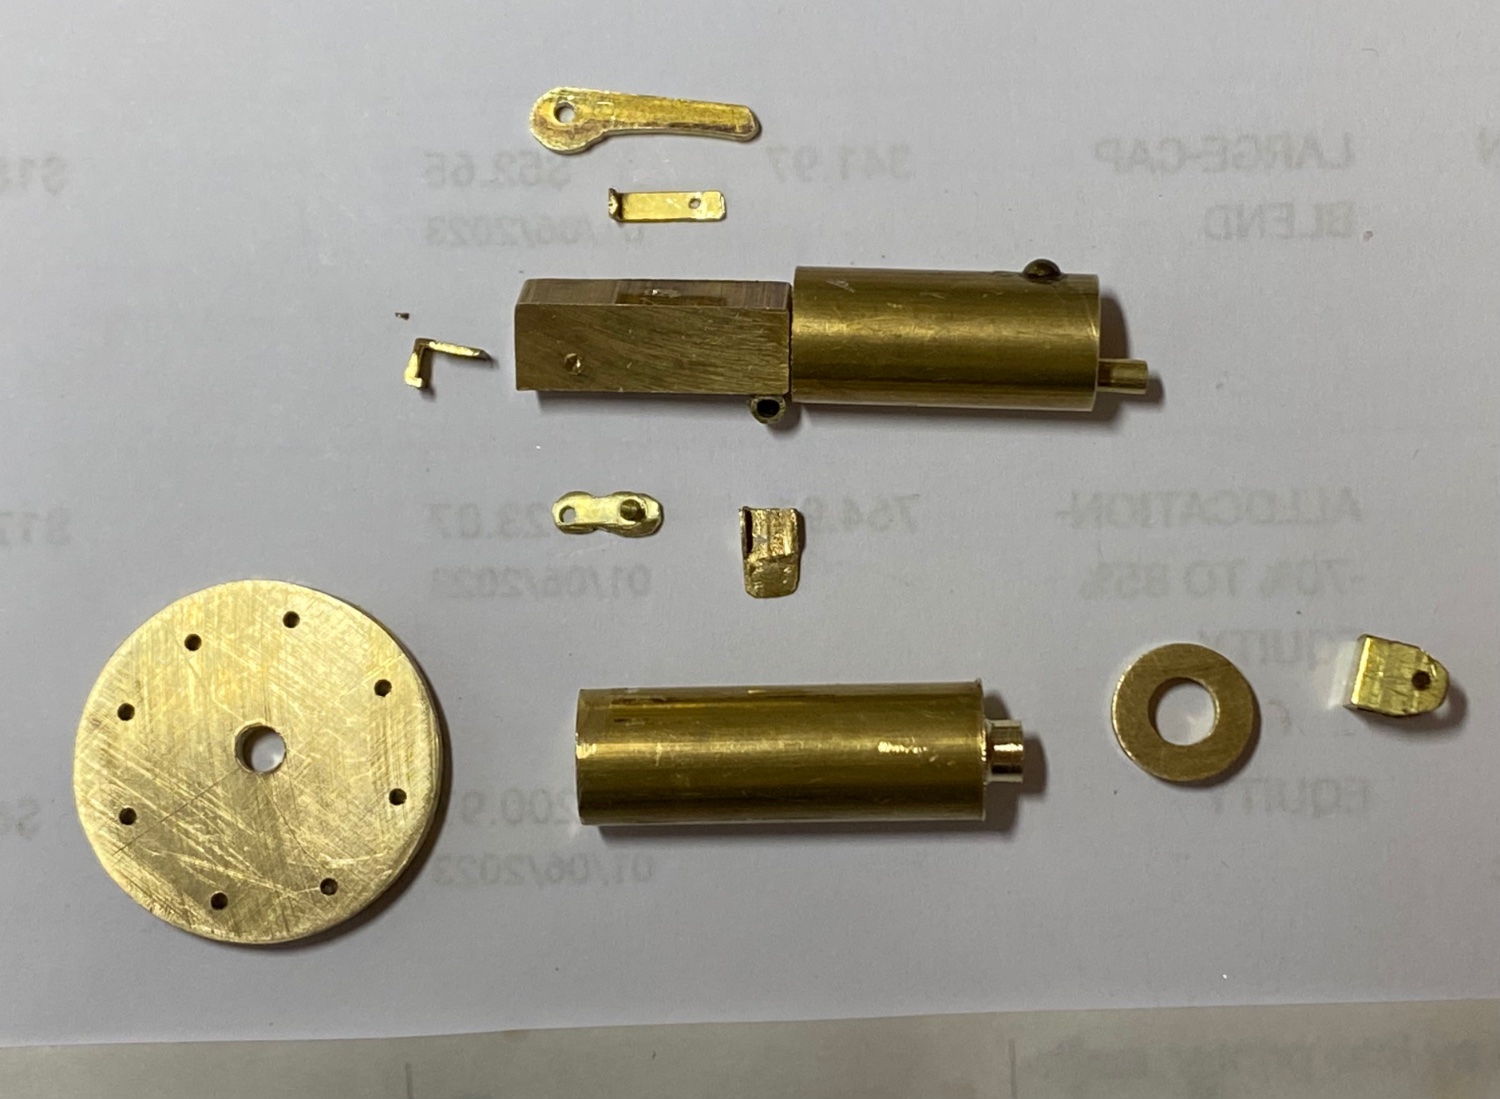
Sorry about missing the scale. Following are more pictures of the parts. And then the assembled MG. And for you Keith (LOL) And finally the Maxim temporally in place astern. Next week I am stuck with the Pinewood Derby in house (remember to "Never Volunteer"). But after that, we will get into the real gun: The Hotchkiss 3pounder. I will have to try my luck on the lathe at the tapered barrel. This forum has been a tremendous help to me on this build. It has given me the confidence to attempt these microscopic fabrications. So, big thanks to all of you.


- 85 replies
-
- 12
-

-

-
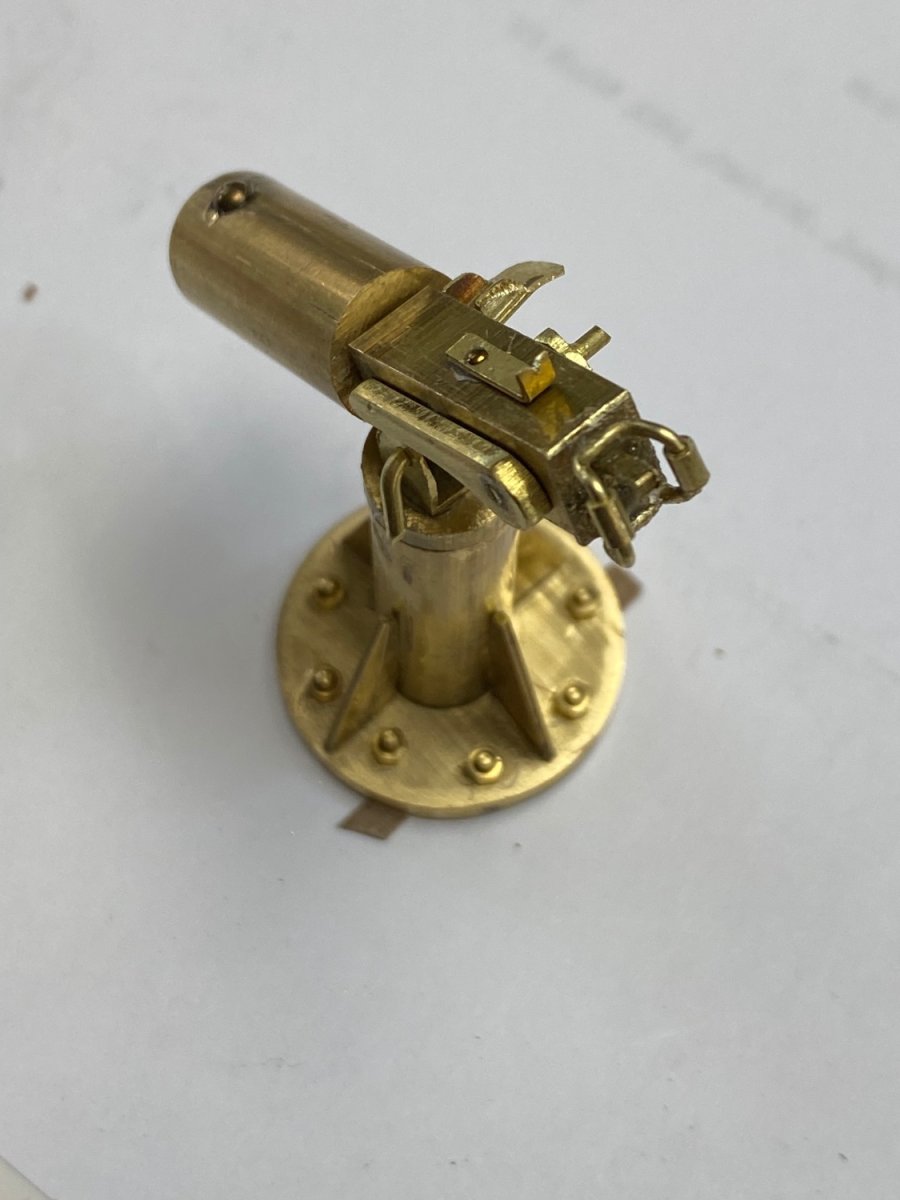
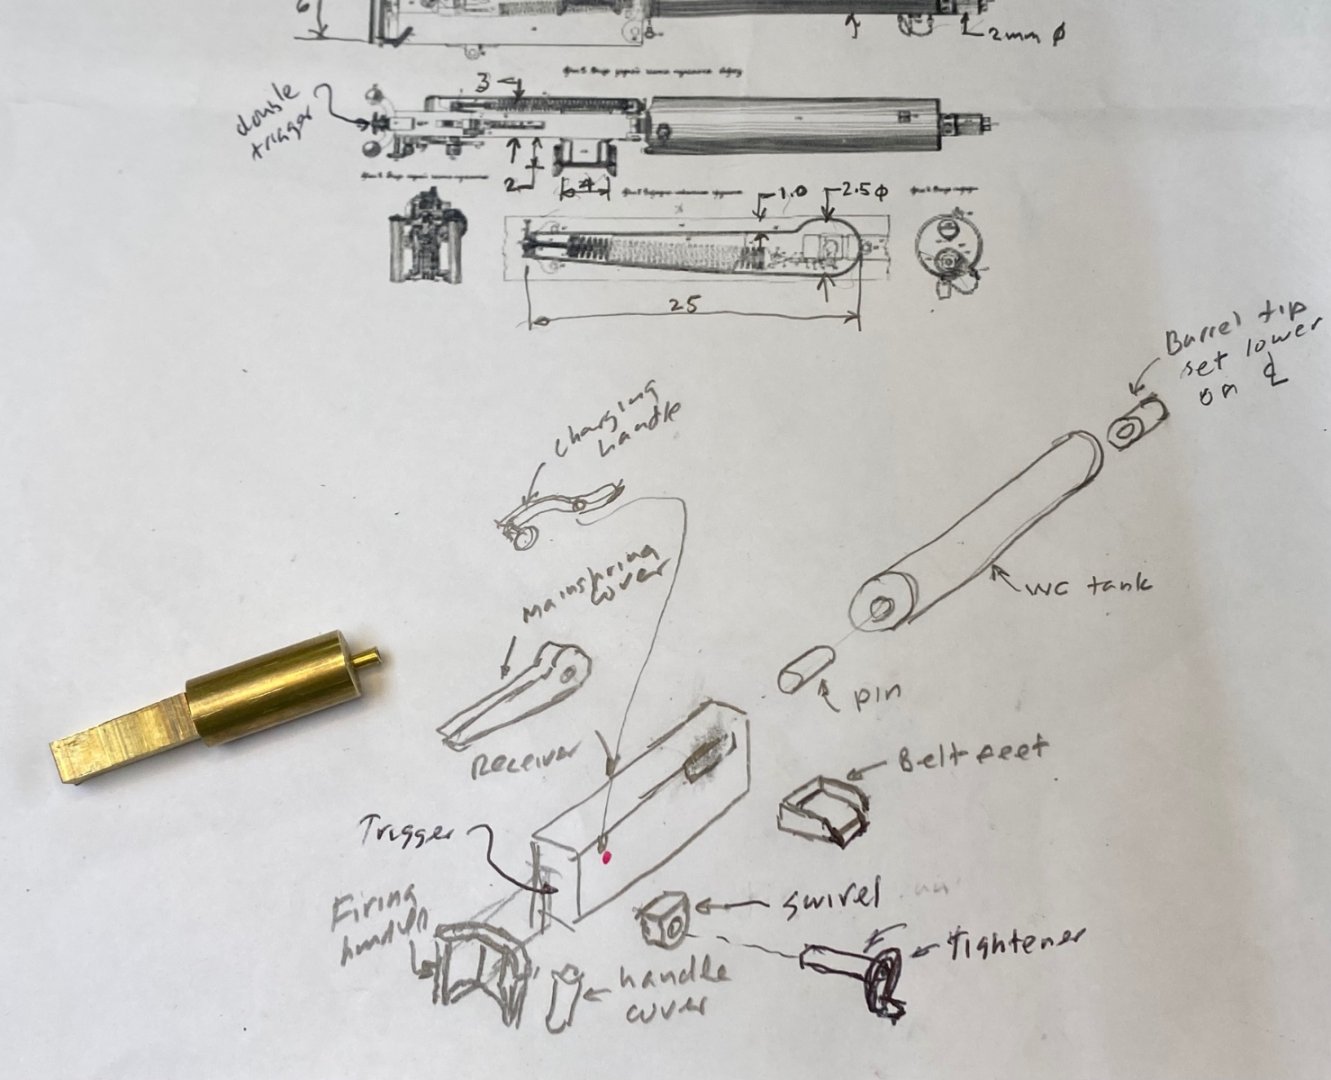
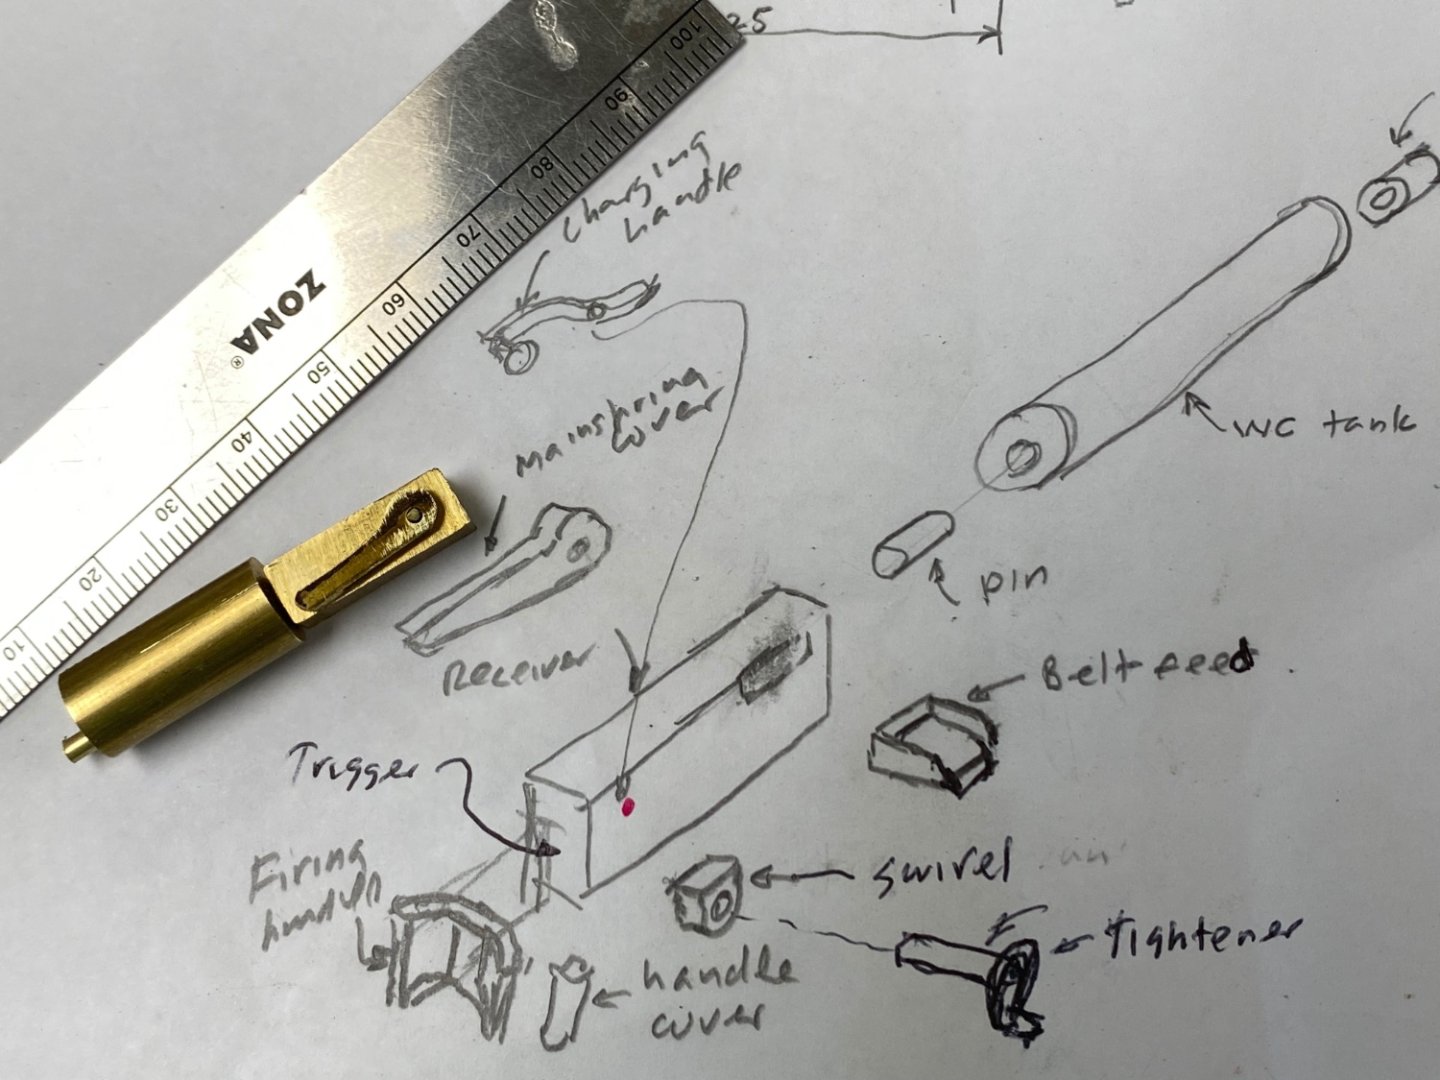
Well , as promised, these are the latest photos of my miniature Maxim. Still need to make the operating handles and the support brackets for the MG post. From top to bottom you have : mainspring housing, sights, receiver and water cooled barrel. On the left are the double trigger. Following are the charging handle and the belt feed tray. Finally the MG mount assembly. Love this job.

- 85 replies
-
- 10
-
-
-
Wefalk, you are right. On second thoughts the MG I posted is a tripod mount heavy service. It is good you came with the explanations as today I spent the whole morning trying to fabricate the elevation arms and making them parallel. Without them I have a simple two way saddle mount. I have made more of the small parts and tomorrow I will post more pictures. Love working with metal parts. Thanks for the likes.
-
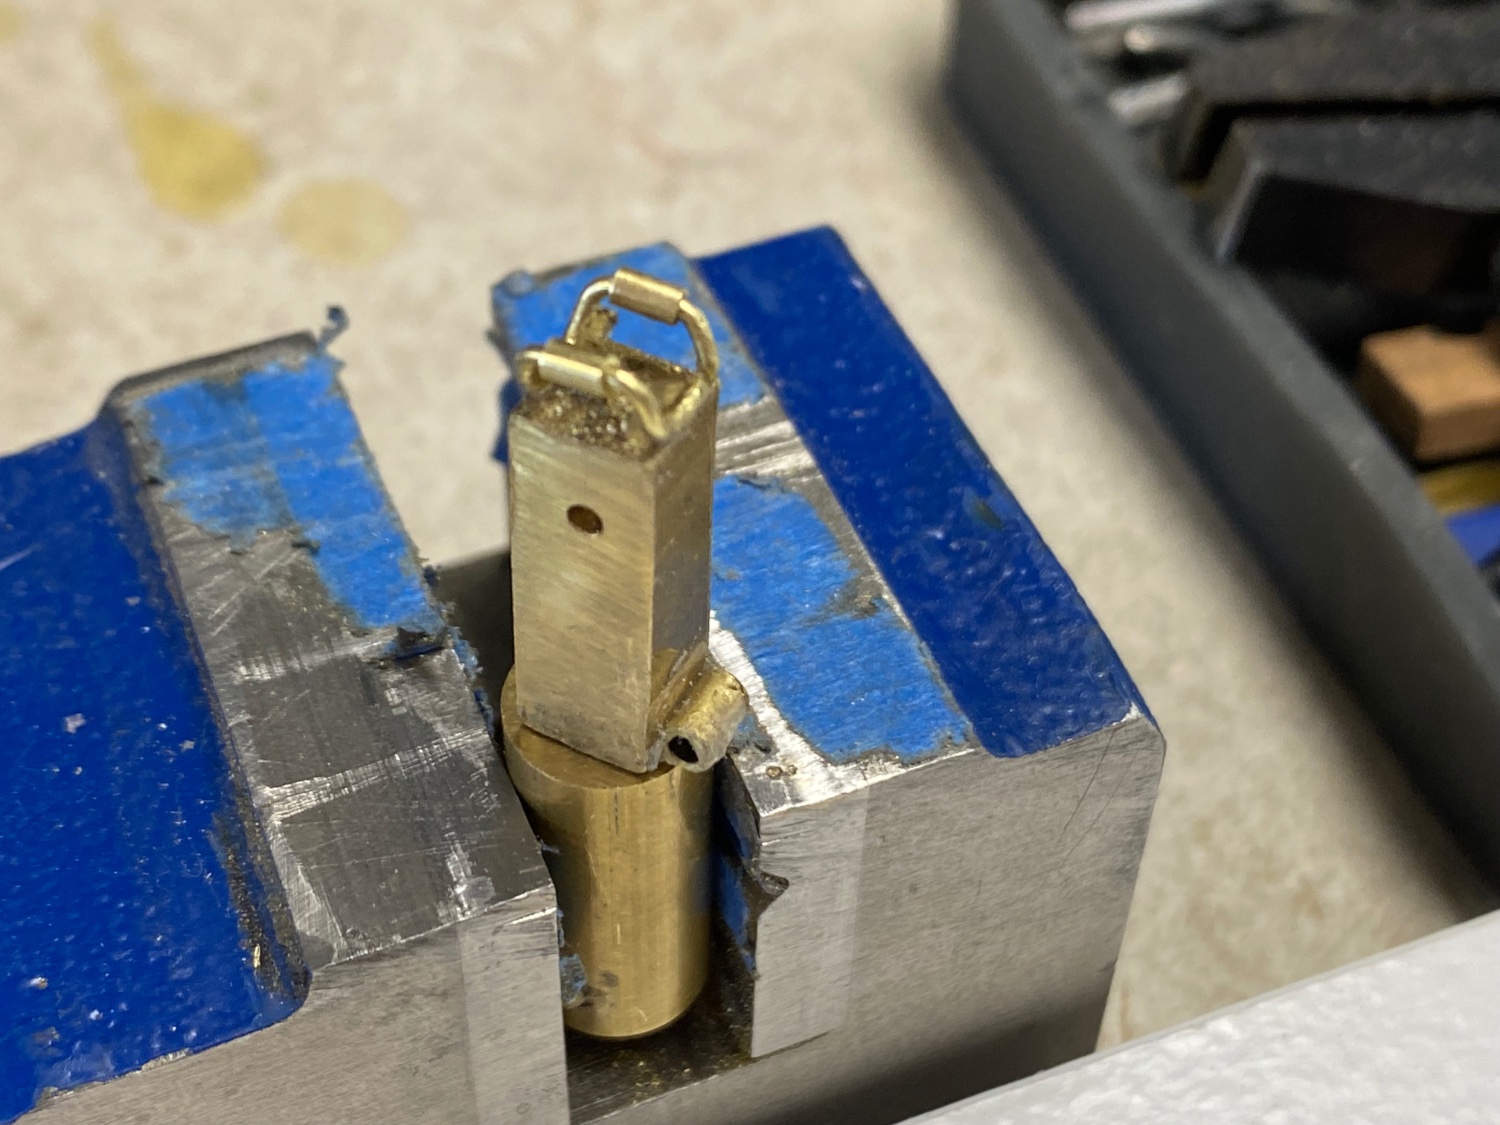
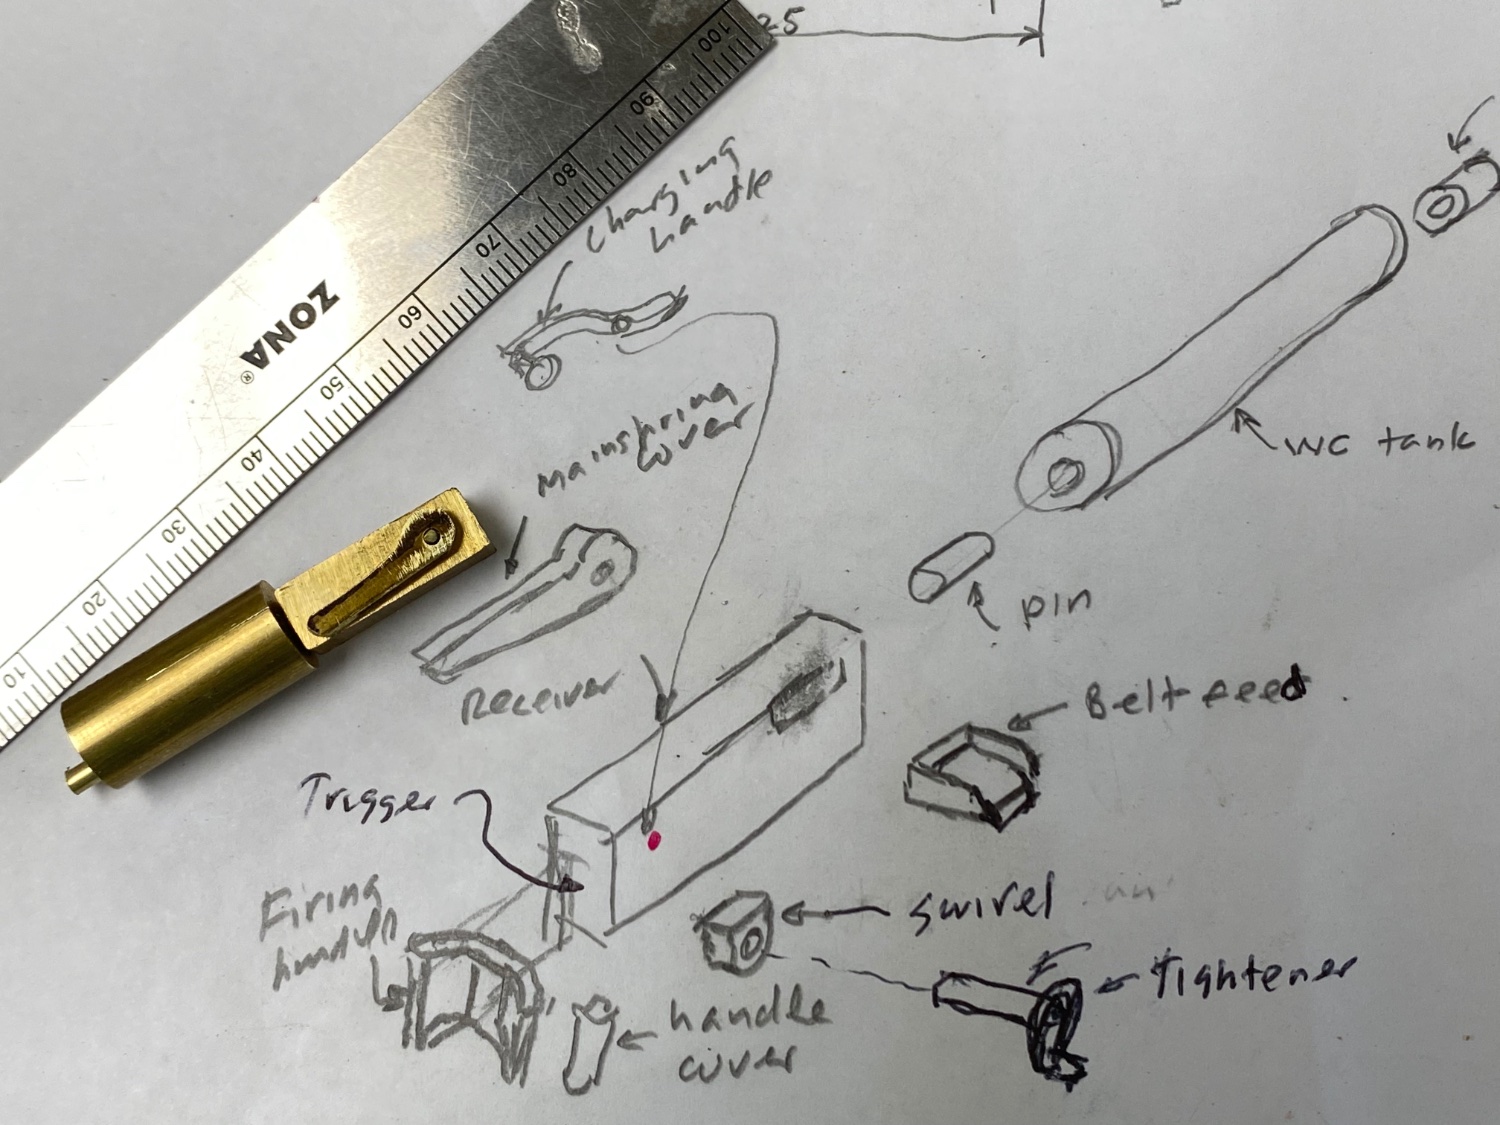
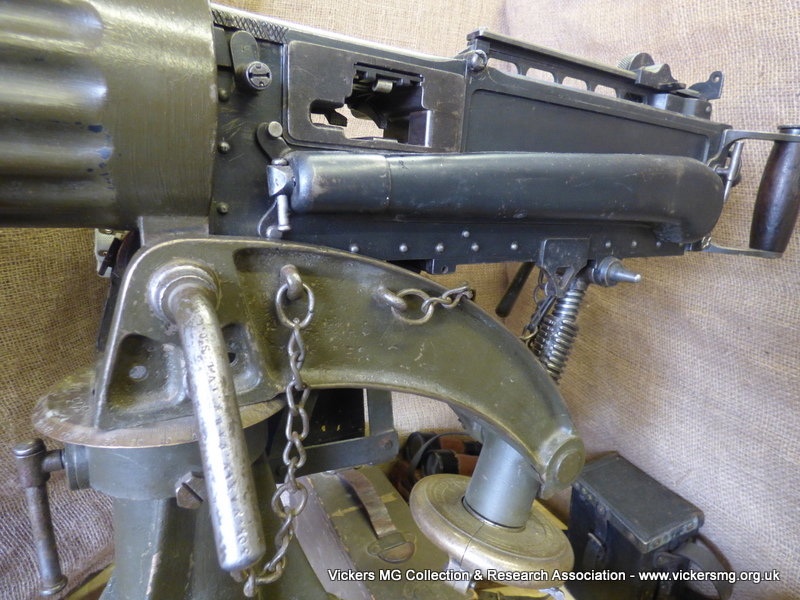
Started the work on the Maxim and when I drew the schematic I was amazed at the number of microscopic parts I had to make. But, following the example of the masters in this forum, I started with the easy ones: the water cooled barrel and the body of the receiver. Then came the first miniature challenge: the mainspring housing. Today I worked on several mini-parts but, unfortunately, forgot to take pictures. I made the belt feed tray and the charging handle. I also worked on the swivel mount. In the plans I have, the gun seem to have a two way swivel: elevation and training. Without any restrain. But, in looking at real gun pictures the swivel was restrained in both directions with adjustments by the operator. This would keep the fields of fire constant and relieve the operator of fighting the recoil. So I am now trying the imitate the mounting shown in the picture below. I figured that the operators would have not been any Rambo's firing a 30 caliber weapon hands free. Thanks for watching and comments are appreciated.
- 85 replies
-
- 10
-
-
Roger, were in Westfield, just north of Indianapolis. Keith , the trip was hell on wheels. We got stuck in Nashville and had to detour more than 50 miles. Then we got stuck again in Atlanta. At my age , it was too much.
-
Mimi is back. Me and the Admiral spent the holidays in Indiana in the middle of a blizzard and a disastrous return home when Southwest airlines canceled our flight back. We opted to drive and, a 14 hour trip took us 20 hours due to the heavy traffic in the interstate roads, Now we are back in our loved sunny Florida. Still working on the finish details. Here is my interpretation of the bilge pump that shows in the drawings. The unpainted parts. Following is the finish pump dry fitted in place. Tomorrow I will be working on the Maxim machine gun. See you then.


-
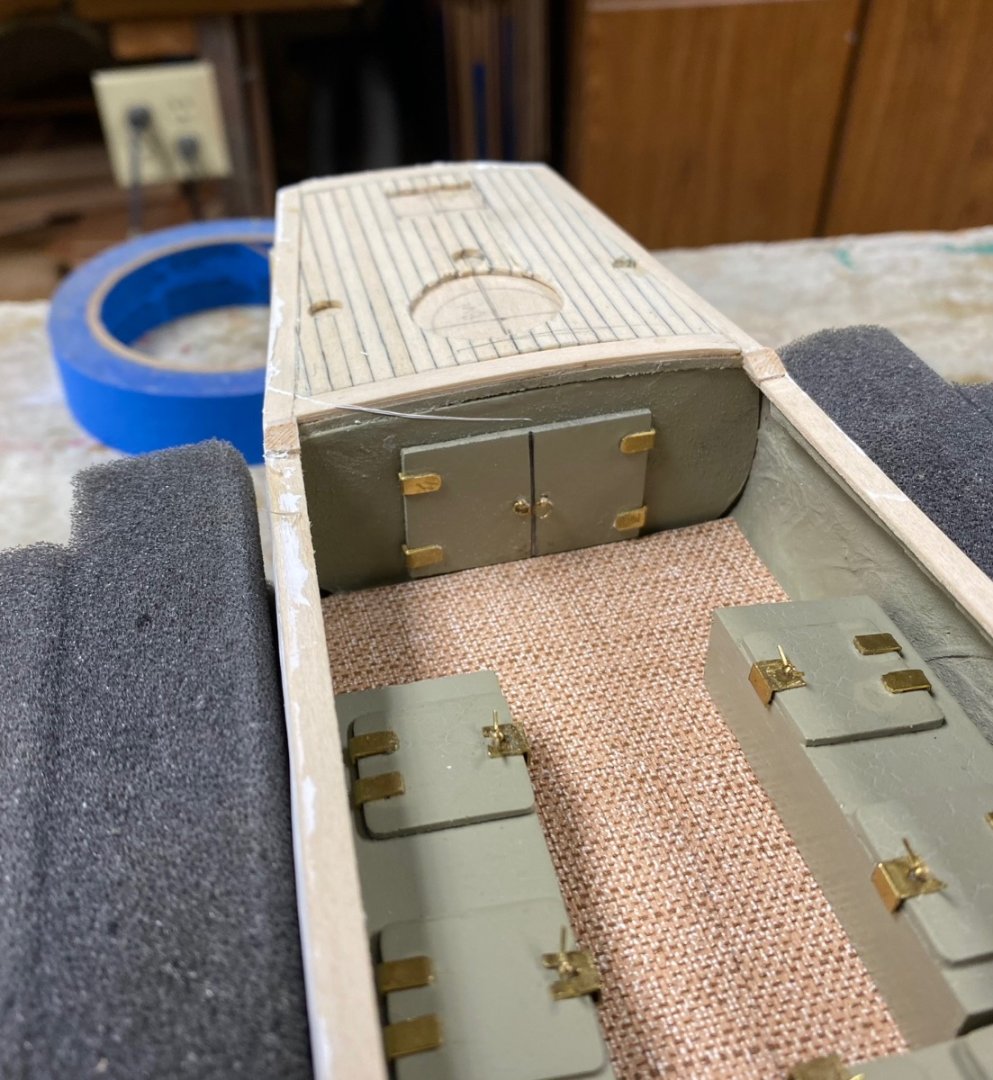
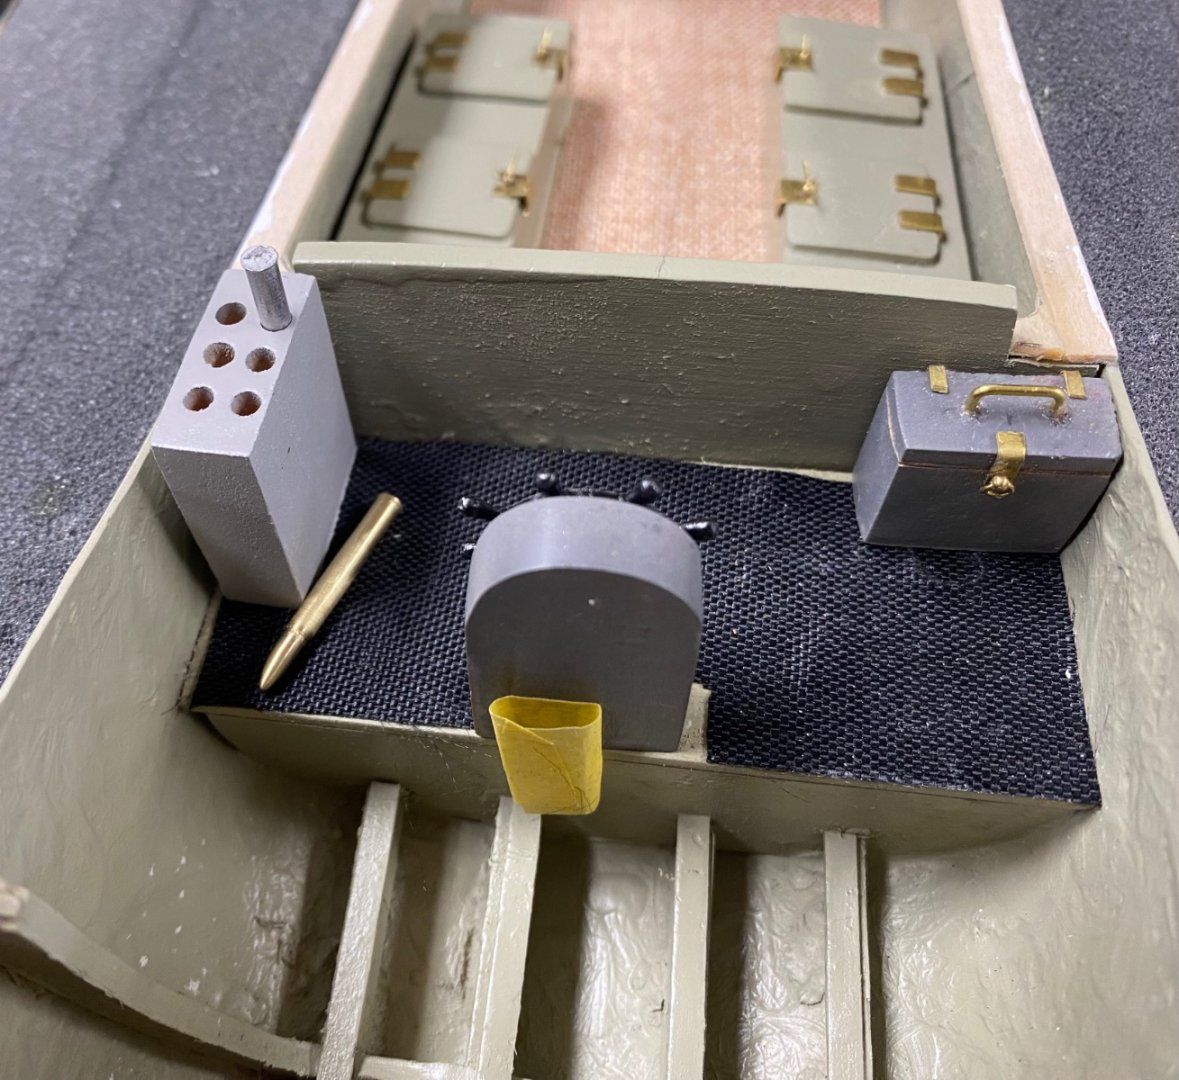
Ha, Ha, Ha, Keith. Those are the ready ammo lockers, with the ammunition supply to pass on to the gunner forward. After the battle their use is left to the crew. Ammo diameter is approximately 2 1/2" which will fit a regular beer can, however, the space is almost 20" deep. It will be hard to pull those cans inside the openings past the rim of the locker. But, maybe they could fill the holes with ice and load only a six pack. British sailors were pretty savvy with respect to spirits so I am sure they would have figure it out. LOL
-
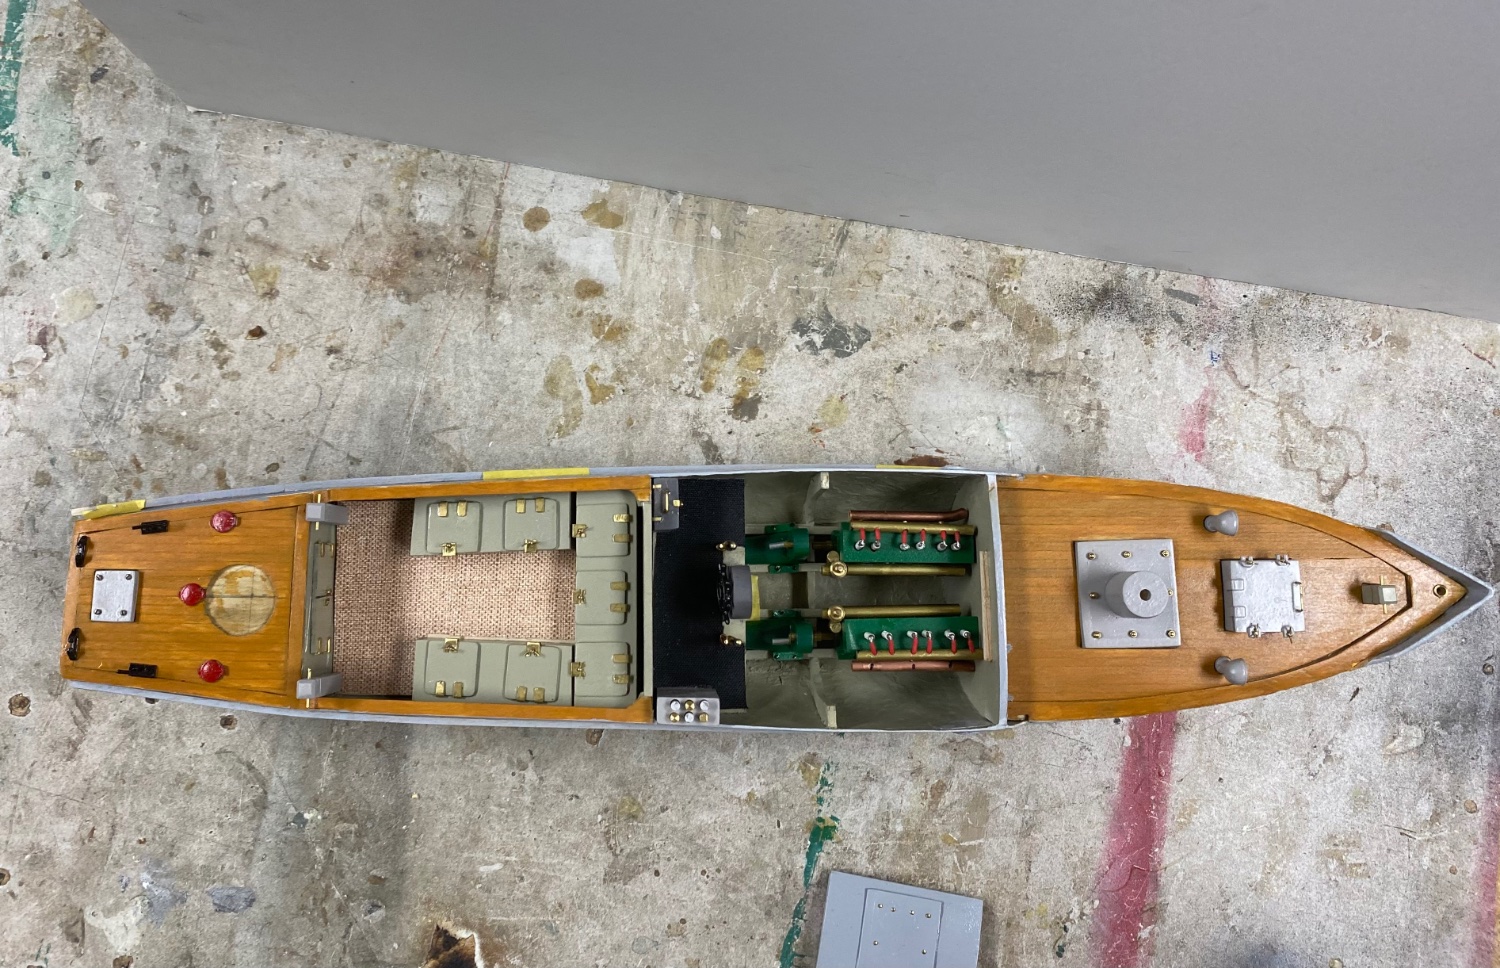
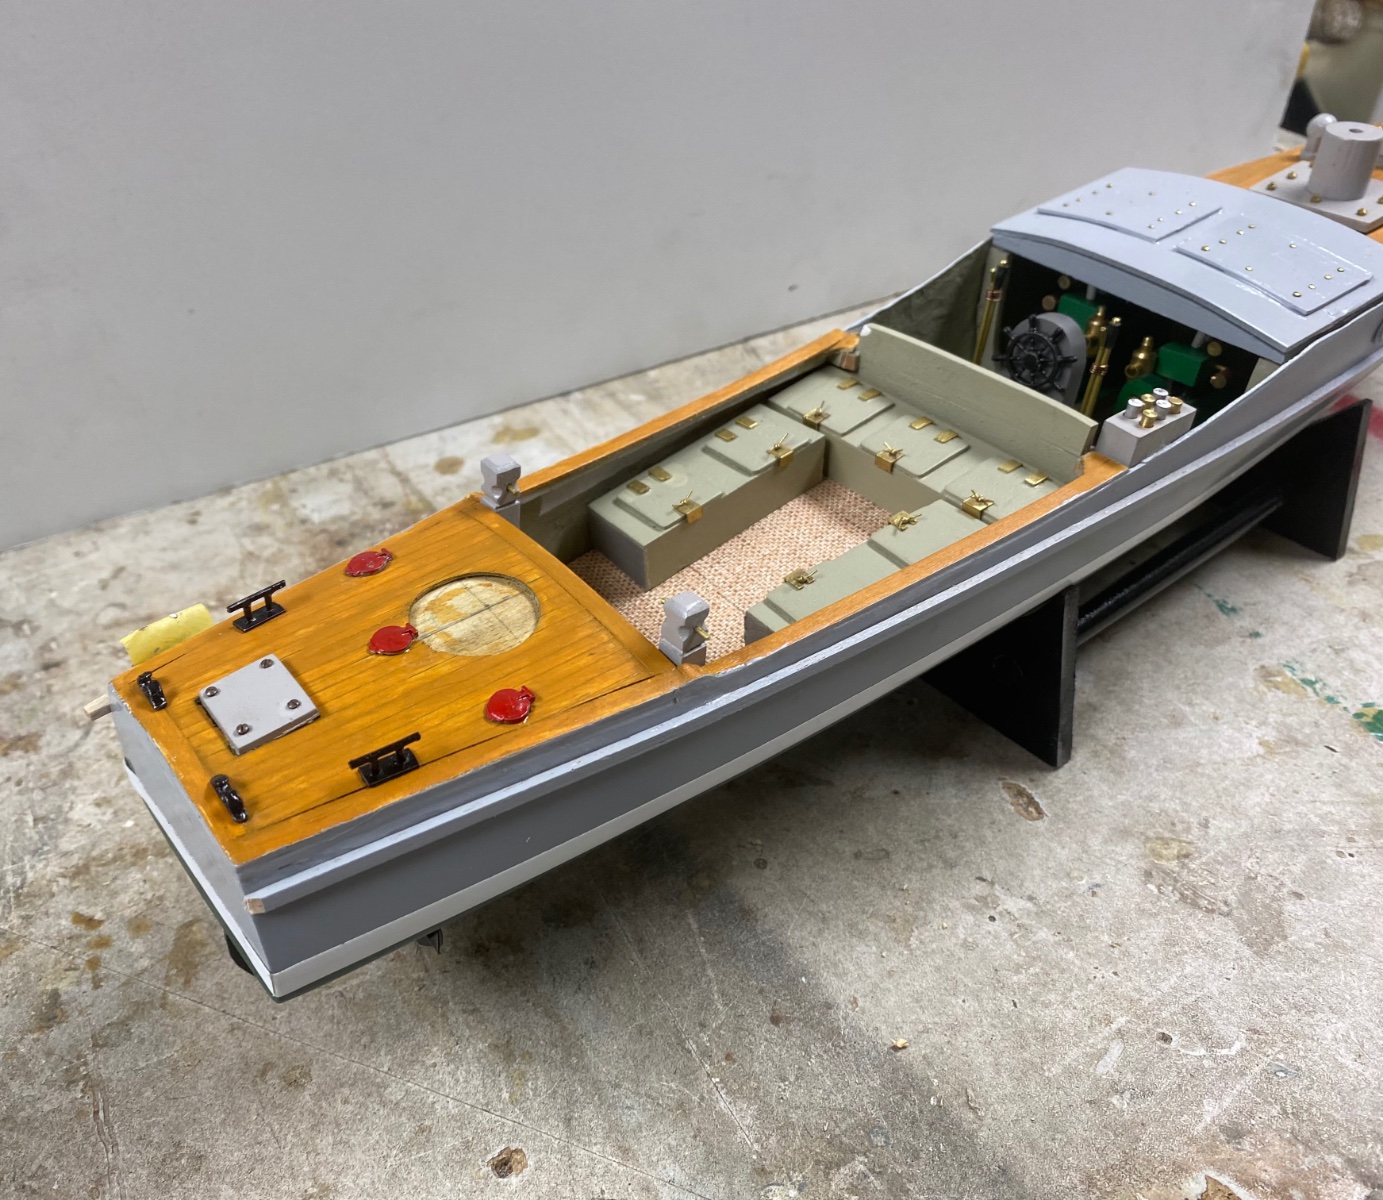
Finally I can show some progress on Mimi. I did not like the printed planking provided in the kit, so I used prefabricated scored planks from Micromark. Completed the work under the water line by adding the propellers and the rudder. I omitted the propeller skegs. Then I fabricated the top of the cabin, making it removable so as to show the engine room details. Completed the installation of all the deck accessories previously fabricated. Also installed the side rubbing strakes. There are a few bo-bo boos and some touch up required . The Admiral and I are going to be away during the holidays. I hate to leave sunny Florida and spend the Christmas in cold Indiana but family duties prevail and thus I am packing all my winter gear. I plan to work on the engineering for the upcoming tasks which are: to build the guns using my mini lathe. I also plan to build the bilge pump and the hand cranked siren. I wish y'all a merry Christmas and a most prosperous New Year and, specially for Valeriy sake, peace in the world.


- 85 replies
-
- 11
-
-
-
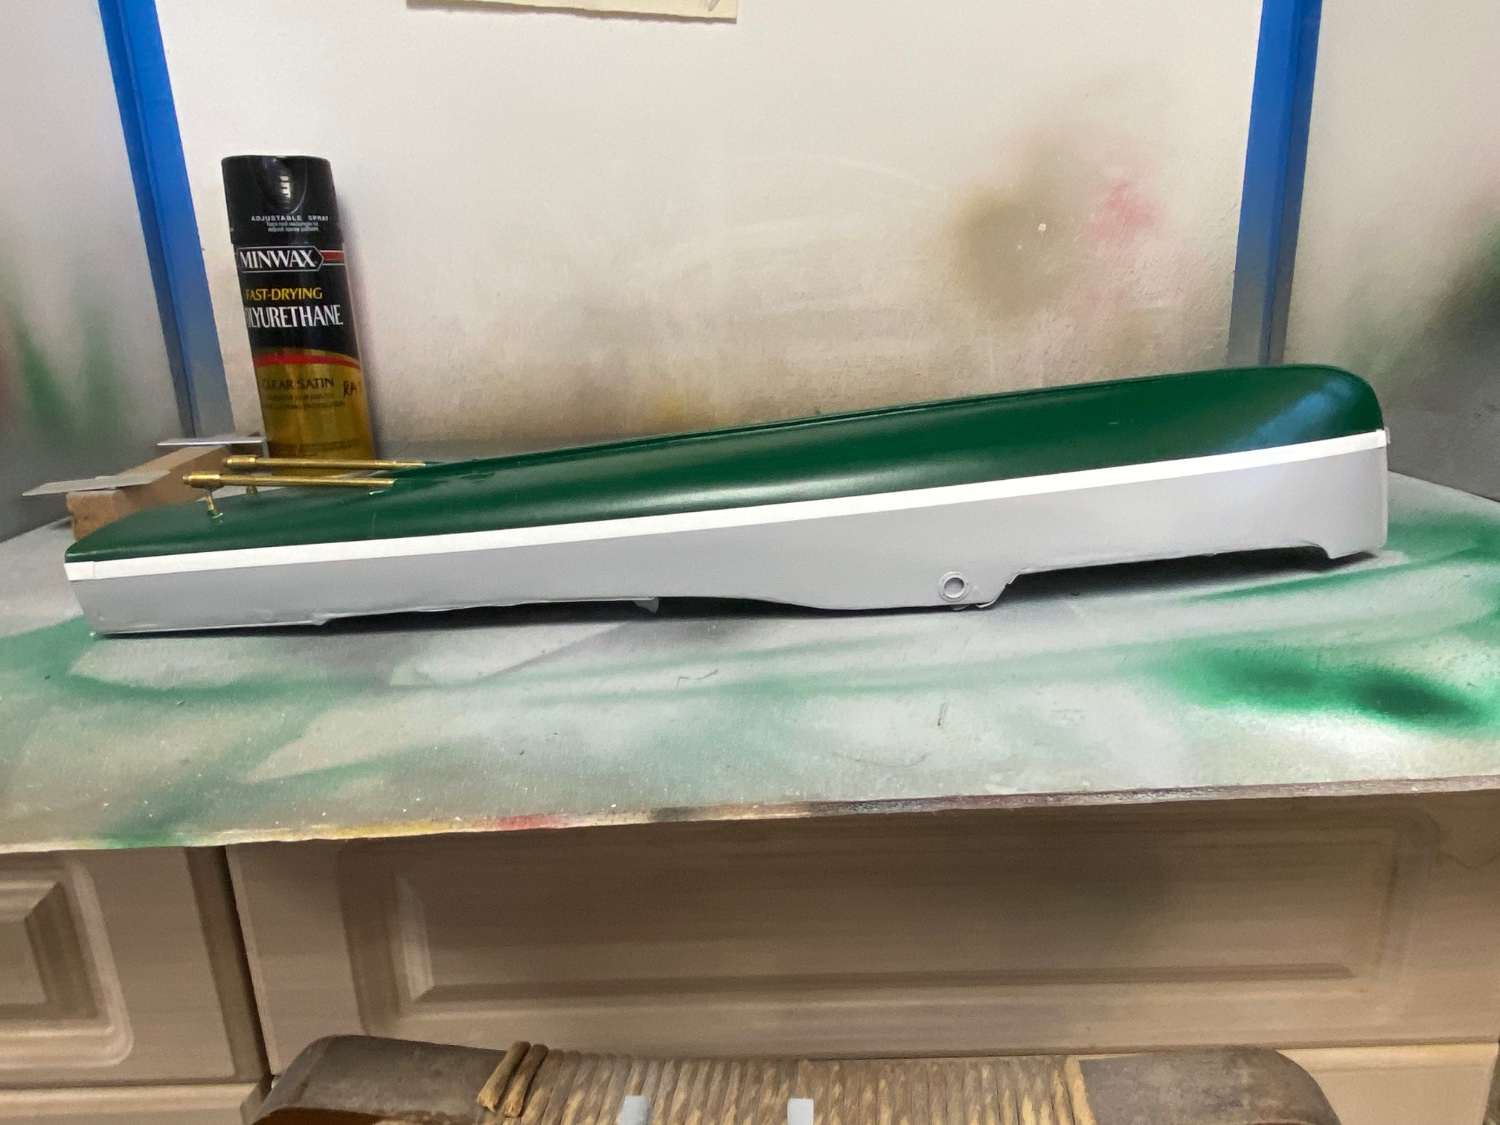
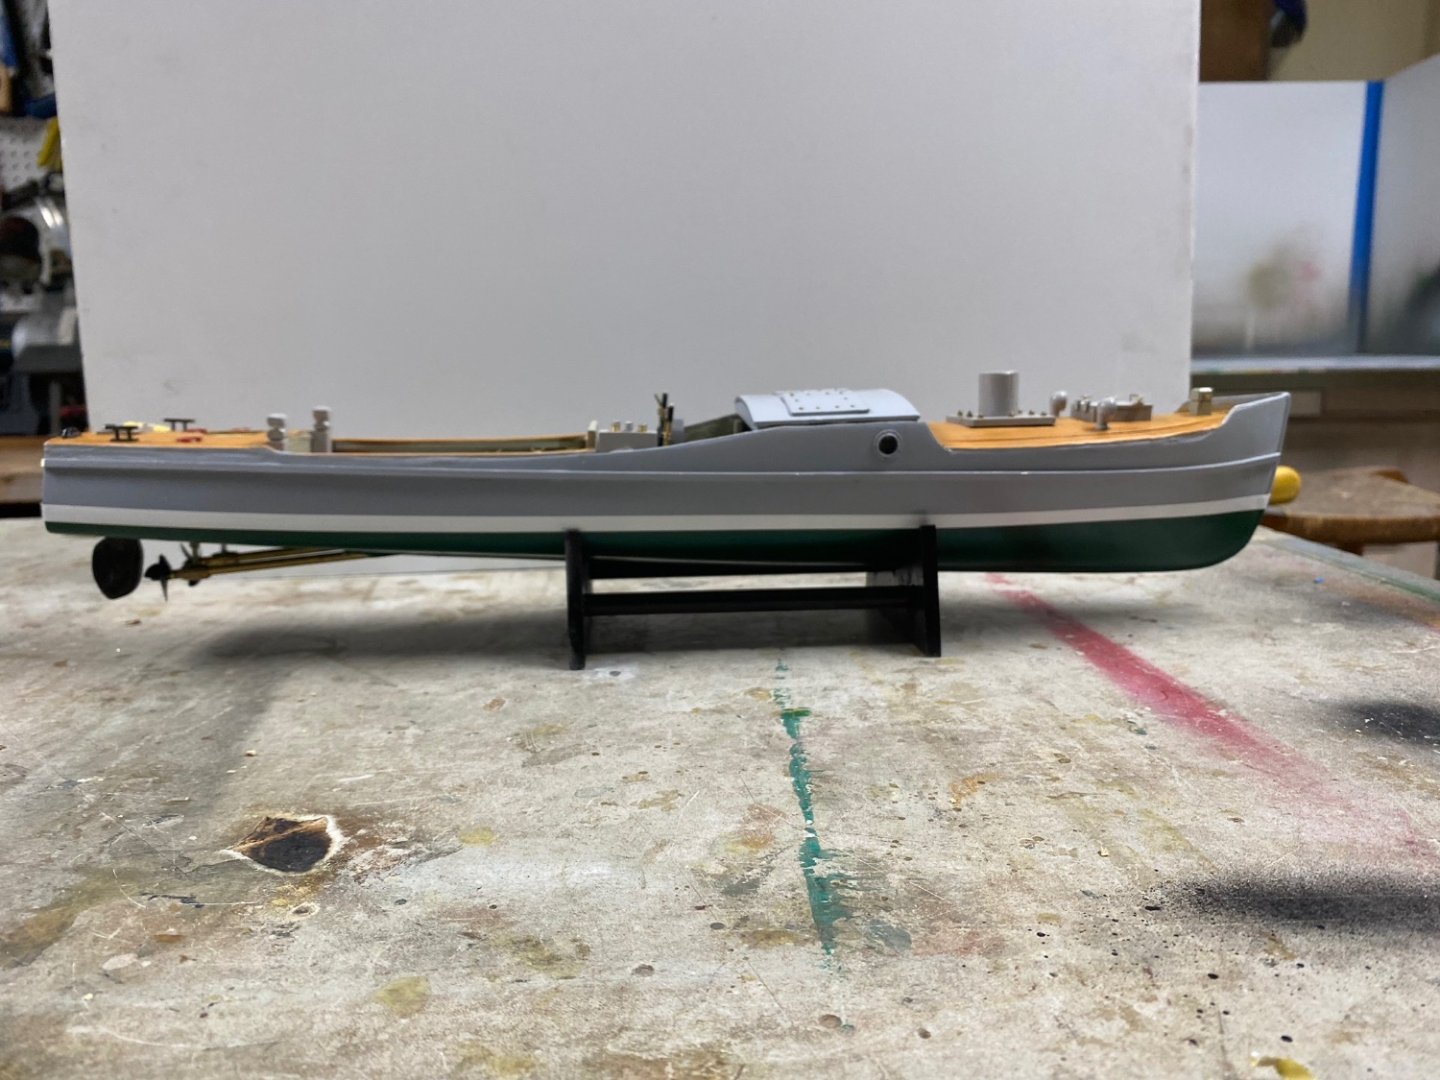
This last week I have been working on the hull painting. I had to cover the whole topsides and in sequence spray the hull. The bottom of the hull is described as a dull dark green in my data but had no idea of the top colors. Since r this is a war ship I figured a light grey will be adequate. And thus is the result. After drying, I coated the hull with Minwax polyurethane satin finish. Little bit of touching up will correct some of my mistakes or misses. Painting is not my forte. Now I can proceed to install all of the deck items I have already fabricated and begin building the guns. The end is near.

-
Thank you guys for the comments and the likes.This forum has helped me tremendously by challenging my abilities. Tblack, I live in Senior living facility and they have a "work shed". Everyone that has worked here has donated their tools so we have ample supply of everything including a precision $10,000 router/saw table. Before I moved in, we had sold our house which included my shed full of my tools. As I started back to the hobby I found myself rebuying all of the tool needed for the small work. Right now I am the only one working in this shop. There is another modeler in the building but he rather work in his apartment. Him and I share share spaces in the curio cabinets at the lobby, where we have our models displayed. Keith, I have to admit that the carpet in the shop is awfully old and dirty. And it has an endless appetite for small items. Thanks again
-
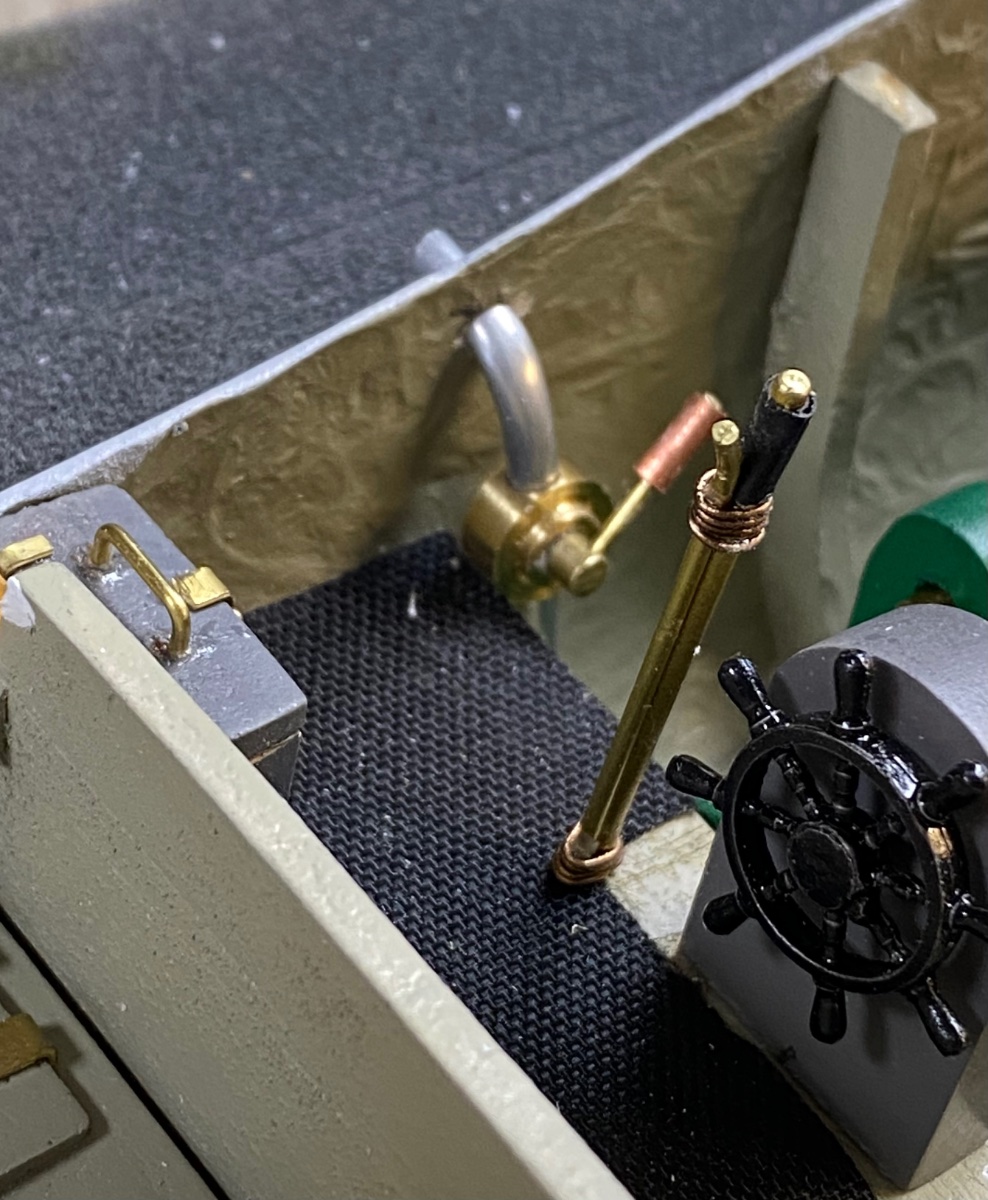
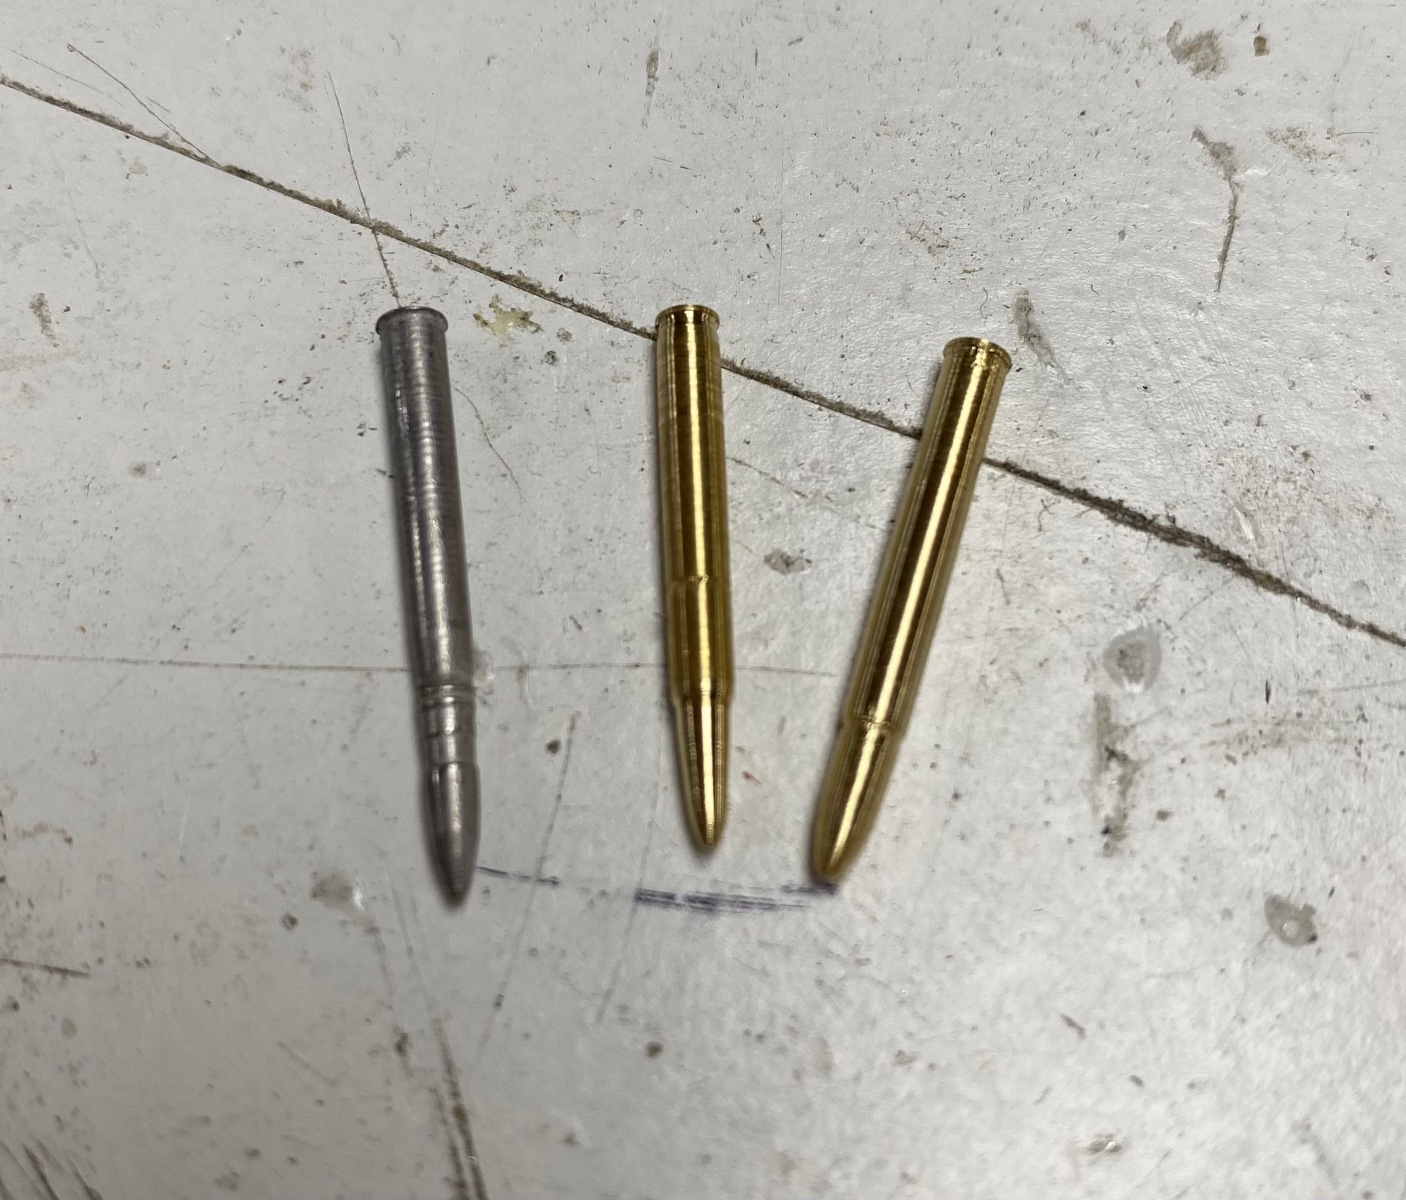
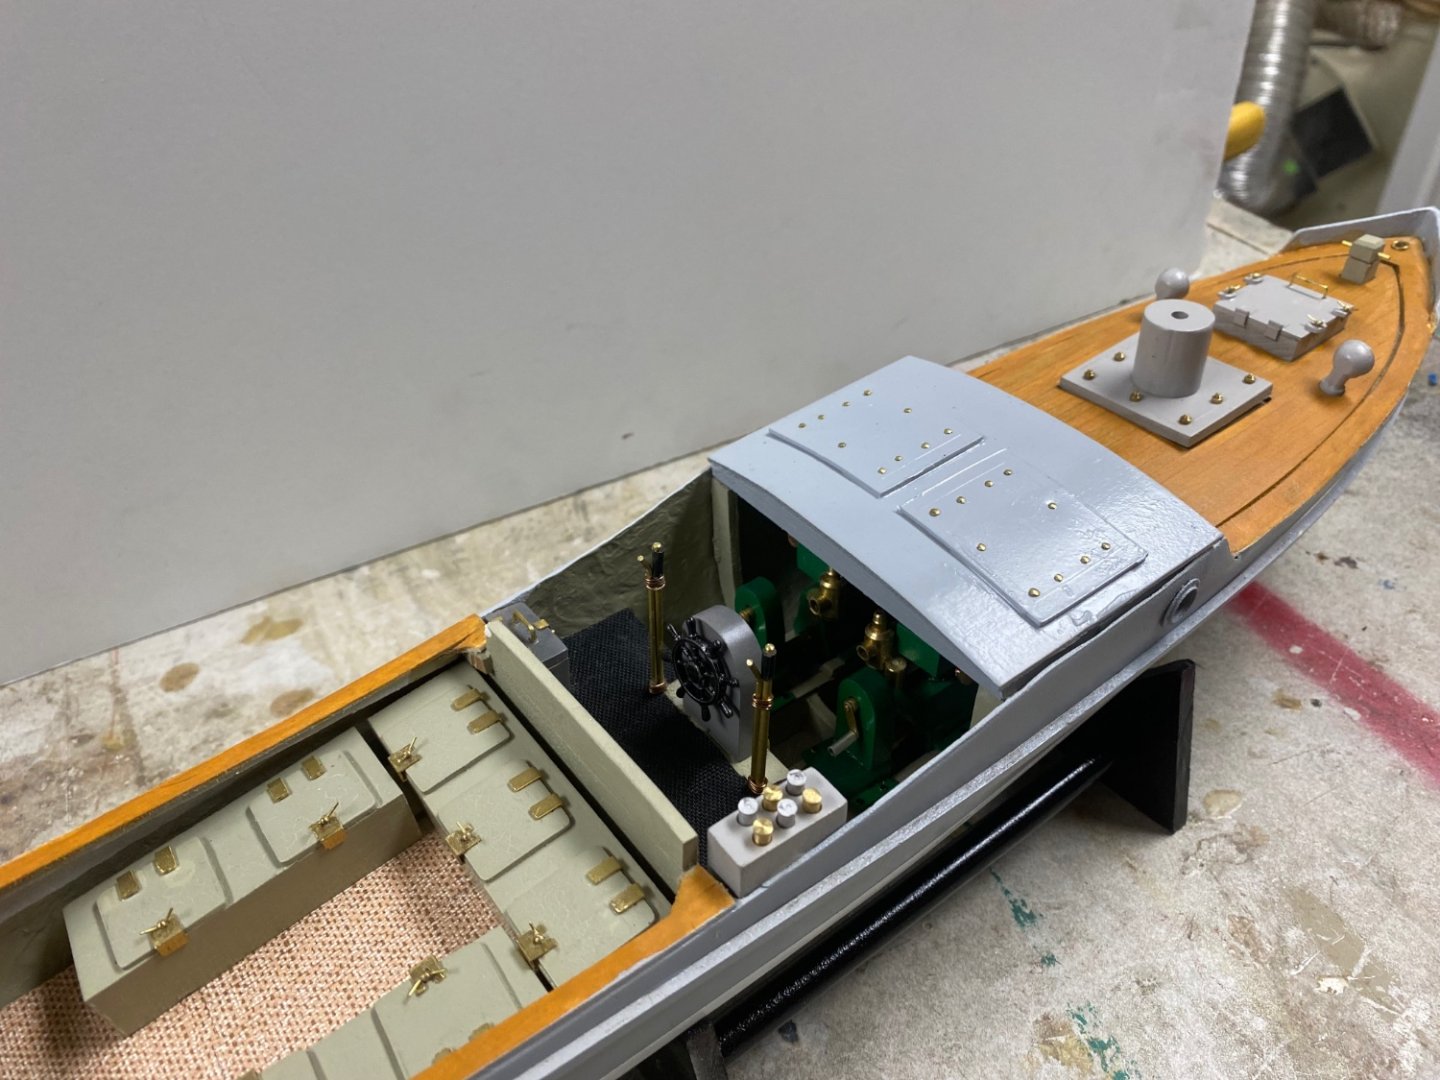
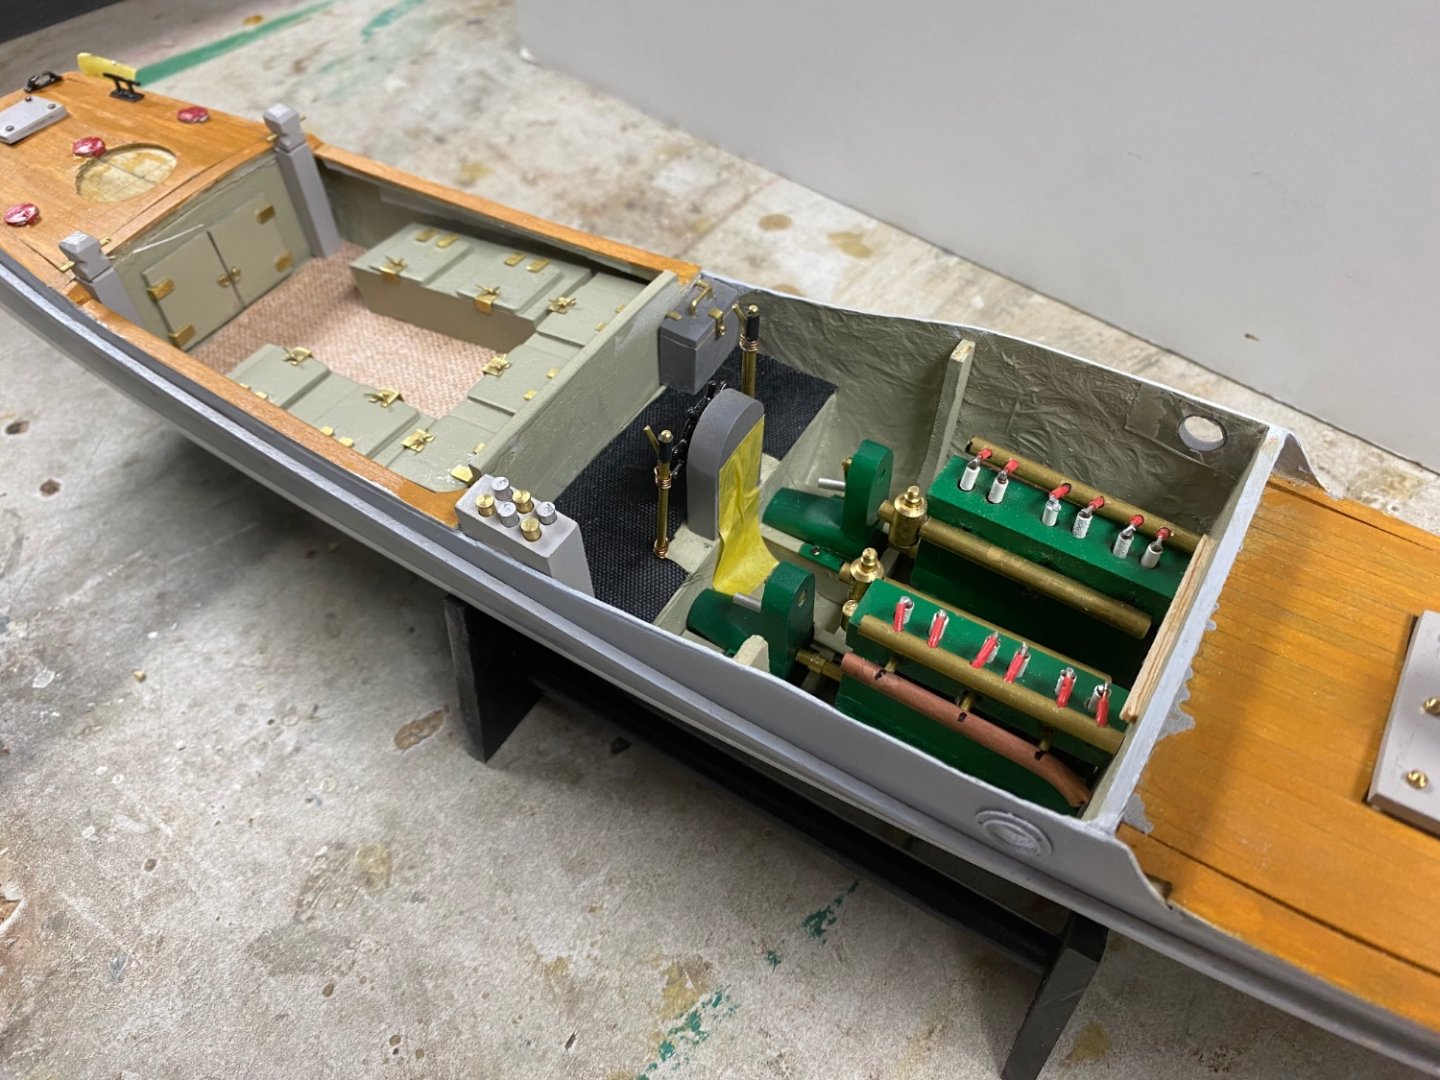
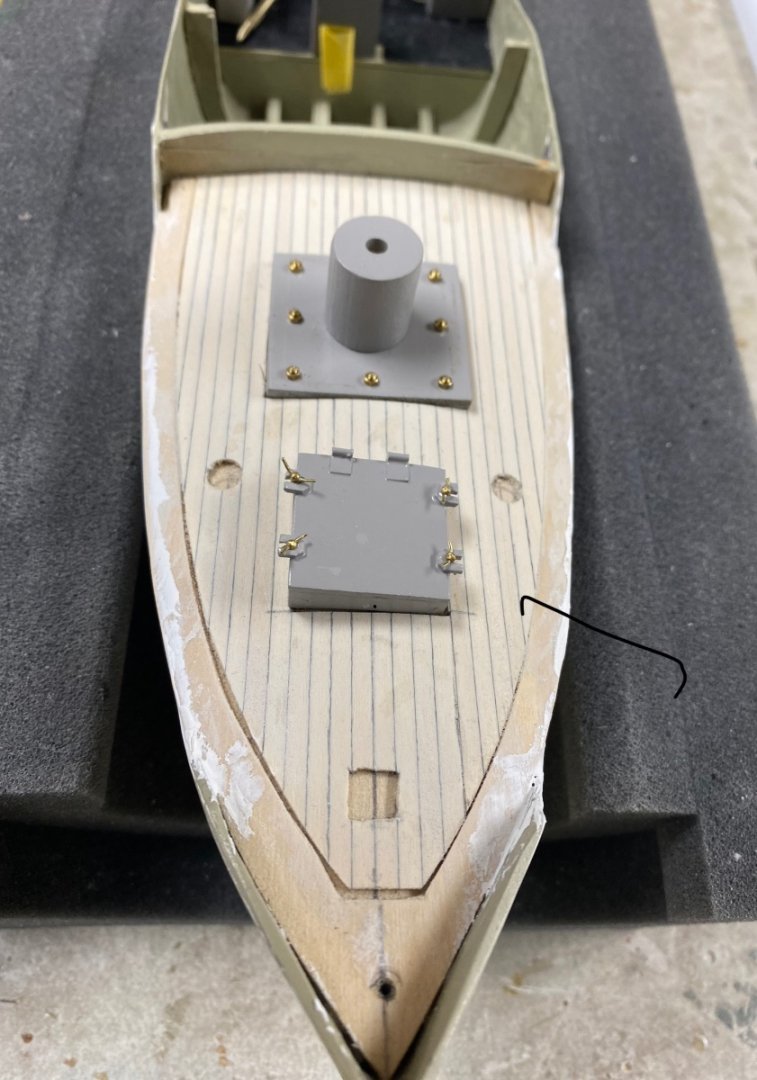
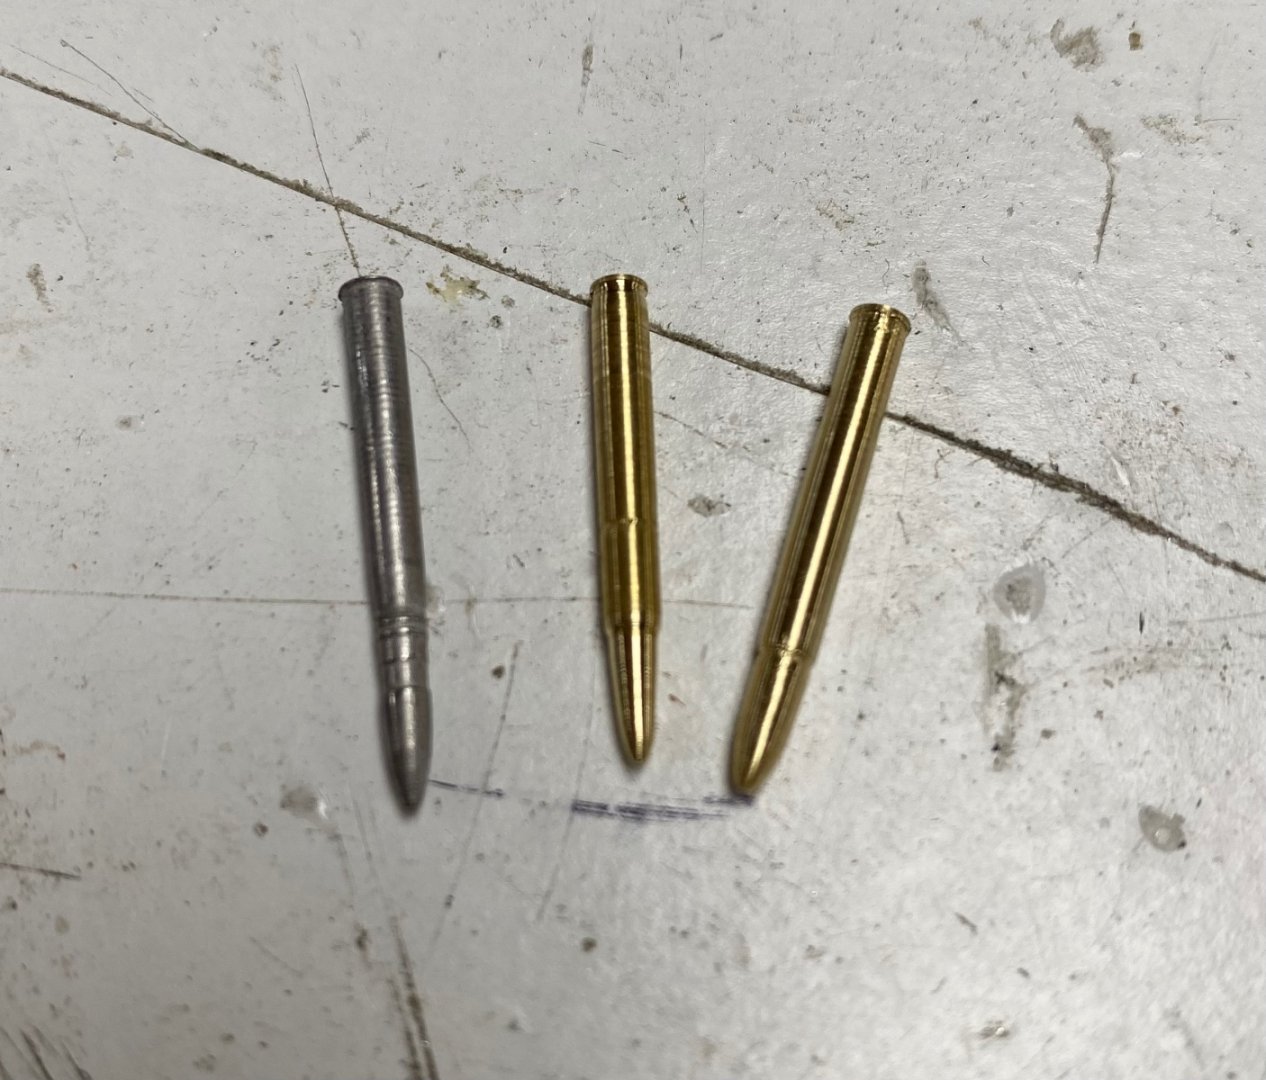
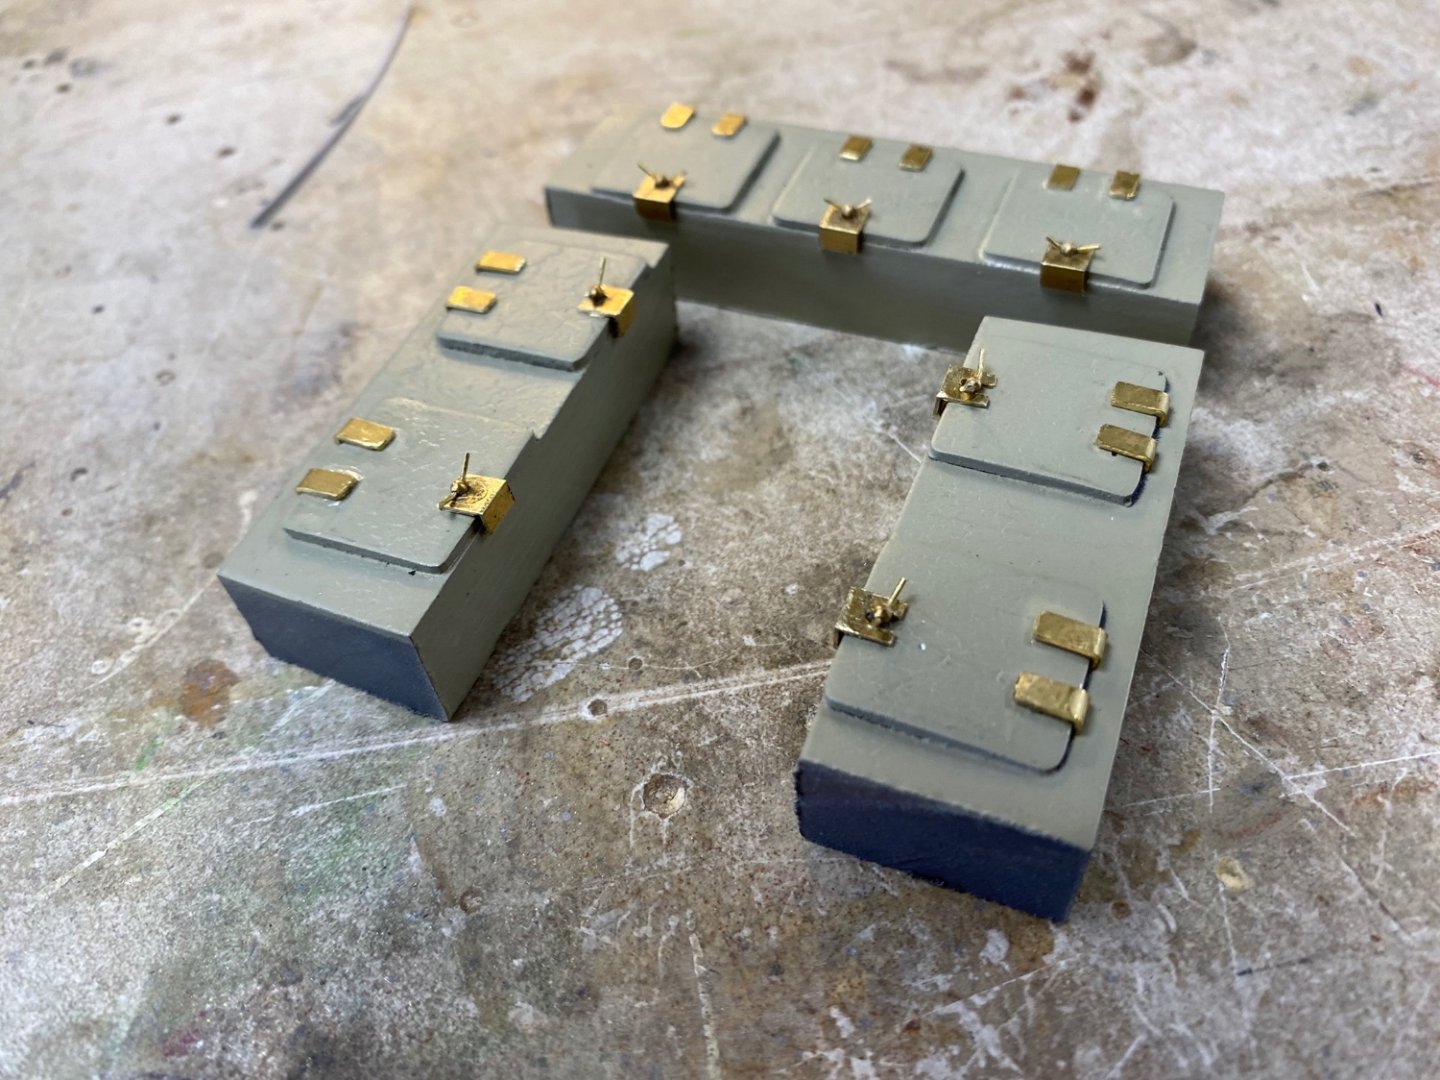
Wefalck, you are absolutely right. On the first try of the gun the gunner was kicked out if the boat when firing sideways. Also the boat rolled almost to the gunnels. Then, they modified the base, and you can see, on the drawings I posted on post #1, how they reinforced the gun base all the way to keelson. They also lowered the gun so that the gunner actually had to kneel to fire it. From then on they actually deleted the sponsons on the sides and the routine was to fire the gun only looking forward. I wondered about how would the gunner and the ammo would have to climb from the cockpit to the forward deck. It must had been a risky try. Those were the things that made me think about building this particular model, A great history behind a simple wooden 40 ft launch. Following are some more pictures of the progress on the model. Please note that the deck accessories are only dry fitted. After I complete the deck fittings, I will paint the hull and proceed to build the guns, install the engines and set the cabin roof that will be removable to allow seeing the engines. A view of the aft deck and the quarterdeck with the ammo lockers. The foredeck. The cockpit with a tool box and ready ammo rack. And finally, my redition of the ammunition for the 3 pounder gun. The one on the left is the kit supplied one. Still need need to refine my duplicating ability.
-
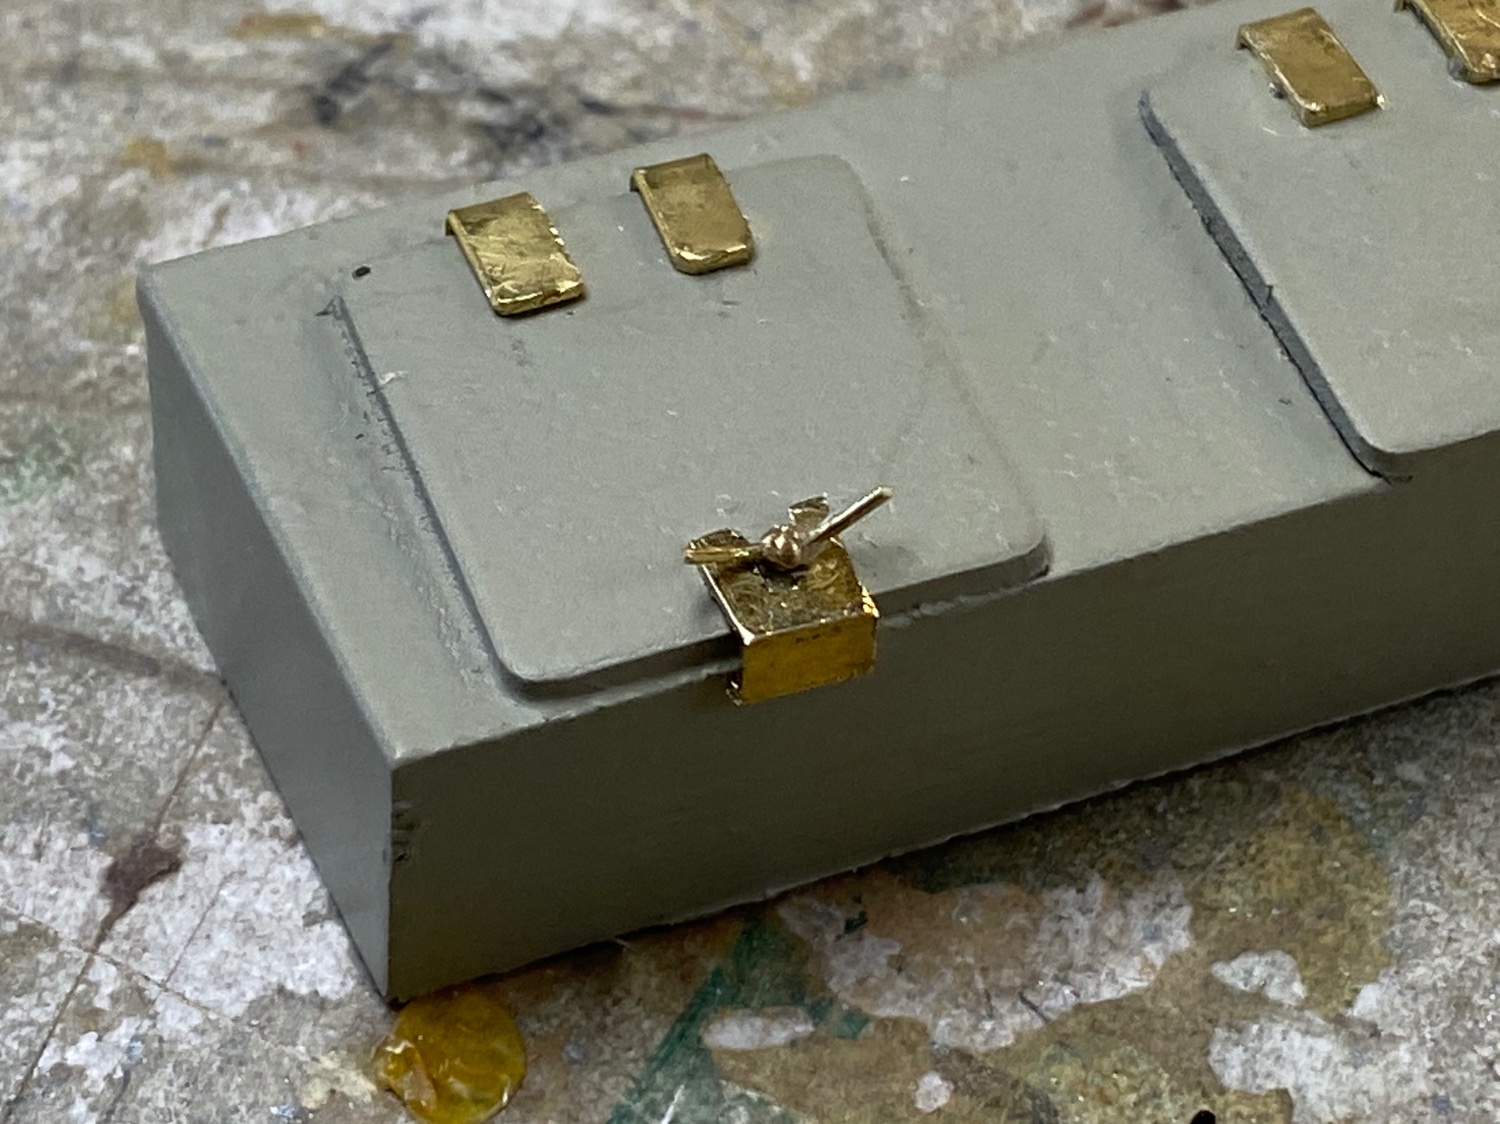
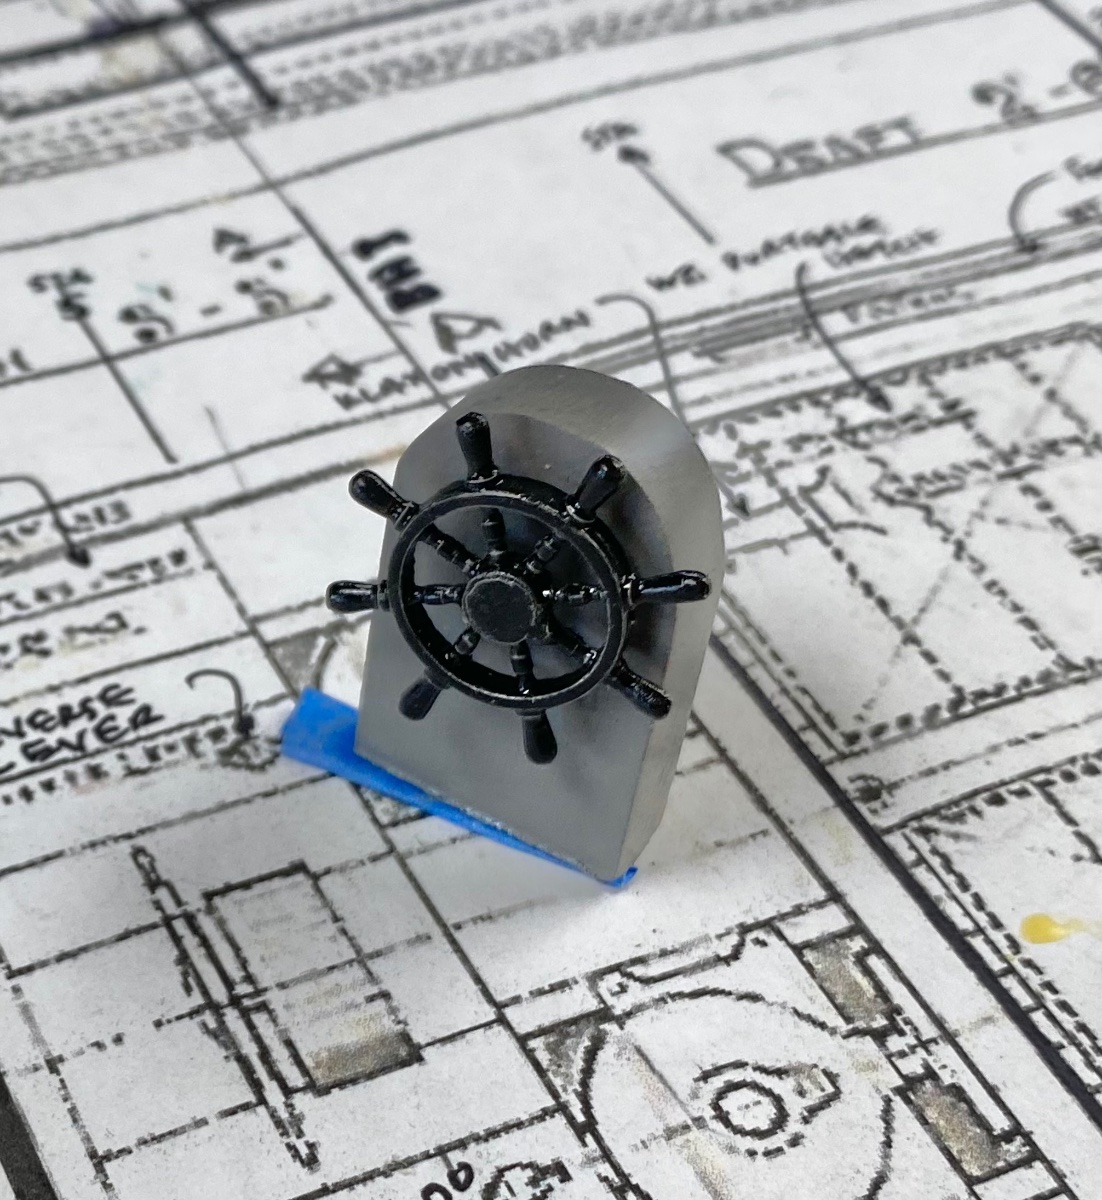
Wefalk, thanks for the video. It is a great addition to my information package on HMS Mimi. The model has had a very slow progress. Mainly because I am fabricating miscellaneous microscopic parts that keep disappearing into the floor carpet. Hinges and locks for the ammunition lockers 3 pounder gun base. Helm. This afternoon I will take additional pictures of the ship and the deck fitting


-
Ditto on Sasha's comments. Beautiful work. What is amazing to me is how you can duplicate pieces so accurately at such a small scale.