


Rick310
-
Posts
362 -
Joined
-
Last visited
Content Type
Profiles
Forums
Gallery
Events
Posts posted by Rick310
-
-
-
Good luck with your build. Nic’s (Mr Bluejacket) model of the Red Jacket is beautiful!! Maybe Nic can send you pictures. I use his model as a reference for my Flying Fish!
Rick
- John Ruy and Ryland Craze
-
 2
2
-
-
-
Thanks George!!
you did a magnificent job on your Flying Fish!!
I also really appreciate your blog as I have used it for a reference frequently as I slowly progress!
Thanks again for your kind words.Rick
-
Rob,
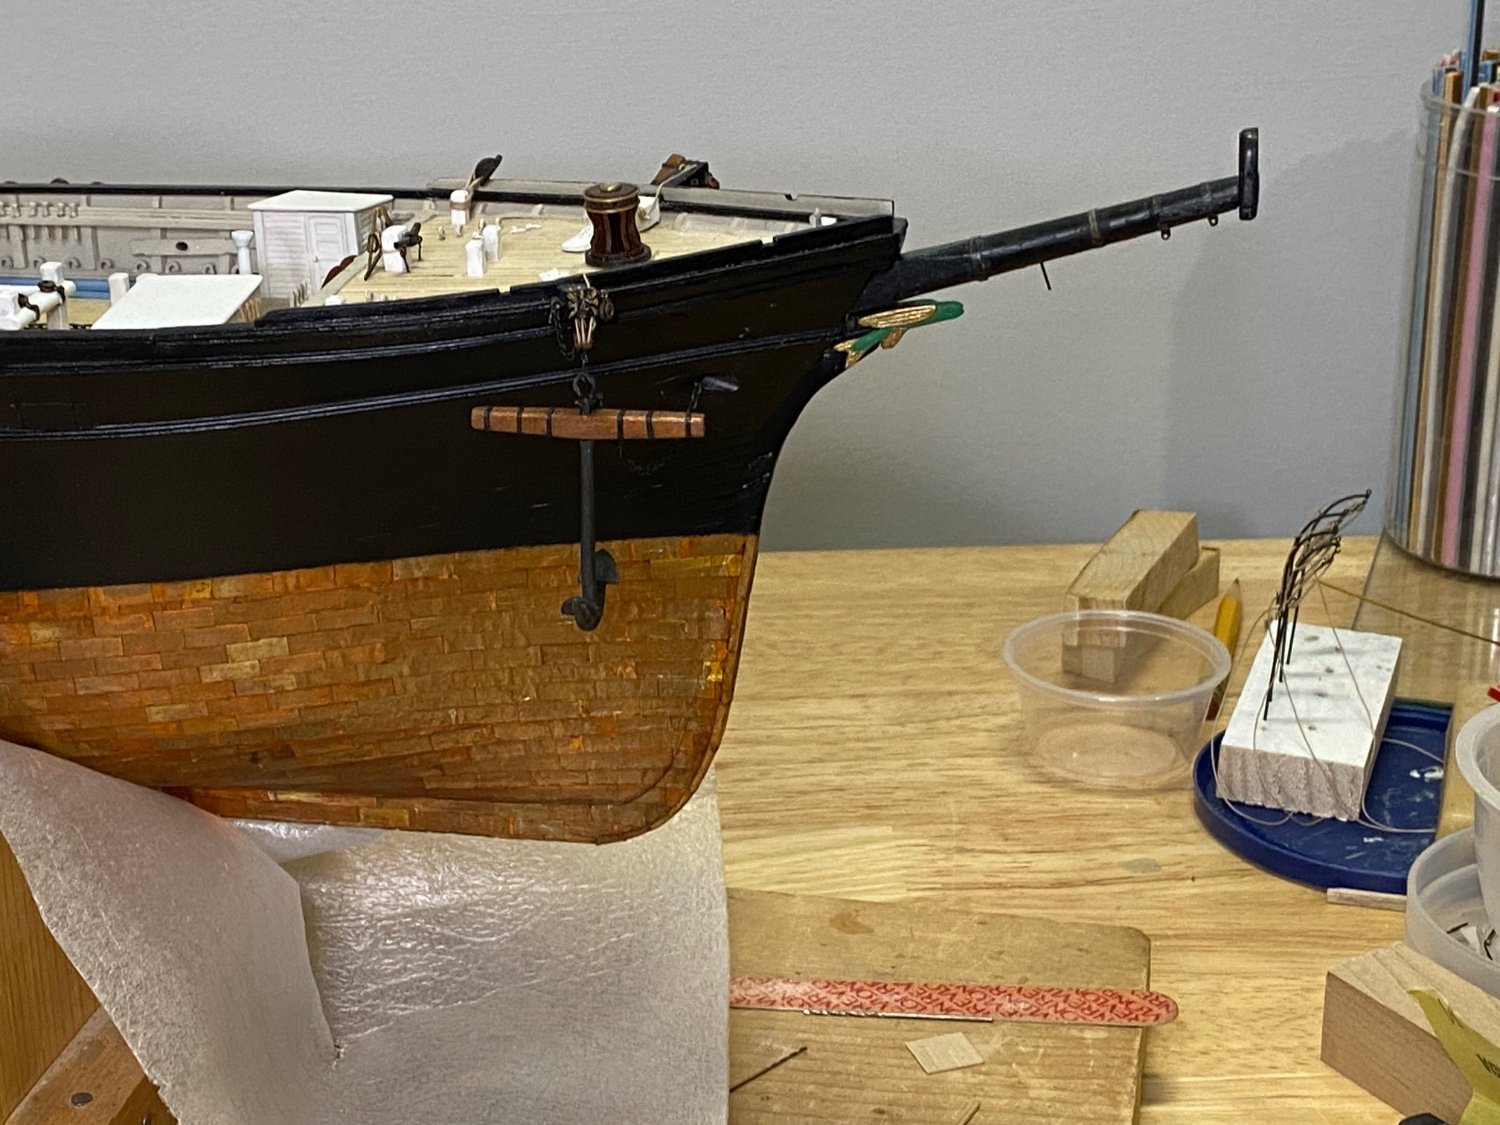
Thanks for your input. In examining both contemporary paintings, I don’t see a definitive naval hood on the Flying Fish. Given that there are several decades separating the launch of the FF and Glory, could the naval hood represent a further development of the bow/ stem/ cut water of Mc Kay’s ships?
Certainly Glory’s is substantial.
On my model, I tried to show an extended stem/ cut water to more closely match the Buttersworth’s painting, ie the graceful arc of the stem as opposed to the stem the plans show which is more straight up.
Rick
-
I bought the Byrnes table saw 16 yrs ago and it is worth every penny!! Absolutely could not make the Flying Fish without it!! I’ ended up milling almost all of my wood stock as the wood supplied with the kit is inadequate!
Jim Brynes takes an occasional break but his table saw is still available,
Rick
-
WOW. Beautiful metal work!!!
Rick
- FriedClams, mtaylor, Valeriy V and 2 others
-
5
-
rigging.
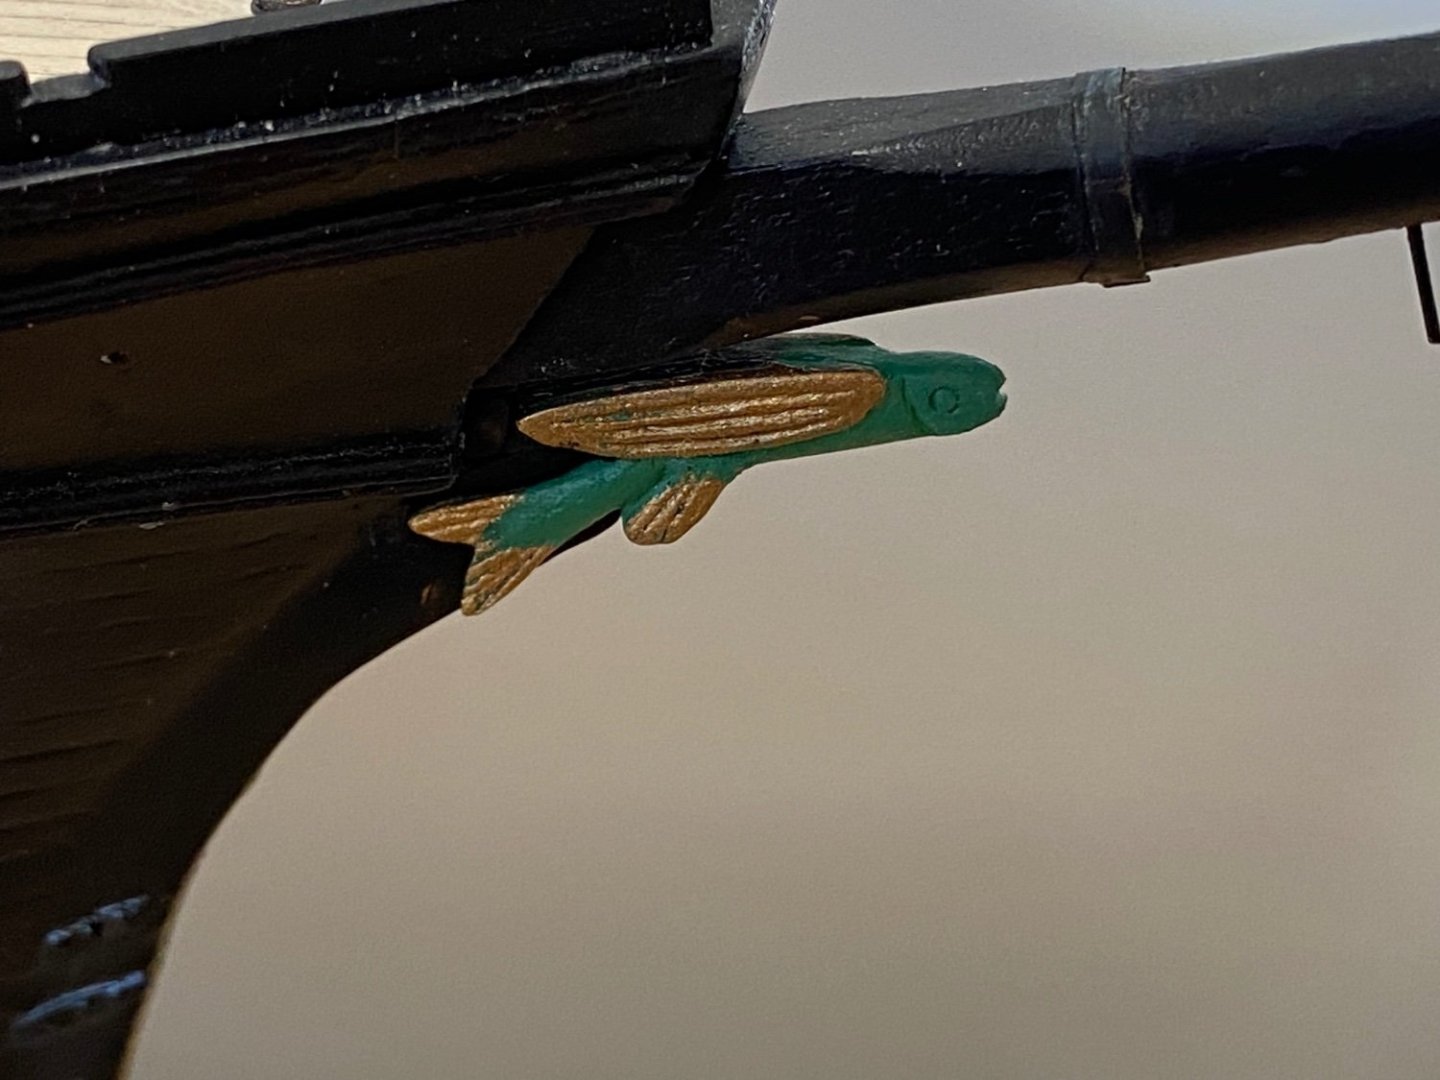
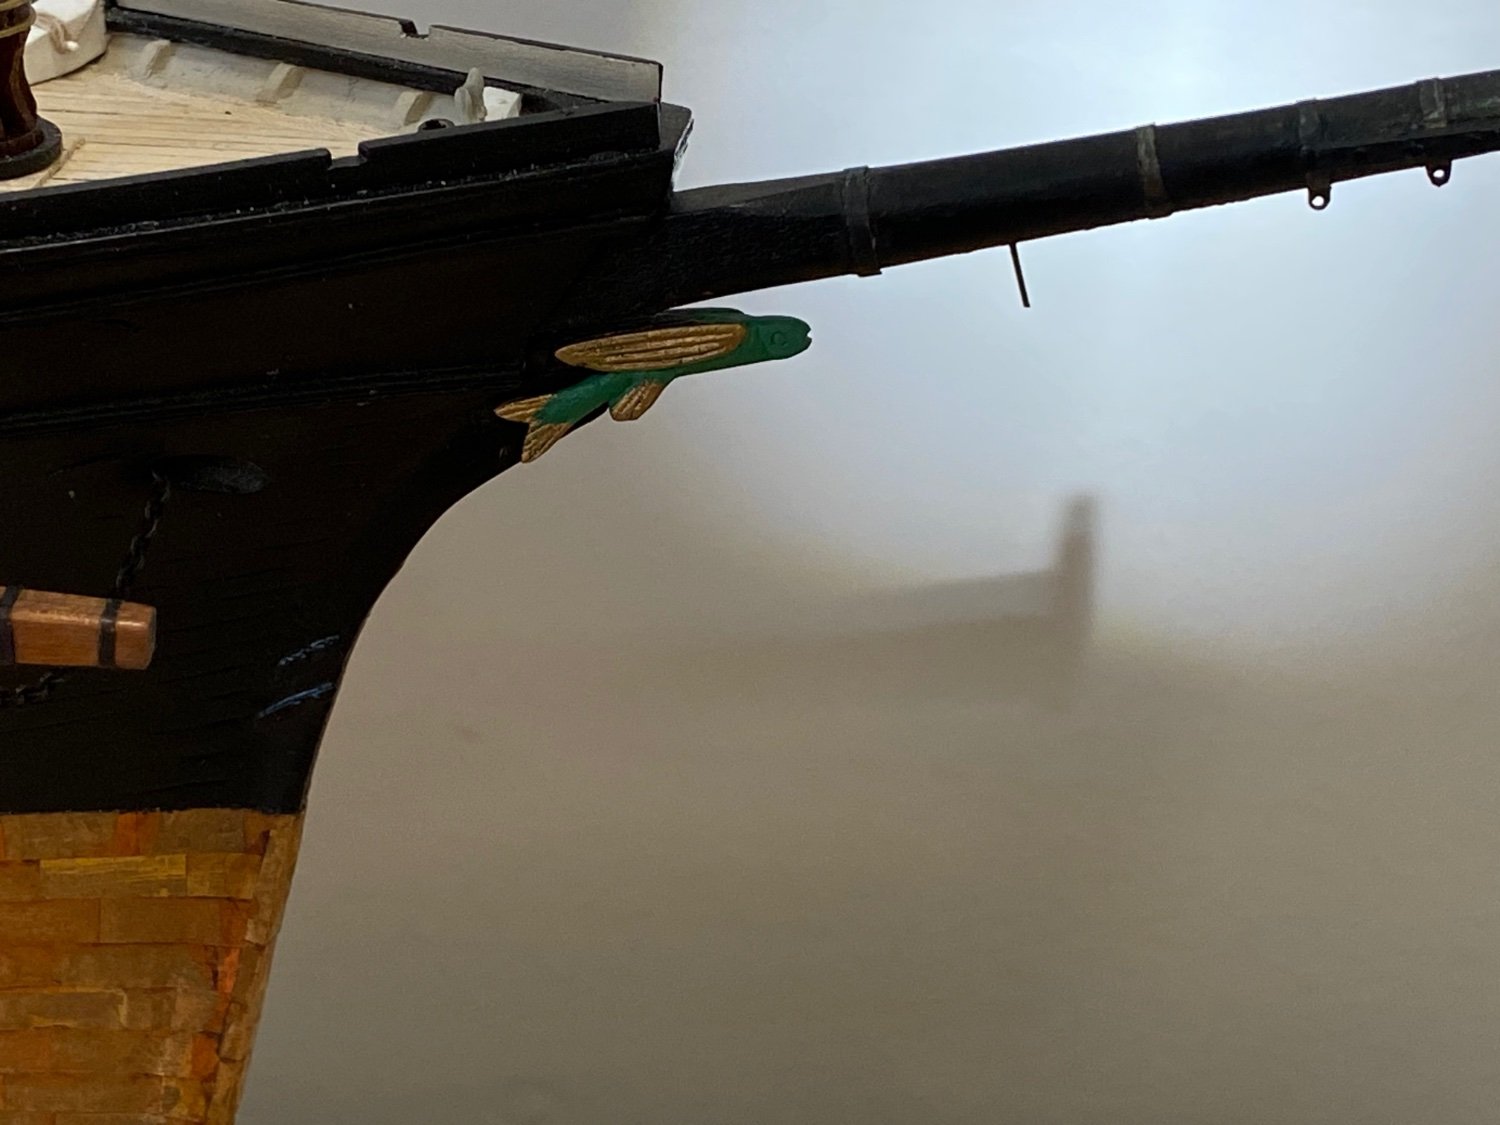
I carved the fish figurehead over 5 years ago. I tried to make the length appropriate to the figurehead shown on the plans. Over time it just looked too long, so in a fit of insanity, I shortened the Fish. Now it looks short. Additionally, I could never figure out how the stem, hull and bowsprit came together and I’m sure mine is not correct. Now it’s time to face the music. Fortunately, since then, ClipprtFan , Rob and others have revised how a Donald Mc Kay bow should look, which more closely reflects the Buttersworth’s painting.
Not wanting to do major surgery to the bow and stem, but still wanting to be more accurate, I decided to extend the stem, placing the figurehead more forward. This looks much better than the original plans and duplicates the graceful, curving arc of the stem/ cut water. It also places the figurehead in a more realistic position. The pictures show the figurehead in place, but not glued as I intend to place the bobstays first.
I considered many different paint schemes, from all green to all gold, to a combination of green and gold. I ended up with a green body and gold wings and fins. The green paint is a mixture of Model Shipways bright green and ocean green. Don’t love it but I can live with it. The Buttersworth’s painting shows the fish solid green and the China Trade painting shows it gold.

-
-
Good luck and best wishes for a speedy recovery!!
My wife had both eyes done and she is very happy with the results!!
my stepdaughter shops for me for her mother which thrills my wife as she knows that she is going to like what ever Nicole buys for her, Thst somewhat gets me off the hook although I am responsible for at least 1gift on my own.🫤🫤🫤
Rick
- FriedClams, mtaylor and Keith Black
-
3
-
Really nice job on the rails. They look great!! I know I had trouble bending mine on the Flying Fish, even when I laminated and soaked them.
Rick
-
-
Really well done!!! I admire your courage cutting into your beautiful hull!
Rick
- mtaylor, Keith Black, Retired guy and 3 others
-
6
-
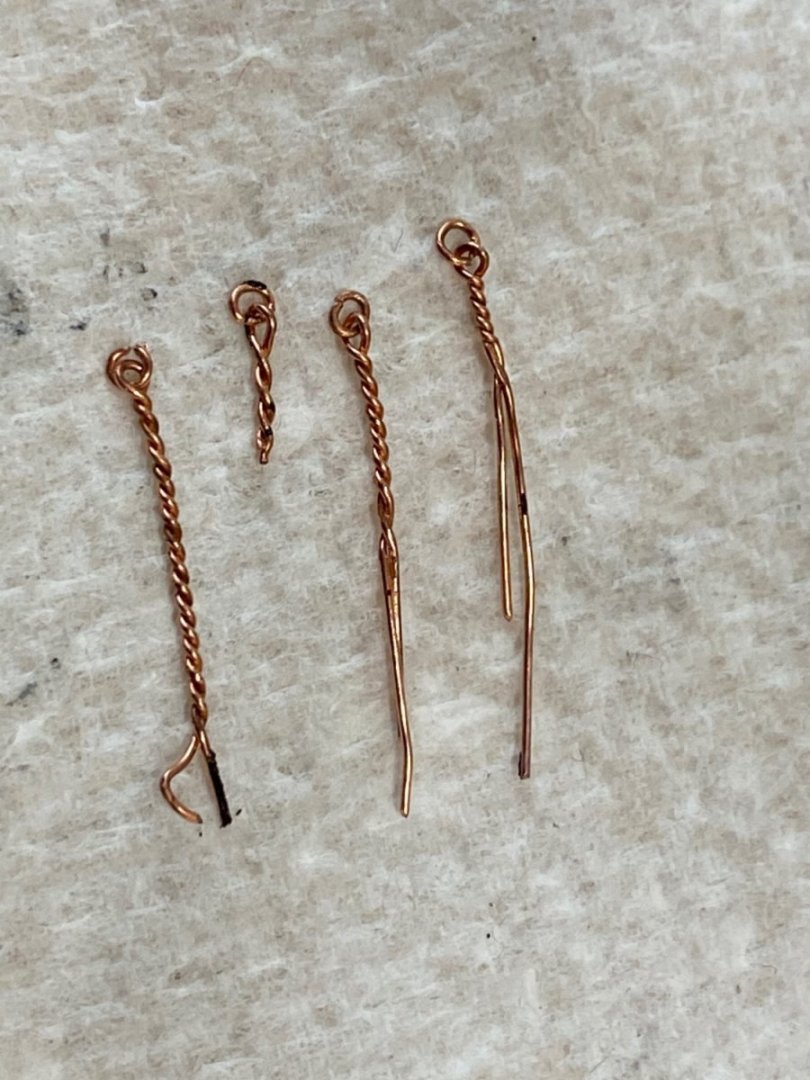
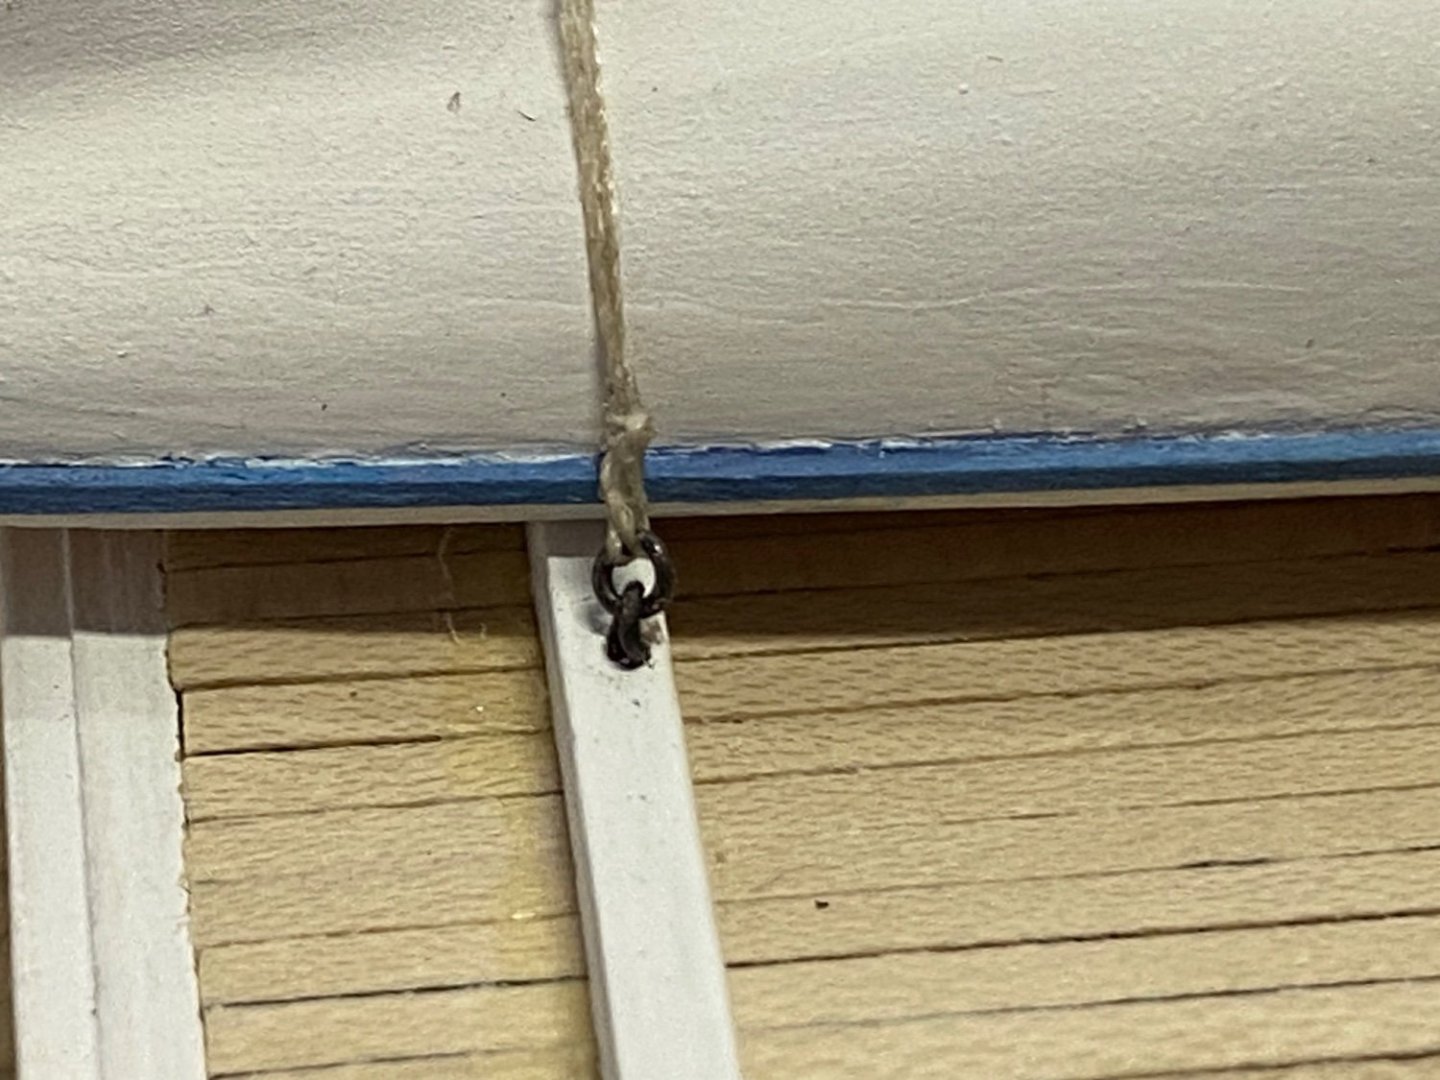
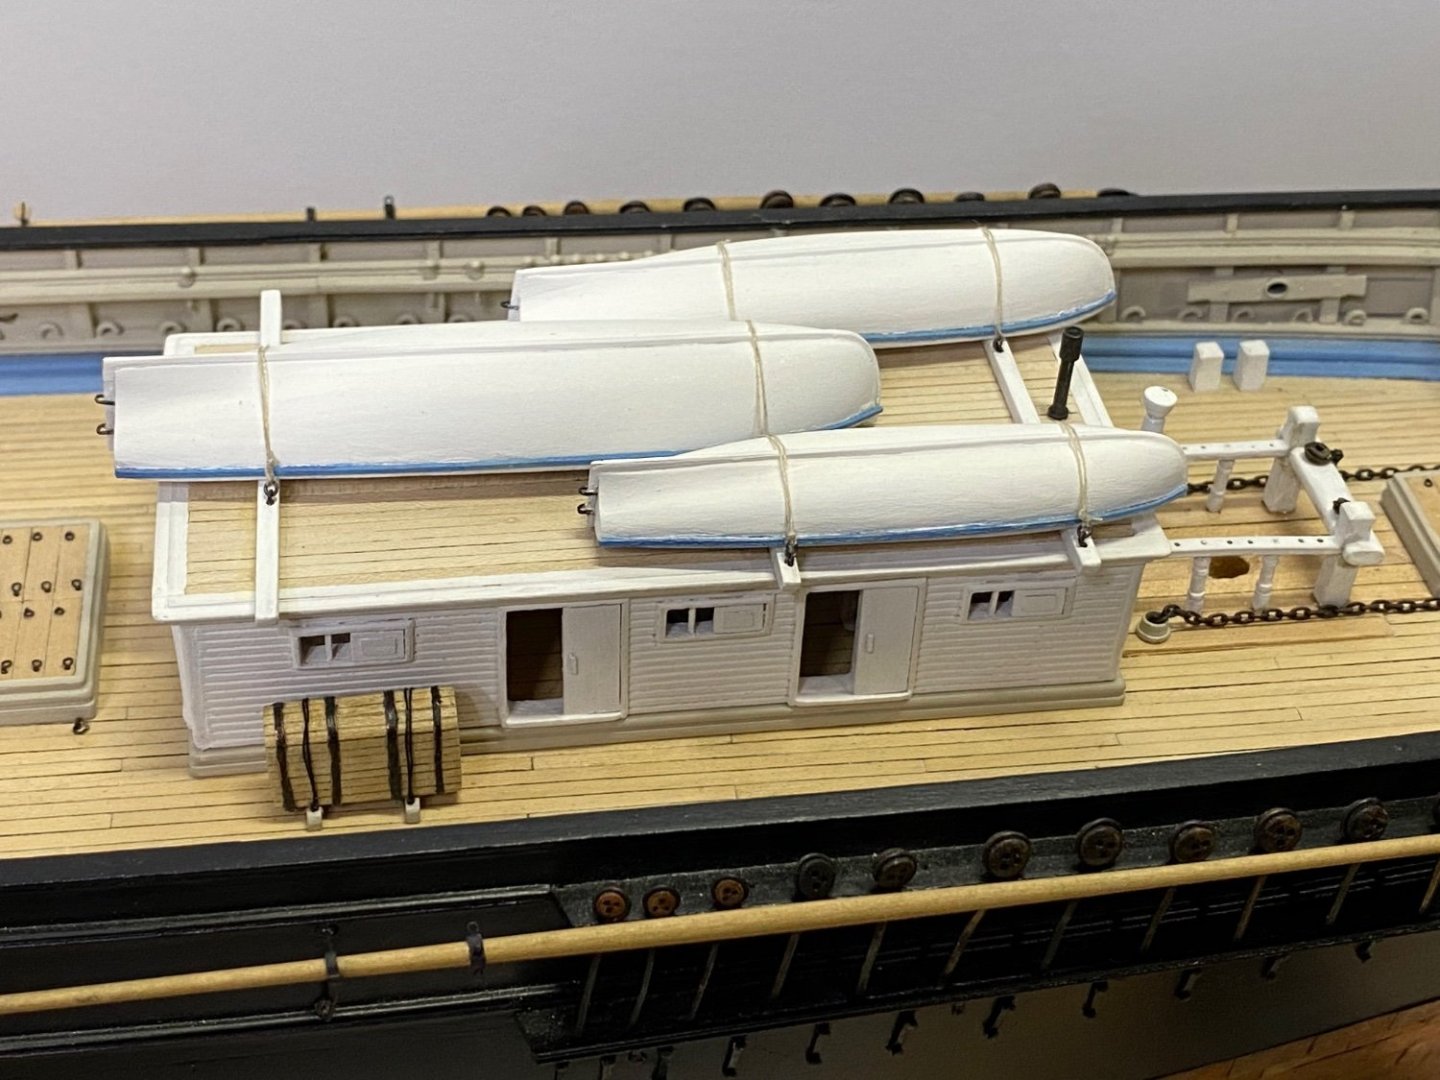
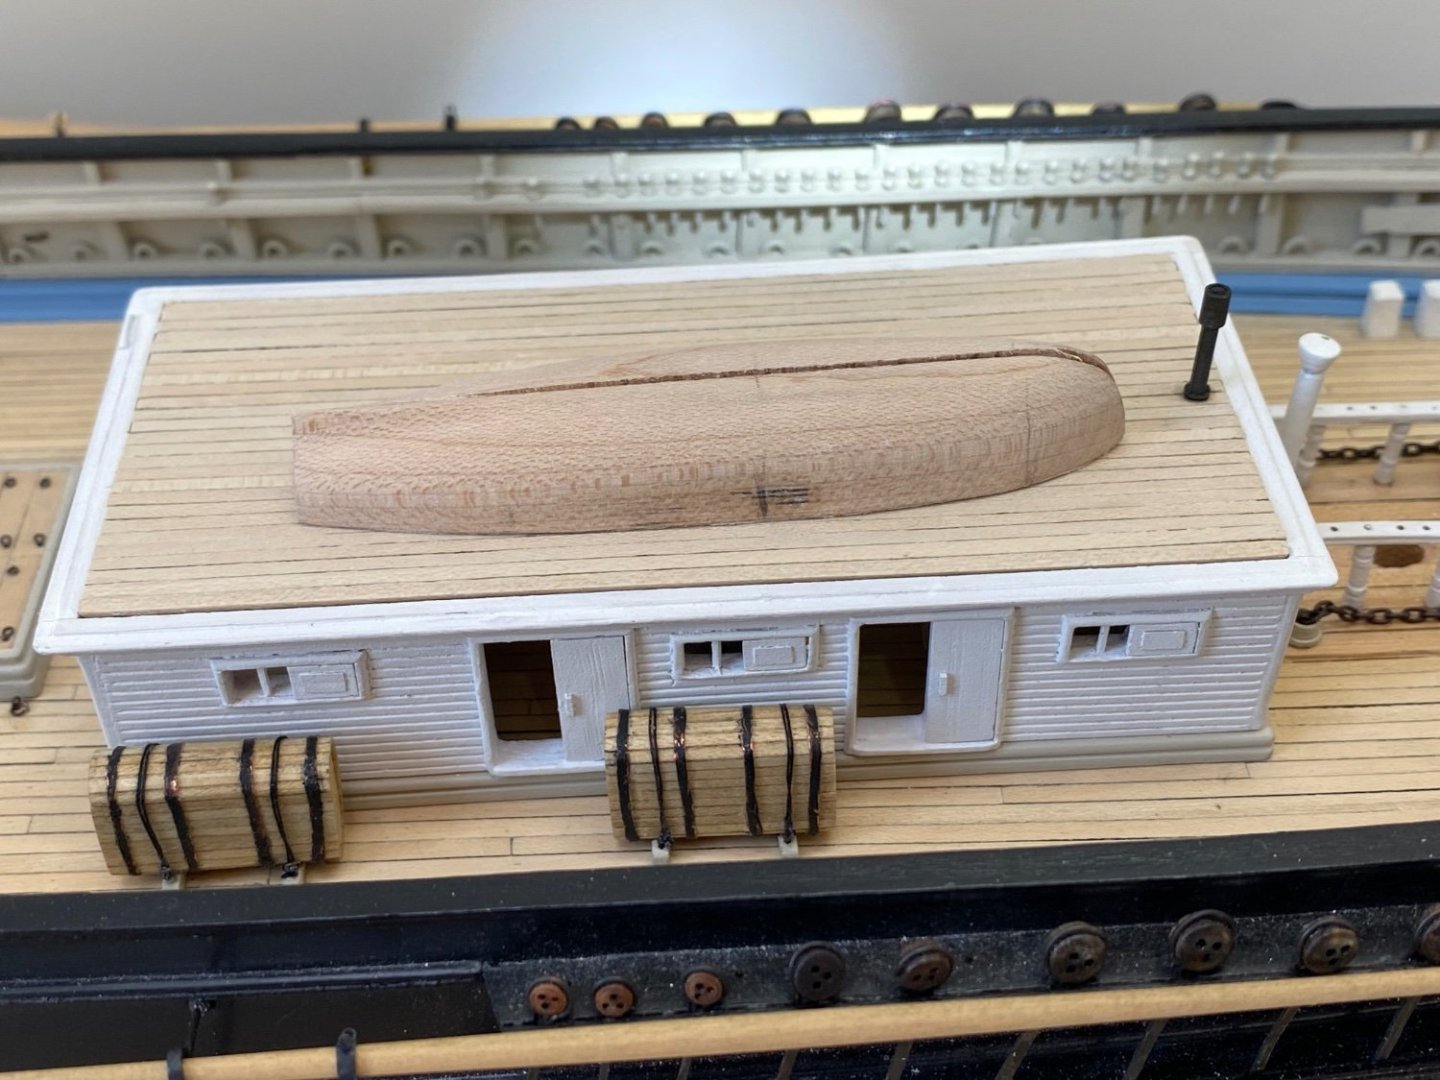
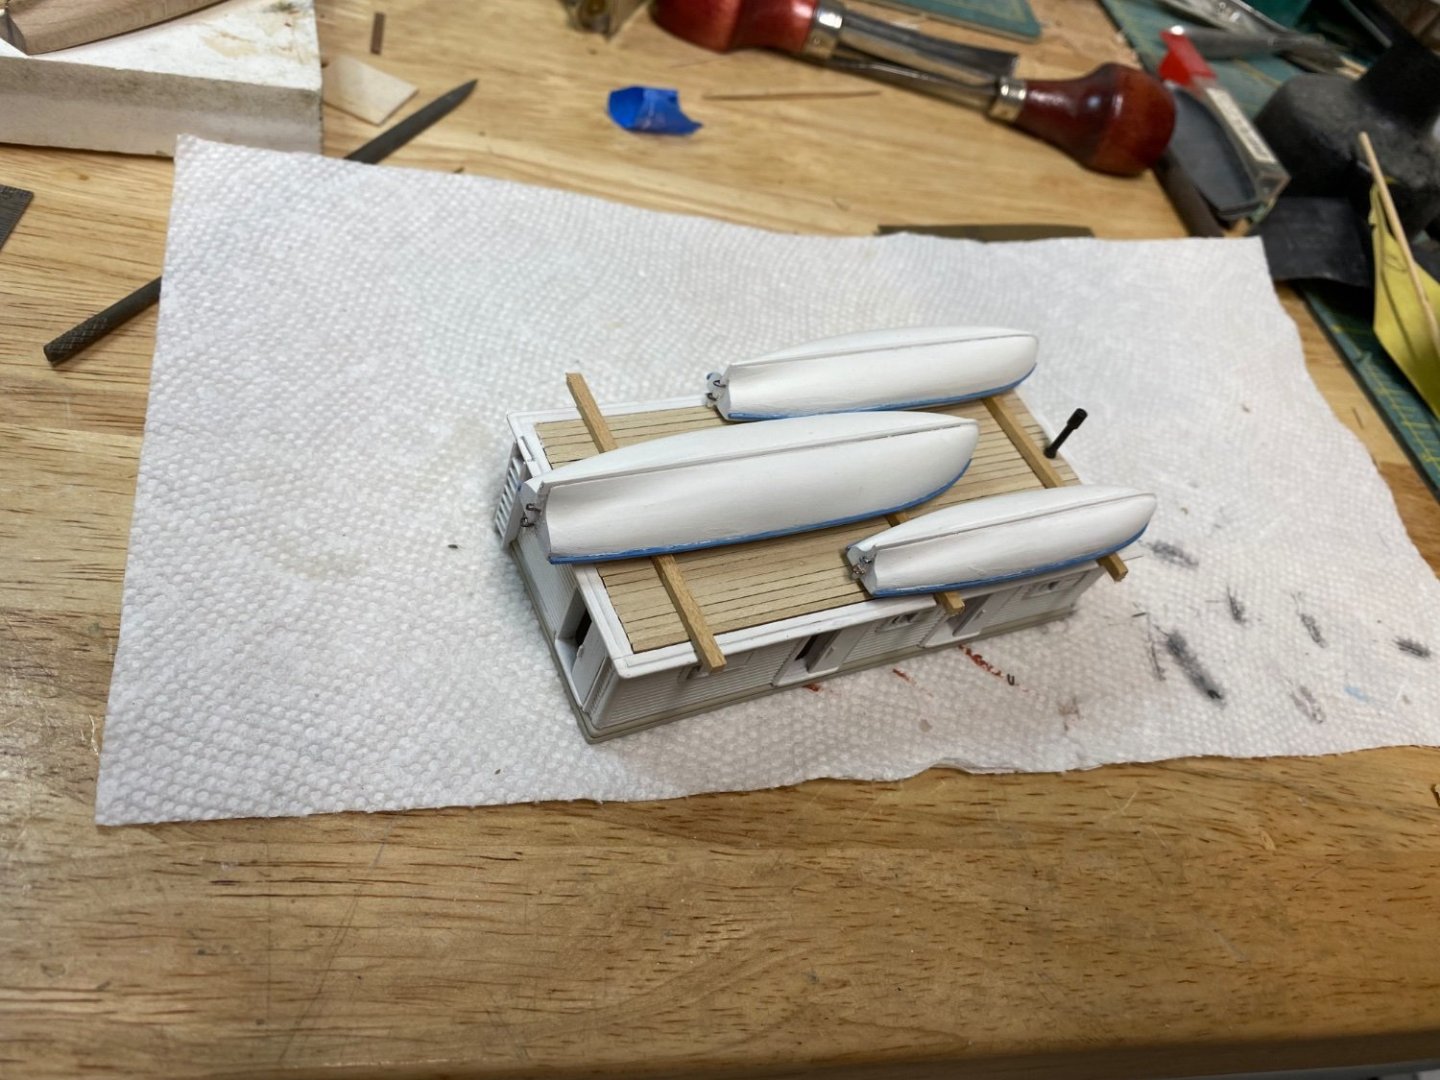
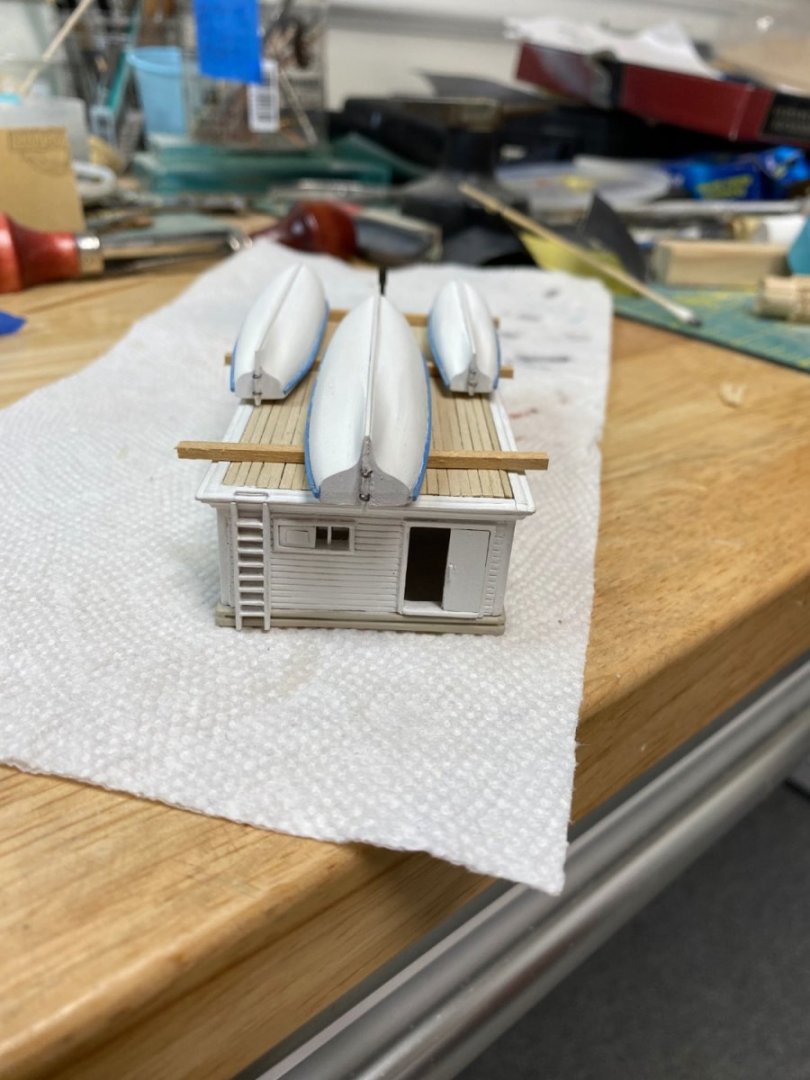
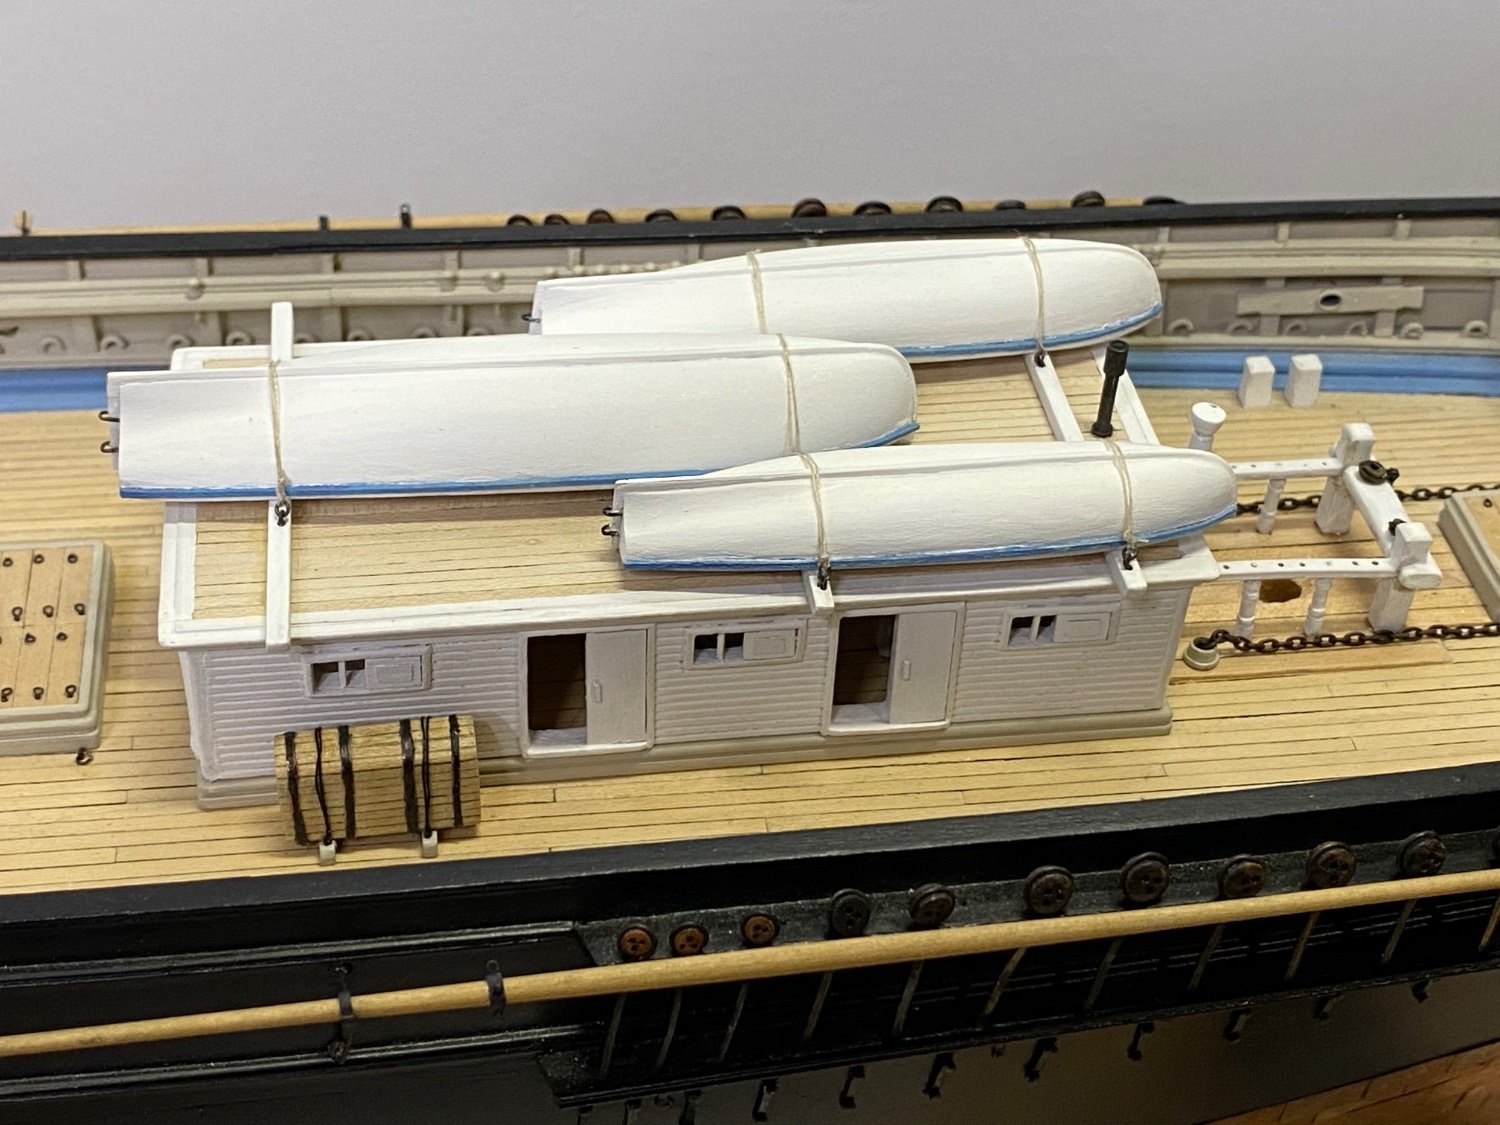
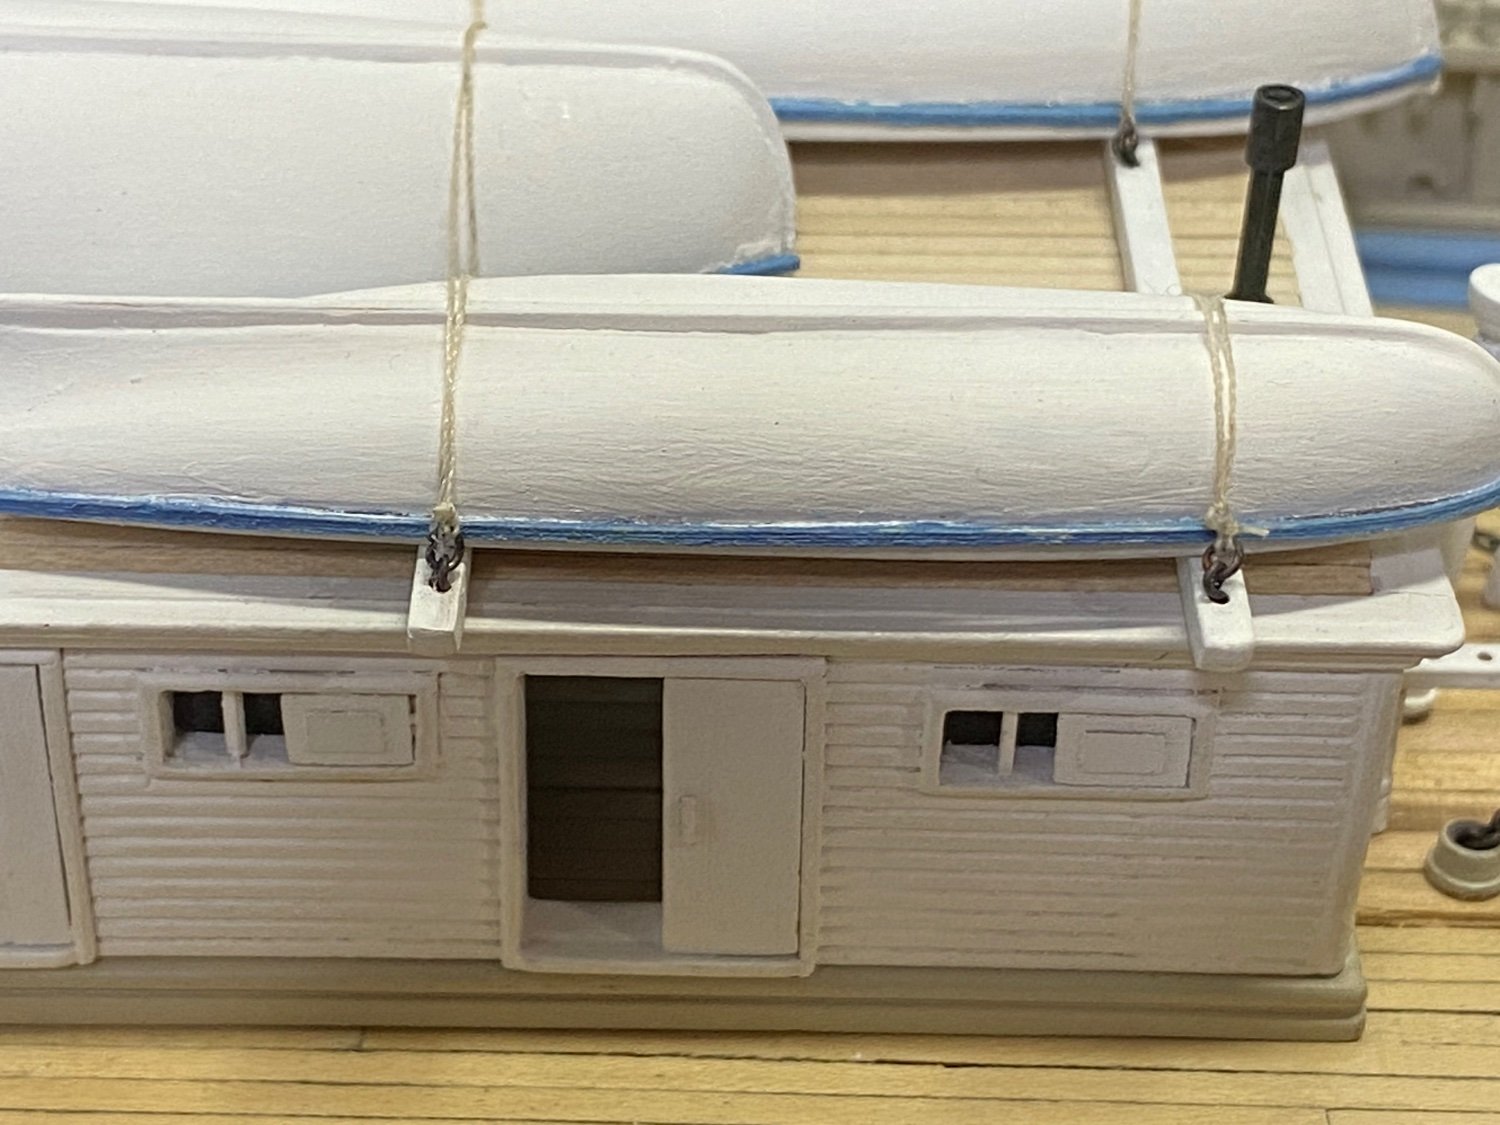
I made the boat skids from strips of basswood that I had. The ring bolts were made from 28 gauge copper wire bent around a small drill bit and blackened.
I decided to mount the boats per the Flying Cloud model at the Boston Museum of Art, with the long boat aft and the cutter and gig forward. I used tan thread for the lashings which may be a bit light instead of heavier rope, still undecided.
Except for a few items, including the figurehead, this about does it for the hull and on to masting and rigging.
Happy Thanksgiving everyone!!


-
Good luck and best wishes for a speedy recovery!!
My wife had both eyes done and she is very happy with the results!!
Rick
- Keith Black, mtaylor, FriedClams and 2 others
-
5
-
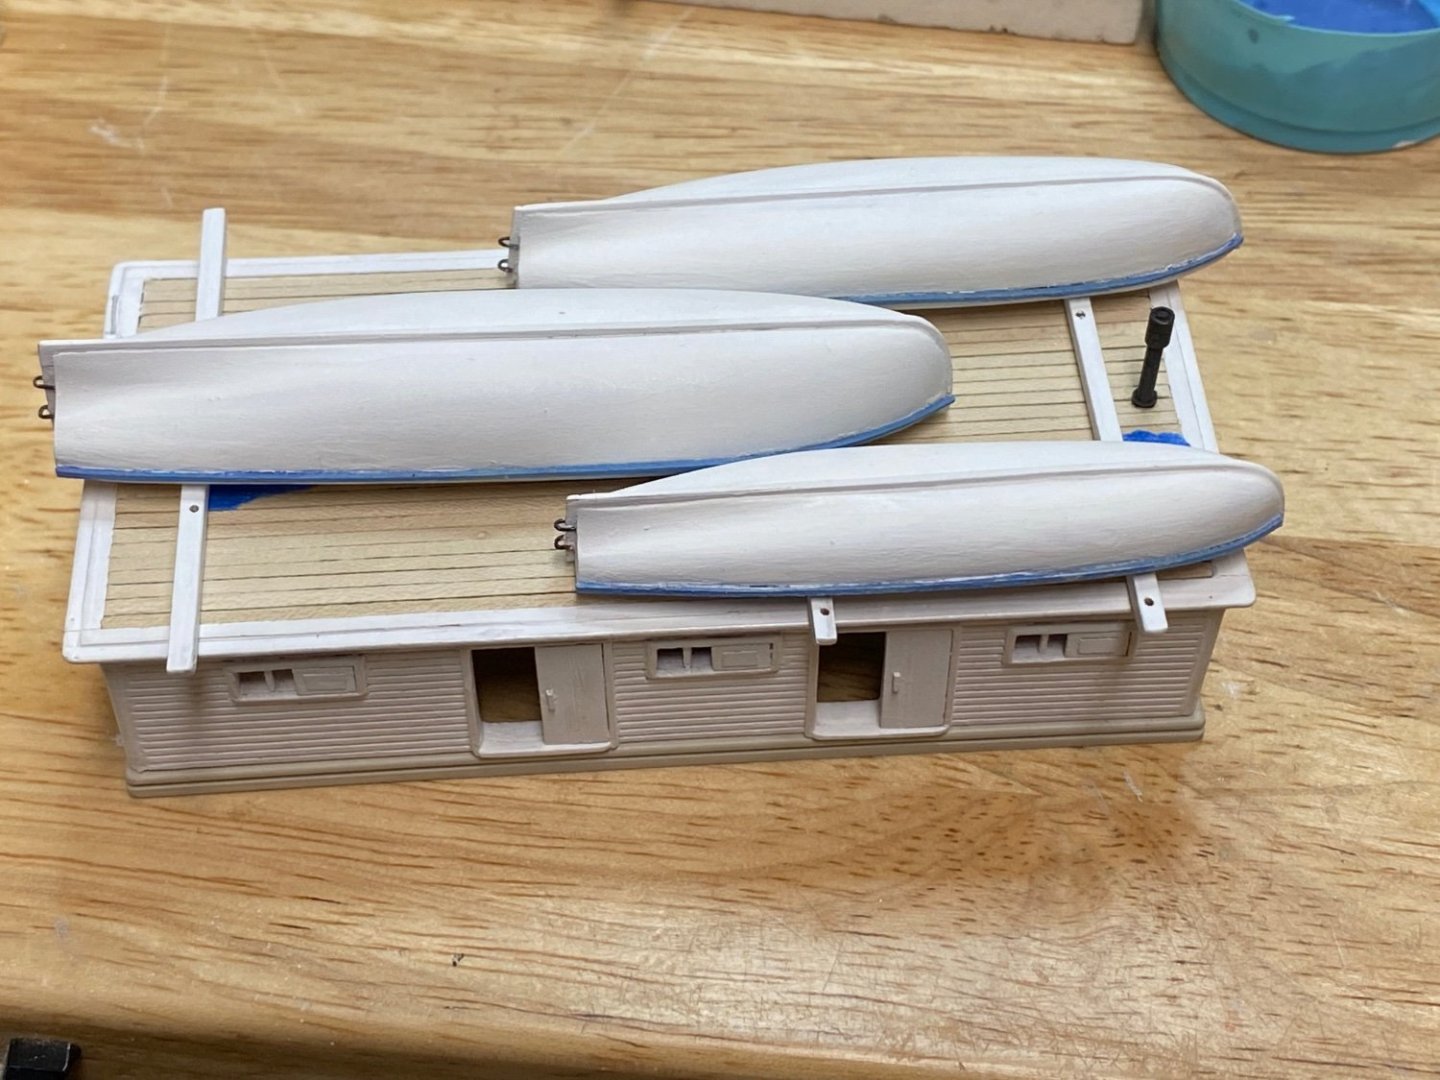
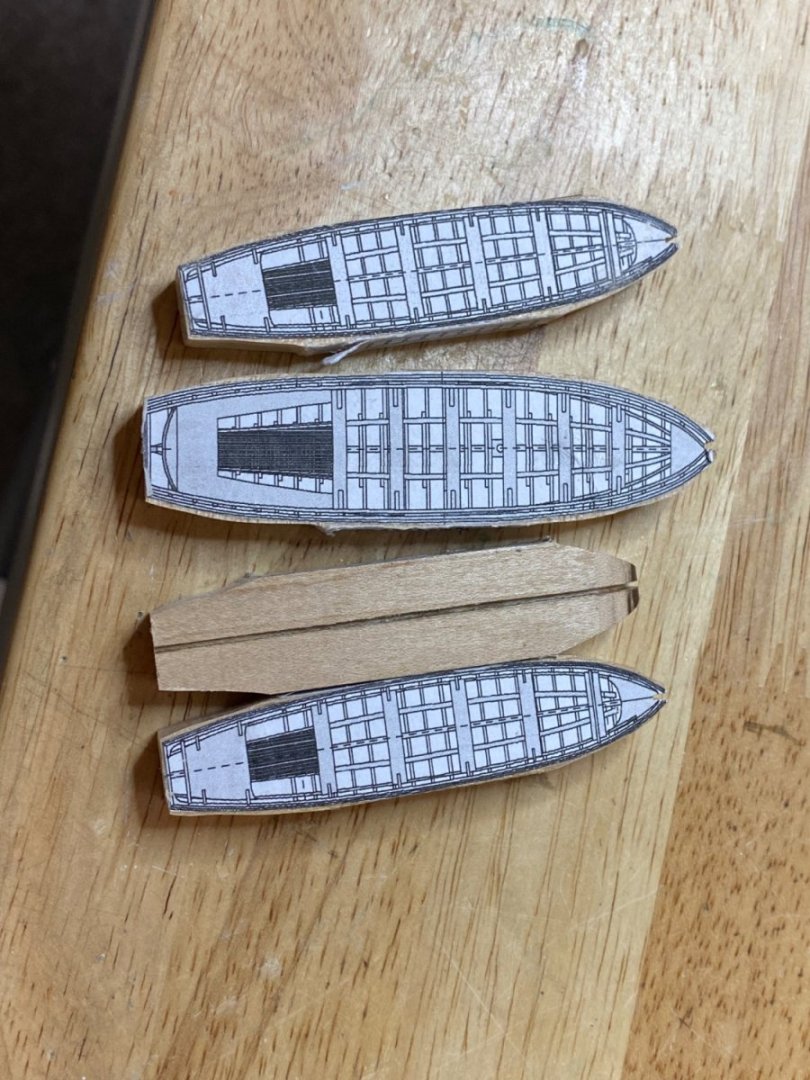
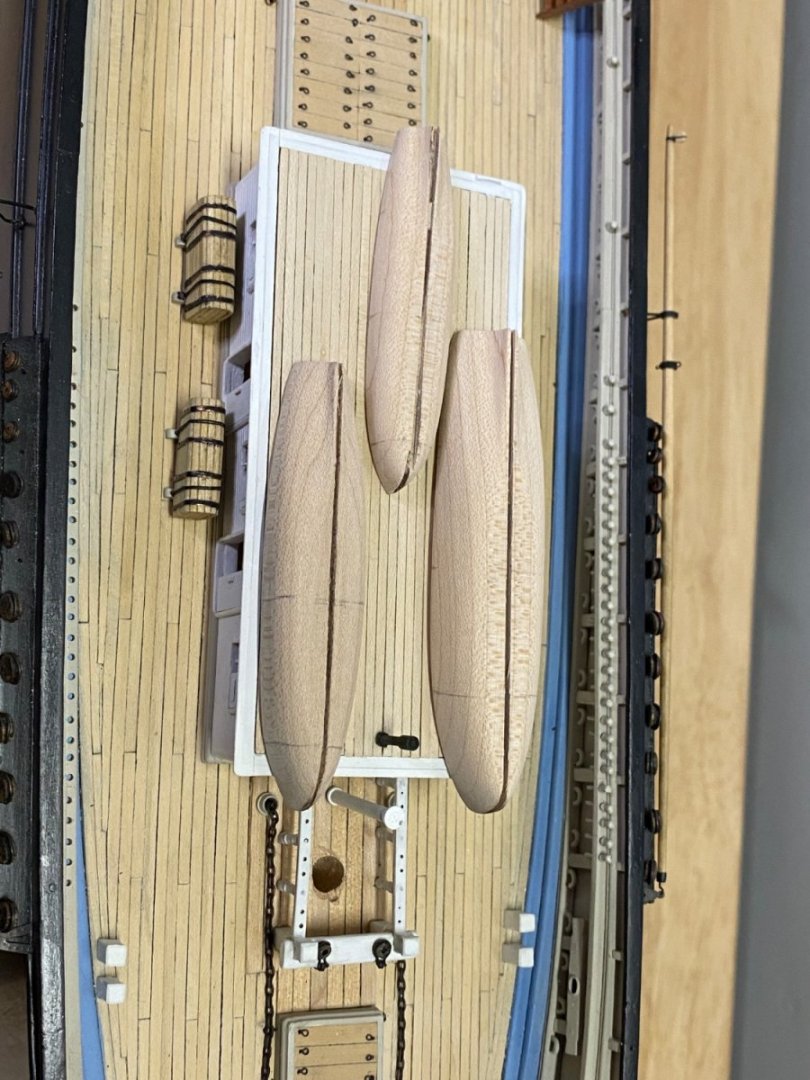
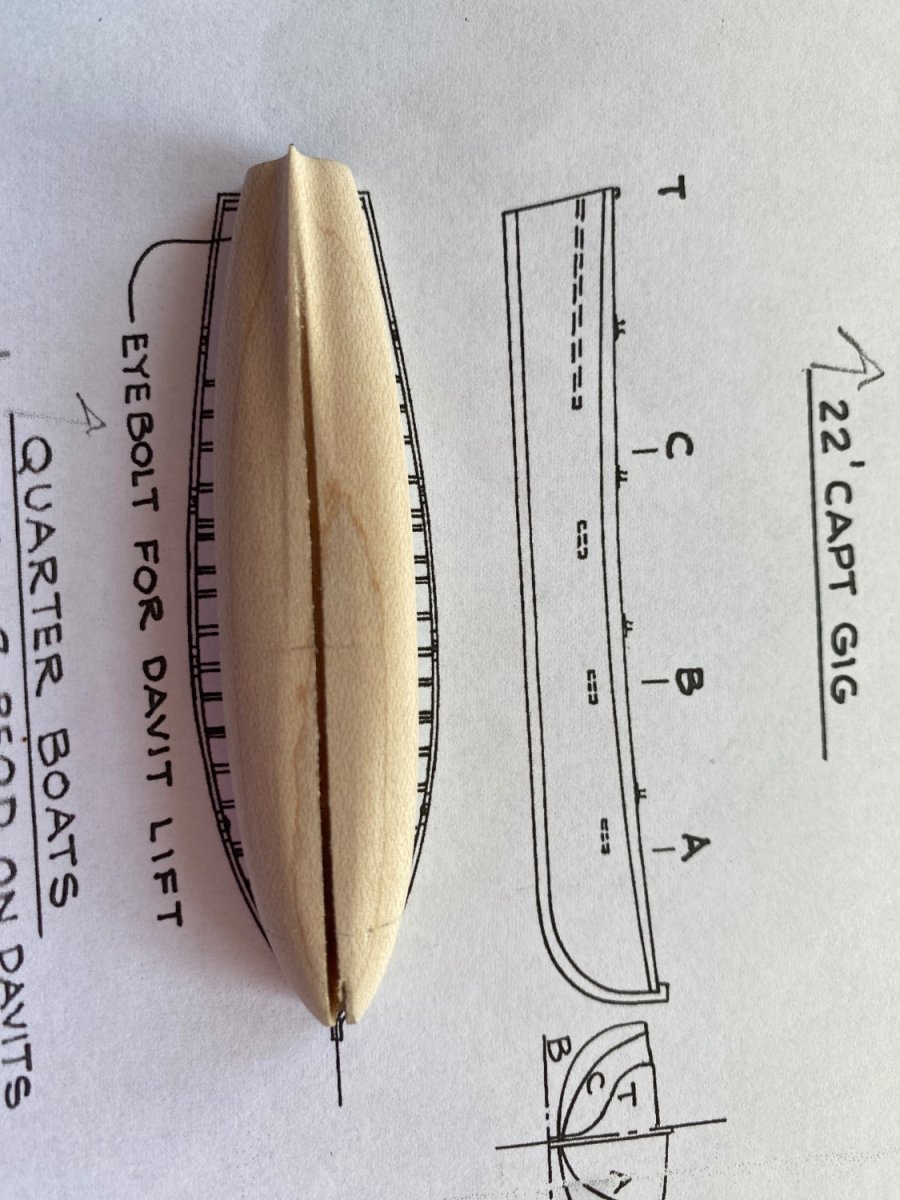
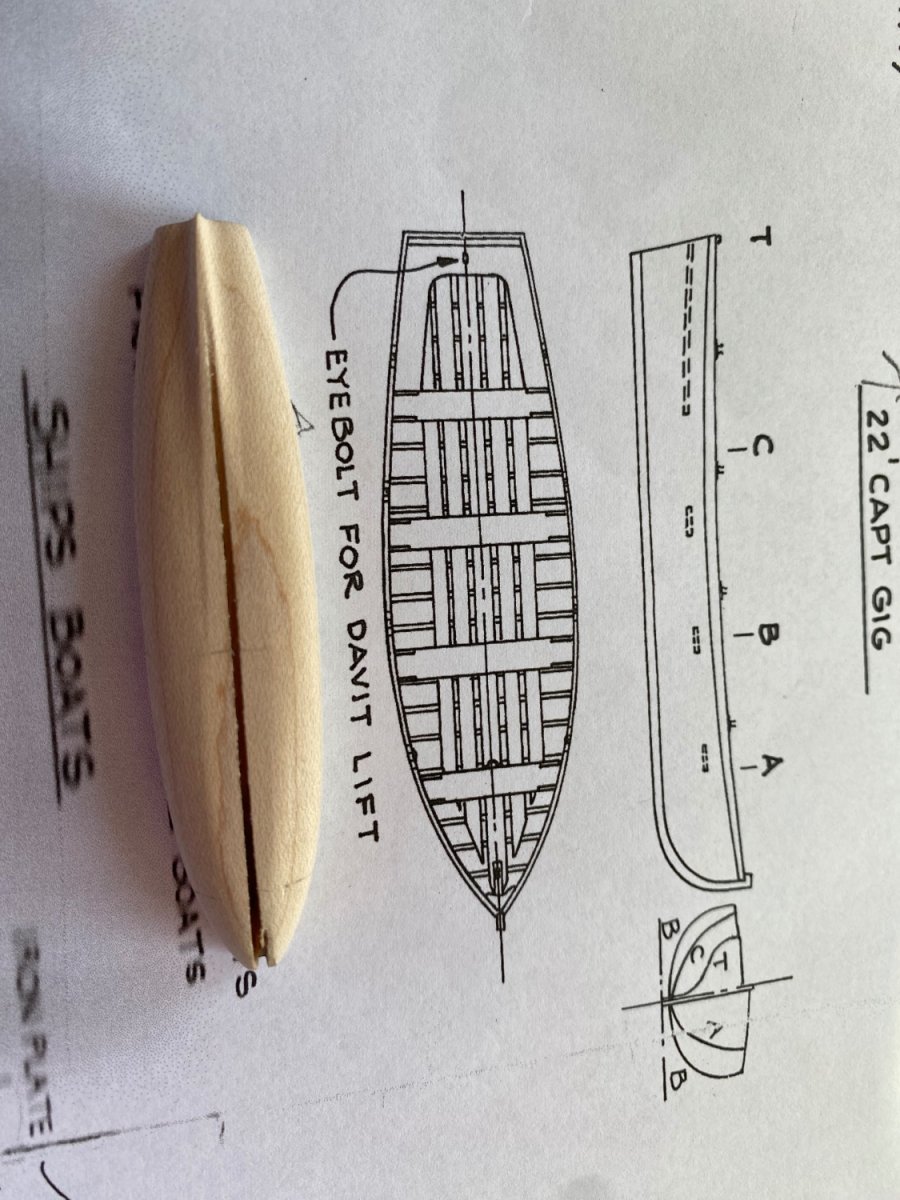
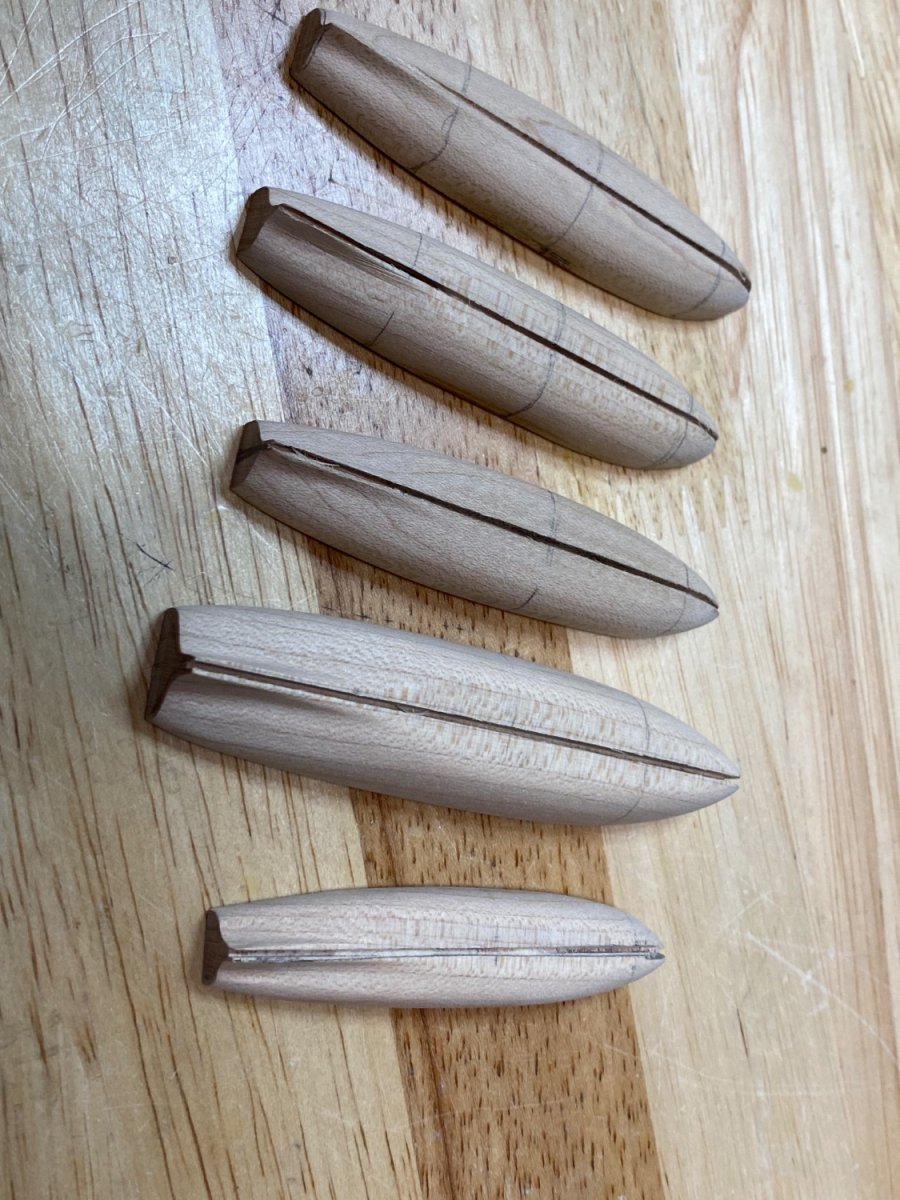
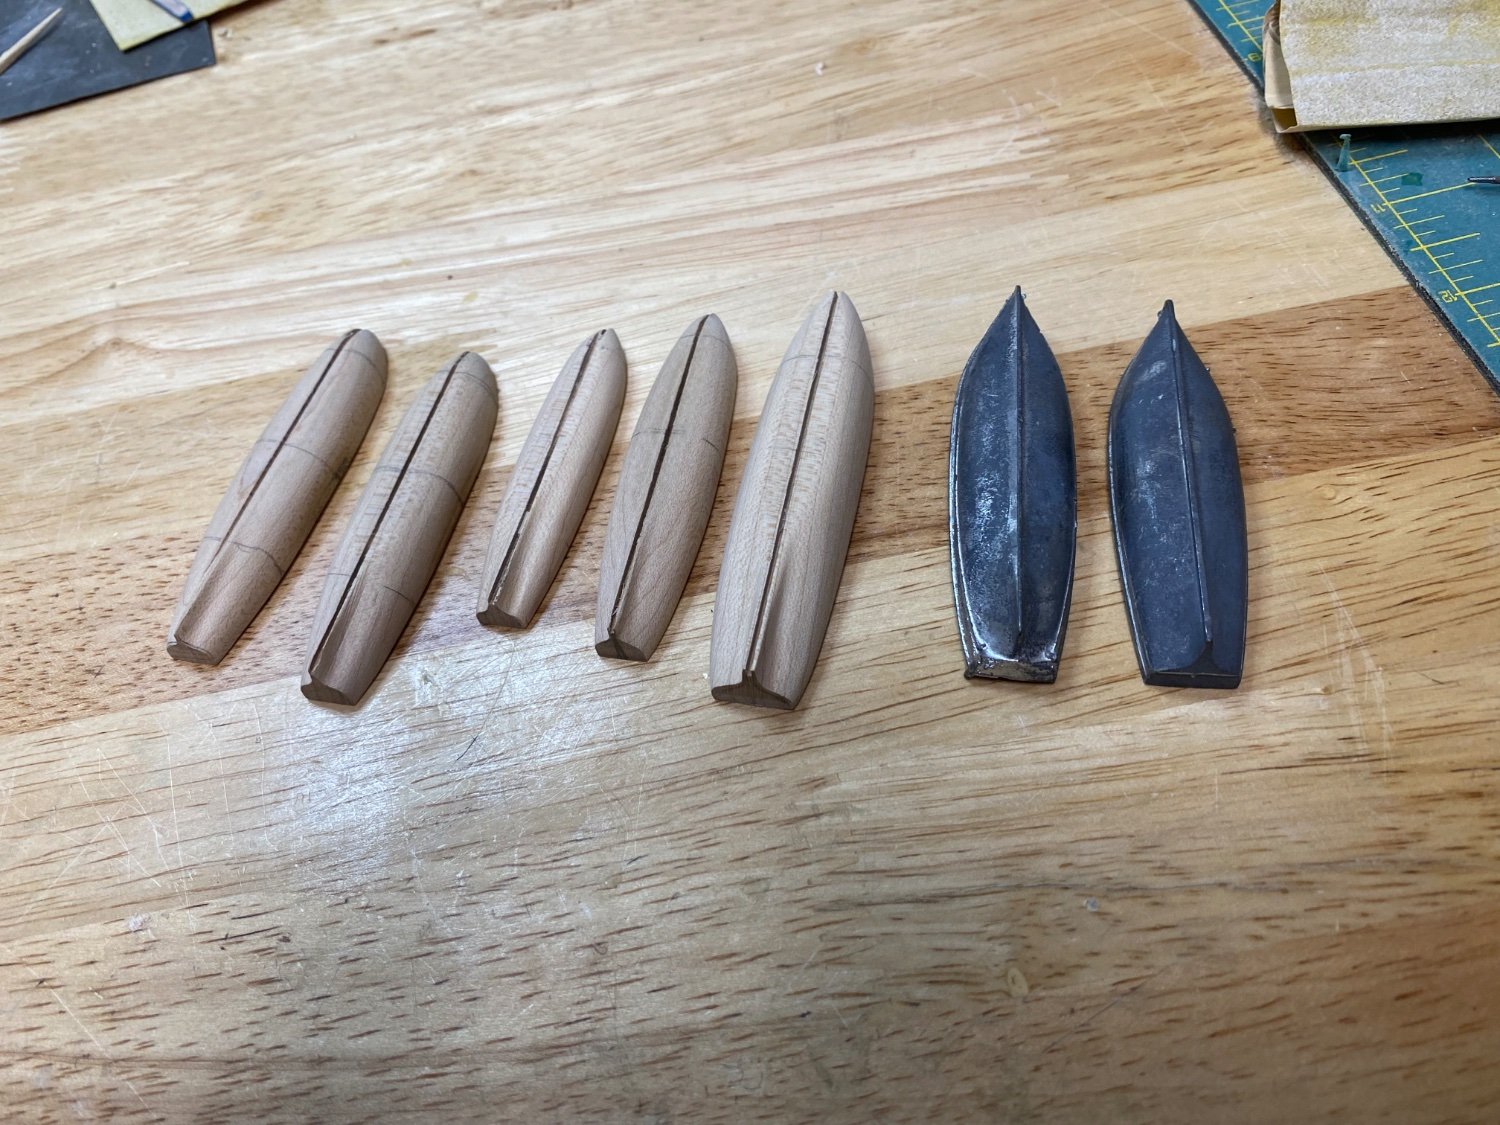
Now, on to the 5 boats.
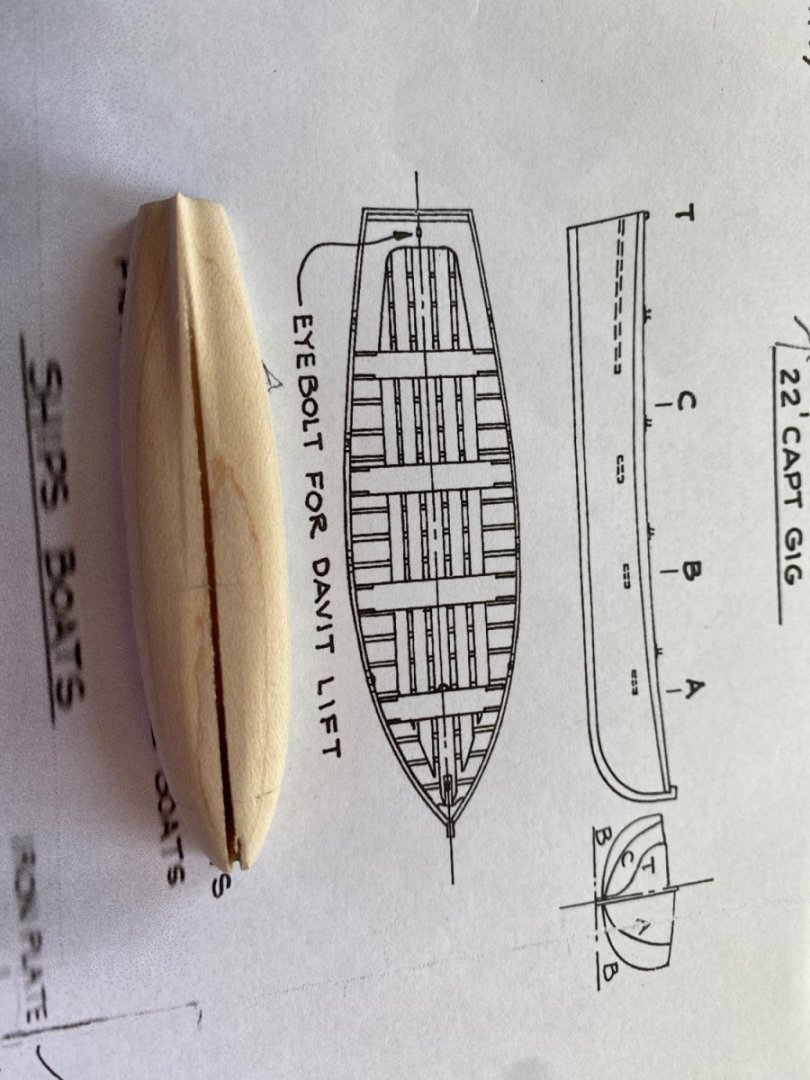
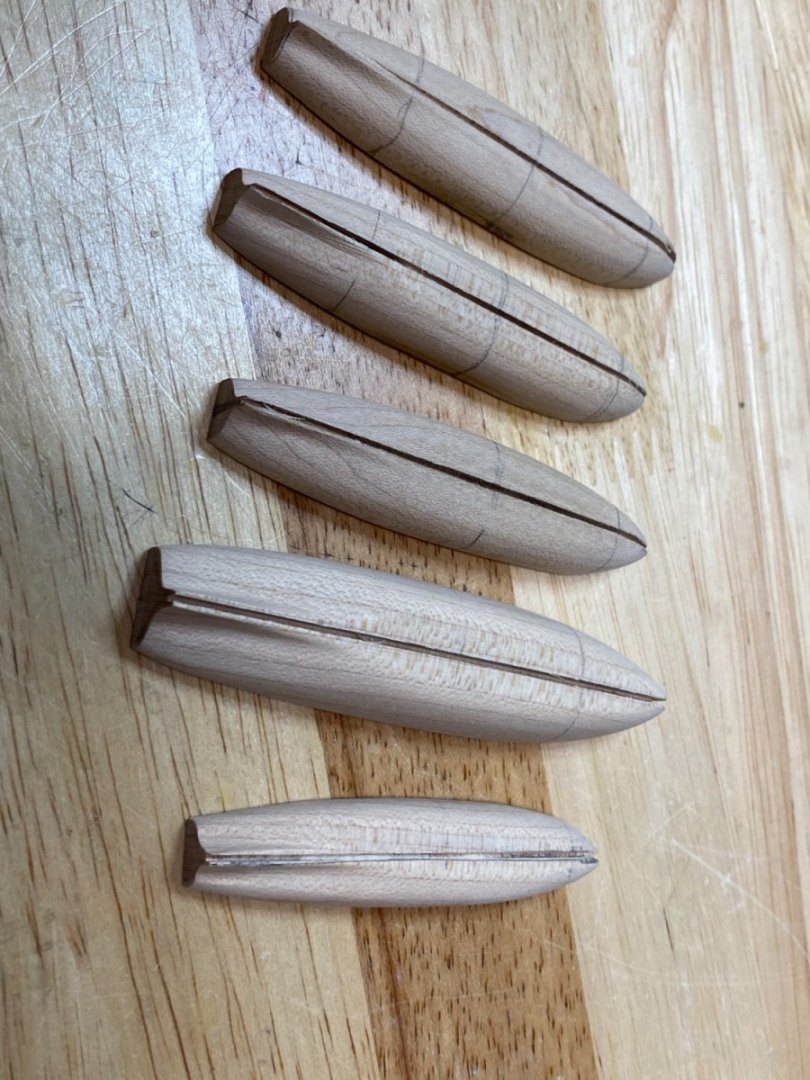
After much deliberation, I decided to go with the boats from EDT’s Young America.
Model Shipways only supplies 3 boats in 2 different sizes, so to get all 5 requires obtaining or making an addition 2. The boats supplied appear to be equivalent in size to the boats shown on the plans, however, to me, they appear to be bulky and large.
The boats for YA are slimmer and again, to me, look more appropriate. This would mean having to carve the boats myself as the fabrication process described by EDT is way above my skill level with a major difficulty being unable to reliably mill very small strips of wood, especially the ribs. I haven’t found a good way to mill strips of wood1/32 x 1/32 or smaller with any consistency.
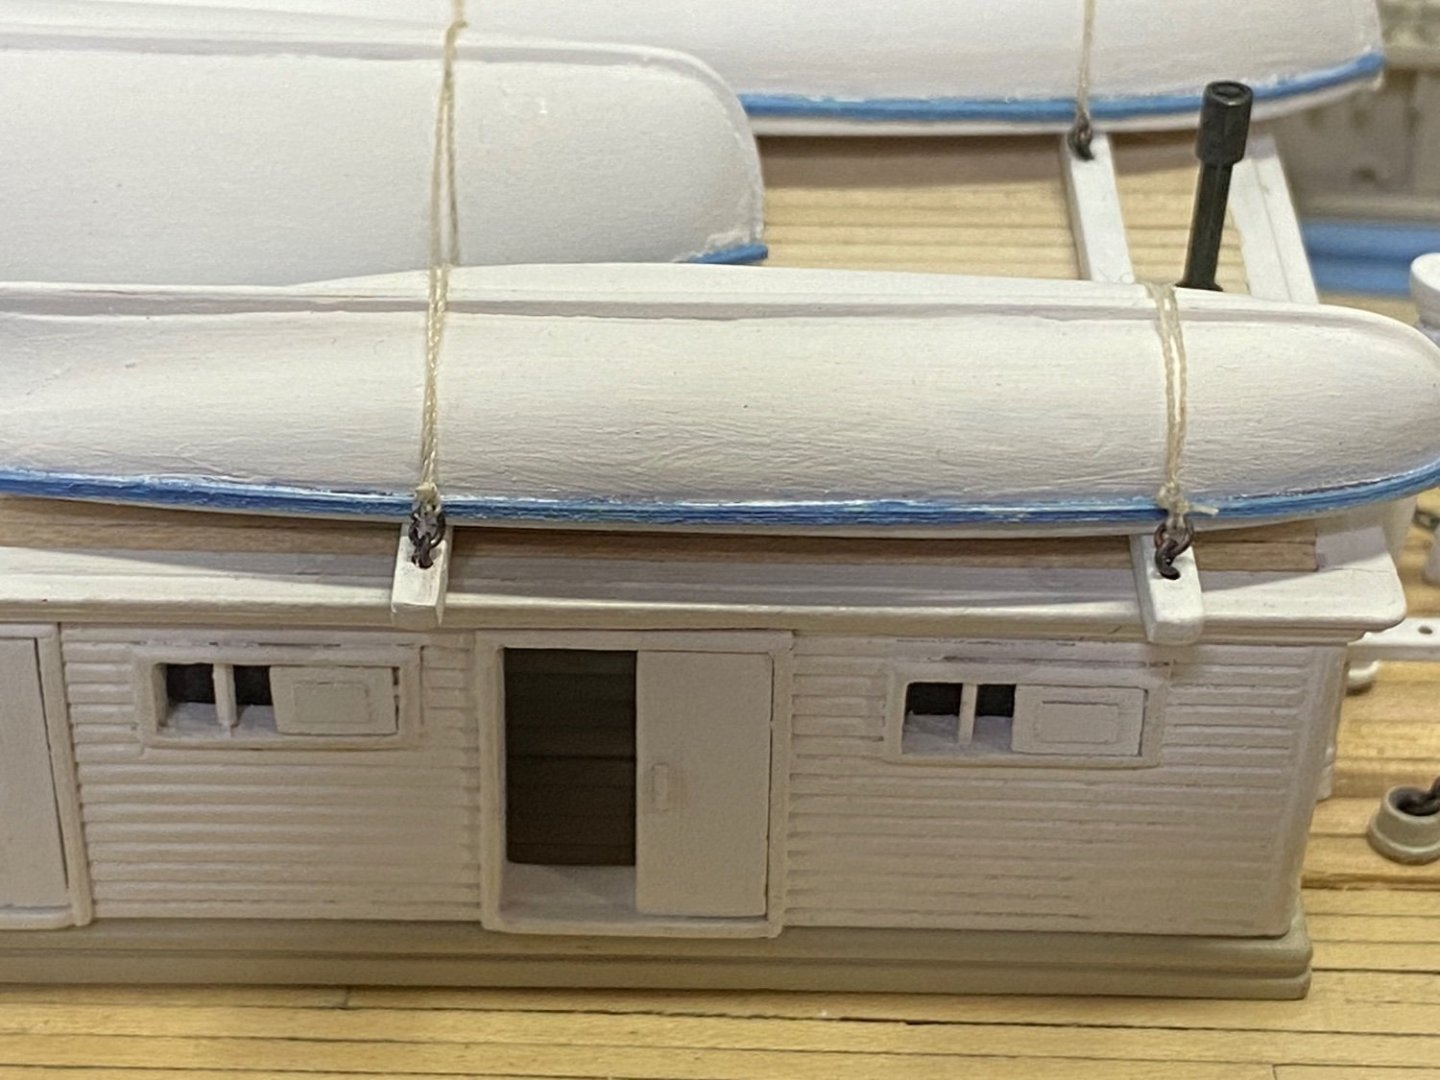
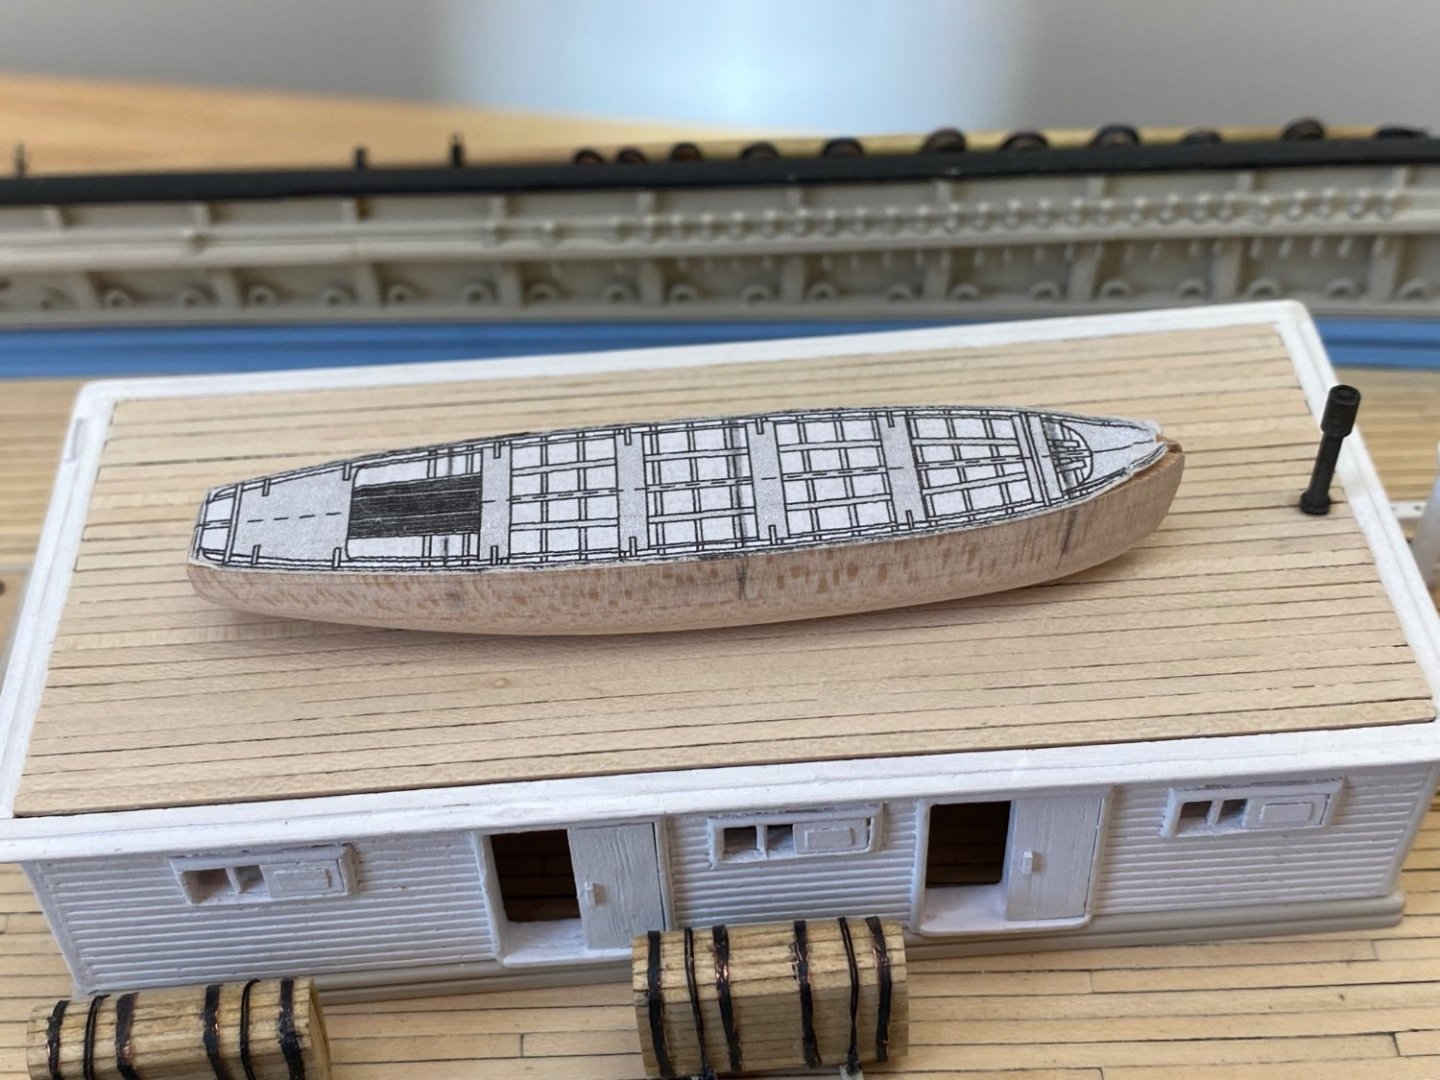
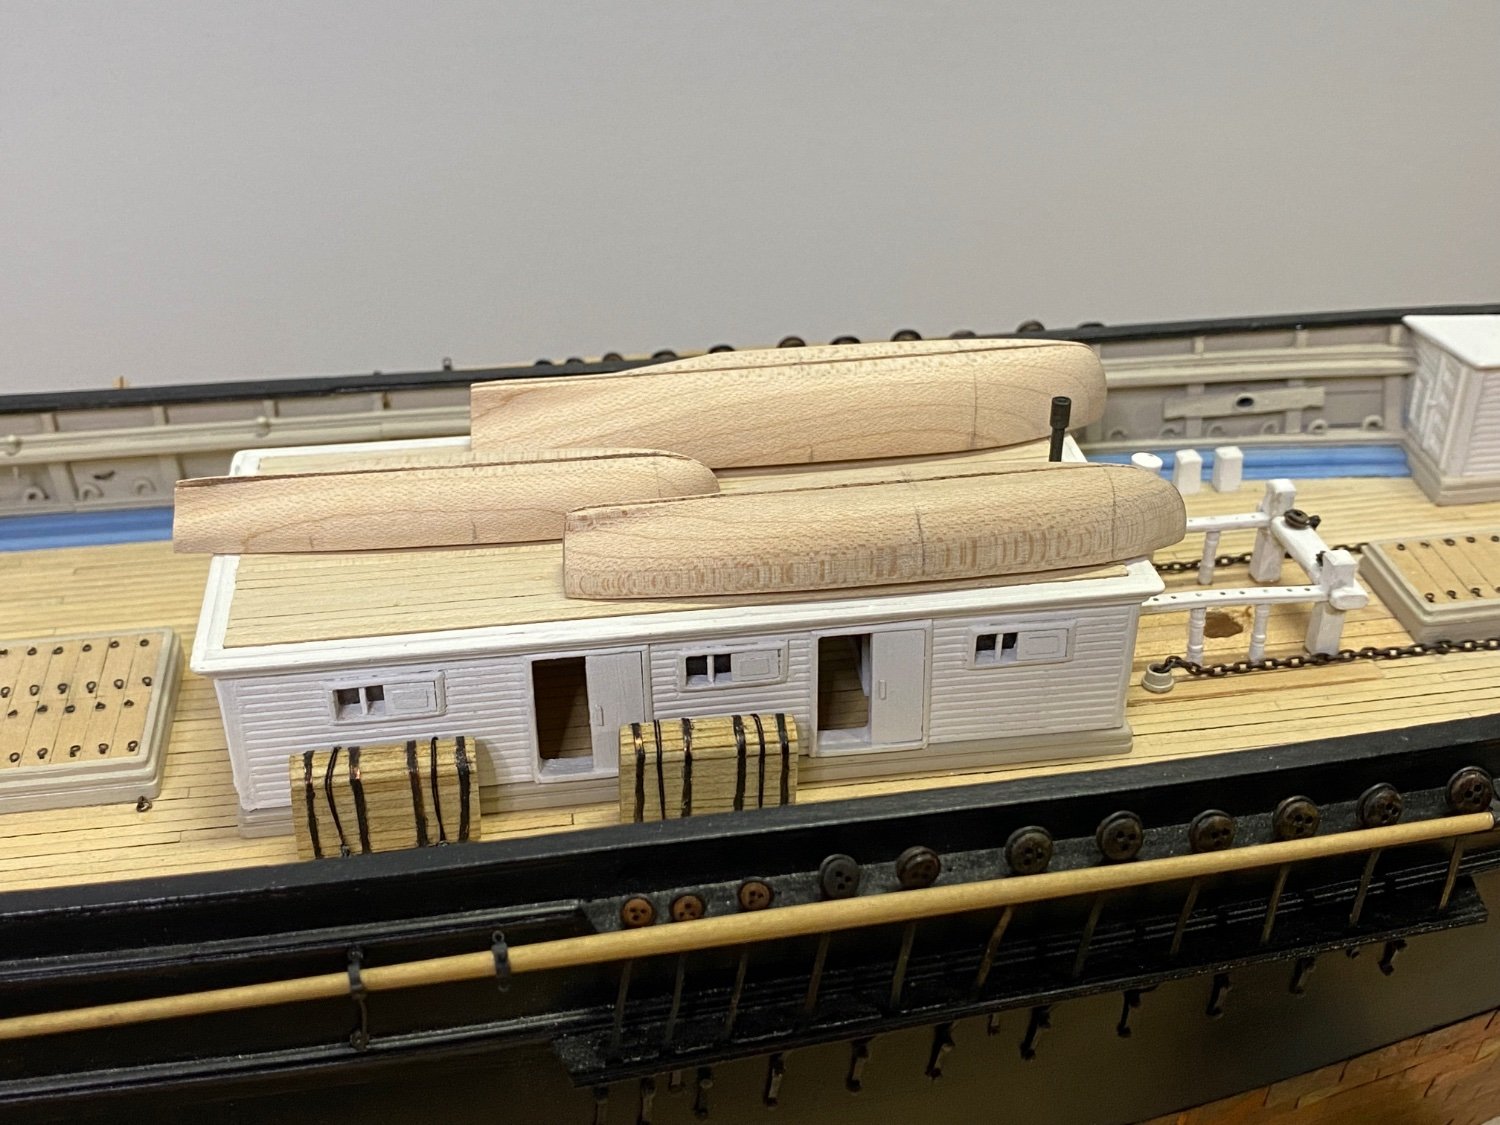
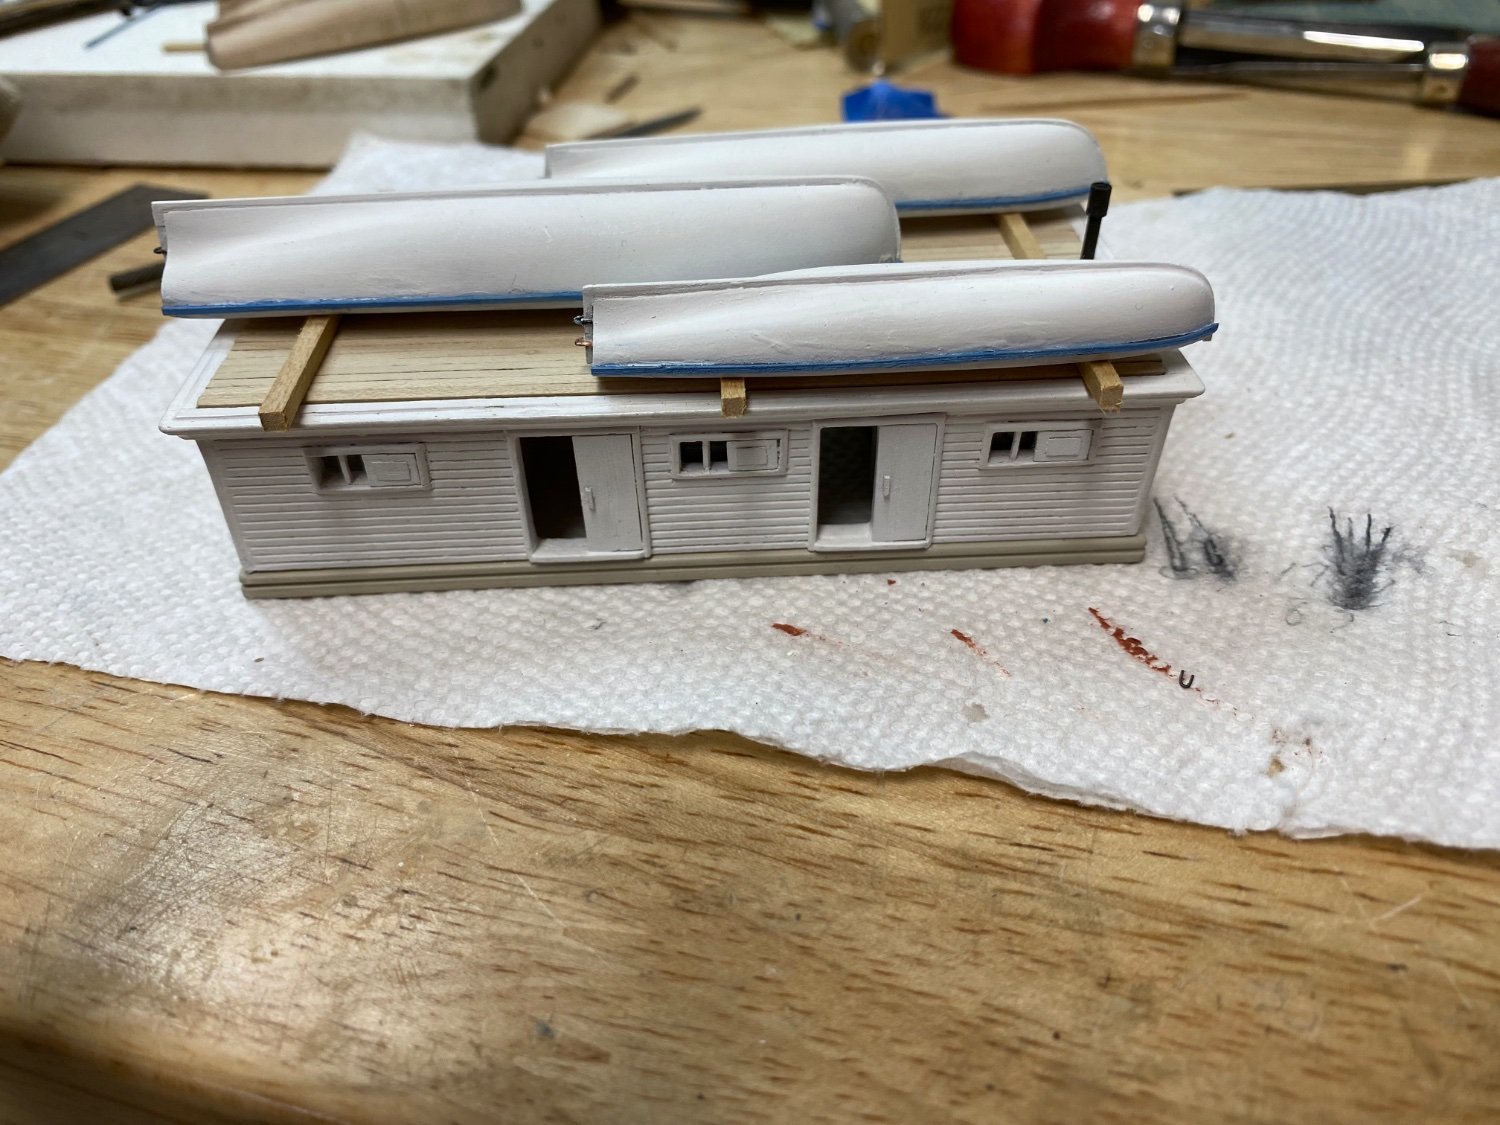
The 3 boats on the top of the fore cabin are mounted upside down so the interiors won’t be visible. The 2 lifeboats on the davits will have to have the interiors done as they will be visible. I’ll worry about that challenge down the road.
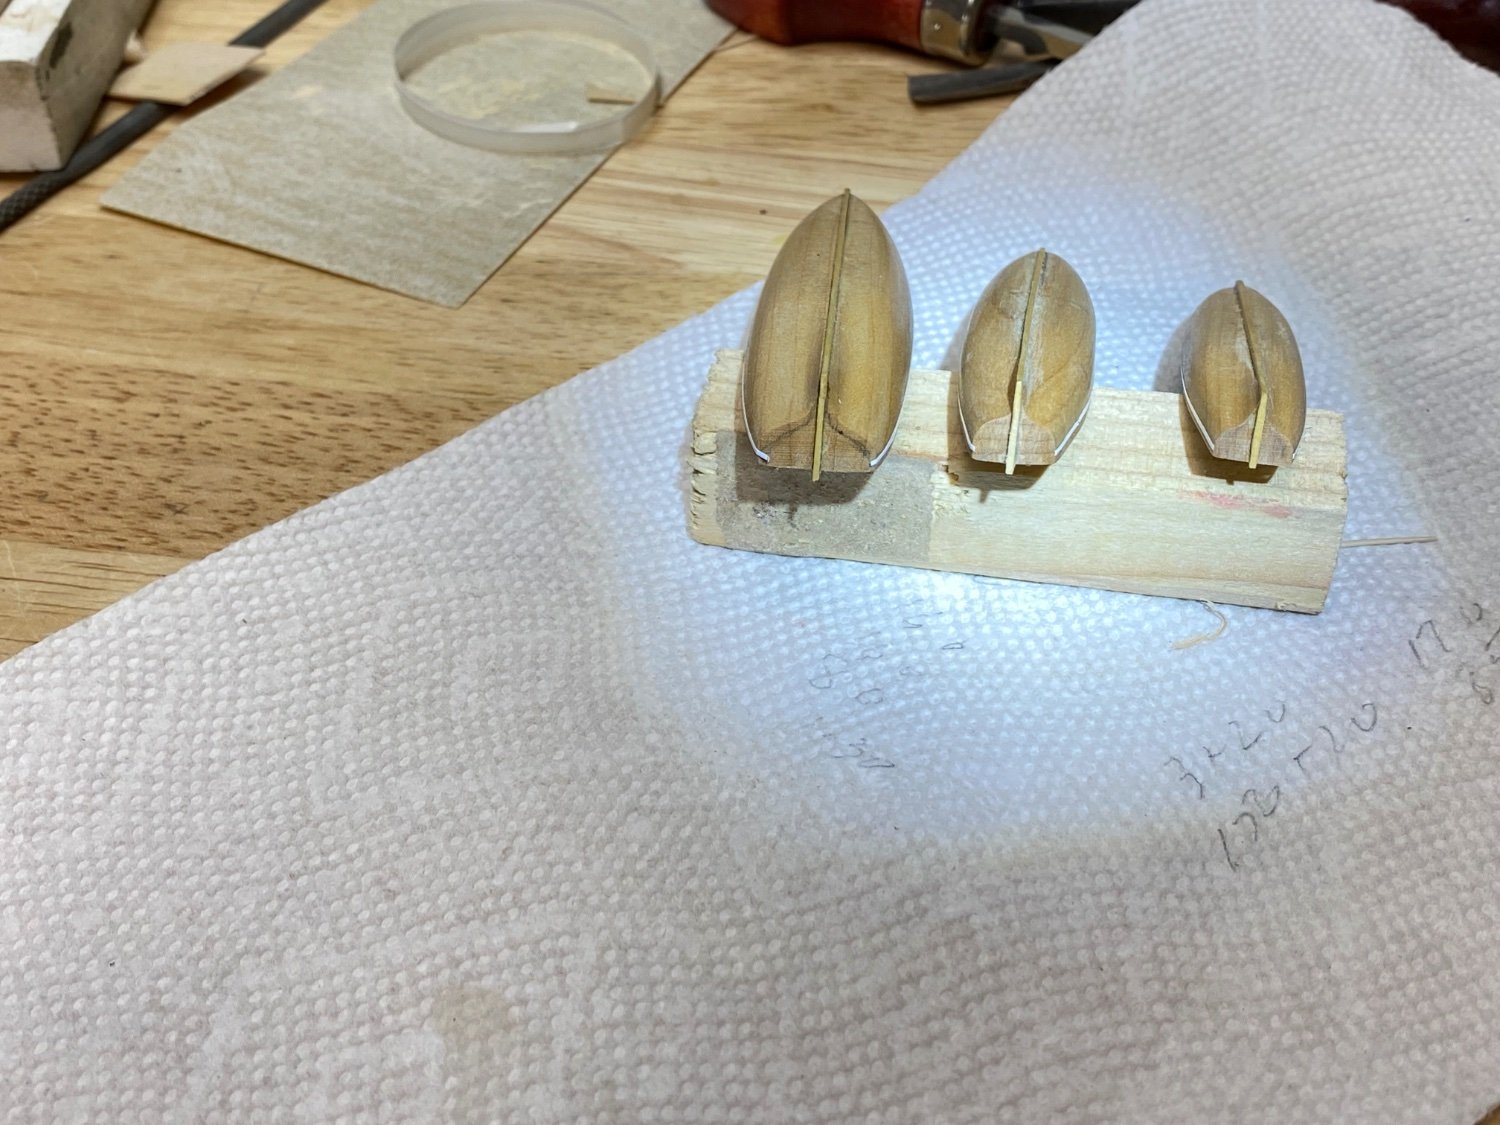
I started by copying the plans for the boats from the CD supplied with the 3 volumes on YA. These were glued to blocks of cherry and shaped on the disc sander using the same technique that EDT used to fabricate the molds for his boats. Patterns for the stations were glued to basswood strips and cut out on a scroll saw. I used a small hand plane to initially shape the boats then used round files and 220 grit sand paper to finish to shape. Previously I cut a groove in the cherry block with a .030 blade on the table saw for the keel and stem post after shaping was done. I made 1 long boat scalled 28 ft long, 3 25 ft cutters, of which 2 will be for the life boats ( transom sterns), and 1 22ft cutter. I originally intended to attempt to plank the boats but decided against that as I am happy with the results as they are and fear making a mess of them trying to plank them.
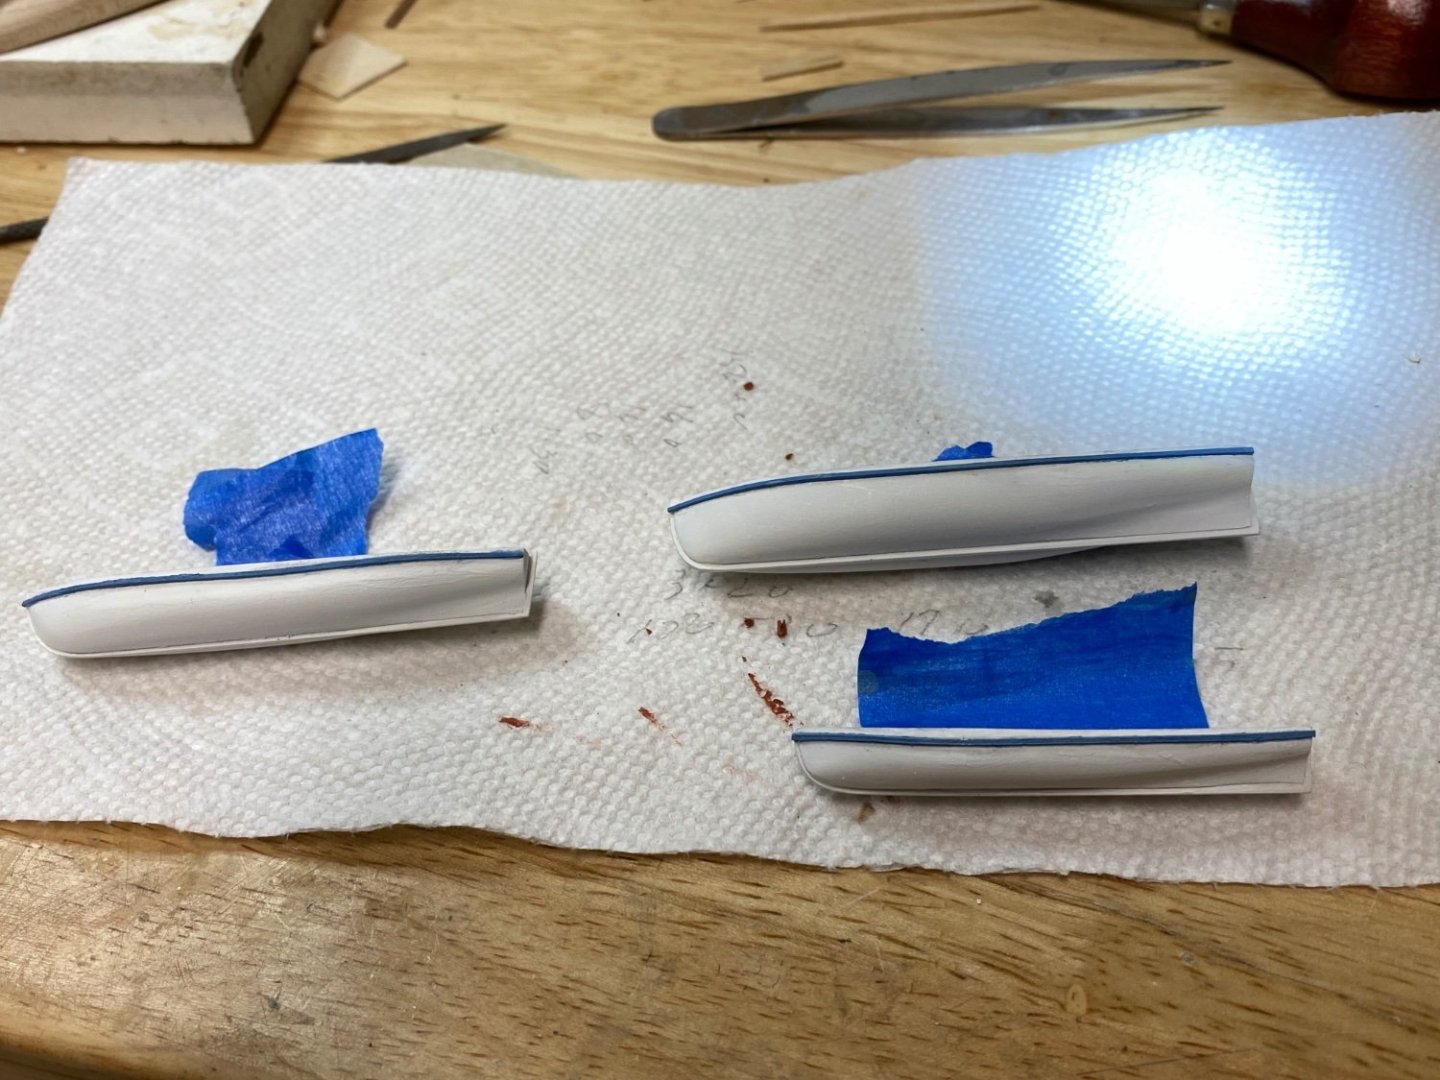
I finished the 3 boats on the fore cabin . These were painted white with a blue rubbing strake, again, per EdT and YA. Making the rubbing strakes was exasperating as I had to hand sand the strip down to size. They are not consistent but hopefully they are too small to tell. These were glued on after the boats were painted white. I used striping tape to keep paint off the strip for the rubbing strake. Cyano was used to glue the rubbing strake to the hull as wood glue was too messy and didn’t work well.
The gudgeons were made from 28 ga copper wire and also glued on with cyan.
Next up are the skids on the top of the fore cabin with the eyebolts and mounting the boats on the cabin.


-
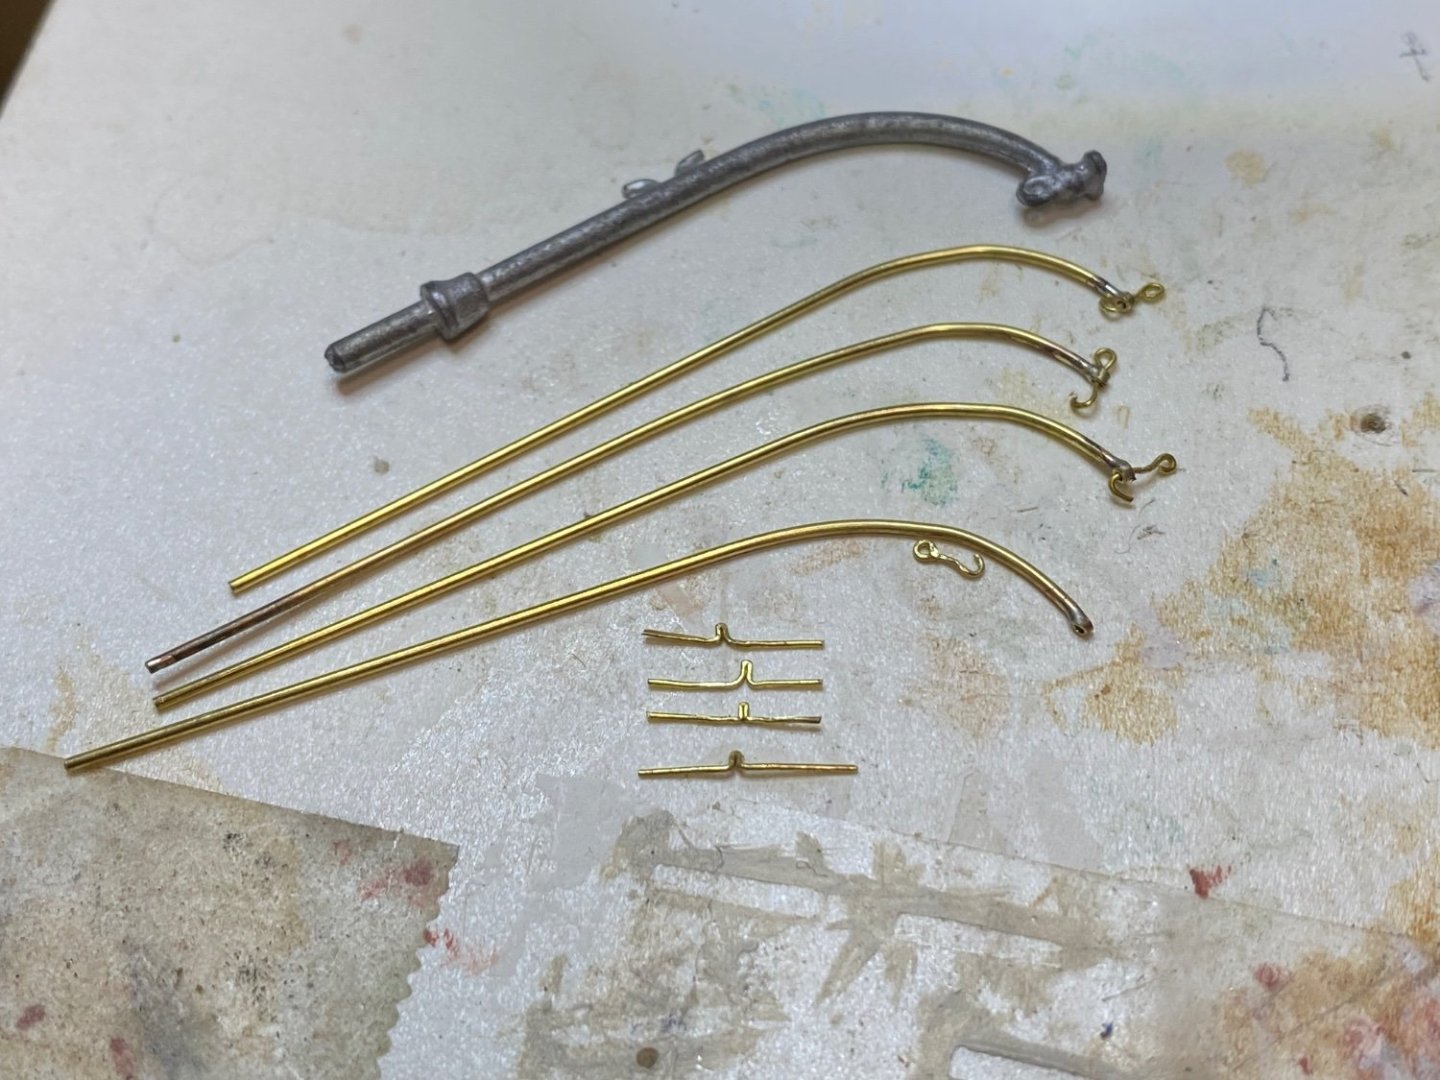
I went ahead and made the lifeboat davits due to concerns that George (GAK) had about the placement of the davits on the mizzen channels on his model. I also had to face the fact that I have been avoiding dealing with the issue of the lifeboats. I don’t like the ones that came with the kit and I didn’t want to use plastic and size of the boats was crucial for placement of the davits and arrangement on the top of the fore cabin.
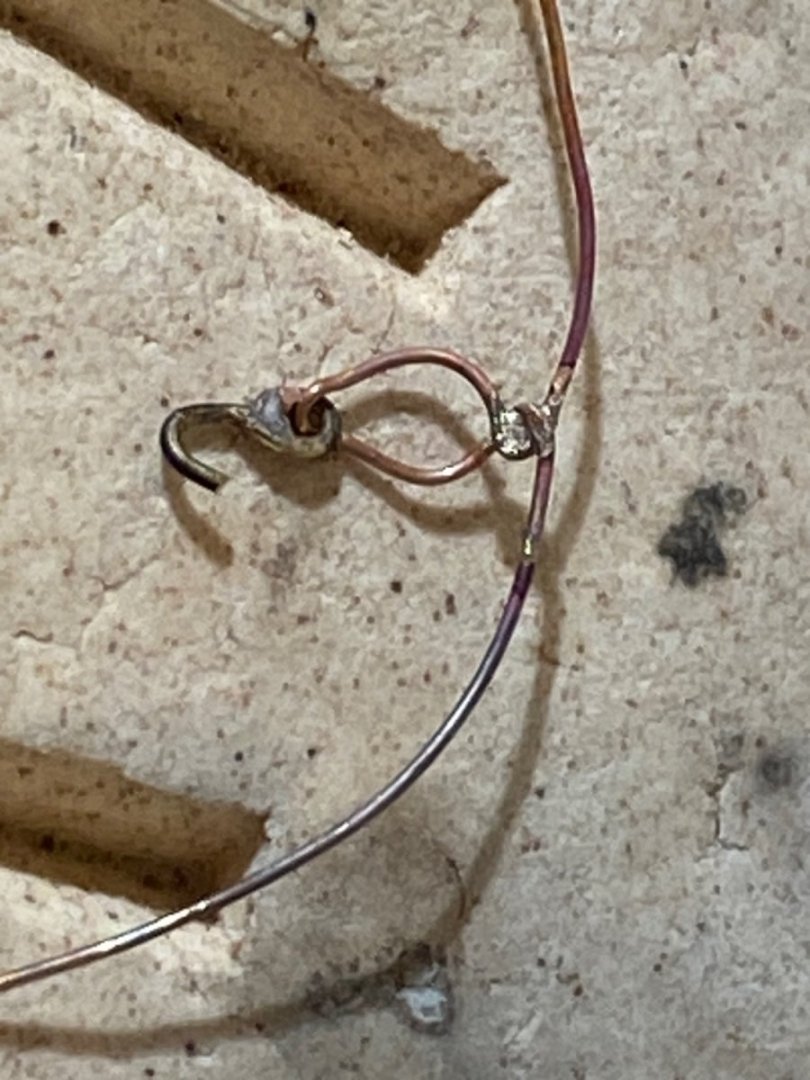
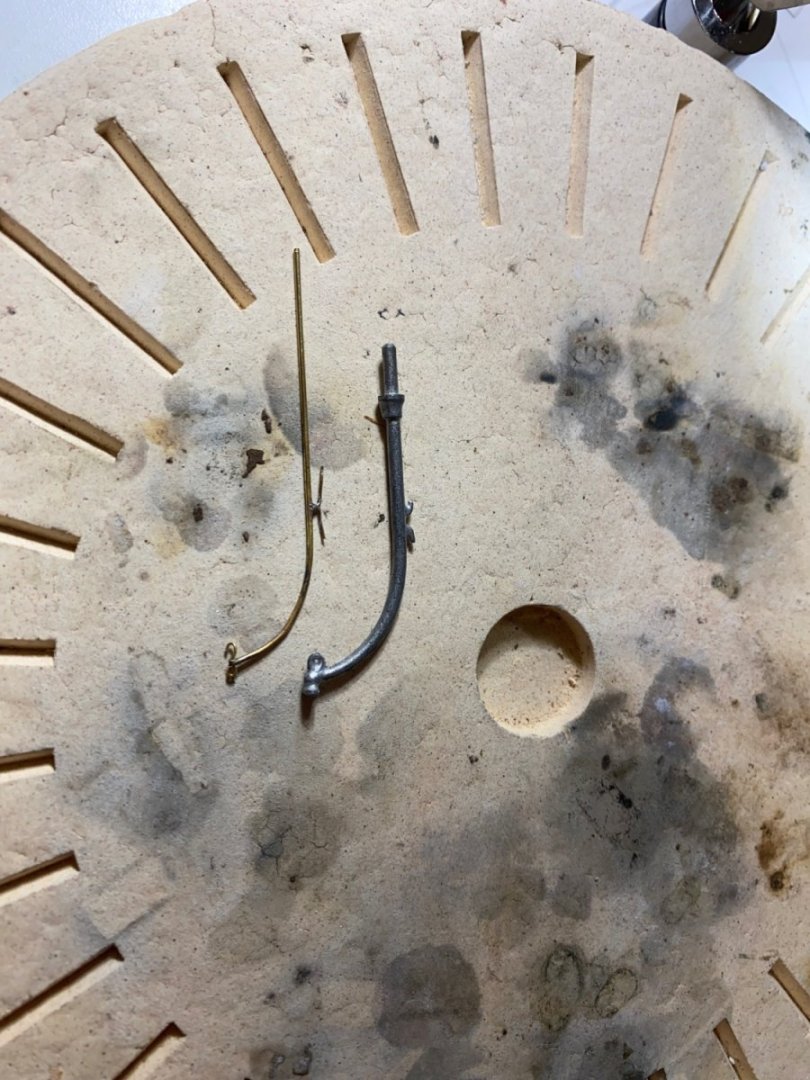
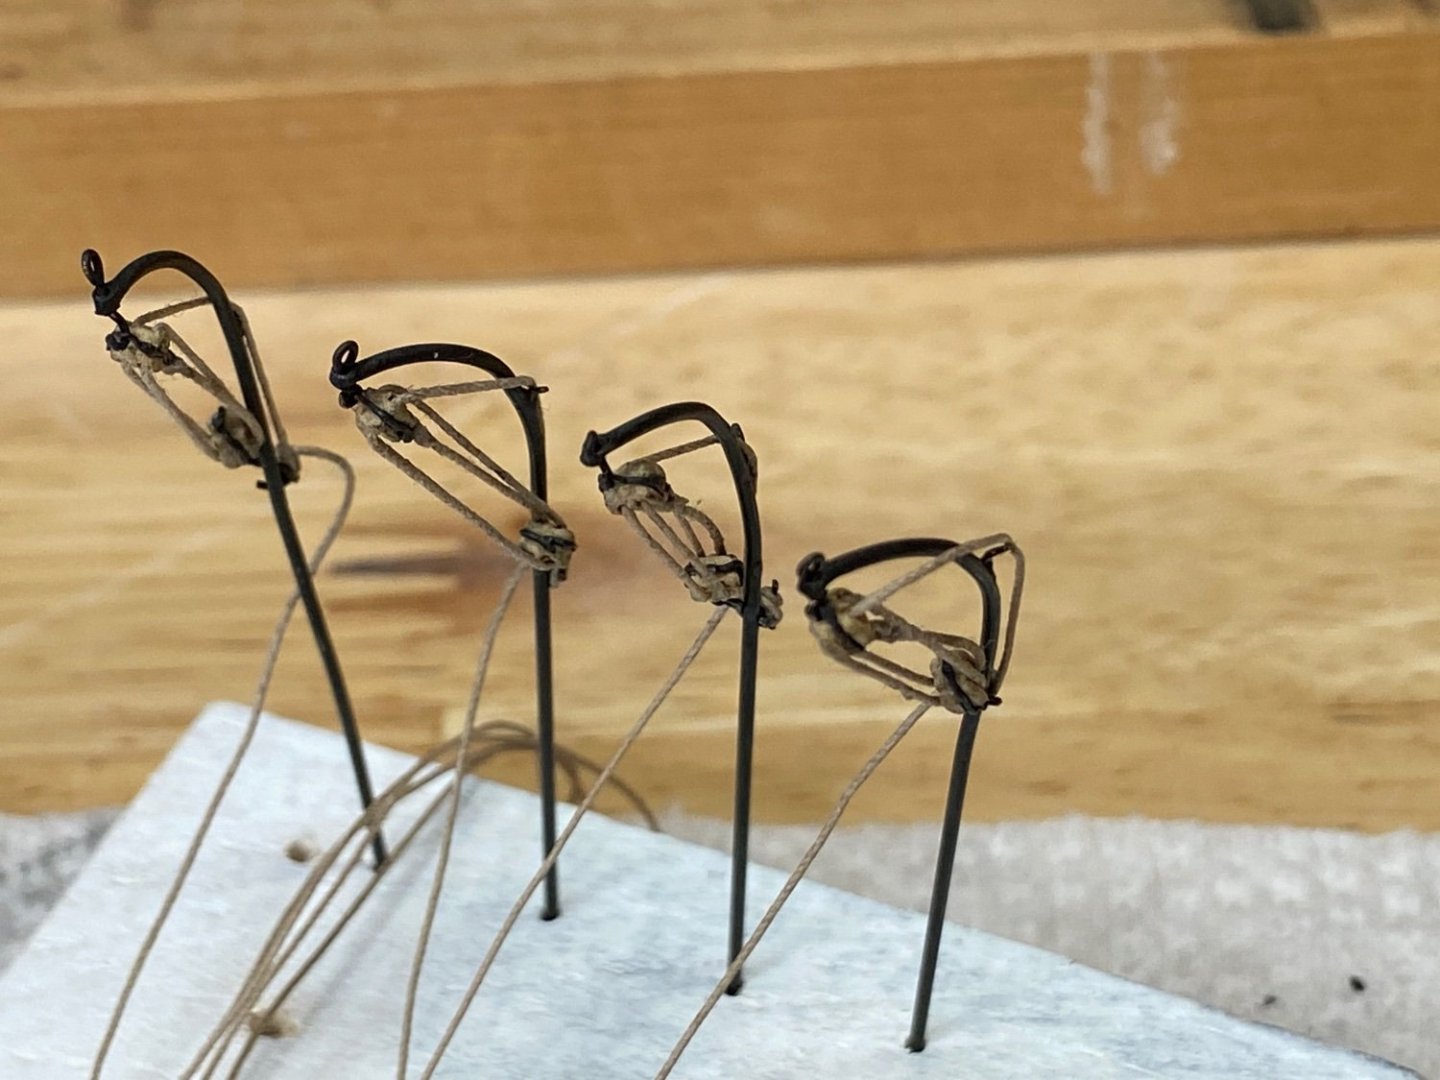
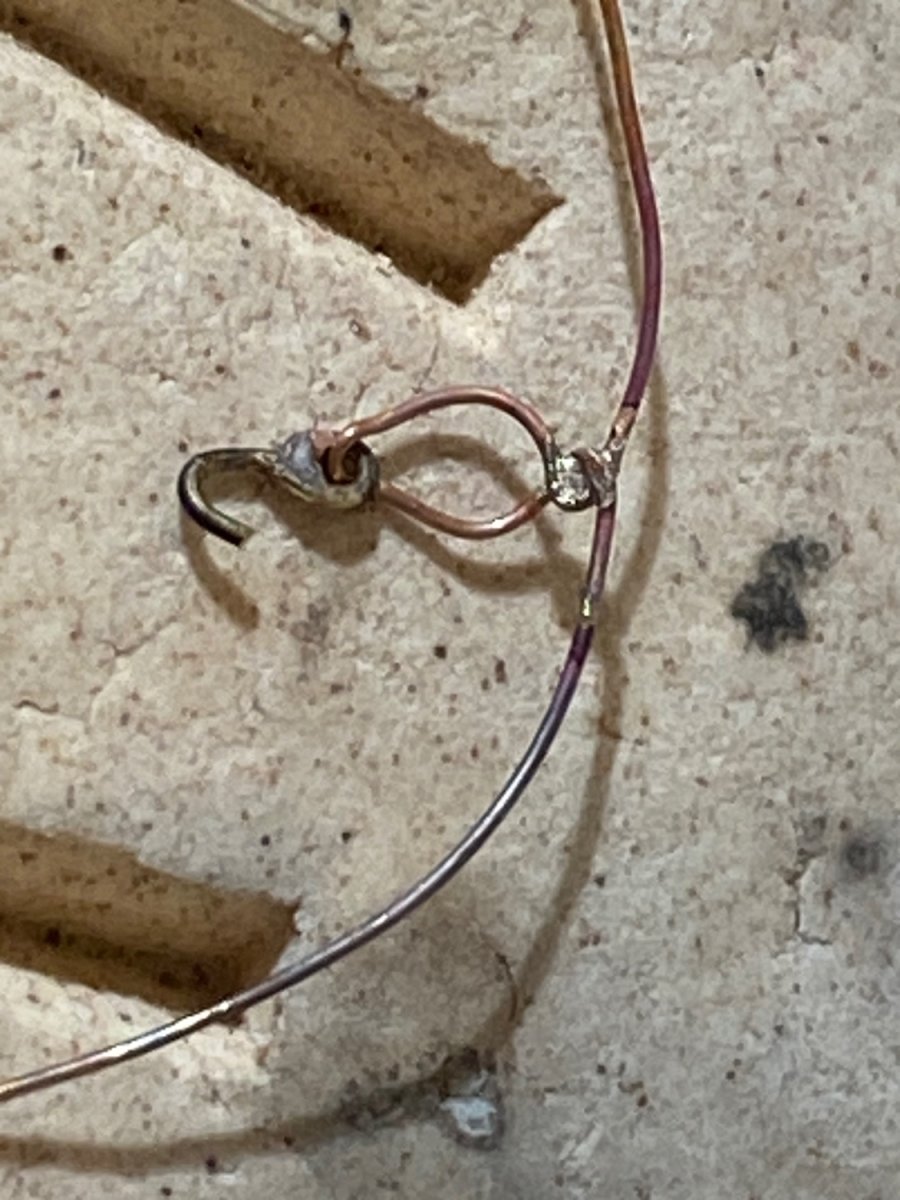
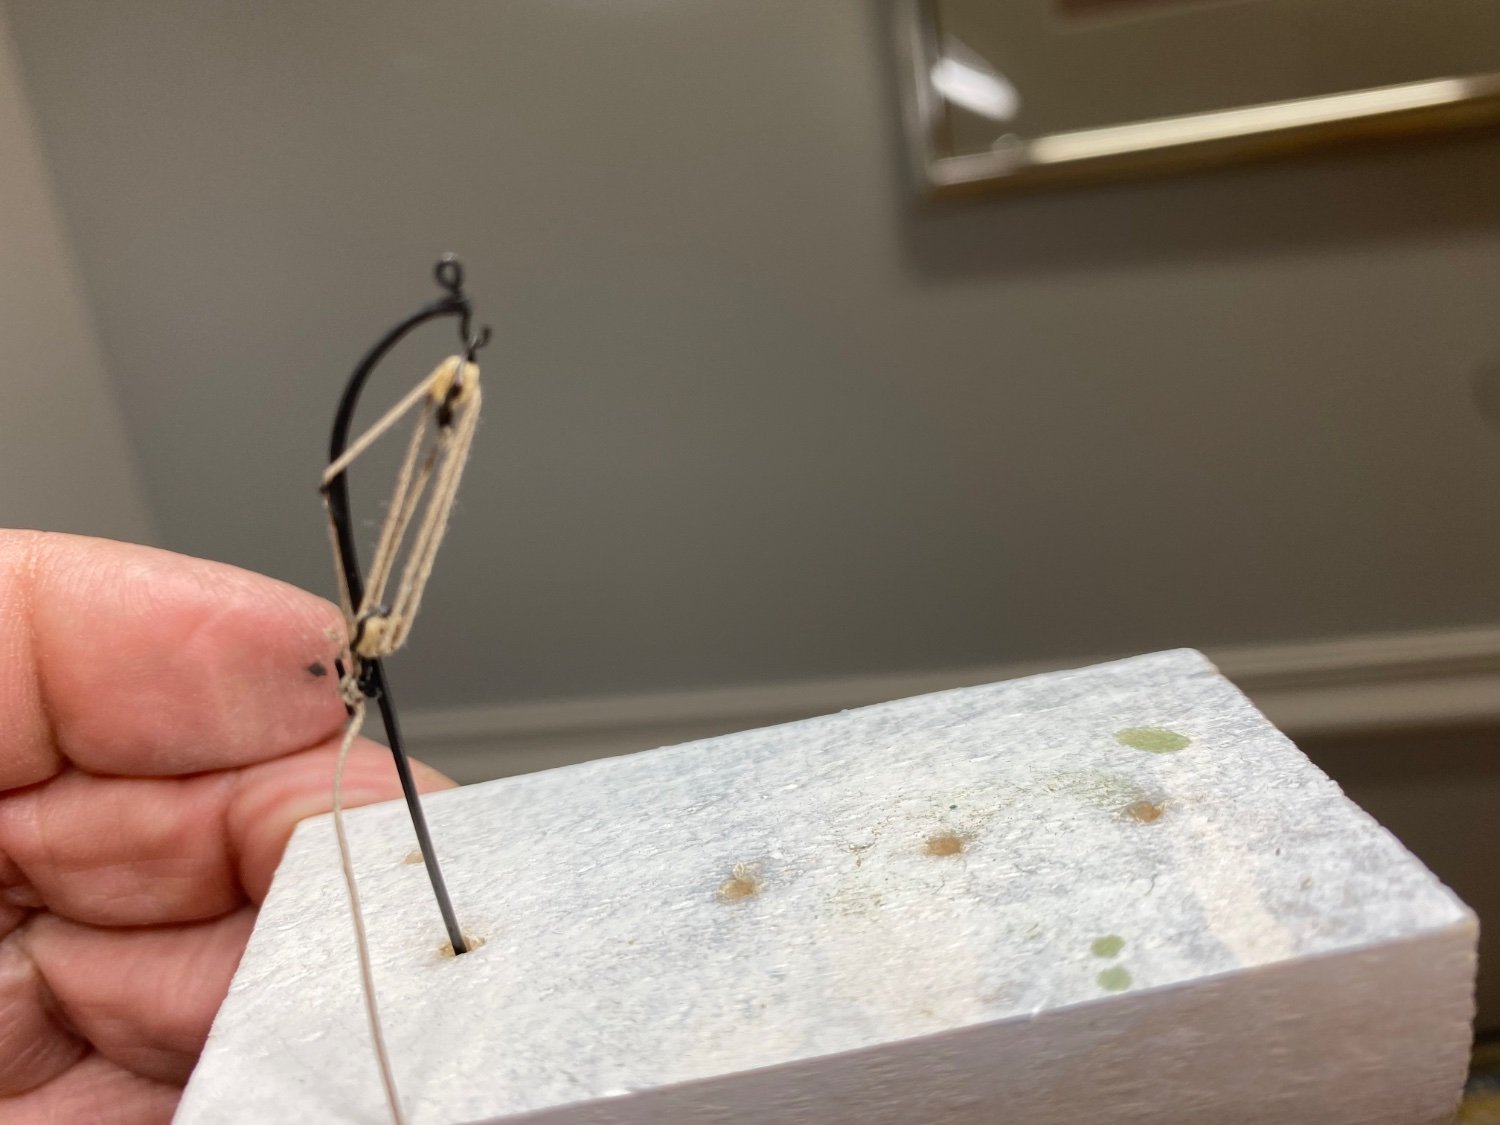
The davits were made from 1/16 inch brass rod. It should have been 3/64 inch but I picked up the wrong rod and didn’t realize it until they were fabricated. Hopefully these will work, but if not, they were relatively easy to make.
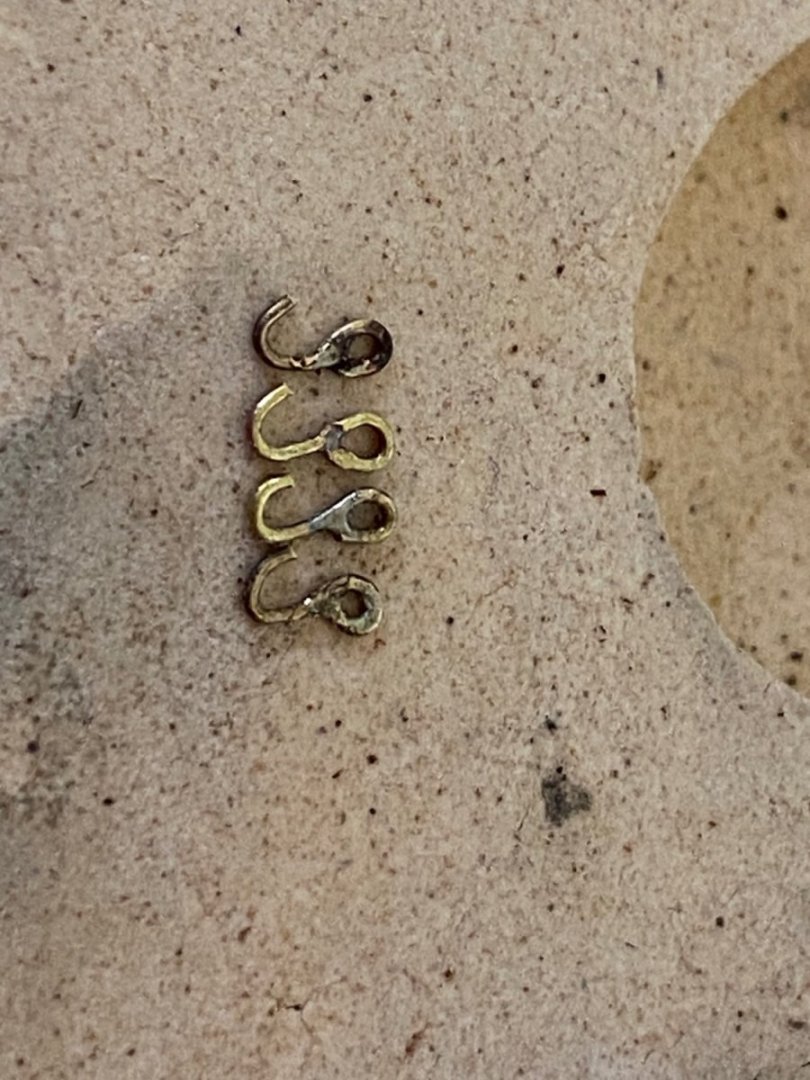
I used 3/32 inch double blocks from Syren and strapped them with 28 gauge copper wire. The hooks were also made from 28ga copper wire. They were rigged with line also from Syren. The cleats and fair leads were made from 30 ga copper wire and soldered to the davit. Cleats should be on the outside of the davit but it was easier to solder them to the back of the davit. The eye at the top was made from brass tube soldered on to the end . I found strapping the blocks this way to be difficult and frustrating. It was my plan to strap almost all the blocks this way but now have to rethink this.
I attached the hooks on the lower blocks to the cleats to keep them from tangling and out of the way. The davits have not been cut to length yet. I also made the brackets for the forward davits. These were made from rectangular brass tube per EdT.
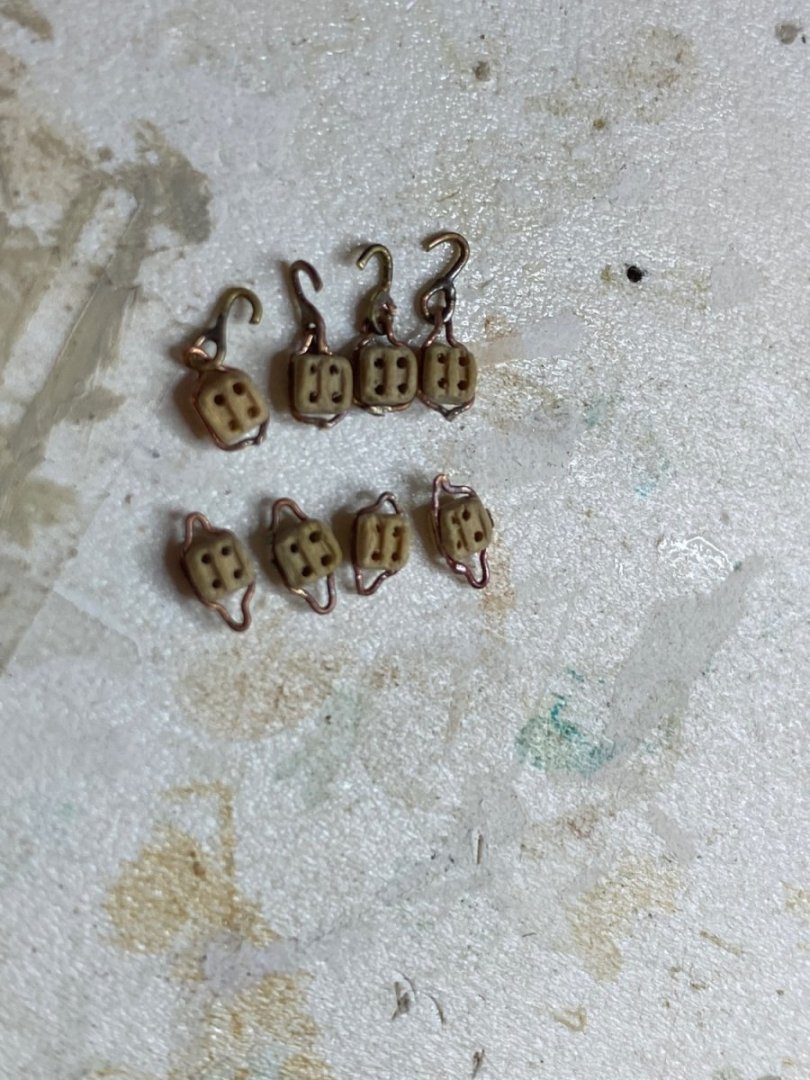
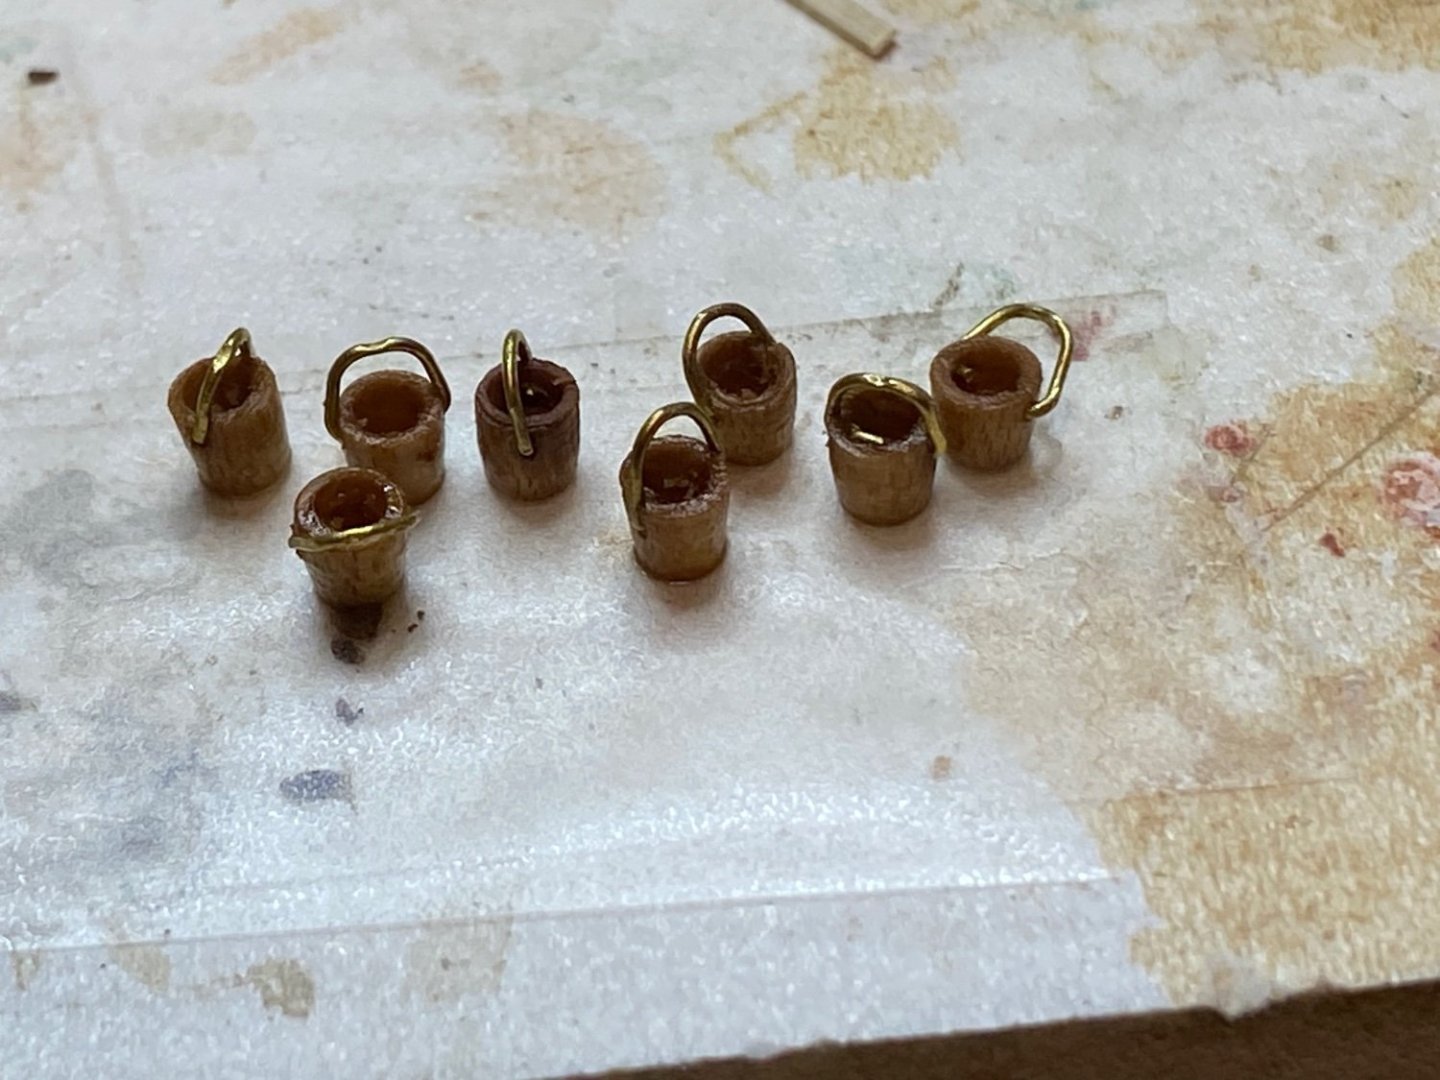
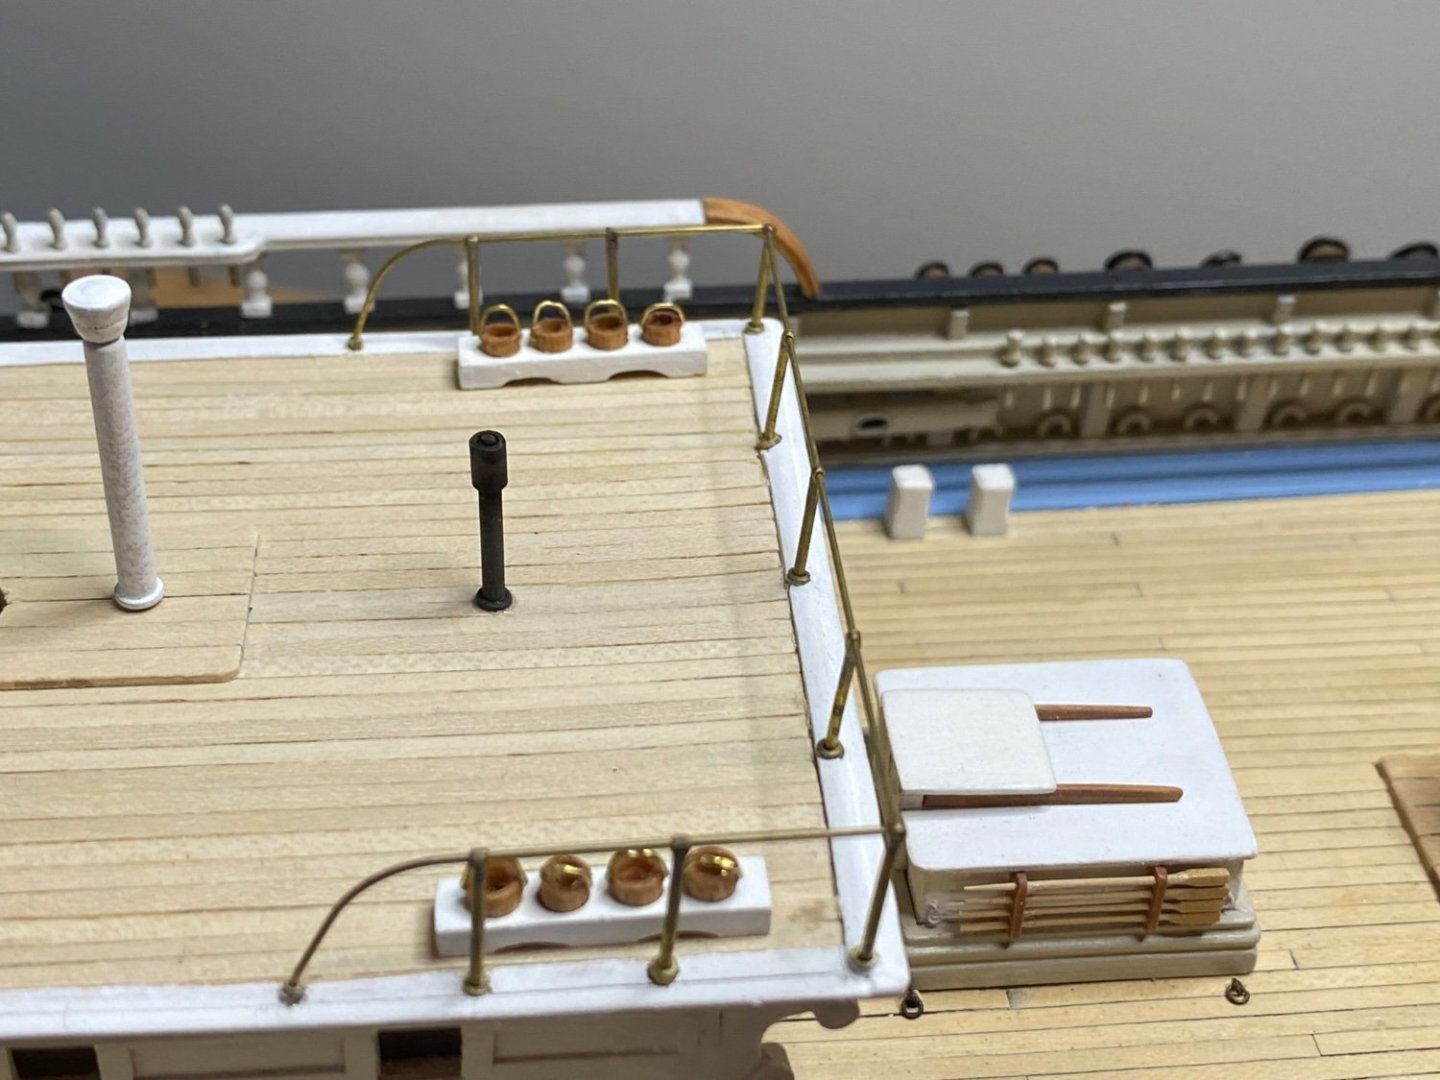
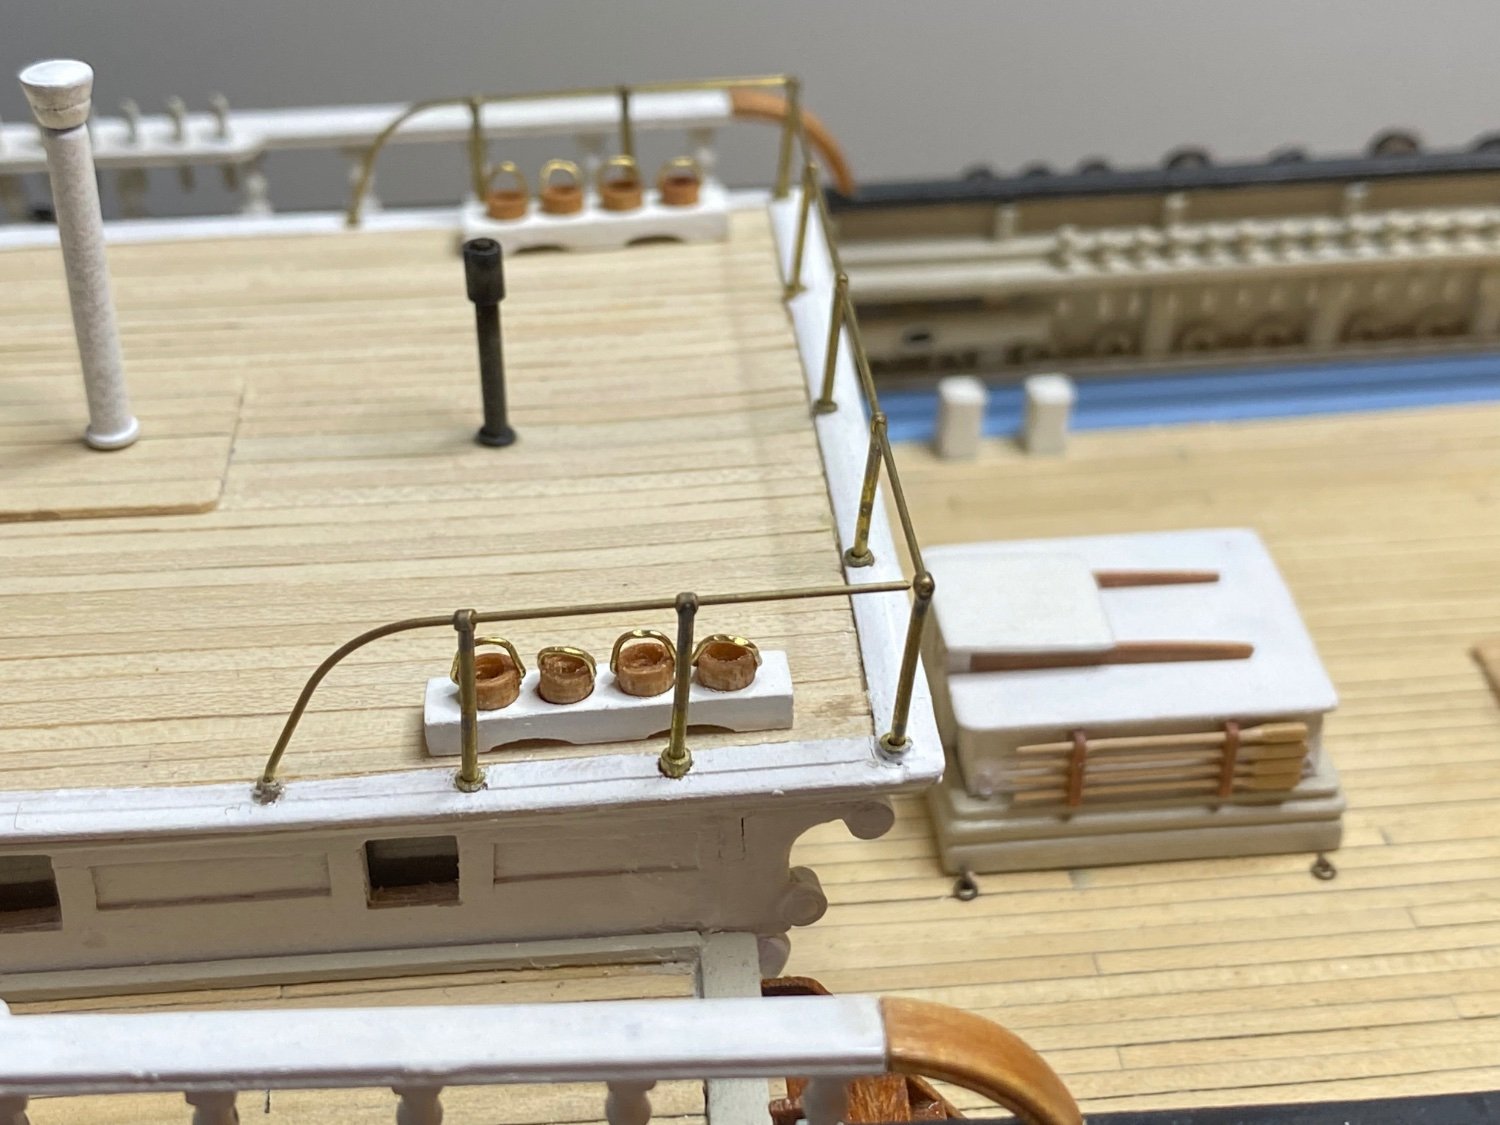
Next up we’re the fire buckets and their racks.
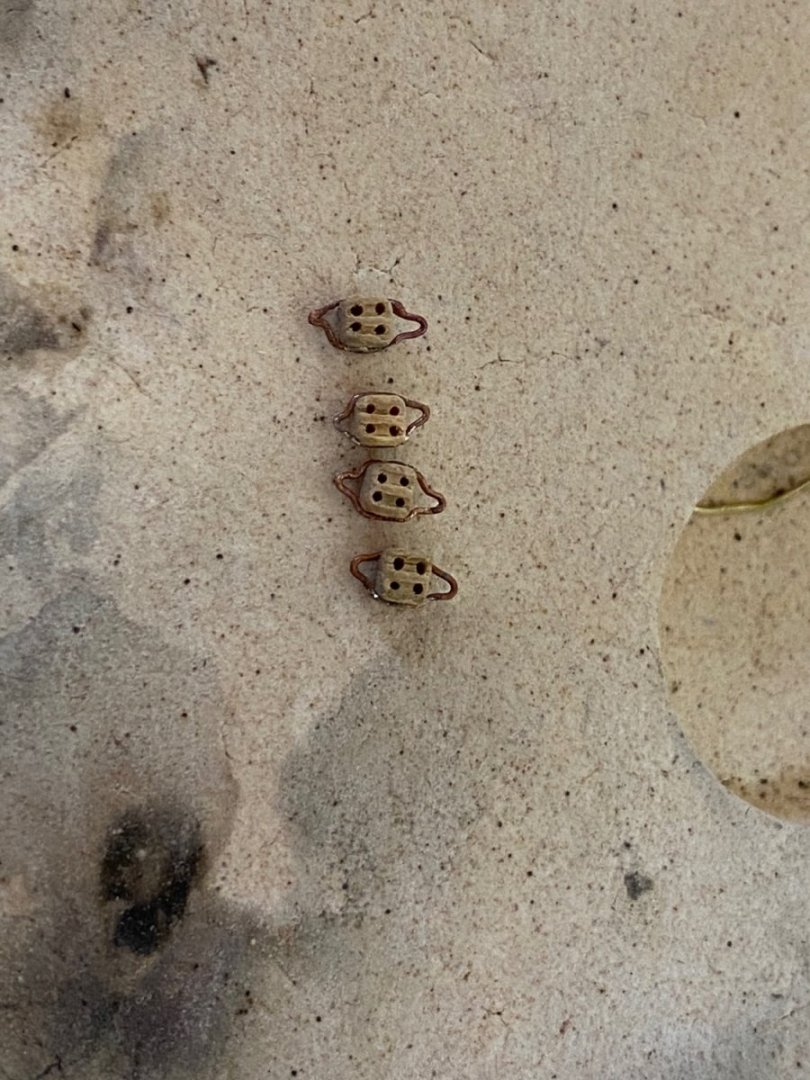
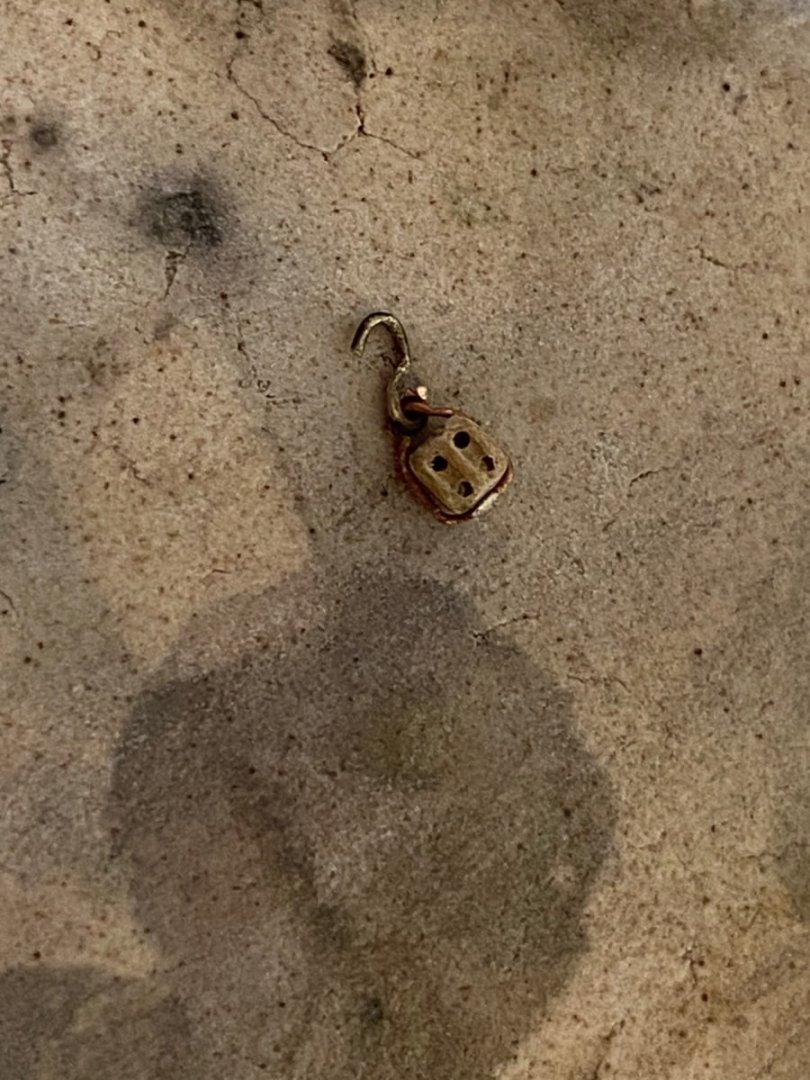
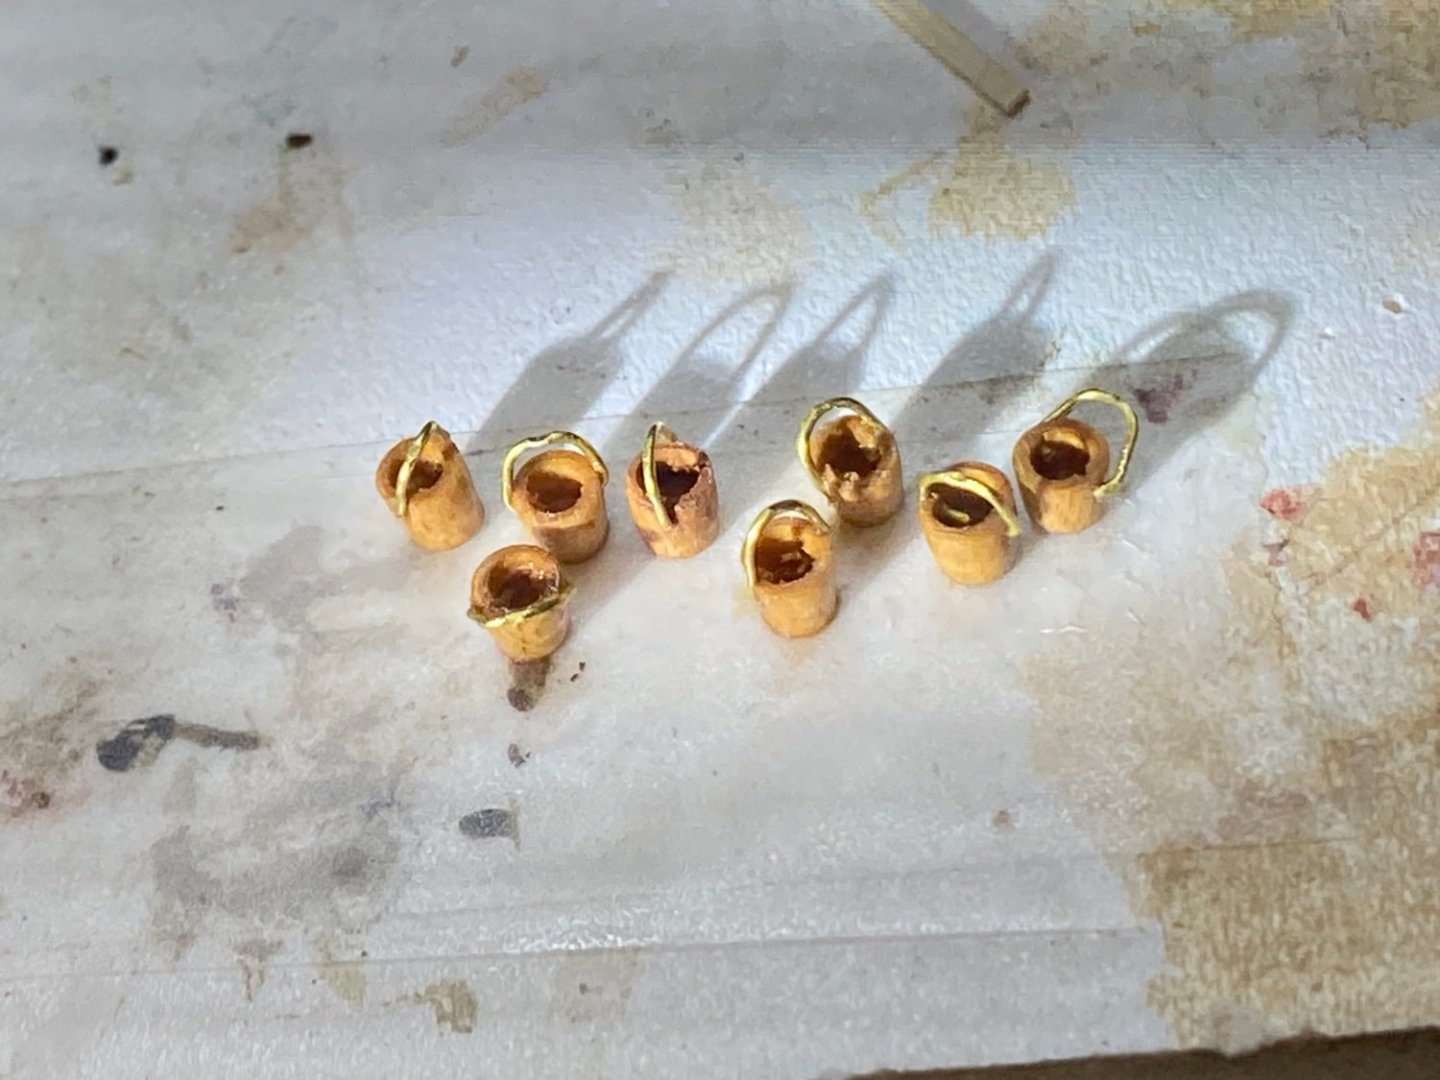
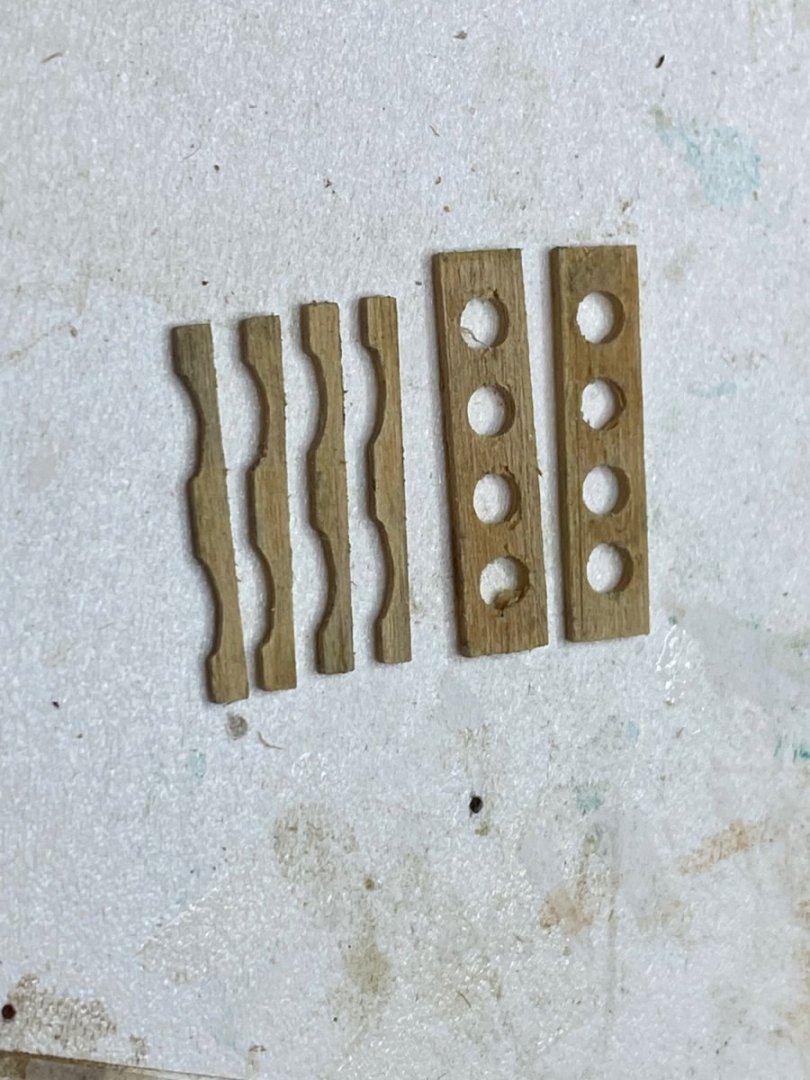
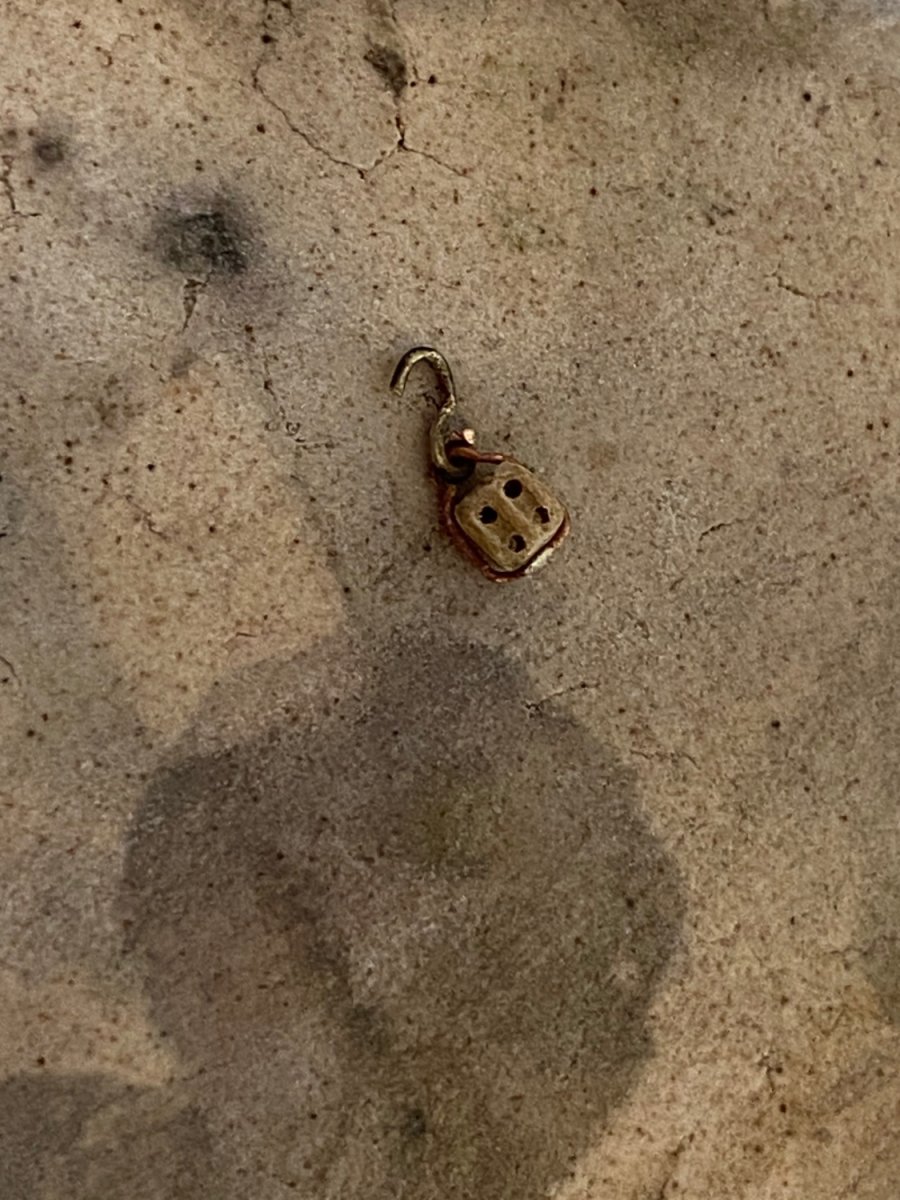
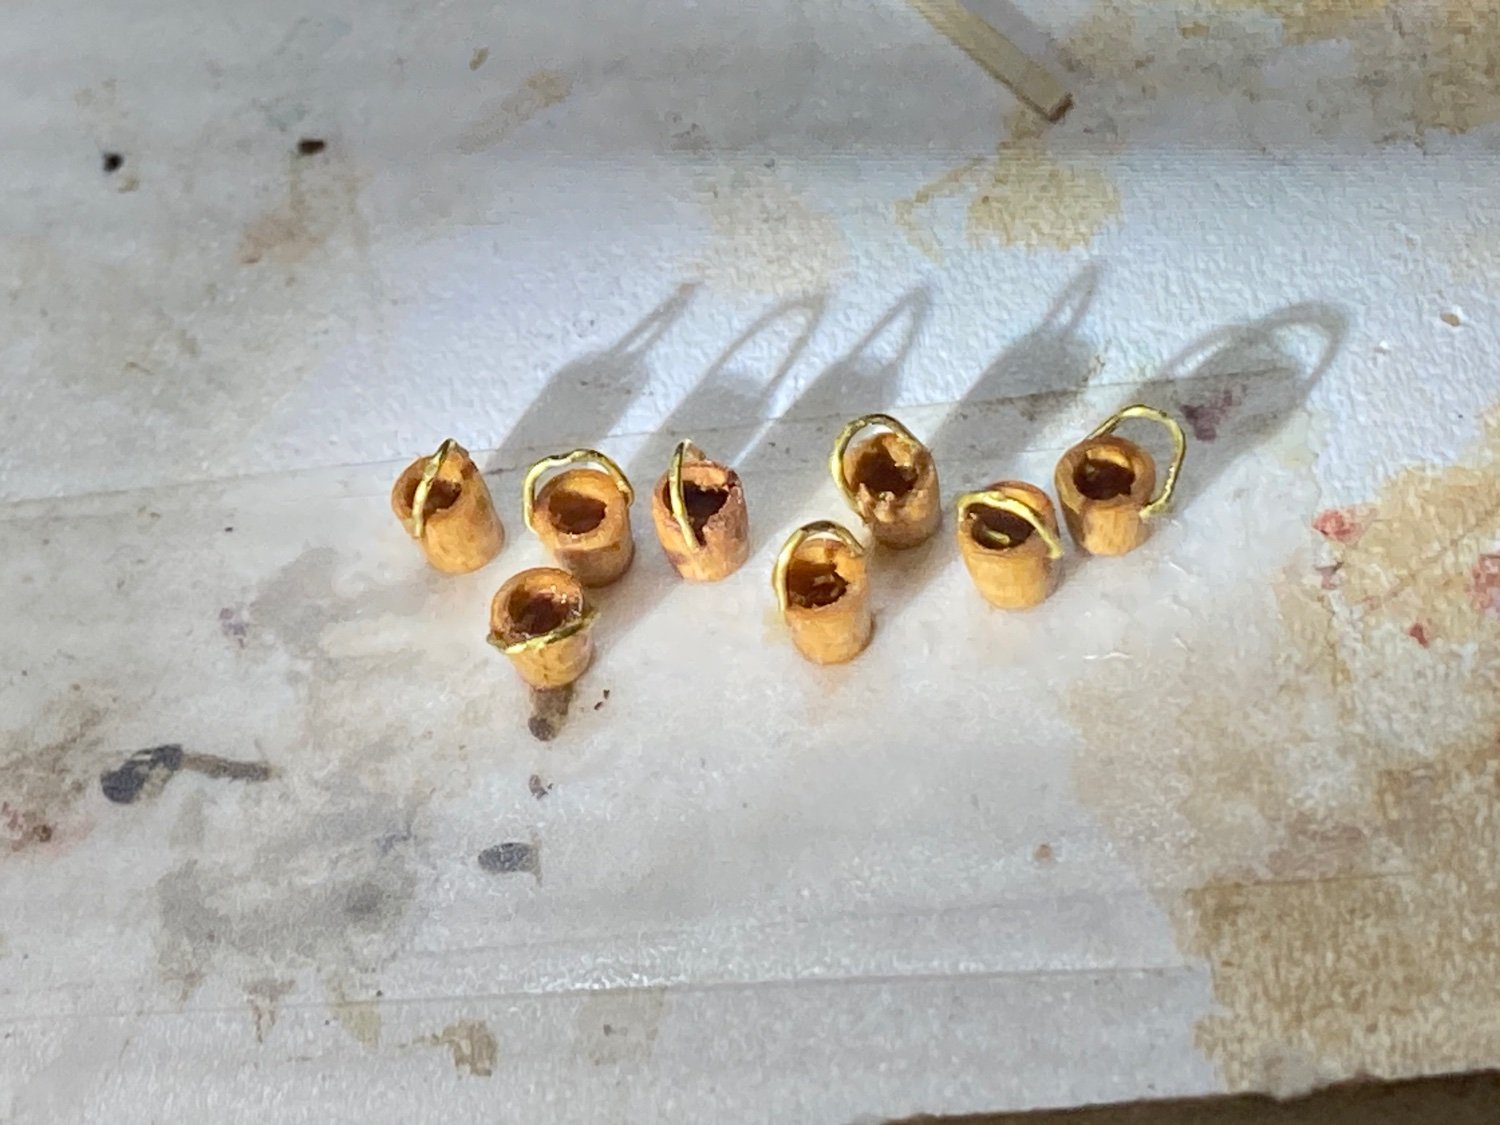
The fire buckets were turned on the lathe using some cherry I had. I needed 8 but ended up turning 20 to get 8 as there was a definite learn curve associated with making them. These were stained with Ipswich pine stain as both mahogany and walnut stained made the look black. The handles were made from 28 gauge brass wire. I was going to blacken them but like the brass look.
The racks were made from boxwood and painted white. These were glued to the deck of the aft cabin per the plans.
I have seen these buckets painted red or white but I liked the look of them stained bright. Call it artistic license.


-
-
George,
I also have been debating where to place the aft davit. Right now I think I will place them between the 3rd and 4th mizzen shrouds also. Depending on the length of the boats, this will move the fore davit aft of the freeing port which seems to agree with the Buttersworth painting. Both Buttersworth and the China trade painting indicate the davits further aft than shown in the plans. I have not yet drilled the holes in the channels as I am waiting to to get to the rigging to see if there are any interference with the braces ect. I have made the davits and the mounting brackets which I will post soon. Currently I am trying to carve the ships boats.. we’ll see how that turns out.
Congratulations on a beautiful model. I’ll miss checking on your progress.
Rick
-
Coming along well!Rick
-
-
Great model, great result and great blog!!!
I have really enjoyed following along. It’s been quite a journey. Congratulations on a job well done!!’
Rick
- Canute, mtaylor, Keith Black and 2 others
-
5
-
Beautiful George!!!!
I reference your blog to see how you did things as I slowly progress.
Rick


Chaconia by Javelin - 1/100 - RADIO - LPG Tanker
in - Build logs for subjects built 1901 - Present Day
Posted
Beautiful!!!