


Egilman
-
Posts
4,385 -
Joined
-
Last visited
7 Followers


About Egilman

- Birthday 07/11/1957
Recent Profile Visitors
6,110 profile views


-
 Egilman reacted to a post in a topic:
Messerscmitt Bf-109G-5/G-6 by BLACK VIKING - FINISHED - Airfix - 1/24 - PLASTIC
Egilman reacted to a post in a topic:
Messerscmitt Bf-109G-5/G-6 by BLACK VIKING - FINISHED - Airfix - 1/24 - PLASTIC
-
Egilman reacted to a post in a topic:
Bentley Blower by RGL - FINISHED - Airfix - 1/12 - PLASTIC
-
Egilman reacted to a post in a topic:
1955 Chevy Convertible Indy 500 pace Car by CDW - Revell - 1:25 Scale - PLASTIC
-
Egilman reacted to a post in a topic:
1955 Chevy Convertible Indy 500 pace Car by CDW - Revell - 1:25 Scale - PLASTIC
-
Egilman reacted to a post in a topic:
1955 Chevy Convertible Indy 500 pace Car by CDW - Revell - 1:25 Scale - PLASTIC
-
Egilman reacted to a post in a topic:
Kawasaki Ki-61 Hien "Tony" by ccoyle - Halinski/Kartonowy Arsenal - 1/33 - CARD
-
 With respect as well, I implied no such thing... Anyone who studies the history of slavery in the US states knows there is no broad brush accounts for it... There is no 100% slave state... Missouri VOTED to be admitted as a slave state... like all the others that did such because of the established economies of the areas... With all due respect to you and your thread, at this stage I'm no longer a contributor, I do not want to be responsible for derailing it anymore than it already has been... As you have respectfully requested... Any further off-track discussion will be ignored by me... Respectfully, Egilman
 -
Well, I'm a historian as well, Boone County MO prior to the civil war was mostly small farms owned by whites with around 10 or so black slaves on average... (Missouri was a slave state in that era) After the Civil War and the emancipation of said slaves, most of the owners left the area for what they considered greener pastures, leaving the remaining ex slaves to homestead the vacated farms.... Still a poor rural small farm area... The one thing that stands out is Boone County is known as a millinery county... meaning a central hub of grain mills and elevators taking in raw freshly threshed grain from all over... (up to 100 miles in some cases) So yeah grain elevators were a very prominent feature of the central Missouri landscape... And it goes without saying the railroads that supported getting that grain to market... Yes there were mechanical threshers in Boone County in the 1880's... Missouri's own agricultural records show this, usually owned by the Millerinery businesses.... (the farms were for the most part too small to afford Threshers and the associated equipment and it was before the time of collectives and farm associations) but there were Steam powered threshers in Boone County... Existing historical photo's prove it... Photograph of John Ellis and S S Warren sitting on a thresher. Part of the Harris Family Photographs Collection, a collection of photographs of family, friends, employers, church, and schools collected by Julia Warren Harris. The collection is a vivid portrait of Black family and social life in Boone County, MO, particularly the Three Creeks area, Columbia, and Ashland. In researching this photo it's time scale is in the late 1880's... I'm not trying to argue with you brother, and in the area your modeling there wouldn't be many pieces of such equipment.... But to say it's not possible due to the economic condition of the area, the lack of wealth in the area or the early examples of pre war equipment exclude their inclusion... History clearly, if delved into deep enough, shows they were there, prior to 1900 as a fact... But probably a rarity and the property of the milling-grain elevator businesses of the era... Before the great farm organization efforts of the early 1900's... Probably not enough volume to include one in your work,.. (and your working on a very narrow time frame) I agree.... Your doing a wonderful job on this, a master work, and the education in history and modeling skills that go along with it causes me to pause in awe... Great respects my friend... EG I apologize for the derail... I will step out of the conversation now
-
Try the 1850's.... Steam powered agricultural equipment had been around 40 years before the first Diesel tractor was born.... Was old tech in the early 1900's
-
Old Collingwood reacted to a post in a topic:
1960 Corvette by gsdpic - MFH - 1/12 - Multimedia
-
1960 Corvette by gsdpic - MFH - 1/12 - Multimedia
Egilman replied to gsdpic's topic in Non-ship/categorised builds
Hey Brother, another note.. Your going to want to strip the orange off the bell housing, every single one chevy produced, ALL of them, were bare aluminum and the transmissions were bare steel.... -
1960 Corvette by gsdpic - MFH - 1/12 - Multimedia
Egilman replied to gsdpic's topic in Non-ship/categorised builds
It would be the same system, the '62 327ci was simply a bored out 283 with hi-flow heads... They shared the same block and manifolds.... https://www.corvettecentral.com/1957-fuelie-ls-classic-intake-system-351265 -
1960 Corvette by gsdpic - MFH - 1/12 - Multimedia
Egilman replied to gsdpic's topic in Non-ship/categorised builds
Hey brother, good review will be following.... And a side note, The "Orange" used on Chevrolet engines in the '50's & '60's would be described by anyone actually looking at it in real life as red... They named it as "Chevrolet Orange" so they could take ownership of the color, hence anyone who wanted to repaint their engines with authentic color had to pay a premium so Chevrolet got their cut of the profit... Everything a US automaker did was done to make a profit... (a Ford practice from the start that continues to this day, remember where Kingsford charcoal originated from, shavings from Henry Ford's spoke lathes, rather than burn them they made another product out of them) Most people look at it and call it red... For all intents and purposes if you weren't rebuilding engines back in those days you wouldn't know that... GM changed it sometime in the late '60's - '70's where they went to all black for most of their brands.... -
Starcraft Adjutant AI by yvesvidal - 1/6 - RESIN/PLASTIC
Egilman replied to yvesvidal's topic in Non-ship/categorised builds
Reminds me of the Borg Queen from STNG.... -
Starcraft Adjutant AI by yvesvidal - 1/6 - RESIN/PLASTIC
Egilman replied to yvesvidal's topic in Non-ship/categorised builds
If there was any questions of what 3D printing will do for modeling... This represents the answer.... Very well done.... -
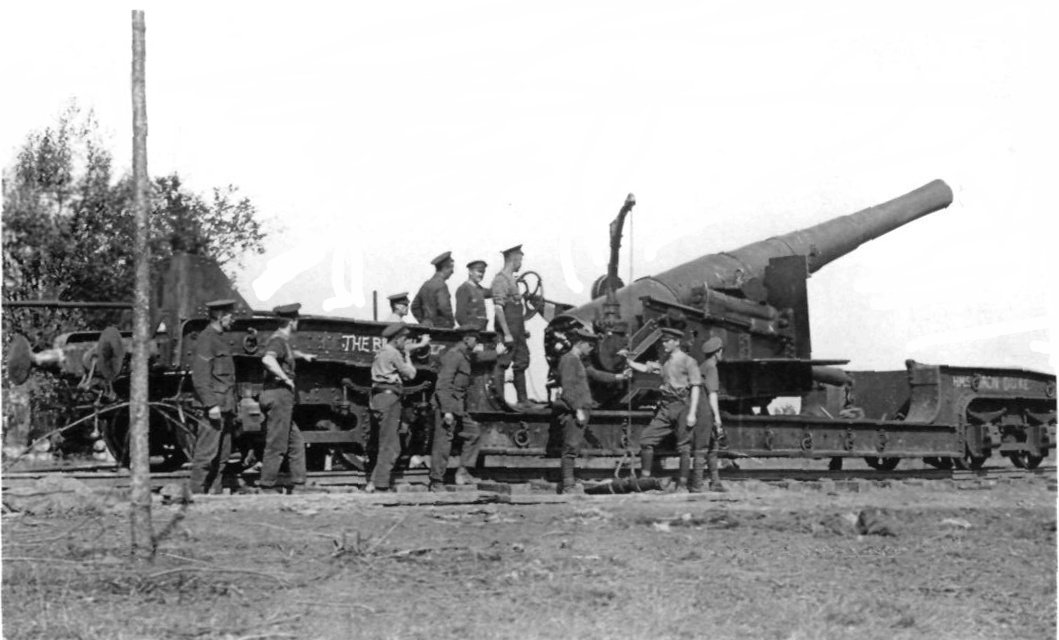
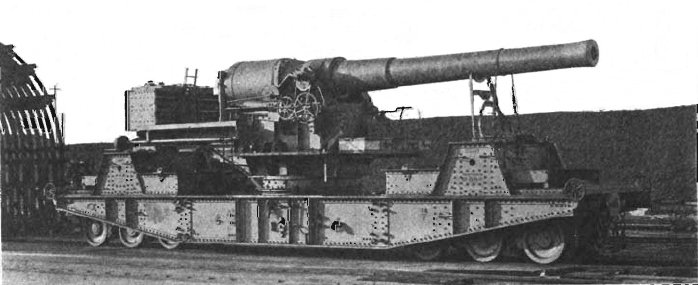
Hi guys... This was coast defense railroad artillery.... And the D-Model designation is Mk I which is the designation of the carriage not the gun itself... The Gun itself is a Mk III to a Mk VI adapted to the Mk I deep well railroad carriage... Here is a picture of one in operation in France.... from "THE FIELD ARTILLERY JOURNAL". VOLUME VII NUMBER 2. April-June 1917. THE UNITED STATES FIELD ARTILLERY ASSOCIATION WASHINGTON, D. C. Downloaded from http://sill-www.army.mil/FAMAG/1917/APR_JUN_1917/APR_JUN_1917_FULL_EDITION.pdf This photograph Q 4280 comes from the collections of the Imperial War Museums. Photograph of British BL 9.2 inch gun, Mk III* or Mk VI HMS Iron Duke, mounted on Mk I railway truck, in action at Maricourt, France, during the Battle of the Somme Sep. 1916. There were no Mk I guns produced in 1896 as they were deemed deficient.... Most of these guns were reclamations from the Royal Navy as they replaced them on their capital ships... The Guns had a 10 deg traverse left to right on the mounting any further traverse was accomplished by moving the gun on it's curved track to change it's bearing on target... It's elevation was 28 degrees which was improved to 35 degrees sometime in 1916... All of these guns were scrapped after WWI... The only ones that were saved were the Mk XIII model and those are the ones that served into WWII... They were mounted on a straight back carriage..... Interesting gun.... Beautiful model Brother....
- 18 replies
-
- 11
-
-

-
Looks beautiful Brother, absolutely authentic except for the unattended Chauchat sitting there on the sidewalk, (never happen in real life) probably should be near the gunner with it's bi-pod legs folded leaning up against something.... A more casual setting given the casual setting of the scene itself... It would never be set up in firing trim in that situation...
-
Nice rendition of the discolored stainless steel aft fuselage... That is about the color of overheated SS... When hot, it would exhibit all the colors of the rainbow, reds, purples and blues in bands between the bulkhead stiffeners... Very pretty... when they first sent them to SEA, they painted them in camo, but that quickly burned off after a few missions... It makes for one of the most difficult planes to paint... You have a great start on a early war bird.... Very nice...
-
You even got the bent exhaust stack right.... Most excellent work brother... Very well done....
-
No doubt Brother, once the war was over, the debate on the proper usage of the new weapon ran for years... Even though the tech hadn't quite kept up with the thinking... And figuring out the logistics of moving tank columns were still being worked out... And then, expanding the ideals to Combined Arms in actual combat.... The development of the armored forces concept is a broad and very deep subject.... And we can't forget Dwight Eisenhower in the mix, he was the other genius behind what the US Army Armored force became...
-
Andy not going to argue here but armored vehicles were a concept recognized as advantageous for centuries... Just about every nation on the planet has someone that can claim to be first... Hussite forces in Bohemia developed war wagons – medieval horse-drawn wagons that doubled as wagon forts – around 1420 during the Hussite Wars. These heavy wagons were given protective sides with firing slits; their heavy firepower came from either a cannon or from a force of hand-gunners and crossbowmen, supported by light cavalry and infantry using pikes and flails. Heavy arquebuses mounted on wagons were called arquebus à croc. These carried a ball of about 3.5 ounces (100 g) Armored wagons and locomotives were used during the Civil War... The concept is as old as the hills... But the melding of it all together into a cohesive plan of usage was Patton's idea... The FT-17 is recognized as the first modern pattern tank and set the pattern that has been used ever since... The pierce and encircle calvary tactics was perfect for the equipment of the day... Everything else since is simple refinement of the successful concepts that he first employed in France....
-
Tanks are what they are today due to the forward thinking of one man... And one man only.... George S Patton.... He was the first to apply calvary tactics to light tanks on the battlefield... During WWI he commanded the AEF's tank battalions to great effectiveness... Post war he served under Eisenhower who commanded the US Army's tank school until they disbanded the Tank Corp.... Take a look at the US army's combat cars... 40mph in the '20's but the depression prevented the army from filling their ranks with them... Patton worked closely with Christie to develop the T3 combat car, of which the army had 7... He eventually went back to the calvary when the Tank Corp was disbanded due to inter-army political influence/warfare... but during his time after he was sent to Namur, the French military school where he expounded his ideals with people like Liddle Hart, who wrote books about good armor tactics and was considered the world wide authority on Armor usage on the battlefield... His writings were studied by Heinz Guderian, who developed combined arms blitzkrieg tactics based upon Liddle Hart's books and Patton's writings.... (and developed the methods of supporting them on the battlefield, the infrastructure, the chain of supply for moving armor columns) The rest of them, including Rommel, all learned from the masters... Patton, Liddle Hart & Guderian.... George Patton is the godfather of tank tactics, he wrote the ideals of and demonstrated the proper usage of tanks on the battlefield, during WWI...