


Egilman
-
Posts
4,375 -
Joined
-
Last visited
Content Type
Profiles
Forums
Gallery
Events
Everything posted by Egilman
-

Russian modern armoured vehicles by Baker - ACE - 1/72
Egilman replied to Baker's topic in Non-ship/categorised builds
Battalion sized, one for each nation.... Stunningly beautiful.... -
I put those in my "Sealed with a Kiss" classification.... One dedicated to social angst rather than telling an accurate story...
-
Yep Moskit, They were just as difficult to find as REXx sets today are... I guess you could call them 3D printed in a sense, but what they are is electroplated over a master form, then the form is melted away leaving a very fine metal shell... This is why they state they are "grown" rather than printed... They (Moskit) were the thickness of tinfoil... (it's why they looked so realistic) I've been told that the REXx sets are a bit thicker but not by much.... Moskit died a quick death when it was discovered that their parts were so fragile, you had to be careful even looking at it... REXx has the same reputation.... Also, when they say they are designed for a specific model they mean it... You will have a very, very difficult time adapting/modifying them to any other kit... Most modelers I've inquired about them would not recommend them... Museum quality looks? yes, Very difficult to actually use without destroying them? yes, Worth it in the long run? opinions vary... Don't dispose of your kit exhausts until your completely done with the kit, there are any number of reports on REXx sets getting completely destroyed beyond repair by just picking up the model in the wrong spot... Personally, not worth it in my opinion....
-
P-51D Mustang by CDW - FINISHED - Dragon - 1:32 Scale
Egilman replied to CDW's topic in Non-ship/categorised builds
A Silverbird.... A legend in it's own time.... Probably the greatest single engine, propeller driven fighter plane ever built... Of course I'm down for this one, wouldn't miss it.... -
Good question... The prototype didn't have them, the modified 14-bis did... Greg, since none of the original drawings exist, it's a guess... It's one solution that results in what was described in the period literature, and it fits the materials and techniques of the period... But was it "THE" solution there is absolutely no way of knowing.... Now the guy that's got one flying replica down there in Brazil, is using actual ailerons, which allows him to fly it as the ailerons do work as they are supposed to... Still herky jerky as that is the design limitations, but what he is showing is how close Dumont was getting to actually having a truly flying aircraft... I believe he would have sussed it out in a few months... Period pictures do show the flat panel ailerons in it's later life, so they are period correct, but the film of the period doesn't pick up details very well... (it's why the Wright's painted their machine in cadmium paint before going to Europe, they knew that the monochrome film would not pick up the control setup against a silvery monochrome background) It's why there were a lot of copies of the Wright airplane built in Europe, (based upon the pics) but they couldn't get any of them to fly like theirs did so the design was rejected by the Europeans.... {chuckle} Any way it turns out my friend, your building a beautiful model, don't let the vagaries of old history stop you...
-
Keeping my head in the game.....
Egilman replied to Egilman's topic in 3D-Printing and Laser-Cutting.
Well, going over what is next, I need the firewall to do the steering and accelerator pedal... SO in getting the little things done first, I decided to add the Steering Linkages, the Steering Knuckle off the right spindle and the Pittman arm off the steering box, then the steering gear box itself... I need the Gear box in place cause it sets some of the angles needed for the steering wheel and it's support structures.... I need the firewall in place cause it sets the location of some of the accelerator linkage details.... And all that before I need the Carburetor.... So finishing off the Engine gets pushed back a little more on the schedule... Anyway, here is the progress on hooking up the steering.... This image shows both arms in their relative locations, the drag link connecting the two comes next... Location of where the Gear Box will be built.... The long cylinder is the output housing of the Gear Box and that strap looking thing bent over the housing on the left is the beginnings of the frame clamp.... Just a short update today brothers... Onwards...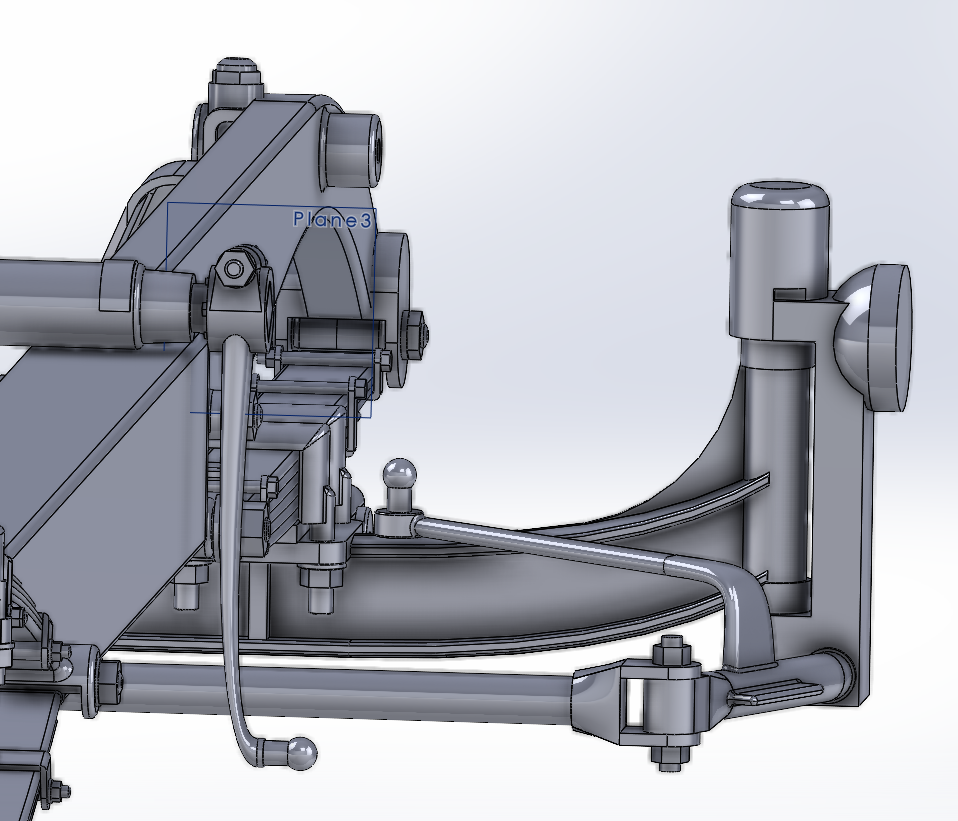
-
Check this video out.... Has some very detailed views of the rigging and the control system..... What I saw was a wire connected from the top wing to the aileron with a shrouded spring connected to the bottom wing... The cable runs vertical to the wing through a sheave then along the wing surface through guides to a point almost at the pilots position where it is connected to the ropes that the pilot looped over his shoulders.... And, as originally built, No Ailerons at all....
-
Ok Those images are not available from any repository I have access to.... But what I can tell you is the craft was built in 1909 never made a flight longer than 220 metres, and it only made 8 flights in total before it was completely destroyed... the "Ailerons" shown on the kit were added after it's third flight to improve roll control and were simply straight fins intended to redirect airflow and weren't true ailerons as Curtis created them... And it's last five flights proved them ineffectual.... It was also the first in europe to be considered as actually flown rather than lurching around in the air like a drunken pigeon.... There are many people who claim that he was the first to fly, but even he acknowledged that his inspiration to get into heavier than air craft, (and away from dirigibles) was the reports of the Wright's and what they were doing around Hoffman Prairie in 1906-07... (circles and figure eights and flights as long as 10-20 miles)... When the Wrights finally went to Europe in 1908, it was Dumont who famously exclaimed, We Are BEATEN!!!! very loudly on the very field (Lemans) where the first demonstration flight took place... Dumont understood that control in all three axes was the achievement and that no one in Europe had arrived there yet when the wrights first flew at the Paris Exposition...
-
Yep, Orville expressed the same in '17 and again in '32.... But military advancement is what drove the advancement in engineering... The one thing I wish? someone make a kit of the first military airplane, Signal Corps #1....
-
In 1908 he was considered the worlds leading expert on heavier than air machines... By 1912, he was simply a peer, By 1914 he was an also ran that worked on airplanes once.... That is sad....
-
Yeah, he was figuring out CoG right about then, but they still missed the even more important aspect of balance around that CoG... At least they had got away from those horrible twin main wing monstrosities they were trying to fly.... Dumont was the closest of the Europeans gaining an understanding of control in three axes, but the Thomas Edison approach to the engineering was slow going.... And it wasn't long, everything was published back in that day as it was believed that science was for everyone... How it works wasn't patentable, how to make it work was... Everyone wanted to be the first to really "Fly" like a bird... I personally believe SD had just about figured it out, and then saw the Wrights working solution in Paris.... It didn't take long after that for everyone to figure it out... Dumont's subsequent airplane work after that was proof of concept, and when he established it to his satisfaction, he stopped... I believe his stopping work was a major loss to science....
-
They were kept that way through their entire lifecycle, at least ours were...
-
Good Idea! just hang it like a museum would hang it.... Five wires (one holds up the nose with it's boxkite) & two crossbars, one under each wheel carrying the weight.... I wonder if Dumont ever figured out why this thing would take hops but would never actually fly...
-
Keeping my head in the game.....
Egilman replied to Egilman's topic in 3D-Printing and Laser-Cutting.
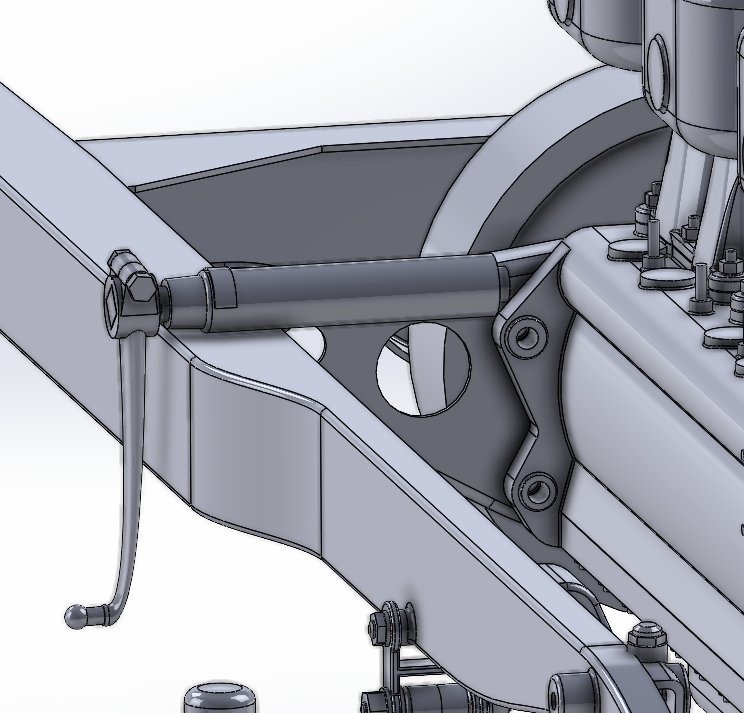
Another small update... Clutch Pedal and it's mechanism.... Only roughed out at this point, I still have to figure out how it attaches to the frame.... But, as far as the driving Brakes connection, I found this... Lower right corner, in the background just above the clutch operating rod, is the clevis that attaches the brake rod to the clutch pedal.... looks like a little round bearing on a triangular tab on the back side of the pedal arm... A look from the right side... And a direct left side view.... So that leaves the right side pedal in the cockpit as the accelerator pedal.... So I'll finalize this addition, and look at what's next, probably the engine cause the intake needs to be complete and the firewall installed before I can address the Accelerator pedal... (it is a lot simpler than the clutch pedal) Onwards...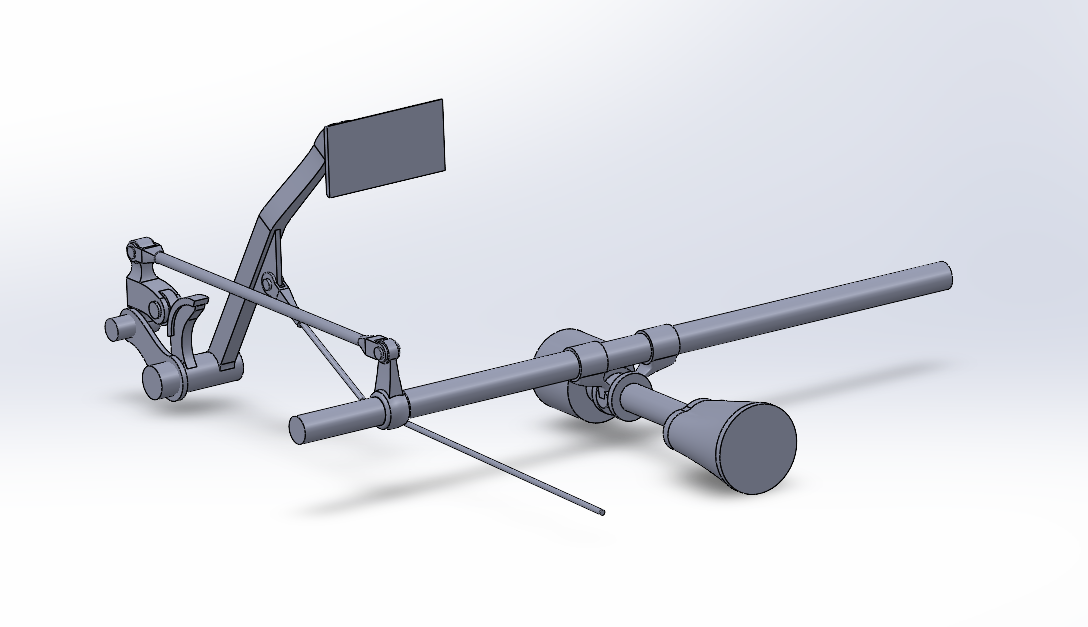
-
Well your a better man than me..... I had grass all over the workbench, table, chairs floor.... the Admiral asked if I was turning my model room into an garden room... (not that she minded)
-
Keeping my head in the game.....
Egilman replied to Egilman's topic in 3D-Printing and Laser-Cutting.
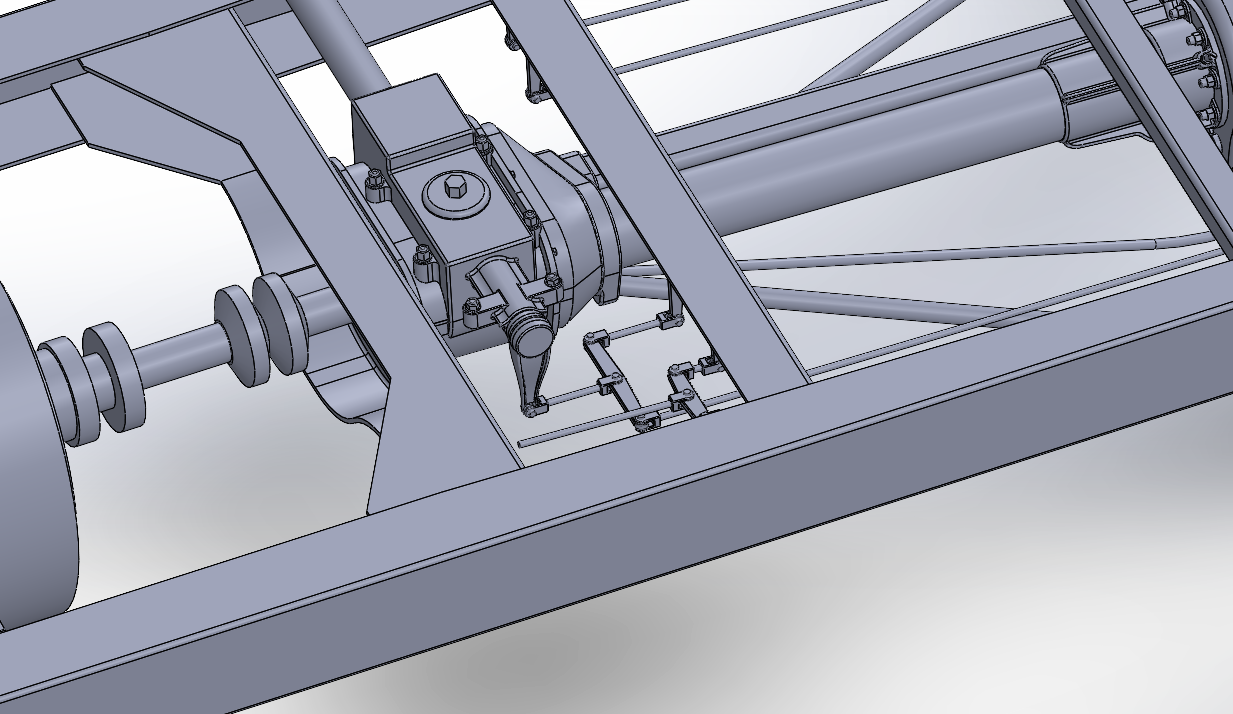
Well, another little piece... The brake isn't set and the tranny is in neutral..... And the overall look from the right side.... The next and final step to getting the operating controls all hooked up, (except for the Steering) is the Clutch linkages, Throw-out bearing and forward universal... (which is represented by those two conical discs in the frame bay behind the conical clutch... The Clutch pedal is mounted in the engine compartment... The clutch is actuated by a linkage from the engine compartment to the cockpit which operates a torque tube to rotate the throw-out bearing which carries the clutch away from the flywheel... The Clutch pedal also operates the driving brakes and is adjusted to engage after the clutch has disengaged... They were a pain in the you-know-what to keep adjusted correctly.... I don't have an image of the linkages used to effectuate this for this car, but I do have such for the 1911 National model 40 which was set up identically to this car.... (a National Model 40 won the 1912 Indy 500) This brake setup was standard on these race cars during this period, the civilian production variants were set up differently with independent brakes.... Anyways, Onwards....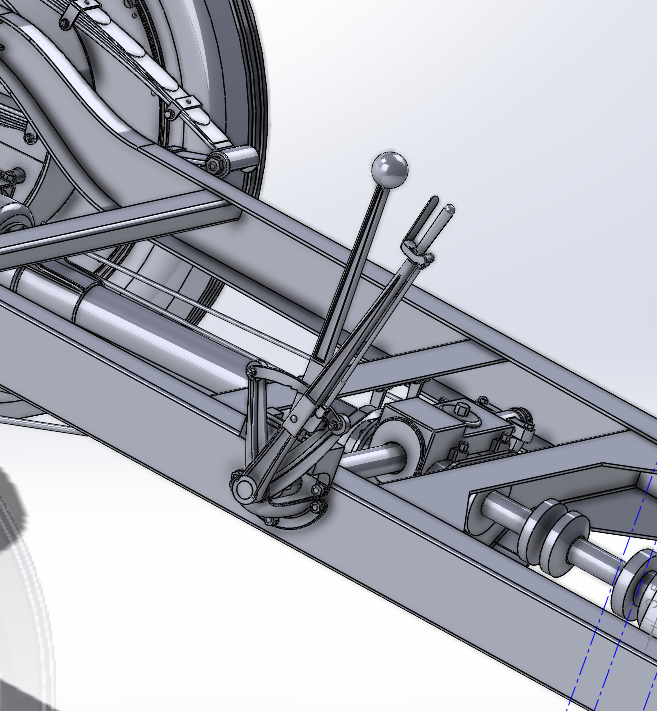
- 85 replies
-
- 11
-

-
Well I'm here as I'm sure the brothers will be as well... There are videos of how to do stippling as well... Will be following along my friend, I wouldn't miss it...
-
Since you already have it masked Brother, Break out the stippling brush.... (just remember when painting the pattern draw the brush away from the masking when painting) Once you get the pattern down and masking pulled, you stipple the hard edges with a drybrush to give the soft edge... It's fairly easy, but does take some practice to get it right.... Just remember, stipple dark over light....
-
One thing has come to my belief, I could never, not in the course of a thousand years, duplicate the skill and craftsmanship on display here.... Just absolutely stunning...
- 233 replies
-
- 13
-
-

-
It is my belief that we model the life cycle of an object, any object... In wooden ship building, the highest class of the art is the prototype model, the classic english 1/4 scale constructors model showing all the details... That is probably never going to change as it is it's own art form and is the most popular presentation for that class of model.... All else can be anything we envision, from the destroyed tank to the one sitting on the delivery apron... Aircraft, Cars, Ships the same way.... The point of weathering is to pick out a day in the life and represent it... In scale of course... As delivered is the most popular in cars, but the wrecking yard can be just as stunning.... As we have seen right here on this site... It is another way the hobby has grown.... They are all beautiful in their own way.... Make it look real... And we have masters of the craft on this site, like several in this thread... Including the OP... All just my opinion of course...
-
Keeping my head in the game.....
Egilman replied to Egilman's topic in 3D-Printing and Laser-Cutting.
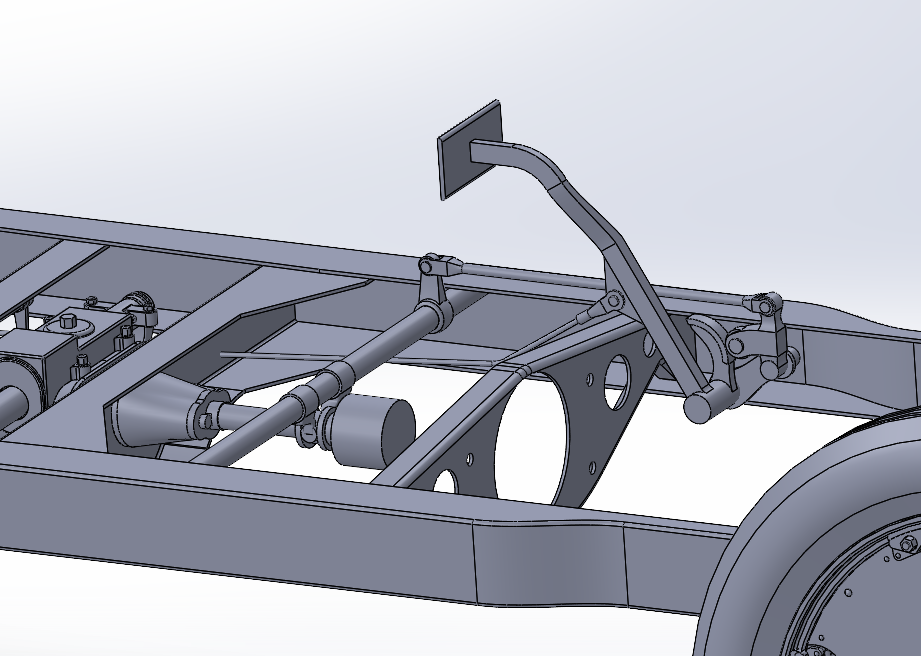
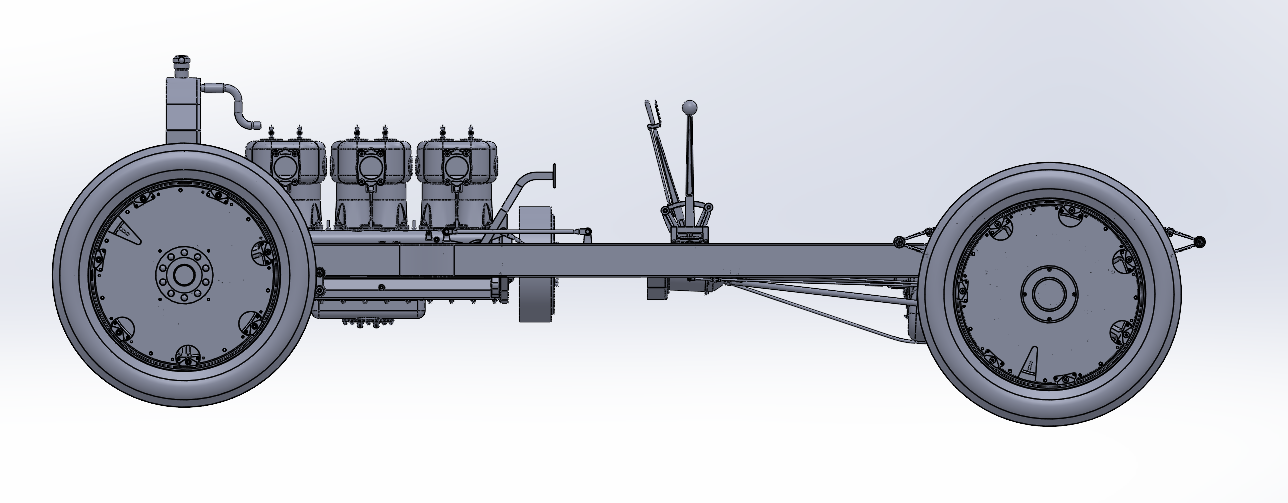
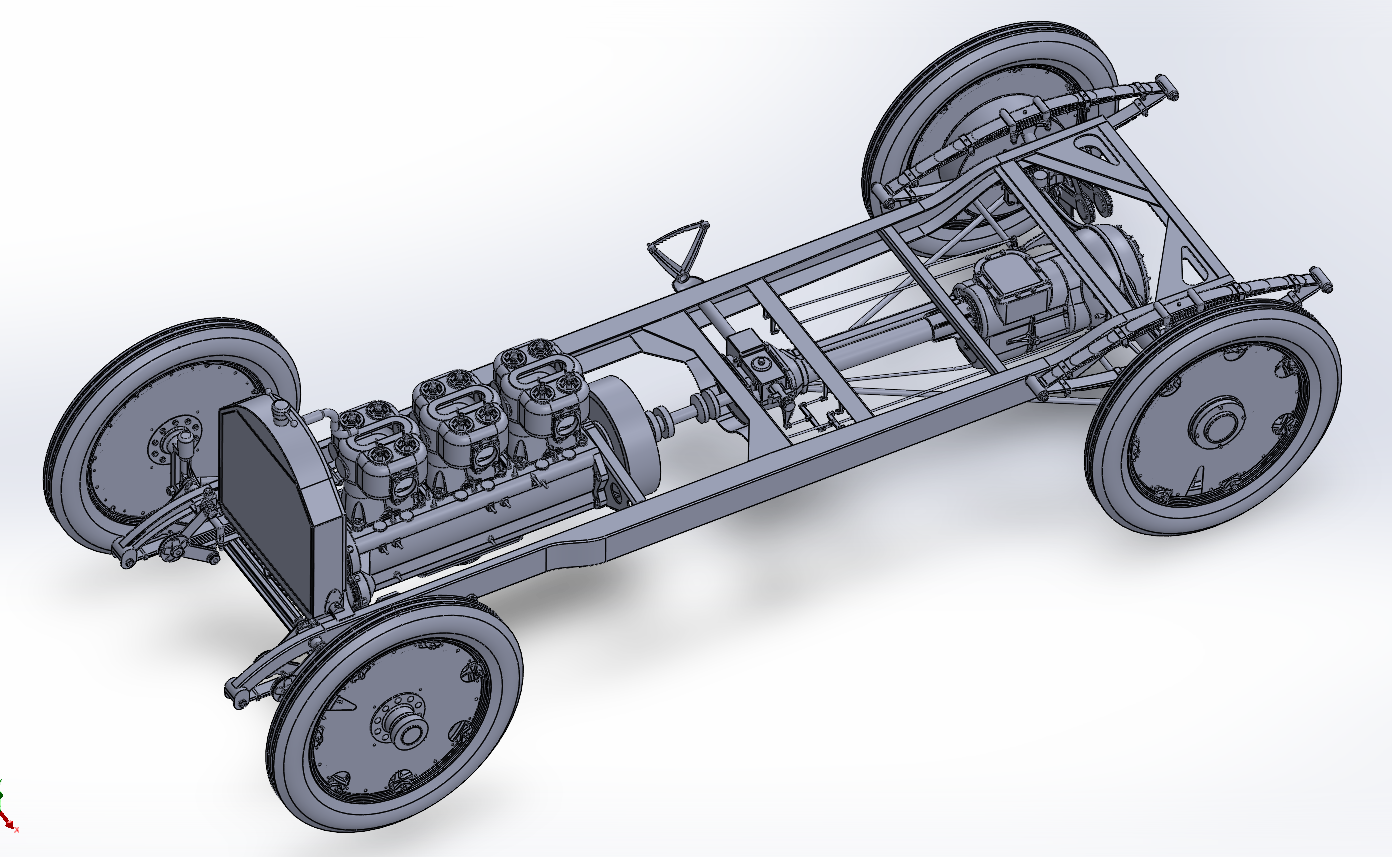
Well, still plugging along... Finished hooking up the emergency brakes and designed the brake lever bracket.... This is where she is at as of a few minutes ago..... Once the Brake and Shift Levers are done I move on to the clutch pedal then the operating chassis hardware will be complete.... Not sure where I will go next, probably figure out the steering and finish off the front end.... After that back to the engine.... Onwards...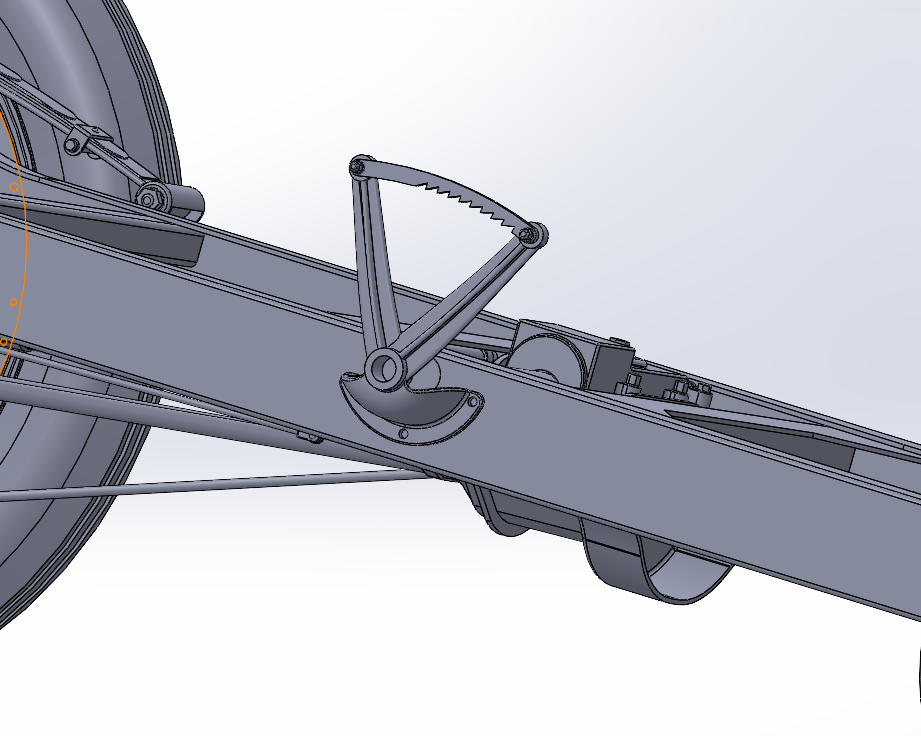
-
Opportunity lost is lost forever... Ney had the opportunity to take the farm early in the morning when it wasn't defended at all... Napoleon in fact gave him the order to do such... There is a lot of speculation as to why he failed to carry out this order.... By the time he got around to looking at it, the KGL were there (but in small numbers) It seems that only Nappy knew the importance of that farm tactically... It was Napoleon's third order to Ney to take the farm when the real fight took place in the afternoon... Nappy made it Ney's personal responsibility... By the time Ney got after it in earnest, the KGL had the farm fortified with a company of sharpshooters... It took everything Ney had to take it and by the time he did it wasn't because he won, it was because the KGL ran out of ammo and gave it up... And by then the French army was too weak to exploit it, Von Bluecher's arrival seals the deal for Wellington.... If Ney had taken the farm when Nappy first ordered it, Waterloo would have been a French victory... The Farm was the key to the battle...
-
It would be but there are noted historians of the battle that clearly believe that he was shot dead in the initial advance on the NW side of the farmhouse in an attempt to clear out the 13e Legere skirmishers who occupied the Kitchen Garden and were trying to force the farmhouse door... In their advance down the slope, they were hit by Col, Crabbe's cuirassiers descending down the slope and through the Battalion... The Battalion broke and ran, von Klencke was killed in the first overrun assault, and about half the battalion fell, the remainder either surrendered, made it back to the ridgeline or retreated into La Haye Sainte... That's the base story, oh, and Colonel von Klenke was dismounted.... (according to the standard story) But there are some historians that take a different view and facts are sparse in this area, they were more about saving their own tails at the time than recording it... so take it with whatever grains of whatever you need to, {chuckle} At this time I don't think what actually happened will ever be known...
-
Light Field Battalion Luneburg was raised in 1813. By June, it was commanded by Lieutenant Colonel August von Klencke. At Waterloo, it was in the 1st Hanoverian Brigade. they were assigned to the 3rd Division, 1st Brigade under Major-General Count von Kielmansegge - to the north-west of La Haye Sainte. Lüneburg Light Infantry Battalion. Green jackets with black facings and green pantaloons. All of the leather equipment was black. The battalion wore shakos of a Portuguese design. Other sources suggest blue trousers, not green for this battalion, while others suggest that only the officers wore the blue trousers. I believe von Klenke survived, there is a report that he took over command of the brigade for a period when Major General Kielsmanegge was unable to command.... this was after the battle at the farm... Records are spotty at best of this period... and there are some differing reports of troop outcomes.... A good book on the subject is The 400 Men Who Decided the Battle of Waterloo The Longest Afternoon It goes into first person individual detail on the battle of La Haye Sainte... and is an excellent read to boot...
-
Congratulations on gaining your freedom from wage slavery... {chuckle} Well paid for I'm sure.... But, don't forget to find something to do outside the house, otherwise you will start hearing about being underfoot all the time.... {chuckle} Retired since '93.... My admiral kinda chuckles now when we remember those days.... But it was a significant lifestyle change, all at once.... (will take some getting used to) Your zipper is looking great, Need to get back to mine... {chuckle}


