


Egilman
-
Posts
4,199 -
Joined
-
Last visited
Content Type
Profiles
Forums
Gallery
Events
Posts posted by Egilman
-
-
24 minutes ago, Canute said:
You may want to glance at both pages, since some drawings were re-done.
Yep definitely read both pages... The info is pure gold... Also that's the place to ask those questions... The general idea is that given the mission and what was on hand munitions wise, they could have carried anything within the aircraft's approved spec config, any day of the week... The full range of munitions was available... The best bet is to look at combat pics for specific aircraft... (which is typical for any model carrying external ordinance)
You have the decals for VF-31 Tomcatters, off the USS Lincoln, one of the three carriers operating in the Persian Gulf over Afghanistan & Iraq during OEF, OSW & OIF 2002-03....
-
1 hour ago, CDW said:
I am going to need to research reference material to determine an appropriate bomb cat load out. If any of you know about it or are aware of reference sources, please chime in.
Here ya go...
http://www.arcforums.com/forums/air/index.php?/topic/221470-f-14-tomcat-weaponry-config/
Covers typical air to air and some fairly standard OIF (Operation Iraqi Freedom) loadouts...
The weapons that come with the kit puts you right into that OIF & OEF time frame...
Hope it helps...
-
Yep, this was still the era of open air tapered clutches, they had just began using universal joints to transmit power so the only place the Tranny could go was in front of the Differential....
You see a lot of people use the 20th/21st century term Transaxle for this but it wasn't that at all, there is no mechanical connection between the two, the differential can be completely disassembled without touching the tranny...
When they perfected the disc clutch, that's when the engineering concept changed, a flat thin flywheel with a thin clutch plate allowed the creation of the bell housing which acted as the mount for the Transmission and removed the need for rear engine mounts... It also reversed the method of mounting to two points forward and one point rear... (usually at the end of the Tranny, the system still in use today) This made the Engine Clutch and Tranny one single assembly which made manufacturing even more efficient.... One of the residuals from the system this car has is the thrust bearing with it's integral universal joint in the middle of the frame became the carrier bearing along with the split driveline with the rear suspension pivot point remaining the same clear into the late '50's early 60's... (where we still saw it on the light trucks of the era and eventually lead into the two link coil spring rear suspension we saw on the 60's/70's chevy pickup trucks)
So many of the features of this car carried long into the future of the automobile and didn't really disappear until the early 2000's.....
She was state of the art in her day....
- chadwijm6, modeller_masa, Canute and 3 others
-
 6
6
-
-
IT's RED!!!!
Wow fantastic job... Red isn't a great color to go overall with but you've done it justice...
Well done....
- king derelict, davec, Jack12477 and 4 others
-
7
-
Back in the '90's I had a model room in my previous home 14'x10' it had two shelves that went around the walls completely just above the door line... On those shelves I had every single one of Monograms 1/48 scale lineup... (add in a few of Revell's as well) The jets definitely take up a LOT of room.... Almost as much as the B-24 & B-17....
-
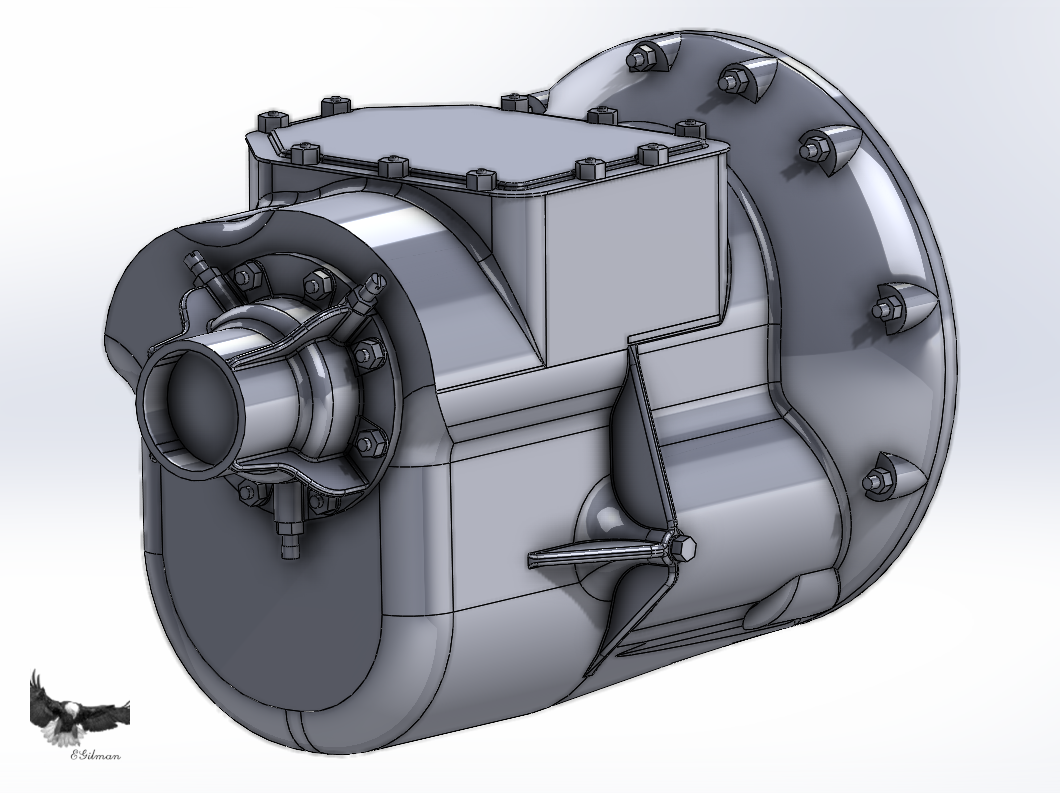
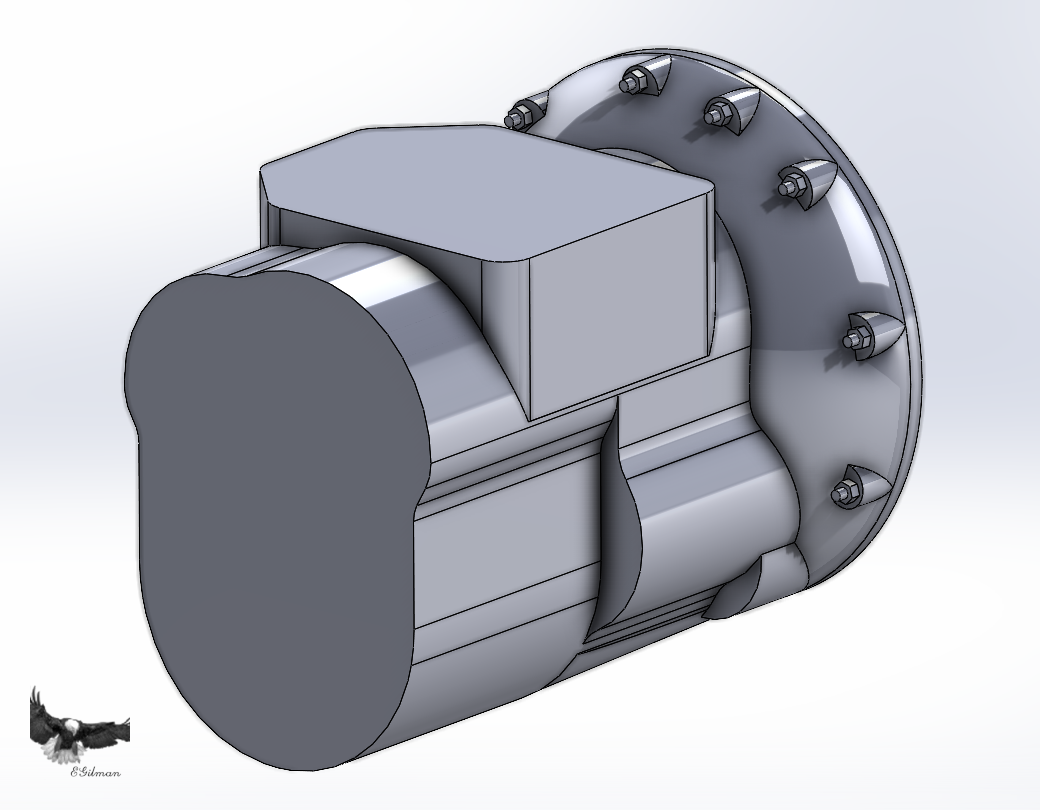
Well, I've gotten the Transmission to where I'm going to call it done.... Might still need some tweaking as other parts are added... But we will do those if any when we get there...
Here is what she looks like...
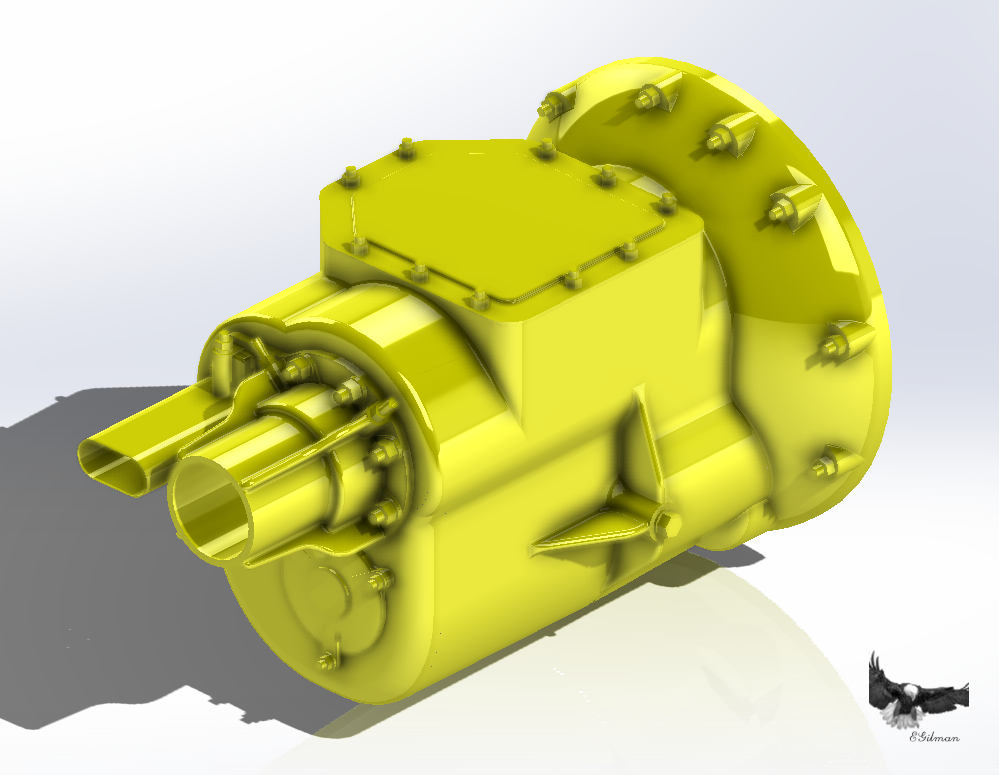
And with the axle/differential....
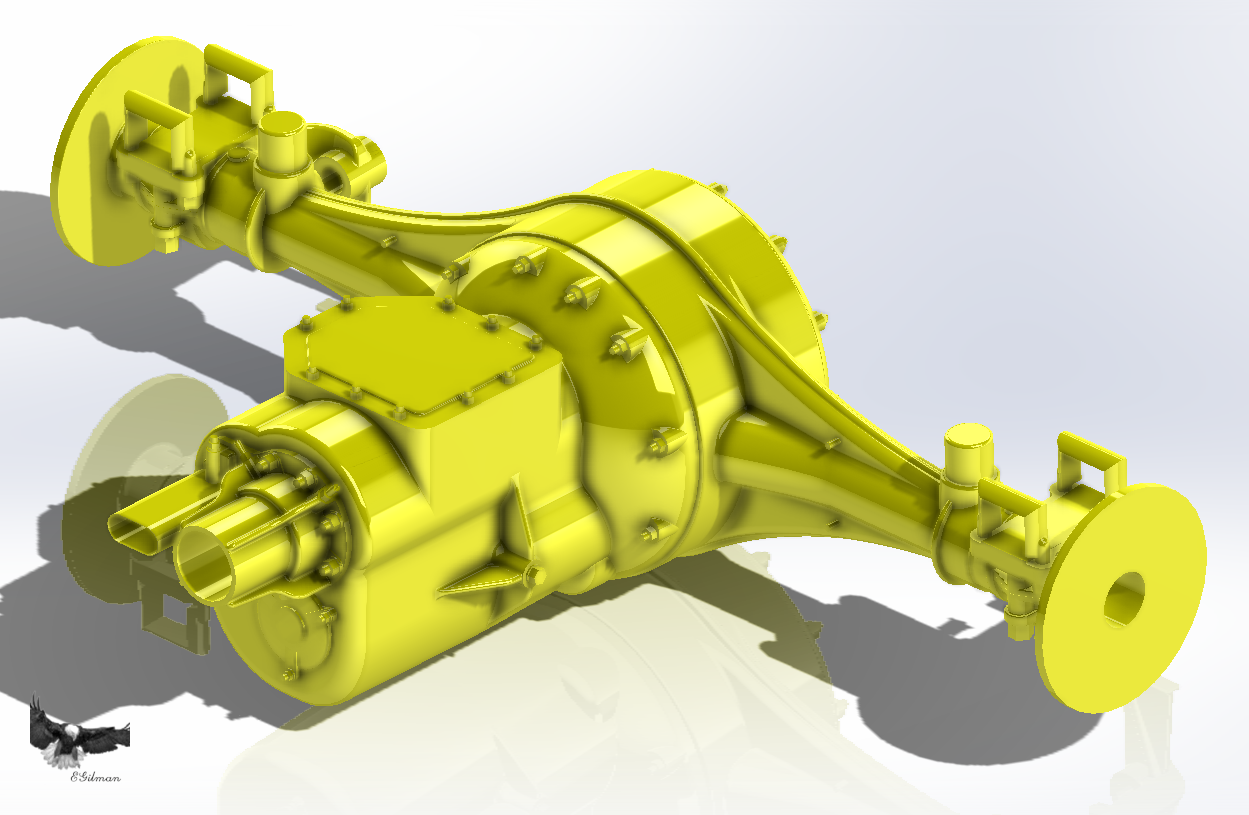
The yellow is for glamor purposes... {chuckle}
In the frame...
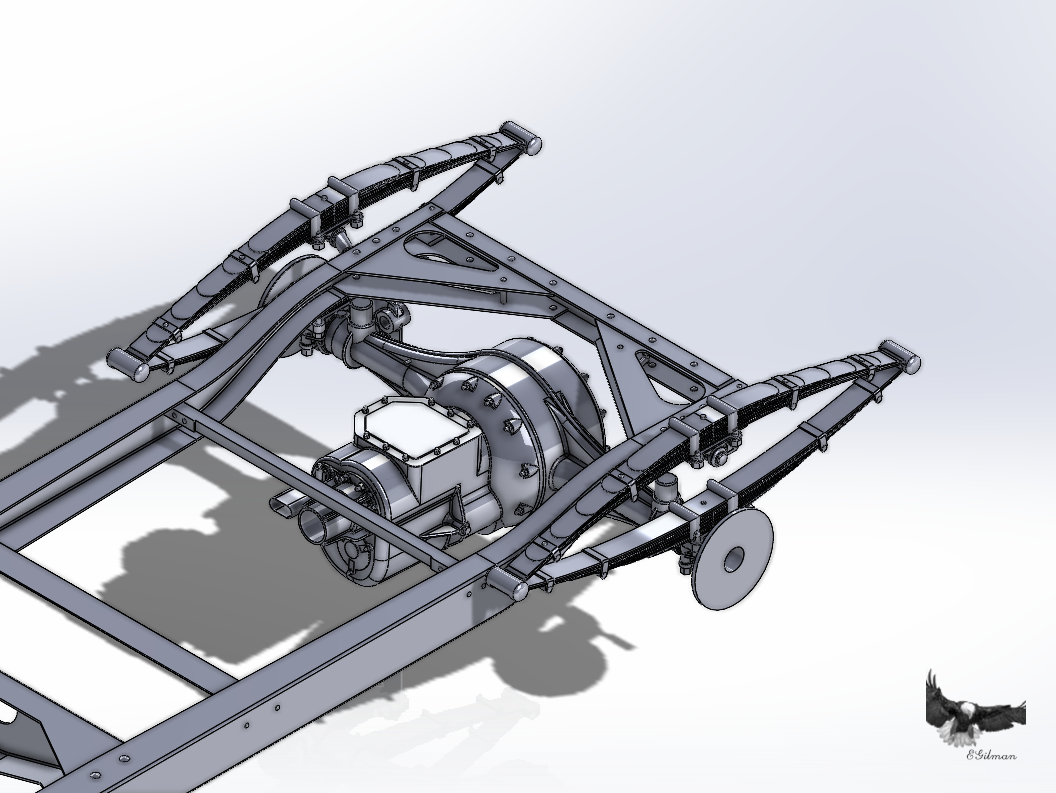
I would say she is 95% accurate, there were still a few spots without enough coverage to be sure, but a lot of hints to what had to be there...
Anyway I'm calling it done for now...
And the usual overall shot...
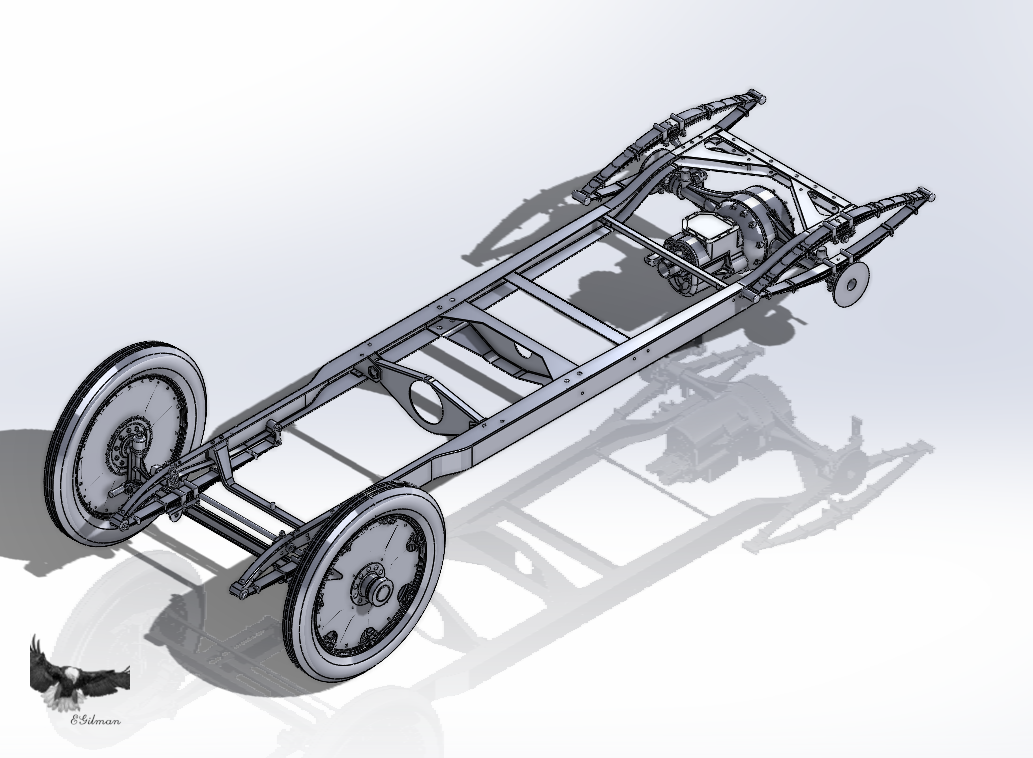
Onwards!!!
- Canute, Seventynet, Rik Thistle and 4 others
-
7
-
6 hours ago, CDW said:
...as fate would have it, quite by accident, found my missing tire and wheel from the kit I was building. It had fallen down between some boxes in a place I could not see until I moved the boxes while looking for something else.
Yep, that happens all too often.... Good that you found it...
- Canute, Old Collingwood, mtaylor and 2 others
-
5
-
2 hours ago, chadwijm6 said:
No, this is one of the engines supplied with the kit EG
Wow, that hs made up my mind, I won't be buying AM for mine then,, those kit engines look great...
- king derelict, Jack12477, chadwijm6 and 3 others
-
6
-
If those are your aftermarkets they look very good.... Nice paintwork....
- davec, Old Collingwood, Canute and 2 others
-
5
-
-
5 hours ago, Old Collingwood said:
I am trying to do everything scenery wise from stuff we have in the house.....
Oh I completely understand my Friend.... May I make a suggestion.....
Do some materials pre-work/ pre-prep,... Standard poster board is about the thickness of the cardboard on the bottom of many notepads.... About 20-30 thousandths thick... A standard copy paper sheet is 4-5 thou thick... Laminate 6-7 sheets together into one sheet... You could even stagger the sheets to give you a thin starting and ending edge... This way you get the benefits of a thicker stronger foundation medium and a thin edge for finishing... The laminations would be lay a sheet down on a non stick surface (plastic sheet) and spray it wet with your diluted glue, lay the next sheet and do the same continuing with the inside sheets to the thickness you want, then the final sheet you lay over the freshly wetted last inner sheet and allow the glue to soak into it from underneath... Then allow to dry....
It will be a little stiffer than normal poster board from the laminating process but should duplicate the medium quite well....
But before you commit to this test it out with a one sheet set to find out how it works best for you if you go this way.... I think it will be a lot easier in the long run, yes a bit more time in preparation, but less chance for issues when you get to applying it on the model...
-
4 hours ago, Old Collingwood said:
sounds straight forward in my head - just a case of having enough paper for the height I want - then just sloping the A4 sheets in the directions I want using PVA to keep them in place and build it up as I go, don't foregut on top of this I have my grass sheet that will be glued over the top of the contours.
Should work brother, but it's going to be heavy... I would recommend poster board for the contours, it's thicker and much lighter, and you can put holes in it under the uppermost layers to keep the weight down, then use your typing weight sheets with waters down PVA to give the final layer before doing the grass sheet....
One thing it does do is give you a good surface to mount figures and trees and the like to....
-
Yep, Copperhead BB's .177 cal. (4.5mm) Steel covered in Copper....
Cheap and very effective... I bought a bottle of 1500 4 years ago for under $10.00 and still have over half of them...
Mfg. by Crossman of Air rifle fame for a goodly number of decades.... You can get them pretty much anywhere, Wally World is where I get mine...
Or you can buy the Stainless ones, for three times the price for only a few hundred from the model paint manufacturers...
In this particular case cheaper is better.... {chuckle}
But seriously, if you have a large collection of seldom used paints that tend to settle out in the bottle a paint shaker is a fantastic way to revive them, especially if you have a few copperheads in the bottle, there are several do it yourself shakers online and several cheaply made ones from the model supply companies... But liquid shakers are old old tech, they have been using them in the drug manufacturing industry for over 5 decades, those are the ones to get, built to last... Yes they are pricy, but they seldom fail or break... You will probably never need to get a second one....
- Old Collingwood, mtaylor, Jack12477 and 1 other
-
4
-
Ouch!!!! Which part is the malfunctioning one? the Hood or the Distributor?
I know HEI distributors set a bit high when mounted..... but even with the carb top flange is a bit much....
Is there a shave in the offing? A bit off the hood and a bit off the distributor?
Or is it a bit too much to take off.....
- Canute, chadwijm6, Old Collingwood and 3 others
-
6
-
1 hour ago, king derelict said:
They seem to need a serious agitation to get a good consistency
Invest in a medical grade paint shaker, or stainless steel balls... Or the budget alternative, a bottle of Copperheads.... I generally put 5 in a bottle, it doesn't take much shaking to get a good mix that way, gives you creamy smooth paint when combined with a medical grade shaker...
- Old Collingwood, Canute and mtaylor
-
3
-
Thank you Mike... It's appreciated....
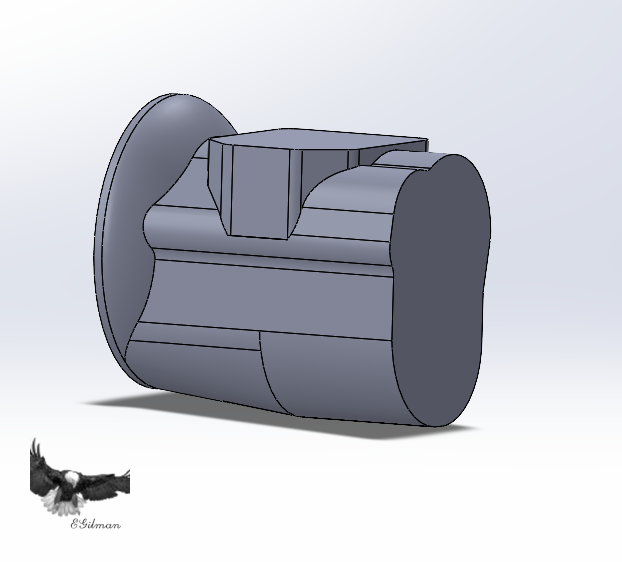
Well another minor setback, my initial design doesn't work, everything that needs to be there won't fit.... and it's basic fitment, the detail HAS to be there and reworking the current design just didn't cut it, it was becoming even more convoluted a mess trying to fix the original so I decided to start fresh, take the best parts of the original and adjust to what needs to be as I go....
this is where I stopped adding detail and re-evaluated...
The Real deal...
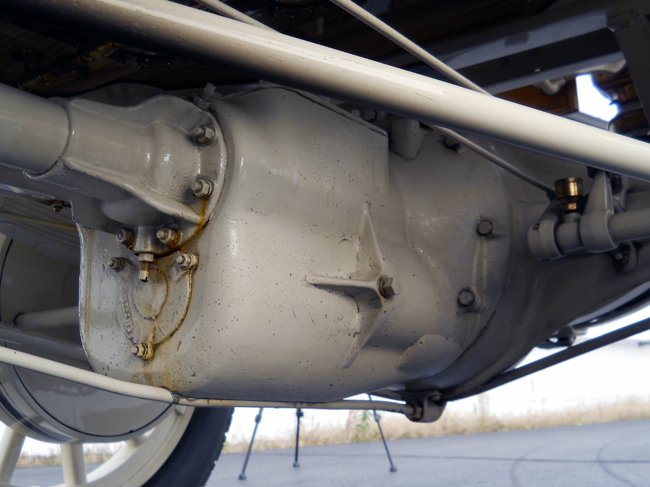
That is from a 1911 Marmon Speedster The one below is the Marmon Wasp....
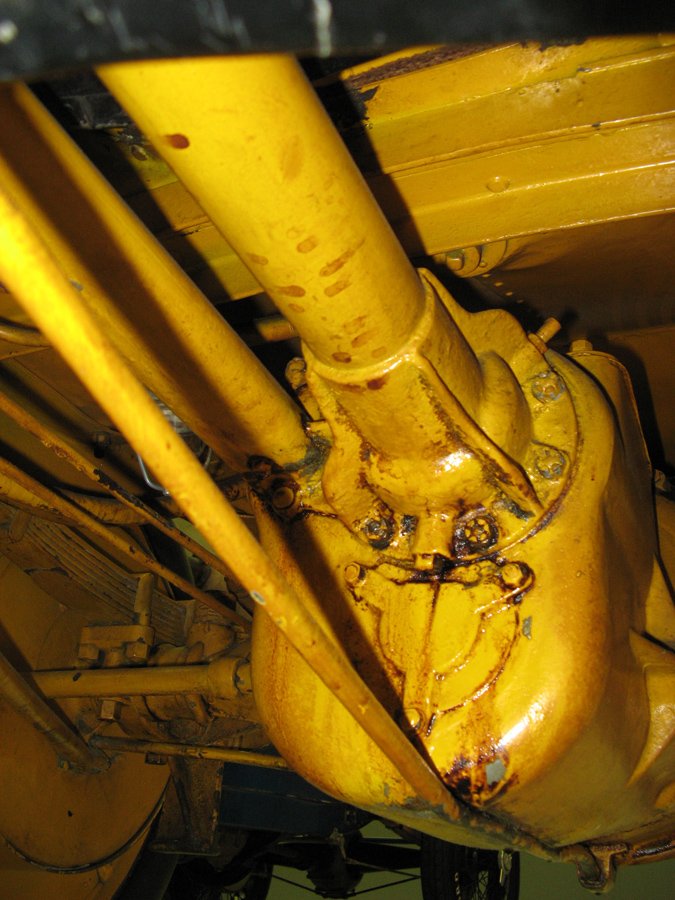
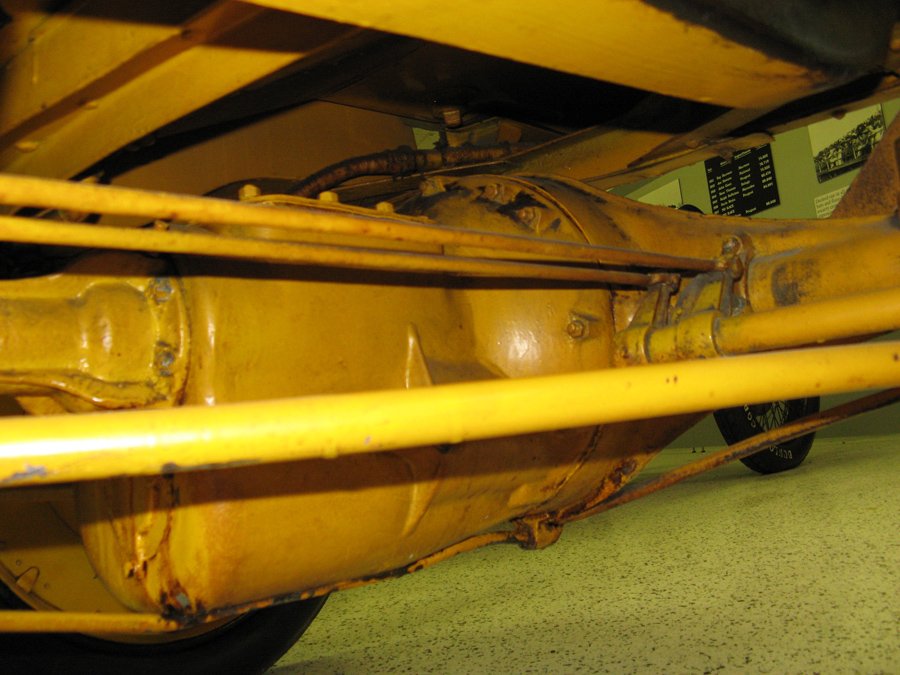
What was before....
And what is now with the added changes....
Yep the differences are subtle, but they make all the difference when fitting details where they need to be... And, like almost always, it is close to the finish when this issue pops up... But such is the life of a design draughtsman....
RE-starting the detail design part now.... {chuckle}
Onwards Brothers, onwards....
- Jack12477, mtaylor, modeller_masa and 5 others
-
8
-
I think I understand what is going on with their UK shipping, he's trying to set up/find a UK dealer to handle his products.... Shipping directly to the UK would make such an arrangement less attractive...
Backwards thinking if you ask me.... His stuff looks great though.... and it's the first time I have ever heard of someone refusing to ship to the UK because of Brexit.... That makes no sense at all...
-
5 hours ago, chadwijm6 said:
Unfortunately they don't deliver to the UK due to Brexit.
Wow, Guy sells internationally on e-Bay yet doesn't ship to the UK?
https://www.ebay.com/str/resin2detail?_trksid=p4429486.m3561.l161211
Something strange going on brother if that's the case...
- mtaylor, Old Collingwood, Jack12477 and 1 other
-
4
-
The R2D looks very nice, and it's 3D printed, perfect for your display piece as all that detail will be covered up in the nacelles....
If I was going to do this now it's the one I would be buying... (and your corsair would benefit from that R-2800 he's showing as well)
-
1 hour ago, chadwijm6 said:
Scratch that, apparently it's awful.
He lost me when he started talking about 7 intakes and 7 exhausts... He doesn't even understand what he is building... The little kit has 14 intakes that he was showing you....
That's a good kit it just takes a bit of work...
I will say that there are better kits out there...
I would pass...
-
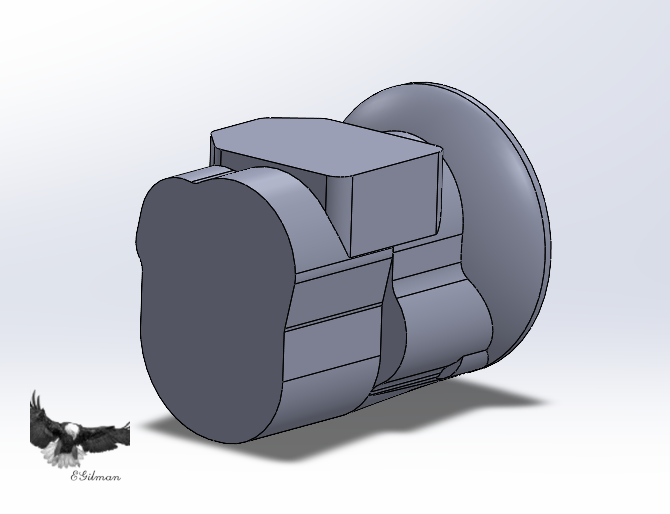
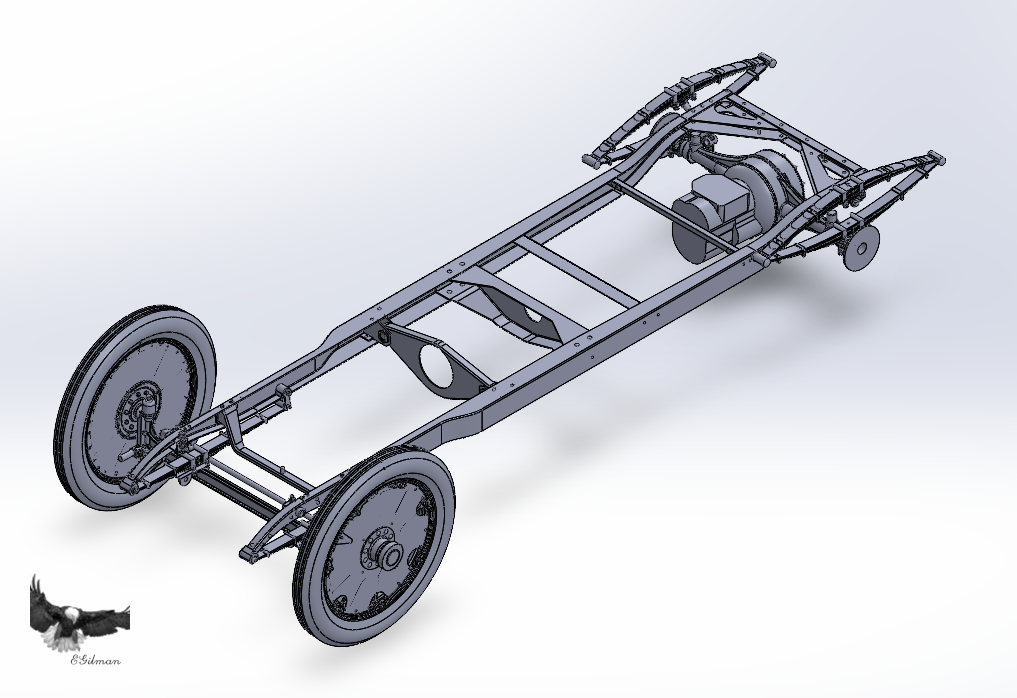
Latest Update: Blocking out the Transmission....
Left side...

Right side...
In the frame mounted to the Differential case... Left side upper and lower angles....

Now I'm ready to add the details....
Stay tuned my friends...
Onwards...
- chadwijm6, gjdale, Haliburton and 2 others
-
5
-
Thank you Brother, I'm very happy your enjoying this excursion down the modeling path.... I hope everyone is enjoying it...
Still working my way back to where I was before, but I'm a lot more confident in it's design accuracy now...
Yes, I'm intending to print it, but at what scale I haven't a clue yet... Still too early in the process to figure that out... Right now she's being drawn 1/1...
Thank you for asking...
EG
- Rik Thistle, mtaylor and Canute
-
3
-
The Tamiya Corsairs, (there is more than one) are probably the most built, (and considered the best kits if you can handle the price) But if budget is a consideration, there is the grand old Revell Corsair that can be built into a stunning model as well...
Plenty of build logs and plenty of aftermarket out there for it as well... At one time it was the only game in town in 1/32.... Still widely available as well...
Not looking to change your mind if you have your heart set on a Tamiya, but the Revell bird is the grandaddy of Corsair models, and deserves a mention in any convo on 1/32 scale corsairs....
Wow an F4U and a PBJ in the same display.... I'm down if you wanna go that route...
- chadwijm6, Old Collingwood, Canute and 2 others
-
5

B-25J Mitchell by Chadwijm6 - HK Models - 1/32
in Non-ship/categorised builds
Posted
Beautiful, with one exception, the front reduction gear cover should be grey... (your pics will give you the color) They were painted that way, (every single one) on the production line before they were ever shipped....