HOLIDAY DONATION DRIVE - SUPPORT MSW - DO YOUR PART TO KEEP THIS GREAT FORUM GOING!
×


Egilman
-
Posts
4,377 -
Joined
-
Last visited
Content Type
Profiles
Forums
Gallery
Events
Everything posted by Egilman
-
 Something about water brother especially on a bay, slack water is still, high water is ripply, ebb tides generally have long flows but can be confused with still water, incoming tides carry the long swell wave action ... Water like that your depicting is usually at the freezing point where the successive edges build upon one another with the occasional small clear water patches... The ice surface is seldom smooth usually a bunch of slight jagged edges sticking up in every direction... The ice gets smooth when successive snows and the sun has had a chance to work on it smoothing out the ragged edges... You need to decide what type of water you want to depict, ebb tide, slack tide or incoming tide.... high water is not in the picture... Check out some pics of the Canadian Labrador or Maine bay waterlines in late fall early winter for examples... The farther north you go would be better...
 -
Had to be something like that brother, I will say they could have been a bit clearer in mentioning it rather than letting people pull their hair out... Didn't mean to offend...
-
Amen.... more times than I care to count for me...
-
Update.... just want to point something out my friend, the next step shows the configuration of the head to the cylinder Rys 26... Sorry for the small size, but the black line between the head and cylinder, (red arrow) represents the position of part 34e after the assembly step (Rys) 25... It appears that we are both right, 34e is the base of the head, but it completely covers the outer rim of 34d... which means there wouldn't be an inside part that fits inside 34b.... Not belaboring the point my friend, just looking for an explanation in an effort to help...
.jpg.aa727caf179541ffe34eb1d6d7e456de.jpg)
-
Maybe it's just me brother, but looking at the parts and the diagram it looks like e is the same size as the rolled d... But then I'm only a technical illustrator, not a paper modeler... If it is supposed to fit inside the rolled b,c & d, then it is one heck of an illustration drawing mistake... b & c have lines which show where they are to be glued to each other creating a tapered shape with d wrapping the end creating a lip on the end of the cylinder... what your going to have is a tube with a flat end that is the thickness of three paper tubes... They wouldn't have left that as a bare exposed end, they would have covered it to hide the cut end to make them look uniform and flat... looking at the parts, 34a is much closer to the size of the inside of the cylinder tube b and 34e is much closer to the outside size of cylinder tube d... In my opinion of course... Not trying to argue here my friend, your a lot more experienced in interpreting paper model instructions than I... It doesn't make any sense looking at the actual parts and the exploded parts drawing... Now I'll bow out... it's got to go together some way....
-
I don't see the problem brother.... 34, 34a & 34A, #34 is rolled and 34A lazercut is inserted into it's end with 34a capping the cylinder boss.... 34b, c, d & e, b,c & d are rolled and slid into each other forming the cylinders with e capping the end.... 2 Parts f form the cylinder head they are rolled then glued together and then Part 34G lazercuts are inserted into the rocker openings with part 34g as the cap for the rocker covers... Am I missing something? Parts f are edge glued to part e... that's why part e has the line across them to locate the head halves... Part e is the cap to the cylinder with the line guiding the head placement... So the question becomes what shapes the base of the head halves once they are formed and glued together? As I see it you can use part e as the base of the heads and insert a short rod of something suitable to fill the cylinders parts b,c &e... They might have missed a part when designing the lasercut sheets... the cylinder head base... A simple rod filling the cylinders eliminates the problem... That's the way it makes sense to me as I envision the assembly... In fact, looking at it a second time, once you insert lasercut parts 34G into the rocker holes you won't have enough space in the remaining volume of the head for anything else.... your forced to edge glue the head onto the cylinder cap....
-
Oh there's all kinds of stories, like the day I was about 50 miles past Vantage on I-90 Riding back to a pickup site when the driver experienced a pair of flats on the Jenny van.... Only two of us and no spare on the trailer... Tires not destroyed but off the rims... (I-90 can be a very lonely place) where I showed him how to bead seat tires with a cigarette lighter and a can of ether.... He had to get up in the sleeper and change his pants after the first one, it scared the crap right outta him... The life of a carney driver....
-
Yep, they were well designed when they came out with a fully detailed period interior, (60's-70's) the plywood liner only reaches half way up the side walls leaving bare ribs and ceiling... Usually they had a single tiny light in the center of the roof as well... (they never worked) This trailer model was state of the art in it's day... They do build into nice pieces with a little work so I would say they have held up well over the years....
-
Very nicely done and in 1/72nd scale to boot!!!! Tiny...
-
Going to be a good looker brother... You gonna throw some cases of coke in the van? (that would be an interesting creation) Have you found anything to scratch the spare carrier? the kits I have do not have one... (but then my SATB build is a very specific trailer) Looking good..
-
You've always wanted to, admit it, just haven't convinced yourself yet... {chuckle}
-
Congratulations!!! Our 35th is coming this December.... (but we were an item for five years before the "let no man put asunder" ceremony) It's been a trip... {chuckle}
-
They cast a LOT of trailers out of those molds brother, it's been in constant production for over 50 years so I would expect some issues... Nothing insurmountable though.... Any comment on what your turning it into yet? or did I miss it...
-
Vincent Black Shadow by CDW - Revell - 1:12 Scale
Egilman replied to CDW's topic in Non-ship/categorised builds
Yes Excellent Steer brother.... Thank you.... (it's sure a heck of a lot cheaper than Testors brand MEK as well) -
You can tell a real ship builder designed and built that roof... {chuckle} Looks like an upside down boat hull.... But then tapering like it is it's probably the only way to do it quickly, and truly custom.... It's nice to see the principles of hull engineering applied like this, very innovative.... Well done...
-
Vincent Black Shadow by CDW - Revell - 1:12 Scale
Egilman replied to CDW's topic in Non-ship/categorised builds
Extra thin is 51% acetone and 49% Butyl Acetate.... Their airbrush cleaner is either 50/50 Acetone/Acetate or 49/51% depending on whose MSDS you read.... So yes, they are essentially the same material... And since the Airbrush cleaner is 55% cheaper than the Extra Thin.... you make your decision.... -
Hi Brother, I'm real interested in where your going with this.... And as a note Round 2 still produces the Pete 352 pacemaker, can be found for under $40.00 in the Coke outfit and there are still some of the 1970's kits around as well... And as you said the trailer is a multi generational trailer pretty standard 40' footer... And yeah those landing gear wheels from the '30's thru the early '60's they were something weren't they... The thing I see in the pics? Single axel trailer with a single half leaf spring suspension, with an AIRBAG in front of the spring??? No backing plate on the brakes??? I doubt that DOT would allow that on the road today.... A very stiff rough riding trailer indeed.... And split-rims were and still are dangerous... The mounting spoked hubs were simple and very safe and are still in use today... But the rims very few people wish to deal with them anymore, in fact three of the five Les Schwab tire shops around here refuse to do them, citing insurance limitations... I always found that if you maintain mounting standards, they were no less dangerous than dish rims. the thing is the locking ring is only good for two or maybe three tire mountings then the entire rim and lock ring needs to be replaced... Held to that standard they are some of the easiest rims to deal with and a heck of a lot lighter that steel one piece rims... Mack trucks still installs them on some of their trucks... Anyway, I'm down for this one brother... and good to see you back at the bench...
-
Yep, much like PE cockpits/interiors, on some of them you have to ask if all the work and stress you just went through executing them was worth it... For most it isn't, but for the most exacting modelers, the results cannot be argued with... Nice work brother....
-
Thank you for that, I've still not seen an image of any allied aircraft with "Mop" painted invasion stripes... Two pics and a journalist's opinion showing the unfinished application of stripes to aircraft means it was sloppy work does not make proof ... Just my opinion which is probably not worth much either.... Sorry, not trying to argue here.... the order to remove them also was not completely carried out on many aircraft as well, I touched on this in my P-51 B build log where many of the fighter units only removed them from the upper surfaces of the aircraft leaving them on the undersides making for some very unique applications of said stripes... There is also the scale effect to consider as well, A slightly irregular line in real life will appear as arrow straight at a distance... (or in scale which translates visually as distance) No they weren't perfect that is true... But they were not only very effective, in most cases, they were attractive as well....
-
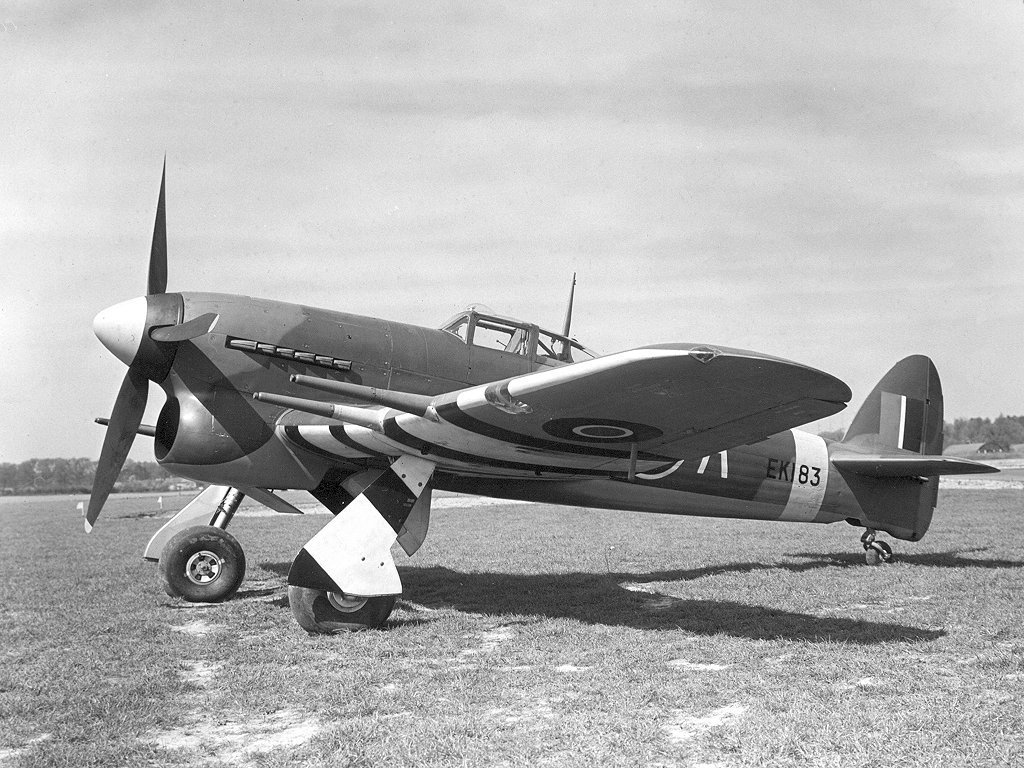
April 1943.... Typhoon Mk I with ID stripes... The pattern is different, D-Day invasion stripes were 18" wide on single engine aircraft and 24" wide on twin engine aircraft and were composed of alternating white and black stripes three white stripes and two black stripes... From the pic above you can clearly see that the standard RAF pattern was four 12" black stripes and three 24" white stripes... The orders were issued in late may to change over and some aircraft didn't start until June 3rd so yea, there was some sloppy striping done as no masking was used... A simple chalk line and 4" brushes handled most of it.... But trying to spot the sloppiness on an aircraft say 15 yrds away was next to impossible... They weren't mopped like with a floor mop they did take a modicum of care in doing it... I've yet in all my years looking to see a pic of invasion stripes that were anything but straight and basically even in width... They weren't that bad....
-
It's even more pronounced with British aircraft... British aircraft carried id stripes on their wings long before D-Day, (from late '42 I believe) especially the low flying types... There are numerous examples in the photo archives as well... In fact the whole invasion stripes idea was an RAF one.... (with thousands of aircraft in the skies and an expected massive response from the Luftwaffe planned for, they ordered the stripes installed on every aircraft that contributed to the invasion) Original British ID stripes were not even in width nor in length... the Air ministry ordered the RAF aircraft repainted with the same pattern used on US aircraft so there would be NO mistakes in the air... And one must admit, with the stripes in place, one glance told you which side the aircraft was on... They were very effective...
-
Amen to that!!! But just think abut it for a sec, same techniques just different subjects.... It keeps the brain engineering functioning...
-
Vincent Black Shadow by CDW - Revell - 1:12 Scale
Egilman replied to CDW's topic in Non-ship/categorised builds
Another suggestion, the gold will have to go down as a two step process, since there is no paint that will give the reflectance that the decal has... Make two stencils one an outline for the gold portion, the other the black lines portion, make the outline stencil for the gold a hair smaller than the outline portion, apply the outline stencil and use bright gold RnB (Rub n Buff) to fill the gold area then use the line stencil over the RnB layer to finish it off.... That is if the cricut can cut that small... It should give you the gold back decal perfectly... -
Vincent Black Shadow by CDW - Revell - 1:12 Scale
Egilman replied to CDW's topic in Non-ship/categorised builds
Yep, it's completely hardened and has started flaking off the backing paper, usually this means that the film is cemented to the paper.... What I found is once the liquid film is applied let it dry for a full 24hrs, then, once cut out, allow them to soak for at least 6 hrs, let them float right off the old backing paper cause that is what they will do then apply them directly from the water they are floating in... It works sometimes, other times it doesn't, but more often than not it does... But it is a roll of the dice... Depending on who made the decals it could be a simple soap solution used as the glue, others would use a milk solution, it's the milk solution that seems to dry up and flake off over time... Let me know if the cricut machine works in cutting the stencils that would be the best way to deal with it then paint them on... (I've been thinking about acquiring a stencil cutter) -
Vincent Black Shadow by CDW - Revell - 1:12 Scale
Egilman replied to CDW's topic in Non-ship/categorised builds
They haven't yellowed yet so that is excellent, but it does look like the adhesive holding them to the paper has gone south... Micro Liquid Decal Film 1oz from microscale... I've used it on some old decals where the glue got to the point of attaching the decal to the backing permanently.... (it takes three times longer to soak them off, usually they fracture into a million pieces) It worked on most of them.... My first suggestion is take a close up photo of the sheet to use as artwork in case you have to have them printed by a decal print shop... (there are several good ones on the net) Then, try the decal film on them and see if it works, the film holds the decal together so it doesn't fracture when going thru the slower process of applying.... Above all go slow and use patience, they probably can be recovered...