Egilman
-
Posts
4,379 -
Joined
-
Last visited
Content Type
Profiles
Forums
Gallery
Events
Everything posted by Egilman
-
 I do not know how I missed this one mike, I'm sorry.... More of your stunning PE work... I wouldn't, a 500 lb bomb wouldn't do that much seeable damage... Maybe, (probably) bulge the deck a bit, possibly split a few seams, if it was an armor piercing bomb it could easily have penetrated completely through the deck and hull to explode below the ship.. (happened to several ships at Pearl, there wouldn't be any serious stand out damage) In my opinion brother, I wouldn't enlarge it any and what you have is more than enough...
 -
I haven't forgotten this one my friend, it has just been set aside while real life and other projects diverted my attention.... I will be getting back to it eventually... (yeah 2.5 years I know, that's a lot of sidetracking)
-
Beautiful job, harkens back to the day when machining was an art form itself... Today the art is being lost, everything is computer driven and is capable of some fantastic things, but still, seeing it done by hand with nothing automatic warms my heart in ways many wouldn't understand... Very well done....
-
F4U-1A Corsair by DocRob - FINISHED - Tamiya - 1/32
Egilman replied to DocRob's topic in Non-ship/categorised builds
Chuckle, I don't see the decal printers going out of business any time soon.... Not everyone has the skills to paint insignias and technical stenciling on everything.... Sometimes it is just easier to decal as opposed to painting... Few can tell the difference when done properly... -
My first three months in machine school was learning how to cut metal and read and draw blueprints, the other 21 months was learning how to make the machine do what I want it to correctly and most efficiently... You can't do that without creating jigs and fixtures.... That is the real art to successful production machining...
-
F4U-1A Corsair by DocRob - FINISHED - Tamiya - 1/32
Egilman replied to DocRob's topic in Non-ship/categorised builds
Very nice sequence, I remember creating these masks when friskit film became widely available, it's an involved process and takes a bit of patience, but when done right, beats all decals hands down... Decals can come close but paint is much more real looking.... Well done.... -
Glen Curtis tried to patent the Aileron as a different method of control and failed.... The reason, the Wrights sued him for patent infringement and won... The Wrights patented the method of controlling an aircraft based upon the physical sciences involved, not the mechanical means of doing it.... Wing Warping was one mechanical way of effecting wing surface curve control, not the only way.... They patented a scientific discovery, not a mechanical device.... Ailerons do exactly the same thing as wing warping does, they increase the curve of the wing causing more lift on one side over the other.... A simple change in the mechanical application doesn't change what is physically happening... Curtis made the argument that it was completely different, problem is he couldn't get around all that wind tunnel testing and charting of the coefficients of lift for different curves and shapes at different AOT's the Wrights did to get an accurate table of pressures... Wing Warping and Ailerons do exactly the same thing they increase the curvature of the upper wing surface thereby increasing the lift on that side of the aircraft given the angle of attack... The same thing happened when they tried to patent flaps and flaperons.... Modern control surfaces are just a different mechanical way of accomplishing the increase in lift that the Wrights proved.... The whole issue of patents became moot in 1917 when war was declared and the government opened the patent office, suspended and declared a moratorium on patent claims for the duration due to war emergency... After that, everyone has access to the science....
-
Get yourselves well Brother.... I'll be prayin' for your Admiral and You...
-
They were the first.... (to successfully devise and use one in accurate aerodynamic research) That Tunnel at the AF Museum is their 1916 wind tunnel, they used it for airfoil and drag research at their Dayton lab during WWI.... (at the time, it was the most powerful wind tunnel on the planet, capable of 175 sustained MPH) Their original 1901 wind tunnel which they devised and used to rewrite (and correct) Otto Lilienthal's table of pressures, no longer exists... I believe there is a replica at the Smithsonian....
-
Dennis, the revolution that was the Fokker rudder was that it was almost a live tail, it had a full third of its surface area ahead of it's pivot point.... the small forward stabilizer and larger rudder surface split the airflow between live tail and rudder, the small lower end that provided the sideways lift was accentuated by the much larger live surface above it that applied airstream force to the lift function.... Kinda like a booster to the moment of force applied to the yaw... That's why they were so maneuverable, they could turn in their own wingspan... It's also what put the extra stress on the upper wings of the Dr.1 and the D.VIII.... The D.VII on the other hand didn't suffer from the stress issue because of the strut bracing design which imparted all the lateral twisting stress into the main lower box wing spar.... (which was capable of handling 7 G's laterally as tested by the Smithsonian after the war)
-
The Wright Bros figured out how to control an aircraft in the air... in 1903 the actual engineering of the best ways to do it were still to figure out... the first flight of an aircraft actually happened in Europe 3 years earlier, the problem was no one knew or understood how to control it once it got into the air... Everyone was thinking rudders like on a ship and inherent stability instead of actually controlling lift.... The wright flyer had huge control surfaces, about 4 times what was actually needed but they didn't know it at the time, and their control moments were way too fast... Wind tunnel testing done in the '90's confirmed that the wright flyer was all but uncontrollable.... But that is what Wilbur and Orville wanted, they wanted it all but uncontrollable... What better way to prove they succeeded than by flying an almost uncontrollable craft.... If you take a look at the Flyer II they decreased the control surface areas, (and reduce control moments) and tried to increase power, but the flyer II was barely able to get into the air much less fly.... The next year the flew the Flyer III which had a more advanced engine much smaller control surfaces and a huge reduction in control moments, and that is the plane they made their first full circles and figure eights with... That is the plane they took to Europe on tour to show everyone that they actually did it culminating in the Paris airshow.... No less than the great Santos Dumont was dumbstruck when they launched the Flyer III and went out over the field then banked into a smooth left turn and returned to where they launched... His exclamation was "We are BEATEN! they actually did it" Everyone else in the world was still working on inherent stability and steering rudders for everything... (but they knew that control was the thing they were seeking and hadn't reached yet) The first flyer had huge control surfaces simply cause they didn't know any better... They were still figuring the mechanics out.... Smaller control surfaces work much more efficiently in creating lift and drag cause that is how an airplane is controlled in flight.... (it has nothing to do with directing the airstream and everything to do with directed controlled lift)
-
It looks the part brother.. Well Done!
-
1936 Rolls Royce Phantom III by CDW - Revell - 1:16 scale
Egilman replied to CDW's topic in Non-ship/categorised builds
The chassis looks great brother.... The engine is nice, looks the part...- 97 replies
-
- 10
-

-

-
And very well done I might add.... Congratulations!
-
F4U-1A Corsair by DocRob - FINISHED - Tamiya - 1/32
Egilman replied to DocRob's topic in Non-ship/categorised builds
Very nice, a light to moderate chipping would be appropriate for a marine land based bird.... -
It depends, in real life, Green went over the Brown, in the modeling world either way works.... And I agree he's doing a fantastic job of it.... the Black sides will set it off perfectly...
-
Sea Harrier FRS1 by AJohnson - FINISHED - Airfix - 1:72
Egilman replied to AJohnson's topic in Non-ship/categorised builds
The voice of experience I assume..... {chuckle} Amen Brother...- 71 replies
-
- 10
-
-
Sea Harrier FRS1 by AJohnson - FINISHED - Airfix - 1:72
Egilman replied to AJohnson's topic in Non-ship/categorised builds
Tamiya Fine White or Grey are the only two I use anymore, Fine White for bright colors and ultra smooth surfaces and Grey for the rest... It does smell a bit but it's the fastest drying primer I've found and covers great... It also lays down the dead flattest I've ever experienced... leaves a smooth surface without runs or puddles and it will take both sprayed and brushed paint, enamel or acrylic..... To me it is the best available model paint primer hands down.... None that I know of either... Acrylics don't have the bite of Enamel, they don't attach to the surface very well and forget smooth surfaces.... +1 +1 -
F4U-1A Corsair by DocRob - FINISHED - Tamiya - 1/32
Egilman replied to DocRob's topic in Non-ship/categorised builds
On a production corsair nothing was cloth..... All aluminum..... -
Dehavilland Mosquito by Edwardkenway - Tamiya -1:48
Egilman replied to Edwardkenway's topic in Non-ship/categorised builds
Oh Brother, it was nothing of the sort.... Sometimes you have to put several coats of future down before there is sufficient smoothness for decals... the look has to be at least semi-gloss with complete coverage of where the decal is going to sit... The water soluble glue they use to affix the decal to the paper should be removed completely and with the surface smoothness the only way it adheres is tightness to the surface... Then the Micro Sol reduces the film making the inked decal seem painted on.... Micro Set aids in adhering the film to the surface supposedly by softening the painted surface but in reality it is a surfactant, it evaporates leaving no air between the film and surface.... As it dries it sucks the decal down tight against the smooth surface.... They are doing the same thing when they put window tint on car windows or UV film on commercial windows... The surfactant dries and sucks the film to the smooth surface... A lot of people like to blame the setting solutions but for every complaint there are thousands and thousands of successful applications... Those reviews and logs where you see such complaints are generally from those that do not completely understand the process and what happens during each step.... Without that understanding, the blame for the outcome comes to the easiest thing to blame, not where it really belongs... No blame was cast here brother, just trying to educate, my apologies if it came across as something else...- 33 replies
-
- 11
-
-
Dehavilland Mosquito by Edwardkenway - Tamiya -1:48
Egilman replied to Edwardkenway's topic in Non-ship/categorised builds
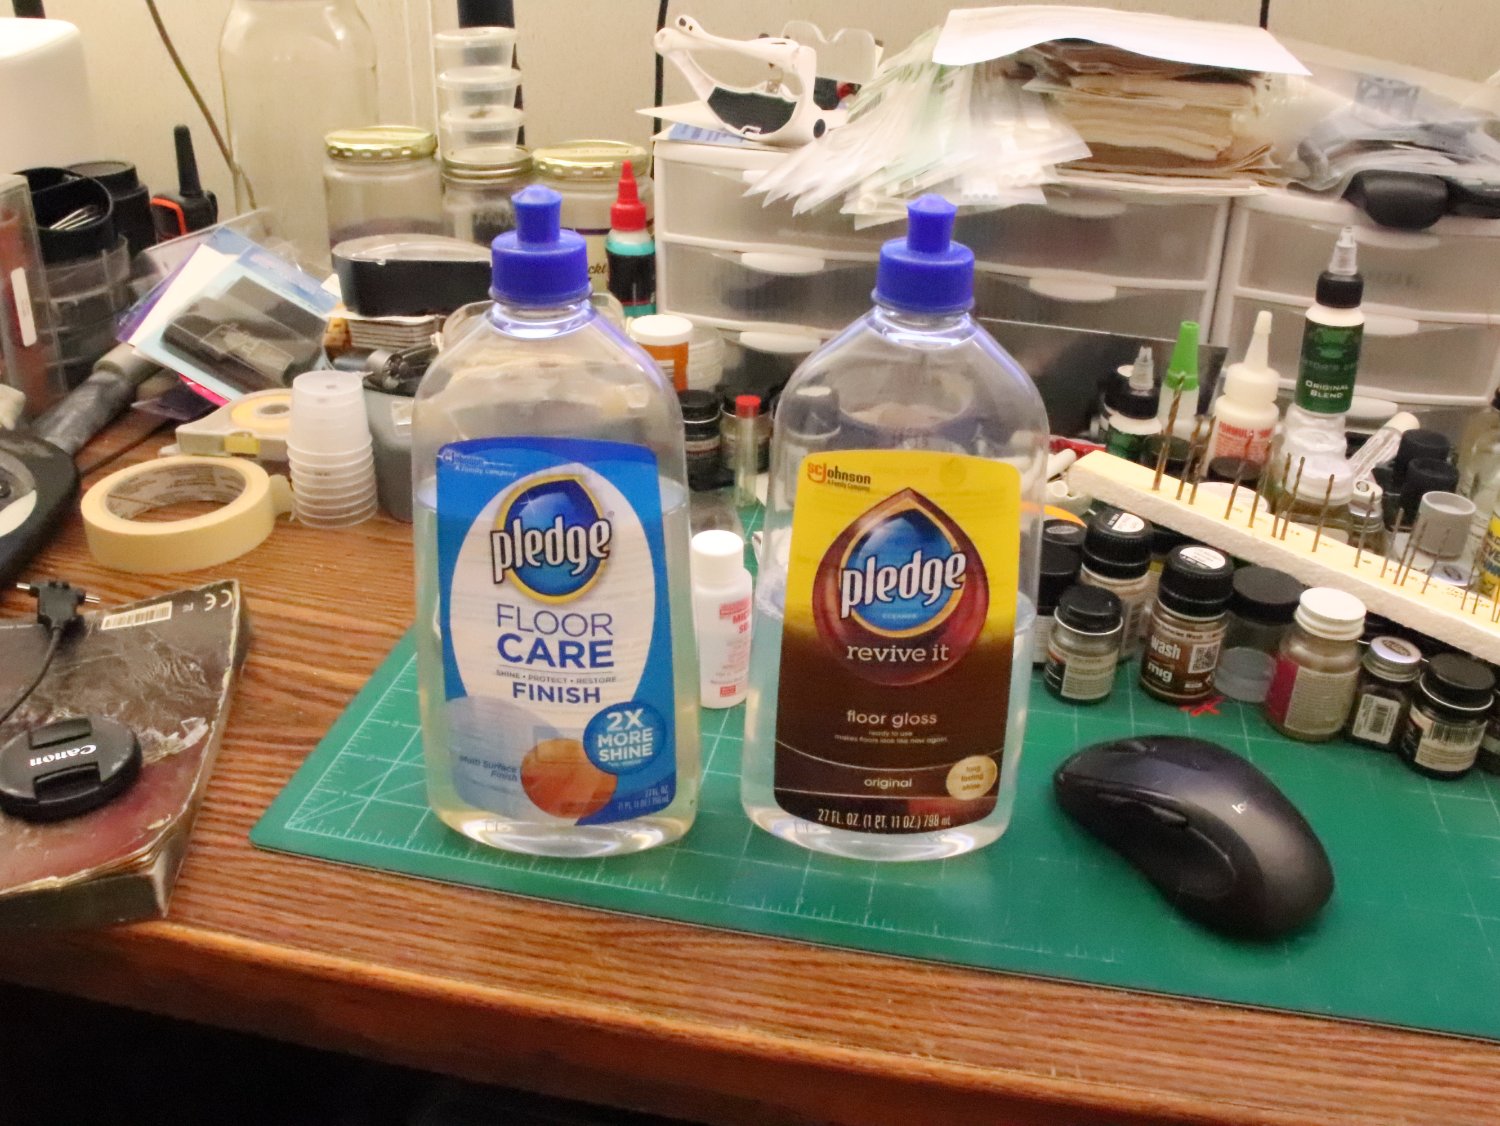
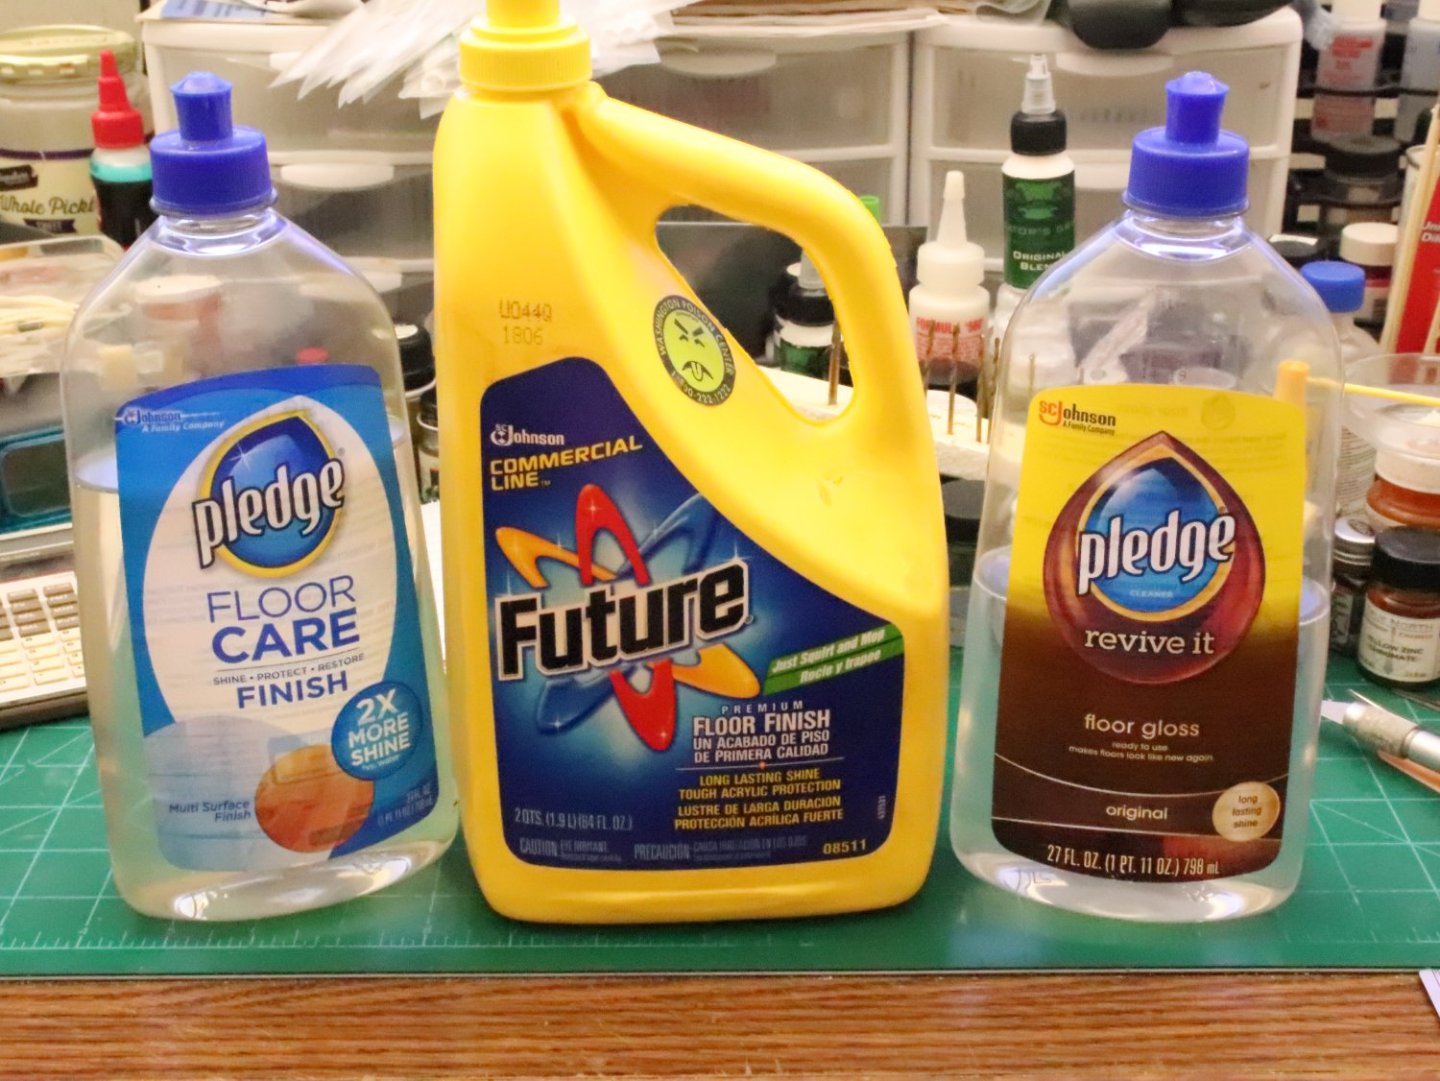
Micro set is nothing but acetic acid (vinegar) mixed with water... Micro Sol is a combination of alcohols, I do not know which ones nor their percentage of mix... Walther's Solvaset is the same mix as Micro Sol, (but I do not know it's percentages either) and do the same things as Micro Sol... Users preference as to which works better... I've reached the point where I no longer use Micro Set and go straight to Micro Sol over Future over Enamel paint... (I do not use acryls except for Future) I have never had a problem with Micro Sol or Solvaset over Future and I've used both... One issue just might be the version of Future used, there are several versions in fact... There is the clear acrylic version in the squeeze bottle, the milky looking cloudy version in the pour bottles and from what I remember several other versions available in the marketplace... They are NOT all equal... For example... Two different products... Take a look at the scan tag on the back of the bottle... IDENTICAL! they are the same product.... It is also the correct product for decaling either one... An example of an incorrect one? the one in the middle is not the same product as the two on the outside, it comes out of the bottle as milky white, more like an acrylic cover coat for bare wood floors which usually dries in an hour but takes several days to fully cure... Good for that new wood flooring you installed throughout your home not for painted surfaces.... You notice on the two outside3 bottles, the say protect and restore, they are a coating/sealer for already finished surfaces... There is a huge difference between the two.... Make sure your using the correct one.... PS: yes I've used straight, undiluted white vinegar to set decals in the past when I was out of Micro Sol, it does work very fast, but destroys more decals than it sets.... The cloudy future issue with setting solutions is not letting the acryl paints or future clear coats cure long enough before applying the future... This allows the Microsol alcohol based product to react with the future, 99% of the time a recoat of future will remove the cloudyness... Decals silvering is the decal not adhered to the surface allowing air to get under the decal, impossible to fix once a clear coat is applied and has nothing to do with the setting solutions... Sorry brothers, I have to say it... Decal silvering is caused by incorrect or careless application, period... EG

- 33 replies
-
- 13
-
-
-
1936 Rolls Royce Phantom III by CDW - Revell - 1:16 scale
Egilman replied to CDW's topic in Non-ship/categorised builds
Good job.... Congratulations... -
Dehavilland Mosquito by Edwardkenway - Tamiya -1:48
Egilman replied to Edwardkenway's topic in Non-ship/categorised builds
Oh Brother , another skeeter.... (chuckle) I'm in for this one.... -
Nice work...
-
Very Very well done! Those old Revell corsairs can be made to look great, as you've done here....