Bill97
-
Posts
2,333 -
Joined
-
Last visited
Content Type
Profiles
Forums
Gallery
Events
Everything posted by Bill97
-
Thanks Veszett. I plan to tackle those aggravating little f’ers today 😬.
- 1,503 replies
-
- 1
-

-
- Le Soleil Royal
- Heller
- (and 1 more)
-
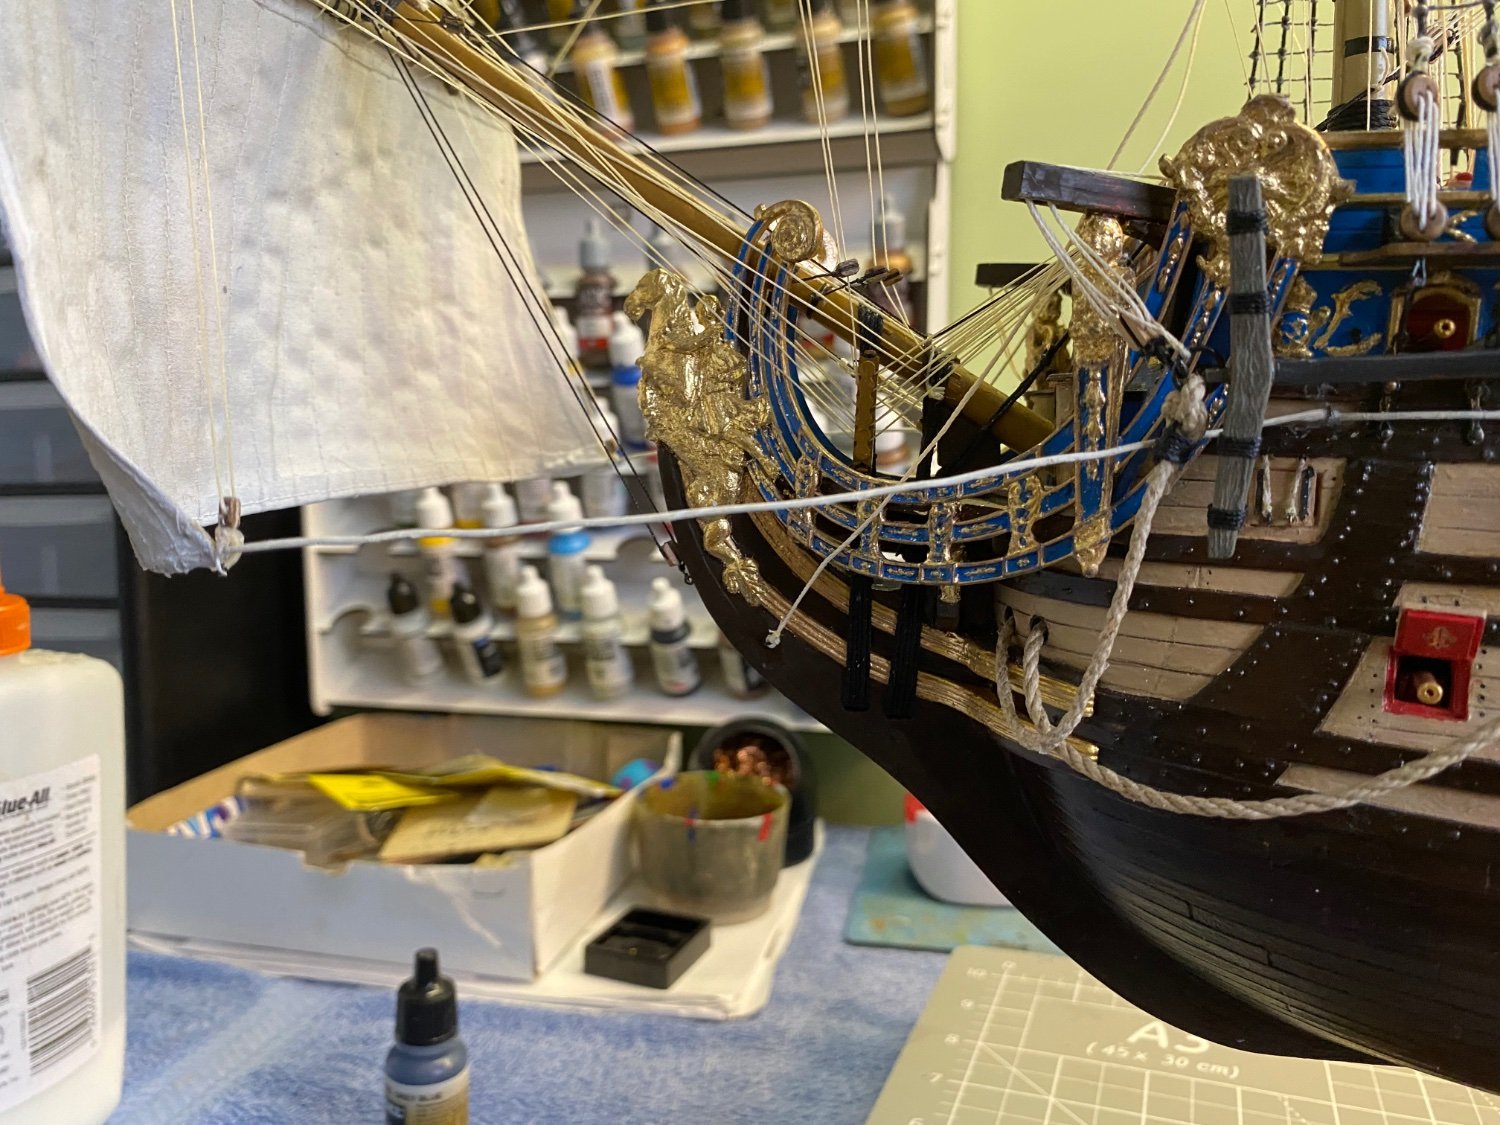
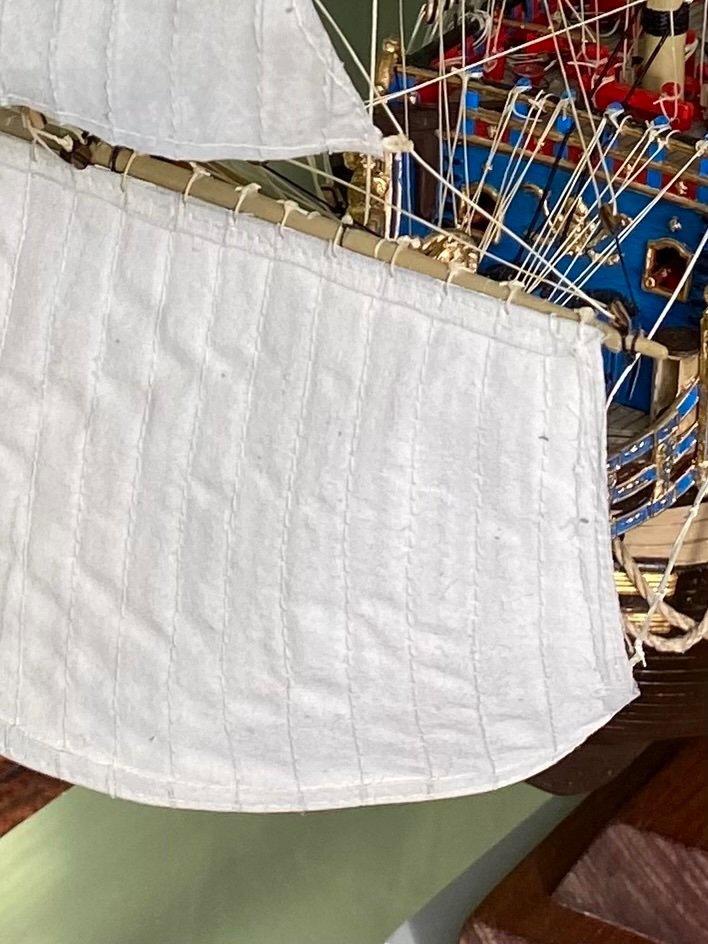
Yeah Henry those reef point threads have come close to being the end of me! Unfortunately I used a thread that has some natural stiffness to it causing them to not want to lay flat. On one of the sails I used a cloth adhesive on the tip of each one and placed a metal ruler across all the points on one reef line to hold them down while the glue dried. When I lifted the ruler off the next day I had an ugly rust stain all across the sail 😞. Had to put a stain blocker on the sail and then repaint it. Will come up with a workable solution by the time I complete this build, even if it is the end of me 😊
- 1,503 replies
-
- 2
-

-
- Le Soleil Royal
- Heller
- (and 1 more)
-
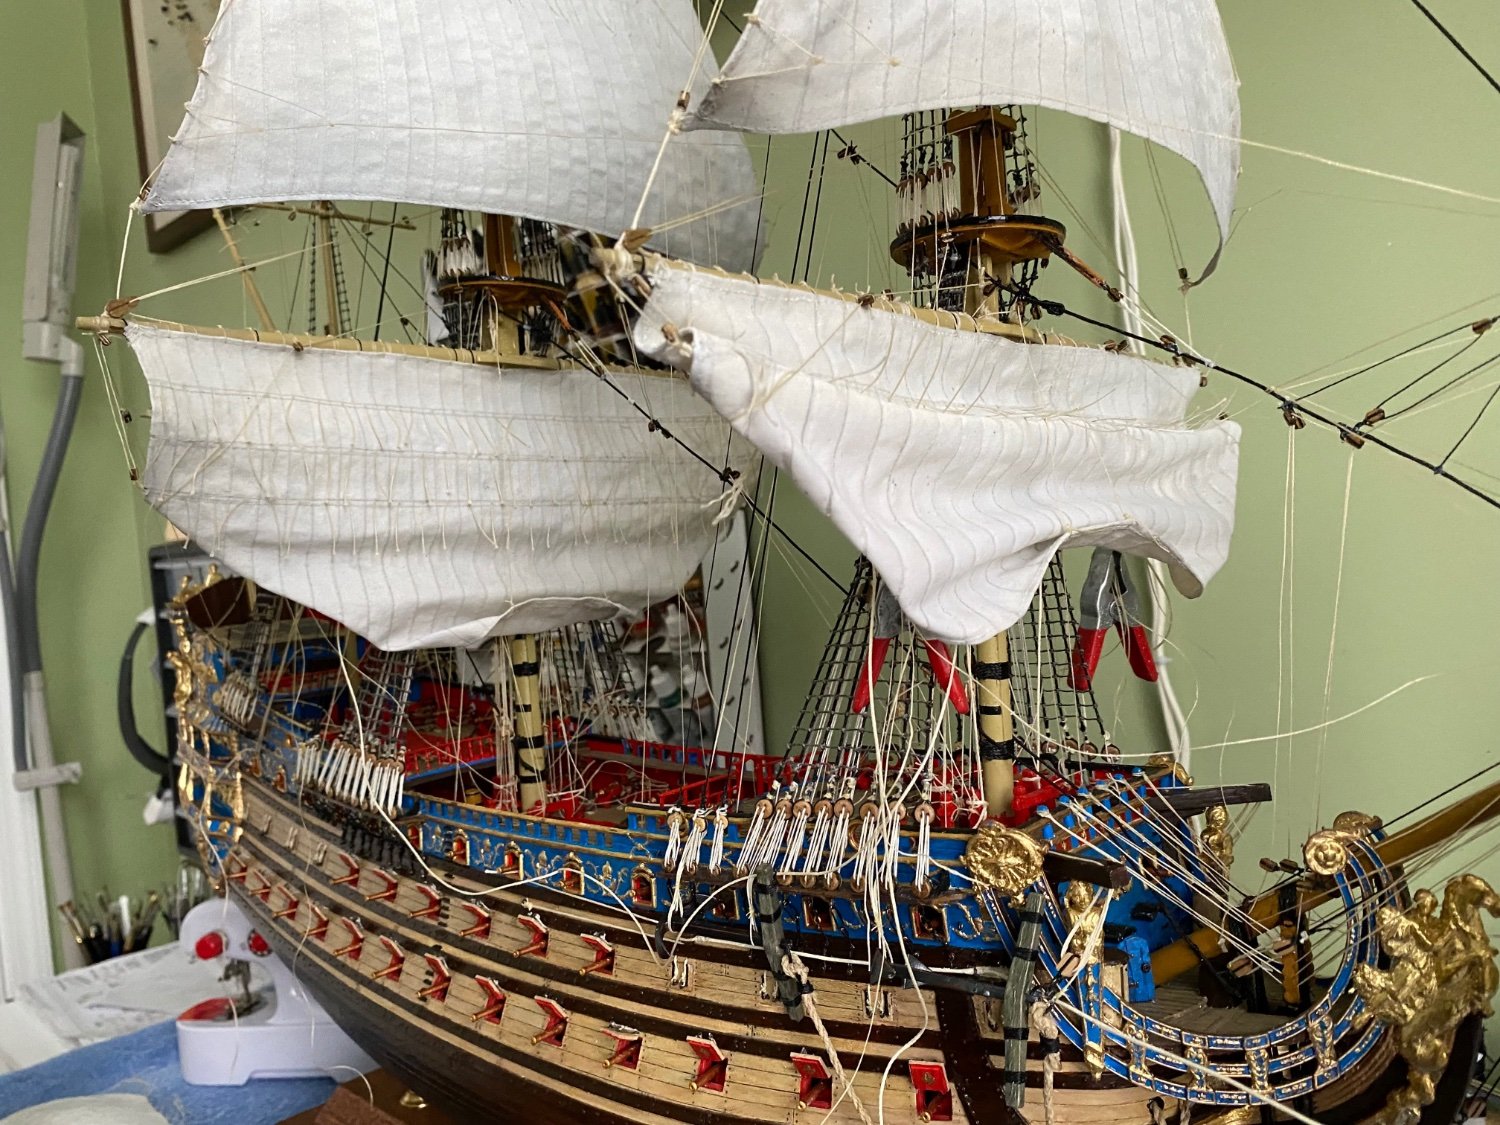
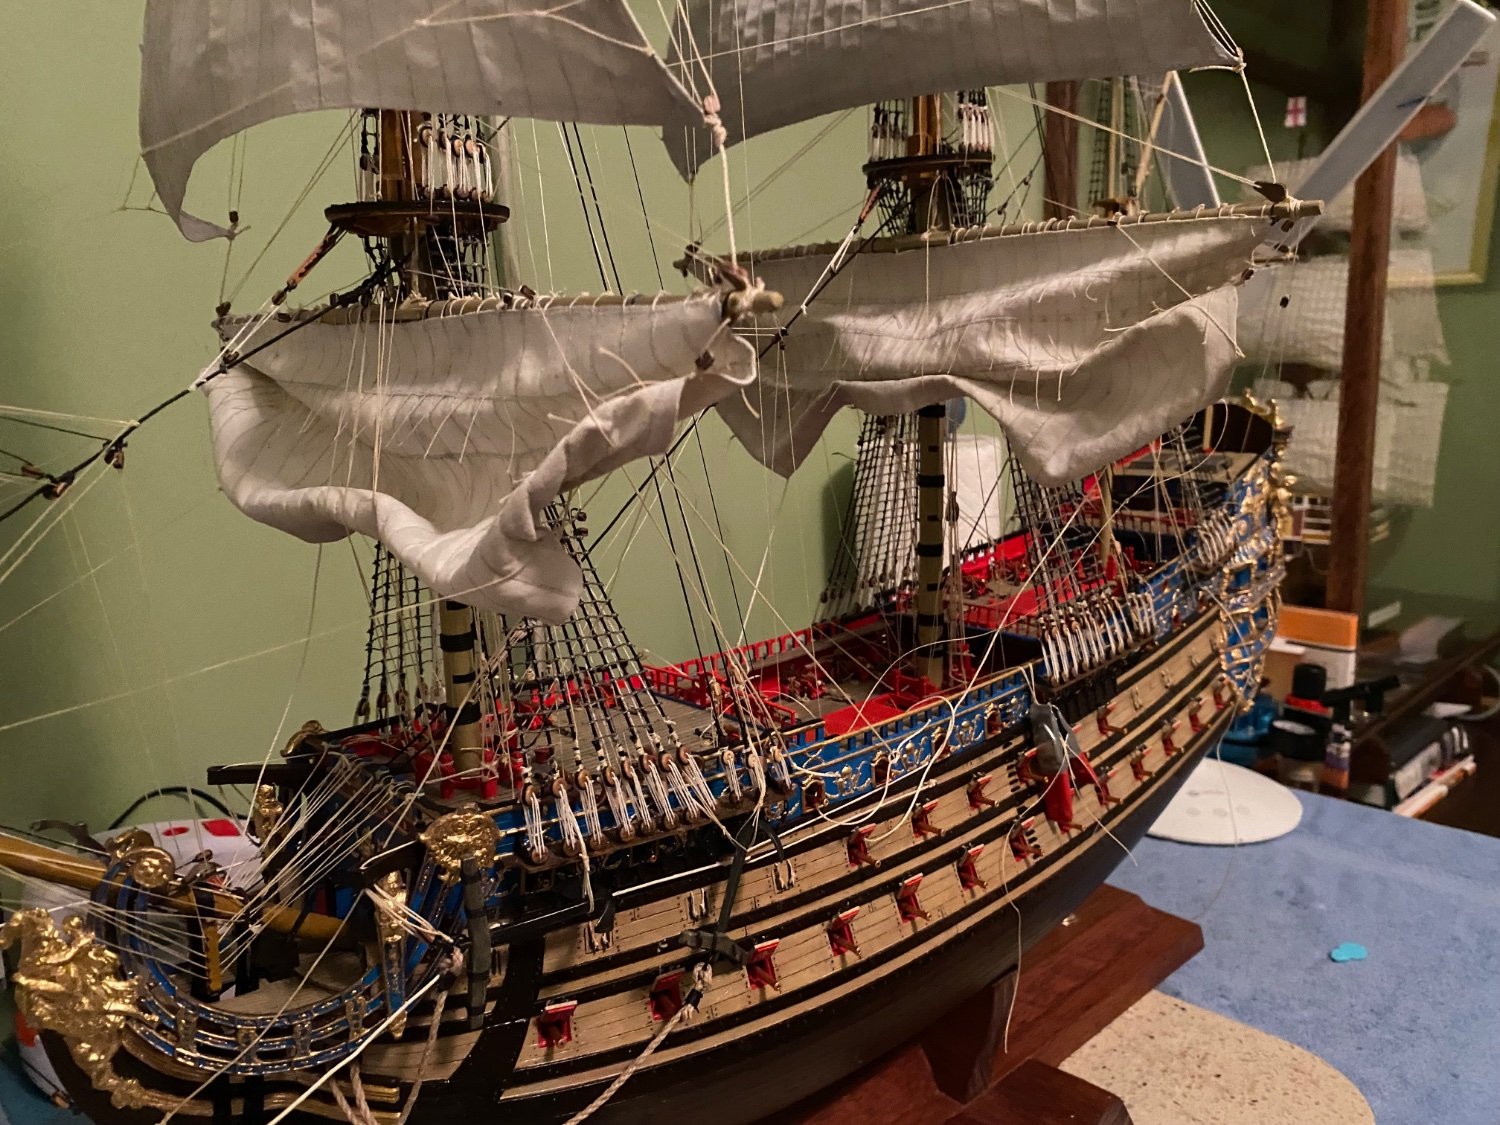
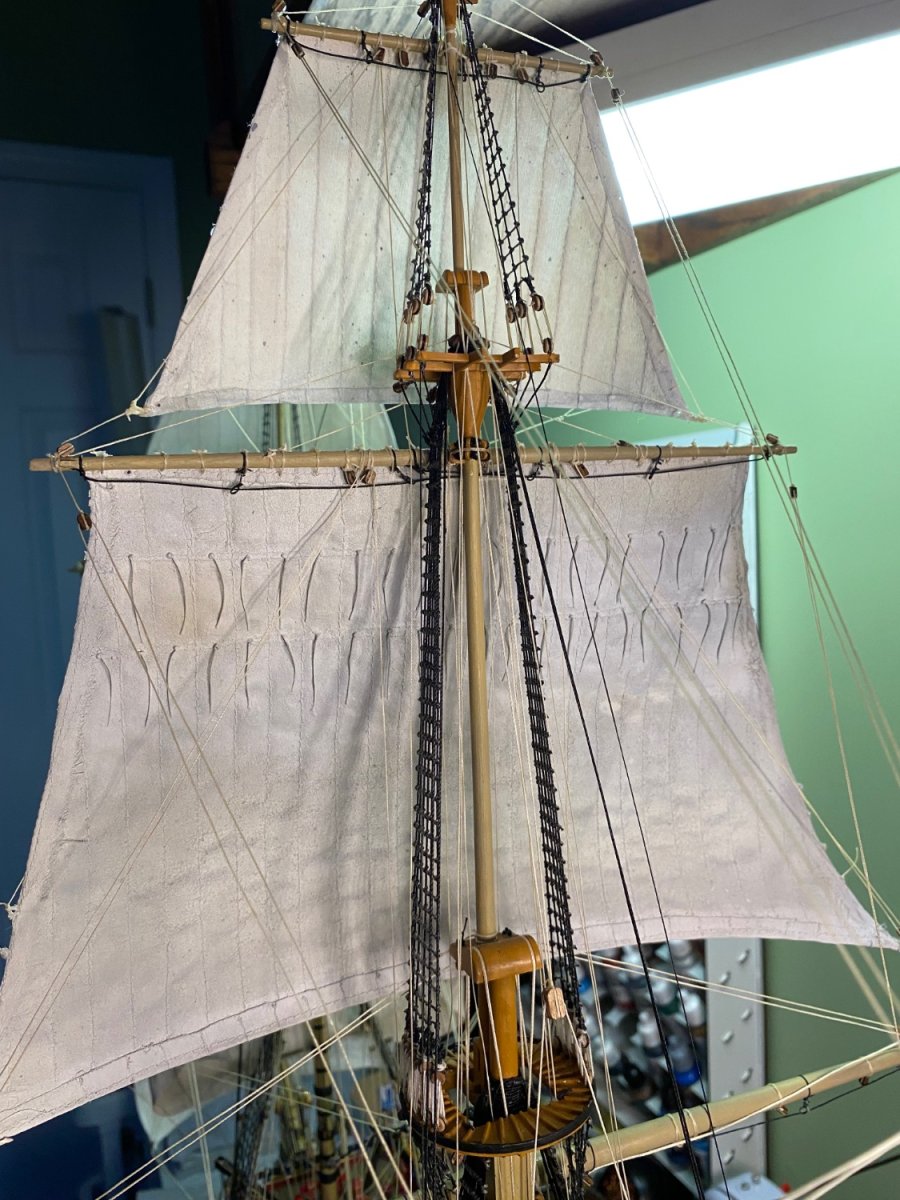
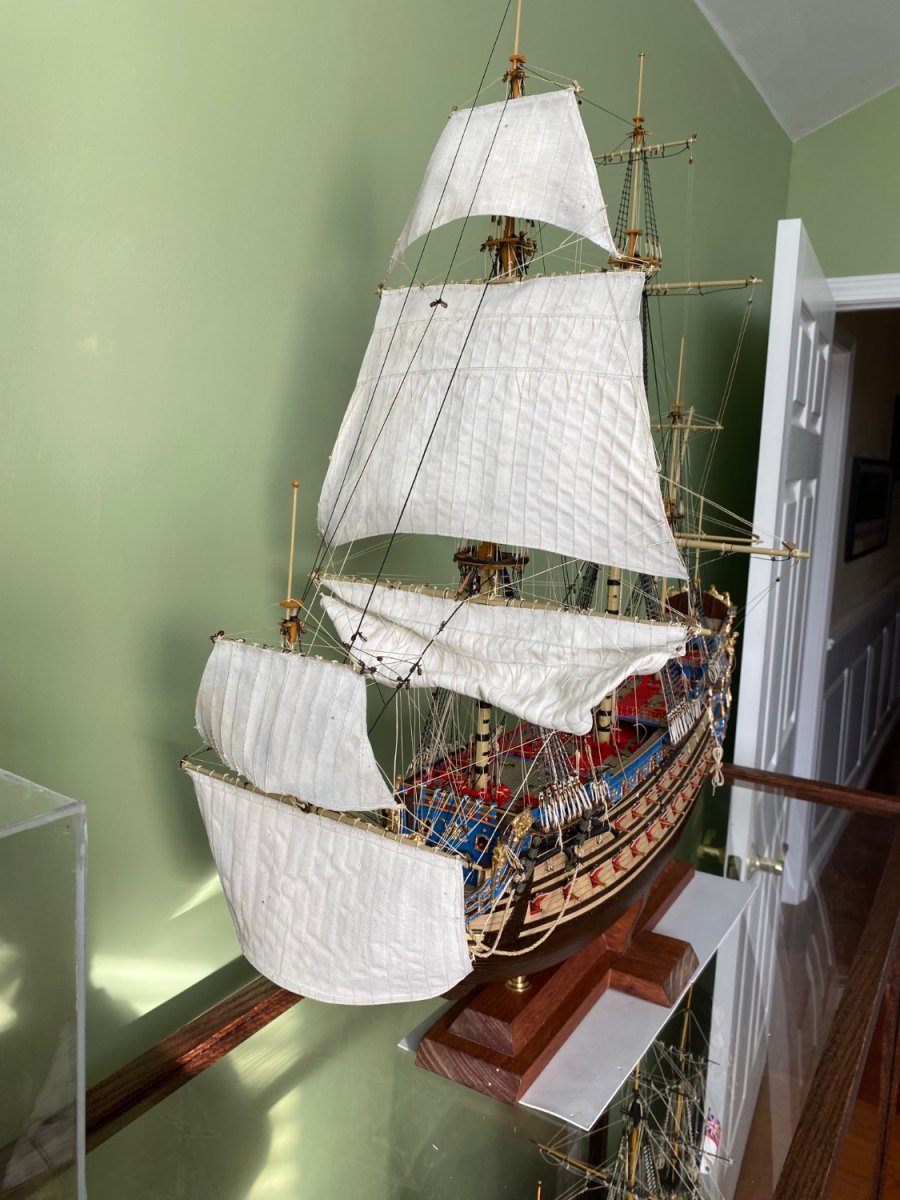
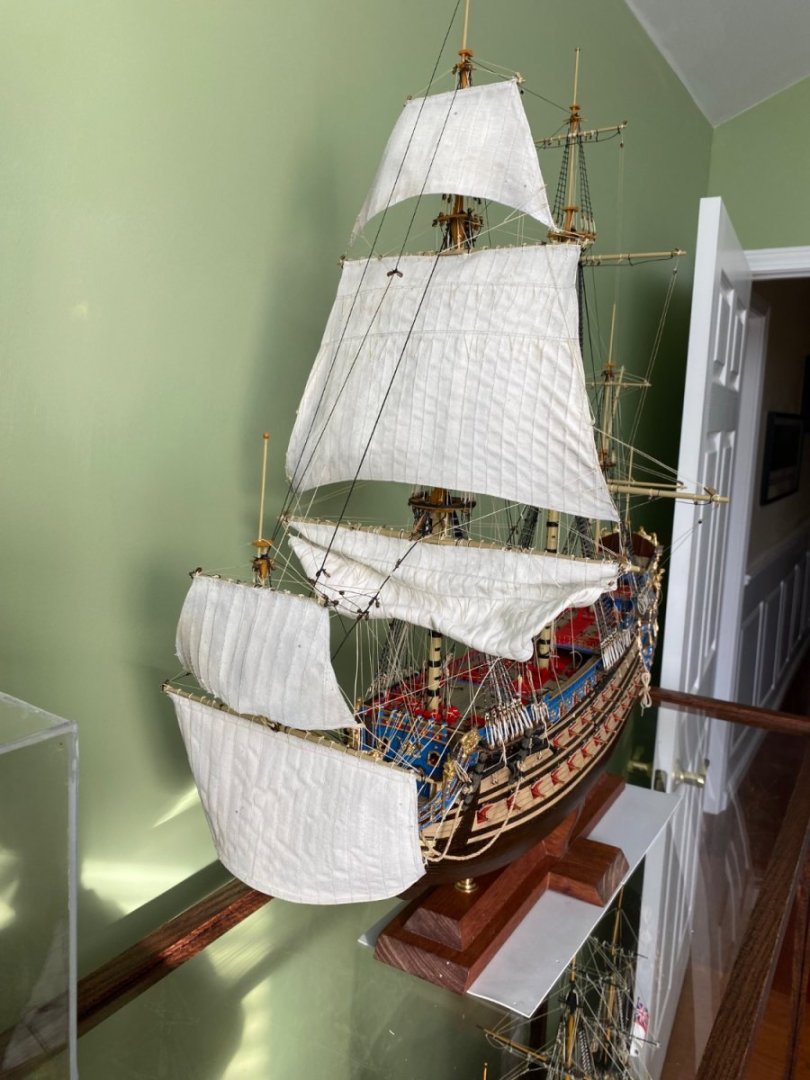
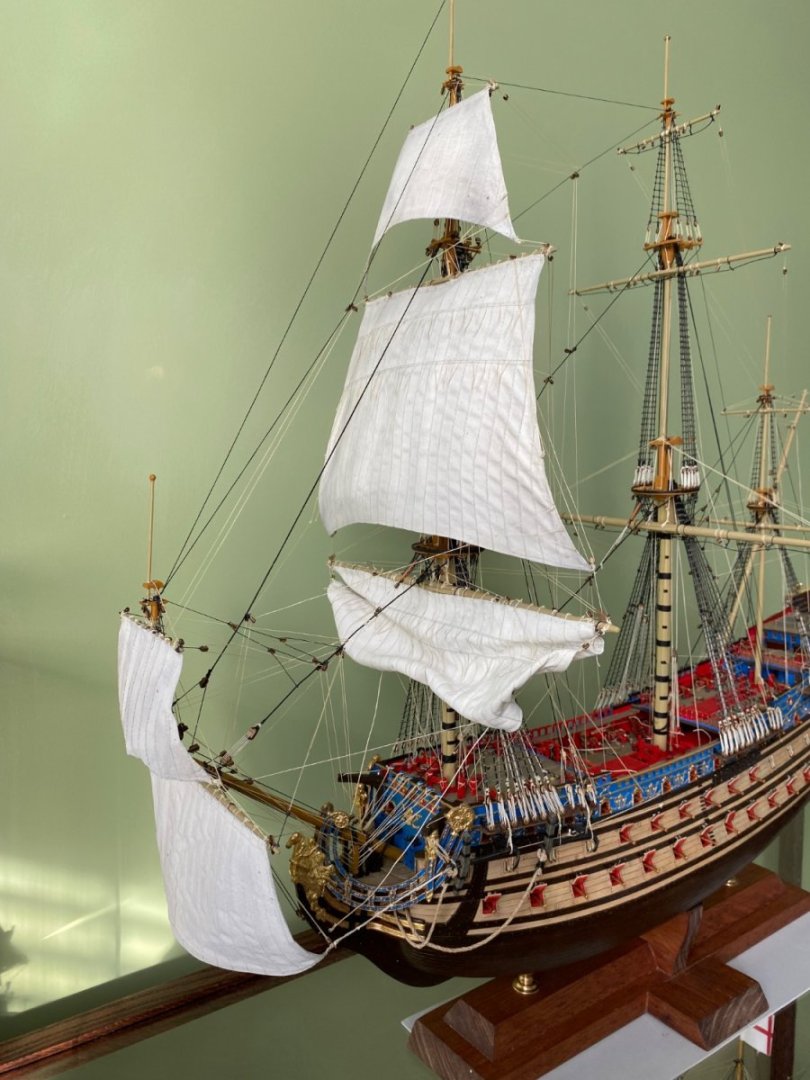
Gentlemen with a few adjustments this is what I have settled on. Just partially hauling in the clew lines and buntlines on the fore and main course sail to have the sails hang in the buntlines just a bit above the deck.


- 1,503 replies
-
- 5
-
-
- Le Soleil Royal
- Heller
- (and 1 more)
-
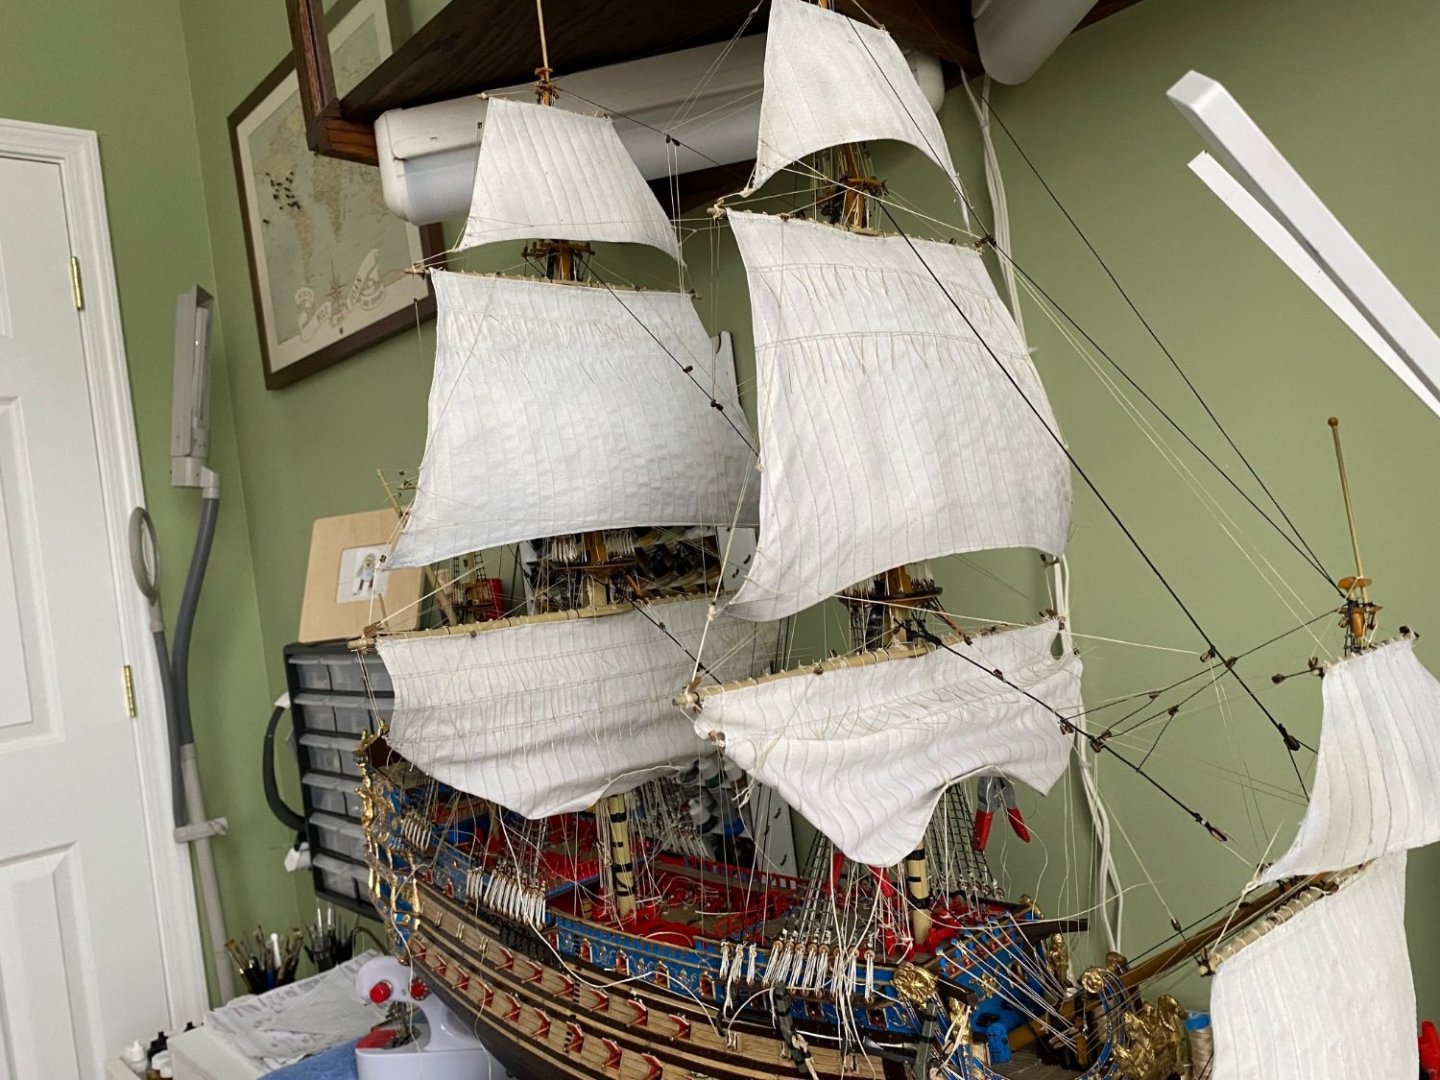
That is my hope Henry. As my discussion went several pages back, this was not my original plan or goal for the ship. I had the idea of doing a partial furl of the fore and main course sail to fully expose the deck area. As Marc observed the weight of the cloth I used for the sails presented a much heavier appearance than I expected. I was iffy on my opinion of the final result. Your comment that it was a good representation was appreciated and maybe I acted too hasty in taking them down. I think this representation serves my purpose of exposing the deck with out the sail appearing to bulky. Still thinking about if I should pull up the fore course as well or have it fully set.
-
Oh no Henry! You think it was a good representation of a sail “hanging in it’s gear”. Marc thought they would look better set so I took the rigging down and spritzed with water to soften the glue. Now I am working toward a compromise like Ian’s photo. I pulled up the clewlines on the main sail to fold back the clew corner and left the center of the sail full length. I have rerigged it but not exactly sure if I just leave the bowlines hang slack. Still debating the fore course. Right now I have it fully set but not rigged.


- 1,503 replies
-
- 2
-
-
- Le Soleil Royal
- Heller
- (and 1 more)
-
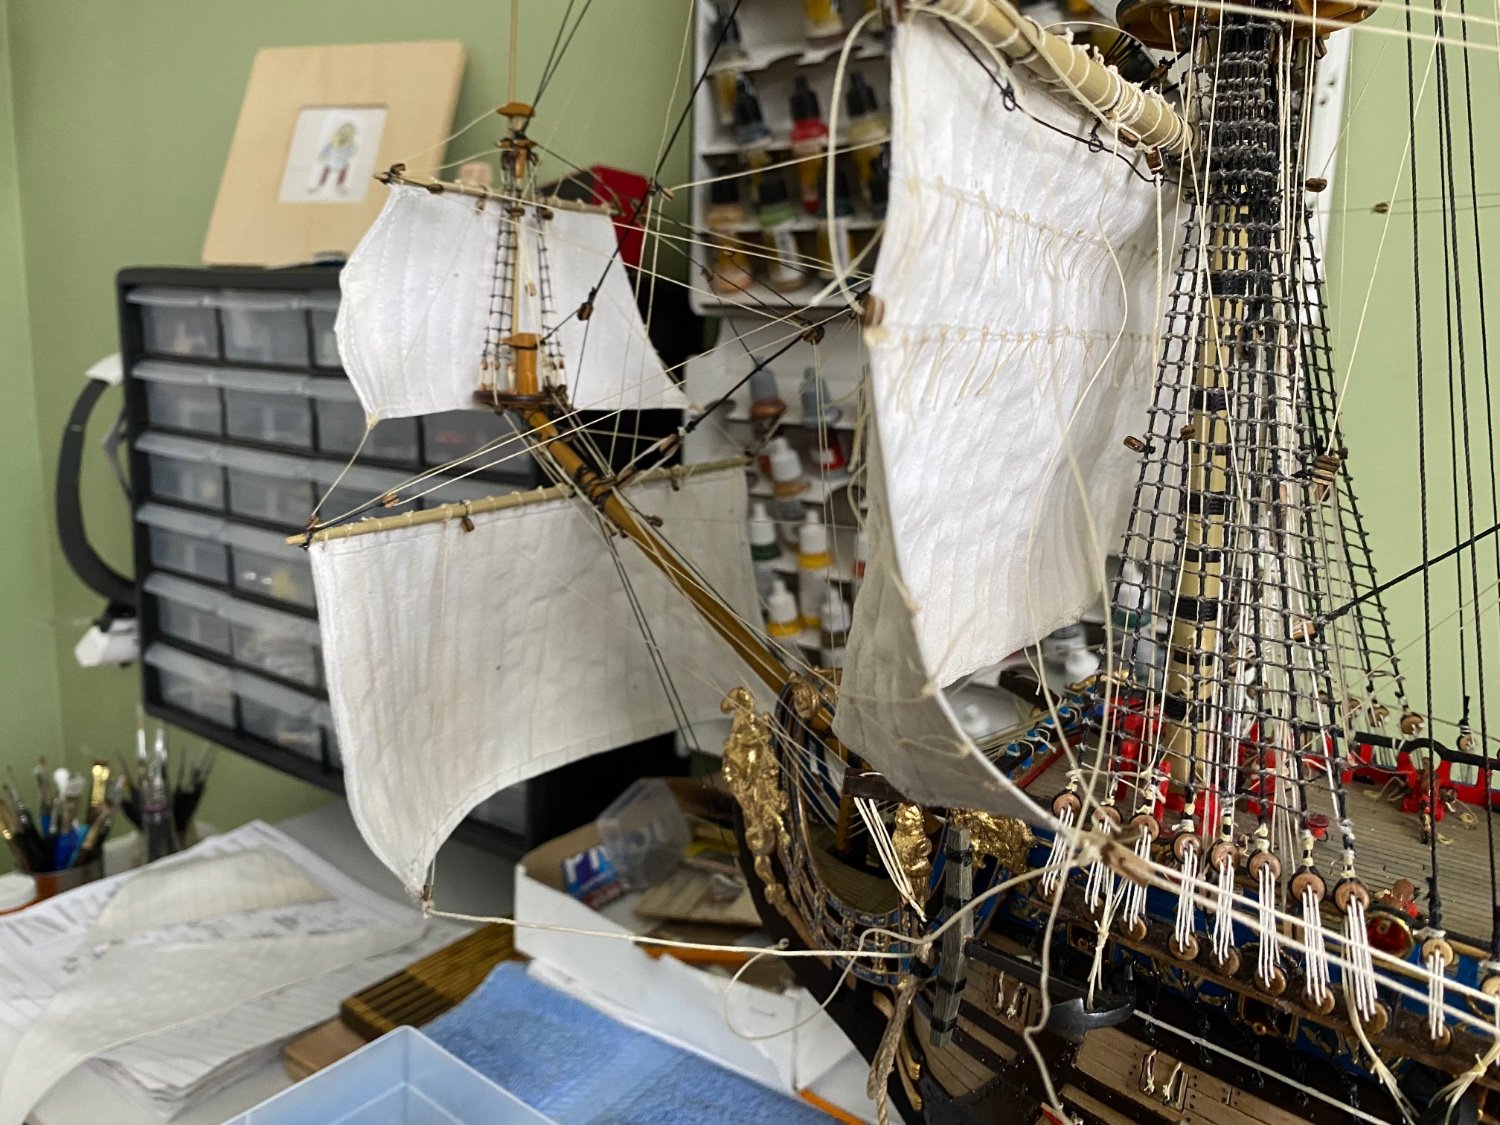
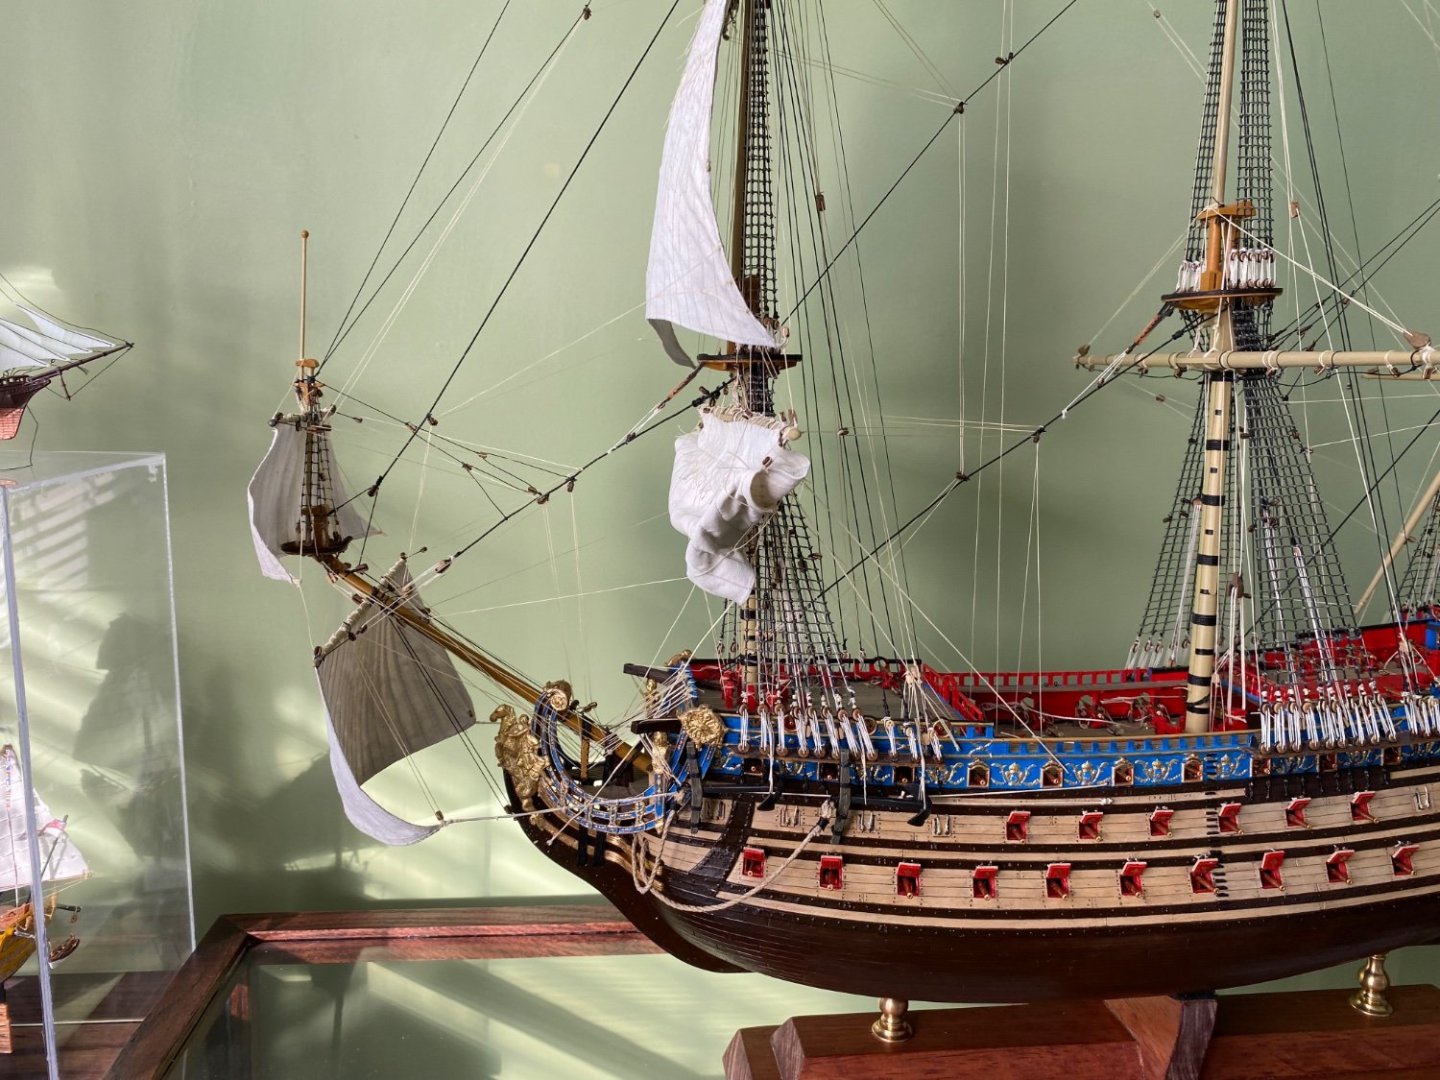
Ok. Got the course sails down. Will see where I go from here.

- 1,503 replies
-
- 3
-
-
- Le Soleil Royal
- Heller
- (and 1 more)
-
Could I get by pulling up the fore course similarly? I am actually, as you probably expect, just trying to expose the deck area for viewing.
-
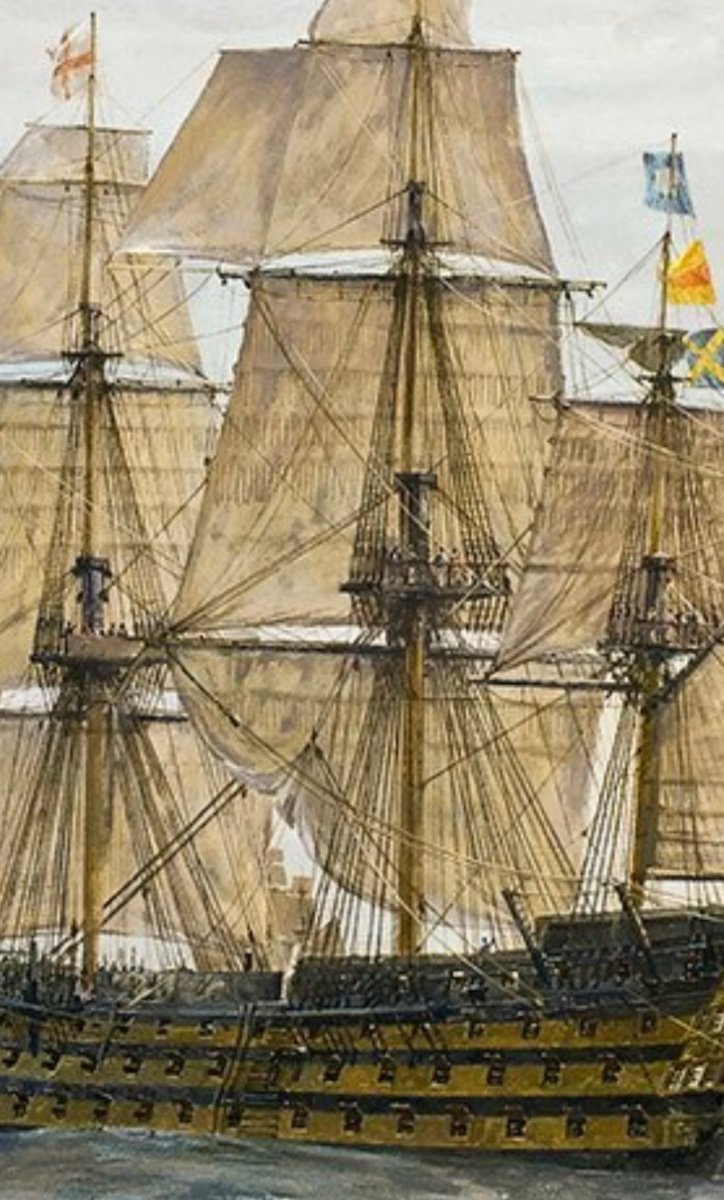
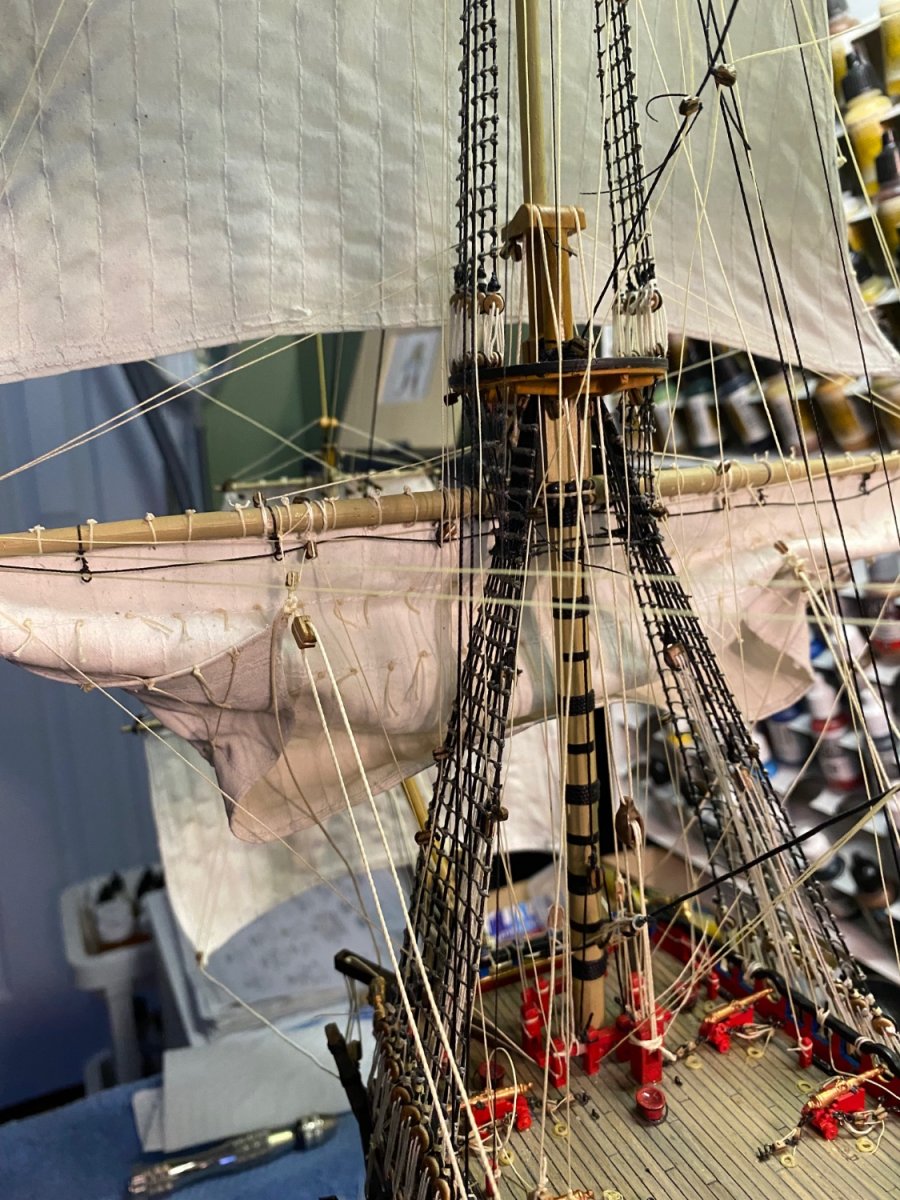
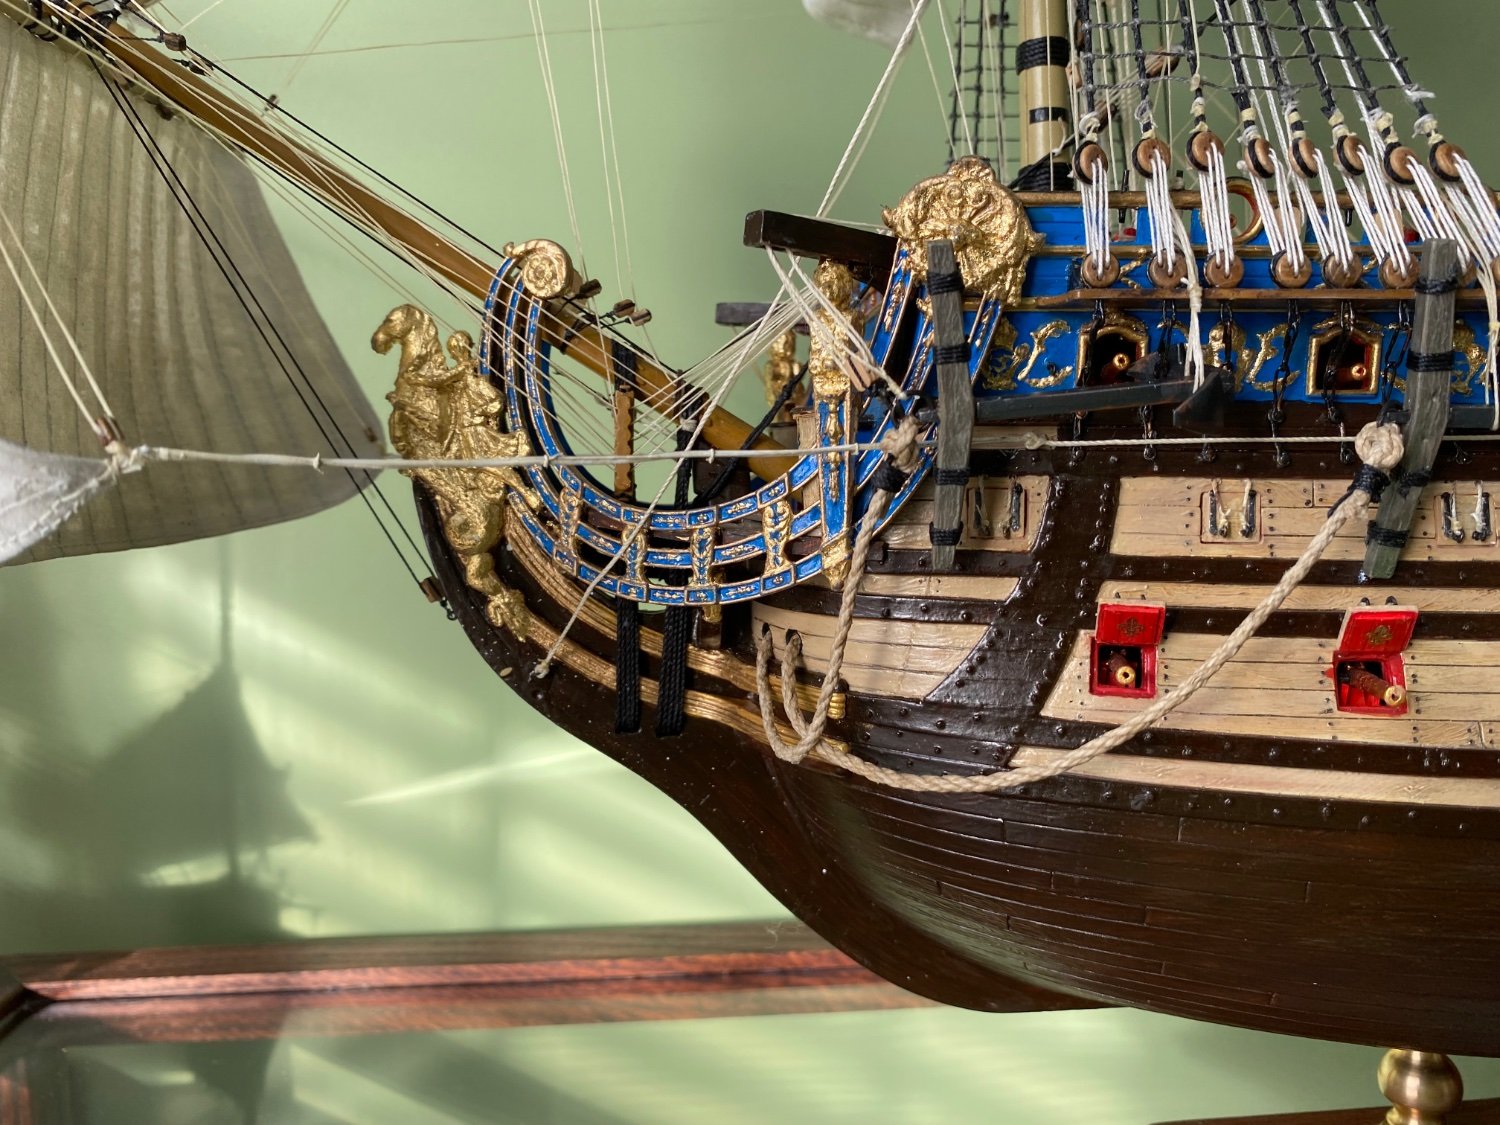
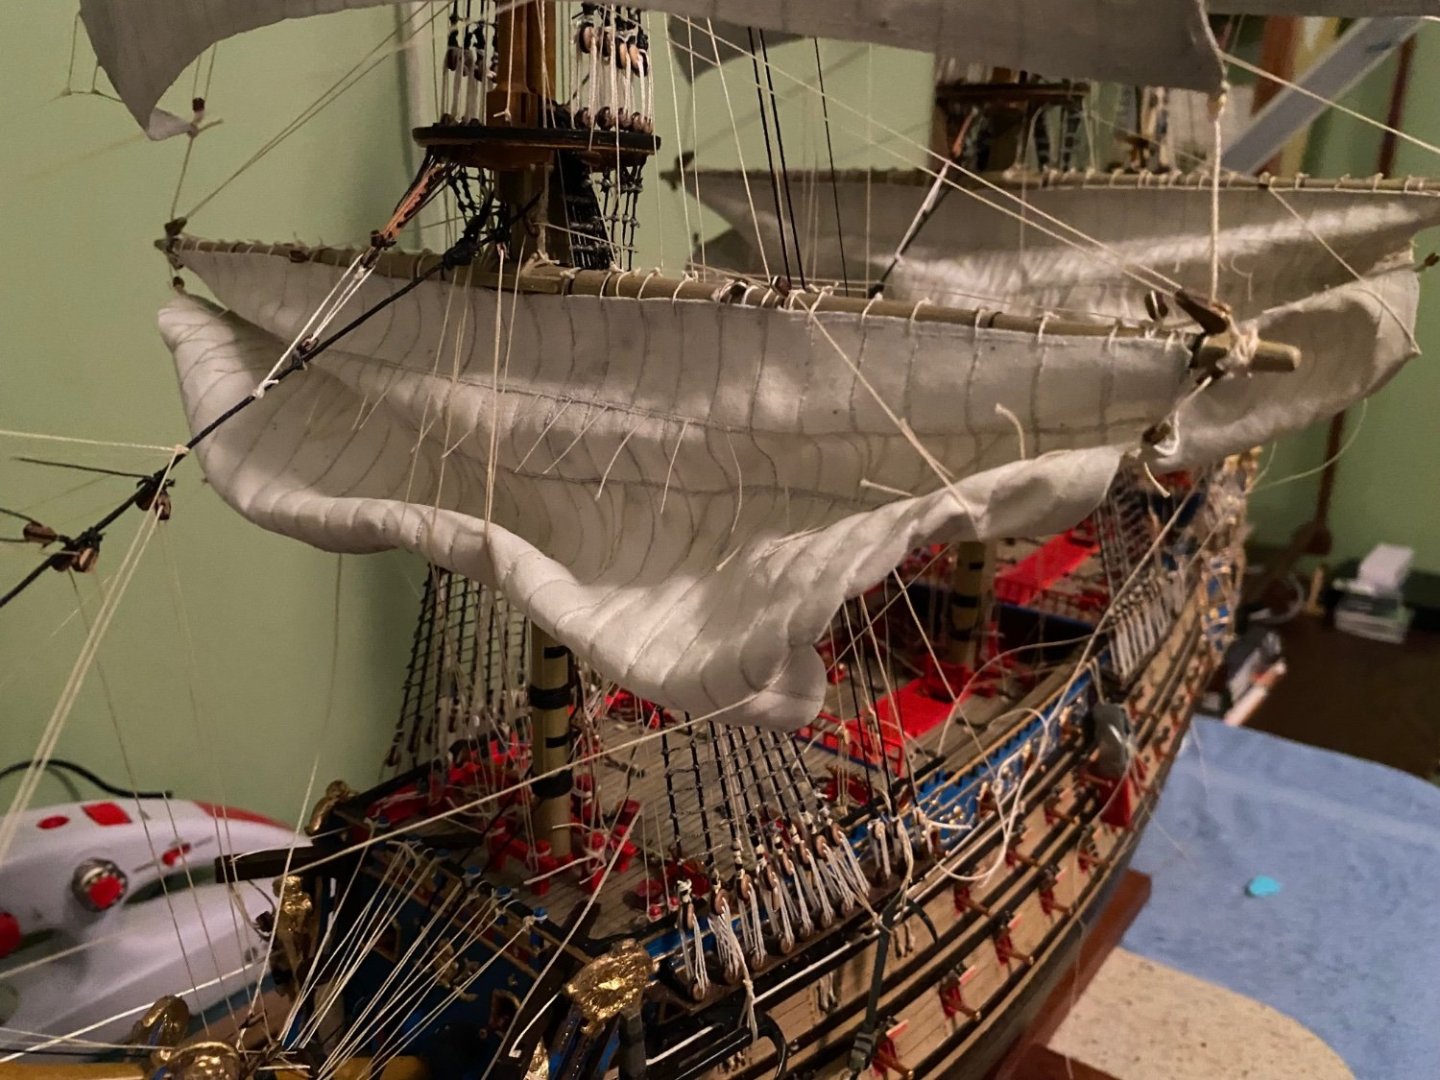
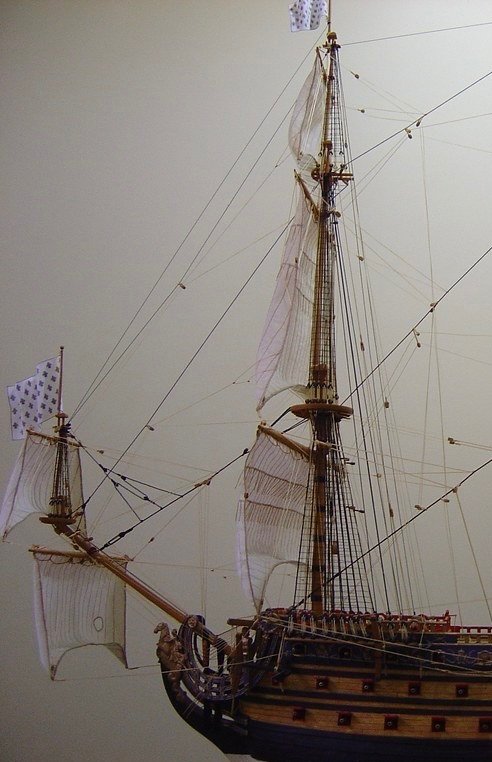
Marc that is something I am for sure struggling with right now. Have to come up with an acceptable solution that will not require me to fully unrig those two sails, take them off the yards, and make new ones. After I put them up I saturated them diluted white glue to hold their shape. I may attempt to spritz them with water to soften the glue and attempt a better minimal pull up that is not so dramatic. I am still confused how the buntlines and clewlines work in random. The clewlines pull the sail up toward the mast on the aft side of the sail while the buntlines pull the sail up on the fore side. I can’t figure out how that is possible. I may try to shape something like this photo that Ian suggested. In this arrangement are the buntlines and leach lines just loose?
- 1,503 replies
-
- 1
-
-
- Le Soleil Royal
- Heller
- (and 1 more)
-
But then Henry how does that work with the clew line pulling up the corners on the aft side of the sail? I have my fore and main course sail pulled up just a little but I have them curled up to the aft. This may be wrong.

- 1,503 replies
-
- 1
-
-
- Le Soleil Royal
- Heller
- (and 1 more)
-
Gentlemen if a sail is partially pulled up, that would include tightening the bunt lines a bit, would the pulled up lower portion of the sail most often be to the fore side of the sail or would it sometimes be to the aft side of the sail? With the bunt line rigged on the fore side of the sail, pulling on it pulls the sail up on the fore side b
-
Perfect Henry. I might pass this quiz yet! 😀 Thanks my friend.
-
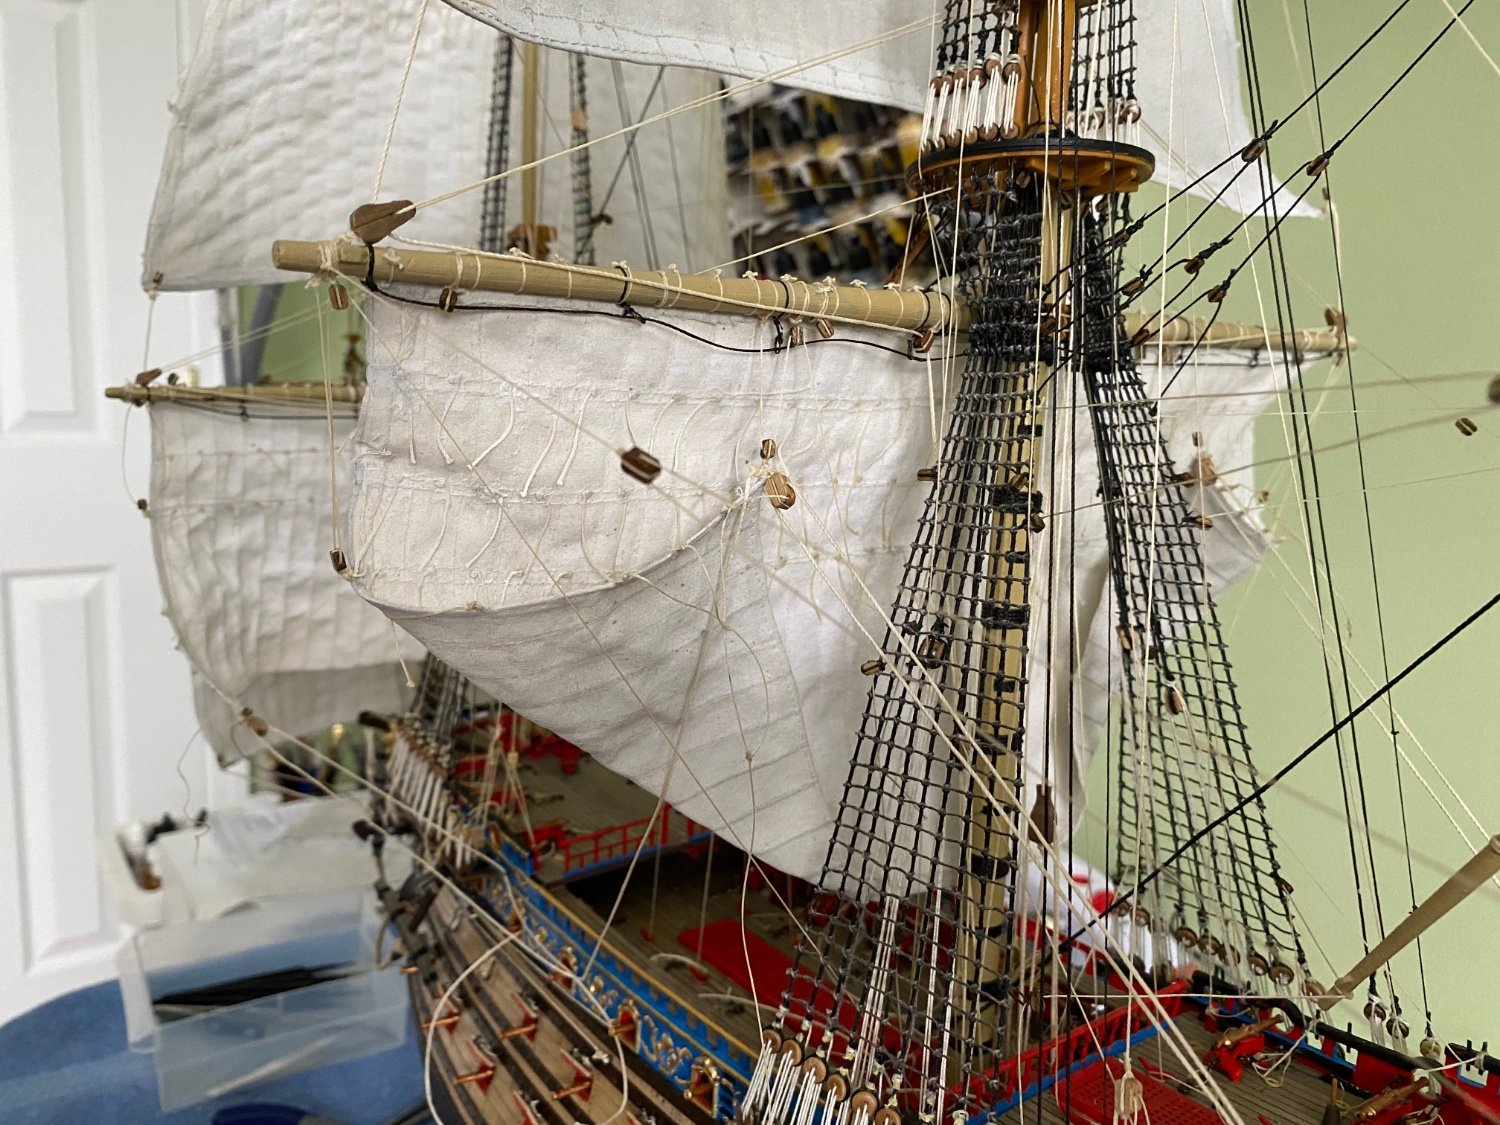
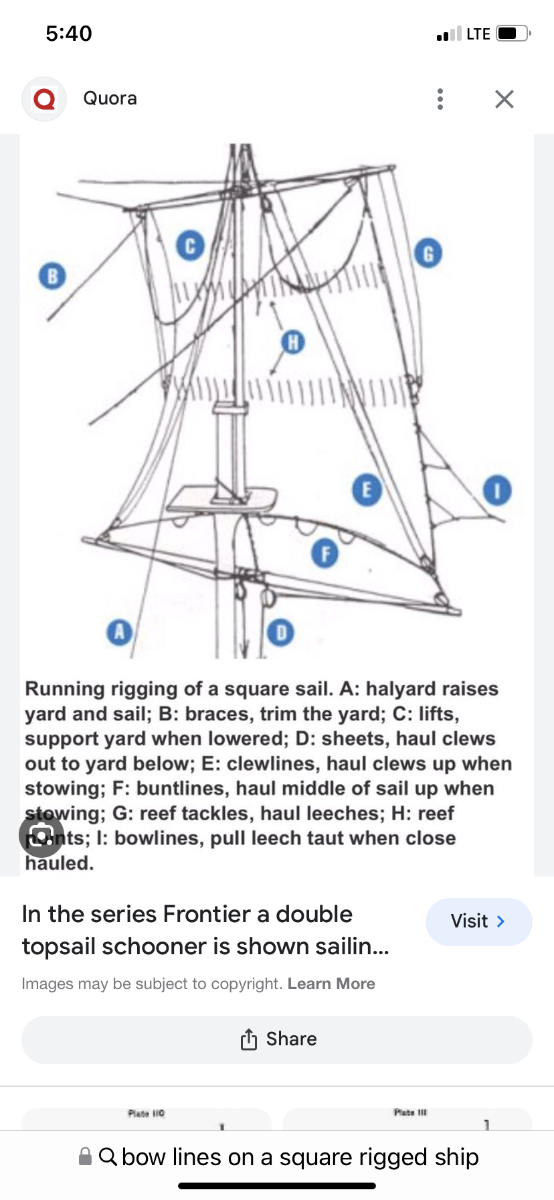
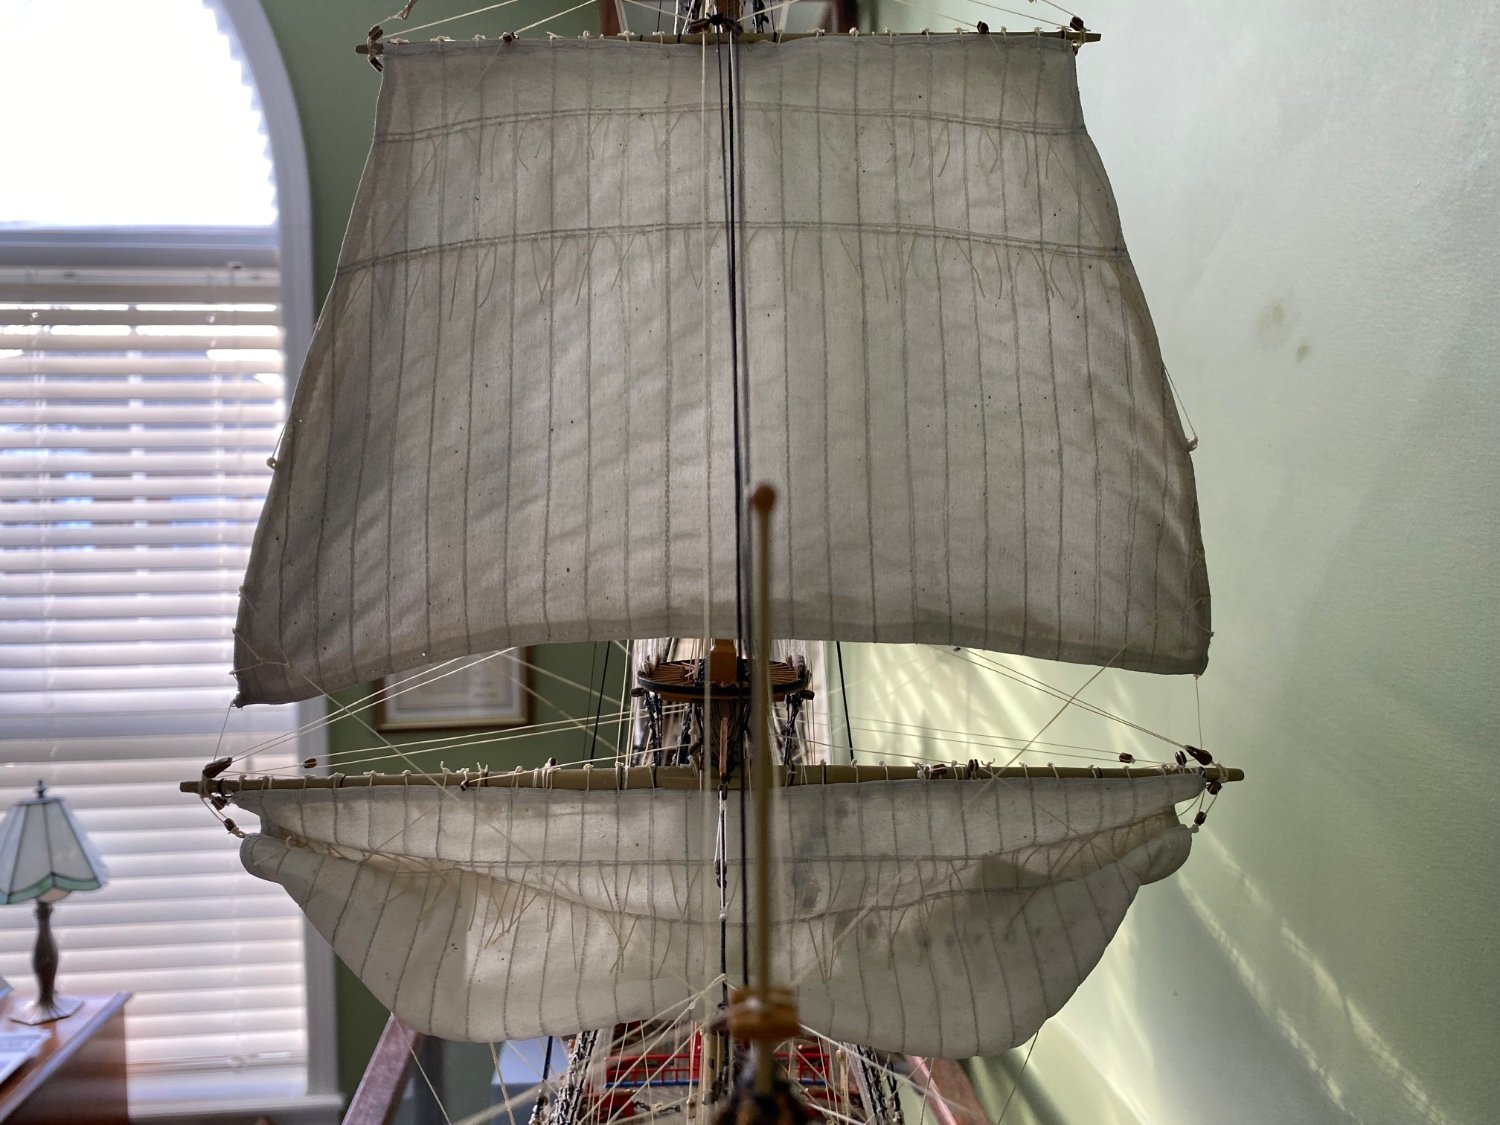
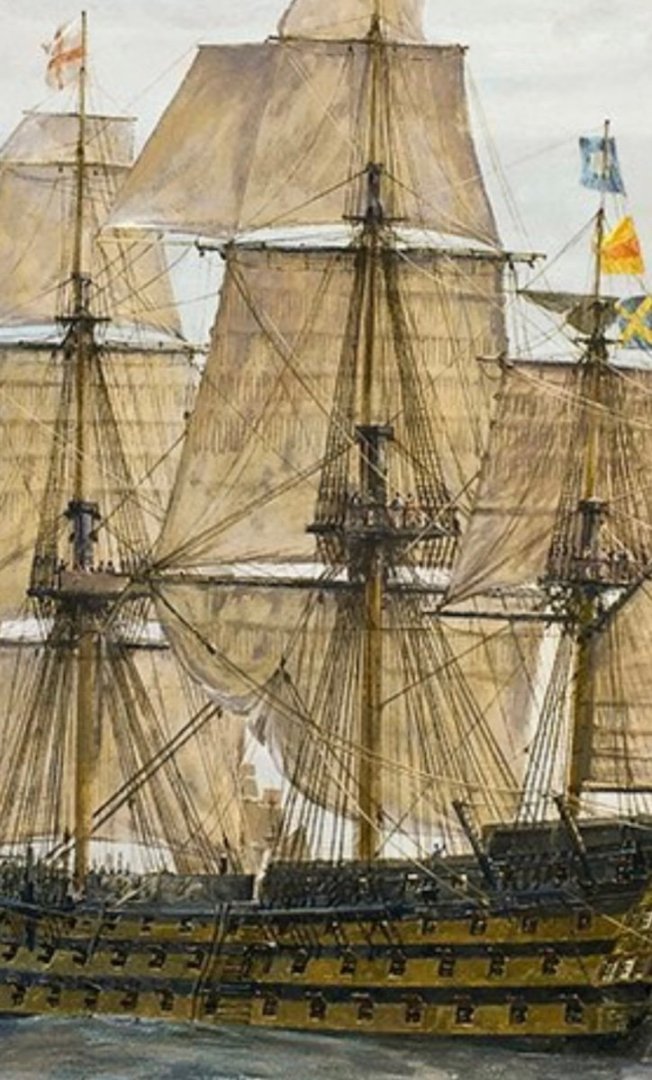
Great. I got that now. How about leach lines and bunt lines? Leach lines attach to the leach (side) of a sail and buntlines attach to the bottom of the sail? Both have the same purpose to help haul in the sail? I found this helpful reference photo.

-
You’re right Henry. I am still memorizing these rigging lines, especially the ones attached to the sails. I got the sheet, tack, bowline (now), bunt line, and reef tackle down pat. I still am a bit confused the difference between clew line and a clew garnet.
-
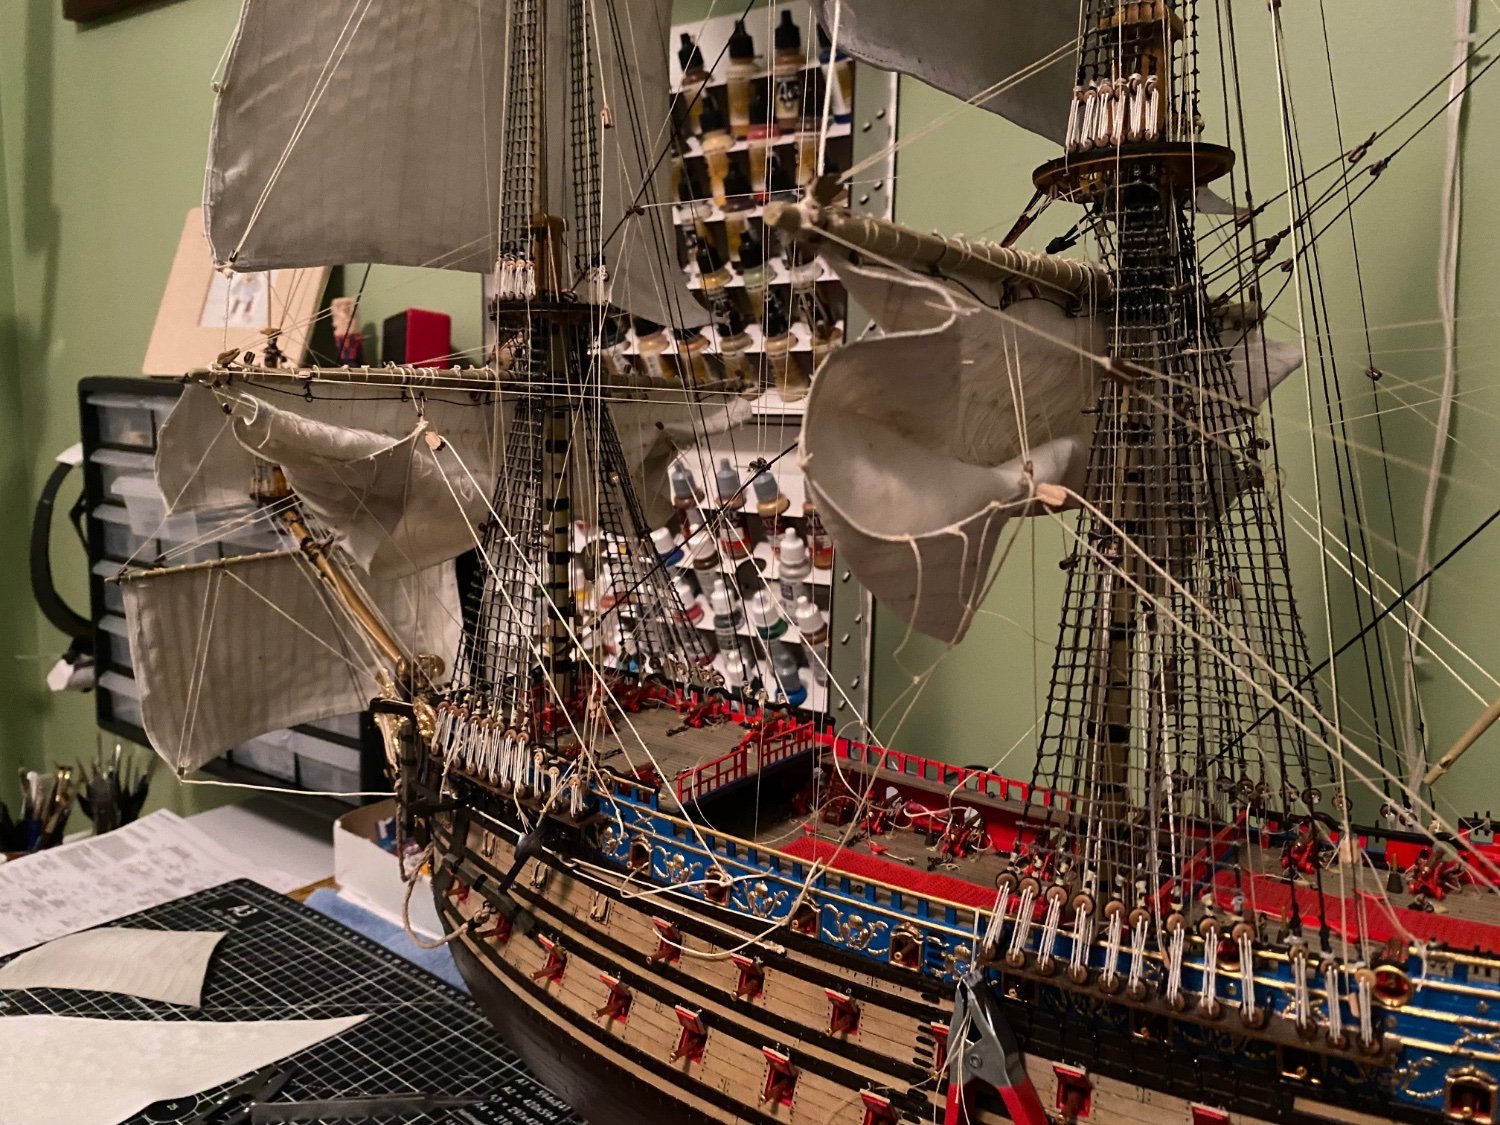
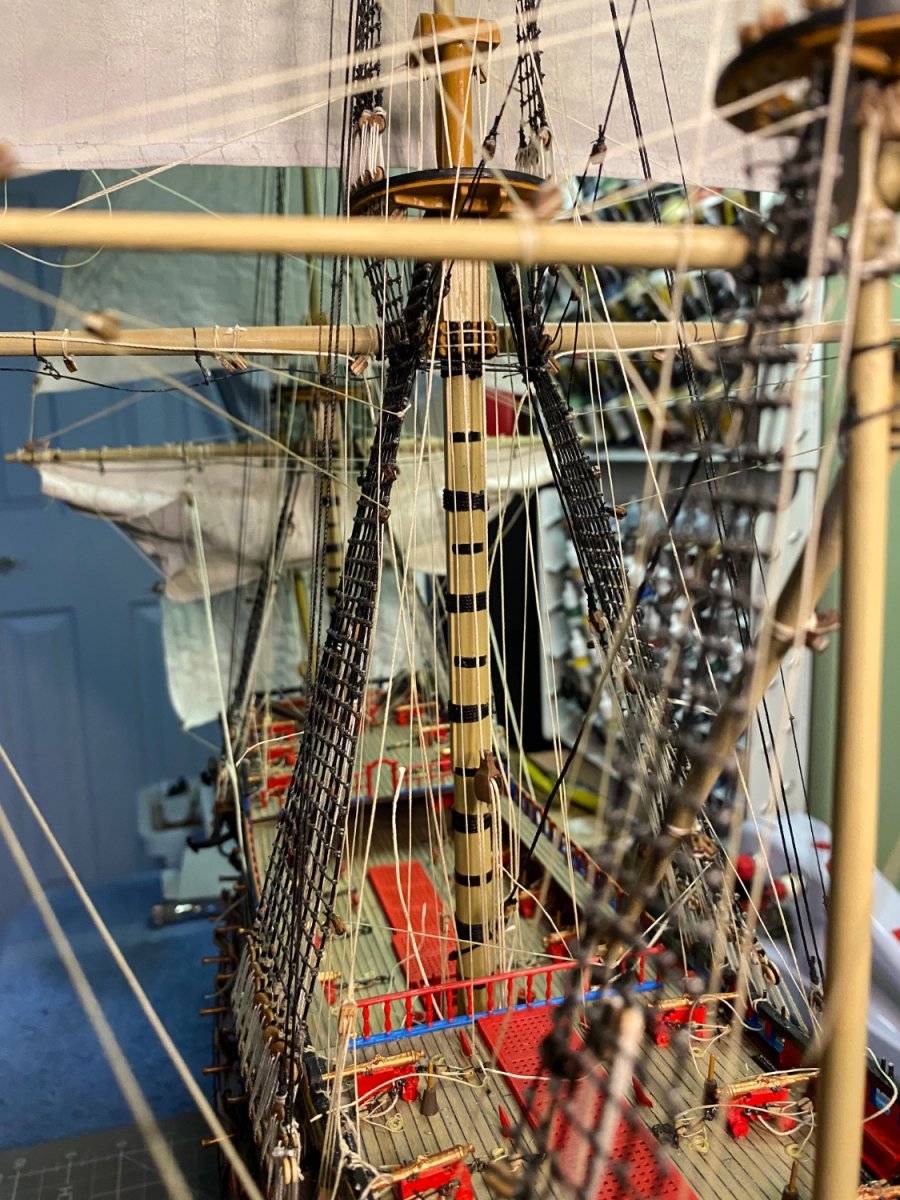
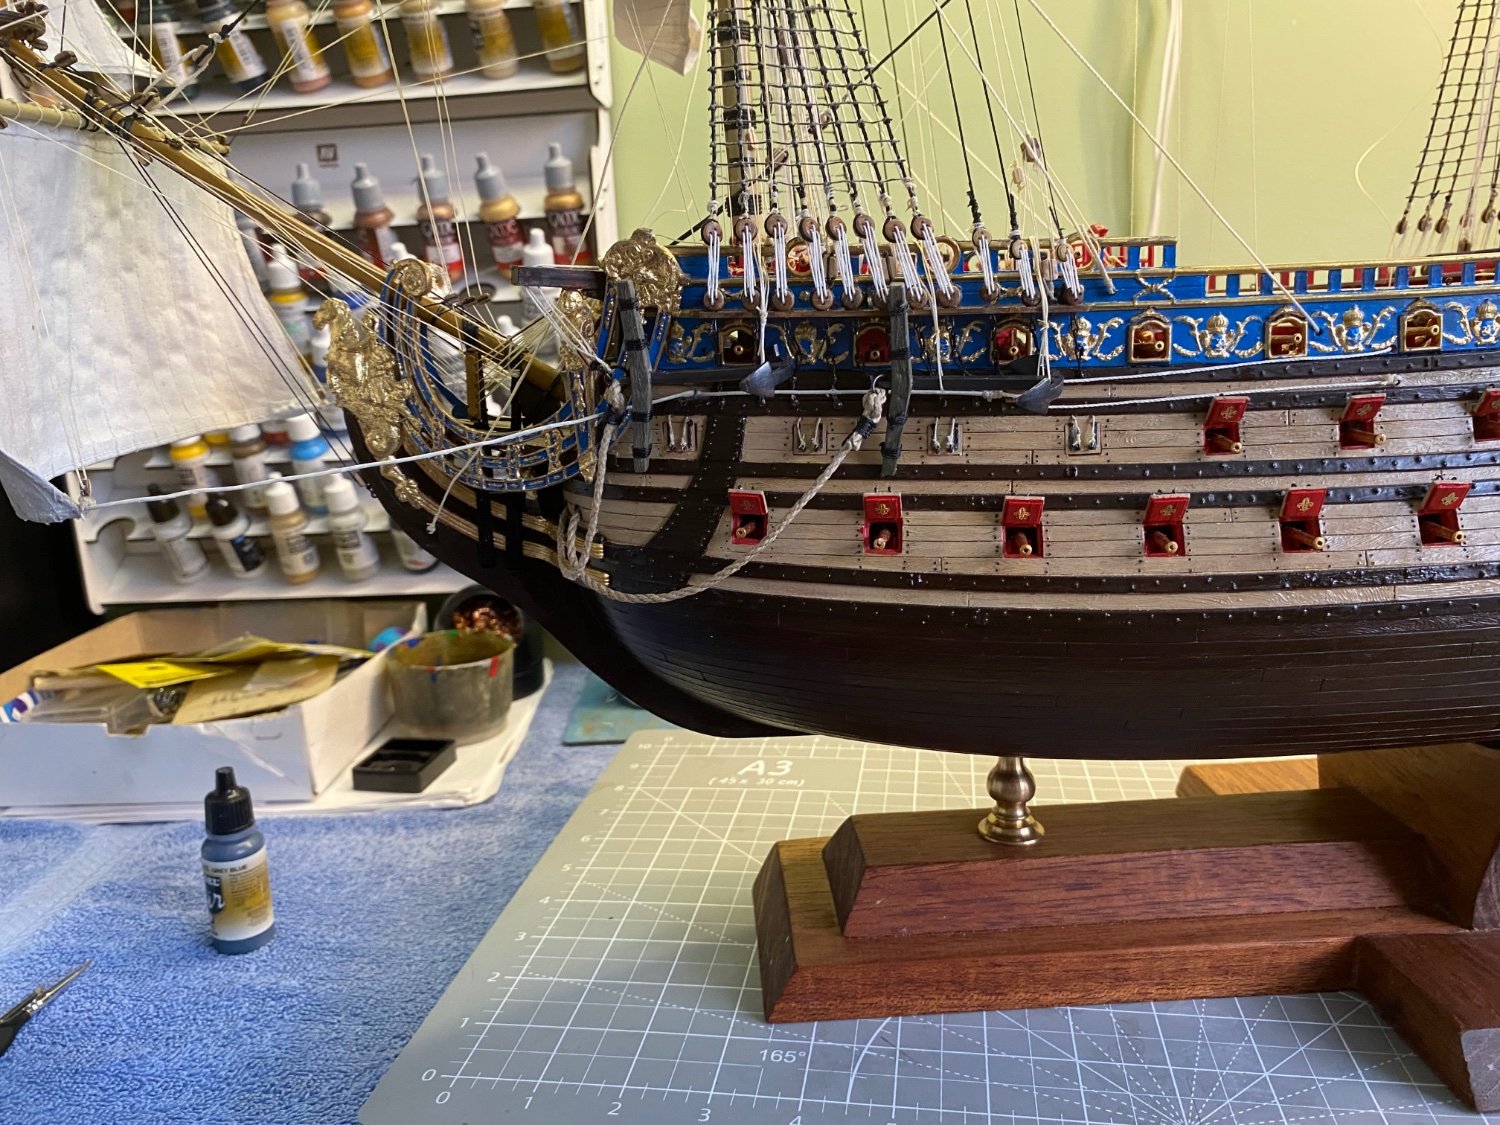
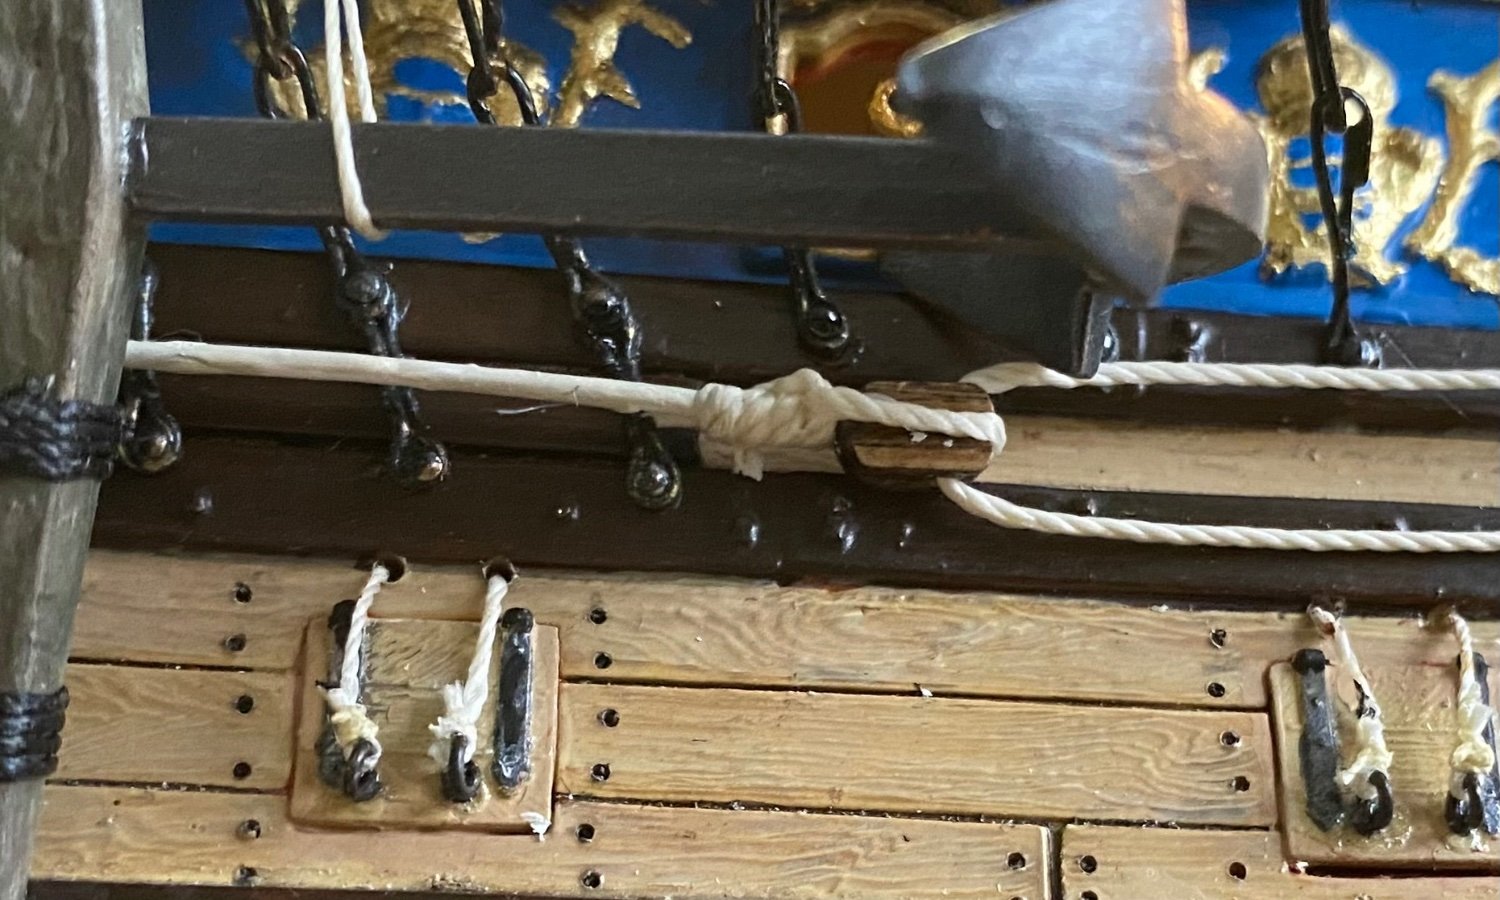
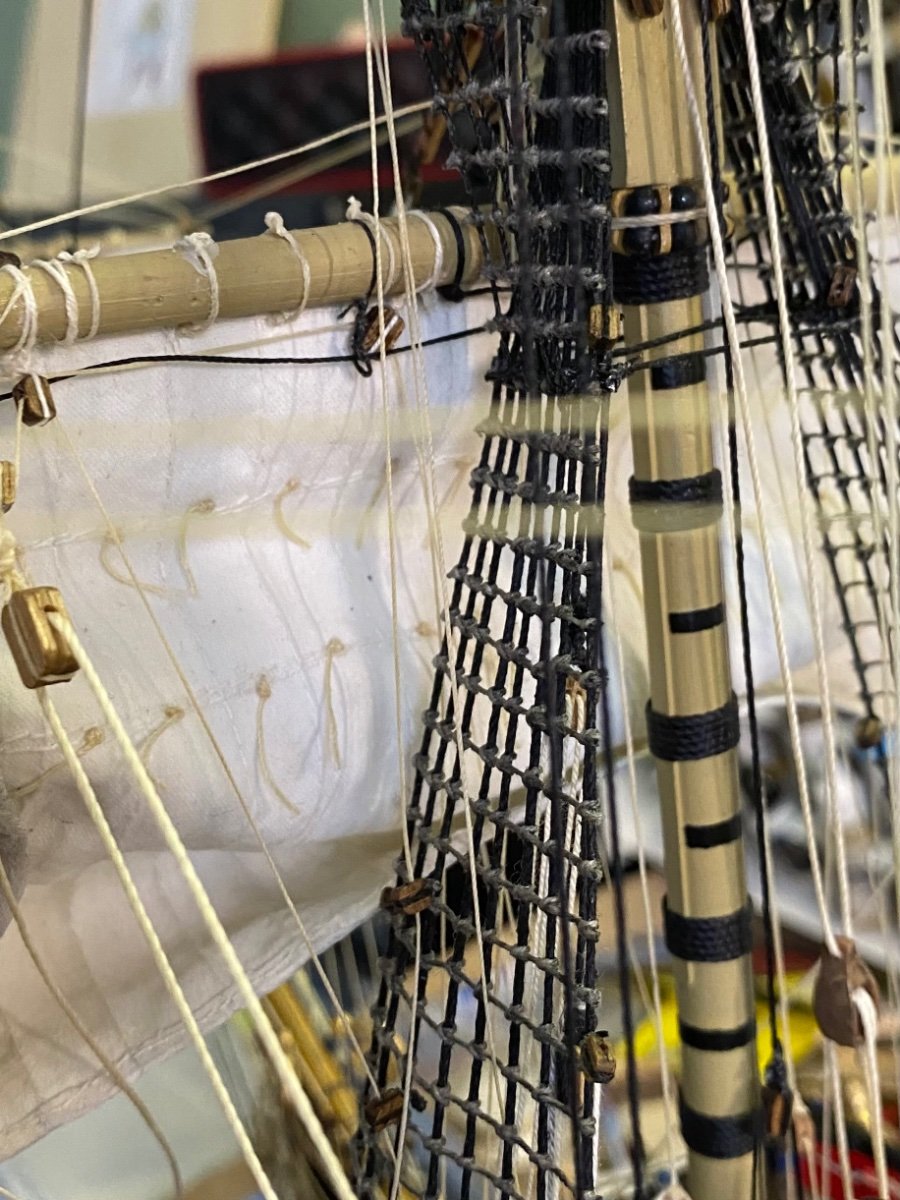
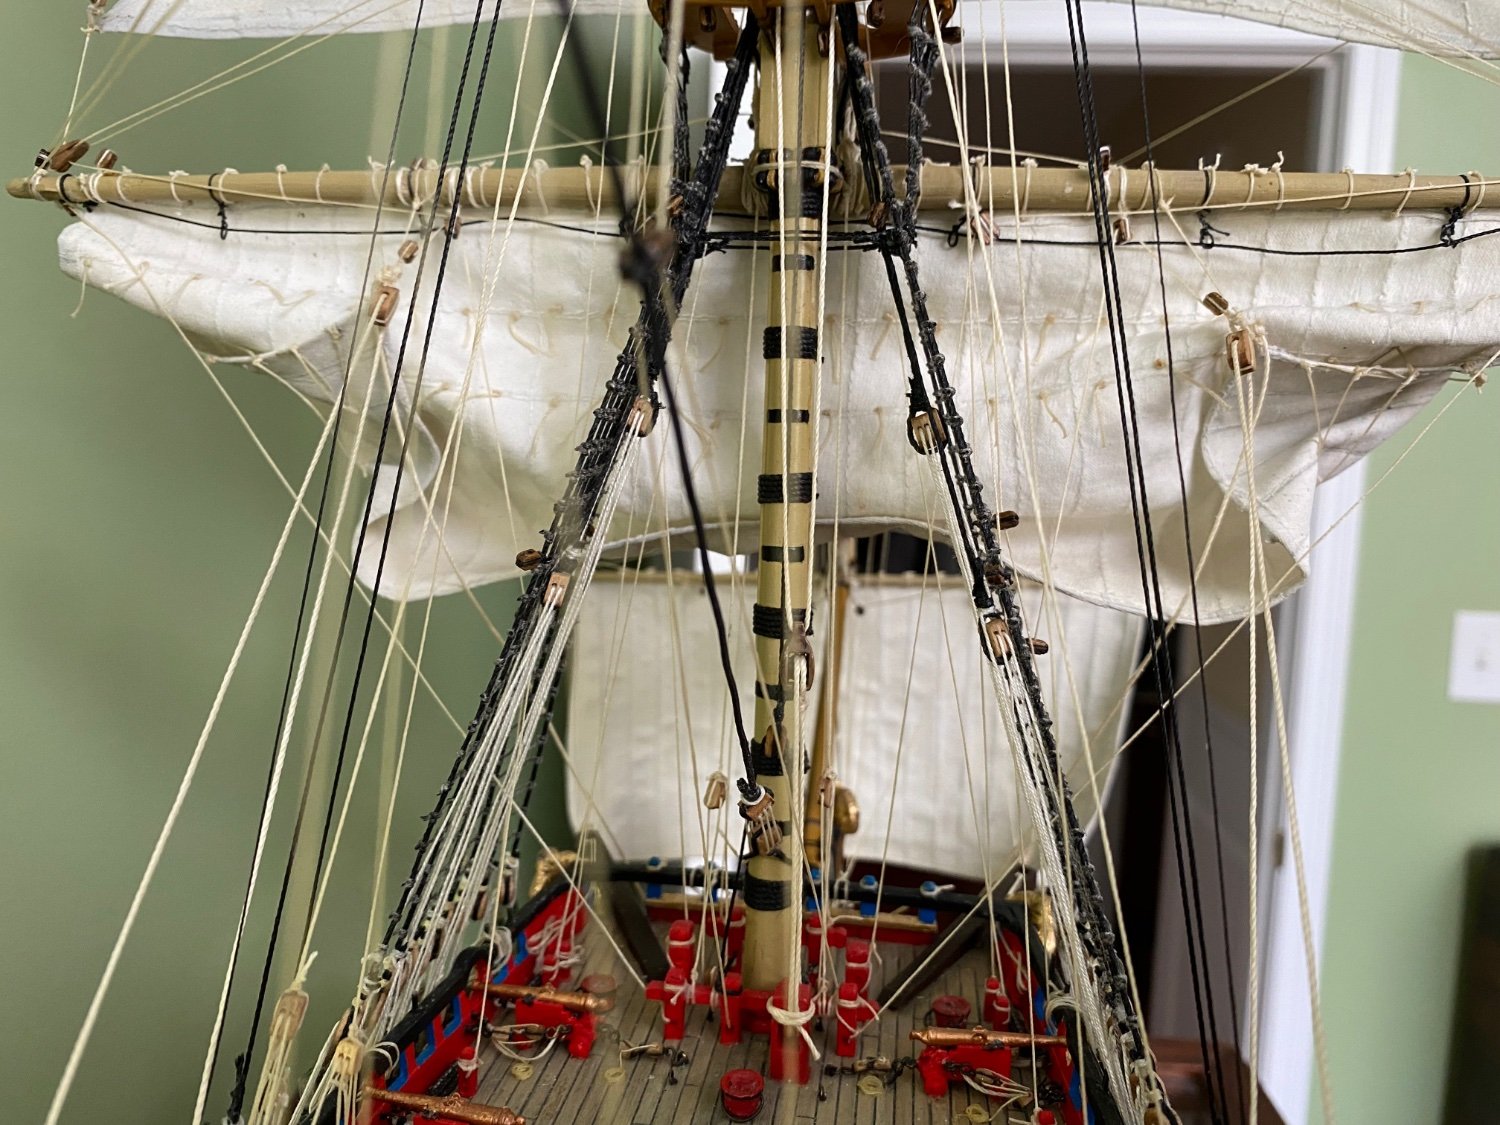
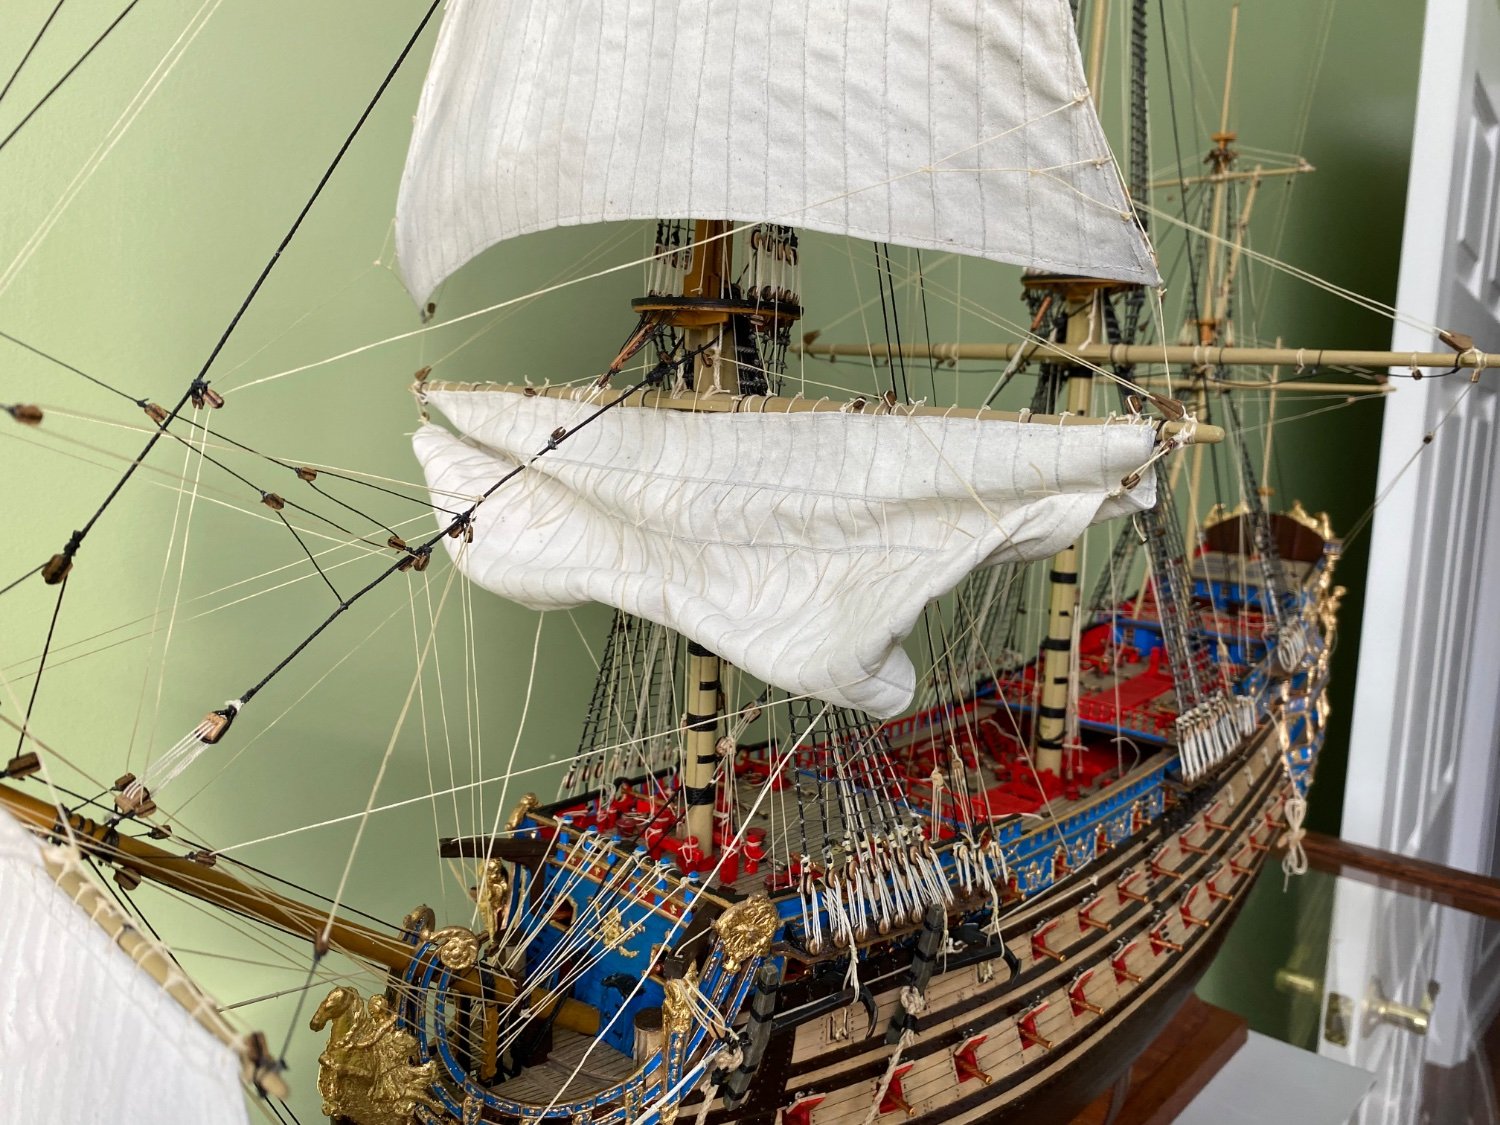
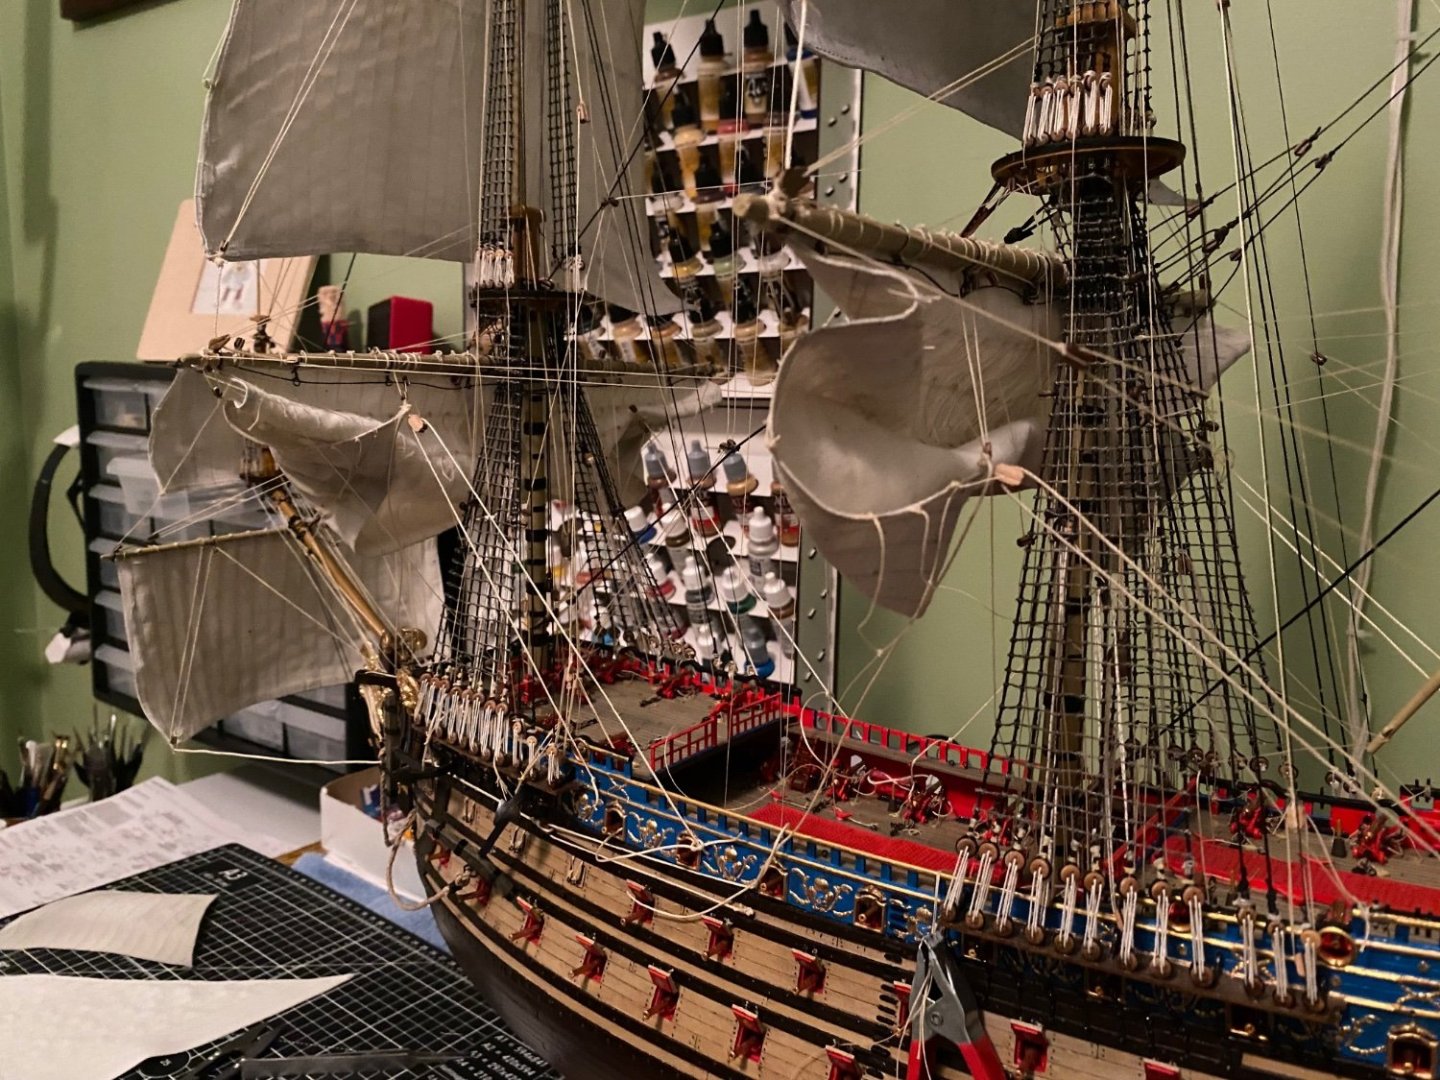
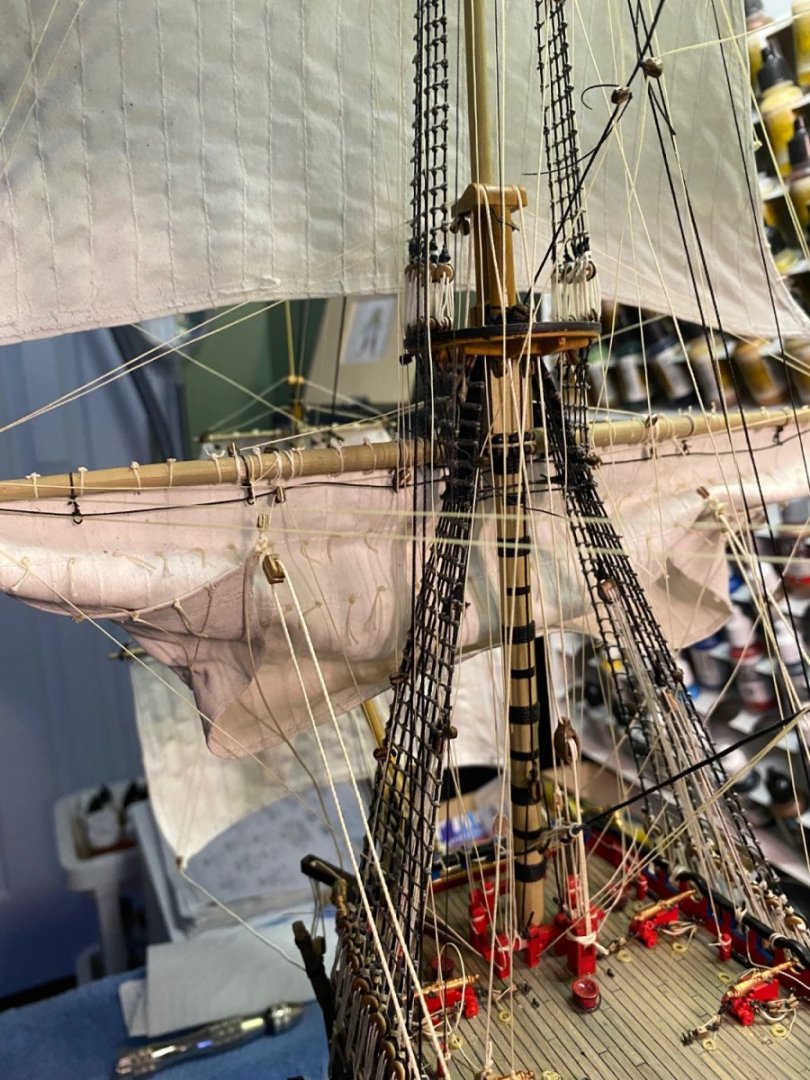
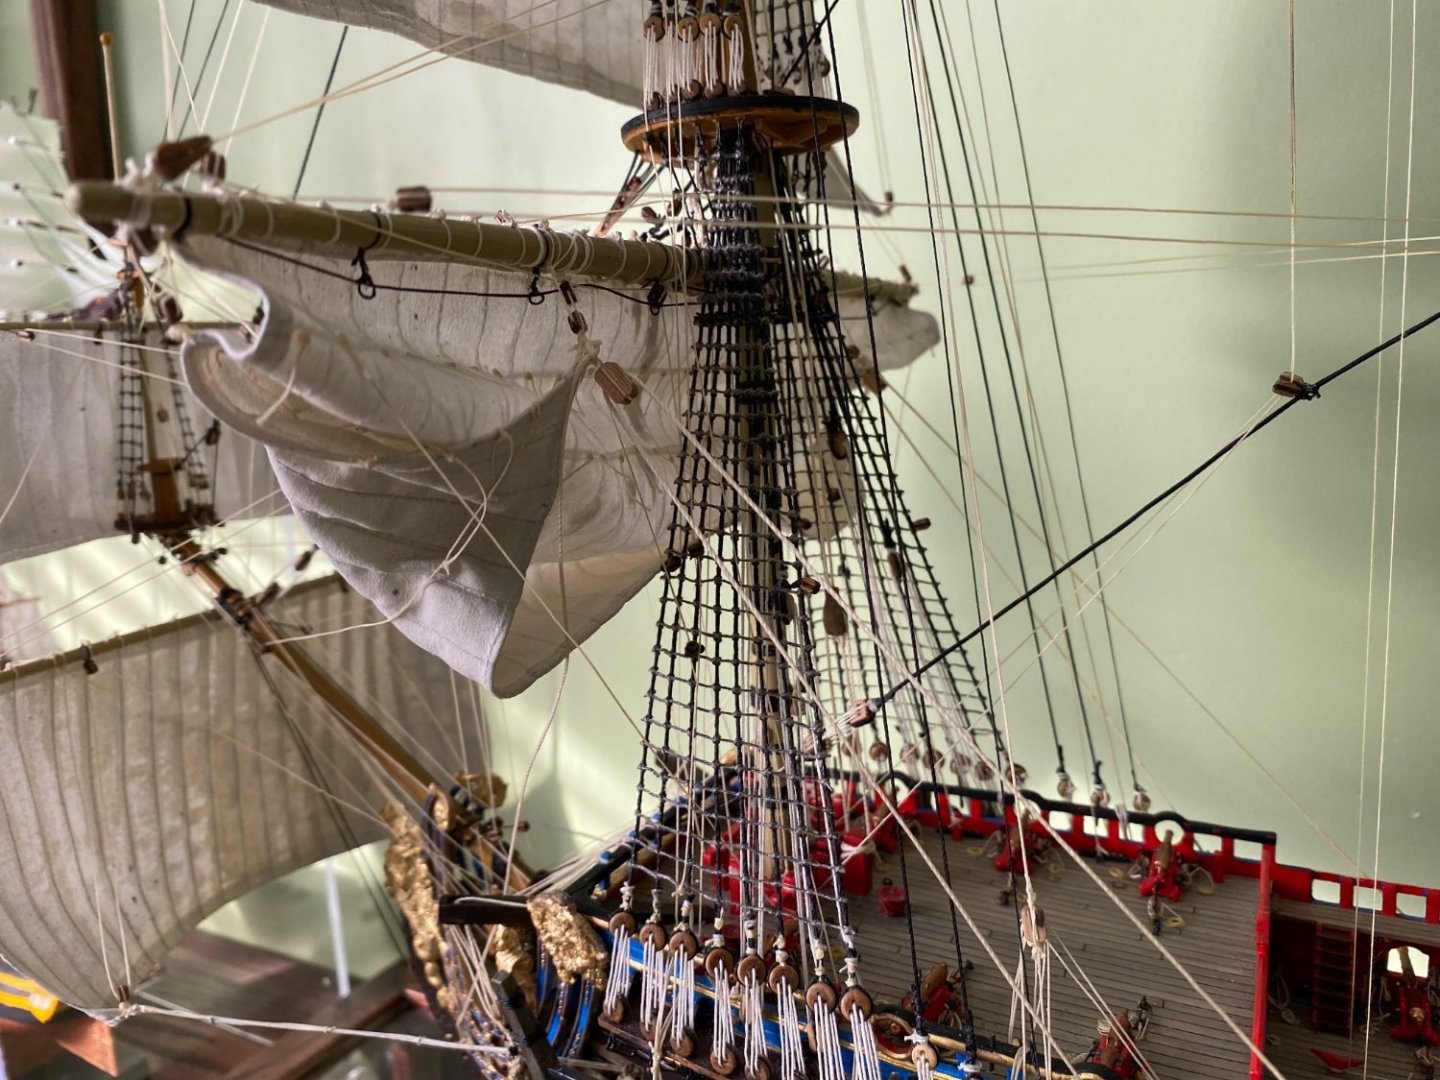
Thanks Marc and Henry for your comment and emoji. As you can see in the next to last photo above (the one that shows the area between the fore and main mast), the buntlines off the main topgallant sail and the topsail are giving me grief over how they bend the stays they tie too. I know we discussed this way back in my build. I have loosened and tied, loosened and tied. I am thinking the buntlines probably were not taut on an actual ship but just more controlled the sail. So I am thinking I will allow a little slack in them so as to not bend the stay. I have the topgallant buntlines about as good as I can get with the stay. Just a slight bend in the stay. Still some tuning to do on the top sail buntlines and the stay. A bit to much zig zag for my liking in the stay.
- 1,503 replies
-
- 1
-
-
- Le Soleil Royal
- Heller
- (and 1 more)
-
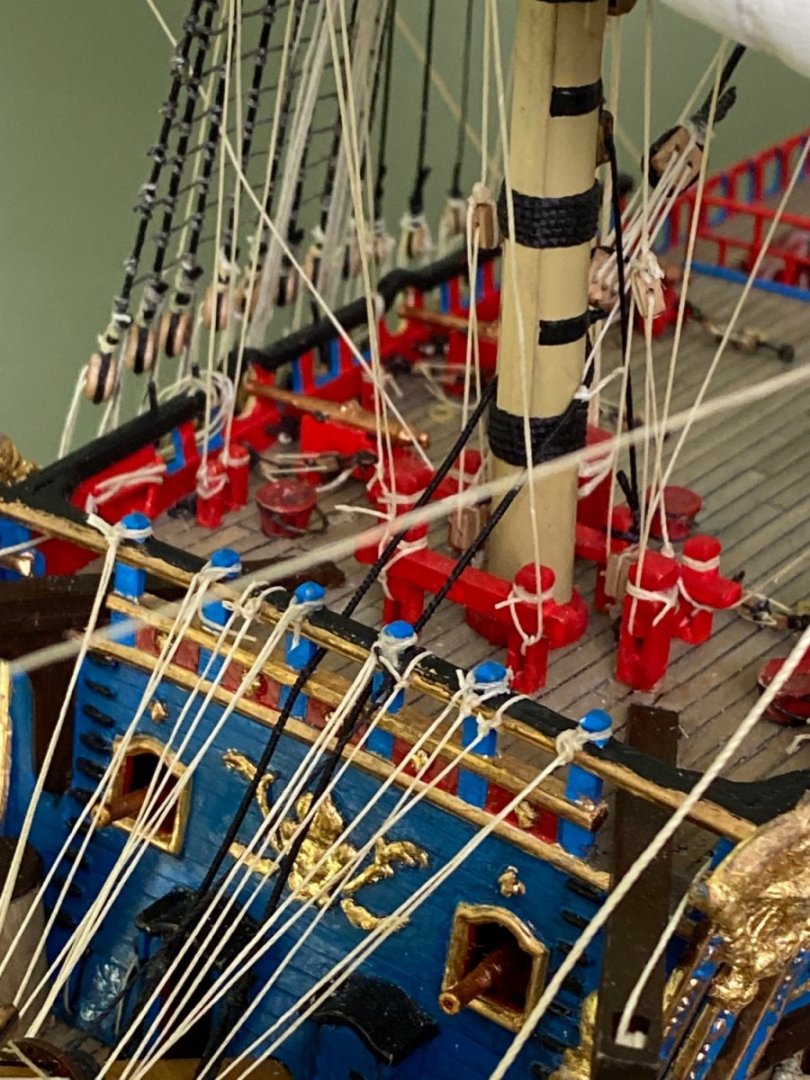
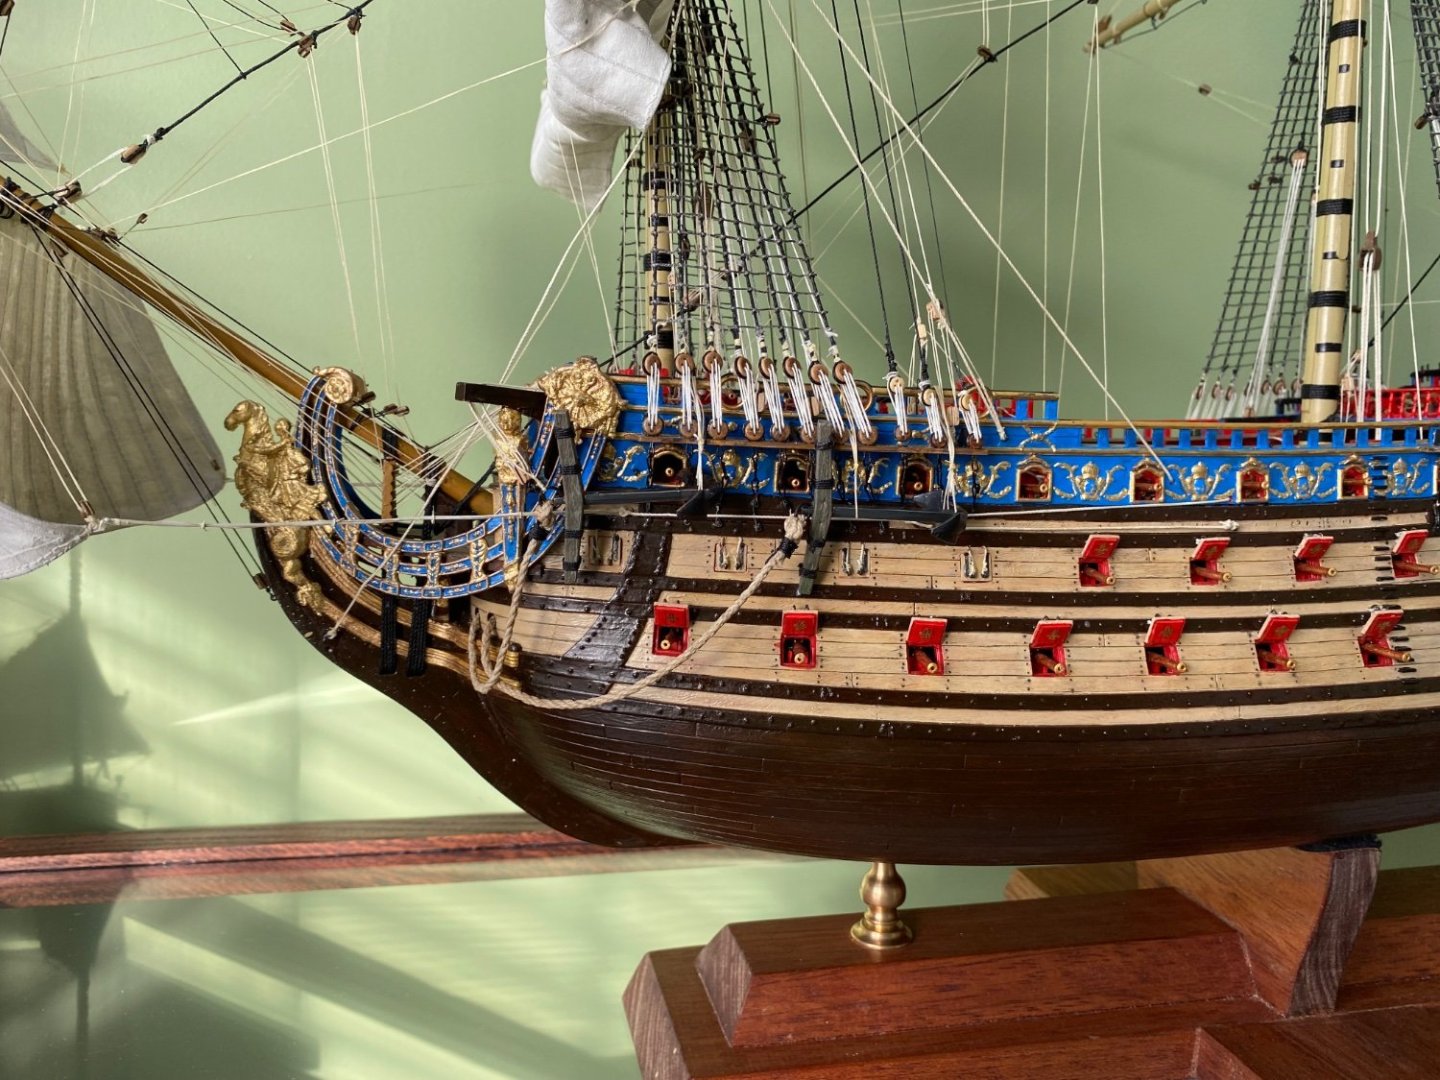
This rigging is getting intense!!! Of all the things I did to change the kit one that I am really glad is the belay points on the top of the bulwarks. Way back in the beginning I cut off all the plastic molded nibs on the rails and replaced them with strong blackened wire. The number of times I have tied and untied a line, as well as the tension I have applied would have destroyed the plastic belay points. Running rigging with sails is a true labor of love. Almost ever time I finish a line I discover it crossed another line and I have to redo it and lace it perfectly down from high in the masts to the deck. I truly find this a beautiful piece of art seeing all these lines running throughout the ship, and now as I have gained nautical knowledge knowing they each serve a very important function.


- 1,503 replies
-
- 5
-
-

-
- Le Soleil Royal
- Heller
- (and 1 more)
-
Robert I continue to read through your build over and over. Your progress photos are extremely helpful. I kind of wish I could just print your build blog for a handy book to use as reference when I start my Endeavour probably sometime in February. A lot of great photos that give me ideas of items I need to purchase in advance. Definitely I will need more small clamps than I currently have! I have a couple easy questions I hope you can answer. What wood glue did you use? I have the wood glue I use in furniture making but am curious if that is appropriate for this use. Also the big question that will have a bearing on if I stay married or not 😀. As I mentioned before, and you said as well, this will be my first wooden ship. All of my builds in the past are plastic. I realize there will be a great deal of sanding on the hull once planking is done along with shaping the stern and bow. I will definitely do that in my shop. But other than that does building this ship creat a large amount of saw dust? My build room in my house is the same room where I display my ships. I just wonder if I am going to constantly have a dusty mess?
-
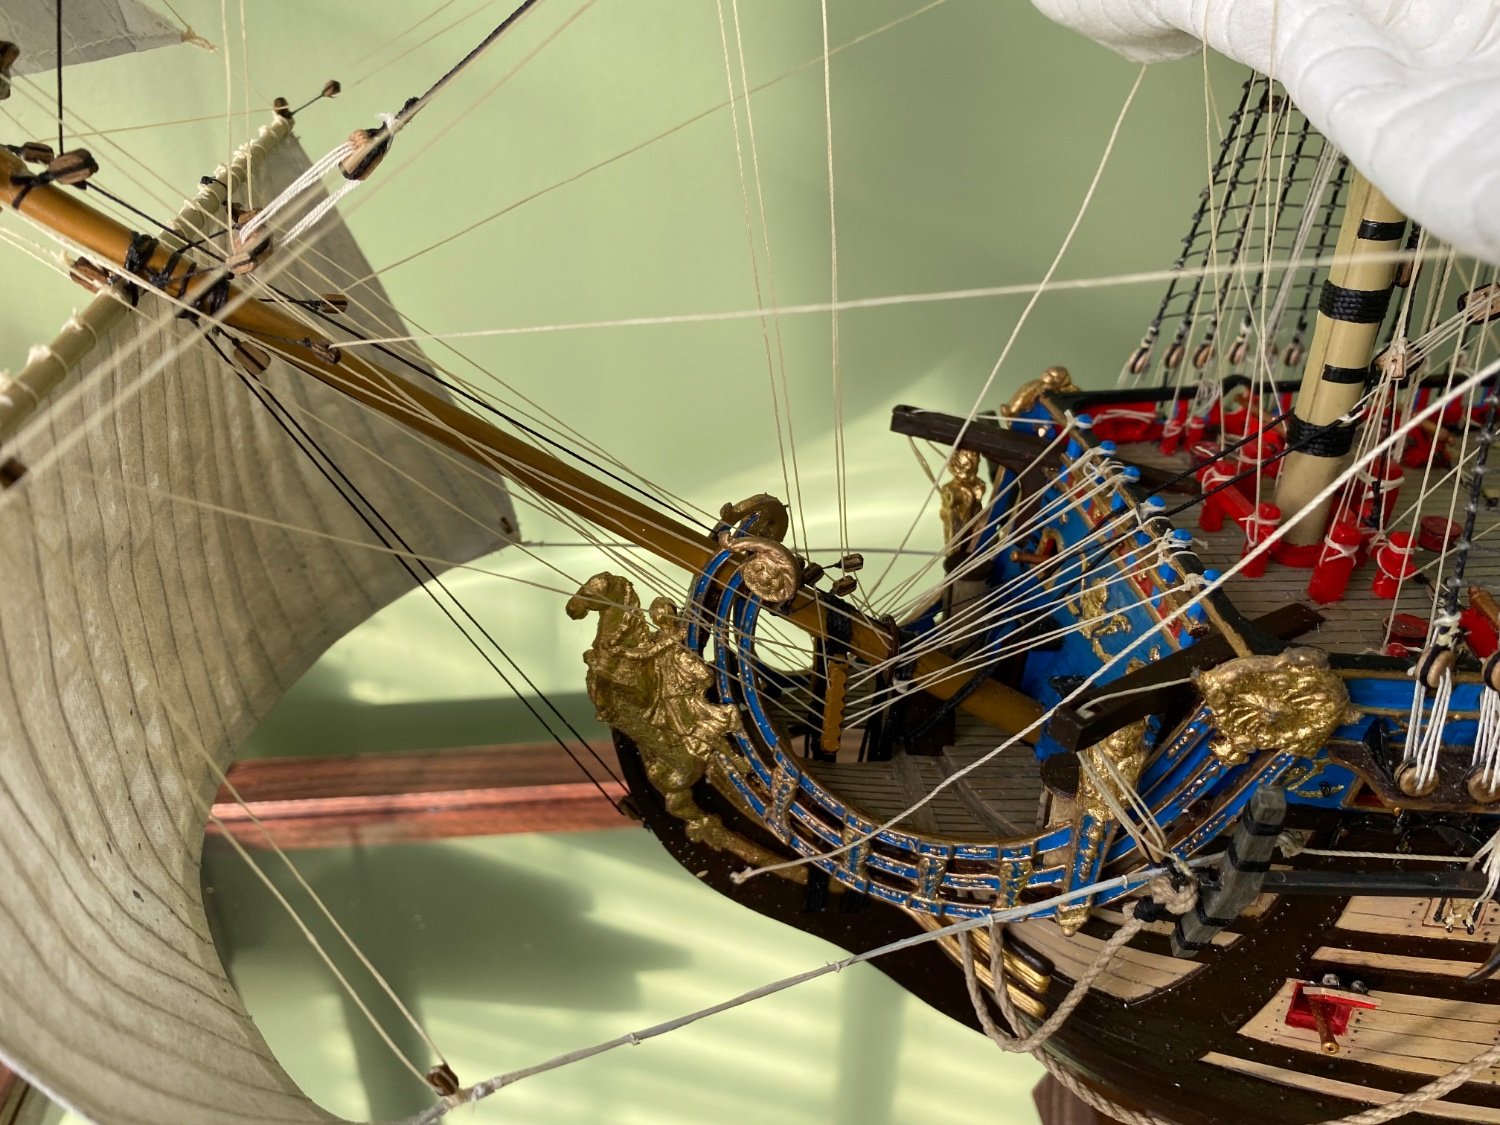
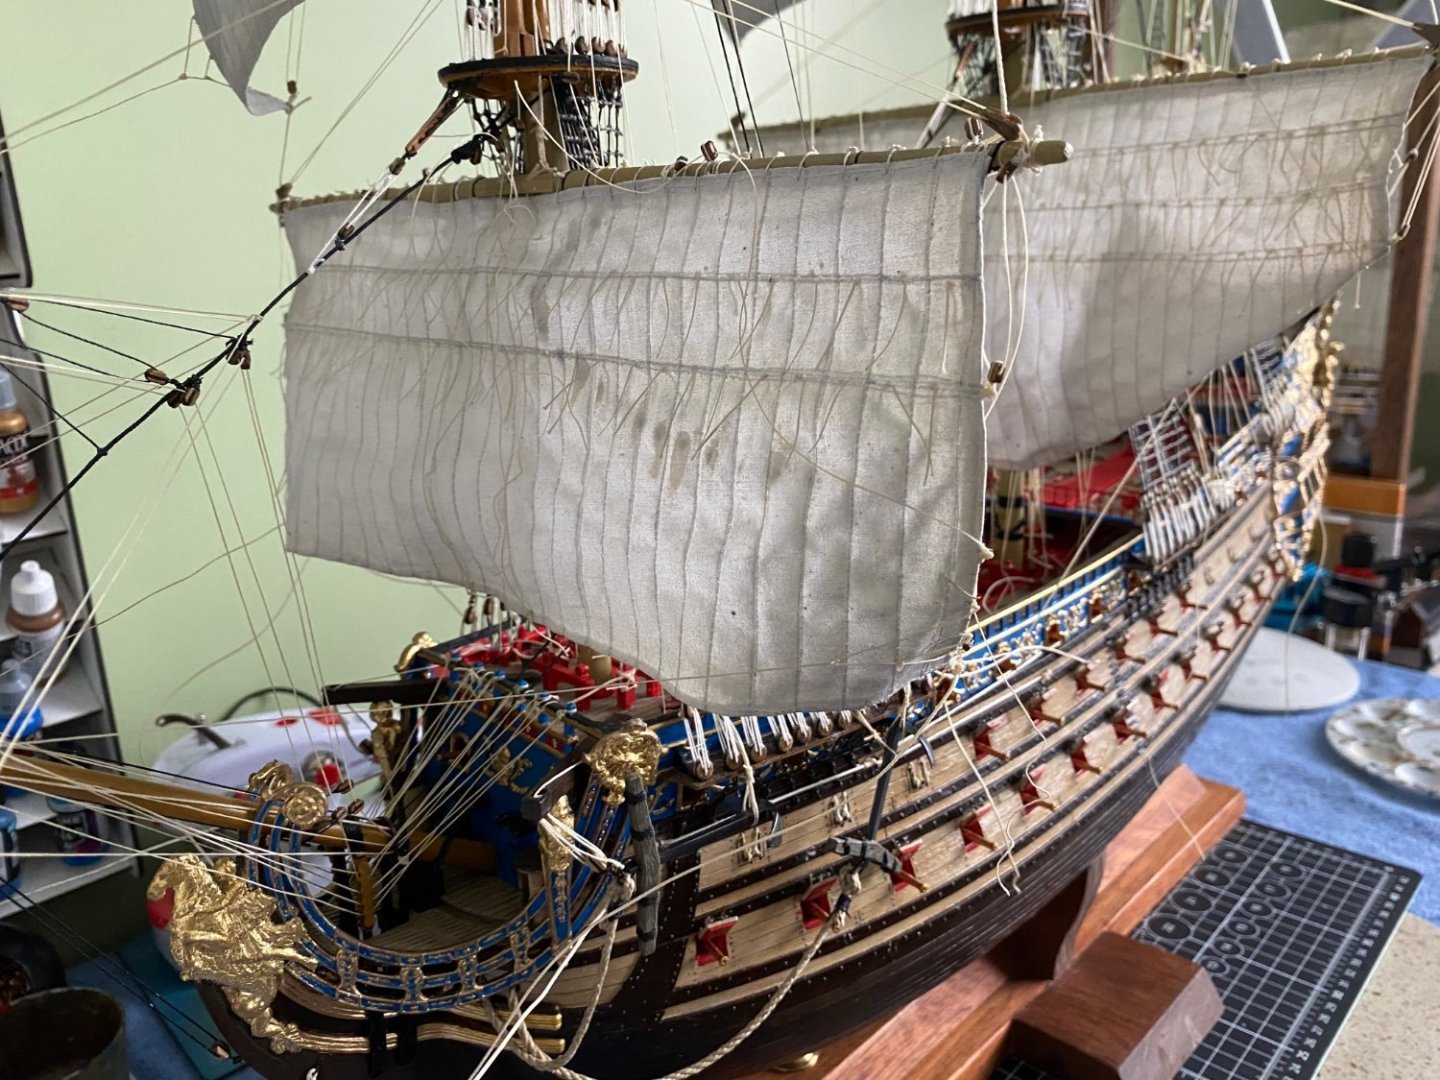
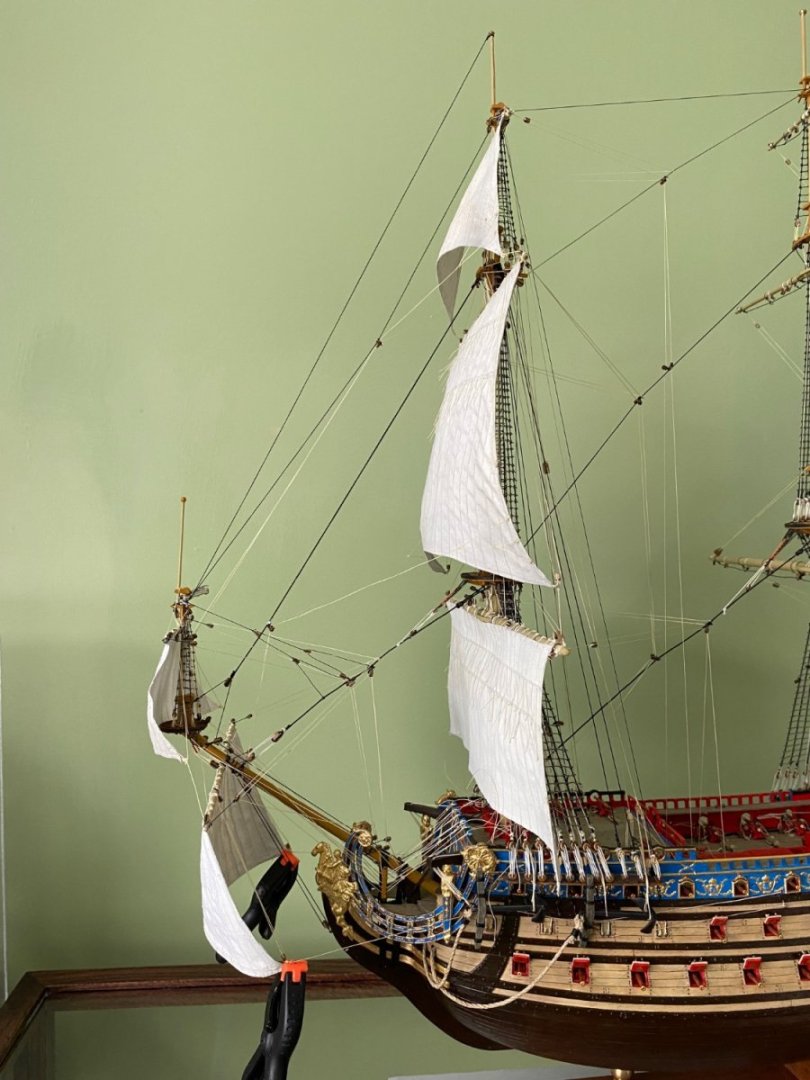
Went back and modified my spritsail sheet after I removed the spritsail because I insulted it backwards. This time I used a piece of 18 gauge wire and ran it all the way from the clew of the spritsail through the eyebolt in the hull and back to a point where it met up with the spritsail sheet tackle. I drilled a hole in the end of the block and using CA glued it to the end of the wire. I then rigged the rest of the sheet as I normally would using the same size thread (4.5mm) as the 18 gauge wire. I painted the wire a color as close as I could match the thread. The spritsail now has a nice billow and the sheet is taut. With the fore yard sails rigged I am making and installing the main yard sails.


- 1,503 replies
-
- 2
-
-
- Le Soleil Royal
- Heller
- (and 1 more)
-
Perfect Henry. Thanks. That is what I have. In a few instances there are lines that reeve through blocks on the outside of the shrouds in route to belay point. I was just curious if that was the proper case for crewman climbing the shrouds to occasionally encounter a rigging line or block?
- 1,503 replies
-
- 1
-
-
- Le Soleil Royal
- Heller
- (and 1 more)
-
My friends I have a general rigging question I have not given a lot of thought to. In running rigging if there is a line that comes down from the top sail or topgallant sail and through blocks tied to the lower shrouds and on to wherever they belay, should all those lines be routed through the opening in the mast top and belay inside the shrouds? Or are there times when it is perfectly acceptable to have lines on the outside of the lower shrouds?

-
MERRY CHRISTMAS to all my MSW friends I have developed over my modeling years. Hope you have a beautiful season! Bill
- 1,503 replies
-
- 3
-
-

-
- Le Soleil Royal
- Heller
- (and 1 more)
-
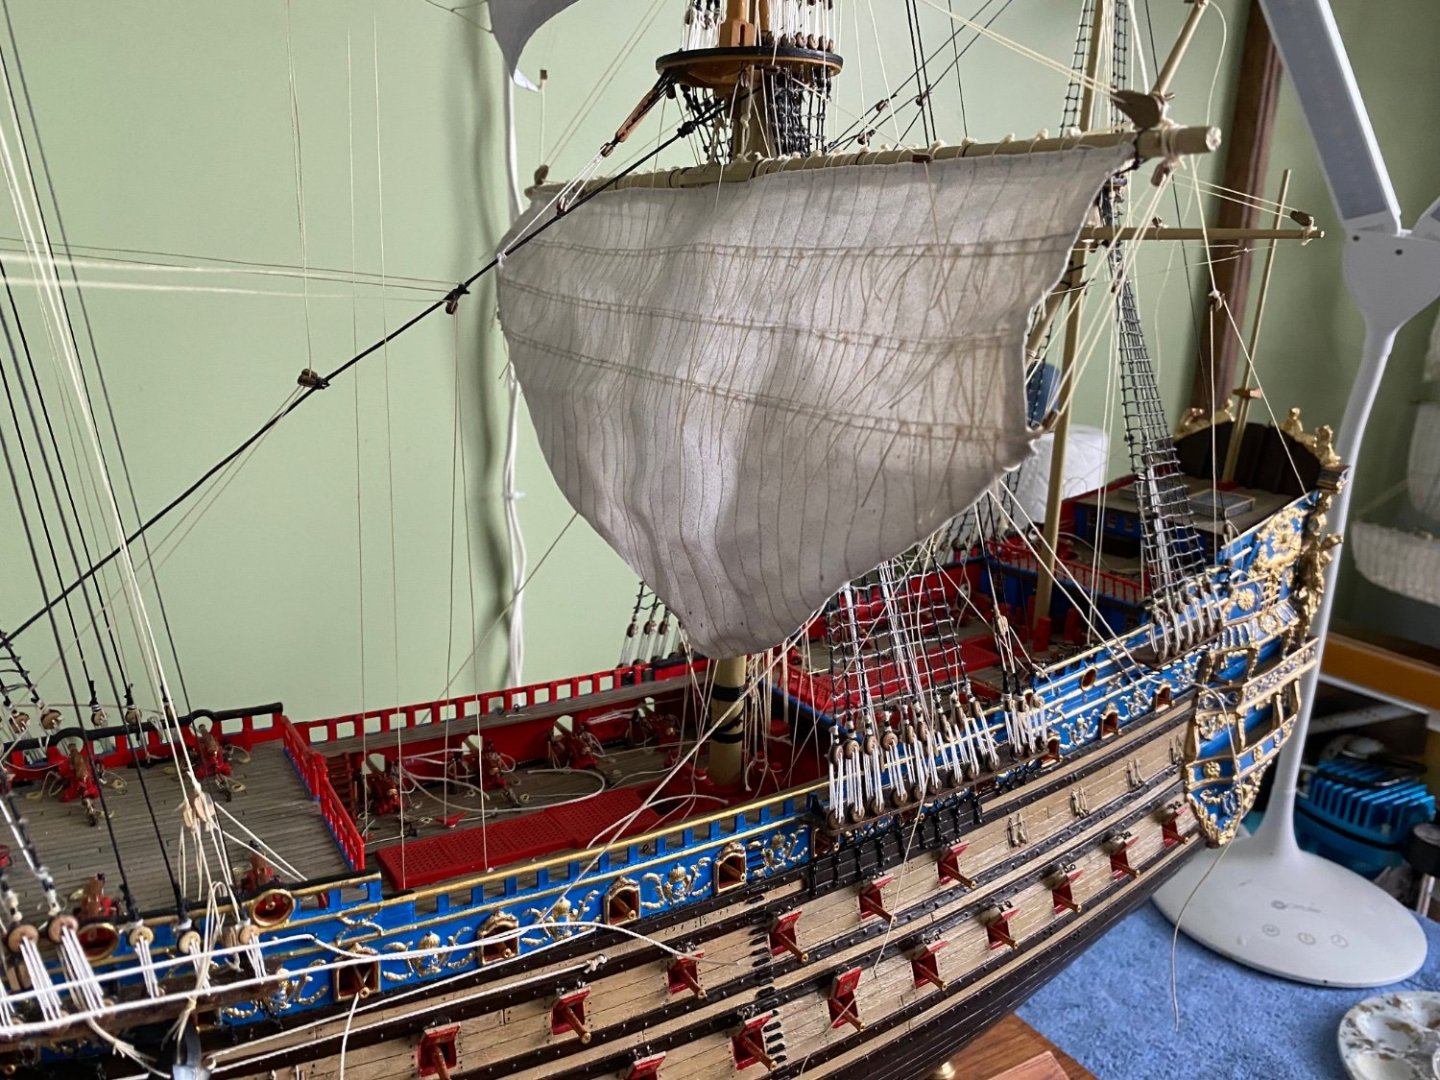
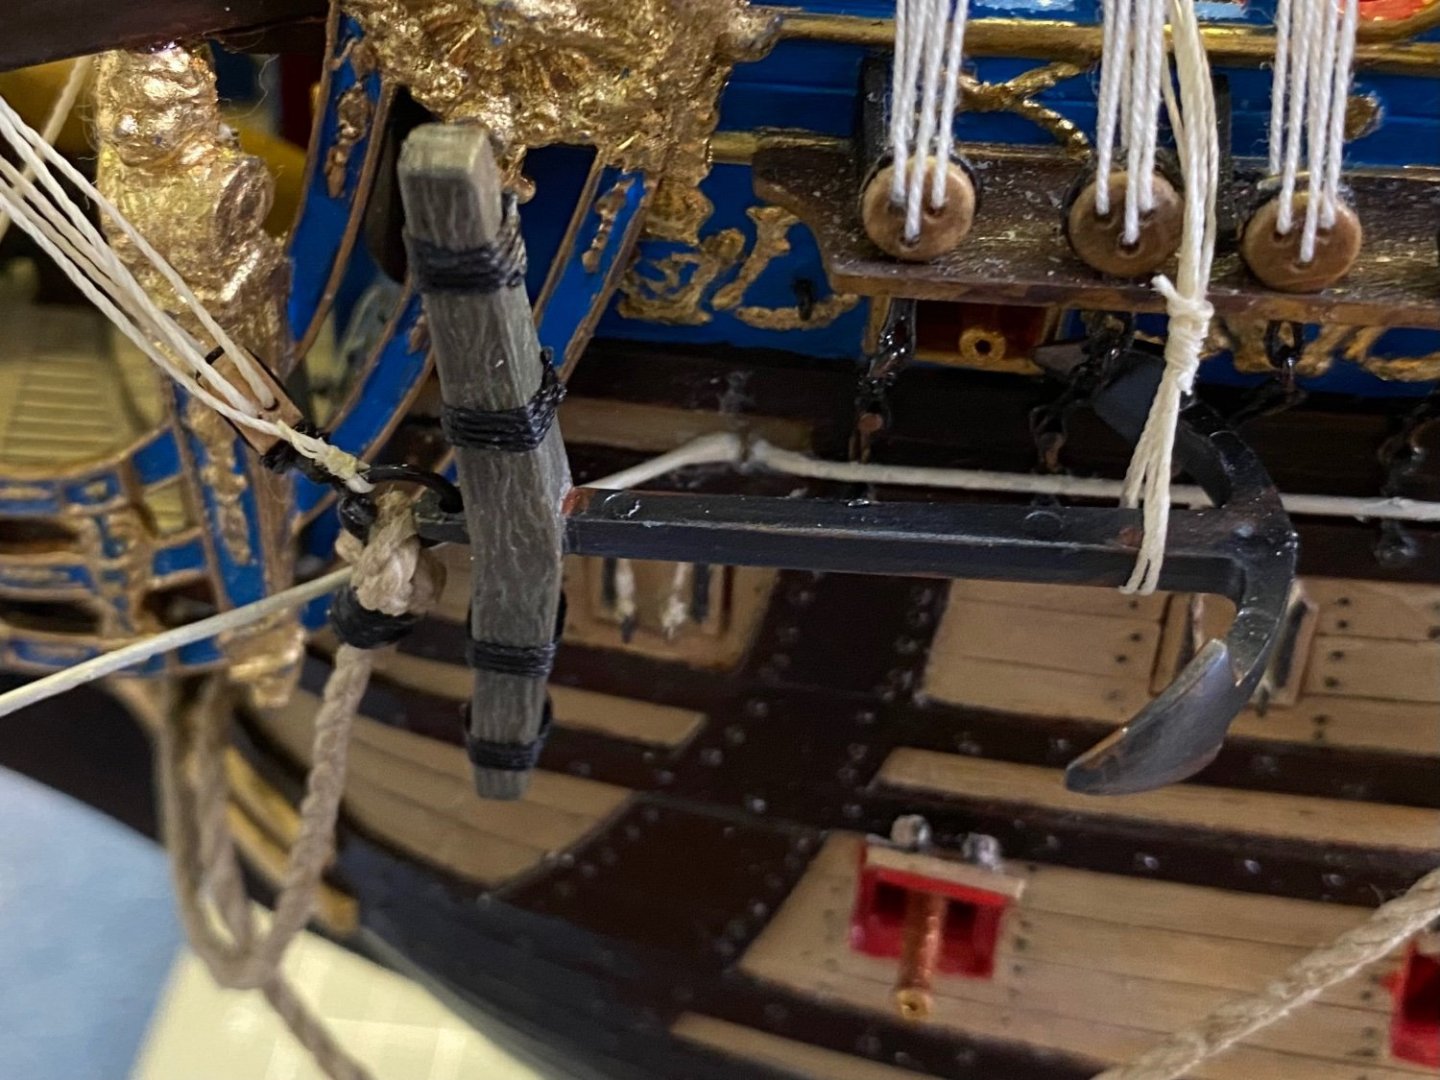
Two steps forward one step back. Looking closely at the photo you will notice I installed and rigged my spritsail backward. The hem I sewed all around the sides show to the front. Have to take it down, turn it around, rehang and rerig again.
- 1,503 replies
-
- 3
-

-
- Le Soleil Royal
- Heller
- (and 1 more)
-
Thanks Ian. Probably not by Christmas but maybe by the early part of 2024. Still a good bit of sail rigging to do and then a few odd and end things on the ship like the lanterns and such. Still have not done anything with the boats yet. Got something completely new planned after my SR for 2024!
- 1,503 replies
-
- 1
-
-
- Le Soleil Royal
- Heller
- (and 1 more)
-
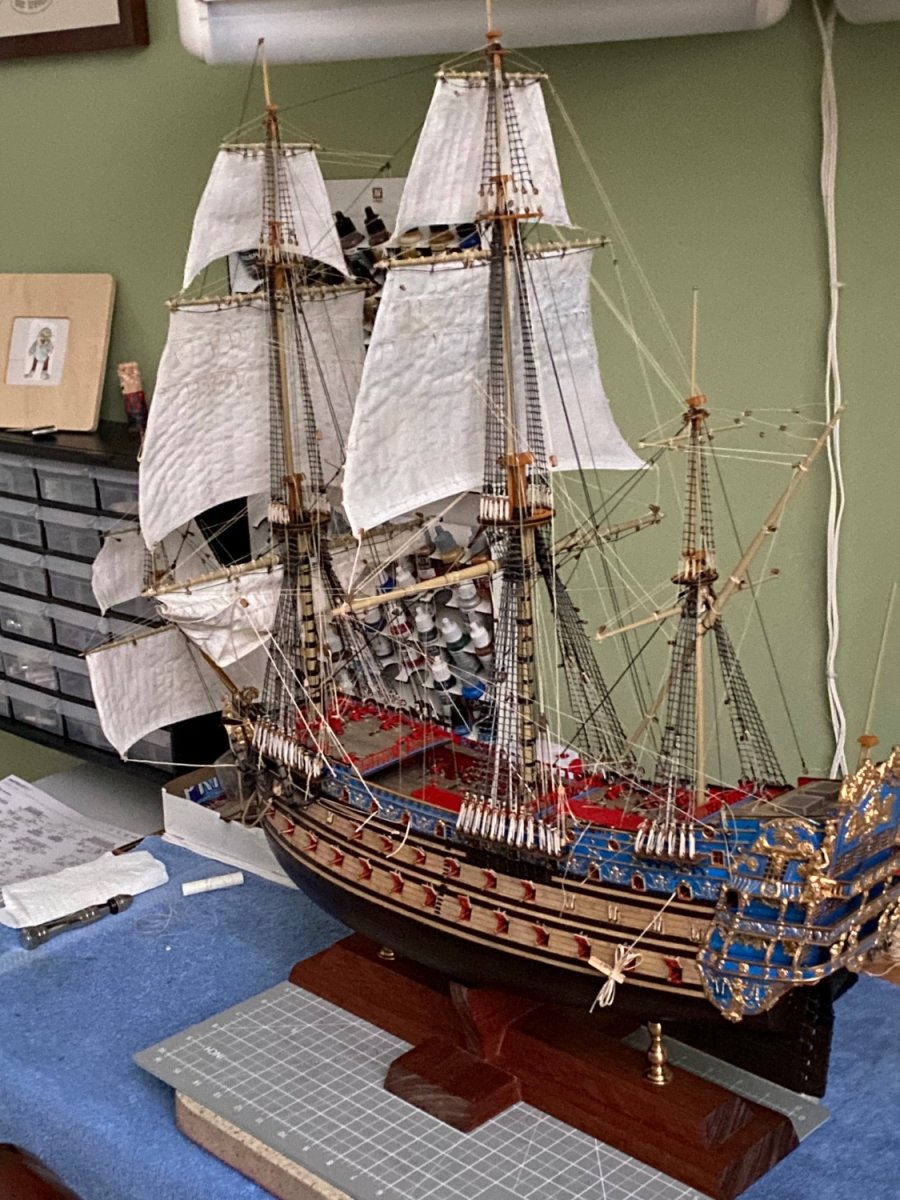
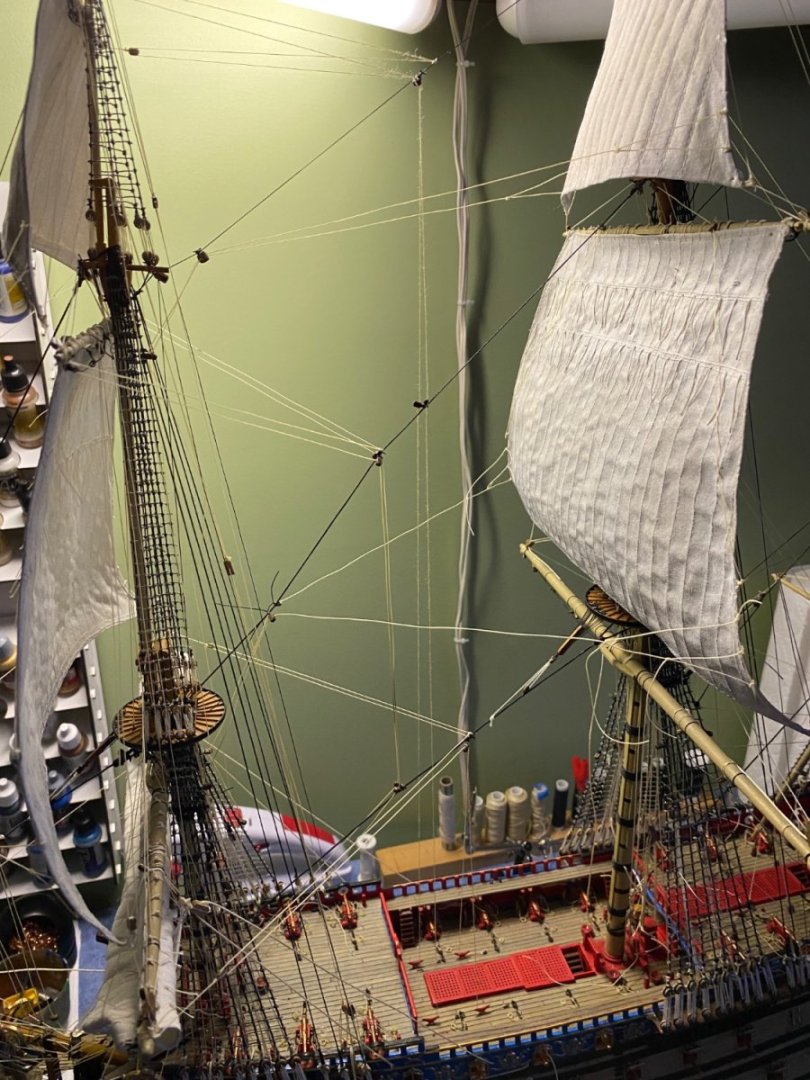
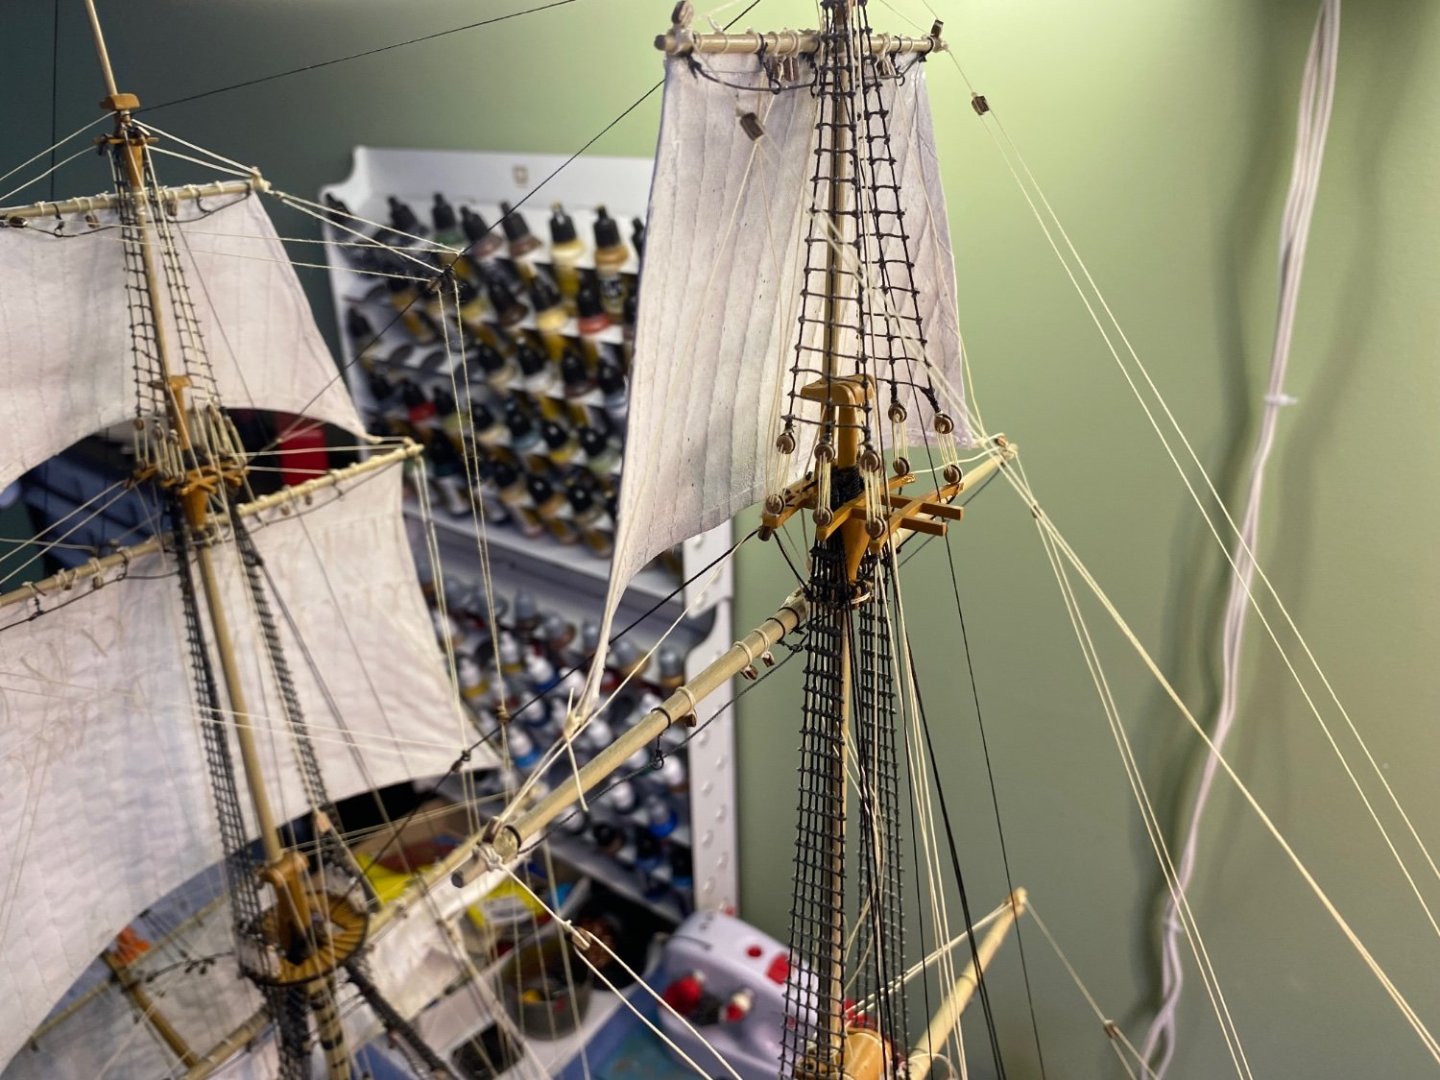
Ok here is what I ultimately did. I selected the smallest gauge wire that was still strong enough to remain somewhat stiff. I ran it along side the spritsail sheet from the corner of the sail to the eyebolt in the hull that the sheet reeves through. A touch of CA glue at each end and some thread color paint satisfactorily hid the wire. Then from the eyebolt to the block for the sheet and the sheet tackle that passes through the hole in the hull I increased the size of the thread I used for the sheet to match the combined diameter of the wire and smaller thread that runs along the wire (if any of that makes since). The overall effect appears as a thread running from the sail through the eyebolt and making the tackle. I also finished rigging all three foremast sails. As you can see in the photo I did pull up the fore sail and rigged all the lines that would have been rigged if it was set. Eventually I will go back and add coils to all the belay points.


- 1,503 replies
-
- 4
-
-
- Le Soleil Royal
- Heller
- (and 1 more)
-
Thanks Henry. I am not going to add the staysails. My attempt at using glue on the sheets was much minimally effective. My next idea is to use a piece of small gauge wire of some sort that has very little flex to it. See if I can maybe place it serve it the sheet. That may make the sheet look to our of scale and be a bad idea.
- 1,503 replies
-
- 1
-
-
- Le Soleil Royal
- Heller
- (and 1 more)
-
Ok Ian here is what I settled on. Comparing mine to the reference you attached above. I think my topgallant bowline is pretty close. My topsail bowline is a compromise of where I wish it was and where I was able to put it. I moved the blocks down the stay as far as I could with out interfering with the spritsail topmast braces. I think I have the crows feet for the spritsail topmast a bit future up the stay than your example. I don’t really want to change that. Took a good while to get it just right. Where it crosses the stay also presented limits on where I could move the bowline blocks to. I think it all works out OK. I also loosened the sheets for the spritsail as you recommended. This results in a conflict with my OCD type A personality. There is nothing that creates resistance against the sheets. As a result they hang loose and unnaturally. If there was a bit of wind in the sail as the billow I have molded reflects, the sheets should be somewhat taut, I would think. I am attempting the idea of coating the sheets with white glue and the weight of the clips while it dries to see if this adds some stiffness. We will see. No idea how the builder of the model in your photo achieved the taut sheets.
- 1,503 replies
-
- 3
-
-
- Le Soleil Royal
- Heller
- (and 1 more)