MORE HANDBOOKS ARE ON THEIR WAY! We will let you know when they get here.
×


Keithbrad80
-
Posts
416 -
Joined
-
Last visited
Content Type
Profiles
Forums
Gallery
Events
Everything posted by Keithbrad80
-
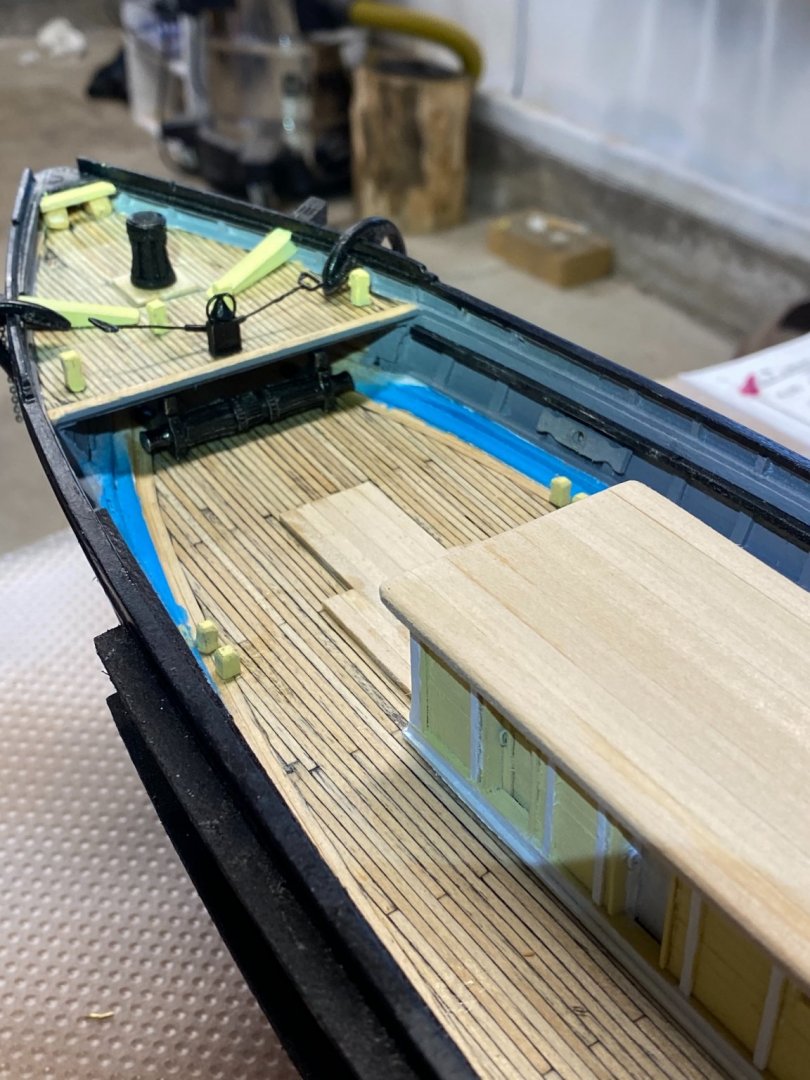
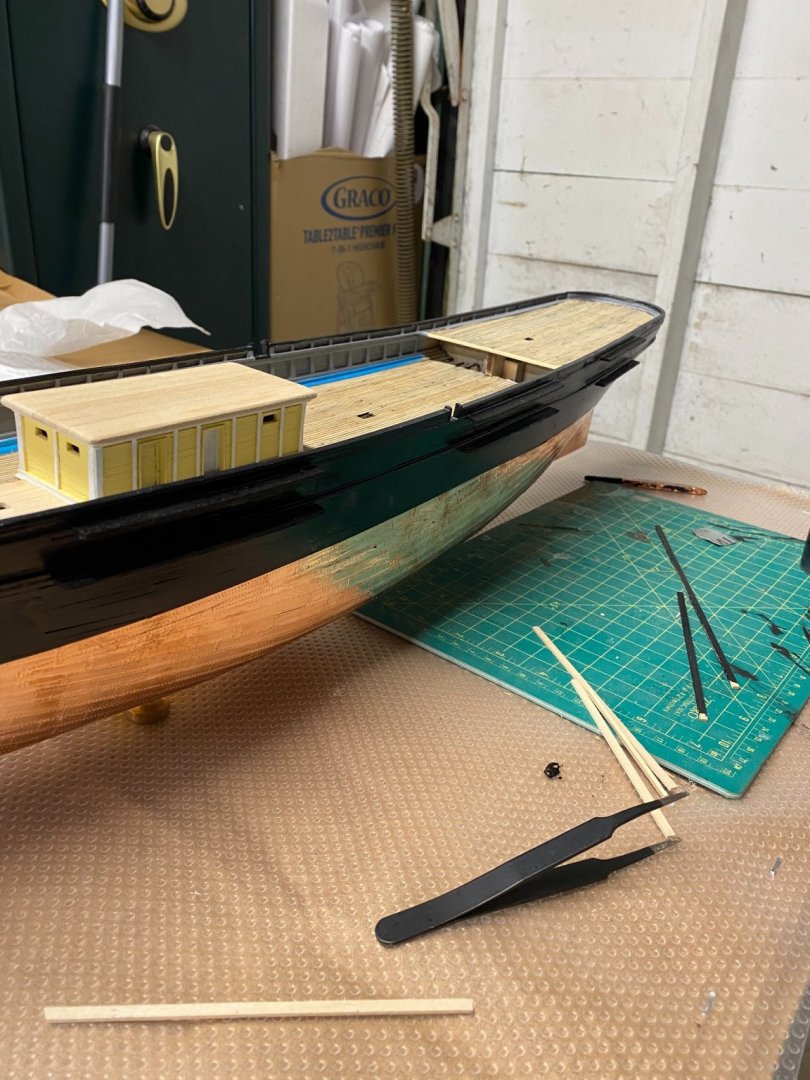
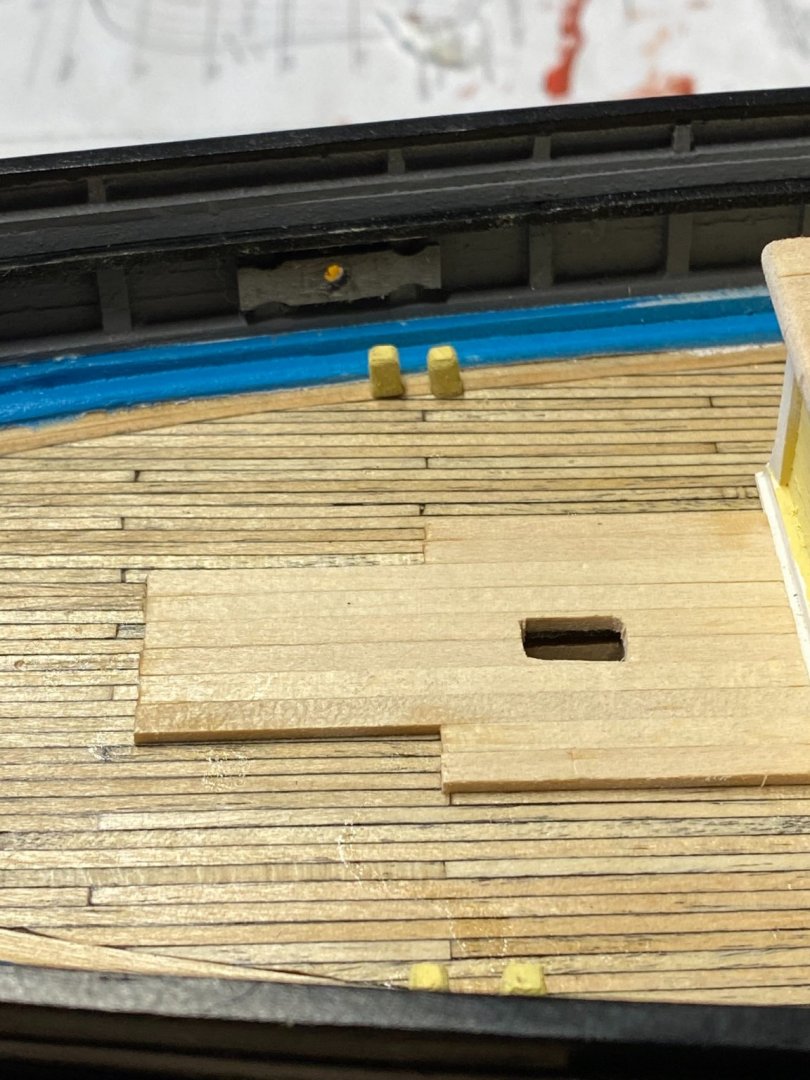
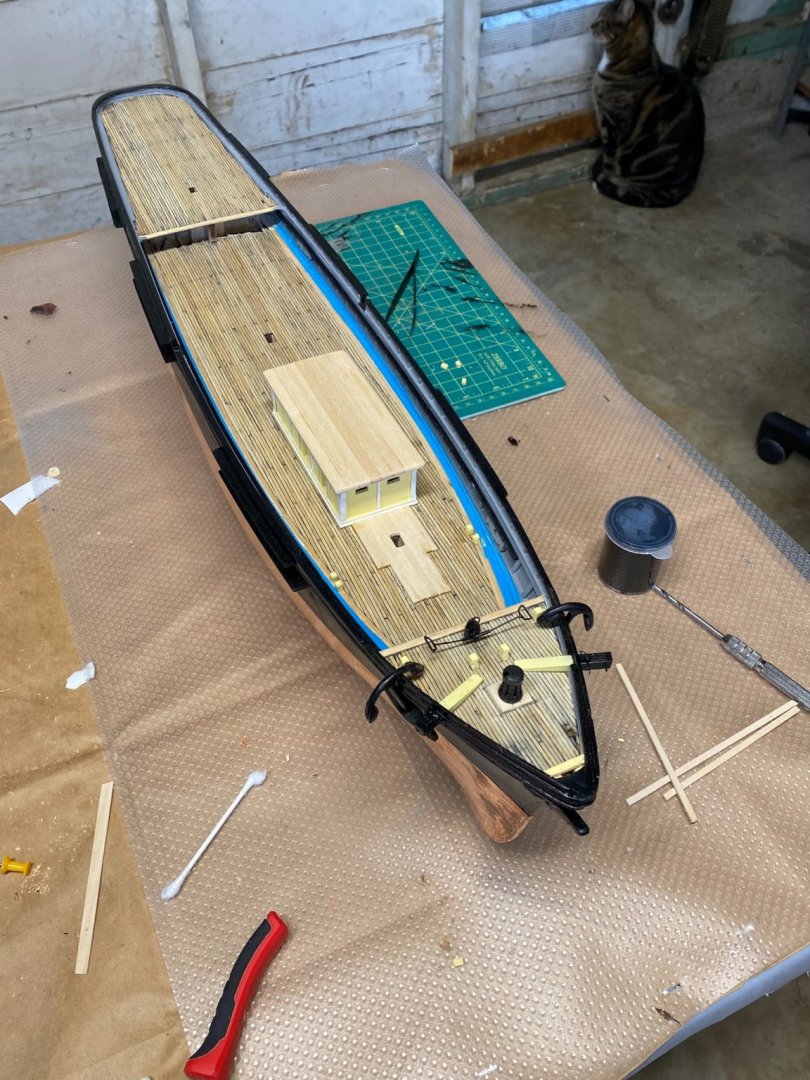
Hello everyone, I had some time this morning to work on the windlass. I’m not sure why but I just couldn’t seem to get the windlass right on my lathe, either I would break it or the dimensions were off. The goal for myself was to try my best to make everything for this build by hand, but I decided I’m going to use the cast one that comes with the kit. I spent some time cleaning up the casting marks and it honestly didnt look to bad, I am disappointed I couldn’t figure out a solution for this but after painting I was happy with the cast version. I was honestly surprised when I dry fit the windlass under the forecastle because I didn’t put the dimensions of the cast windlass into consideration when constructing the forecastle, but the fit was very tight. Now that the windlass is installed, I’ll starting working on the two water closets forward of the main deck cabin. I decided the best way for me to do this, was to use basswood blocks. Ill carve them to fit and then plank the outside like I did with the main deck house, hopefully these don’t take me a month to build lol. I did just buy one of Chucks, Royal Barge kits so I’m sure that will delay construction even more! Thanks again for stoping by. Bradley

-
Cheap and effective tools
Keithbrad80 replied to Ron B's topic in Modeling tools and Workshop Equipment
The Marine Corps recently changed their standard issue sewing kit which is to bad because I swear they made the previous version just for modelers. There was a pair of scissors, which was essentially 2 #11 blades with a handle, it was incredibly sharp and lasted for ever, they were specifically made to remove IPs, little strings on your uniform. There was strong Black and Tan line in there of different sizes, it had a few cloths pins and some needles, it had all sorts of stuff in a nice green plastic bag lol. The best part is they only cost a dollar! They were cheap because they were pretty much disposable. As soon as you unraveled the string you were done with the kit, but the scissors were crazy sharp and are perfect for rigging. They used the price to $5, which isn’t bad still for a pair of scissors that is super sharp, very small and light weight. Bradley -
Soldering Iron/kit
Keithbrad80 replied to DaveBaxt's topic in Metal Work, Soldering and Metal Fittings
Personally I prefer a soldering torch, and different temps of soldering paste. The paste comes in a syringe and you only need a tiny amount, you heat it up with the torch and it will eventually do its thing. Although a soldering torch doesn’t have any kind of temp control, well they make different variations of soldering paste for that problem as well, so you can have a low temp medium temp and high temp, with the difference being how long you have to hold the torch to the paste. I took a small wood cabinet and bolted it in the ground against the wall, I then laid bricks on top of that creating a “soldering table” as I call it. I also used a small Stanley bench vise with soft clamps to hold my work, that way I can hold what ever I’m soldering with clamps or my hand or both while I apply heat. Like everything else this all requires practice, I break joints all the times, as long as I use enough paste with enough heat and clean metal I never have issues. Bradley -
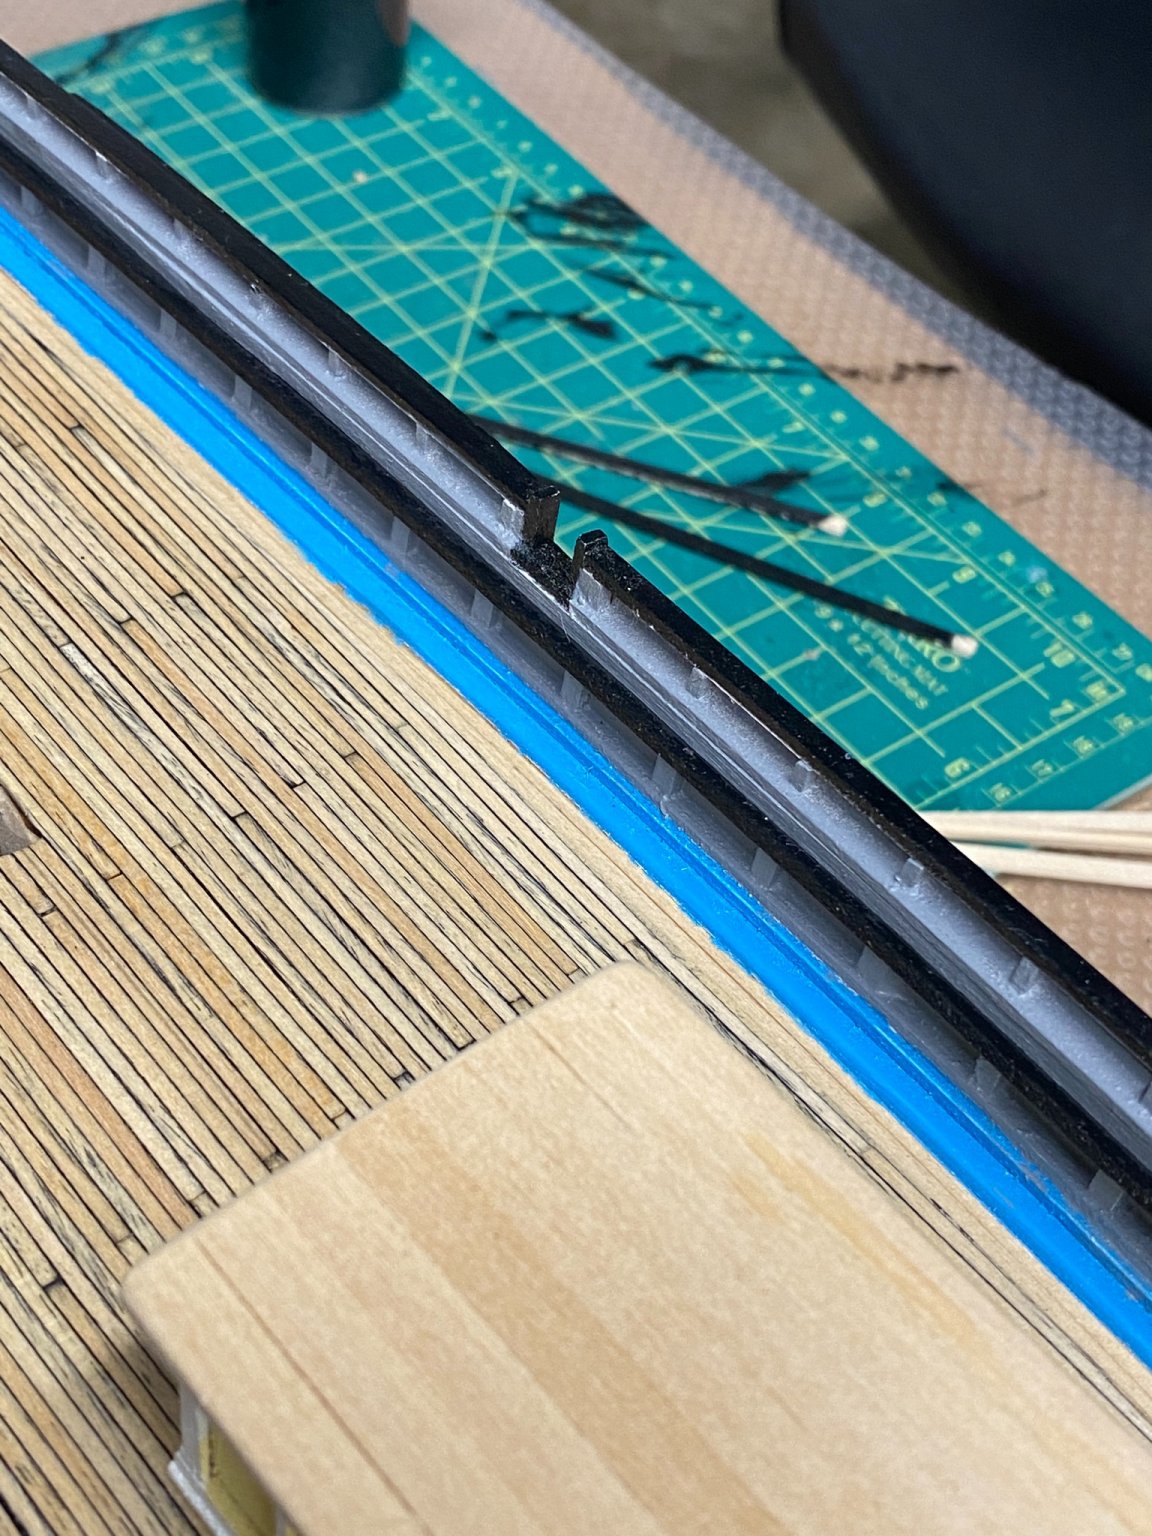
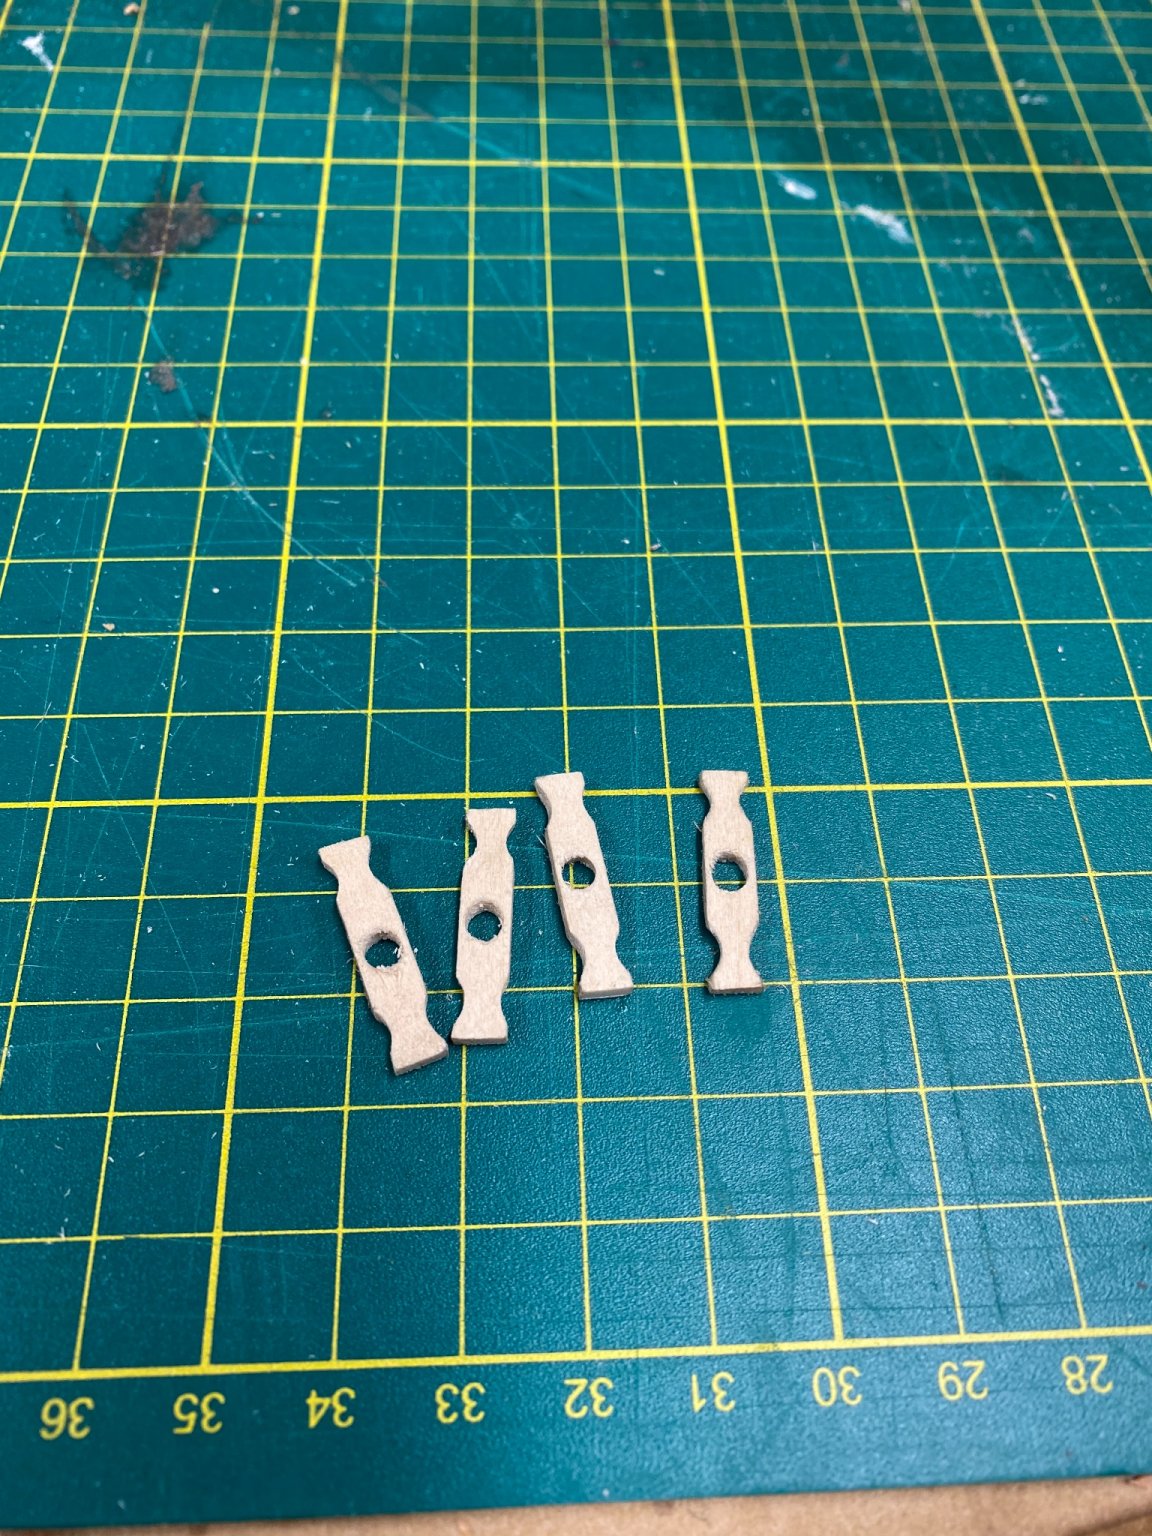
Hello everyone, It’s been a while since I have had some time to work on the flying fish, but I found a few hours this morning and got back to work. I finished painting the channels, I got the pin rail in, the mooring chock and cavil, and finally the mooring bitts. None of it was very difficult or time consuming to build, and I think things are looking pretty good! here are the painted channels: next is the pin rail, I haven’t started drilling holes for belay pins yet, I’ll do that soon. there are a few spots that need some paint clean up but I’ll do all of that in a bit. I made all 4 mooring chocks at the same time which gave me better results than I excepted. I also painted these the same color as the bulwarks before installing, the hole in the middle is drilled all the way through the bulwark as well. Now that they are installed I’ll use a small needle file to make the hole in the middle a little more oval shaped. Thats it for today, hopefully in the next few days I can get some more work done. Thanks again everyone. Bradley


-
Great work! Your method seemed very well thought out and obviously well executed! Bradley
- 950 replies
-
- 1
-

-
- syren
- model shipways
- (and 1 more)
-
Yup. This all I use, my local art store sells it in the cleaner section. It’s really good at cleaning old brushes as well, soak the old brush in water for a few minutes then rub your brush into the soap until the bristles separate. Then I run the brush against a paper plate adding water until the paint breaks up and repeat until it’s all gone. It smells weird though so use in a well ventilated area. Bradley
-
Where can I get TINY letters for my ship?
Keithbrad80 replied to Brenticus's topic in Plastic model kits
This is what I do. My local art store sells letter transfer sheets that you print on from a regular printer then cut out your self. A little bit water and they slide right off. I have a sheet that I have printed on several times before for something small, cut it out then you can put the same sheet right back in your printer (as long as you don’t print where paper is missing lol). Bradley -
I could be totally wrong here, but I noticed in that link that those wedges are only present on smaller vessels. I feel like in real life the wedges wouldn’t have been sufficient enough to hold the masts in place. Again, I could be totally wrong, thats just an observation. Bradley
- 950 replies
-
- 1
-
-
- syren
- model shipways
- (and 1 more)
-
Awesome job! Bradley
-
Proud owner of a Dremmel drill stand
Keithbrad80 replied to DaveBaxt's topic in Modeling tools and Workshop Equipment
When using a drill to shape masts, I like to use sand paper and my hand. I also have a Dremel drill stand and used it to drill some stuff before I got my replacement drill press. I noticed that the dremel had a lot of wobble even though it was bolted to my bench. I think it’s because of the plastic housing for dremel, it doesn’t provide a lot of support. If a traditional drill press is not economical for you right now, or you just don’t have space for one, then the dremel drill press should do what you need it to. A sanding drum on your dremel is going to have to much power and will remove to much wood. Bradley -
Same. I buy my CA from model expo as well, and have tried a few different types but have never been happy with any thing else. I use super thin CA a lot for a lot of different things, it’s a really popular finish for pen turning. Applied in several thin layers CA create a very shiny and hard shell which looks pretty good on pens. Your also totally right about thicker glues, they won’t bleed nearly as much, I just didn’t have any before hand and didn’t want to buy more. It also would have taken me a long time to recreate theses tests with different thicknesses of the glue. Thanks for your input on this! Bradley
-
Fantastic plank job so far! Very interesting build so far. Bradley
-
Thanks for sharing your technique, I recently drilled mine as well and realized there was pretty much no explain other than just drill them. At least you can mask them so that’s not bad, very nice work so far it’s looks great! Bradley
-
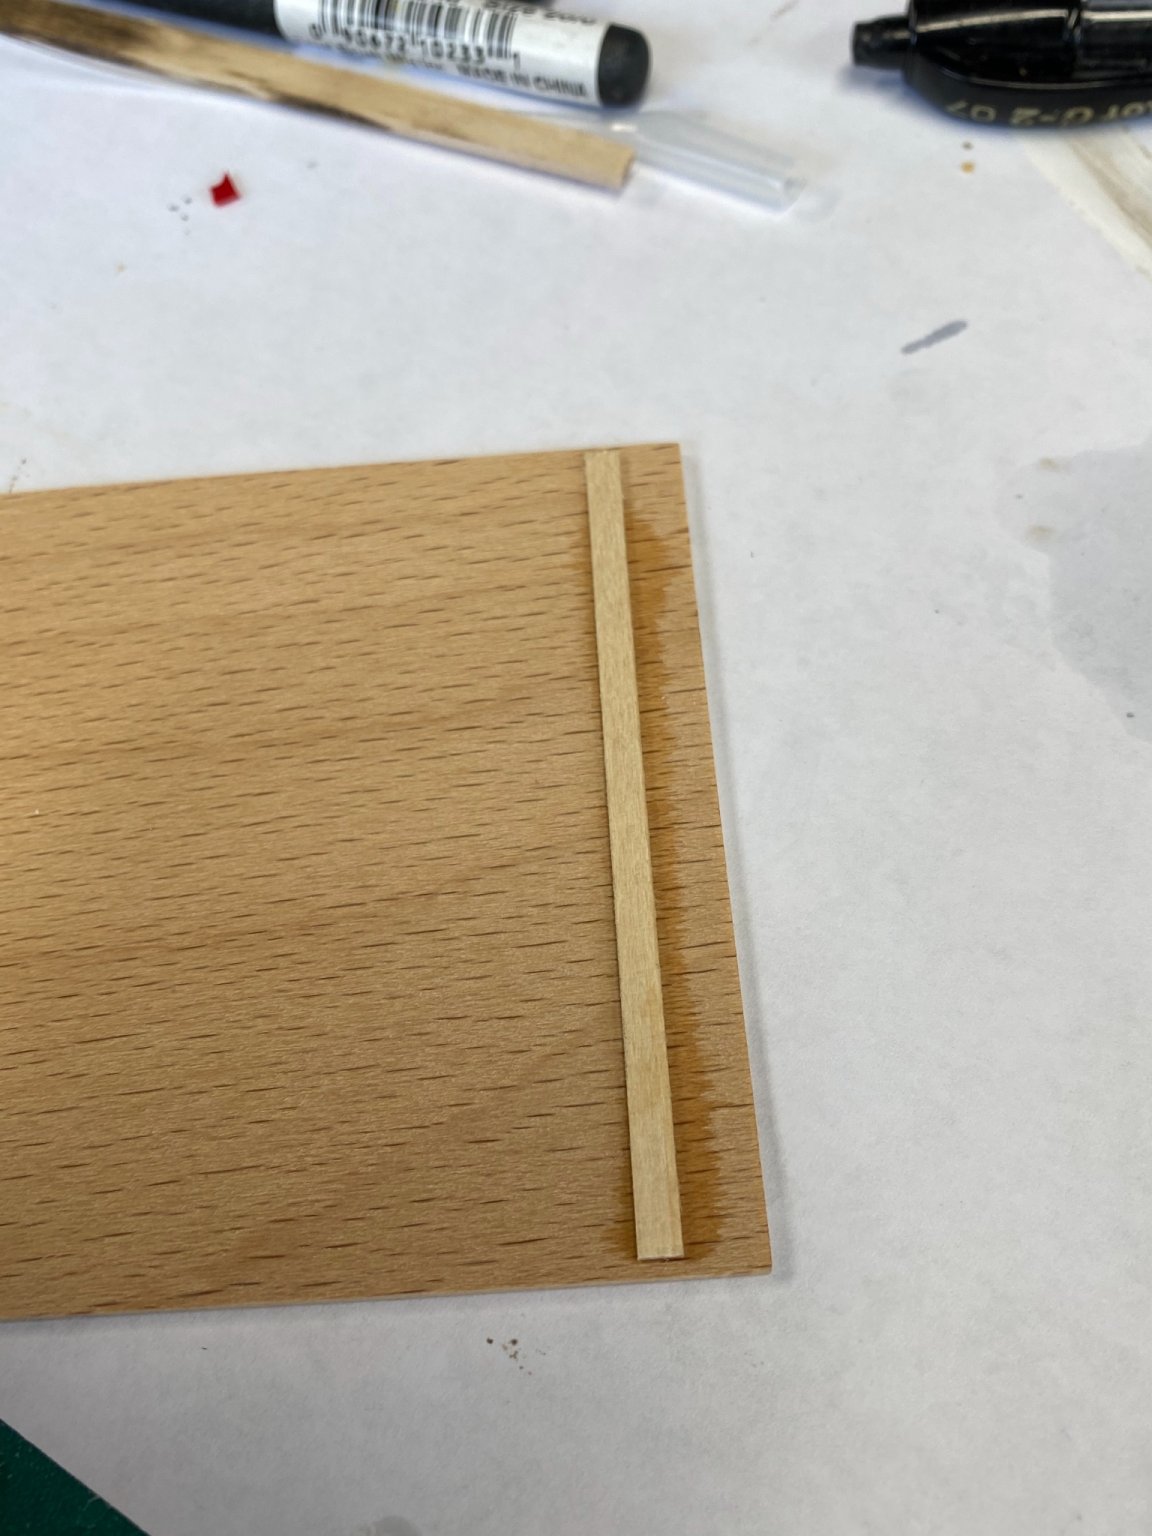
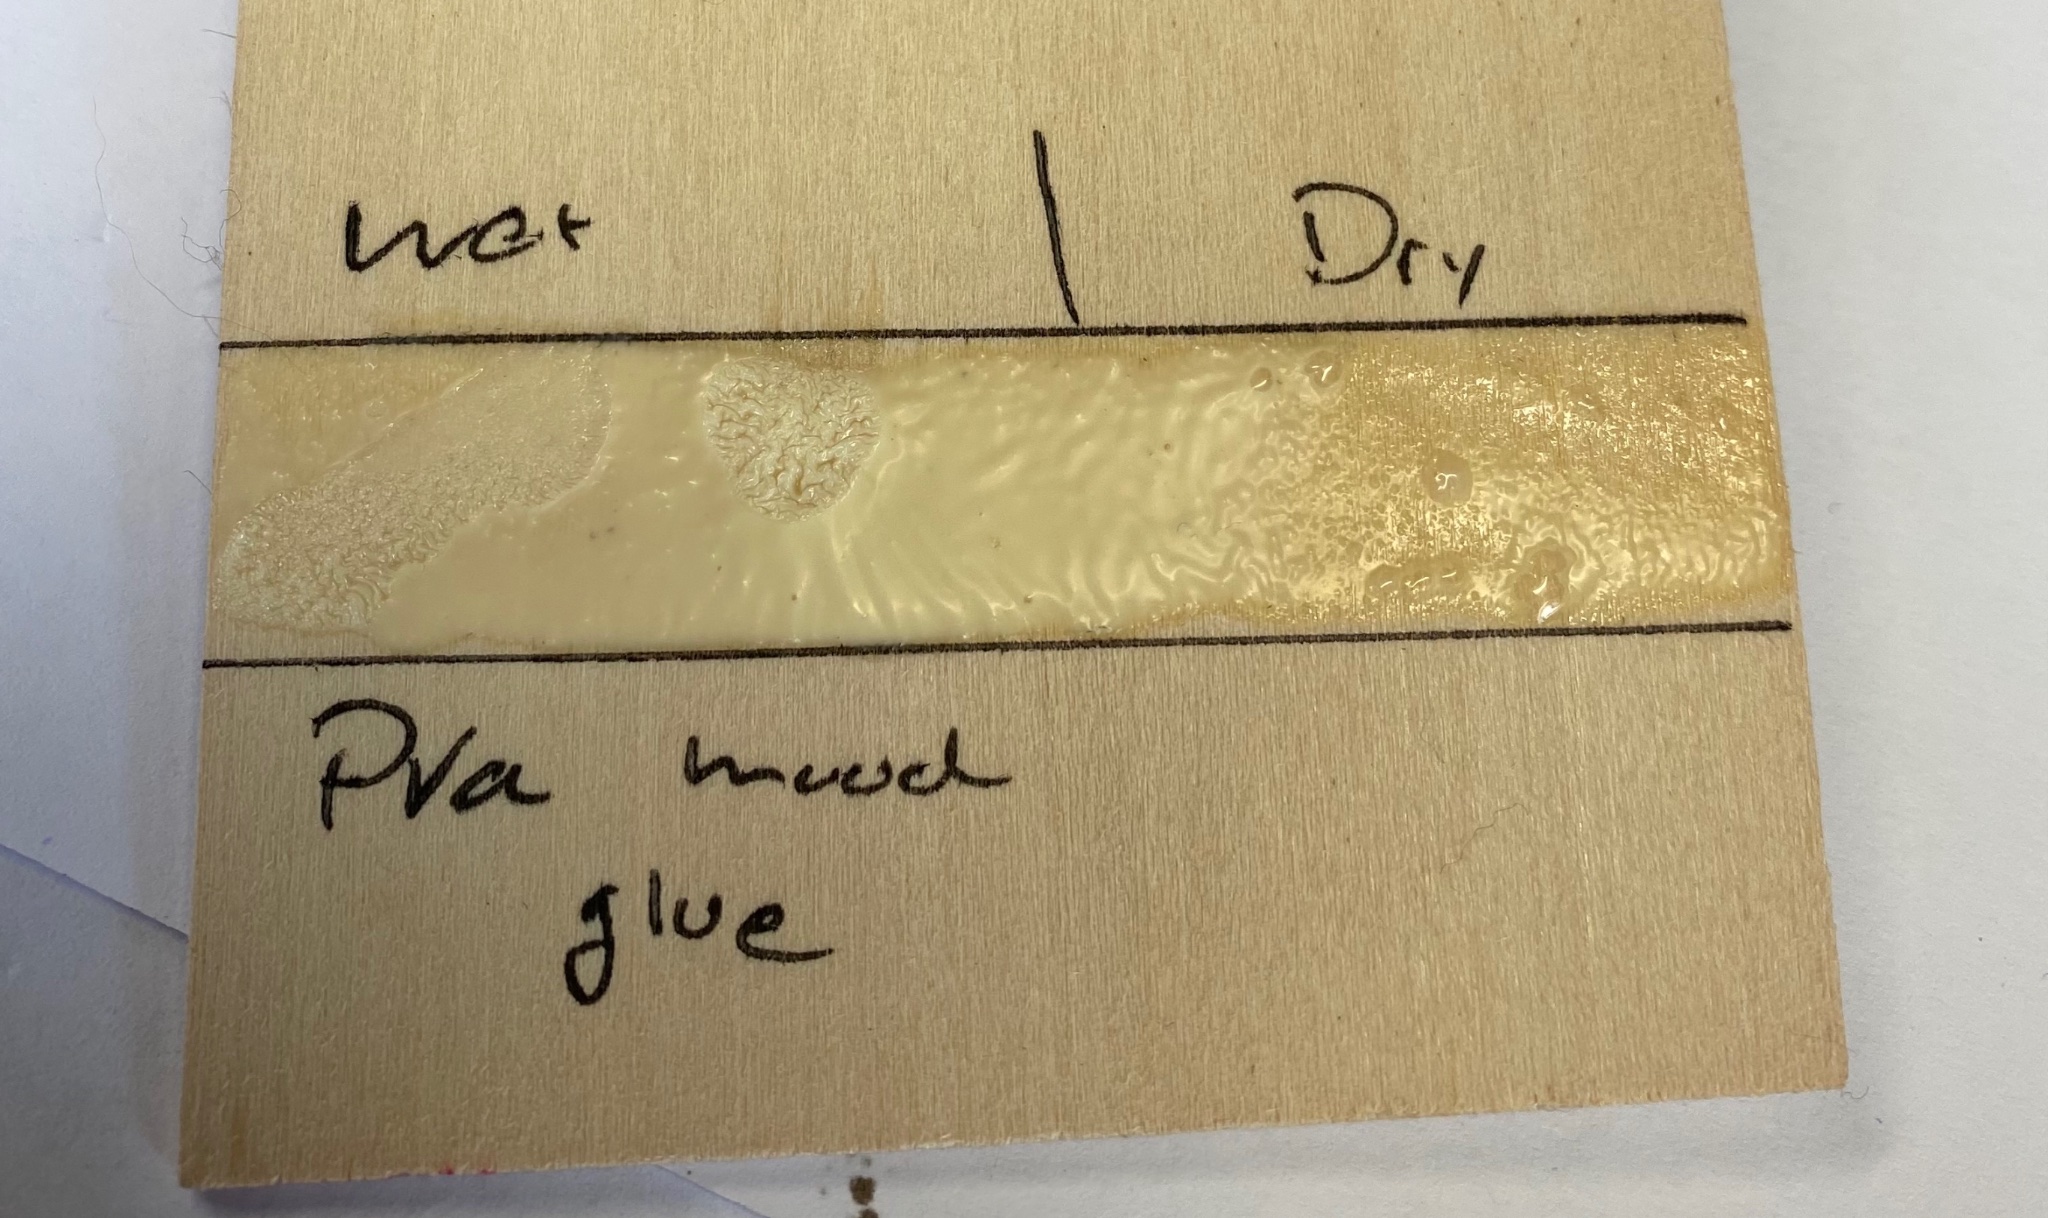
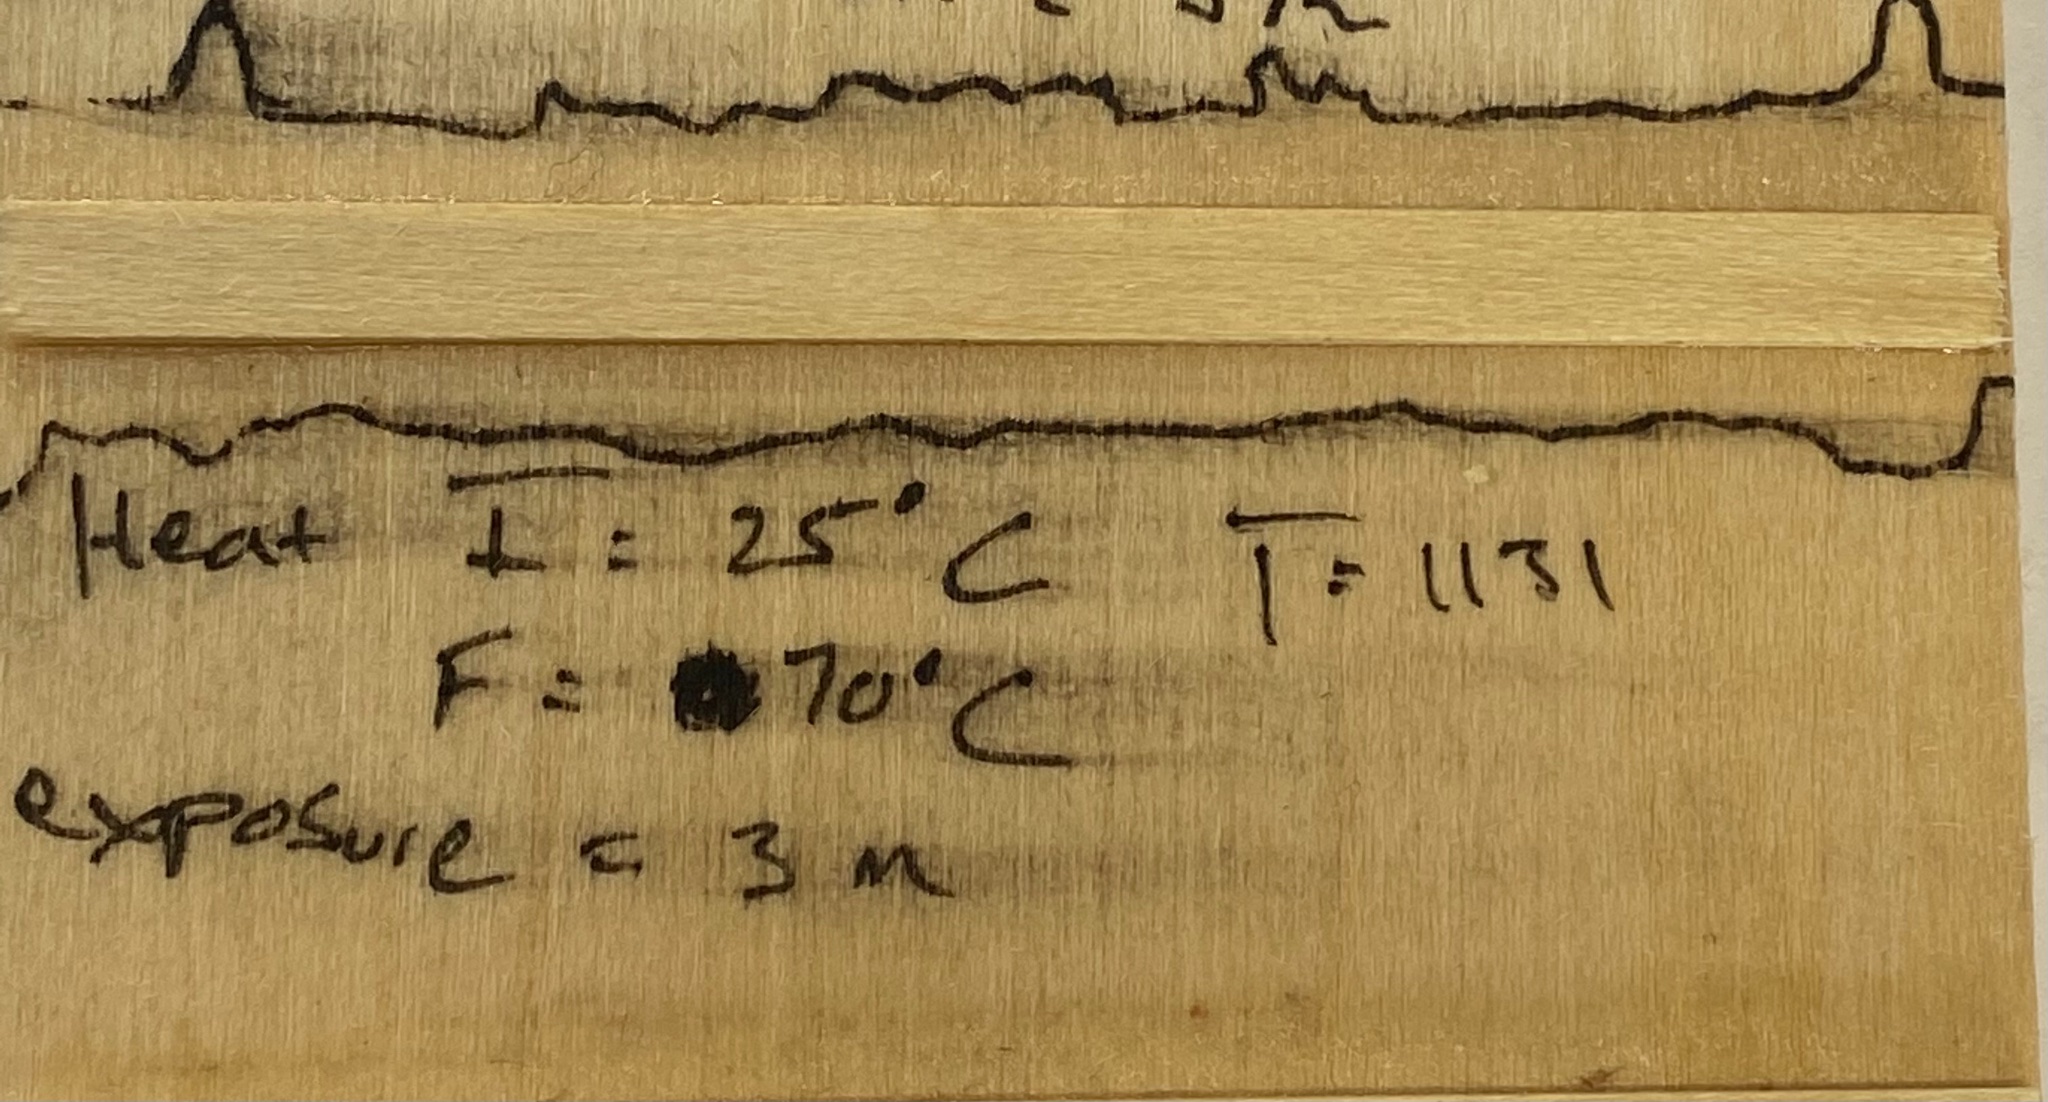
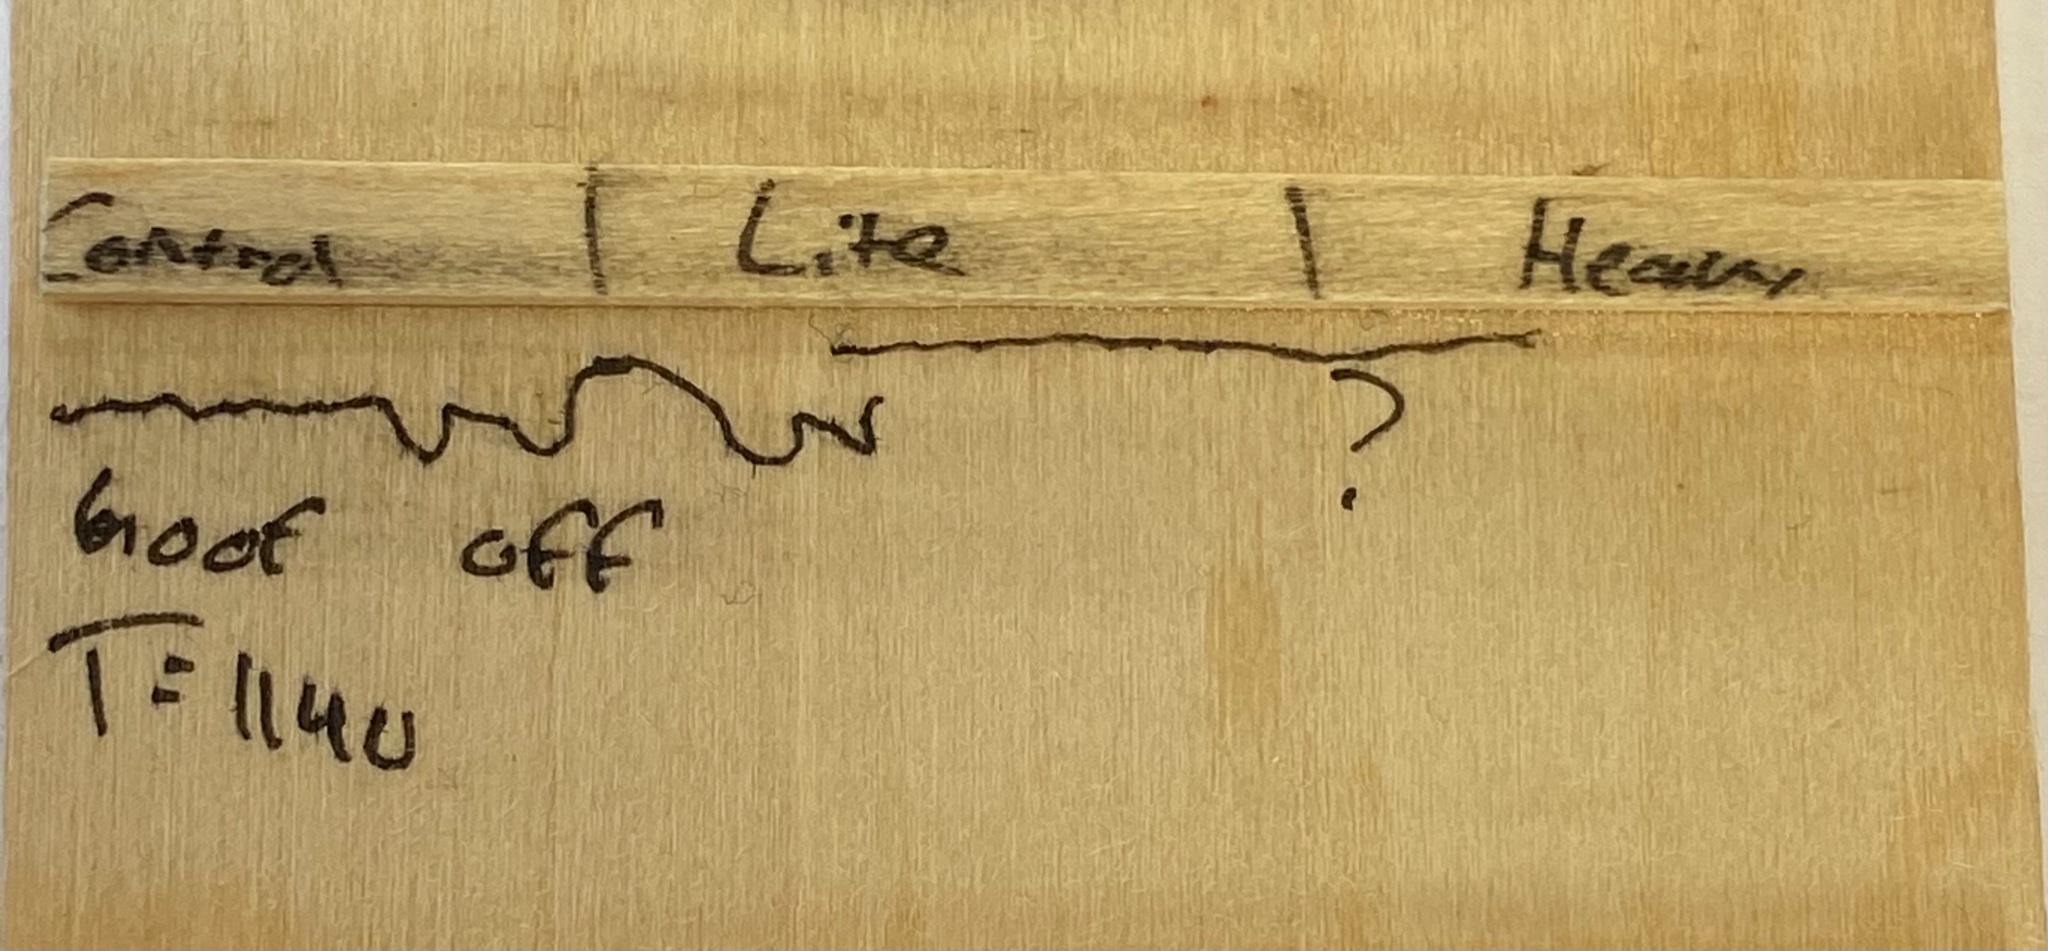
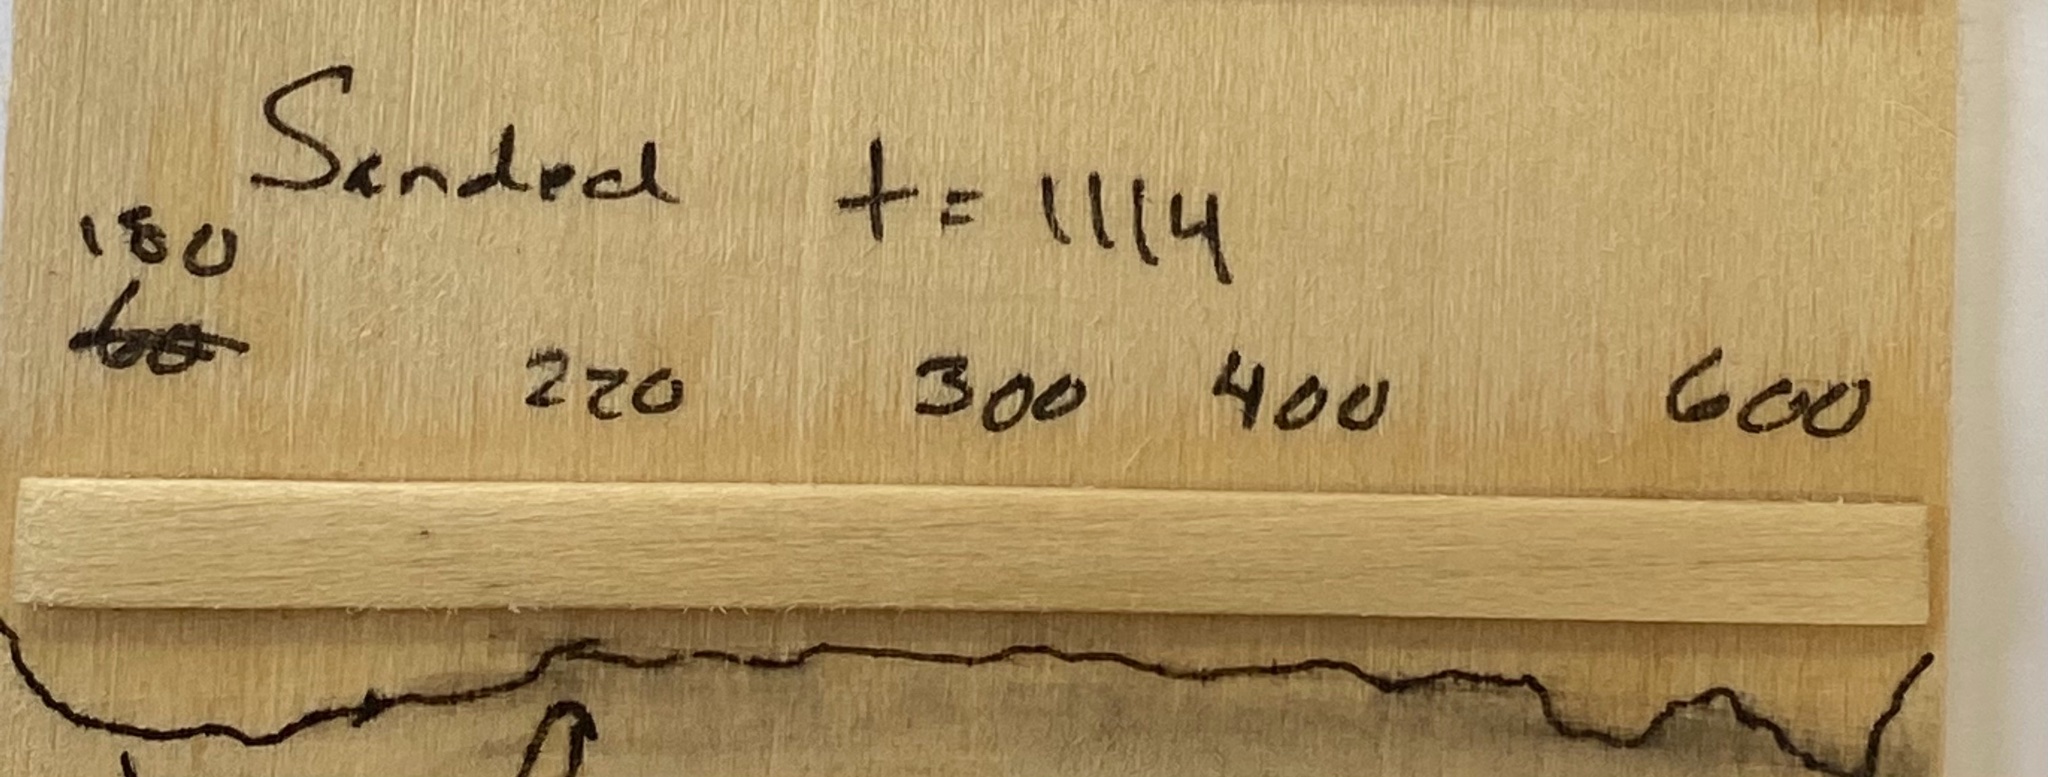
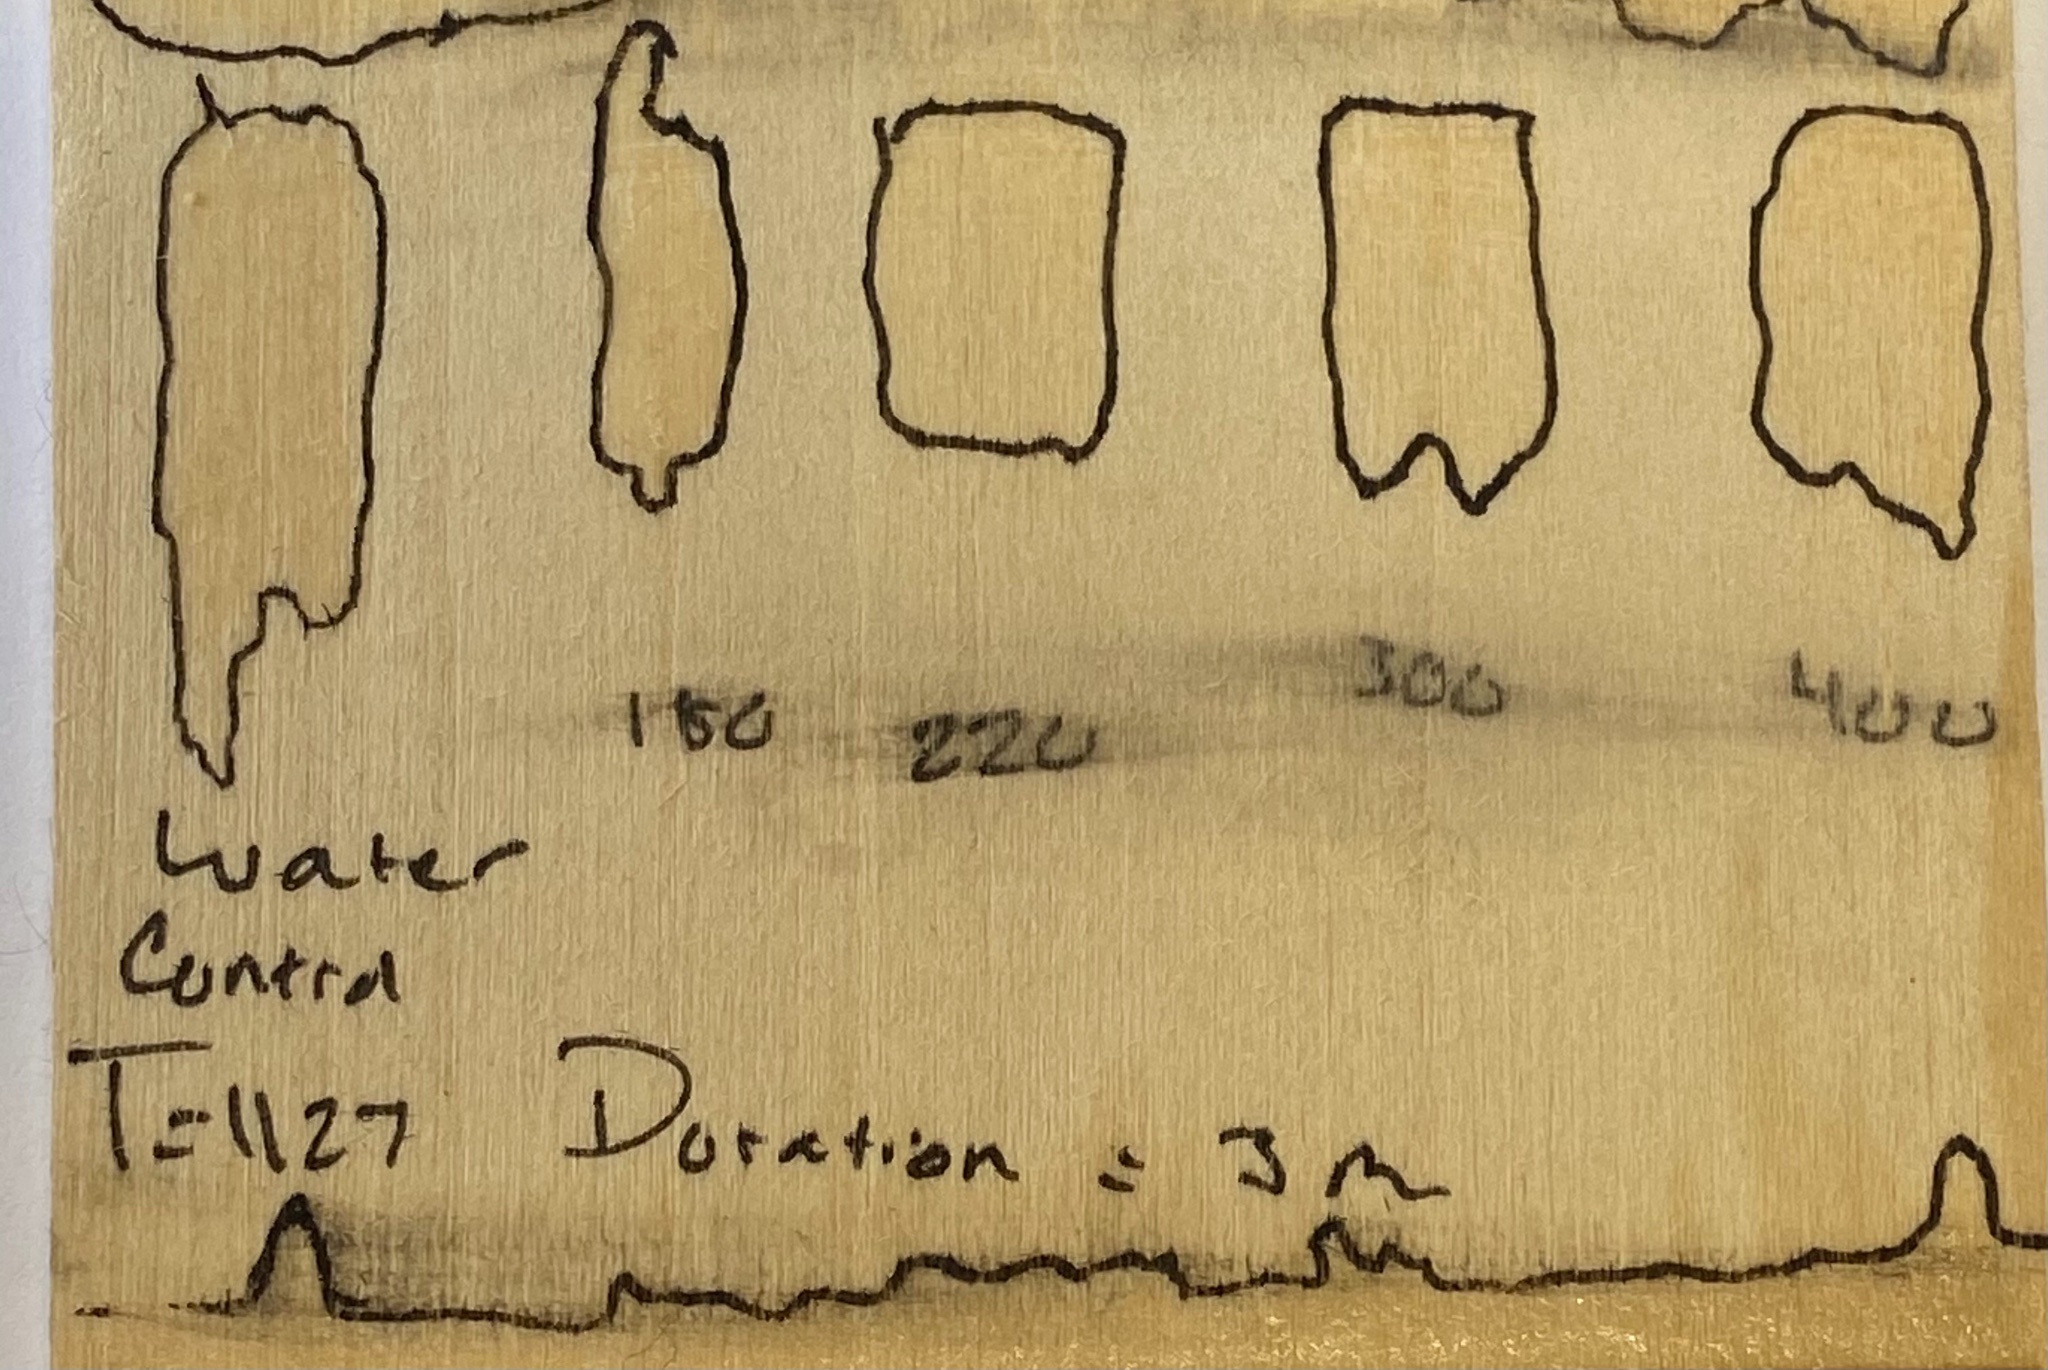
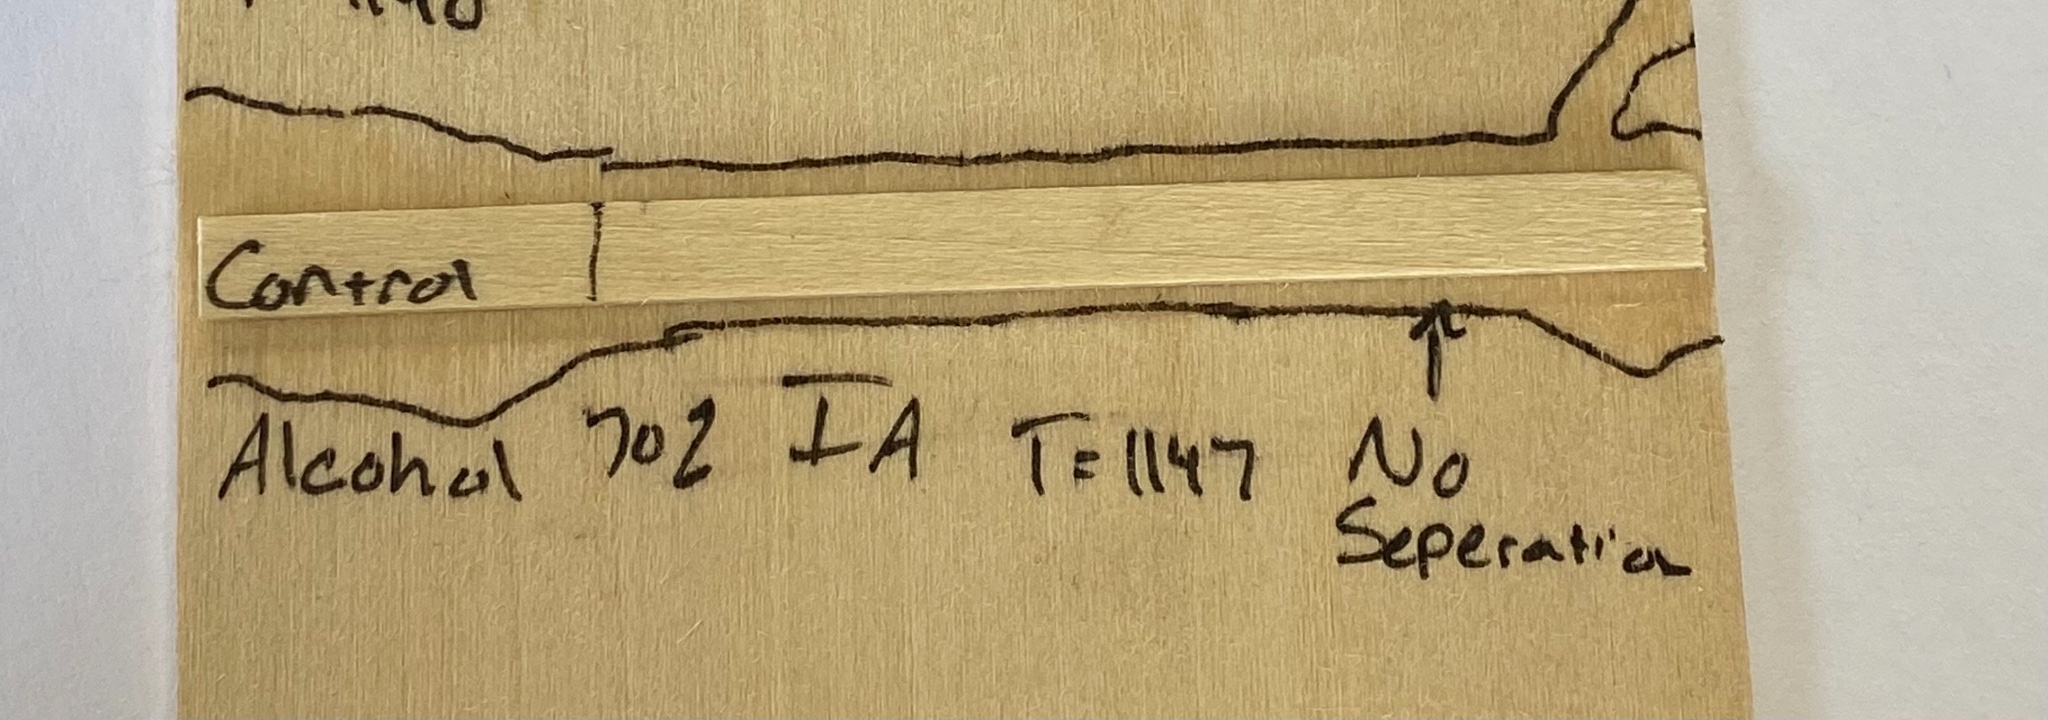
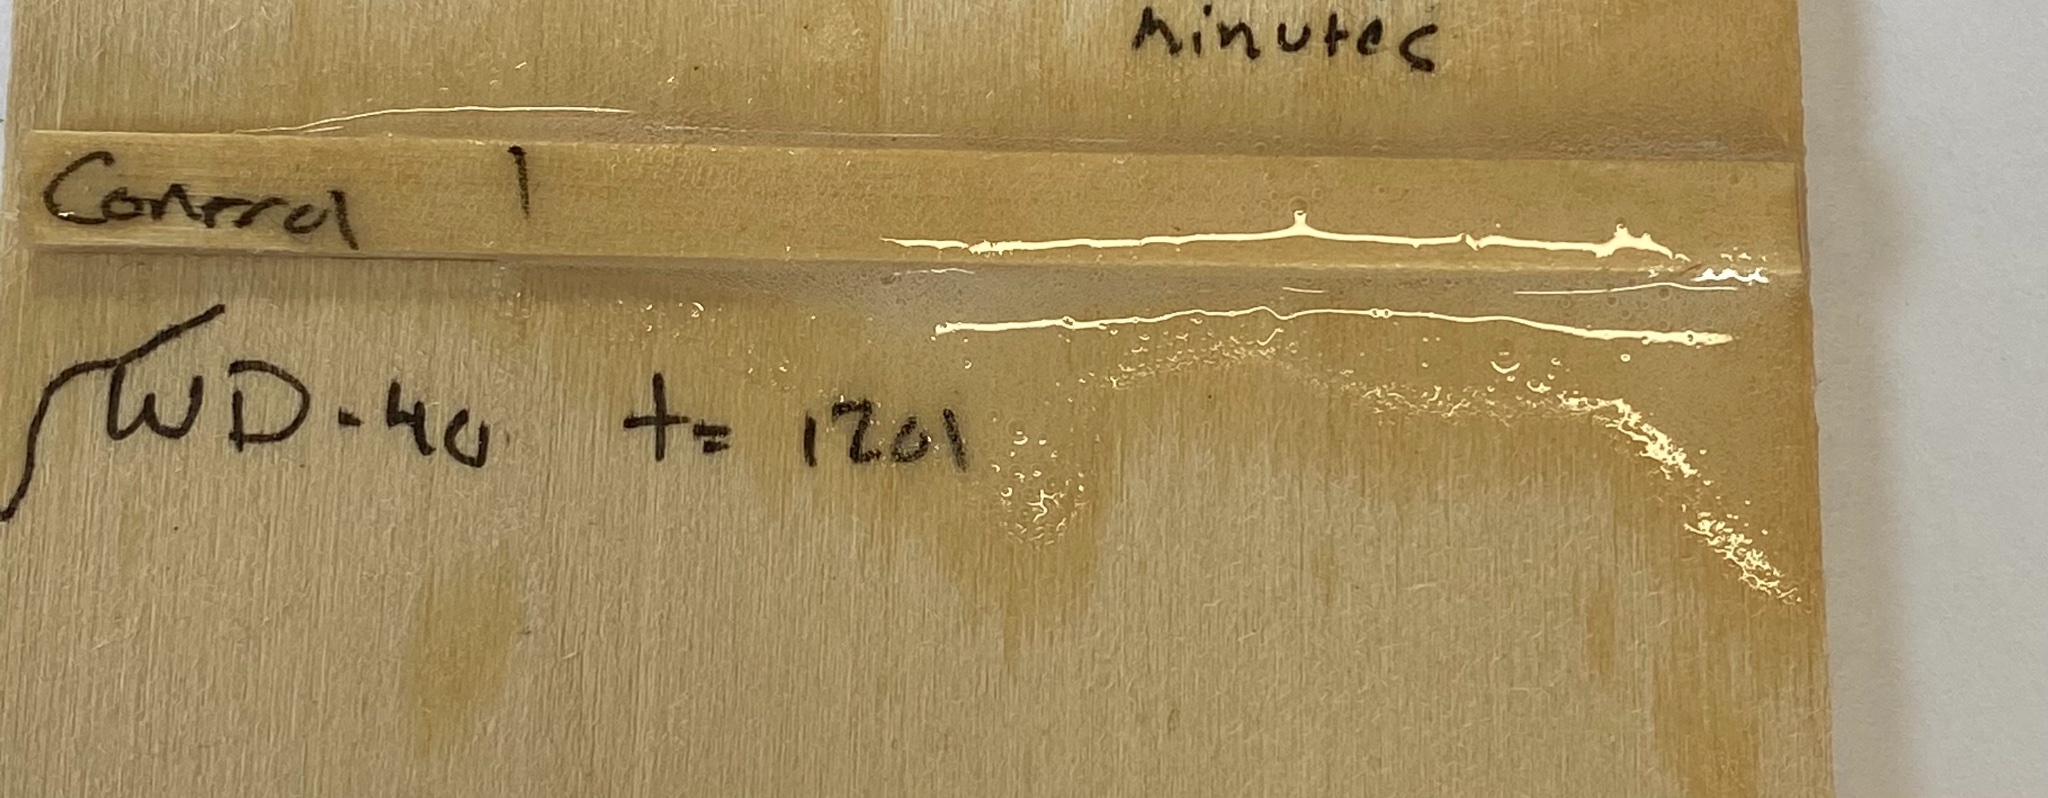
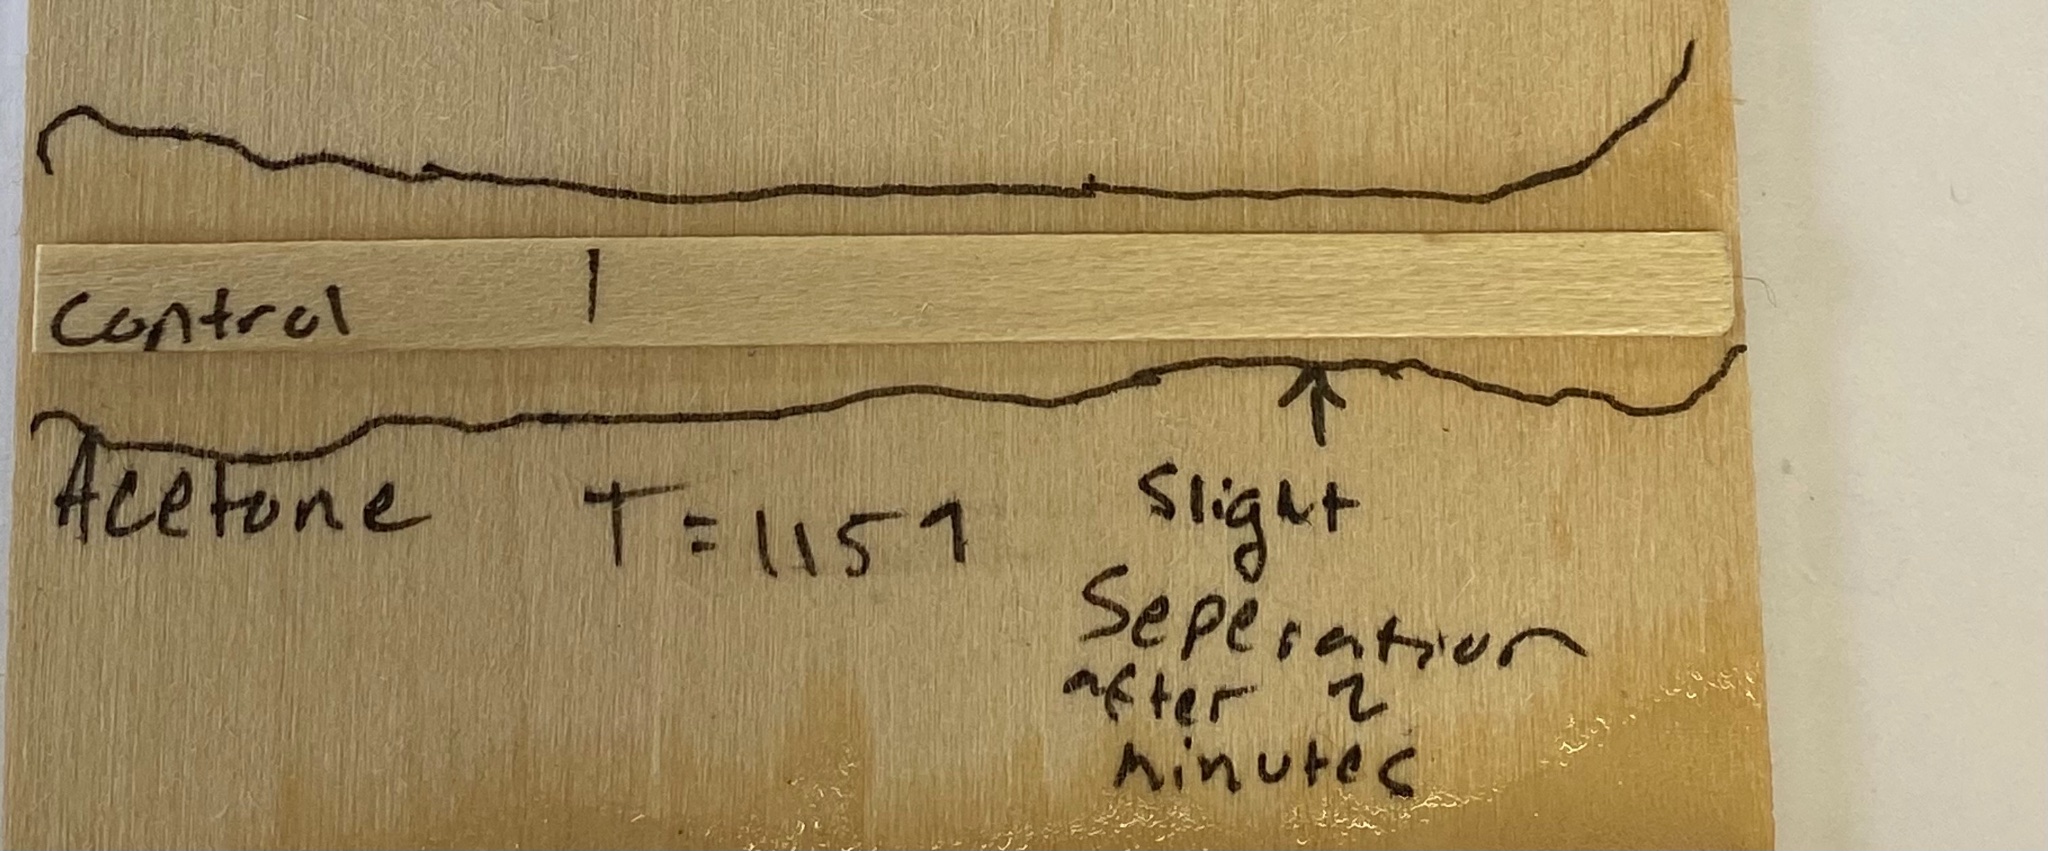
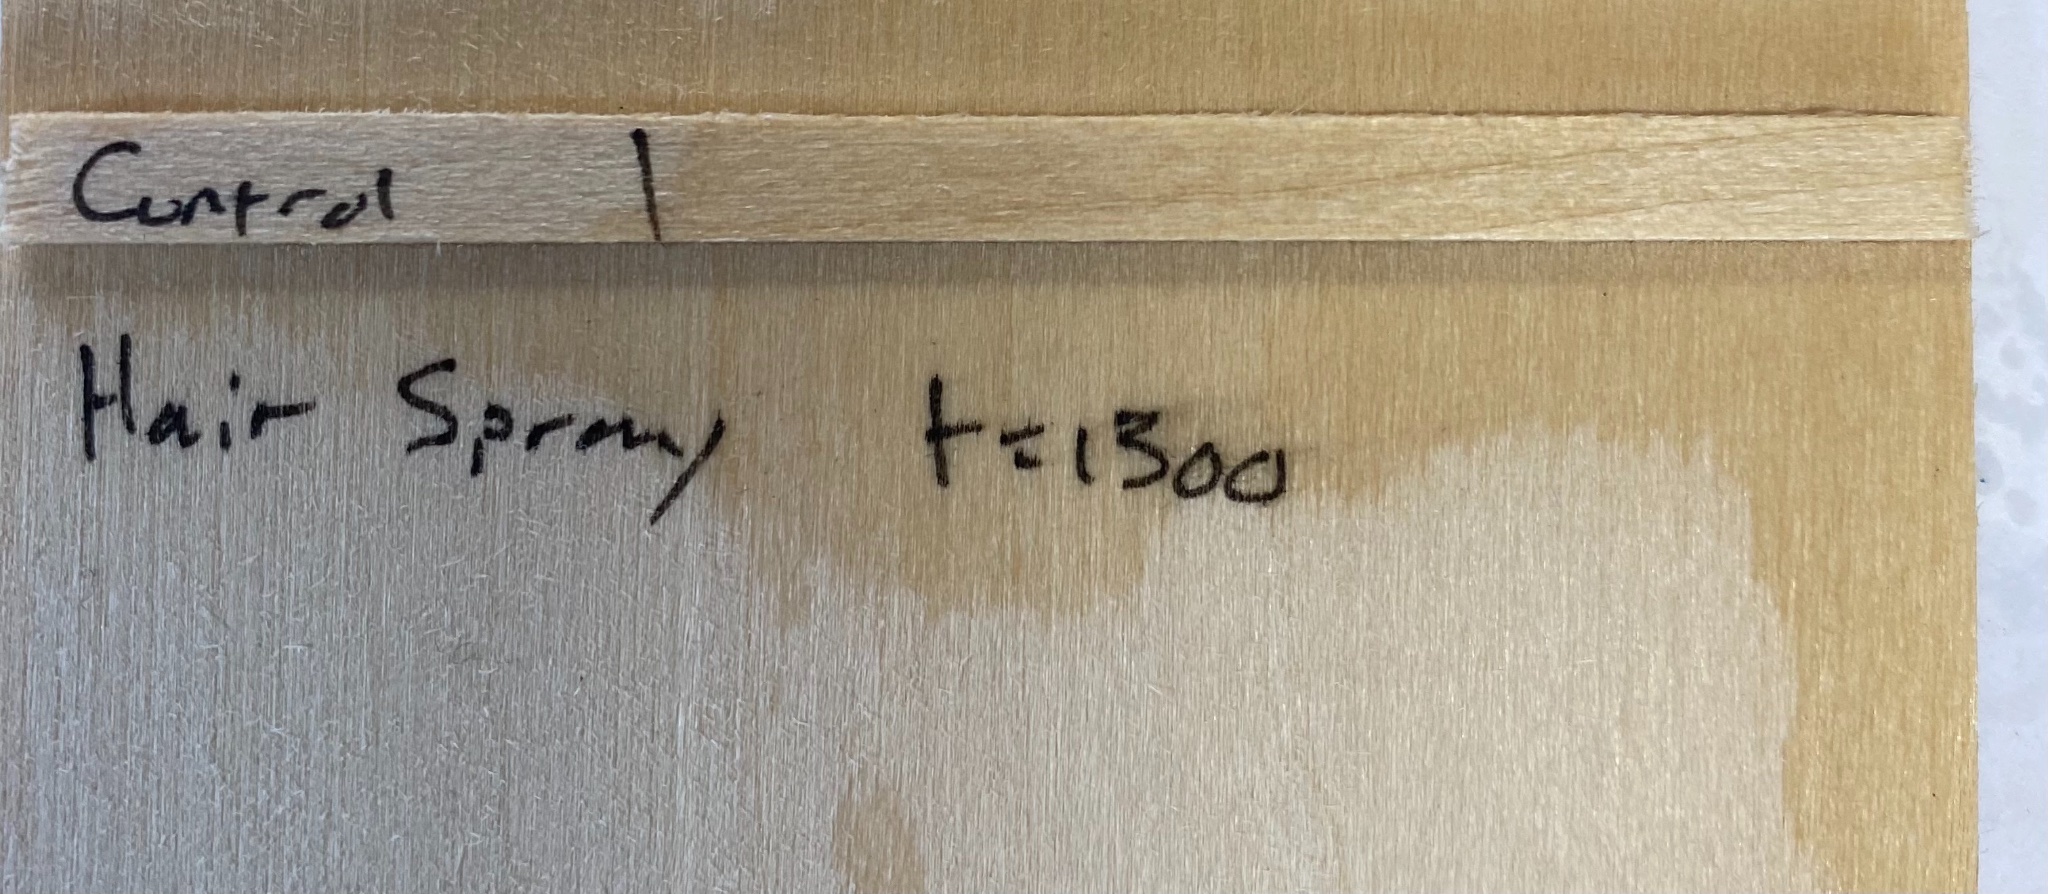
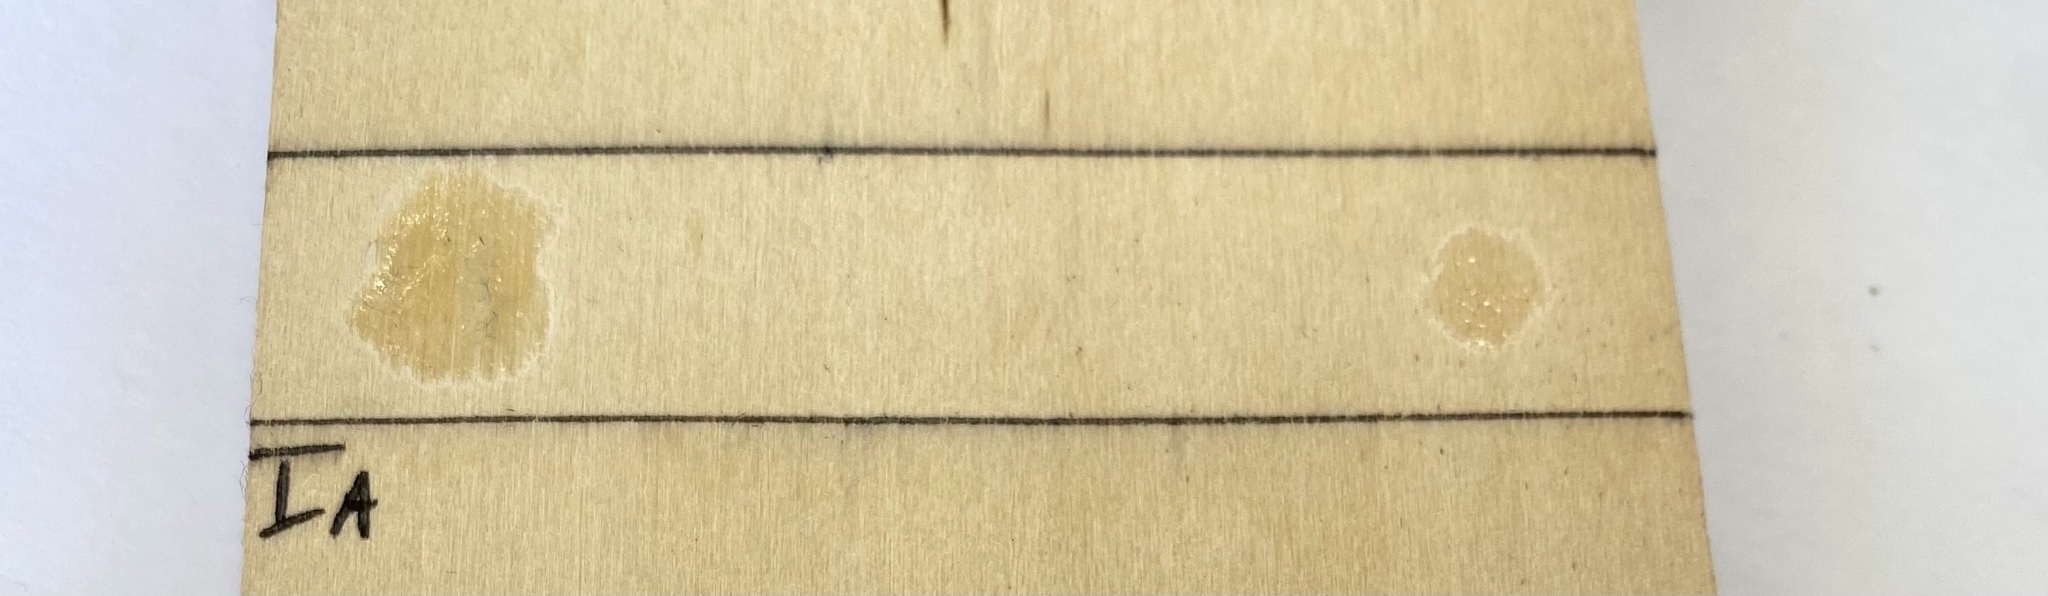
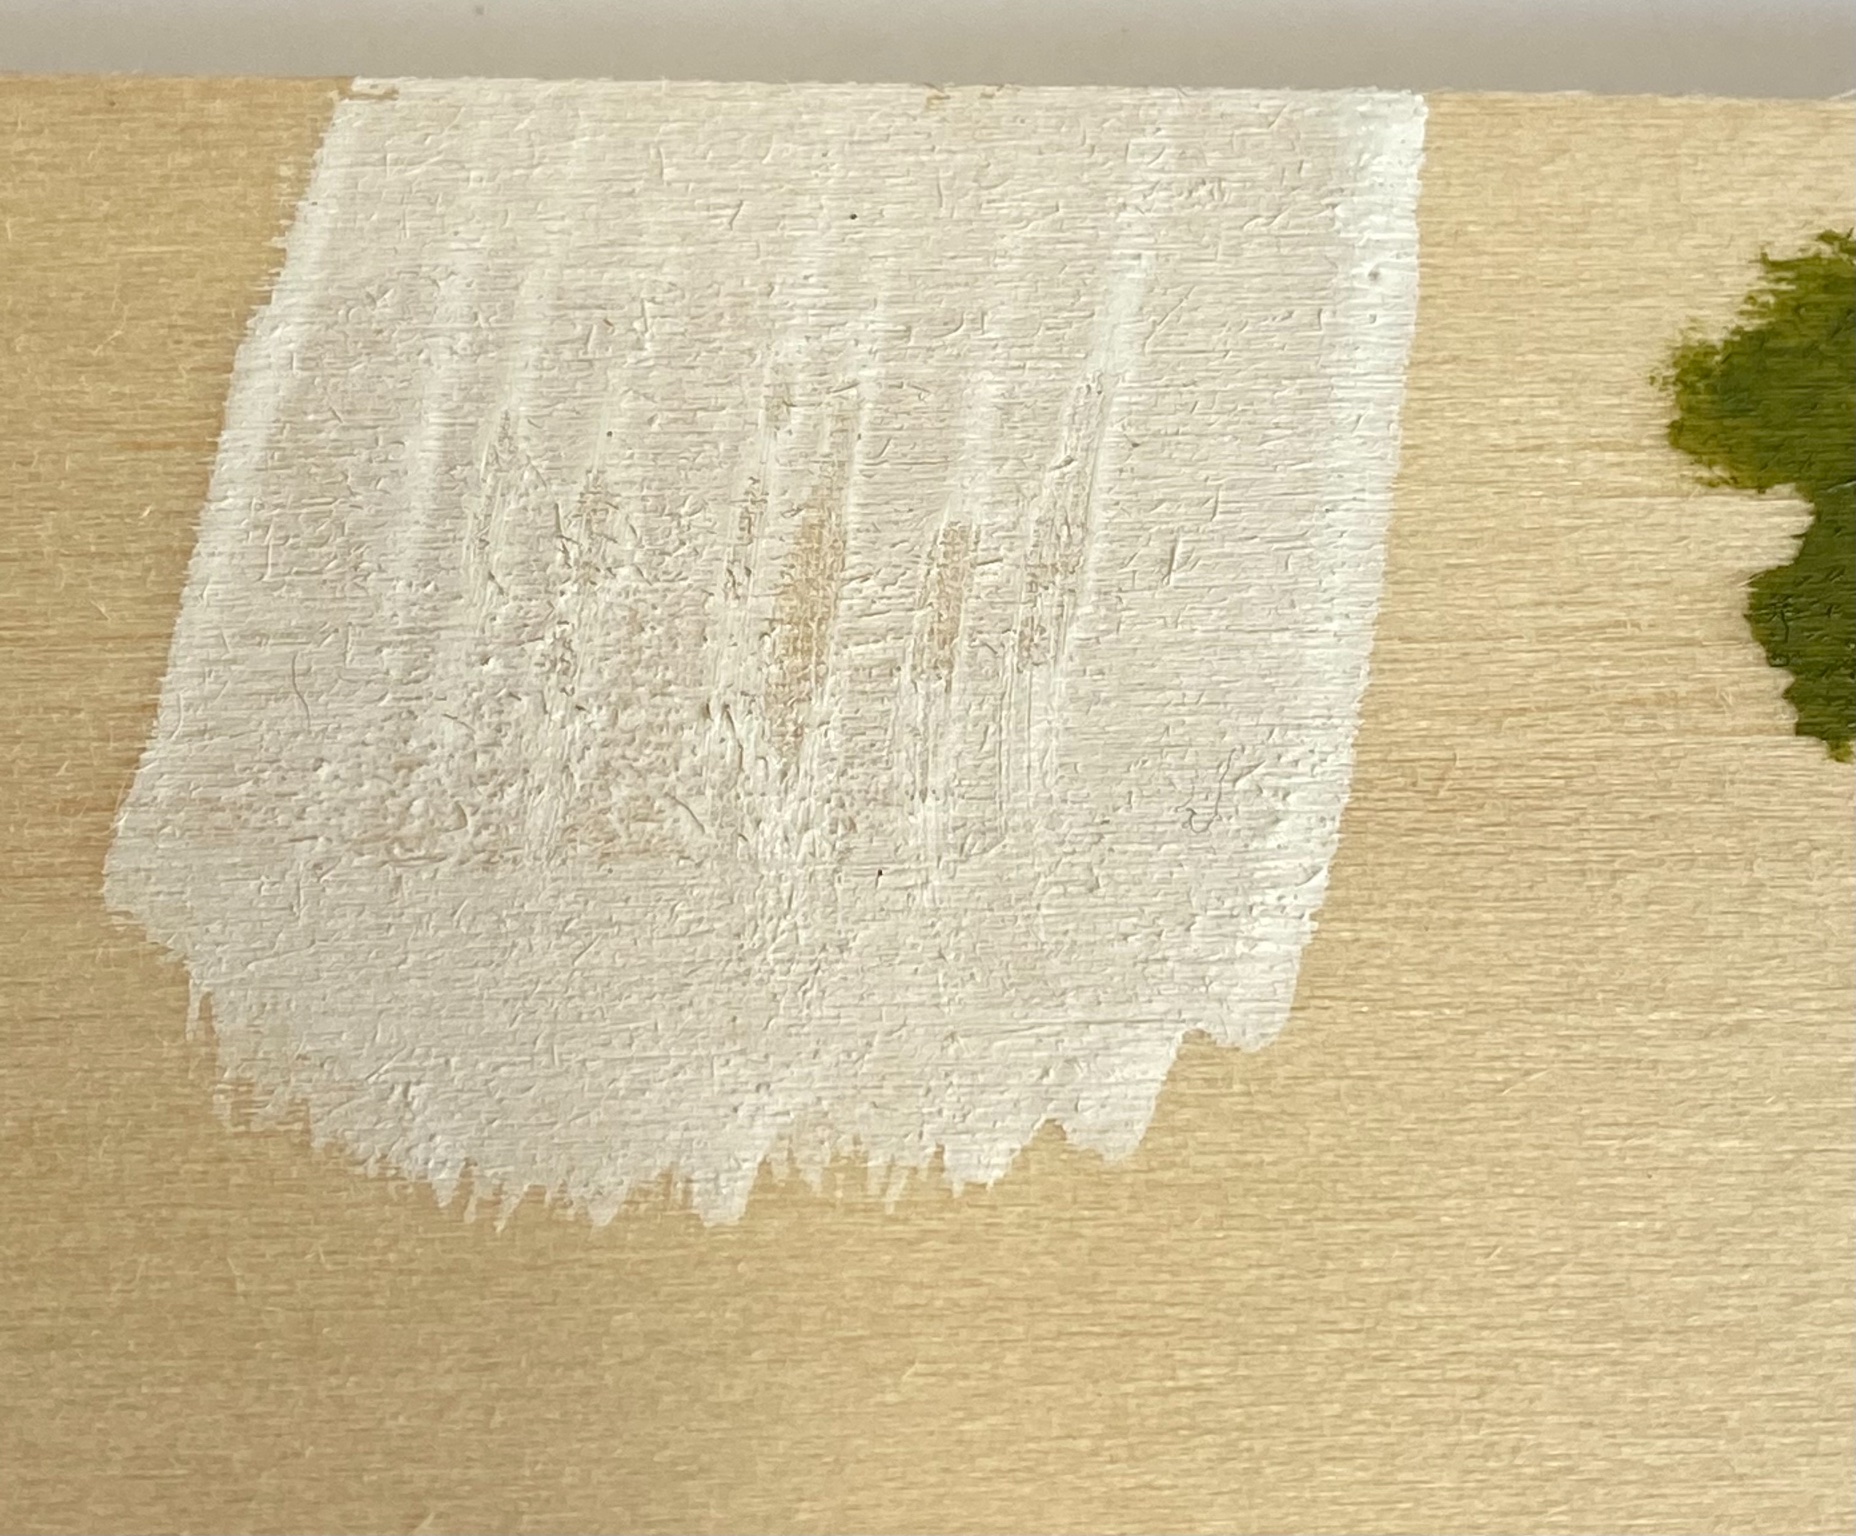
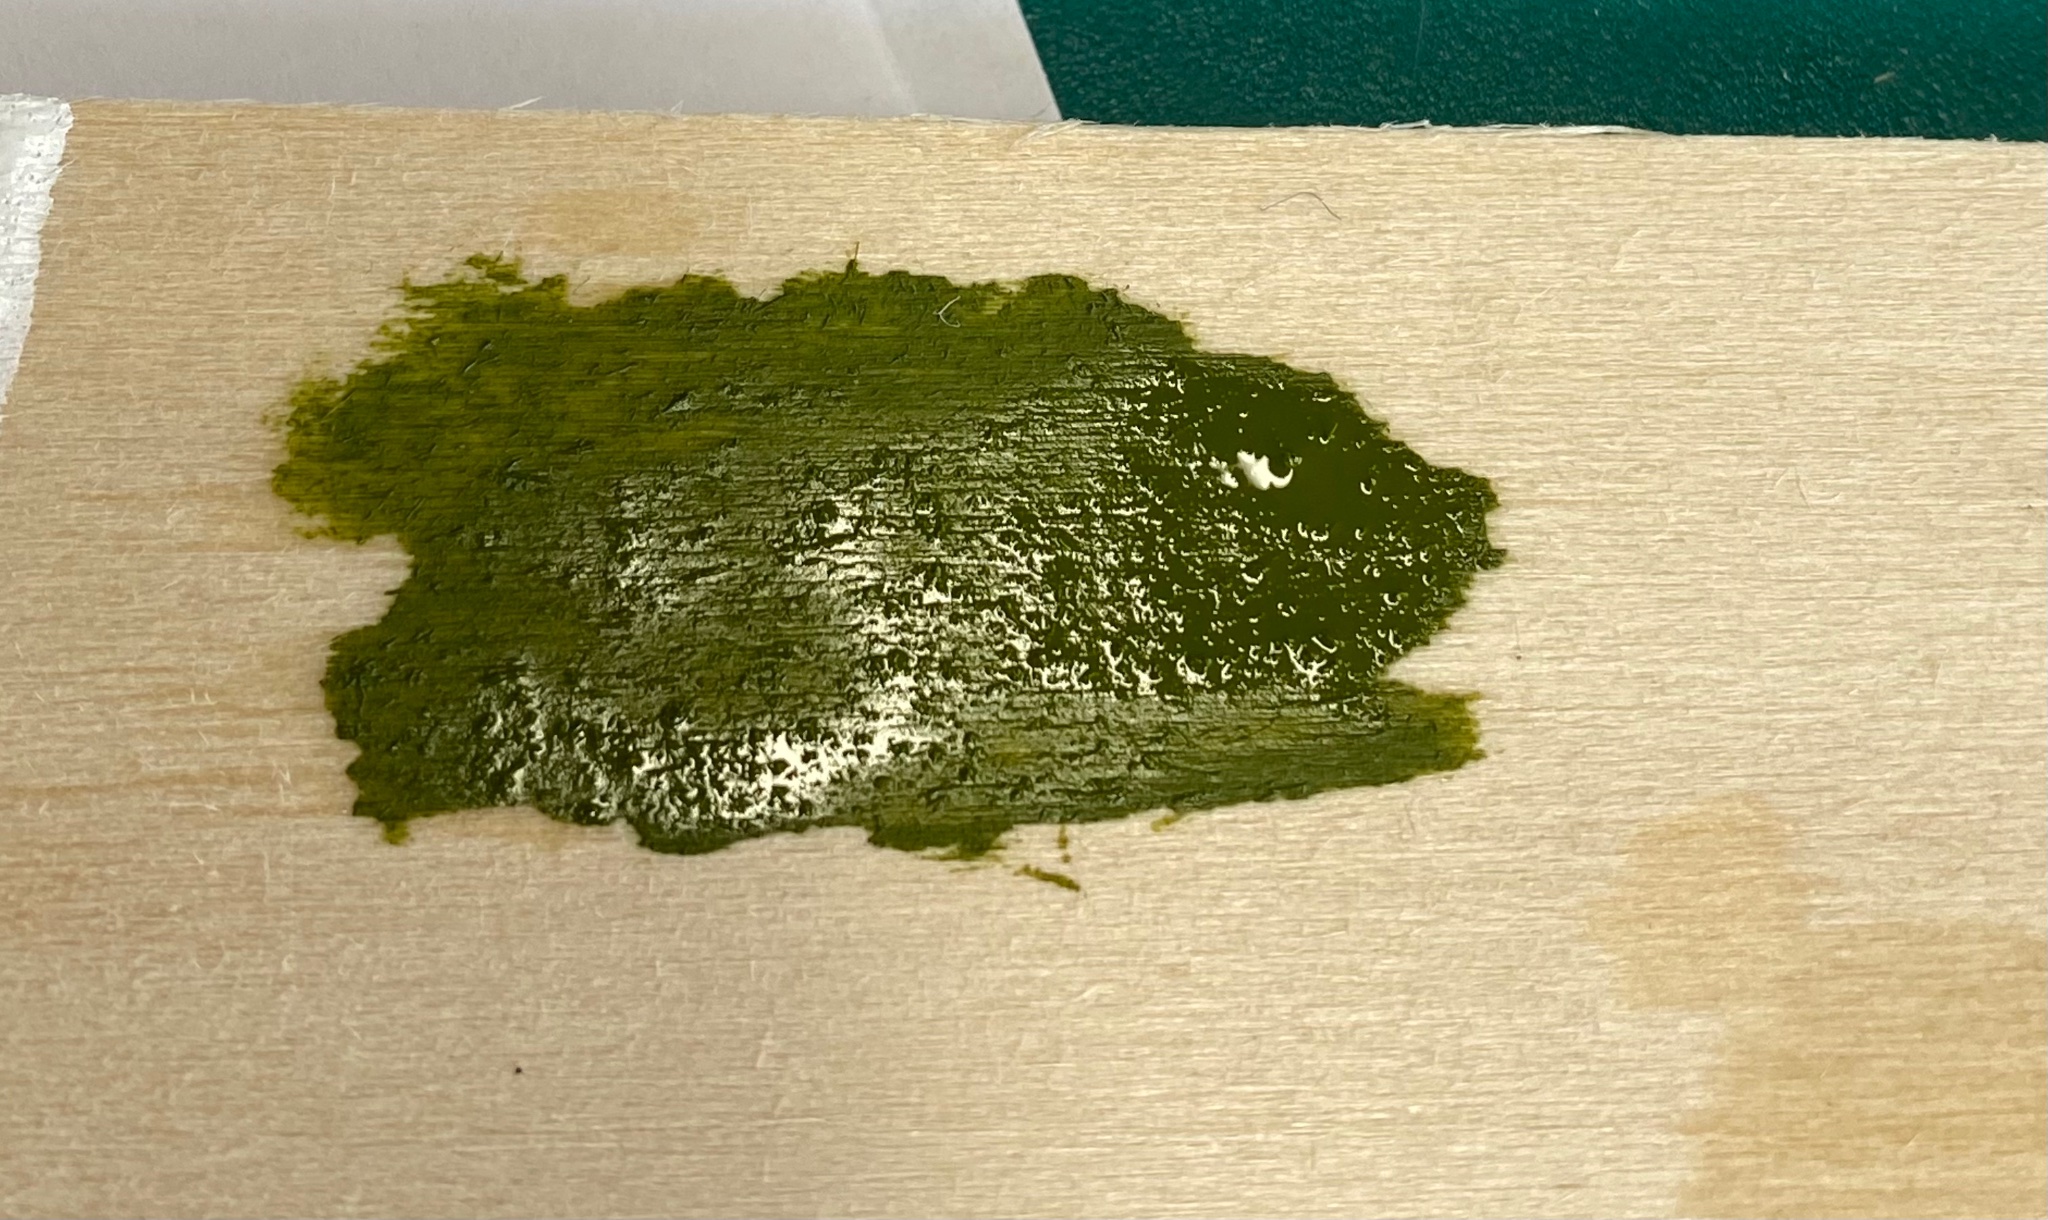
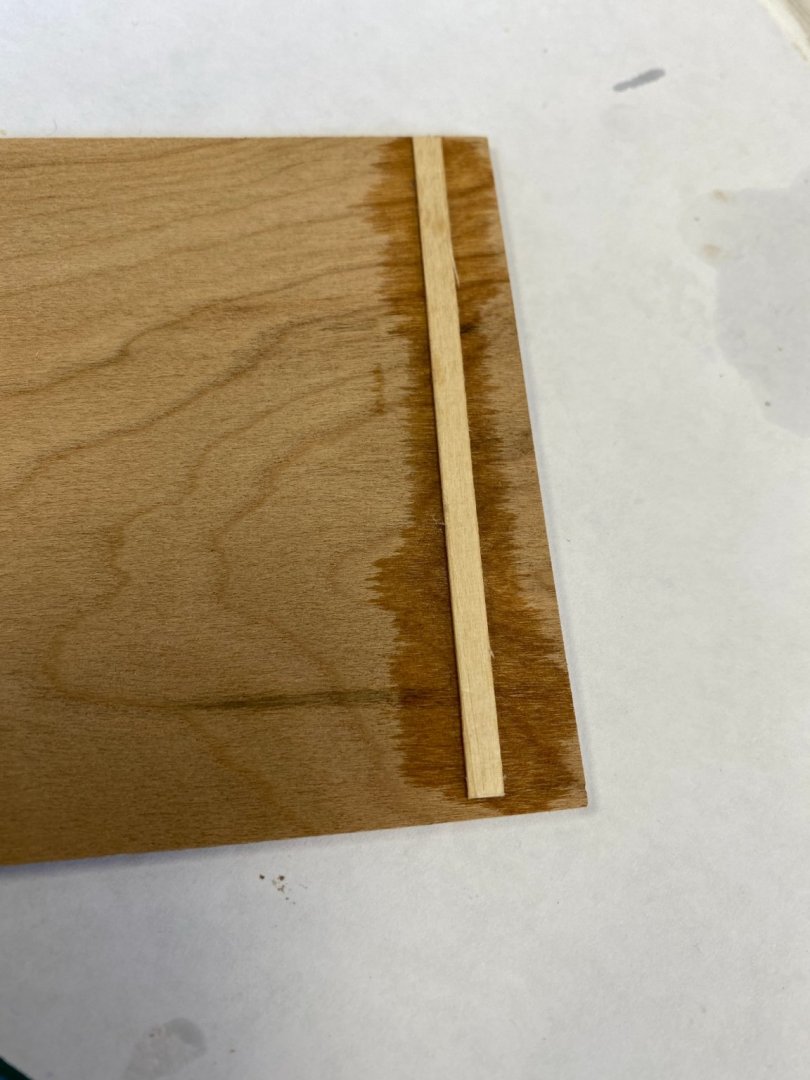
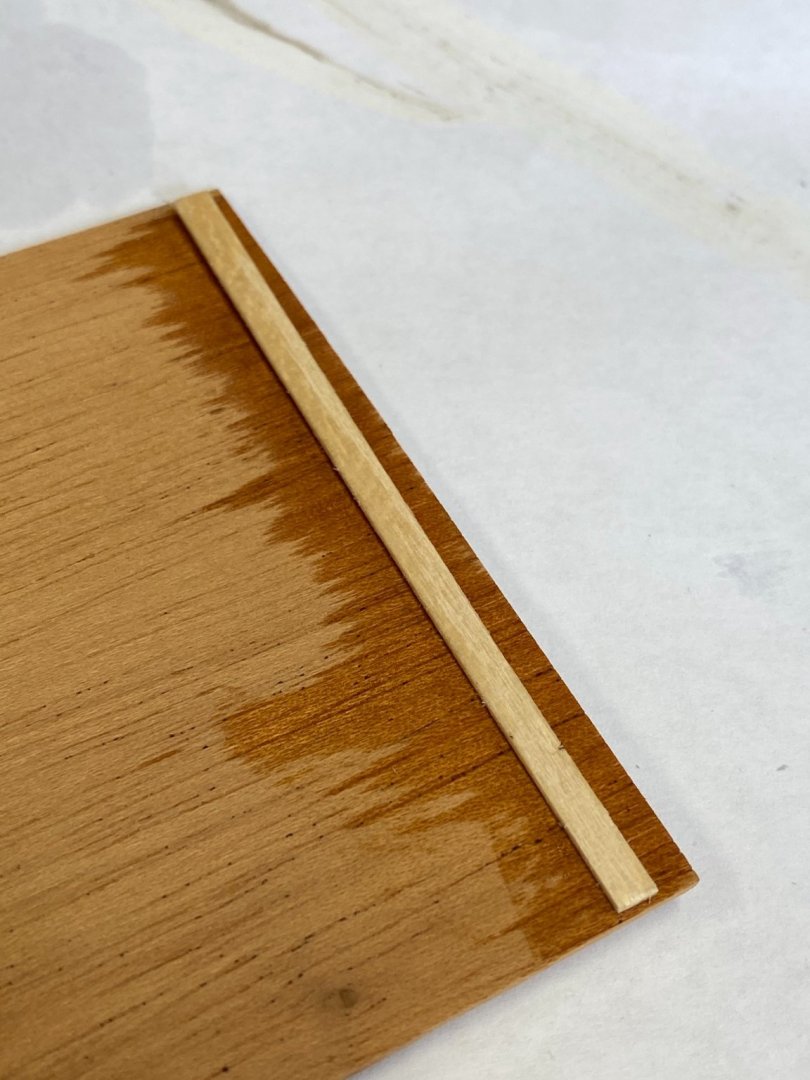
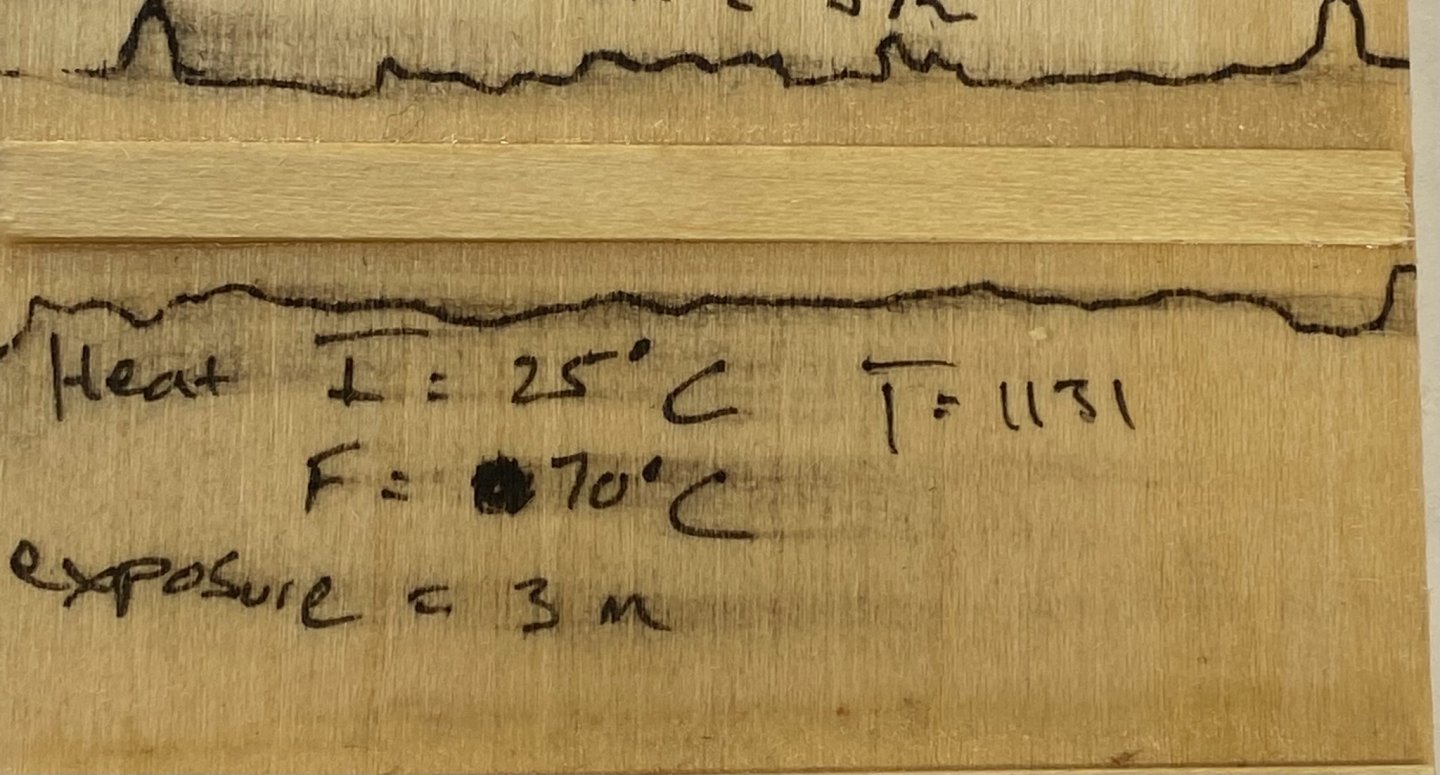
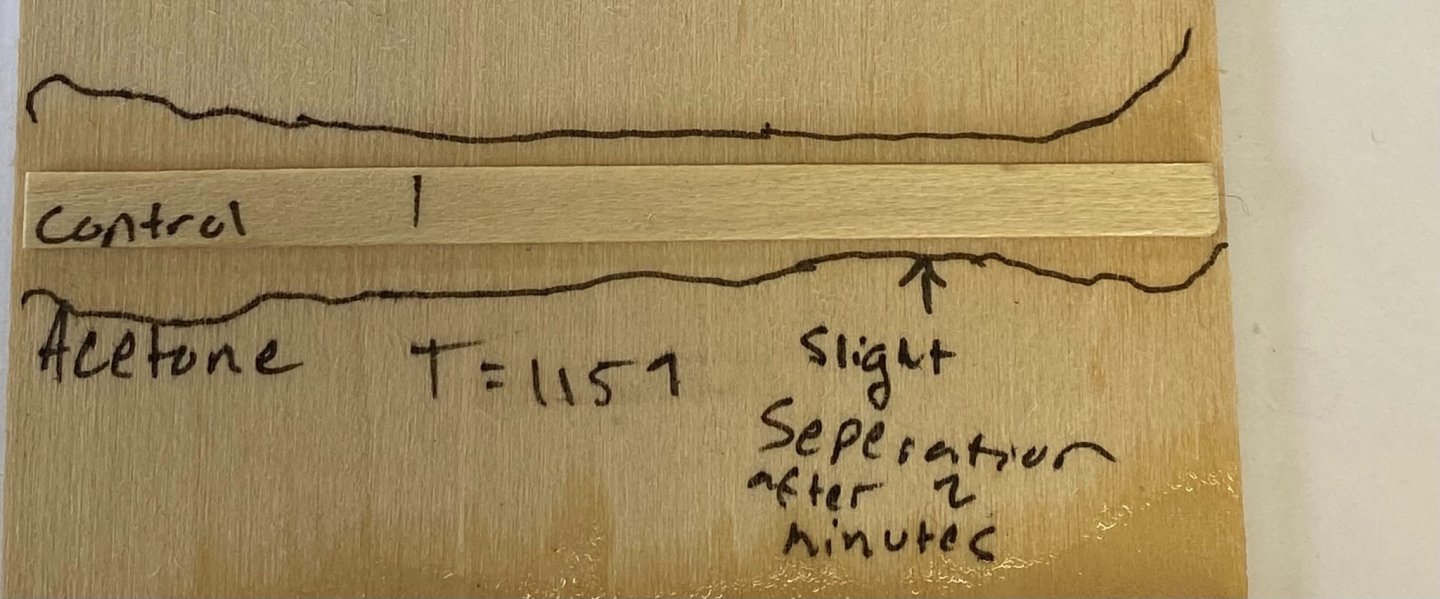
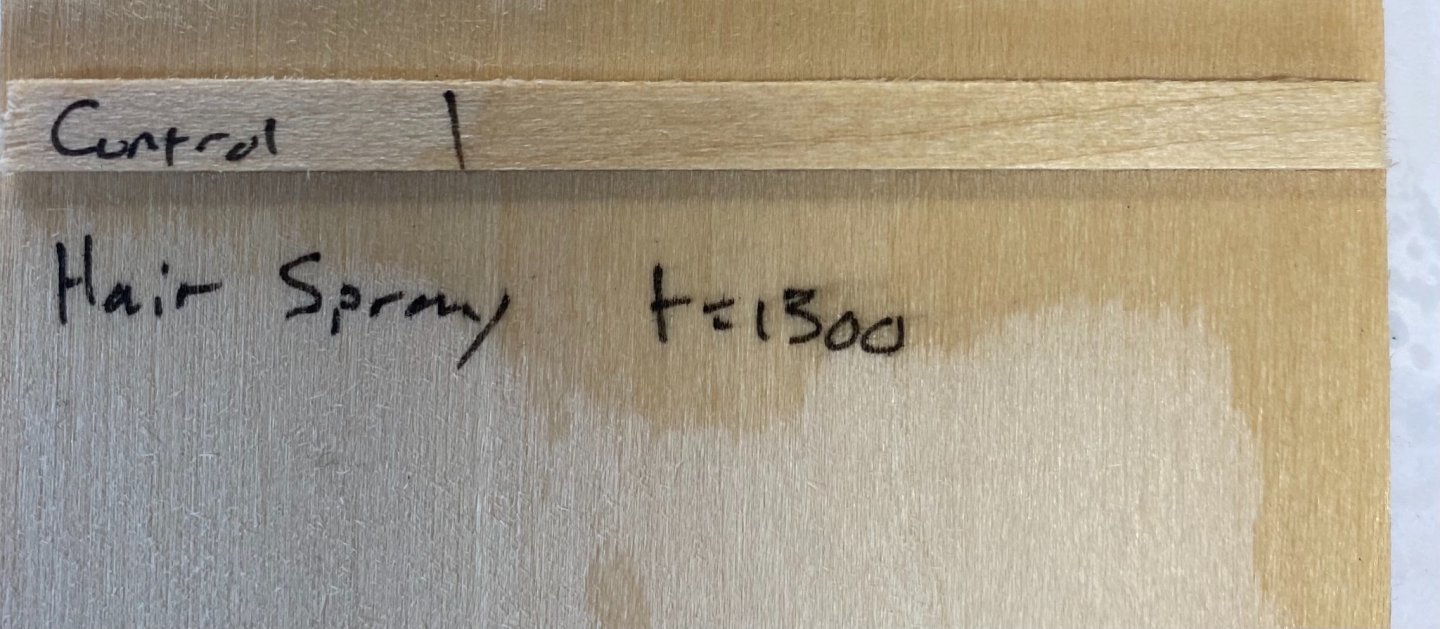
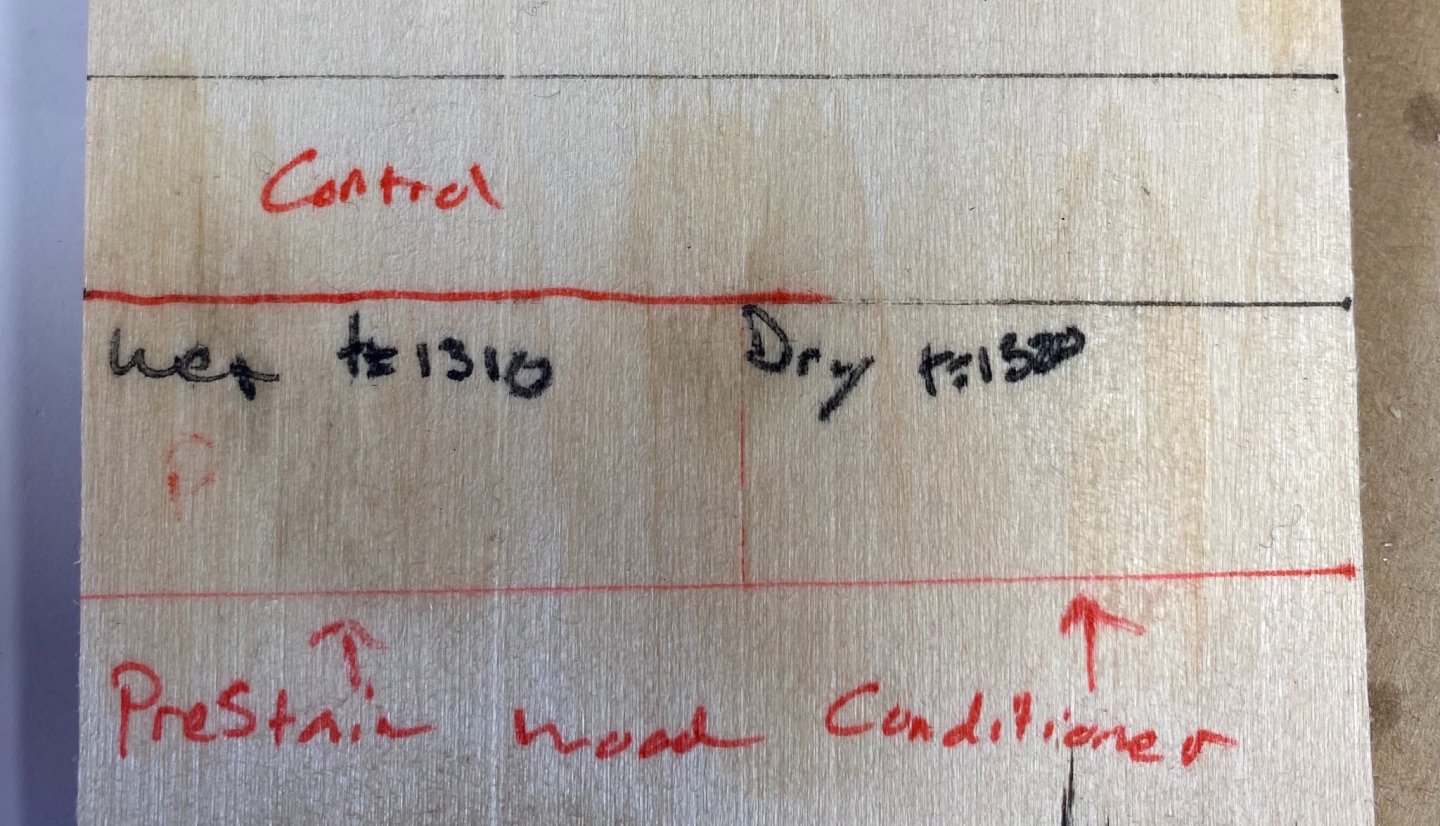
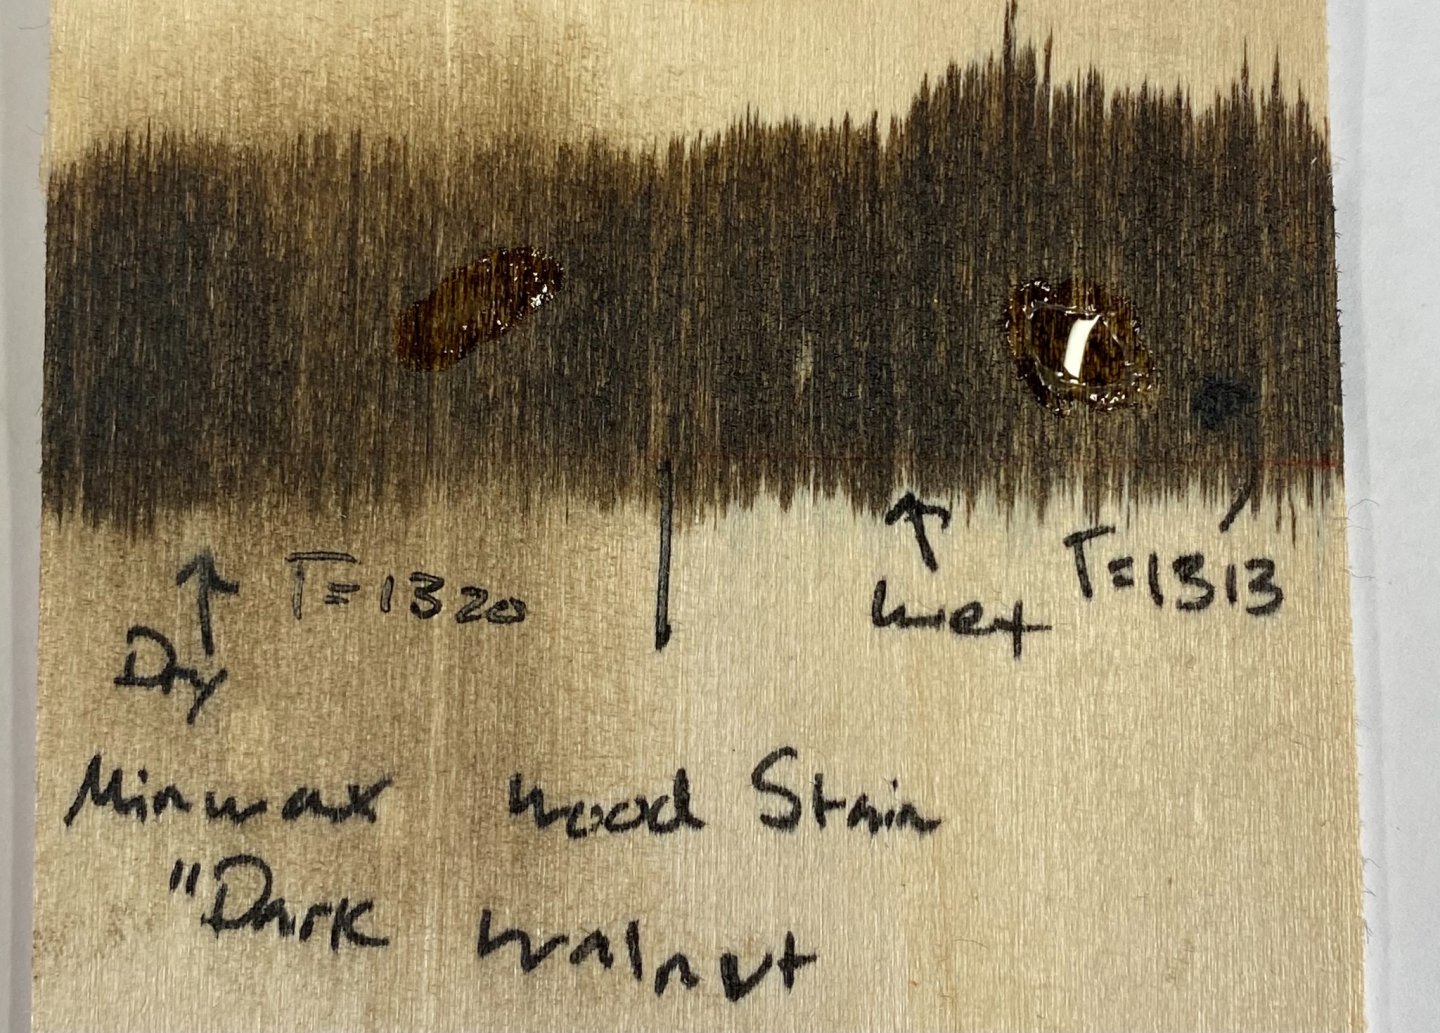
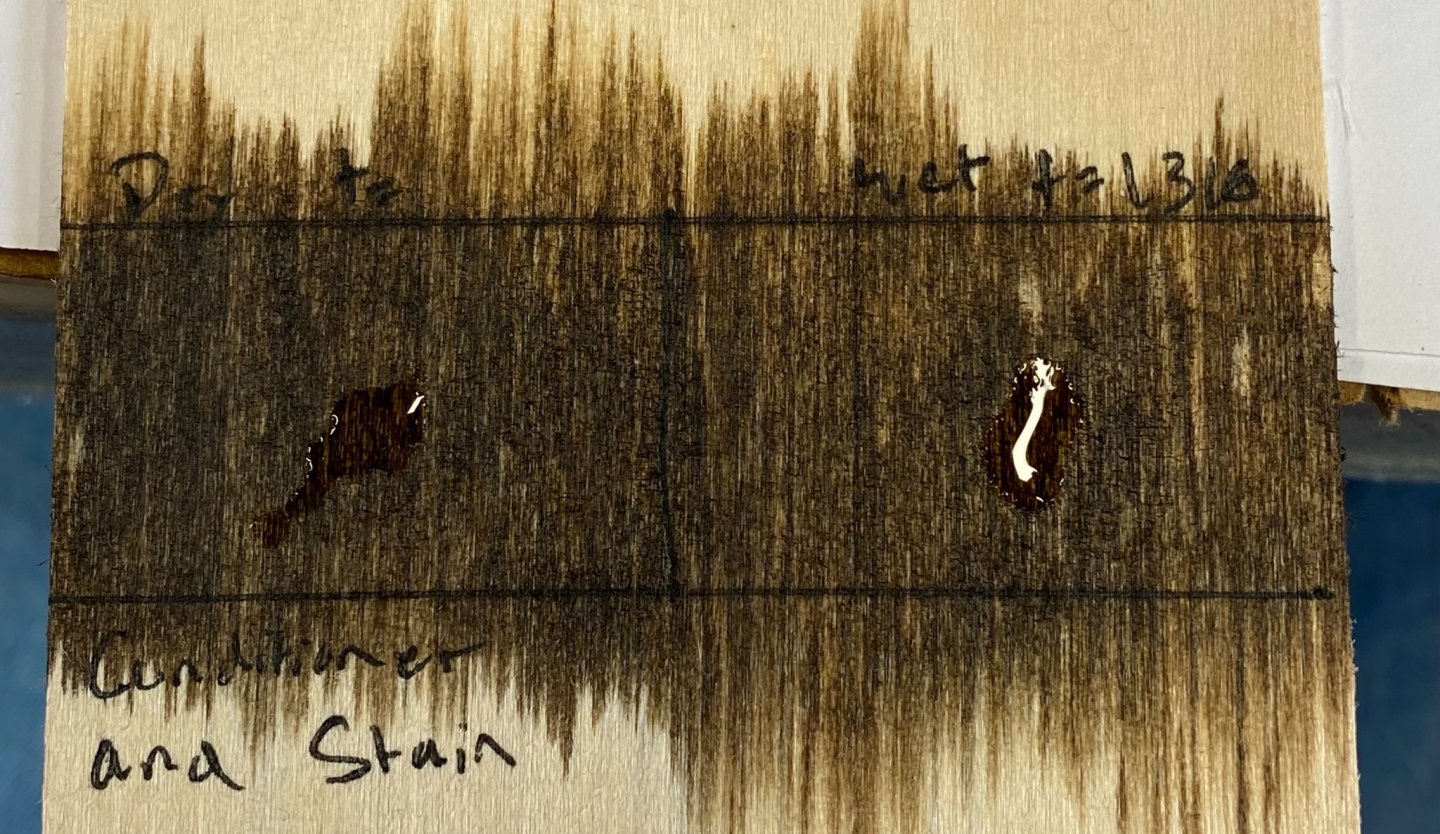
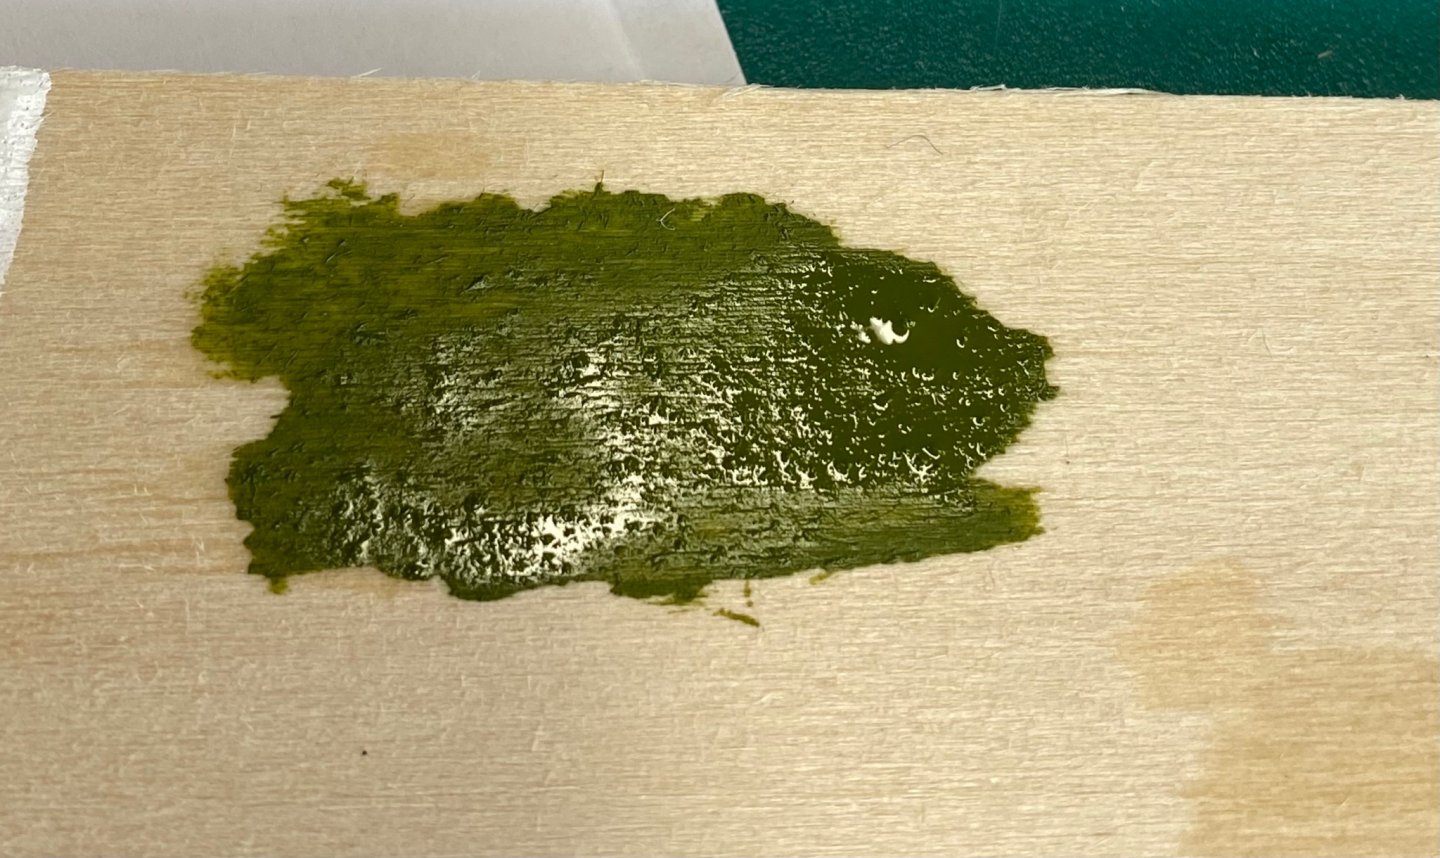
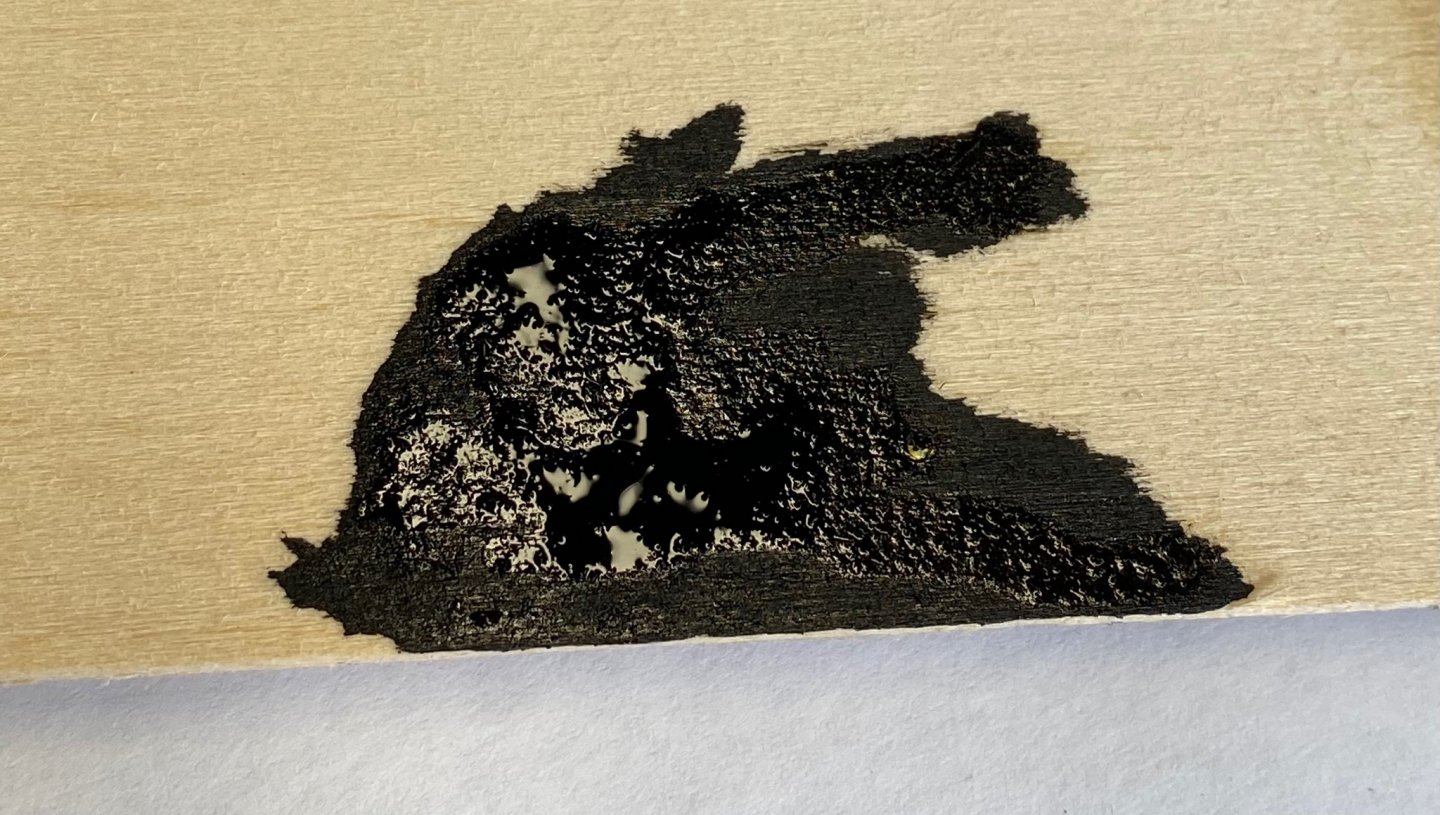
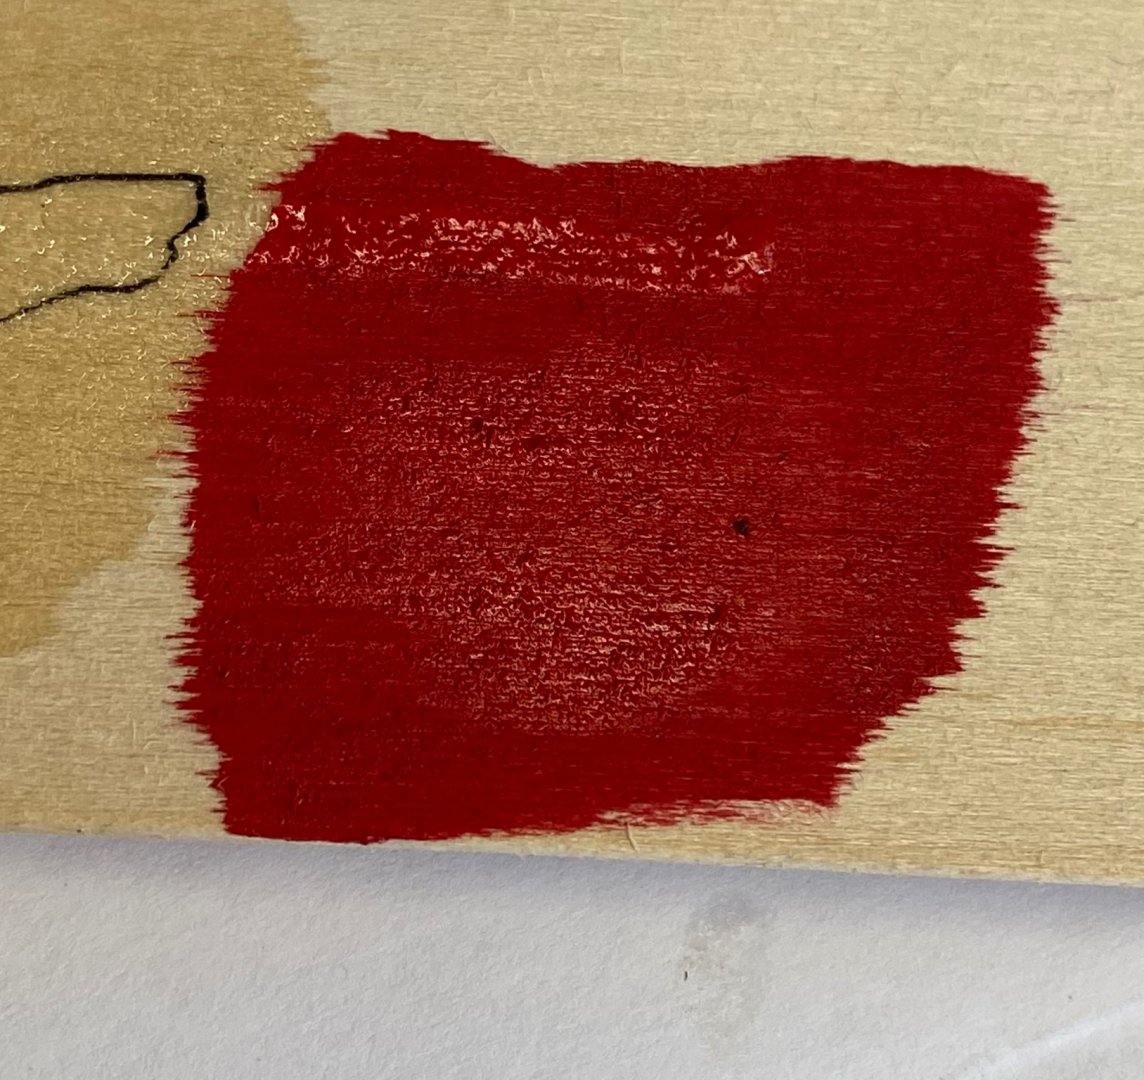
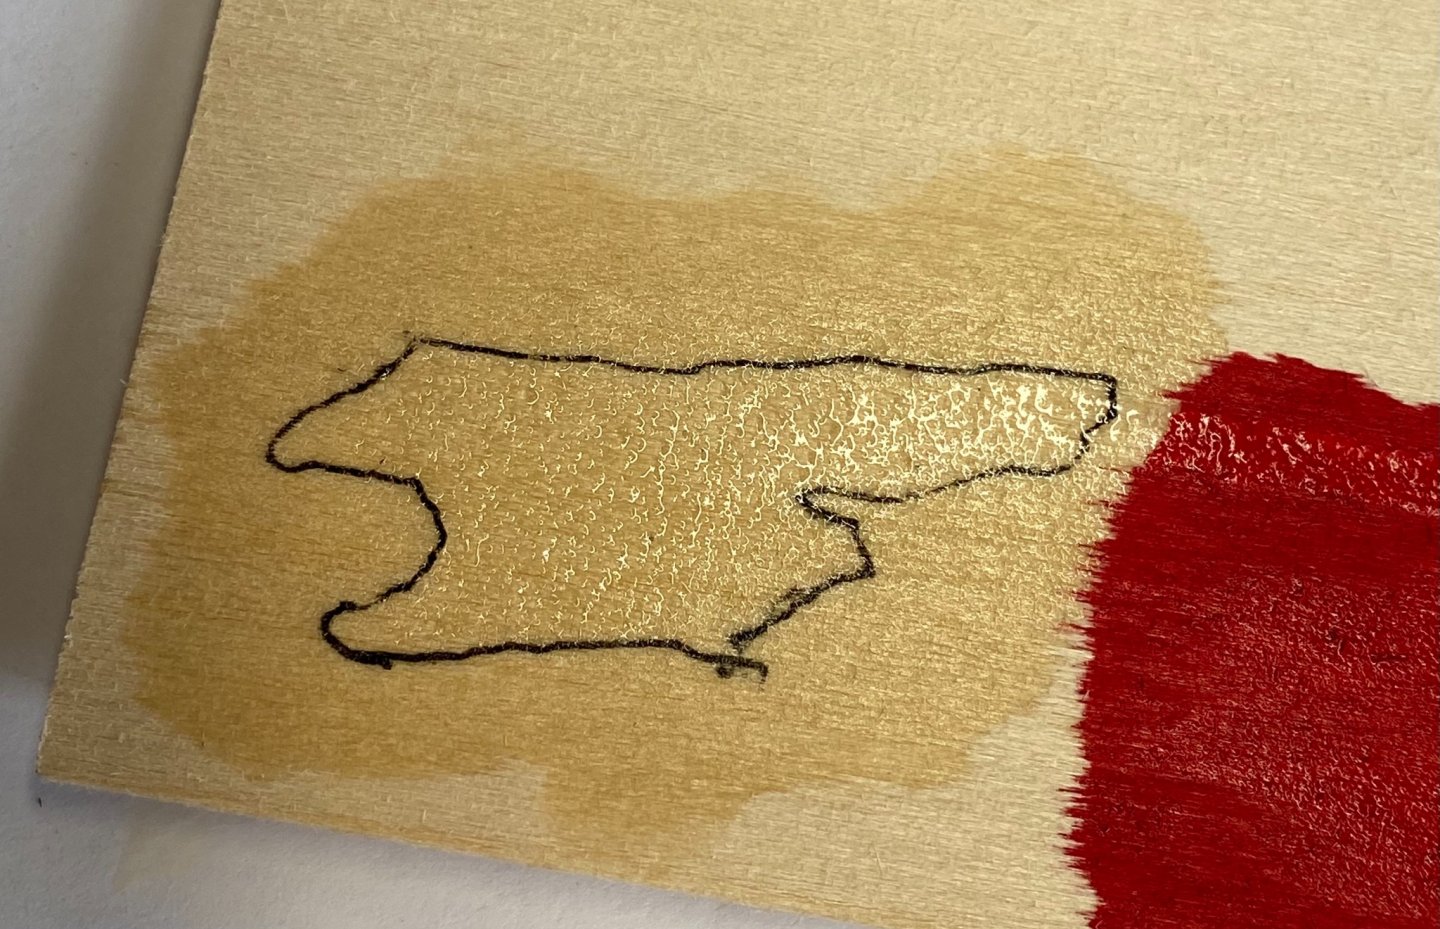
I wanted to present some findings from a few tests I did. A few things about these tests before I get started; the woods I tested were basswood, cherry, mahogany, beech and walnut. The vast majority of these tests were done with basswood, due to its common appearance within kits. Also, I didn’t want to waste a bunch of hardwood for this. All chemicals were mixed or introduced outside, and I wore an N95 mask, a face shield, rubber gloves and a not cotton shirt while conducting all of these tests. If you do not know the chemistry do not try some of these tests at home. Like my dad use to say: don’t be dumb! Once again my intention with this thread is to help educate new modelers or those who haven’t used CA before. The tests I conducted obviously were all centered around the glue, but obviously the thing we care about the most is the wood and how it behaves. A lot of these tests you will likely never encounter, but I wanted to see if unconventional methods would work. First I wanted to see if you could remove enough CA from wood to make it look like it wasn’t used, the second goal was to see if something could be applied under CA glue to prevent it from penetrating to deep in the wood, and the third set of tests were to see what I could use to hid CA glue. All basswood strips were cut to 2 inches, and a line of thin CA was applied to either side of the strip of wood after clamping to the board I used. Any other specifications will be given during the direct test. Finally on to the tests! Test #1 Usually the first thing a modeler might try when they get something on wood is to sand it, so can CA be sanded? The simple answer is kind of. When you put CA on wood, you may not notice but there is some on the surface so its no longer flat. Sanding works great to remove large amounts of excess CA glue, but it wont remove the CA from the pores of the wood, it just removes the shiny look the CA leaves behind. I sanded with 180, 220, 300, 400 and 600 grit. 180 removed all excess CA glue, from there it just polished the wood. Test #2 This second test was water, can you wash it away? I’m sure we are all familiar with the difference between end grain and edge grain, so I wont discuss that here, but the idea is, if CA glue is applied to the edge grain of a piece of wood, you could swell the wood grain enough to sand it away. This didn’t really work, honestly it just added another step to the process. I saw pretty much the exact same results with just sanding. Test #3 Some glues will soften with heat, so the next logical step is to try heat right? I anticipated that this wouldn’t work but I tried it anyway, honestly I was pretty curious about this one. CA glue is flammable, with a flash point of 75 C, so I had to be pretty careful with this one, I did this one out side with my hose in hand. I used my heat gun to heat the glue at the joint to 70 C while constantly monitoring the temperature, I didnt leave the glue at this temp for more than a few seconds, and it quickly cooled down. The heat actually thinned the glue making the problem even worse! Test #4 If I was desperate and didn’t know anything about wood or glue I might try goof off next, who knows maybe it will work. Goof off kind of surprised me. Along the line that I placed the glue it didn’t have any effect, although goof off did a really good job at removing the bleeding of CA glue outside of the line. In some spots it removed all of the bleeding glue. Test #5 I have seen lots of people suggest the use of Isopropyl alcohol, AKA rubbing alcohol, (referred to as IA from now on) to remove already cured CA glue, and I think I have even use this method before. My results weren’t great though, I only had 70% IA which is probably the reason my test didn’t give the results I expected, I’m not sure you can buy 100% unless your a professional but places like The Home Depot, any grocery store and I think hair supply stores sell up to 91%, maybe even more. I did two tests with IA, the first was rubbing the IA into the joint with a Q-tip to see if I could soften the glue, I replaced the Q-tip every 10 seconds and rubbed the joint for two minutes without separation. The next test I did was a two inch joint held together with CA that was submerged for 2 hours, again no separation. I submerged the joint only halfway, because I was also curious what would happen to the wood around that joint that you didn’t put IA on. My test didnt show very good results, but thats ok! Test #6 We established much earlier that the product of the bond made by CA resembles plastic based on its composition and characteristics, and so if you really want to remove something held together by CA use acetone. Acetone is a powerful solvent that is used mainly in the plastic industry, but it is also powerful enough to completely debond CA glue, which can be great sometimes. I conducted the same test with acetone as I did with the IA, with two minutes of rubbing the acetone in I had some separation, after 2 hours of submersion it had completely separated and most of the CA glue stain was also gone. I suppose this method works well for a single piece, If I built something and didnt like the CA stain I could submerge it in acetone to remove it, however I would not use it on something I already glued to the model. Acetone works very quickly so be careful not to spill any on anything you dont want to remove it also evaporates very quickly at room temp so don’t worry if you pour a little in a cup and its gone in an hour. Last note about acetone; its very flammable and volatile, store this in a cool dry place that is not exposed to direct sunlight, wear a face mask as well, the odor is really strong. Test #7 At this point I decided to test some stuff that I may have not considered an option before, like WD-40. WD-40 is a great multipurpose metal cleaner and lubricant. Interestingly WD-40 itself actually cant lubricate anything, it works by displacing the water around it, so it pushes it out of the way resulting in a slippery feel. I sprayed WD-40 right on the joint and noticed it did not penetrate the wood but instead sat on top of it, it did a really good at camouflage because it stained all the wood around it. I dont recommend WD-40 for CA glue removal. Test #8 Hair spray was next, and it had similar results of that as WD-40. It actually did remove some of the glue, it didnt penetrate the wood very deeply and the didnt break the joint, but did remove some of the CA glue stain around the joint. I also dont recommend hair spray, as the stain it created was way worse than the CA stain. I did a few more tests afterwards with the following products that pretty much all had the same result. I tried: Makeup remover wipes, gasoline, liquid chlorine meant for a pool, hand lotion, air brush cleaner, and baby wipes. It’s not worth posting pictures of these because they all look the same as WD-40 and hair spray. I don’t recommend any of them. Test #9 So from here I wanted test what would happen if you put CA on a surface that wasn’t bare wood, the first test I tried was water. I really wasn’t sure what to expect because water is critical in the curing process of CA glue, personally I thought the CA glue would cure even faster, which isn’t exactly what happened. I did three tests with this, the first was putting CA on a wet piece of wood, the CA glue just sat right on top. I suppose nothing, not even water can inhabit those pores for CA to properly penetrate the wood. The second was if you soaked the wood then let it dry would that have any effect? Surprisingly, kind of. With a dry piece of wood that was wet, the CA penetrated fine but left a really hard and shiny shell over the wood when applied, different than regular CA stain. I have no idea why this happened and I wouldn’t be surprised if my test was the reason for this. The third was what if you just wiped it really quick instead of soaked it? It quickly thinned out to cover the area of the water, I will compare it to a primer of sorts, there was a short pause before it thinned out (a fraction of second) but then covered pretty well. It did not stop or avoid any CA glue stain. Test #10 Have you ever gone to stain something and gotten splotches or streaks? In regular wood working it’s likely you didn’t apply an even coat or waited to long to wipe it off or for a bunch of reasons, this can an incredibly frustrating result because once the wood stain is on there, there isn’t much you can do. Preventative measures do exist though, a prestain wood conditioner does a great job at evening out the stain. I wanted to test what the results would be if I applied a prestain wood conditioner and put CA glue on top of that. I conducted two tests with this one, CA glue on wet conditioner and CA on dry conditioner. The CA didnt penetrate at all with wet prestain conditioner. It did penetrate the wood with dry prestain conditioner and with a little sanding actually looked pretty good, there was still some CA stain but it didn’t look to bad. Test #11 What if you stained your wood before gluing to the model, would that help at all? The simple answer: no. Wood stain is oil based, so its very thin and as soon as you make contact with the wood it spreads very thin and really penetrates the wood. CA acts in a similar way but if the oil is there, the CA will not want to penetrate that wood, instead it just sits right on top. Once again I applied CA to wet and dry stain and both showed the same result, 0 penetration of the wood and just a spot of CA sitting on the wood. Awhile ago I mentioned that when CA comes in contact with air a “rind” will form on the outside of the drop. I got a picture of it that I hope better illustrates that idea. Test #12 Prestain wood conditioner was allowed to dry for this one, then a wood stain was applied on top of that and CA glue was applied to a wet sample and a dry sample with the same results as the previous test. No penetration. Test #13 I tried IA as well, who knows! It didn’t stop the CA from penetrating the wood but when CA was applied to wet IA that had not dried it never cured, I wonder if the alcohol changed the glue at all? Interesting, but I don’t think I would try this on my model. Test #14 I wanted to see what happened when you put CA on top of PVA wood glue. With dry PVA the CA “ate” its way through the wood glue until it reached the wood, I dont think there was any penetration of the CA in the wood below the PVA. When applied on top of wet PVA it created this weird texture but nothing really happened, they didnt mix or react. The CA just kind of disappeared, I’m honestly not sure. I tested a few other things that were not that interesting, and gave results similar to wood stain. I tried vinegar, cooking oil, a salt solution I made, and pool water. Test #15 Ok, so we used CA glue, we tried to remove what we could and that didn’t work, we tried to better prep the wood and that didnt work. Looks like CA is here to stay, so how do we hide it? That was my next question during these tests. These next few tests, are me trying to figure out which type of paint or finish will cover CA glue well. First up, an acrylic based primer, it worked great! I used a brush to brush it on, I didn’t care about the neatness of the paint, just how well it stuck. I have used an acrylic based primer with an air brush on surface with CA stain my self with fantastic results. If painting your model after using CA I highly recommended some sort of acrylic based primer. Test #16 Acrylic based paint was the next obvious test, it also worked just as well, I will say that both primer and paint did take a few extra minutes to dry in spots where they sat above CA glue stain. This really was not that big of a deal though, because eventually it evens out and dries nicely. The two working together create an excellent finish that hides glue stain all together. Test #17 Oil based paint was next. I dont use oil based paints very often, spray paint is a pretty good example of an oil based paint, but you can buy them in all sorts of configurations. The oil based paint soaked into the wood very quickly and dried within minutes, except for the spots with CA. The oil based painted almost highlighted the CA in a way because the paint on bare wood dried in a lighter color. I would not recommend oil based paint on CA glue stain. Test #18 I have almost never used enamel based paint, the first model I built was a plastic model just a few years ago and used enamel to paint it, thats the extent of my enamel knowledge. I will say it didn’t care for CA, like oil based paint it did great on the wood but dried a different color over the CA, it also took almost an hour for this to dry. Test #19 This next test is my go to if I have bare CA glue stain that I want to hide. The use of a dull coat or sand and seal, or a wipe on poly like I used for this test, some how completely hides CA glue. I’m not sure what the chemistry is there but I know it doesn’t remove any CA glue. For this test (and all other painted tests) I put a big drop of CA on a basswood board then applied the finish on top. For the wipe on poly test, I put a large amount of CA, enough to really soak it, I then gave 15 minutes to fully dry. One fully dried I outlined the stain in black pen and applied the wipe on poly on top. I didnt do any sanding of the CA or poly, I only applied one coat and this is the result. While the wipe on poly took longer to dry, it still does an excellent job of hiding CA glue. I highly recommend this technique. Test #20 Now I wanted to test the physical capabilities of CA and the environments they could handle. First up is the cold. I had two pieces of wood clamped together had joined with CA, like every other test, and put it in the freezer. The temp before was about 25 C (room temp) and I cooled the joint until it reached 0 C, the glue didn’t debond but became very weak, I was able to pull the two piece apart with a little effort. This is something to consider if you live in an area that gets very cold, if its freezing every night, your joints could potentially become really weak. Test #21 I read that mixing CA with certain things like sodium bicarbonate (baking soda) creates incredibly strong bonds. Real quick note: CA glue is exothermic as we have already discussed, meaning it releases heat during the curing process. Baking soda drastically increases the amount of heat CA puts off, and creates a toxic vapor so don’t do this if you are not familiar with these properties. I only mixed a small amount outside while wearing the proper PPE with my hose in hand next to the pool, so I felt safe conducting this experiment. What’s interesting is I thought if I mix a 50/50 ratio of CA to baking soda it should create a soupy mix, which is not happened. Instead the baking soda absorbed a huge amount fo the CA very quickly formed a very hard and very light disk of CA. Along the long axis (Ill call this the x-axis) the CA was incredibly strong, I hit it two or three times with my 28 ounce hammer, pretty hard. Along the short axis (y-axis) it was very brittle, one hit and it shattered. This test showed me the physical impact CA could take. I did a few more physical tests like this that were already described or were not interesting enough to mention here. Test #22 This is where I tested how CA would look and react to other wood species. For all of these next few tests, I use a two inch strip of basswood glued to a board of the wood in question and a line of thin CA was applied to both sides, and allowed to fully cure. First up was cherry, my personal favorite. I have yet to build a model out of cherry but have worked with it in other senses. It did ok with the CA glue, unlike basswood the CA took a longer time to dry and presented an even worse CA stain. I had to clamp these pieces together to get them to hold. Test #23 I then tested Mahogany wood, it absorbed the CA better than the cherry but still didn’t do as well as the basswood. I didn’t have to clamp the wood this time and it took hold after a second or two, the stain on this one was the worst I think, it just spread everywhere once it touched the wood. Test #24 Next up was Beech wood, it actually did really nice with the CA. It held immediately, didn’t need clamping and the CA didn’t spread very far. Test #25 The last hardwood I tested was walnut. Walnut didn’t really take the CA at all, I had to work the CA in with the other piece of wood, and clamp it for awhile before I noticed enough strength in the joint to let go. A little push with my finger though knocked it right off. I dont recommend using CA on walnut. Test #26 This next one is something you do not want to happen. You dont want to get CA on clothing, specifically cotton. Clothing has a very high surface area because of the individual fibers, this allows for CA to become very thin and cure extremely rapidly. As I mentioned a moment ago, CA is exothermic, so when the surface area of CA is increased, and the rate at which it cures is increased, the heat output of the reaction is also increased. This means when you get CA on clothes it gets very hot very quickly, and because its CA it’s likely to stick to your skin as well. This obviously screams danger so try not to get it on your clothes, in fact a recent experiment conducted by scientists found even putting a Q-tip inside a bottle of CA can cause it to catch fire. So always take the proper precautions. This ends my discussion on CA glue, I’m sure there are several things that I missed, but then again I’m not a chemist, so most of this information was research done on my part. If any one has any questions please feel free to ask, I’m sure there are a lot of other inputs and experiences with this topic, personally I don’t advocate using CA for everything. I think a harmony between PVA glues, CA glues, and epoxy are what is going to give you the strongest model, but hopefully with the information I have provided you can make the determination on your own of when and where to use this glue. Thank you again for taking the time to read this very long post, happy modeling every one! Bradley


-
I apologize if my previous comment was misleading, I had a specific environment in mind with your question and failed to consider other alternatives. I hope this didn’t confuse you much but your original thought was correct. Hopefully today I plan to post a long write up a quite a few tests I have conducted with CA and how it reacts with certain stuff hopefully you find it useful and it answers some questions you might have! Bradley
-
Good point, I had only put wooden models into the equation, I could imagine wood glue would not do great on plastic without sanding or something. Bradley
-
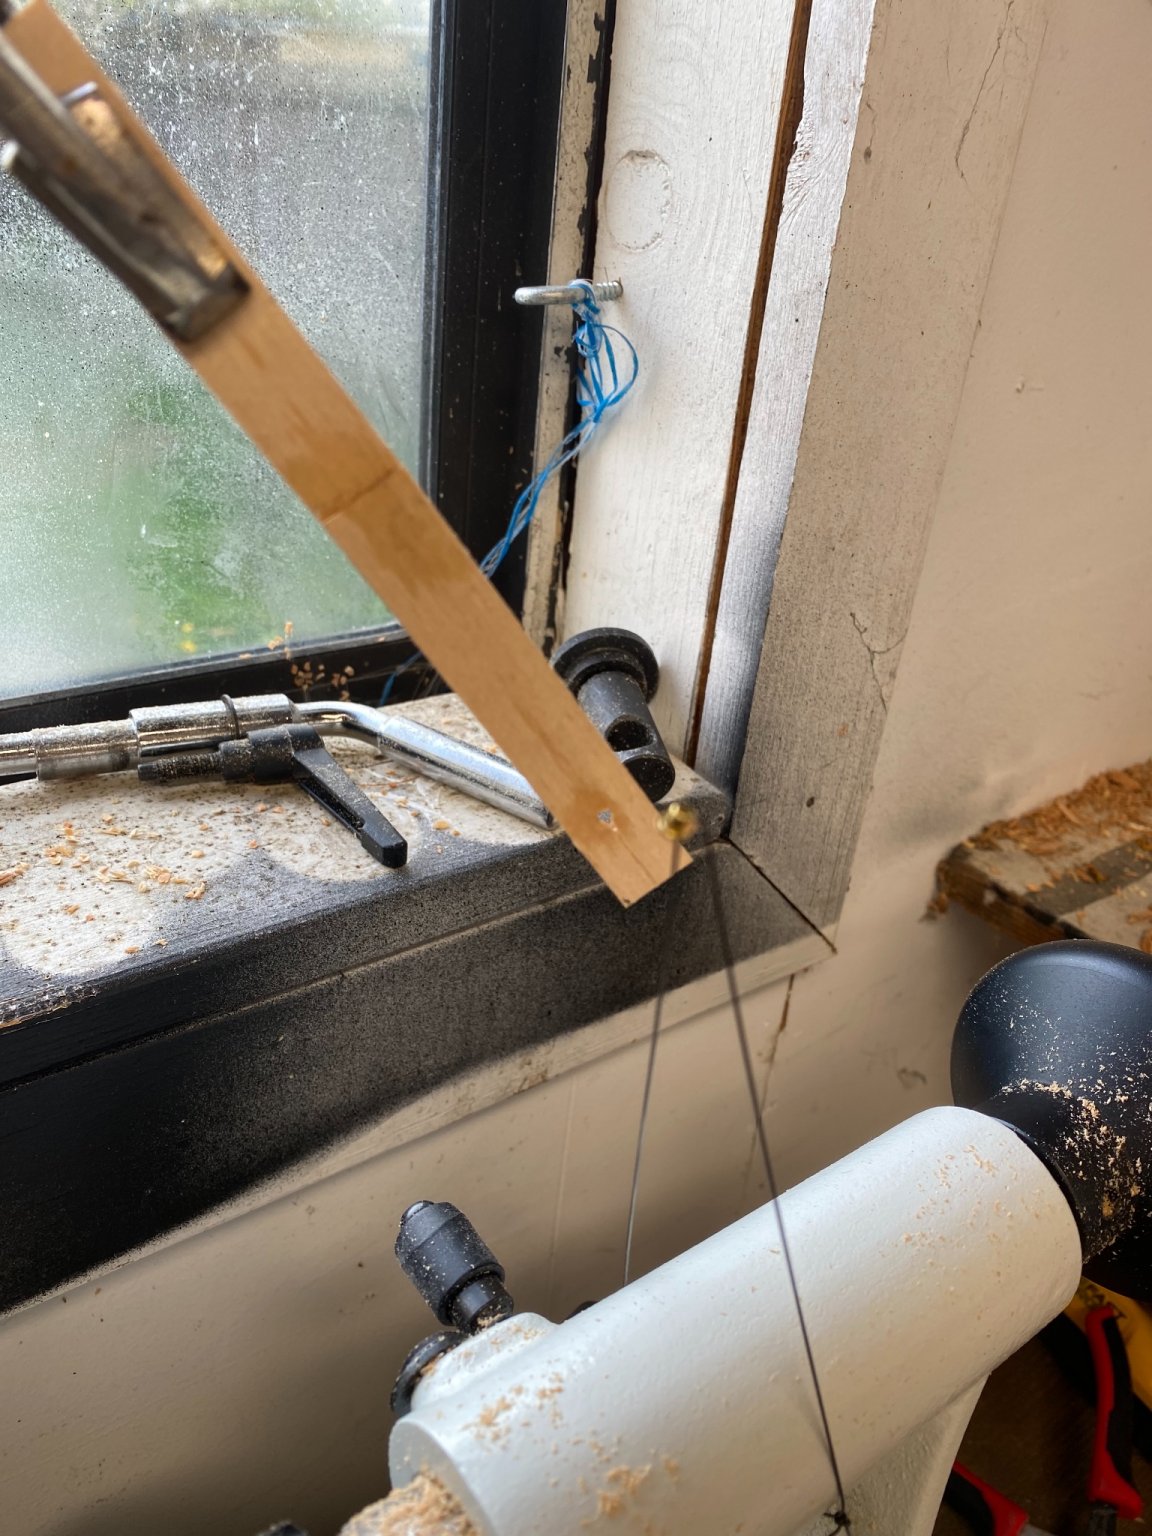
No one is going to believe me until I post pictures but this stuff is amazing! I did exactly what you did, glued two pieces together clamped one side and put weight on the other. I ran out of things I can weight this piece of wood down with. I drilled a small hole on one piece and put a metal sleev in the strengthen that point then I fed metal wiring through that and tied it off to different stuff. I did a couple different tests but I first tried a gallon of vinegar, 10 pounds no problem. Next up 5 bricks, mine are 5 pounds each, that’s 25 pounds, again no problems. Then I though ok what would really break this joint? I tied that off to my 100 pound lathe and it picked it up no problem. It only held for a second before that metal sleeve ripped through the wood. How’s the joint you ask? As strong as ever! I have a completely different kind of test I want to conduct as well in regards to strength of the glue. I haven’t taken to many pictures yet because I was amazed that it withheld any of that to begin with. The psi isn’t all that impressive, according to my math here lifting that lathe of 100 pounds with an area of .75 inches resulted in 133.3 psi. If I had a better method for testing this I’m sure I could pick up lots more. For this test I actually don’t care about the psi though, because I feel like lifting that much weight has proved that modern formulations of this glue are really good and much stronger than most think. This is the only picture I have taken so far, it’s just after the sleeve in the wood broke. Hopefully you believe me that I’m not making this up lol, I’ll take better pictures later. Bradley

-
There is probably some shear stress, but for a shear stress test the best method is a pull method. glue two planks together just as you have and instead of twisting them, hold onto the clamps you have and try to pull them apart horizontally, if that makes sense. I did a few of my own as well that I plan to post tomorrow hopefully. Bradley
-
After as much research as I have done on this, I’m starting to feel the same way. Modern formulations of CA glue are so much stronger than it use to be.
-
For removing large amounts of wood I use cabinet files. I have a 10” cabinet file and a 10” wood file from lee valley tools. I like them because they have some weight to them so I don’t have to strain my arm over time. They also have a good bite so they can really remove some material. Both of mine are half round, They seem to be the most versatile for shaping the hull. If you really want to remove material you can use a wood rasp, mine is also from lee valley tools. Files leave a cleaner finish than rasps. Also, make sure to use a file card often to clean your files. Lee Valley Tools half round files: https://www.amazon.com/Nicholson-File-Card-Brush-Pack/dp/B001KVM2H2 Lee Valley Tools wood rasp: https://www.leevalley.com/en-us/shop/tools/hand-tools/files-and-rasps/rasps/20135-wood-and-cabinet-rasps?gclid=Cj0KCQiA34OBBhCcARIsAG32uvOXAPM4-JpTUYynzJCJs_s48d4jb39vuPd8O2slPNNOMje9nK_mbp0aAv5hEALw_wcB File card: https://www.amazon.com/Nicholson-File-Card-Brush-Pack/dp/B001KVM2H2 Bradley
-
The exact measure of stress being applied to an object is probably different at every point in the hull based on a bunch of factors, so to give an exact number is very difficult. There are a lot of different stresses being applied to a plank on a hull and in some cases its not hard to exceed the breaking point of CA glue. Some models that have a steep curve at the bow or stern probably generate a lot of constant stress in longer planks, shorter planks don't have to bend as far. I don’t want to go to deep into the physics of the wood here but for this exact reason a lot of people choose to use a different glue. Also ounces, are used to describe things like mass, weight or volume. Some of these units can be very confusing to fully visualize what they mean, so for this instance square feet works perfectly fine as long as you do the proper conversions, which you did so nice work!
-
So the adhesive that holds the deck furniture to the deck experiences compressional stress, not shear stress. I found a patent by a Japanese company filed in 1989 that discuses their shear strength testing of the adhesive. The units are kilogram-force per square centimeter, a form of stress, those units are derived from all sorts of math that would take me awhile to describe, they report shear strength of around 300 Kgf/cm^2 of most glues they tested. I didnt have much work to get done today so I had some time and conducted over 40 tests of CA glue in various environments with various wood species. One test I will talk more about later, was a single drop of CA on basswood, followed by a single coat of satin finish poly, the CA glue immediately become invisible.
-
Welcome to MSW! your first build looks great, the Wasa is a very difficult kit from what I have seen so it’s probably best to start small and work your up! This site has pretty much any information you might need to help along the way, and if it’s not already here I’m sure lots of people can help! Looking forward to seeing a build log! Bradley
-
Your speed and attention to detail is very impressive! Fantastic work on this model, the Cutty Sark has always been high on my build list, so very nice work! Bradley
- 48 replies
-
- 1
-

-
- Cutty Sark
- Artesania Latina
- (and 1 more)
-
Your jig is awesome! What a simple but effective design. And your build up to this point is excellent, very nice work all around! Bradley