


Matrim
-
Posts
1,401 -
Joined
-
Last visited
Content Type
Profiles
Forums
Gallery
Events
Everything posted by Matrim
-
Thanks all. exotichardwoods also seem to have wood my table saw can cut (blanks for guitars from the looks of things). The pear is steamed though so I am enquiring as to whether they are the ones steaming. Otherwise beech/american cherry will be the way to go.
-
You've gone this far in a month! Good grief that's two years of work for me It's looking good though, how are you finding the kit and instructions??
-
Hi, I am not certain you can shape once the planks are on but if you remove them and replank then soaking the planks before bending and heat can both work well. There are also plank benders out there that work with varying degrees (I have used several in the past the one I 'like' best scores the inside of the plank allowing you to not only curve but also angle it - I will try and find out the name tonight). The simplest for someone unfamiliar is to soak the plank first and even pre-bend it round another item that follows roughly the shape that you are after (I have used a playmoblil boat in the past and bowls). If you don't mind the holes pinning it on whilst it dries also assists. Your work doesn't look at all bad (especially for someone just starting) and you will be amazed how much post sanding can help (you may have to fill as well as sometimes post sanding can open gaps). Excellent covered everything but nothing in this post so probably utterly unhelpful...
-
It is (from this supplier) - I always thought that was too soft for decent frame building? Hence why I ignored tulipwood as well. The list I am picking from can be seen here. https://www.woodshopdirect.co.uk/planed-all-round/ I am ignoring most of the African wood due to toxicity issues..
-
Hi all, I am starting to consider re-starting my Amphion scratch build so am looking (again) at wood choices. For the frame (as that's what i will be on for the next eight gazillion years) I have the following options. The list is constrained by a particular supplier and the fact that I have decided I do not have the space to size wood myself so am buying planed to a size where by Byrnes can cope (so 'thin') White Beech Steamed Beech (above but pinkier/darker) American Cherry Canadian Hard Maple Western Red Cedar I started with American Cherry so may just keep with that but thought I may look around at some other low grain options. Any opinions on suitability will be gladly welcomed..
-
Complete at last. Now follows an unsuccessful attempt to find the best place to take a photo which sets her off nicely. But fails. I was pleased with the way that the hull and wood fittings sections went and thought most of my scratch and replacement choices both looked and worked well. This was not a surprise as after my last kit (Caldercraft Diana) I had specifically been unhappy with both of these and had then completed the Triton cross section and Chucks longboat in an attempt to improve basic wood working skill. Curiously though I had been happy with my rigging on Diana and it is something I enjoy doing a lot yet I was much less pleased with my rigging now. Probably due to the length of time since I last attempted to rig an entire ship. The worse bit if rigging for me was the shrouds. Looking back at my Diana the Shrouds are straight (still) and their primary weakness is that the ink has worked off (basically if there is any movement in the shrouds over time due to dusting etc then even sight motion will gradually de-ink). For this kit I used black thread and whether this made it worse or whether it was the relative size and distance they did not come out well. Something for me to consider in far more detail when moving forward. The Rigging. Since it’s been so long and it is likely to be a similar huge amount of time before I rig again I want to cover some of the lessons learnt concerning rigging to remind my future self of what to do. Now rigging, like many things, is an art and some people are very good at it. It is less important to an unknowledgeable observer as it is the impression of the multitude of ropes that counts rather than ‘ooo that one is seized beautifully’ but even so I want to try and move towards best practice from ‘just works’ So random notes (in no particular order) Add the shroud cleats to the shrouds BEFORE tying the ratlines and carrying out any other rigging. I attempted to add after I had starting rigging and it did not go well IF you superglue to secure a rope then ensure you put it under strain before supergluing. If you don’t then you will get a rope with a weird angle (I don’t do this any more but remembered it from last time) You will accidentally punch a rope when tying something, so it is NOT POSSIBLE to keep ropes correctly tensioned. The solution here is to seize the highest (most easily accessible) section of the rope (usually the one on a yard) allowing it to be tightened later on in either direction. That way if something gets loose you can do something about it. So the area on a live ship where you would tension the rigging (down on deck) is actually a locked area and tensioning is done where you can both easily reach it and where it can occur (allowing you do not glue both ends) Order is important and not always the kit order. I think starting from rigging that bases itself close to the masts then move outwards (after the primary (not back) stays). Always drill block holes again and test the intended rope fits through prior to fitting on the mast/yards. You will regret it if you attach a block then find it has too small a hole for the rope. Especially if trying to do so from two inches away Like with gun carriage rigging I often found that it was easier to rig off model with the rope through all the relevant blocks and then attach to the model and then tighten as opposed to trying to rig onto the model directly. When making belaying pins it is better to have long shanks as it is easier to get purchase around them when rigging especially when other ropes are present. The shanks on the Bounty are tiny so I gave up and went for simple hitches in most cases. Before securing ropes try and tighten manually to see if another rope is in the way. Sometimes you add a rope think it looks okay and then tighten then when you see its actually competing with an unexpected different rope, so you have to undo and re-do. there was something dodgy about the lifts and the way they were interacting with the shrouds. I suspect I made a big mistake somewhere so be careful of this next time. In the past I have secured the yards with a pin. This is all very well but A) Doing so prior to the shrouds going on can cause shroud issues so don’t pin until you can see the shrouds and secondly it can make securing the yards correctly difficult. I found I preferred not pinning and pulling the yard into place was the easiest approach. When cutting loose ends of threads always pull the loose end with tweezers first so you can see what you are cutting. Though I was much better at this this time around I still ended up cutting two-three actual ropes as opposed to the loose end I was aiming for When attaching blocks to ropes I found simple seizing was the easiest approach (not historical) and secured the block better. Basically wrap the thread around the block and hold close to the block with locking tweezers then a simple hitch with thin material at the block end then repeat further back. Slight drop of super glue on the securing material (not on the block holding rope!) and job done. Don’t forget that if you randomly tighten one rope that looks loose then you may be loosening a different rope elsewhere. Scale matters. My Snake and Diana are at the same scale as the Bounty but are larger ships so the rigging is (was) easier. For this reason it looks like the Bounty rigging is even more simplified but equally there are a lot of ropes fitting in a smaller area. For me my next task is to build a couple of Goban (not ship modelling related but it will help hone skills with almost all of my machine tools) which should take a month or two to do correctly. After that I may re-furbish my Diana by fixing some broken rigging (and a mast ☹ ), re-inking the shrouds and generally trying to de-dust. That should take only a week to do. After that I am going to re-start my Amphion. Due to the lessons learnt above I will be upping the scale from 1:64 to 1:48. I have zero chance of getting a 1:64 scale frigate into the house so since it will be remaining in my workshop I might as well go for a 1:48. This will make some of the parts much easier to make and machine. It’s either that or drop it to 128 and lose loads of detail and perhaps go solid hull. I have a couple of months to decide. Anyway, thanks for reading and happy modelling.
.thumb.jpg.987d4c45695c7b446c298e1279b2b328.jpg)
.thumb.jpg.ff6a019e4e3edb36881ad9770e9acd73.jpg)
.thumb.jpg.78945ad32cb5af002d0f0c6b2fdec933.jpg)
.thumb.jpg.77c15ad570a983e6be07c3d87581eef9.jpg)
- 38 replies
-
- 6
-

-
- bounty
- caldercraft
- (and 1 more)
-
As an aside I have used a bit of wood from the piece used to hold the laser cut pieces. It is a useful thickness, already has an excellent 'curve' so just needed a slot for the wheel house and some shaping underneath to fit the very slight inverted U (or V) of of that area and does not get in the way of the lanterns.
-
Need CAD type program
Matrim replied to Sambini's topic in CAD and 3D Modelling/Drafting Plans with Software
I like TurboCad. The version under a hundred quid does fine at any ship plan cad work. -
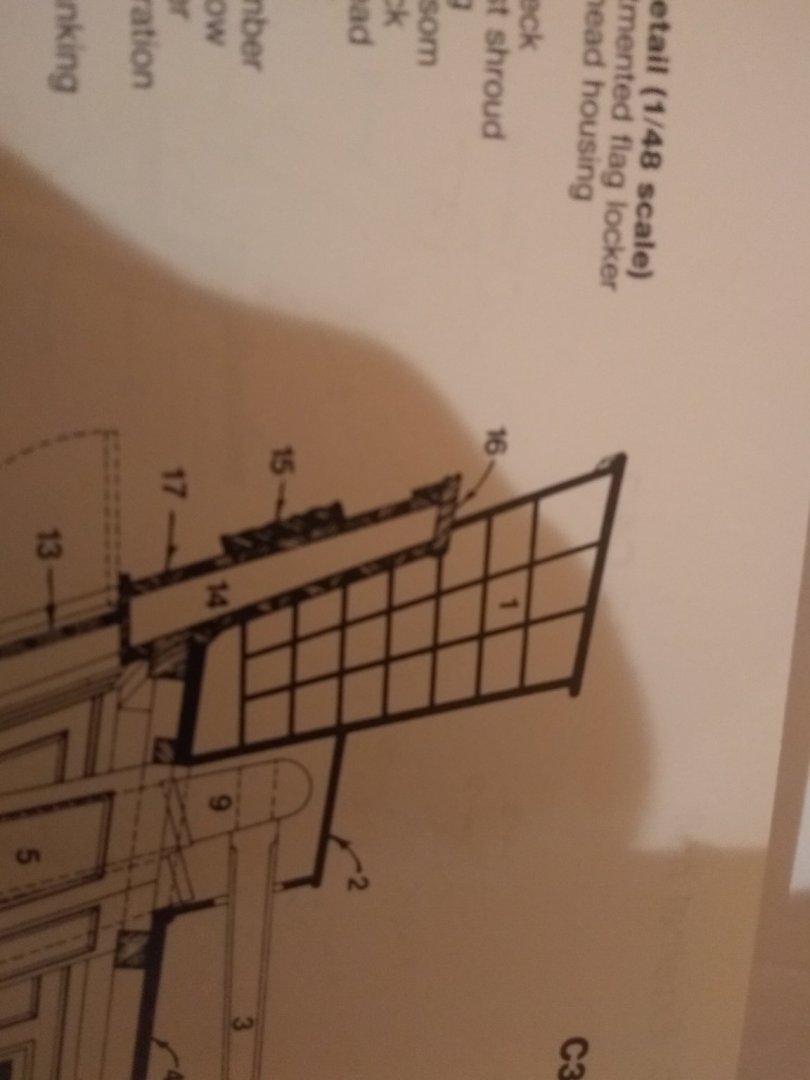
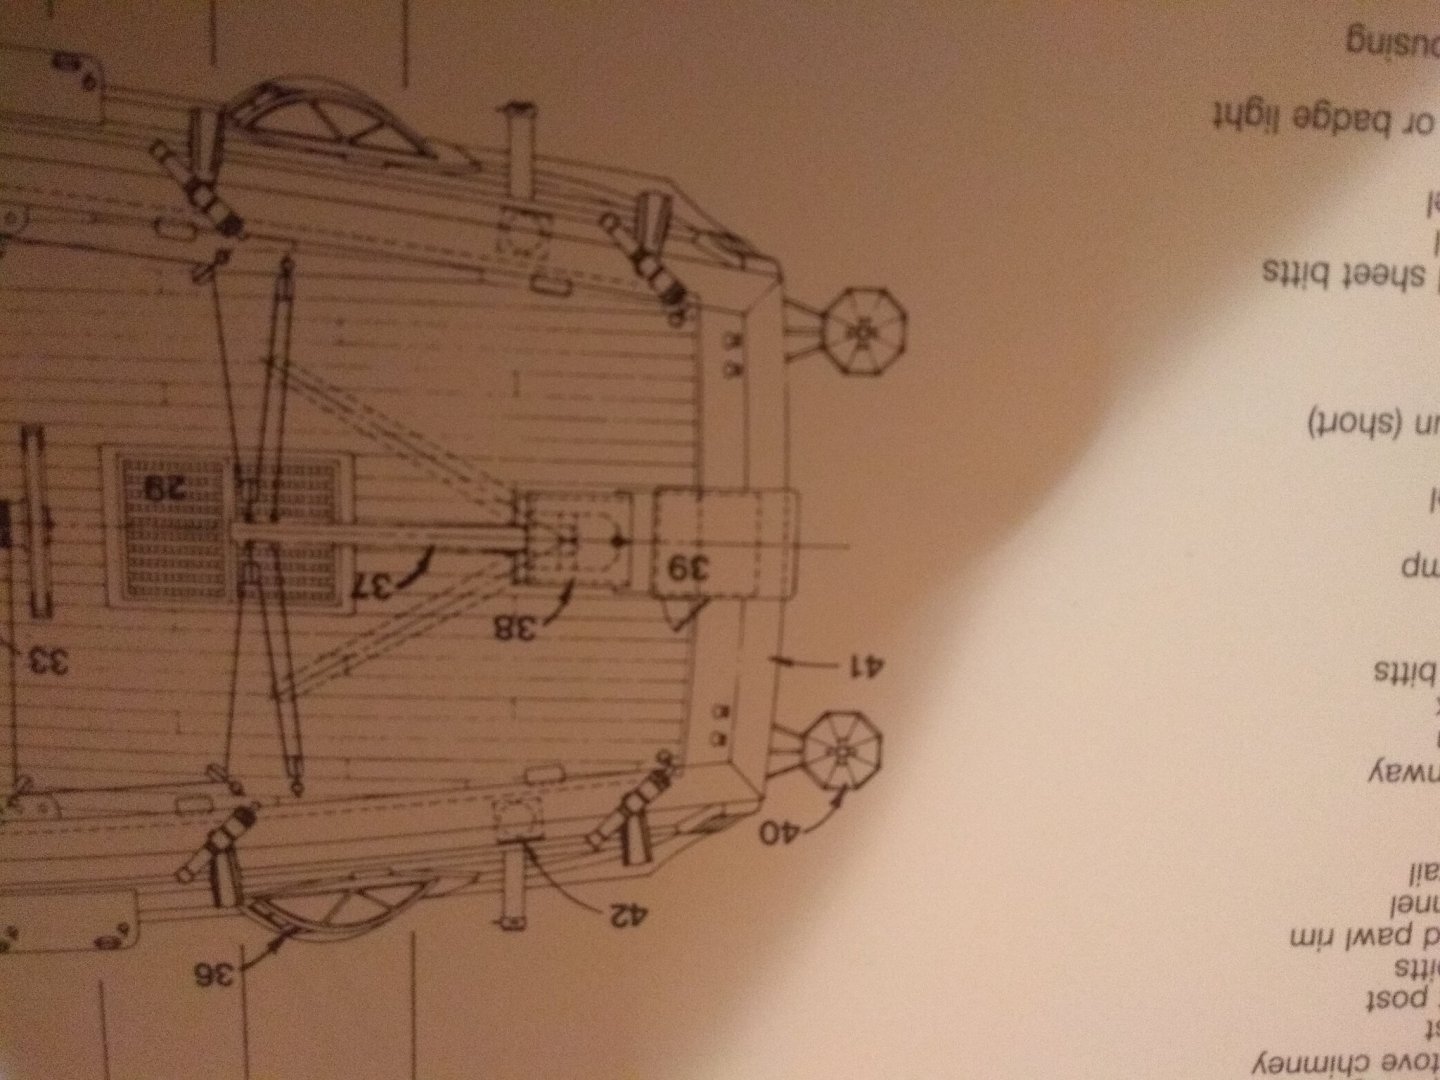
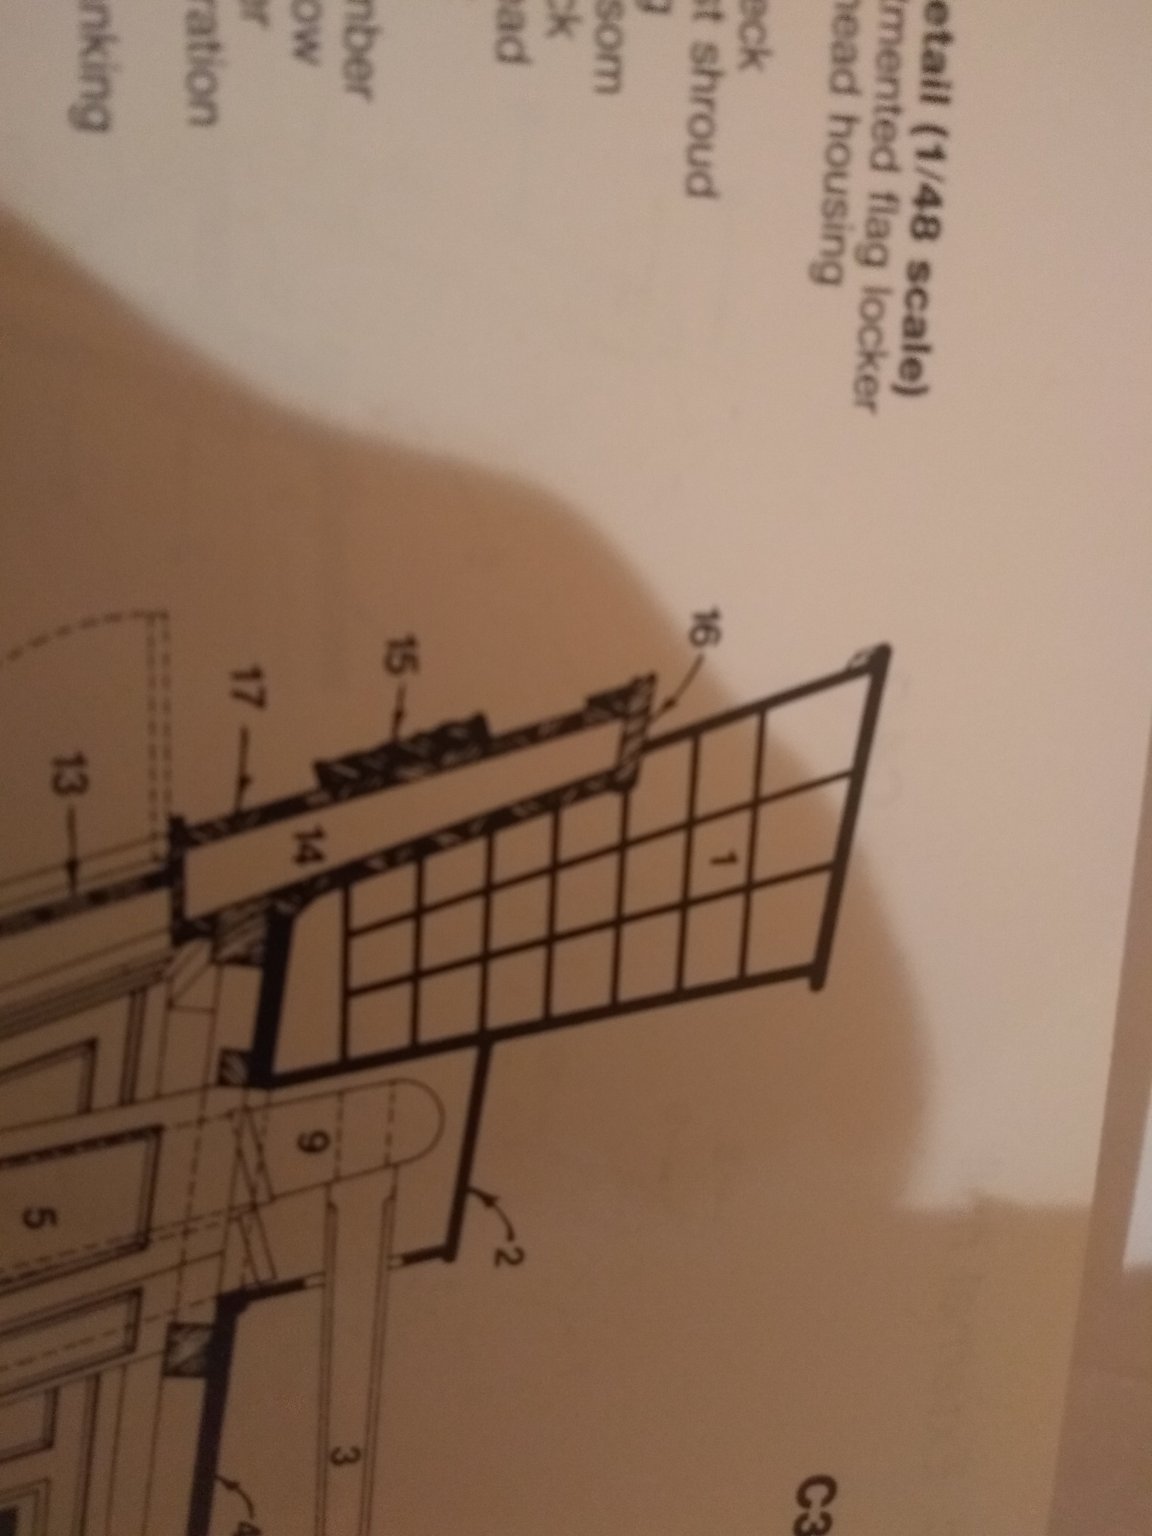
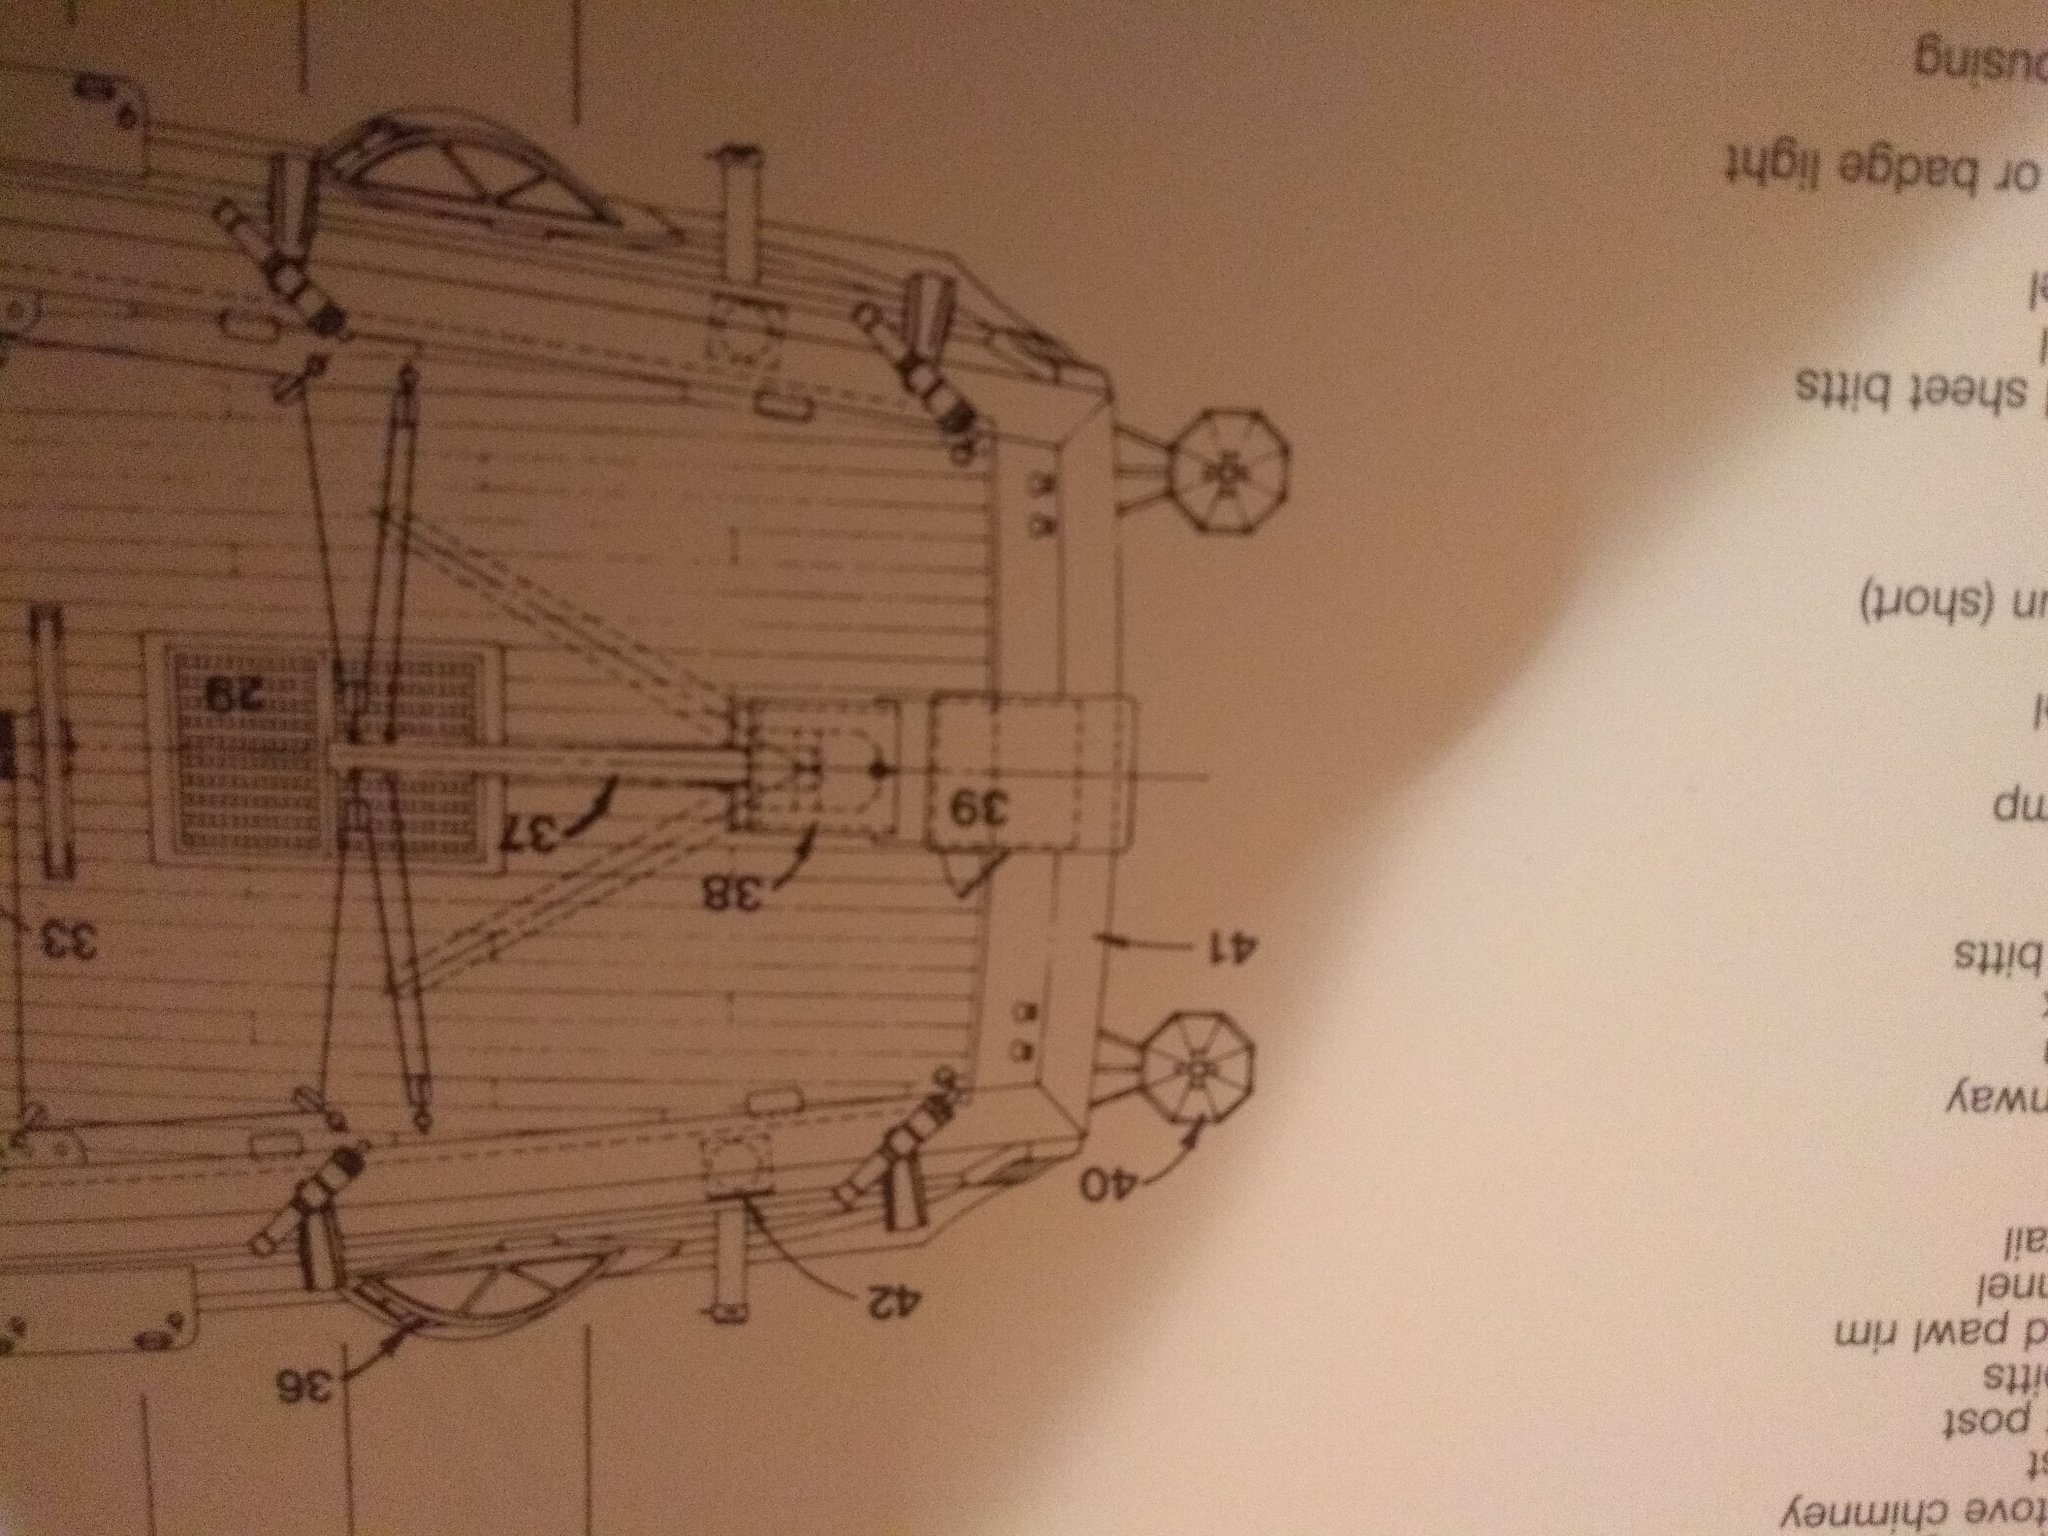
Had a look at mine and I have (also) not added a Taffrail. It's not on the plans and not (as far as I can tell) referenced in the instructions. I did dig a bit deeper as I have the AOTS Bounty Book and that does show a Taffrail. I would guess that it would have to go on after the wheel house thing as that leans into it so it would need either cutting round or angling at point of contact. Looks like I will have to carve one out for myself before I start rigging the mizzen. (I also checked my other Caldercraft models and they seem to have the same issue. Anyway here are a couple of photos of the taffrail from AOTS. First up '16' is the piece in question And here is an overhead where I am guessing 41 is the taffrail.
-
Once you have got through one completed model then I think you are quite able to up the complexity of kits undertaken. If (on the other hand) you start but don't finish one then staying at beginner (or dropping if you started higher) might be appropriate.
-
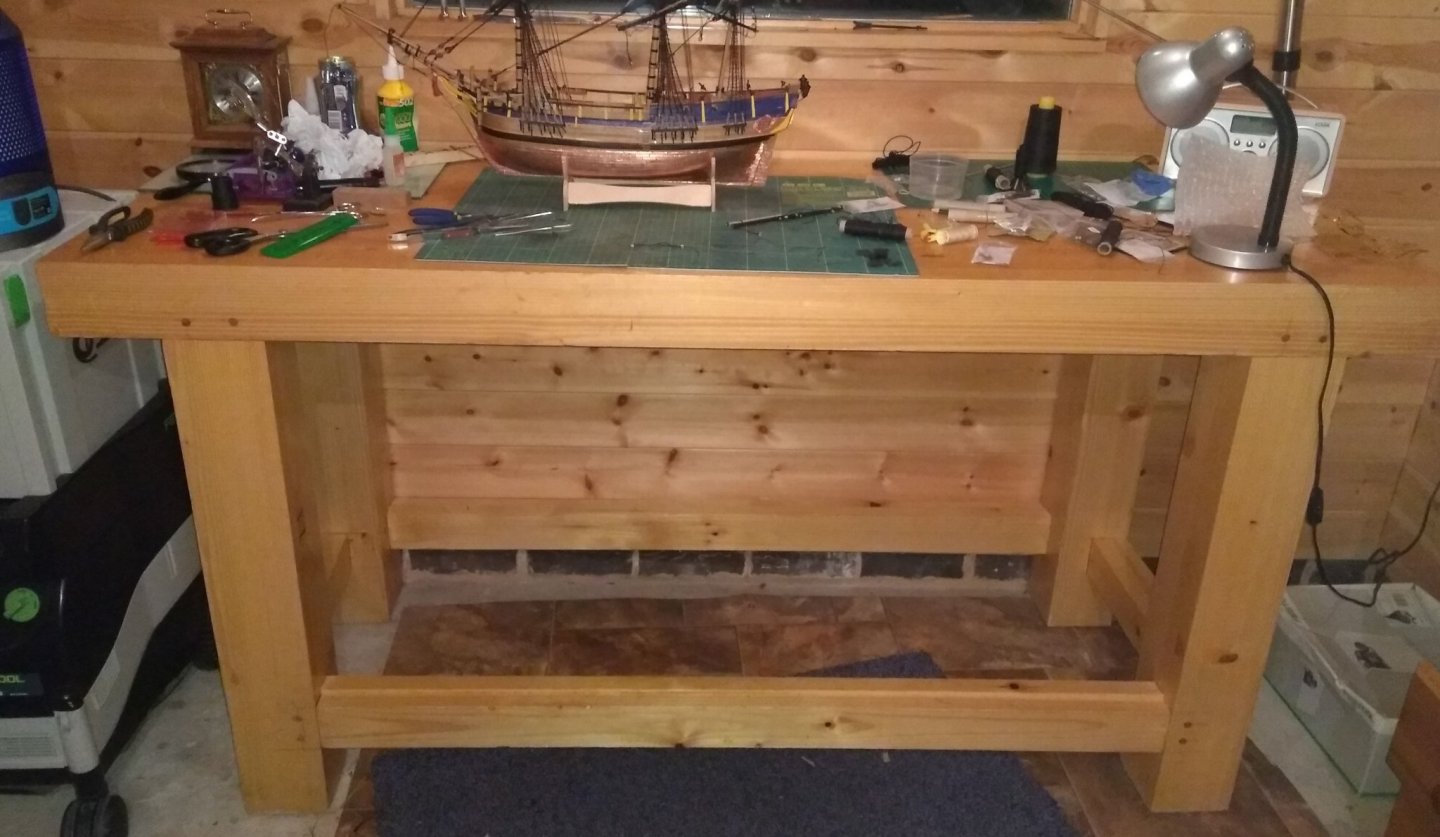
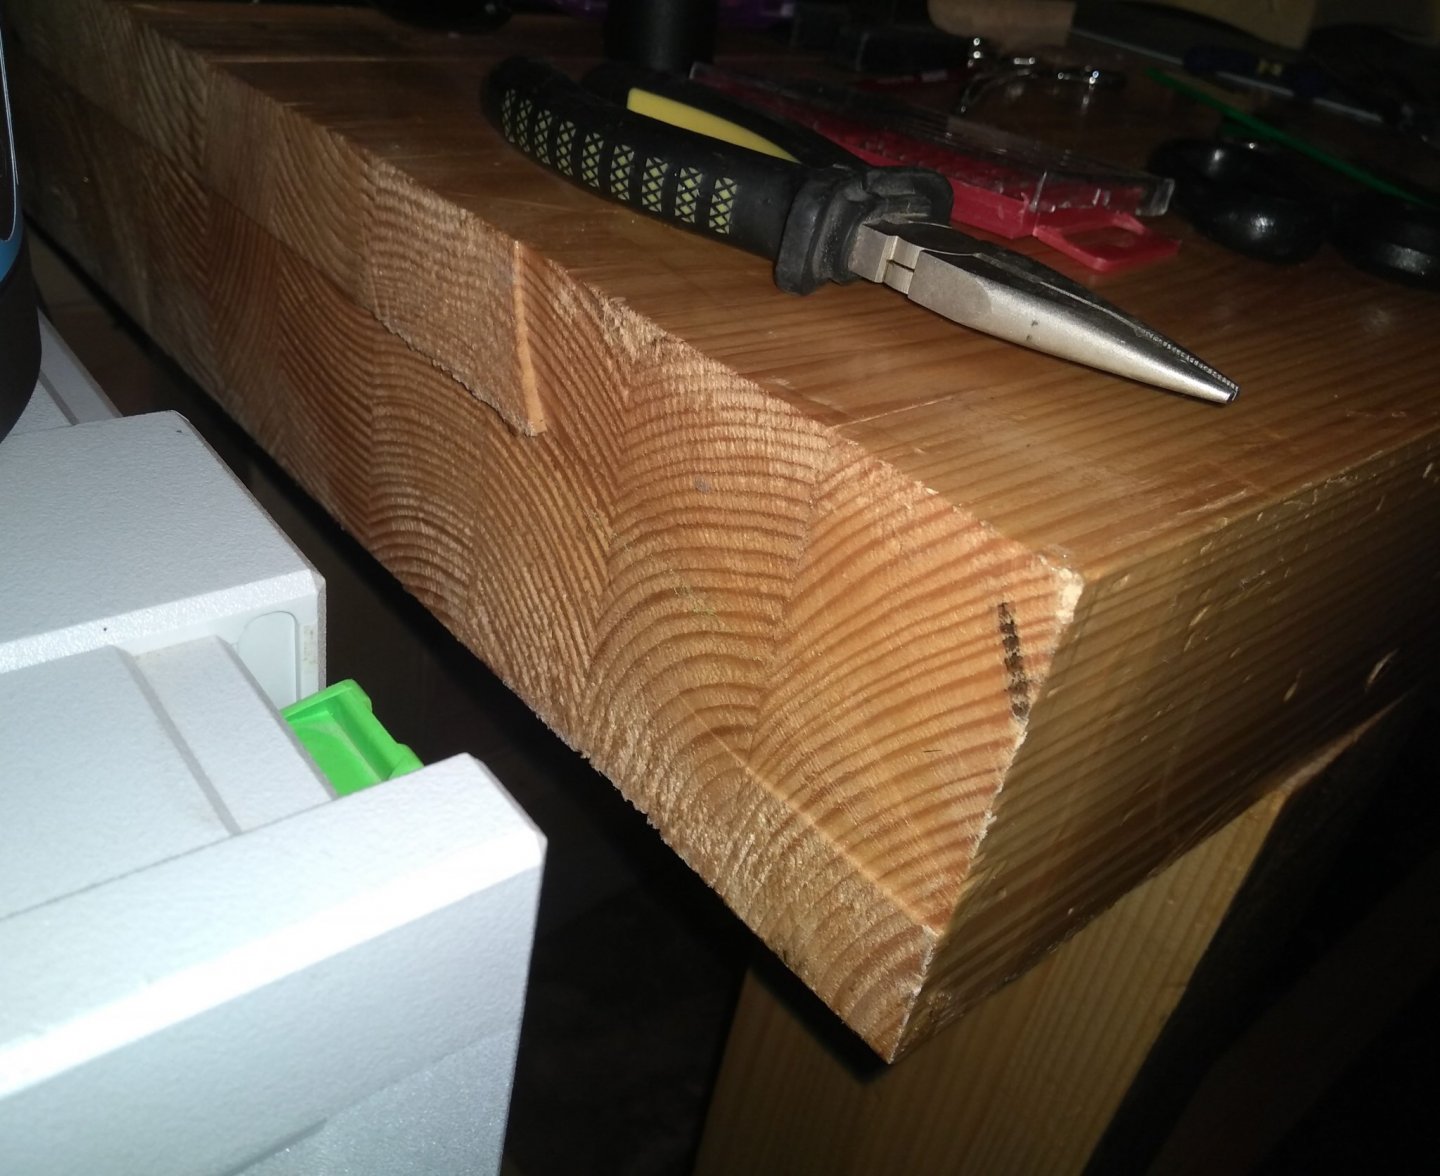
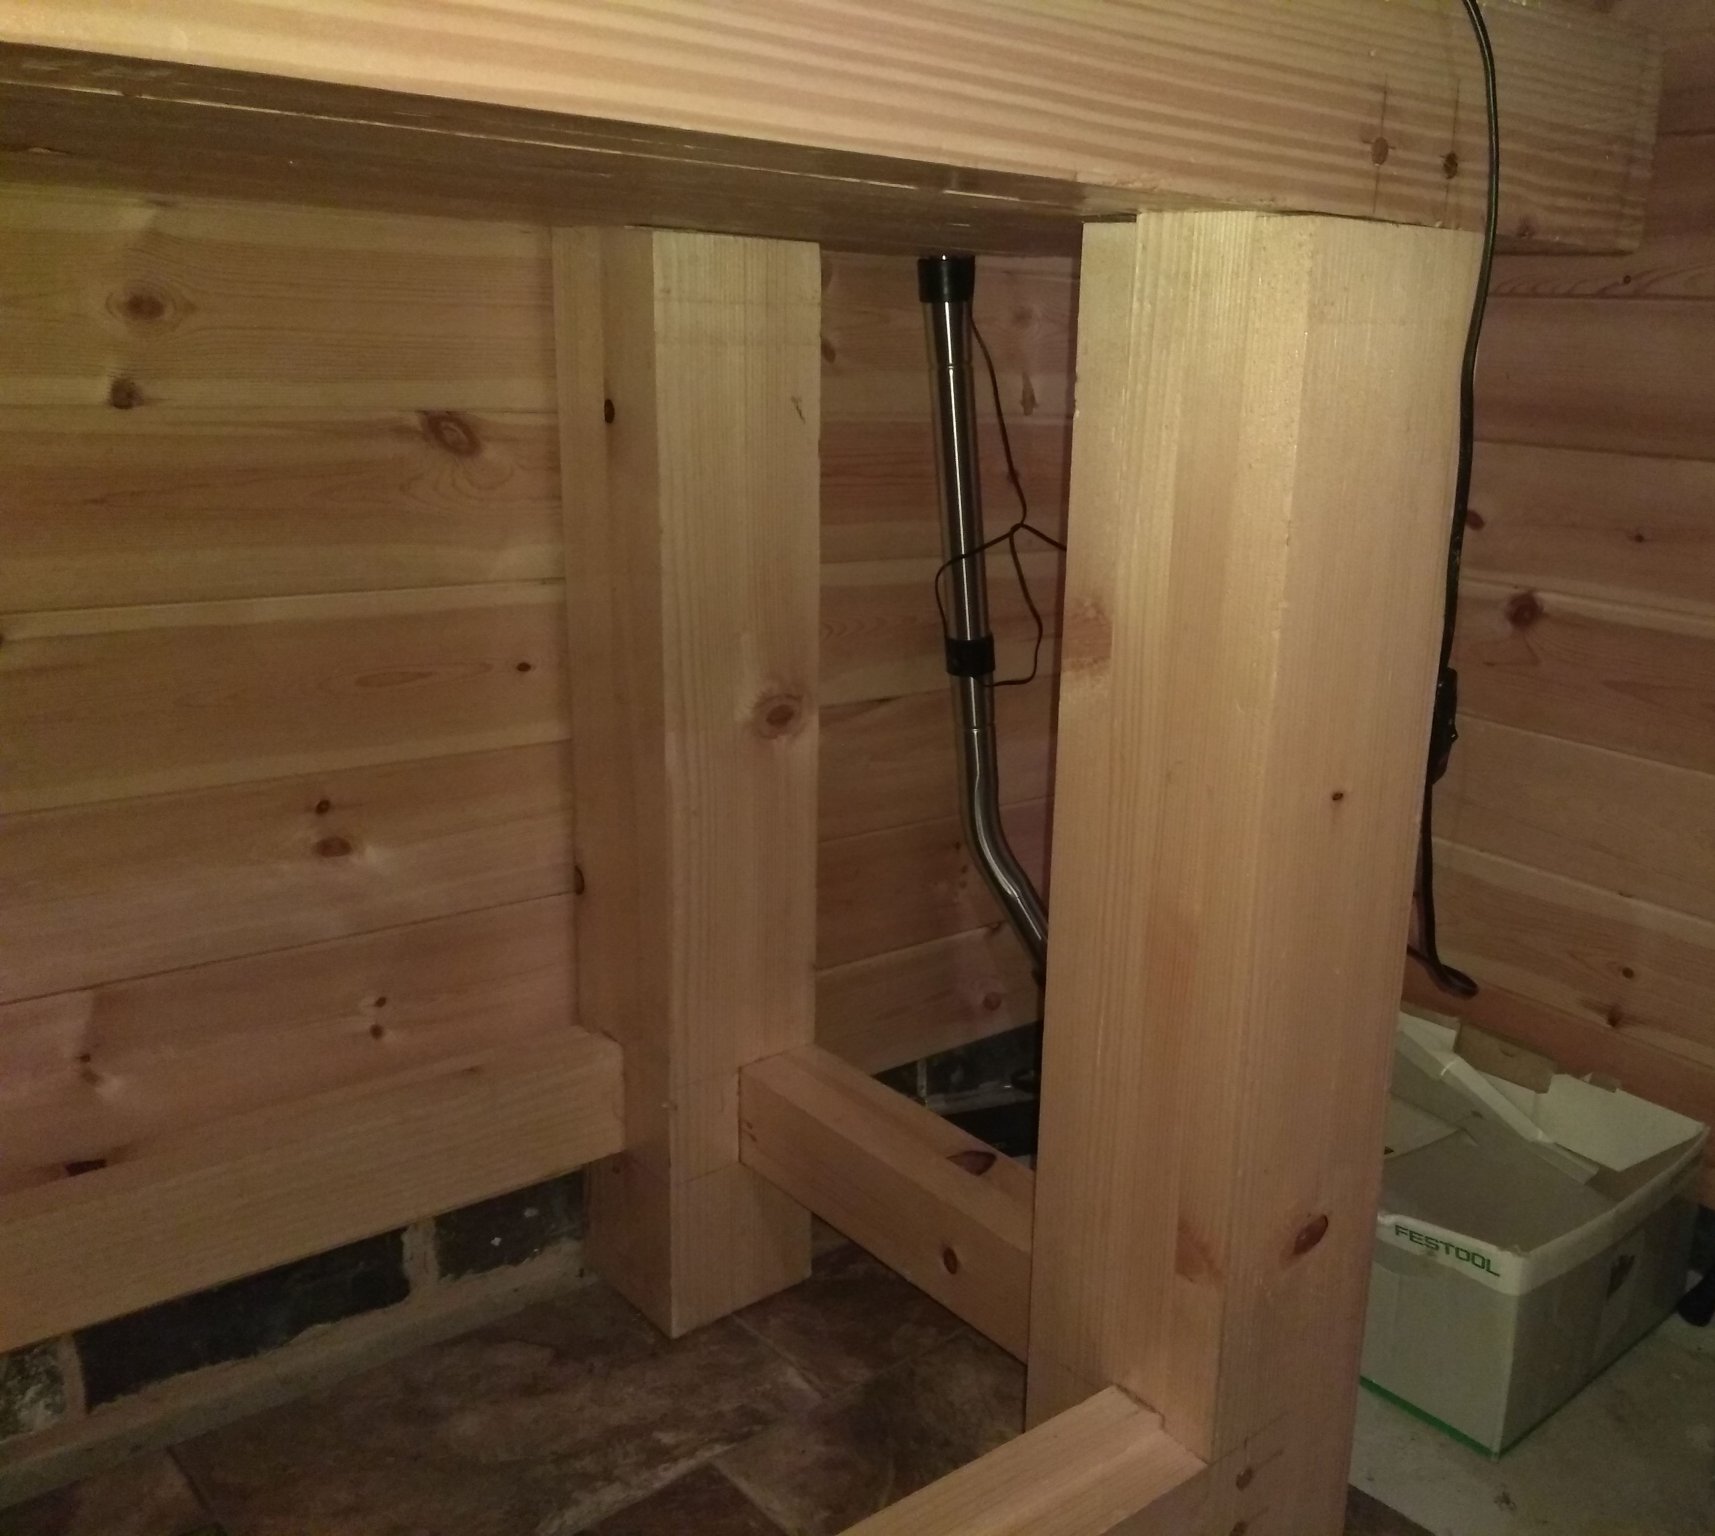
when i built my work table I joined the planks vertically together. It made the top 'thick' but gave it a lot of strength that I think it looses by joining width ways. Here are some quick shots (you#ll have to forgive the mess as as I am obviously mid model) So front view showing size Side view to show how the table top planks join together And finally how the base structure works (this is actually similar to your approach I think) It is very heavy but will not move anywhere and if the table top gets cut up then I can always re-plane and varnish and it would still be huge...

-
If you are completing then you are a 'successful' newbie. There will always be someone 'better' as with most things in life some people dedicate everything to specific endeavours and so will be miles ahead of everyone else. I tend to be happy if my current model improves on my last and fortunately there is a huge amount to improve.. Anyway welcome to the site!
-
wouldn't it be better to contact the publisher?
- 1 reply
-
- 1
-
-
It wasn't so bad as the sherline is so good to use. You just get into an automatic mindset... Plus it really helped with the outside holes when attaching the crows feet thingys though as ever I should have gone for a larger hole as I had to widen before the thread would pass..
- 38 replies
-
- 1
-
-
- bounty
- caldercraft
- (and 1 more)
-
Time for a text based update. I will try and take some photos soon as a wall of words is very 'meh' Currently on rigging and it has been a while since I have rigged. Obviously the intervening years have not improved my capability at cutting any rope attached in two or accidentally punching a rope I have not seen as I desperately attempt to attach a block to an area 20mm by 20mm. Sometimes the simplifications ship model kits have are also tripping me up. As an example I replaced most of the kits blocks with Chucks (which are lovely) but now rigging is occurring I keep finding 1mm rope stays being pushed through 3mm blocks and it is either a simplification of the original plan or requires a different block structure. In some cases I ended up replacing with the kits 5mm single because these had a single big hole in the middle which I could widen with a pin drill to take the stay. The belaying plan with the kit is also not always clear and sometimes seems directly at odds with the belaying plan of Lennarth and the Bounty book (unsurprisingly as none of those were collaborations). Things I have improved at include tying off the loose ends of rope (and I can improve this further) and using less glue Things i want to improve at include making the shrouds more competently - this time I used black thread for the shrouds (though I could have gone for black shrouds and natural ratlines) as in the past I used Caldercrafts 'use this thread then stain with Indian ink' approach. Which is all very well when you first build the model but as time passes the ink either fades or any motion in the rigging by generating movement helps remove the stain and older models are looking distinctly bare in the ink department. I have never been entirely impressed with the weird and wonderful auto-shrouding tools but have been considering some batten like wood strips which could be inserted at two or three points around the shrouds to hold them in place allowing the ratlines to be tightened... Something to consider moving on. Anyway ramble over as I get back to stays.
-
Rebuild a ship model kit?
Matrim replied to ubjs's topic in Building, Framing, Planking and plating a ships hull and deck
Interesting concept though I suspect you would damage a lot of the wood taking it apart. I think you would have more success with a second model and using the first to improve skills. Or go and scratch build where you can re-make the same part ten times until you are happy. -
I have a nice Byrnes table saw but have not managed to find (yet) a connector that will allow my festool dust extractor (CTM) 35mmh to connect efficiently to the U.S dust port. (38mm interior hole?). So the hoover is loose and thus with a gap the air pressure is lessened so loosening the effectiveness. In the past I have used masking tape etc to try to seal it better and have also tried some uni-size adapters which have universally failed to work so far. So this is just to see if anyone knows of a decent connector I can look to purchase that will make a better join/seal..
-
Nice thickness... I am using cotton but it is a) a little too 'fluffy' and behaves weirdly sometimes so am looking for something better and this might be it..
-
That's a rather nice approach
-
Lovely, I must admit when I finished my Bounty I was considering back to my potential scratch built Amphion but may squeeze an Alert kit in first (my niece's daughter has been begging me for a model as well)
-
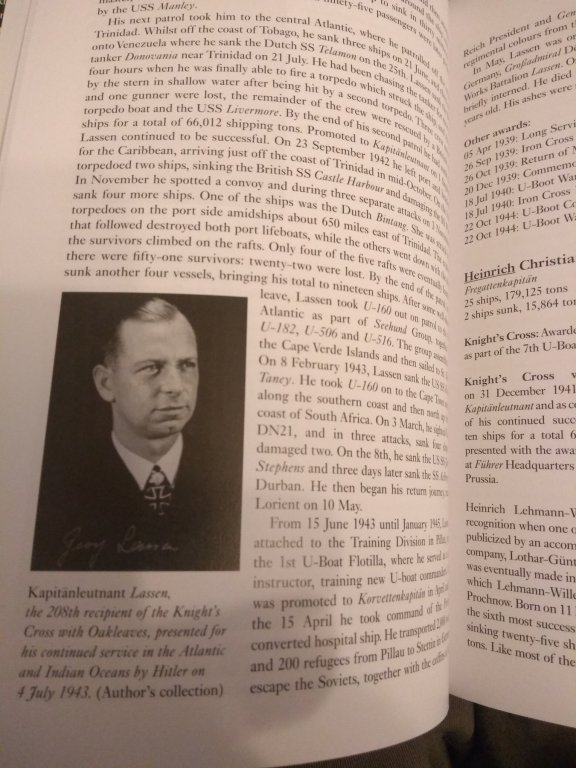
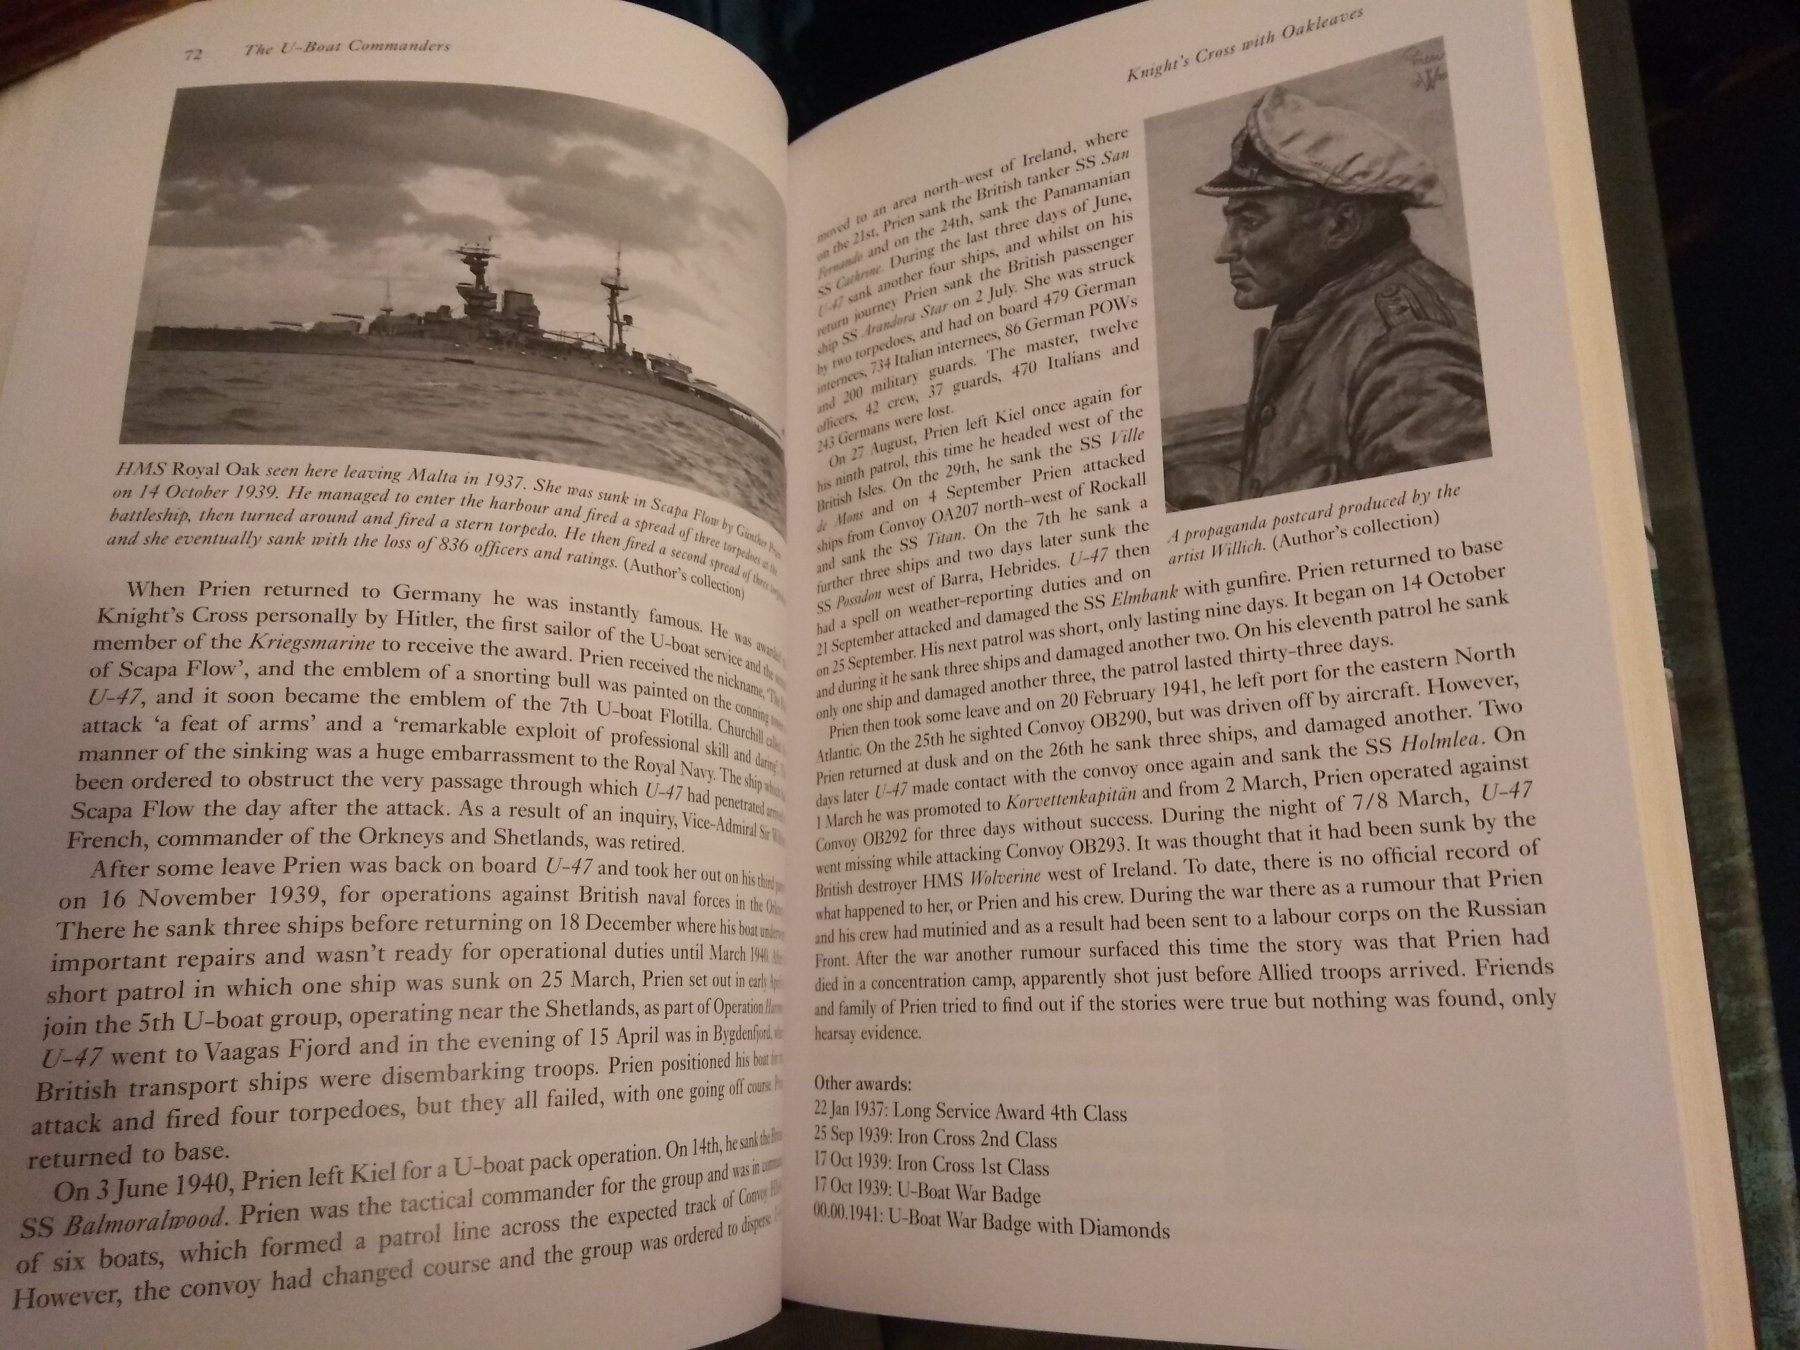
The U-Boat Commanders - Knight's Cross Holders 1939-1945 Company: Pen & Sword Books Ltd Author: Jeremy Dixon Kit No: ISBN 978 1 52671 873 0 Pages: 323 Retail Price: £ 25.- ($49.95 U.S) This is a very detailed book a very specific subject which follows the biographic approach often seen in such reference books. It provides detailed career information on every U-boat commander granted the Knights Cross and on average covers two pages worth of detailed information on each. This ranges from full career details to their actual combat record and command histories. Finally it also covers (should the officer have survived the war) briefer details of post-war jobs and events. It is is not a book for a casual reader to dive into but would appeal to anyone with an interest in the German Navy, the submarine/convoy war and German Naval operations especially as the information contained within would be difficult to obtain elsewhere. It is the sort of book where you either utilise it for information on a specific officer or interest (or officers if researching a particular submarine or sinking) or read perhaps an officer a day. It does provide some fascinating insights into the men who commanded these ships and the German Navy as a whole plus shows some of the difficulty the U-Boats operated under during the second world war. Example pages

-
- 4
-
-
The angle does change as it moves. I tend to simplify buy having 3 angle cutters to do the line dependant on where it is.
-
Wood for decking
Matrim replied to JamesT1's topic in Building, Framing, Planking and plating a ships hull and deck
I like Holly myself though it usually comes in unusual sizes due to the small size of the source. To me it represents nicely a holystoned deck though it can run from pale white to a yellower tinge. Here is a close up of some of mine used on my Bounty.thumb.jpg.84451034e31de00293345413e5de76e3.jpg)
-
Crusoe, Castaways and Shipwrecks in the perilous Age of Sail by Mike Rendell Pen & Sword Books, 2019 142 pages, 16cm * 24cm This is an enjoyable historical retelling of what would have been some of the headline news (for weeks – if it had had such coverage) items over the Georgian period. The author covers some widely differing disasters that can be grouped into three sections – castaways that could have influenced the writing of Robinson Crusoe (and the authors fascinating life), enormous storms and the damage caused and finally single ship disasters of varying natures. The Bounty Mutiny is also included but this strangely seems a unusual side-line perhaps included just because of its modern day fame. I was pleased to note that the author follows the current historical interpretation of those events (as best covered by Caroline Alexander) and not the more populist view. That was the one event that seemed out of place though it might be due to the huge amount of popular research already existing on that specifically. His style is very readable and reminded me (at least) of the military historian Gordon Corrigan in that there is a certain degree of humorous asides with regard to some of the people/events contained within though never to any extent to undermine the conscientious telling of some fascinating tales. Most of the accounts relate to Georgians in the 17th century so mainly British ( though a large portion involve people living in what would become the U.S ). Some Dutch and French events are referenced in equal detail with one of the Dutch in particular being particularly shocking. It is not a huge book but is nicely presented with decent quality paper (a pet peeve of mine on some prints) so it makes a pleasant light read and the author shows considerable mastery of his obvious interests. I found it both fascinating and readable any would recommend it to anyone with an interest in some of the more common disasters that could affect seafarers in those far off times.
.thumb.jpg.a7be9ca1c3386a07353b99a51dfb7d9b.jpg)
-
- 3
-
-
I love my Hegner but it is probably out of your modelling budget
.jpg.6fd26fbd9f789dc32bba0e7d1873fc4e.jpg)
.jpg.0b15f006aaace73c4e03840b5499f2fa.jpg)
.jpg.bbf4178748f2d65504cd6b96a9017e05.jpg)
.jpg.9fd524105daee78623887329c690cb3f.jpg)


.jpg.1760af282f986c2a0efb0edf372def63.jpg)
.jpg.57e02c988cd86e793baac8c54eef6797.jpg)