


GGibson
-
Posts
1,069 -
Joined
-
Last visited
2 Followers


About GGibson

- Birthday 06/15/1955
Recent Profile Visitors
4,165 profile views


-
 GGibson reacted to a post in a topic:
USS Constitution by Der Alte Rentner - Model Shipways - 1/76
GGibson reacted to a post in a topic:
USS Constitution by Der Alte Rentner - Model Shipways - 1/76
-
 Der Alte Rentner reacted to a post in a topic:
USS Constitution by Der Alte Rentner - Model Shipways - 1/76
Der Alte Rentner reacted to a post in a topic:
USS Constitution by Der Alte Rentner - Model Shipways - 1/76
-
GGibson reacted to a post in a topic:
USS Constitution by Der Alte Rentner - Model Shipways - 1/76
-
 That's an innovative way to replicate planking, Peter! 👍 Well then, just don't invite some of us over to the house when it's finished! 🤣🤣🤣😉
 -
mtbediz reacted to a post in a topic:
USS Constitution by rvchima - Mamoli - 1:93
-
 GGibson reacted to a post in a topic:
Rattlesnake by Ed Ku20 - Model Shipways - 1:64
GGibson reacted to a post in a topic:
Rattlesnake by Ed Ku20 - Model Shipways - 1:64
-
GGibson reacted to a post in a topic:
USS Constitution by Unegawahya - Model Shipways - scale 1:76
-
 GGibson reacted to a post in a topic:
USS Constitution by Der Alte Rentner - Model Shipways - 1/76
GGibson reacted to a post in a topic:
USS Constitution by Der Alte Rentner - Model Shipways - 1/76
-
Canute reacted to a post in a topic:
USS Constitution by rvchima - Mamoli - 1:93
-
Der Alte Rentner reacted to a post in a topic:
USS Constitution by GGibson - Model Shipways - 1:76.8
-
bhermann reacted to a post in a topic:
USS Constitution by GGibson - Model Shipways - 1:76.8
-
 GGibson reacted to a post in a topic:
USS Constitution by GGibson - Model Shipways - 1:76.8
GGibson reacted to a post in a topic:
USS Constitution by GGibson - Model Shipways - 1:76.8
-
PaddyO reacted to a post in a topic:
USS Constitution by GGibson - Model Shipways - 1:76.8
-
ccoyle reacted to a post in a topic:
USS Constitution by GGibson - Model Shipways - 1:76.8
-
Geoff Matson reacted to a post in a topic:
USS Constitution by GGibson - Model Shipways - 1:76.8
-
Unegawahya reacted to a post in a topic:
USS Constitution by GGibson - Model Shipways - 1:76.8
-
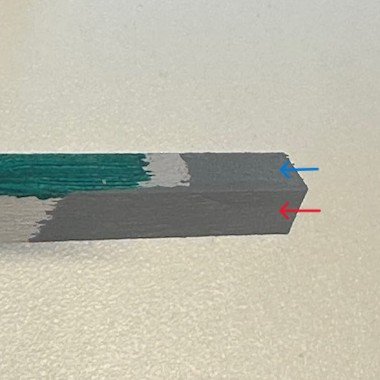
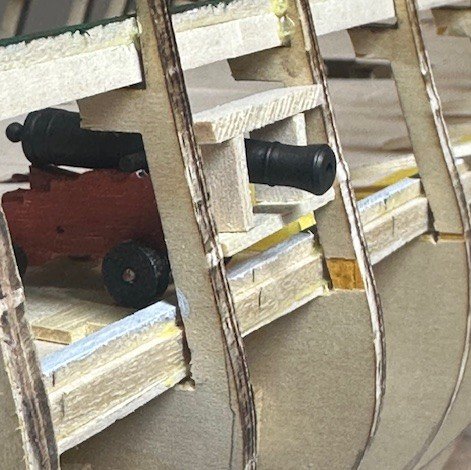
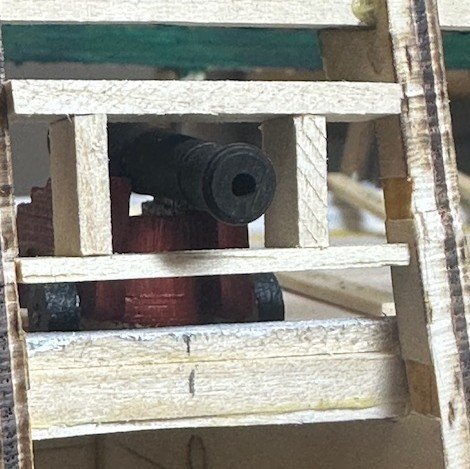
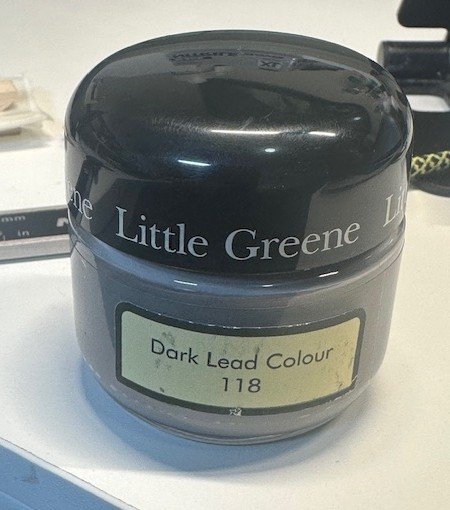
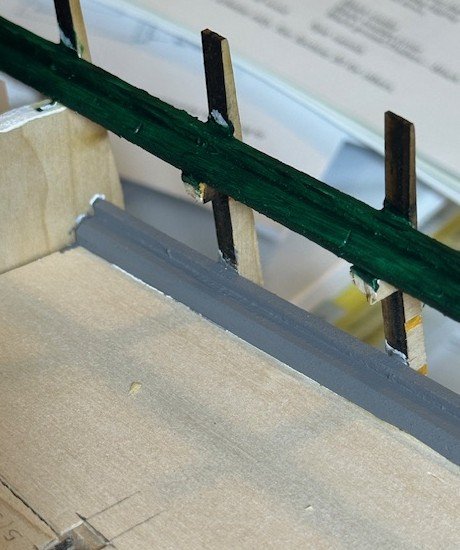
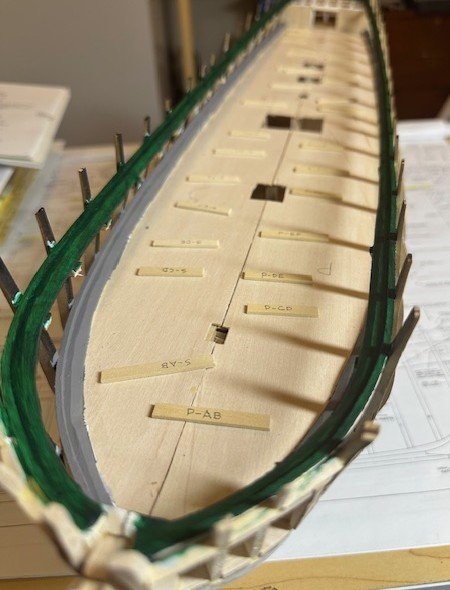
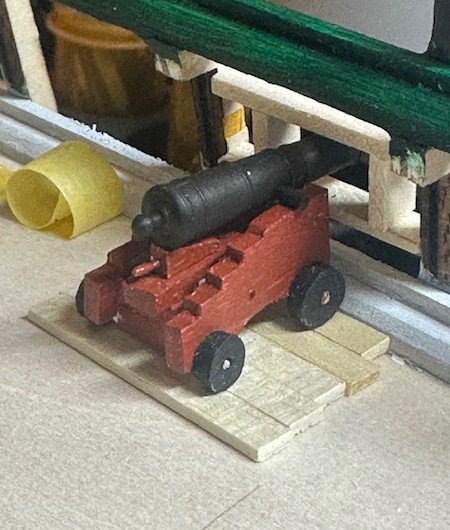
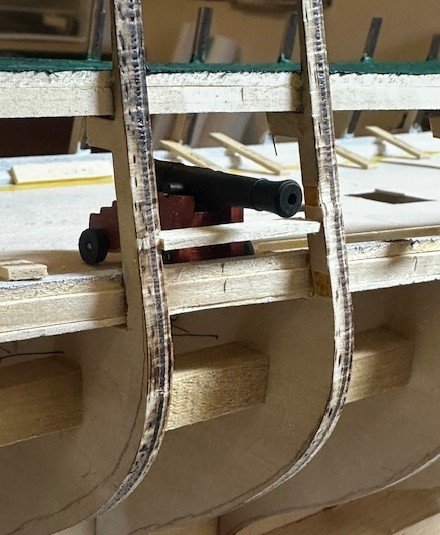
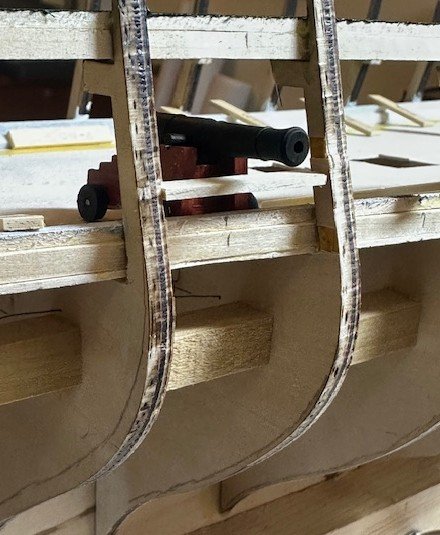
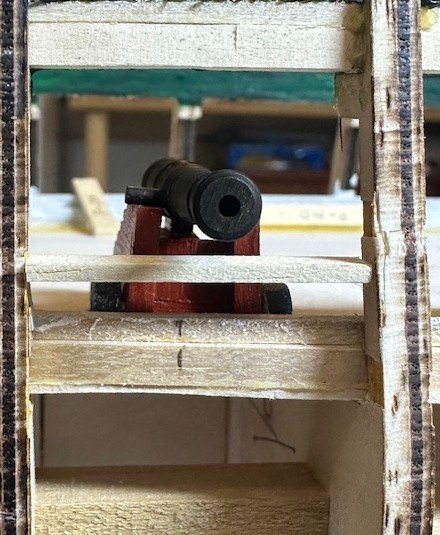
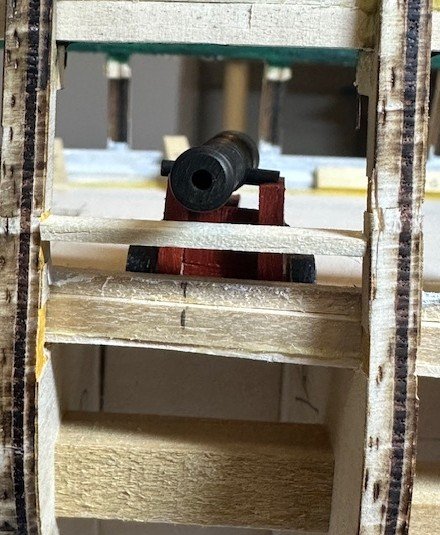
OK, a follow-up to my request for assistance in reviewing my possible gun deck cannon positioning… and a shout-out to Jon Gerson for helping to remind me of my failure to account for gun deck planking (duh!) in my initial positioning review. But first, I have been able to complete the painting of the gun deck’s waterway and planksheer. I noted in the re-listing of the USN Plan #35810, Painting Schedule that appeared in BlueJacket’s guidebook by Laurence Arnot that, while the spar deck’s waterways were to be painted green, the gundeck’s waterways were dark lead in the 1812-1815 period. Dark lead, as you can imagine, is defined as a dark grey color. While I had a small supply of Liquitex Heavy Body Acrylic Neutral Gray, I was curious about this Dark Lead color and found some (of course) on the internet. Upon receipt, I compared the two paints and, while my phone’s camera and the lighting may not do the comparison fair justice… can you see any difference?!? OK, there is a bit, but the blue arrow is the Liquitex Neutral Gray and the red arrow is the Little Greene Dark Lead. I chose the Little Greene Dark Lead for the gun deck waterways and planksheer. I don’t think I mentioned it in any previous post, but I painted the spar deck waterways and planksheer using Liquitex Basic Acrylic Green Deep Permanent paint. While I will undoubtedly do some touch-ups as I come across areas that need it, I think both deck’s waterways look good. So, now to test the gun deck cannon positioning again. In one of the starboard side locations, I built out the gunport framing. Again, the bottom frame is 5/32” above the planksheer. Each gunport frame will be 9/16” wide, and 13/32” tall from sill to header (thanks again to Jon for a nice diagram in his build log that appears to match my framing). In this test framing, I did not build the vertical framing in the parallelogram shape, but the height distance remained at the required 13/32” height. When I actually build out each gunport frame, I will use a 13/32” spacer block and the sides will be cut at proper angles, according. With that said, here’s how a carriage and cannon look sitting on the gun deck planking and with the framing. This positioning looks better than what it did previously. Any other thoughts, recommendations and additional advice?

-
mtbediz reacted to a post in a topic:
USS Constitution by GGibson - Model Shipways - 1:76.8
-
GGibson reacted to a post in a topic:
USS Constitution by rvchima - Mamoli - 1:93
-
Jon, thanks for your input! And, as I was reading your response, I had an "a-ha!" moment. When taking the picture with the carriage and cannon, I placed it directly on the false deck. I need to allow for the gun deck planking, as well! Duh...!!! OK, let me make an adjustment with some planking under the cannons, I'll build out a complete gunport, and re-test the positioning. I appreciate your time in responding, Jon! Thank you, sir!
-
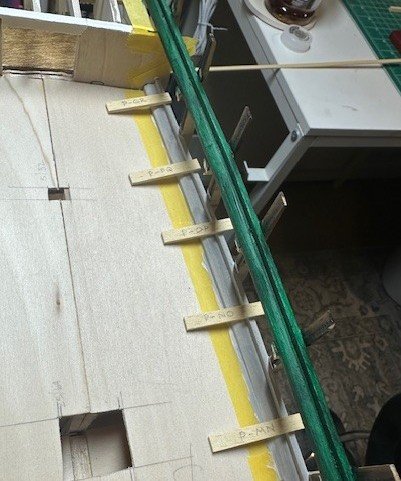
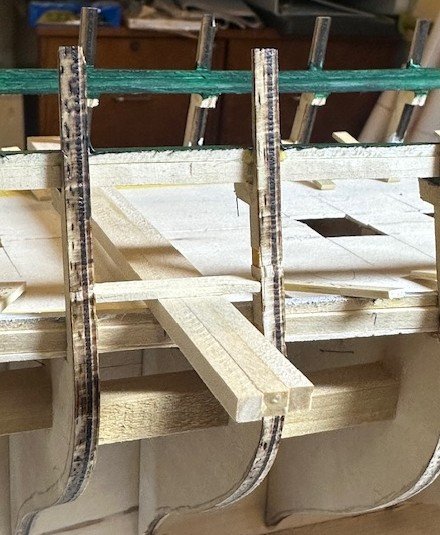
Began working on the gun deck’s gunport framing by measuring and cutting each of the bottom frames. I figured it was easier to measure them all (and marking them, accordingly) and make all the cuts rather than gluing individual bottom frames after each cut. I will now work on securing the bottom gunport frames between each bulwark extension. I do have a question, though, for those who have previously done this (I know you are listening… or at least I hope so!) I cut these bottom frame pieces using a 1/16” x 7/32” stock strip. Others have used 1/8” strips all around, I believe, in their gunport framing. However, I think others with these same waterway measurements have then had concerns with their cannon positions being too low. Here is where the 1/16” bottom frame will sit, using a 5/32” spacer between the waterway and the bottom frame. And then, pulling out the spacer and positioning a cannon and carriage, you can see the height of the cannon barrel. Assuming the 13/32” vertical spacing, it appears the cannon should end up being well centered. Agreed? I will plan on using 1/8” stock (or close to it) for the vertical sides and the top framing. What are your thoughts on using the narrower 1/16” stock for the bottom frames? Will I have issues with planking? I appreciate input on what issues I might have. It appears, though, that the cannon framing will be good. Thanks for your comments.
-
Good start, Rod! No "clowning" around on this build!! Ha!
-
GGibson reacted to a post in a topic:
USS Constitution by Der Alte Rentner - Model Shipways - 1/76
-
GGibson reacted to a post in a topic:
USS Constitution by mtbediz - 1:76
-
GGibson reacted to a post in a topic:
USS Constitution by mtbediz - 1:76
-
USS Constitution by mtbediz - 1:76
GGibson replied to mtbediz's topic in - Build logs for subjects built 1751 - 1800
Wow, excellent solution and creativity, Mustafa! How thick and wide is that brass sheet, then, that you wrapped around the wood? And, from the pictures, is the inside curvature painted white but everything else black? -
Thanks, Peter! Yeah, I had forgotten that my wife had taken this picture as we were waiting to take the Constitution tour that day. As you can sort of tell in the background, it was a cloudy day that day, off and on drizzle, so much of the spar deck stuff was covered. Bummer! I'm tempted to take a 1-2 day quick-trip to Boston this spring just to get back on it on a clear day for good pictures. As I mentioned somewhere, I'm starting the gundeck gun port framing now. I measured and cut the bottom frames last night, so will glue those in today, I hope, before grandkids are over here. Then work on finishing each of the gunport framings later in the week. Thanks for checking in, sir! Your ship is shaping up nicely! You're getting to the fun rigging stuff now!
-
For those of us striving for an "1812-ish" rendition, Frank, let us know if you learn anything definitive. Those are great questions!
-
GGibson changed their profile photo
-
Nice work on the forward guns, Frank!
-
Wow! Nice work, Peter! 👍🏆
-
Thank you, Mustafa. I appreciate the concern you raised. It will definitely be easier to work with the gundeck level bulwarks, knees, etc. I have also been taking note of where the new spar deck beams will be placed. Working now on painting the waterways and beginning to place the gundeck gun framing. I am noticing that some of the cannon placements, according to the plans as they are laid onto the false deck, are very close to some bulwark extensions. I want to look at some of you gentlemen's previous work to see how you addressed the framing spacings. I have a busy "papa week" scheduled, so may not get back to shipyard until later in the week. Again, Mustafa, thanks for the feedback. Appreciate everyone's input!
-
Your sailing pram is coming along nicely, Tom! Regarding the dagger board and its initial loose fit, remember that once you either paint it or stain it (whichever method you choose), that will add just enough thickness to make it a "firmer fit" again.
-
USS Constitution by mtbediz - 1:76
GGibson replied to mtbediz's topic in - Build logs for subjects built 1751 - 1800
I now recall you telling us about your use of pearwood (and hornbeam) previously. Thank you for the reminder, Mustafa! -
USS Constitution by mtbediz - 1:76
GGibson replied to mtbediz's topic in - Build logs for subjects built 1751 - 1800
Excellent work, Mustafa! Totally jealous of your skills and your attention to details. One question that you may have answered previously. I am noticing a discernable difference in the shade or tone of the wood you are using for the smaller pieces you are milling like the jib boom saddle, the bees or the fairlead, as examples, vs. the bowsprit itself. Are these boxwood pieces or another type of wood? I assume these are harder woods that provide sharper and cleaner corners. Appreciate the info, sir! -
Looking good, Peter! Gotta love the Proxxon! At least you are not doing the '2 steps forward, 3 steps back' routine I've been doing lately... 🤷♂️🫤