


GGibson
-
Posts
517 -
Joined
-
Last visited
Content Type
Profiles
Forums
Gallery
Events
Posts posted by GGibson
-
-
2 hours ago, JSGerson said:
They were like eating potato chips - "you can't just eat one."
32 minutes ago, SUBaron said:I decided it was like a nice appetizer that’ll be eaten during the main course 🙂
Y'all are making me hungry, dang it! 😄🤷♀️😋
- Der Alte Rentner, SUBaron and mtbediz
-
 3
3
-
-
Looks really nice, Peter! Congrats on getting the planking done! From everything I have read from others' build logs, sounds like a "cannon diversion" may be the best option! 🤷♀️But, for now, enjoy your evening out! 🍸Cheers!
-
I do have the "helping hands" unit to help in seizing blocks and tying knots, etc., but I have also found a pair of hemostat forceps to work really well. I clamp the block in the forceps and then clamp the forceps in a desktop vise, and everything stays solid and secure.
-
On 4/14/2024 at 5:43 AM, Scottish Guy said:
I just found your LOG, really nice ship and looking great. Thank you for sharing.
Micha
2 hours ago, Chuck said:Really wonderful and well executed project. I cant believe I did t spot it until now.
Ditto here, as well, in not seeing this log previously! Exquisite work, Richard! And love your excellent work in posting the pictures with the text attached. Can I ask what program you are using? Seems quite technical, but very impressive! And the work on the ship itself is awesome! Will continue to follow, if you don't mind... 👍
- Scottish Guy, Keith Black, mtaylor and 1 other
-
 4
4
-
1 hour ago, SUBaron said:
Gunport Framework
I’ve noticed that the kit supplied 1/8” x 3/32” basswood stripes are not all uniform. Some are thicker - even within a strip. I keep fishing out the better ones from my pile. Hoping I don’t run out of the good ones b/c it’ll be a PIA to thin a bunch of these by hand.
If you find that it may be easier to order some additional wood of very good quality, I highly recommend Joe at Modeler's Sawmill. I have ordered from him a few times for additional strips that I cannot create or alter myself. Milled wood lumber strips for the model ship builder - Modelers Sawmill
1 hour ago, SUBaron said:“The Chopper” is great for cutting identical gunport frames. The metal attachments and reference lines can provide repeatable cuts. The unit is well built - very solid. The blades are single edged razor blades and are easily replaced. The provide a clean cut on the 1/8” basswood. I haven’t tried it yet on anything much thicker.
I have The Chopper I from NorthWest Shore Line and I use it quite often! I must have the "original" 1st generation Chopper (hence it being called Chopper I, I presume!), as mine does not have the reference lines, which would be handy, but it does have holders on either side of the blade cutter so you can set and make consistent repeatable cuts. 👍
-
-
-
Awesome pictures, Jon! Maybe 1:48 based on this website, Peter? Mark Antczak (1949 – ) – American Marine Models (shipmodel.com)
-
Excellent work, John! Jib sails and rigging look great! And I have to review the snatch blocks. Not sure I placed those yet! Thanks for the reminder!
I've been reviewing your prior log posts (primarily around Post #169) regarding your mast placements and stepping. Finishing up some pre-rigging work on the main boom and then looking at what blocks and pre-rigging is needed on both masts before stepping. Everything I have read, including your build log here, says to hold off as long as you can and do a lot of block placement off of the ship, but... torn on whether it's better to place the blocks on the mast where needed and then rig the lines or rig the lines through the blocks off-ship and then attach the blocks. Did you find either way easier or a better way to do it?
Sorry to take up space on your log with this query, but wanted to comment on your jib sail work while I was already peeking at your prior posts. Keep up the great work, sir! 👍
-
2 hours ago, Der Alte Rentner said:
Greg,
How are you formatting your photos in these posts? Or asked another way, how are you getting photos to appear side by side?
Thanks
Peter
Hi Peter! I am not a tech person by any means, so if my explanation is too basic or is confusing, I apologize in advance, but I will go through my entire process of posting pictures. Perhaps the shortest answer to your question, though, regarding photos appearing side-by-side is to format them or crop them small enough that they go side-by-side by themselves.
Now a longer explanation... Again, there may be an easier or more efficient way of handling this technology, but this is what I do. I am taking pictures on my iPhone, then emailing them to myself so I can download them and save them to a file folder on my laptop. Once I have them in a laptop folder, I am opening a picture using the default Photos program on my Windows 11 Pro OS laptop.
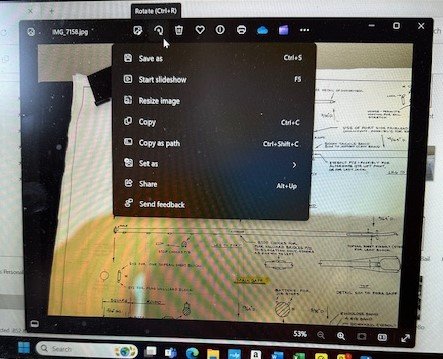

I am then formatting each picture. I first rotate the picture a full circle 360 degrees (first screenshot on the left). For some reason, if I don't tell it this is exactly how I want it rotated, the laptop will decide for itself what direction it wants to post and you end up having to tilt your head sideways to view. Doing this full-circle rotation seems to fix that issue.
Then, I click the Edit Image button just to the left of the Rotate button and crop the image, taking out unnecessary background items and just focusing, if you will, on the particular subject matter for the picture. As I said early on, as well, cropping these images as small as you can will also assist you in getting them to post side-by-side.
So then, when I am posting these pictures to a build log entry, as I have done here, I click the first picture in the "Uploaded Images" section. Then, I will hit the space bar a few times before clicking the 2nd picture, which allows for some "white space" between pictures. As I said above, if the pictures are formatted/cropped small enough, they will then appear next to one another.
Hope my explanation helps, but didn't bore you! Enjoying watching your progress on your Constitution! The Model Shipways Constitution box is up on my "to-do" shelf for.... SOMEDAY! 🤷♀️😄
-
9 hours ago, navarcus said:
...sort of a short in height, but long in length "Z". Is there a trick to how I bend it?
8 minutes ago, Bob Cleek said:"Hard" brass can easily be annealed with a torch, but there are limits to "bending across the flat" which would seemingly be exceeded in this scenario.
Totally NEWBIE input here, but from how "drastic" he is needing the brass bent into a Z shape, would it be better to simply solder three pieces in that shape rather than attempt to bend, even with the annealing process? 🤷♀️👍
- mtaylor and Scottish Guy
-
2
-
-
47 minutes ago, SUBaron said:
Workspace
I’m curious about the work/hobby stations folks use. I’m fortunate to have a workspace in the sunroom - it allows me to work and still be sociable.
I have no idea what this "sociable" attribute is that you mention, Andre... 🤣 Your shipyard area looks really nice, though! For a long time (for my first three builds), I was in a similar location in our house... tucked away in a corner of our pool table room using a tilting drafting table (but it stayed flat) as my workplace and had all my supplies stacked in a nearby "out-of-sight" storage area. I had windows right there where I could look out to our side yard and occasionally see the neighbor kids out playing, etc., so it was nice.
Last summer we did some reorganizing and I move the shipyard to a basement room... which I have pretty much taken over! Purchased a nice-sized L-shaped corner desk that I use for my main building location, the tilting drafting table now holds my plans for easy reference, and I have another rolling table as my soldering station when needed. No windows to look out of and daydream, but definitely quiet... well, unless I get my Pandora music too loud!
Excellent work on your Constitution, sir! Following your progress with great interest! 👍🏆
- Scottish Guy and SUBaron
-
1
-
 1
1
-
-
2 hours ago, John Ruy said:
Thanks Greg… The tips on the pliers actually measure 1.4 mm. Got them at Joann’s.
https://www.joann.com/8in-round-3-in-1-nose-plier-by-hildie-jo/17167362.html
Oh cool! Mine are "only" 2mm tips! And, according to their website, a local JoAnn's here in KC has 1 of those left in stock of the 1.4mm size. And their website might even be showing a smaller one than that in stock, as well. ROAD TRIP! 👍🤣
And to follow up on Tim's query, I do like your use of the S-shaped hanks on this Bluenose. They do look more "scaley".
- Glen McGuire and John Ruy
-
2
-
13 hours ago, allanyed said:
Hi Gregg,
I love the blocks from Syren. Hard to tell from the photos, are you using the internally stropped blocks that would be on Bluenose? They take a little doing to assemble but they enhance the model a lot as the blocks are prominent and very realistic.
Regarding the silk span sails, there is a little booklet on making sails by David Antscherl at Sea Watch books for $5 as well as the Tom Laurie video mentioned by wmherbert that shows similar techniques. https://seawatchbooks.com/products/swan-iv-sail-making-supplement-from-the-revised-and-expanded-edition-by-david-antscherl
Allan
Thanks for the reminder, Allan, about the internally stropped blocks! I ordered some from Syren a while back... just have to remember where I put them (in a place where I'd remember where they were when I got to this point).... crap... 🤷♀️🤣 The search begins!!! And, yes, I do recall that they were probably going to be a bit challenging to assemble properly.
Yes, I have seen Tom Laurie's YouTube video, and I saved it to Favorites so I don't lose it like I've apparently done with some blocks.... and regarding David Antscherl's booklet...
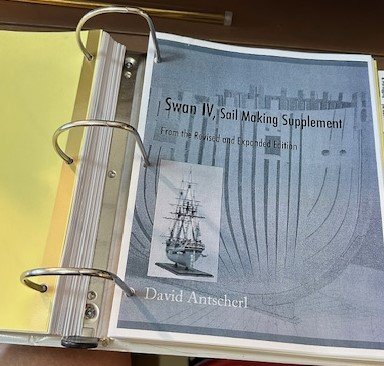
...I purchased it from SeaWatchBooks, and it's in my binder! 👍🏆
-
-
36 minutes ago, Keith Black said:
For the life of me I can't figure out the 'why' of the feature.
Interesting question... I guess if you are 'stalking' a particular user, you'll know where to find 'em... <shrug> 🤷♀️🤣
- mtaylor, PvG Aussie, Scottish Guy and 1 other
-
1
-
3
-
It looks like it displays the last topic the user (in this case you, if you are looking at your own status) viewed. Test it by going to another topic, then to your profile. It will show that topic instead of "Status?".
- PvG Aussie, Keith Black, mtaylor and 1 other
-
3
-
1
-
Excellent work, John! 🏆👍 Are your jewelers' pliers 2mm size?
-
On 4/7/2024 at 6:11 PM, GGibson said:
Time to begin rigging, stropping blocks, tying lines, etc. Need to sit down before jumping in head-first and review all of the available build logs before me to assess the challenges and develop a game plan. There are some great rigging examples in that group, I know, so their work is extremely appreciative and inspiring.
Well, that's pretty much what I've been doing for the past week. Really nothing done on the ship itself, just trying to soak in what many previous Bluenose build log builders have done regarding their rigging, masting and moving forward. Wow! A lot to take in, much more than I remember on my prior builds, but... they have not been as detailed and complicated. Guess that's what we get when we reach for higher ground, right? A few more challenges than before. Ok...
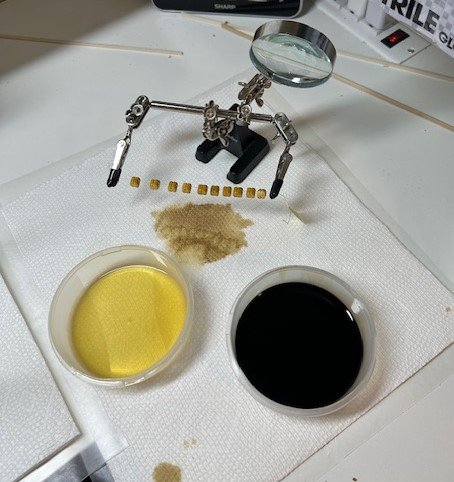
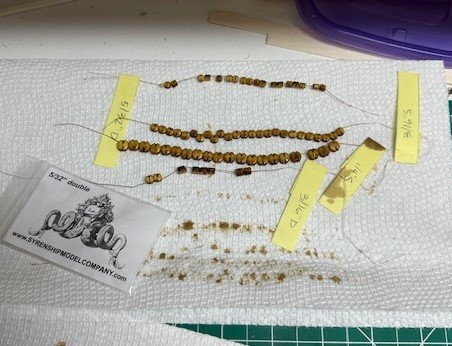
While I am researching others and coming up with my own game plan, I thought I would prep all of the blocks that may be needed for the Bluenose and began staining them. Strung them on some thin line and dipped them in stain. First, a bath in some pre-stain, then in some Minwax Golden Oak stain, which is what I also used for the masts. Seemed right. Also, I am replacing as much as I can of the kit-provided blocks with those that I got from Syren Ship Model Company, which I had used in my Ballahoo build and liked their quality.
Also, in the "What Did You Receive Today" category, after reading the pros and cons of sail construction, I ordered some Silkspan tissue for this Bluenose. Found what seemed like a reputable vendor in Sig Manufacturing (out of Des Plaines, IL) and ordered two types of silkspan tissue, what they call a LIGHT version and a MEDIUM version, so I can determine which will be best for the sails when I get to them shortly.
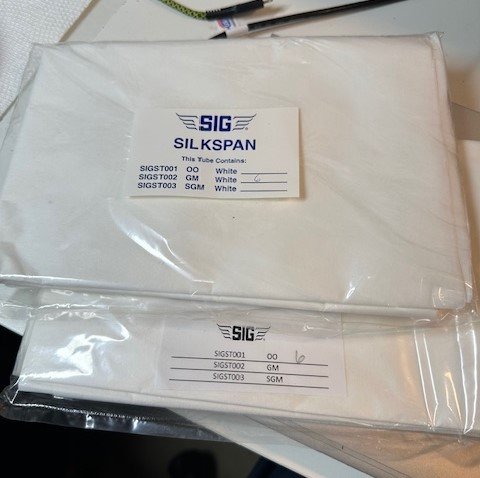
And kudos to Sig's customer service! I ordered these on Wednesday and received them today. Two thumbs up! I've still been a bit on the fence about whether I was going to do full sails or furled, but think I have convinced myself to do the full sails. Could still convince myself to change, but... <shrug> Either way, these silkspan sheets should look better than the kit-supplied cotton sail cloth... I HOPE!
- bhermann, Der Alte Rentner, mtbediz and 2 others
-
5
-
On 4/12/2024 at 11:17 AM, kurtvd19 said:
We also have a two part one on June 15 on Creating Realistic Working Sails and Creating Furled Sails.
I have participated in previous Saturday morning workshops. They are awesome! Definitely interested in the upcoming June 15 workshop on sails! May have to hold off on my Bluenose rigging and sail construction until then!! 🤣🤣
-
Excellent detail, Mustafa! Are you blackening the brass first before painting? How will you be painting to assure a nice coverage? Especially since it appears to now be all assembled. I am curious, as my brass painting seems to always be spotty, but the blackening technique, along with an acrylic paint on top of it, seems to cover better for me.

Bluenose 1921 by GGibson - Model Shipways - 1:64
in - Kit build logs for subjects built from 1901 - Present Day
Posted
Well, I have done a little bit more, so thought I would toss in an update. Been struggling a little with how to approach all of the rigging work. But, starting to do some rigging on a few of the spars that, no matter which way I decide to go with the sails, etc., I will need to rig anyways, so... here we go. Not much of a play-by-play on these spars coming off of the main mast. But definitely props to several of the Bluenose modelers who have come before me and shown a lot of their processes and techniques well enough for me to follow much of their guidance. Props especially to @genericDave, @Ed Ku20 and @John Ruy, whom I have either relied heavily on researching their completed build logs, or John's responses to queries on his ongoing (and almost completed) Bluenose build.
With that all said, a few pictures (with little comment) I took during some of the pre-rigging for the main mast spars...
Trying to remember to do some of the stropping with brass wire vs. thread.
And yes, need to use the Syren internally-stropped blocks on some of the 1/4" singles and doubles. So may re-do some of these after-the-fact.
As I am completing different portions of the pre-rigging, I am wrapping them as best I can and setting aside.
This rigging will be for the main boom's crutch tackle.
A closeup of the end of the main boom and topping lift rigging.
The completed rigging on the main boom (with all of the rigging banded and secured until it's placed on ship).
Top part of the lower main mast, with the blocks for the main peak halliard and the pendant rope for the topping lift.
Rigging the main gaff bridle assembly.
All of the rigging lines associated with the main mast.
Well, as far as I can tell (so far), this may be it for the main mast pre-rigging process. Now it's pretty much a "rinse-and-repeat" routine for the fore mast rigging with a couple of exceptions. Then, it appears the shrouds are after that, which means getting those masts firmly secured on deck.
Let's see how this progresses!