


GGibson
-
Posts
1,086 -
Joined
-
Last visited
Content Type
Profiles
Forums
Gallery
Events
Everything posted by GGibson
-

USS Constitution by mtbediz - 1:76
GGibson replied to mtbediz's topic in - Build logs for subjects built 1751 - 1800
Great work on the carronades, Mustafa! And it is exciting to see how the view of the gun deck is coming together, even as you add these carronades to the spar deck. Have been curious how that was all going to look. Very nice, sir! 🏆 -
USS Constitution by mtbediz - 1:76
GGibson replied to mtbediz's topic in - Build logs for subjects built 1751 - 1800
The carronades are looking really sharp in place, Mustafa! How are you securing the carriages to the deck? Simply by using PVA glue? The spar deck is really taking shape! 🏆👍 -
Perhaps Mr. Szkutnik could do a batch order... save at least on shipping individual units. 🤷♂️🤣👍
-
USS Constitution by mtbediz - 1:76
GGibson replied to mtbediz's topic in - Build logs for subjects built 1751 - 1800
The eyebolts look really good, Mustafa! And really look nice after they are blackened. When making them, did you bend them first and then create the loops, or first make the double loops and then bend the end? Which did you find was easier and more accurate for you? -
Hey Jon! Great work on these rails. I know you have toiled long and hard on how to best recreate these stair rails, and your solutions have resulted in a great finish. Looking forward to seeing these in place on the deck. Carry on, sir! 👍
-
Nice lines, sir. Looking very sharp. 🏆 I bought one of those OptiVISOR magnifiers a few years back (maybe it was when I was working on my own lobster smack). Had to send it back... it didn't fit my 7 7/8 noggin. 🤷♂️🤣
- 59 replies
-
- 2
-

-
- muscongus bay lobster smack
- Model Shipways
- (and 2 more)
-
Thanks, Neil. Appreciate the follow and comments.
-
It all looks really good, Peter. Great prep work. Safe travels wherever you are vacationing. 👍
-
Byrnes Table Saw on Ebay UK
GGibson replied to Some Idea's topic in Modeling tools and Workshop Equipment
Yep, it's true. Congrats, pppilot, on your new saw. I've had my new Byrnes saw since August. Ordered it on 8/5, received it on 8/13. Donna has been awesome in getting Byrnes Model Machines back to operational. Donna told me that Mike was a protege of Jim's and has helped her tremendously in that effort. -
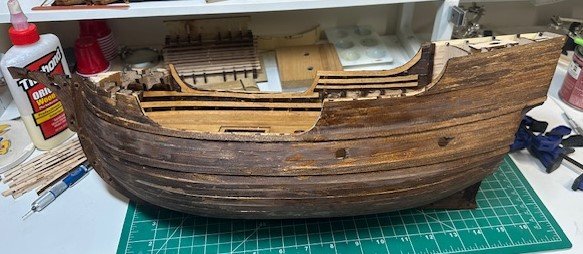
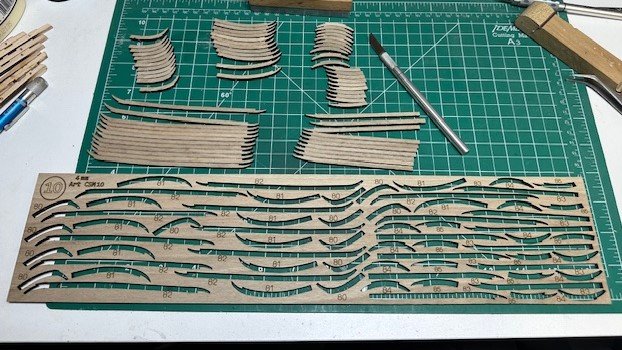
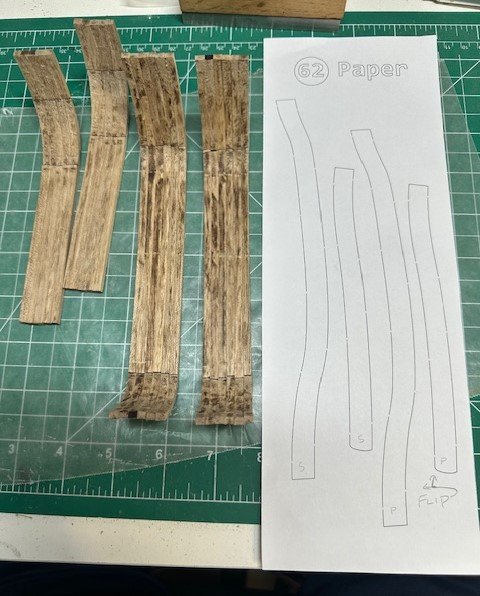
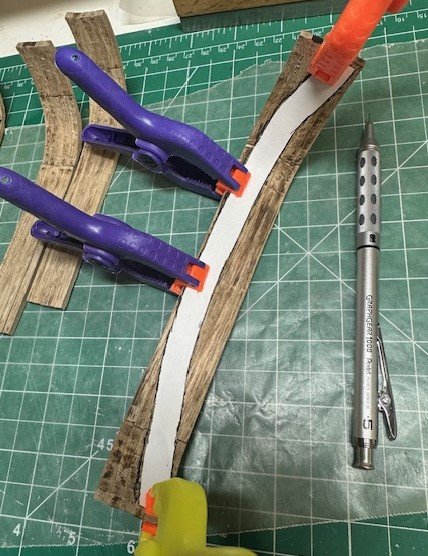
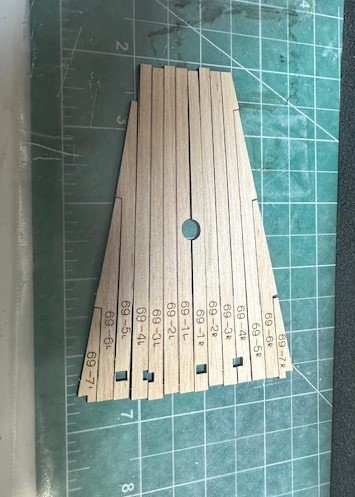
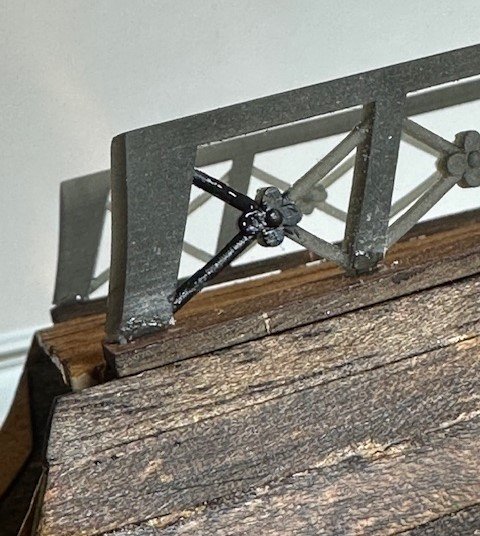
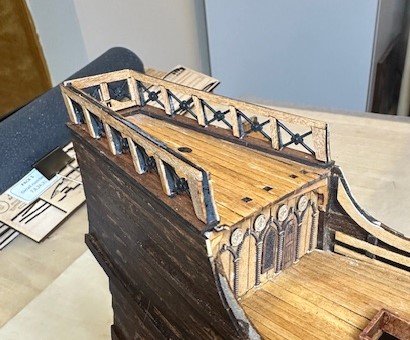
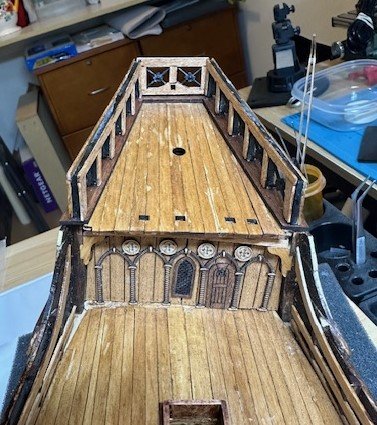
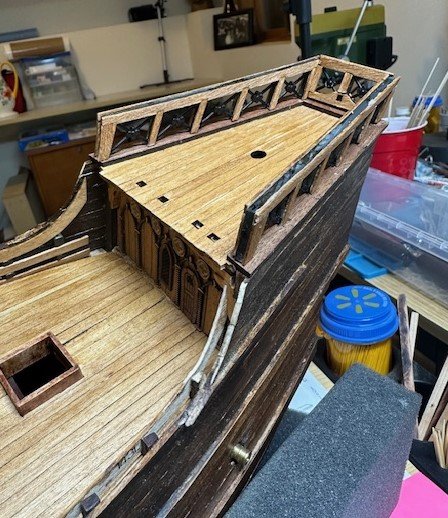
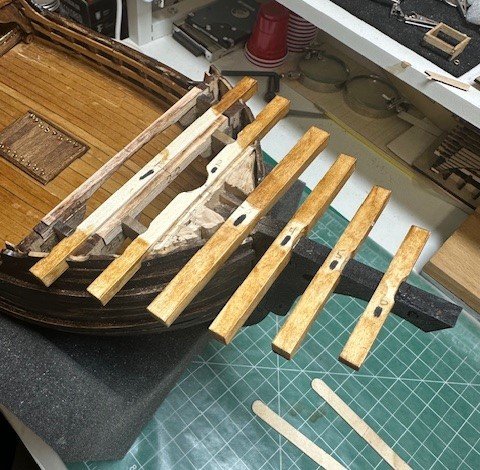
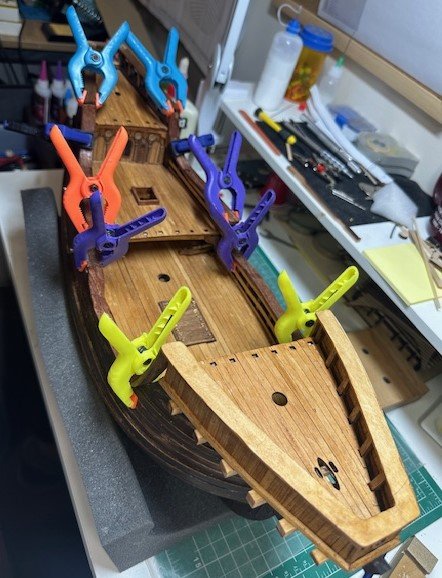
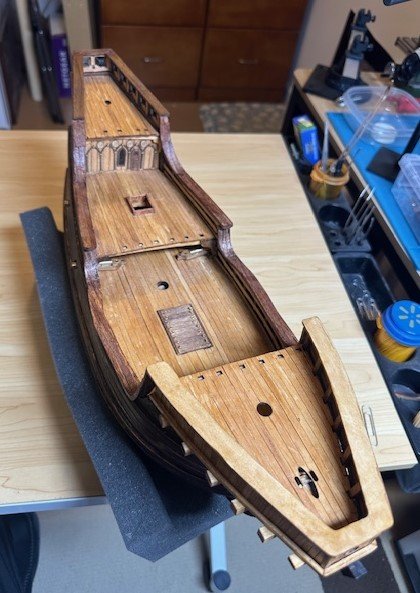
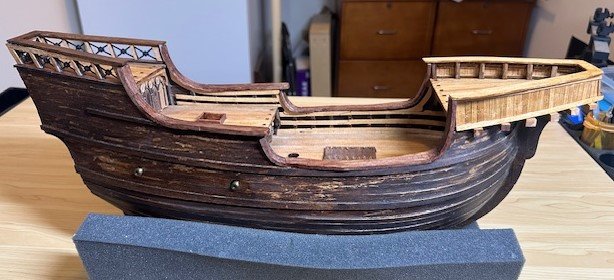
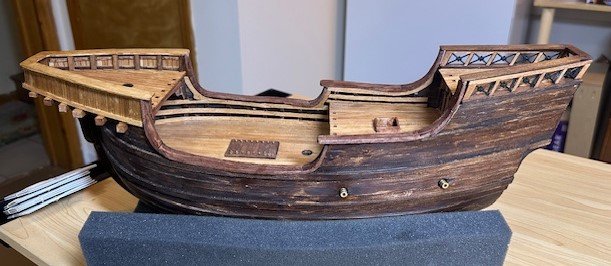
Well, I've completed another phase in this Santa Maria build, so thought I'd post an update with the progress I have made and the pictures I have taken to-date. At my last update at the end of December, I had not yet stained the outer hull, so it was time to do that. I think I had noted that Pavel Nikitin had his own set of paints/stains that he was recommending but, being the poor sprayer that I still am, I decided to use more conventional stains and brush or wipe them on. For the hull, I wanted a darker stain, so I opted for Minwax Honey wood finish. I wiped it on the hull, then sanded and used some steel wool to smooth it out some, then applied a 2nd coat. May do a bit more touchup before completion, as it is a bit "splotchy" in spots, but it gives a decent impression, I think, of how a 15th century ship may have looked. Next task was to work on the main deck and quarter deck rails. The kit's quarter deck rails consist of 5 sets of two rail pieces glued together to make the proper rail width. while the kit's main deck rails consist of 6 sets of three rail pieces joined to make its rail width. The char on all of these pieces was removed the best I could using my Dremel with a 220-grit sanding disc. Once these were all glued together to form two sets of rails, the kit provided a sheet which was needed in order to cut and shape each of the rails to their proper form. That was completed and then they were set aside for now, waiting to be stained and then placed once the decks were completed. There is a back wall for the quarter deck that really isn't discussed anywhere in the pictorial instructions but suddenly shows up in a subsequent picture, so we added that now while also working on the quarter deck planking. As the provided planks were placed on the quarter deck braces, there was a gap in the planking, so I cut an extra piece using the sheet that the planks came from and filled that gap. The poop deck planking was also laid out. Again, as is done with all of Pavel's sheet pieces, you can see the numbering on the planks for identification and placement but, of course, these were flipped/rotated when secured on the ship, so the numbers are not visible. The rail system that was provided in the kit for the poop deck was a dark gray resin material. Most of it would be covered by wood slats, but the decorative "X" supports were painted black in order to stand out a bit better. The top rail isn't in these pictures, but you'll see it in later pictures. The poop deck came out looking fairly well. Now to the front of the ship. I had previously completed the forecastle deck but have not yet secured it to the ship itself. I had also worked previously on the braces that go under the forecastle deck, but they were a bit shorter than I wanted, so I re-did them so the braces extend out a bit more on the sides. I stained the braces using the same Minwax Satin Antique Walnut that I used for the decks. The black marks on each of the braces just helped me remember what side to face up during placement, as the forecastle deck will be placed on top and cover the markings, anyway. Once the forecastle deck was placed and secured, I could then place the main deck rails and quarter deck rails that I had previously completed. They seemed to go on fairly well, but I will need to look at filling a few gaps between the rails and the hull where needed. But, with the placement of the rails, that pretty much completes this phase of construction. I think the next project is to work on the vertical buttock riders that are placed on the hull along with the channels, and then there are several deck items to work on, including rails, ladders, the windlass, etc. So, for now, this is how my Santa Maria looks. Appreciate those of you who have been peeking in with the likes, comments and advice. Thanks...


- 58 replies
-
- 11
-
-
- Santa Maria
- Ships of Pavel Nikitin
- (and 1 more)
-
Hold my beer.... 🤷♀️🤣 Great work all around, gentlemen!
-
Jig and carronade carriages look good, Peter! Enjoy your vacation time!
-
All great historical research and discussion, gentlemen! It is going to be interesting to watch how each of you complete your spar decks and what combinations of 1812-era carronades vs. the 1927-1931 restoration castings each of you place on your spar decks. Of course, I'm watching it all with great interest and admiration. Carry on, fellas! 👍🏆
-
Nice looking Pinnacle, sir. Couldn't have cut off too much thumb. I don't see any red stain on the ship. 🤷♂️👍🤣
-
USS Constitution by mtbediz - 1:76
GGibson replied to mtbediz's topic in - Build logs for subjects built 1751 - 1800
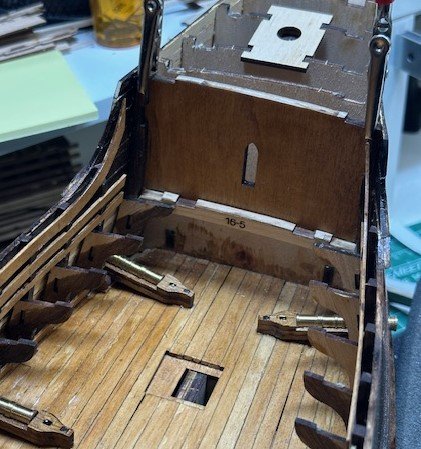
When this discussion of using plexiglass for the spar deck planking was raised as an idea, I thought it had some merit, but I, too, was curious whether one would cut it as one full sheet or as individual planks. And, as Mustafa questioned, as well, if cut as individual planks, how would they be secured and would any visible adhesive (once dried) have any effect on the appearance? How would that also affect any faux-caulking applications between planks and its appearance? Very cool idea, but not sure it's ever been done for deck planking before. Doing a search for plexiglass on MSW, and you get 19 pages of posts regarding display cases, but none of the posts deal with deck planking. But, visualizing how it would look, I have to admit I'm intrigued. -
All looks really sharp, Unegawahya! After all the work you were doing last fall on the ship's wheel, nice to see it in place! Congrats on the work-to-date!
-
Looking forward to seeing how you place them on the Constitution, Peter. They do look nice!
-
USS Constitution by mtbediz - 1:76
GGibson replied to mtbediz's topic in - Build logs for subjects built 1751 - 1800
Very interesting, Mustafa! Yeah, didn't know how far in you were planning on planking from the carriages, leaving visual "windows" on either side of the centerline, or leaving the centerline open. I'm excited to see how you have envisioned this and see it come together! And I am not familiar with the hornbeam wood but in reading up on it, it sounds like a very hard wood that is used a lot in building percussion instruments, handles, wheels and flooring (even if that flooring is only 1.5mm thick!). They say it's a very white wood and it looks that way in your pictures. Are you staining the spar deck, just putting a topcoat on it or leaving it natural? Should look really nice when you are finished, sir! -
USS Constitution by mtbediz - 1:76
GGibson replied to mtbediz's topic in - Build logs for subjects built 1751 - 1800
The initial spar deck planking looks very nice, Mustafa! I have been very curious how you were going to plank this upper deck in order to allow us to still see your gun deck work. Now we get to see what you do! What type of wood are you using for the spar deck planking? Thanks! -
Welcome, Dave! Model Ship World is a great place to learn and to share information! And... we'll see you in Kansas City in two weeks... 👍🏆🏈
-
Welcome Jim! The Norwegian Sailing Pram was a good start for me in this hobby. You will enjoy your time with the ships you build. Frustrating at times, yes, but you will have fun. My son and his family lived in Hanford for a few years, so flew into Fresno a few times. 👍
-
Hey Peter! I have used Joe at Modeler's Sawmill in the past and he's awesome with good quality wood strips or sheets. His strip packages only go down to 1/32" and it looks like you are needing 1/48" (wow, that's thin!), but see what he can do! Wishing you the best! Milled wood lumber strips for the model ship builder - Modelers Sawmill I haven't used styrene before, but in reading all of your build logs, it sounds like that is going to be an option I'm going to need to have ready, as well! Taking notes...!
-
Hope your move goes well, Chuck! That is definitely a view you are not used to... but will enjoy the difference probably very quickly! Congrats on the transition. We shall visit sometime after February! 👍
-
USS Constitution by mtbediz - 1:76
GGibson replied to mtbediz's topic in - Build logs for subjects built 1751 - 1800
If you would have asked my opinion of choosing black over dark gray for the carronades without the pictures, I probably would have chosen black. But in your pictures, the ones painted dark gray look (to me) more of a "dirty black" and seem to show their lines better than the solid black ones. So, I'd maybe select your dark gray ones, but I'd be consistent with all of them on the spar deck. Great work, Mustafa! -
Nice to see you were able to separate the carronades from their bases for the ones that have the screw barrel elevation mechanisms, Unegawahya! Did you just use something similar to an Xacto knife or something more complex? They look good!

