


GGibson
-
Posts
1,086 -
Joined
-
Last visited
Content Type
Profiles
Forums
Gallery
Events
Everything posted by GGibson
-
 Thanks, Neil! I hope it looks good after I'm done! 🤷♀️🤣👍
- 58 replies
-
- 1
-

-
- Santa Maria
- Ships of Pavel Nikitin
- (and 1 more)
-
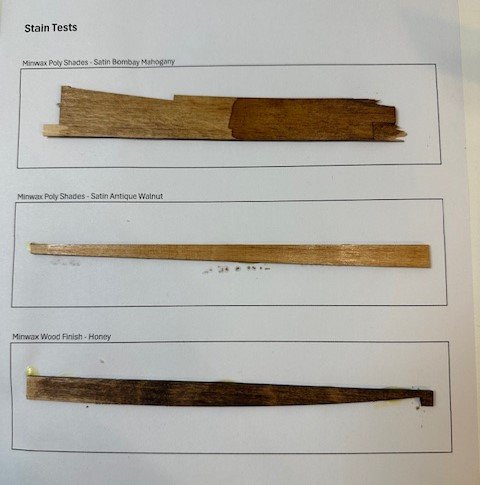
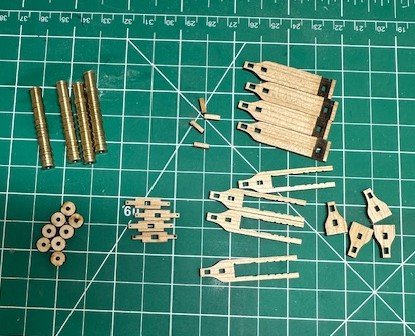
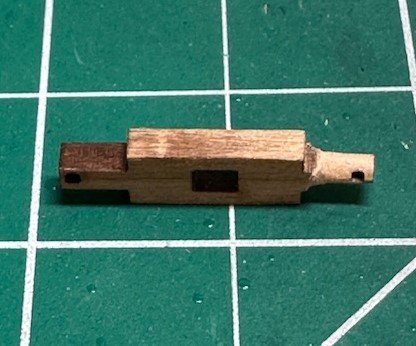
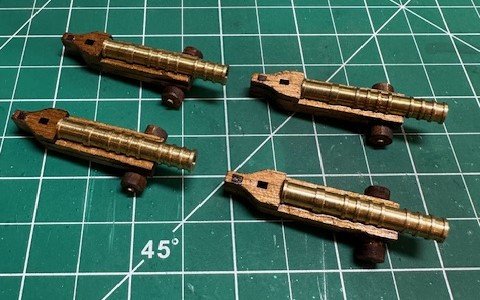
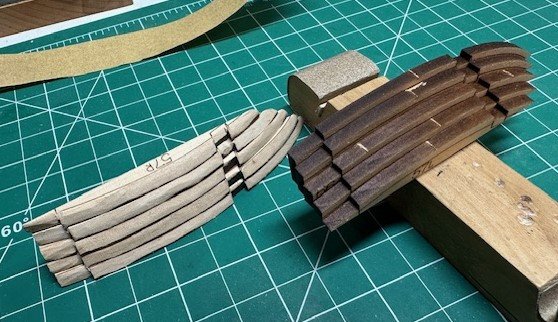
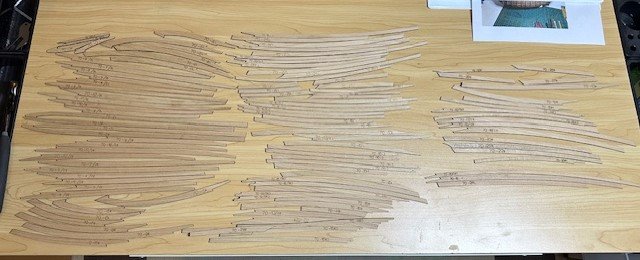
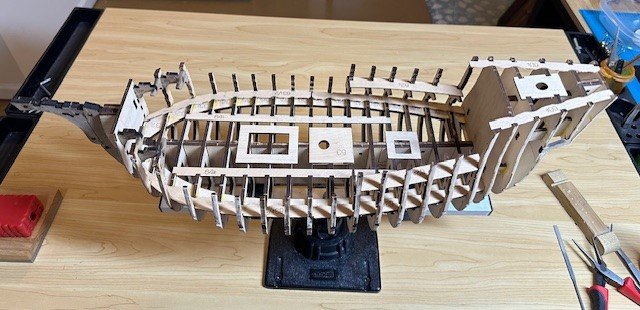
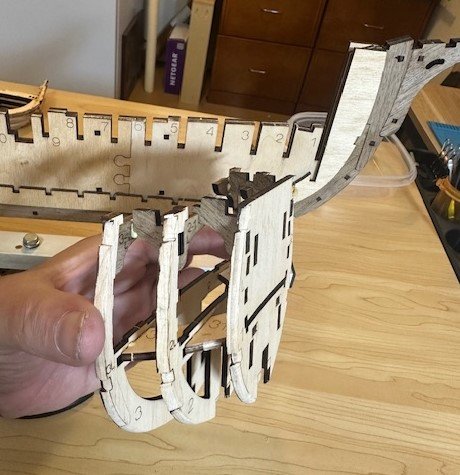
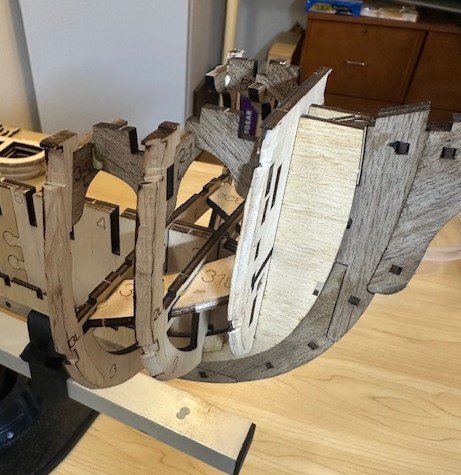
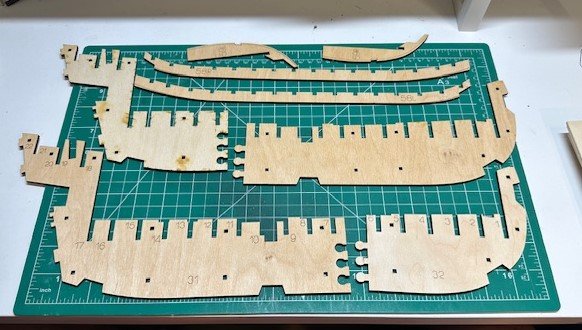
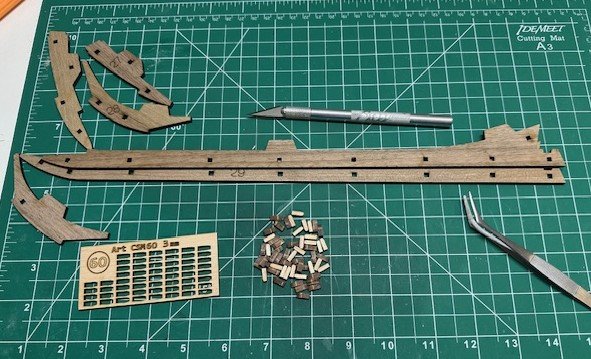
OK, another silly little update before I start on another major sub-project... After I finished planking the main deck, I wanted to look at how I was going to paint/stain each of the decks, the hull, and all of the fittings and other gear that will be placed on all of the applicable decks. Pavel Nikitin has a pretty detailed YouTube video (narrated by Olha Batchvarov) on how to paint the ship using his paint kit and an airbrush. I am still horrible at airbrushing, so I am going to opt for using stains (either wiping on or brushing on) in order to achieve similarly satisfactory results. I tested three (3) different stains with multiple coat options to see which ones I liked, and which ones would provide close to the appearance that Pavel achieved in his work. Here's what I landed on... This ship is painted/stained very dark. So, I found a Minwax Honey stain (bottom sample on the test sheet) that, after about 3-4 coats, looked like it would be a good finish for the exterior hull. We'll go with that. The middle sample stain is Minwax's Poly Shades Satin Antique Walnut, and the far-right sample represents 3 passes/coats. We'll use that for each of the decks. And finally, the top sample is Minwax's Poly Shades Satin Bombay Mahogany, and I will use it for the fittings, furnishings and other pieces that will be placed on the various decks. The third coat got pretty dark, so I'll judge that "on the fly" on how many coats each fitting receives. So, with that said, I began staining the main deck, as a large part of it will be inaccessible once we place the quarterdeck planking in its place. I have given it 3 coats of stain so far and may give it another coat or two before finishing. I think, though, that the subtle differences in shades between decking, hull and furnishings should look sharp (well, I hope so, anyways!). Also, before planking the quarterdeck, I will need to secure the cannons in their proper places while I can get to those spots. So, I thought I'd take a break before the planking project and work on the cannon carriages. The Pavel Nikitin kit provides small parts to build up a basic carriage unit and since all that will pretty much be visible once everything is built is each of the four (4) cannon muzzles extending slightly from the hull gunports, we will use the kit's carriage parts. A bit of sanding was required for pieces to fit, but everything seemed to come together nicely. We'll set these aside for now until ready to secure to the main deck. Interestingly, in the Anatomy of the Ship - The Ships of Christopher Columbus book by Xavier Pastor, there is no mention or depiction of cannons or gunports on the Santa Maria. But, as has been widely discussed, there are no actual "certified" drawings of the Santa Maria, so.... we'll call it designer's prerogative! <shrug> Before beginning the hull planking, Pavel provided some additional "layered blocking" at the stern to help support the hull planking at the front of the ship. These layered pieces required beveling so that there was a smooth curve for the planking to adhere to. That process worked well. So... we are now to the stage where we need to begin planking the hull. Pavel Nikitin's kit includes several sheets that include a bunch of pop-out CNC plank pieces. The instructions assist in showing which numbered planks go where. Others who have worked on this kit recently have indicated that some shaping may be necessary, whether heating or soaking or a combination of both, to fit the planks properly. Well, let the hull planking begin! I'll check back in as this process progresses. As always, appreciate the likes, comments and criticisms!
- 58 replies
-
- 7
-
-
- Santa Maria
- Ships of Pavel Nikitin
- (and 1 more)
-
I'm very interested in that info, as well, Unegawahya! I have only been able to purchase the smaller scale brass rods and tubes (circular, not square) directly from K&S, although I have seen some inventory, but never the scale I was looking for, on sites like onlinemetals.com and metalsupermarkets.com. Appreciate the follow-up!
-
Agree that Joe is awesome!
-
The video paul ron posted helps in understanding how the proportional divider would work in a larger scale than what we are doing with model ships at anything from 1:64 to 1:96 scales, for example. I love seeing new tools being displayed (I'm a sucker for new tools) but would like to see an example of how the proportional divider would be used for something like our planking tasks. EDIT: I read the instructions on the MicroMark link regarding scale discussion and that, along with Wefalck's comments below, helps understand better how it would be used in our world. Thanks!...
-
Hey Jon! Great explanation of your process for these canopy stanchions. Hopefully, when I get to this point (probably 10 years from now at my speed), my Proxxon drill will work well in making those small drill holes. And, yes, I love K&S Metals and their brass rods. I have a decent supply already of the 0.51mm and 0.81mm rods, and I know where to get more if needed! Ha! Interesting info about the drill bits. I have the standard #61-#80 drill bit set, but also recently purchased a small supply of #65 & #75 Gyros premium HSS twist drill bits. Used one of the #65 bits awhile back and I recall it held up well with what I was cutting (not brass, though). Will be interested in hearing how your newly ordered bits do.
-
USS Constitution by mtbediz - 1:76
GGibson replied to mtbediz's topic in - Build logs for subjects built 1751 - 1800
Continued amazing work, Mustafa! With all of your concentration lately working on the interior of your Constitution, it was especially nice to see some new exterior pictures in your latest post. Beautiful ship, sir! -
Thank you, Peter! Appreciate the kind words. After this Santa Maria, the Constitution is the next one coming off my shelf. 👍
-
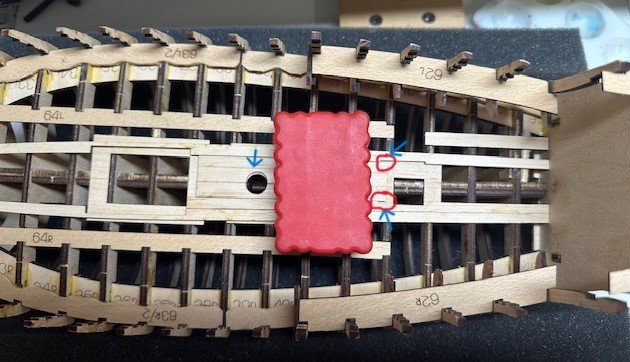
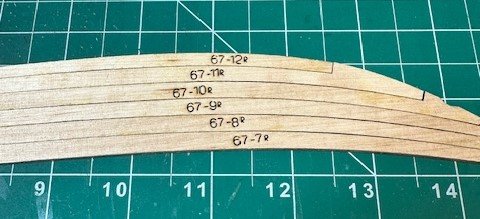
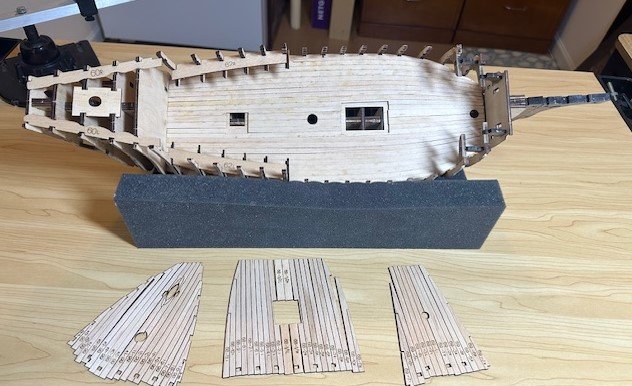
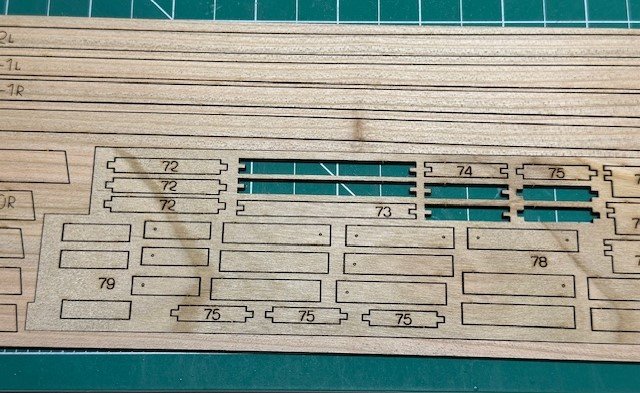
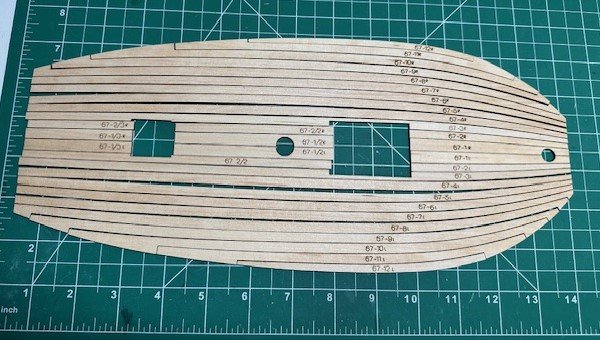
Another short update (or at least I'll try to make it short...) as I reach another transition point in this Santa Maria build. Time to plank the main deck! Of course, I began with the planks at the centerline and worked out both ways, alternating placement on the port side, then starboard. You will recall in the picture in the previous post with all of the main deck planks laid out, the centerline section of planks are in three sections. I lined up the two R & L center planks on the center line and in position with the bulkhead cut for the main mast drop. You can see there is a slight overlap discrepancy with the underlayment, but I'll take care of that, if needed, with a Dremel when we look at the main mast placement. But, with its placement there, you may be able to see that the two longer pre-cut planks do not line up properly with their neighboring planks for the hatchway placement. And, I found this to be the case with all of those planks on the aft side of center. After contemplating it for awhile and concerned about cutting into Pavel's designed kit, I decided to make the cuts. So, 4mm was cut from the following planks - 67-1/3R, 67-2/3R, 67-3R, 67-1/3L, 67-2/2L, 67-3L. As I continued with the deck plank placement, I decided to "pre-glue" the last six (6) outside planks on each side and then fit them in position with any necessary tapering done where needed in order for them to fit in with the best placement. That process seemed to work pretty well, and the finished main deck planking looked like this... There are some areas along the bulwarks that may need some scrap fill, but I will look at that when we look at completing those inner sides. You can also see in the above picture the layout of planks for the other three decks, as well. Before I start working on the quarterdeck placement including the support beams that will support the quarterdeck, it is probably smart to do some main deck staining and place the smaller hatchway, as that work will be impossible to get to after the quarterdeck is up. Also, I believe there are some cannons that will be located under the quarterdeck, as well, so determining their placement will be important now, too. So, I pulled out the laser-cut sheet that has the hatchway pieces on it. In the instruction drawings, it appears the two hatchways have some ring handles to open or remove the hatchways. The laser sheets have locations drilled or burned on a couple spots on boards, but not all of them. So, I'll mark and drill those, and then use some available eye pins and jump rings to create the handles, as I do not see those included in any of the kit boxes. So, I will work on these hatchways and the main deck staining. I have several different darker stains I am going to test on some scrap sheets to see what best replicates what Pavel achieved in his demo videos and pictures. We continue to move forward. As always, appreciate the reads, likes, comments, suggestions and criticisms. Thanks for peeking in.
- 58 replies
-
- 9
-
-
- Santa Maria
- Ships of Pavel Nikitin
- (and 1 more)
-
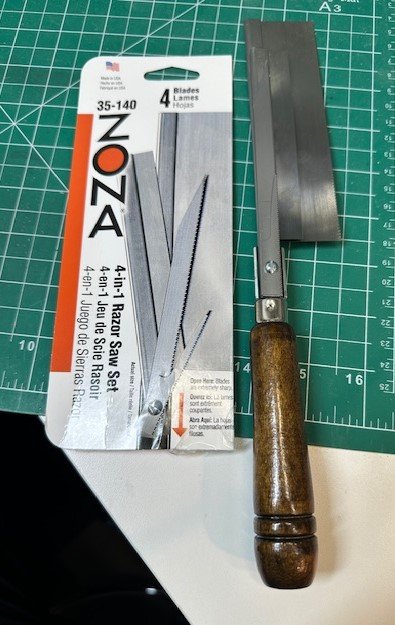
Wasn't sure whether to post this here in the Tools discussion or in the Shore Leave "What Did You Receive Today?" forum, but decided here since it is... well... a pretty sharp tool! Saw this on someone's post, whether it was here on MSW or another forum, and I was intrigued, so had to order it. It has a nice wooden handle and 4 separate blades that can be attached. It comes with all four blades on the handle but you remove all but you are using. I'll keep all of them stored in a small plastic bin I have when not in use. There is a finger-nut on the other side of the screw to tighten the blade onto the holder. The four blades are: 52tpi Ultra Thin Kerf , 24tpi Keyhole Saber, 24tpi Large Saber, and 32tpi Fine Kerf. I know we all have acquired numerous types and sizes of blades and knives, but thought this was a good addition to what I already have. And, I have a large fine kerf saw that I use with a really nice steel miter box, but I lost the handle of the saw somewhere a while ago, so been using it without a handle for years. This will be much more comfortable!
-
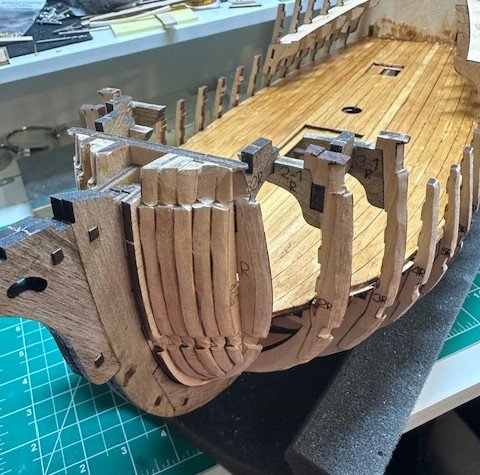
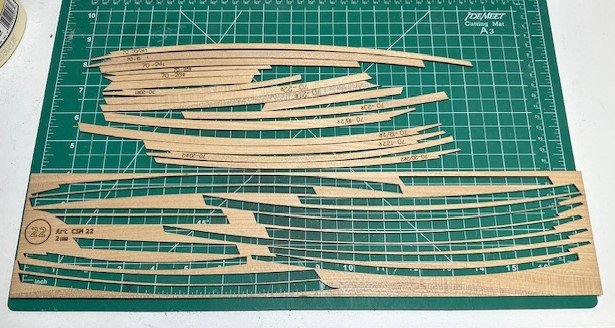
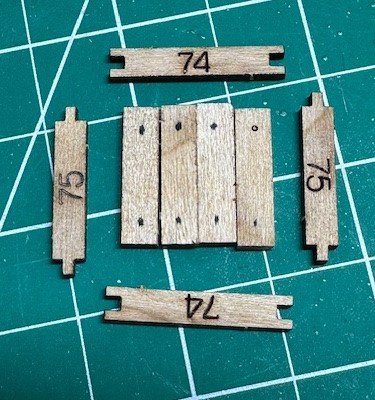
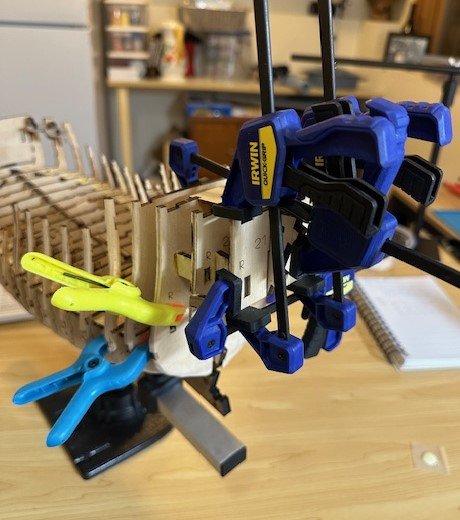
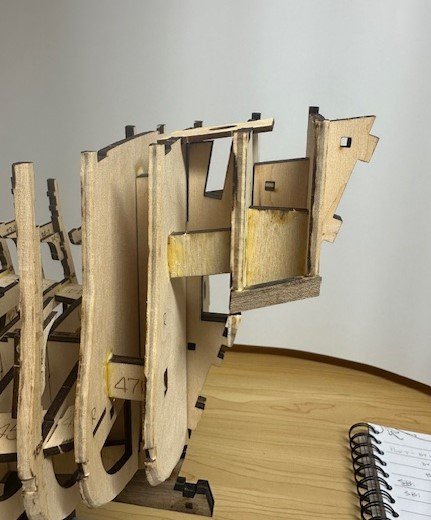
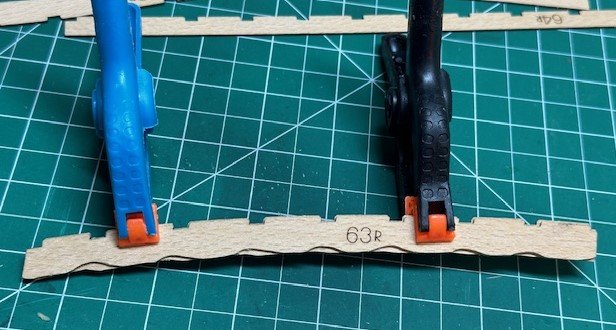
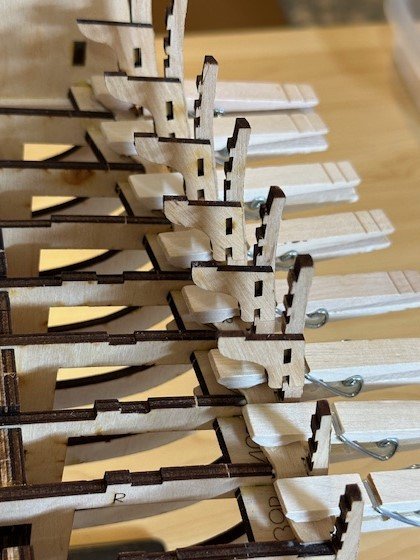
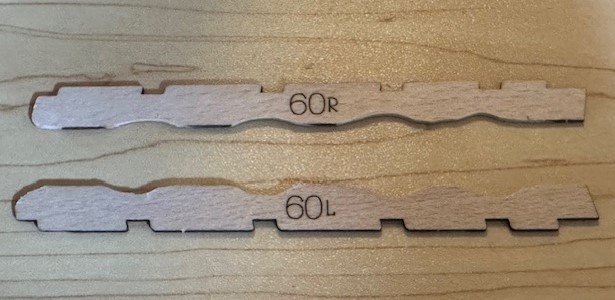
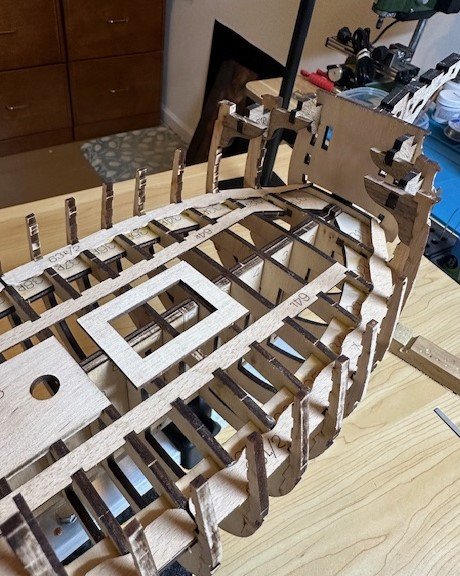
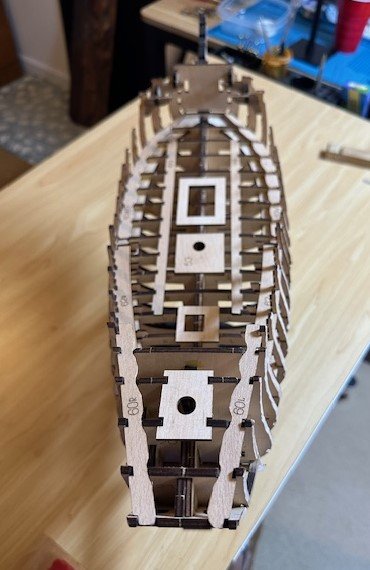
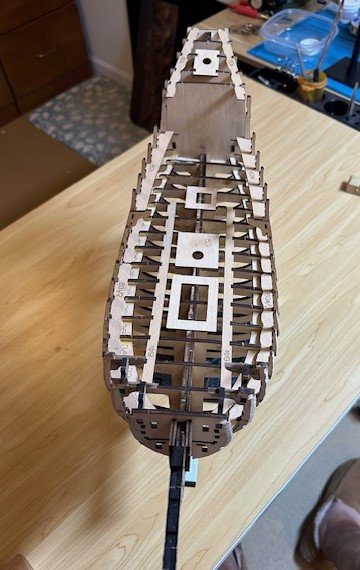
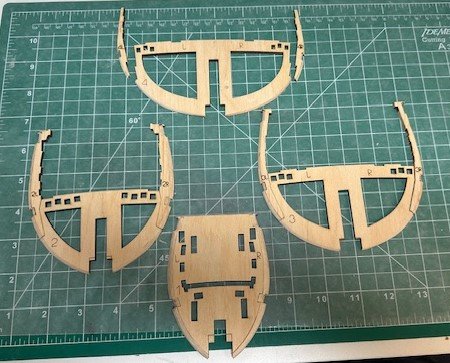
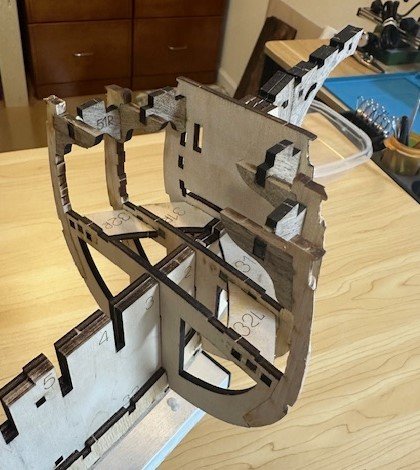
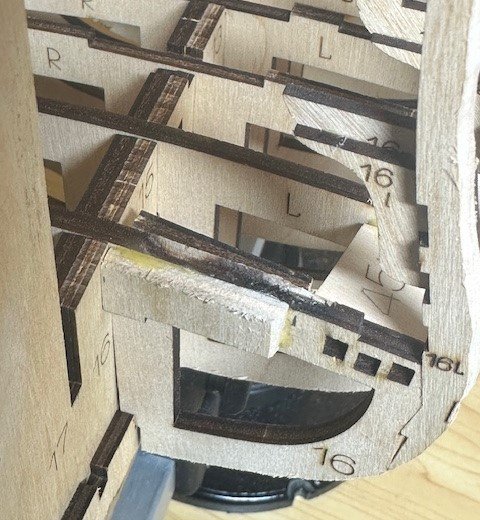
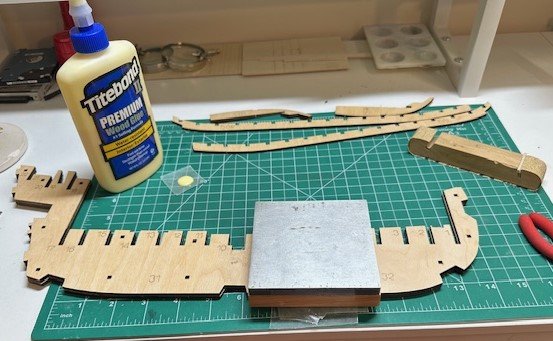
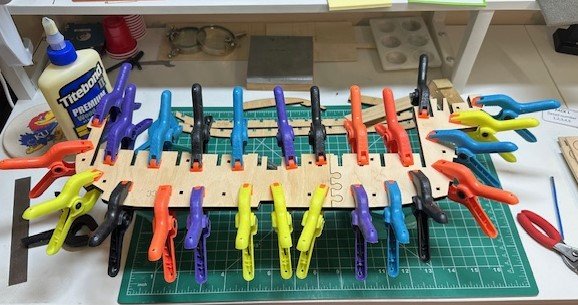
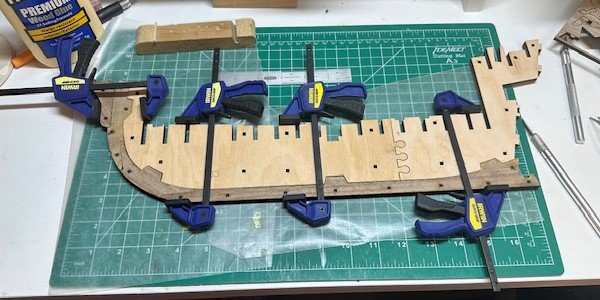
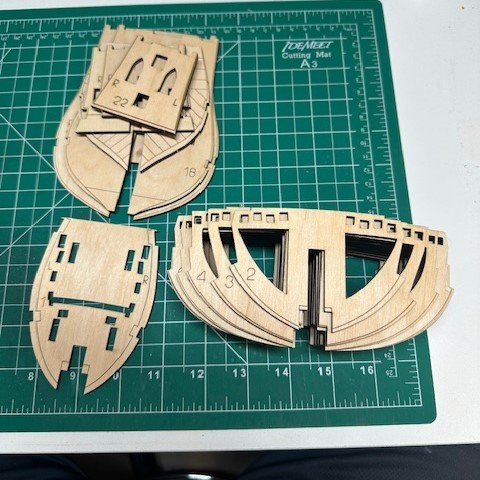
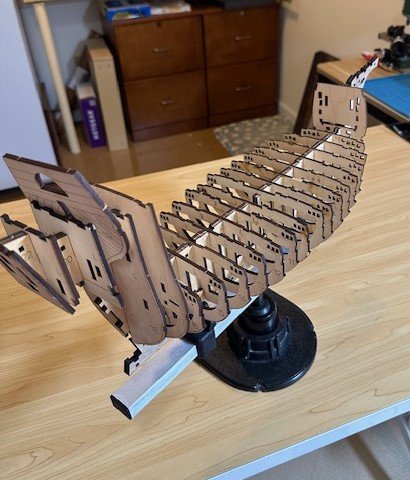
One more (brief) update before we finish this section of construction... As mentioned briefly in my post above, I resolved my spacer issue by simply cutting off the single tab side and gluing a small shelf for the spacer to rest on using a couple small spare strips of 1/32"-square wood. This should work out OK. The last few bulkheads and corresponding spacers that needed to be added were a bit challenging to get set just right and secured properly, but after a couple "glue and unglue and re-glue" sessions, I believe we got it how it's supposed to look. One can never use too many clamps to make sure everything sets properly, right? As you have probably noted in these pictures I have posted so far, all of the parts in Pavel's kit have numbers lasered into the piece. On these last bulkheads 17, 18, 20, 21 & 22, I was having difficulty determining just how the spacers would be placed in order to have a natural (and correct) rise in bulkhead tops to create what will become the poop deck. This is how my spacer placement ended up... Port Side Between BH 17-18, Spacer 47R Facing Out Between BH 18-20, Spacer 48R Facing In Between BH 20-21, Spacer 49R Facing In Starboard Side Between BH 17-18, Spacer 47L Facing In Between BH 18-20, Spacer 48L Facing In Between BH 20-21, Spacer 49L Facing In & Upside Down We also placed some thin 1.3mm strips along the outside next to the bulwarks that I guess will serve as an underlayment, if you will, for the decking for the main deck, the quarterdeck and the poop deck. I did need to use the Dremel a bit to allow the pieces to fit snuggly in place. A few pictures of the ship after all of the initial framing is complete and before the decks are placed... Next up is placement of the deck planks, beginning with the main deck planking. I popped out all the laser-cut pieces from the sheets and laid them out to see how they were looking, and they seem to be ok. Having these deck planks pre-formed (hooked scarf joints and all!) is a huge time-saver. As with all of the other pieces in the Pavel Nikitin kit, you can see that the deck planks have numbers and locations laser-burned on the planks. One thing I should note here, as I don't think I've mentioned it before... you have seen that pieces are designated with numbers and either R or L. The R-designated pieces are placed on the port side of the ship, the L-designated pieces go on the starboard side, as if you were looking down the center of the ship from its bow. However, when placing these deck planks, we will flip them so the laser-burned markings are on the bottom. The "R" planks will be on the starboard side, the "L" planks on the port side. I'll let you know on how everything fits on the next update, I suppose! Fun to see this ship taking shape! I will trudge forward. As always, appreciate the reads, the likes, the comments, the advice and the criticism!

- 58 replies
-
- 7
-
-
- Santa Maria
- Ships of Pavel Nikitin
- (and 1 more)
-
Thanks, Ronald & Bob both, for your perspectives and possible solutions. But, no, I had tried that "flip", but the single tab is still in an incorrect position, so... I've already chopped it off and glued a small knee "shelf" for that spacer. Details will be shown in my next update. You may be right on the future for these kit companies, Bob. I see that OcCre has been announcing an upcoming launch (their promotional email this morning says its 3 days away) that may incorporate some of these same designs. 🤷♂️
- 58 replies
-
- 2
-
-
- Santa Maria
- Ships of Pavel Nikitin
- (and 1 more)
-
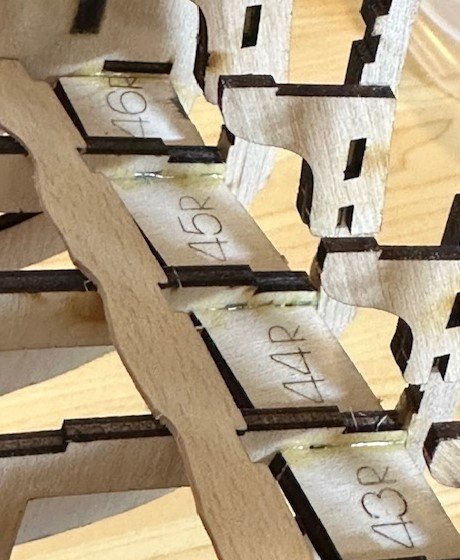
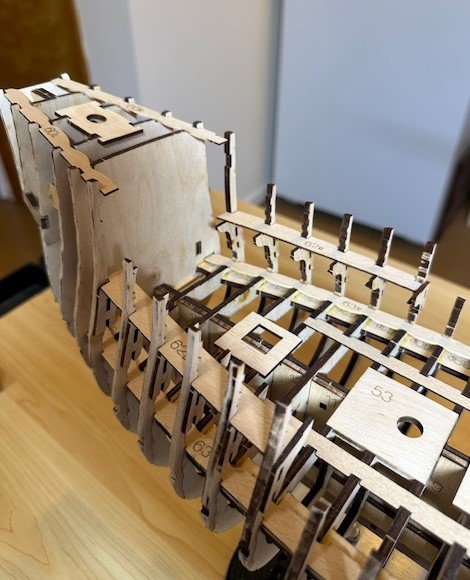
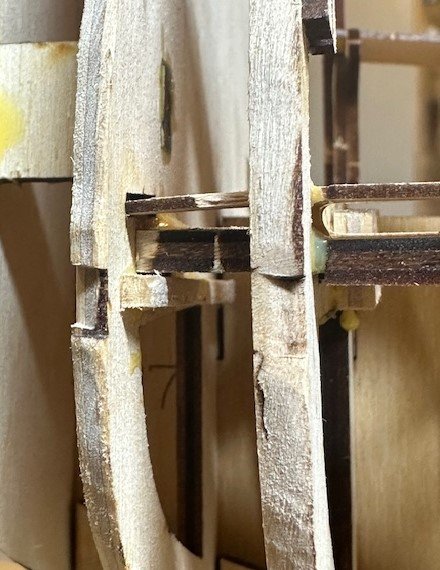
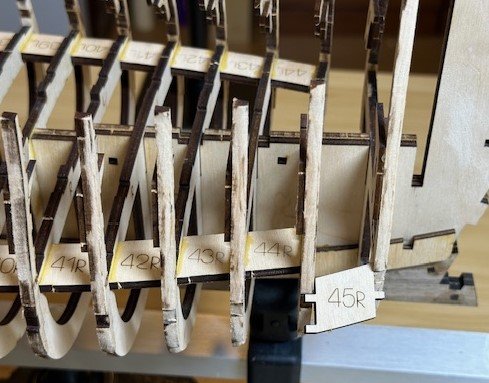
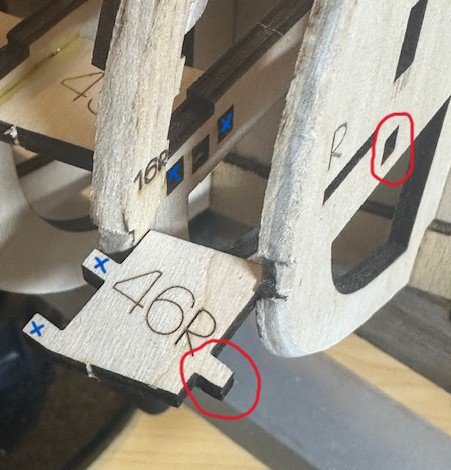
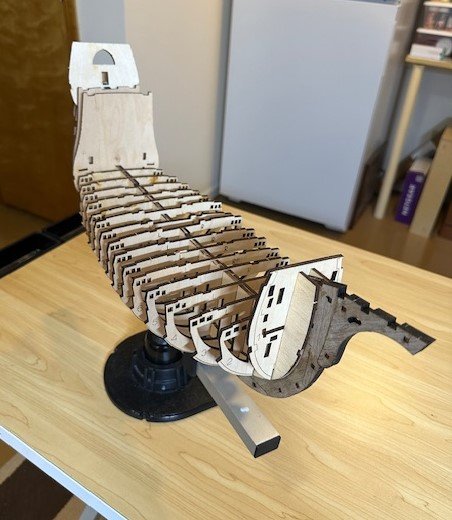
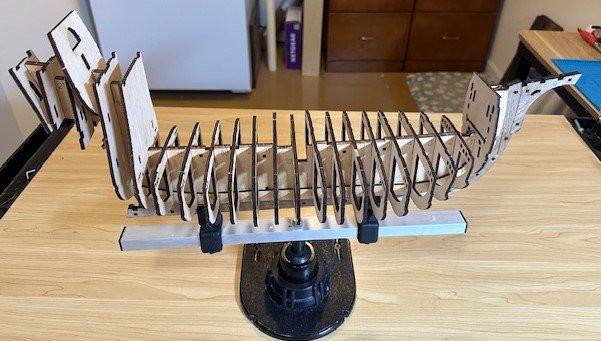
Another update! I have been working on the placement of each of the bulkheads along the former (thanks, Mustafa, for the proper vocabulary lesson!) and placement of the kit-provided battens or support reinforcements that are secured between each bulkhead. As I began through this build process and reviewed through the 90+ page pictorial Guide to Manual booklet (or at least the initial section pertaining to the bulkheads), several of the pages seemed out of place for me to follow. So... I reorganized the first few pages to make it easier for me. Pavel's instructions do say that on some of the pictures, you can see details from later steps of construction, but it was easier for my mind to process it all with at least these first few pages reorganized. My sorted page list is now... 1-4, 25, 5-9, 12, 10-11, 14-15, 26, 16-17, 27, 18, 28, 19-24, 29-30, 13, 31-33. With that said, on to my construction notes... First off, I sanded each of the bulkheads and their corresponding bulwarks as marked to the fairing lines indicated. This worked really well using the Dremel (outside!) and then smoothing with sandpaper. Each of the bulwark pieces are then glued to their respective bulkheads. I was impressed with the fit between each of the matching pieces, as they all fit snuggly with a nice thin glaze of Titebond. In addition to the bulwark attachments, bulkheads 2 & 3 on the fore end and bulwarks 11-16 on the aft end have little knees or supports glued in position to support decks that will be above them. Again, the fit on these were impressive. Kudos (so far) to the precision laser cutting. Bulkheads 1-3 were able to be assembled off-ship, with the kit-supplied battens or reinforcements placed and secured between bulkheads. The three assembled bulkheads were then able to be slid down into place onto the former. Nice fit, and the batten spacers seem to be helping quite a bit in solidifying the bulkheads in place. I, then, proceeded to move down the line, placing each bulkhead in its rightful spot and inserting the batten spacers between each bulkhead for support. After every two or three, I would spread some Titebond using a toothpickand use a mini-clamp to secure for a period of time. In the second picture below, you can see how each of the batten spacers are shaped with the tabs, two on one side, one on the other, that were inserted into the existing square holes. For each placement (especially for the second placement between the R & L sides) it was difficult to spread the bulkheads out away from each other enough for the tabs to pop into place. My routine was to insert the two-sided tab on the fore end and then spread the bulkheads enough for the single tab to pop in (I used small pliers to hold while positioning). And more on that in a second... I did fine on all of the inserts until one of the last bulkheads, and on bulkhead 16 I was attempting to spread wide enough to insert the support piece and... snap! The wood cracked on the left side of bulkhead 16. I forgot to take a picture of the "post-snap, pre-repair" bulkhead, but I took a couple small pieces of scrap from an empty sheet, glued on each side of the break and squeezed until the repair dried, and... I think that will work. My next concern that I ran into is one that I'm totally unclear why it appears this way, but think I know a resolution in order to move forward. Bulkhead 17 is one of the final bulkheads that will be placed on the ship and is different than its neighbor bulkhead 16. There is a batten spacer similar to the other spacers that needs to be placed in between. However, it appears to me (and I have positioned all of the affected parts in multiple positions, right-side up, upside down, pivoted 180 degrees, etc.) that the single tab on the #46 batten support (it's the same concern on both left and right sides) is in the wrong place for it to be inserted into the square hole on bulkhead 17. The double tabs will be placed in the two holes on bulkhead 16 (all marked with the blue X's). But, as the two bulkheads are placed in their proper positions on the former, bulkhead 17's square hole is to the inside of the inside hole on bulkhead 16! And, as it hopefully depicts in the picture, its tab on the 46R batten support is roughly in the middle of the two tabs on the fore side of the support. They ain't gonna fit! Does this explanation make sense? My resolution to this at this time is to simply cut off the single tab and, with some type of small strip of wood, glue a knee of shelf underneath where each of the 46R and 46L pieces should sit, and glue it all securely... and move on. Other than that latest little hiccup, it is all coming together well so far. Pavel's Santa Maria continues to be a ship that I look forward to getting more involved in and excited about as I continue forward. I think this has been a good selection for my 5th build, although as I said before, a bit different than the previous four builds. As always, thanks for the reads, the follows, the likes, the comments and the criticisms.


- 58 replies
-
- 7
-
-
- Santa Maria
- Ships of Pavel Nikitin
- (and 1 more)
-
Chris & Jon - Relieved to hear that both of you are safe, albeit a ton of cleanup and repair is ahead for your communities.
-
Thanks, Ronald! Yes, very interesting! Should be a unique, fun build. Appreciate you looking in.
- 58 replies
-
- 1
-
-
- Santa Maria
- Ships of Pavel Nikitin
- (and 1 more)
-
Thanks, Mustafa! And thanks for helping me with the terminology! I have heard of the false keel term, but had not heard the bulkhead former term. If anyone that I am following in their own builds knows all of the various terms, I figured it would be you or Jon! 😁👍
- 58 replies
-
- 2
-
-

-
- Santa Maria
- Ships of Pavel Nikitin
- (and 1 more)
-
Hey Neil! Glad to connect with you here. Appreciate the follow. 👍
- 58 replies
-
- 1
-
-
- Santa Maria
- Ships of Pavel Nikitin
- (and 1 more)
-
This ad popped up on my FaceBook page. I normally delete ads faster than lightning, but this one caught my eye.. A micro reciprocating sander. Has anyone purchased this and happy? My Dremel works well for things like sanding char and other small sanding purposes, but sometimes I can't pass up a cool new tool... 🤷♀️🤣 DSPIAE Electric Reciprocating Sander – HobbyistHaven
-
The damage, destruction, and loss of life we are seeing reported on the news is horrifying and so sad to see. Comforting to hear that you and your family are safe, Jon.
-
USS Constitution by mtbediz - 1:76
GGibson replied to mtbediz's topic in - Build logs for subjects built 1751 - 1800
Congrats on completing this stage, Mustafa! Those beams are so sharp-looking. I am impressed with their consistency from fore to aft. Great detail! -
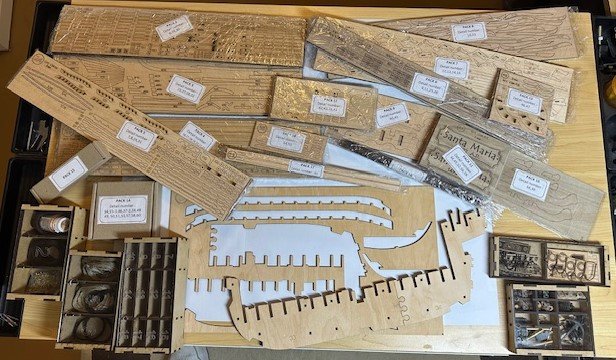
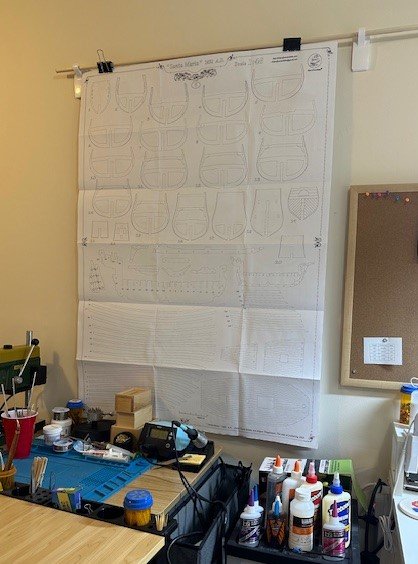
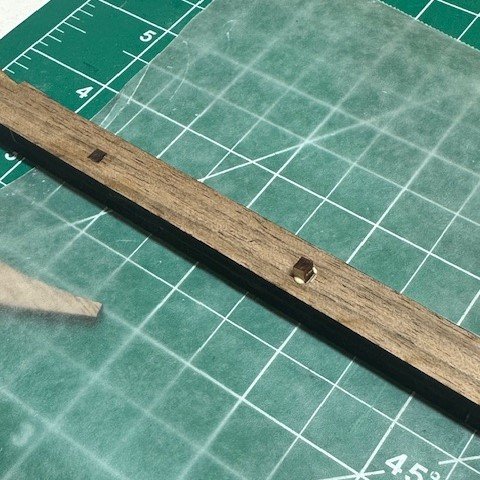
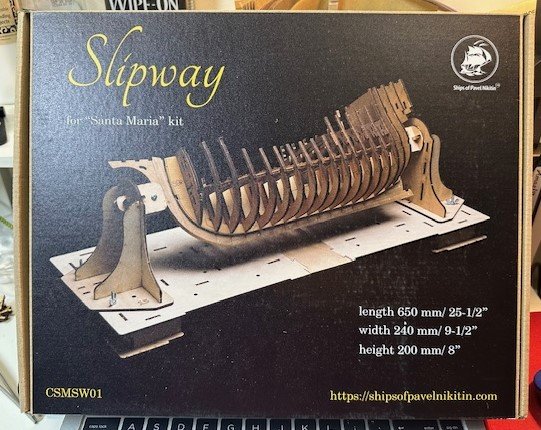
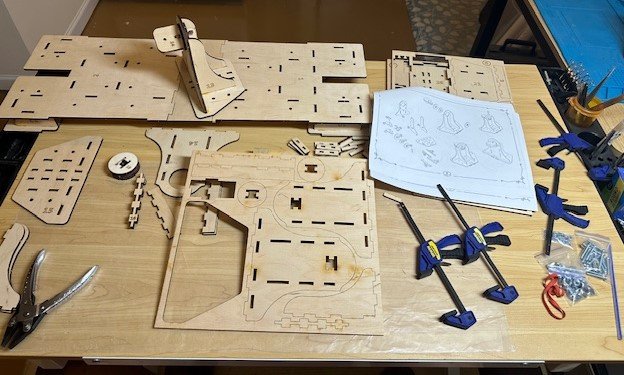
Well, after finishing my Bluenose, it's time to begin another build! And I am going to work on the Pavel Nikitin Santa Maria that I purchased earlier this year. Will work on this iconic ship, and then will build the Constitution. At least that is the plan... for now! While there are quite a few Santa Maria build logs here on MSW of differing scales and manufacturers, there really aren't any (yet) from the Pavel Nikitin group. There are a couple current logs on the Ships of Scale site that I will use for research and reference, as well as some YouTube videos of build logs. So, hopefully I will have plenty of references if I have questions. I mentioned back in January when I opened this build log as a "placeholder" for when I began the actual build that the box the materials come in was heavy! As I unpacked everything and began sorting, there are multiple packs of laser-cut sheets. The five (5) sheets of plans are huge! Got them hung up on the wall for now for reference. Began working on the keel, of course, as a first step. Each of the sheets are about 3.5mm thick and they are doubled up to form the full keel piece, so it makes for a nice, solid keel of a bit over 7mm in thickness. Always fun to bring out the clamps when gluing these big pieces! Then worked on the bottom piece of the keel (sorry, is there a formal name for this?) that will be exposed after the hull planking is completed. Again, two pieces glued together, with small square pegs inserted for additional strength and placement. Got to pull out the mini-clamps again, too! This Pavel Nikitin kit also came with a slipway to assist in the building process. Looks nice and I've seen other build logs using it, so I thought I would build it. Have to admit that it was challenging and frustrating. Was having difficulty sliding pieces into other pieces and getting things to fit well, so... I put it all back in the box and pulled out my "Keel Klamper" swivel vise. This should do just fine... Popped out all of the bulkheads from the laser-cut sheets and placed them on the keel to test-fit. All of them slid down into place pretty well, some are actually pretty loose. There are actually some kit-provided reinforcements that will connect between each bulkhead, so they should get better fits as we progress through the final placements of each bulkhead. Those will be shown in a future build log update. So, not a whole lot to start this build log, but wanted to get an initial "build" post on the record. As others have mentioned in their logs, this kit is definitely different than others I have worked on. It appears so much of the cutting and shaping has been done for us in this kit, as opposed to other kits that simply provide straight wood strips and you have to shape and cut them as needed. That analysis may change as I progress in this build. But, the Santa Maria should be an enjoyable build. Time now for some sanding and fairing! Appreciate the follows, likes, comments and criticisms, as always!
- 58 replies
-
- 12
-
-
- Santa Maria
- Ships of Pavel Nikitin
- (and 1 more)
-
Hey SkiBee! Great to catch up with you once again! I'll be following along! 👍🏆
-
Excellent work, John! 👍🏆
-
Thank you, Mustafa! Yes, I am already beginning the Santa Maria. I will hopefully see you on that build log! Appreciate your words of encouragement.
- 184 replies
-
- 1
-
-
- Bluenose
- Model Shipways
- (and 1 more)
-
Thank you, Jim! Yes, was hoping I could get the flags to hang at rest better, but the Canadian Red Ensign looks good on the Bluenose!
