

GGibson
-
Posts
1,038 -
Joined
-
Last visited
Content Type
Profiles
Forums
Gallery
Events
Everything posted by GGibson
-

Period Scale Model Masting and Rigging Tables
GGibson replied to DaveBaxt's topic in Masting, rigging and sails
Hi Dave. Did you intend on sharing/attaching the Excel spreadsheet for people to check calculations? Don't see anything attached. -
Appreciate your support, John! Beginning the sanding work on the wood dowels for the booms and gaffs, and have your Bluenose Post #156 readily available for reference, coming up with a game plan. 👍
- 184 replies
-
- 4
-

-

-
- Bluenose
- Model Shipways
- (and 1 more)
-
I found a couple sources for the 1/64" thin brass strips, I believe, and have ordered more. Until those arrive, it appears I have plenty of sanding to do, however, to shape and taper the various dowel rods for the booms and gaffs. Yay!
- 184 replies
-
- 2
-
-
- Bluenose
- Model Shipways
- (and 1 more)
-
Not really, Mustafa, but I appreciate the confidence! I'm getting a lot better than I was 6 months ago, though, so that is positive. Thanks for the support!
- 184 replies
-
- 1
-
-
- Bluenose
- Model Shipways
- (and 1 more)
-
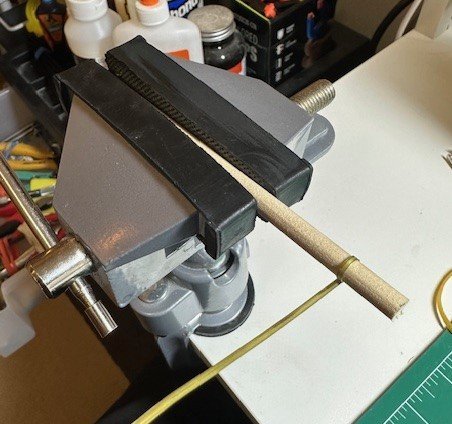
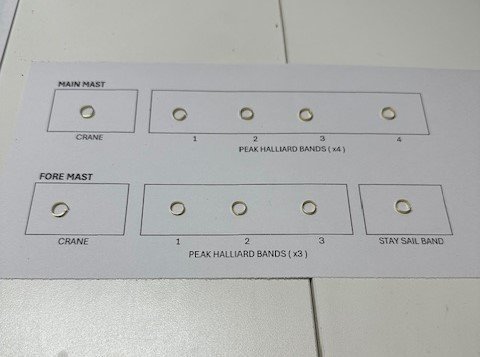
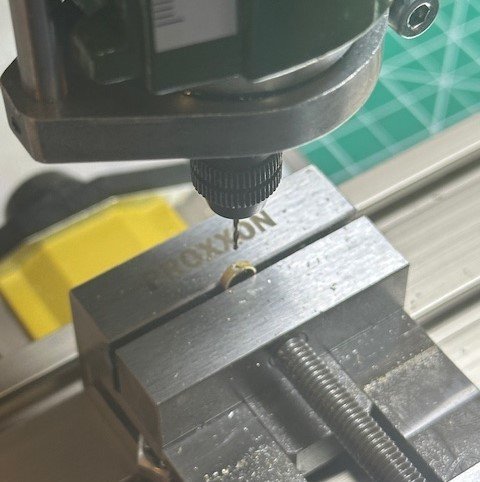
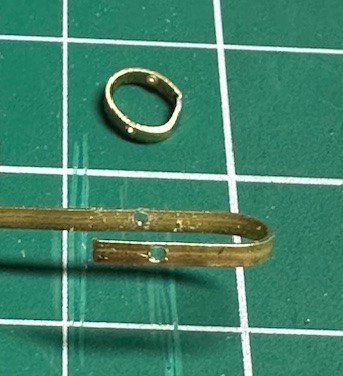
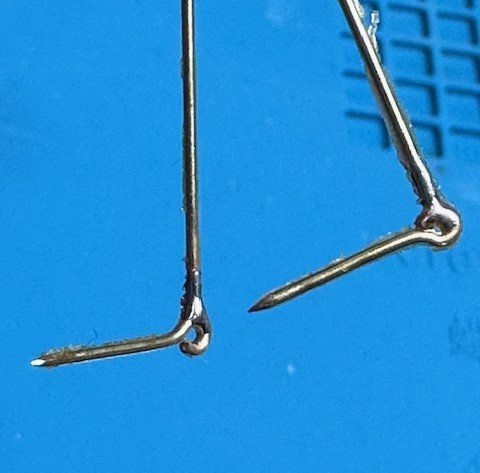
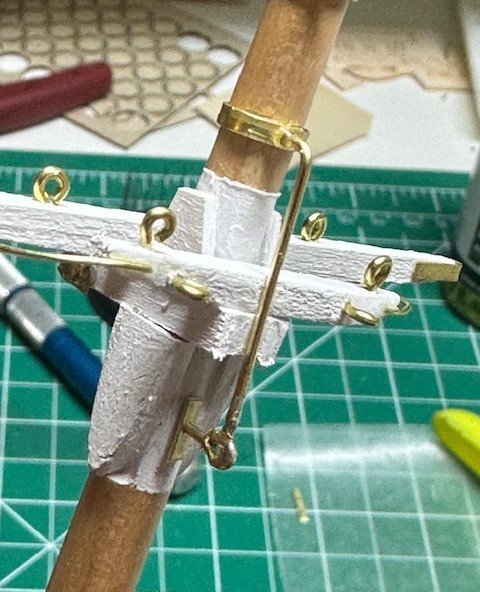
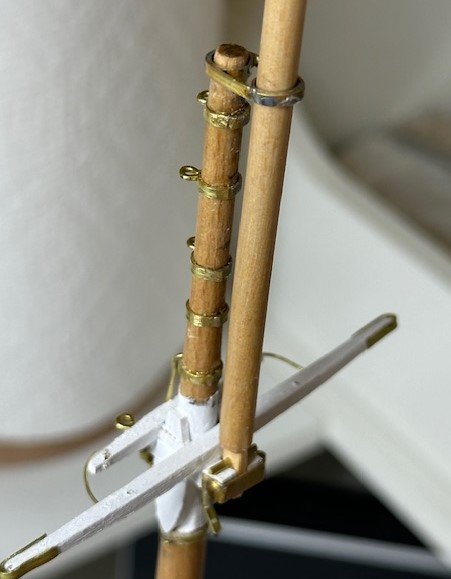
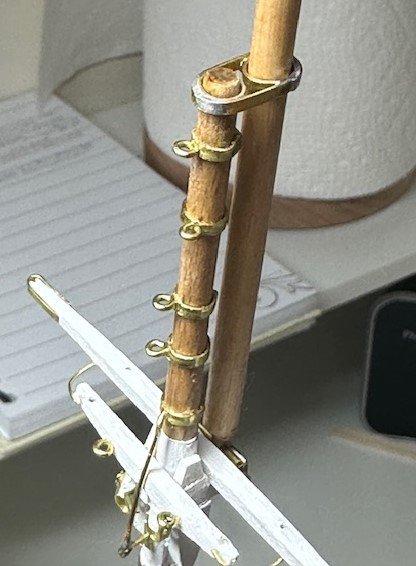
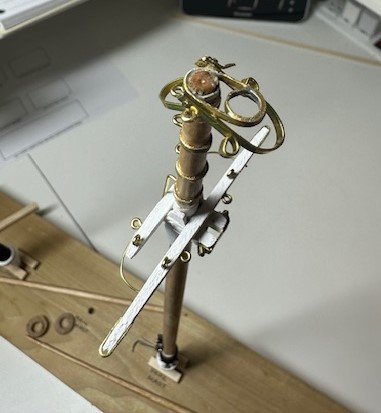
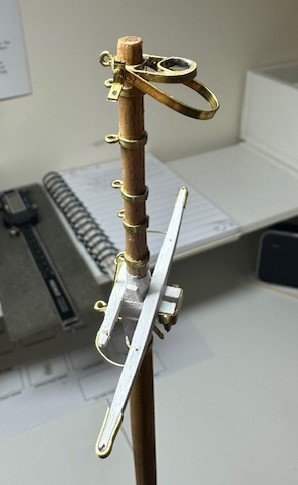
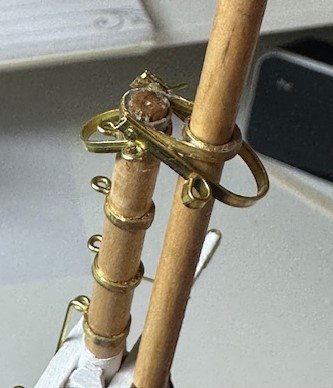
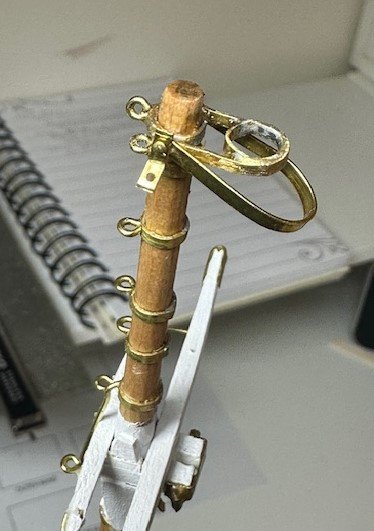
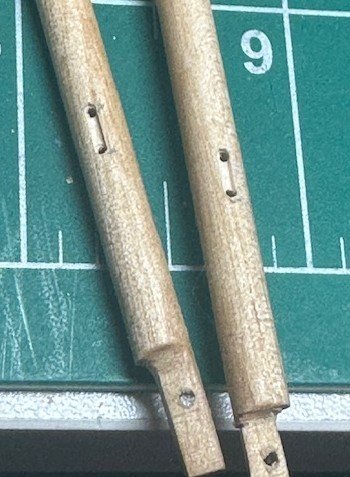
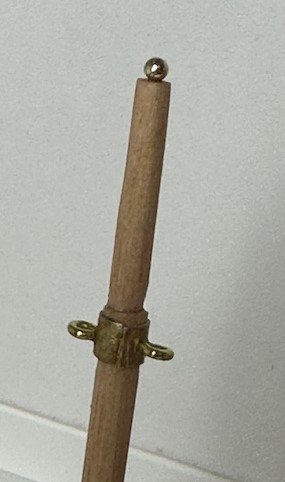
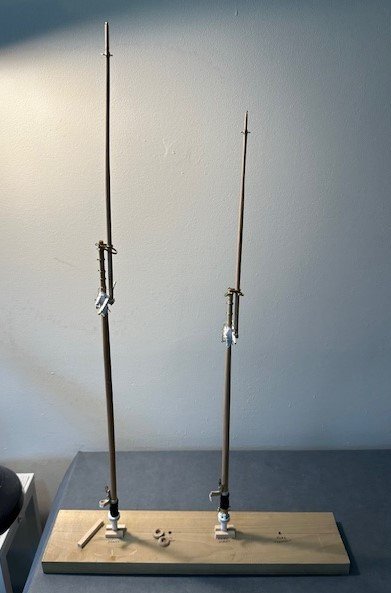
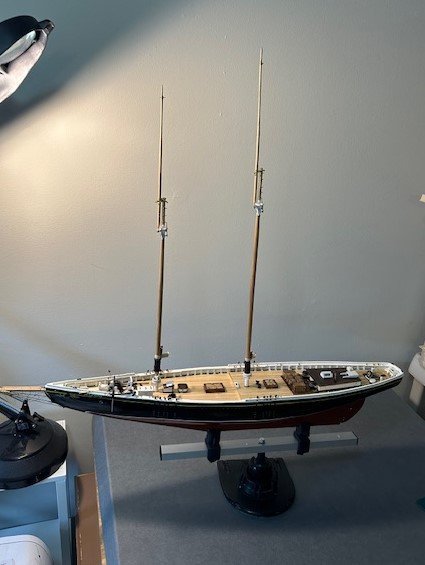
Well, I got another phase of this Bluenose build accomplished, so thought I'd share what I did and where I have progressed to to-date. Finishing up the work on the mast bands after completing the trestle trees on the upper part of the lower two masts. Lots of soldering of small strips, rods and bolts. For the mast bands above each of the trestle tree areas, I used a slightly-smaller-than 1/4" dowel held in a vise to initially shape the ten (10) needed bands for the tops of the lower masts. I would wrap, measure and then cut the bands to (what I thought was) the appropriate circumference for the position on the mast. I then would solder the individual brass strip, but was then finding that the newly-soldered bands were too tight to go back in the place I had just measured them for. And this happened a few times. Grrr... So, I had to give just a bit more "slack", for lack of better terms, when wrapping the strips, measuring, cutting and soldering so that each of the NEW bands then fit snuggly, but manageable. As I had seen others do, I also typed out a little placement chart to keep all 10 of the bands organized while I was making them, soldering, etc. Worked out well. All of the bands need at least one hole in them, so used my new Proxxon drill with the precision vise to drill the necessary holes. That worked out well, as I then placed the bands in their proper locations and, using a pin vise, drilled holes through the band holes into the masts for the eyebolt placement. Next was working on the spring stay sail band on the foremast. On other Bluenose build logs, I have seen others use either brass rods or brass strips to create and attach this spring stay bail band and the jib stay bail bands. I thought using narrow brass strips (1/16" wide) would be easier to attach to the masts and mast bands, so I used strips (and I am running out of brass strip stock quickly!). Anyways, the spring stay bail band went on well after shaping. The cranes for each mast were made from 0.84mm eye pins soldered to 0.81mm brass rods. (In the zoomed-in picture below, they look a bit dirty, but were cleaned, of course, after soldering.) Brass strips were cut for the back plates and the links on the back side. Drilled holes using a #65 bit (.88mm) and placed the cranes in place on the two masts. This all worked out pretty well. For the mast caps on both the foremast and main mast, outer bands were shaped and soldered around the individual mast bands, and this all worked out pretty good, as well. The pictures below were taken after they were soldered and fit on the masts, but before I did some cleanup and touchup on the soldered areas. Finished out then, with the longer jib stay bail strips and long links on the fore mast. Didn't take a great number of notes on the top masts, but it all came together well. To recreate the mast tackle sheaves on both top masts, I first drilled two holes in each using the Proxxon drill and precision vise. Then, using the Proxxon MF70 mill, I cut slits to shape what would appear to be a pulley inside. Debating whether to do any more with these, but thought the mill did an excellent job of cutting those small grooves in the masts. For the gilt ball on the top of the masts, I had purchased a small box of 30mm long brass ball head pins with a 1.9mm wide ball at the top. I cut a couple of those and inserted them at the top of each mast. I may take some sandpaper to these to dull them a bit, make them a bit less shiny, but otherwise much better to use these than to create something so small. Speaking of small, I have NO idea how to make the truck for the flag halliards. Tried cutting small small circles but everything was breaking. I'll leave that for now until I get to that point in the rigging. With that said, the masts (I think) are pretty much done. Just for grins, I put everything together on the work stand, and then on the ship itself, to see how it all looks. Man, this ship is going to be big when done! Now, I believe it's on to the booms and gaffs! As I mentioned earlier, I have run through all of the 1/64" x 1/16" brass strips that I had in inventory. Got some new brass strips, but they are not quite as thin as the 1/64" ones I had, so a bit harder to bend and shape. Have another source I am querying, so we'll see if they come through, as it appears I have plenty more bands to create. As always, appreciate the likes, comments and criticisms!

- 184 replies
-
- 10
-
-
- Bluenose
- Model Shipways
- (and 1 more)
-
Keel holder/clamp recomendations
GGibson replied to Mike Shea's topic in Modeling tools and Workshop Equipment
Although I have the Keel Klamper (doesn't everyone?!?) and use it primarily, I also have a foam cradle that has been helpful at various times, as well. I got mine from Micro-Mark. Triple Duty Foam Cradle for Models and Ships (micromark.com) -
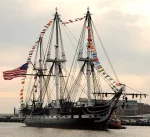
USS Constitution by mtbediz - 1:76
GGibson replied to mtbediz's topic in - Build logs for subjects built 1751 - 1800
Those are awesome. Thanks for the "zoom-in", Mustafa. -
Excellent work, John! Standing rigging looks great. Nice closeup shots that I will be referring to hopefully soon!
- 282 replies
-
- 2
-

-
-
- Bluenose
- Model Shipways
- (and 1 more)
-
That hull looks great, Jim! Congrats!
-
USS Constitution by mtbediz - 1:76
GGibson replied to mtbediz's topic in - Build logs for subjects built 1751 - 1800
Thanks for the additional info on the ladder construction, Mustafa. Great work! I am also interested in the stanchions and how you secured the hand ropes that go around the stairwell. Can you take a closeup photograph of one of the stanchions? Is the rope passing through small brass tubes at the tops of each stanchion? Again, marvelous detail, sir! -
USS Constitution by mtbediz - 1:76
GGibson replied to mtbediz's topic in - Build logs for subjects built 1751 - 1800
These ladders look great, Mustafa! The cuts in the side rails for each of the steps/rungs to be held is perfect. Did you have a jig set up with your mill to do those? -
USS Constitution by mtbediz - 1:76
GGibson replied to mtbediz's topic in - Build logs for subjects built 1751 - 1800
Ahh yes, using capstans! And an awesome video! Adding that to my library to watch the entire video at a later date. Appreciate the info, Mustafa! And again, the chain looks really sharp. -
USS Constitution by mtbediz - 1:76
GGibson replied to mtbediz's topic in - Build logs for subjects built 1751 - 1800
The chain pots and chain look really nice, Mustafa! Perhaps I missed it earlier, but where do those chains go as they come out of the chain pots and underneath the spar deck? Was there a windlass underneath they wrap around? Are these anchor chains? Sorry for being inquisitive! Trying to absorb everyone's great work on their respective Constitution logs! -
Great sail work, Tim! and I love the rope coils next to the belaying pins! Sharp looking! A question on your picture just before your "Finished Sail" text, the one with the single block right next to the fife rail. Where is that rigging going up to on the mast? Not seeing this in the Sheet 5 or Sheet 6 Rigging details, but am overlooking it, I am sure.
-
Hope this post isn't a jinx, but... after trying to learn an efficient way for me to do the little soldering I need for these model ships, and being terrible at many different attempts and methods, I think... I hope.... that I have found a method and combination of materials that have (so far) been working very well for me. Having no previous history in soldering before my venture into model shipbuilding a few years ago, I have been a complete novice at this, and have read through multiple "how-to" websites and videos on recommendations for everything from equipment to technique. I have tried resistance soldering, silver soldering, purchased various setups and tools, and nothing has really been working well for this old man! Had to share the fact that I think I've finally hit the right combination of equipment and technique. I am using a Weller WE1010 soldering station with soldering iron. After some good swipes with some sandpaper at the solder spot to clean and prep it, I am using Nokorode Regular Paste Flux and applying just little dabs on my small brass rods and brass strips (all the materials I've needed to solder so far) and touching just a bit of Alpha Fry 4 oz. 60/40 rosin core solder on the location, and... boom... success! May be trivial to many, but had to share! 👍
- 2 replies
-
- 12
-
-
USS Constitution by mtbediz - 1:76
GGibson replied to mtbediz's topic in - Build logs for subjects built 1751 - 1800
Mustafa, love the symmetry of this spar deck! It looks awesome! -
Just did another quick scan of Sheet 6 - Rigging Details, and I was probably thinking of the numerous shackles, not turnbuckles. Continued great work, John! 👍
- 282 replies
-
- 1
-
-
- Bluenose
- Model Shipways
- (and 1 more)
-
Excellent work on the turnbuckles, John! My $0.02 would be either aluminum or a brass-like gold. For my bowsprit turnbuckles, I purchased some "pre-made" ones that turned out... ok. But, now that I have a mill machine, I believe I could make some even better like yours here. And all of the tubing that I have is brass. Hmmm... I think there are some more turnbuckles higher in the rigging, isn't there?
- 282 replies
-
- 2
-
-
-
- Bluenose
- Model Shipways
- (and 1 more)
-
Great work, Jon, as usual! I am always looking for new and interesting hobby tools. Where did you find the four-corner brace/brackets in the 1st photo of this post? And... for what it's worth, I have admiration for what both you and Mustafa (and Peter aka Der Alte Rentner, as well) are doing with your Constitutions! I took advantage of Model Shipways recent sale and have added the Constitution to my shipyard. Couldn't pass up a great deal on an iconic ship. Besides the fact that I have some great modelers who have paved the way in front of me! Carry on, sir!
-
Let us know which one you get, Tony! Will be watching. And yes, vossy, I added the Pavel Nikitin version to my shipyard for.... someday! <shrug> 👍😁
-
Absolutely fine, Bob! Always appreciate additional encouragement and criticism! I have no less than 10 Bluenose build logs that I refer to, as well, for insight and inspiration, including @John Ruy, @Fubarelf, and @JohnU, who all have active, awesome build logs, in addition to several finished Bluenose build logs from @genericDave and @Ed Ku20. I encourage you to find all of their build logs, as well! Speaking of following build logs, though, did you have a build log for your Amati Santa Maria? I was intrigued by Pavel Nikitin's Santa Maria, so I have added that to my shipyard shelf, and may do that one next... if I ever finish this Bluenose! Speaking of which... BACK TO WORK! 👍🤣
- 184 replies
-
- 1
-
-
- Bluenose
- Model Shipways
- (and 1 more)
-
That looks interesting, Bob! I'm saving that one. I have this one saved for reference and have used it several times... Rope Knots - All Rope Knots Animated and Illustrated | How to tie all knots for Boating, Climbing, Scouting, Survival, (netknots.com)
-
Thanks, John! Appreciate your peeking in and commenting. Yeah, a few things I wish I'd done better, but as many have said countless times, only us as the ship builder will notice. For the friends, family, etc who will look at, they will be amazed... 😄 <shrug> Just finished the peak halliard bands on both lower masts and... I think I'm getting better at this soldering thing... 🤣🤣 The cranes and the mast caps pose additional challenges...
-
Hi Bob! No doubt John's Bluenose has been turning out great from the get-go, which is why I've been following his progress (and stealing ideas!) for a long time. Yours looks equally as magnificent! Congrats! For alternative options to the hull color, on my Bluenose hull, I used Liquitex Basics Acrylic Alizarin Crimson Hue Permanent (brushed on with multiple coats) and sealed with Minwax Polycrylic Crystal Clear Topcoat. I was really pleased with the outcome.
- 282 replies
-
- 2
-
-
- Bluenose
- Model Shipways
- (and 1 more)