rfolsom
-
Posts
881 -
Joined
-
Last visited
Content Type
Profiles
Forums
Gallery
Events
Everything posted by rfolsom
-

Cutty Sark by NenadM
rfolsom replied to NenadM's topic in - Build logs for subjects built 1851 - 1900
Ok , Nenad, I think I know what you're getting at... Ironically, in a way, I just dealt with that problem with my other build, the Niagara. That ship is much, much easier to build (so far). Won't any detail be covered up by the stem detailing? -
Cutty Sark by NenadM
rfolsom replied to NenadM's topic in - Build logs for subjects built 1851 - 1900
Nenad; I am not sure what details you are referring to; Please elaborate so I can fix my build . It will be awhile before I build the head timbers and the scrollwork. (I might try my hand at photo etch; carving would be beyond my ability)... ~Bob -
Thank you, Popeye and Bill, for the kind words. Bill, I just alternated between a #11 x-acto and my sanding stick with 400 grit, taking baby steps along the way and checking with my calipers. A draw knife would probably work a lot better, but I do not have one, and have never used one. It might be a good idea for me to invest in one and learn to use it, as I used the same technique to fashion the octagon on the end of one of the masts (test-fitting when forming the mast support blocks during framing), and I'm not really as satisfied as I'd like to be with the end result. Any suggestions for a good brand or size? Thanks! ~Bob
-
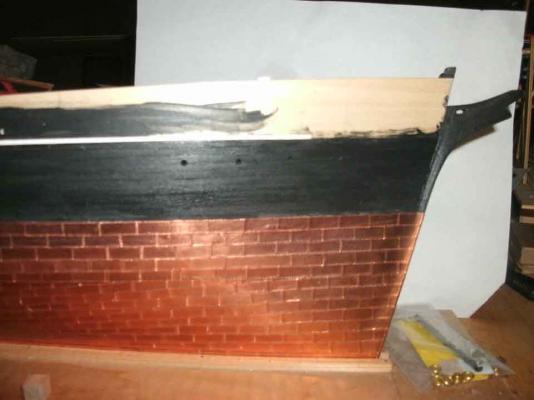
Nenad: Not sure what you're looking for, but I hope these pictures help. This area still needs to be finished at and above the white rubbing strake... ~Bob

-
Cutty Sark by NenadM
rfolsom replied to NenadM's topic in - Build logs for subjects built 1851 - 1900
Dear Friends; Yes, we will drive ourselves crazy trying to find that "right look" at the "right period". That's not my intent. However, If you use the law of averages, and how the group sees the problem as opposed to the individual, you will arrive at the best possibility. I use this in my other hobbies, such as ethnic cooking. I will usually consult 10-15 recipes before usually committing to not one, but my interpretation of all I see. Same for model ship building. Many details I've planned to omit, but decided otherwise, (Thanks, Nenad) will be implemented, but many won't. This is a hobby, and the fun is in the whole challenge; as Nenad says, watching you model grow up, learning, fixing, and the intelligence you gain from the research... Good luck with all the builds... ~Bob- 4,152 replies
-
- 5
-

-
- cutty sark
- tehnodidakta
- (and 1 more)
-
Rich; Hope your first day of the new job went well! ~Bob
-
Cutty Sark by NenadM
rfolsom replied to NenadM's topic in - Build logs for subjects built 1851 - 1900
Thanks to Lou and Sudomekh for helping the CS fleet! A concern I do have about those that want to model in absolute detail and authenticity: How do we determine which of these photos show original rivets or panel lines? If you were to pull up the floormat of a pristine 1967 Mustang and find a riveted floor panel, you would know that it was a replacement part for rust. It's much harder to tell with a 144 year old ship, whose original plans (at least to my knowledge) do not exist. G. Campell provides the best plans I know, but they are not the original, and in 1869 designs were improvised on the fly as the ship was being built. Some of the photos from the report suggest repairs made much later than the original build. Tough choice! Nenad: I am impressed with your level of testing; I tried a test with the outside bulwark iron panels, but gave up. Keep up the great work! ~Bob- 4,152 replies
-
- 1
-
-
- cutty sark
- tehnodidakta
- (and 1 more)
-
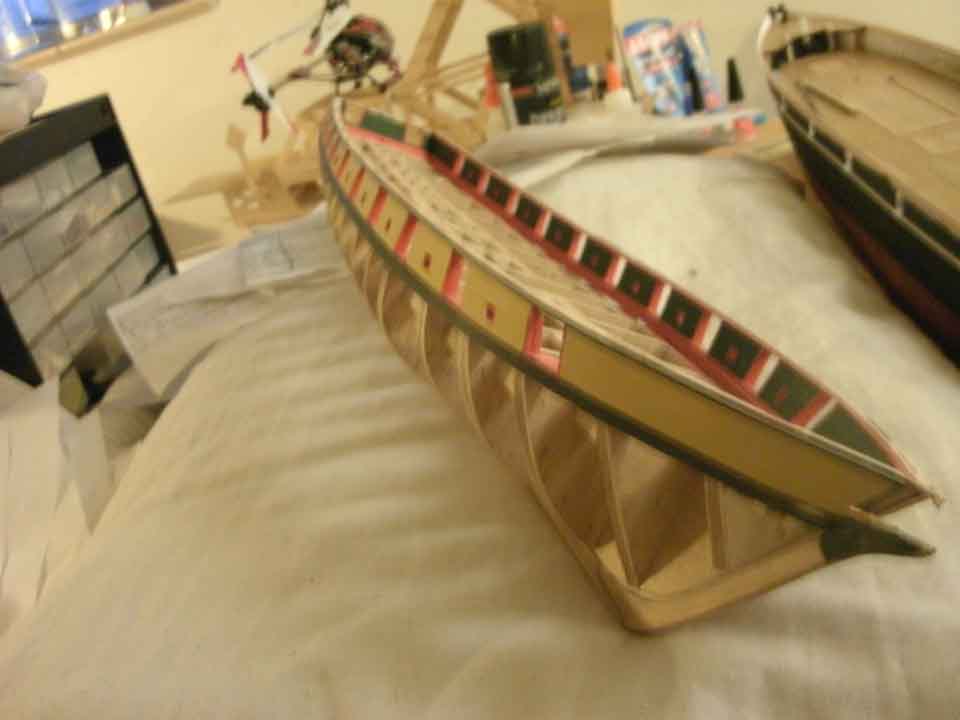
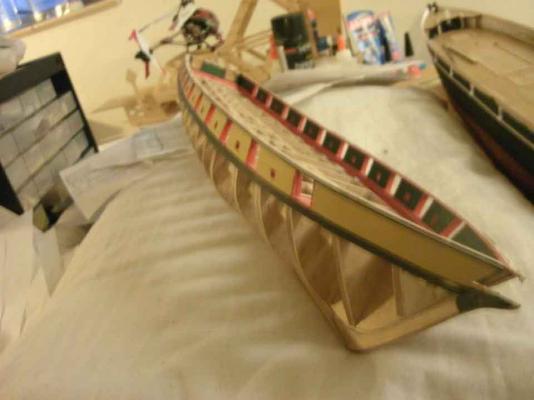
Bulwarks finally finished. (Well, not finished, needs trimming and touching up, but all wood is finally in place...)

-
Hello, AJ, In my previous builds I've always planked the deck before the hull. With my Niagara, I was planning on planking the hull first, as the others have done, (and the instructions read). I've noticed you've chosen the deck first. Advantages, one over the other? What do you think? Great work, by the way.. ~Bob
-
Awesome deck work, AJ. I'm looking forward to that part of the build; one of my favorite parts. I wish you well with the RA challenge; Your passion for the hobby will help give you the will and means to carry on. All my best, ~Bob
-
Thanks, Marc; Lately, I haven't found much time... Picked up the Inner bulwark panel strip for the CS tonight, and 2 hours later set it down in frustration, so now it's time to turn back to the Niagara...
-
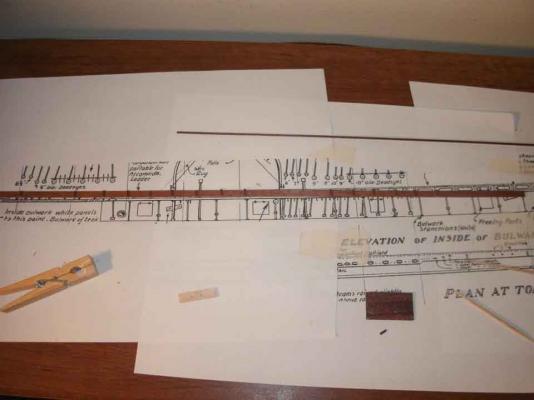
Brian and Marc; Thank you both for your input! Brian: My plans were included in my incomplete, yet unstarted, Model 459 Billings kit, purchased off of ebay. There were actually two copies of each of the three sheets, both identical and in actual 3/32" scale. I posted one copy of the three on my wall for reference, and secured the other copy of the three away safely after scanning them piecemeal into my computer. It was then easy to crop and enlarge different areas in photoshop by 166.67% to achieve an accurate 5/32" scale that the ship was modeled in. I was happy to see that the full scale (i.e. 5/32" ) plans matched almost exactly with the kit's die-cut keel and bulkhead pieces. (I had to add a small, (1/4" I think,) sternpost to the end of the keel to exactly match the plans, but all curves matched up.) I too was concerned about possible measurement distortion due to curvature of the bulkheads, but after measuring the greatest curvature that would affect the panels (the first 3 inches after the toilets) and using the theorem provided by our good friend Pythagoras, the measurement error in those three inches amounts to about 1.2 mm total for that area, (about a quarter millimeter for each panel, and much less with less curved areas) an amount that I can live with. Marc, not planning on modeling either of them at this time: both would be easy additions at any time of the build. (cutting out the removable rail after all rigging is done might be a little tricky, but not too bad)..... Best Regards! ~Bob
-
Cutty Sark by NenadM
rfolsom replied to NenadM's topic in - Build logs for subjects built 1851 - 1900
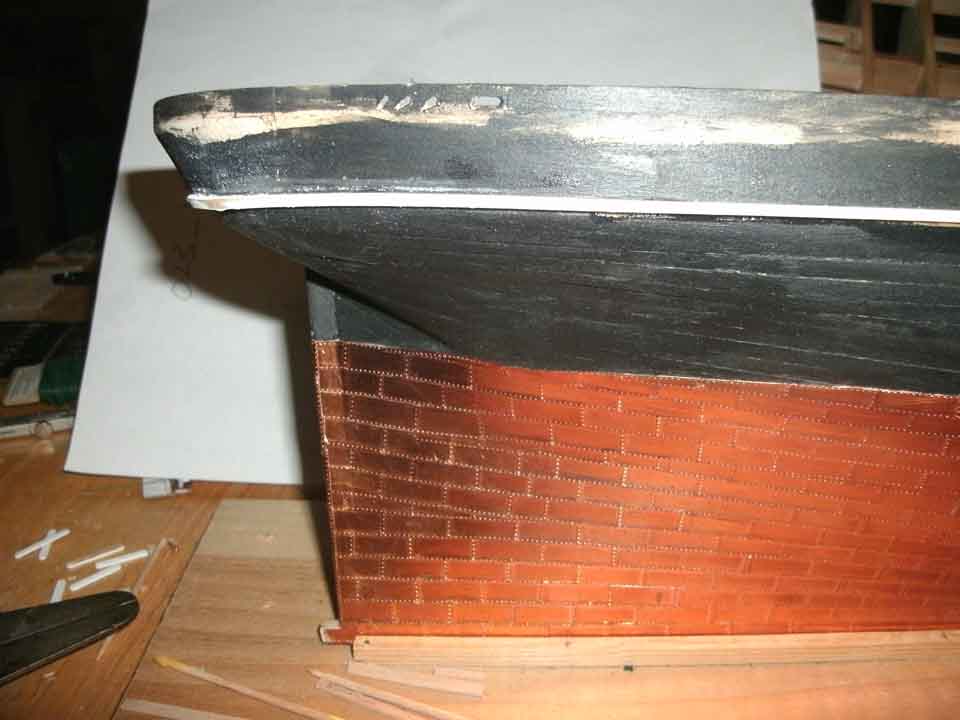
Nenad; Your solution for these metal plates, and those for your copper, might turn out to be one and the same. I simply chose to coat the "iron" bulwarks with several coats of sealer to try to hide the woodgrain (and my cracks) as much as possible before painting... Looking forward to seeing your solution! ~Bob- 4,152 replies
-
- 1
-
-
- cutty sark
- tehnodidakta
- (and 1 more)
-
Once these thin veneer strips (with uprights) are drilled with the oval recesses, they will be applied to the inside bulwarks.
-
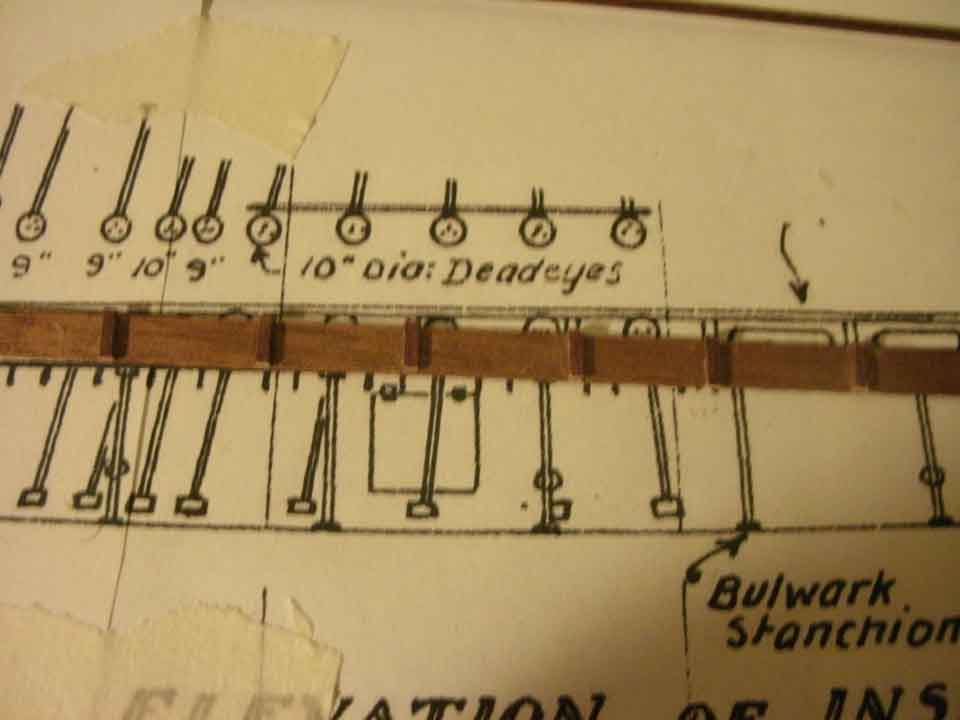
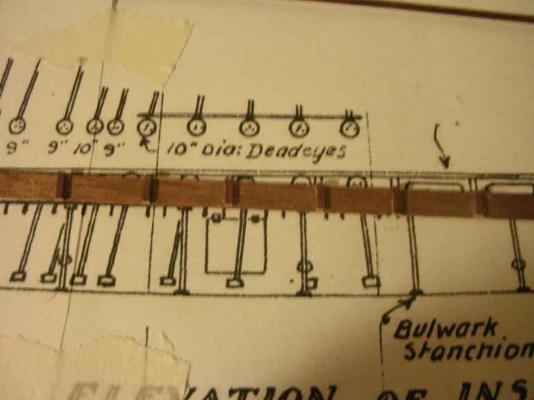
Hi Brian, This is definitely a good way of dividing the bulwark into even panels and eliminating the cumulative errors, but I am modeling directly off of my 1:1 plans, and Campbell shows varying panel lengths. If this is 100% accurate, or an error by Mr. C., I don't know, but I'm leaning towards Mr. C.'s plans. I also arrived at the same count for both stanchions and panels as you, and the spacing between stanchions remains quite consistent. There are several stanchions which, in the plans, are superimposed by either a deadeye stay, or a davit, and this was ambiguous as to whether the stanchions were present or not, until I found actual pictures that clarify the area, and these stanchions were always present. When installing my stanchions, I always measured from several point of reference: 1) Starting aft, from the break in the poop deck to each stanchion. 2) Distance between each stanchion in order, never assuming 100% equal spacing. 3) Distance from stanchion to next available and previously premarked reference line (section or deck beam line) on the deck, bulwarks, or waterway. 4) Distances from stanchion to next 2 available deck landmarks, such as a coaming or mast center. This measuring technique was fairly painstaking, but allowed me to get the most accurate position of each stanchion, and will help form new landmarks for the rest of the build. I am modeling my topgallant inside trim from 0.3 mm x5mm walnut veneer strips 40 cm long, with 1/32" x 1/16" strip uprights installed directly from Campbell's plans, and then will be drilling out the oval recesses.
-
Happy Thanksgiving, for all that support it! ~Bob
-
Hi! Did the same thing, (but not quite as good).. Are we in a race? How do you do this so quickly? (elves.... Santa Claus....) Very Good Work! ~Bob
- 304 replies
-
- 1
-
-
- niagra
- model shipways
- (and 1 more)
-
Yes, Campbells plans are the stuff: (for lack of a better term). Do not trust kit plans!
-
Rich: I wish the best of luck to you; Cross-country moves are very stressful; And, I hope you have an excellent Thanksgiving!! Best regards. Always. ~Bob
-
Cutty Sark by NenadM
rfolsom replied to NenadM's topic in - Build logs for subjects built 1851 - 1900
Nenad; I've noticed that the more I add to the bulwarks, the sturdier they get. Since you've already added the detail work, you probably won't have any problem with cracking. It took me 7 months to do the copper; but the good thing is it doesn't require a lot of heavy thinking.. I'd put a movie on and grab a beer or pop, and spend 2 or 3 hours a night just cutting, dimpling, and affixing the little things.. I want to wish you and everyone else a Happy Thanksgiving, I know you probably don't recognize the holiday, but it's a good time to sit back and give thanks for all we are blessed with. (I'm atheist as well, so thanks go to my Niece who cooked a wonderful meal, Sister who is always there, The Admiral and her unfaltering love, and everyone on Model Ship World for their thoughts, comments, and help ) . Best regards, Always. ~Bob- 4,152 replies
-
- 3
-
-
- cutty sark
- tehnodidakta
- (and 1 more)
-
Cutty Sark by NenadM
rfolsom replied to NenadM's topic in - Build logs for subjects built 1851 - 1900
Marc' (and Nenad) I broke my 1/32" bulwarks at least 5 times when coppering; but they came back within reason...- 4,152 replies
-
- 1
-
-
- cutty sark
- tehnodidakta
- (and 1 more)
-
Cutty Sark by NenadM
rfolsom replied to NenadM's topic in - Build logs for subjects built 1851 - 1900
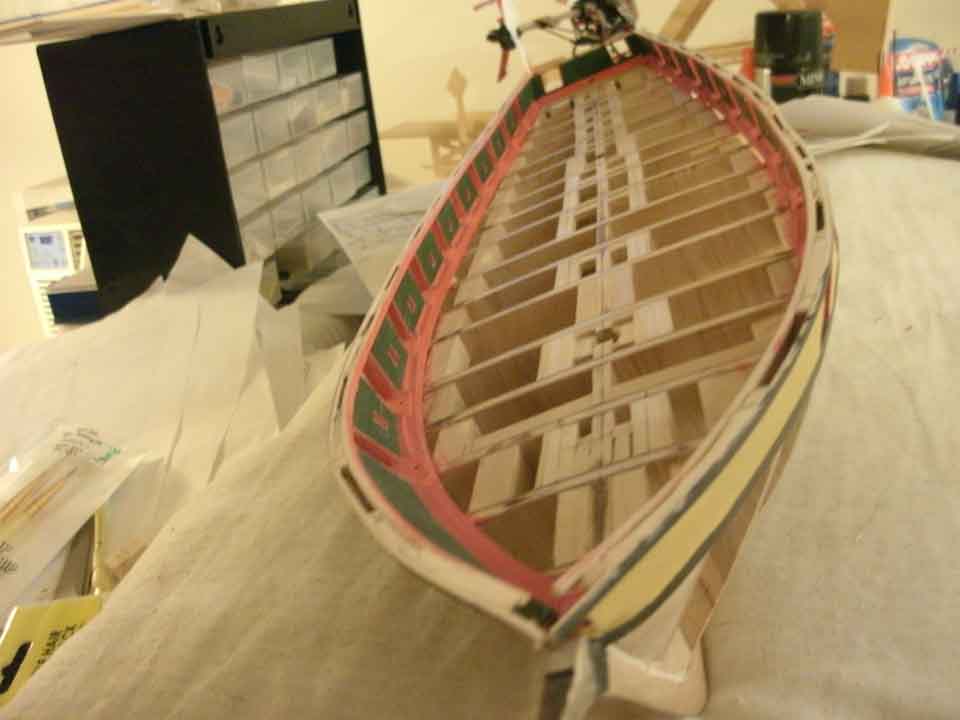
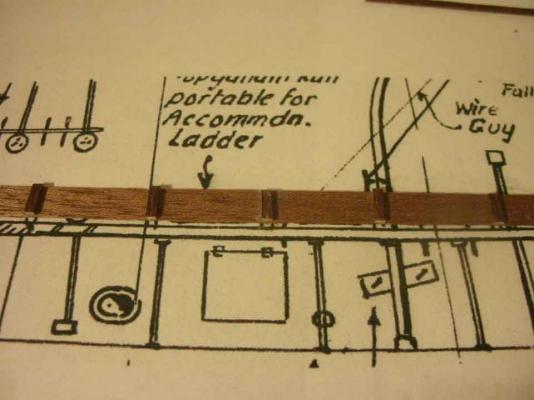
Here is a labled cross section of the test bulwark from my log for comparison...
- 4,152 replies
-
- 1
-
-
- cutty sark
- tehnodidakta
- (and 1 more)
-
Cutty Sark by NenadM
rfolsom replied to NenadM's topic in - Build logs for subjects built 1851 - 1900
Nenad; you are pretty much correct with how I made my bulwarks. However, in my build, red a and b are one continuous sheet of 1/32" (0.8 mm) basswood, and 2 is actually two pieces- the inner pre-drilled pinrail, and the outer trim (1/16" square). I also added the 1/16" square "stanchion rail" labeled with green 2.5 in the modified diagram. The V shows where my 0.3 mm walnut veneer strip with drilled ovals and mounted uprights will go. The "stanchion rail" was not present on the real ship, and secures the tops of the stanchions, while forming a stable base for the pinrails to set upon. I chose to use several coats of sanding sealer on the a + b bulwark, and partially paint, before adding the pre-painted white 3 strip. That is when I installed the 2.5 "stanchion rail" on the inside, and installed all stanchions. I then made the pre-drilled pinrails in several sections. This is where I am at now. After shaping and staining the pinrails, they will be glued to the bulkheads and on top of the "stanchion rail"; and then pinned through the a+b bulwark for added strength. The tops of the pins will then be hidden by the outside rail (number 2 on your diagram), the veneer strip V will be added, and the top rail 1 will be glued last after everything is sanded smooth and painted. I recommend coppering your hull after your second planking is complete, and the hull is smoothed to your liking, before any painting or outside detailing of the hull, and definitely before any deckhouses or deck details are added. Hope this helps.. ~Bob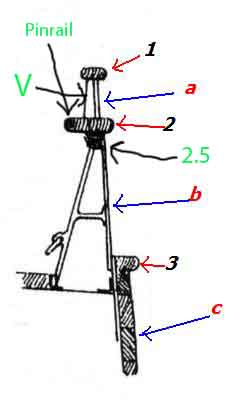
- 4,152 replies
-
- 1
-
-
- cutty sark
- tehnodidakta
- (and 1 more)
-
Dognut; I'm also awaiting progress after your Cutty's bath; I believe I mentioned on my log about how the false deck got warped after my parakeets splashed water on it, (it spent time in the closed bathroom under weight with the shower going full force on hot to steam the deck flat.) So, bath or sauna, we gotta do what we gotta do... Bob
- 70 replies
-
- 1
-
-
- cutty sark
- constructo
- (and 1 more)
-
Cutty Sark by NenadM
rfolsom replied to NenadM's topic in - Build logs for subjects built 1851 - 1900
Nenad; It takes a lot of courage to dig into your build like that; your determination is phenomenal! I'm sure you'll be greatly pleased with the results. Sudomekh: Your build is terrific, I would like to try a larger scale build such as this some day, much easier to detail at a larger scale.... Nenad: I can't wait to see the start of your second planking; better hurry, Spencer might be on his tenth or twelfth ship build by then... (Joke....) Bob- 4,152 replies
-
- 2
-
-
- cutty sark
- tehnodidakta
- (and 1 more)