HOLIDAY DONATION DRIVE - SUPPORT MSW - DO YOUR PART TO KEEP THIS GREAT FORUM GOING! (Only 20 donations so far - C'mon guys!)
×


Glen McGuire
-
Posts
1,956 -
Joined
-
Last visited
Content Type
Profiles
Forums
Gallery
Events
Everything posted by Glen McGuire
-
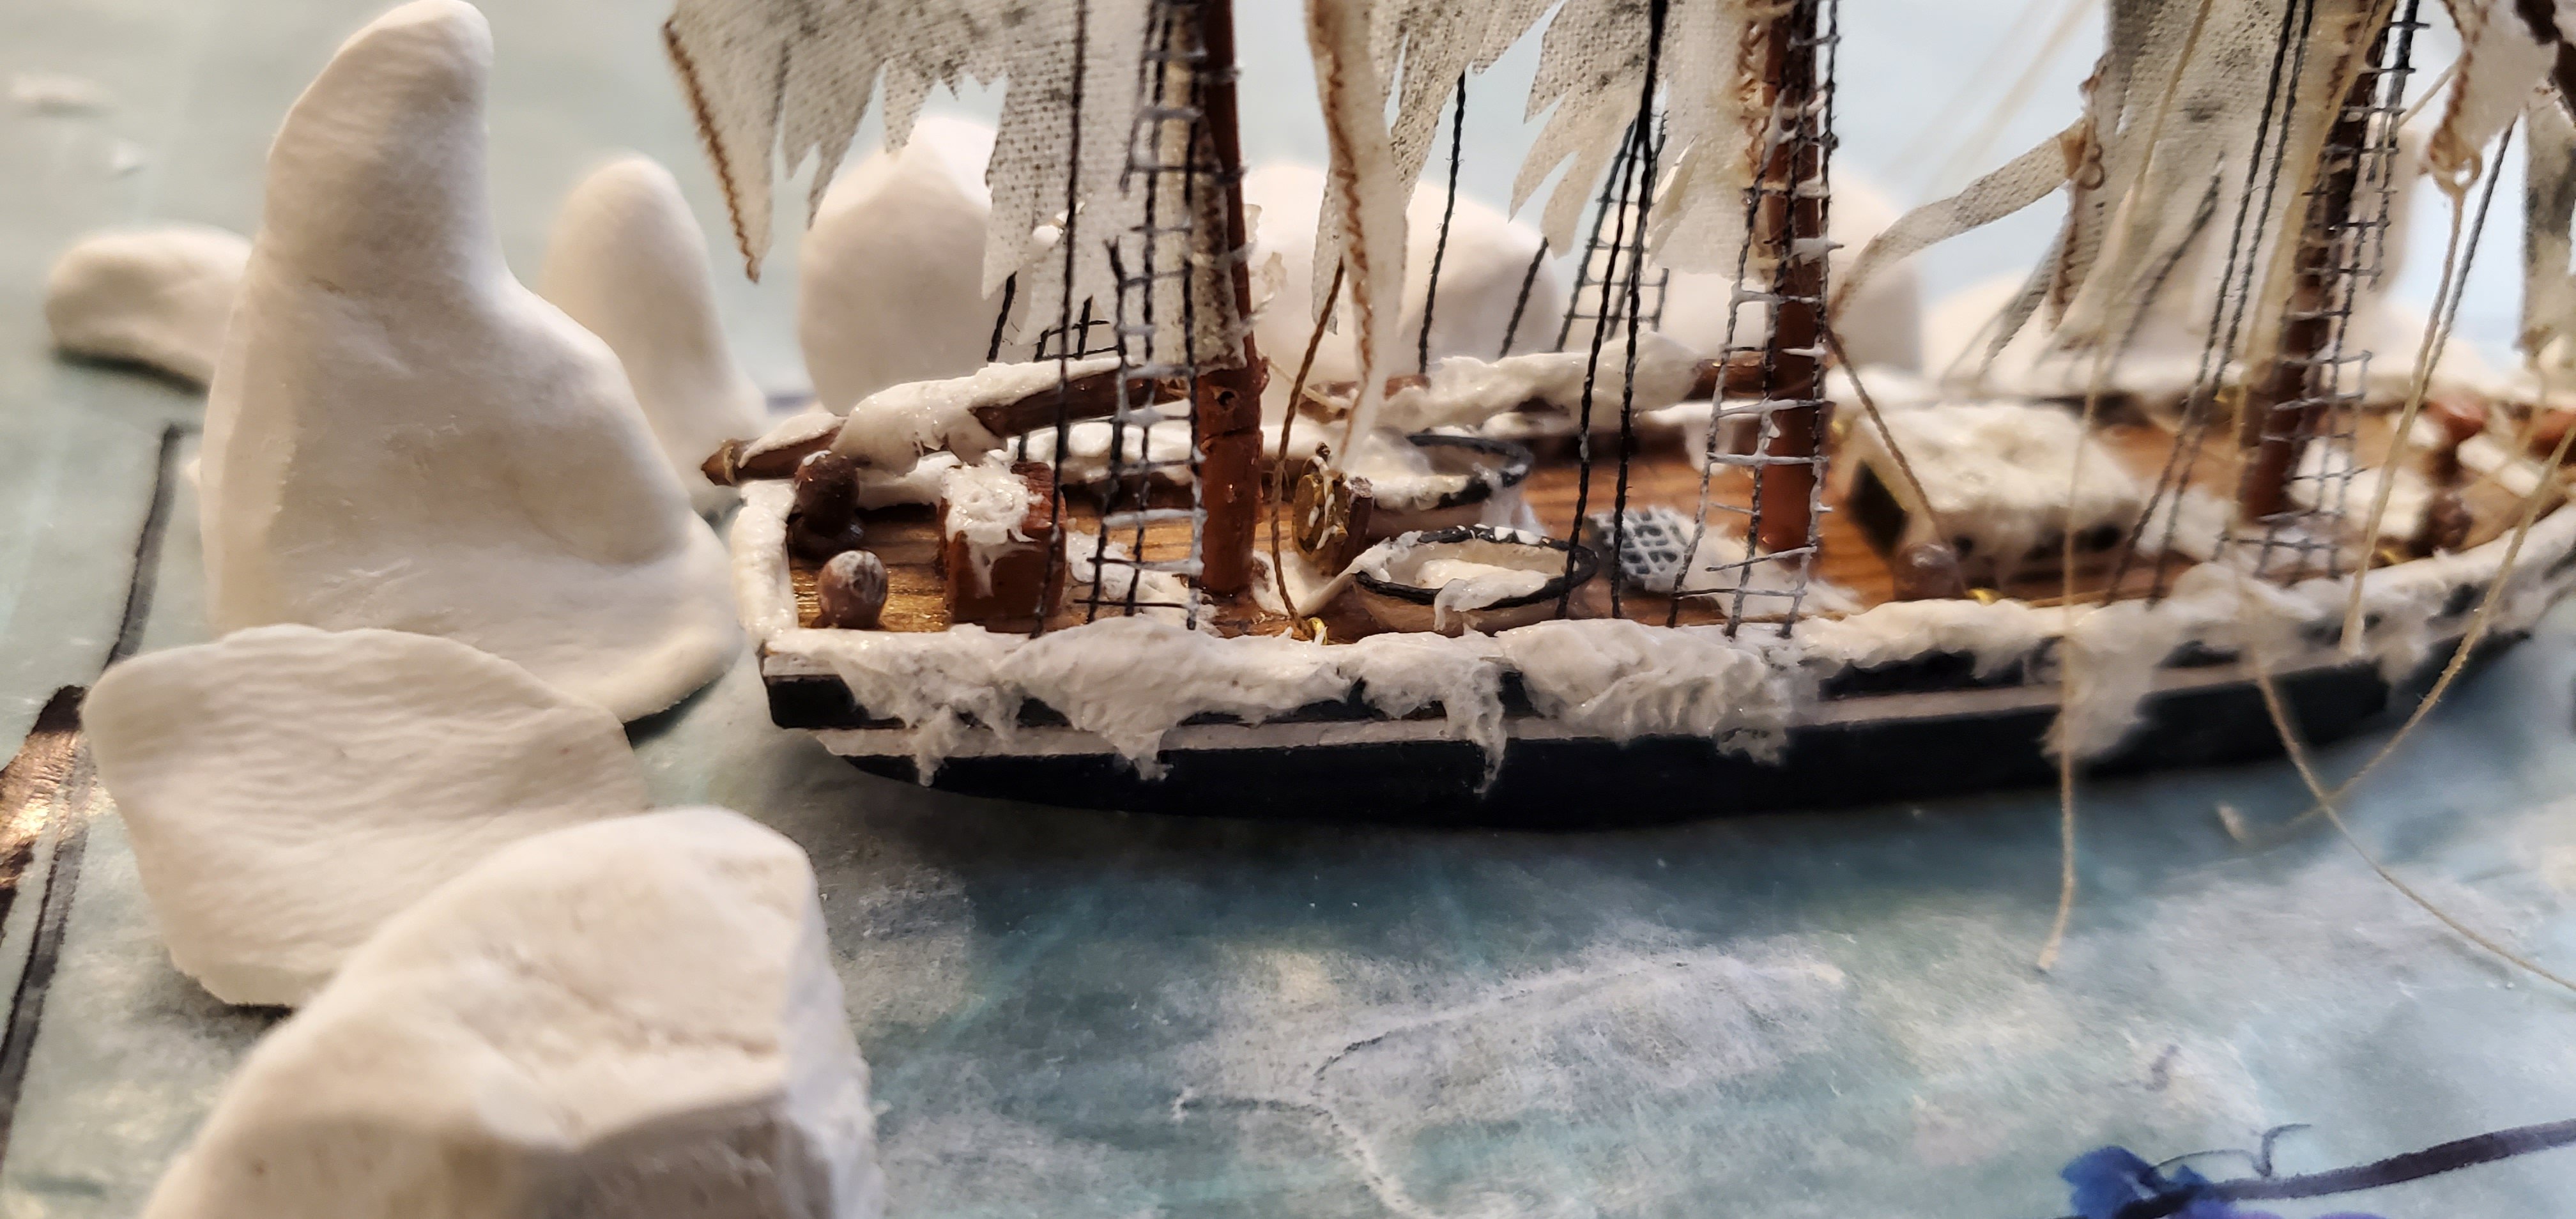
 Hey Javelin. It's definitely too late, but I actually did think about that earlier. I quickly dismissed the idea because of what I saw the epoxy resin do in my 2 previous builds (as well as your sea installer project). If you recall, as the epoxy resin cures it tends to crawl up edges that it's in contact with. As small as my icebergs are, I was afraid the resin would crawl all the way up to the top edges of the icebergs and look terrible. Most iceberg pictures I found had a pretty sharp distinction at the water's edge, so I wanted to match that look Totally agree. I started off with a just little bit of ice and frost in various places around the ship and then kept adding small bits at a time. I finally forced myself to stop and say "good enough" to keep from going overboard.
- 109 replies
-
- 6
-

-
- Ghost Ship
- Jenny
- (and 2 more)
-
I was actually at Plymouth Rock back in Feb. Here's is your destination! You did a superb job on your Mayflower, Bob. The sails and rigging, in particular, look top notch. I bet Captain Marvin is secretly smiling behind that scowl!

-
That is an interesting discussion on the true color of icebergs! Having never been closer than 8000 miles or so to a real iceberg, I can only go by what I see in pictures found on the internet. So I sincerely appreciate any insight or opinion on how to make my SIB more true to life. This is especially true for colors, where I struggle with the artistic side of things. Personally, I believe it's hard to say there's a "true" color for any object you see outside. So much depends on the ambient lighting, angle, reflections, etc, (not to mention the quality of the eyes looking at the object). I can be right next to someone and argue with them about the color of a car we're both standing next to. It's also interesting to think about how people who look at my icebergs will judge them. People like Keith, who have actually seen and even been on the ice will judge them against what they've seen in real life. People like Micah (and me) have to judge them against what we've see in various pictures. At the end of the day, as long as both types of people think, "ok, those look like icebergs", it's mission accomplished!
- 109 replies
-
- 7
-
-
- Ghost Ship
- Jenny
- (and 2 more)
-
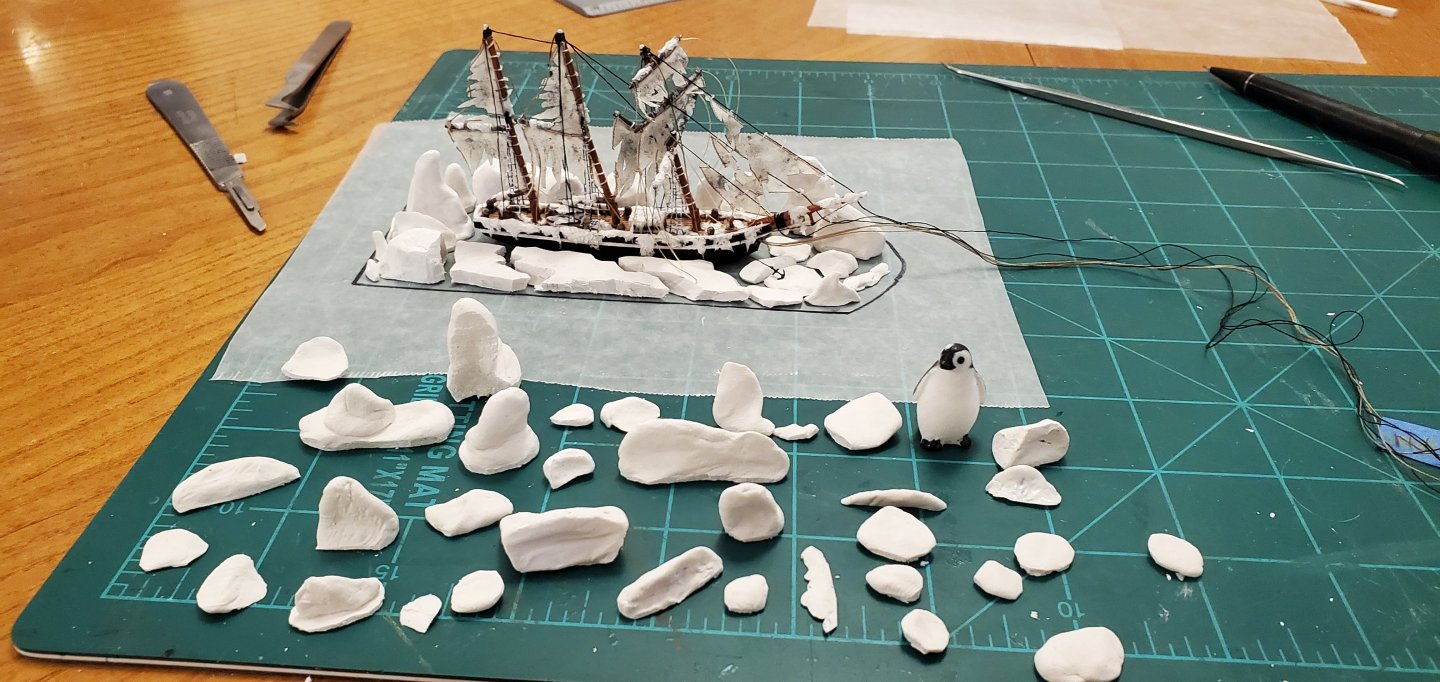
As Gary (a.k.a. @gsdpic) suggested, I made an effort at giving the ice bergs a very slight tint of blue. @Thukydides also gave me an idea with his suggestion of using inks/pigments instead of paint to color the varnish. I did not have any pigments on hand but I've got a bunch of epoxy resin dye. I thought it might work, so I gave it a try and was really pleased with the results. The pic below shows a tinted berg next to an untinted berg. It's hard to see much difference from the pic, but in real life it is more noticeable, just barely, which is what I wanted. So big thanks to Gary and Thukydides for their suggestions. Next, here's the dummy ship in place with all the bergs in formation, followed by the bergs going inside the bottle. I think the 2nd pic does a better job of showing the slight bluish tint. And here's the icy tomb complete, patiently awaiting it's sea-faring sarcophagus. Sorry, @Knocklouder, no penguin or longhorn "tracks" in my pristine ice!! 😃😃

- 109 replies
-
- 13
-
-

-
- Ghost Ship
- Jenny
- (and 2 more)
-
I have a pretty dismal knowledge of kits (I've only done 1 and it was a square-sailed steam yacht). I would suggest posting that question on the "Discussion for Ship's Plans and Nautical Research. General Research on Specific Vessels and Ship Types" forum on the MSW home page. I'm certain you would get a lot of responses from the MSW community.
- 109 replies
-
- 3
-

-
-
- Ghost Ship
- Jenny
- (and 2 more)
-
That's the great thing about a subject like this - whatever you choose to do, nobody can prove you are wrong!
- 109 replies
-
- 3
-
-
- Ghost Ship
- Jenny
- (and 2 more)
-
What kind of inks are you talking about? Do you have a product name as an example?
- 109 replies
-
- 5
-
-
- Ghost Ship
- Jenny
- (and 2 more)
-
Yes, Gary. I'm experimenting with adding a touch of Tamiya clear blue to some gloss varnish to see if I can get a good look. The Tamiya clear blue is sort of translucent and I'm hoping it will give me just the slightest hint of blue while maintaining the shine of the gloss varnish. I've got lots of leftover icebergs to play around with! I was talking about snow melt, but you are right, Keith. My choco taco used to last about 30 seconds in August heat before it was making a puddle on the sidewalk!
- 109 replies
-
- 6
-
-
-
- Ghost Ship
- Jenny
- (and 2 more)
-
That's assistant manager Choco Taco named in memory of one of my favorite freezer treats that was tragically discontinued a few years ago. Hey Micah! I was not able to find any plans or any information about the actual ship, other than it was a 3-masted schooner. I'm not surprised you couldn't find it in a ship register since there's some doubt if it's a real story or urban legend of the sea. The best write-up that I could find for Jenny's story is here: https://puzzleboxhorror.com/ghost-ship-jenny-the-frozen-crew/ (although the picture used at the beginning is obviously not a 3-masted schooner). With all that uncertainly, I figured I had plenty of artistic license when creating the ship. So I ended up making sort of a composite build using pics and plans from three different 3-masted schooners - the sail plan (more or less) from the William Ashburner, the sheer plan from the James Miller, and the deck fittings and rigging from the Oosterschelde. I agree that it would make an interesting subject for a scaled diorama. Let me know if you decide to take it on!
- 109 replies
-
- 5
-
-
- Ghost Ship
- Jenny
- (and 2 more)
-
Welcome to the best site on the interweb, Jay!!
-
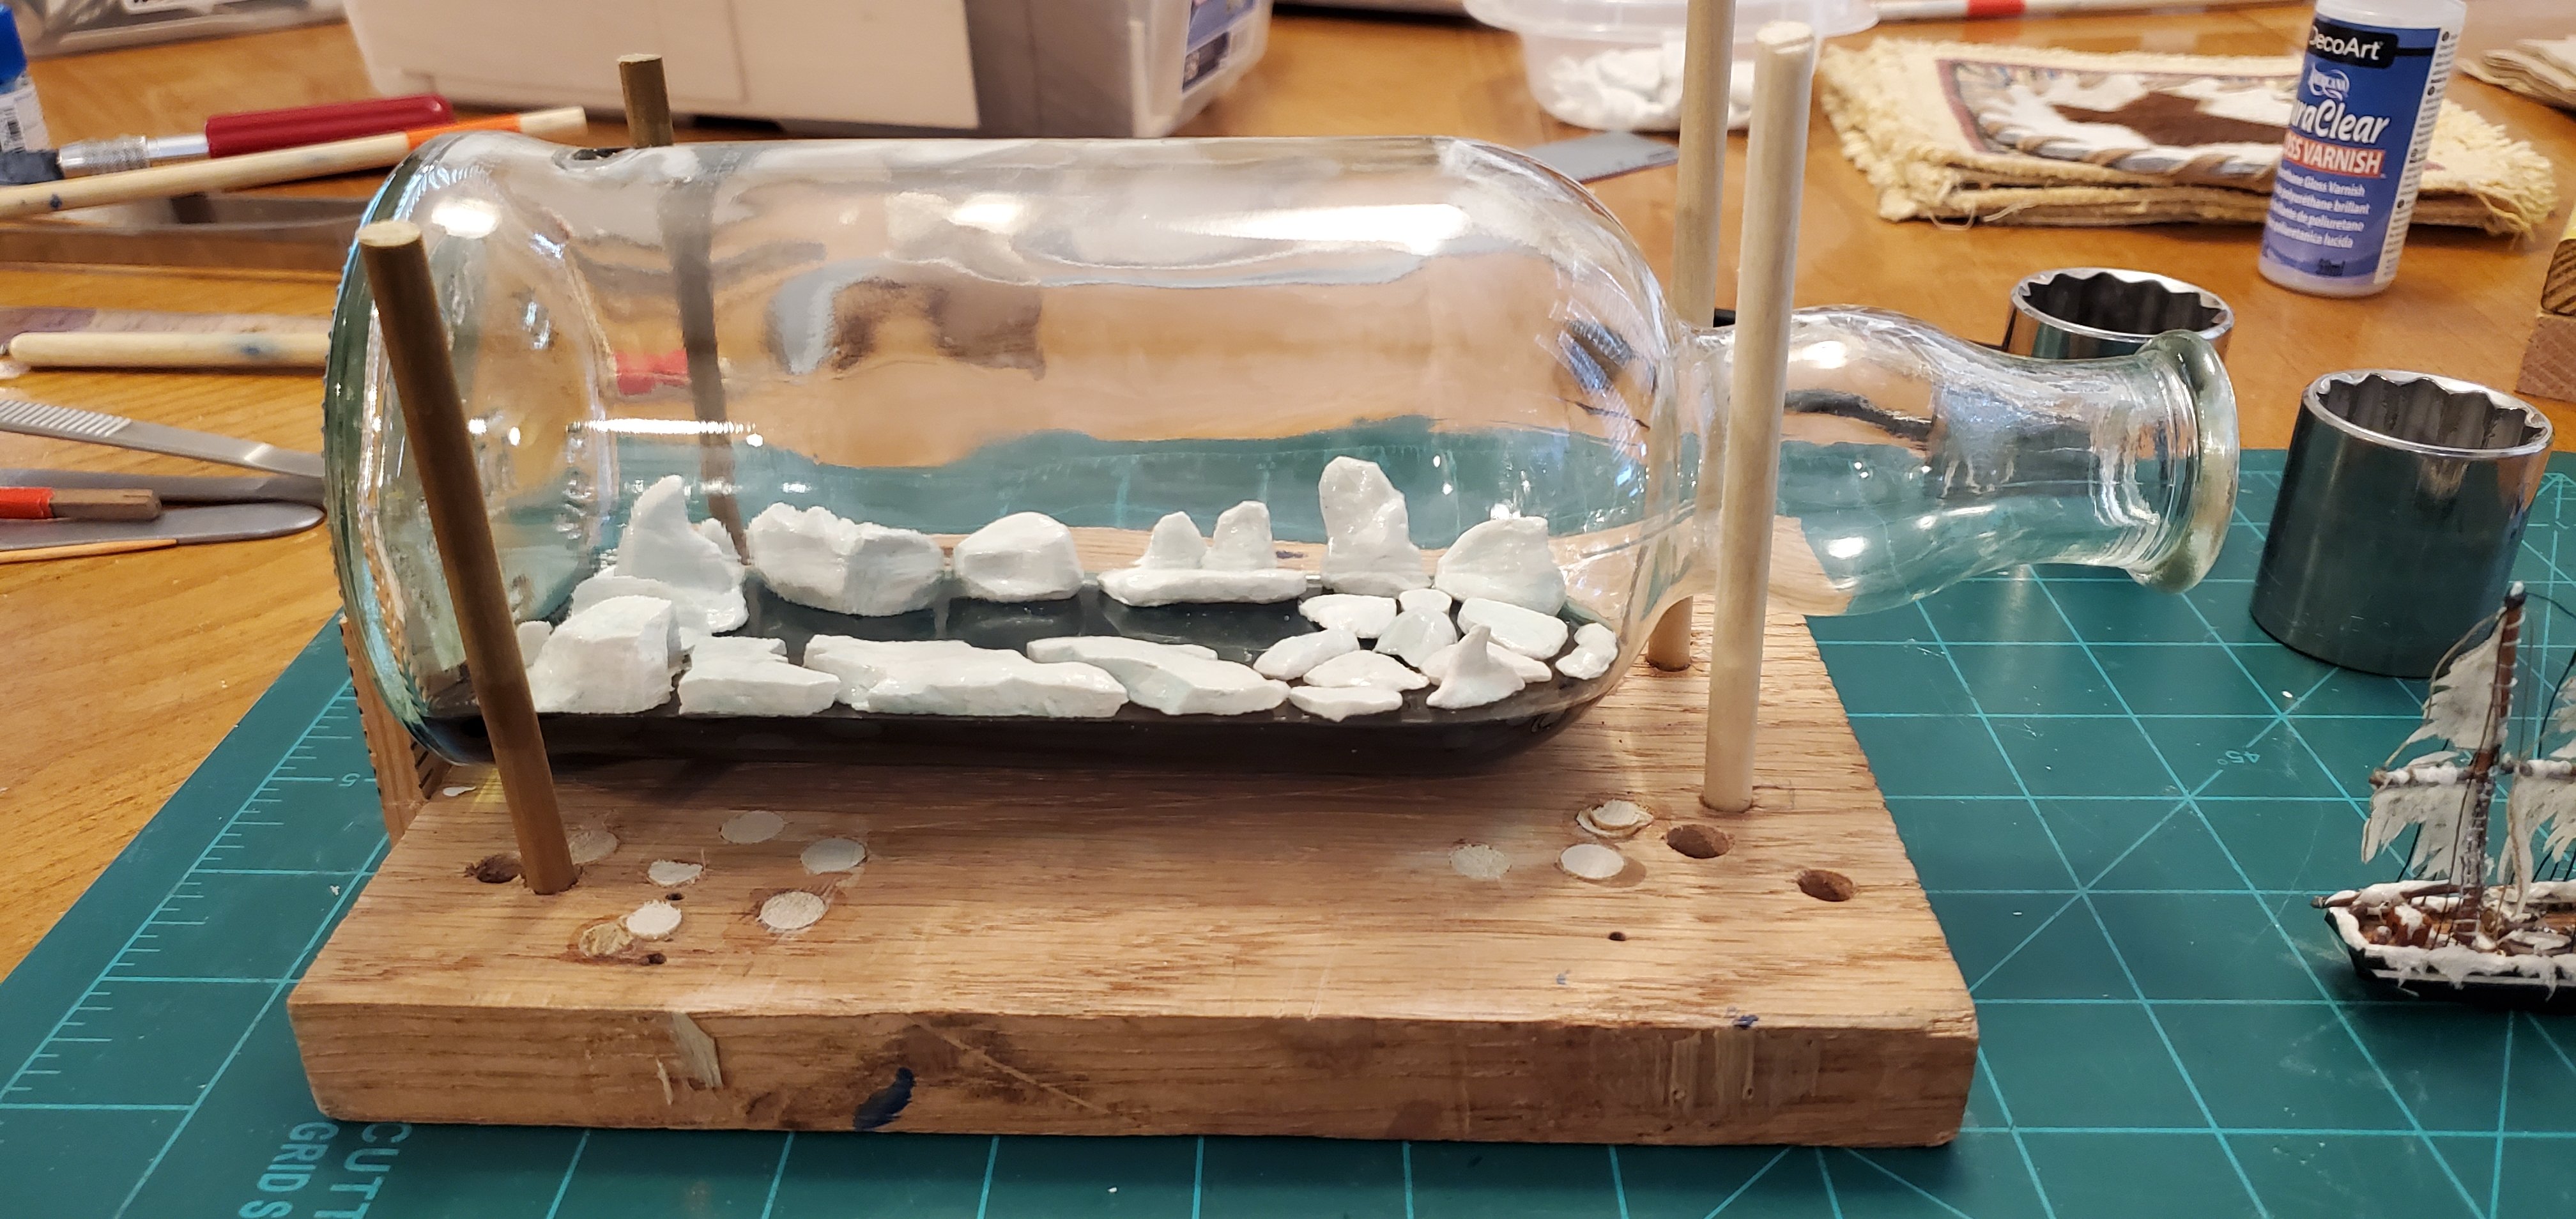
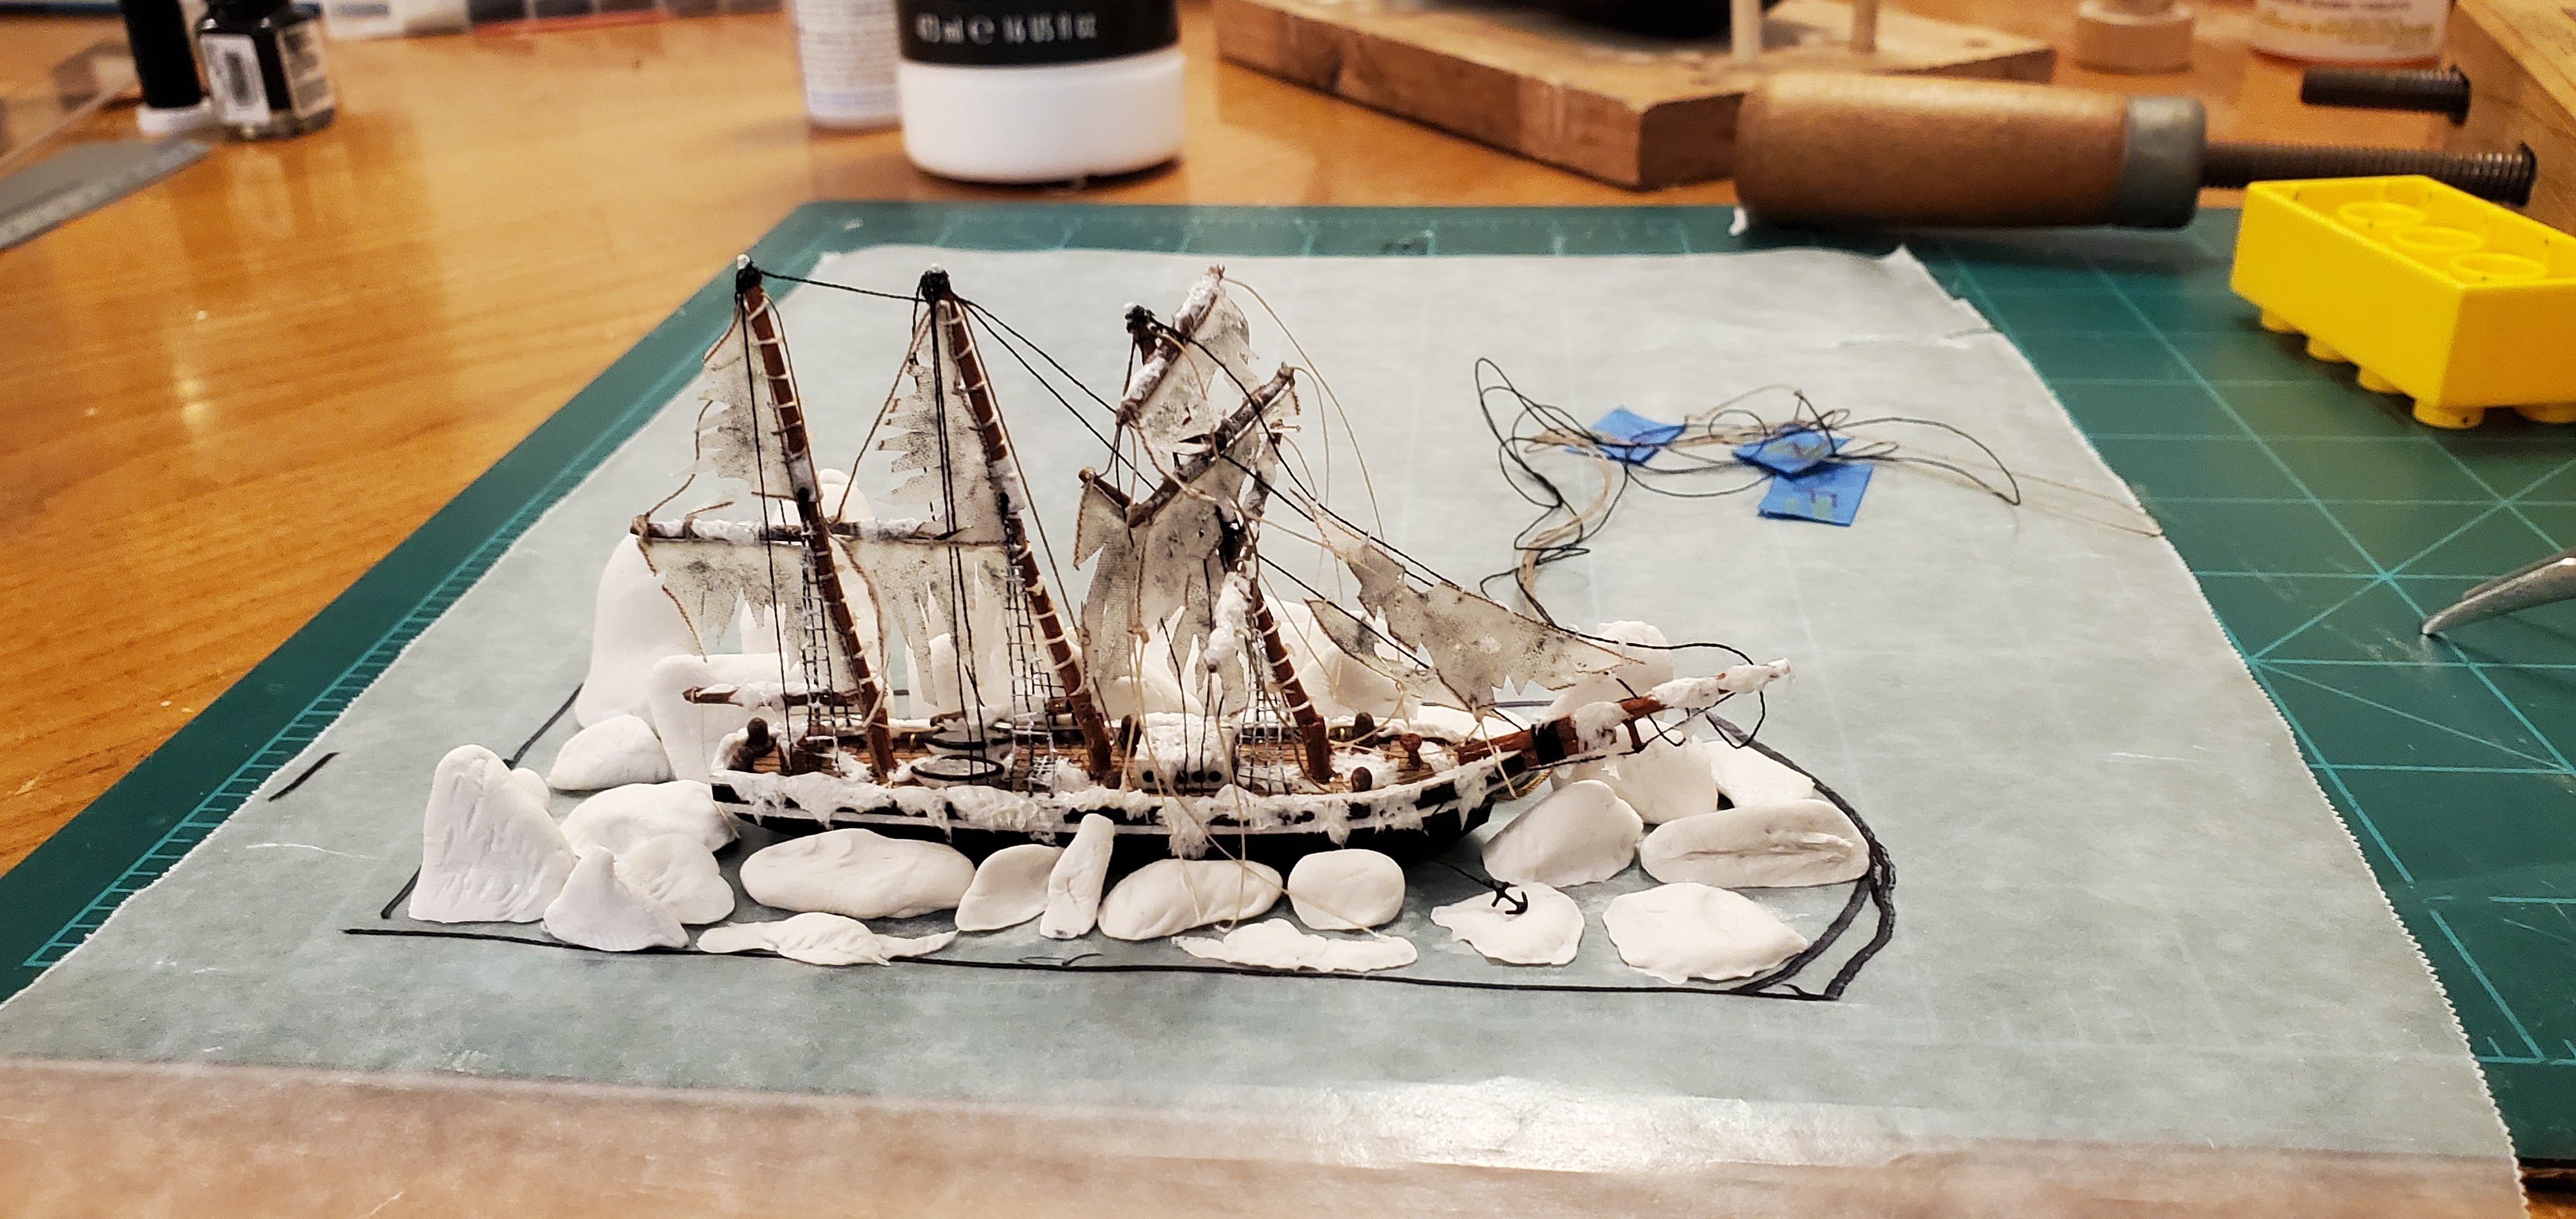
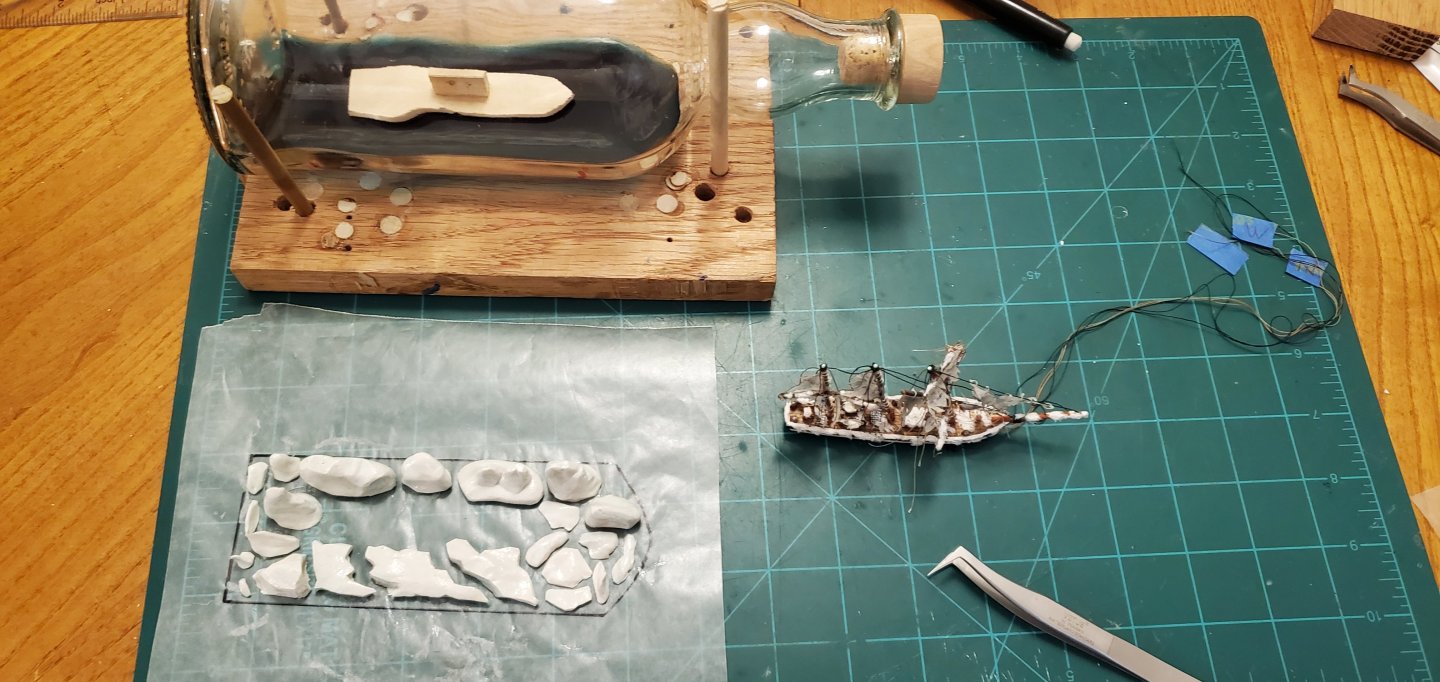
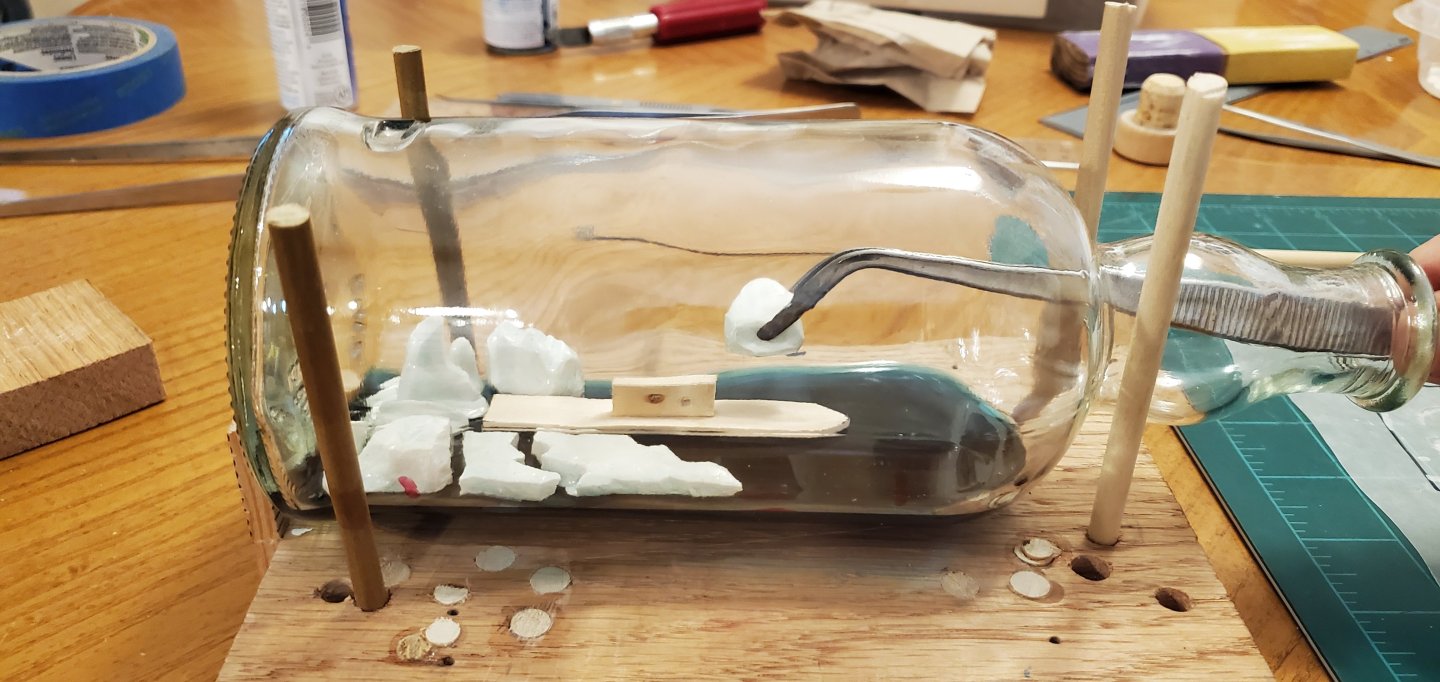
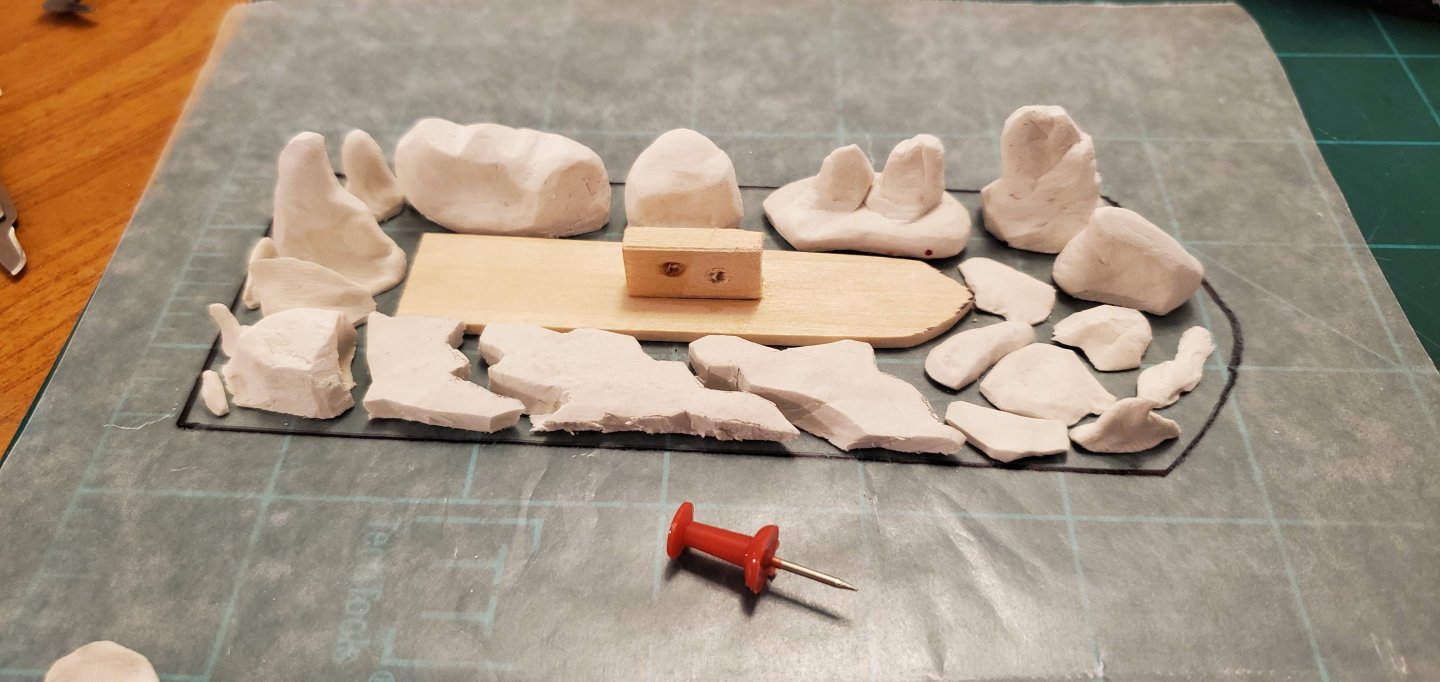
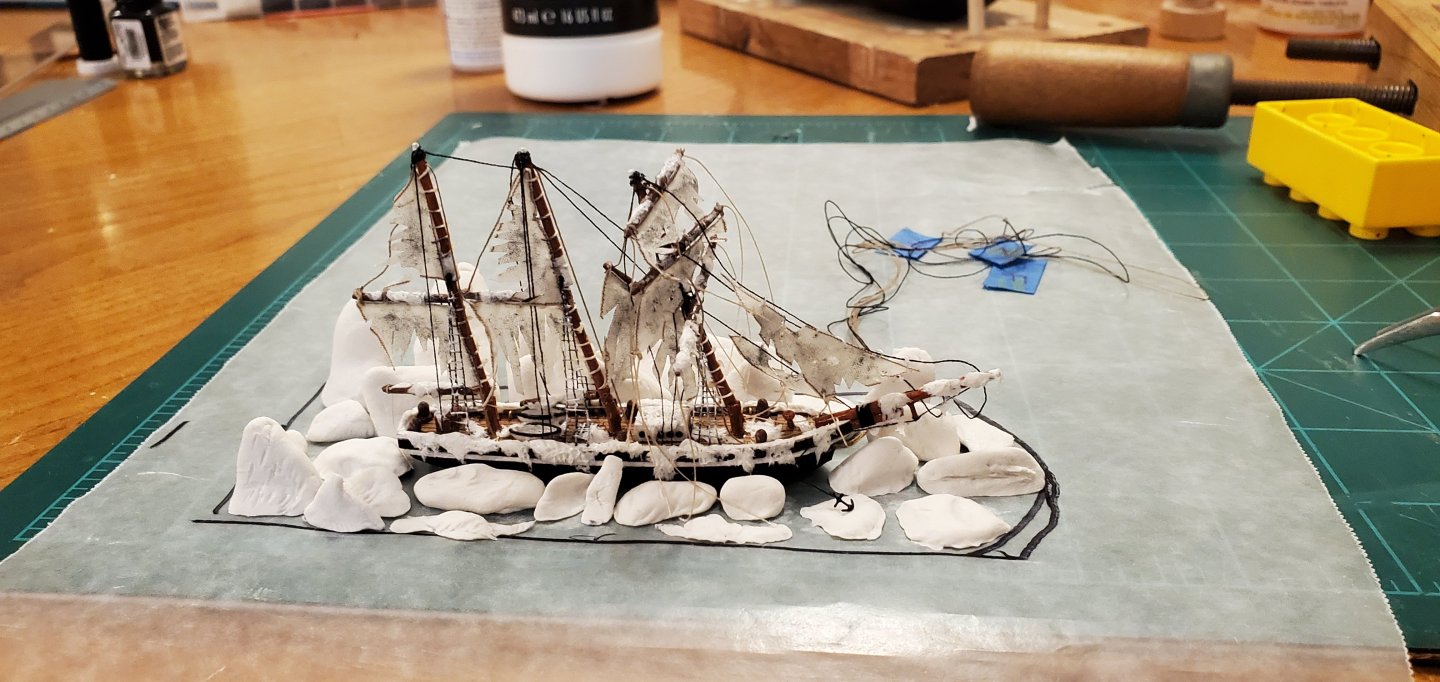
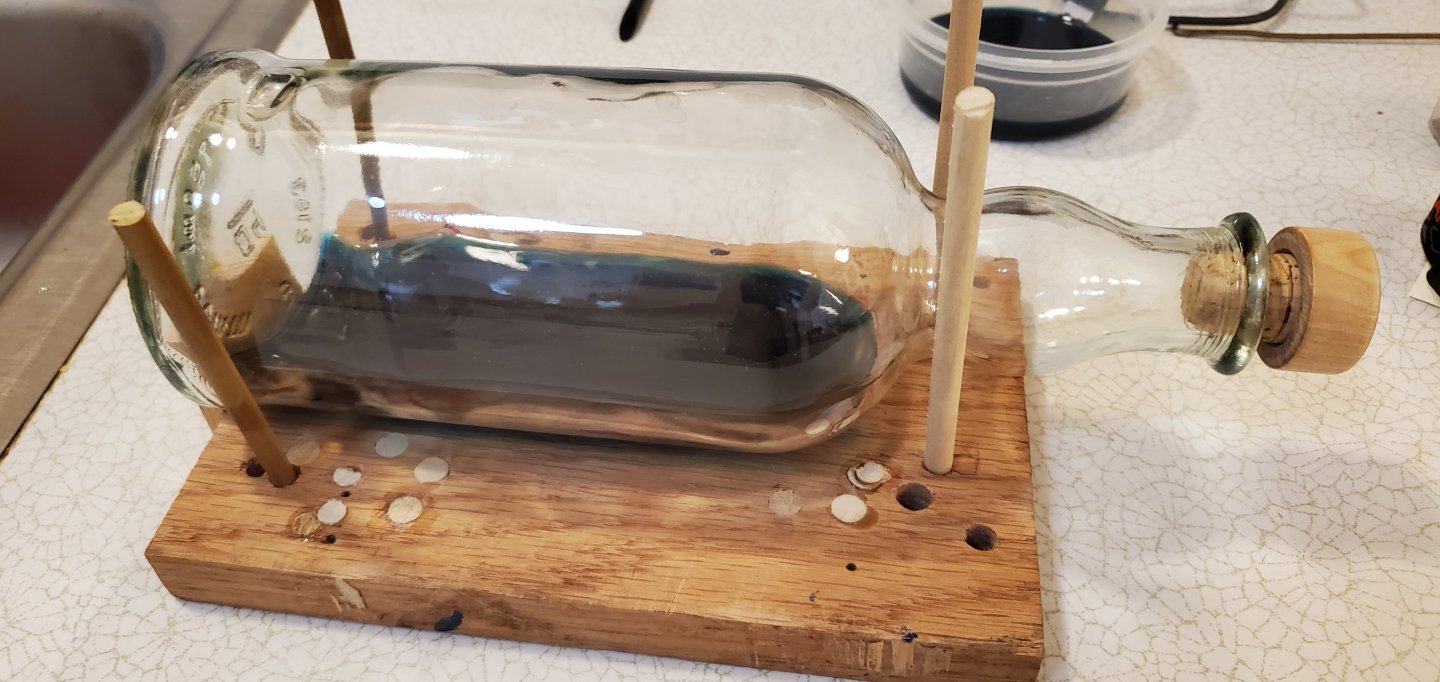
I took care of the suggestions from @Keith Black and @Knocklouder by adding some light frost to the ship's wheel and a glop of snow to the ship's boats. I like the way it looks, so thanks to Keith and Bob for the good ideas! I want everything to appear as frozen, but in the process of thawing out. Of course here in central Texas, I don't have a lot of real life experience seeing things thaw out from snow and ice, so I'm doing the best I can!! The clay mini-icebergs and floes finally dried. Again, I made way more than I knew I needed so I could pick and choose which ones fit together better. I did some filing and shaping to give them sharper edges trying to make them look more like ice than blobs of clay. Here's the final arrangement. I still need to hit each piece with some gloss varnish to give them a bit of a shiny, wet look. Next, I made a footprint of the ship. The process will be to place the footprint inside the bottle exactly where the ship will go, glue each piece of ice in place around the footprint, remove the footprint, and replace with the ship. The good news is that if anything on the ship breaks during the insertion process I will claim I was just following @Ian_Grant's suggestion above and adding to the abandoned appearance!

- 109 replies
-
- 13
-
-
-

-
- Ghost Ship
- Jenny
- (and 2 more)
-
I like the way your sails look, Bob. Especially the way you tied them to the yards with double loops.
-
Whoa! That is amazing work, Ian, especially considering you were in high school!
- 109 replies
-
- 5
-
-
-
- Ghost Ship
- Jenny
- (and 2 more)
-
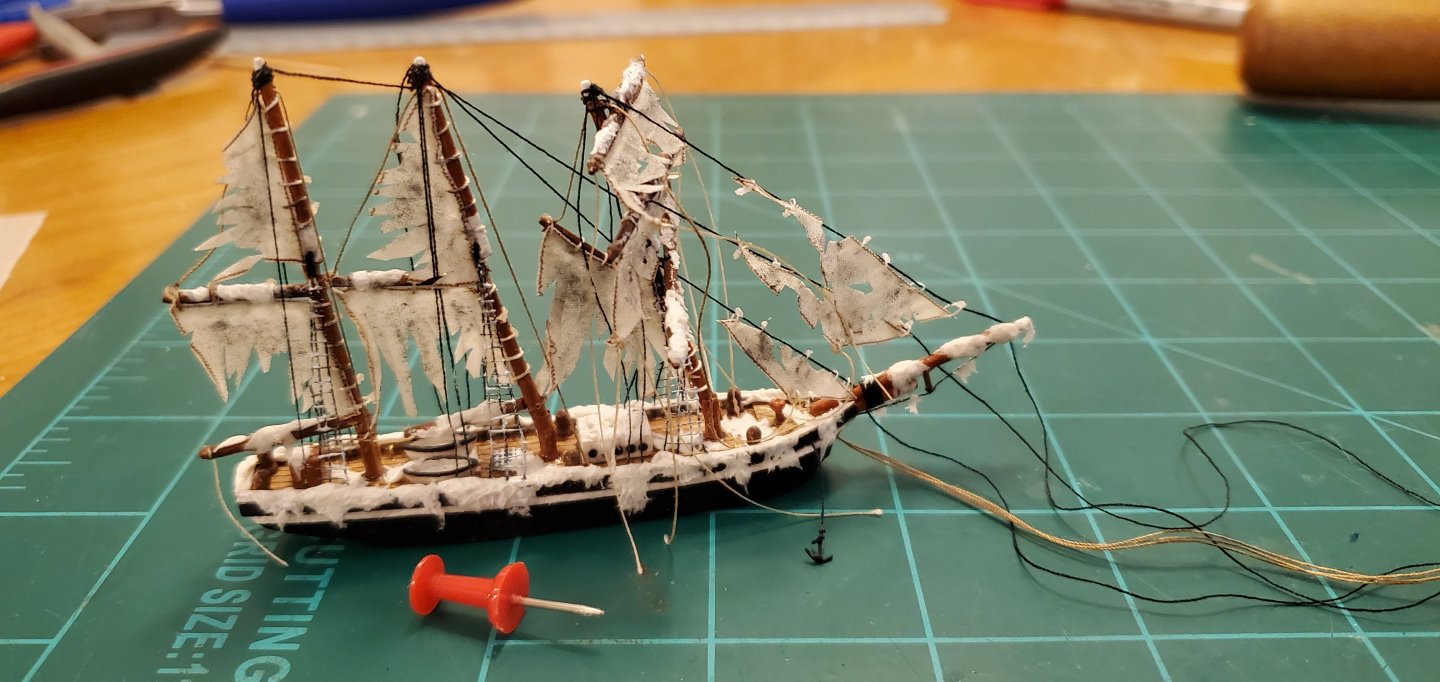
I certainly did, Ian. That was one of my original thoughts. But when I got her put together, I really liked how those topmast square sails looked on top of the typical schooner sails, so I didn't want to diminish their appearance further than the shredding.
- 109 replies
-
- 8
-
-
- Ghost Ship
- Jenny
- (and 2 more)
-
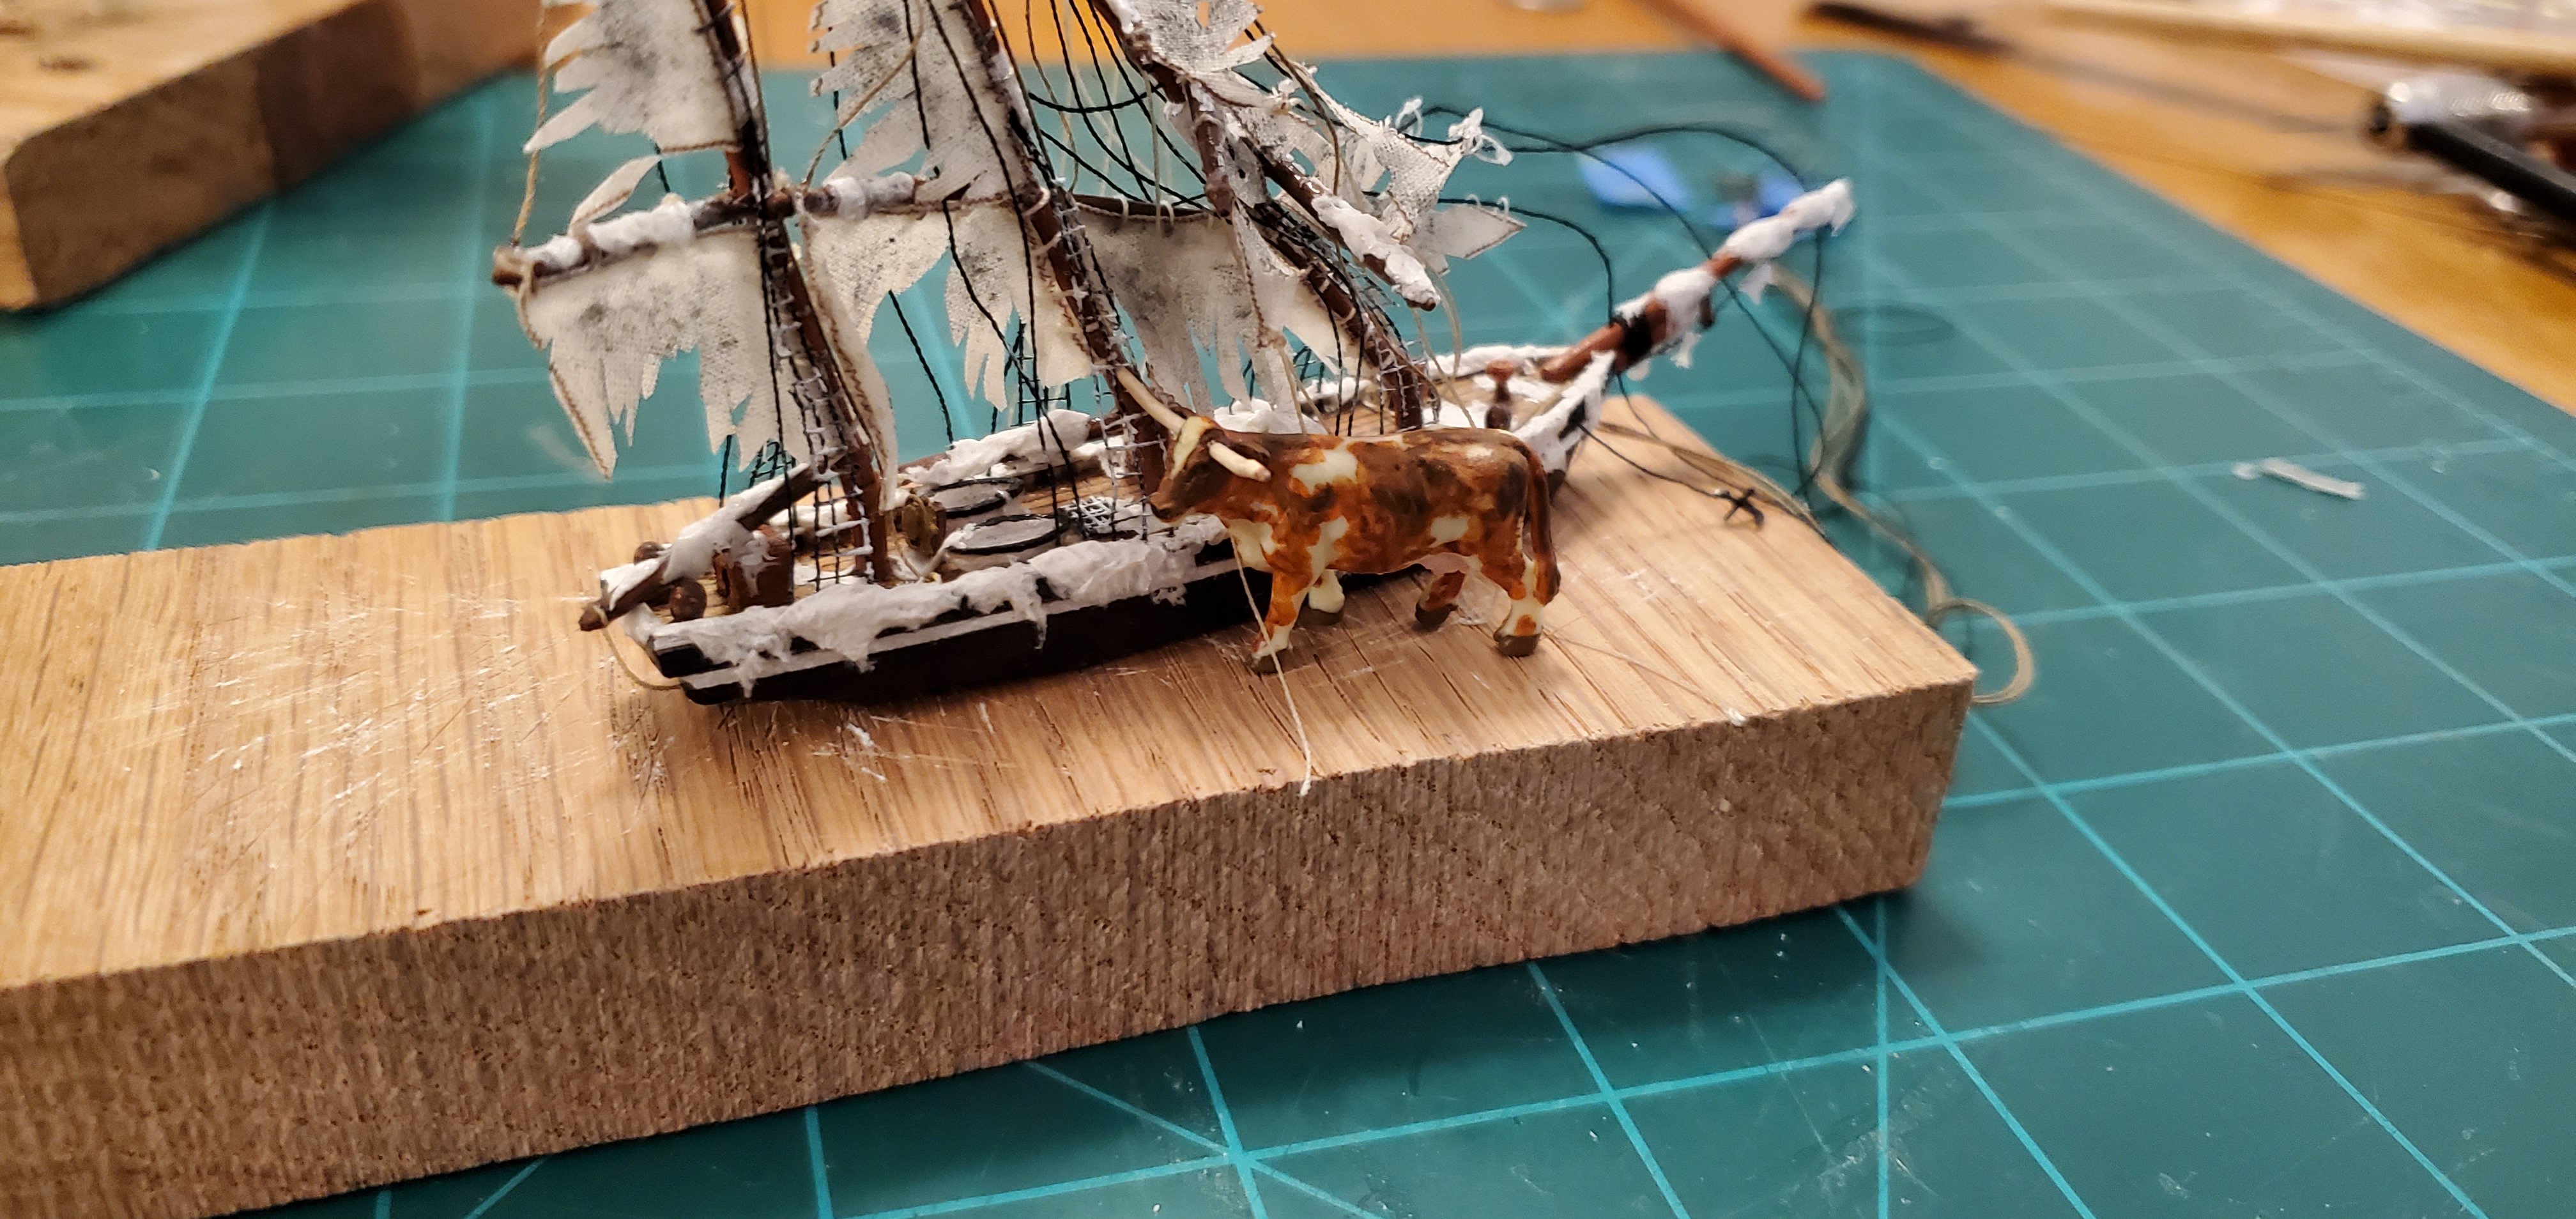
Unfortunately, I do not have Captain Marvin Ship Inspector to guide me thru my builds like Knocklouder does for his. I've only got Dimples the Surly Cow for help. And she says no-go on the ship's wheel icicles. However, she said that adding a touch of "Gesso frost" to the wheel would be ok. And she did give a nod to adding some snow inside the ship's boats. So I'll work on that. Now if I could only keep her from getting those horns tangled up in the rigging.

- 109 replies
-
- 10
-
-
-
- Ghost Ship
- Jenny
- (and 2 more)
-
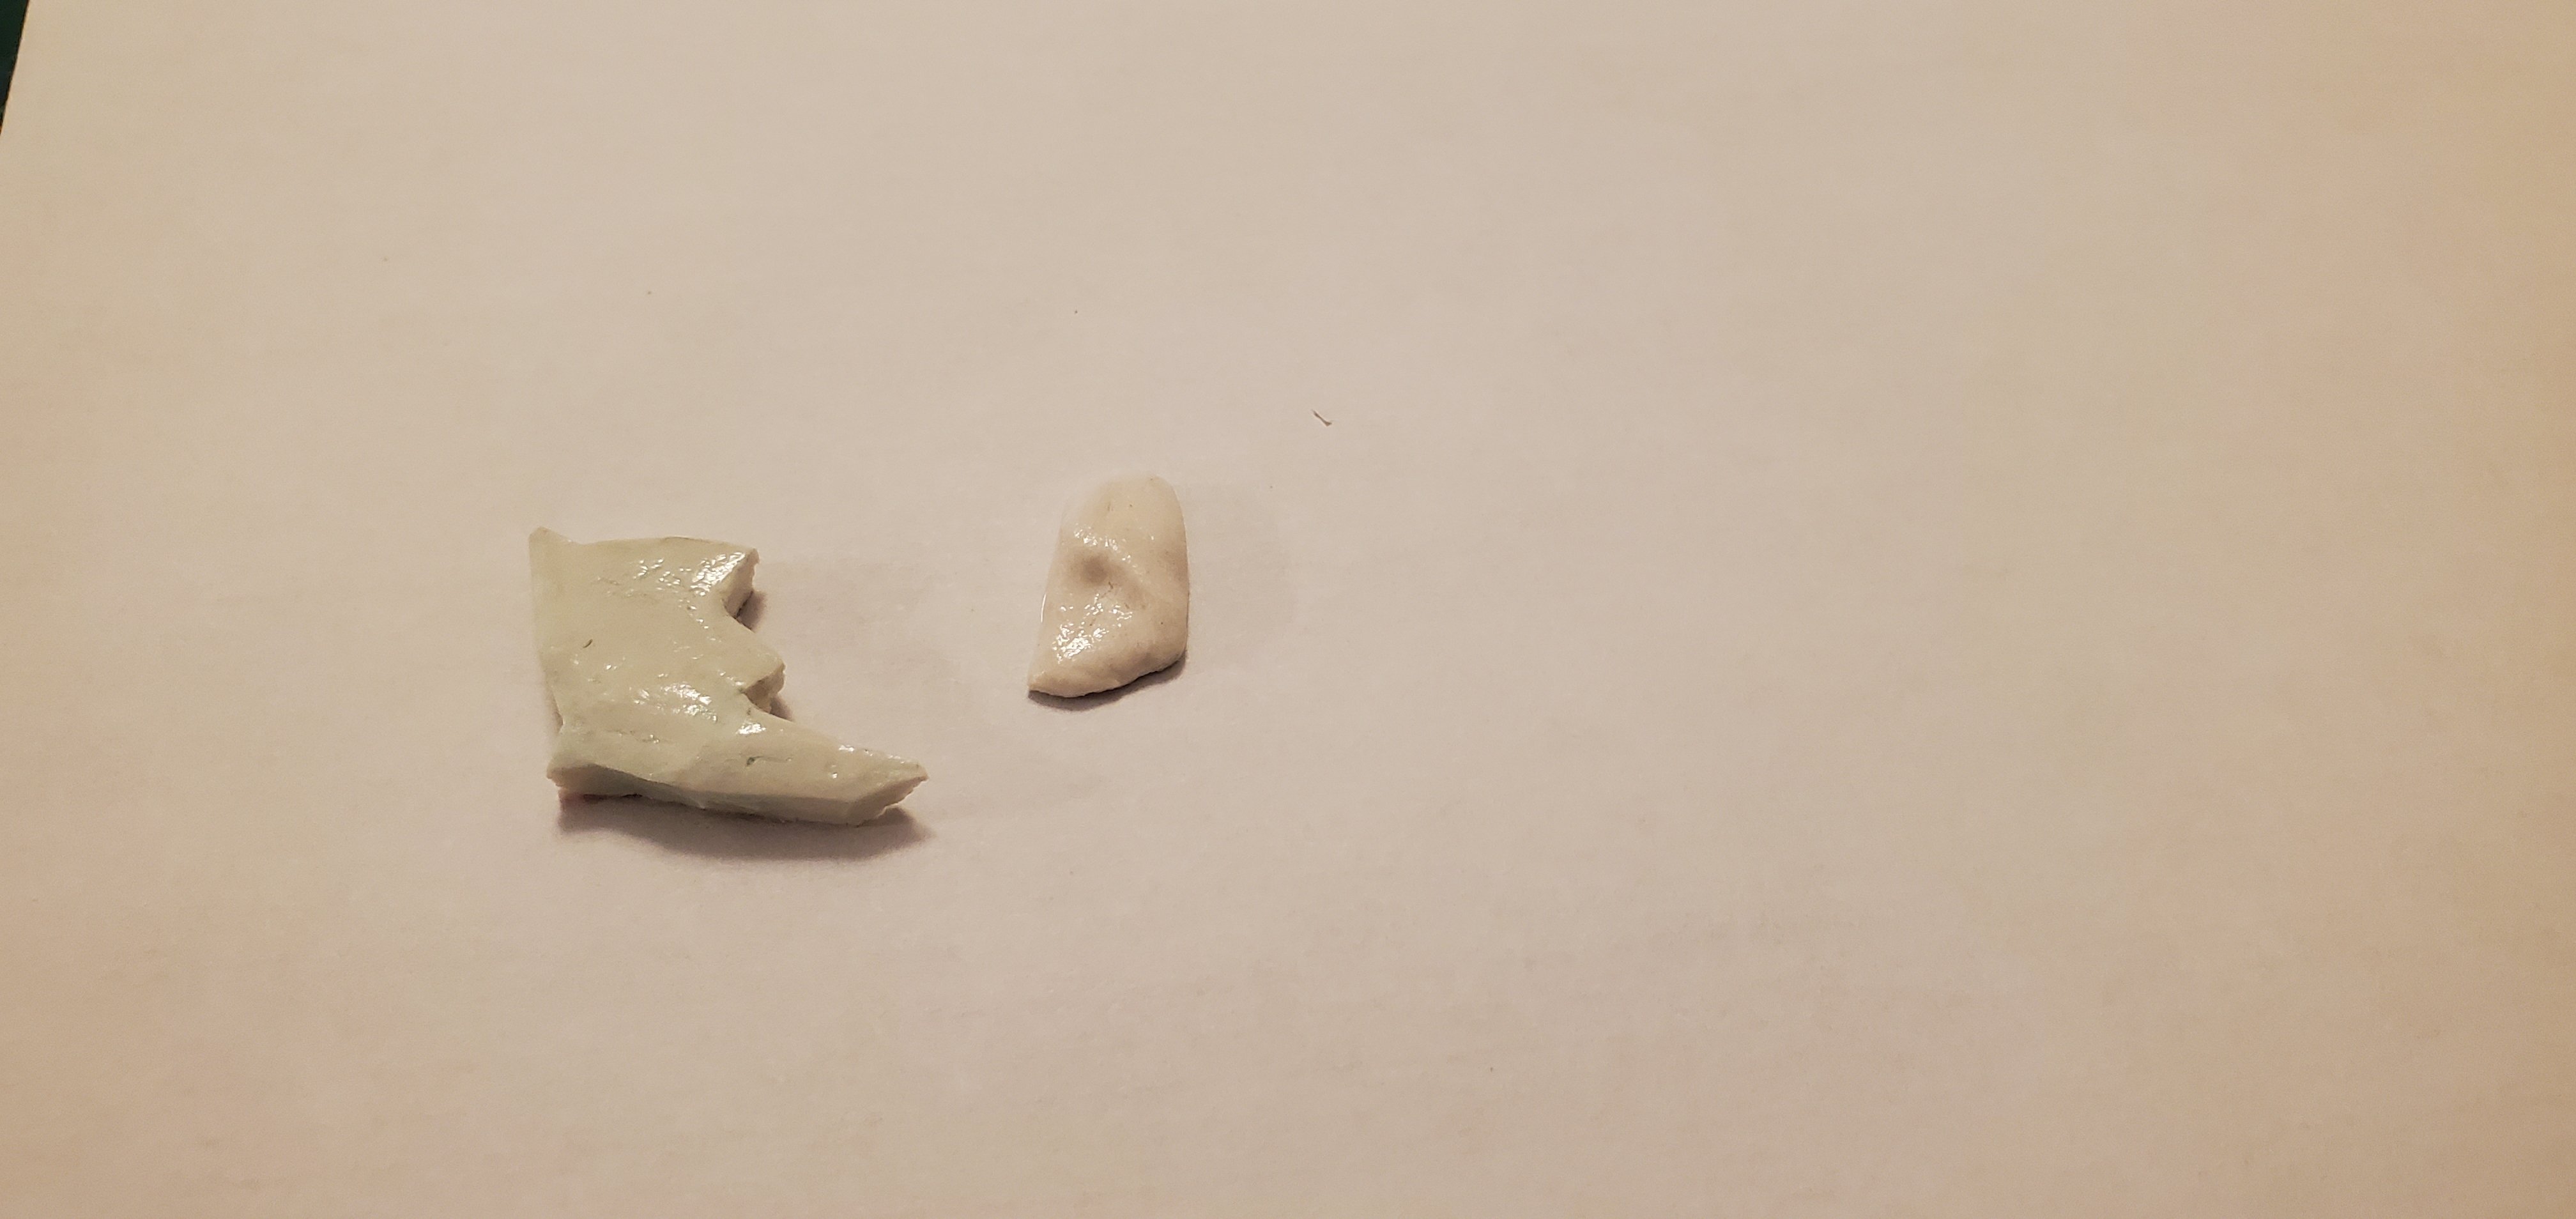
Is this the gumming that you are talking about and want to remove it (see pic below)? If so, the only thing I can think of (rather than reprinting as you describe) would be to try and "floss" the converging gaps between the fingers. Maybe try some super thin fly tying thread and carefully work it back and forth into the gap.
- 536 replies
-
- 4
-
-
- Quadrireme
- radio
- (and 1 more)
-
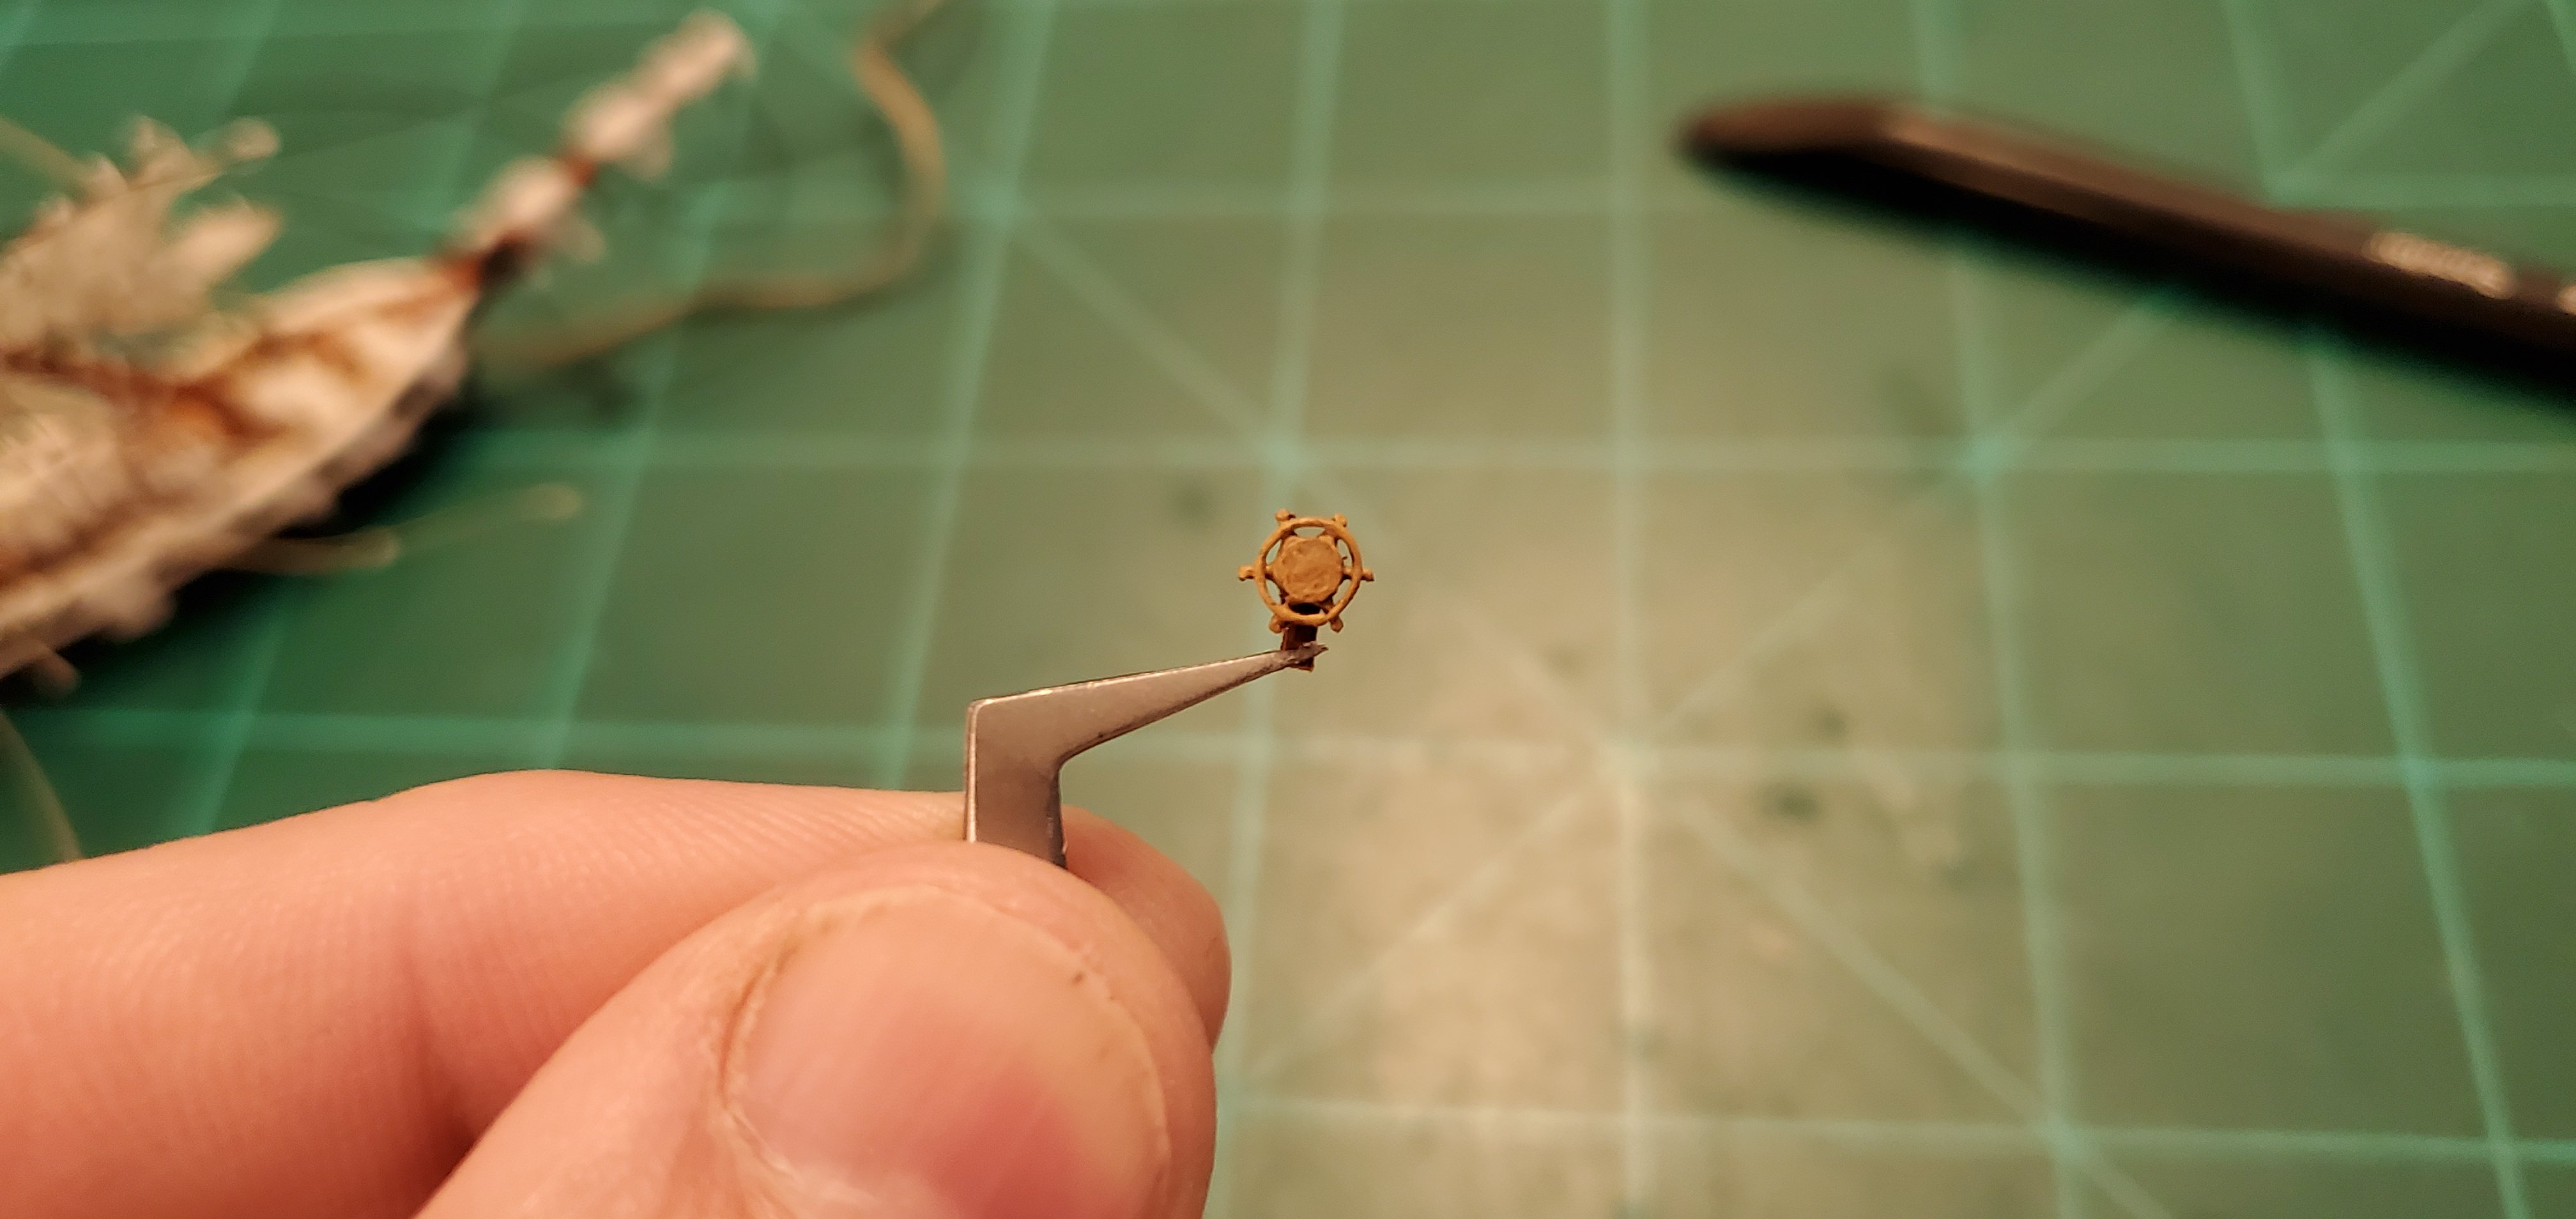
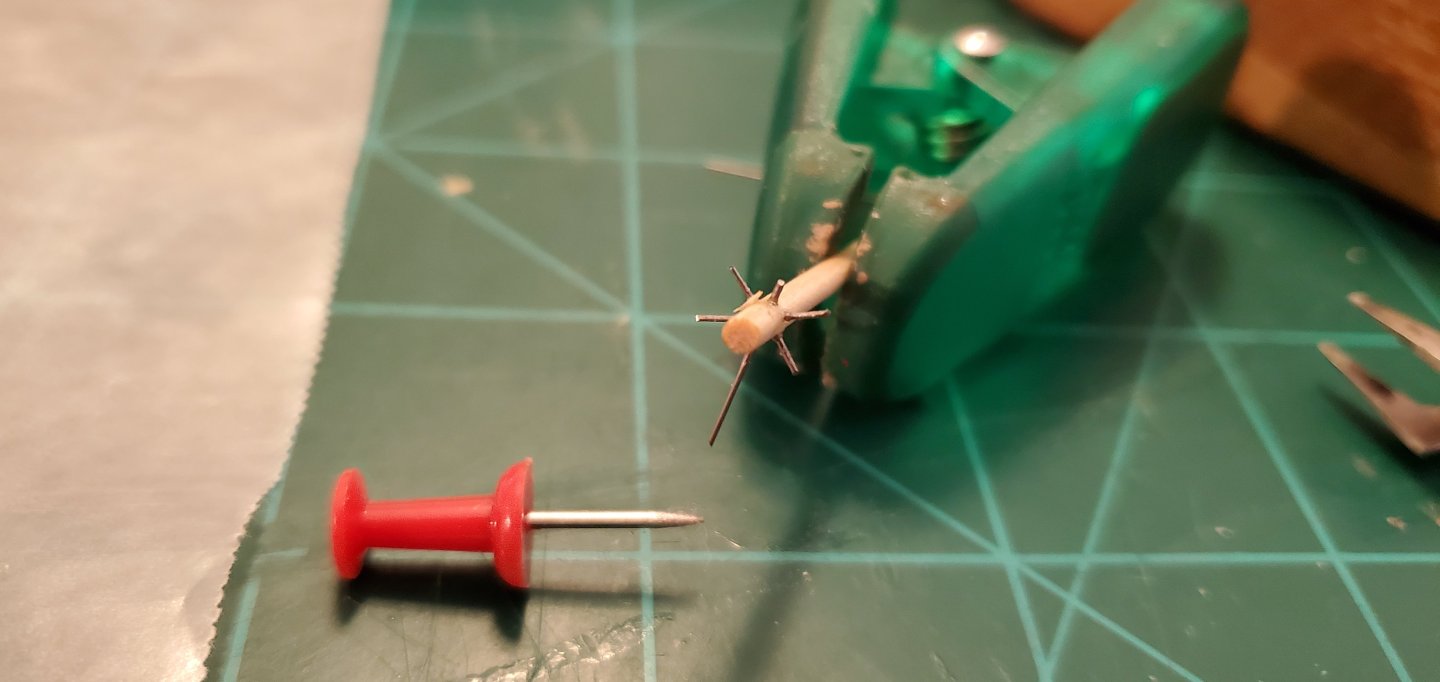
OK, Keith. I managed to fit the wheel onto the Jenny's deck. A touch large for scale, but I still think it's a good addition.

- 109 replies
-
- 13
-
-
-
- Ghost Ship
- Jenny
- (and 2 more)
-
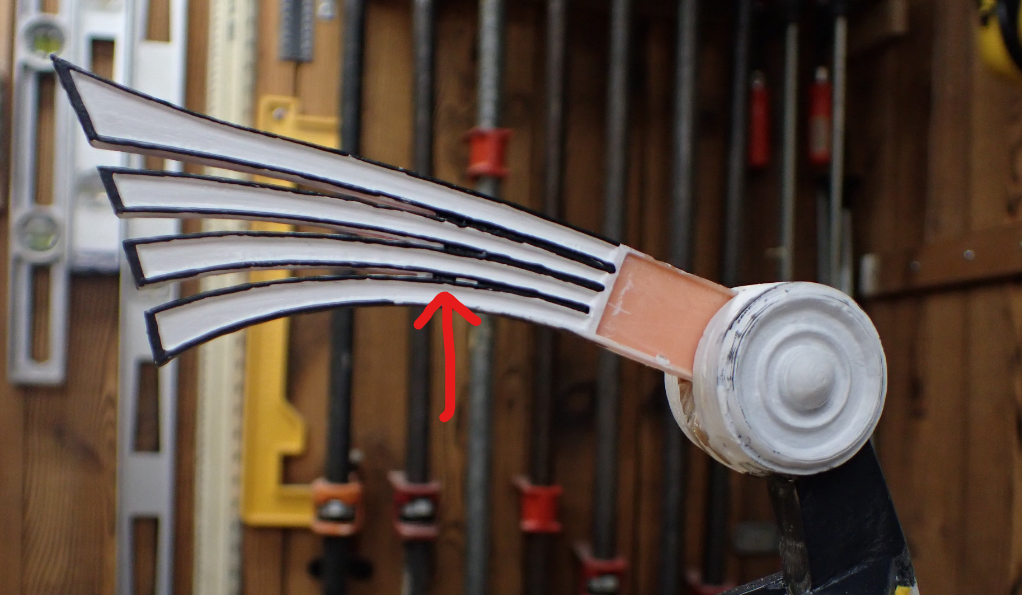
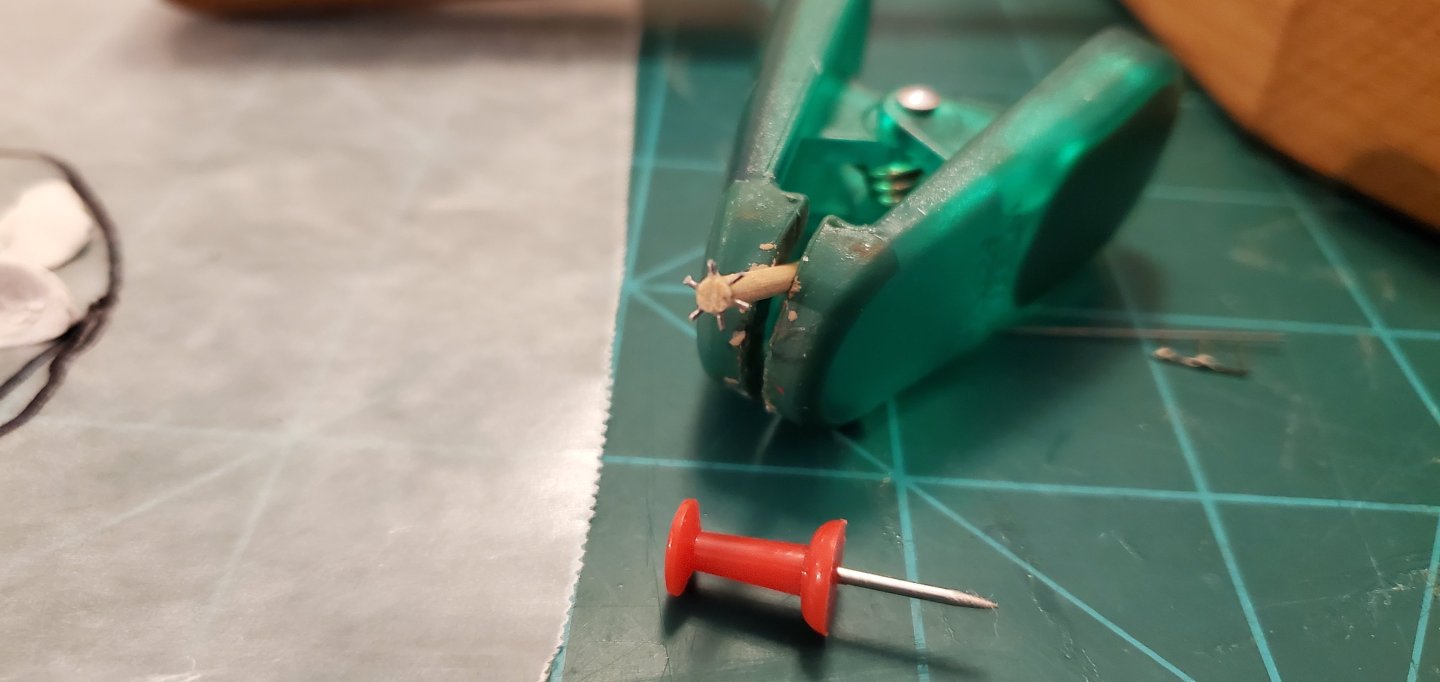
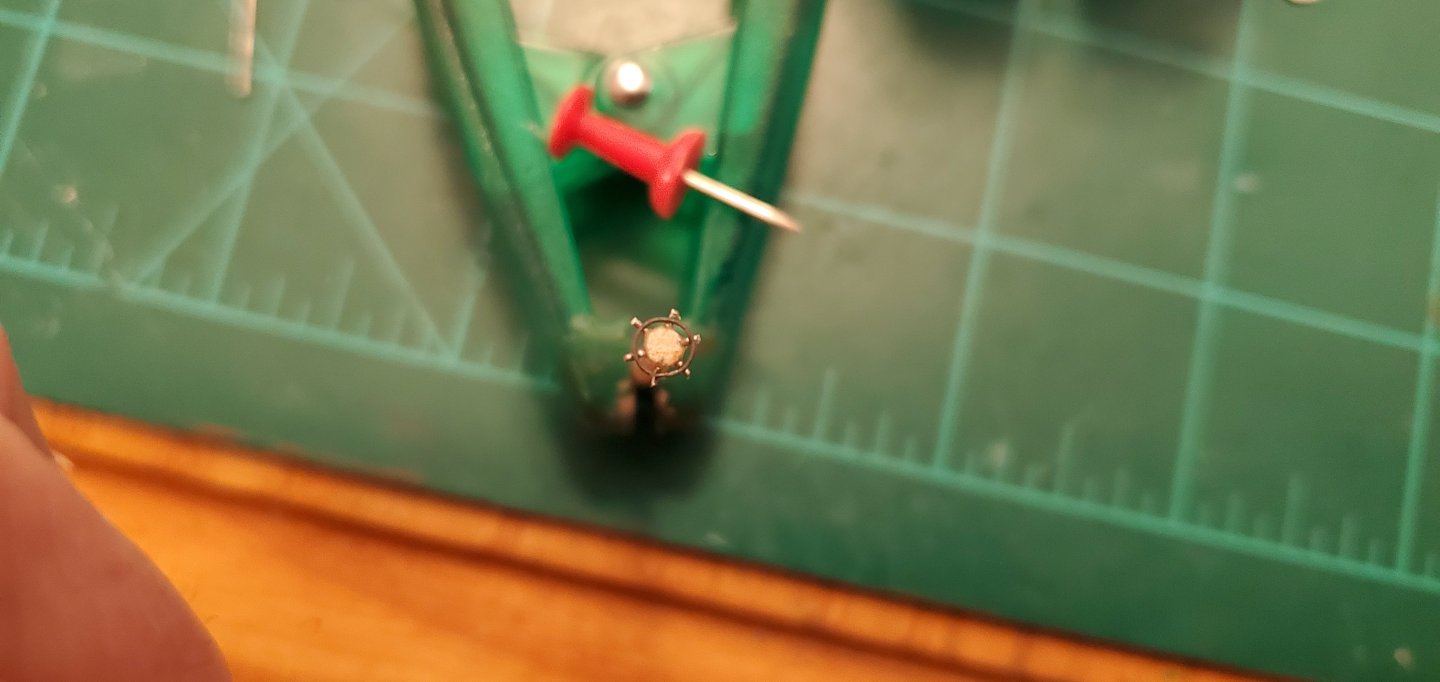
The air-dry clay takes a few days to fully harden so I decided to take the opportunity to try something new. I'd been wondering for quite some time if I could fashion a reasonable looking ship's wheel at this scale, but I'd never taken the time to see if I could actually pull it off. I figured now was the perfect time time give it a whirl. I played around with some different ideas and here's where I finally landed. I took a .08" diameter dowel and used a 78 drill to punch 6 equally spaced holes around the edge. Then I snipped off 6 pieces of .015" music wire and inserted them into the holes to make the spokes. Next, I trimmed the spokes to equal lengths and sanded the outer end of the dowel almost flush with the spokes. Next, I took some .01" wire, wrapped it around a bamboo skewer (.14" in diameter), and glued it onto the spokes. Finally, I cut the wheel off the dowel, sanded the backside almost flush, painted, and affixed to a post. And voila! It's certainly not a thing of beauty, but I think it's at least recognizable as a ship's wheel. I don't know yet if I can fit it onto the Jenny's deck. If not, I'll save it for a future build.

- 109 replies
-
- 15
-
-
-
- Ghost Ship
- Jenny
- (and 2 more)
-
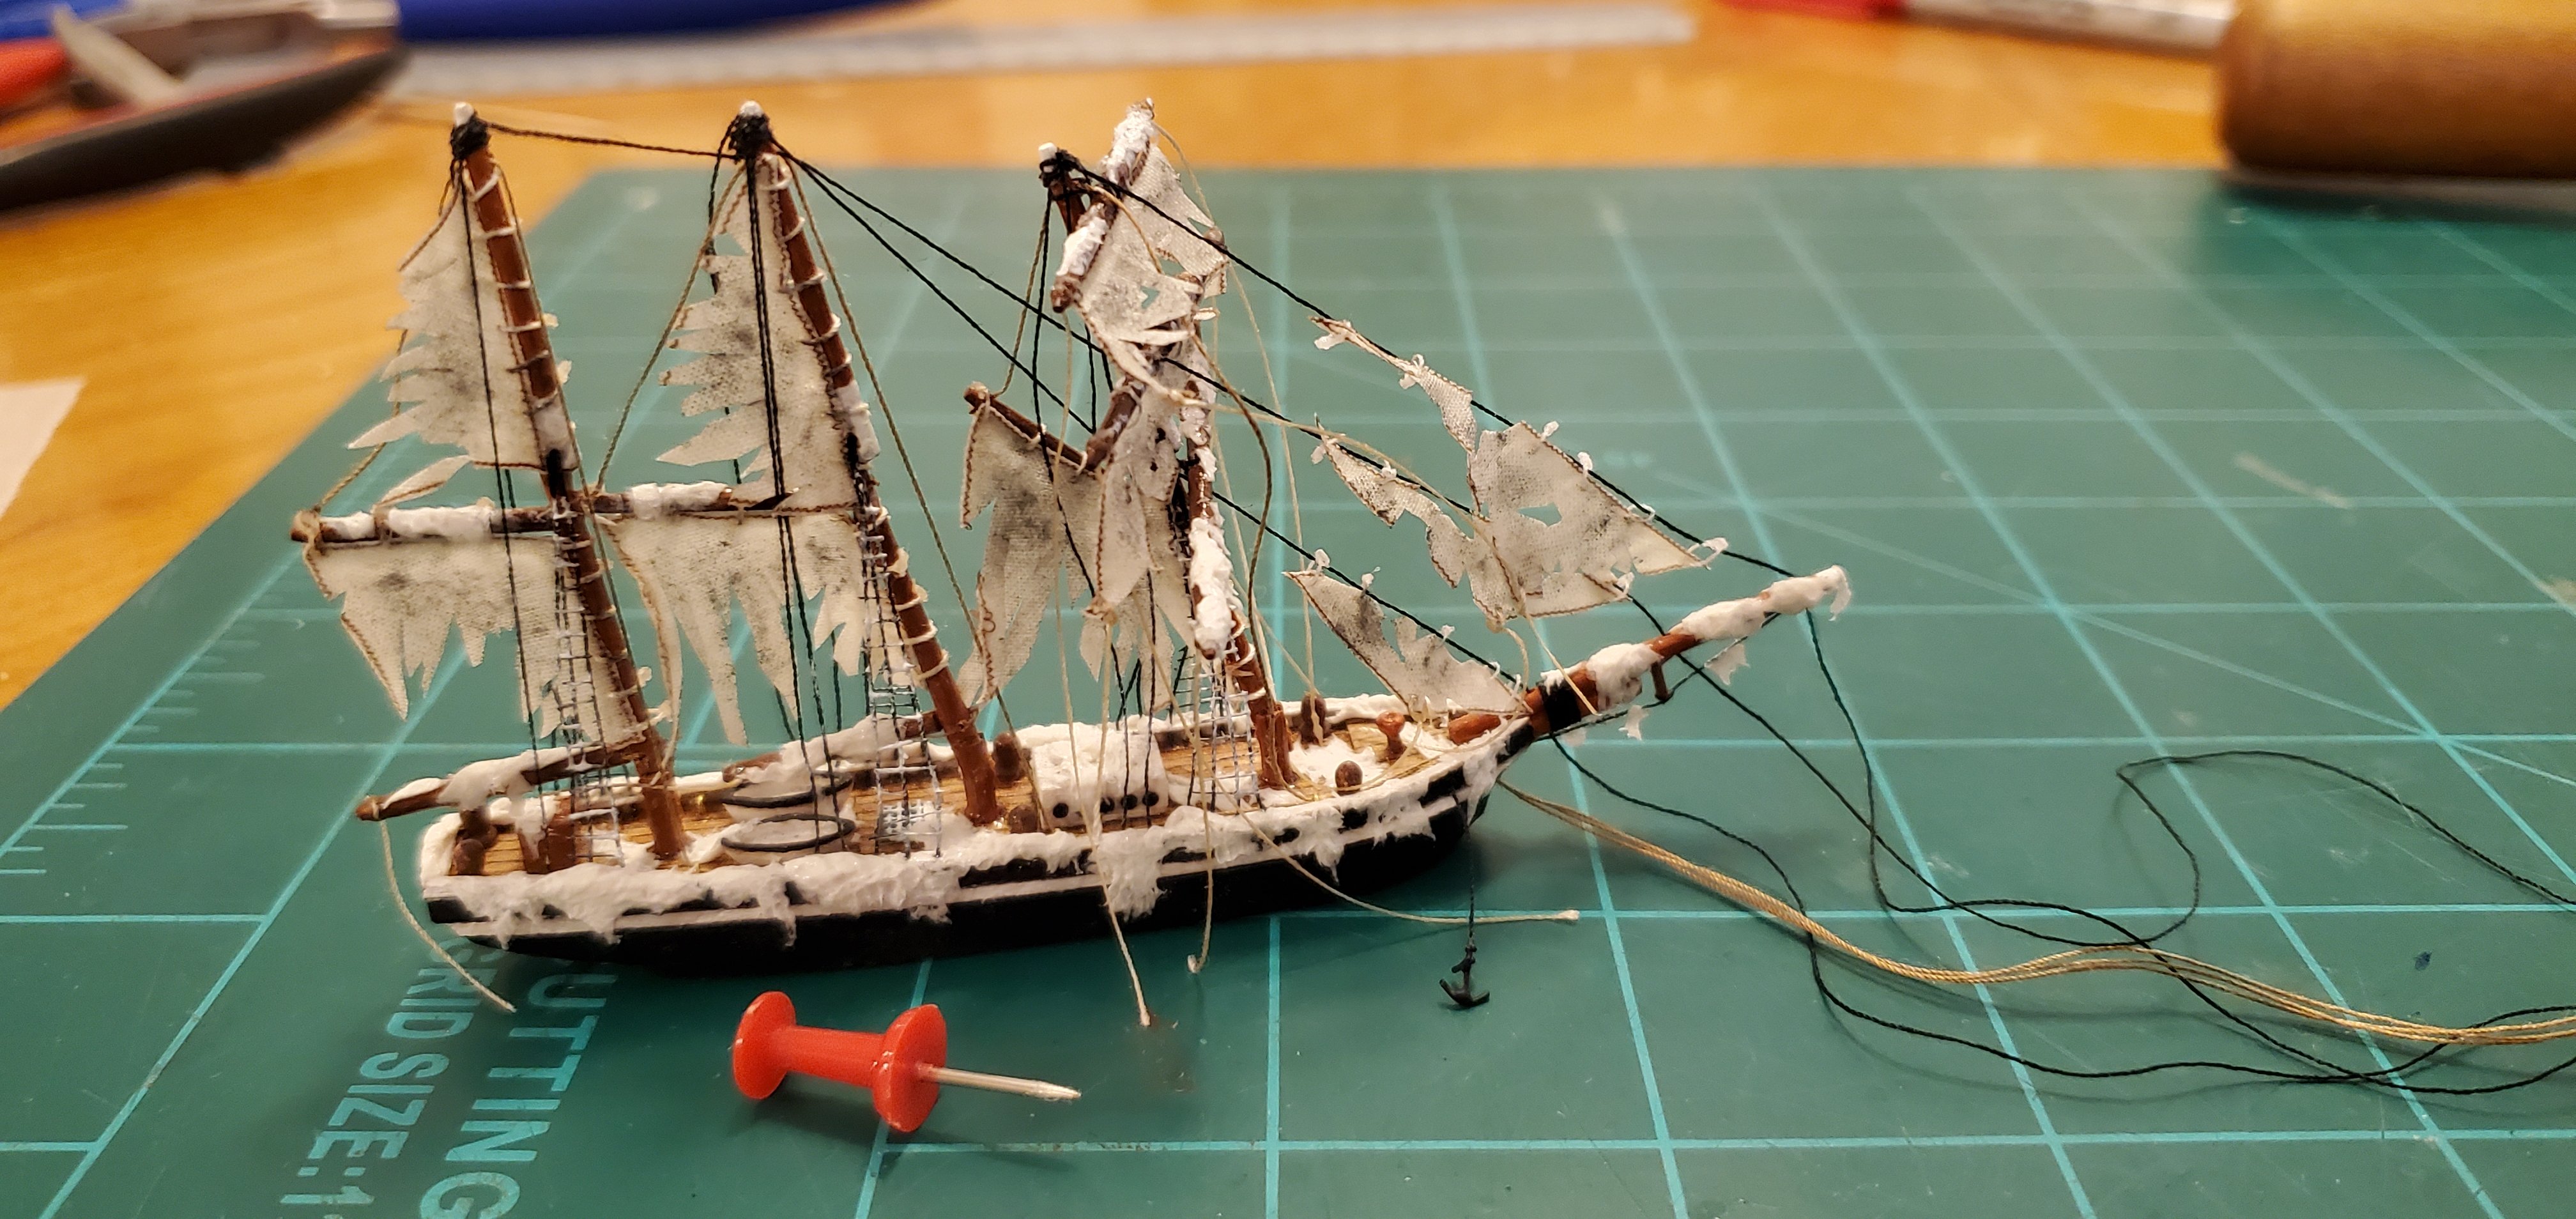
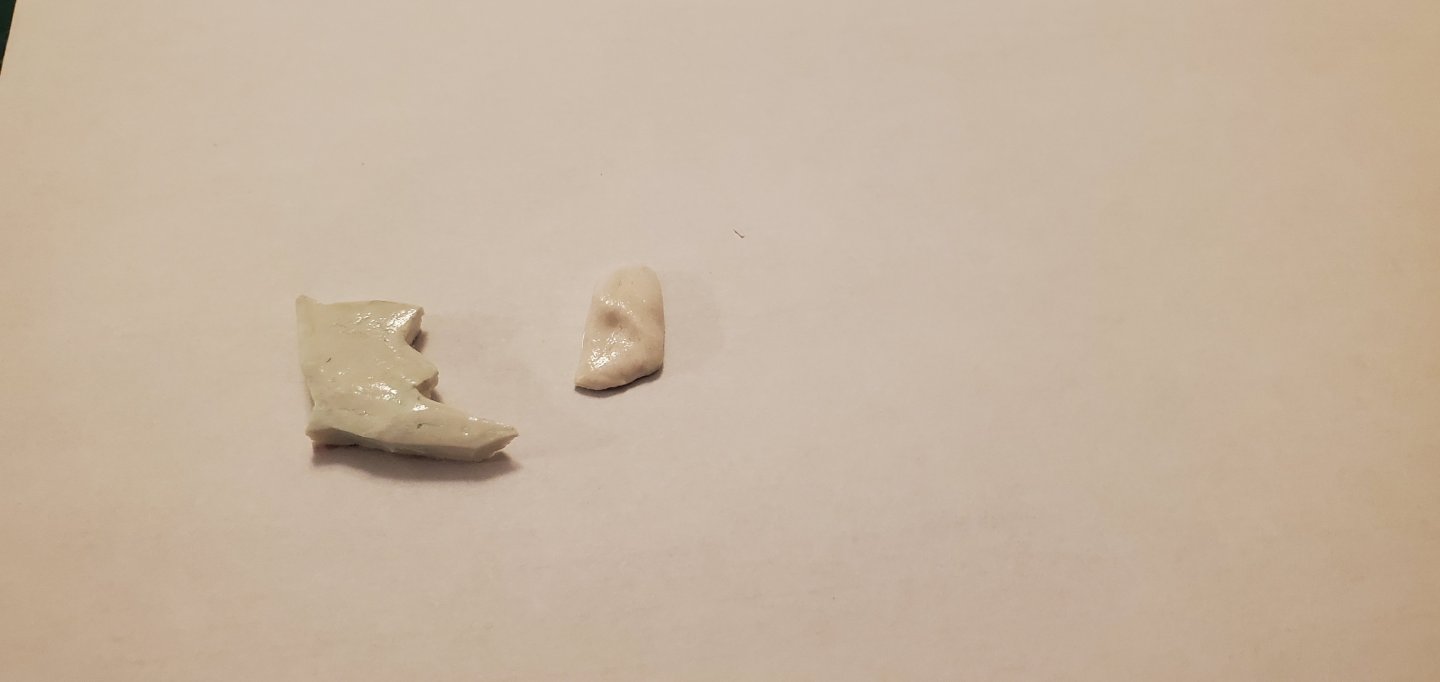
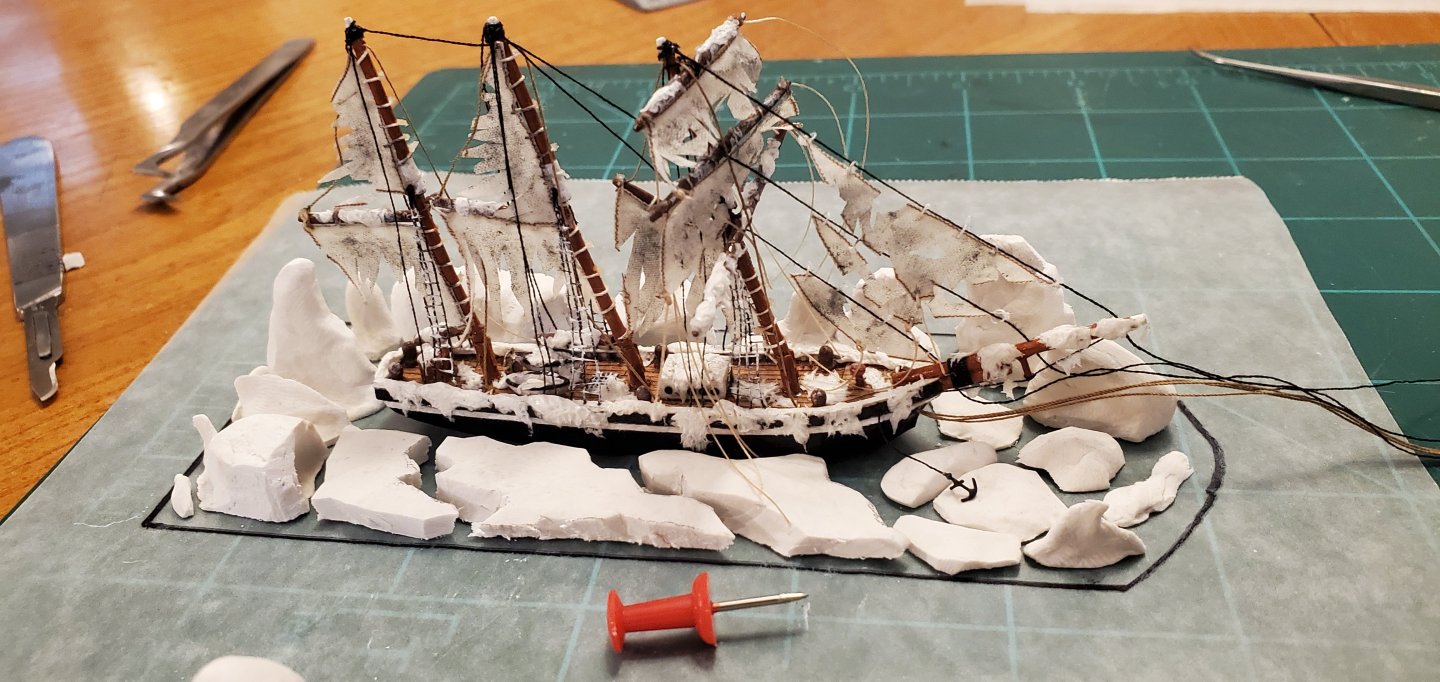
OK. Back to the build! I was not quite satisfied with how the Jenny looked so I decided to cold-weather her a little more. I added some hanging icicles to the rigging on the martingale along with lumping some additional snow on the gaffs, booms, and yards (small bits of modeling clay). The I finished it off with some light frosting on the ratlines (thinly brushed on Gesso). I think I'm good with how cold she looks now. Right before I started this build log, I had added the water (epoxy resin) to the bottle. The next step is to create the icebergs that entomb the ill-fated Jenny. The plan is to make the icebergs and arrange everything outside the bottle. I took some wax paper and drew a footprint of the water, then started molding the bergs out of modeling clay. It's got to be a large collection of small bergs since they have to fit inside the narrow bottle opening. I made more than I need so I can fit them around the ship like puzzle pieces. After the clay dries, I'll sharpen some edges and try to get them to look more like icebergs rather than lumps of white clay.
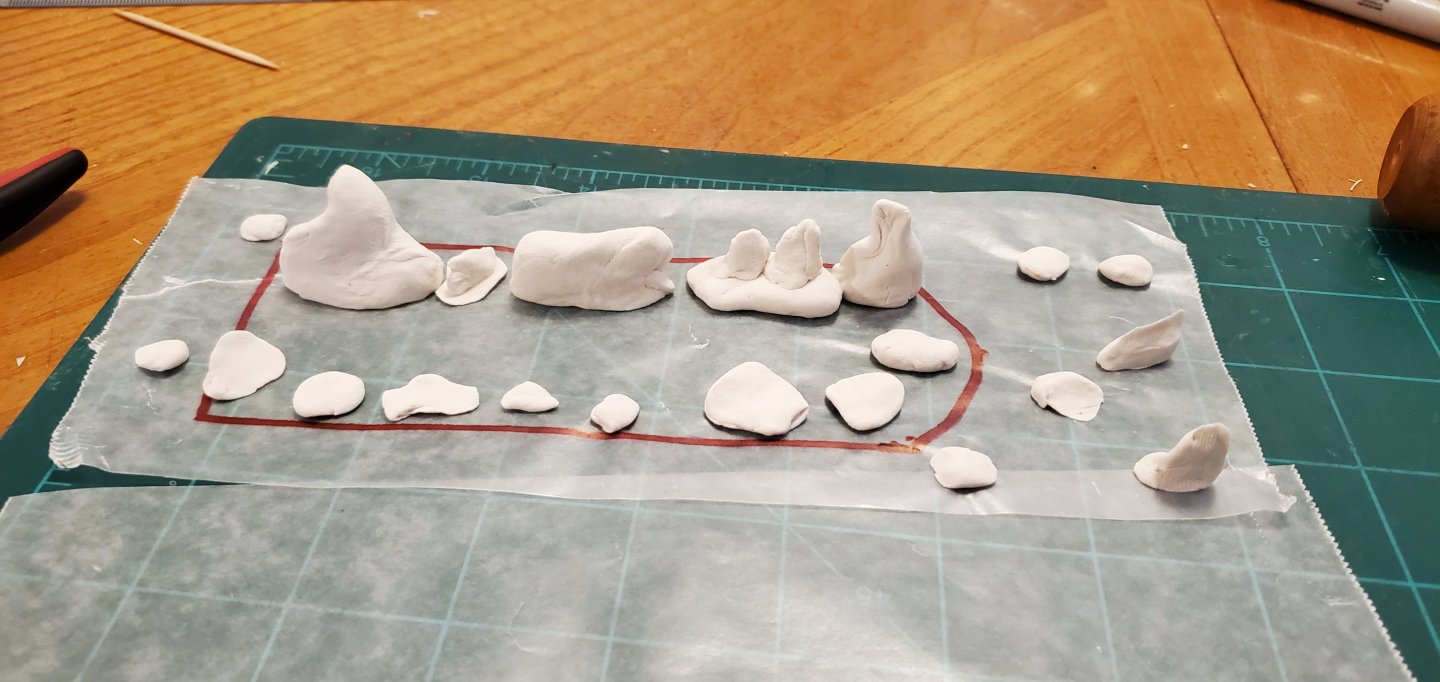
- 109 replies
-
- 15
-
-
-
- Ghost Ship
- Jenny
- (and 2 more)
-
Sounds like it was worth the drive to Llano! I hope you stopped at Cooper's BBQ on the way out or back. On second thought however, I imagine the line at Cooper's was stretched way down the road! No doubt, Keith. I've seen partial solar eclipses before but this was my first total and as Gary said, there's a huge difference. Even though it was only for 5-10 seconds at a time here in my driveway, seeing the corona and the Baily's beads were spectacular.
- 109 replies
-
- 6
-
-
- Ghost Ship
- Jenny
- (and 2 more)
-
@Knocklouder That's a cool story about the Canadian penguins. Now if you could only teach them to hunt rats!!
- 109 replies
-
- 6
-
-
-
- Ghost Ship
- Jenny
- (and 2 more)