HOLIDAY DONATION DRIVE - SUPPORT MSW - DO YOUR PART TO KEEP THIS GREAT FORUM GOING! (89 donations so far out of 49,000 members - C'mon guys!)
×


Glen McGuire
-
Posts
1,963 -
Joined
-
Last visited
Content Type
Profiles
Forums
Gallery
Events
Everything posted by Glen McGuire
-
 You ain't alone. I hate to think how many hours of my life I've spent looking for stuff I just had my hands on. Regardless, superb work on some detailed fitment.
 -
In the close-up picture, it looks a little bulky. However, when I see as part of the whole boat in the latter pics, I thought it look fine. But definitely your call on that as things can look different in person vs pictures. Regardless of what you decide, the boat is really coming along nicely! Such a cool project.
-
You ain't the only one, Gary! You'll notice I only stuck it in far enough to make sure it would fit, then quickly retracted before I did something really dumb! Yes, it would've meant getting another bottle of that rotgut. I took a swig of Ol' Jerry's brew and I don't think it compares very well to the Bundy rum all the Aussies keep talking about. 😝😝
- 235 replies
-
- 5
-

-

-
- Banshee II
- Bottle
- (and 1 more)
-
It immediately made me think of you and @gjdale. I'm counting on one of you to make a tiny working steam engine to spin those wheels for me!
- 235 replies
-
- 7
-
-
-
- Banshee II
- Bottle
- (and 1 more)
-
Those golden arches are making my cow nervous, Keith. Remember, we don't use the "B" words around here (Burger, BBQ, Brisket, etc).
- 235 replies
-
- 5
-
-
- Banshee II
- Bottle
- (and 1 more)
-
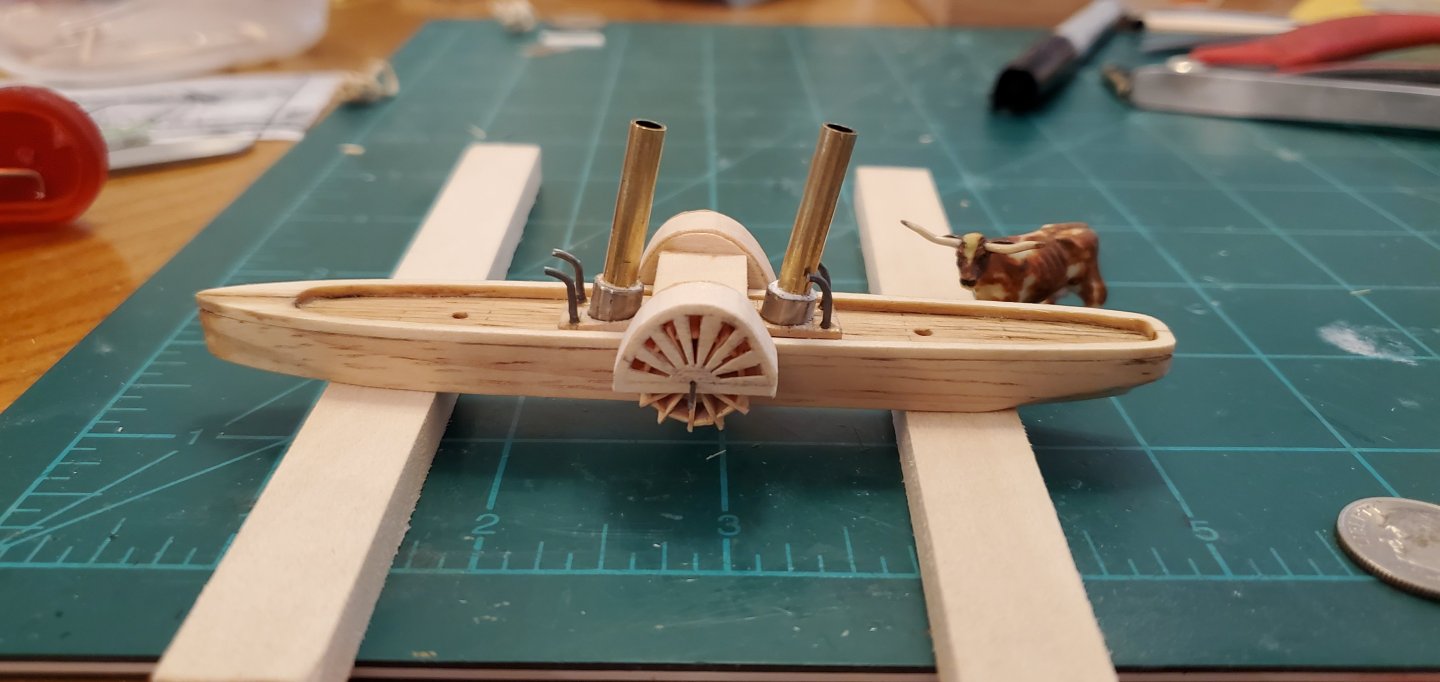
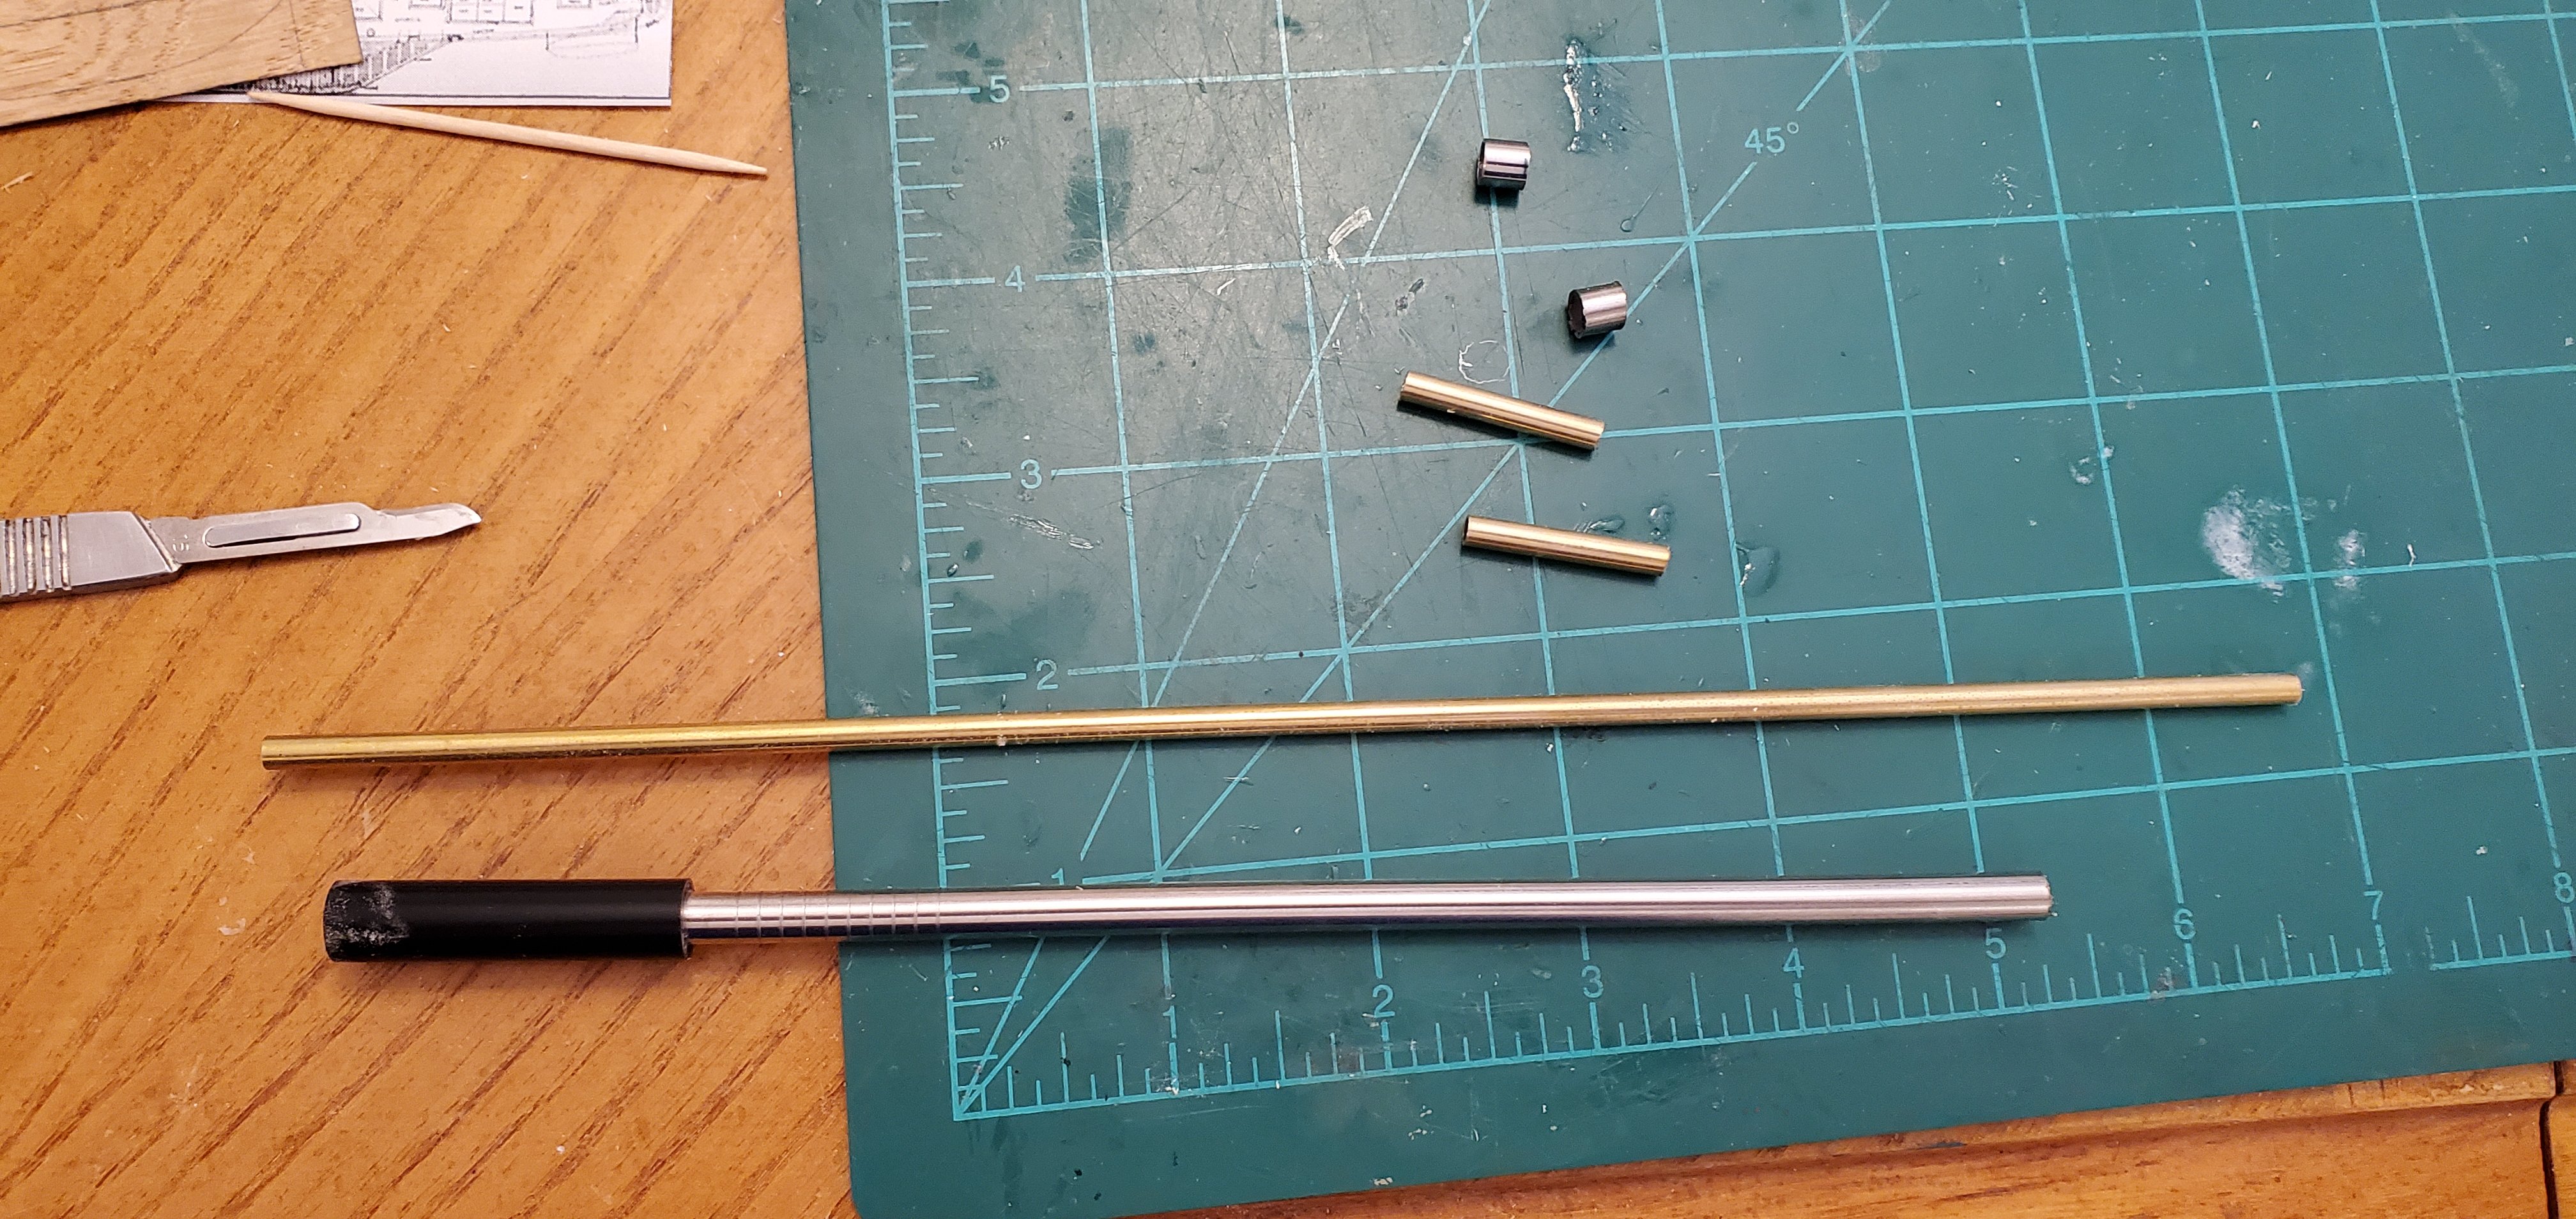
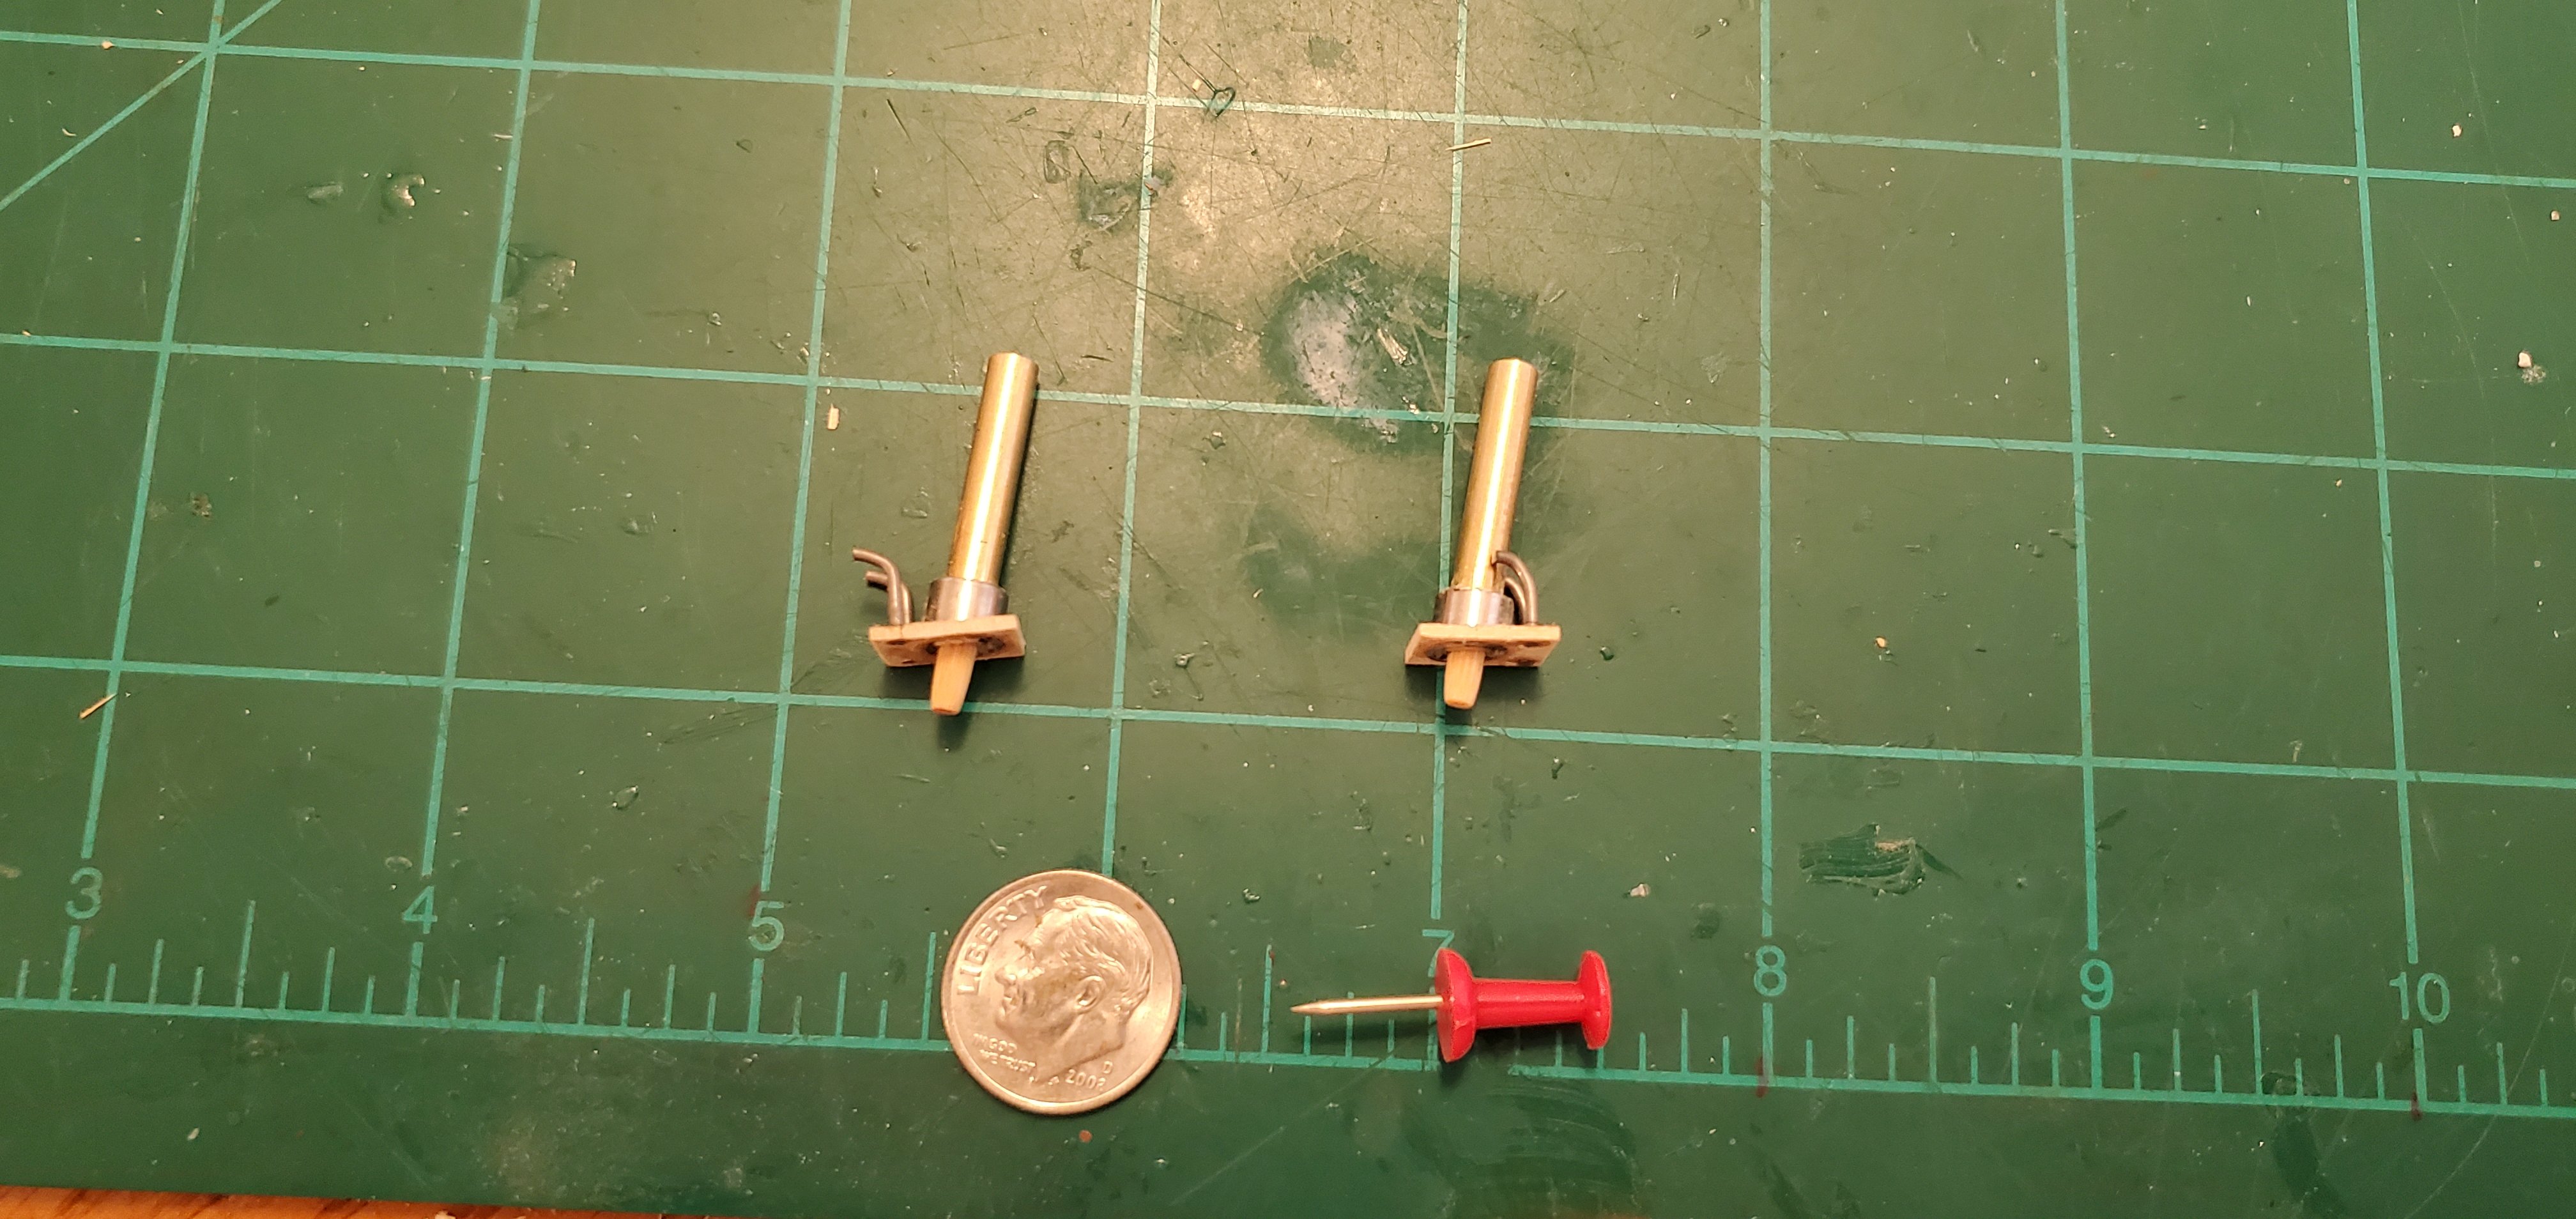
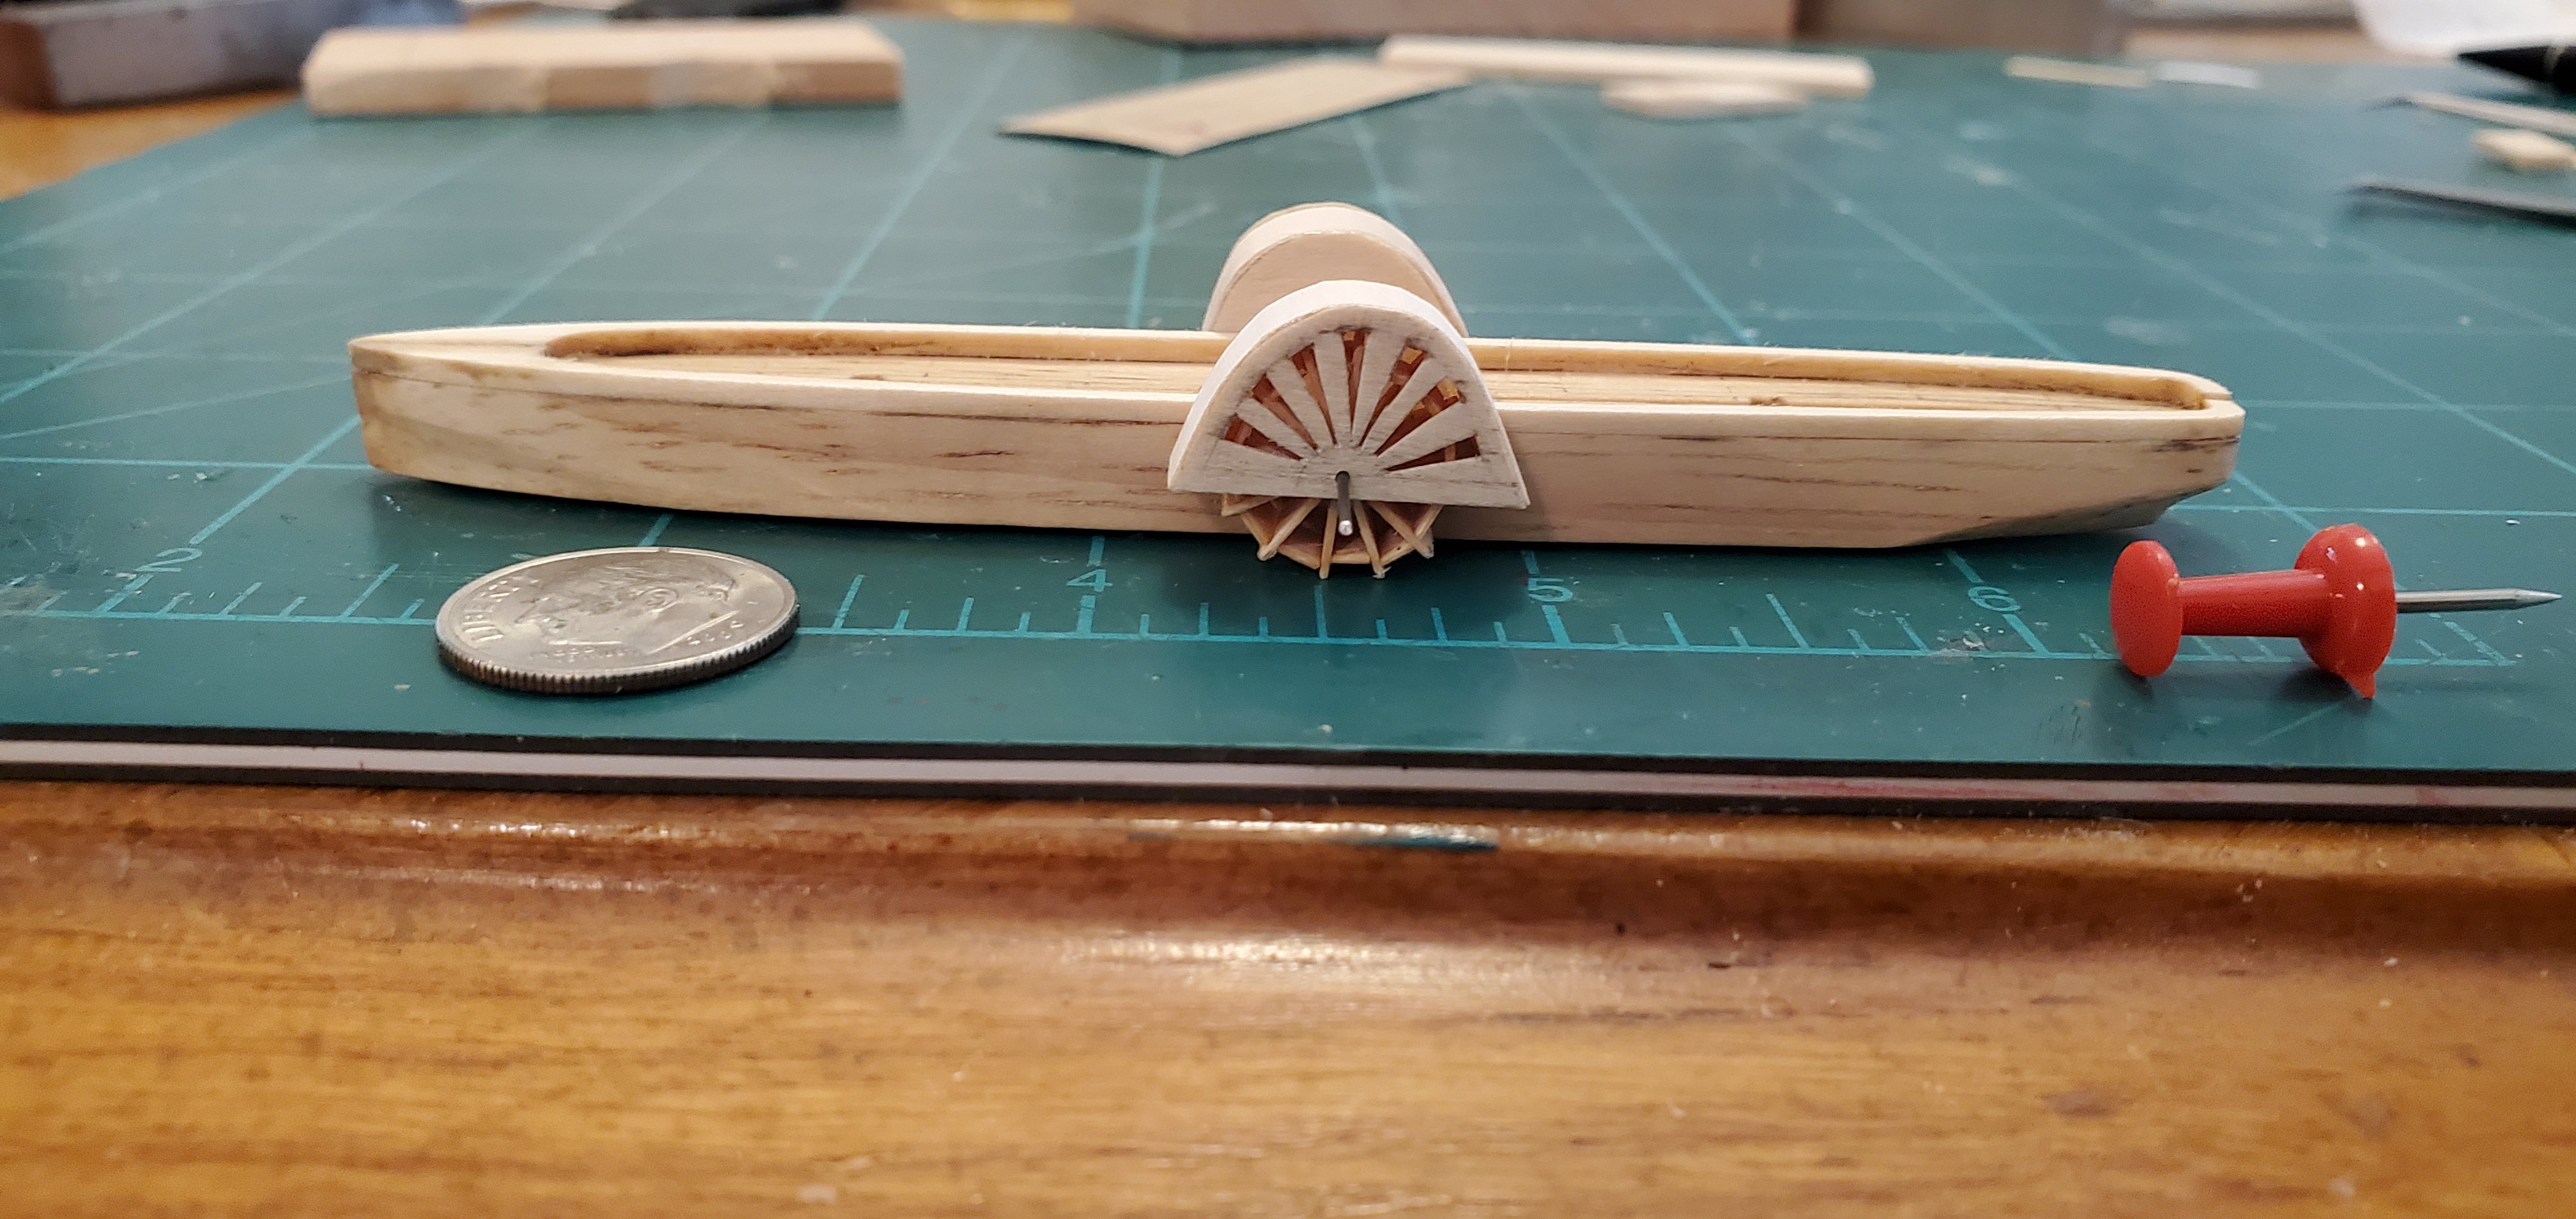
Finishing up the sidewheel subassembly. First, I cut a slot for the wheels' axle to rest in. Next was cutting notches in the bulwarks to fit the structure that connects the 2 sidewheels. Next, I built the structure and attached the sidewheels to complete the subassembly. Finally, I dropped it in place for a dry-fit test. So far so good. At this point, I figured I'd better see if the subassembly would fit thru the bottle's neck. And......of course it did not. But it was close and only took a small bit of shaving to make it work. Next to the sidewheels, I think the most iconic thing about the ship is the dual smokestacks. So I wanted to pay particular attention to them. These are also subassemblies that will be installed onto the deck inside the bottle. I had some 4mm diameter brass tube which was a good size for the bulk of the smokestack, but I needed a slightly larger diameter piece for the smokestack to rest in at the base. I scrounged around and found these stainless steel straws I'd gotten as a weird Christmas gift a few years ago. They were 6mm in diameter and perfect for what I needed. Hopefully the person that gave me the straws will not figure out what I used them for! The 4 vent pipes are 1mm music wire. Here's everything so far, dry-fit in place. Mini-Dimples the Ship Inspector finally decided I'd gotten far enough along for her to look things over. She gave it two horns up, but said she's still skeptical about this thing getting successfully assembled inside the bottle.


- 235 replies
-
- 17
-
-

-
- Banshee II
- Bottle
- (and 1 more)
-
Here's what I envision Ian and other engineer types doing in their spare time... https://x.com/HumansNoContext/status/1799367028580532379
- 235 replies
-
- 10
-
-
- Banshee II
- Bottle
- (and 1 more)
-
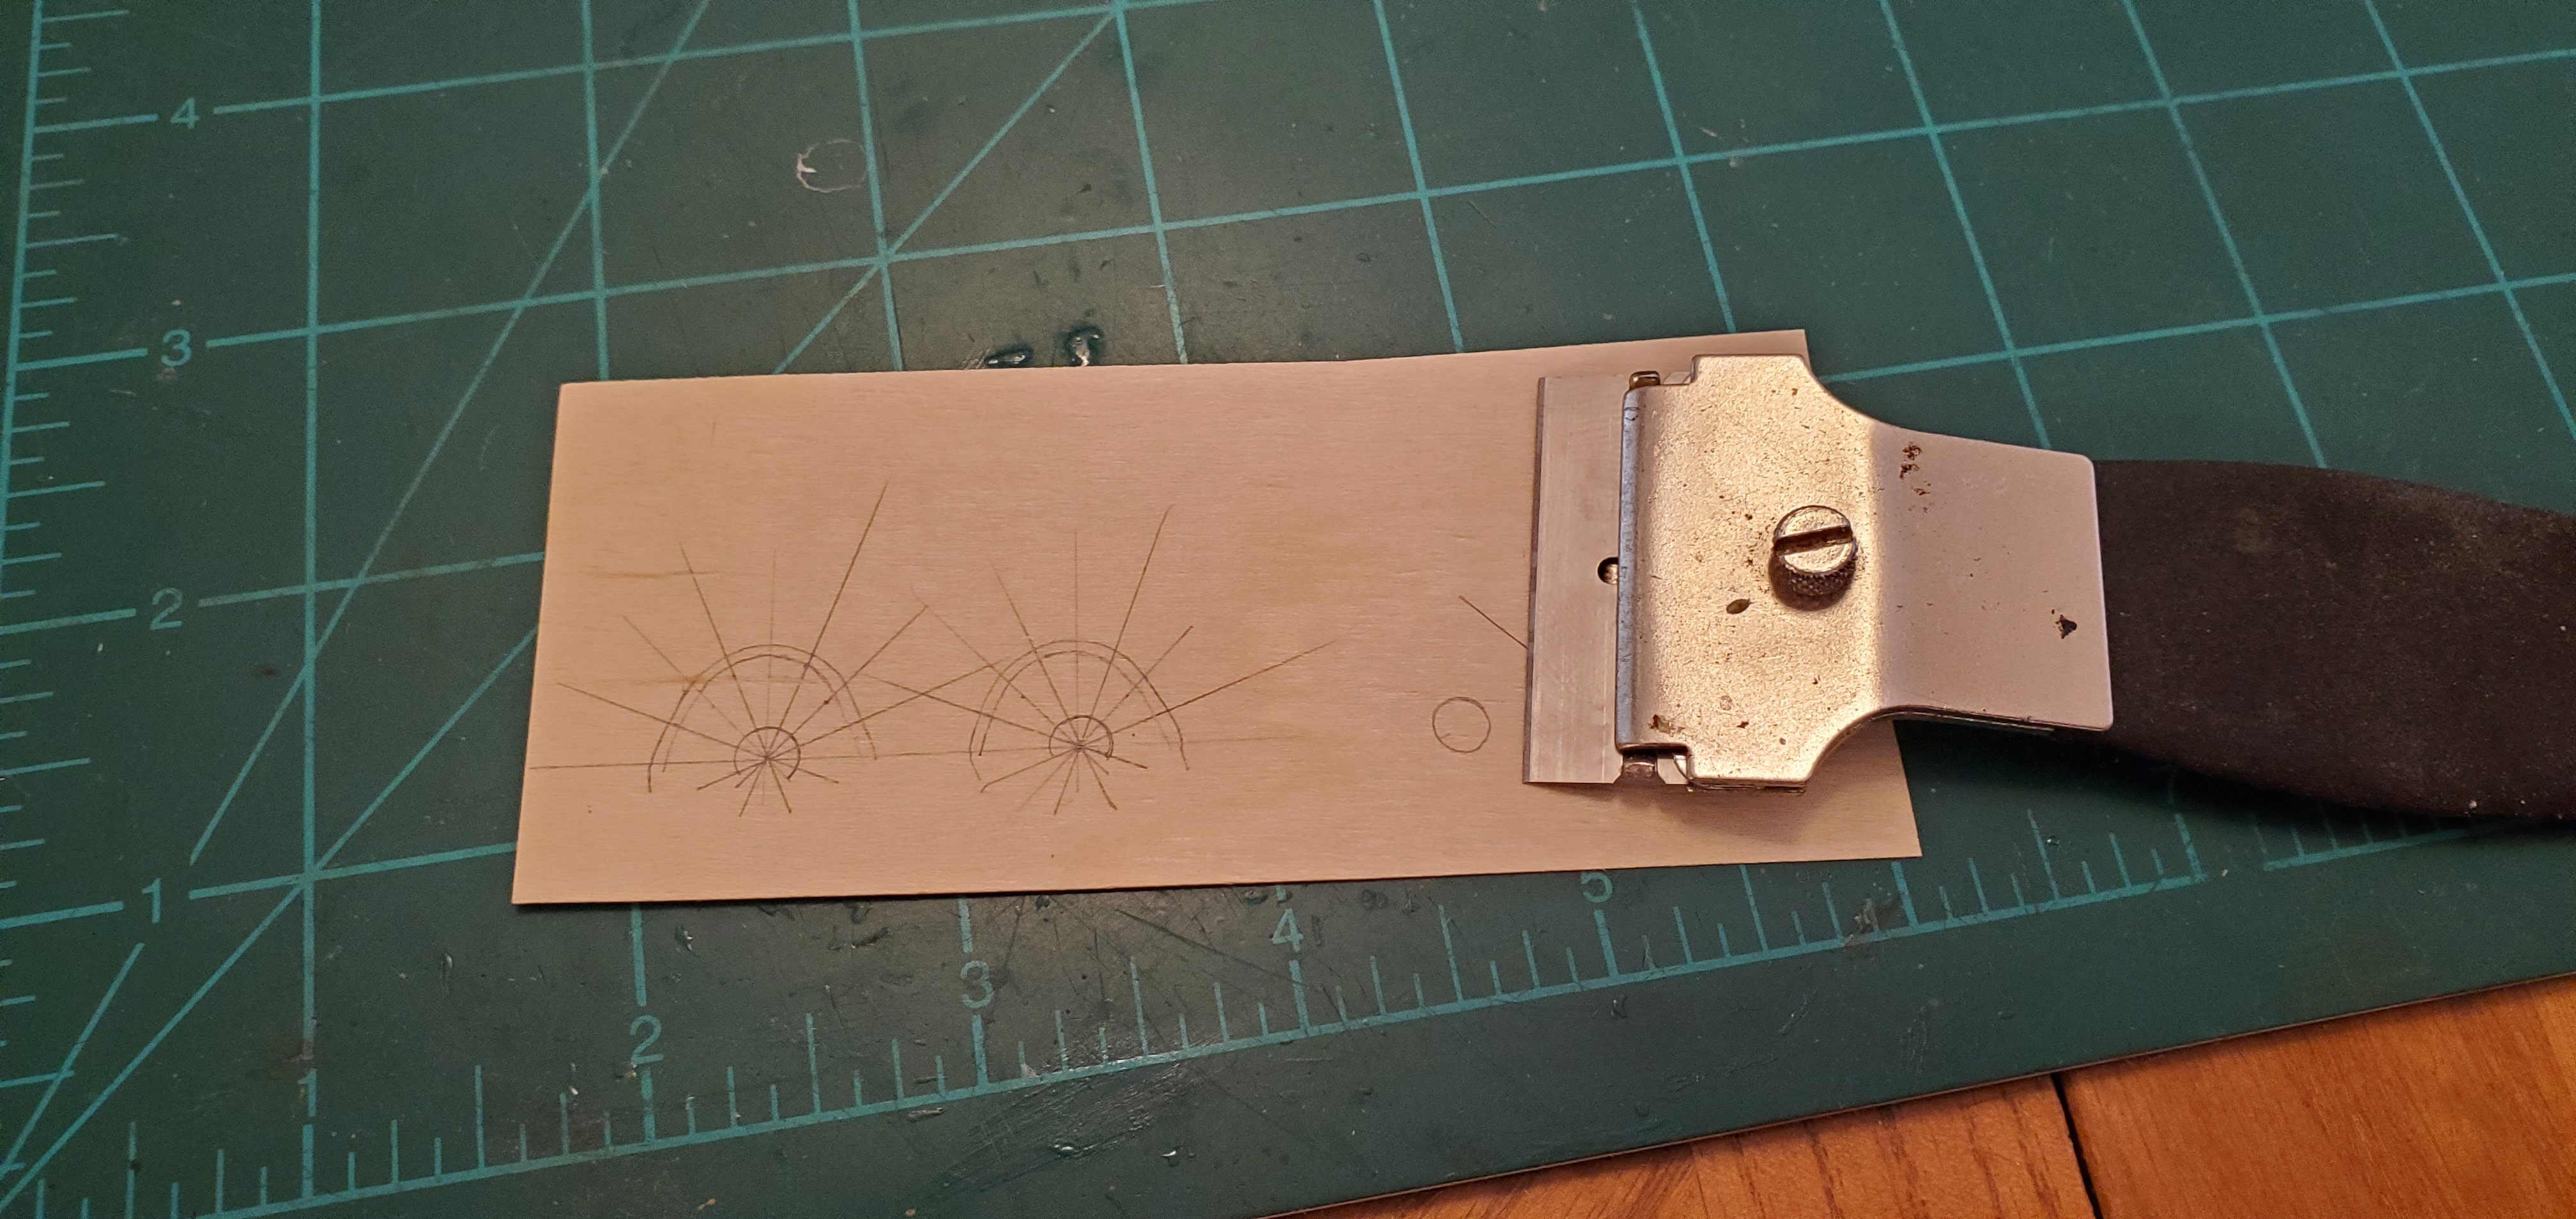
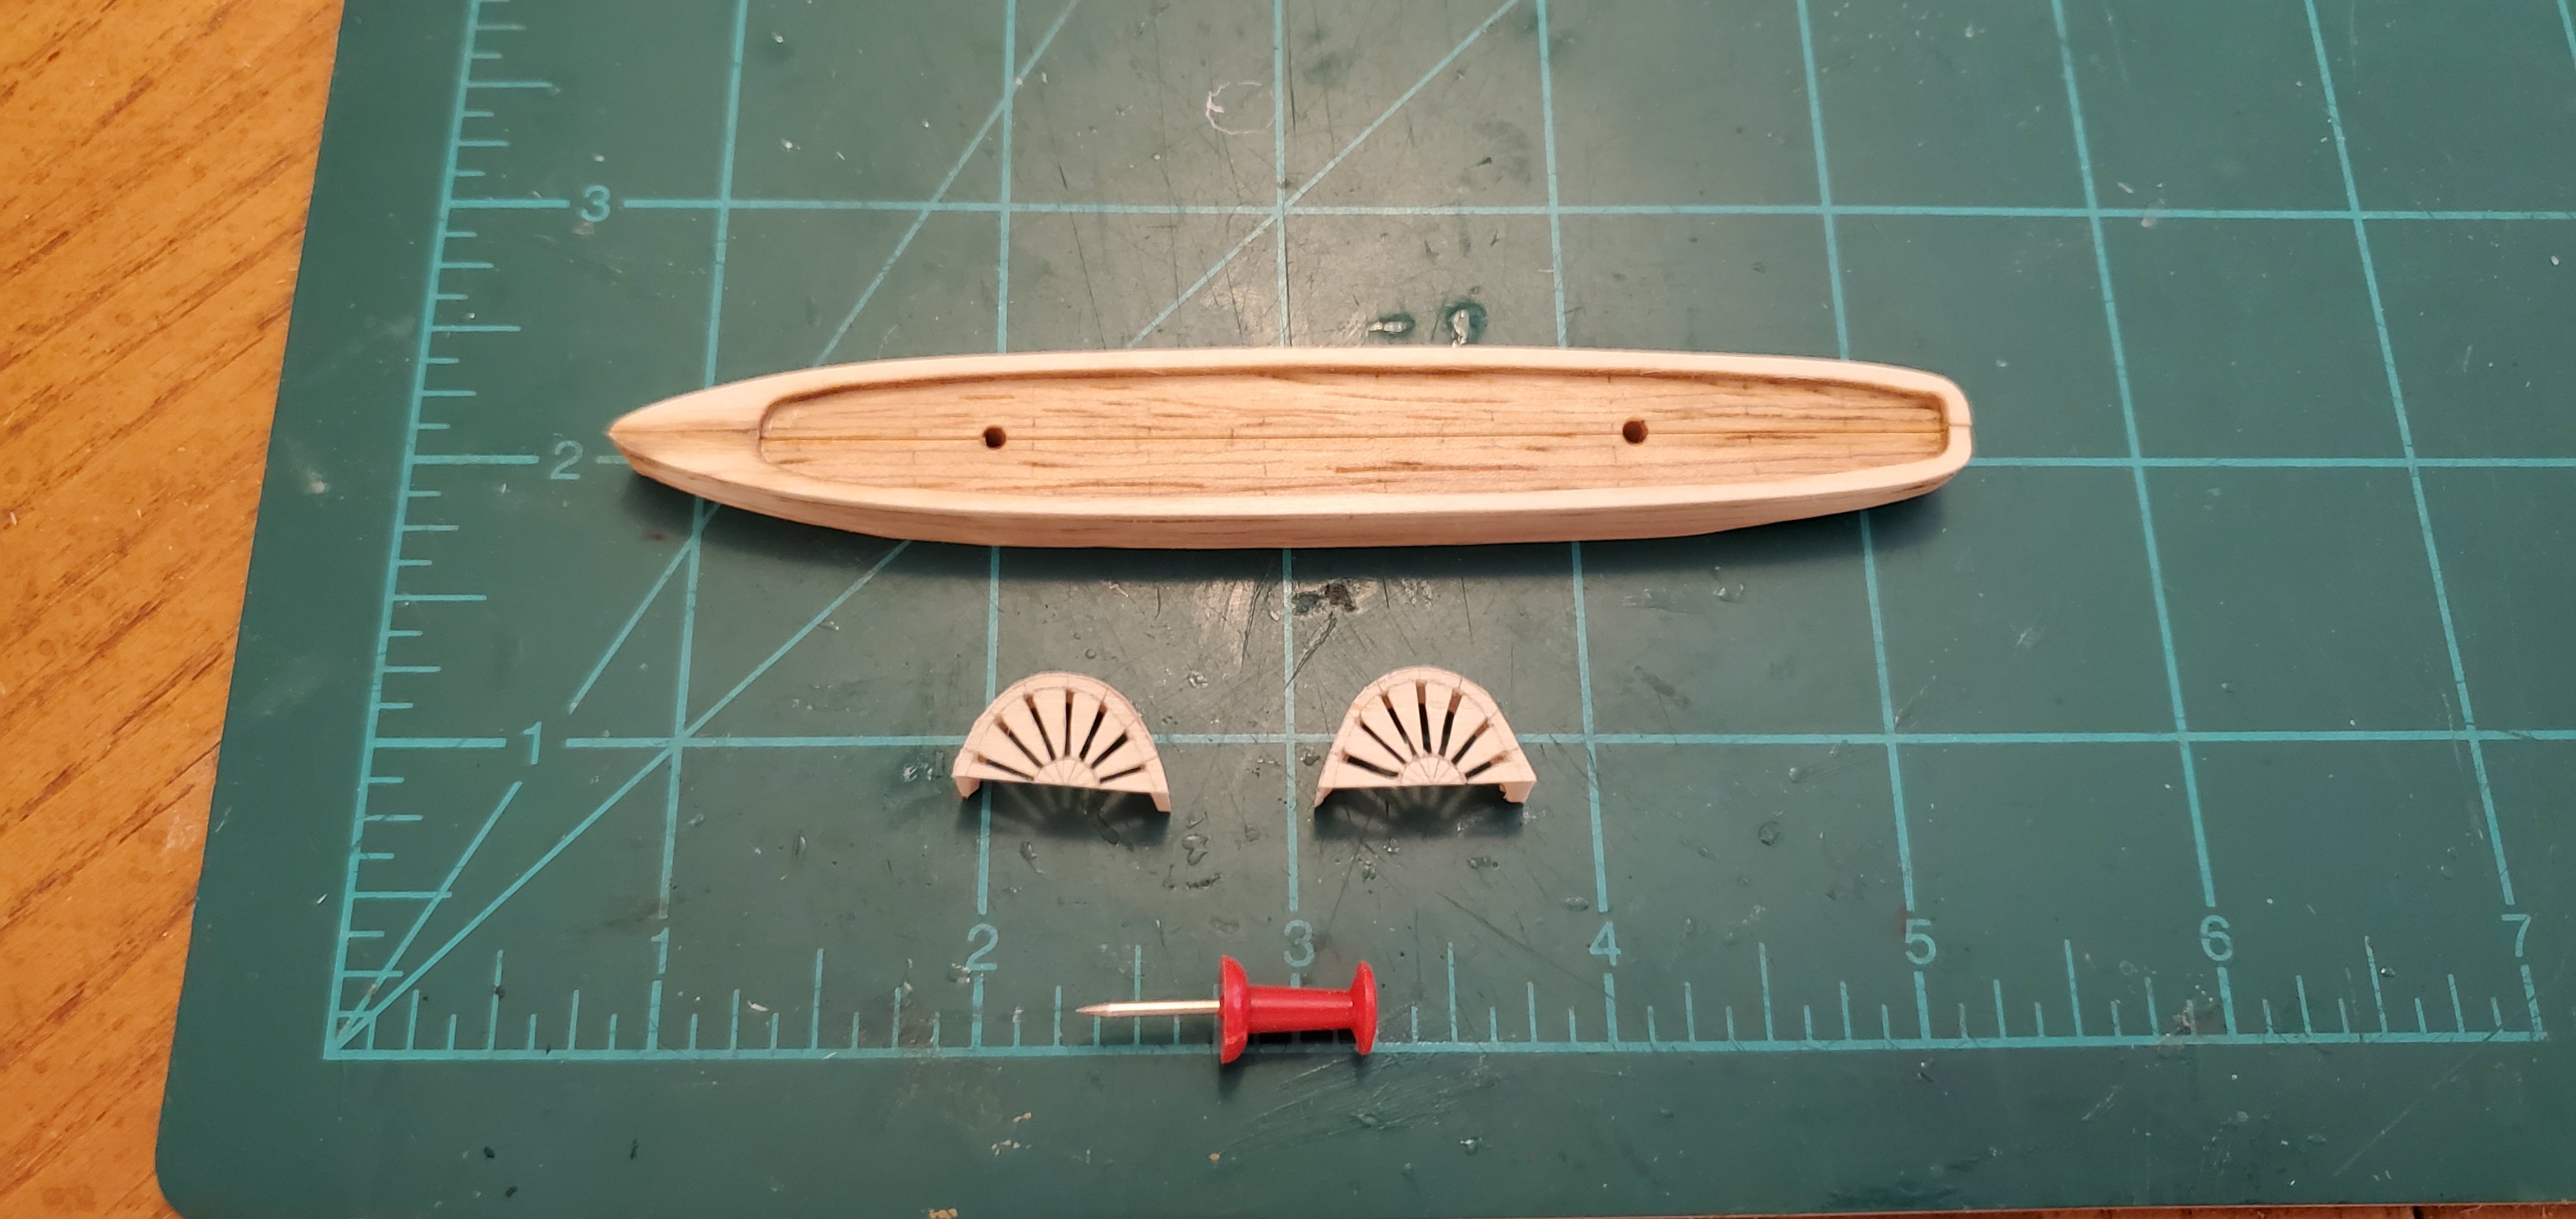
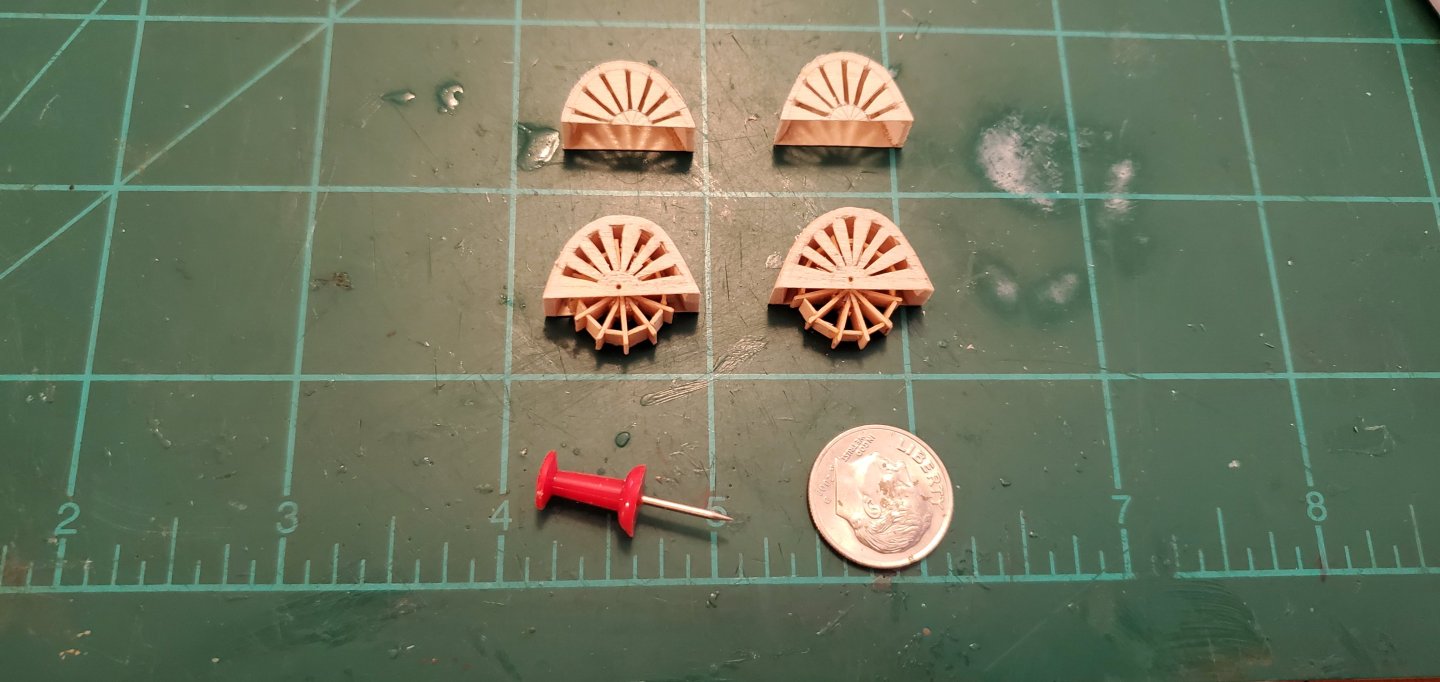
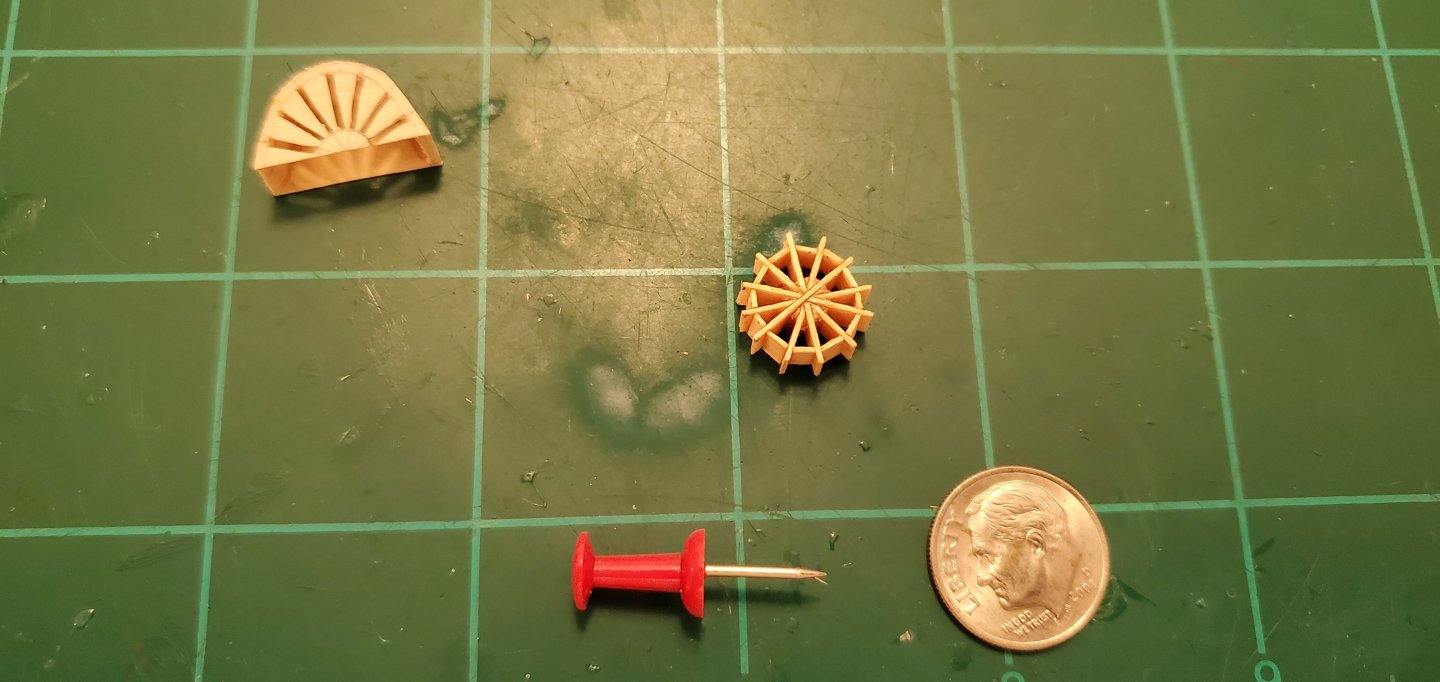
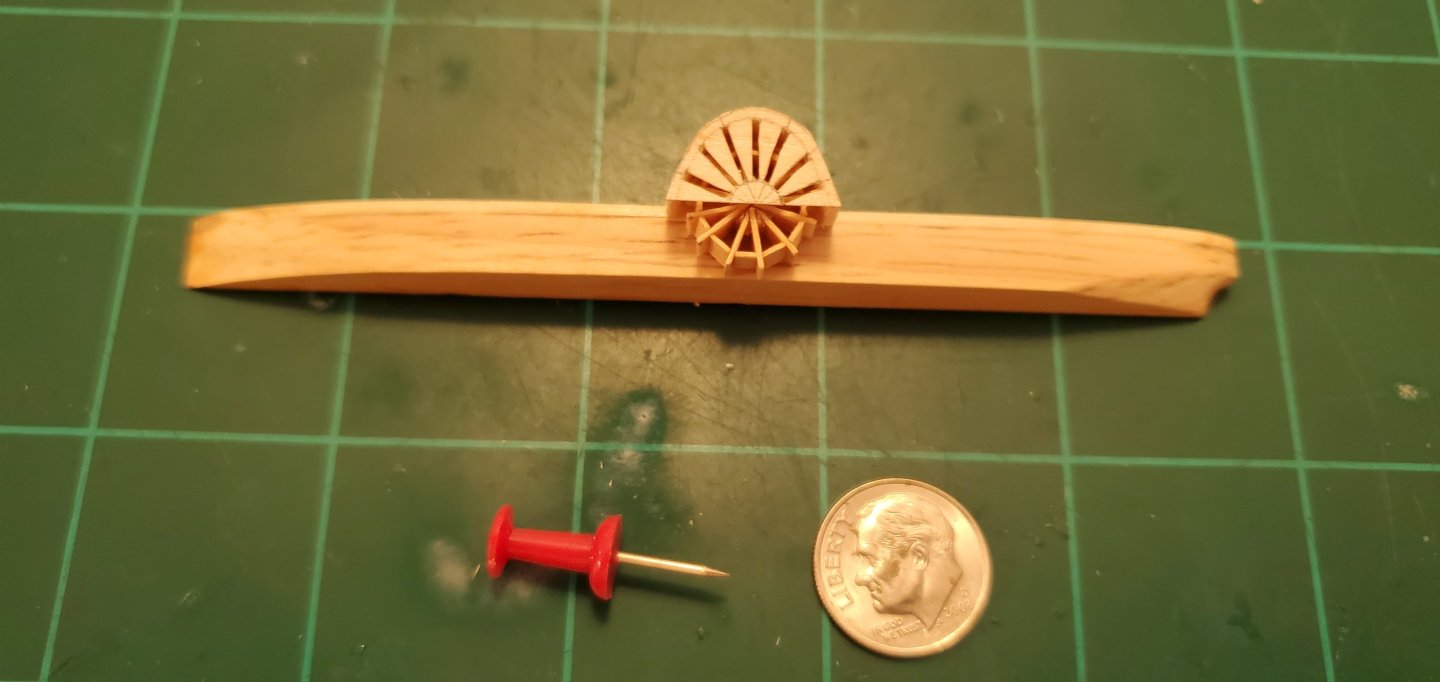
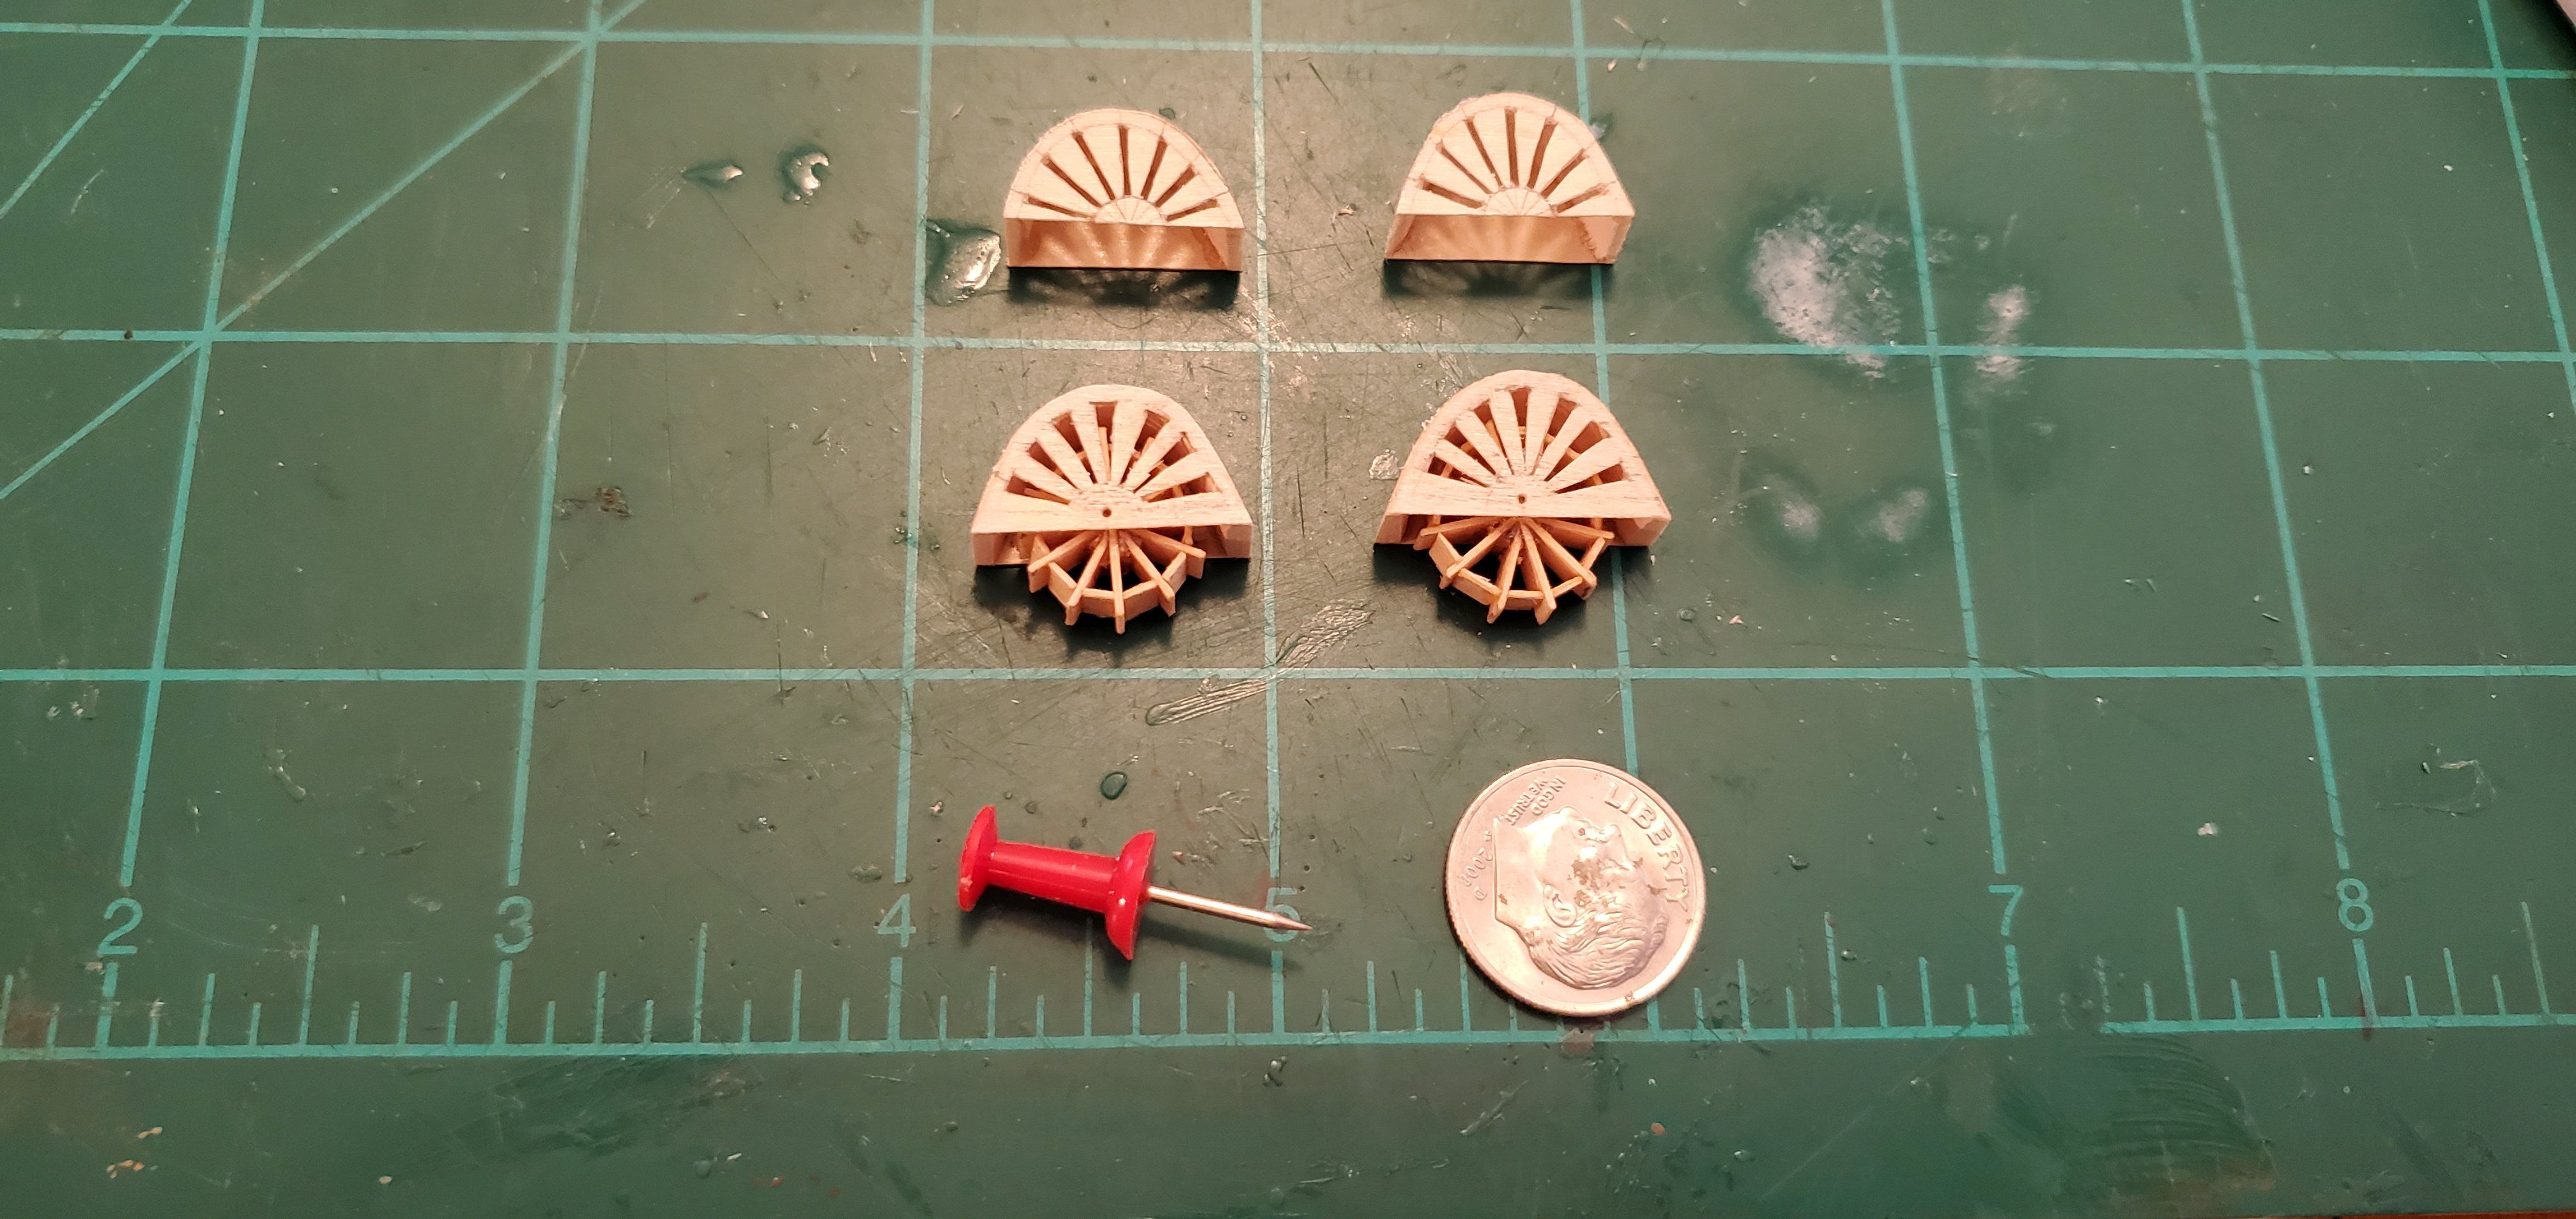
Thank you, @Keith Black, @Knocklouder, @BANYAN, @Ian_Grant, @Canute, @Rick310, @berhard, for the comments. Very much appreciated. As I mentioned in an earlier post, I was not thrilled my work on the wheel covers. So I decided to bite the bullet and make new ones. It was a 4-hour time investment, but I like the new ones a lot better. There were 2 things I wanted to fix. First, I needed a little more material across the bottom to fit an axle since the wheels must actually be able to spin! Second, the vent slots were bugging me and it took me a while to figure out why. After staring at them endlessly, I finally realized they needed to fan out to conform better with the round shape of the cover rather than simply being rectangular slots. The first pic below has the original ones on top and new ones below. The bad news is the width of the sidewheels make each half of the split hull too wide to fit inside the very narrow bottle opening. So the new plan is to connect the 2 wheels with their housing structure to make a one-piece subassembly. Then I can insert it sideways into the bottle, turn it 90 degrees, and drop it in place onto the hull. The further I go, the more complicated this thing gets! But I do not want to scale down the sidewheels to make them fit. To me, they are what makes this ship (or these types of ships) really unique. When this project is done, I think the sidewheels will be the thing that catches your eye, so I want them to be prominent.

- 235 replies
-
- 19
-
-
-
- Banshee II
- Bottle
- (and 1 more)
-
Rifles?? You're going to have to splain that one to me, Keith!
- 235 replies
-
- 4
-
-
-
- Banshee II
- Bottle
- (and 1 more)
-
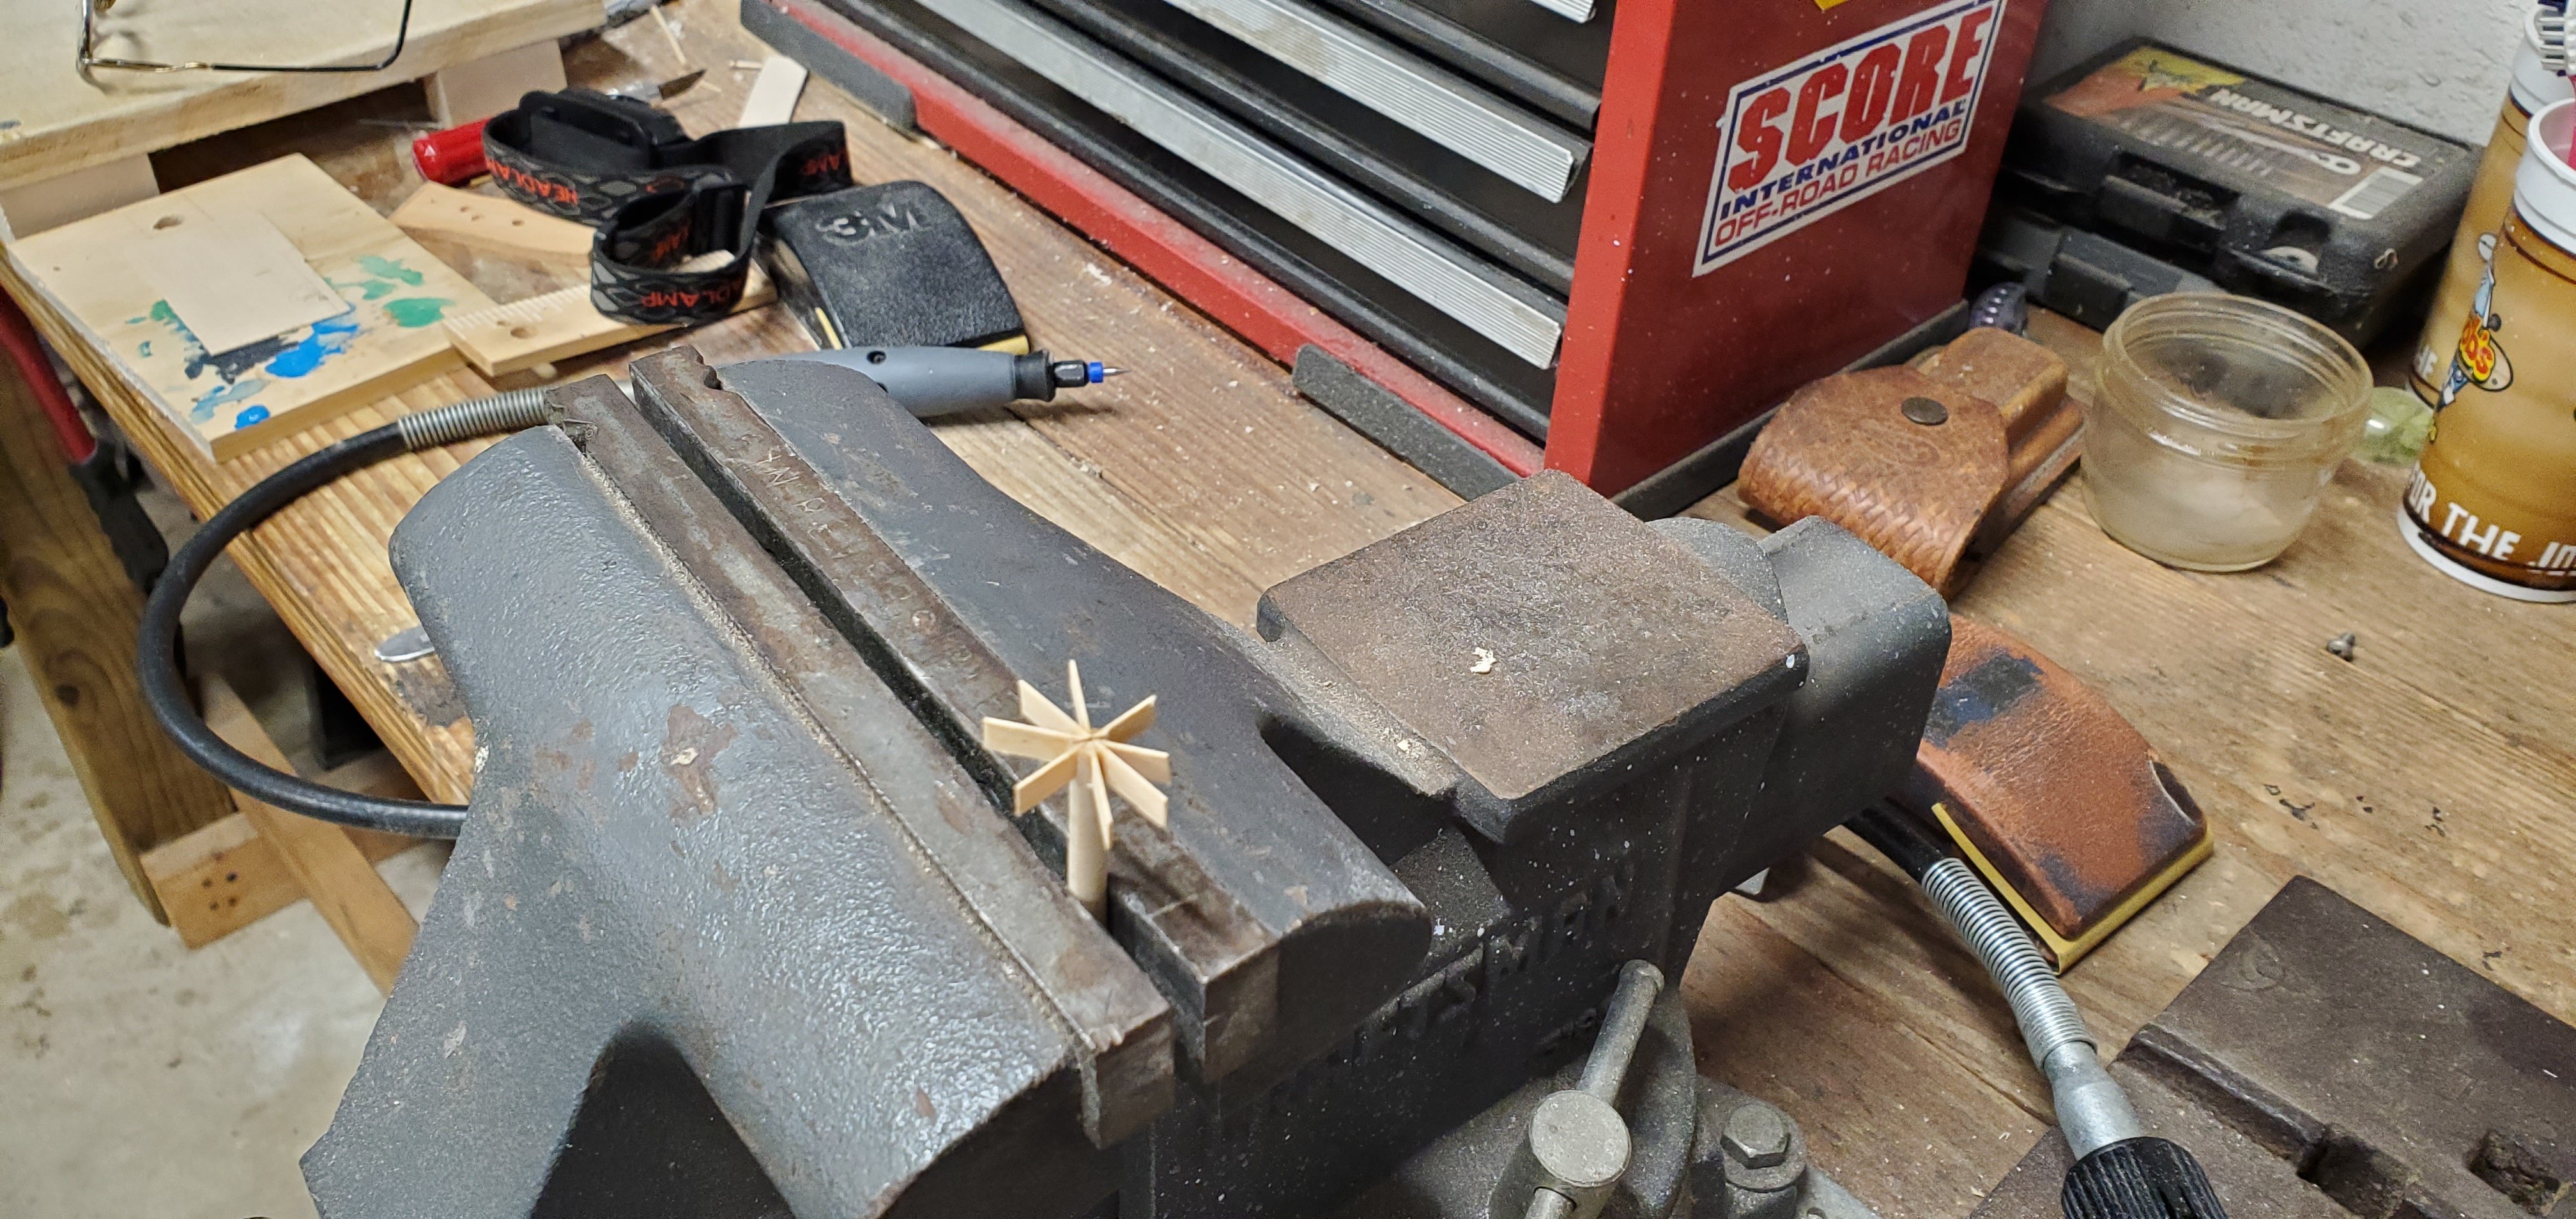
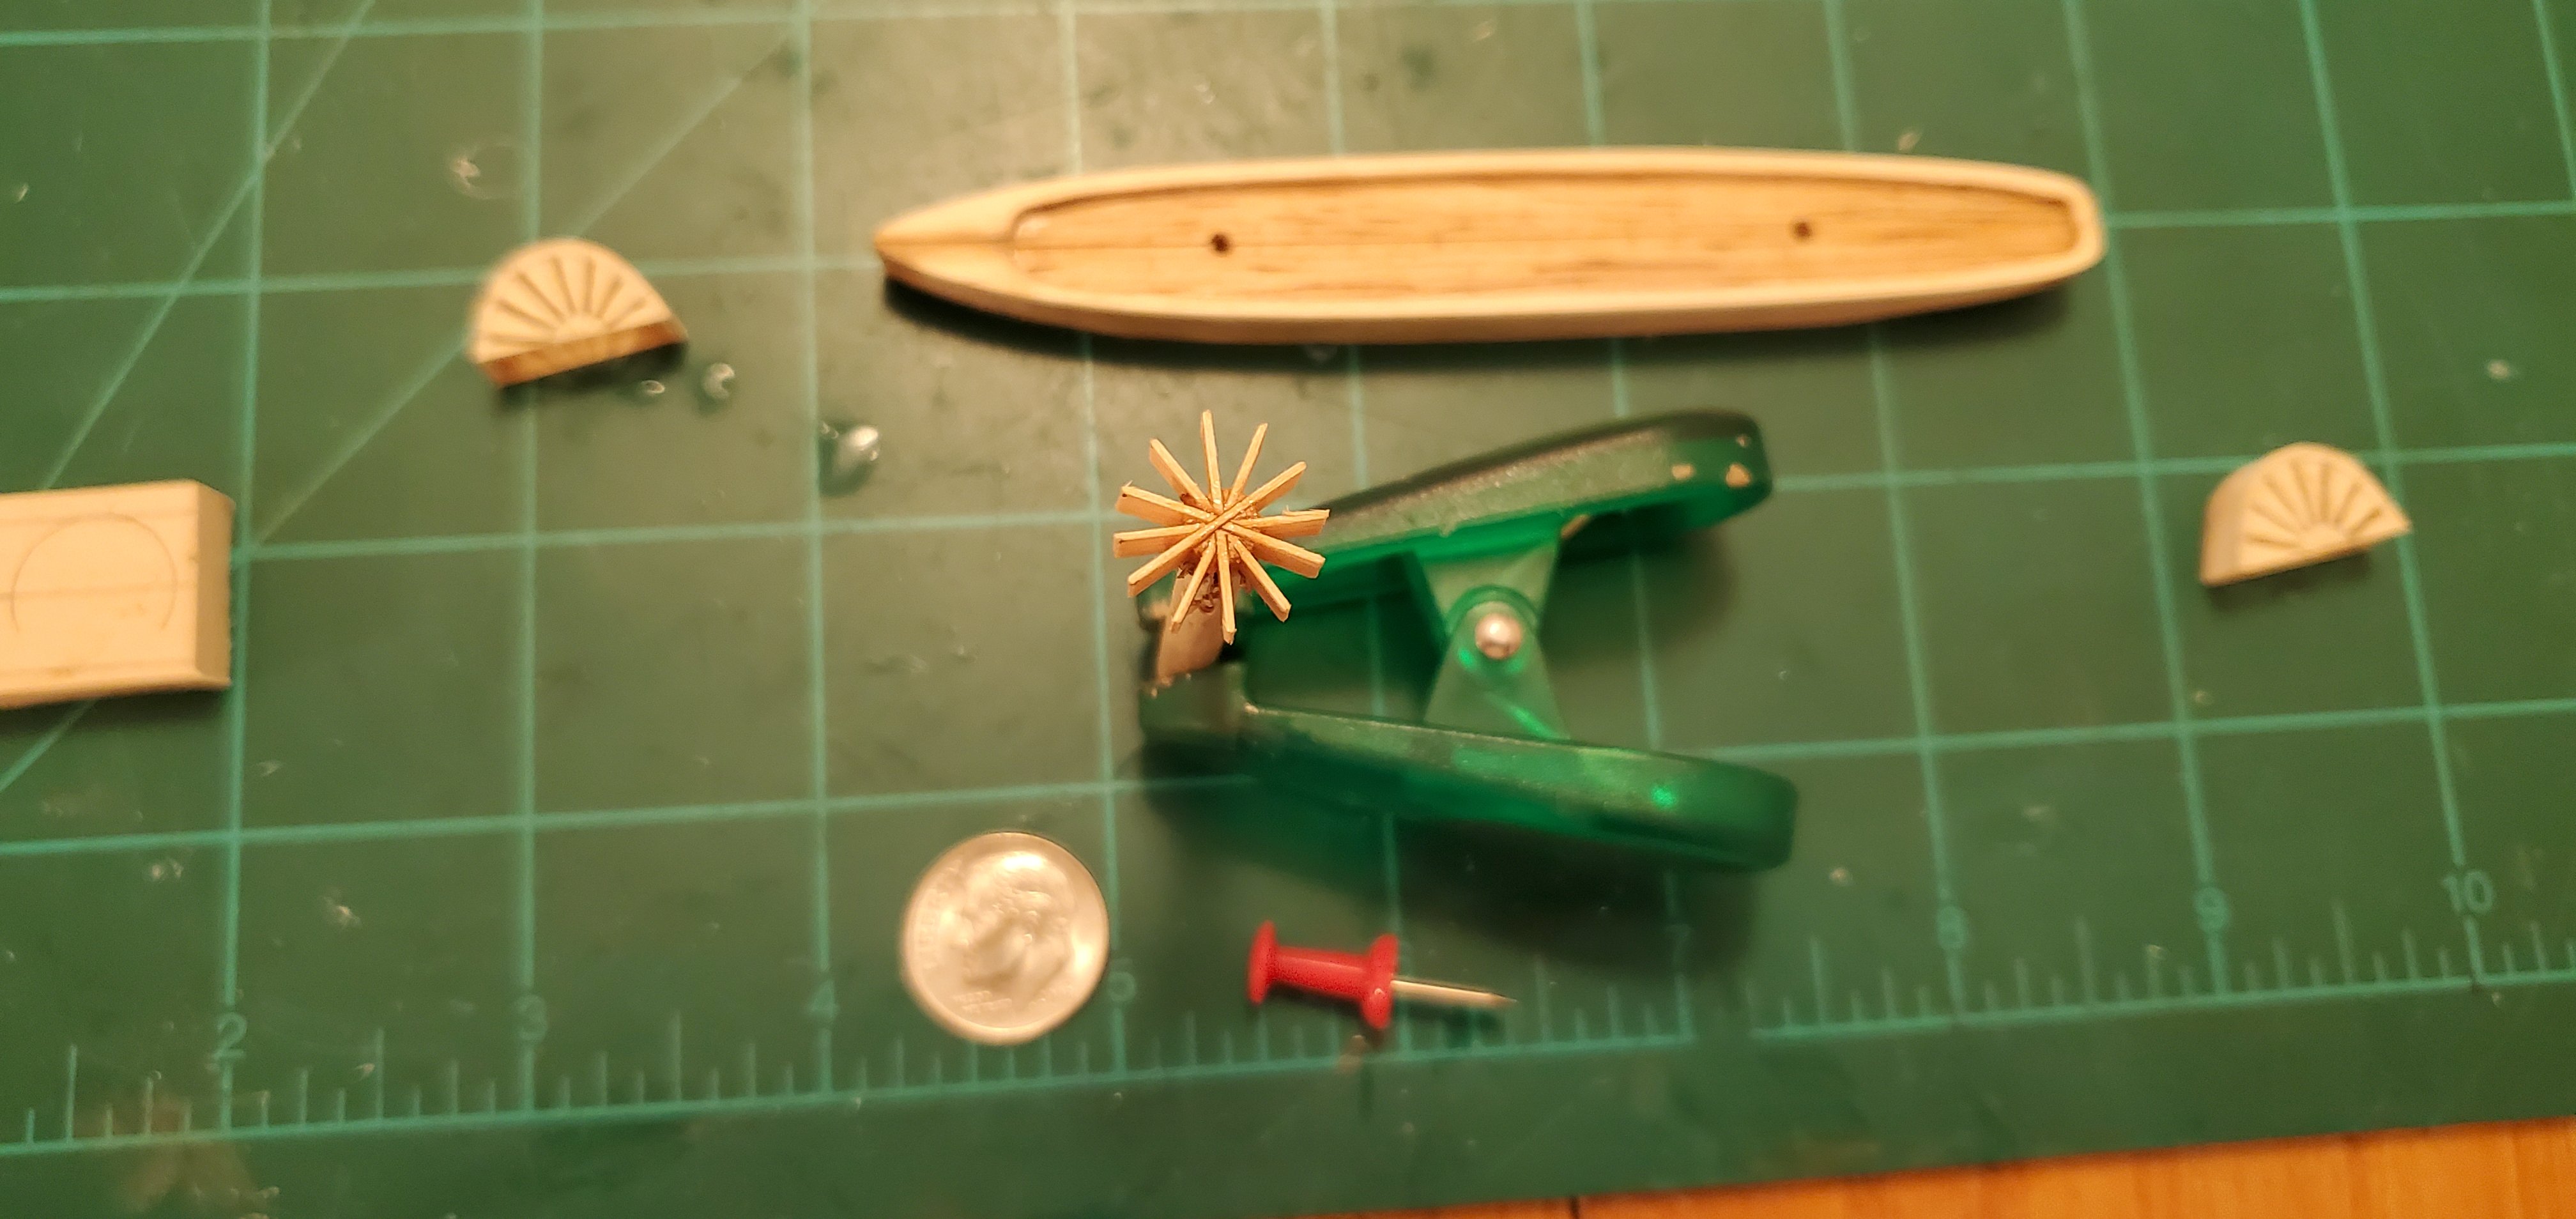
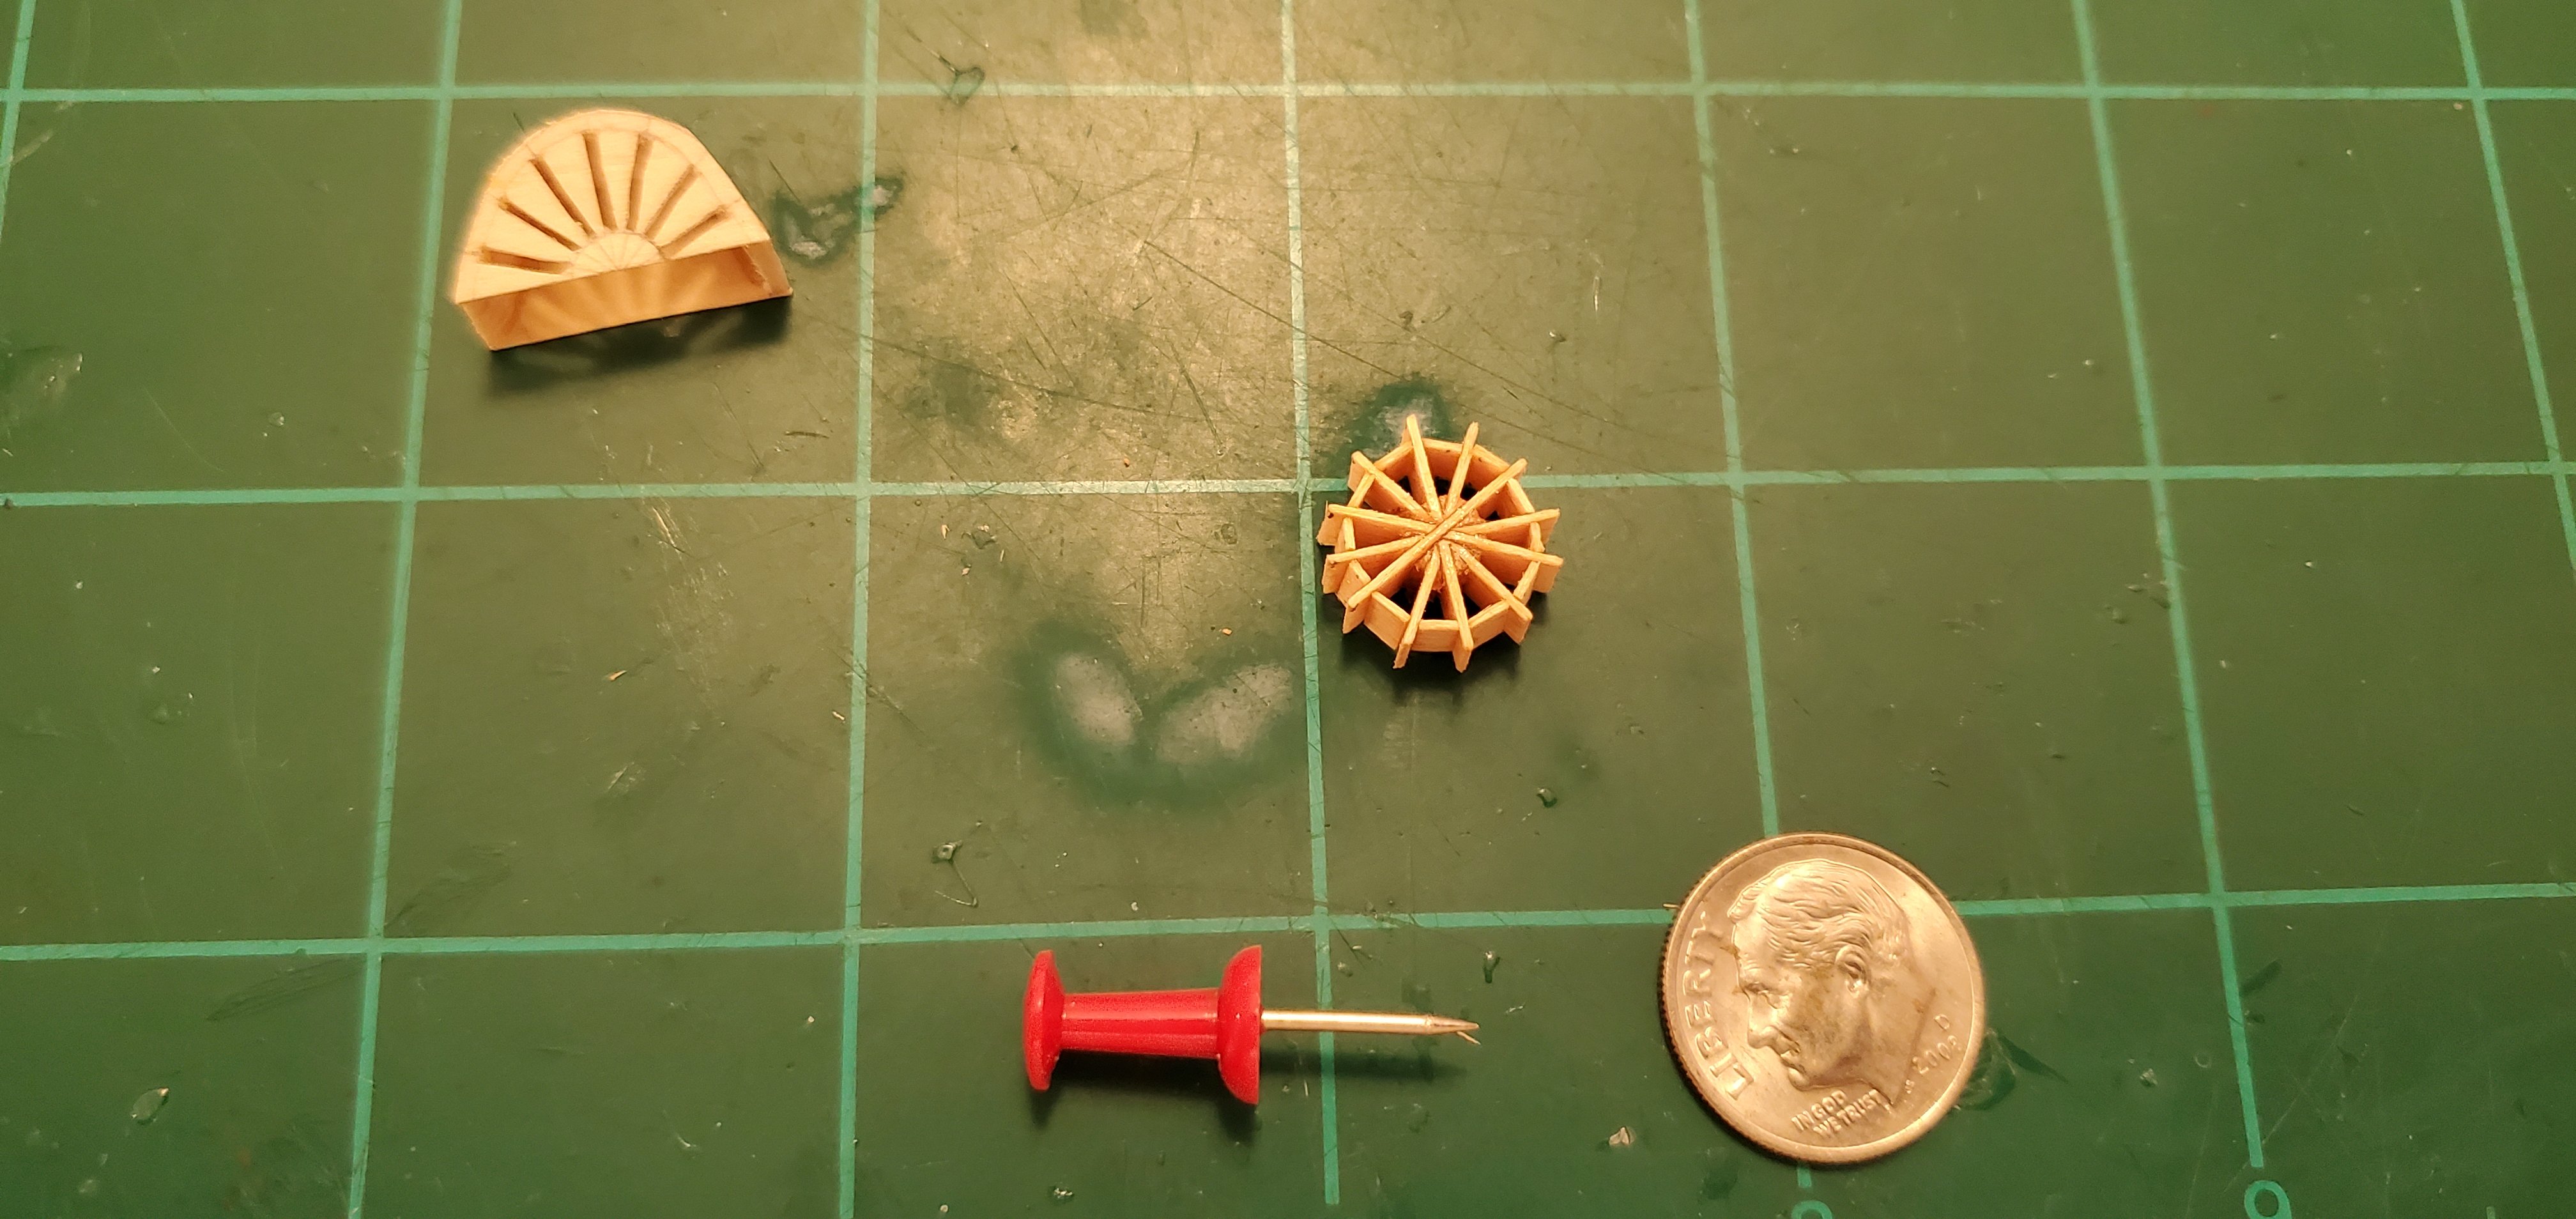
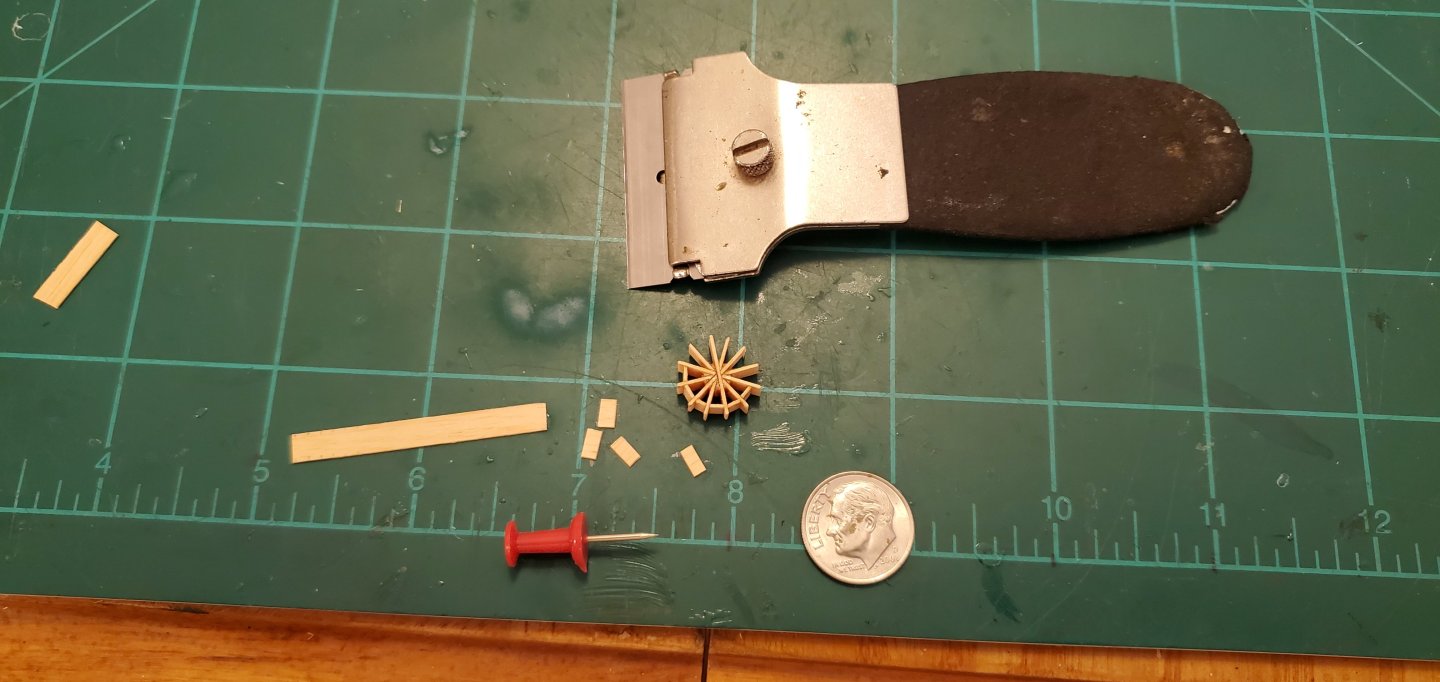
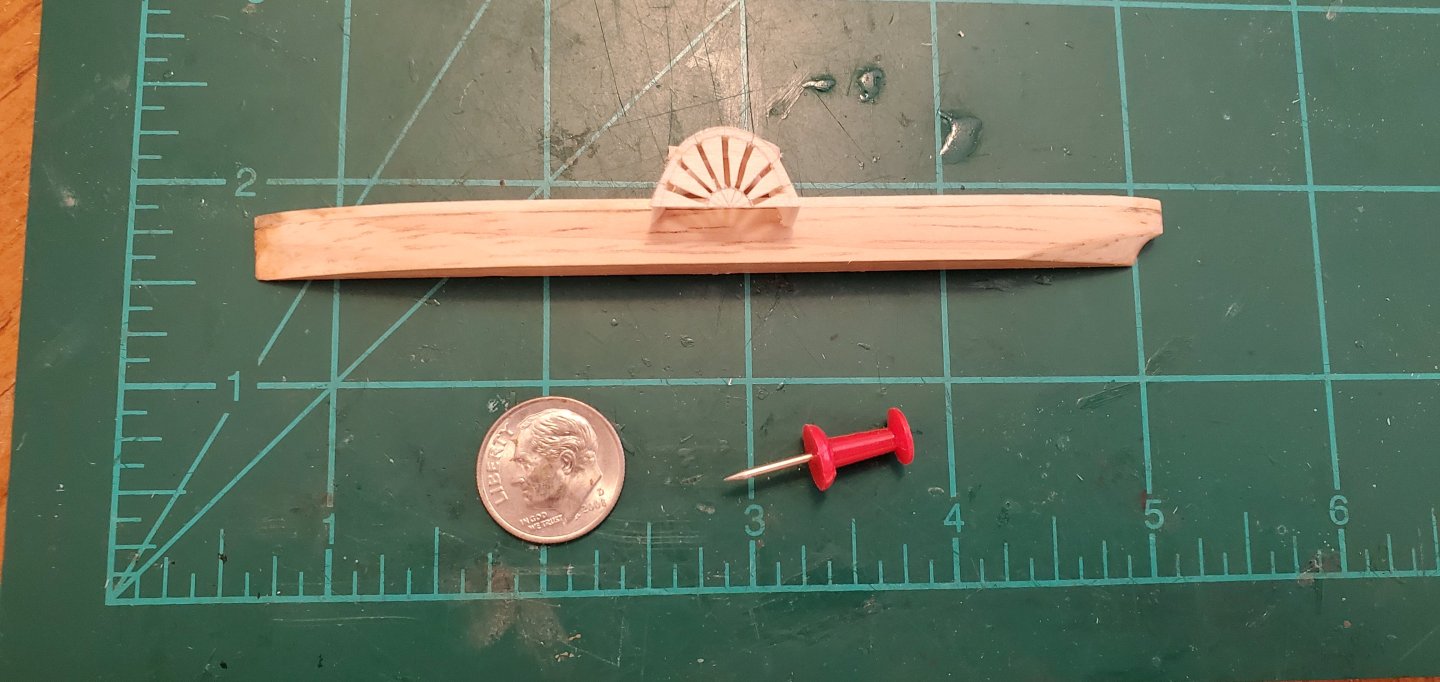
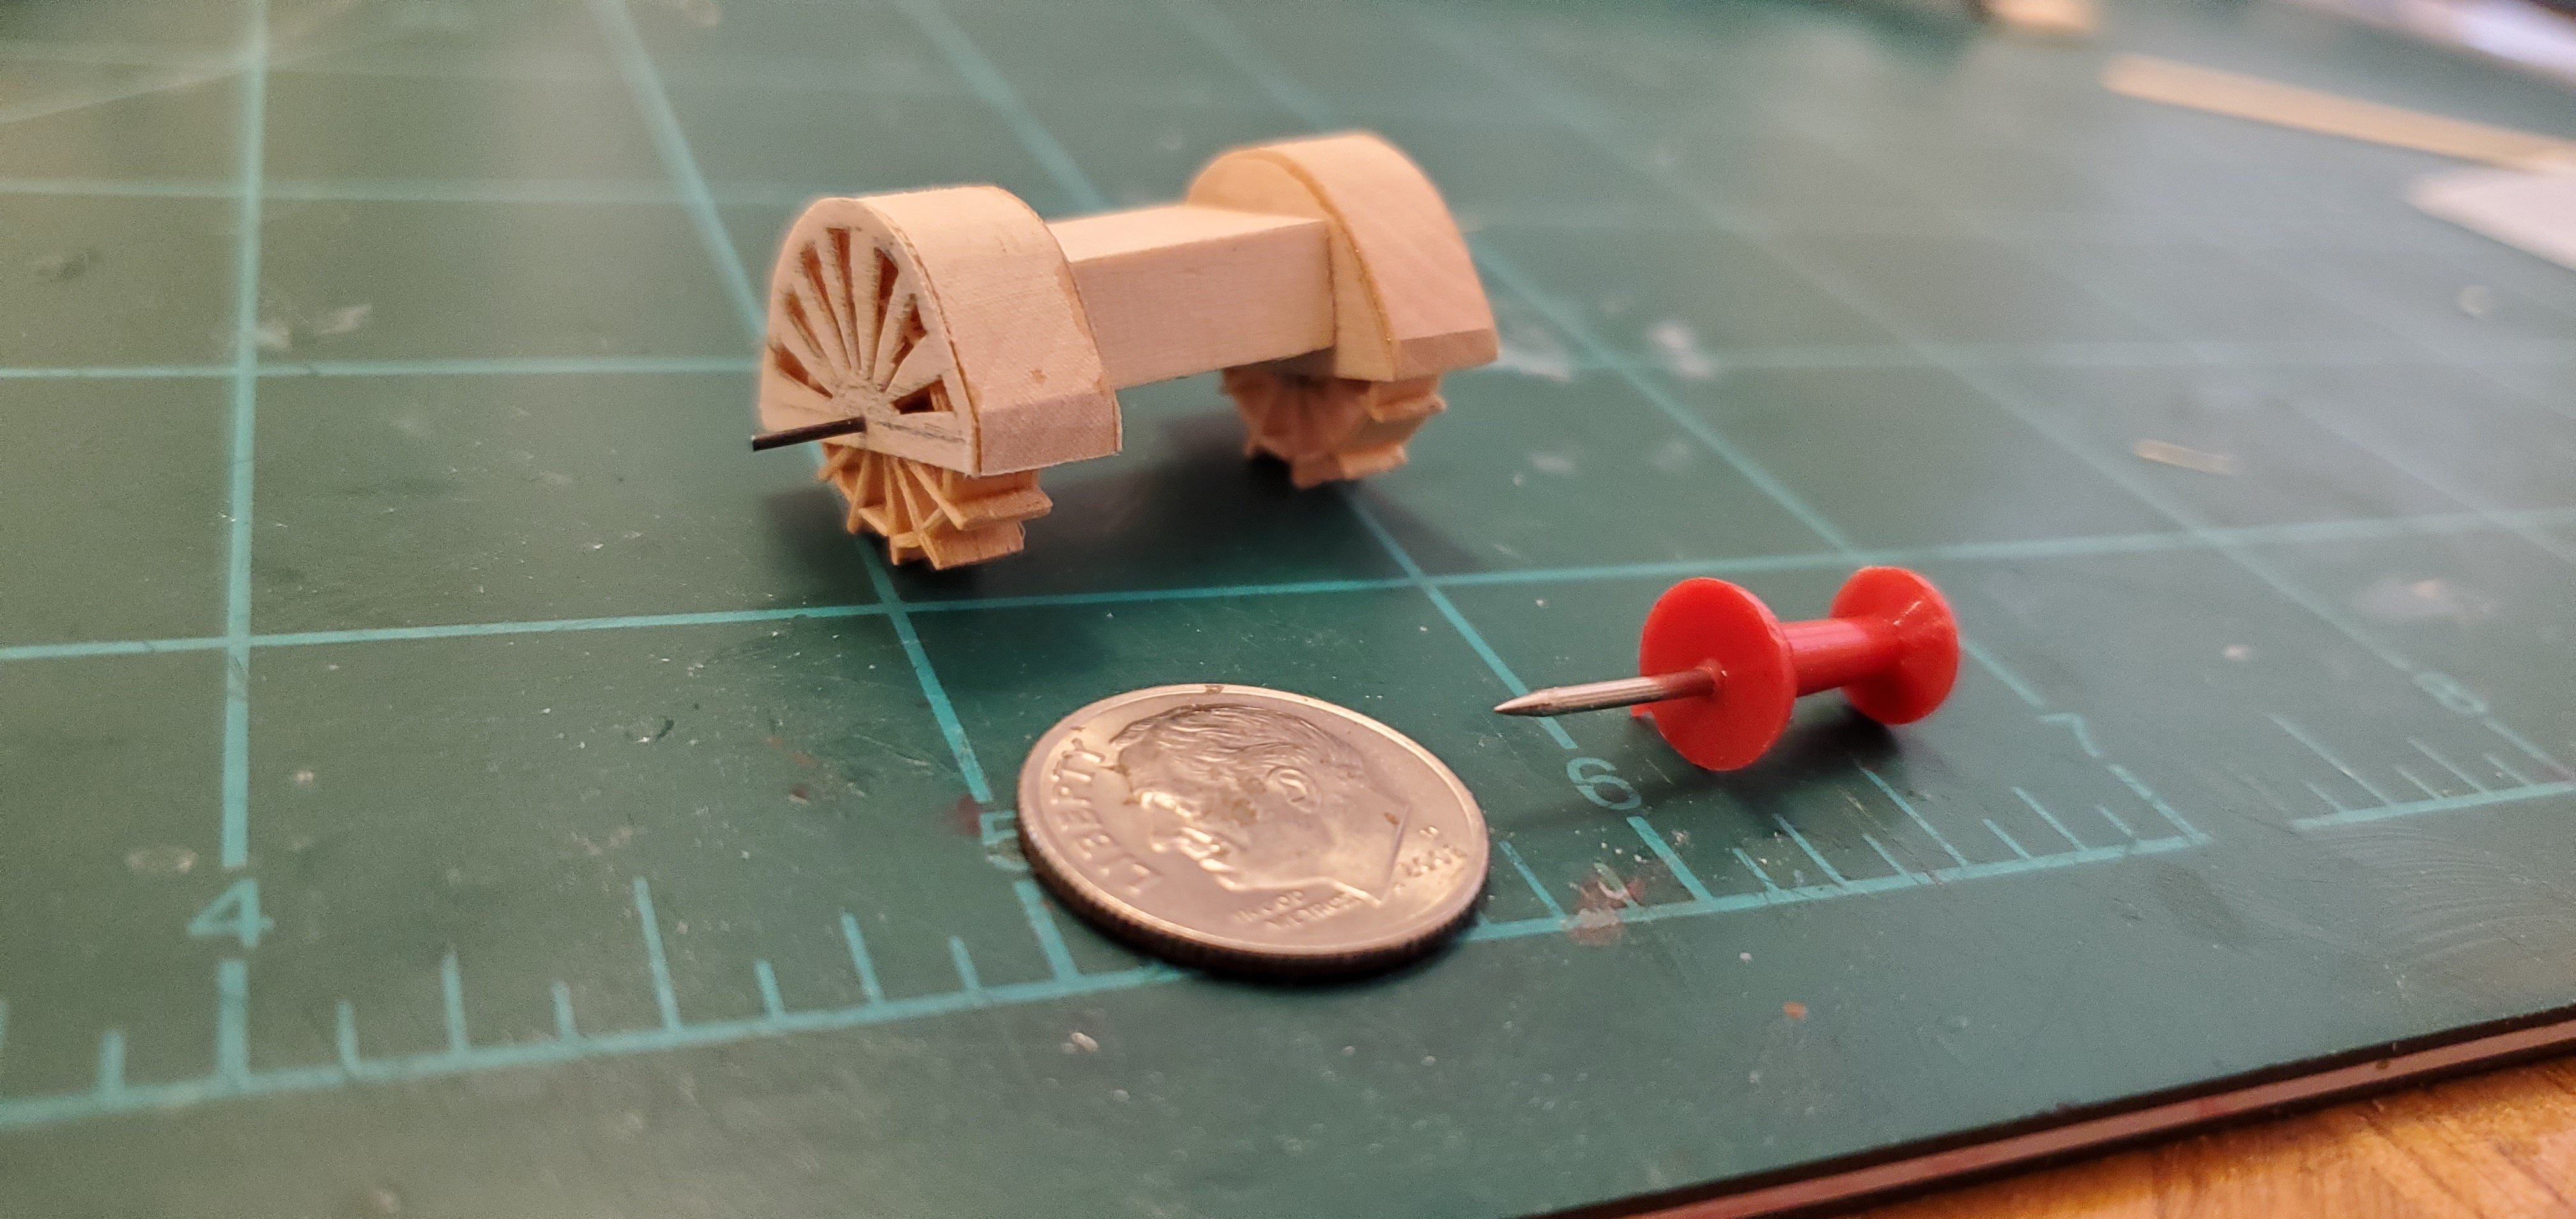
Thanks, Keith and Pat. I think y'all are being generous, but I'll take it! For the last few days, I've been bouncing around ideas in my head for how to make the paddle wheels, but couldn't come up with what I thought was a great plan. Finally, I said WTH and just started building one, kind of making it up as I went along. I started with a 3/16" dowel for the hub which I decided was a good diameter. Then for the blades, I scrounged around and didn't find anything around here really suitable. So I went to where I go when I'm desperate - my unstarted Artesania Latina kit for the USS Constellation. And there I found exactly what I was looking for. The planking strips are super thin (0.5mm) and the perfect width (5mm) to fit in the wheel housings I'd just completed. The pics below show the sequence of steps involved. First was to put the dowel into a vise and, using a fine kerf saw, cut a slot to slide the blade into. I did this one slot and one blade at a time. My original plan was to do 6 blades. With a hub of only 3/16", I figured that's all I had room for. But things went surprisingly well so I decided to try and double the number of blades to 12. Trying to go from good to better is usually when I get myself in deep trouble. But I closed my eyes and kept going! And somehow, things worked out pretty well. With a big sigh of relief, it was time for some tedious work - making the outer ring near the ends of the each blade. I didn't really have a plan for this either when I started, but I figured I'd try something with the planking strips again. I took one and cut a bunch of pieces that were about 2mm long purposely varying the length of each by a hair or two. Then it was a matter of trying different ones till I found the perfect fit between each blade, then inserting it. And the final result: I'm really happy with how the wheel turned out. Now I just have to do it again.
.thumb.jpg.59c8317ee89679827d8509b57e026001.jpg)


- 235 replies
-
- 16
-
-
-
- Banshee II
- Bottle
- (and 1 more)
-
HMCSS Victoria 1855 by BANYAN - 1:72
Glen McGuire replied to BANYAN's topic in - Build logs for subjects built 1851 - 1900
Doesn't look like luck to me. Very high skill required to get the results I see. Superb work, Pat.- 1,013 replies
-
- 4
-
-
- gun dispatch vessel
- victoria
- (and 2 more)
-
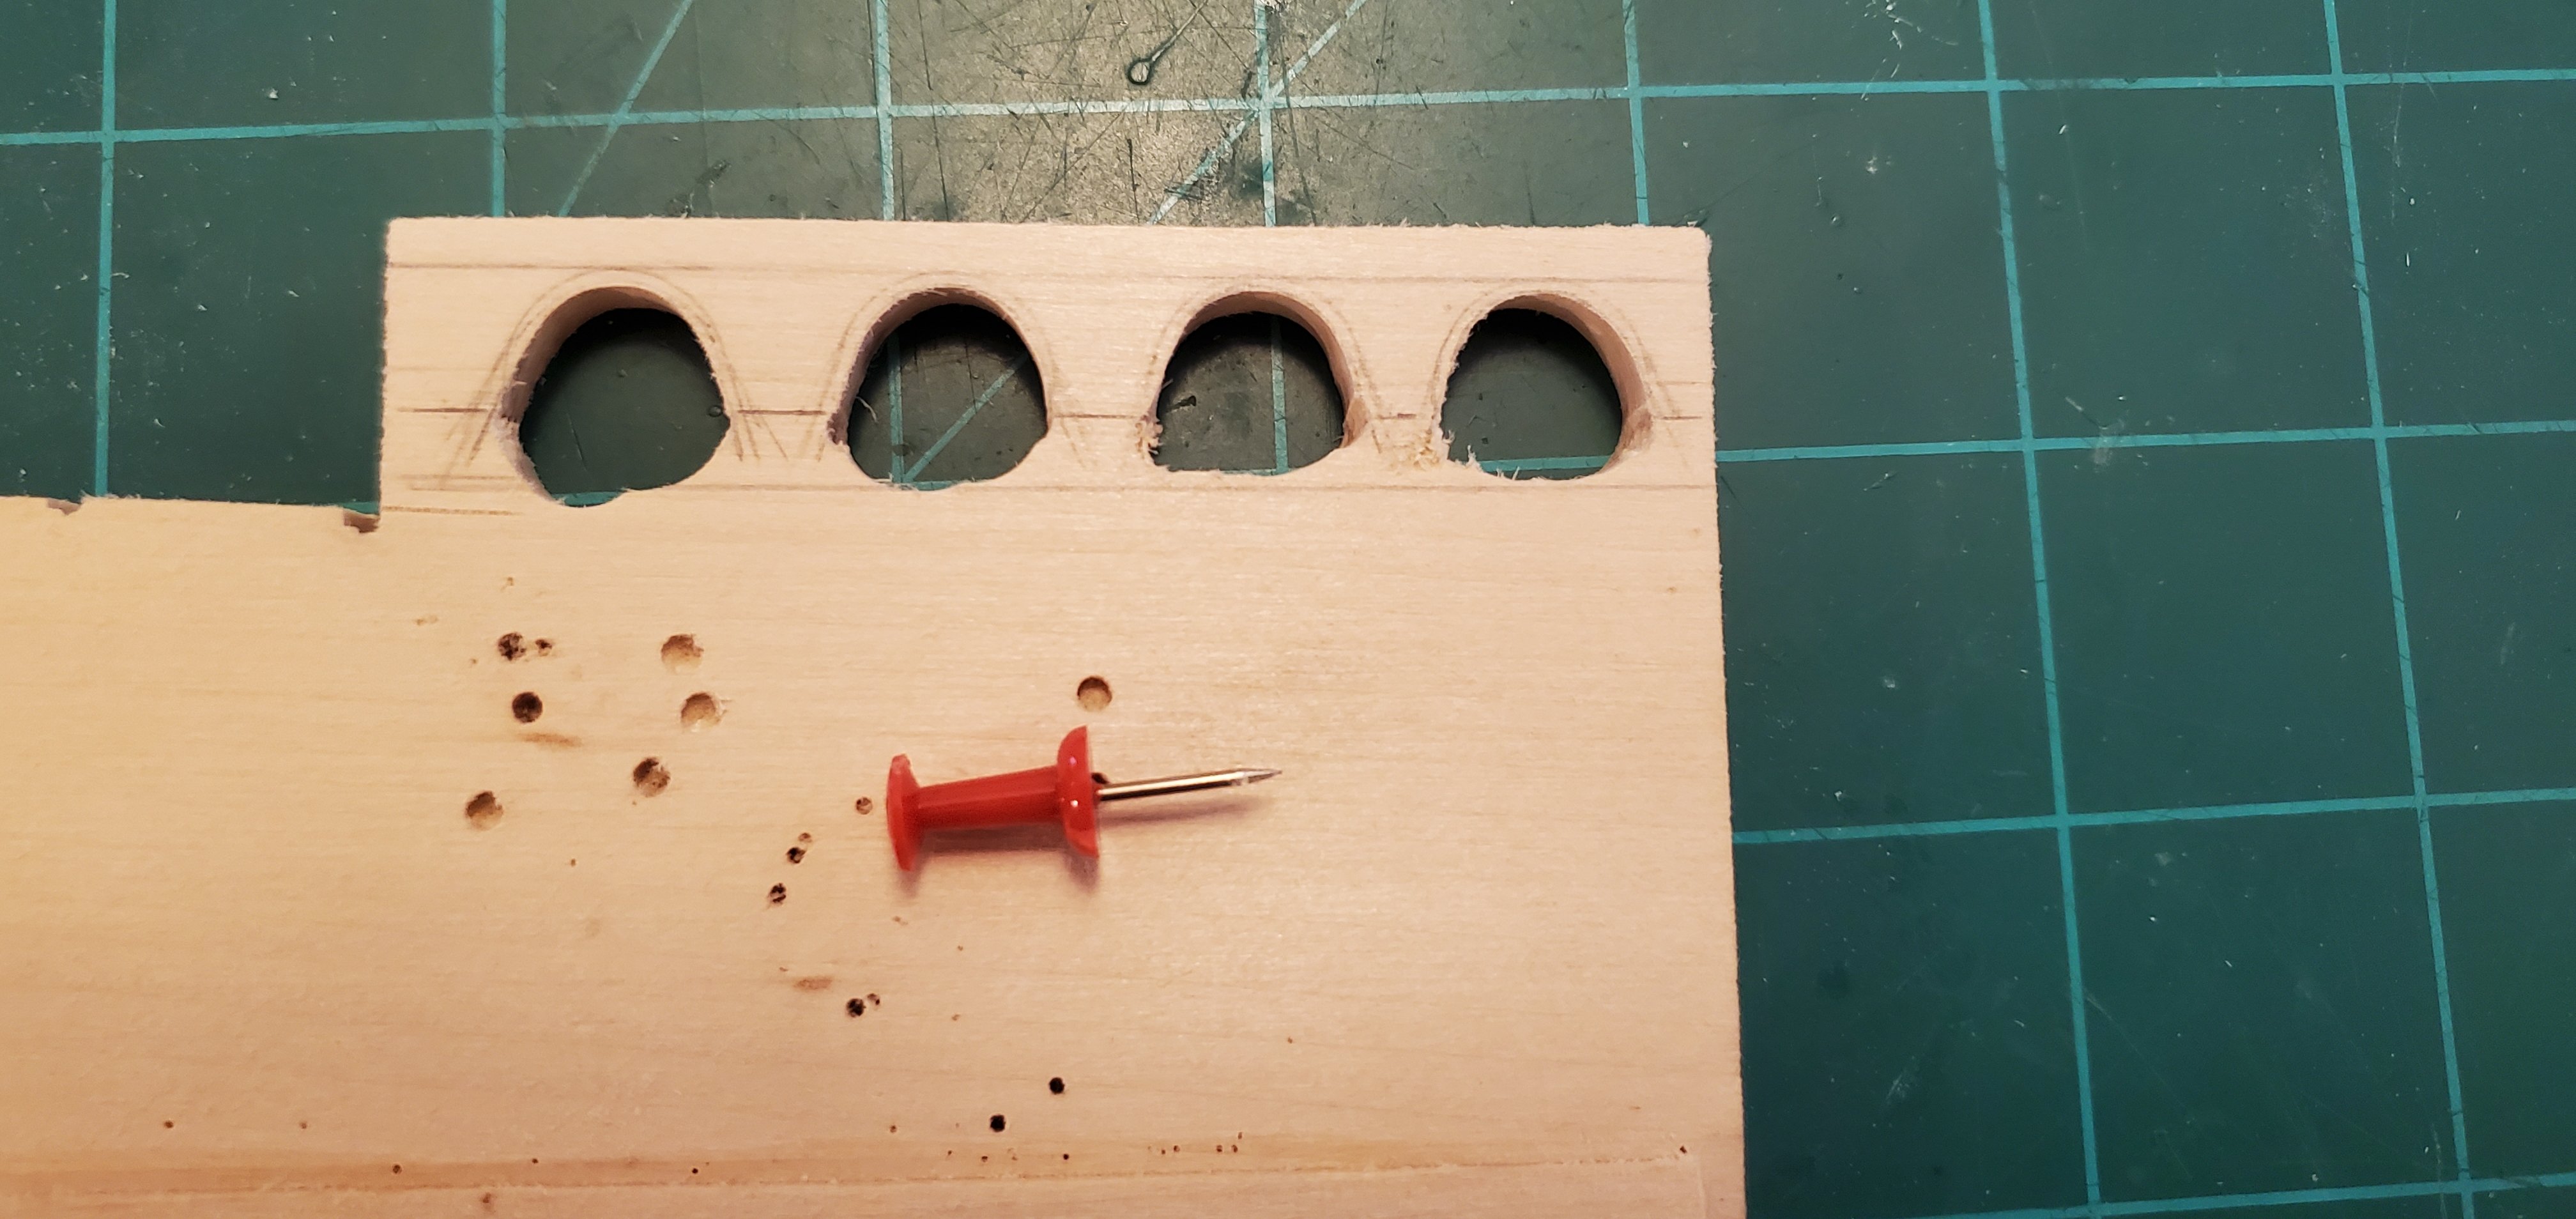
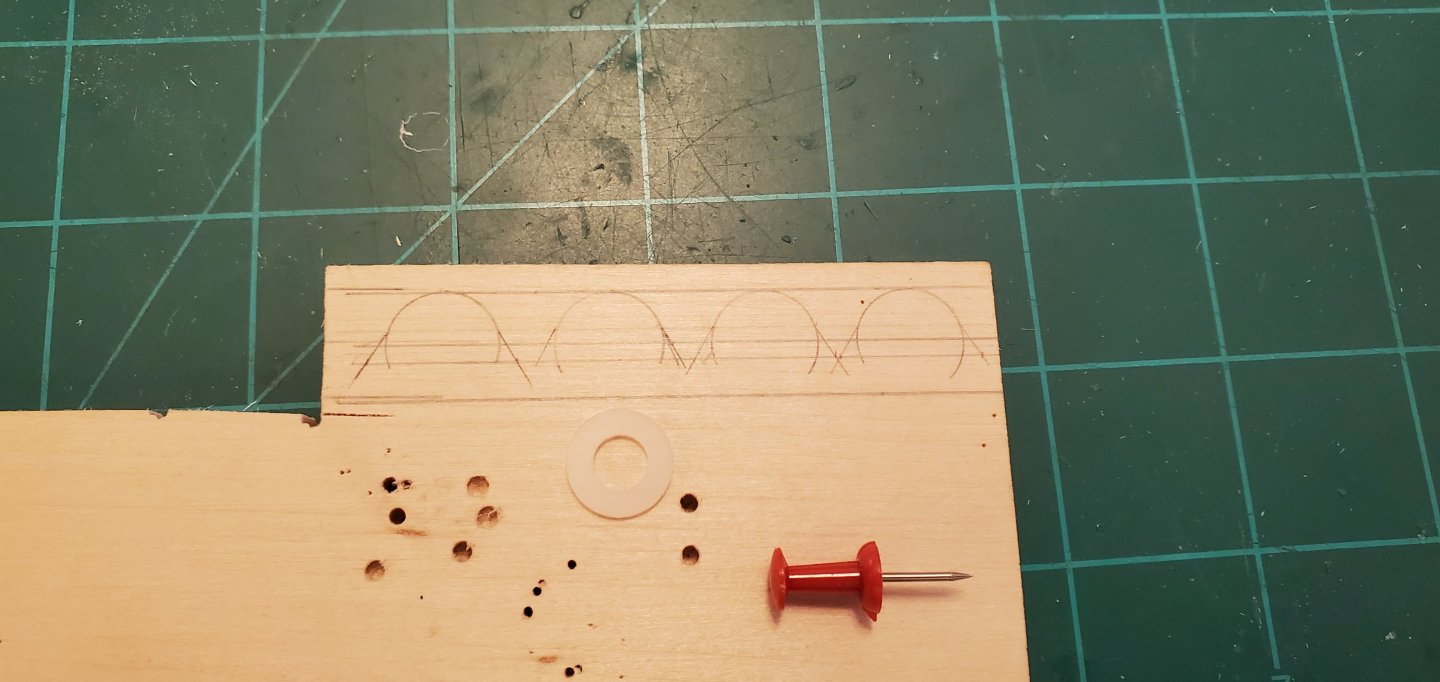
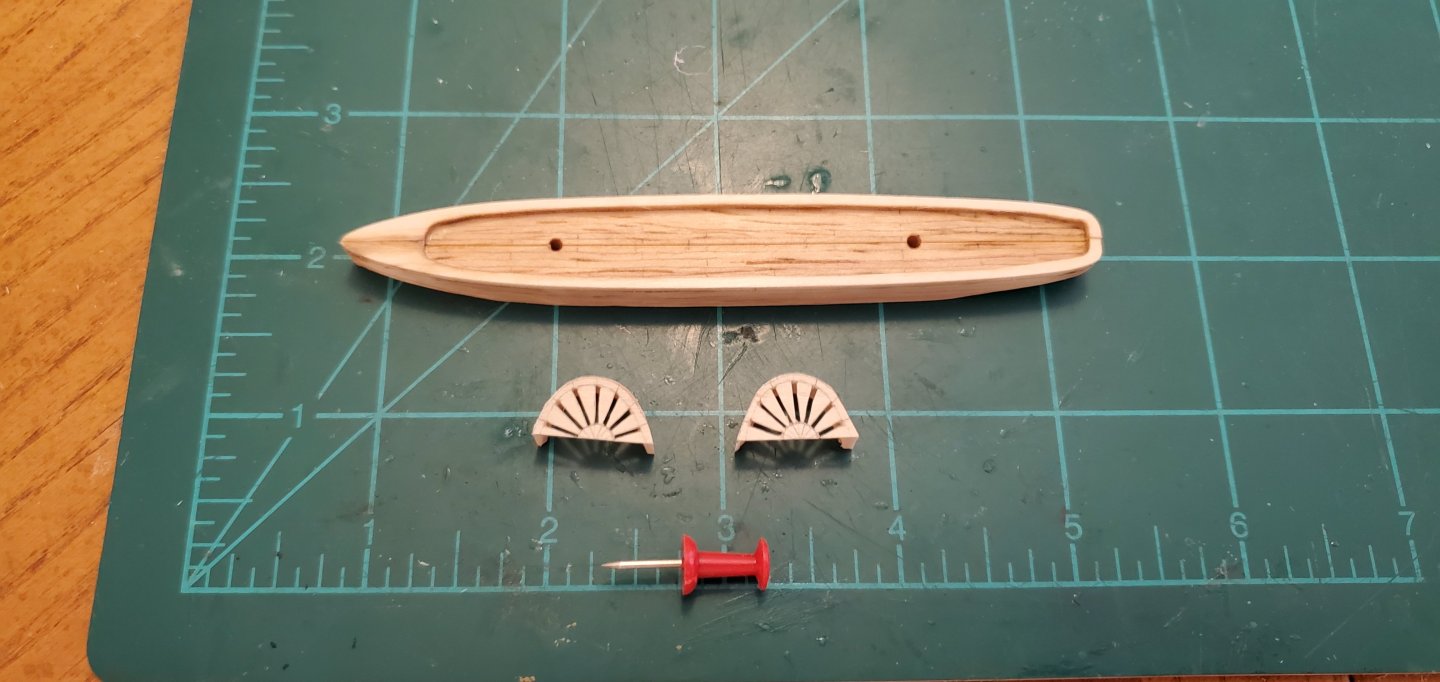
I ordered some of the Bare-Metal foil that @Landlubber Mike suggested. Thank you, Mike! While waiting for it to arrive, it's time to take on the first real challenge - the sidewheels. I'm starting with the housing that covers the actual wheels. The first chore was making the semi-circle part that covers the top half of the wheels. I penciled them on a 1/4" thick piece of basswood, reamed out the middle, cut them out, and sanded to their final shape. You can see I began making 4, expecting a yield of 50%, which turned out to be right. Next step was the side covers. They were relatively easy to cut, but carving out the vent slots was a bit of a challenge. They did not come out perfect, but I think they will do. Everything in the last pic above will be covered in the Bare-Metal foil and painted gray.


- 235 replies
-
- 18
-
-
-
- Banshee II
- Bottle
- (and 1 more)
-
I know it would be more trouble, but I vote for the old and grungy weathered look!
- 57 replies
-
- 6
-
-
- live steam
- radio
- (and 2 more)
-
That looks interesting! Thanks, Mike. I'll check into it. And thanks for following along! Always appreciate your insight and comments.
- 235 replies
-
- 4
-
-
- Banshee II
- Bottle
- (and 1 more)
-
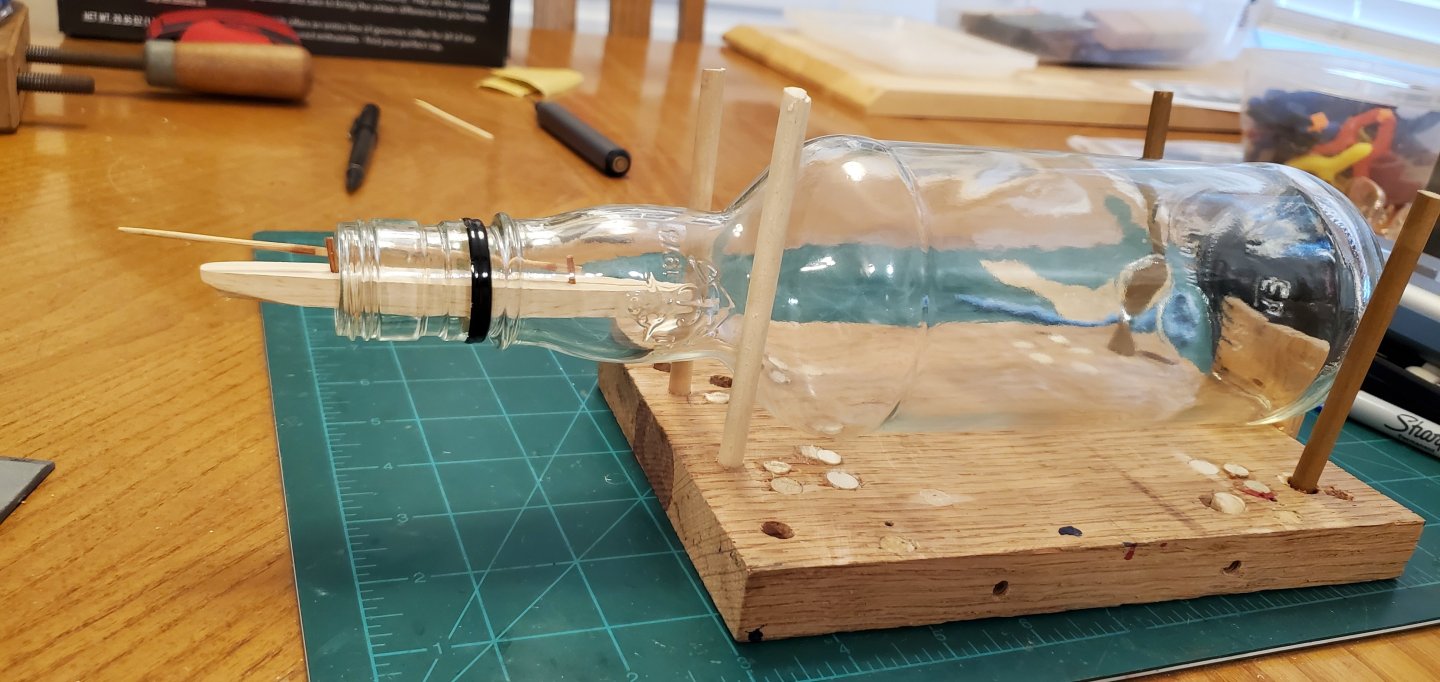
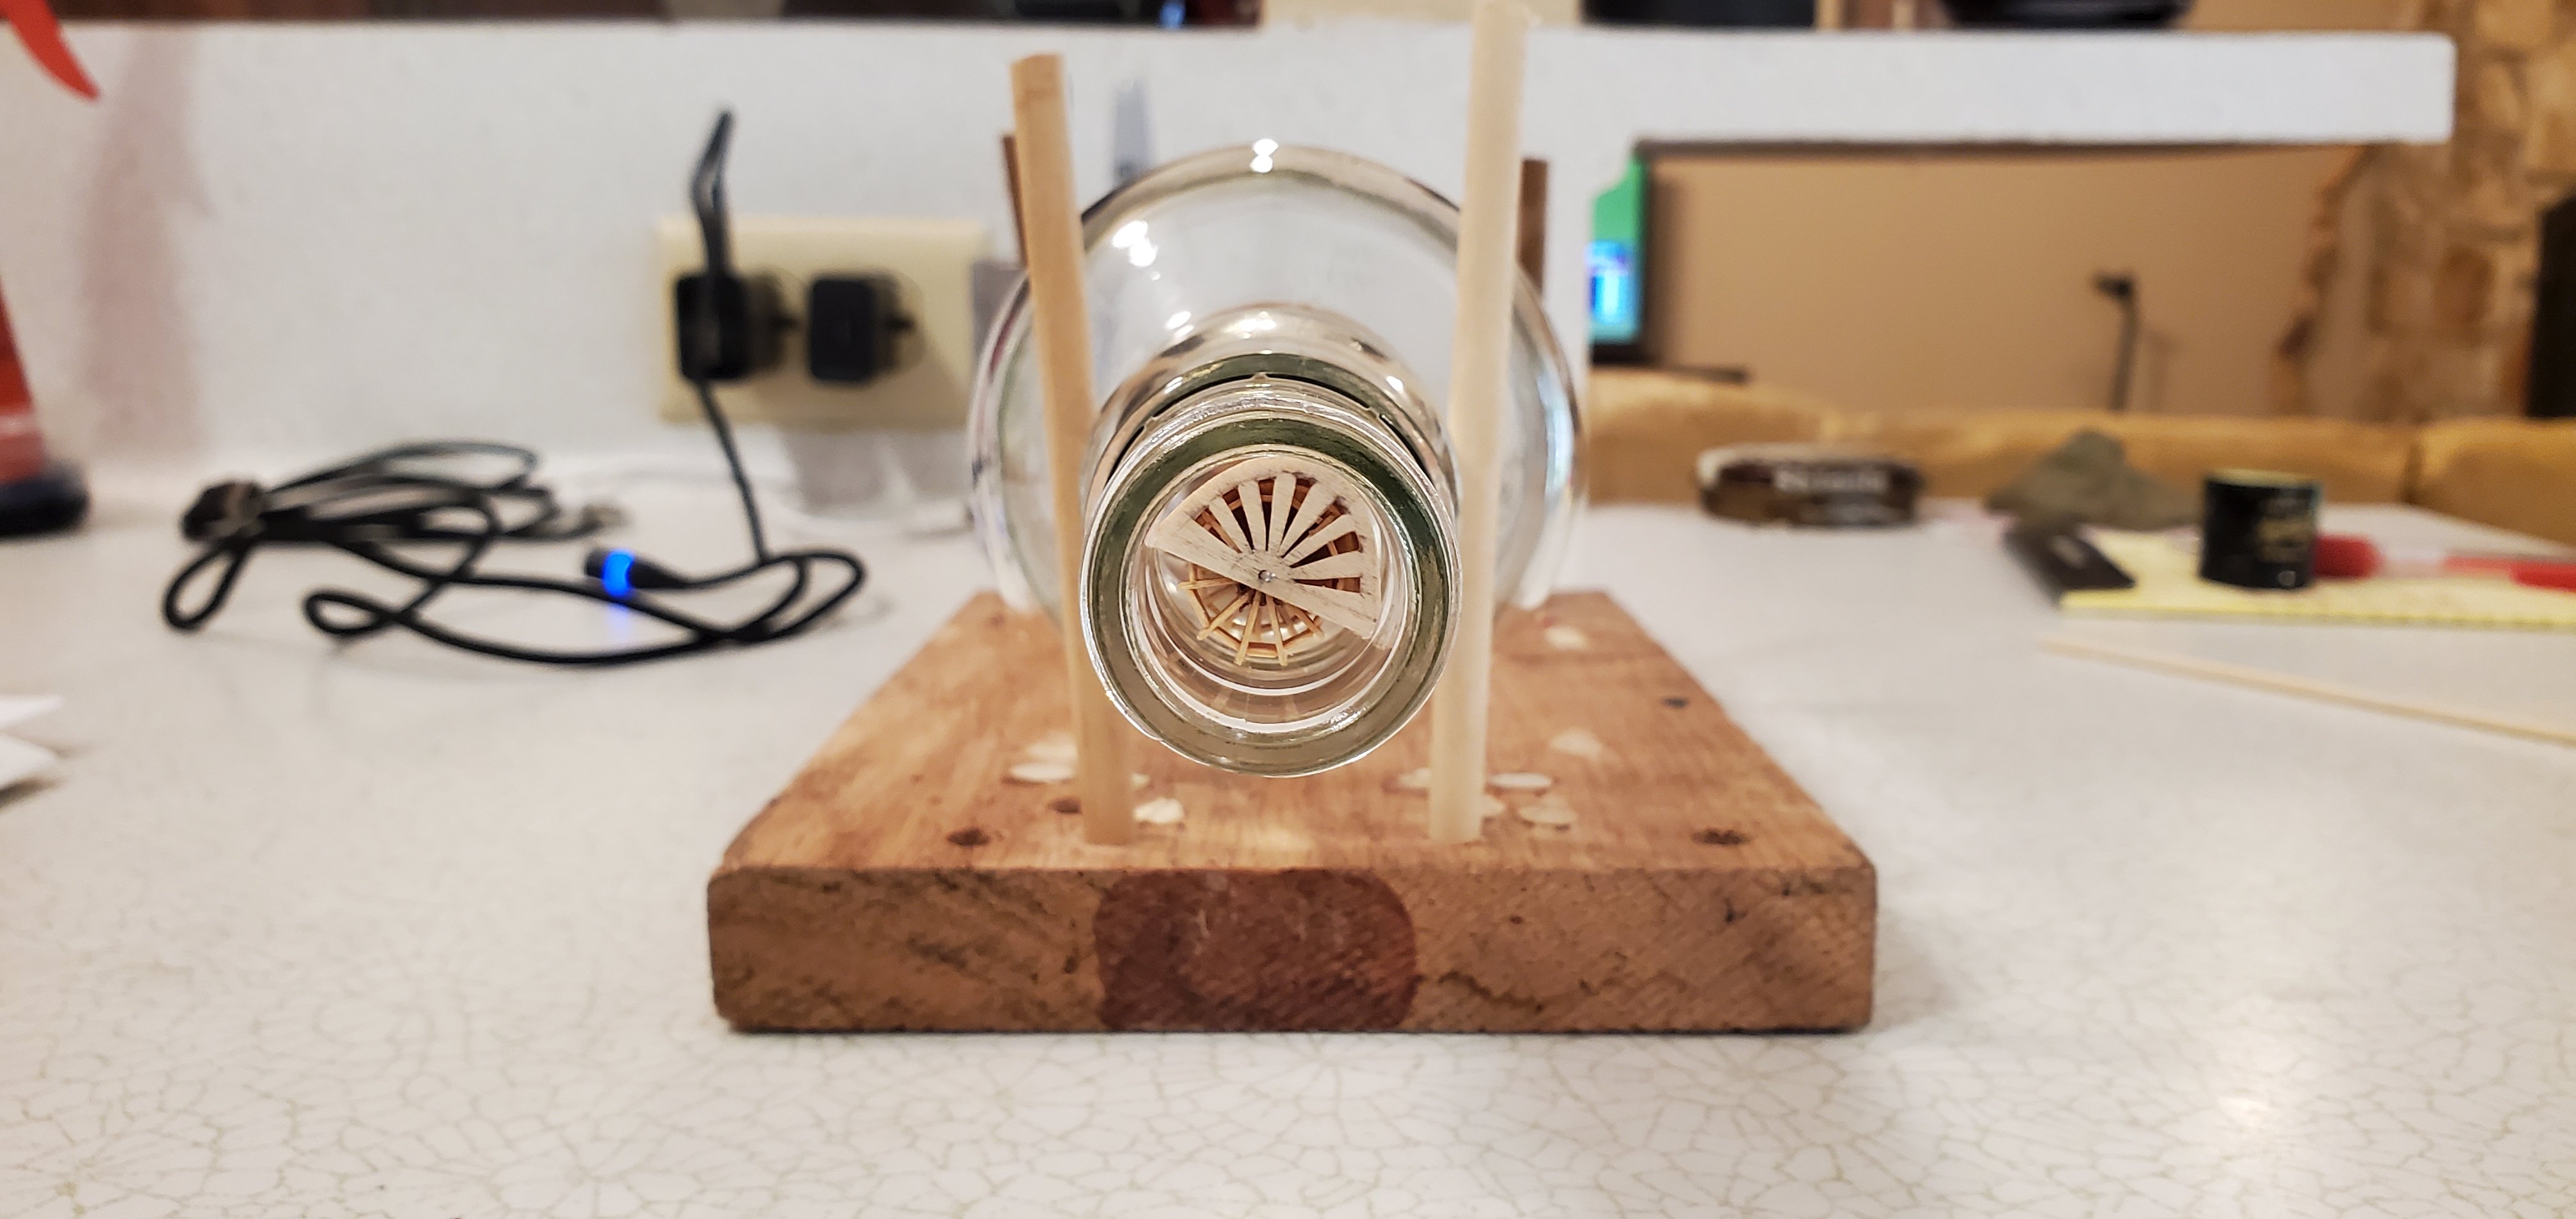
No doubt, Keith. No matter what I do, it seems all my ships end up scraping the inside of the bottle's neck when I put them in. A reflection on my design and planning skills. ☹️☹️☹️ Regarding the stacks, the plan right now is to install them (and the crosswalk structure between them) after the ship is in the bottle.
- 235 replies
-
- 4
-
-
- Banshee II
- Bottle
- (and 1 more)
-
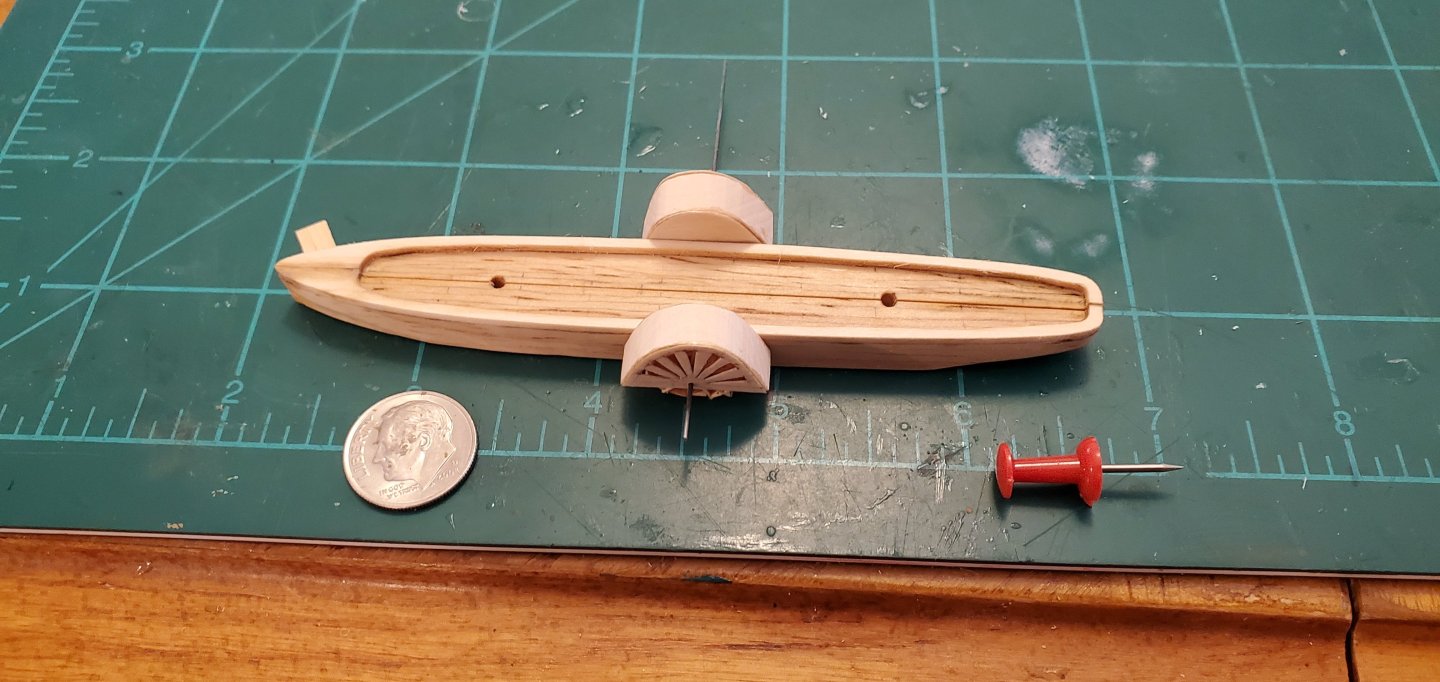
Hey Keith! It's definitely the largest ship I've tried to build so far. Most of my previous hulls have been 3" - 3.5" in length, except for the quadrireme which was about 4". This one is 4.5" in length and 5/8" in width. When I add the sidewheels, it will be 1 1/8" in width, thus the need to split the hull. The good news is that it's a fairly easy fit (right now) even thru Sailor Jerry's narrow bottle opening.
- 235 replies
-
- 11
-
-
-
- Banshee II
- Bottle
- (and 1 more)
-
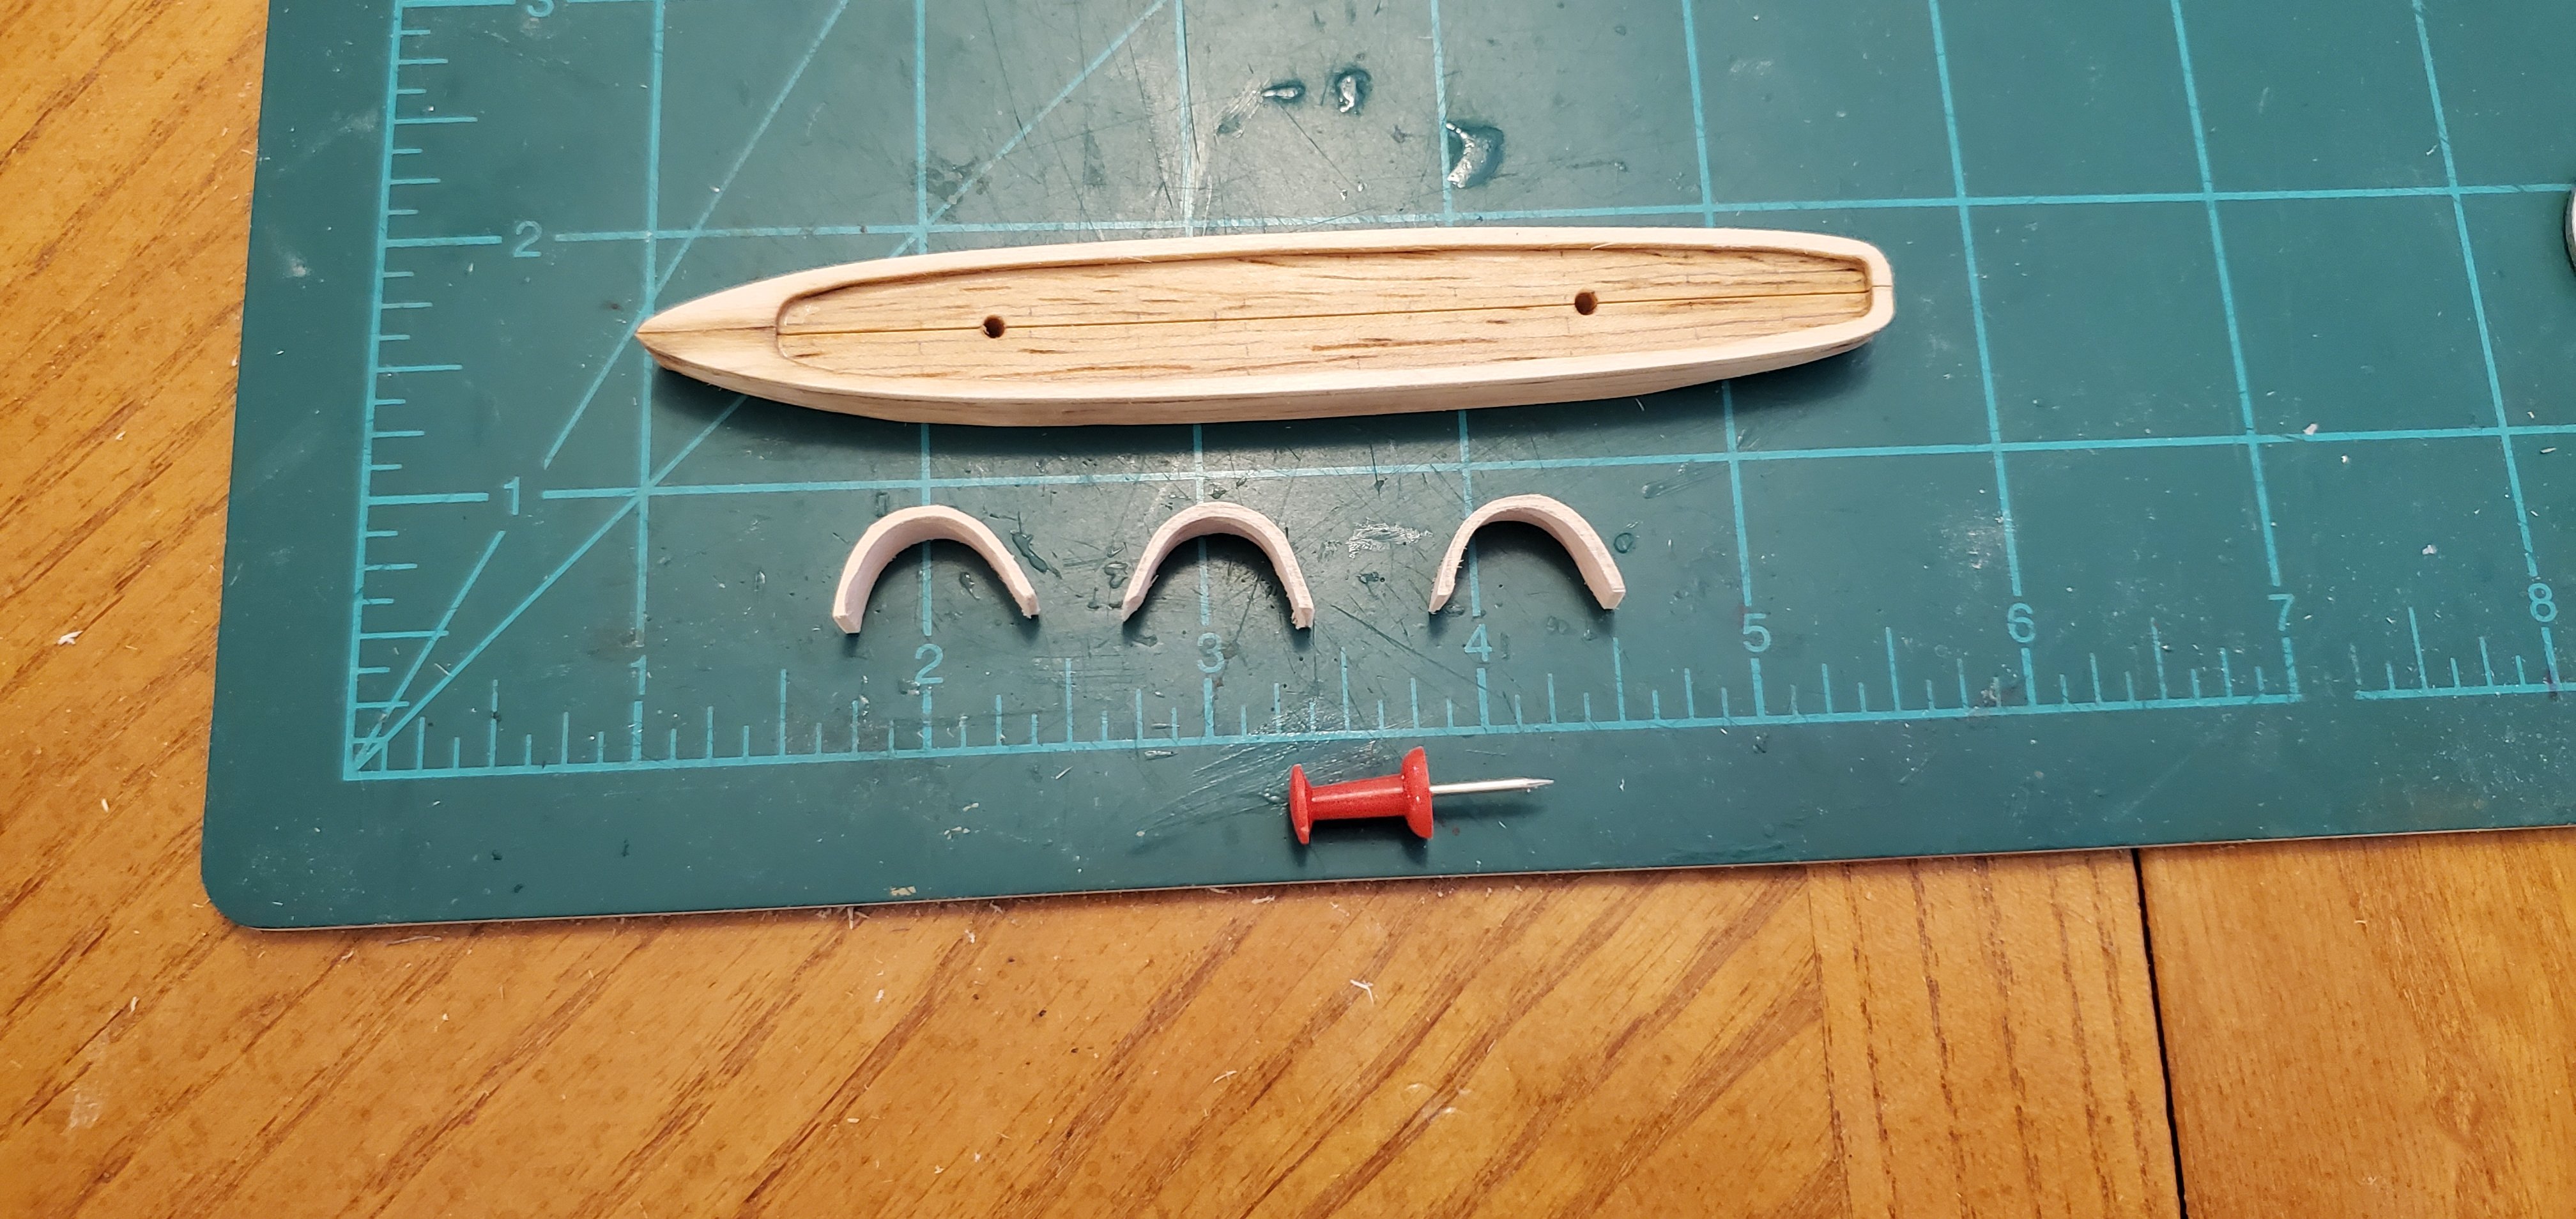
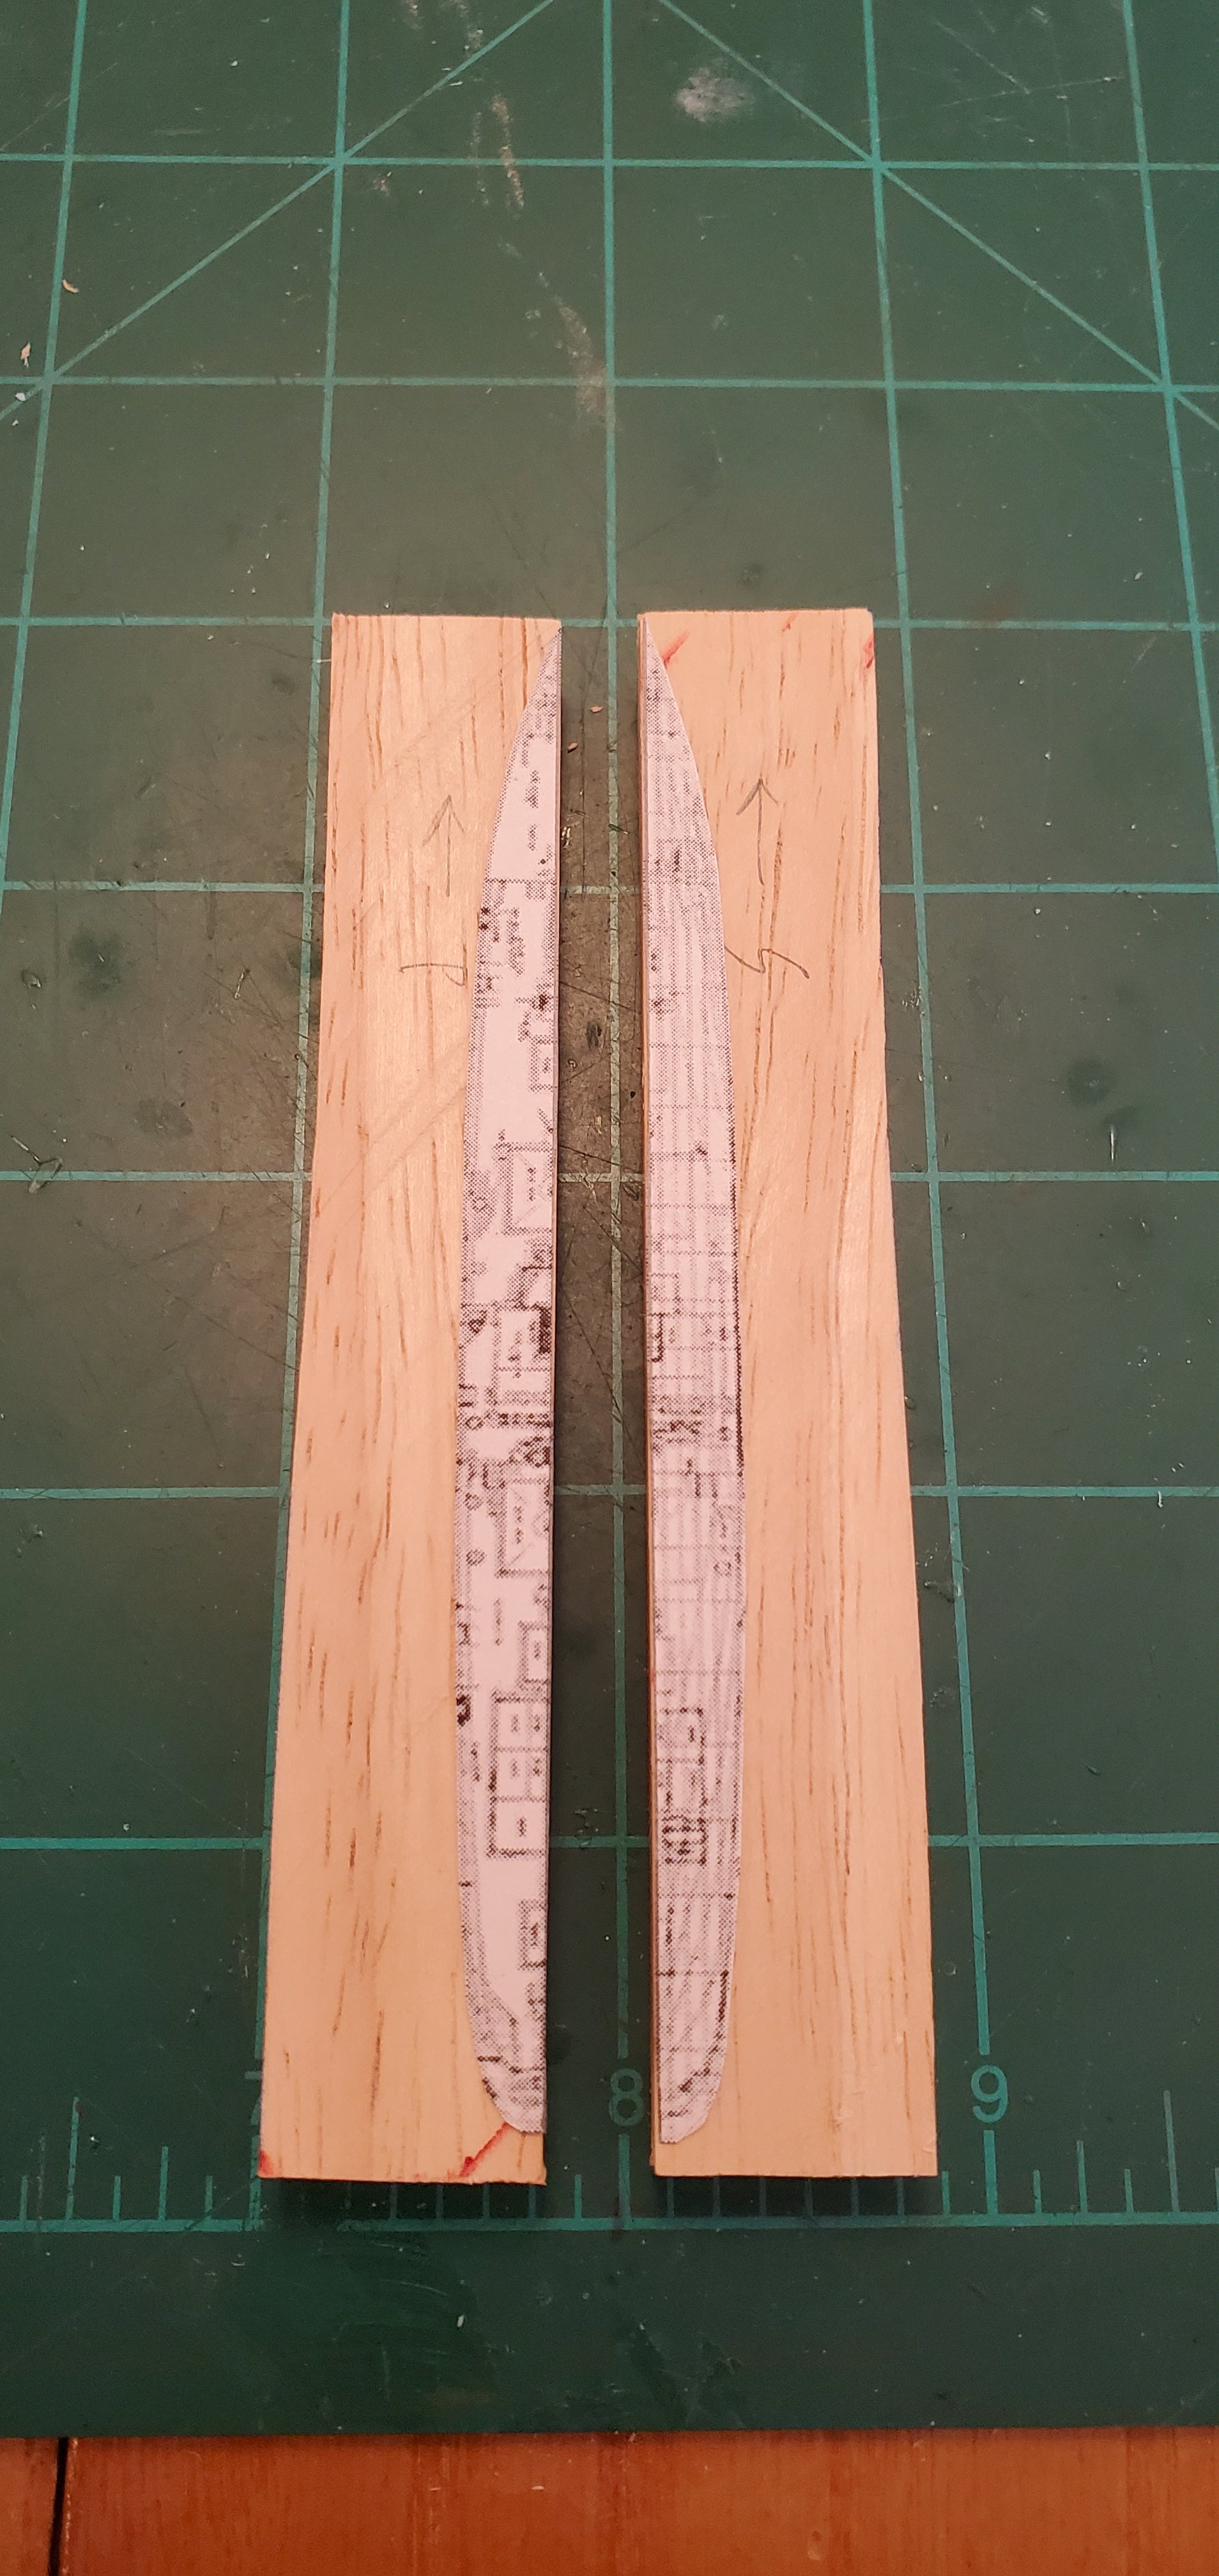
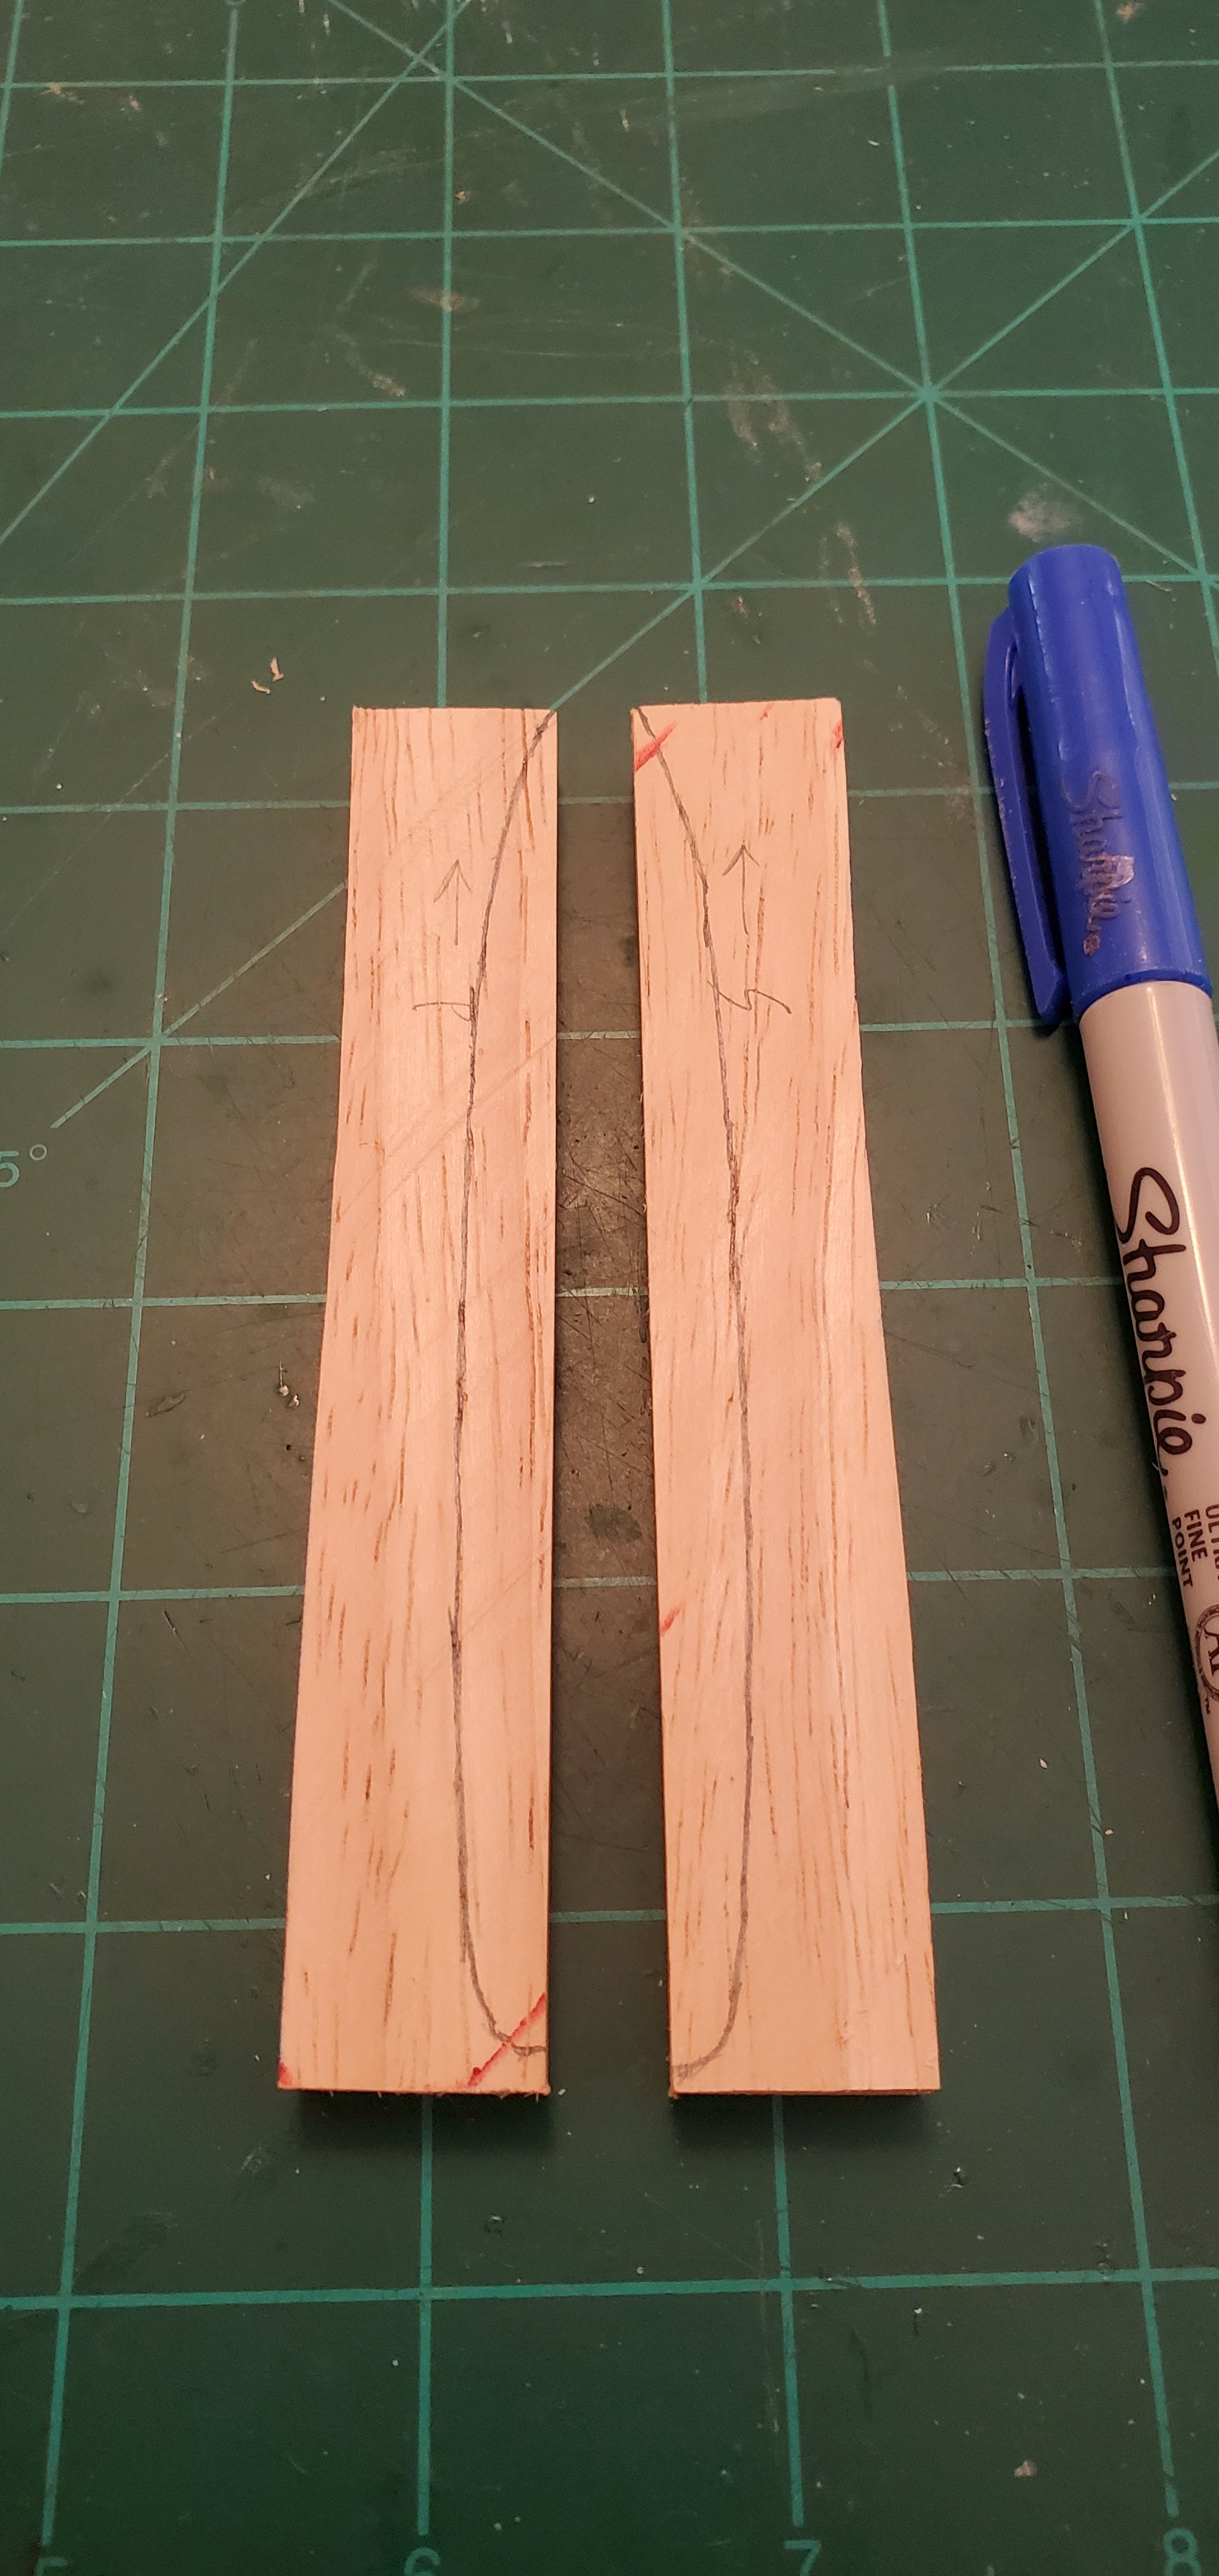
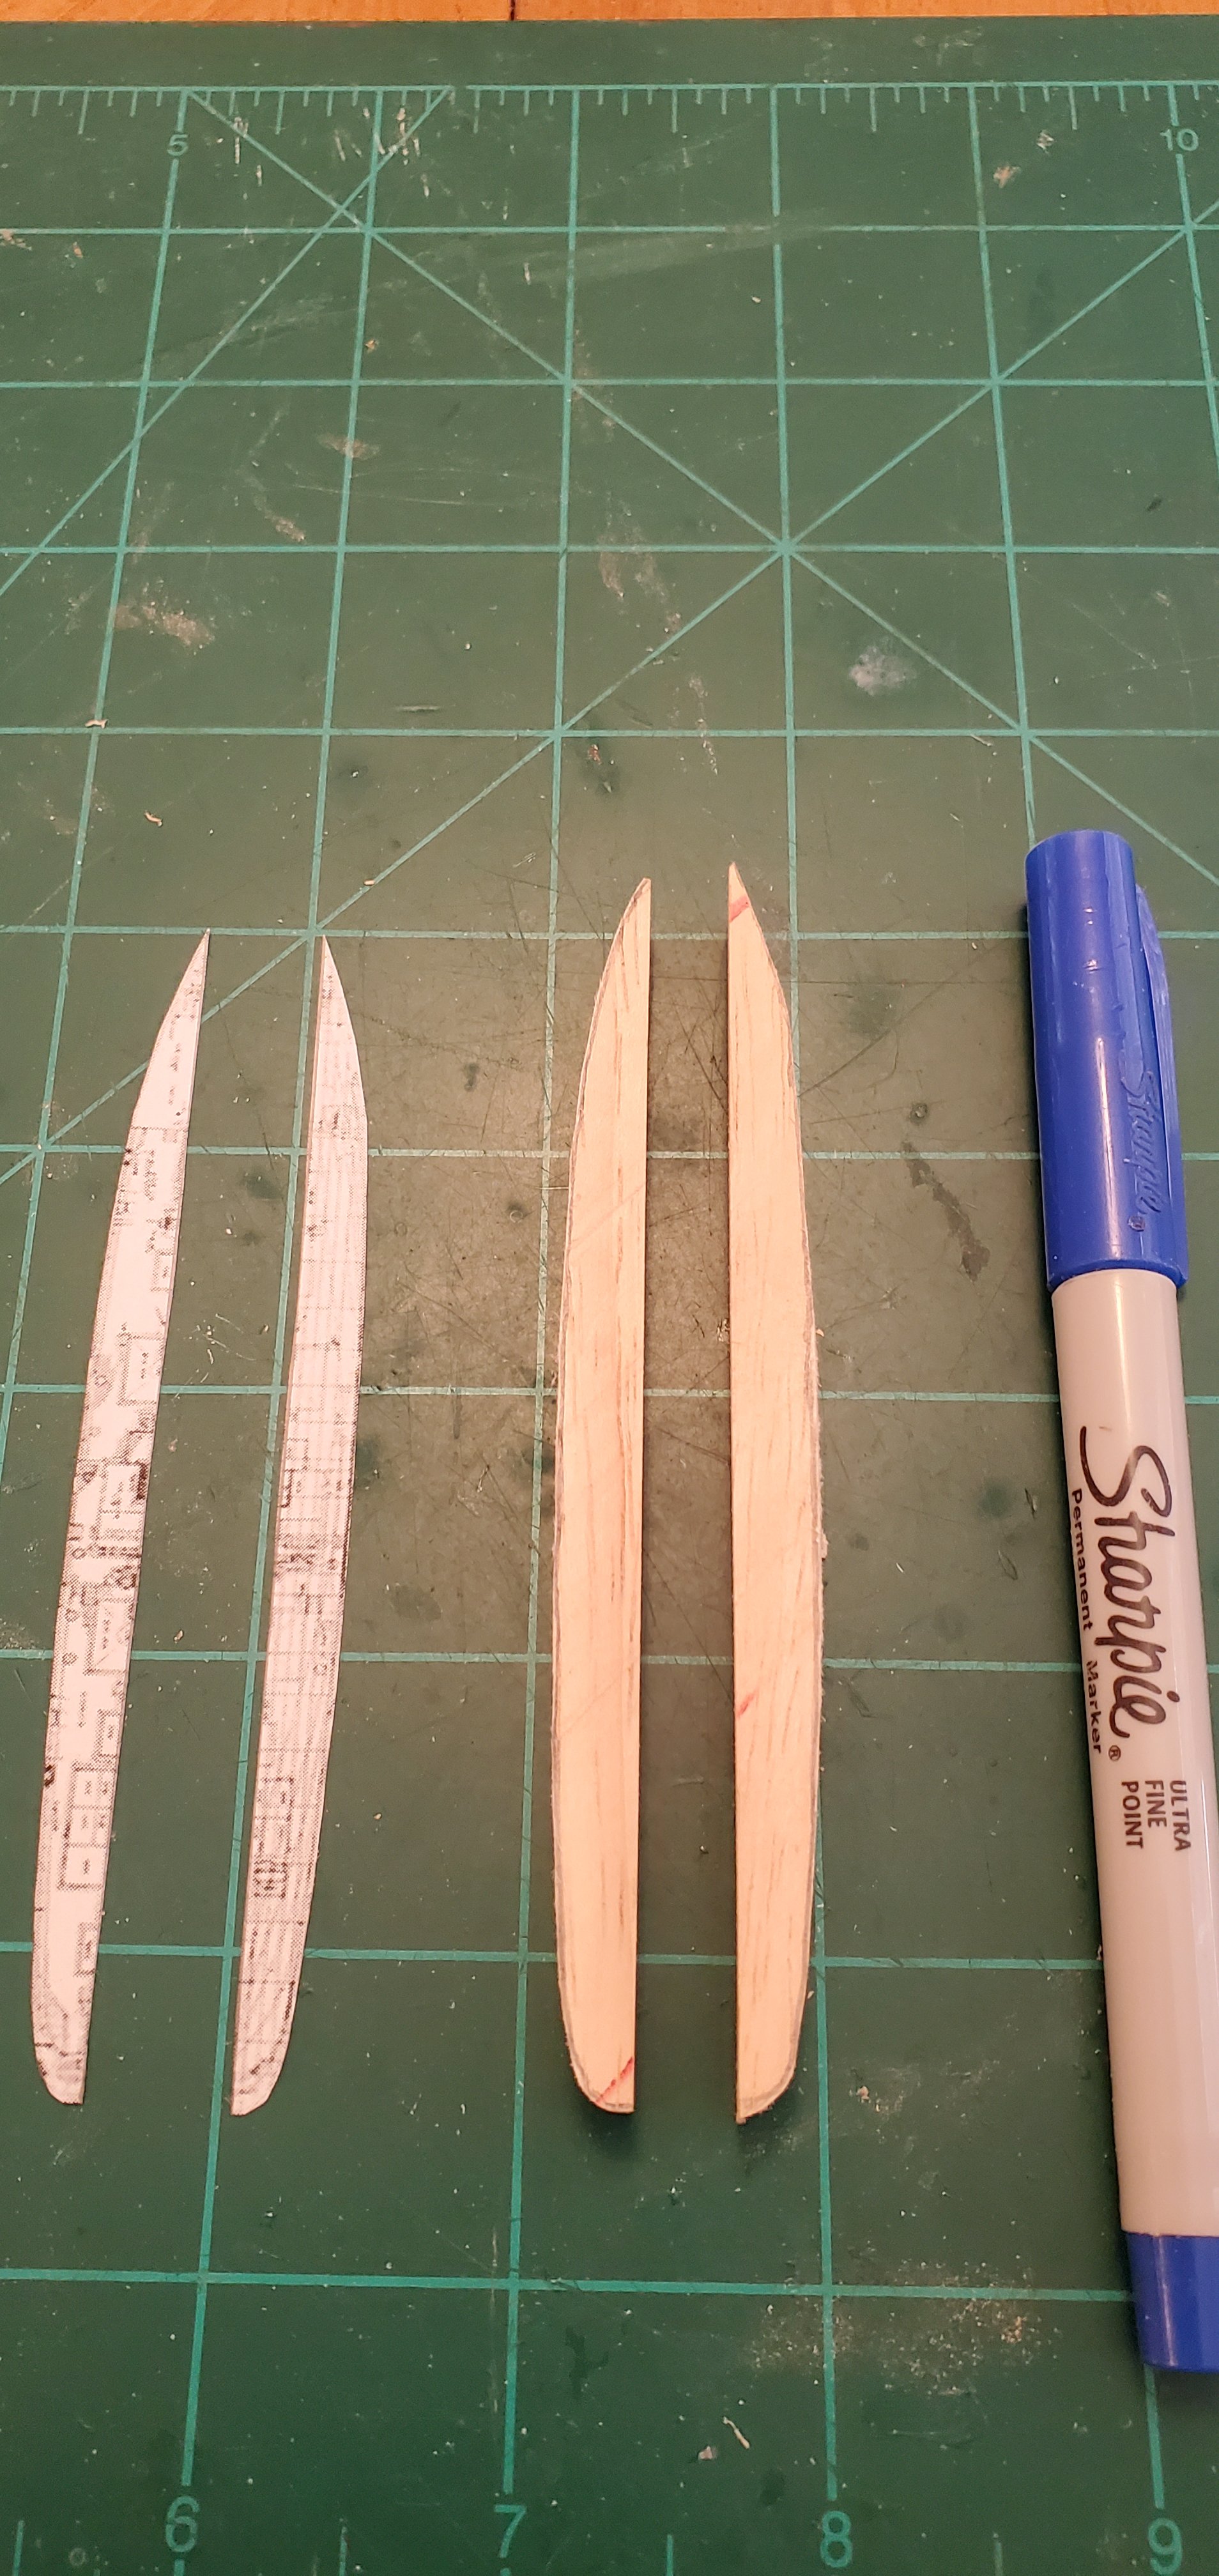
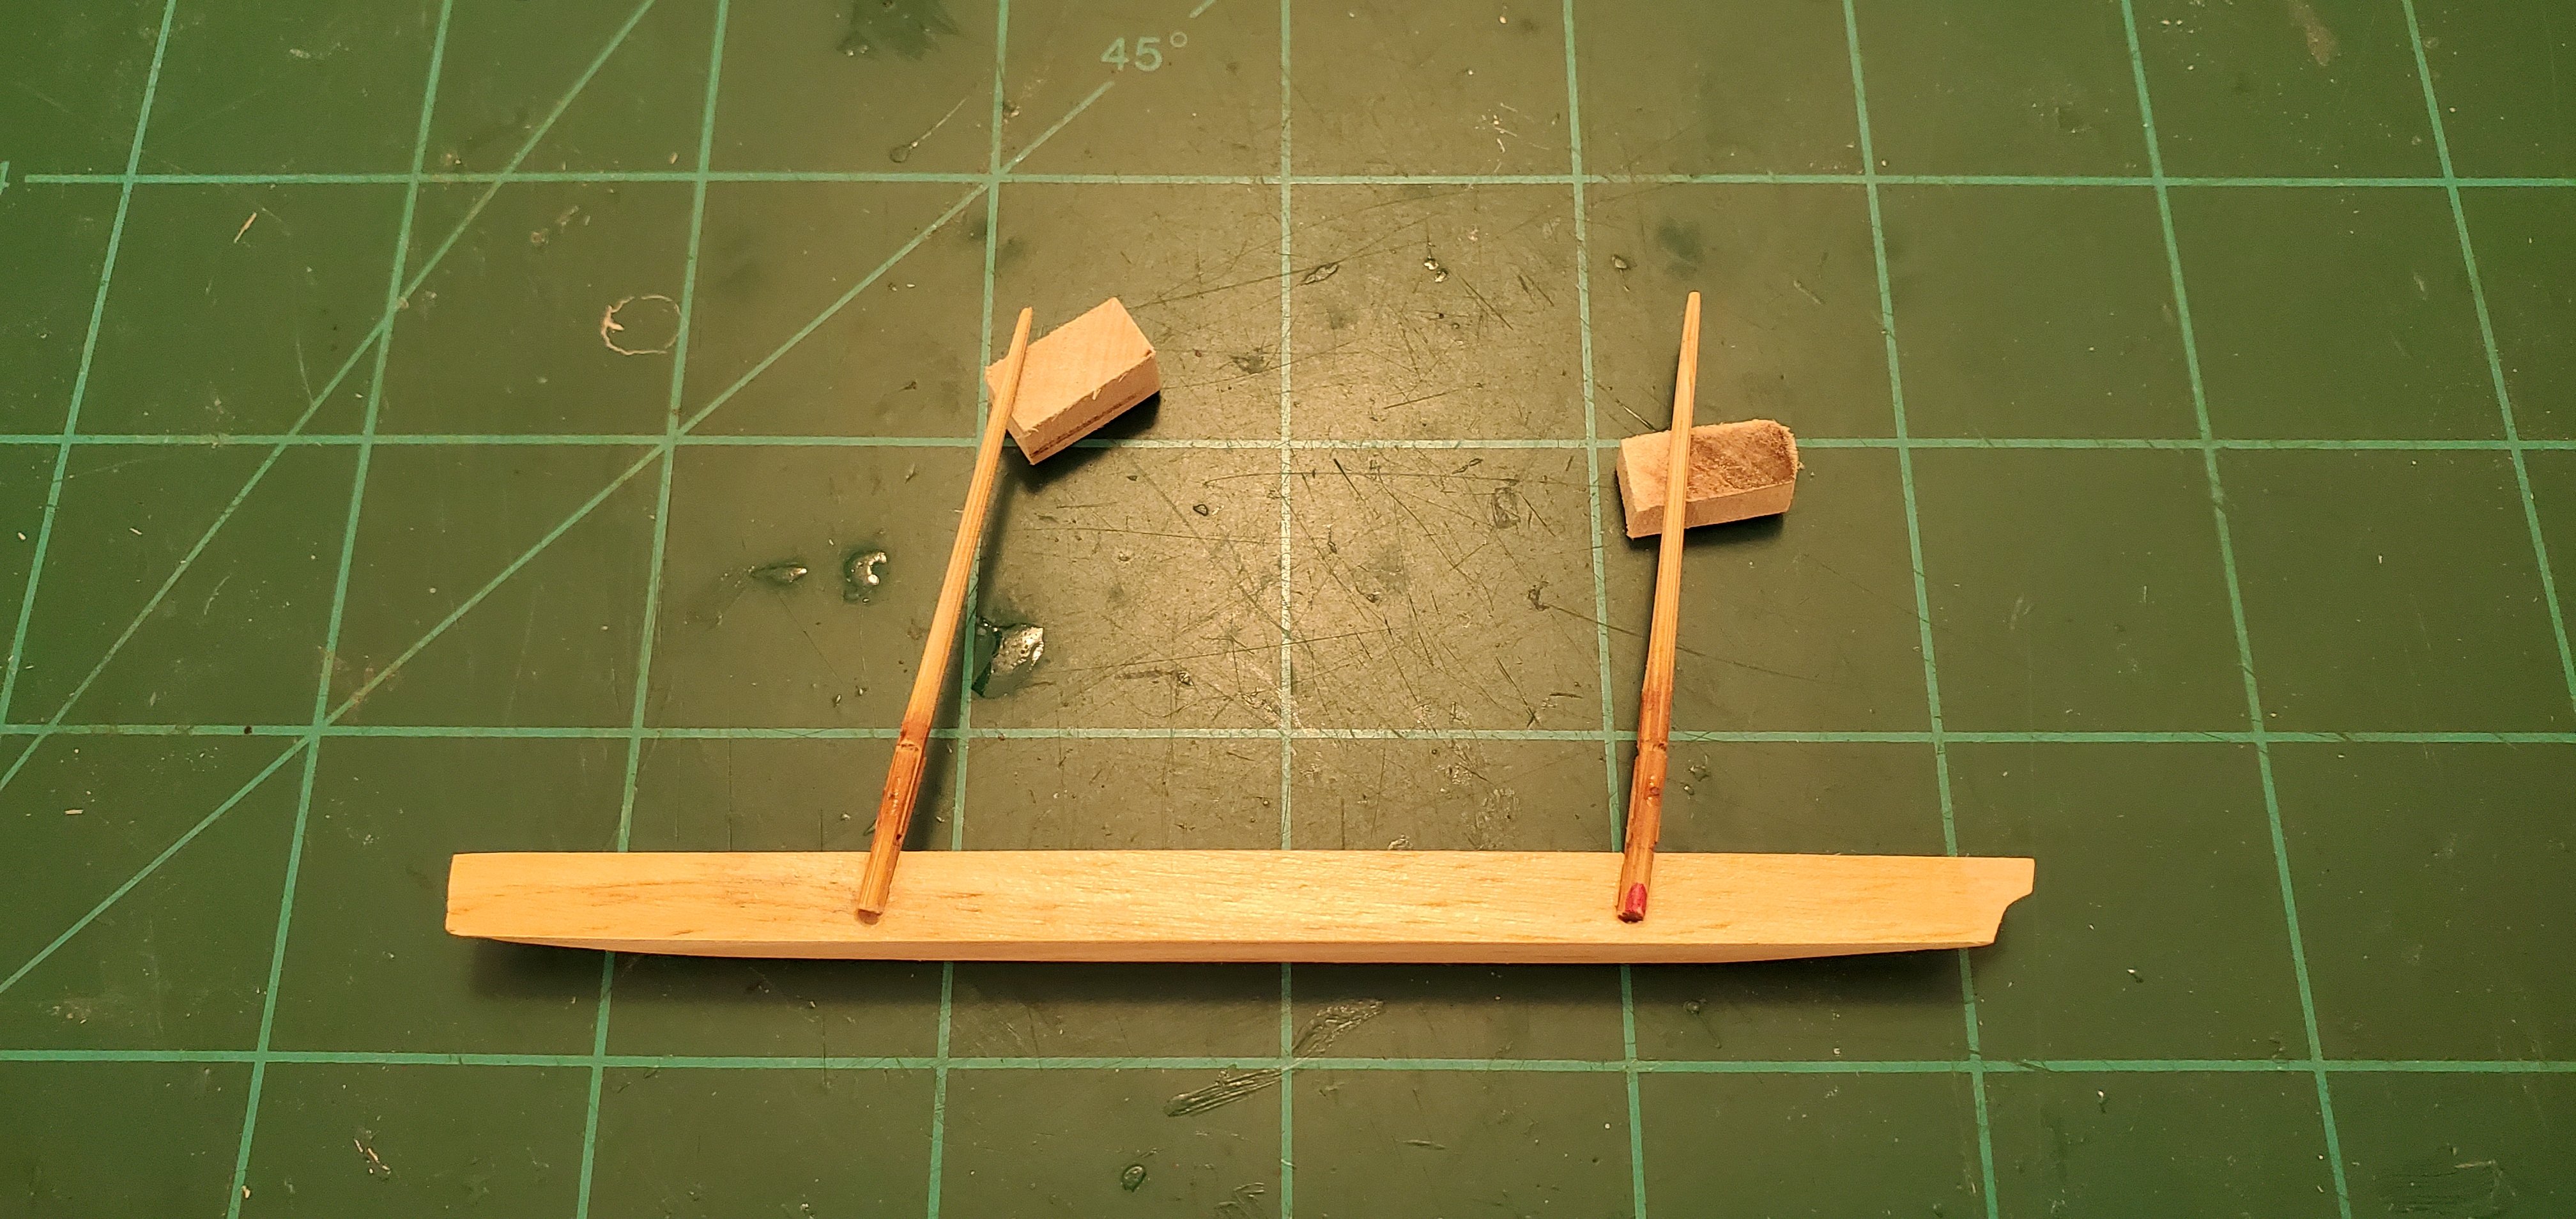
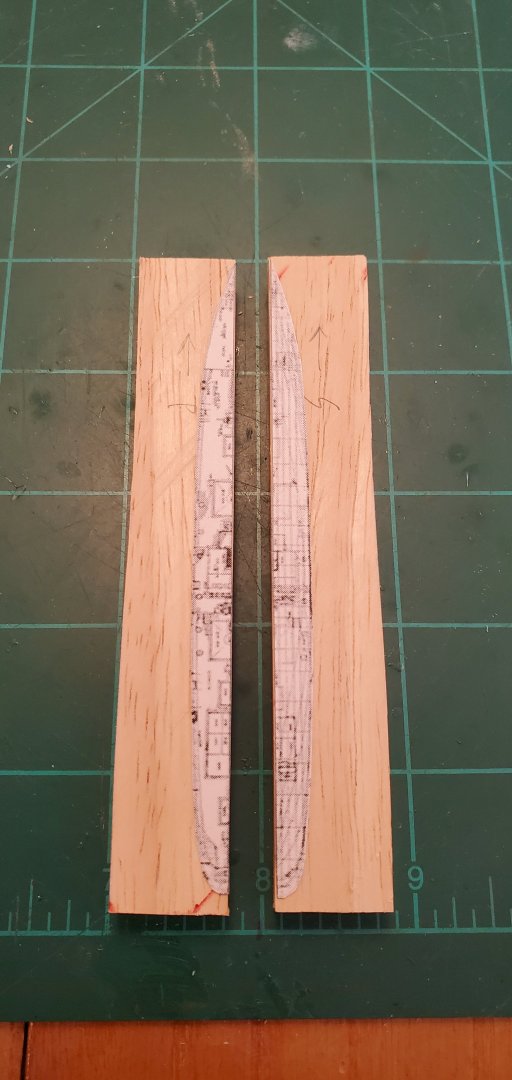
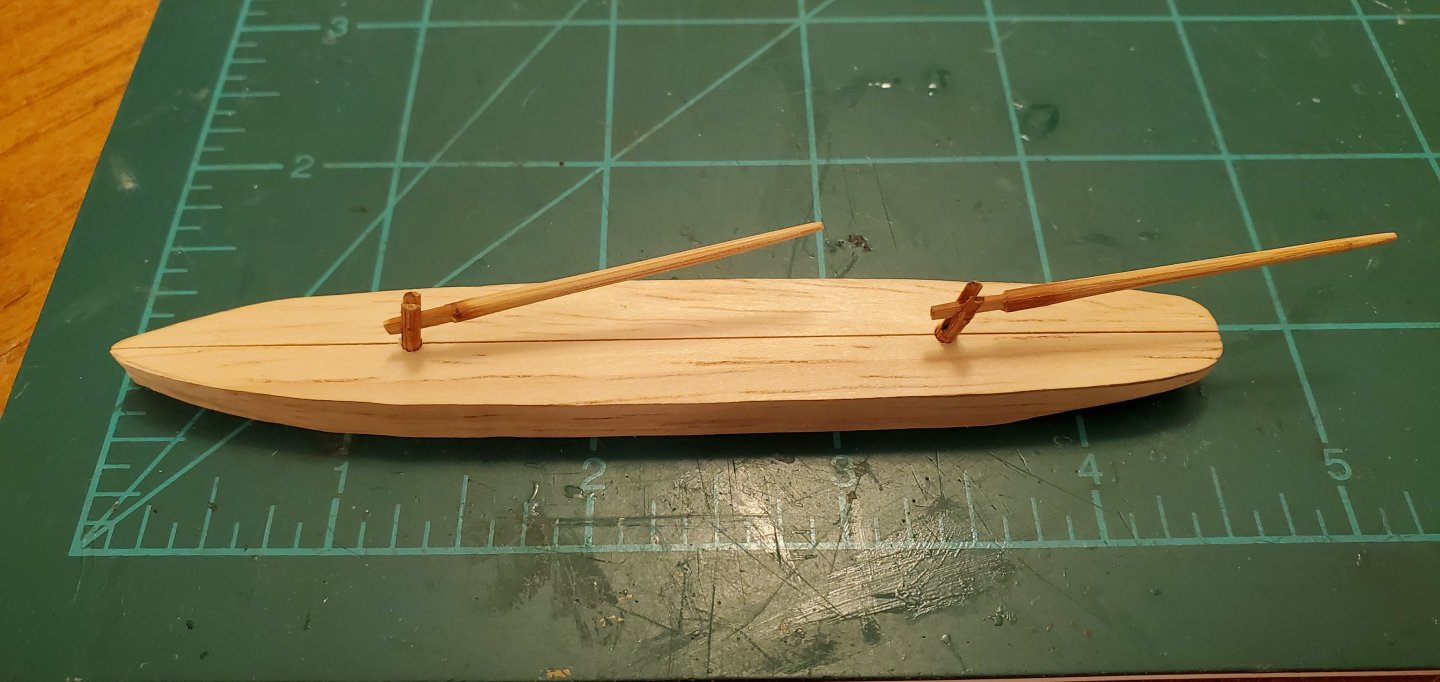
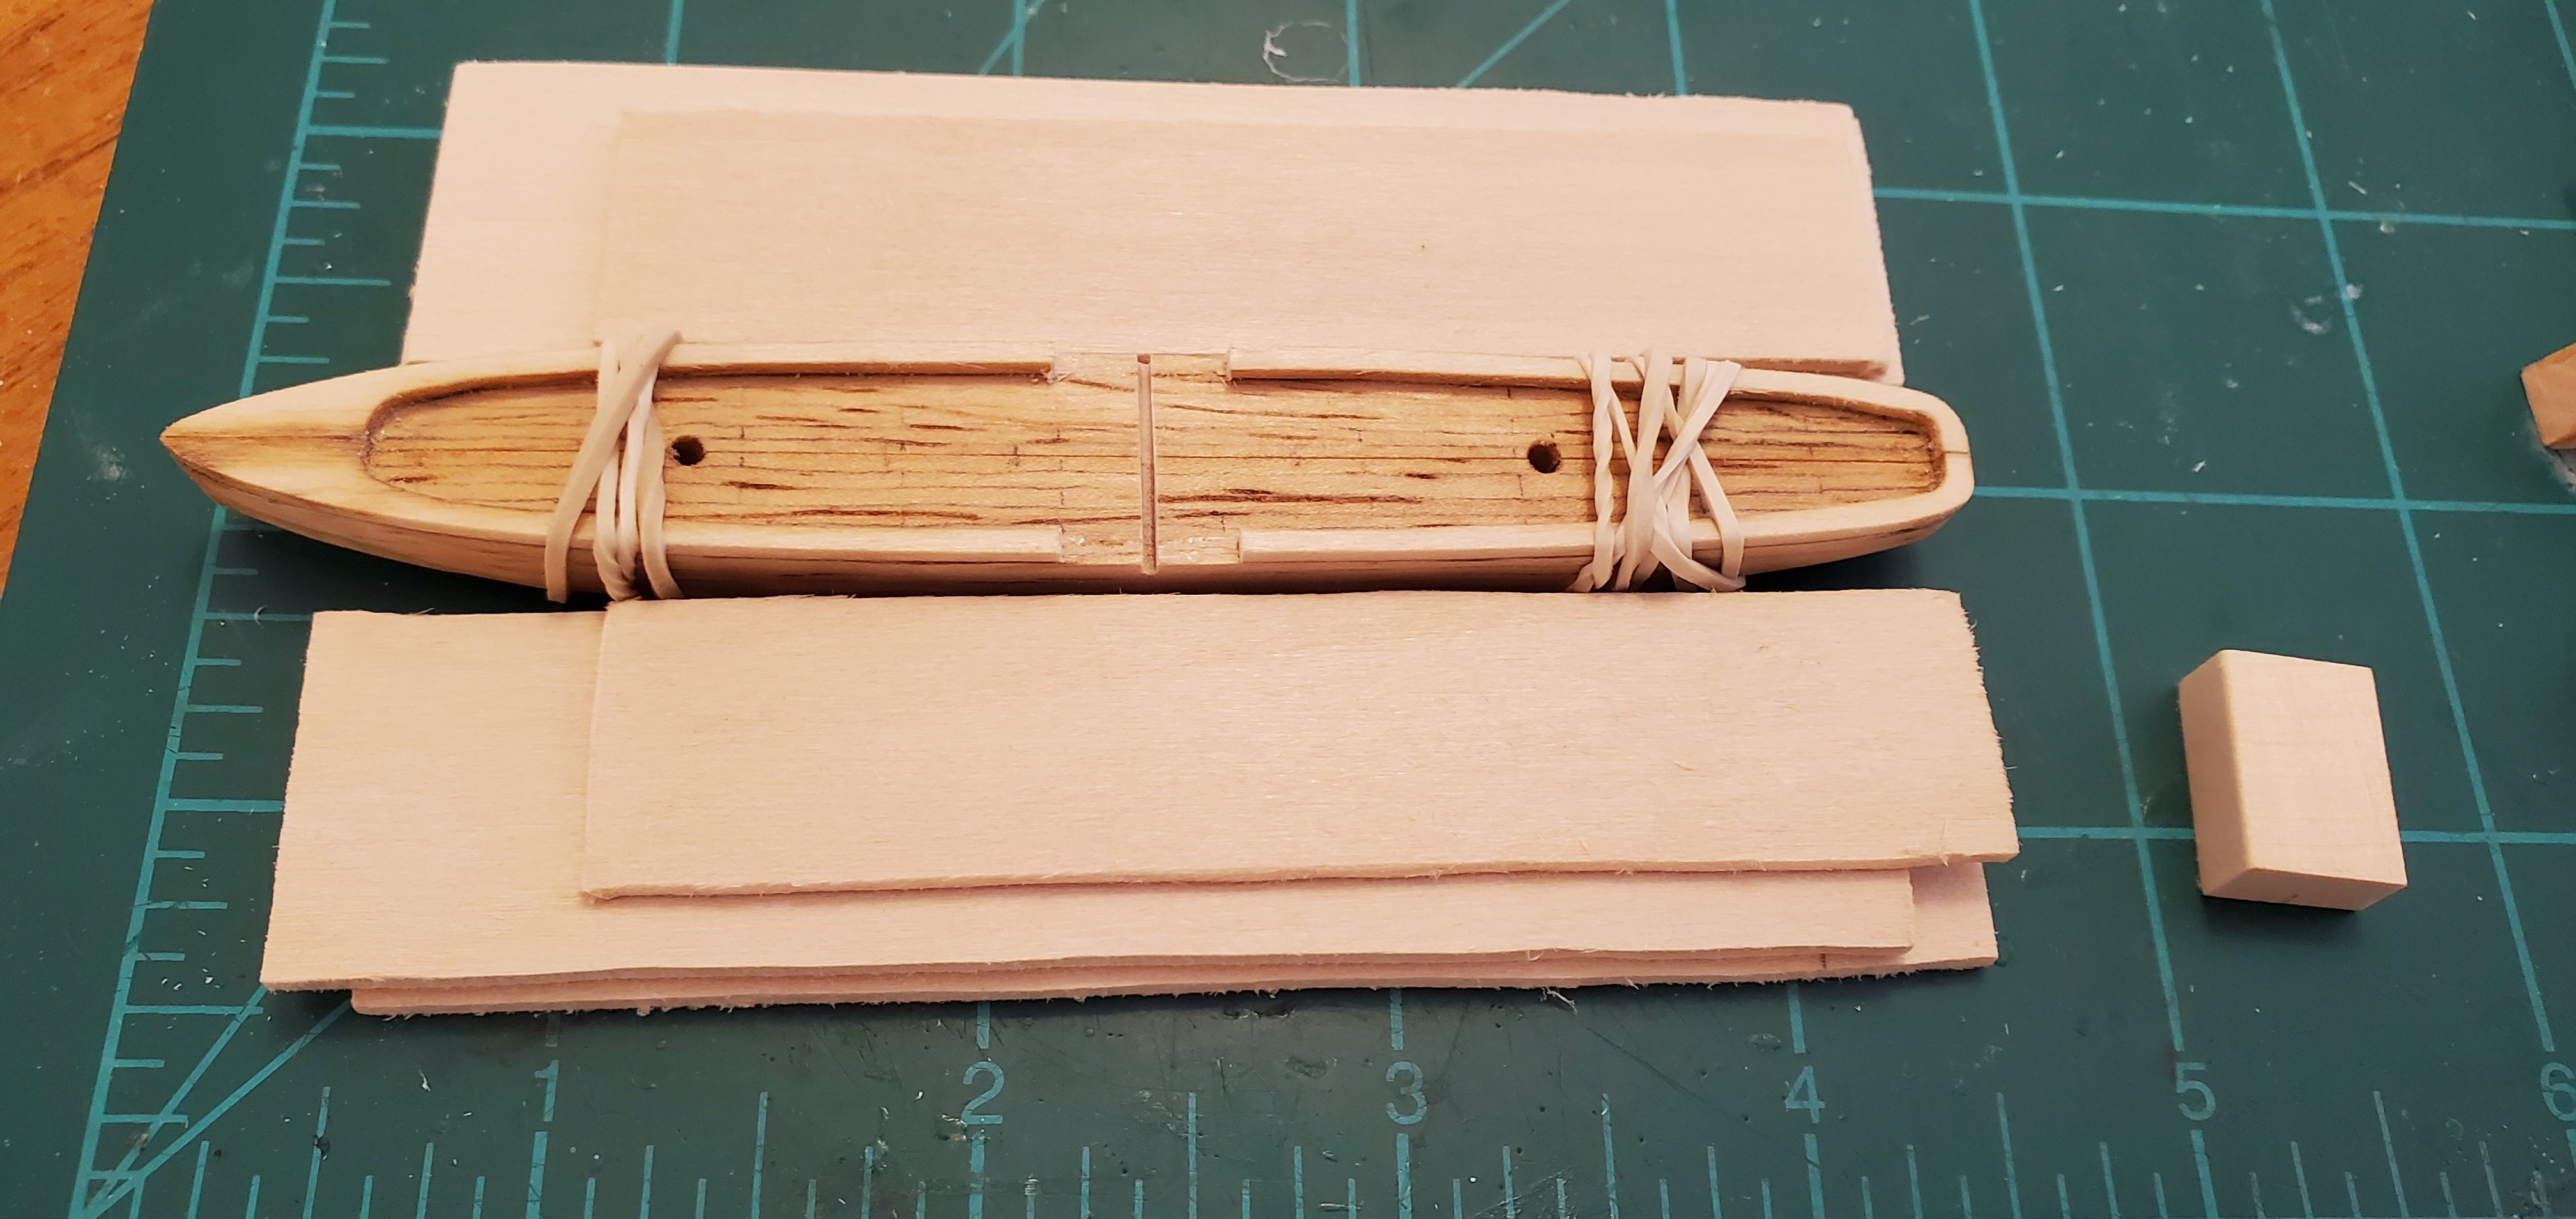
I was out with the cows yesterday but they were not happy with me. They could tell I was thinking more about this ship than I was about them. The more I think about building this sidewheel steamer and getting it inside the bottle, the more I realize it's going to present a lot of challenges. Split hull, sidewheels, smokestacks, ship's boats with davits, and rigging with a split hull. This is gonna be fun to try and figure all of that out. So onward through the fog! I finally got started building the hull last night. Instead of the usual basswood, I'm using a harder wood for the hull so it will sand down smoother without the bit of fuzz that I get with basswood. Here are pics of the steps in building the hull with the masts added at the end. I took the plan for the hull's footprint, cut off the sidewheels (those will be built separately and attached later), and split it down the middle. After splitting and shaping the hull, I drilled holes for the masts penetrating about 80% of the way thru the hull. The masts will be glued to one half of the hull for insertion into the bottle.


- 235 replies
-
- 11
-
-
- Banshee II
- Bottle
- (and 1 more)
-
Looking good so far! Haven't seen your inspector show up for duty yet. Is he on vacation? You didn't let one of those rats get hold of him did you?
- 87 replies
-
- 3
-
-
- King of the Mississippi
- Artesania Latina
- (and 2 more)
-
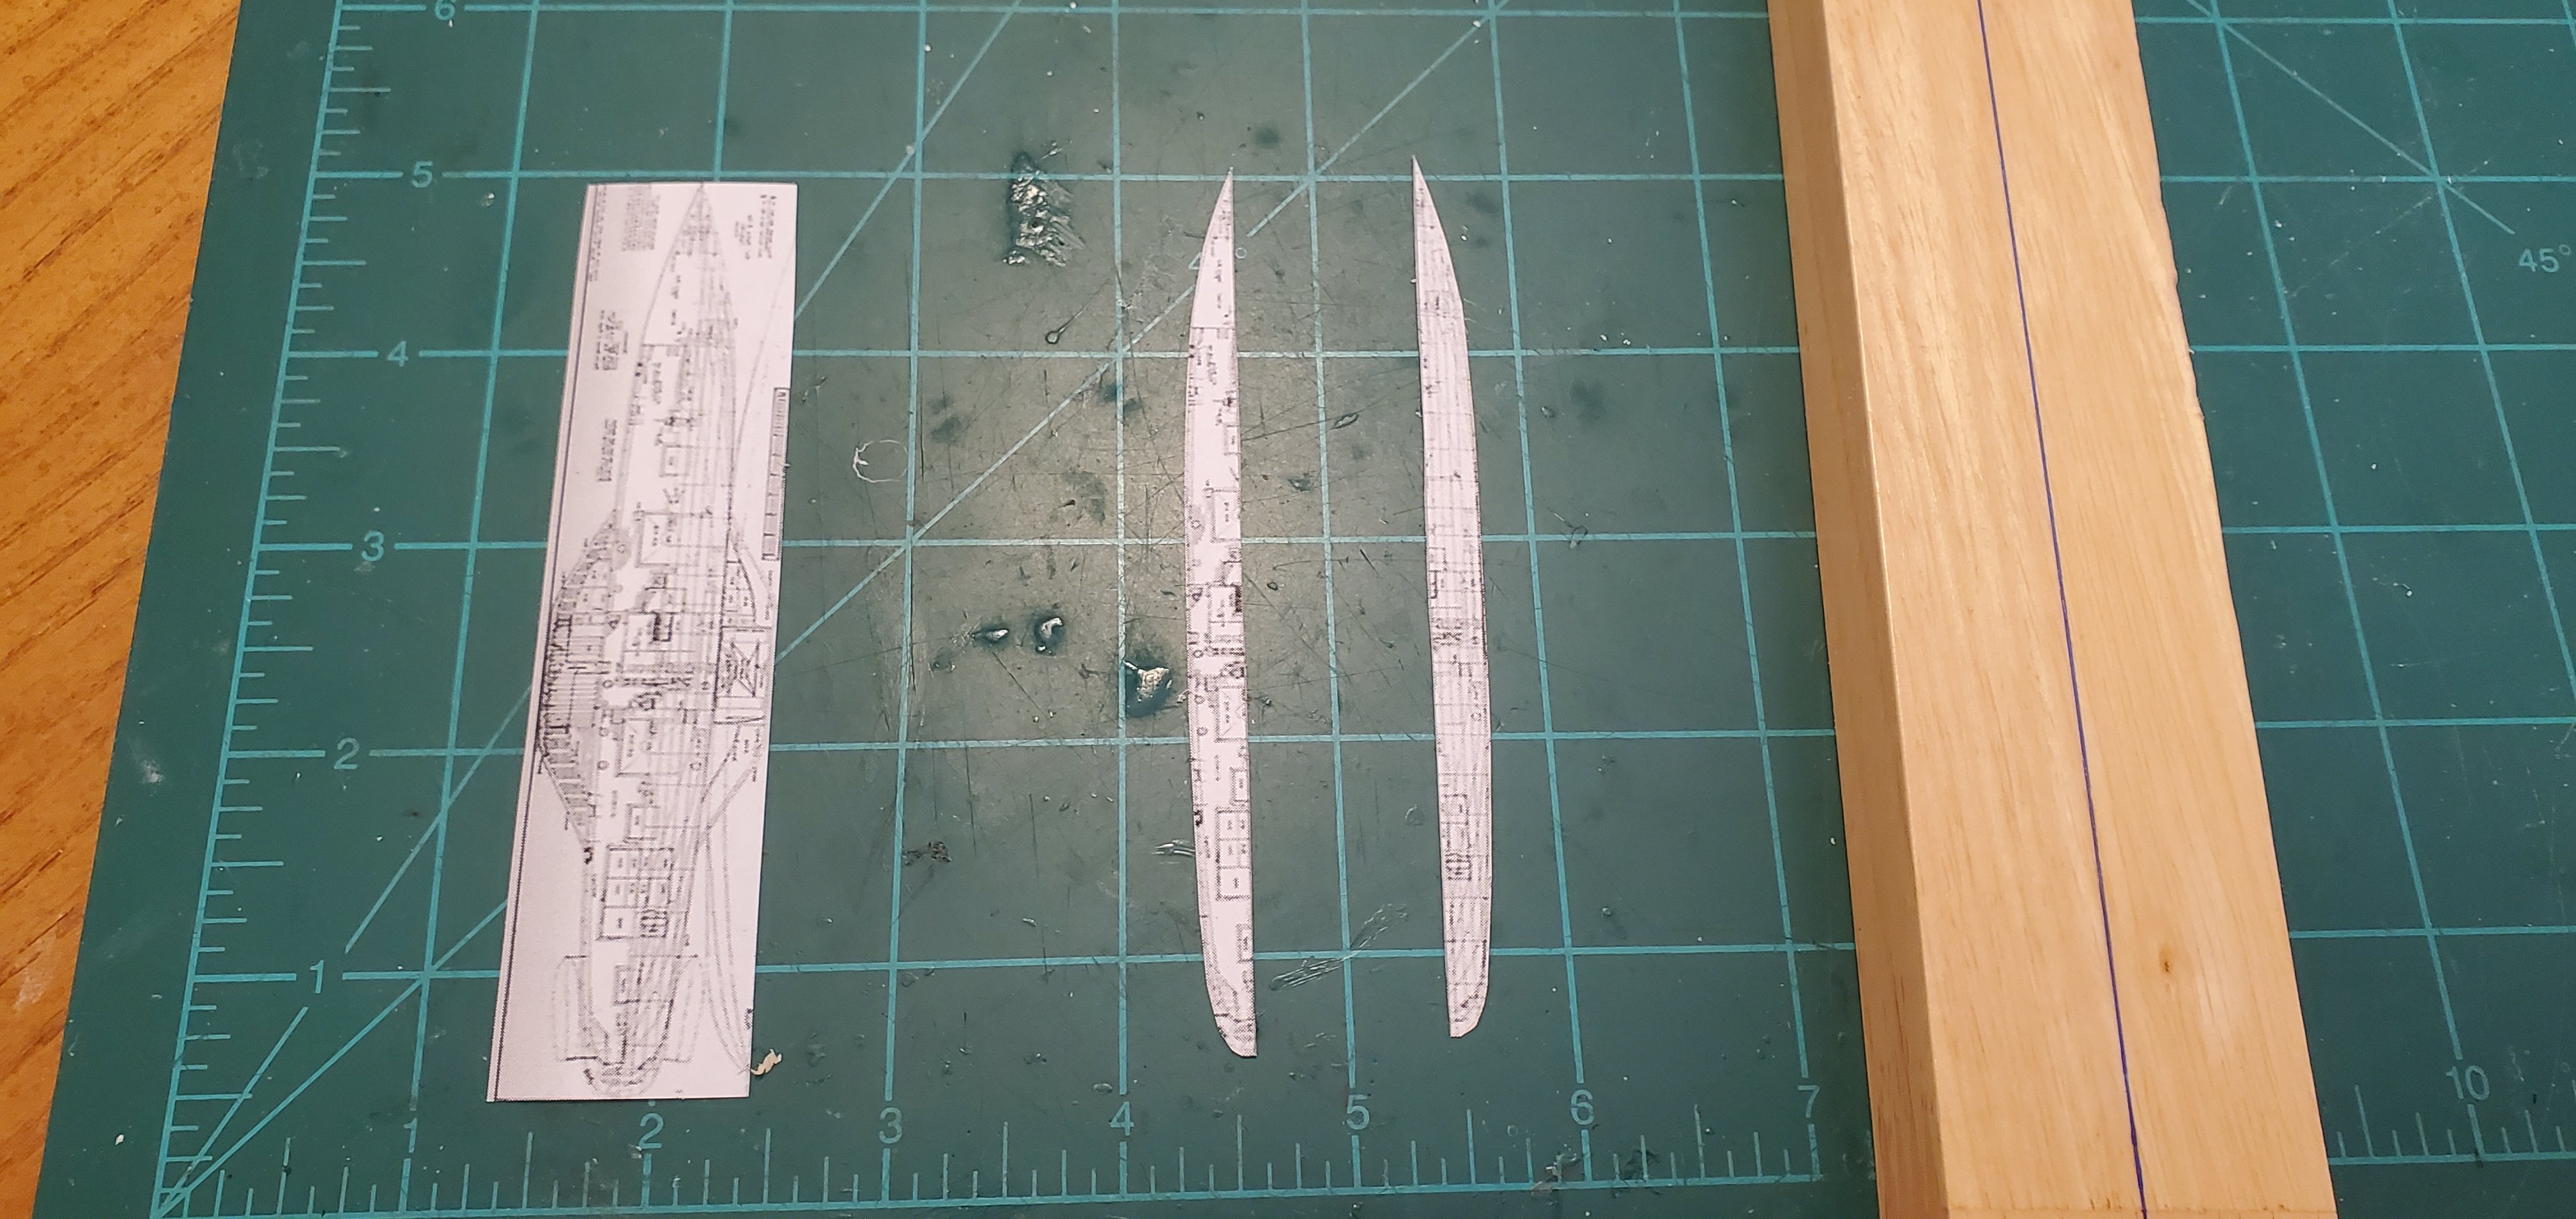
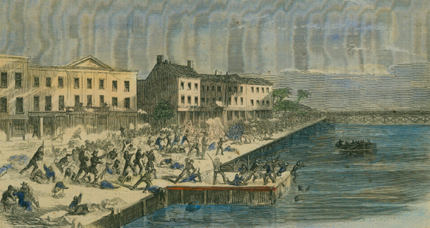
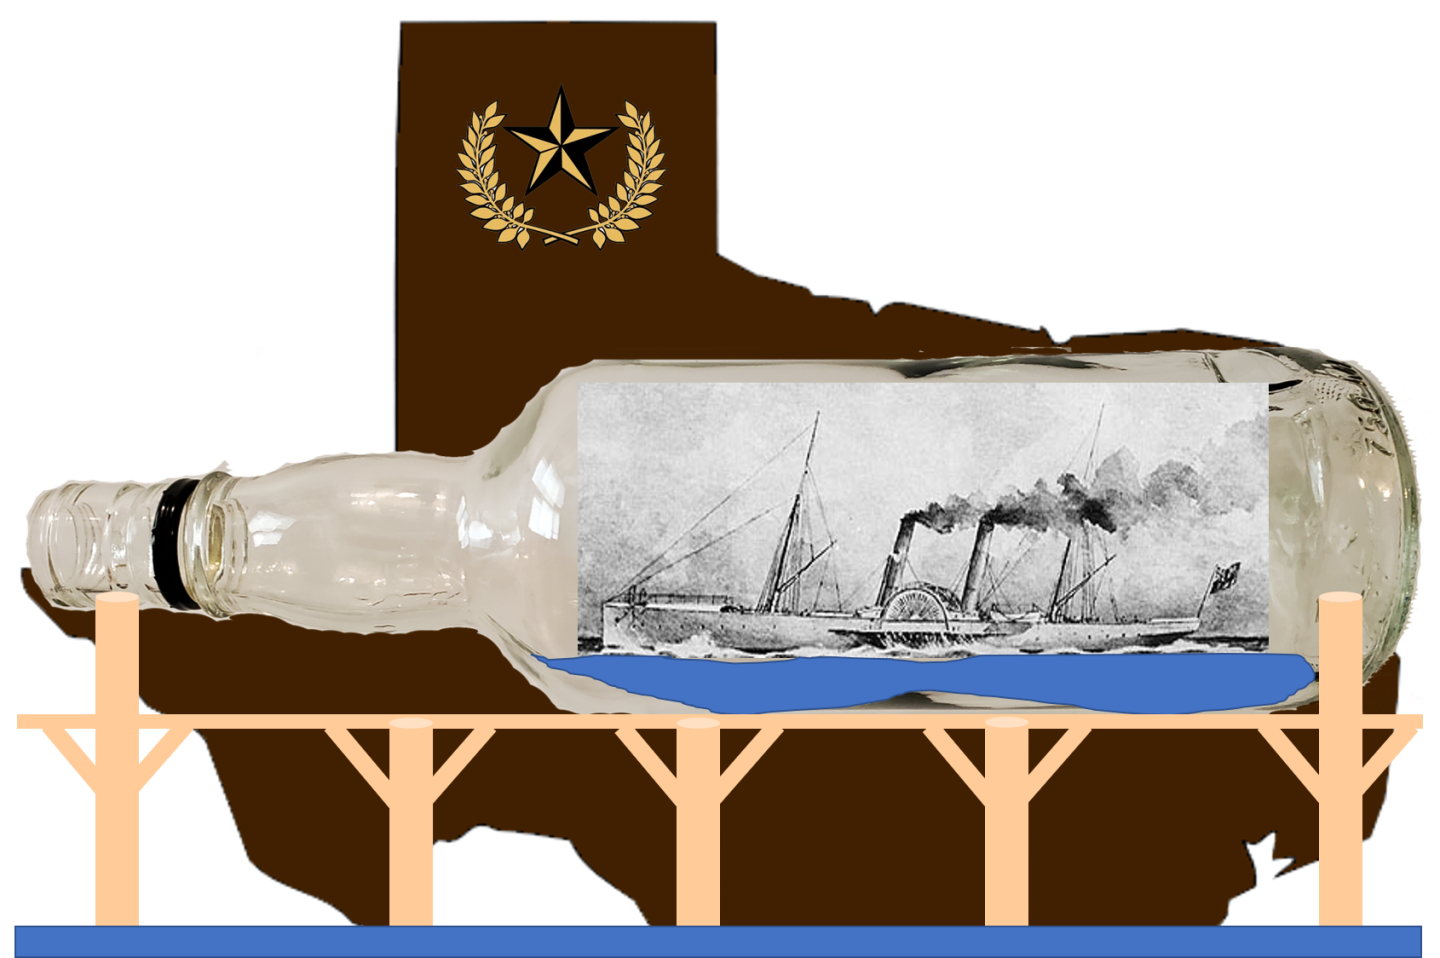
Hmmm, Pat. I think my CNC will consist of a dremel rotary tool and crude manual skills. ☹️ In the meantime, I have not gotten any work done on the ship - still doing some research and playing around with the whole concept. Thanks to Phil, (a.k.a. @GrandpaPhil), for the link to all those ship plans. There was nothing for the Banshee, but I did find a couple of sidewheel steamers that are similar enough that their plans will help me with the profile and footprint of my ship. Although I'm embarrassed to tell you how long it took me to find the button that converted the language from French to English. 🙄 For those interested in more history of the blockade runner ships, I did find a couple of interesting bits of information: First, according to historian Stephen R. Wise, the Confederate blockade runners carried 2 types of coal on board - hard (anthracite) and soft (bituminous). The hard coal burned smokeless and efficient, making it better suited for use when it was time to actually run the blockade. It provided strong bursts of speed and lower visibility. The soft coal was used in open waters. Even while burning the soft coal, the blockade runners could outrun almost all the Union ships. Second, there's a simple reason why there never seemed to be a shortage of blockade runners willing to help the South, despite the obvious risks involved. The return on investment in many cases was tenfold. In his book, From Sail to Steam - Four Centuries of Texas Maritime History, Richard Francaviglia gave an example of the schooner John Douglas buying cargo for $2000 and receiving $21,500 upon its delivery just a few weeks later. I think I've pretty much zeroed in on the concept for the project, although I reserve the right to change my mind along the way. Since Galveston was central to the Banshee II's story, I wanted to incorporate something about civil war era Galveston into the presentation. Unfortunately, there's nothing hugely recognizable or iconic about Galveston, except maybe the seawall. But the seawall was built in 1902, a couple of years after a major hurricane almost wiped out the city. I did find this painting of the Battle of Galveston (1863 when Confederate forces expelled occupying Union troops). The painting shows hand to hand combat on the city's waterfront. I liked the look of the waterfront with its wooden planks and piers, so decided I would try and give a small representation of it. I've also got some nice walnut cutouts of Texas that I think will make an interesting backdrop. So here's the whole idea roughed out in Powerpoint.
- 235 replies
-
- 13
-
-
-
- Banshee II
- Bottle
- (and 1 more)
-
Exceptional work, Keith! From now on, I'm going to send all my SIB penguins to you for painting!! 😃
-
Great minds... Believe it or not, Pat, I was drinking a can of my favorite soft drink this afternoon (Mountain Dew) and that same idea occurred to me! I need some metal that's thick enough so it won't wrinkle (like I'm afraid foil would), but thin enough to easily shape. So the side of an aluminum can just might be perfect. I'm going to give the can idea a try and see what happens. Thanks for the suggestion, Pat!! Also, I have no idea what CNC means. Is that another Australian tot or something?
- 235 replies
-
- 4
-
-
- Banshee II
- Bottle
- (and 1 more)


.jpg.cae55935fd9ce87b9ab419d8af2eee3f.jpg)