Glen McGuire
-
Posts
1,985 -
Joined
-
Last visited
Content Type
Profiles
Forums
Gallery
Events
Everything posted by Glen McGuire
-
 Ah ha! If you look at the the quinquereme in my powerpoint concept drawing at the start of this log, you will see that I grabbed the quinquereme pictured on the website you reference!! Very helpful site indeed!
- 290 replies
-
- 5
-

-
- Quinquereme
- Finished
- (and 1 more)
-
Congratulations on a superb build, Mark! So well done. I greatly admire your perseverance and I join you in your toast with a Texas margarita (or 3)! 🍹🍹🍹
- 505 replies
-
- 8
-

-
-
- vanguard models
- Sphinx
- (and 1 more)
-
Thanks, Ian! The sails and rigging shown will be particularly useful. You are correct about that being sufficient for SIB. That's about as much detail as I would ever need.
- 290 replies
-
- 4
-
-
- Quinquereme
- Finished
- (and 1 more)
-
Hey Phil, I would love to see the plan! Especially since all I've got to work with is a few google images.
- 290 replies
-
- 4
-
-
- Quinquereme
- Finished
- (and 1 more)
-
@Louie da fly Those old illustrations are fascinating! I will likely continue on with my plans for a single-hulled galley, but I reserve the right to change my mind later! Very interesting discussion.
- 290 replies
-
- 4
-
-
- Quinquereme
- Finished
- (and 1 more)
-
@Roger Pellett - Going back to your comment about the article in Scientific American speculating that these ancient galleys might have been catamarans. I was looking at my siege picture again this morning and saw something I had not noticed before. The 2 attacking ships in the foreground do appear to be catamarans while the 2 in the background look like single hull vessels. Interesting. So thank you for your comment. I doubt I would have noticed that otherwise! I wonder if the Polybius "Histories" book that @Ian_Grant just ordered will shed some additional light on the subject. Ian, you will have to let us know!
- 290 replies
-
- 5
-
-
- Quinquereme
- Finished
- (and 1 more)
-
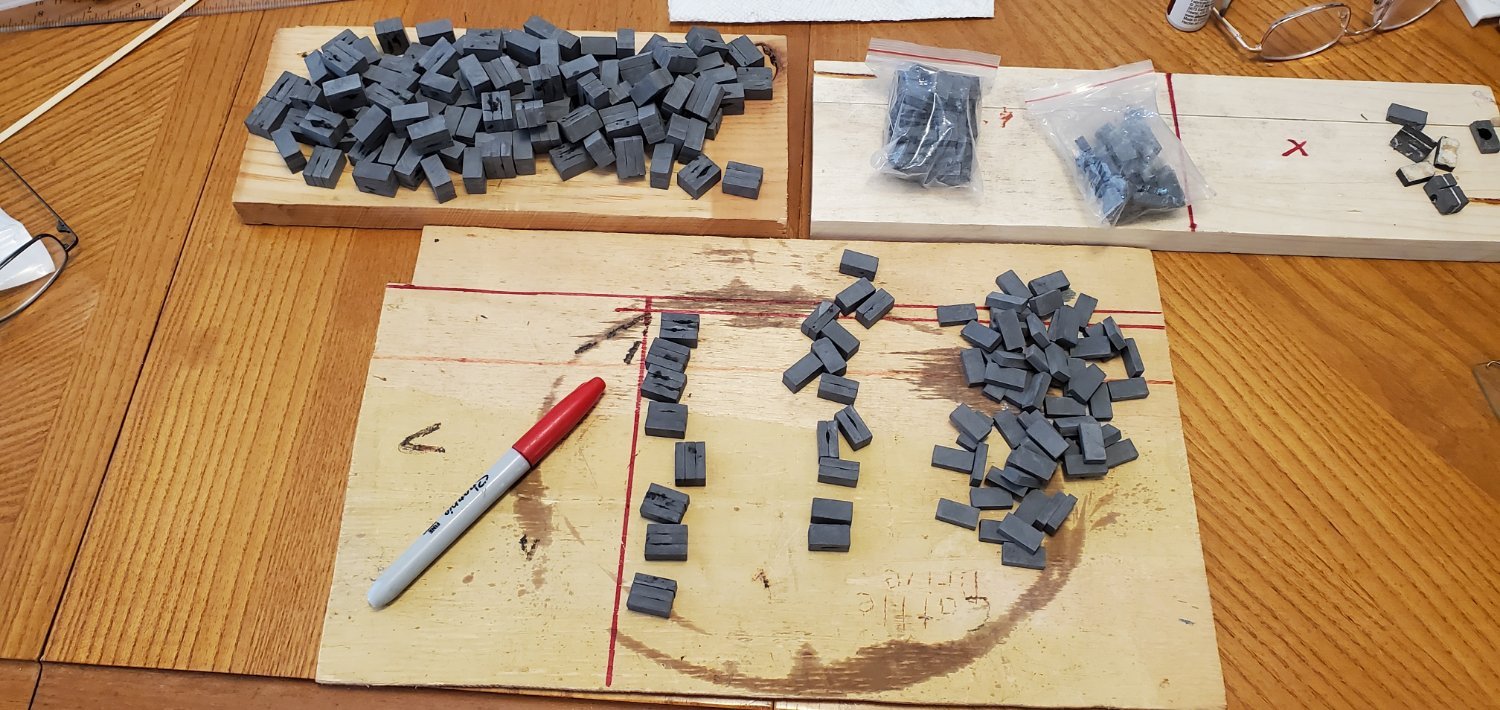
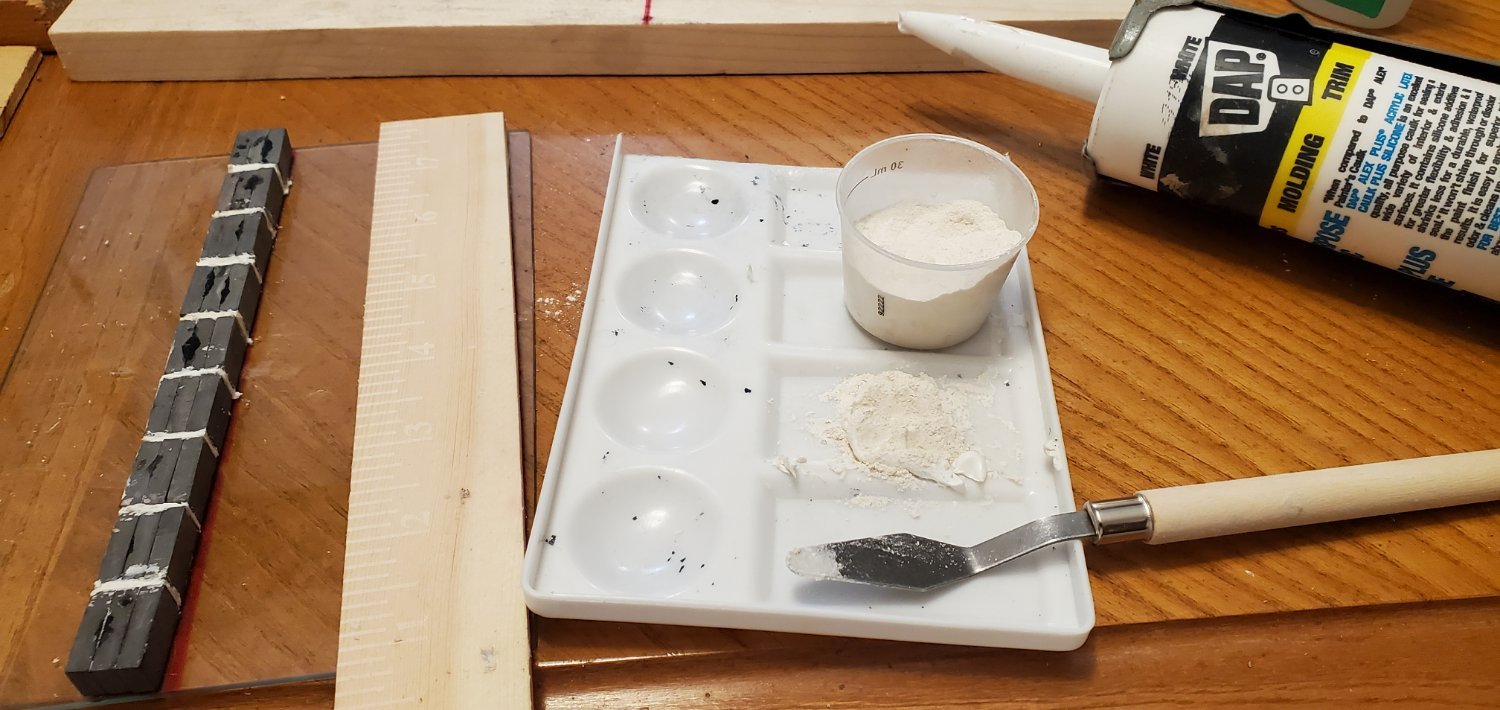
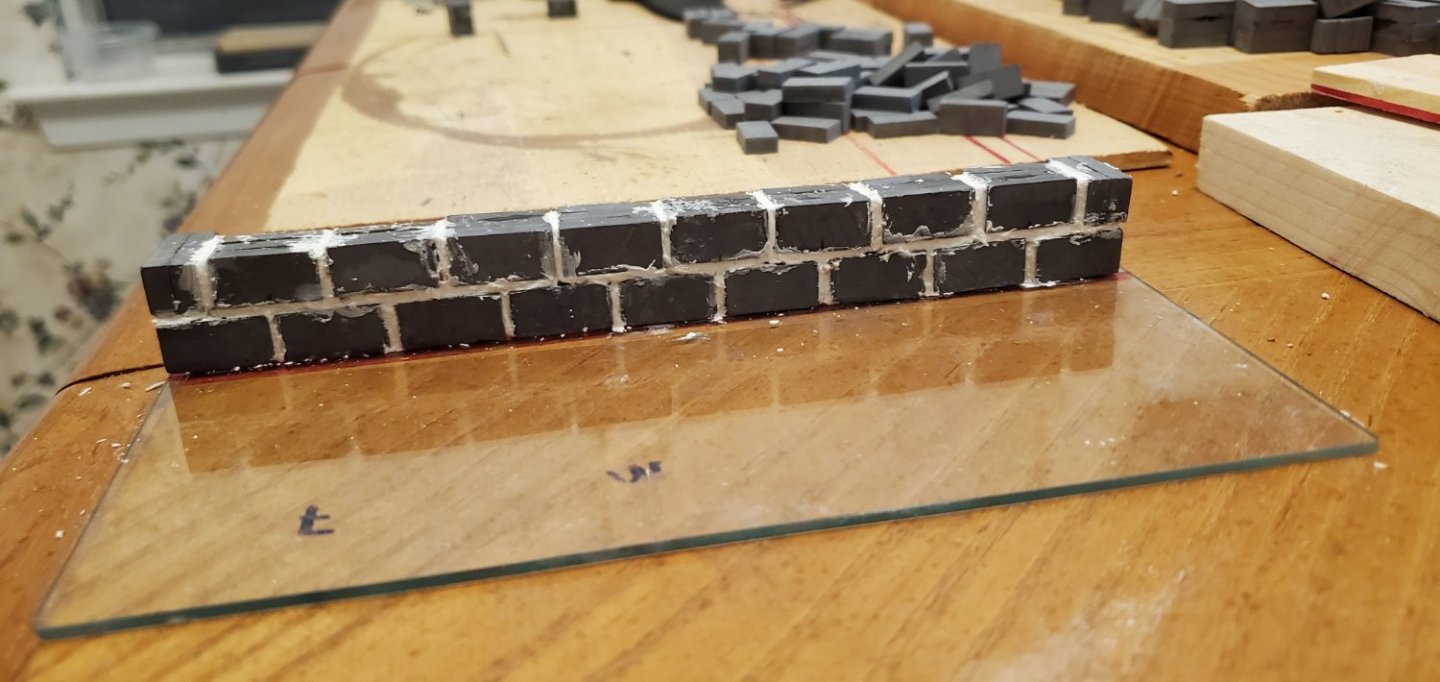
Thank you, Bob, for your prayers! Thank you, Mark, for your prayers too. And your are absolutely right, my friend is a one of a kind jewel. Thank you Ian, Pat, Keith, Grant, and Phil for your well wishes for my friend. I appreciate all of y'all so very much! Now on to the build! The first thing I decided to work on is the seawall because, uh, why not start with something I’ve never tried before! There are a lot of youtube videos on how to make rock-looking walls out of styrofoam, cardboard, and other soft materials. I wanted something sturdier and more realistic. I couldn’t find any stone bricks made out of actual rock at the size I needed, but I did find some small bricks on Amazon made out of pottery clay. Close enough! So I got 500 of them for about $25. They are 18mm x 9mm x 4.5mm. Turned on their side, the bricks were a good height (9mm) and good width (18mm). But I needed them deeper for the wall thickness I wanted. So I glued 3 together to make a single wall brick. I also glued some doubles that will be necessary for the end pieces. I’m still not exactly sure what I’m going to do for the top of the wall, but I will figure that out later. During my research, I could not find out what the seawalls of Syracuse were actually made of. But pictures of the wall ruins look like limestone to me. Also, I did read where limestone is plentiful throughout Sicily, so I figure there’s a good chance the walls were made of limestone. With that in mind, I wanted to give my wall a limestone look. Coincidentally, the walls of my house are made of limestone blocks (also very plentiful here in Austin) and I’ve also got a bunch of extra blocks I’ve used for borders around the yard. So I grabbed a few, some all white and some with the common orange patina. I want to have some variation in the color across the entirety of the wall. Once again, I borrowed @gjdale's “chalk method” of adding color and texture to objects from his amazing Shipyard at Foss' Landing build. I took a rasp and ground out a bunch of limestone chalk dust and separated it into 3 cups for white, off white and orange(ish). But I'm not ready to add the limestone dust to my bricks yet. I decided I'd build the wall first. So how do I put these little bricks together and make a wall? Having never done any actual masonry work in my life, I wasn't quite sure what to do, but I knew I needed some type of mortar. I tried a few things (including grout for mosaic tiles) but nothing worked very well until I tried caulk. It was easy to spread and adhered to the bricks very well. The only problem was that it was too white and too smooth. So I tried adding some of the limestone chalk dust to the caulk, which turned it slightly off white and added a bit of grit to the texture. It turned out exactly like I wanted. And here's the first couple of rows of bricks. They will get some cleanup later, but I think they look ok for a start. Maybe. If any of y'all have actually done real masonry work, please hold your laughter!


- 290 replies
-
- 14
-
-

-
- Quinquereme
- Finished
- (and 1 more)
-
I know I said in my first post above, “Without further ado, here we go.” But I actually have some further ado before I officially get started on the quinquereme and claw. I am dedicating this project to my nearest and dearest friend who suffered a massive stroke 5 weeks ago and spent 17 days in ICU. She has been a big part of my SIB work even though she knows nothing about ships or modeling (you could say she doesn’t know ship from shinola 🙄). She gave me the bottle for my first scratch SIB, made me redo my “boring” mono-colored shields on the Oseberg, picked out the eyes for my Kraken, and offered great suggestions on a bunch of other things. She was also my editor for an article I wrote for the USS Constitution Model Shipwright Guild magazine, The Broadside. She takes everything I do and makes it a lot better. So this one is for her as she battles thru rehab. And now for real, without further ado, here we go!
- 290 replies
-
- 8
-
-
- Quinquereme
- Finished
- (and 1 more)
-
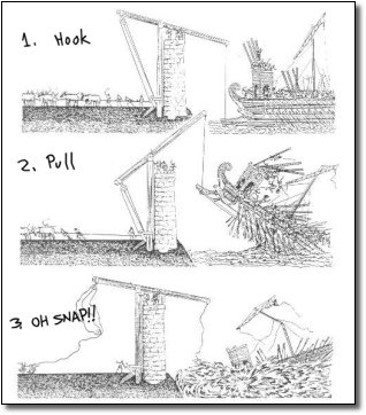
I believe you are correct, Roger. The Greek historian I quoted above (Polybius), also said this about the claw's effect after it hooked onto the bow and lifted it some amount: "The result was that many of the vessels heeled over and fell on their sides: some completely capsized; while the greater number, by their prows coming down suddenly from a height, dipped low in the sea, shipped a great quantity of water, and became a scene of the utmost confusion."
- 290 replies
-
- 5
-
-
- Quinquereme
- Finished
- (and 1 more)
-
Hmmmm. Good question, Javelin. I have not thought that far ahead yet. But I suppose I should respect the laws of physics and make the water in the bottle level with the sea surface. I haven't even started yet and things just got more complicated!! 😳
- 290 replies
-
- 3
-
-
- Quinquereme
- Finished
- (and 1 more)
-
Another ship I ran across in my research was called the "Tessarakonteres", which is similar to what you describe, Roger. It reportedly was a massive catamaran galley built by Ptolemy IV Philopator of Egypt. There's an interesting discussion about the ship here: https://www.thearchaeologist.org/blog/the-hellenistic-giant-galley-tessarakonteres-one-of-the-largest-human-powered-vessels-in-history. Below is what the site calls a speculative illustration. I nominate this for @Ian_Grant's next servo-powered project.
- 290 replies
-
- 4
-
-
-
- Quinquereme
- Finished
- (and 1 more)
-
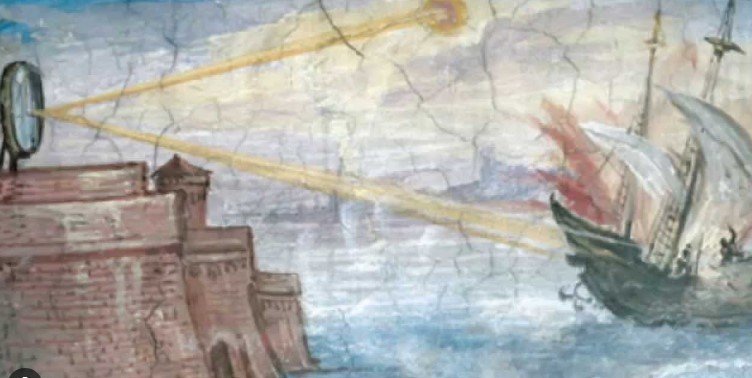
I fixed my reference. Not sure why, but I had it locked in my mind that your were building a trireme. Thanks for historical context of the ancient galleys or "reme" ships as I've started calling them. While doing my research, I was also surprised at how many versions of history there are surrounding the details of these types of oar ships. I decided I to pick the version that made the most sense to me and run with it for this project. Thanks also for the engineering lesson. I find it fascinating, but way over my head. That's why you are able to do what you do and I'll have to stick to what I do!! 😃 And just so the right expectations are set in advance, the only way my little oars will move is if I drop the whole thing and they go scattering across the floor!! While doing my research on the claw, I also ran across another interesting invention he supposedly devised to defend against the siege. It was an array of parabolic mirrors mounted atop the seawall that would concentrate the sun's light on the approaching ships and set them on fire - a death ray of sorts. But some historians insist it's legend rather than fact. Thank you, Mike! Glad to have you onboard for another ride. We will see how this thing turns out. 😵
- 290 replies
-
- 7
-
-
- Quinquereme
- Finished
- (and 1 more)
-
Welcome to MSW, Herby. Glad to have you on board!
-
I promise you, Brian, you ain't the only one!! This is the first time I've looked into this build. You have done very nice work so far!
-
SIB Concept My rendition will have a Roman quinquereme inside a bottle as it approaches a portion of the seawall of Syracuse. I will have a claw of Archimedes hovering over the top of the seawall. The claw will be hooked onto the neck of the bottle lifting it up out of the water. Here’s the usual crude powerpoint drawing of the concept. So without further ado, here we go!

- 290 replies
-
- 13
-
-
-
- Quinquereme
- Finished
- (and 1 more)
-
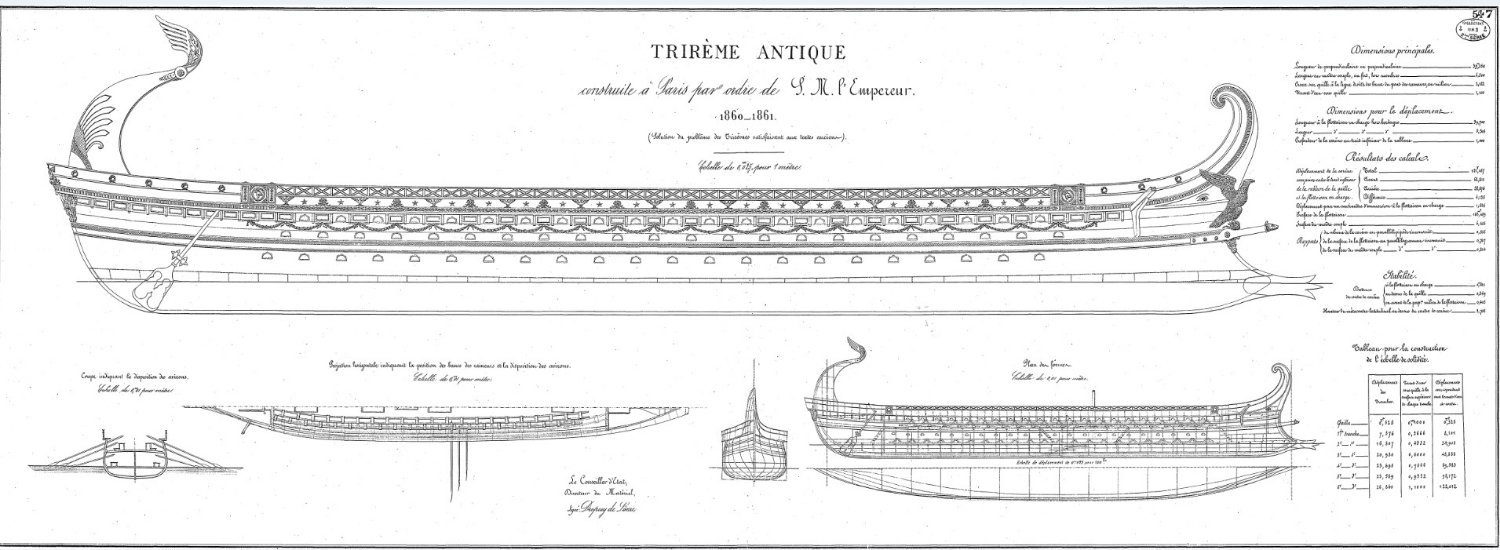
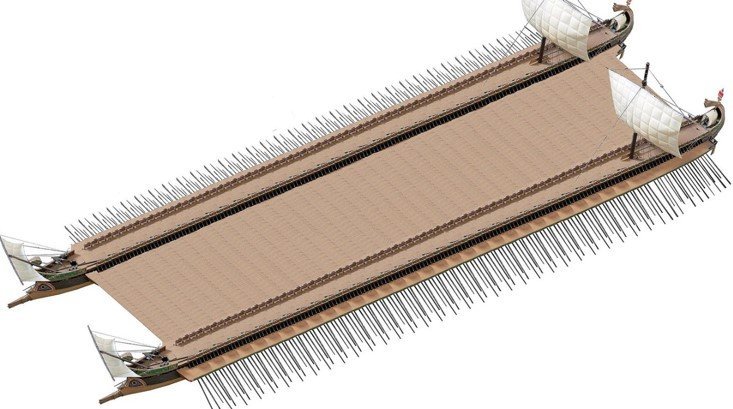
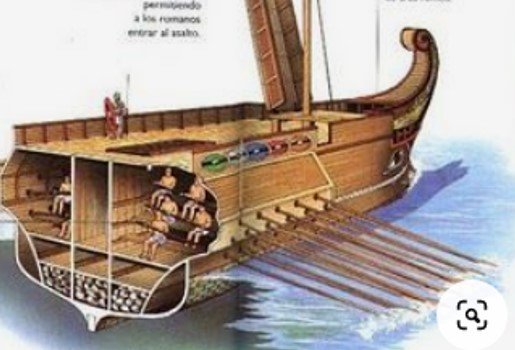
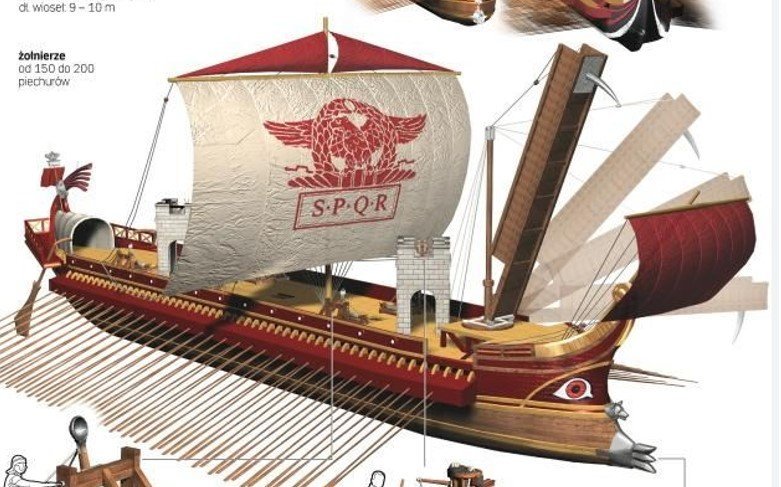
Quadrireme vs Quinquereme While Ian is building a quadrireme for his project, the Roman ships attacking Syracuse were primarily Quinqueremes. The tyrant of Syracuse, Dionysius I, is credited with the invention of both types of ships in the early 4th century BC. Quadriremes were based on biremes and propelled by two banks of oars on each side of the ship. The quad in the name comes from having 2 oarsmen per oar, thus 4 oarsmen for each vertical pair of oars. Quinqueremes, on the other hand, have 3 banks of oars on each side. The quin in the name comes from having 2 oarsmen per oar on the top 2 banks and a single oarsman per oar on the lowest bank. Quinquereme cut-away illustration below. According to Polybius, the typical quinquereme was 45m long with a beam of 5m and 90 oars per side. It had a displacement of about 500 tons and carried a crew of approximately 420 men, including 300 oarsmen and 120 marines. Here are a couple of examples of the full ship that I will try to model mine after:

- 290 replies
-
- 9
-
-
- Quinquereme
- Finished
- (and 1 more)
-
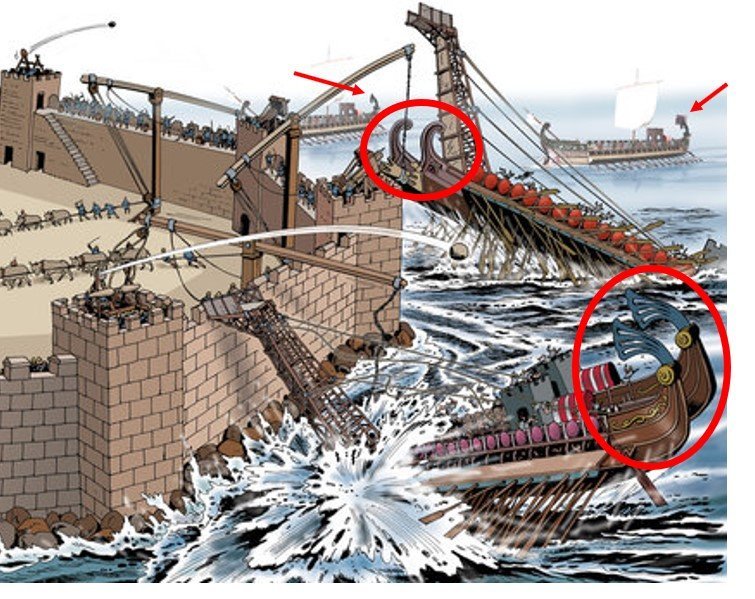
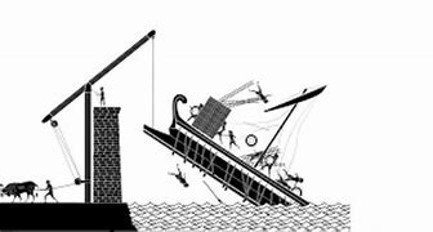
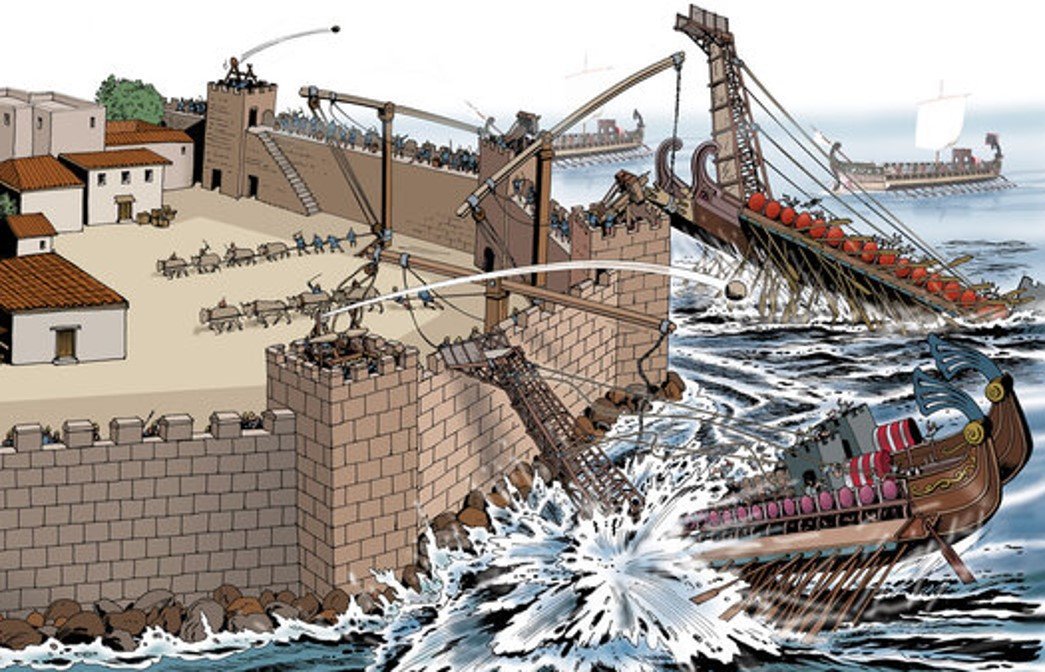
The concept for this project was inspired by @Ian_Grant's amazing build of a working quadrireme. I have been following that build for a long time and it has been an object of utter fascination for me. While I don’t have a fraction of the mechanical engineering skills required to do what Ian is doing, I did think it would be a cool idea to put a quadrireme or quadrireme-type ship in a bottle. In choosing a ship for a project, I am drawn to ones that are unique and/or have an interesting story - ships that have historical significance but might be a bit off the beaten path. I also want to pick something that offers an opportunity for an interesting presentation. So after deciding I wanted to do a quadrireme type of ship, I started digging around and stumbled upon something called the “Claw of Archimedes.” Brief History Archimedes was a Greek mathematician who lived in the city of Syracuse from 287 to 212 BC. Many consider him to be the greatest mathematician of ancient history and credit him with laying the foundation for calculus, approximating the value of Pi, and a host of other mathematical achievements. In addition, he was also a renowned inventor. During the second Punic war between Rome and Carthage (218 to 201 BC), King Hiero of Syracuse tasked Archimedes with devising a defense for the seawalls of Syracuse. The king’s particular concern was an amphibious assault from Roman quinqueremes under the command of Marcus Claudius Marcellus. Archimedes solution was to build a mechanical contraption which became known as the Claw of Archimedes. The Greek historian Polybius described the claw’s build and performance: “…(the claw) let down an iron hand swung on a chain, by which the man who guided the crane, having fastened on some part of the prow where he could get a hold, pressed down the lever of the machine inside the wall; and when he had thus lifted the prow and made the vessel rest upright on its stern, he fastened the lever of his machine so that it could not be moved; and then suddenly slackened the hand and chain by means of a rope and pulley.” Here's a couple of artist's renderings of how it worked: Multiple claws were deployed along the Syracuse seawall and were used effectively during the siege, sinking or damaging many of the Roman quinqueremes and causing much destruction of the fleet and soldiers. While the Romans eventually breeched the seawall of Syracuse and stormed the city, the claws protracted the battle and were credited with large casualties on the Roman side. Unfortunately, Archimedes eventually lost his life during the siege despite Roman orders not to kill him.
- 290 replies
-
- 10
-
-
-
- Quinquereme
- Finished
- (and 1 more)
-
Hey Gary, just stumbled onto this build log. Looking forward to watching you bring this thing to life!
-
Well, I stole my layered hull technique from Amati and their Hannah kit which was my first SIB effort! We are a den of thieves!
-
Javelin, sorry I am late to the party. This is another unique and fascinating type of ship you have chosen for your SIB project! Where in the world do you come up with these? 😃 Also, what material are you using to make the hull?
-
If you make that front porch like this, it won't sag.