Glen McGuire
-
Posts
1,985 -
Joined
-
Last visited
Content Type
Profiles
Forums
Gallery
Events
Everything posted by Glen McGuire
-
 Thanks, Pat. Sorry to hear that the flu got hold of you but glad you are on the mend.
- 290 replies
-
- 2
-

-
- Quinquereme
- Finished
- (and 1 more)
-
Wonderful craftsmanship, Bryan!
- 49 replies
-
- 2
-

-
-
- muscongus bay lobster smack
- Model Shipways
- (and 2 more)
-
Hi, from Balearic Islands, Spain.
Glen McGuire replied to Miguel Juan Calvo Fürst's topic in New member Introductions
Welcome, Miguel! Sounds like you've got a very interesting project. I hope that you will create a build log for it so we can follow your progress, -
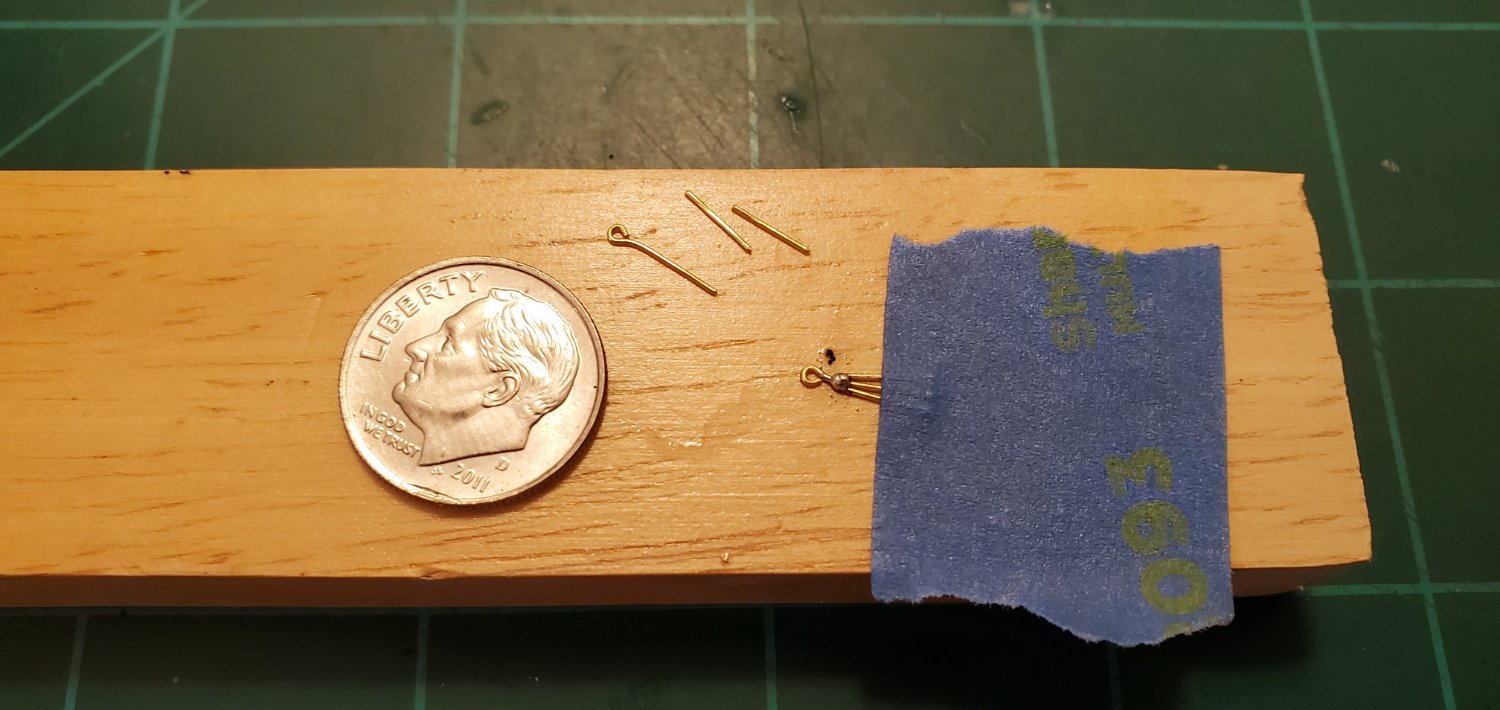
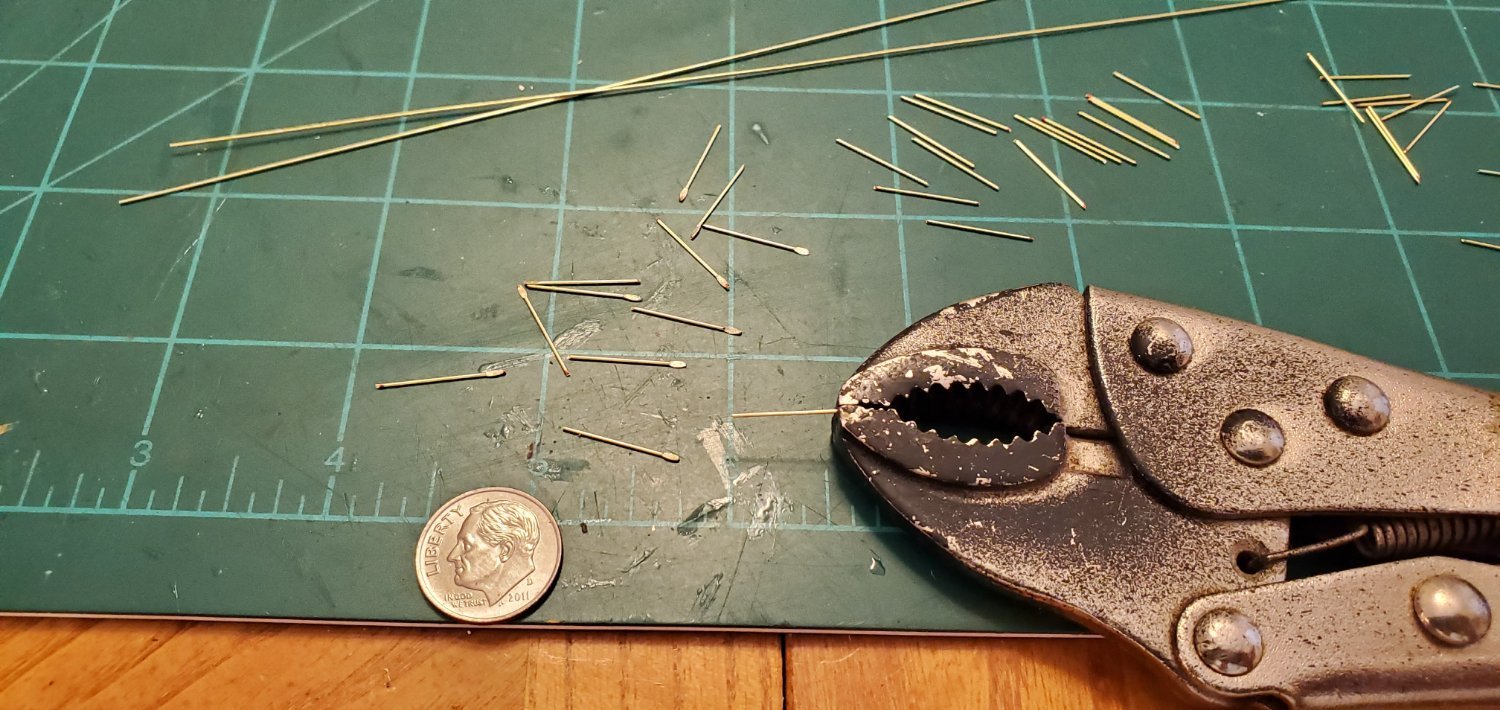
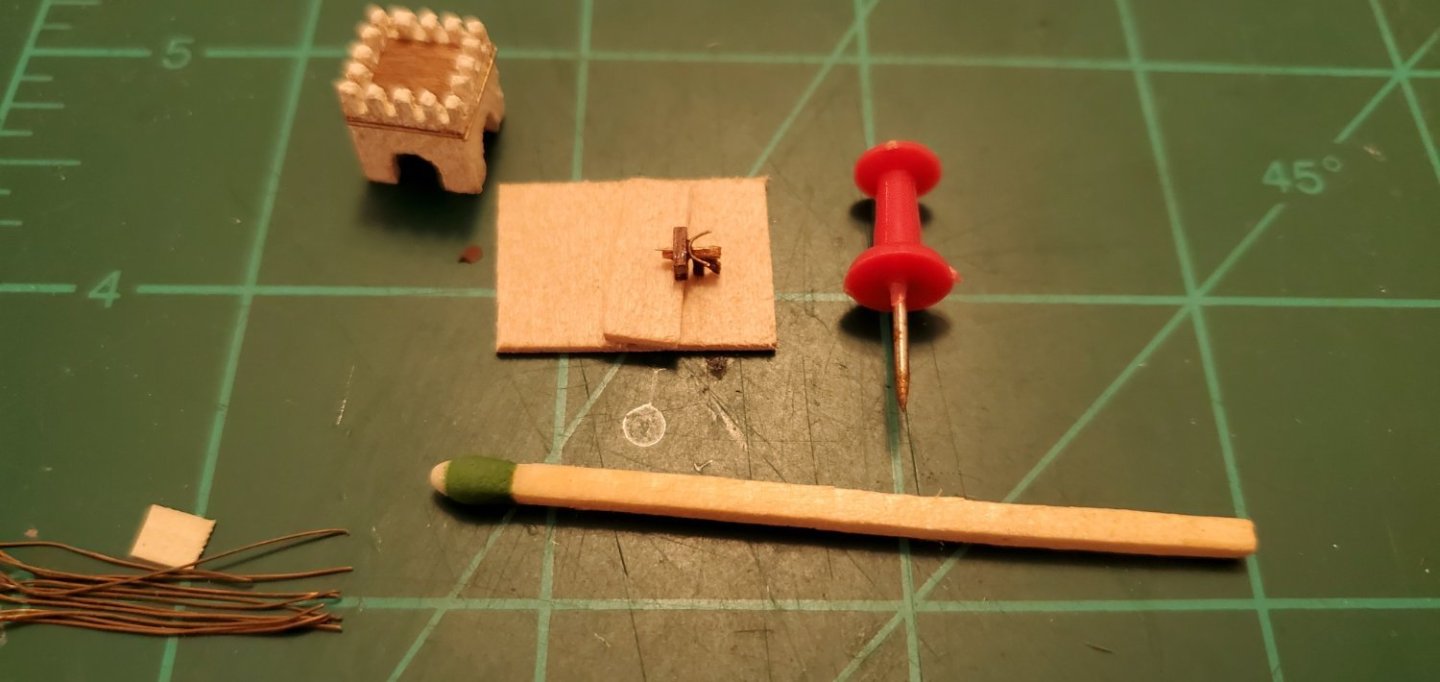
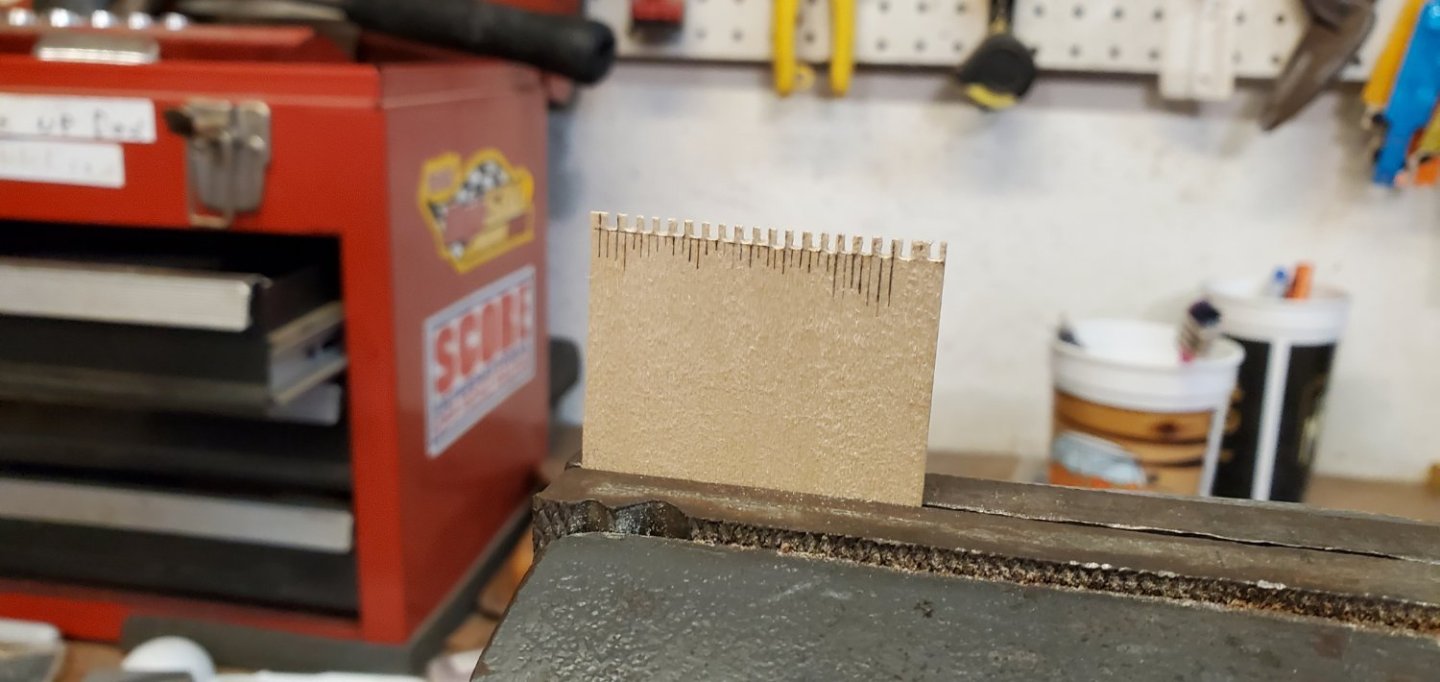
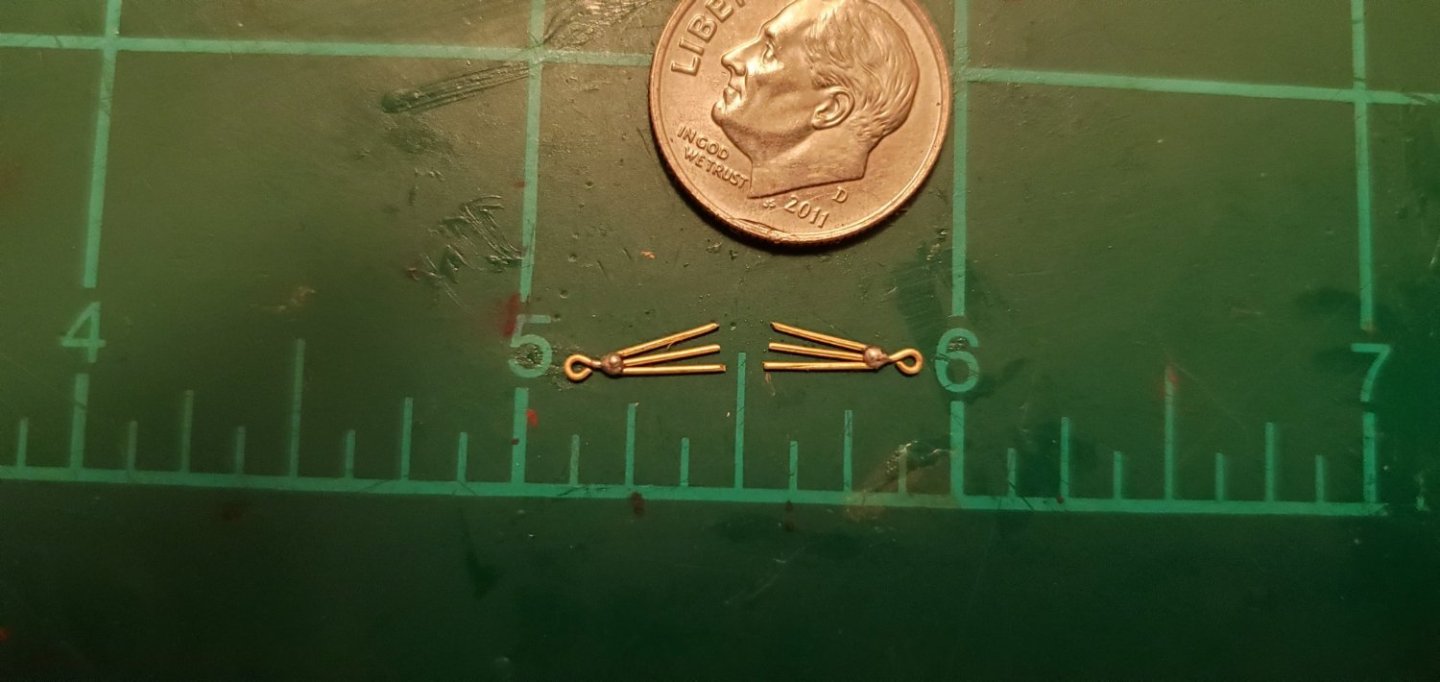
There were some interesting and entertaining responses to the question I posted on the Tips and Techniques forum regarding size reference for pictures. A #11 hobby knife blade and a Tic Tac seemed to be the most popular. But I have neither of those, so for now I will go with the push pin. I finished up with the scorpios. And dang, those were the hardest things I've tried to make for any of my SIB projects. My tweezers were acting like a hand-held ballista, launching tiny bits of wood and wire all over the place. I think I made 20 of them to end up with 6 that I thought looked acceptable. The shield part is made from some pieces of a walnut strip that was a hair over 1mm thick. For the launching arm and legs, I started with 1mm x 1mm wood strips and sanded the 4 sides down a bit. The arrow is a piece of copper wire that is 0.2mm thick and the bow is wire that is 0.25mm thick. The bowstring is made from ultra thin fly fishing thread.
- 290 replies
-
- 14
-

-
-
- Quinquereme
- Finished
- (and 1 more)
-
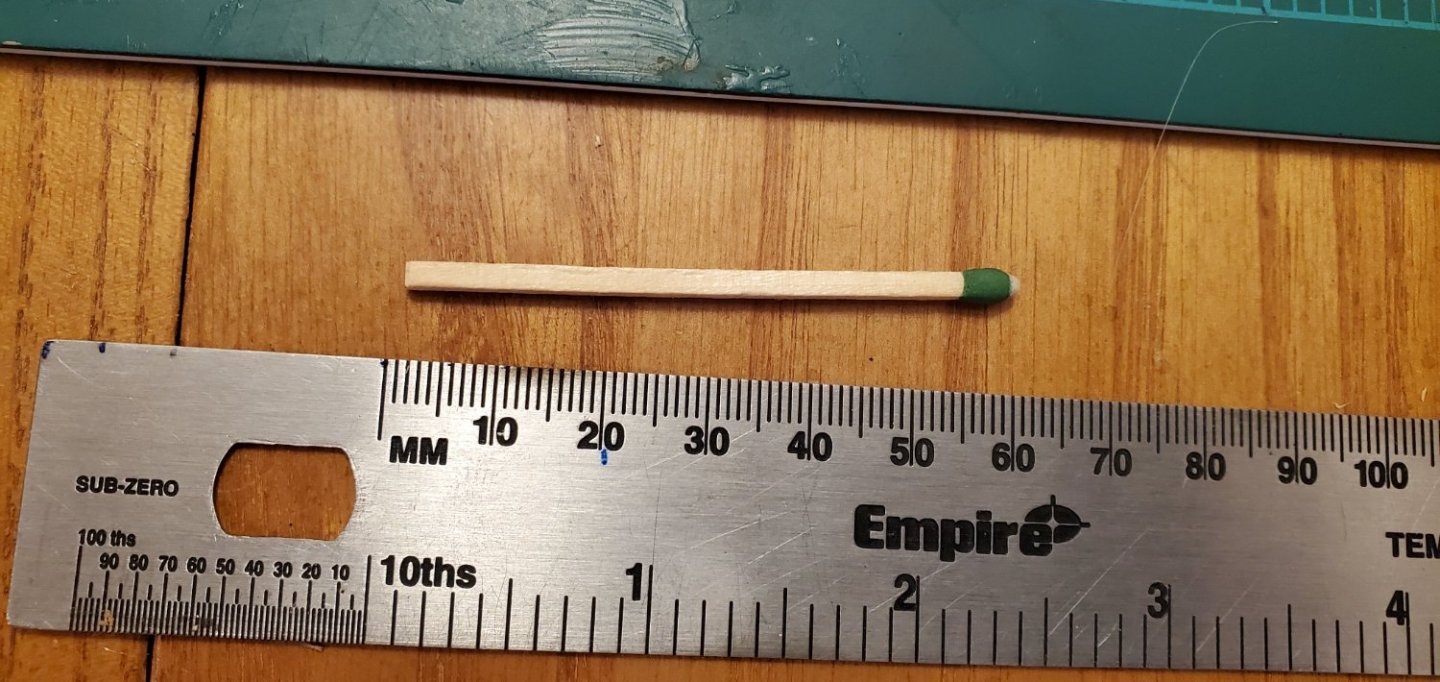
Not only is it devilry, I think it's GIANT devilry. I'm guessing the gridlines on your mat are centimeters which would make your matchstick about 4.5cm long. My beastly green thing is 6cm. Maybe everything IS bigger in Texas.
- 290 replies
-
- 7
-

-
-
- Quinquereme
- Finished
- (and 1 more)
-
That's pretty dang funny, Keith. But since I bought that box of matches here in Austin, it's probably true!! It also probably explains why they were so expensive. 😃
- 290 replies
-
- 4
-
-
- Quinquereme
- Finished
- (and 1 more)
-
Good point, Steven! However, a matchstick would dwarf some of my stuff. Anything smaller that is universal that you can think of? What about a push-pin? As a test, here's one of the scorpio weapons I've been working on today. Or maybe I just put the object next to the head of the match. That might give the best perspective for the really small stuff. Thinking out loud again. (later edit) I just posted the question on the Tips and Tricks forum to see what ideas others might have.
- 290 replies
-
- 9
-
-
-
- Quinquereme
- Finished
- (and 1 more)
-
How interesting, Ian! That means I accidentally made mine more historically accurate, right?
- 290 replies
-
- 7
-
-
-
- Quinquereme
- Finished
- (and 1 more)
-
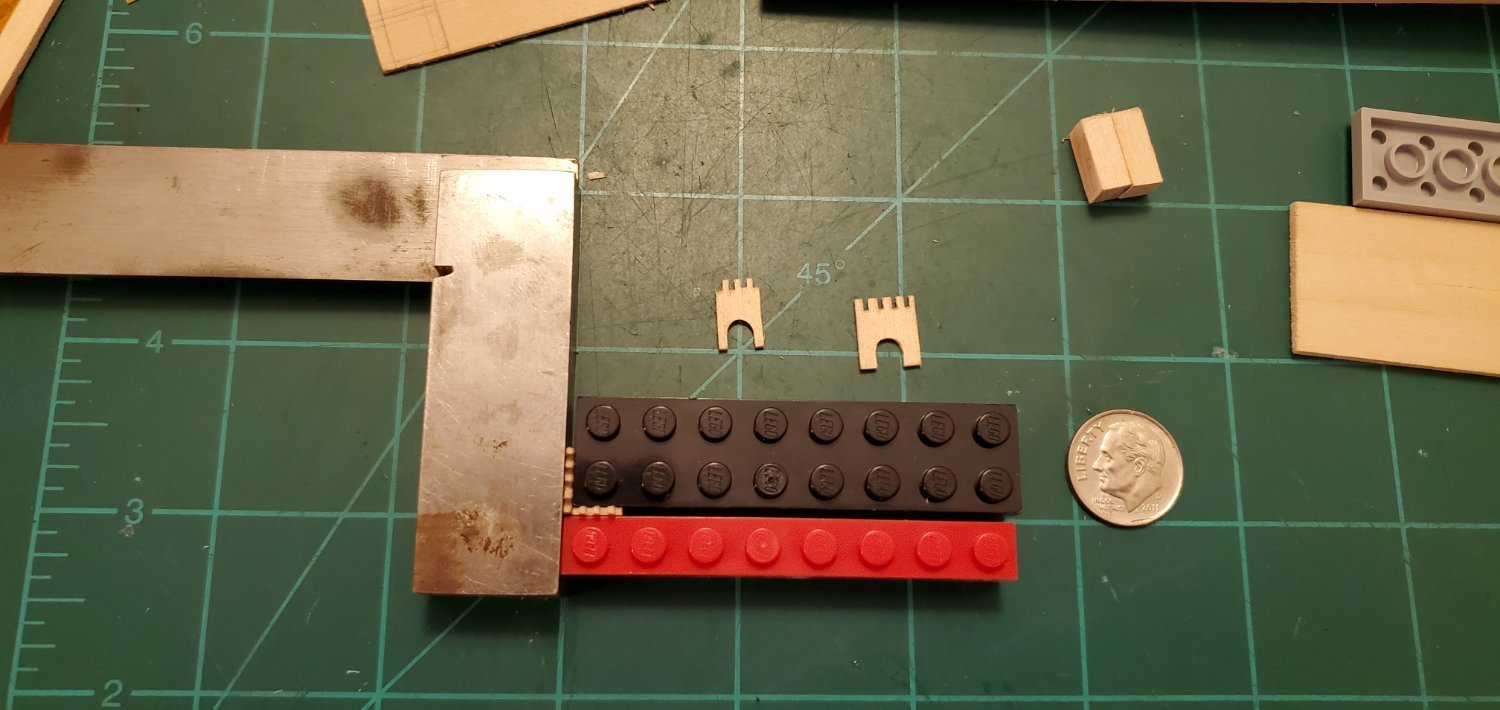
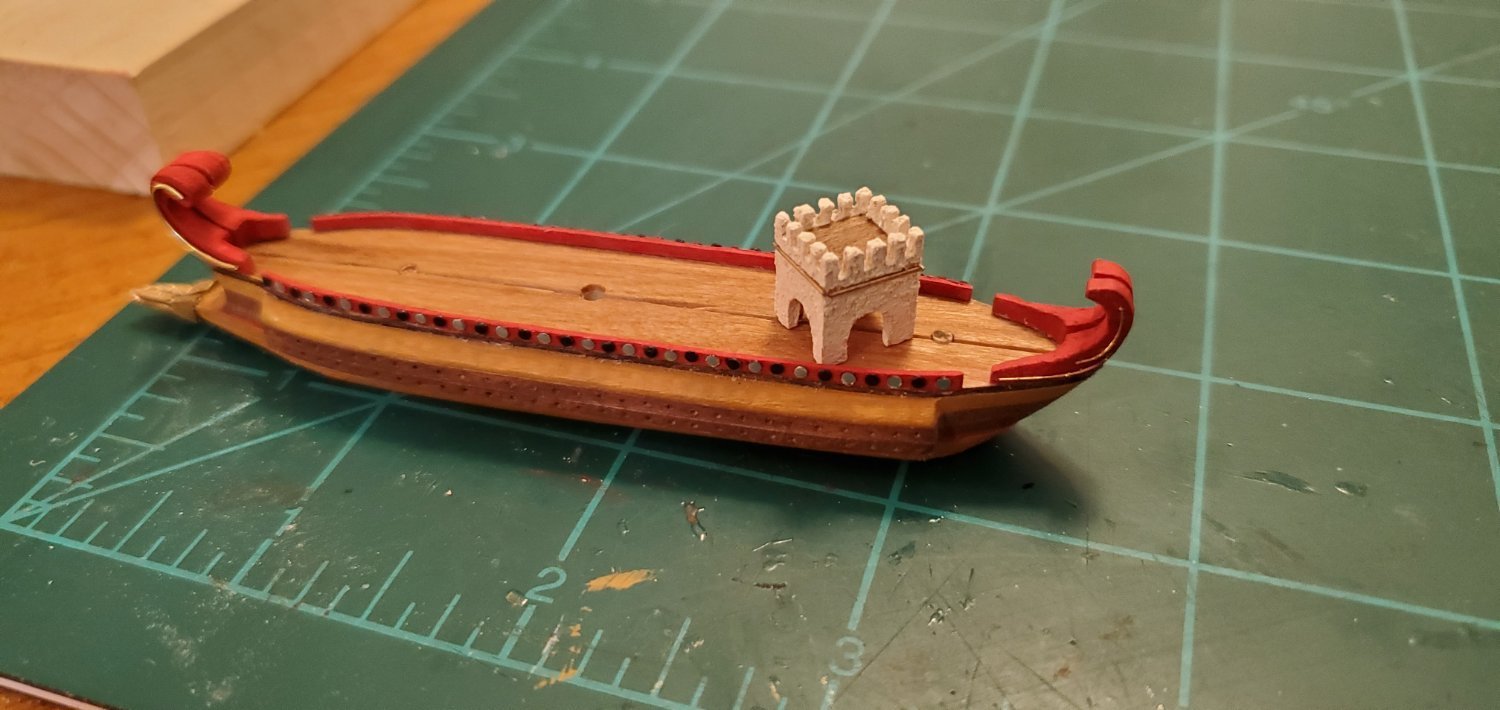
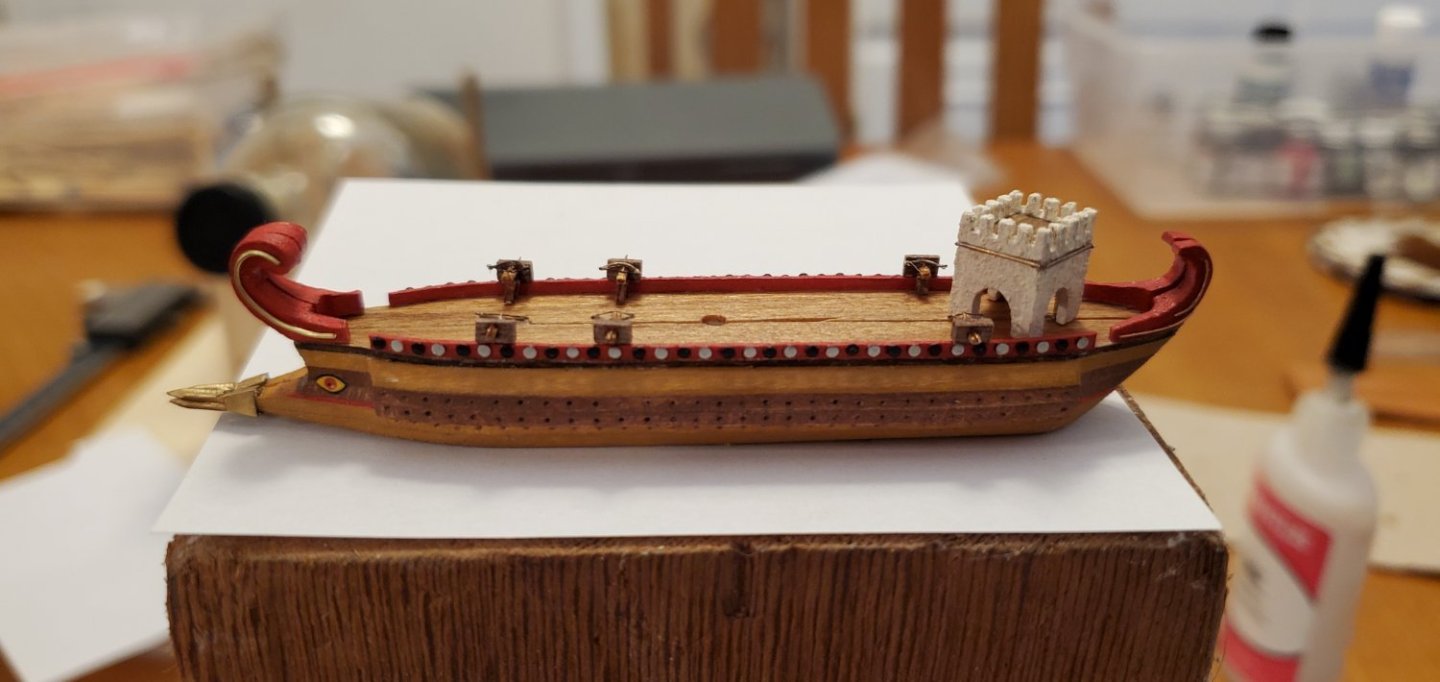
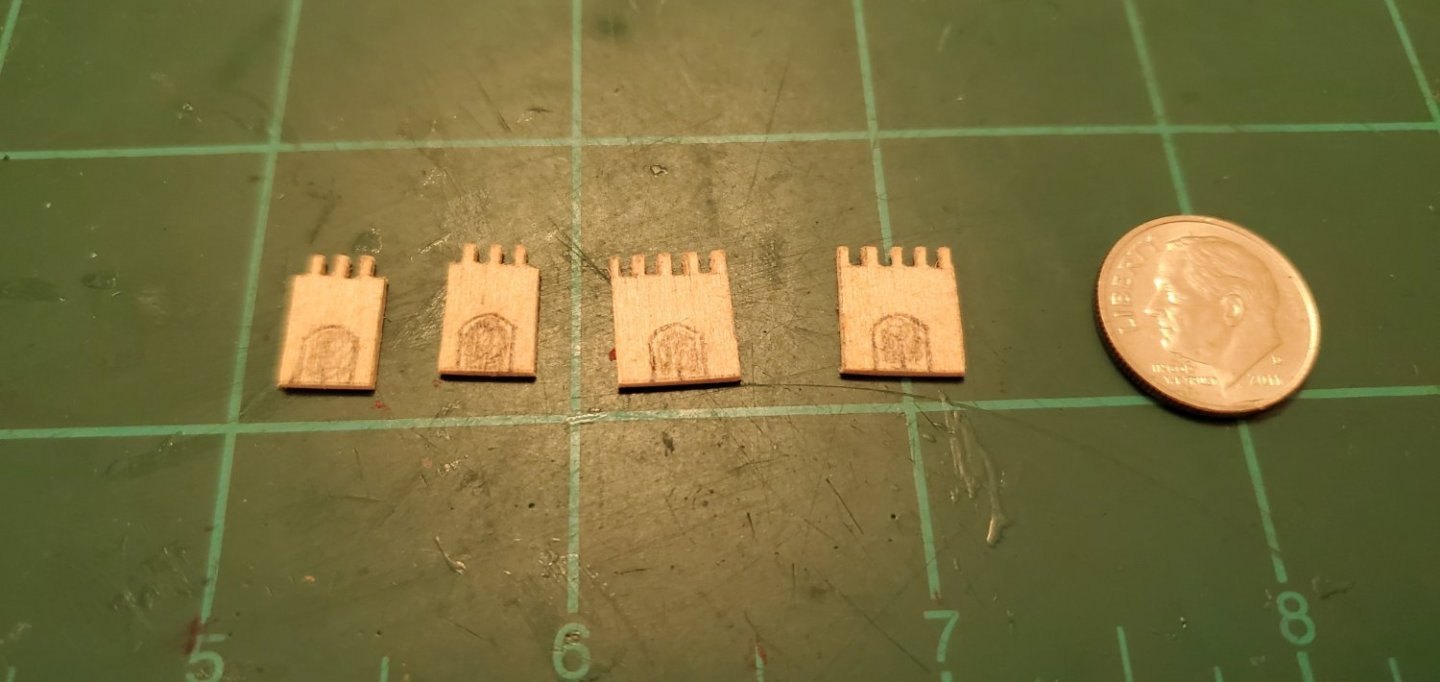
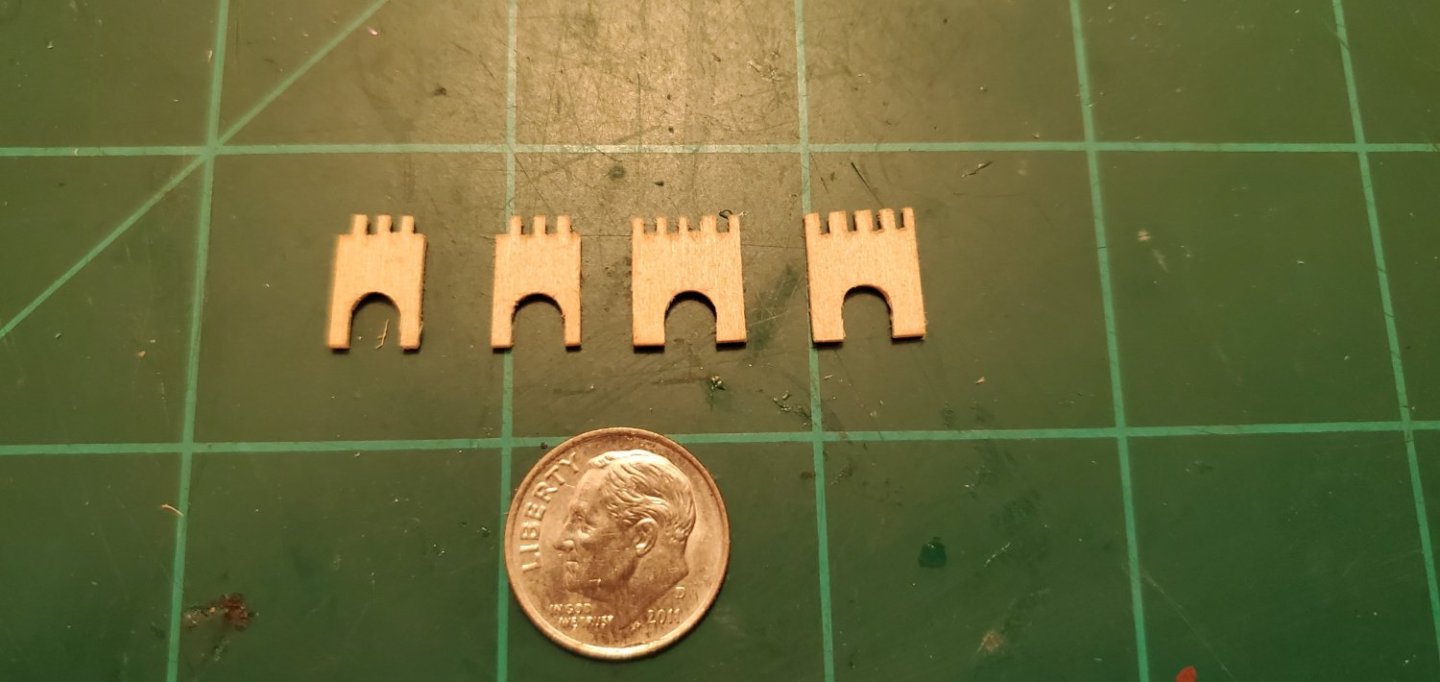
The castle or archer's tower is complete. It's made from 1mm thick basswood. For painting and texture of the surface, I used the same limestone dust method I used for the seawall earlier. The construction process is shown below. In the 4th pic, I used a tip I read in someone's build log here on MSW, but I cannot for the life of me remember whose it was to give them proper credit. The brilliant builder used lego pieces to true-up corners. I loved that idea and stole a few pieces from my son's old lego box. The last pic shows the castle dry-fit in place. I'm thinking right now that I'm gonna have to affix it to the hull after the boat is in the bottle and the 2 halves of the hull joined. When the castle is in place, it prevents that mast from lying flat enough to fit thru the bottle opening. That should not be to difficult.


- 290 replies
-
- 10
-
-
-
- Quinquereme
- Finished
- (and 1 more)
-
Adding well wishes to all the ones above, Roger.
-
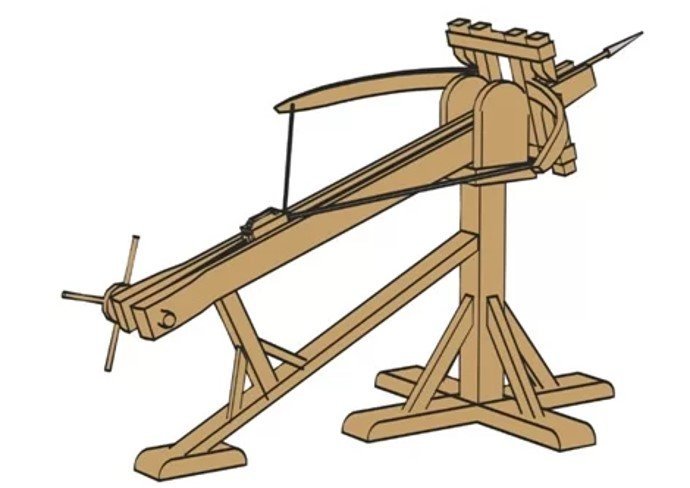
Wow! A beautiful model indeed! I did see the boarding bridge in this one. I also noticed that the fan tail curves downward in this one as opposed the the upward curve that Steven @Louie da fly shows in his post above. Hmmm. Looks like I've got a decision to make there. I may have to consult my dear friend to see if she's up for providing artistic guidance again. Thanks for the correction. I should be referring to a scorpio rather than a ballista. And yeah, the scorpio is even smaller than the ballista so it will indeed be a challenge at this scale. But the goal is just to produce something that bears a resemblance. Here's the diagram I'm using as a reference. My version won't be near as detailed since it will maybe be 2mm tall, which is enough to peek over my bulwarks. Possibly. Are you talking about this product: https://sigmfg.com/products/sig-silkspan-tissue?variant=465592156169
- 290 replies
-
- 5
-
-
- Quinquereme
- Finished
- (and 1 more)
-
Thank you, Ian! Great video and model. Things I saw in the video that I plan on adding are the castle (archer's tower), an oculus (decorative or intimidating eyeball), several ballistas strategically mounted behind the bulwarks, and of course the sail. I'd love to put an eagle on the sail like I've seen in so many pics, but I don't know how I'd do that on my sail cloth at the small size required. One thing on my list of deck fittings that I did not see in the video is a corvus (bridge) mounted between the mast and the bow. I'm working on the castle right now, then probably move on to the ballistas and then the corvus.
- 290 replies
-
- 3
-
-
- Quinquereme
- Finished
- (and 1 more)
-
I appreciate the nit-picking, Steven! It always helps make these builds better. Whether I can pull it off remains to be seen, but now I'm gonna try! Also, those are fascinating pictures of the old ram they dredged up. Thank you for posting that.
- 290 replies
-
- 5
-
-
- Quinquereme
- Finished
- (and 1 more)
-
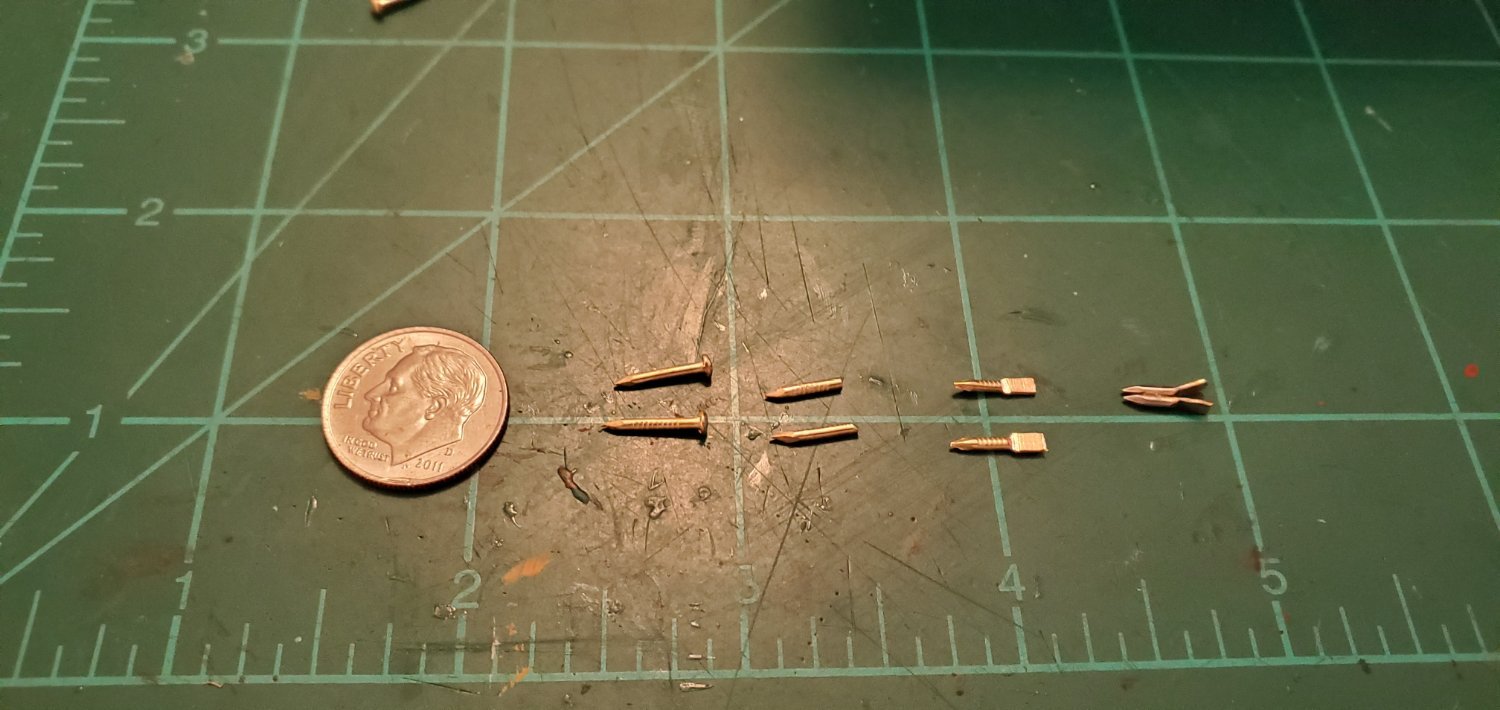
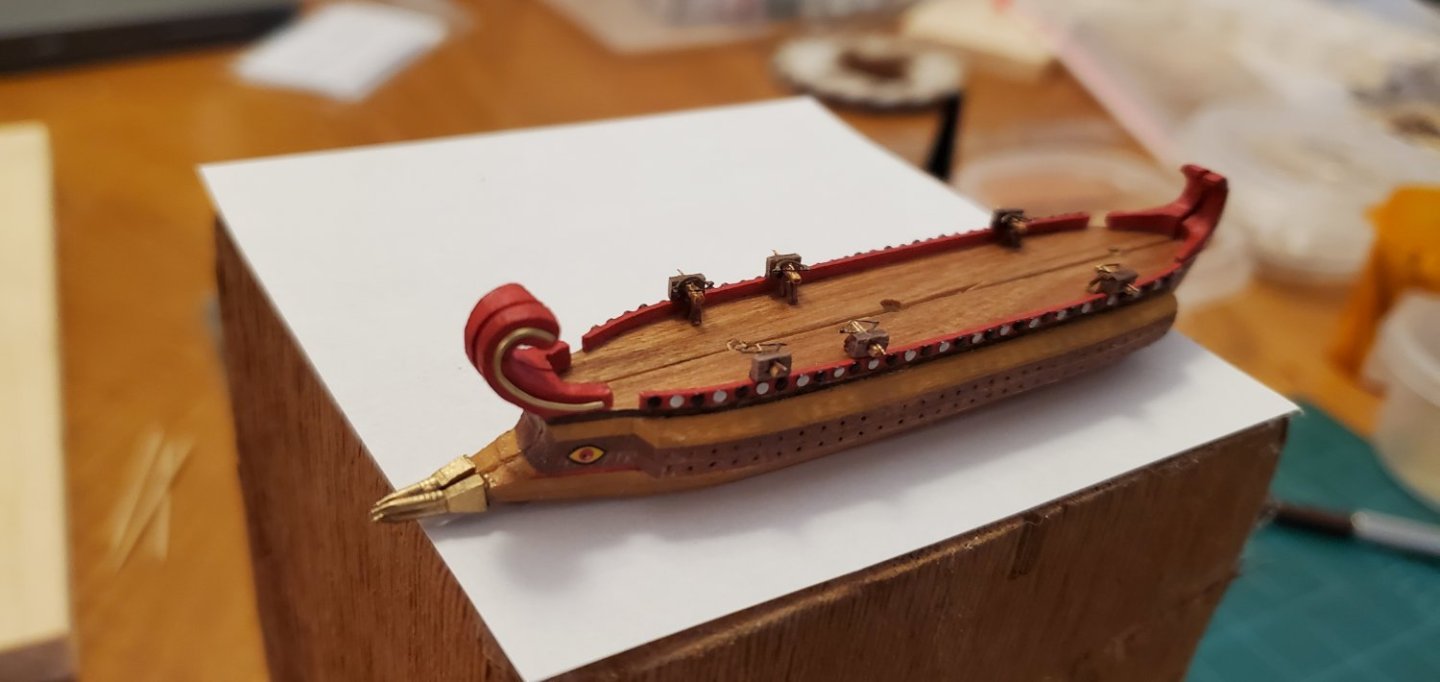
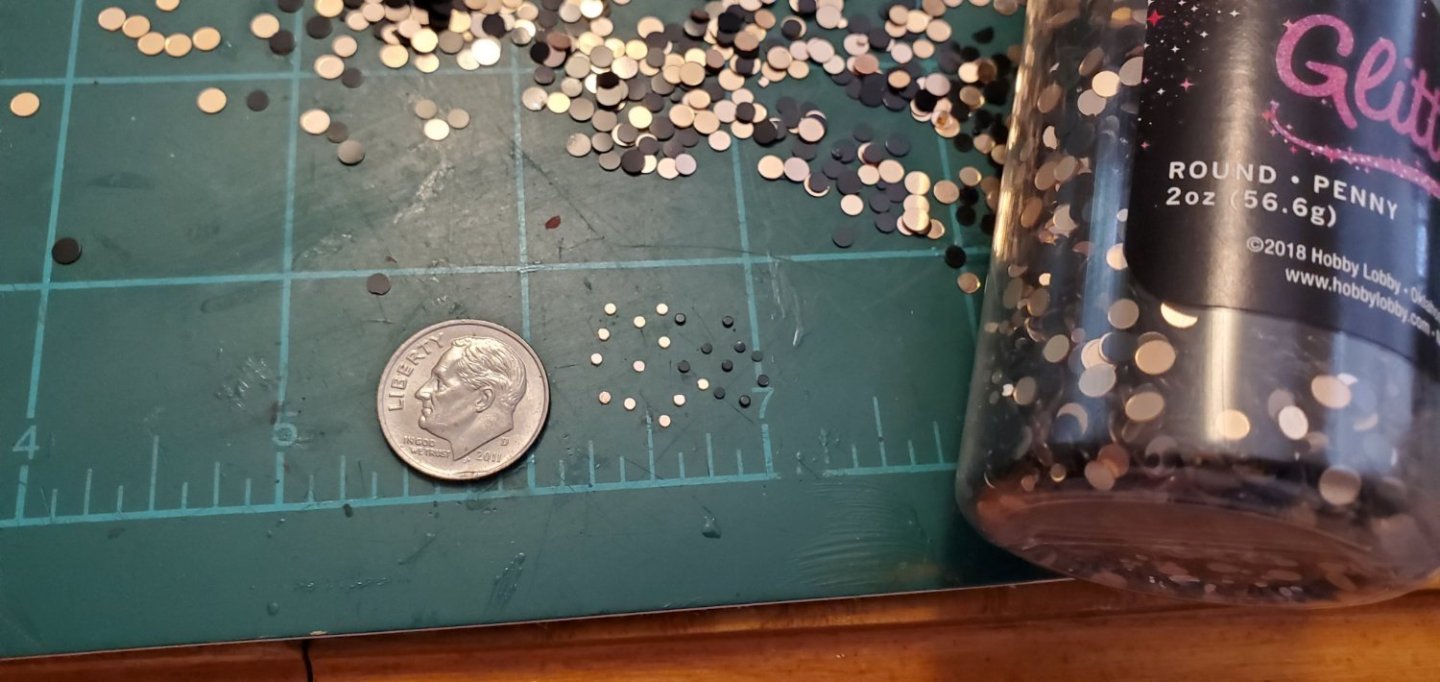
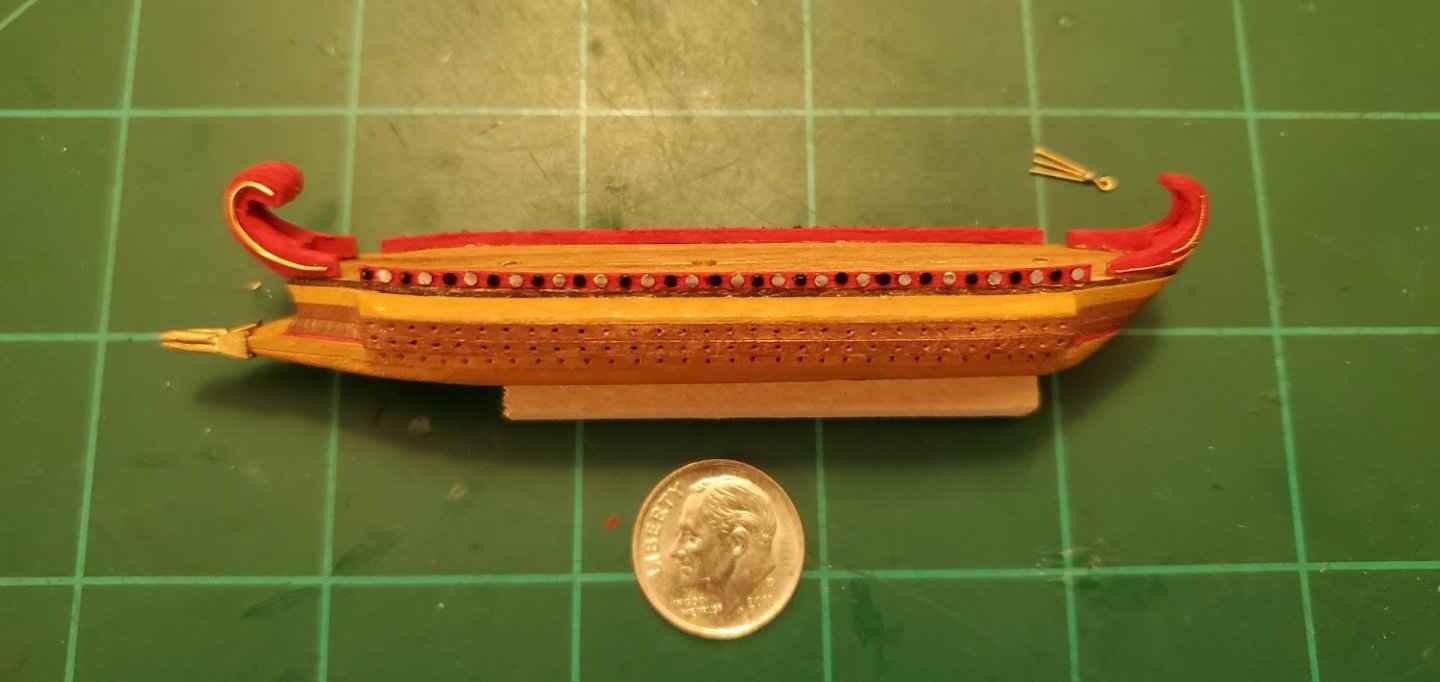
I rifled thru my bins of spare metal parts looking for something suitable for the rostrum, finally settling on some small brass nails that are 1.2mm in diameter and about a centimeter long. To get them in a shape resembling a rostrum while also being able to attach them to the waterline protrusion at the bow, I cut the heads off, pressed the round ends flat in a vise, bent the flat portions at opposing angles to fit the bow protrusion, and soldered them together. The sequence is shown below. Next it was time to add some more bling to the boat. There are conflicting references about whether or not the quinqueremes had shields mounted on the bulwarks. Naval-Encyclopedia.com says the quinqueremes did not have shields on railing. Rather they had real bulwarks decorated with "pseudo-sculpted shields". Since I've got real bulwarks instead of rails, I believe it's appropriate to go with the pseudo-sculpted shields. Now, what the heck can I find for those! After scouring the aisles of Hobby Lobby for longer than I care to mention, I found a container of round glitter containing 2 sizes. The smaller circles (slightly > 1mm in diameter) were almost exactly the height of my bulwark. Perfecto! I chose a container of copper and black colors. Alternating colors, I spaced the 2mm apart on the bulwark above the slanted roof above the upper oar deck. They were a bit too shiny, so I painted them with a flat black and flat silver. Here's the ship with the rostrum glued on, the pseudo-shields painted and in place, and some bling added to the stern post. I am going to hold off on attaching the fan tail to the stern post. It's pretty fragile, and I've still got to handle the boat quite a bit, so I don't want to risk screwing it up.

- 290 replies
-
- 12
-
-
-
- Quinquereme
- Finished
- (and 1 more)
-
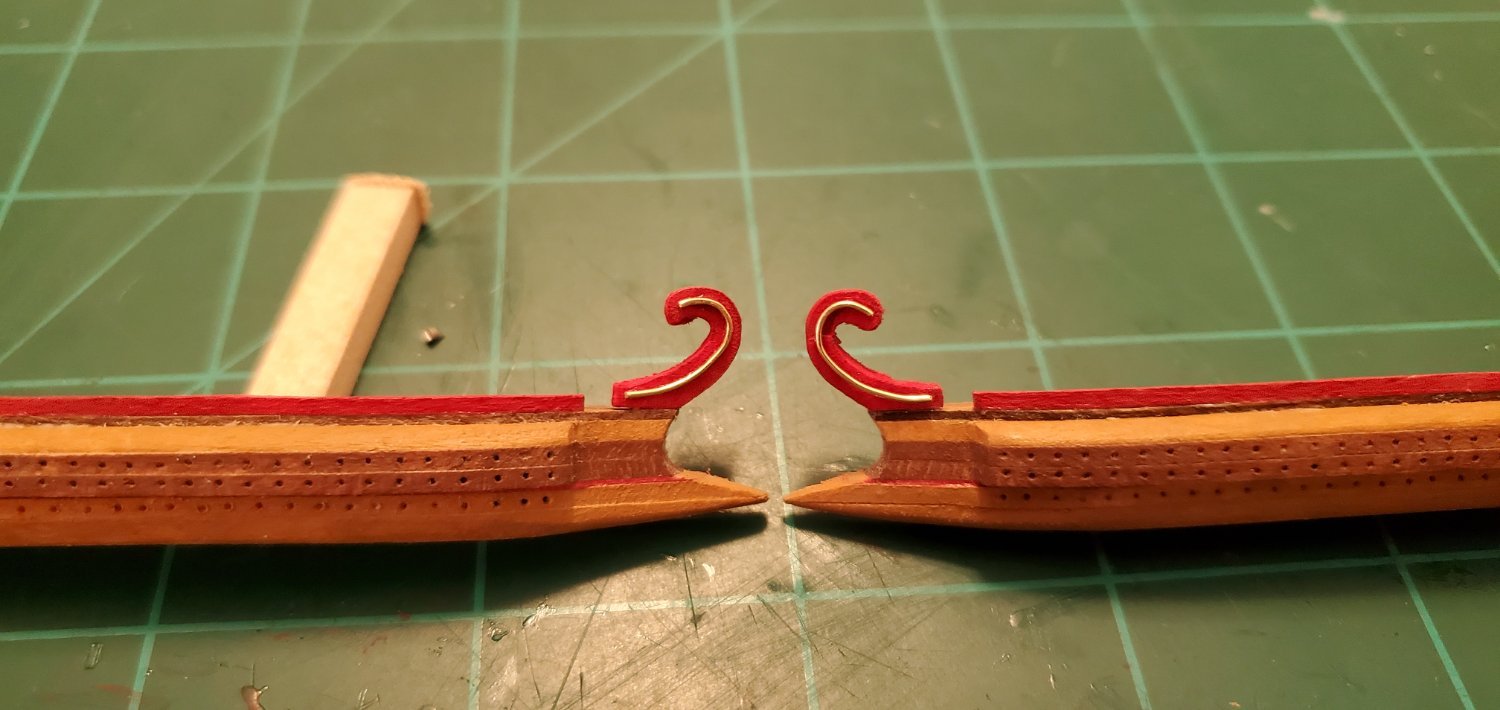
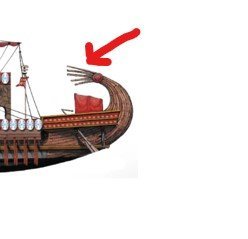
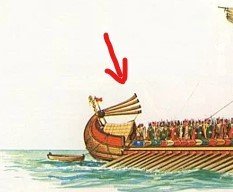
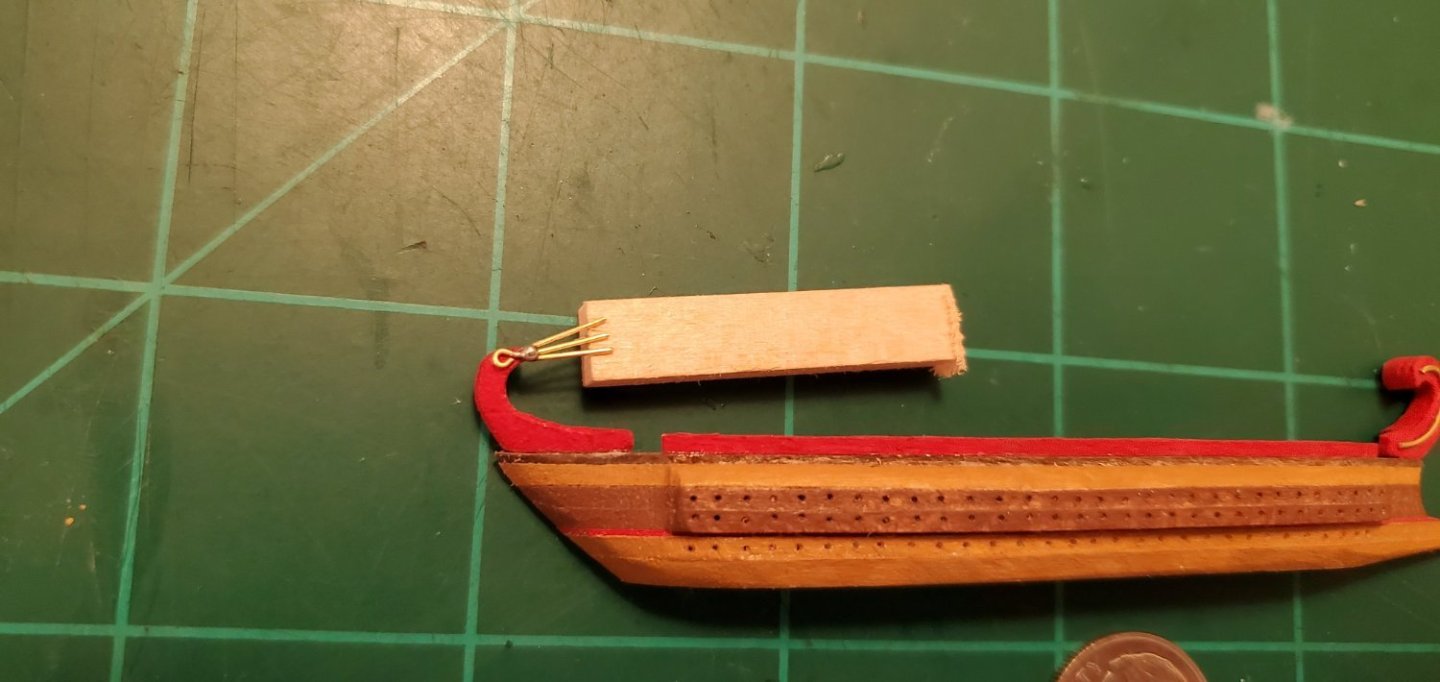
Now to make some of the decorative elements for the boat. First, a simple gold line (0.5mm brass rod) that articulates the volute on the prow. Next is the, uh, I have no idea what it is called and cannot find a name for it anywhere. So if anyone knows what the decorative, fan-tail extension of the stern post is please educate me. I'm trying to make something that resembles either of these 2 examples: Here's my effort using 0.35mm diameter eye pins soldered together. Next up is the rostrum or battering ram. The terms seem to be interchangeable for these Roman warships based on what I've read.


- 290 replies
-
- 13
-
-
-
- Quinquereme
- Finished
- (and 1 more)
-
Looking good! Glad to see you have not lost interest like you mentioned in an earlier post. Such a cool and unique ship.
-
New sailor from Seville (Spain)
Glen McGuire replied to Jesús Reina's topic in New member Introductions
Uh, I think I will be learning a lot from you based on that picture in your post!! Welcome to Model Ship World, Jesus, -
Hey Javelin, yes to both of your questions. I did consider it but, as you said, the oars would prevent the wider half from fitting thru the bottle opening. Also, since there's now real way to mask the split line of the deck once the hull halves are joined inside the bottle, I'd rather have it running down the middle for a symmetrical look. There will be some items on the top of the deck that will rest on the centerline - the mast and mast step, a corvus, and an archer's castle. What I'm thinking for those is to secure them to one of the deck halves (likely the display side) to where half of each item hangs over the edge of the deck. Once I join the 2 hull halves, the items will be centered on the deck, but will not actually be glued to the other deck half. Although I guess I could put a spot of glue on the other half of the deck where the items will connect for additional security. Kind of thinking out loud here.
- 290 replies
-
- 7
-
-
- Quinquereme
- Finished
- (and 1 more)
-
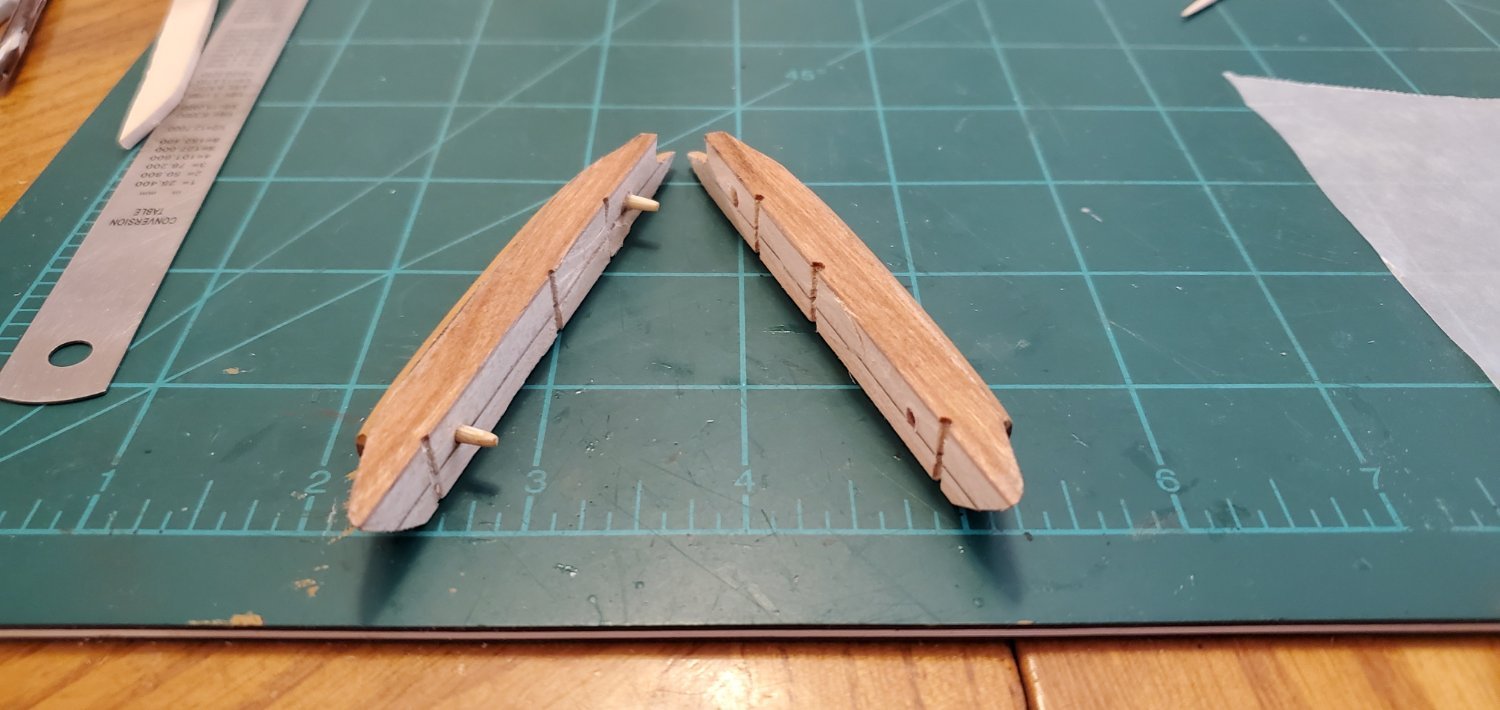
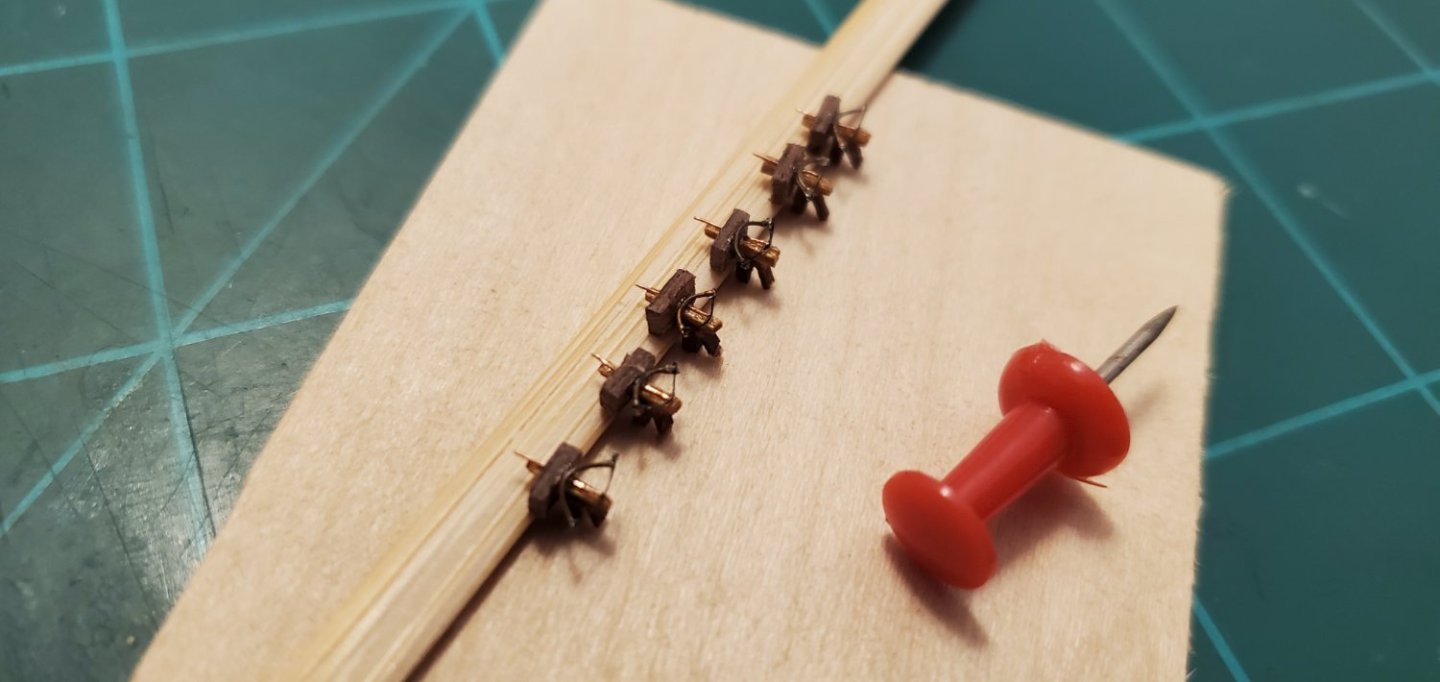
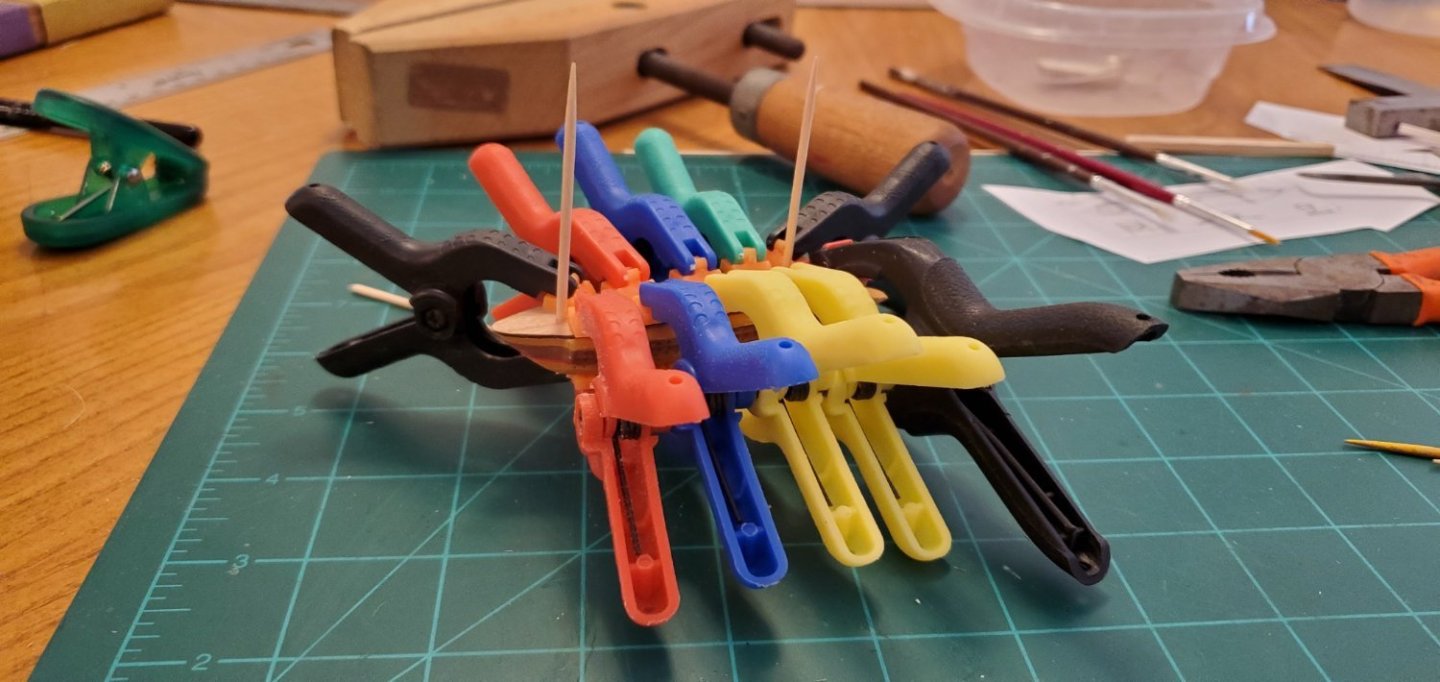
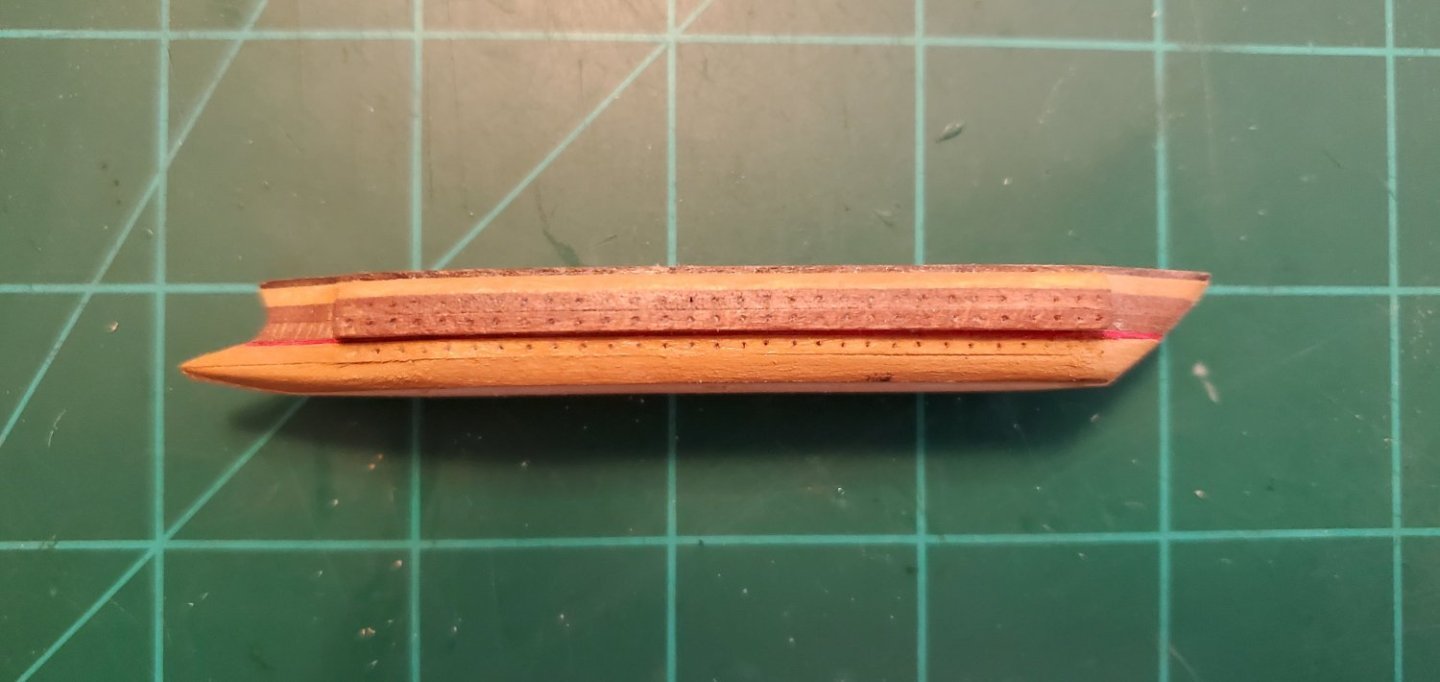
Since Javelin has apparently grounded me until I make further progress, I figured I'd better get busy. There's a new Mission Impossible movie coming out in a couple of weeks and I want to go see it. So here's the latest. Next steps were painting the 7 hull layers and gluing them together. That's another reason I like doing laminated hulls - when I want layers that are contrasting colors, I can paint them before gluing and avoid having to do pinstripe painting afterwards. While the glue was drying, I finished construction on the 180 oars (actually 190 for some overage). I take 0.5mm brass rods and cut them into 5/8" segments. Then I use vise-grips to smash down the end for a paddle. Here's the hull glued up. And then the nerve-wracking job of splitting the hull down the middle and hoping I don't slip with the saw and have to rebuild the hull. I also added alignment dowels to aide with joining the hull halves inside the bottle. Next was carving the bow and stern shapes and adding them to the hull. The final step of this update was cutting and adding the bulwarks. The mast is dry-fitted for now. Once again I'm using @John Fox III's genius hidden hinge method of mast construction. I figure I'd better get this whole thing finished by September or Javelin won't let me watch any football games!! 😃


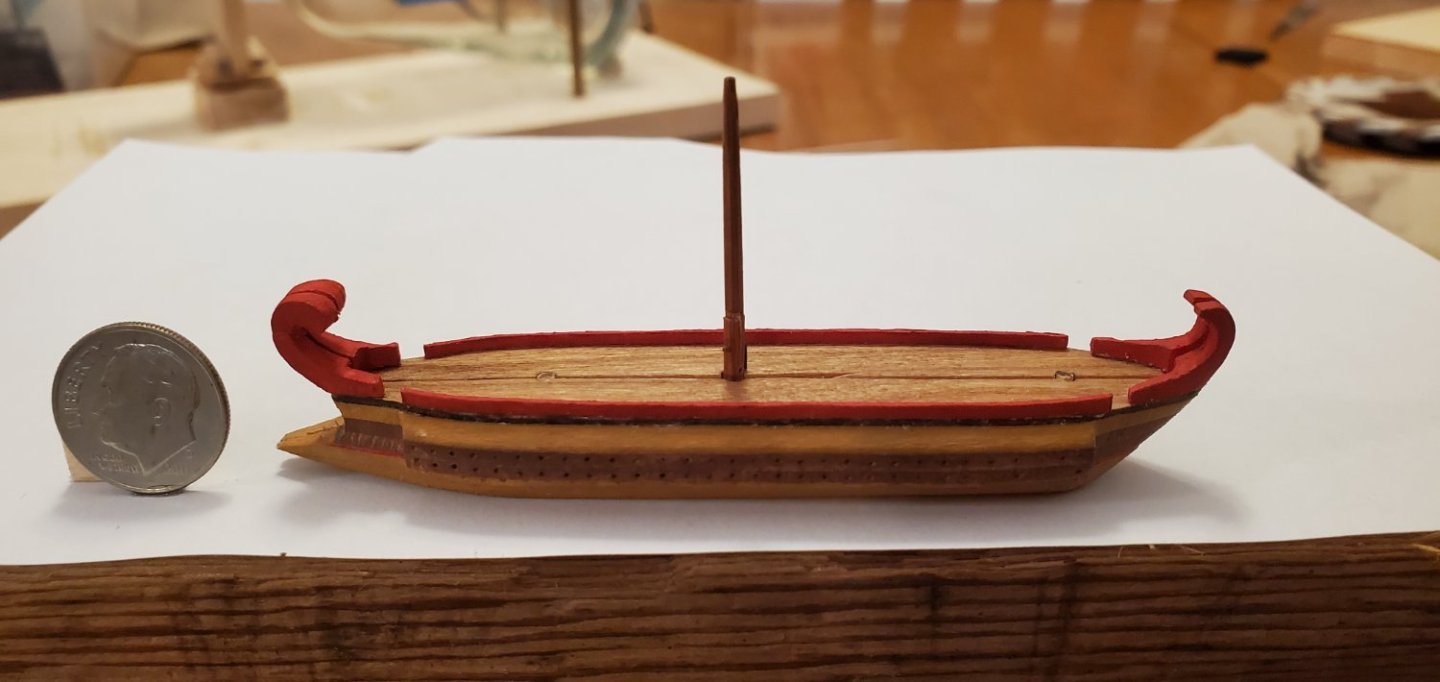
- 290 replies
-
- 15
-
-
-
- Quinquereme
- Finished
- (and 1 more)
-
More proof that our kids are way smarter than we ever thought about being! We need some pics or a video of the boat in the water!
- 536 replies
-
- 2
-
-
- Quadrireme
- radio
- (and 1 more)
-
OK, Keith. In the first few minutes of the film, before you've barely even started on your popcorn, they just might mention another ole dog named Archimedes!
- 290 replies
-
- 6
-
-
-
- Quinquereme
- Finished
- (and 1 more)
-
Heaven forbid that this build log should ever go off on a tangent, but are any of y’all fans of Indiana Jones movies? I’m a big fan and just went to see the new one (Dial of Destiny) with some folks. I won’t give any spoilers here for those of you that plan on seeing it, but I will say that it’s quite obvious Disney has been trolling Model Ship World for script ideas! In fact, there’s one build log in particular (AHEM…AHEM) that contains a lot of things mentioned in the movie. I’ll leave it at that! 😲
- 290 replies
-
- 8
-
-

-
- Quinquereme
- Finished
- (and 1 more)
-
Good luck ever topping this thing, Grant! But I can't wait to see you try!!