


Snug Harbor Johnny
-
Posts
1,379 -
Joined
-
Last visited
Content Type
Profiles
Forums
Gallery
Events
Posts posted by Snug Harbor Johnny
-
-
On 8/21/2025 at 11:31 AM, rwiederrich said:
Got a link to that build log?
Rob
Its just a single entry in the "At a Glance" log, page 2, entry #59 ... unsure if there is any 'link' to a single entry, so I can paste below. I look at her often, and have taken some pictures as work is done to put into a log when finished (since I have a couple unfinished logs already - and there are enough of those). I was focused on authentic lines, and the vertical stack of varying thickness of basswood worked like a charm. All the grain was well oriented and I was amazed how quickly it went as far as I got. 1:110 means that I can use the Revell deck houses and deck equipment as they won't be too far off, as well as some of the stuff in the 1:124 scientific kit where convenient.
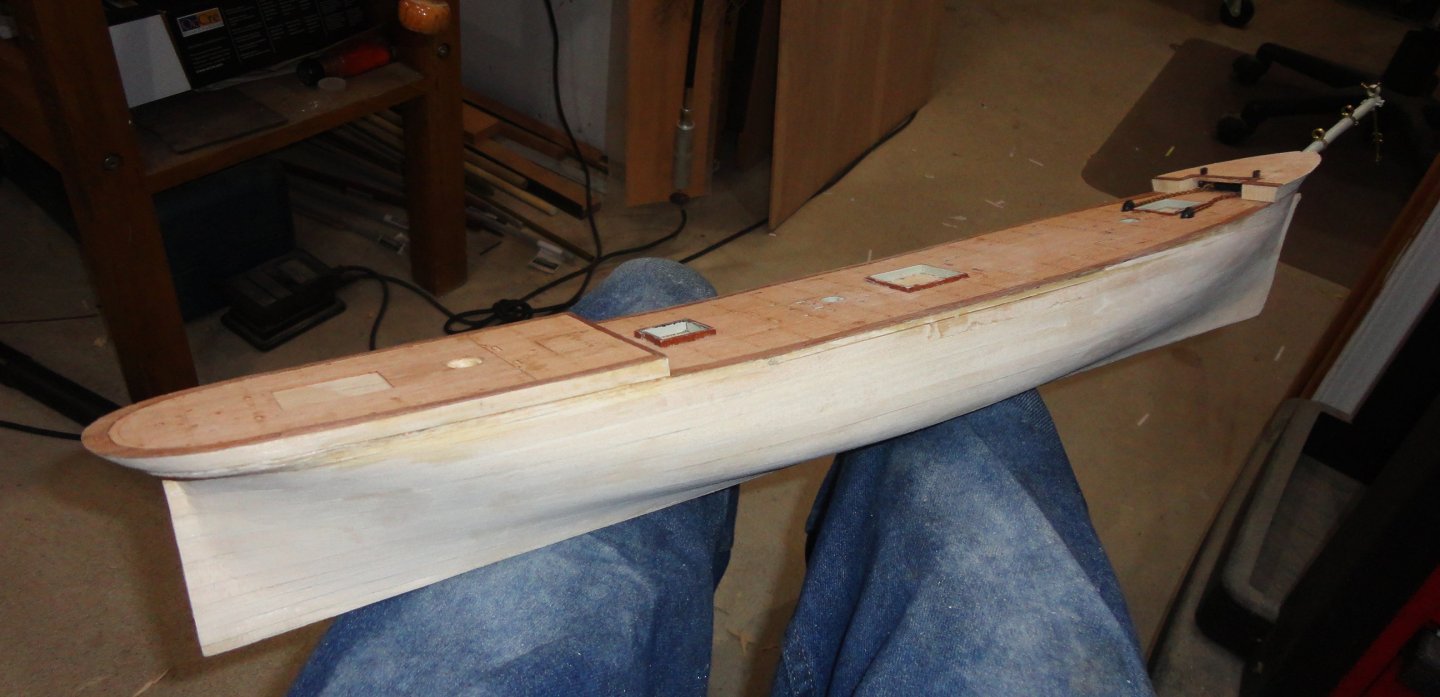
Ahoy, mates! Old snug hasn't posted anything in a while since present builds are on hold while sideline work is being done on a pet project 'thought about' for years ... my own shot at a more accurate Thermopylae than can be had with any of the few kits ever offered 'out of the box'. The inspirations are the fine MSW clipper builds of late. Collected were the Revell 1:96 ca. 1959 - (H.I.S. laser deck ordered) and the aprox. 1:124 Scientific Thermie kits. The former requires far too much busting (and still would have compromises) and the latter has quirks of its own as well as being just too darn small for my skill level (less now with age and bumble fingers).
The most important to me are the ship's lines (available on the internet) and hull outfitting (inspired by the detailed Cyril Hulme model in the Powerhouse Collection, Sydney Australia), but I want to represent her converted to Barque rig as pictured docked at San Fransisco before she was painted white. Below is only a single snapshot of the hull as-is now after 60 hours of work (over many weeks as time permitted), and only AFTER completion will a build be created ... no more unfinished builds.
I bought various thicknesses of basswood sheet from Blick art supply to conform with the thicknesses of the accurate lines in elevation scaled to 1:110, transferred the 'top view' (plan view) of each layer with bilateral symmetry to the respective sheets, then glued-up the stack. Plastic cut-outs from the Revell deck were inlet where needed for masting and other deck items, covered by the laser deck (modified to fit the altered scale) - and the forecastle made from scratch. I found that the hull almost 'carved itself', as the corners of the layers were simply hogged off with a bent spoon gouge then sanded to the lines where the layers meet. It was as if there an infinite number of hull templates were already in situ - ∫ d(p), the sum of all possible profiles ( a 3D calculus exercise).
A number of plastic and metal components from both kits will be used as convenient (great idea, Rob, to build the way of least resistance), as the 'in between' scale of 1:110 isn't too far out for many kit items. Others I'll just have to make. Sans sails (as in the San Fransisco photo), it will have standing rigging only.
-
20 minutes ago, rwiederrich said:
I Generally, I have always held, that I am a lazy modeler.....so if I can pull off a task with the least amount of effort.....I'm going that way.
This is sooooo like me (the lazy part). My side project - a Thermie hull at 1:110 scale scratch 'layer caked' from bass sheets, carved and sanded with trimmed-down HiS laser deck over inlet Revel deck pieces (a base to eventually mount plastic details on) was done in 60 hours the 1st 3 weeks of January ... and has been sitting there ever since while I decide how to finish it (a picture was put in the current projects log). Once the gardening season is over I have a few ideas on how to do that.
-
PVA craft glue is used in book binding where some flexibility is desired, e.g. the spine of the book. I tried it experimentally when 'layer caking' a solid basswood hull (from pieces pre-cut along plan view lines), and occasional glue-rich (yet cured) seams didn't sand as well as those glued with wood glue (aka Titebond - aliphatic resin, which dries hard). I've had good results from wood glue, quick set epoxy, and CA on wood-to-wood bonding or wood over filler.
PVA can work when gluing wood decking over a plastic substrate, but this is a special application.
-
51 minutes ago, ClipperFan said:
Rob,
I don't always put much stock in the full accuracy of Buttersworth all the time. It can be maddening to try and reconcile such issues. It makes no sense to have safety rails beyond the aft poop deck. Duncan McLean, a sailor himself and friend of Donald McKay listed the aft poop deck as 44'. That dimesion is repeated in several other reliable articles. I would disregard those extended rails as being inaccurate.
Besides, one should take into account the "preponderance of the evidence". A datapoint that is an 'outlier' from the bulk of the evidence has relatively little weight ... and artists are known to use 'artistic license' at their discretion.
-
17 hours ago, Stevinne said:
While I believe a bad rebuild contributed to the capsizing, I'm not ready to totally ignore the lucky shot argument. Mary Rose was engaged with the French galleys. The galleys were firing heavy balls at the ship. Much of the ship, including the bow areas on both port and starboard sides are no longer there. Since we can't rule out that she wasn't hit below the waterline by a large ball, and we know that she had a successful career for decades up until her sinking, I think it is reasonable to consider that a French ball caused flooding that helped lead to the ship losing stability and not performing as the command crew expected as they made a turn.
Fair points - and unless a well-funded effort to recover every possible scrap of surviving wreck can be done at some future time, we may never know the entire story. The CSS Alabama had a 'lucky shot' that lodged in the rudder post of the USS Kearsarge ... but 'unluckily' failed to explode. Imagine the outcome had the round gone off. History is full of 'what ifs'. With the Mary Rose, we're still short of evidence. And as the parents of most teenagers learn, "The absence of evidence is not evidence of abstinence. "
- sheepsail and GrandpaPhil
-
 2
2
-
'Looks like this would be a GREAT model to gently restore, and a good way to get some experience with rigging without first having to build a hull and outfit the deck. The paper flags have deteriorated, so you could re-create them. The rigging might also be on the weak side, so replacement with scale rope from Siren or Ropes of Scale can insure a long future life for the model. Take pictures so you can replace existing rigging the same way. There are fife rails near the base of the masts, but you can also add a few pin rails inside the bulwarks if you opt to add additional lines. The yards are tied to the masts, so that can be re-done, or you can opt to add yokes/parrels and add halyards. The sails can be replaced (if fragile) by finer material.
Once the yards and rigging are cleared (the masts can be left in place if they won't pull out), dusting and perhaps a few touch ups will freshen the hull and deck. Then re-assemble and think about a case to limit future dust accumulation.
Fair sailing !! Johnny
-
Someone with access to a lathe and metal stock could turn their own pulleys to suit whatever non-toothed belt they have that will deliver approximately the same blade speed.
- thibaultron and sheepsail
-
2
-
With parts missing, can the condition be "great"?
-
1:100 is a relatively small scale to work in (as it tests my skills) - and you are doing a GREAT job of it !!
-
Now that you've stained the strakes, Pavel's scarf joints mostly 'disappear'. The finish on everything looks great !
- Kevin and Old Collingwood
-
2
-
One can use 'natural', but I still think it seems vey light - and may 'read' nearly white in photographs. Brand new full-size rope starts out on the light side, but it doesn't take long under use to darken into a medium tan. Builders can used their own judgement, as the whole point is to please oneself with any build.
-
Siggi, I've received the steering board handle you sent me ... and now I see just how detailed many elements of your project are at 1:50 scale. I salute your skill and craftsmanship ! Johnny
- Siggi52 and Keith Black
-
2
-
2 hours ago, hmcarlin said:
A source for linen thread is:
I've purchased a few of their smaller spools and it's good quality!
Of course, it is white thread (the only kind I've seen), so the resultant scale rope will have to be dyed to the desired color. The classic linen fishing line was also white, but vintage examples are now slightly off-white. White rigging on model ships just doesn't look right anyway. Standing rigging should be either black or a very dark brown - that includes the lacing for the deadeyes and ratlines. Running rigging should be tan - but not too light or it looks "whitish" in photographs.
- robert952 and SiriusVoyager
-
2
-
When using polyester thread, the scale rope made can have a tendency to unravel when cut. Baking (and note that this for a limited time at a moderate temperature 5 - 7 min at 300 deg. F ... to avoid melting) seems to 'set' the rope better and the raveling is far less. Cotton (or linen) scale rope can ravel also, but does not need heat setting. Cotton can weaken over decades, and that used on my Dad's clipper crumbled after 70 years. Heat, pollutants and UV exposure will affect this - as well as for many materials. No doubt, making scale rope from multiple cotton strands should be more durable - but linen is better a s natural material.
The old-timers used linen fly fishing line (known as Old Cuttyhunk) and linen does stand the 'test of time' for rigging as well as sails. The indications are the Polyester scale rope will also hold up over the decades. BTW for either scale rope making or with full size rope (and I've demoed making some of that), one first spins the rope - and the trick is to balance the number of turns v/s counter turns in step one and step 2 of the process. If you've done that, the rope won't 'kink up' on itself.
If nearly in balance, the rope will only kink slightly. The solution is to 'whip' the rope around so that it will get rid of any excess counter-twist. Then with one end fixed to something or restrained as convenient, you pull on the run (not too hard) to get the twist to meld to itself better. Stretching a few times will give a little more length and reduce the tendency to ravel when cut. The poly gets heat-set as noted above. Those who don't want to make their own can buy good scale rope from Syren or Ropes of Scale, as scale rope is far better than what is supplied in most kits.
You'll notice that kit rope has a lot of 'fuzz' in close up shots. Poly has the least fuzz. Cotton rope will have some fuzz, but then what I've made from cotton has been QUICKLY passthrough a (relatively) low temp flame of an old-fashioned alcohol burner. This 'singes' off most of the fuzz, but if you don't move the scale rope fast enough - the line will catch fire and part. DON'T do this with polyester scale rope. Old linen fly fishing line doesn't have much fuzz because of the long fibers (cotton is short fibered), but it is VERY hard to find, since it was not made since the 1940s - and because some people collect spools of it, Old Cuttyhunk is very expensive. The rope size is also larger - for 1:48 scale models.
- robert952, SiriusVoyager and Ryland Craze
-
2
-
 1
1
-
Your rig is similar to Syren's Rope Rocket - the videos on scale rope making on the Syren website are very instructive. The consensus is the Guterman poly sewing thread makes the best rope (oven 'set' 5 -7 minutes in a 300 degree F oven after winding and stretching), with Mettler a close second. I've used both, and the standard sewing thread has been available in sewing retailers (those that have not closed) or on line. Its best to buy in person to judge the color.
The thread is aprox .006" in diameter, and using a single thread on the rig set up for three strand rope yields scale rope about .010 in diameter - that represents 1" rope at 1:100 scale (or thereabouts). Using 2 threads on each of the 3 strand setup (6 threads in all) yields scale rope about .020 in diameter. 3 treads on each of the 3 strands to wind (as I recall) yields closer to .030 scale rope.
By experimenting (e.g. first making .010 rope and using THAT on each of a 3 strand set up - mind how the twist runs - can make thicker rope for larger scales). You get to control the product as needed.
-
Thats some deadrise on the Benjamin F. Packard ...
-
Glad to have you aboard, mate! Johnny
- Ryland Craze, AJohnson and Keith Black
-
3
-
'Hope you didn't refund what was NOT the product you sent. If he contest this, you have a case for customer fraud/theft. Stunts like this were why my Admiral put a no return-no exchanges policy on her ETSY shop.
- Canute, Ryland Craze, thibaultron and 1 other
-
4
-
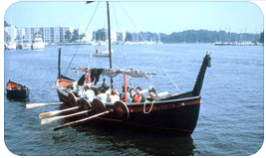
'Sounds like you had a rather warm spell, mate. The Hamburg vicinity is supposed to have an average daily high of 72 deg. F ?
Below is the Sae Earn, a cobbled replica I rowed on in College - The ship's boat towed behind I built myself, named Herjan by the captain, Atli.
- cotrecerf, Keith Black and Siggi52
-
3
-
we have an antique drop-leaf table (mostly mahogany) with one piece on the frane is cherry stained mahogany - and it looks convincing. Note that it isw heartwood cherry - not sap wood.
-
'Lots to learn here. One tip from the home page - you can find MSW build logs (complete or not) for a specific ship (often from multiple kits brands) by hovering on Browse, then clicking forums, scrolling to and clicking the index of build logs (marked 'new') under Members Build Logs, then click the Quick Find indexes (the first listing). There you will find categories by year of launch of the ship you are looking for (you need to know the approximate year that ship was built). An alphabetical list will appear of the ship names, builder and kit supplier (if applicable).
You can avoid many pitfalls by learning from those who have built these kits before.
-
Apparently things get a little complicated with paperwork and Canada's thresholds are different than those of the U.S. As far as Canada is concerned, they have what is referred to as CAD thresholds, which stands for "CAnadian Dollars" - so with the Canadian dollar now representing only about 73 U.S. cents, the CAD 150 threshold for Canadian duties would apply to courier shipments of a Model Expo kit exceeding $109.50 - and many kits are above that amount.
However, "commercial" shipments are subject to a CAD 40, which is only $29.2 ... and it is not clear which limit may apply in the case of model Expo. But even goods now valued between the CAD 40 and CAD 150 points are STILL subject to: Goods and Services Tax (GST), Harmonized Sales Tax (HST), or Provincial Sales Tax (PST). Any kit now over $109.50 (CAD 150) is subject to BOTH duties, GST, HST and PST.
'Sound complicated? Trade deals are still in a state of flux, so it is no surprise that MANY companies are staying on the sidelines for now.
-
AN absolutely BRILLIANT idea for a builder who wants to make the detailed hull the star of the show ! Build her to the point pictured so far (or thereabouts) in your build and call her finished ! Such a model will be easier to case - or perhaps may not need a case ... just a little 'dust off' occasionally, and one can always have immediate access to the model. Transportation or moving won't be a problem, since the ship can be laid on its side over padding/bubblewrap in a box - and can even be safely shipped.
-
Planking bends amidships are generally gradual, with the greatest curves needed at the bow or stern. What I've done with pre-soaked planking needing more bend at the end is to put the end into my mouth ... Don't scoff, since perhaps there is something in saliva that helps the process - then I cautiously use my front teeth to slightly crimp the wood sequentially, with hand and tongue forming a tighter radius. One can 'feel' the fibers strain and just start to crack a little, which is the cue to back off. Its a bit of an art, but with some practice its worked for me.
Different species of wood have a variety of tastes, but as with wine tasters, one does not swallow but rinses with water to cleanse the palette.

Bluenose by rvchima - Amati - 1:100
in - Kit build logs for subjects built from 1901 - Present Day
Posted
I inherited a similar old Husqvarna, and it is HEAVY ... being made of a lot of Swedish steel. Once lubed and adjusted for timing, it sews pretty good - although the buttonhole routine is still a little wonky.