

Gregory
-
Posts
3,170 -
Joined
-
Last visited
Content Type
Profiles
Forums
Gallery
Events
Everything posted by Gregory
-
 Here is the WIKI take on it. Sloop Polychrest
 -
FWIW, here is a drawing from Petersson. Keep in mind that Petersson's reference is a contemporary model of Melampus, 1785, 36 gun frigate. It would be interesting to compare to Lees.

- 422 replies
-
- 2
-

-
- Vanguard Models
- Sphinx
- (and 1 more)
-
Laser cannon bracket
Gregory replied to mediocremodeler's topic in CAD and 3D Modelling/Drafting Plans with Software
Lignum vitae? -
Proxxon mini lathe verdict
Gregory replied to Srenner's topic in Modeling tools and Workshop Equipment
Has anyone ever used this Mantua 'lathe' ? It has the pass through feature. Looks simple and cheap..
-
Proxxon mini lathe verdict
Gregory replied to Srenner's topic in Modeling tools and Workshop Equipment
Your concerns are well founded, but at the price point, it is pretty easy to extend the table on those lathes. When all is said and done, while I was just throwing out some alternatives to the Proxxon machine, I am personally not concerned with the length limitations. I find it's better ( for me ) to break up long spars and masts into shorter pieces, then put them back together. An example from my Resolution. I use a laser for the rough shape, which I turn with the drill and sand paper method. FWIW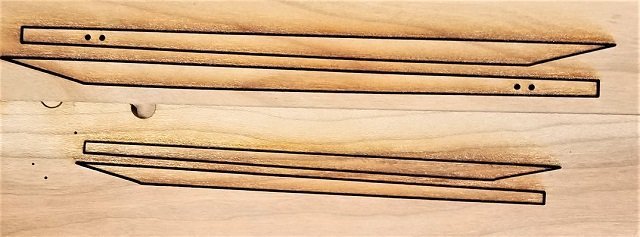

-
Proxxon mini lathe verdict
Gregory replied to Srenner's topic in Modeling tools and Workshop Equipment
I don't know what your buying options are in NZ, but you might do as well with something like this: Mini Wood Lathe $36.99 US At little higher cost, but still about half the Proxxon, here is another option. Mini Wood Lathe $129.99 These machines will have their detractors, and rightly so, but you will have to go past the $500 price point to move into a category that might get the approval of our tool aficionados. I think machines like these will perform as well if not better than the Proxxon.

-
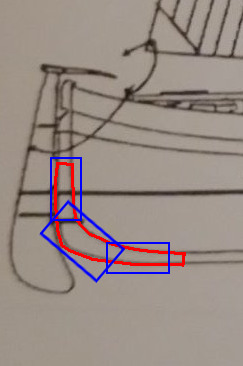
What Mamoli is looking for you to do is trace out a pattern like I have made in red, then use strip wood pieced together like I have indicated in blue, where you would then trace the pattern to give you a shape to fit over the bow and stern without any gaps. You may want to use more pieces than they have shown in the instructions in order to easier make a curve. If this is still a problem for you and I may be able to put together a little demo with some wood.
- 26 replies
-
- 3
-
-
- Solid hull
- Bregante
- (and 2 more)
-
Kit Model or Plans for HMS Centurion 1732
Gregory replied to Fraser1945's topic in Wood ship model kits
Here are the drawings at WIKI Commons Centurion 1732 There are 2, so click through to see the next one. -
I need to get to my drawing tools later, and I can show you what I think you need to do..
- 26 replies
-
- 1
-
-
- Solid hull
- Bregante
- (and 2 more)
-
I’m guessing Mamoli is showing a simplified way to put strip wood together, expecting you to match the curved shape of the stern? Do you have a picture of the profile of the boat?
-
Kit Model or Plans for HMS Centurion 1732
Gregory replied to Fraser1945's topic in Wood ship model kits
There are a couple of drawings in the WIKI Commons.. I can get you a link later. -
Bass is really a pretty good choice if you are painting..
-
You should put together a book with your rigging technique. I would buy it in a heartbeat. Meanwhile, your log is a frequent visit for me. While I would be hard pressed to duplicate your work, a goal would be to get a similar look..
-
Check out HisModel and Amazon. I see they have wooden decks for Cutty Sark.
-
I have bought their cherry and walnut sheets, which were of reasonable quality. I think you are better off going with Modelers Sawmill or Ocooch Hardwoods.
-
Ship Ribbing with CAD?
Gregory replied to Sanjith_D's topic in CAD and 3D Modelling/Drafting Plans with Software
If the 2D drawings do not render well, then they are not accurate. CAD can certainly help to resolve these inaccuracies, but not having the skills to use CAD, should not keep you from producing accurate drawings for use with a laser. -
Ship Ribbing with CAD?
Gregory replied to Sanjith_D's topic in CAD and 3D Modelling/Drafting Plans with Software
While I agree CAD is great for visualizing the entire ship, in the end, the laser is a 2D tool. Accurately produced 2D drawings are ultimately what you need to drive a laser, and they can be produced as accurately in a 2D environment as in a 3D one. -
I like the version from a Bob Seeger song: " I wish I didn't know now, what I didn't know then. " 😁
-
Ship Ribbing with CAD?
Gregory replied to Sanjith_D's topic in CAD and 3D Modelling/Drafting Plans with Software
Another consideration will be the software driving the laser. If the laser controller will support it, see if you can get the community to use LightBurn. It is relatively inexpensive and is very powerful. It supports 2D images that it will trace for cutting, giving you the option of skipping the CAD work if you have a good 2D drawing of your frames or other parts. -
Ship Ribbing with CAD?
Gregory replied to Sanjith_D's topic in CAD and 3D Modelling/Drafting Plans with Software
Not necessarily nicer, but plywood will give you more strength for your framing. Very little, if any will be visible in the end. -
Just wait a couple of hundred years and all your boxwood will look that good…😁
-
I have been meaning to give Thick and Quick a try just to see how it does. CA Does take a little extra care, but a few seconds versus several minutes clamp time means a lot to me.
-
If it crystallizes, then there is something wrong with the formula, or the way it was used. Properly cured CA is just plastic, with fibers penetrating the wood, creating a mesh that is stronger than wood in some regards. The bond can break under shear stress, but this is unlikely to happen with planking, and not any more so than PVA. The times I have seen a CA joint come apart there was always shared wood on the two pieces, which means the wood broke before the glue did.
-
With checkers up forward, surely you must have chess in the Captains cabin. 😁


