

Gregory
-
Posts
3,076 -
Joined
-
Last visited
Content Type
Profiles
Forums
Gallery
Events
Everything posted by Gregory
-
 Great! The flags are especially well done. I will be referencing them..
- 82 replies
-
- 1
-

-
- Yacht Mary
- Mamoli
- (and 1 more)
-
I'm really liking the look of the muslin sails. I will have to try that.
- 82 replies
-
- 2
-
-
- Yacht Mary
- Mamoli
- (and 1 more)
-
Good info from @wefalck. Laser is not your best option, if at all, for detailed carving.
-
I think a laser would be great for your miniature work. Browse through my Rattlesnake and Resolution builds to see how I have put a laser to use. To show you can make some fairly small precision parts, here is a link that shows how I made some fiddle blocks. I would highly recommend LIghtBurn for driving the laser. I have an older 20W Xtool that serves me well but If I were buying today I would go with the xTool S1 20W. Ventilation is a primary concern and with the Xtool all you need is a vent hose to get the smoke and fumes outside. Let me know if you have other questions you think I might answer.
-
How does it deal with two or more objects touching each other? If you have to separate them, you might as well go ahead and count them.😁
-
While interesting, you are showing The Process of Making Wire Ropes. It is not actually a Ropewalk. I'm not sure if it has a specific name other than a wire rope making machine/apparatus. I apologize for the pedantry.
-
If they are requiring the ID, I don't know how you can get around that. However, the foremast provided in the kit would have been a wood dowel that you would refine based on the plans, so it should be fairly easy to aquire one from another source such as Amazon or a hobby shop.
-
Very nice work!
-
I'm not sure why it would matter.. The preventer stay is just a back up, however , Petersson may have got it wrong, or the model of Melampus may be wrong. If it matters, I would go with Lees.
-
For a second there Greg, I thought you looked at my jig and made a drawing of it..😁 I must have seen yours at some point and used the design. P.S. Here is the link I couldn't post earlier.
-
Many use a jig of some sort. Often it is a stiff wire between the deadeyes. I can’t post a link right now, but if you look at #66 in my Resolution log, you will see the jig I used. If the construction isn’t apparent, I will try to clarify later.
-
Here are a couple of build logs. They are pretty comprehensive showing how the model goes together. Barbara, I am curious about several topics you have started with questions regarding various ships and modeling. You have received several replies but you never reply back with regard to the help you receive. Have you been able to benefit from the help you have received?
-
There was /is a banner at the Malco site saying only the ownership had changed. All the employees and infrastructure remain the same. I use their blades with my Proxxon FET and have never had a problem.
-
Best White Wood Glue For Ship Building
Gregory replied to OldeManToad's topic in Modeling tools and Workshop Equipment
The Titebond should be fine.. -
Take a look at some of the build logs for 17th century ships.
-
That certainly looks good. I agree to keeping it simple when possible. I personally would not sweat the historical thing unless you find yourself in a situation where a client is going to pay $50,000, only if it is "historically accurate"..😁
-
What is your technique for getting the folds? When you tried with the tissue paper, did you tape it to a plain piece of paper. I have had pretty good success doing that.
- 82 replies
-
- 3
-
-
- Yacht Mary
- Mamoli
- (and 1 more)
-
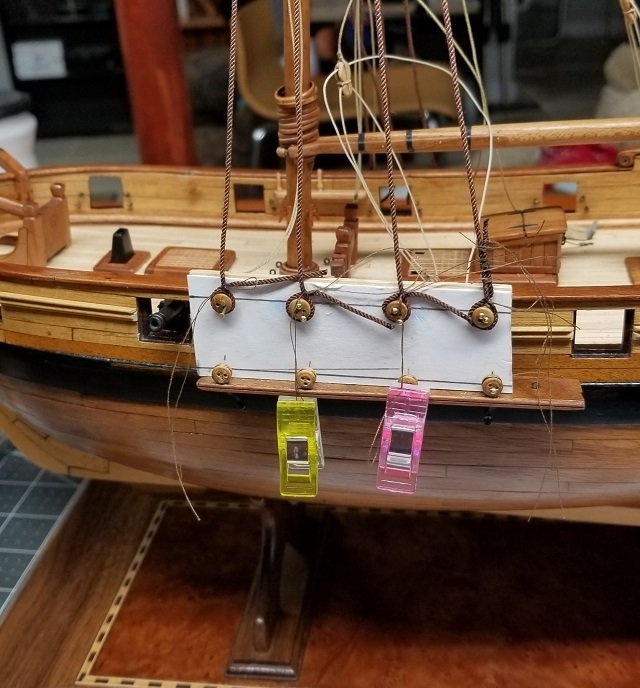
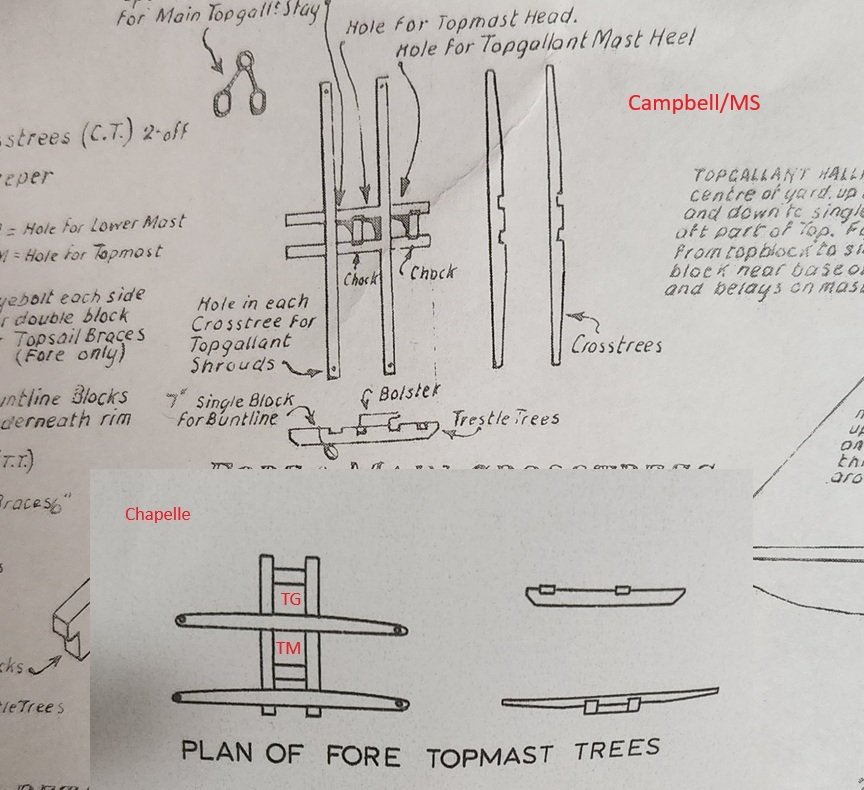
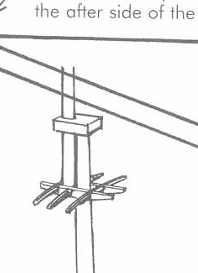
I have plans drawn by Chapelle as well as the MS Plans drawn by Campbell. I think the problem with Chapelle and Campbell is that they are only showing two cross trees where according to Lees there would have been three after 1706. I would expect Colonials would have followed British practice at this time, so Chapelle and Campbell may have got it wrong. How did the practicum draw the trestle trees and cross trees? If there are only two cross trees, I would model it after the plans as shown. Here is how Petersson shows the topmast cross trees, which is how I would model it if I wanted to follow practice; with a cross tree in the middle and not a chock. I wouldn't follow the practicum unless it calls for three cross trees.
-
What is the diameter and arbor of the Preac? I see there is a site called “smaller than life” that sells preac blades. Sorry I can’t post links right now.
-
I think a set of plans would be a good 2nd choice.
-
America is one of my favorite subjects. I look forward to seeing your work. Those plans are a treasure. A great resource for a scratch build.
- 8 replies
-
- 2
-
-
- America
- Model Shipways
- (and 1 more)
-
I found if you Google “USS Kearsarge 1861” and choose ‘images’, you will get several good pictures of the cannon. The rigging details may be a little difficult to sort out. The best image I saw was on Wikipedia.
-
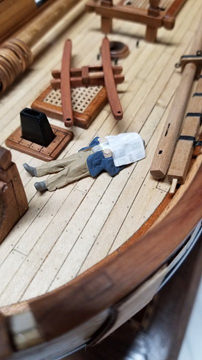
I would like to see those figures painted. I don't fancy myself much of a painter, but those figures make me want to try.
-
I think they are ' interesting'. They add some character . I like the slight caricature nature of some of the faces. I am at in a bit of a quandary about adding figures to a build. To be realistic, the sheer numbers would be distracting from what I want to showcase. I ponder the idea of maybe a single figure along the rail to add a sense of perspective. Otherwise I like the idea of including them in build photos , but not so much in the finished model. If I may clutter up your log a bit.😁
-
Interesting figures. What is your source for those?
