HOLIDAY DONATION DRIVE - SUPPORT MSW - DO YOUR PART TO KEEP THIS GREAT FORUM GOING! (Only 13 donations so far - C'mon guys!)
×


Tim Holt
-
Posts
196 -
Joined
-
Last visited
Content Type
Profiles
Forums
Gallery
Events
Everything posted by Tim Holt
-
 ` You know, having spent 13 years working on a real ship, this is just par for the course. These are scars that tell a story, which is all good. There was that time when we came into port and ends up the bow thruster had corroded away and fallen out, and the captain tried slide it up to the dock... and well it didn't work so well.
 -
What paint brushes to get?
Tim Holt replied to Ed Gibbons's topic in Modeling tools and Workshop Equipment
! -
A quick dry fit with the PLA Inspector after some acrylic varnish…

- 44 replies
-
- 2
-

-
- first build
- Artesian Latina
- (and 1 more)
-
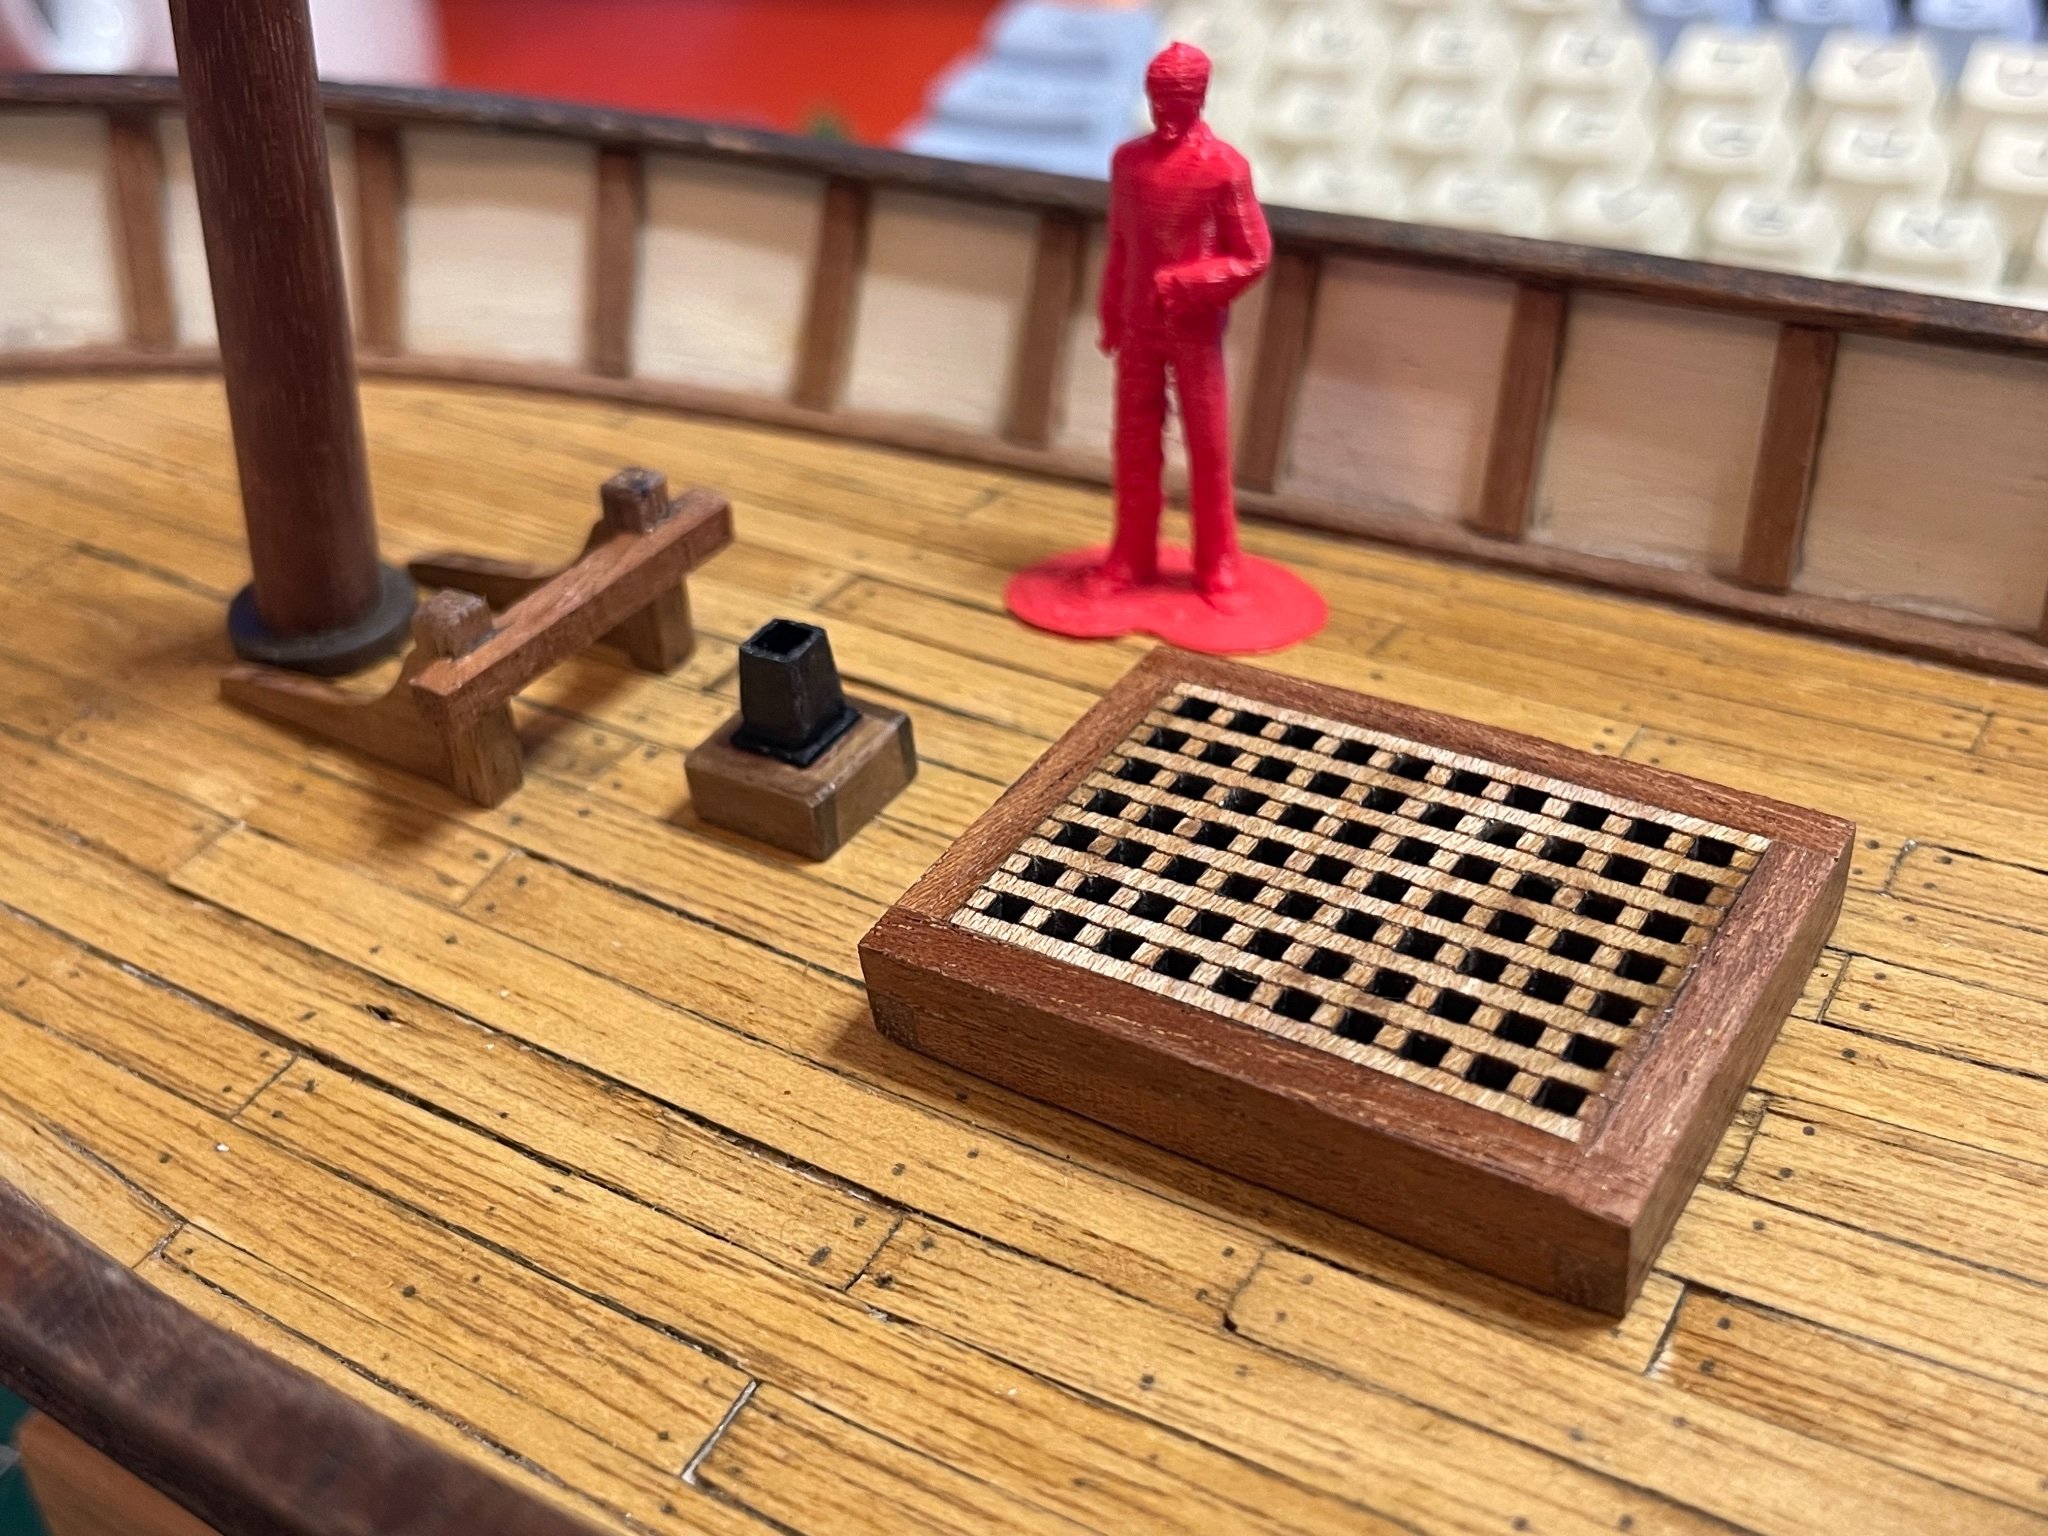
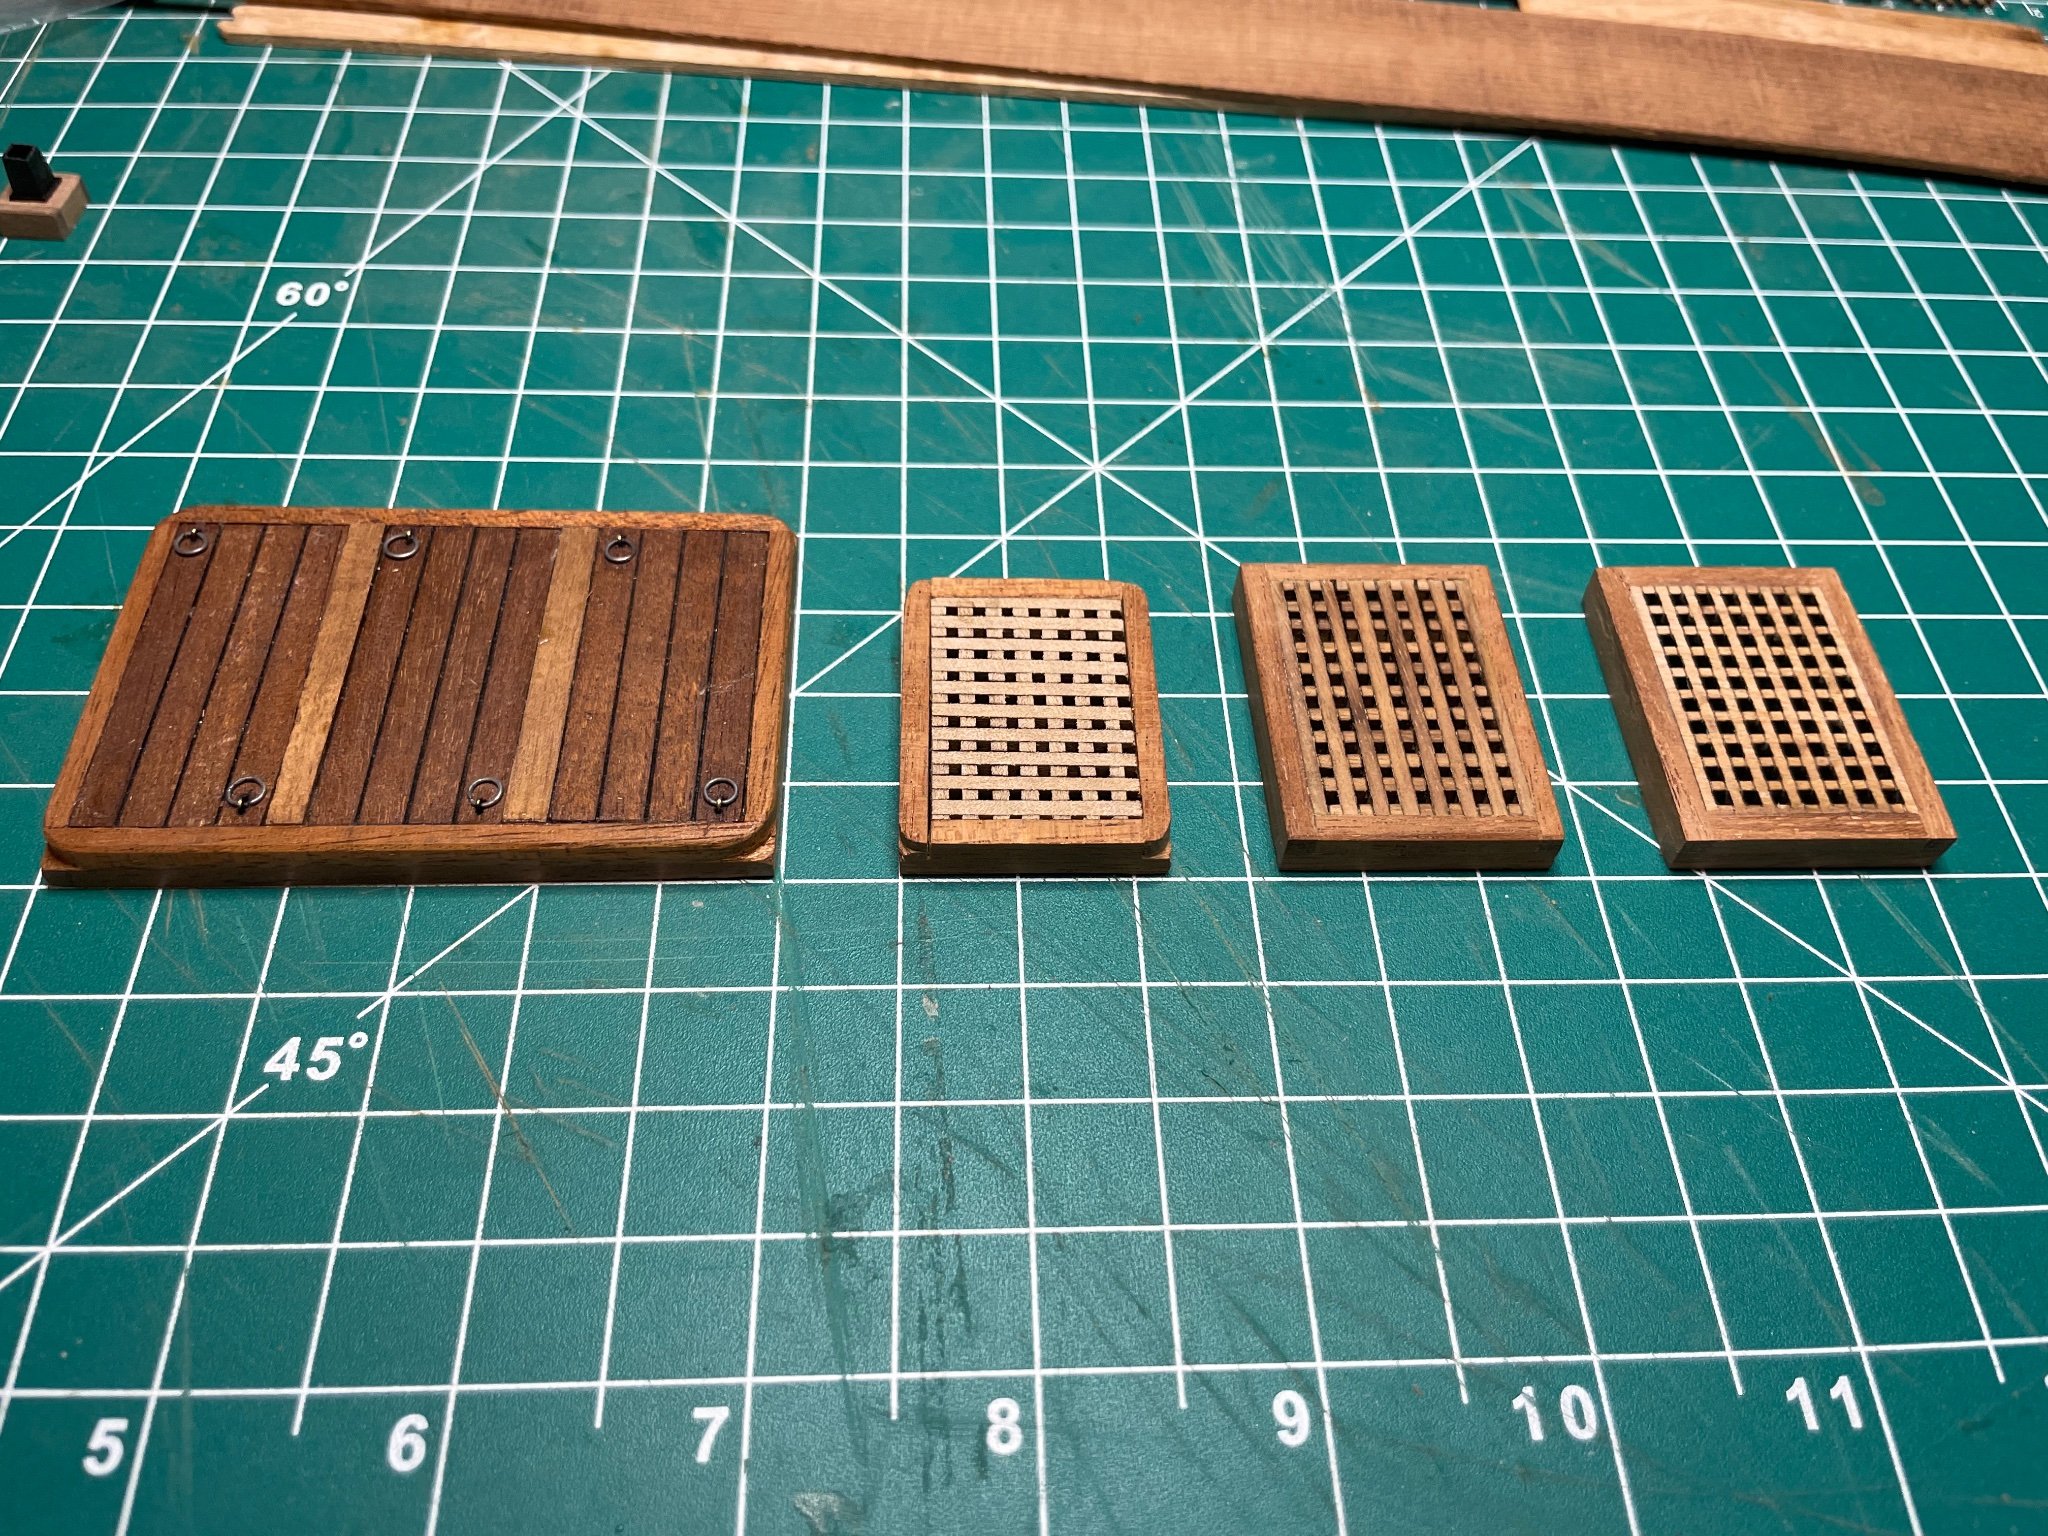
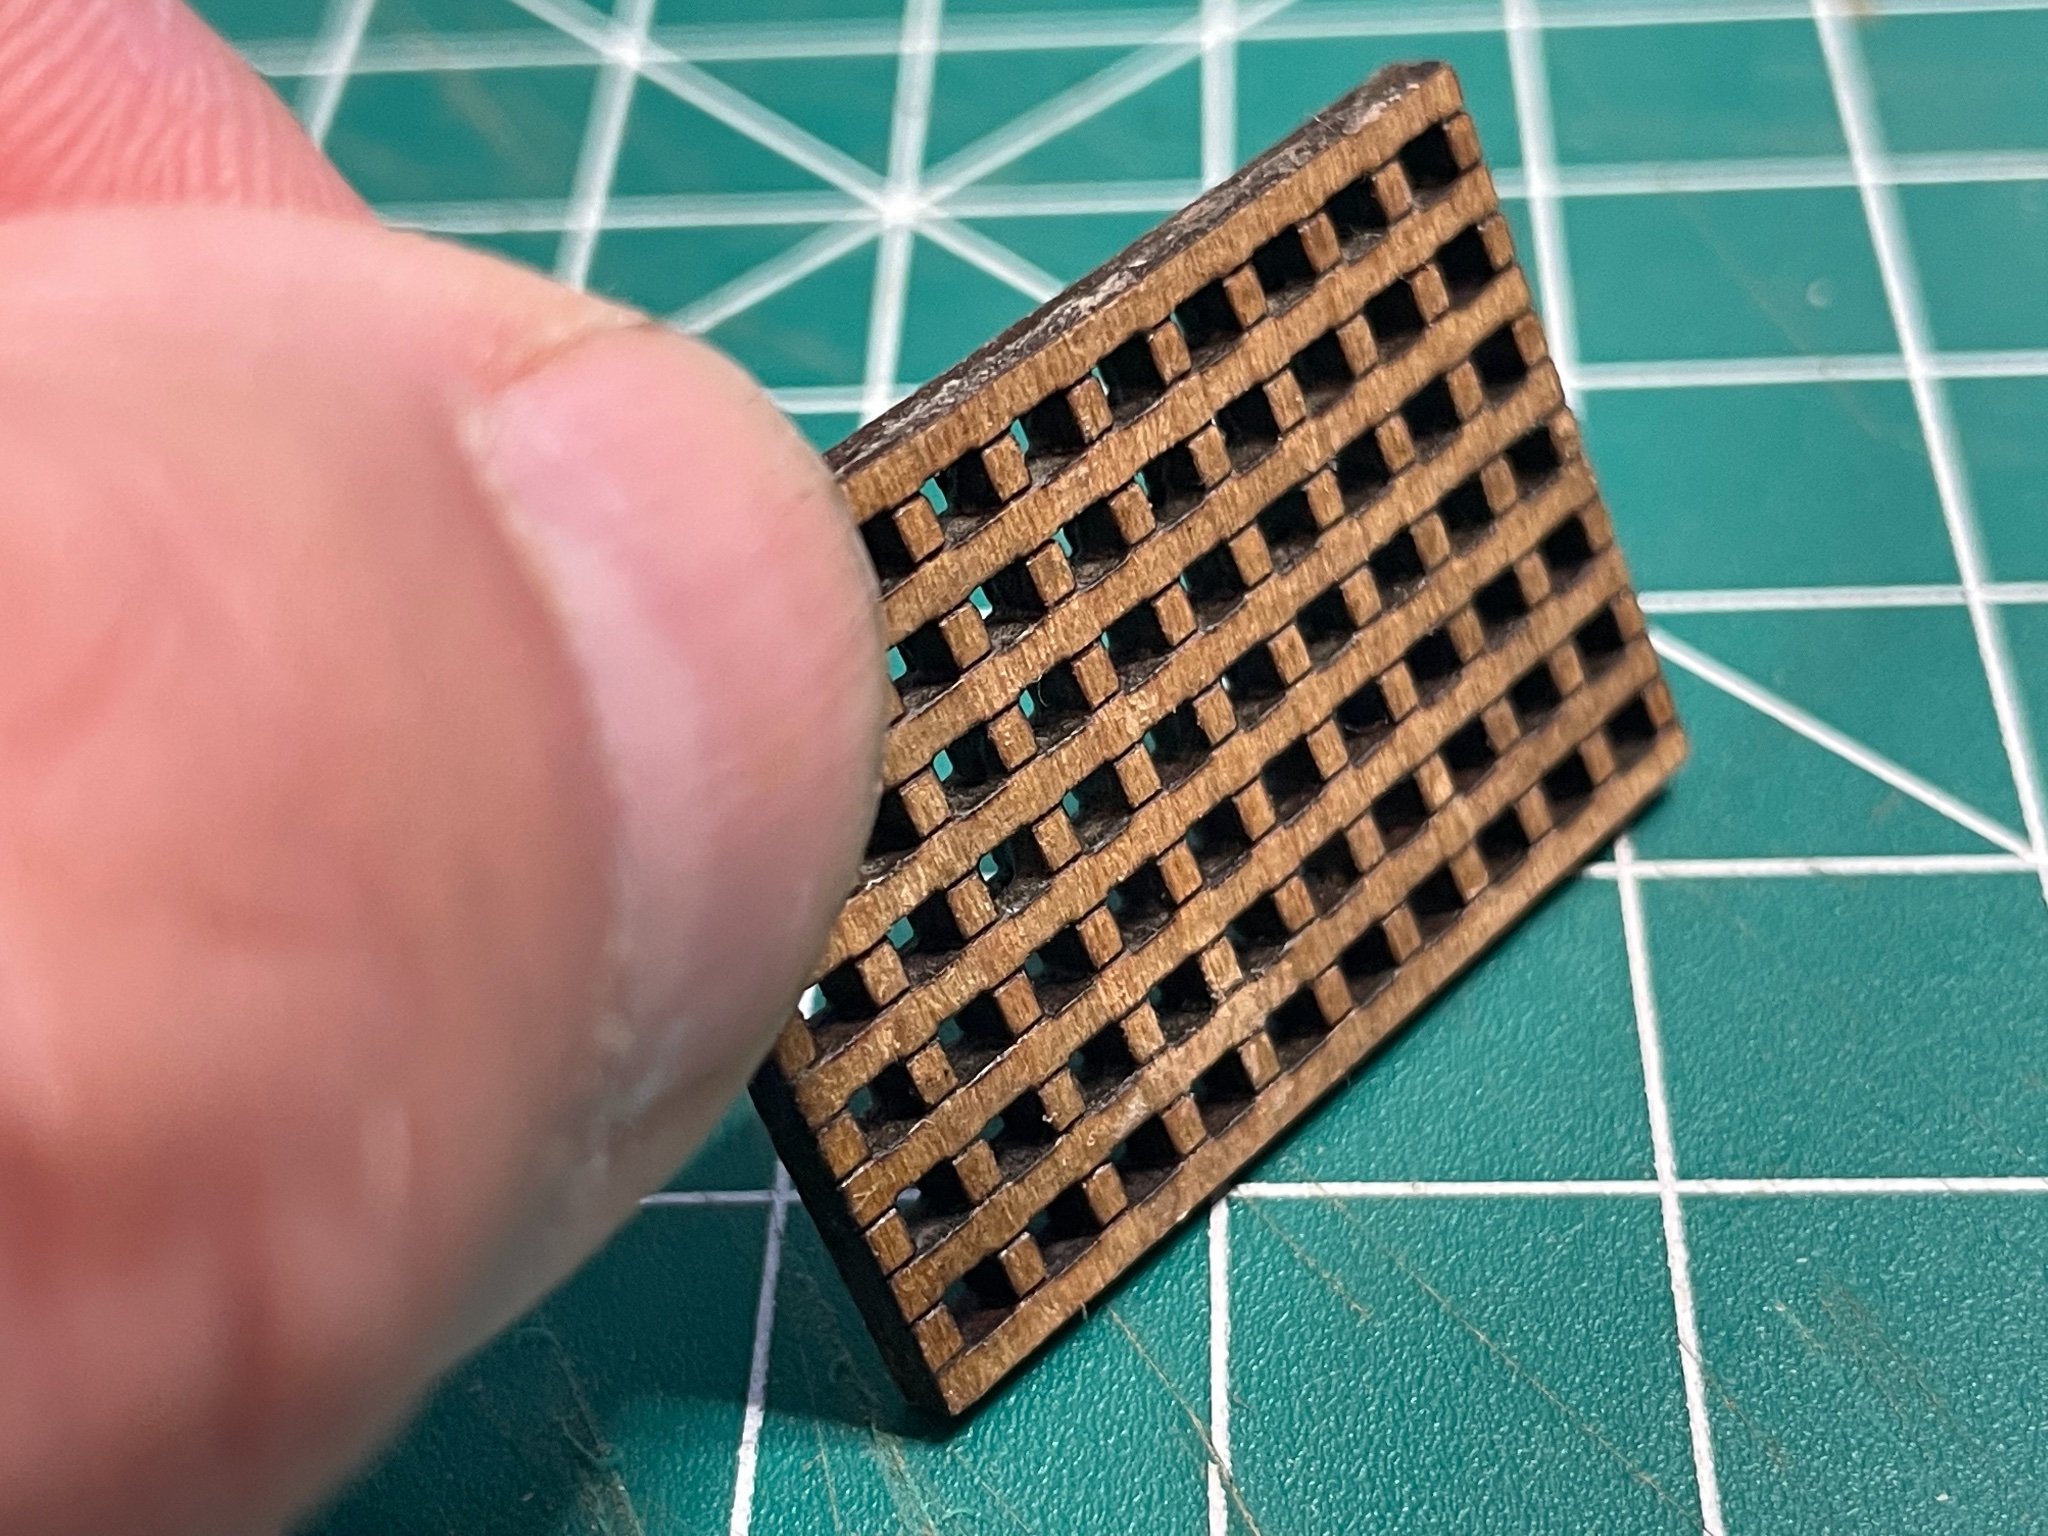
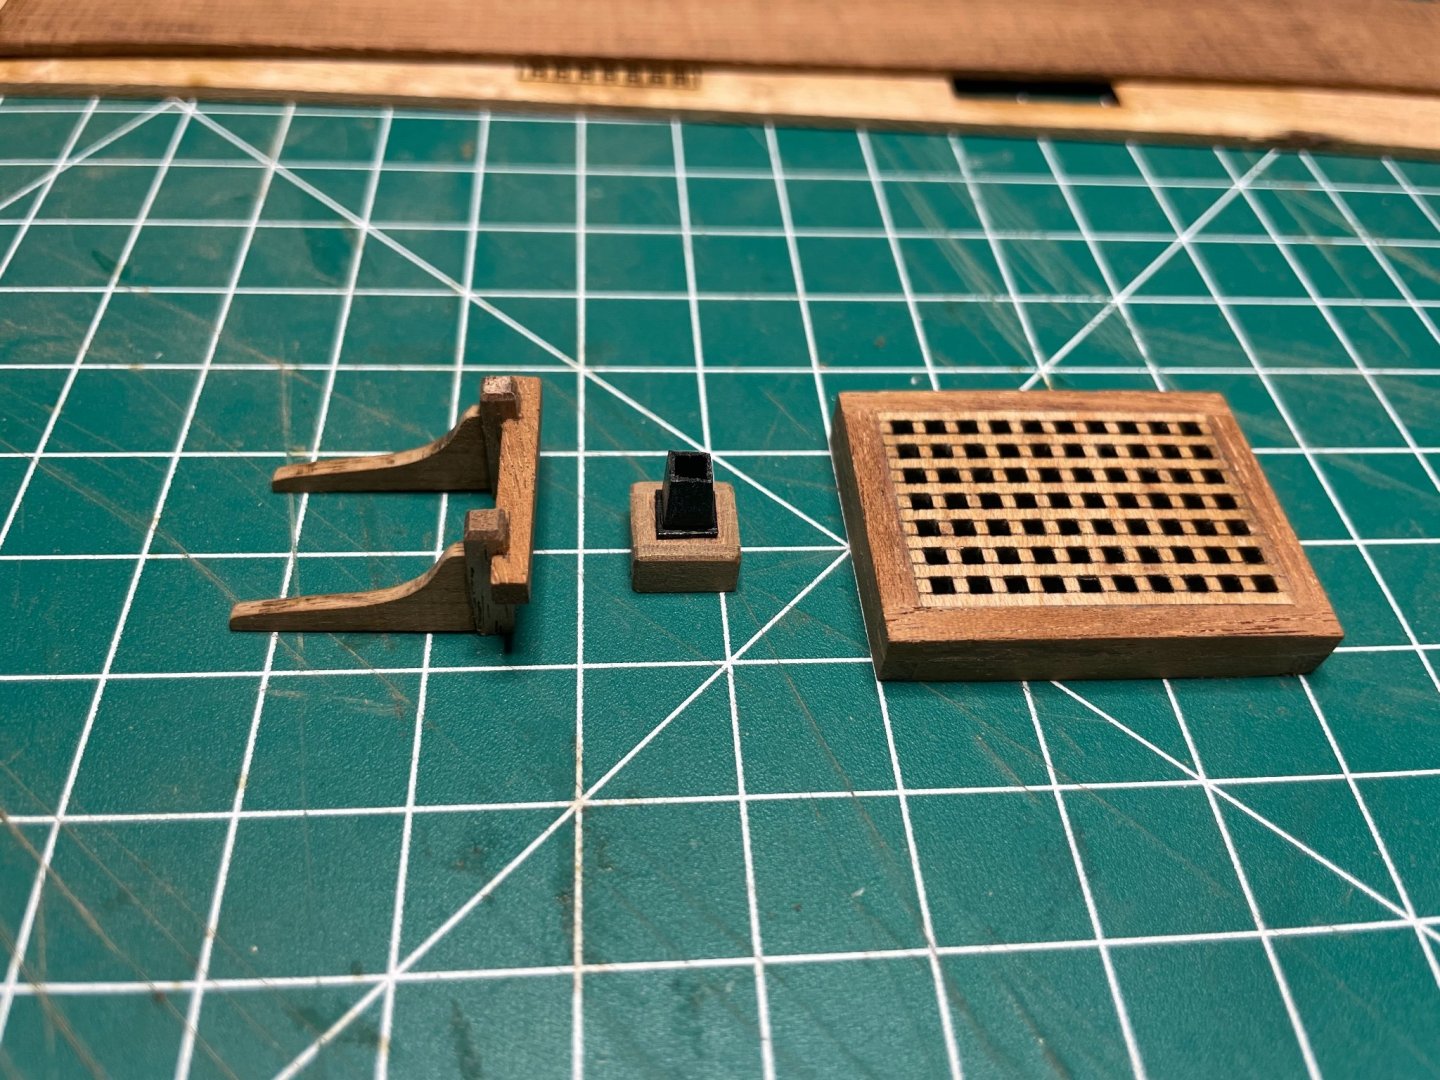
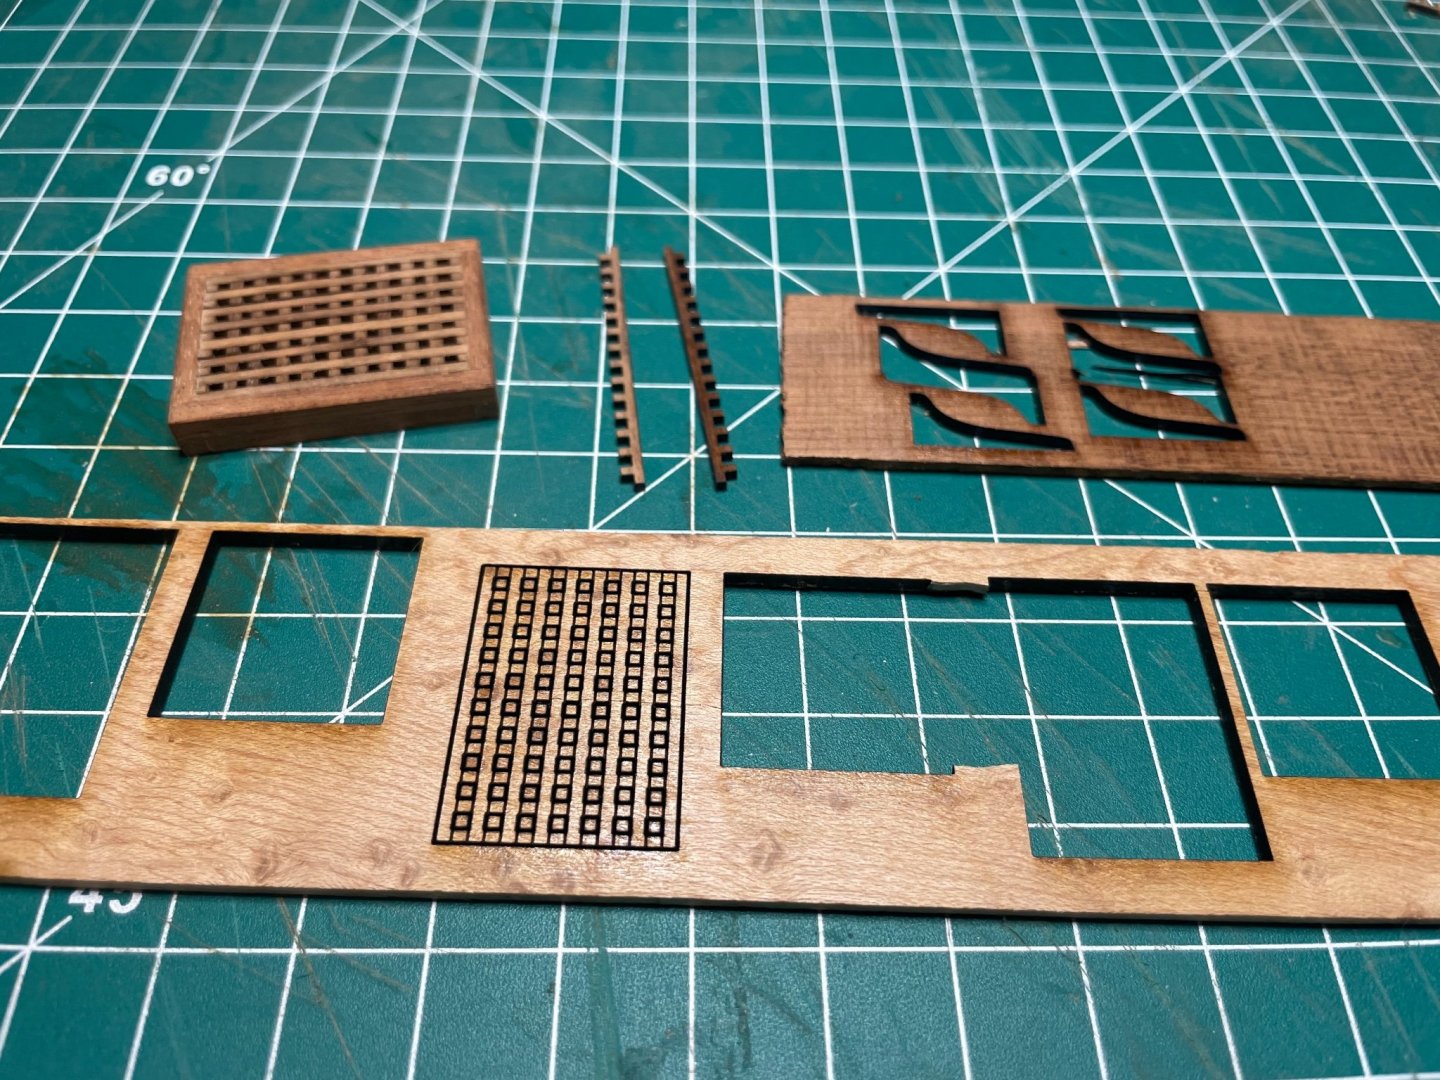
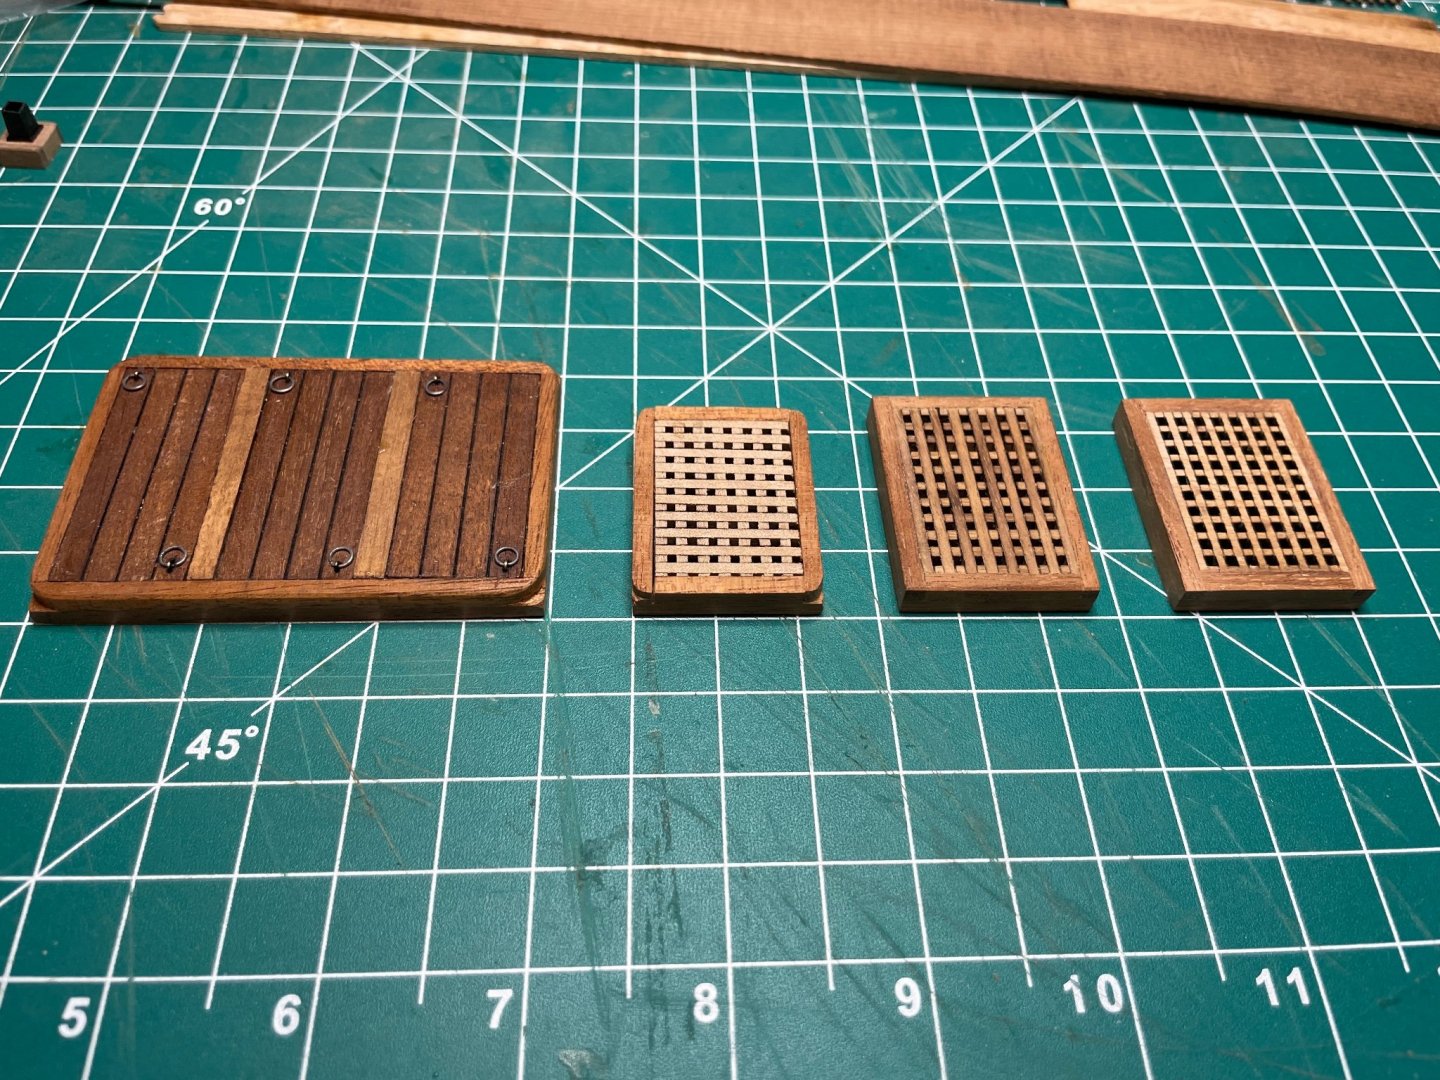
A bit of deck furniture completed yesterday and today. Per a previous post I’m modifying the deck layout quite a bit from the kit’s crude made up layout. Here’s a picture of the new forward bitt (just aft the foremast), chimney, and new grated hatch… The hatch as well as heels for the bit are laser cut as I have access to a cutter via work. I tried a few techniques for the grate, including separately cut pieces, but the thin stock I have isn’t very precise for thickness so it was harder to make the notches work well. So instead I went with the single top cut and etched technique Vanguard Models uses. One cut, no assembly, and precisely square. Here’s a picture of the cutting experiments, as well as a previous hatch I’d made with individual grating strips… Here is one of the grating sheets cut out, before any sanding. The laser char in the holes actually gives a blackout effect that’s not bad if there’s nothing to see below. As anyone who works with laser cut stuff knows, the char is a challenge at times. I found when sanding the gratings I’d pick up char on the sandpaper, which would then get embedded into the uncut wood, which darkened and dirtied it. As an experiment I coated the top and inside the cut out square holes with varnish, which did seem to keep the char from dirtying up when sanding the grating top. I had to experiment a bit with different laser cutter settings to get just the right amount to cut while minimizing char as much as i could. The completed grate on the piece of maple was one that didn’t cut all the way through so wouldn’t come out. The maple by the way was originally destined for a violin side so has a bit of character. I’ve mentioned it before but this kit is a learning experience and experiment at the same time. I’m playing with styles, designs, techniques, etc. As an example, I’m on my fourth hatch now, with a different approach to each as pictured below… Left to right: a rather huge (but not bad) one, second try at making the grating fit the frame (fit the frame to the grating!), next with laser notch cut grating strips again (frame fit to grating), and finally the last done with a single laser cut and etched grating.

- 44 replies
-
- 2
-
-
- first build
- Artesian Latina
- (and 1 more)
-
Hopefully the subject is clear. I'm currently building a ropewalk using some motors to drive both the initial twists as well as subsequent laying up. The motors have optical encoders, meaning I can know rotation counts - exactly how many twists I put on. It's not complete yet so I can't test this, but on a Syren Rope Rocket style setup, in theory is the count of twists for step 1 (individual strand twists) the same as the twist count of step 2 (laying up strands)?
-
I received my order recently- very exciting when a package shows up from overseas! I got the Armed Virginia Sloop 1776 along with some of the additional parts. I have to say, it's nice to have a model on the shelf that's as big as an 8.5" x 11" book!
-
Cheap steamer
Tim Holt replied to Johnny Mike's topic in Building, Framing, Planking and plating a ships hull and deck
I can't be the only person who saw the title and thought, "Oh, a steam ship model! That's a bit different than most builds. I wonder what they mean by 'cheap' though?" -
Thanks for the detailed reply @druxey It seems quite common with the Winchelsea and Cheerful builds. It looks extremely clean and almost stylized in some respects. I like it very much, but I’d be curious to see a build done in the style but aged, weathered and used for a realistic appearance. Even a ship out of the shipyard wouldn’t look that perfect. Perhaps someone will get brave and do an “aged Winchelsea” build just to buck the trend
-
I see this style very frequently here, and I’m curious about the origin of the style.
-
Back at you Freezing Parrot. I saw your post about below deck design earlier and it prompted me to post what I’d been reading up on.
- 44 replies
-
- 1
-
-
- first build
- Artesian Latina
- (and 1 more)
-
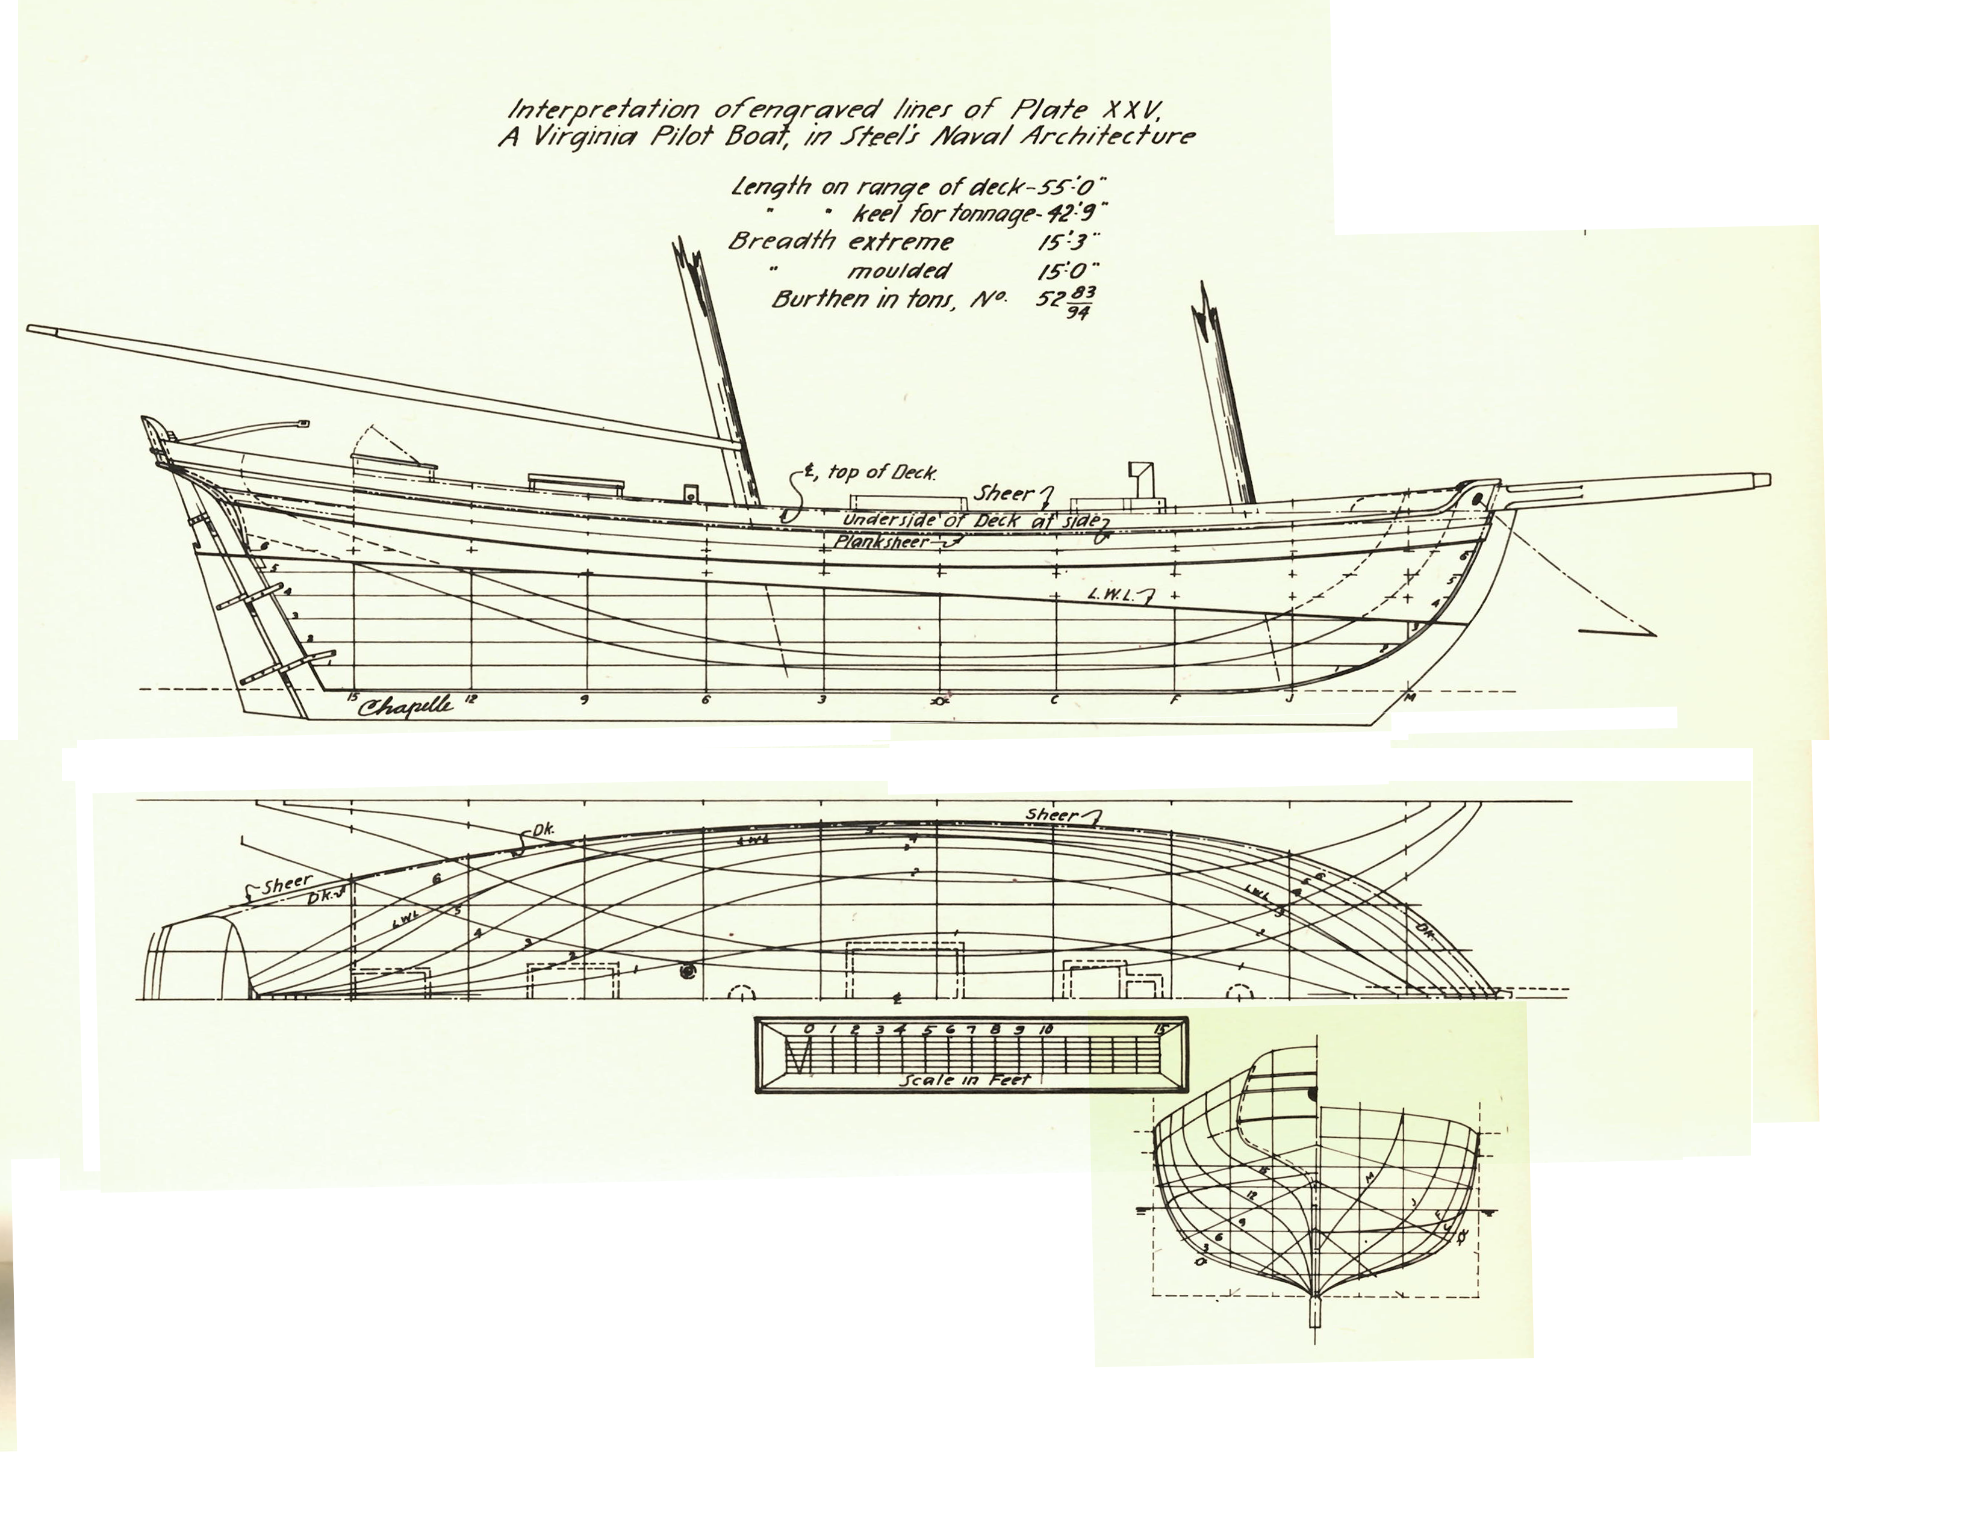
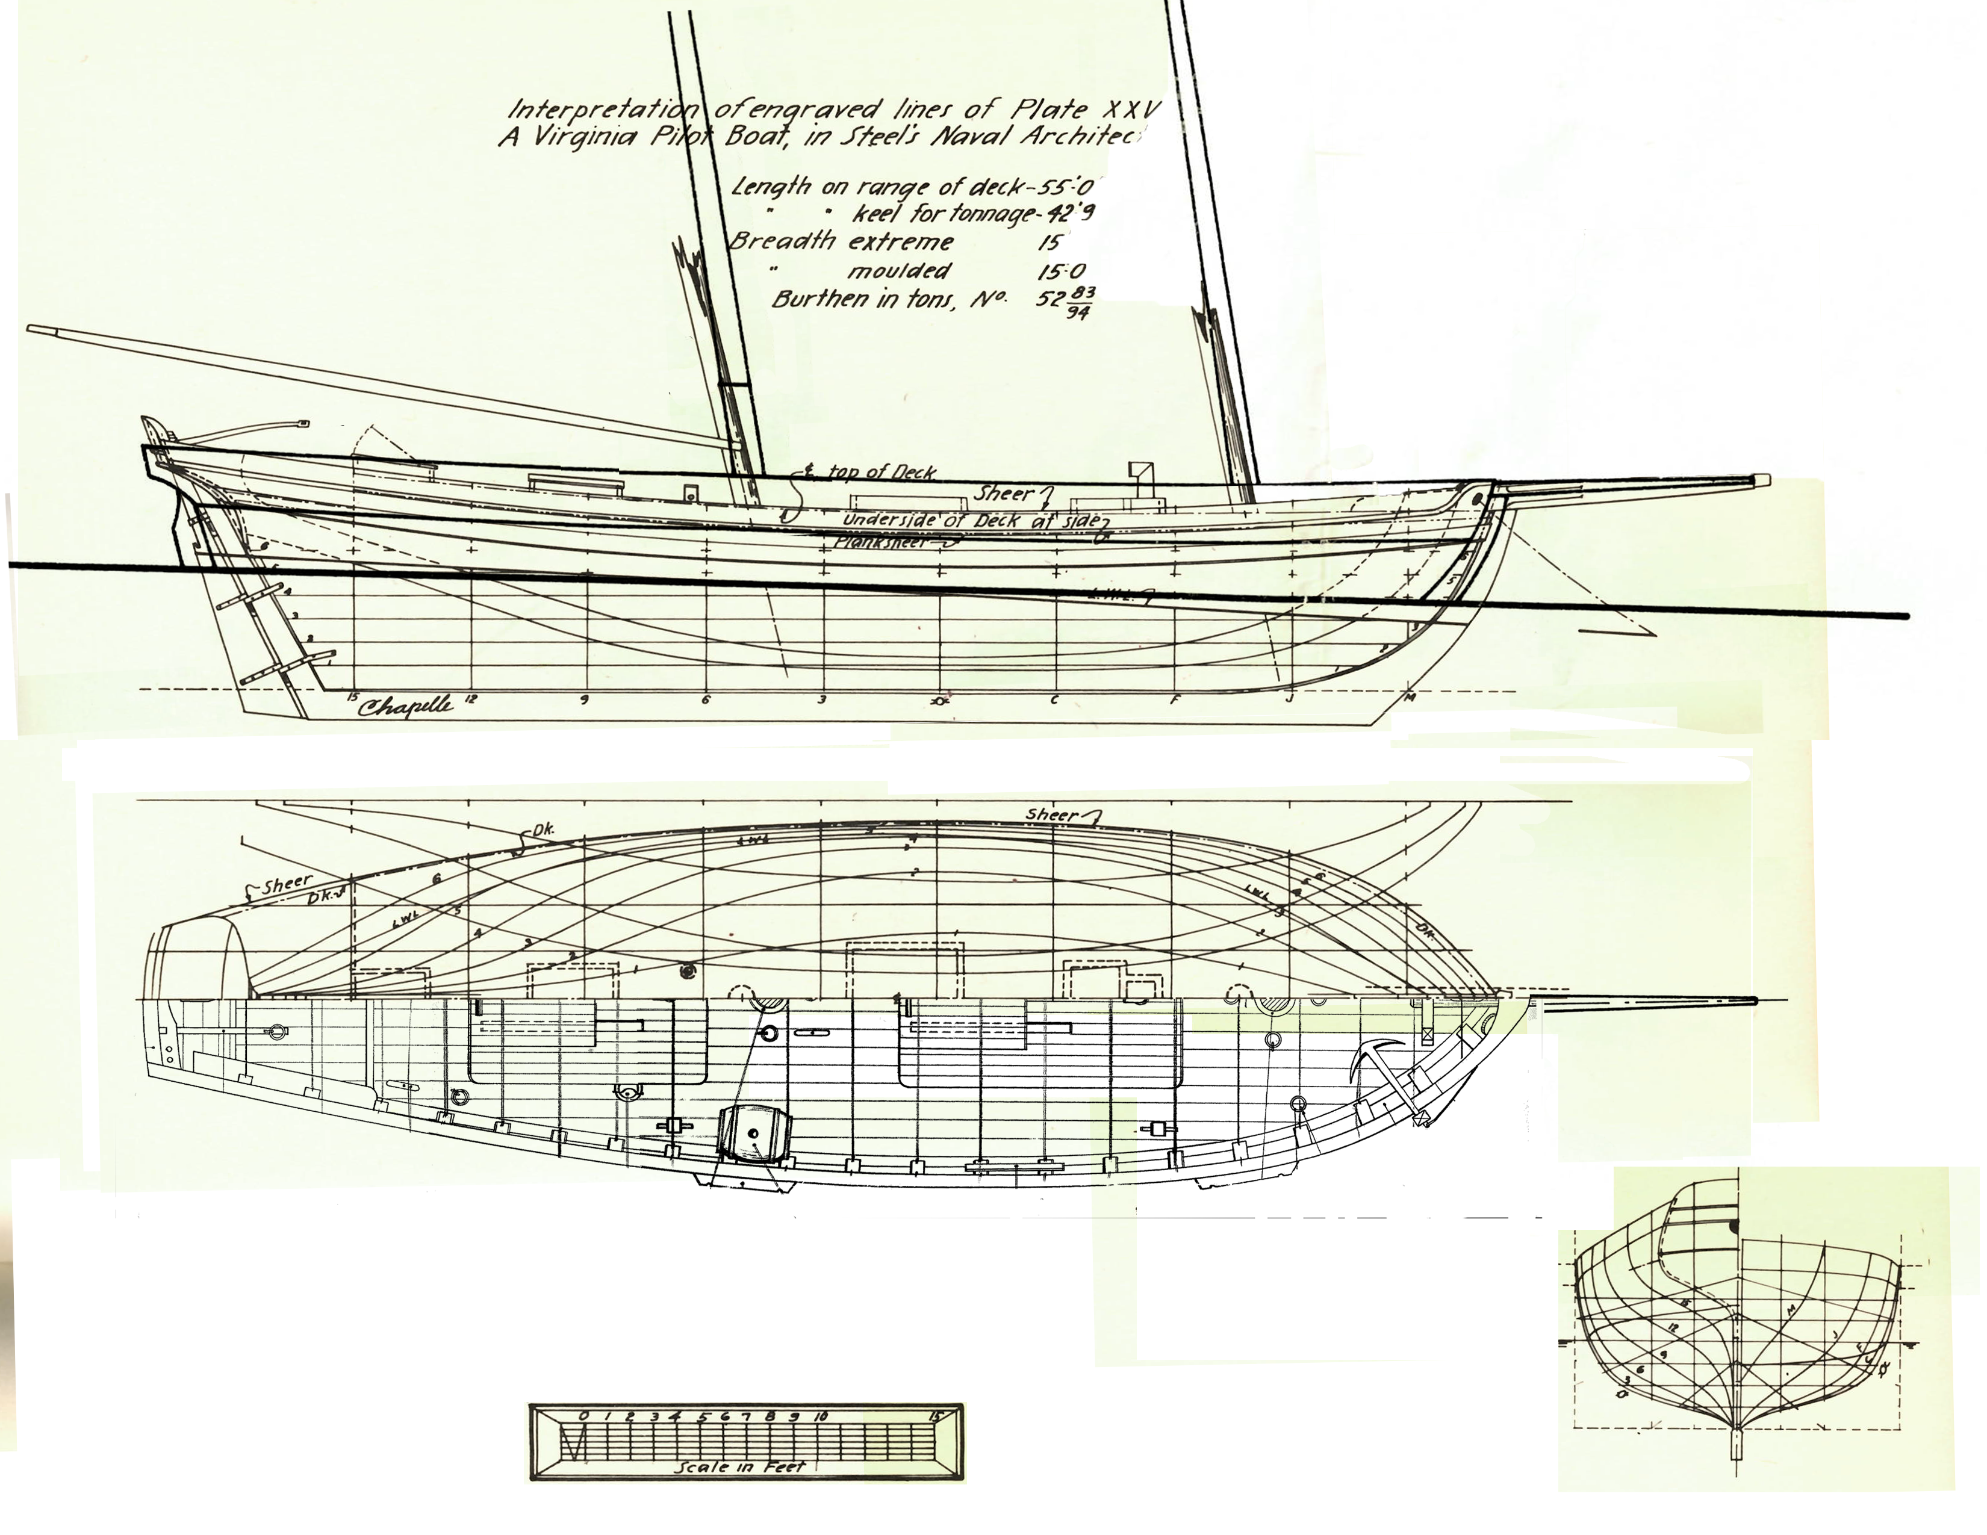
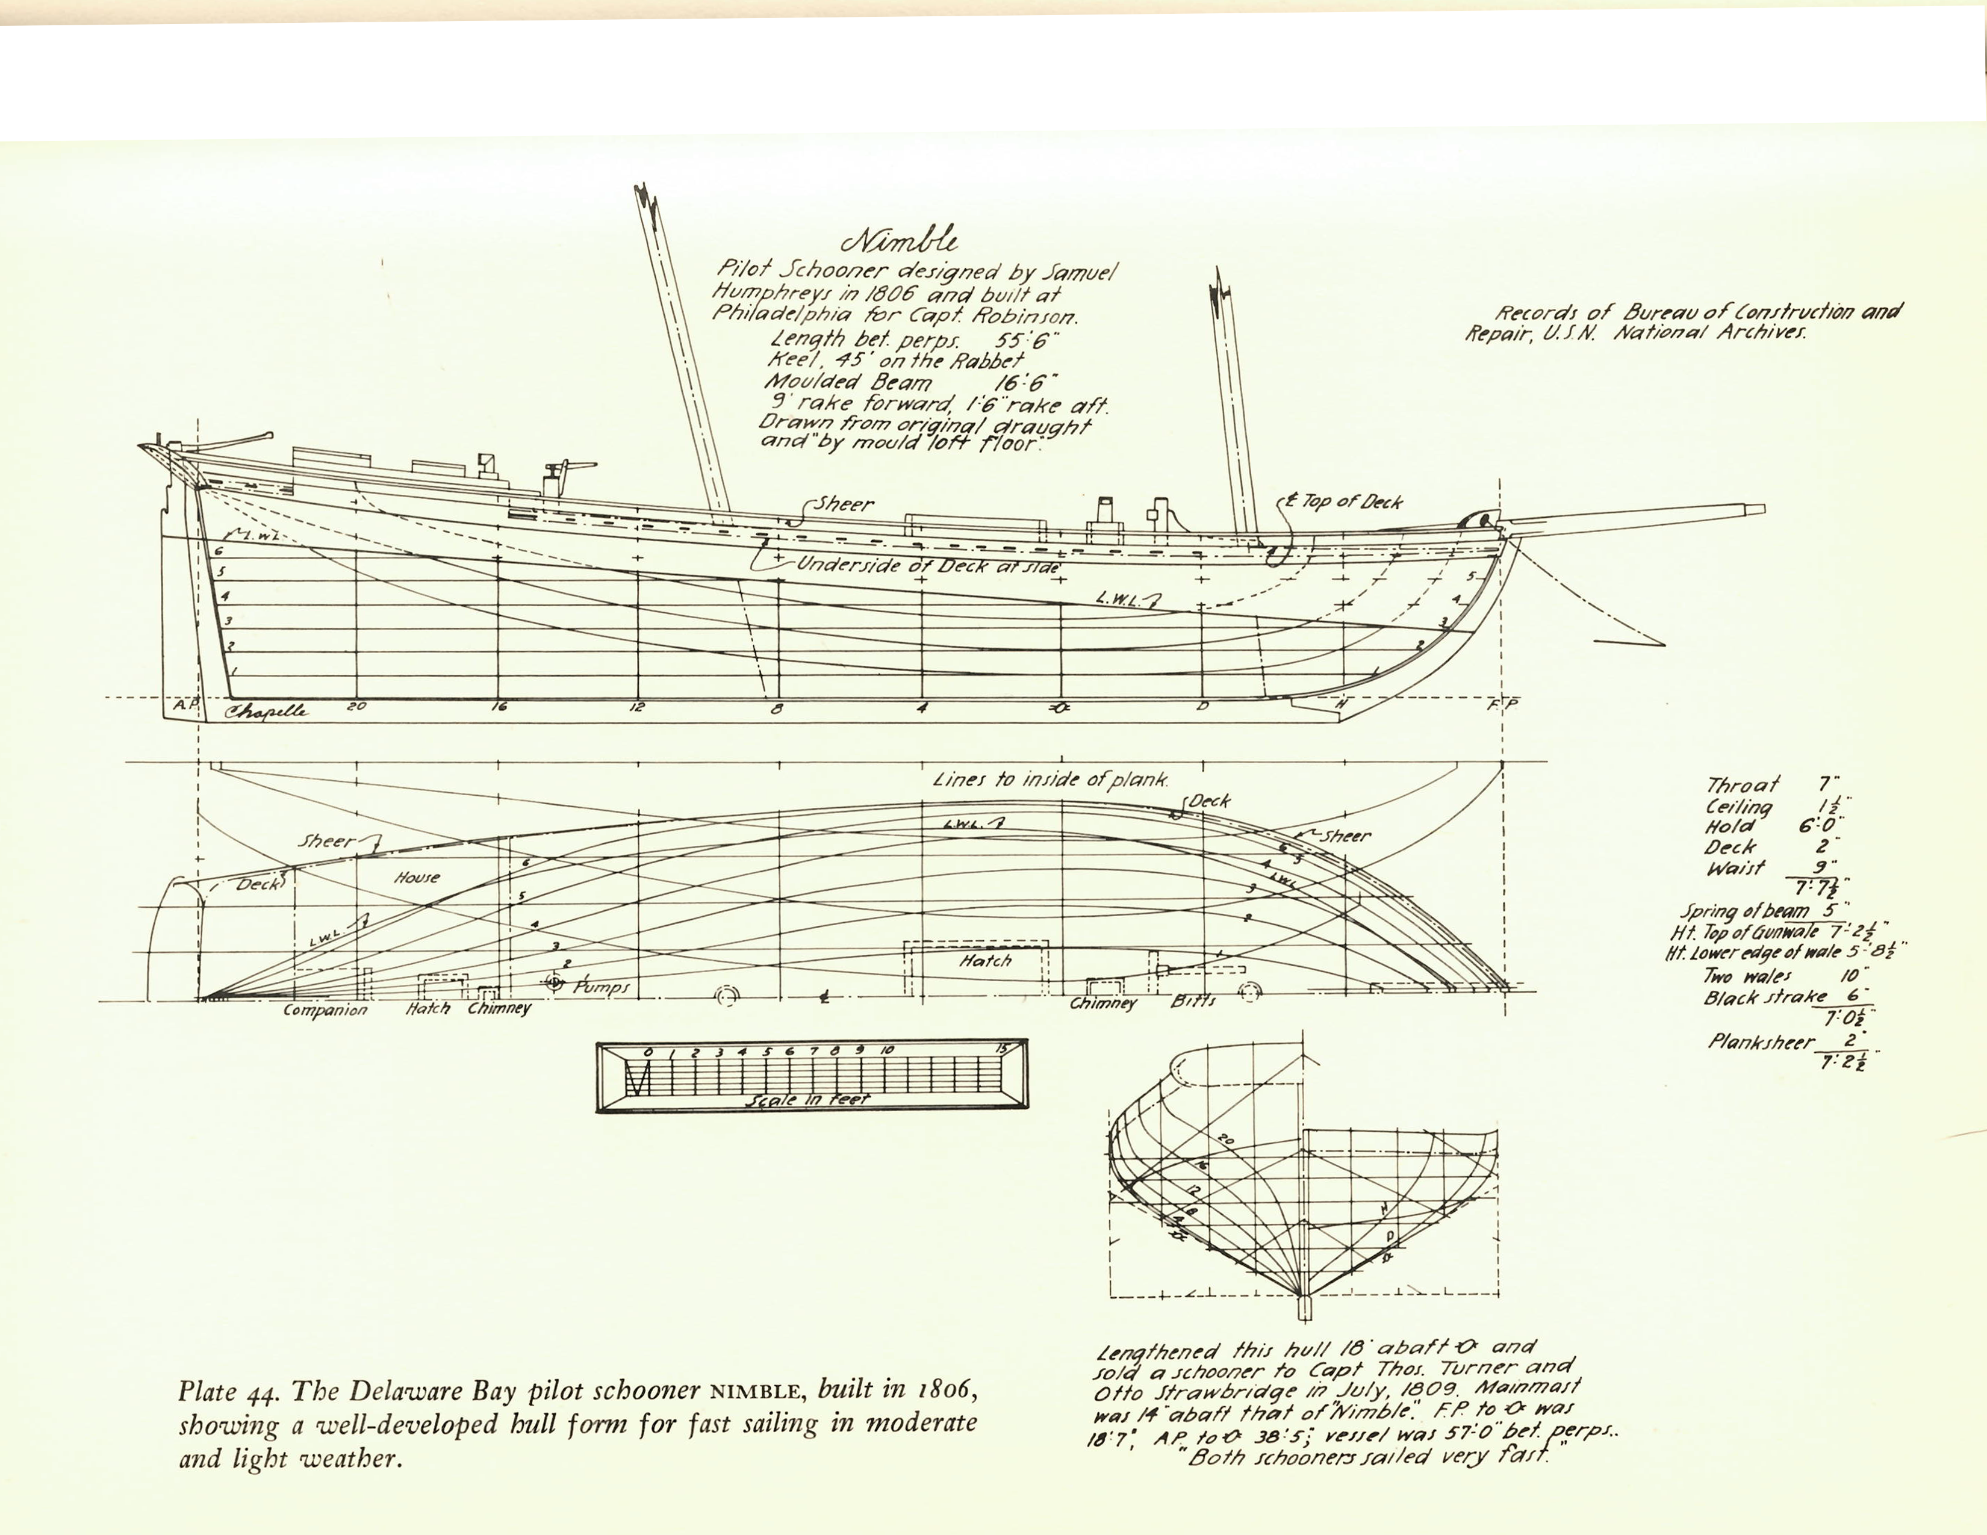
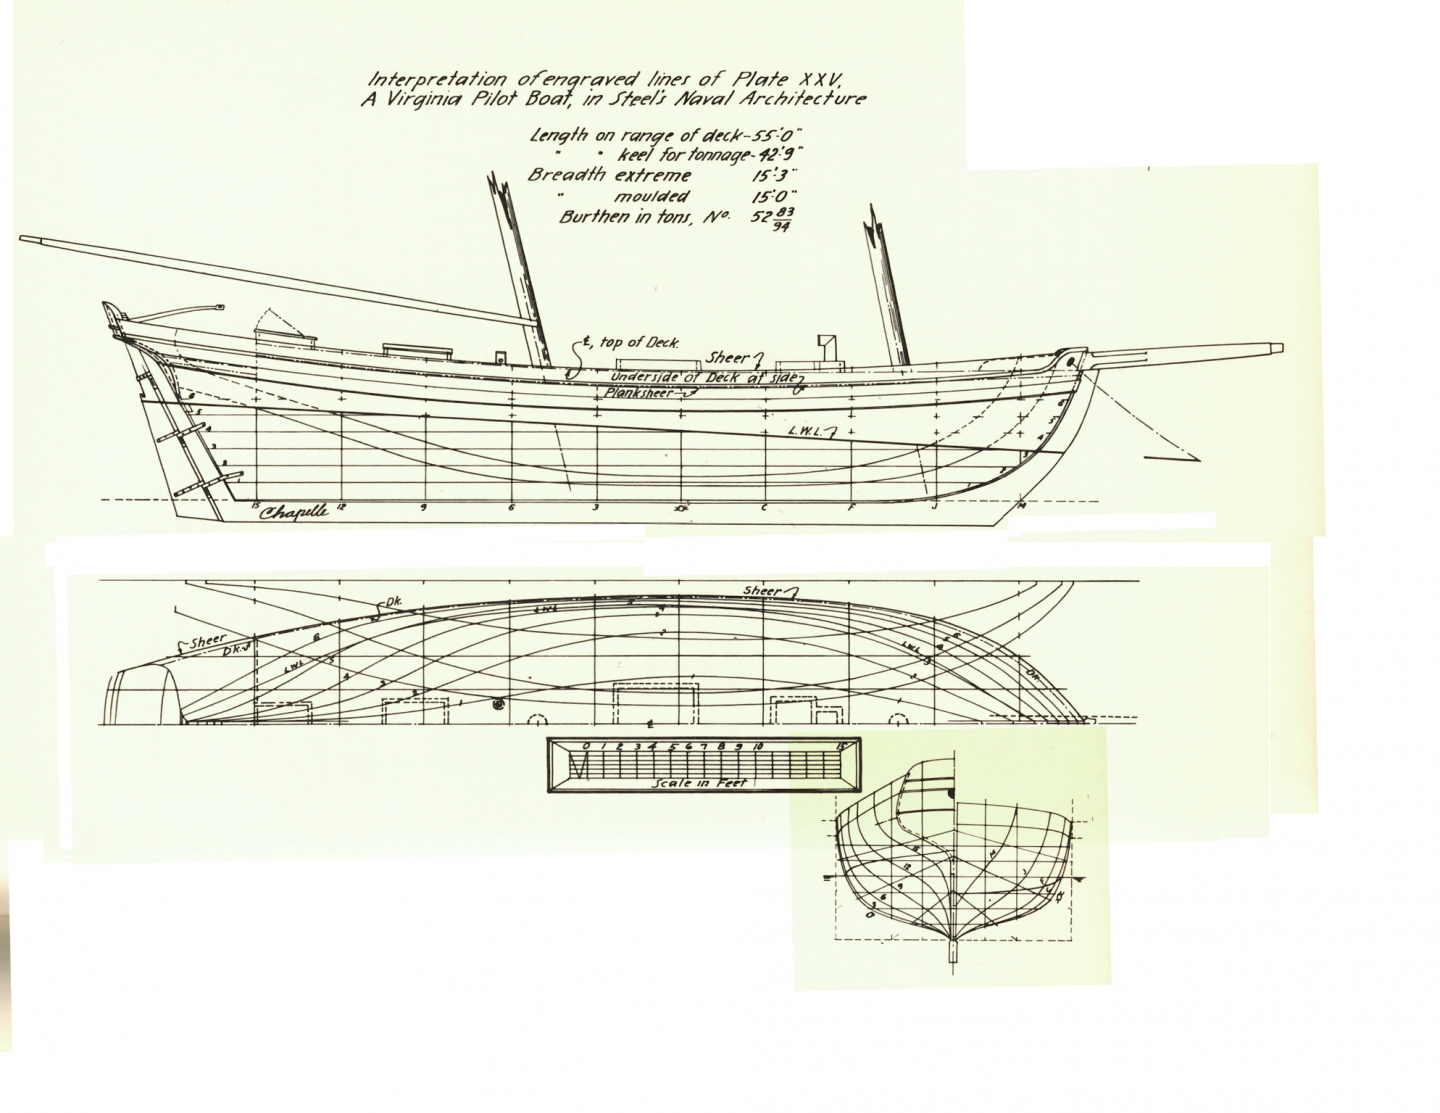
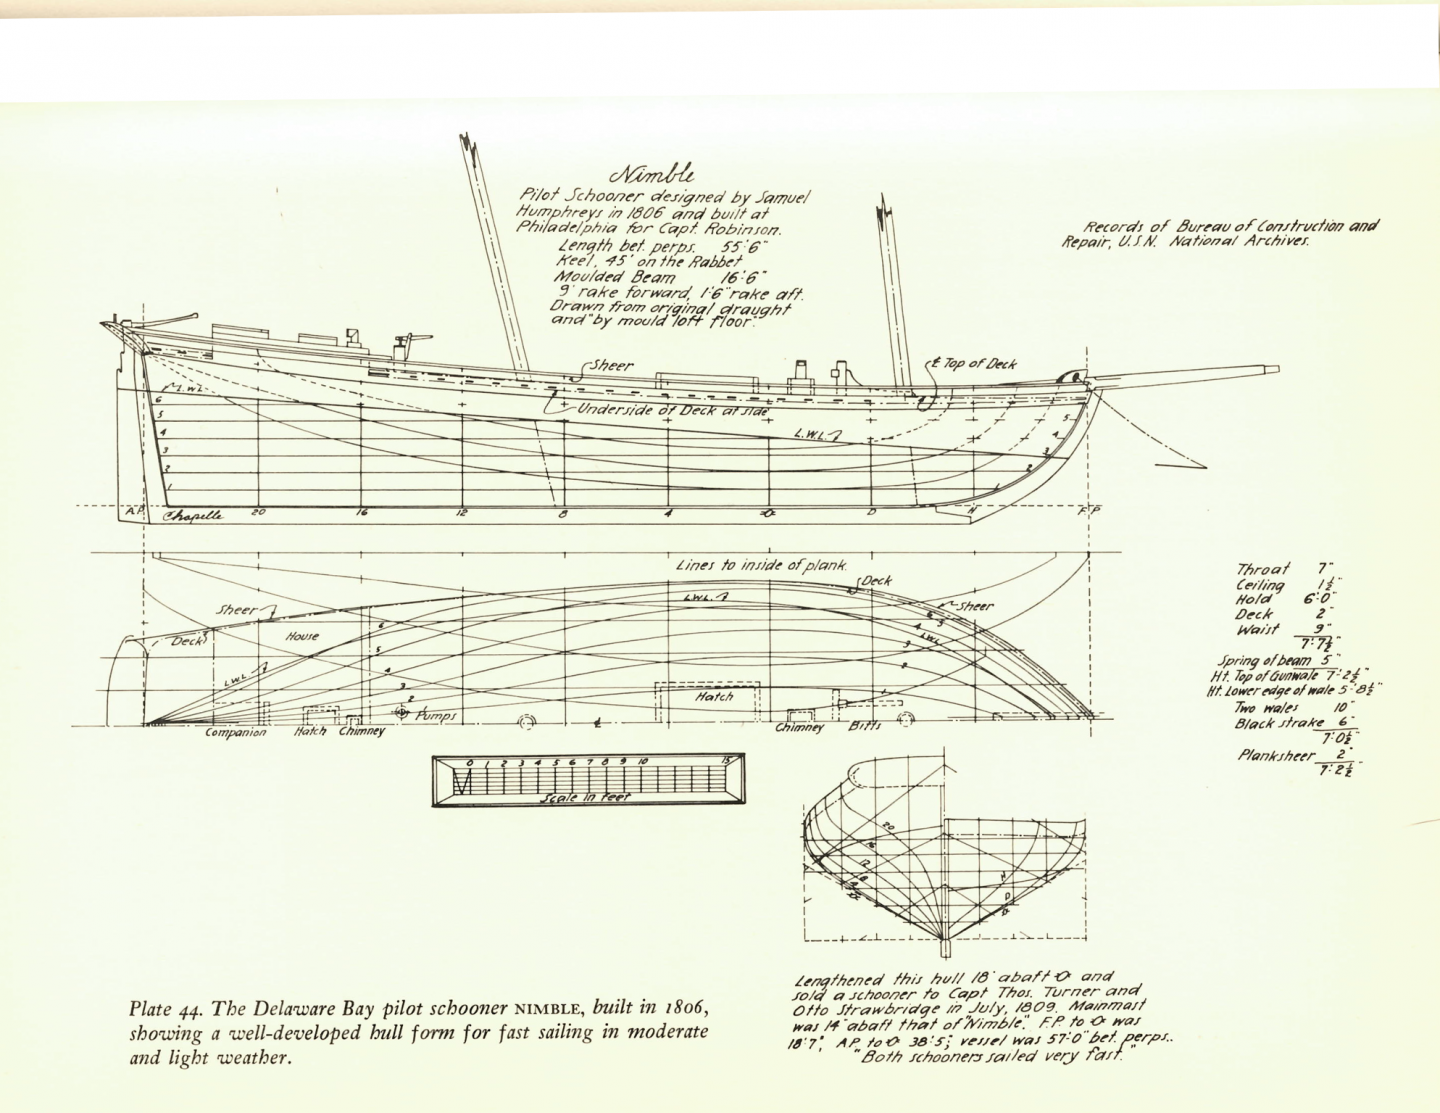
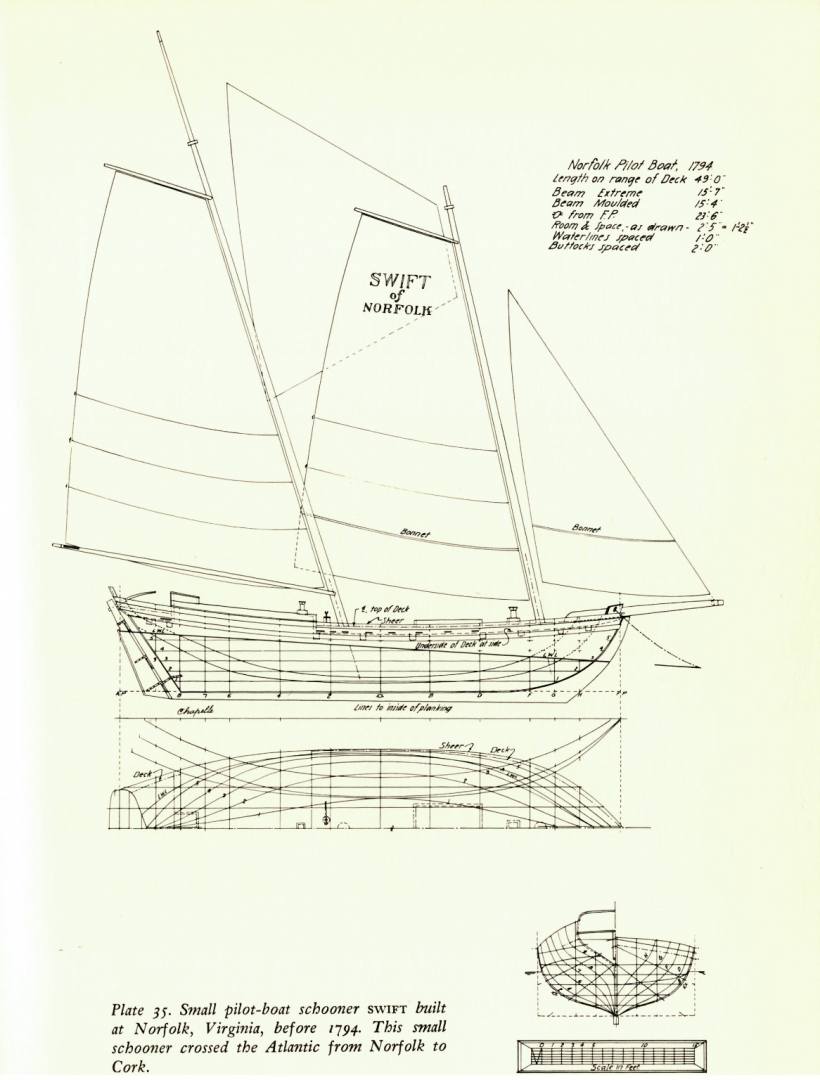
I've not posted much the last few weeks, as I've been looking at how to change this model from the stock design of the kit to something more accurate. I already knew the deck layout and rigging were suspect. That's gotten me down the fun rabbit hole of research and buying books. To start, I picked up Chappelle's The Search for Speed Under Sail" as well as "The Baltimore Clipper". The first book has a plate (#37) that represents Steel's Virigina Pilot Boat, often referenced as the source of the AL "Swift 1805" kit concept. Indeed they are fairly close. The "Virginia Pilot Boat" First, here's a picture from the book of Chappelle's interpretation of Steel's "Virigina Pilot Boat", with a bit of layout editing by me... AL Swift 1805 compared with "Virginia Pilot Boat" Here's a scan of some of the AL Swift kit plans roughly re-scaled and aligned to overlap with the above illustration. A very rough side view of the Swift is overlaid, and the deck view mirrored below. You can see that indeed they are pretty similar, including in size, though clearly the deck layout of Chappelle's version of Steel's drawing is quite different on the deck layout. A few differences in the original that stand out include... Aft cabin area doesn't appear to be a raised structure off the deck Aft cabin area is further back, with the companionway entrance where the "sunken poop" starts Aft cabin area includes a small hatch (or flat skylight?) No stack in aft cabin area Two pumps aft the main mast, compared to 1 forward the main mast in kit Bulwarks are much higher on the model No forward cabin, but instead a smaller square hatch as well as a smaller forward vent and stack Bowsprit lays flush to the deck, which fits the idea of it being through-bolted / strapped to the deck and deck beam Not clear in the picture above, but the original's bowsprit is a bit longer The "Nimble" of similar size and layout Another illustration Chappelle's Speed book has is the "Nimble", also of very similar size and layout. A few differences (and similarities) with the AL Swift 1805 model include... Aft cabin is similar, being raised and having a stack Addition of a hatch in aft cabin Bitts now just aft the foremast Simplified forward chimney, losing the additional small hatch/vent that the Virginia Pilot Boat has Rudder is vertical The smaller "Swift", which shares a name and a few other details Lastly, Chappelle's "Speed" book does include a small "Norfolk Pilot Boat" named Swift. It's smaller (by about 10 feet) but bears a few similarities to the AL kit, including... Raised aft cabin with no hatch and small stack (close match to the AL kit style) Angled rudder, though it does not come through the deck Some conclusions / observations It indeed seems that the AL kit has started with Steel's Virigina Pilot boat, but took a few ideas (like name and aft cabin) from the "Swift" also in Chappelle's book. But then the kit took a few big turns like duplicating the aft cabin forwards, while eliminating the forward hatches and stack. Additionally, the kit added bulwarks, and raised the bowsprit off the deck - which of course leads to an unrealistic bowsprit mounting approach in the kit. Going forward with the build Based on that, here are the changes I'm going to do on the kit... Keep the aft hatch design (as I built it) as is, but move it aft to be as close as possible to the edge of the "sunken poop" Two pumps instead of 1, placed as per the "Virginia Pilot Boat" and "Nimble" plans Keep the bulwarks Keep the off-deck bowsprit but build some kind of heel mount for it Remove the forward duplicate cabin and replace with hatch, etc. I already had decided to do this, but now will reduce the size of the hatch I made to a smaller square design Add forward chimney and bitt per the "Nimble" plans - just because I like the look of the bitt Future research Rigging for sure is to follow. I'm working slowly on a plan for both rope size, as well as appropriate use of blocks and hearts. This will also help me determine where to put cleats and eyes on the deck. One useful reference I've found here is @Dr PR's thread on Topsail schooner sail plans and rigging. The kit isn't a topsail but I've found the wealth of illustrations and notes useful. Perhaps the one thing I'm still working on is what kind of rigging should be on the bowsprit - specifically whether to add a bobstay and shrouds - the kit has neither, but I imagine they should be there to help manage rigging tension on the bowsprit.

- 44 replies
-
- 1
-
-
- first build
- Artesian Latina
- (and 1 more)
-
Any rules of thumb or tables for sizing hearts?
Tim Holt replied to Tim Holt's topic in Masting, rigging and sails
Sorry to be so ignorant. I see them for sale with dimensions like "12mm heart". I'm trying to figure out if that is 12mm long, 12mm across, 12mm on the inside, or what. From your post I assume that 12mm is the equivalent of the 0.41 inches long you mention in your example. I guess the question I had was extremely basic, but for someone not used to dimensions it’s not basic. I've already ordered the wrong sized blocks once out of ignorance of what the single dimension meant for blocks - and I'm trying to not do that again with hearts. -
Any rules of thumb or tables for sizing hearts?
Tim Holt replied to Tim Holt's topic in Masting, rigging and sails
So to be clear, this dimension is the same one that I see listed in tables and the spreadsheet, plus the dimension that vendors of pre-made hearts use, correct? -
Any rules of thumb or tables for sizing hearts?
Tim Holt replied to Tim Holt's topic in Masting, rigging and sails
Thanks Allan! Good info. -
Any rules of thumb or tables for sizing hearts?
Tim Holt replied to Tim Holt's topic in Masting, rigging and sails
I'm not sure if you mean "calculate the size" based on a table, or if there is a formula for that calculation. I have looked at a few tables (back of Biddlecombe , The Art of Rigging for example) that reference hearts at times for some things, but then some references (Chapelle's Search For Speed) I recall occasionally say "heart or deadeye" for some rigging. Let's say a table says deadeye and gives a diameter, and I wanted to use a heart instead. What size would I use? Perhaps that's the case I'm looking for. So far the only thing I've thought of is to take the lanyard rope diameter, multiply by 5 (seems typical number side by side in heart), and use that as my internal wide dimension. Then use the "typical" heart shape and work out the size from that. Additionally, when tables do reference hearts, they only give a single dimension. Which relates to my secondary question: what does this dimension mean? -
I've seen tables of sizes for blocks and line, as well as some rules of thumb (ratio of line size to sheave size). Is there such a thing for determining the size of a heart? And a related question... When the size of a heart is given, it's often just a single dimension. What exactly is this dimension? Is it the widest point of the opening? Outer width? Inner or outer height?
-
I’m eager to see the ebony in place. I have some pieces I (pre)inherited from my father who’s an instrument maker. Lots of curly and hard maple too.
-
Glad that helped! I too have a tiny figure and they do help you a bit with a sense of size and scale as well. Sometimes it helps you appreciate say, how tall the bulwarks would have been for someone standing tehre.
-
How have you in the US payed? The whole "transfer to bank account" part got me kind of hesitant, and I can't seem to find a PayPal option, though it is mentioned up front.
-
Looks nice! It looks like you stood it on end to print? Assuming FDM printer, you've certainly got it dialed in for a clean print. I'm impressed looking back through your log how many jigs and helpers you've 3D printed. Really nice use of one.
- 274 replies
-
- 1
-
-
- Cheerful
- Syren Ship Model Company
- (and 1 more)
-
Doors
Tim Holt replied to Don Case's topic in Building, Framing, Planking and plating a ships hull and deck
Not knots? Naughty! -
She pulls to port a bit but with a little sea anchor off the starboard side she can hold a course.
- 44 replies
-
- 1
-
-
- first build
- Artesian Latina
- (and 1 more)
-
My approach has been to measure things with a caliper, then calculate based on the model scale how big it would be in real life. Then decide if that real size makes sense. I did that with some rings for door pulls on my current build, and realized that if scaled up, they'd be immense. 8" diameter rings made from 1" diameter metal would be ridiculous on a small companionway door!
-
Thanks Mike. I'm definitely making some mistakes along the way, and it's definitely a learning experience. I'm willing to experiment with this one too since it's pretty basic. I didn't go into it, but I had to patch and fill some spots on the rudder where my first attempt at pintles & gudgeons were (oops wrong spot). And you don't want to see how the rudder hole in fantail looks, as it's off center from the stern frames. This is basically because I didn't glue the plywood bulwarks on evenly in the back.