Dan Vadas
-
Posts
3,261 -
Joined
-
Last visited
Content Type
Profiles
Forums
Gallery
Events
Everything posted by Dan Vadas
-
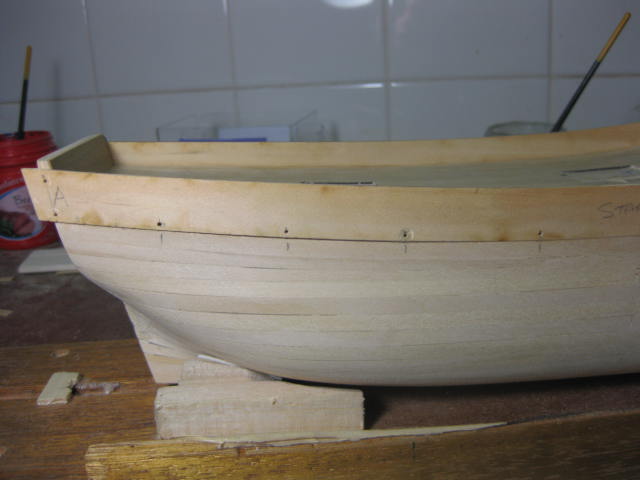
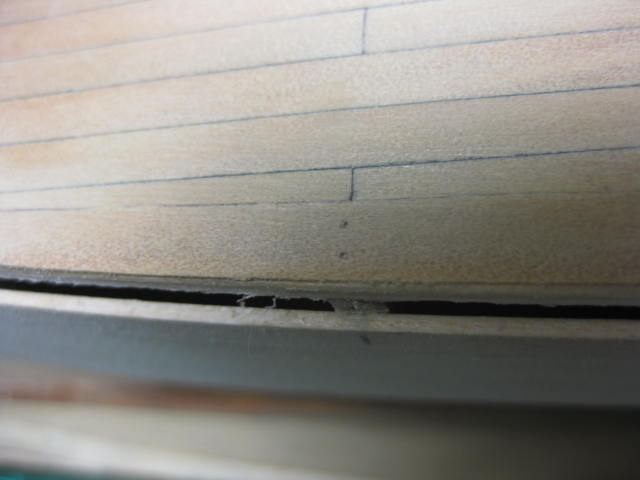
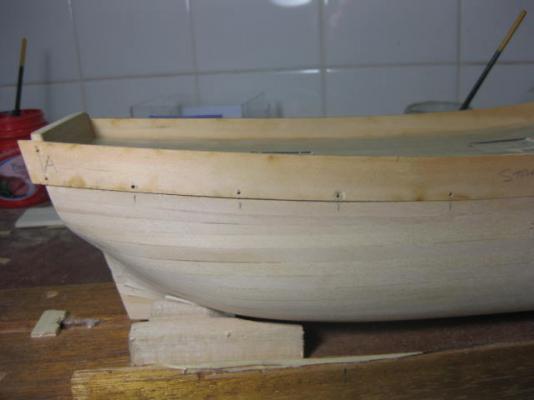
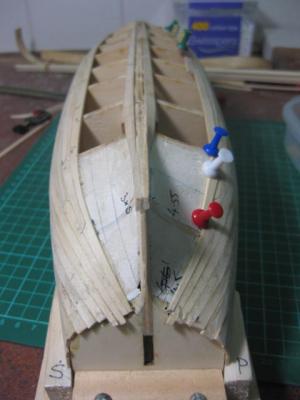
Bulwarks I've fitted the ply Bulwark pieces which I'd soaked and bent a week ago. I was in two minds whether to use these or do a scratch-build of the real planking, but as I'm doing this as a sort of Tutorial for this boat I decided to fit them. The fit was reasonably good, only a couple of small gaps between the bottom of them and my first plank. That was most likely due to my laying the plank slightly too low in a couple of places. Easily fixed, and the 2nd planking will cover the gaps anyway. The insides finished up very good indeed, and that was all that really mattered as the planks I'll be lining the inside with will only be 0.5mm thick.


-
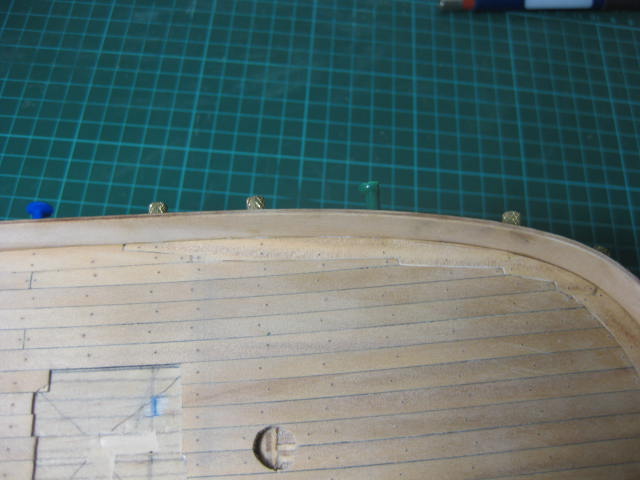
About 340 deck treenails are now in (that's ALL of them ). My fears of the boat catching a virus were unfounded - it looks fine, probably because there is only one nail in each plank/beam intersection. I've staggered the nails into each "beam".
-
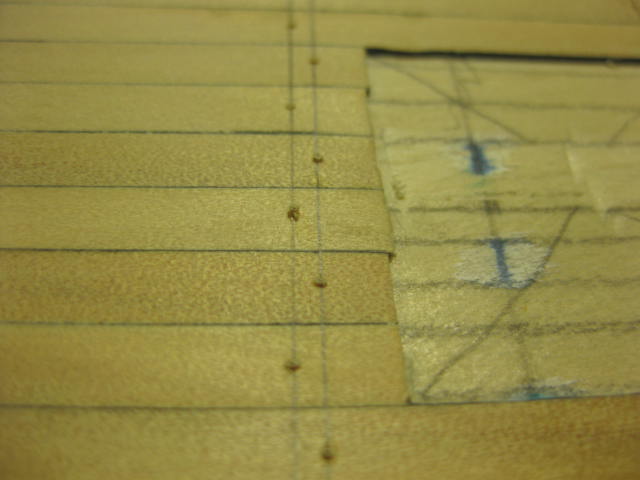
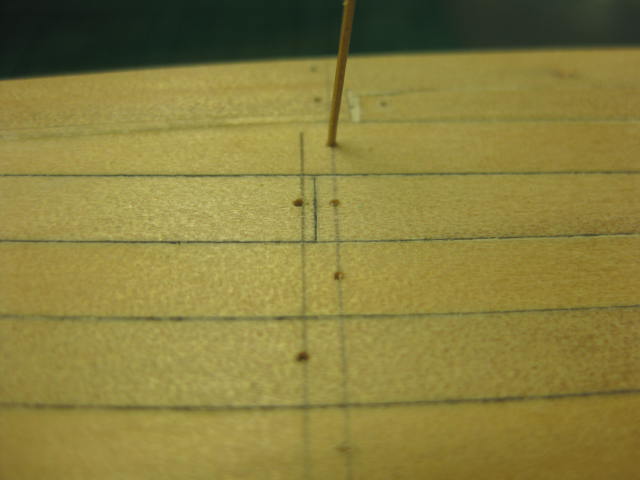
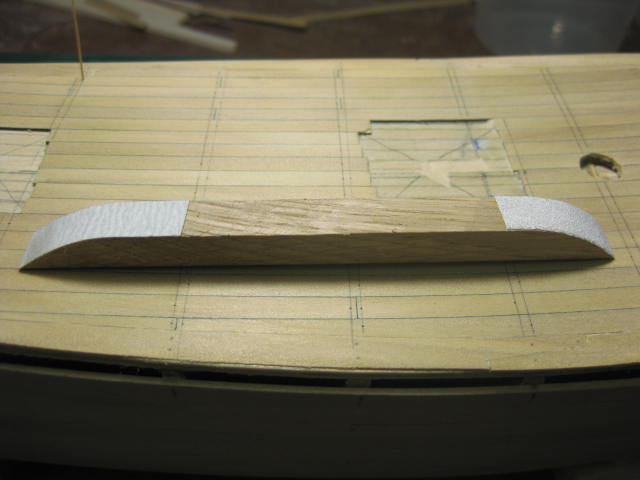
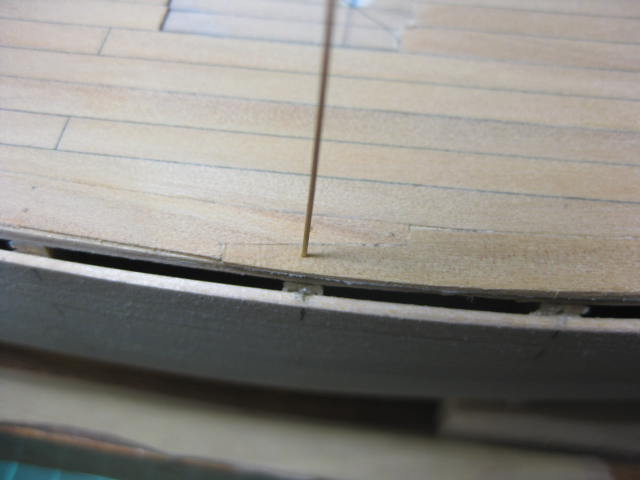
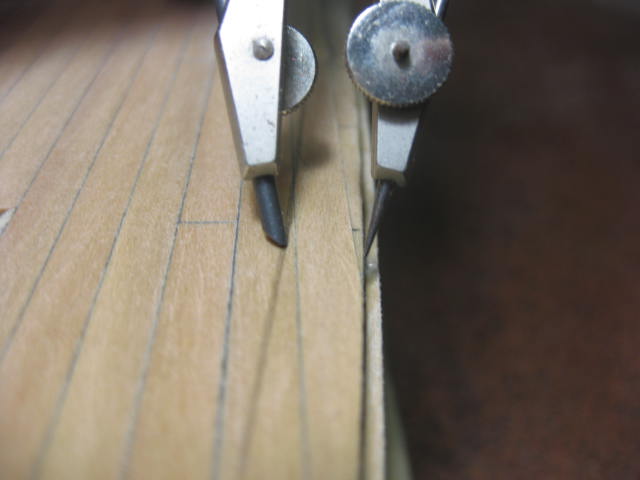
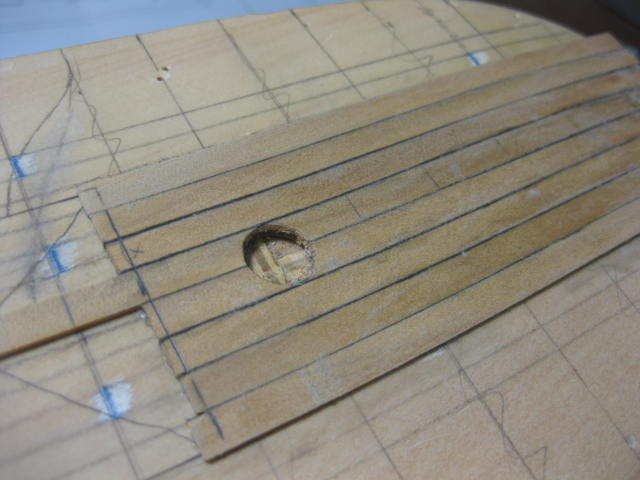
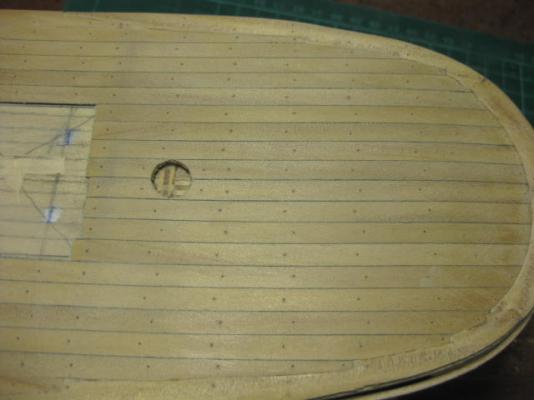
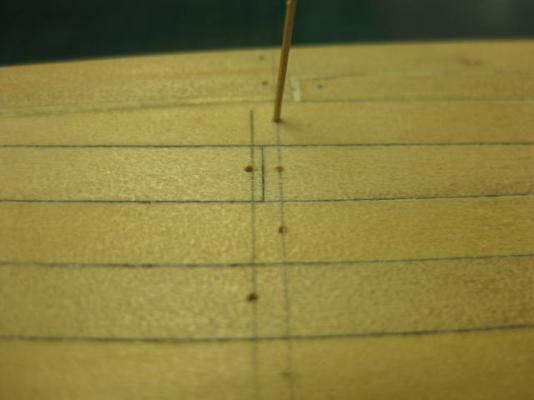
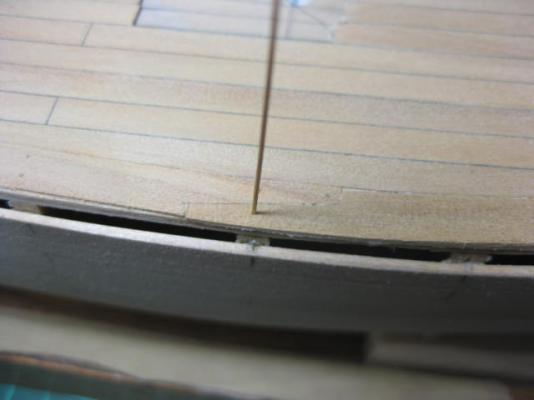
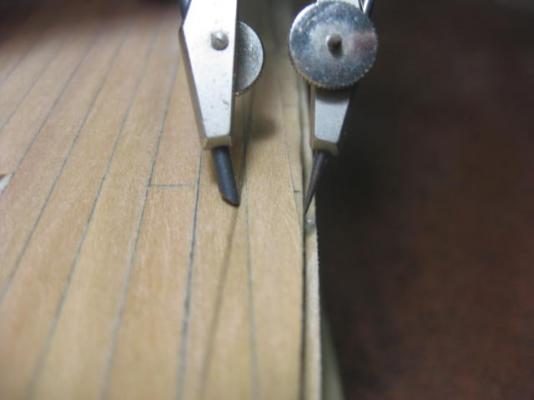
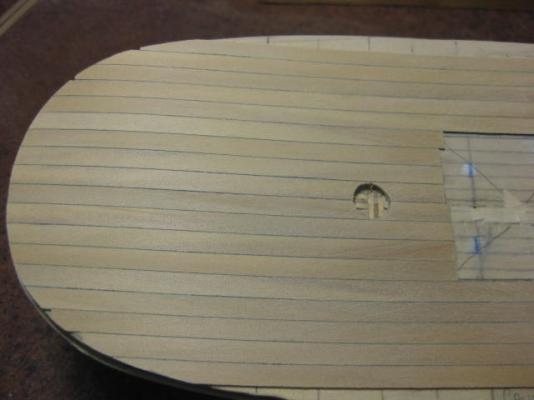
Deck Treenailing I'm into the treenailing of the deck. First I decided on my "nail pattern". As these planks are 7 inches wide they only need a single treenail on each plank. I'm staggering the nails on each side of the frames on alternate planks. I drew two lines across each bulkhead to get the stagger right (pic 1). Next I used an awl to make a centre mark for each hole. I've switched to a slightly larger drill - 0.55mm. The 0.5mm holes, which were the exact size of the bamboo nails, were a little TOO tight. (Pic 2) I put a tiny smear of PVA onto the tip of the treenail and pushed it into the hole (a lot easier now) and snipped it off with a very sharp sidecutter, leaving about 0.5mm protruding - if I cut them too close to the deck the bamboo distorts a bit. BTW - I'm going to put another row of nails between these - the kit bulkheads are about twice as far apart as the frames on the "real thing". I only hope the extras don't make it look like the boat has caught the measles . Last I sanded the treenails flush - note the rather useful new sanding stick I just made for this job. It's double-ended with a different grade of paper at each end. Excellent for sanding the nails on a deck with a lot of sheer, and it also gets right up to the transom along the grain as well.


-
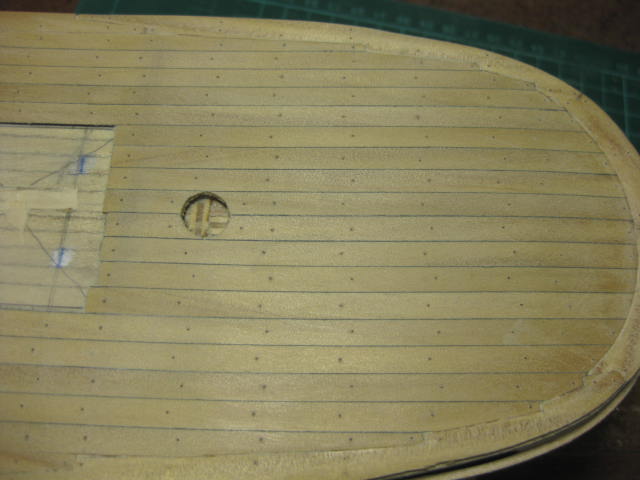
I've finished sanding all the margin planks - they've come up rather well . I've had my first go at bamboo treenailing. I'm hoping they show up a little better when the deck is lacquered.
-
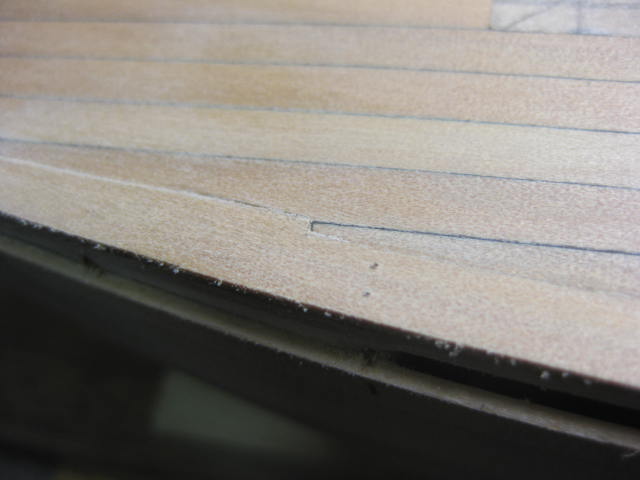
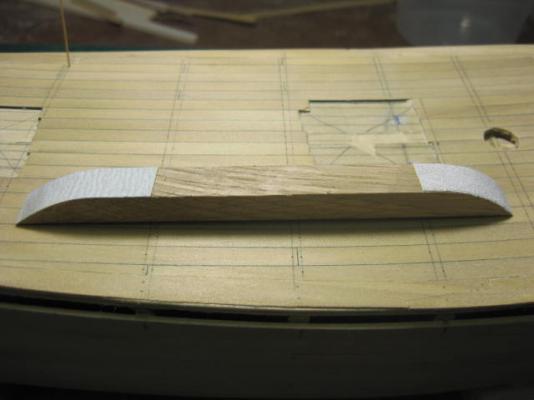
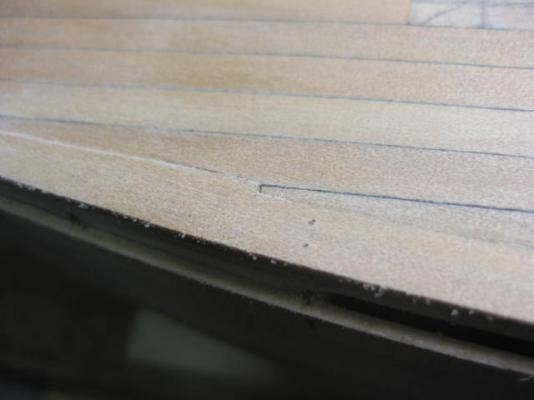
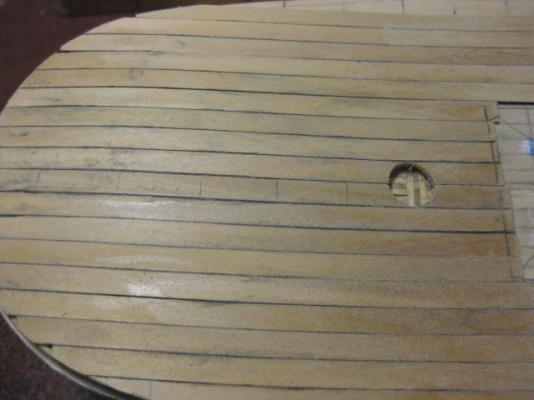
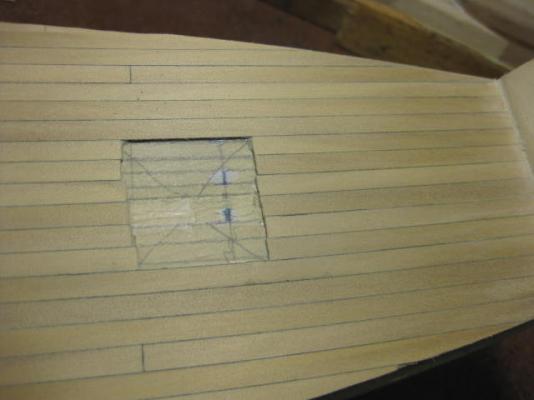
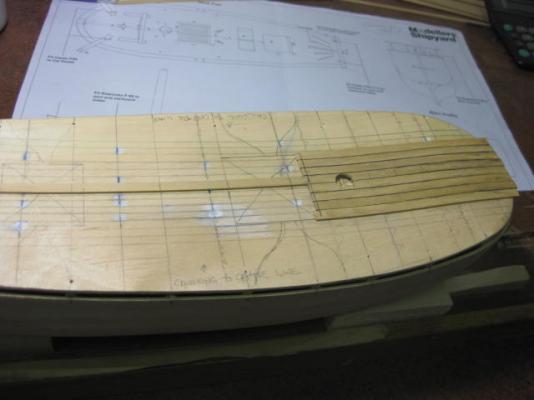
I've fitted the Margin Planks. These were made in three sections per side from 8mm wide Norfolk Pine. I bent the long aft section laterally as shown previously, the two forward sections were cut to shape. The deck planks have been "joggled" where needed. The joins between the three sections were scarfed in. I've sanded the midships section of the margin planks flush with the deck to allow for water runoff through the scuppers, the rest angle back toward the bulwarks to create a "waterway". This will show up better when the deck is lacquered. I still have to sand down the starboard side planks.


-
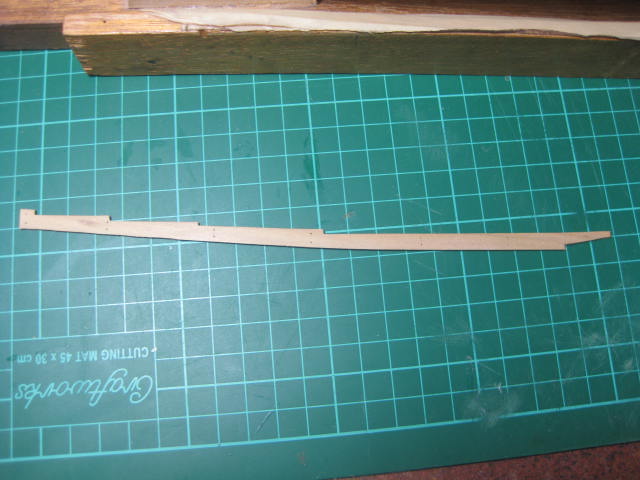
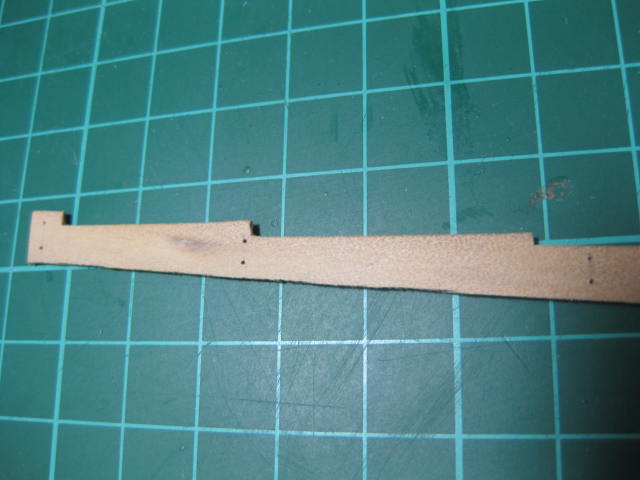
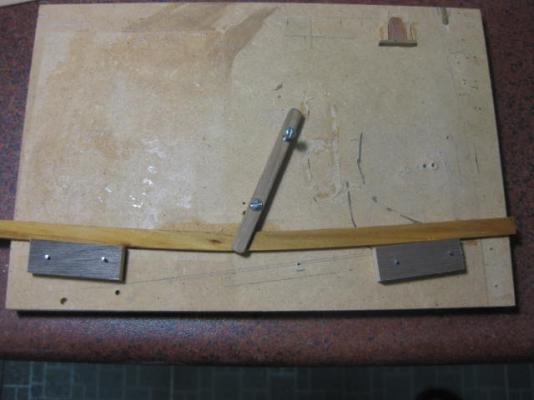
Margin Planks To fit the Margin Planks I first used a compass to draw a line parallel to the edge of the deck. This will be my reference point for the trimming still to come. I've cut two planks for the Margin Planks at 8mm wide to allow for a bit of trimming. I bent two sections of these laterally for the shallow bends - which start at bulkhead 3 and continue to the transom - by soaking them for 20 minutes in cold water and used a simple jig to bend them. These need to dry thoroughly before I can continue.
-
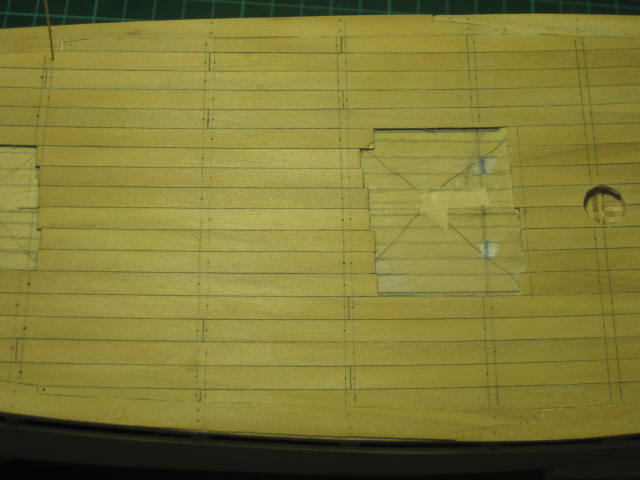
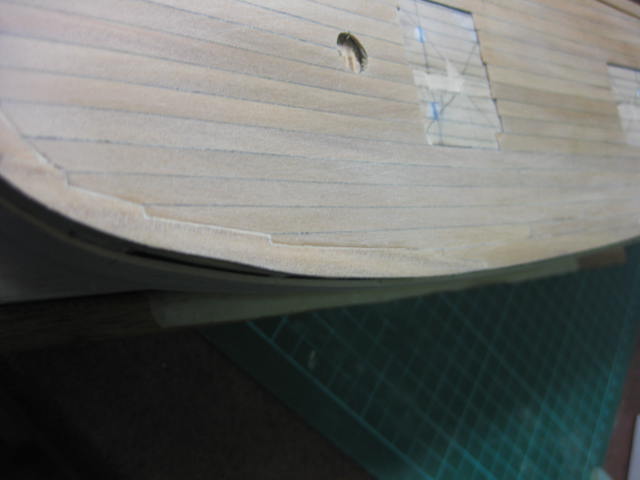
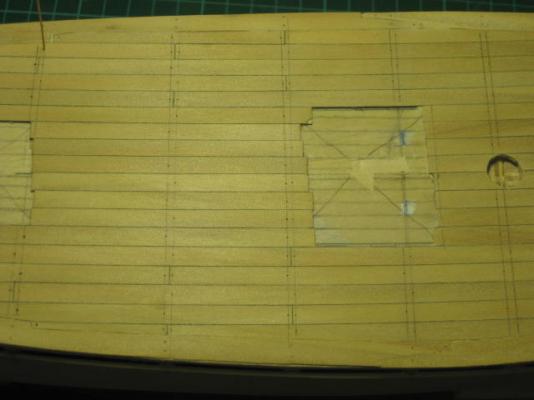
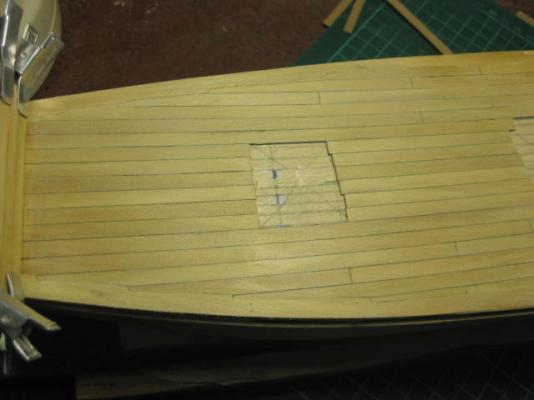
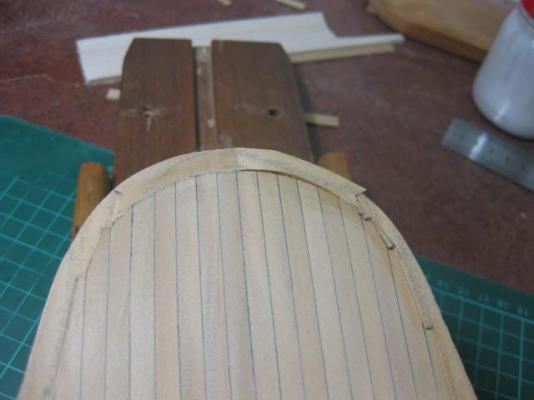
The major part of the deck planking is finished. I've only used a few "butt joins', done in a "three shift", along the sides of the boat where the planks were over 25 feet in length. Pic 1 shows the bow of the boat before sanding, the next two pics are of the sanded deck - note how much neater the "caulking" looks now .. My next job will be fitting a Margin Plank around the sides of the deck, and "joggling" the planks into it where needed. This is one of my DEPARTURES from the kit instructions, which don't have this plank - however it WOULD have been used originally.
-
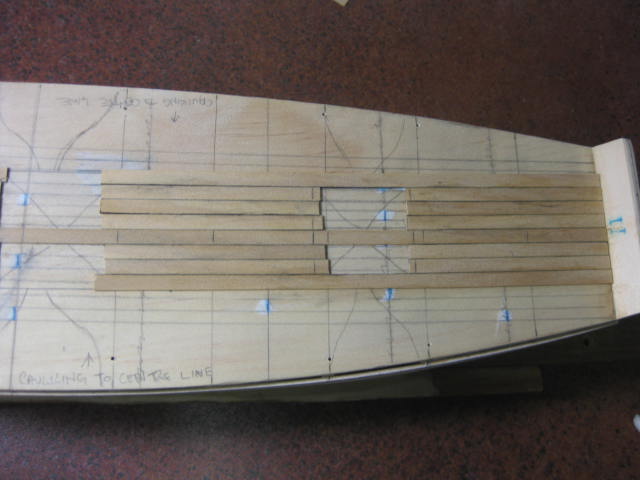
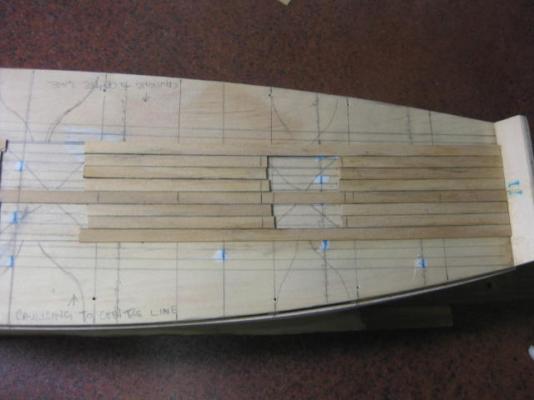
Next I cut 10 planks at 75mm and fitted them between the cargo hatch and companionway, and from the companionway to the transom. I also cut 2 planks at 180mm and fitted them alongside the planks in these two sections. The next planks will run from bow to stern and will need "butt shifts" - none of the previously laid planks needed them as the planks were all under 25 feet.
-
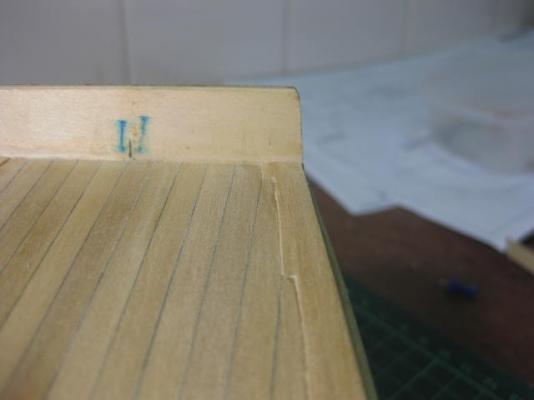
Deck Planking I've started the deck planking. First I had to work out the positions of the Cargo Hatch and Companionway. Here I have a complaint about the kit - the plans are not full-size and they also don't have a measurement for the positions of the deck furniture. Annoying, but not an insurmountable problem - thankfully it's a fairly simple kit without a lot of furniture, or I'd have scanned the plan and blown it to actual size myself. I measured the deck length on the plan compared to the actual deck length on the model. I came up with the figure of 1.3625. If you measure the plan and multiply by that number you get the actual measurement. First I laid one plank the full length of the deck on the port side, with one edge exactly on the centre-line. This is to ensure I work exactly straight in the various sections. I cut 7 planks to 115mm. Then I used an "Archival Ink" felt pen to simulate the caulking on one edge of them - this stuff doesn't "bleed" into timber like normal felt pens do. I laid 3 of the planks on the port side, and 4 on the starboard to bring me to the forward edge of the cargo hatch. I've left it a couple of millimetres into the hatch opening - I'll trim this exactly when I've made the hatch.

-
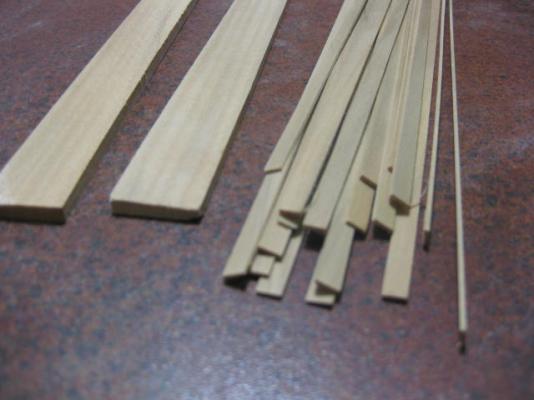
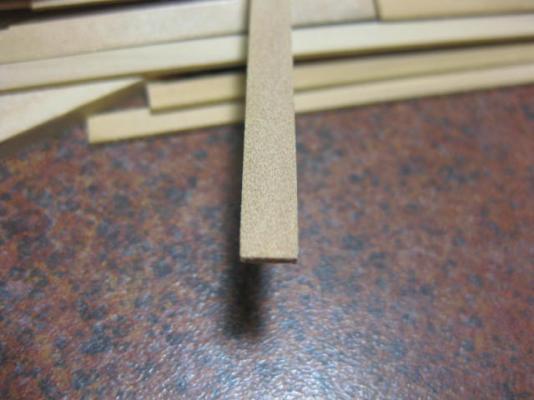
I've started cutting the Norfolk Island Pine planks for the deck and hull. The large billets on the left of the pic are 5mm thick, from which I cut the 0.8mm thick planks. These are turning out quite a bit better than any kit supplied ones I've ever used. Gotta love that Byrnes Saw .
-
I've given the starboard side a rough sand with 80 grit paper to get out all the bumps and hollows. It took an hour to do the whole side - one of my fastest yet . In spite of the way the planking looked in the pics it was all within a fraction of a millimetre, and sanded flat quite easily. The stern area - this requires a delicate touch to get right, it's not hard to take TOO much off where you don't want to. I used the "half-round" sanding block in pic 5 for this area - the flat block did the rest. I won't finish sanding the hull (with 180 grit) until I have the deck planking done and the bulwarks fitted. BTW - NO filler will be required .

- 147 replies
-
- 2
-

-
- norfolk
- modellers shipyard
- (and 1 more)
-
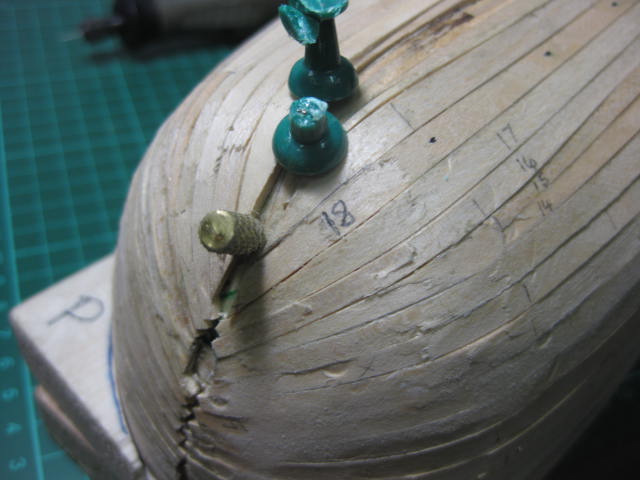
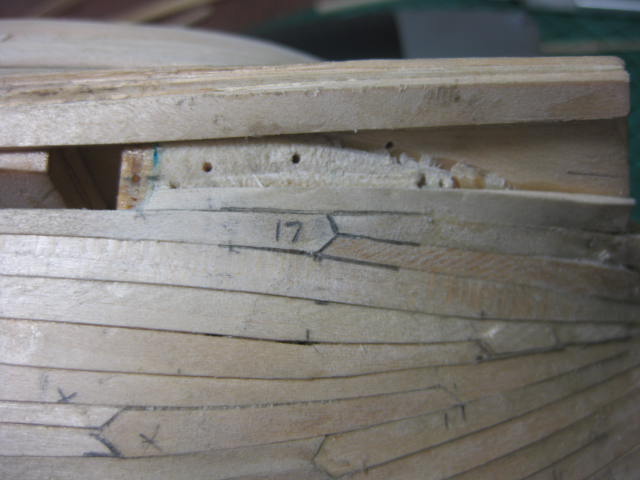
Plank 18 - this one gets cut sharply at the bow to roughly follow the line of the stempost. It has a small taper over the first 30mm, continues full width to bulkhead 4 and tapers to 3.5mm at bulkhead 6. From there it tapers back to full width at bulkhead 8, and is cut for a Half Stealer continuing on to full width at the sternpost. The half stealer is between plank 18 and plank 17. Plank 19 is cut and tapered in similar fashion to plank 18 at the bow. It continues almost full-width to bulkhead 8 from where it tapers to half-width 50mm from the sternpost and is cut to receive a short stealer. This is the final plank, I carefully sanded whatever sections were a tight fit to the garboard strake until it was a neat fit into the gap.


-
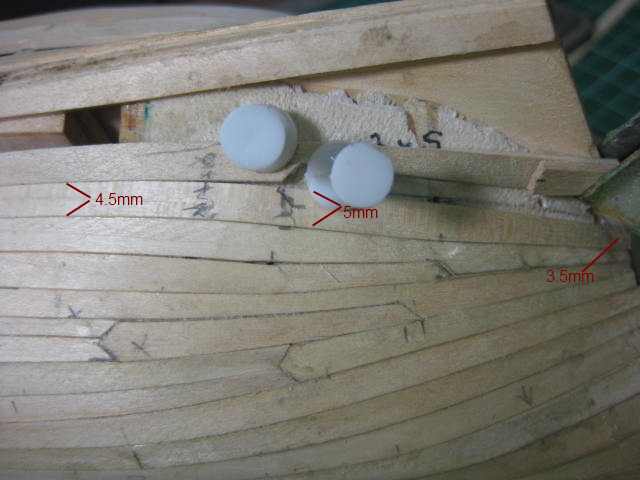
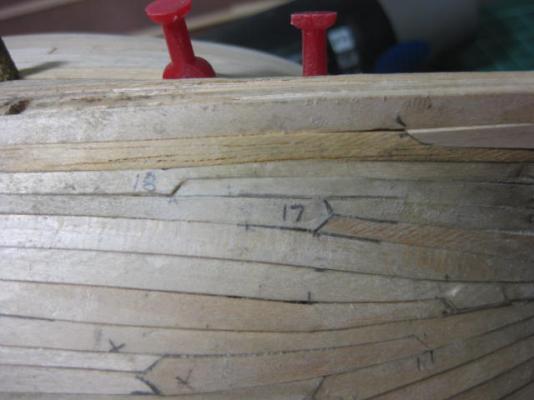
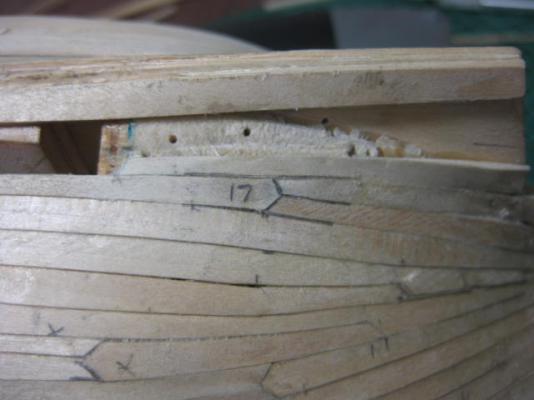
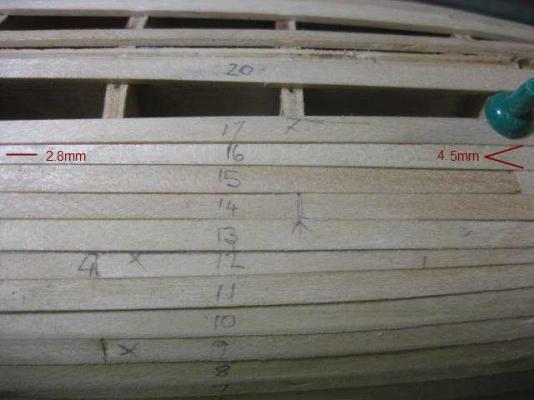
I've just done a re-calculation of my plank widths and realised that they won't quite fit with only 18, so I am cutting the last few to fit an extra one in (I really should have done this about 4 planks earlier - it would have changed the way I laid the last few - doesn't matter, I'll still be able to recover). Plank 17 - The taper at the bow comes back to 3/4 of the way to bulkhead 1, where it's at full width for 30mm and then starts tapering down to 4.5mm at bulkhead 4 and continuing to halfwidth at bulkhead 7. Between bulkheads 7 it suddenly comes back to full width between bulkheads 8 and 9 where it finishes with two diagonal cuts to take two full stealers which continue on to the stern.
-
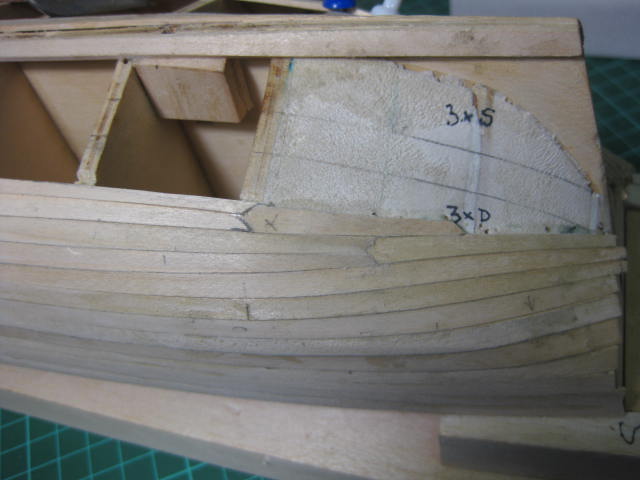
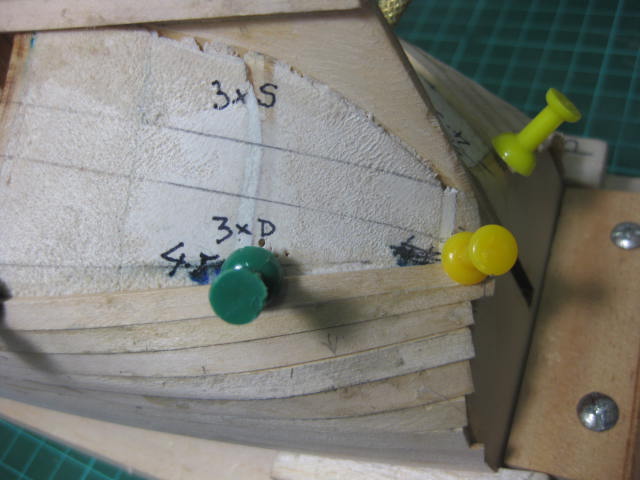
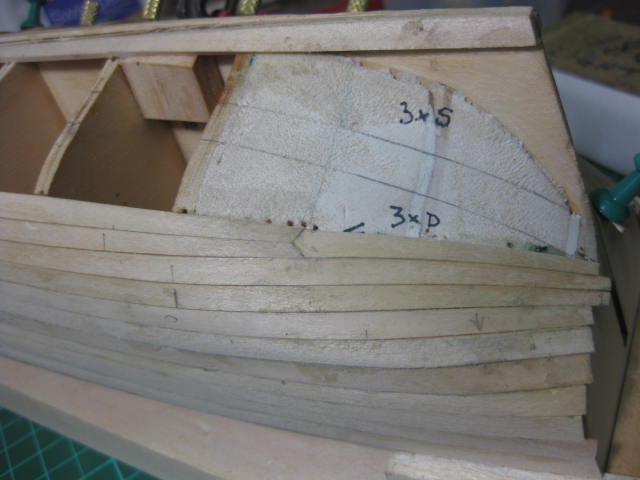
Plank 16 - The bow tapers and bevels as per the usual to bulkhead 1. Rather than trying to explain it - because of the unusual shape of the hull at the bow and the "transition" at the stern I've had to do some unusual things myself - I thought I'd do it with pictures instead. There is multiple tapering in this plank.

-
Plank 14 - I've had to fit a Drop Plank in the Bow. It runs from the stem to bulkhead 1. The plank runs from the end of the drop plank, with a taper from half-width at it's start to bulkhead 3. I finished it at bulkhead 6 (I have a couple of shorter lengths I want to use up). From this bulkhead the plank continues to bulkhead 9 where it ends in a diagonal cut. It's tapered to half-width over the last 30mm. This plank is beveled all the way. Plank 15 - starts at the drop plank on bulkhead 1 and is tapered to bulkhead 4. I finished it at bulkhead 7. The next section is another "Half Drop Plank" which ends at the transom. There's a pic below of the stern part of the plank.

-
Plank 13 - Bow section tapers from half-width over the first 85mm, and finishes on bulkhead 4. The rest of the plank is done in one piece, and it's a bit different to the others. From Bulkhead 4 to 6 it is at full width, then tapers to 4mm at bulkhead 8 and back to full-width at bulkhead 9, where it's cut on a diagonal to suit the drop plank on plank 12. From that cut it tapers to half-width at the transom. This makes it a "Half Drop Plank" I suppose. This plank is bevelled slightly for it's full length. I've added three pics showing the overall progress so far - only 5 planks to go each side.

-
Plank 11 - the Bow section needs tapering to half-width now ..... the curvature of the hull is changing. I've finished the bow section of the plank on bulkhead 3. From there an "intermediate" plank runs to bulkhead 8 - this one is tapered from bulkhead 4 to it's end, and finishes at half-width with a diagonal cut for another Drop Plank. Plank 12 - the same as plank 11, with the diagonal cut the opposite way. The Drop Plank starts from the end of 11 and 12 at full width, and finishes on bulkhead 9 with a diagonal cut. It tapers to half width in it's length. All the above planks are bevelled 45 degrees from bulkhead 1 to the ends. The section from the stem to bulkhead 1 only needs a slight bevel.
-
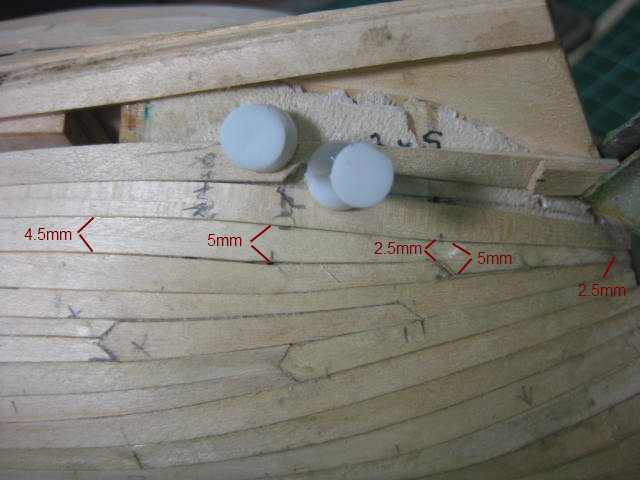
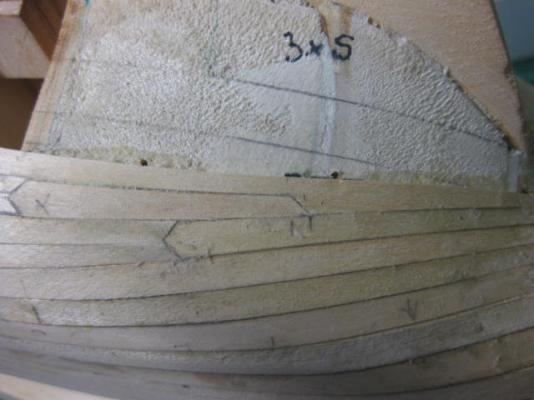
Plank 8 - Usual in the Bow. The Stern tapers to 2.5mm over the last 80mm. This plank is bevelled for it's entire length apart from the last 30mm at the stern. My next few planks will need Drop Planks at the Stern, as is shown by the rapidly converging "batten" lines at the stern : Plank 9 - Usual in the Bow. The stern tapers to halfwidth for the last 30mm, and ends halfway between bulkheads 8 and 9, terminating in a Drop Plank. The whole plank is bevelled to 45 degrees. Plank 10 - Usual at the Bow. The rest of the plank is identical to plank 9 apart from the stern end which is cut on the opposite 45 degree angle for the Drop Plank. The Drop Plank starts at the end of planks 9 and 10. Its forward end is cut to suit the 45 degree cuts in the planks. It starts at full width, and tapers to half-width at the transom. I've included a pic of the tapers at the Bow - they are all even both sides, although some don't look like they are .... trick of light and shadow.
-
Plank 4 - The taper at the bow comes back up to 3mm over the 1st 50mm, it finishes on bulkhead 4. The 2nd half is a full-width to the stern, with a twist and a 45 degree bevel over the last 50mm. Plank 5 has a 3mm taper as well, and a slight bevel over the first 50mm. This plank fitted with no lateral bending apart from the mid-section which is still following the sheer. The rest of the plank is full width to the stern, with the usual twist from bulkhead 8 to the transom. There is no bevel at the stern. Plank 6 - the bow section is the same as plank 5. The stern also has a taper to 3mm and a bevel, both over the last 70mm. One thing to watch out for (I should have mentioned this earlier). Make sure the edge of the already laid plank is free from any dried glue, especially where the pins go into the bulkheads. A needle file does the job very quickly. Plank 7 - forward section the same as the last few. Stern section the taper comes down to half-width - 2.5mm - and extends to the final 80mm. There is a bevel for that length as well.
-
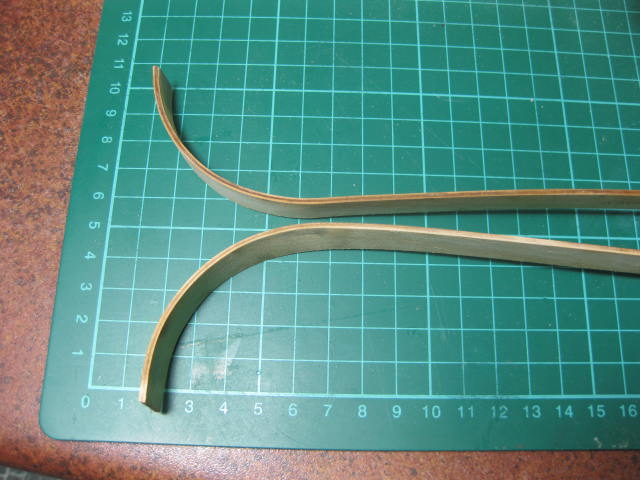
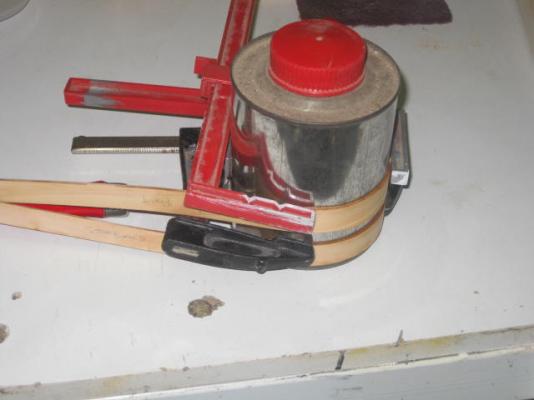
Bulwarks Whilst waiting for glue to dry I thought I may as well bend the laser-cut ply bulwarks. I soaked the ply for about 10 minutes in cold water. I put them into a plastic bottle filled to just past the exit point of the bend. Then I clamped them to a tin that was 5mm smaller in diameter than the curve of the bow, to allow for a bit of "springback" and let them dry overnight. They bent quite easily, and evenly.

-
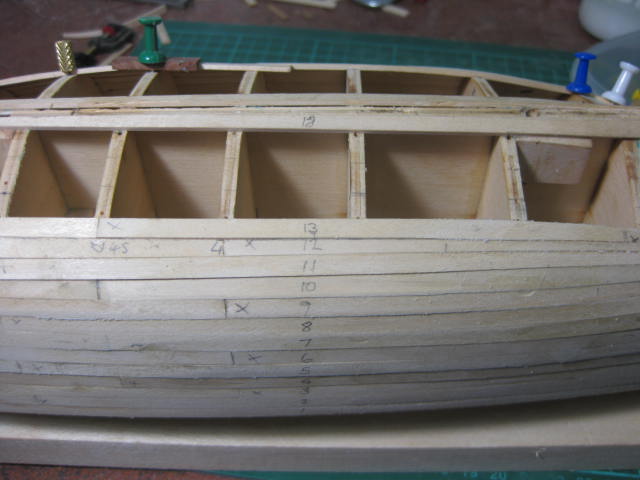
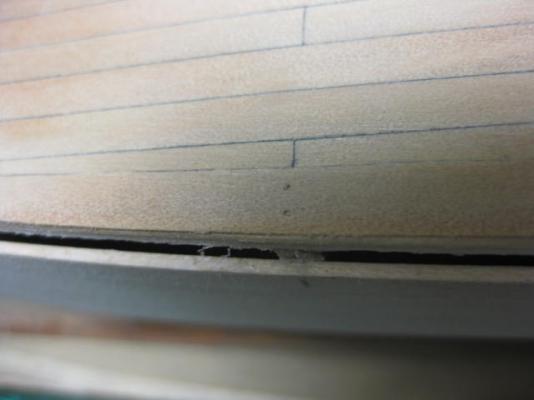
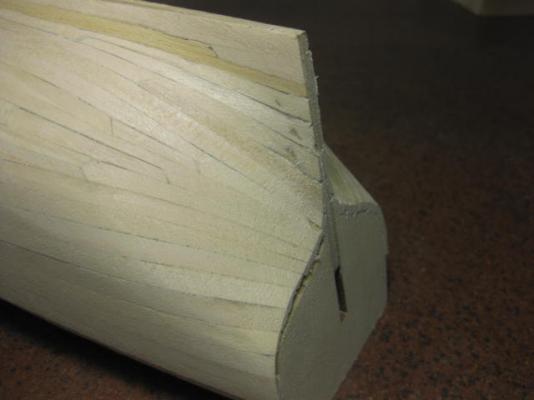
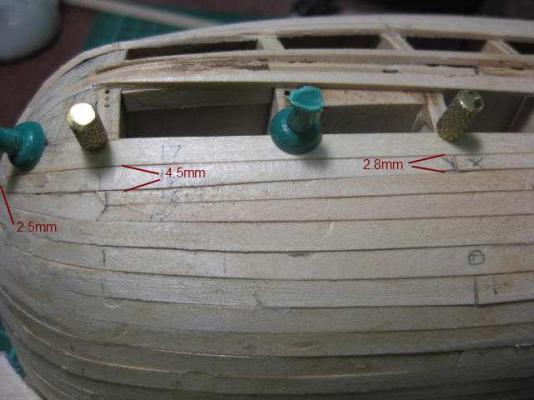
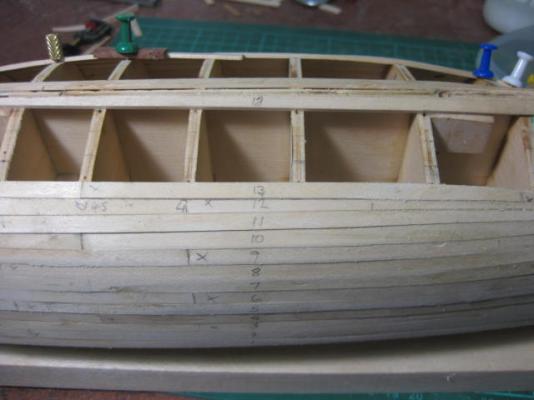
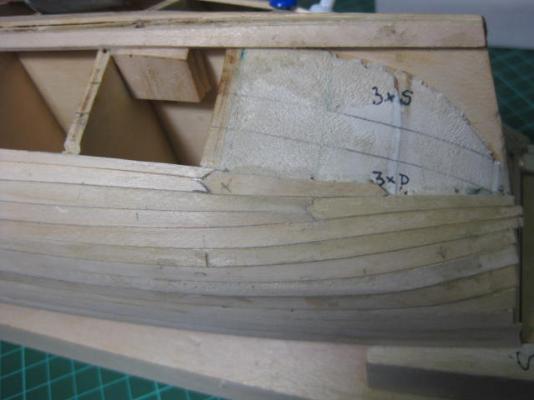
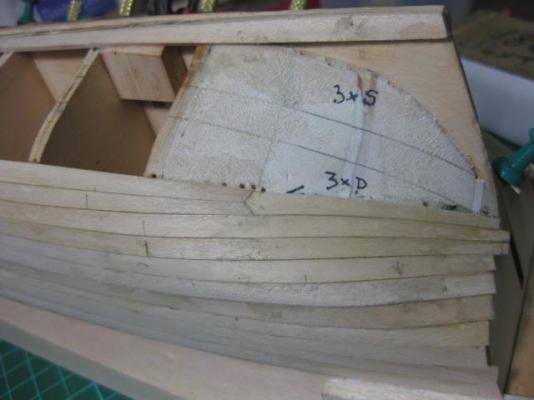
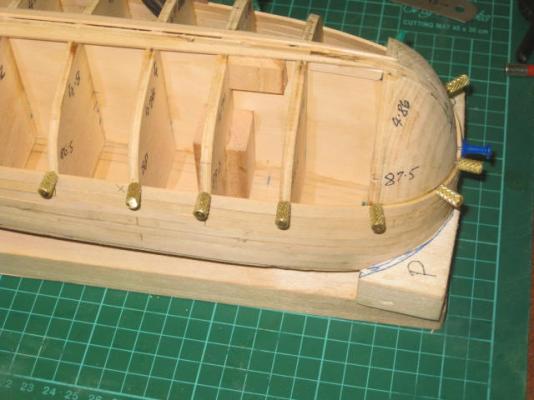
Hull 1st Planking I'm going to do a "plank-by-plank" description as I go to assist anyone following who's building this kit to make them aware of any problems I come up against, and also to save them a fair bit of working out and measuring (hopefully). The top of the Bulwark Strakes (aka Plank 1) are set 3.5mm below the level of the deck for the whole run, and must follow the deck exactly to fit the lower edge of the bulwarks neatly. (See pic below). Note the unusual "hump" at the bow - this is NOT a mistake. I made these strakes in one full length. No tapering or bevelling is required, or recommended for that matter. There IS a small mistake in either the Starboard bulwark, or more likely my planking. I have a small gap between the top of the strake and the bottom of the bulwark between bulkheads 1 and 3. I only found that out just now when I checked the fit of the bulwarks. Perhaps it would be a good idea to bend the bulwarks and mark the bottom on the bulkheads BEFORE fitting the bulwark strake. Unfortunately the instructions have you bend and fit the bulwarks AFTER all the planking is completed. Something to watch out for. Nothing I can't fix easily though. Oddly enough, the Port side bulwark fits perfectly. For easier laying I'm making the rest of the planks in two sections. Plank numbers are taken from bulkhead 5, as there will be stealers and drop-planks confusing the order later on if I numbered them from the bow or stern. Plank 1 is the bulwark strake, plank 18 will be the garboard strake. Plank 2. I made this to finish on bulkhead 3. It tapers to 3.5mm at the bow for a distance of 50mm. There is a Half Stealer which starts on bulkhead 6 and finishes at full width at the stern. Plank 3. This finishes on bulkhead 5. It tapers the same as #2 in the bow, but runs full width to the stern. This one gets a good twist for the last 30mm at the stern. I soaked that bit and pinned it to the hull to dry for 10 minutes to make it easier to glue.

- 147 replies
-
- 1
-
-
- norfolk
- modellers shipyard
- (and 1 more)
-
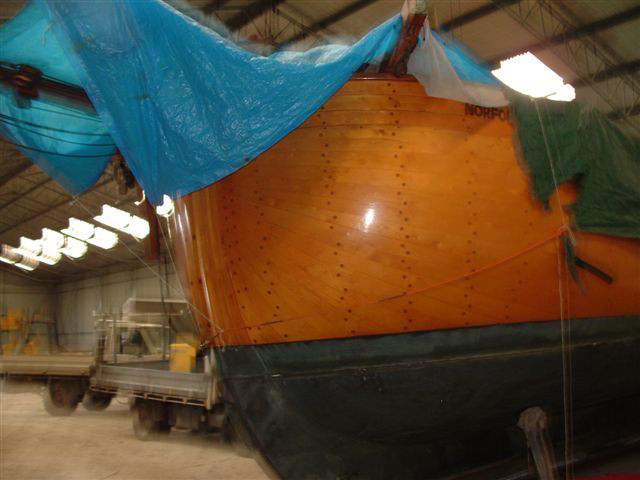
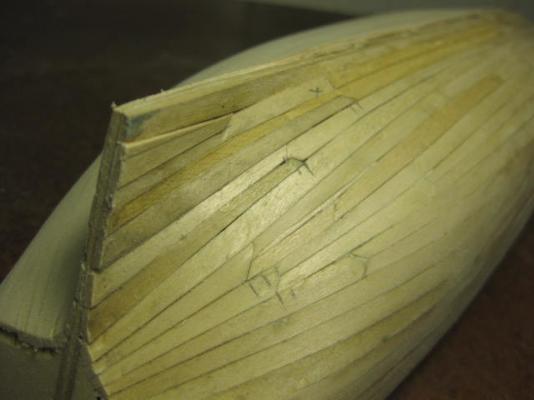
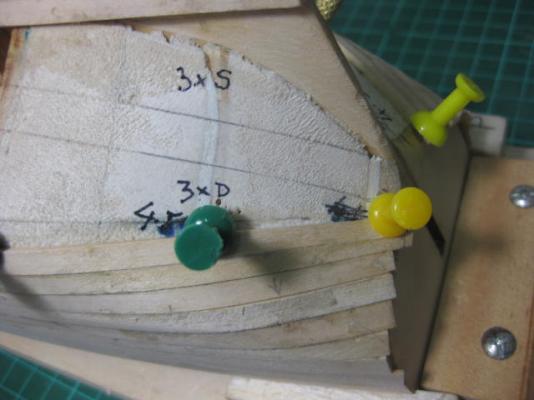
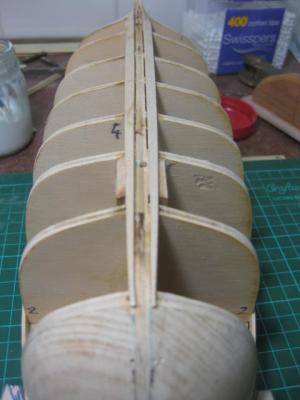
Plank Battens Temporary plank Battens are quite useful, especially on this particular shape hull. I used two to get the "run" of the planks - that is, the way the planks want to "run" naturally without any lateral bending. You will notice that when I ran a batten the length of the hull halfway down it finished up 1/4 of the way from the deck at the bow. A further batten 1/4 of the way from the keel to halfway finished up on the halfway point at the bow. What this means is that the tapers at the bow will not be even - I'd already suspected as much from the shape of the bow. This phenomenon is shown in the picture of the "Norfolk Replica's" bow planking, where they taper quite severely halfway up the hull - TOO severely to my way of thinking, mine won't be quite like that. All the tapers I worked out previously will be OK, with the possible exception of a couple at the stern which I haven't looked at yet. I'll work the bow tapers out as I lay the planks, but at least I'm forewarned now. The same battens as they finish at the Stern - obviously some Drop Planks and Stealers needed here : After some readjusting I worked out the general run of the planks at the stern :


- 147 replies
-
- 1
-
-
- norfolk
- modellers shipyard
- (and 1 more)
-
Gee, thanks very much everyone . I'm stunned, especially by the wishes from guys and gals I haven't had much (if any) contact with on my build log. I didn't realize there were so many following it. EDIT - Sorry to all who posted Birthday Greetings, but I've deleted them (about 3 pages worth ) to free up a bit of room on my build log. No disrespect intended to anyone, and thanks again for the wishes. Danny
-
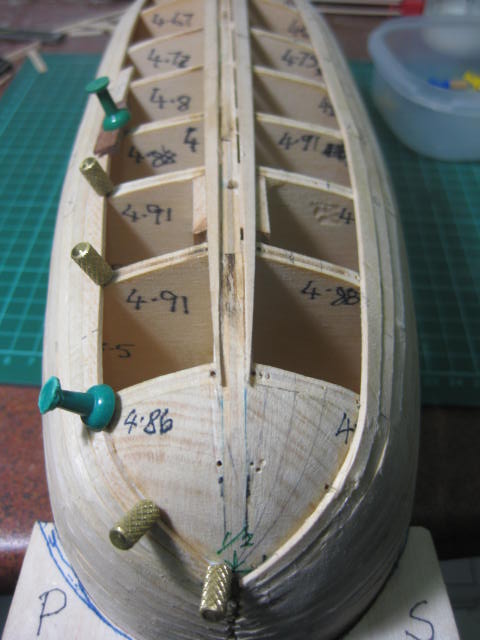
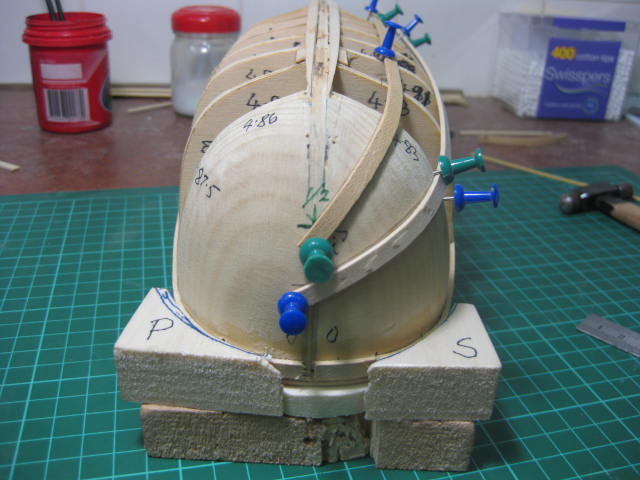
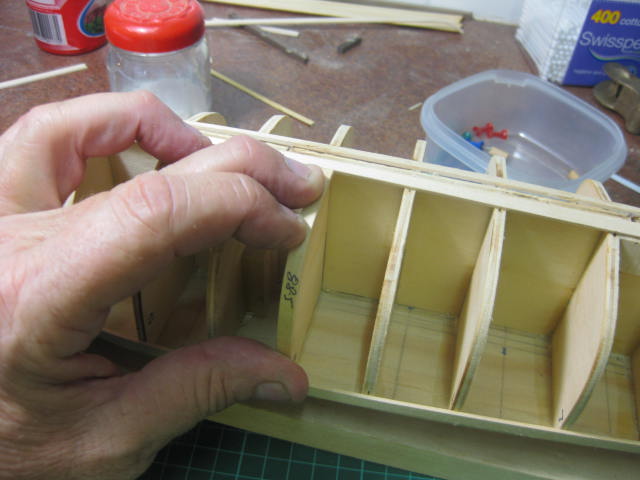
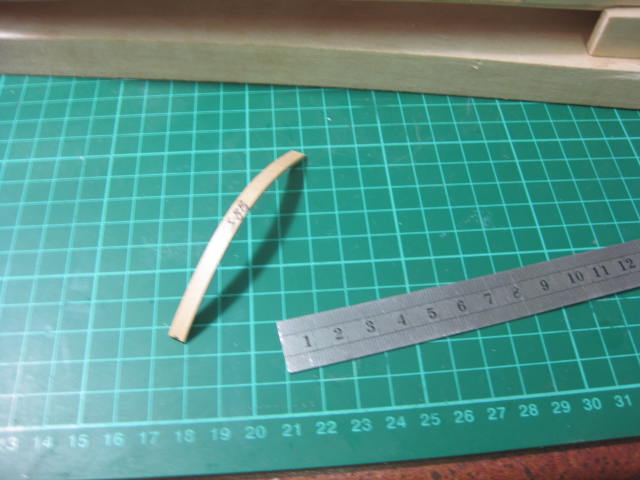
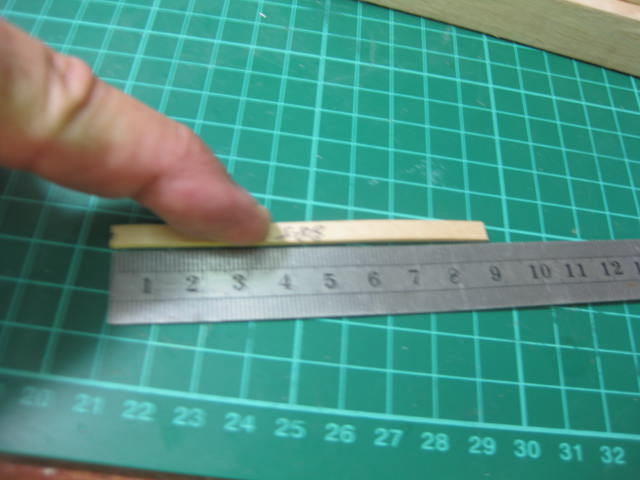
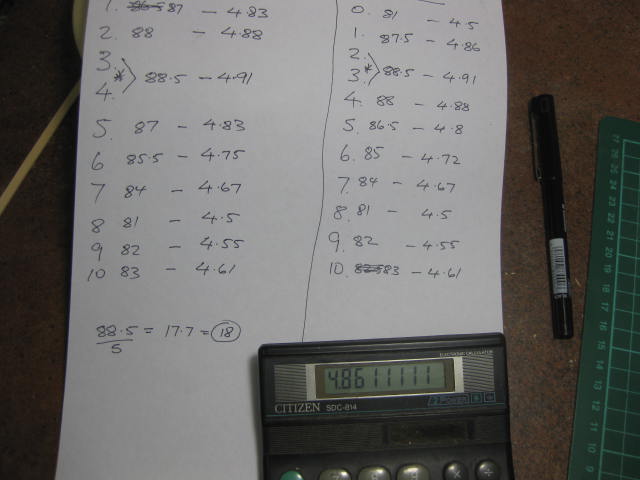
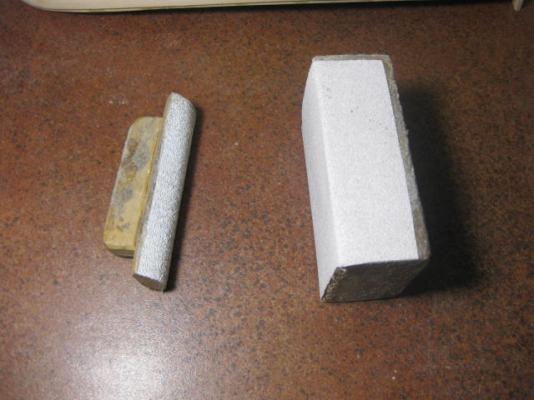
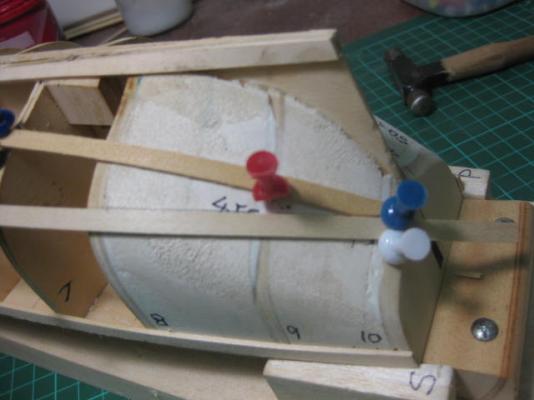
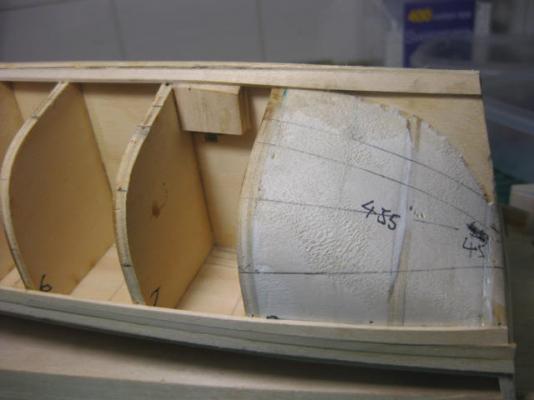
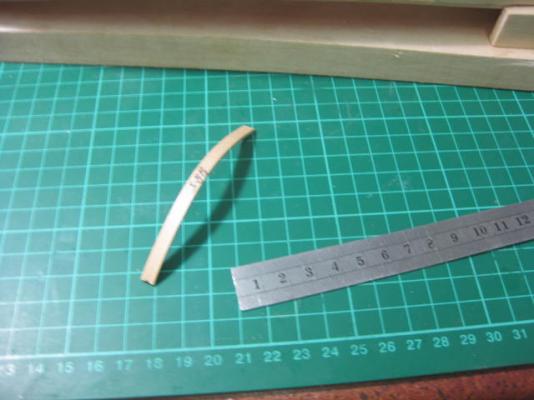
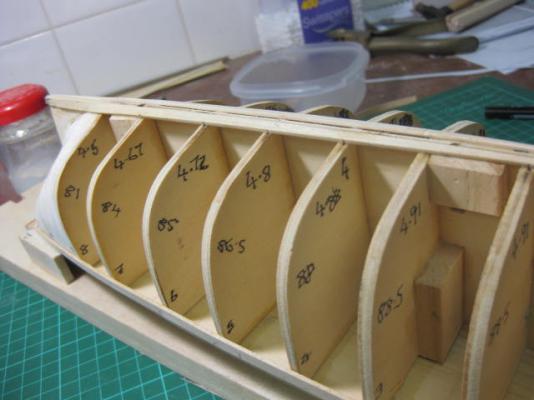
Plank Taper Calculations - how I do it. Some will tell you to use a Dressmaker's tape or paper strip to measure the face of each bulkhead (or frame) to work out the difference in length of each - thereby calculating the width of each plank on each bulkhead. That works - sort of. There is a considerable error (up to 2 - 3mm overall) because you will actually be measuring the INSIDE face of the plank. I prefer to measure the OUTSIDE face, with the thought in mind that it's easier to take a bit more off than it is to add a bit on (I'm going to plank this like a "single plank hull" ... just for the fun of it . The main problem with measuring the inside face is that it allows nothing for the bevels that will be needed. My solution is to bend a scrap of the planking material to suit the largest frame ( in this case #3), roll it tightly around the frame and trim it to a good fit. Then I straighten out the piece and measure it. This one was 88.5mm. I note the measurement on paper. Then I use the same piece for most of the other bulkheads, but I measure the "leftover" at the garboard strake and deduct that from the length of the strip. For example, bulkhead #7 was 3.5mm shorter which gave it a measurement of 84mm. For the bulkheads near the stern that curve into an "S" I used a paper strip - the inside and outside curves pretty well cancel each other out, but I allowed 1mm extra. I noted all the measurements next to the bulkhead number. I actually did BOTH port and starboard in case there was any difference - most bulkheads were exactly the same, some near the middle of the hull were within 0.5mm - close enough in anyone's book. I divided 88.5 (the longest one) by 5 (my planks are 5mm) and came up with 17.7. This means that I need 18 planks to cover the largest bulkhead. Then I divided the measurement at each bulkhead by 18 to get the width of the plank at each bulkhead and noted the measurements. Last I wrote the plank width on each bulkhead, this saves a fair bit of referring to the paper-work.


- 147 replies
-
- 2
-
-
- norfolk
- modellers shipyard
- (and 1 more)
-
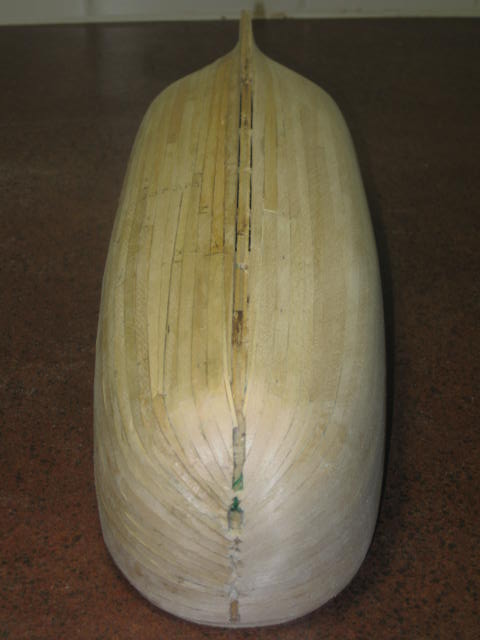
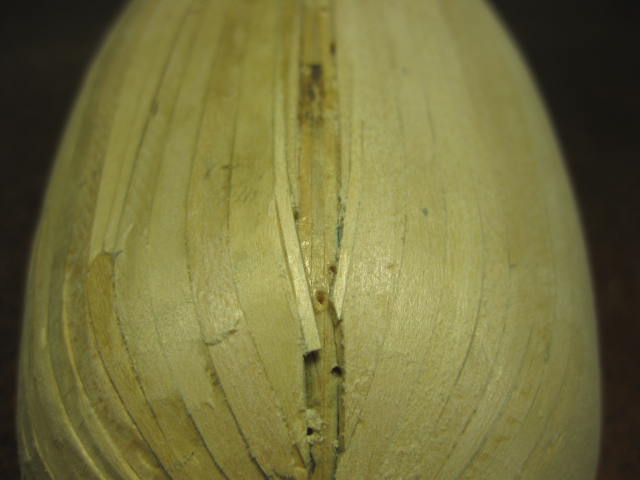
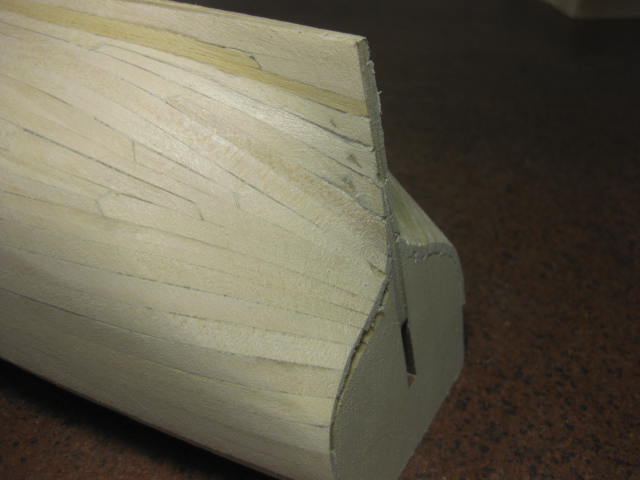
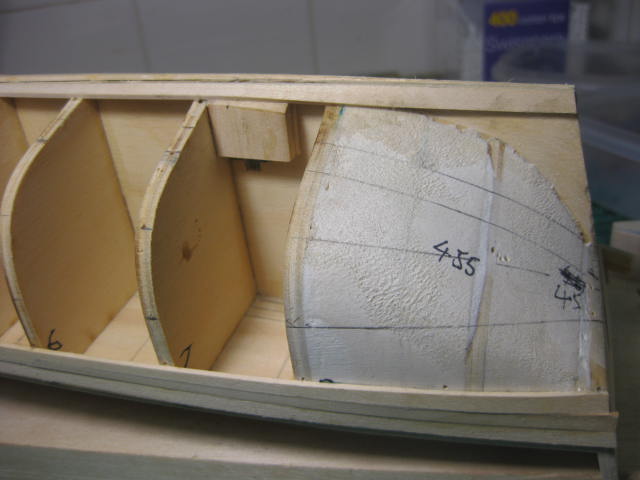
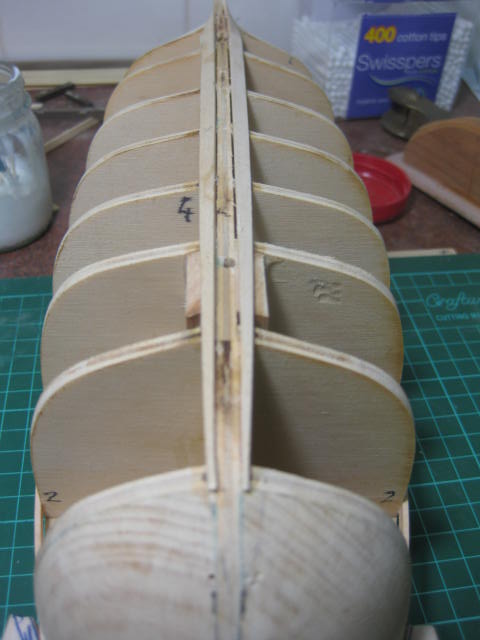
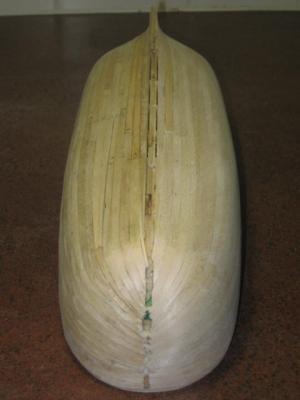
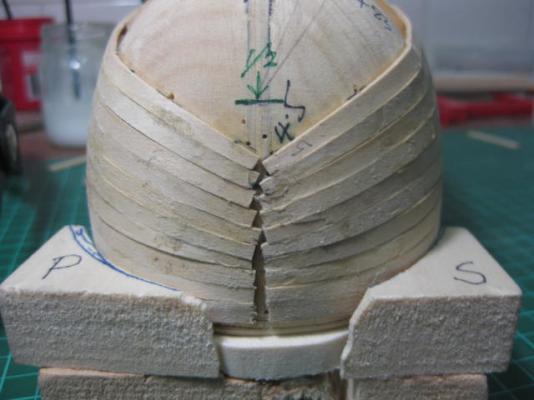
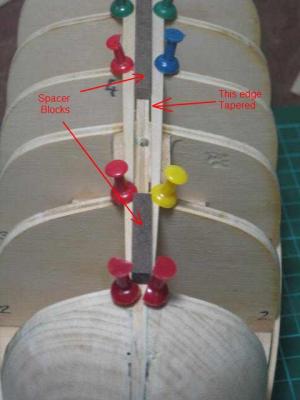
Garboard Strakes To fit the Garboard Strakes I first tack glued three pieces of scrap the thickness of the finished keel (5 mm) to the "false keel", making sure they were perfectly centred and in line. Then, following the marks I'd made previously, I tapered the KEEL edge of the Garboards and glued them on. Also, because the forward ends of the strakes narrow to a point at the bow, I glued a couple of scraps of planking underneath them between bulkheads 1 and 2 for extra support. The Keel will fit perfectly in the gap without much further work (a minor bit of filing where the strakes twist near the stern is all).
- 147 replies
-
- 1
-
-
- norfolk
- modellers shipyard
- (and 1 more)