


Dan Vadas
-
Posts
3,261 -
Joined
-
Last visited
Reputation Activity
-

 Dan Vadas got a reaction from Saburo in HMS Vulture 1776 by Dan Vadas - FINISHED - 1:48 scale - 16-gun Swan-class sloop from TFFM plans
Yeah John, I'm pretty happy with the amount of work I did this weekend - especially with how detailed all this is .
Hi all,
The last couple of things for the Pumps - two Bungs, complete with handles, and the Latch that secures the Cistern Hood :
Danny
-
Dan Vadas got a reaction from Saburo in HMS Vulture 1776 by Dan Vadas - FINISHED - 1:48 scale - 16-gun Swan-class sloop from TFFM plans
Forward Stanchions, Cistern Hood and Pump Dale
Hi all,
The last few things for the Pump Assemblies (almost) - I've made the Forward support Stanchions, the port side Cistern Hood and the Pump Dale for the same side. None will be fitted to the starboard side.
The Stanchions support the forward ends of the Cranks :
The Cistern Hood is made from 1mm thick side pieces and 0.35mm boards over the top :
The Pump Dale is a removable item on the real ship - it would be a constant trip hazard otherwise. It is made from four pieces of 0.5mm thick timber, and attaches to the cistern via a board which can be lifted upwards :
Danny
-
 Dan Vadas got a reaction from ikkypaul in How To : Add Pictures in your Posts and PMs
How To Add Pictures in your Posts and PMs
1. Open the Edit Box by clicking the "Edit" at the bottom of the Post :
2. Click on the "Full Editor" button :
3. Click on the "Choose Files" button :
This will open a Dialog Box to your Computer Files. Select the picture file you want to add and click "Save" (or "Open") to upload the picture.
4. Place the Cursor where you want the picture added. You can use the Icons (circled) to position it on the line :
5. Click on the "Add to Post" text under the Thumbnail of the picture. This adds the Attachment Code into the message at the position you selected :
6. You can add more Text after the picture if you want, or add more pictures (limit of 8 per Post).
7. Click on the "Submit" button. You can use the "Preview" button to make sure your layout is OK before clicking Submit. If you need to Edit your Post again simply restart the process by clicking on "Edit" again. You MUST use the "Full Editor" to post extra Pictures.
A view of the completed Post with Text and Picture Added :
.
PLEASE NOTE THAT THIS TUTORIAL IS FROM THE PREVIOUS VERSION OF MSW AND NO LONGER WORKS AS DESCRIBED. AN UPDATED VERSION WILL BE POSTED SHORTLY.
-
 Dan Vadas got a reaction from mtaylor in HMS Vulture 1776 by Dan Vadas - FINISHED - 1:48 scale - 16-gun Swan-class sloop from TFFM plans
Thanks Remco, David, Alex, Allan, Grant, Joe and Sjors .
None actually - I made a couple of spares, but didn't need them . The Rhodings are a PERFECT fit into the spacers - they need a gentle push to get them in but stay there by themselves. This makes assembly of all the pieces a fairly easy task - well, relatively easy .
Here are a few pics of my current progress - aligning the Rhodings, Bearings and Sprocket has taken some time but I'm getting there. I've had to remove and re-glue a couple of the Rhodings, and I still need to raise the forward starboard one a touch to get it to sit perfectly.
Danny
-
Dan Vadas got a reaction from mtaylor in HMS Vulture 1776 by Dan Vadas - FINISHED - 1:48 scale - 16-gun Swan-class sloop from TFFM plans
Thank you very much Dave and Dave .
You do and you'll clean it up . Seriously, if you're ever up this way - drop in. You're more than welcome.
Rhodings
I've made all the Rhoding Spacers and Bearings for the pump brakes. I used Ebony - I didn't have any suitable brass, and besides it's a bit easier to do with wood (yes, even Ebony ). There are several slight differences in some of the spacers to make up for the differences in the sizes of the Bitt Pins - everything must line up straight .... no easy task .
One Rhoding Spacer glued into place :
I've also turned up two Pillars which support the aft ends of the pump brakes :
Danny
-
 Dan Vadas got a reaction from robin b in HMS Vulture 1776 by Dan Vadas - FINISHED - 1:48 scale - 16-gun Swan-class sloop from TFFM plans
Thank you for the information on places in Oz for brass Janos - I was already aware of them personally (my local Model Railroad shop ... "Vic Barnes Cycles and Model Railroad" in Newcastle also has an extensive range of brass stock - convenient for me ). Guillermo is in the US, so I gave him somewhere more "local" to look at.
Thanks for taking the time to go through my somewhat truncated "new" Build Log Adrieke .
It's important to know the correct terminology for the parts of a ship, especially when it comes to doing Research etc for a scratchbuild (or even a Kit - some kit manufacturers use completely WRONG terminology which adds to the confusion of anyone relatively new to model ship building ).
Hi all,
I've finished making the Pump Brakes - only 8 Bearings and Rhodings to go. The pics show them in various stages of construction.
I used Birchwood-Casey Brass Black to give them a LIGHT coat of black - I like the effect of the lighter color, it shows a lot more highlights (the pics don't do it much justice - they look a lot better in real life, and I'm stoked with the way they turned out ).
Cleaned up ready for Blackening :
After Blackening and polishing :
One brake "in place" for the camera - the bearings haven't been made yet :
Danny
-
Dan Vadas reacted to riverboat in HMAT Supply by riverboat - FINISHED - Jotika/Caldercraft- 1/64th scale
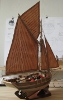
a little update...... When I first attached the sail to the gaff it looked a little skimpy, so I went on line and found a picture of the Surprise with its gaff sail furled. They had it attached to the mast also. I made the correction and it looks alot better....thanks for look'n in..
Frank
-
Dan Vadas reacted to gil middleton in HMS Victory by gil middleton - FINISHED - Caldercraft - 1:72
Peter, Many thanks for your kind comments. I enjoyed looking at your beautiful zeeschouw, which should be about the size of my next model. Victoria, BC is probably our most favorite city. My great grandfather was collector of customs in Victoria and my grandfather moved to Victoria from London at age 14, as an indentured servant to the Hudson Bay Co.
Michael, You are very kind, but "newbie" doesn't fit. Your "Wasa" will be a work of art with all your improvements on the kit.
Lawrence, When I looked back in the reconstructed log, I discovered that details of the gun port lid lanyards were missing, and the photos were not in my computer. My heartfelt thanks goes to Ron (Robipod) from Calgary, Alberta who had saved my entire log (before the crash) in the cloud (where ever that is). Ron helped me download the log to my computer. So, in answer to your question on gun port lid lanyards, I'm reposting the photos from the original build log.
In considering the attachment of the lanyards to the gun port lids, I thought a simulated splice looked better than an eye with seizing. Not original but more natural and better scale.
The line is passed through the ring, then with a needle, the line is passed through itself, then passed a second time just beyond the first pass creating the appearance of a "splice." Pulling on the line with the needle snubs the splice up to the eye bolt.
Placing the gun port lids. Holes drilled for passing the lanyards into the hull.
Using a fixed angle to set gun port lids at a uniformed angle.
Splicing the lanyards to the ring bolts.
A gentle pull on the line with the needle snubs the splice to the ring bolt.
Touching the working end with fast C/A (1 to 3 sec.) creates a "thread needle" to push the lanyard into the hull. That end was cut approximately 10 mm. longer than the visible lanyard. A light touch of C/A (5 to 15 sec.) to the "thread needle" before pushing it into the hull secures the lanyard.
An old geezer trying to keep track of which line is which.
The real thing.
The real ship
Cheers, Gil
-
 Dan Vadas got a reaction from PeterK in How To : Add Pictures in your Posts and PMs
How To Add Pictures in your Posts and PMs
1. Open the Edit Box by clicking the "Edit" at the bottom of the Post :
2. Click on the "Full Editor" button :
3. Click on the "Choose Files" button :
This will open a Dialog Box to your Computer Files. Select the picture file you want to add and click "Save" (or "Open") to upload the picture.
4. Place the Cursor where you want the picture added. You can use the Icons (circled) to position it on the line :
5. Click on the "Add to Post" text under the Thumbnail of the picture. This adds the Attachment Code into the message at the position you selected :
6. You can add more Text after the picture if you want, or add more pictures (limit of 8 per Post).
7. Click on the "Submit" button. You can use the "Preview" button to make sure your layout is OK before clicking Submit. If you need to Edit your Post again simply restart the process by clicking on "Edit" again. You MUST use the "Full Editor" to post extra Pictures.
A view of the completed Post with Text and Picture Added :
.
PLEASE NOTE THAT THIS TUTORIAL IS FROM THE PREVIOUS VERSION OF MSW AND NO LONGER WORKS AS DESCRIBED. AN UPDATED VERSION WILL BE POSTED SHORTLY.
-
Dan Vadas got a reaction from mtaylor in Posting etiquette
If a Builder DOESN'T want someone else's photos in their Build log but someone puts one (or more) in anyway - contact a Moderator via PM and they can be removed.
If someone posts pics on another's Build Log - and the author of the Build Log has already said he doesn't want any one else's pics - then the offender will be dealt with as we see fit.
Danny
-
 Dan Vadas got a reaction from MRJG in HMS Vulture 1776 by Dan Vadas - FINISHED - 1:48 scale - 16-gun Swan-class sloop from TFFM plans
HMS Vulture Build Log Resurrection
Following the Crash of MSW in February 2013 I’ve attempted to re-create as much of my former Build log as I can. The following is a very truncated version of the original. It doesn’t contain any of the comments posted by others, as they were unrecoverable. My apologies for that.
I've also left out the MISTAKES I made during the construction in the "Resurrection" section. Some of them can be found in this Topic : How I Fix Boo-Boos and Oopsies
The original Build Log was started on June 11 2011. Actual work on the model commenced on Wednesday August 17 2011.
The Build Log was terminated on February 14 2013 (the day the Server crashed), and Re-building it started the day MSW came back on-line.
_____________________________________________________________________
Following is an Index to "Points of Interest". you can Click on the Links to jump straight to the First Post that starts a particular Section.
Links to other Sites in the following pages, e.g. Tool Suppliers, look like this : Sherline . You can jump straight to their Webpage by Clicking on them. Note : I have no affiliation with any of the Suppliers I have posted Links to - just a happy customer.
To return to the Index Click on the "HMS Vulture" Link in the Signature in one of my Posts, or use the "Back" Arrow of your Browser. There are no Signatures under my posts in the Reconstruction phase to save page room.
The Index will be updated as work progresses.
____________________________________________________________________________________________________________________________
Index to Points of Interest
Page 1
HMS Vulture - some History of the ship + Links to Build Logs of other Swan Class Ships on MSW
Research and Materials + Links to Suppliers
How the Model will be built
Tools
Preparations
Clamps and Planking Pins
Laying the Keel
Lower Apron
Stem and Fore Deadwood
Aft Deadwood
Sternpost
Rising Wood
Cutting Rabbets and Fitting the Mounting Nuts
Cutting, Shaping and Fitting Transoms
Cutting the Bowsprit Seat
Fashion Pieces
Bollard Timbers
Timberheads and Bowsprit Chock
Forward Cant Frames and Hawse Timbers
Forward Cant Frames
Aft Cant Frames
Side Counter Timbers and Timbers on the Side Counter
Aft Cant Fairing
Knee of the Head Construction
Aft Square Frames
Frame Bend
Shifted Toptimber
Fixed Blocks
Page 2
Frames all Fitted
Toptimber Aligning and External Fairing
Treenailing Frames
Keelson
Pump Recesses
Stemson
Fillings
Harpins
Ribbands
Limber Strakes
Floorhead Thickstuff and Treenails
Mast Steps
Aft Crutch and Lower Breasthook
Limber Boards
Lower Well and Shot Locker
Chain Pump Inlets
Pump Tubes
Chain Pump Sprocket
Lower Deck Clamps
Footwaling
Internal Treenailing
Aft Platform
Aft Platform Carlings and Ledges
Aft Platform Bulkheads and Spirit Room Hatch
Lower Deck Beams
Fore Platform and Bulkheads
Lower Deck Hook
Block Room and Tar Room Bulkheads
Magazine Bulkheads and Mizzen Boxing
Lightroom
Page 3
Finishing the Magazine
Aft Platform Rooms
Upper Deck Clamps and Ceiling
Lower Deck Beam Carling Mortices
Lodging and Hanging Knees
Pillars in the Hold
Opposed Knees, Beam Arms and Iron Knees
Lower Deck Beams, Carlings and Ledges
Chain Pump Inlets and Tubes Fitted
Sleepers
Lower Deck Waterways and Spirketting
Riding Bitts - stage 1
Upper Deck Beams
Lower Deck Planking
Hooked Planks
Lower Deck Treenailing
Hatch Coamings and Companions
Lower Deck Breasthook
Forward Room Bulkheads
Upper Deck Pillars and Beam Set
Forward Rooms Bulkheads and Scuttles
Forward Bulkheads Finishing
Riding Bitts and Sail Room
Wing Transom Knees
Bread Room Bulkhead and Pillars
Aft Bulkheads
Pantry
Upper Well
Upper Deck Framing Finished
Upper Deck Ledges
Page 4
Upper Deck Waterways
Mast Wedges
Main Mast Partners
Aft Beam Arms, Carlings and Ledges
Mizzen and Foremast Partners
Main Topsail Sheet Bitts part 1
Upper Deck Hatch Coamings
Capstan Step
Upper Deck Planking
Top and Butt (Anchor Stock) Deck Planking
Upper Deck Treenailng
Counter Timbers
String in the Waist
Quarterdeck Clamp and Transom
Ebony Wales and "Dummy" Treenails
"Black" Strake
Topside Planking
Port Stops and Sweep Ports
Spirketting,Quckwork and Inside Sweep Ports Trimming
Treenailing Spirketting and Quickwork
Upper Deck Companions
Helm Port
Lower Counter Planking
Garboard Strake
Lower Hull Planking
Top and Butt Planking
Tricky Plank
Hull Planking Continues
Hull Planking Finished
Starboard Sheer Strake
Page 5
Scuppers
Main Topsail Sheet Bitts
Main Jeer Bitts
Forecastle Deck Beams
Hawse Holes Finishing
Fore Topsail Sheet Bitts
Bucklers
Upper Deck Breasthook
Bowsprit Partner, Hanging and Lodging Knees
Manger
Riding Bitts
Galley Stove 1
Galley Stove 2
END OF BUILD LOG RECONSTRUCTION
Chain Pump Cisterns
Pump Chain
Pump Brakes
Rhodings
Forward Stanchions, Cistern Hood and Pump Dale
Capstans
Rudder
Main Piece
Bearding
Pintles
Spectacle Plate
Bands
Gudgeons
Rudder Shipped
Rudder Coat
Forward Athwartships Aft Cabin Bulkhead
Bulkhead Doors
Aft Athwartships Aft Cabin Bulkhead
Longitudinal Aft Cabin Bulkhead
Upper Counter Planking
Forecastle Bulkhead
Forecastle Bulkhead Lights
Making Stern Light Frames
Stern Lights Completing
Rudder Head Trunk
Great Cabin Lockers
Completing Great Cabin
Rudder Head Partners
Transom Iron Knees
Guns
Brackets
Barrels
Capsquares
Drilling the Bolt Holes
Axletrees
Carriage Assembly Jig
Trucks
Bed
Quoins
Hardware
Breech Rigging
Side Tackles
Forecastle and Quarterdeck Carlings
Forecastle Knees
Catheads
Catheads Fitted
Cathead Caps
Steam Grating Coamings
Steam Grating
Galley Cowl
Cowl Baffle
Breast Beams
Forecastle Half-Door and Light
Quarterdeck Hanging Knees
Cast Knee
Quarterdeck Lodging Knees
Beam Bracket
Quarterdeck Hatch Coamings
Capstan Step
Forecastle and Quarterdeck Waterways
Forecastle and Quarterdeck Planking
Forecastle and Quarterdeck Treenailing
Bulwark Spirketting
Gun Rigging Re-do
Gangboard Knees
Planksheers in the Waist
Hances
Making Timberheads
Timberhead Jig
Forecastle Planksheers
Forecastle Timberheads
Quarterdeck Timberheads
Gangways and Gangboards
Entry Steps to the Waist
Gallows Crosspiece
Preparing Tuck Molding and Waist Rails
Quarter Badge
Quarter Badge Stools and Munions
Upper Finishing
Lower Finishing
Carving the Finishing and Glazing Lights
Pilasters
Quarter Badge Crown
Chesstrees
Channels
Sheer Rails
Standards
Drift Rails
Main Studding Sail Boom Irons
Fenders
Entry Steps
Swivel Gun Mounts
Fore Jeer Bitts
Belfry
Forecastle Railing and Spar Rack
Companion Top
Ship's Wheel
Quarterdeck Ladderway
Ladderway Railings
Quarterdeck Breastwork
Fixed Gangway Newel Posts and Railings
Taffarel
Taffarel Capping Rail
Ensign Staff Block and Clamp
Quarter Pieces
Roughtree Rail
Brake Pumps Fitted
Steering Rigging
This INDEX has grown too large, so I will start a 2nd one. It can be accessed by clicking the link below.
Link to Index Part 2
-

-
 Dan Vadas got a reaction from BANYAN in HMS Vulture 1776 by Dan Vadas - FINISHED - 1:48 scale - 16-gun Swan-class sloop from TFFM plans
Hi all, and Pat in particular -
Here's the Chain "in-situ". This is only a very rough Dry Fit to see if I have enough chain to do the full circuit .... I don't have quite enough, two more links will be needed to make it disappear into the Tubes. I'll add two more Saucers as well - these can be epoxied inside the tubes to properly finish off both ends. The Rhodings at the top of the Cisterns will bring the chain and sprocket up a little, and the shaft is simply a piece of wire so far - it needs a LOT more work before it's finished :
I used Masking Tape on the open deck around the cisterns to prevent any mishaps like dropping the chain into the hold .
Danny
-

-
 Dan Vadas got a reaction from Padeen in HMS Vulture 1776 by Dan Vadas - FINISHED - 1:48 scale - 16-gun Swan-class sloop from TFFM plans
Thanks Carl and Mark - it's good to be back at work on my ship at last .
Yeah Mark, there's not a lot of room between the forward part of the Cistern and the Mast - about 2 1/2".
Here's an update for you Sjors - I'm about half finished with the Cisterns. They look out of alignment in the first two pics, but that is the way they fit :
The Pump Dales (drains) will fit into the slots in the outboard end. I'll only be fitting the port side one :
The hole in the side is for a drain bung :
Danny
-
 Dan Vadas got a reaction from druxey in HMS Vulture 1776 by Dan Vadas - FINISHED - 1:48 scale - 16-gun Swan-class sloop from TFFM plans
Thank you David and Grant.
Lovely work on the Cisterns Remco . Grant, that's the same excuse I'm using .
Pump Brakes
Hi all,
Work begins on the Pump Brakes (or Cranks). I've drilled all the holes for the brakes to accept the shafts - I drilled them all in two longer pieces which will be cut to length after I've done a bit of filing to get their correct shape. It's a lot easier to do them this way - saves a lot of setting up, first in the Mill for the drilling, and then in the vise to file them.
I've also cut all the various lengths of Axletrees (shafts) - these are all a little overlength, they will be filed back after silver soldering the two pieces together. The single square piece is for the sprocket centre - this has a 1mm hole drilled through it's 8mm length for the shaft. It's a little too thick - I'll get it to the right size after I've soldered it to the shaft. It has a wall thickness of 0.3mm across the flats at the moment, which will be reduced to 0.1mm - a very difficult task to drill if I'd reduced the outside dimensions first .
Danny
-
 Dan Vadas got a reaction from Adrieke in what powertools to buy
Hi again Adrieke,
Found it - "The Railcar" at Corlette, about half an hour north of Newcastle. They list the Chopper II at $69.95. Here's the link to their web page : The Railcar
Danny
-
 Dan Vadas got a reaction from capnharv2 in HMS Vulture 1776 by Dan Vadas - FINISHED - 1:48 scale - 16-gun Swan-class sloop from TFFM plans
Thanks John, I'm hoping to get a few days in before I have to disappear again for the weekend's work on my holiday van - which is getting very close to completed . Next job on it is building a workbench for my ship modelling .
Derek, you're far too kind . Like most of the guys and gals here I started on Kits (I built about 10 before I started any Scratchbuilding). Most of that phase was foundering in the dark using the kit's instructions, with no real idea of how to do things properly - you know the story .
Then I connected to the Internet and found a great Site of "like-minded" people who helped me out enormously .... yep, MSW. This changed the whole perspective of how I viewed building my models - from religiously following Kit Instructions with all their errors and omissions to "getting it right" ... at least as far as every avenue of research permits (and there are a LOT more of them than you may imagine).
Couple that with a half a lifetime's worth of acquiring some great tools - some more useful than others - and here I am .
Honestly - anyone can do work like this if they have the passion for it, are willing to accept advice from more knowledgeable people, and have the desire to improve their skills with every step they take.
Mark - wait until Remco gets to this stage .... I reckon he'll have a go at actually making it work . I think EdT actually DID .
Danny
-
Dan Vadas got a reaction from mtaylor in HMS Vulture 1776 by Dan Vadas - FINISHED - 1:48 scale - 16-gun Swan-class sloop from TFFM plans
John, what else can I say to that than :D ? The individual Links are 4.5mm long, 1mm wide and 0.15mm thick. They have a "tooth" on one edge to pick up the chain and two 0.5mm holes for the pins. PE is by far the best option to make 26 of them EXACTLY THE SAME - as I may have mentioned, I only have ONE lifetime in which to finish this model . Here's a pic of one of the 26 links :
Wayne, Pat (look for an update on the chain very shortly), Adam, Grant, Christian, Dick (I forgot about the key , I might do one for the Captain's Cabin instead ), Greg and Aldo - Thanks heaps for the compliments .
Danny
-
Dan Vadas reacted to Dfell in HM Brig Supply by Dfell - FINISHED - Caldercraft / JoTiKa - 1:64
Hello
Started this about 2 years ago. Building this was only possible by learning from all the great builds on this forum - so thanks to all of you.
To date have done the Yards with Stirrups and Footropes. Pictures soon.
Regards
Doug
-
Dan Vadas got a reaction from trippwj in Tools That Are a Waste.
Jay, that's not quite right - it should be (((7x16)+13)/16)x25.4 = 198.4375. Your answer came out as 31.75.
The above answer took me about 30 seconds to work out on a calculator - a quick glance at my home-made Conversion Chart (which hangs on the wall behind my bench) shows it as 198.44 - close enough tolerances - and took me 3.4 nanoseconds to find .
Danny
-
Dan Vadas got a reaction from mtaylor in Steps when milling wood
Hi Jeff,
Great article .
I've posted a link to it in a Pinned Topic in the "Wooden Tips and Tricks" forum in case this topic goes down a few pages in the future.
Danny
-
Dan Vadas got a reaction from mtaylor in Steps when milling wood
Oi Jeff - what about the rest of us that want to know too ??? Maybe a Post in the "Modelling Tools and Workshop Equipment" forum?
EDIT -
Oops, just read that .
Some really useful information here - thanks for starting the Topic Dave.
Danny
-
 Dan Vadas got a reaction from EJ_L in Tools That Are a Waste.
Look on the bright side Bill - at least she didn't call YOU a "useless tool" :D .
Danny
-
 Dan Vadas got a reaction from tasmanian in Tools That Are a Waste.
Look on the bright side Bill - at least she didn't call YOU a "useless tool" :D .
Danny