
MORE HANDBOOKS ARE ON THEIR WAY! We will let you know when they get here.
×

Eurus
-
Posts
110 -
Joined
-
Last visited
Content Type
Profiles
Forums
Gallery
Events
Everything posted by Eurus
-
Hello, and welcome aboard!
-
 With the hull and most of the accessories completed, it is time to think about the sails and rigging. This is not a particularly strong aspect of the kit, since everything is oversimplified or maybe badly researched. The Providence has only two sails: a boomless spritsail and a jib. Some of the materials provided are nice, like the sails themselves, which are cloth and come ready to use. These sails are crude but beautiful and serviceable. It would be a bad idea to simply discard them, and too much of a hassle to heavily modify them. We’ll use them as they are, only with a special treatment explained below. The same cannot be said of the cotton threads, which are flimsy and more appropriate for embroidery than model ship projects. Manila hemp or a similar-looking substitute would have been better. I ended up cannibalizing a spool from another ship. In the first row of pictures you can see the preparation stage. In picture 1 the sails are being submerged in black tea, in order to give them a more realistic coloration—it was two bags of Twinnings’ English Breakfast Tea, if you’re interested. The tea was still hot, and they were left simmering for half an hour. Afterwards, the sails where removed from the marinade but not rinsed, and then left to dry flat. The result is subtle but effective, since they do not look pristine anymore. The main sail does not include reefers, and there’s no mention of them anywhere in the instructions. I decided to add some for realism. You can see this process in picture 2. The eyebolts supplied with the kit are too small and unauthentic. They were promptly substituted with these horn cleats from Amati (picture 3) and some larger ones gifted to me by a friend who makes bracelets and jewelry. The new eyebolt will be glued to the top of the box (bow), and this is where the tack of the jib will be attached. This is notably unclear in the instructions, which do not specify the exact place for the ring/shackle. I decided the best place would be the box; otherwise it would obstruct the regular maneuvers of the hunt. The masts were given the same treatment as the thwarts and the other cherrywood parts: fine sanding, dyeing, and then three coats of matte varnish for protection. The rigging blocks were varnished too, but otherwise untouched. The kit’s rigging plan is a disgrace. Every knot is an overhand knot, according to the instructions. I did not follow them. This section is the most ambiguous in the whole document. In picture 4 you can see the small diagram I made, by hand, for the different knots and their use and locations. I made use of some handy tweezers and common sewing needles. Pictures 5 and 6 show the spritsail in place with the reefers dyed and ready, from different angles. In picture 7 you can see the jib now hoisted. There is no forestay: this boat’s rigging is extremely simple. Picture 8 shows a close-up of the bow and the various fittings. The mast has two cleats and two more were installed on the gunwales to control the clew of the jib. All this is missing from the kit’s instructions. In picture 9 you can see a close-up of the stern. Two more horn cleats keep things realistic (instead of the rings provided in the kit). Interestingly, the running rigging is not glued, which means that the sails can be operated and tacked, like a real boat! Everything works. Ready about! Coming next: the oars.
- 33 replies
-
- 5
-

-
- Artesania Latina
- Whaleboat
- (and 3 more)
-
Awesome build! The detail is superb, and the suspension is incredible. Looks like the real thing!
-
Fantastic! Congratulations! 😃
-
Like in my previous log, I will refer to the pictures in a natural, Western-style reading order—from left to right, top to bottom. What follows now is a series of pictures grouped together intended to bring us up to speed. This project was started in 2019, and went into hiatus while my other vessel, the Providence whaleboat, was being built. You can see the build log for that boat here. After the Providence was successfully completed, launched and christened, the work on the ARM Cuauhtémoc continued. So, without further ado, this is what happened: The first thing to assemble was the bow and part of the hull. I used a pair of clamps to help in the gluing process. The first thing I noticed is how big the ship was, and I was initially unprepared. This can be seen in picture 1, at a time when I didn’t have a lot of tools or even the cutting pad. In the early stages I did not have a dedicated place to work, and very soon I understood that this was essential. Picture 2 shows another angle of the assembly. Pictures 3, 4 and 5 show the process of planking the foredeck. This was a hard, tedious activity pretty early on. The number of planks to measure, cut and prepare was staggering, and I decided a bit later to build a jig to help with this, since it was only the beginning. Long wooden planks were cut to pieces of 6.5 cm, and then glued to the deck in a particular pattern. The protruding sections were cut and then the edges sanded to conform to the shape of the deck. In the next instalment: the jig that made all the difference, and we continue planking…
- 17 replies
-
- 5
-
-
- Cuauhtemoc
- Mexico
- (and 3 more)
-
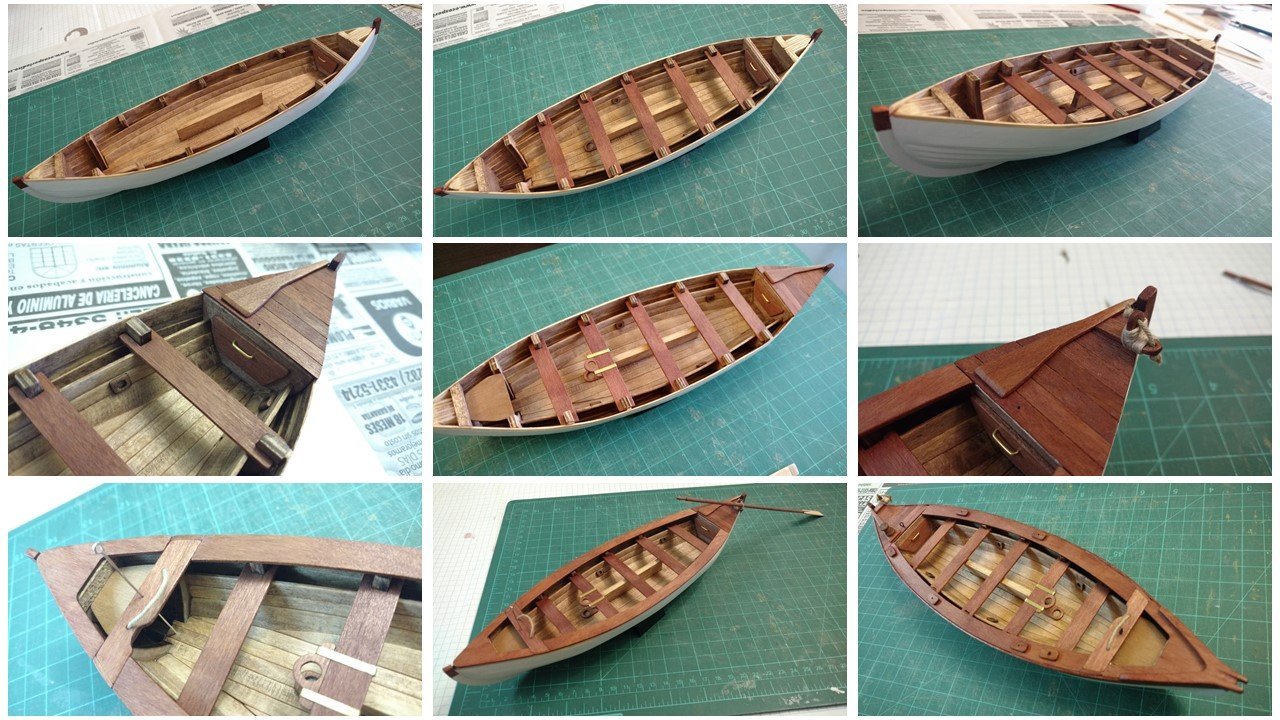
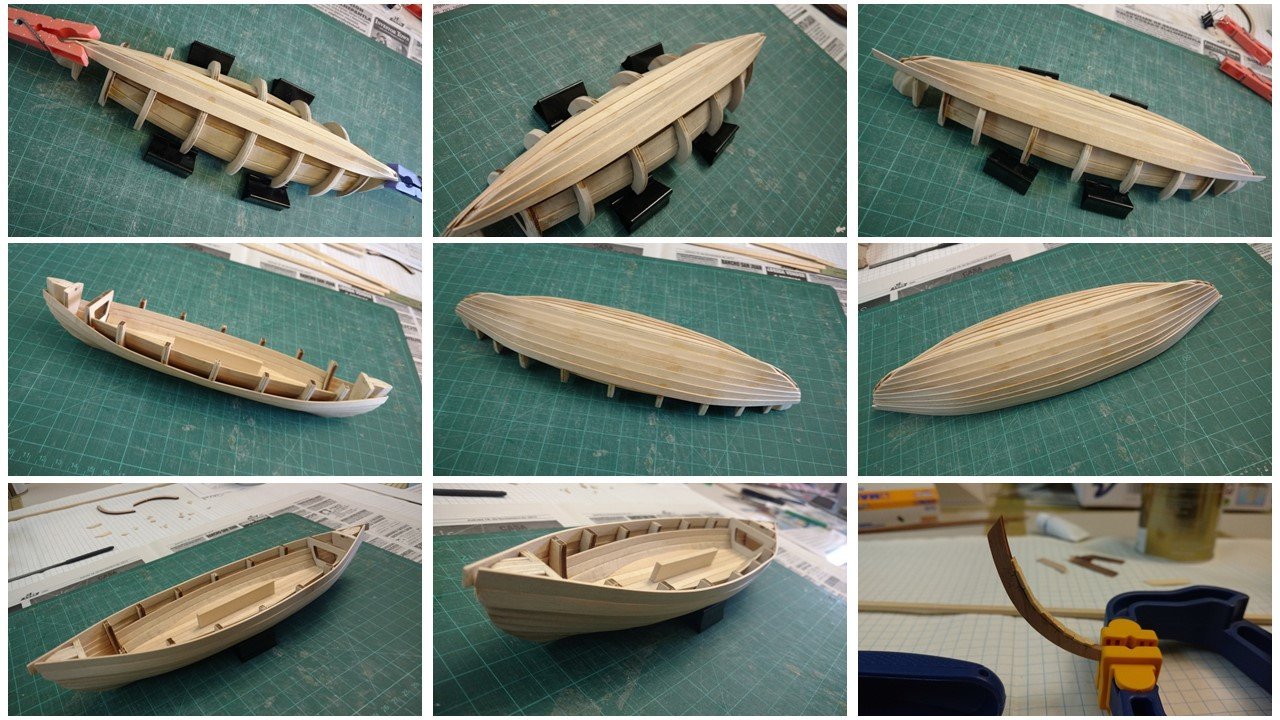
Unfortunately, no pictures survive of the painting process, but it was done with a small can of gloss white spray paint, bought at a specialized store. It was so small that it was enough to paint the Providence‘s hull and nothing else. I don’t remember the brand, but it was a moderately famous one. The whaleboat was carefully covered in paper and masking tape. In picture 1 you can see the results. The inside of the boat, ceiling planks, centerboard, etc. were dyed a bit darker with a diluted mix of hickory and cherrywood. Pictures 2 and 3 show the thwarts glued in their final position. If you look closely, you can see the peaking cleats for the oars and the lid of the aft compartment in place. The thwarts were stained with cherrywood color. Since this is the final phase of many visible parts, they were all treated with three coats of transparent, matte finisher and varnish. This happened before gluing. In picture 4 you can see the detail of the stern, with the box covered in cherrywood planks. This called for an ingenious solution, and it was actually assembled before being glued as a whole piece to the top of the box. The lion’s tongue is also in place—this was not included in the kit, and was manufactured from scrap wood. A closer look will reveal a small hole drilled for the hoisting rings (also not included). Picture 5 shows the mast partner and fittings already installed, as well as a custom cover for the aft box where the whaling line will reside. This was not part of the kit, but it looks awfully incomplete and unauthentic without it, and it is needed to store the stray line while at sea. Picture 6 is a close-up of the stern section, with the steering oar brace positioned in its approximate place prior to gluing. In picture 7 you can see a close-up of the bow and box, the harpooneer’s knee board installed along with its kicking strap and the hoisting ring positioned in place prior to cutting, painting and gluing. The gunwales have also been glued and it now looks more and more like a real boat! You can see the almost-ready whaleboat with an unfinished steering oar in its approximate position in picture 8. Picture 9 shows the oar brace in its final position, and also the loggerhead, the hoisting rings, the carved bow and the oarlock bases. The iron’s crutch base is also in place. The oarlock holes have been drilled. At this point it is worth noting that both materials and instructions provide only for a five-oared boat, without a steering oar or position. The space towards the aft is also quite constricted. I will make a sixth, longer oar for the sake of authenticity. So far, I love how it looks. I imagine the Providence as a brand-new whaleboat, so no aging, weathering or special wood finishing.
- 33 replies
-
- 5
-
-
- Artesania Latina
- Whaleboat
- (and 3 more)
-
I like working on these upgrades. It means the project will be much more authentic. Also, details are the difference between the masters and the rest; between a model and a masterpiece I have seen so many inspiring projects in the MSW forums. One day I hope to build something on that level. I try my best, even if it's the small things.
- 33 replies
-
- 1
-
-
- Artesania Latina
- Whaleboat
- (and 3 more)
-
Custom decals! I would be very much interested in that.
- 294 replies
-
- 1
-
-
- charles w morgan
- model shipways
- (and 1 more)
-
Thank you! I had a lot of fun building and researching for these pieces. I believe the kit is somewhat incomplete--a whaleboat has a lot of parts--but I also understand that this is meant for beginners. Considering that, I did not mind creating some of the extras from discarded material.
-
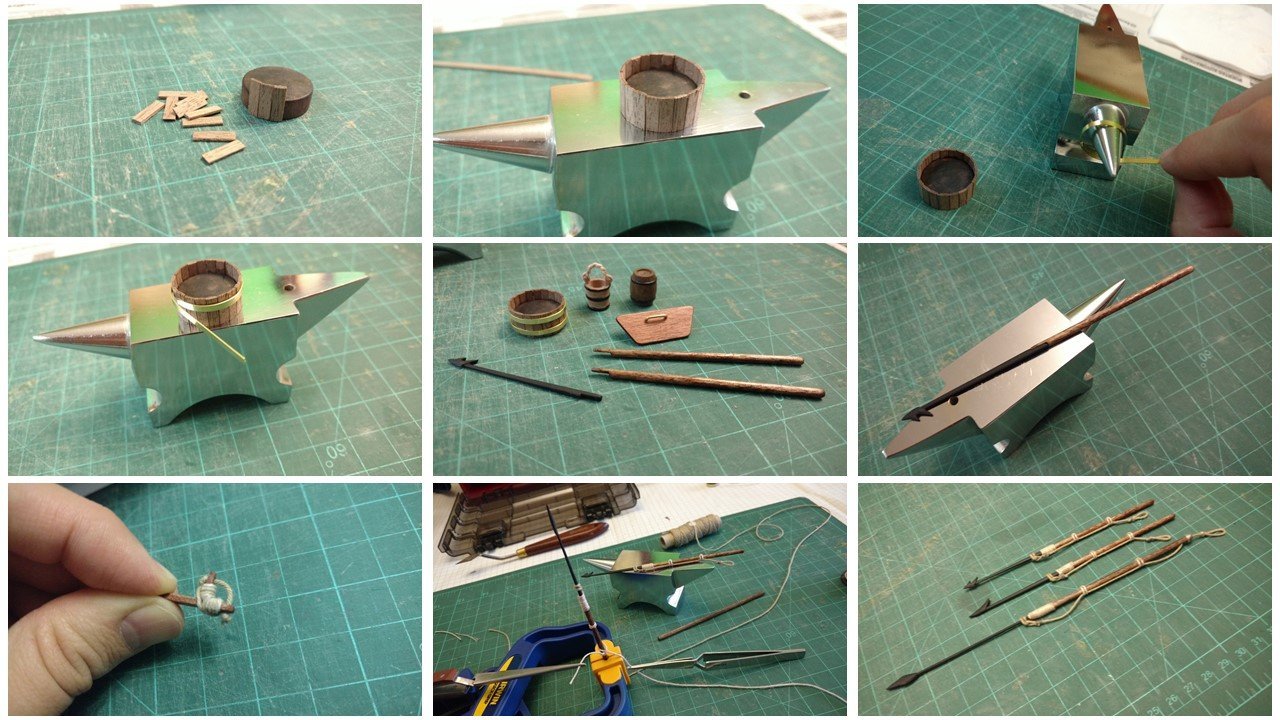
I decided to take a break from the hull and explore the cool accessories and tools of the trade. The harpoon is the most important instrument of a whaler by far, and the position of harpooneer is one of the most prestigious. Their strength, aim and aplomb are necessary when split-second decisions might mean the life or death of the crew. In the boat, he is second in command only to the officer, and both perform a dangerous dance by switching positions amidst the frantic crucial moments of the hunt. The harpoon is made of an iron rod tipped by sharp barbs (called flues). The wooden piece is usually discarded on impact, serving only as an extension of the harpooneer’s arm. The knots tighten with the pull as the enormous cetacean flees, usually with the whaleboat in tow. The line is stored in special tubs, and coiled in a way that it can be quickly deployed. In the pictures you can see the building of some of these objects: In pictures 1 and 2 the tub for the main line is assembled using small pieces of wood as staves. I loved the color. Pictures 3 and 4 show how the hoops are made from brass strips, curved with the aid of a small jeweler’s anvil. Picture 5 displays the main line-tub, a boat-bucket, a water keg, the lid of the aft compartment used for storing small objects like knives and a compass, and an unassembled harpoon. The tips of the two provided harpoons are just terrible: childish and inaccurate, and do not even remotely resemble the real thing. I tried correcting them at first, but the tip of one of them snapped off—so I decided to upgrade both and make new tips from scratch (which turned out to be epoxy putty). It was hard to work with, difficult to mold and then kept breaking every time I tried to sand it into shape once hardened. I had to repeat the process several times. In the end I had to compromise with a less-than ideal final shape (at least by my standards) to save some sanity and keep the momentum. Picture 6 shows the first harpoon, assembled and with proper colors. The harpoon itself was painted matte black to resemble the iron of the epoch, and the wooden shaft was stained to look like hickory. The second harpoon will have a toggle flue. In picture 7 you can see a small element built from scratch that the kit does not include: the steering oar strap and brace. For authenticity, we needed this. Once the shafts are glued to the irons, picture 8 shows the harpoons being rigged. Two different types of yarn were used, with different coarseness and diameters. All knots are period-accurate, and actually work! In picture 9: both harpoons finished and a whaler’s lance made from scratch. Unlike the zamak harpoons, the lance is made of steel and it is sharp enough to be dangerous. The shaft is also meant to be as accurate as possible. All finished wooden pieces were coated in three layers of varnish for protection from the elements. I want my model to last a long time. Overall, making these tiny murderous things was quite fun. Up next: hull’s painting and staining.
- 33 replies
-
- 6
-
-

-
- Artesania Latina
- Whaleboat
- (and 3 more)
-
Thank you! I had never considered a driftwood base until then, but it ended up looking great. It gives it a different vibe. Also, it can be positioned in several ways, since the boat is not fixed.
- 33 replies
-
- 1
-
-
- Artesania Latina
- Whaleboat
- (and 3 more)
-
After a brief driftwood-hunting distraction, we are back at the dry dock to continue with the keel of the Providence. It is comprised of three separate parts, and with the small augmentation seen in past sections, they are ready to be glued, as shown in pictures 1 and 2. Picture 3 shows the boat ready, before sanding or applying any kind of filler. Afterwards, a little filler will be used—to cover only the gaps between the keel and the hull, not the strakes—and then sanding with a smooth sandpaper in order to preserve the details and wood grain. In picture 4, as suggested in the instructions, a coat of wood primer is applied with a brush. At this point, the hull is ready to be painted. Next post: we take a detour and start with the fittings and accessories.
- 33 replies
-
- 4
-
-
- Artesania Latina
- Whaleboat
- (and 3 more)
-
Allan, you're right. I always thought those were carved wood ornaments, part of the decoration and not actual roof tiles--more like the sculptures or the other patterns--but I have never seen them up close, so I stand corrected. Still, the tiles and arrangement of the mystery model looks unrealistic from a naval perspective.
-
It does not look like it is a model or replica or any real ship, since its proportions and elements are all wrong. There is considerable "artistic license", like the weird mix of styles and elements from different cultures. Some of these are outright fantasy, like the multi-gun turrets and in general the design of the poop deck--which looks more like a fairytale house than part of a ship. I have never seen roof tiles on a ship. That backwards-pointing mast is also quite strange. As mentioned before, this looks more like folk art designed as ornamentation. Restoration might only be worthwhile if you like it a lot, or if it has some sentimental value.
-
Thanks for the warm welcome! As for the build log, I have already started, and you can find it here:
-
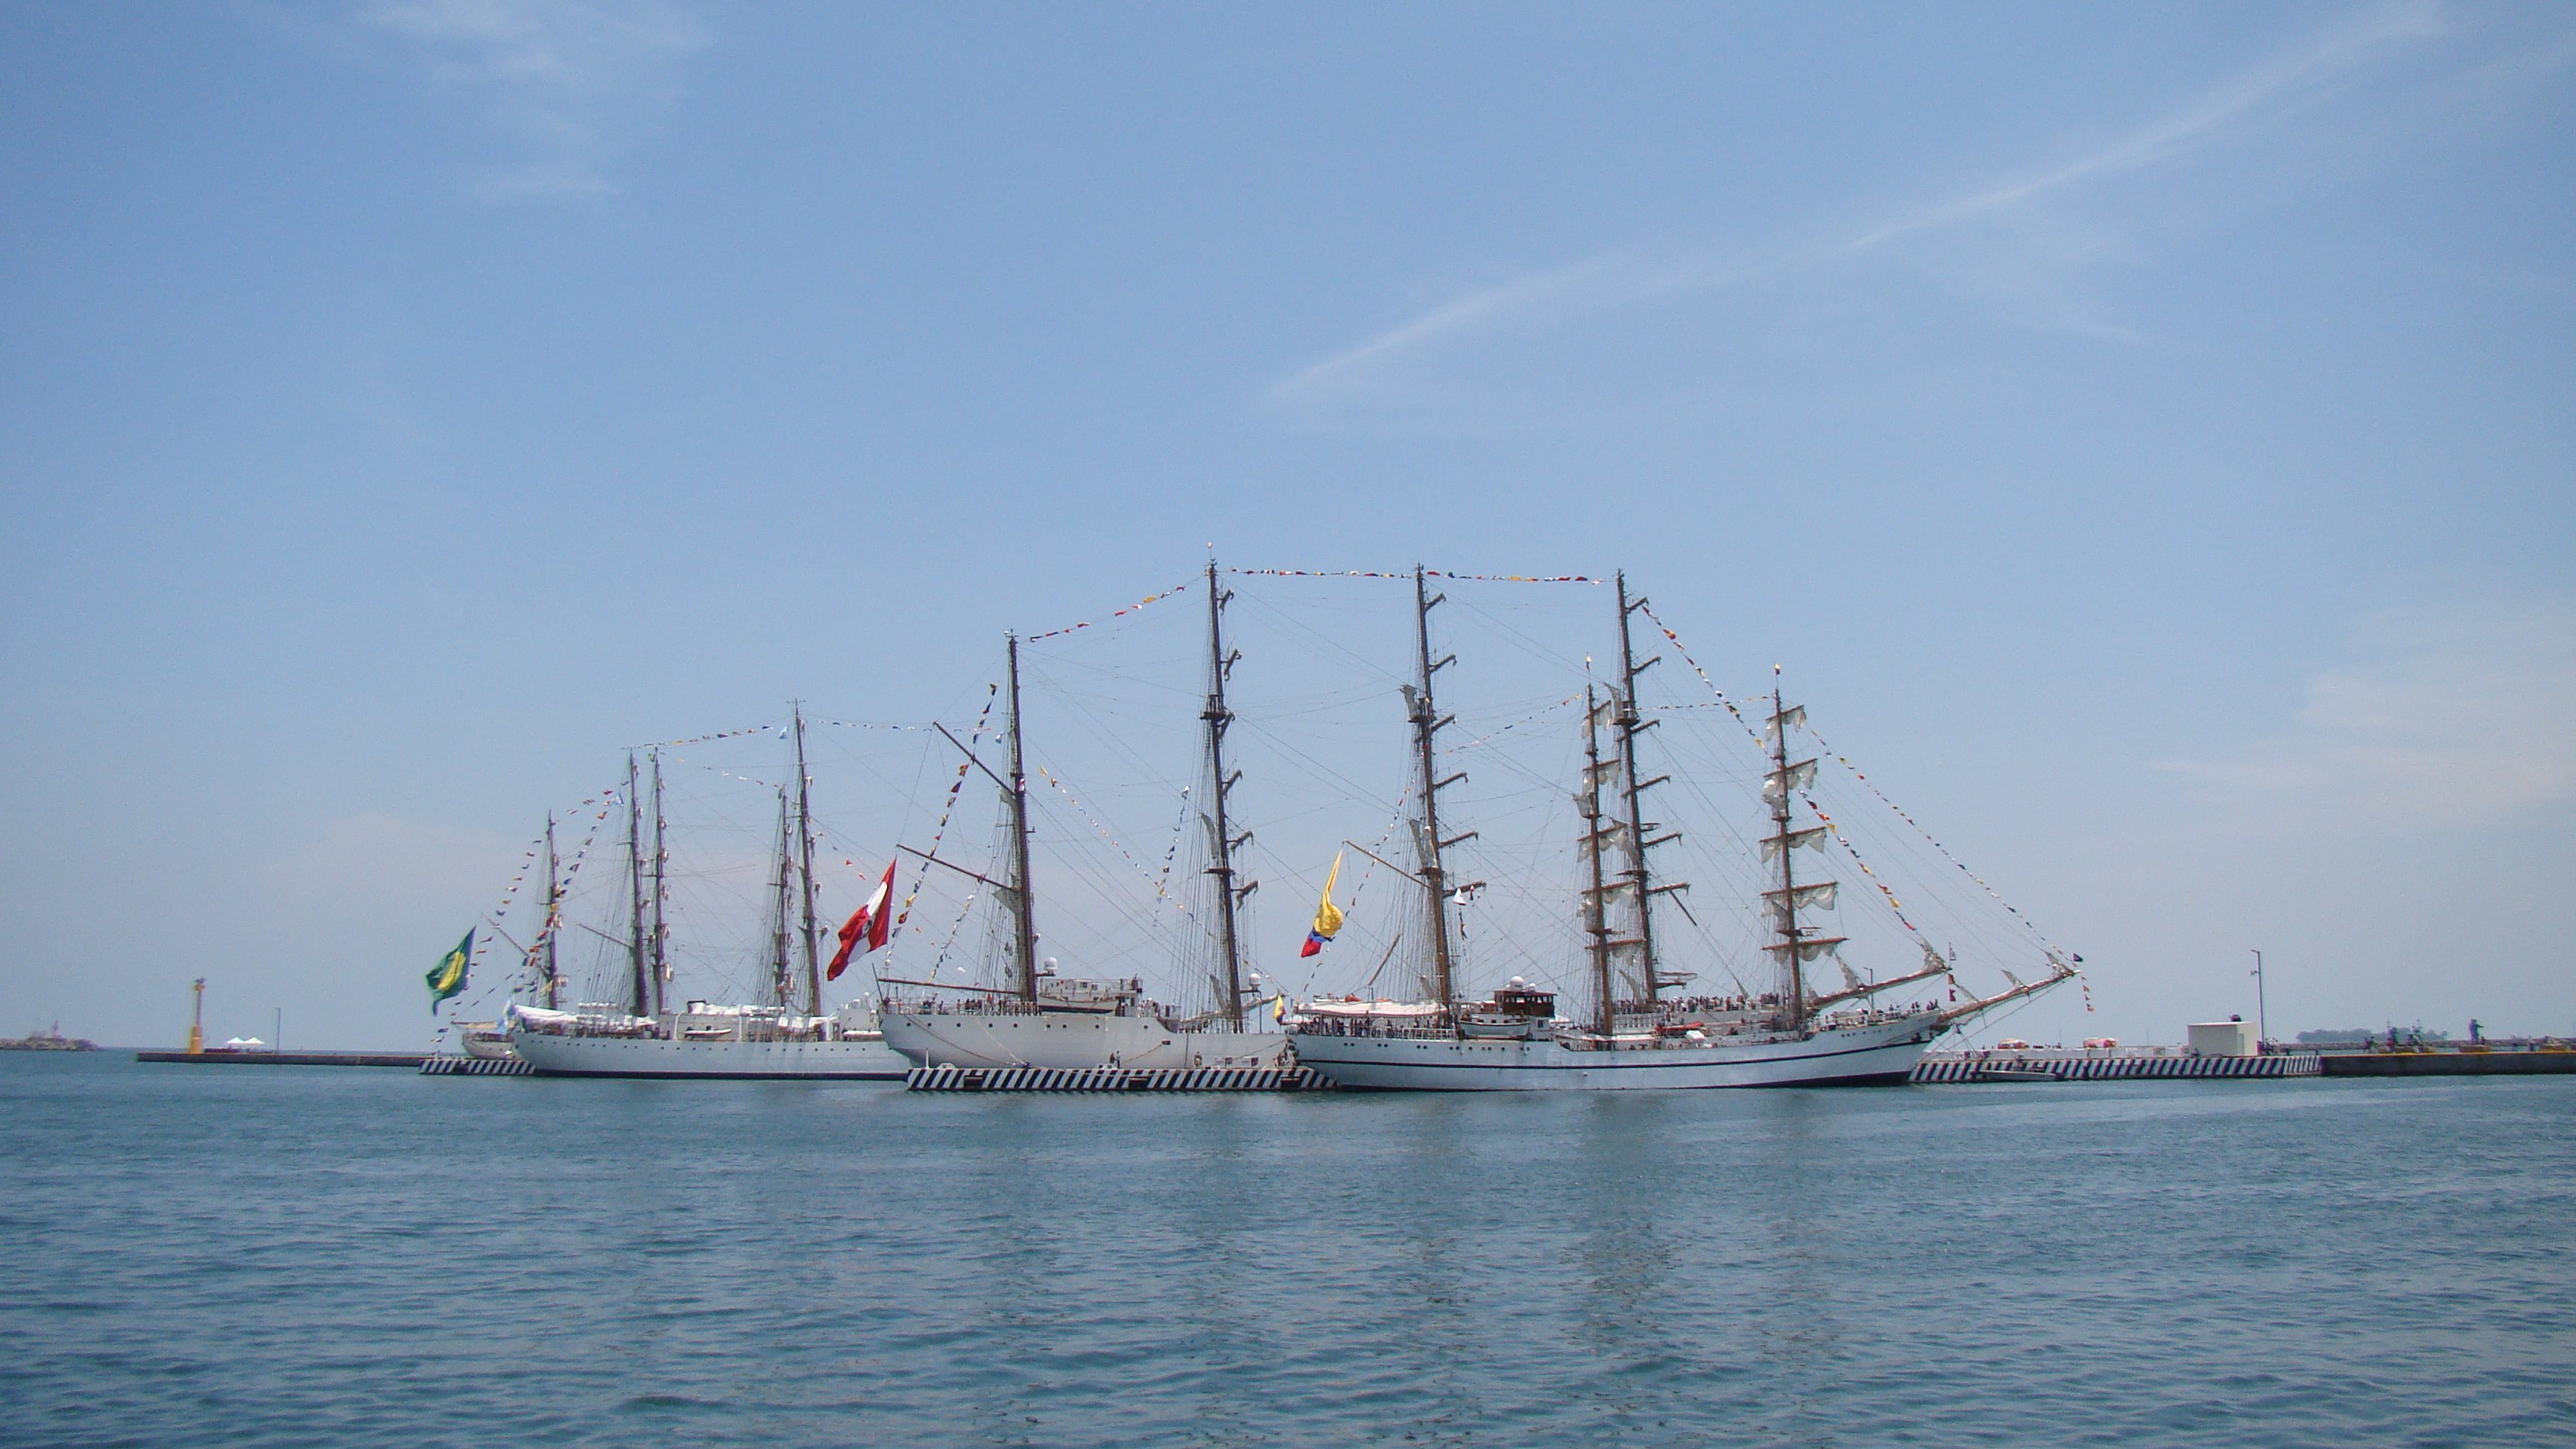
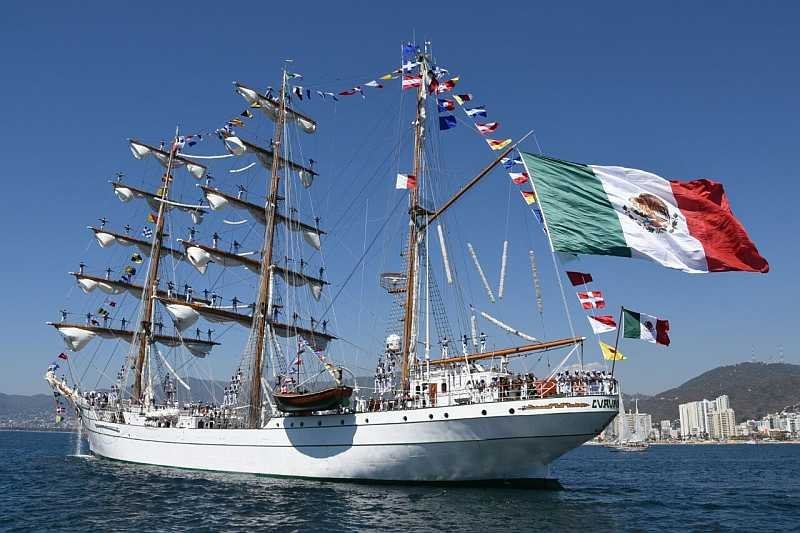
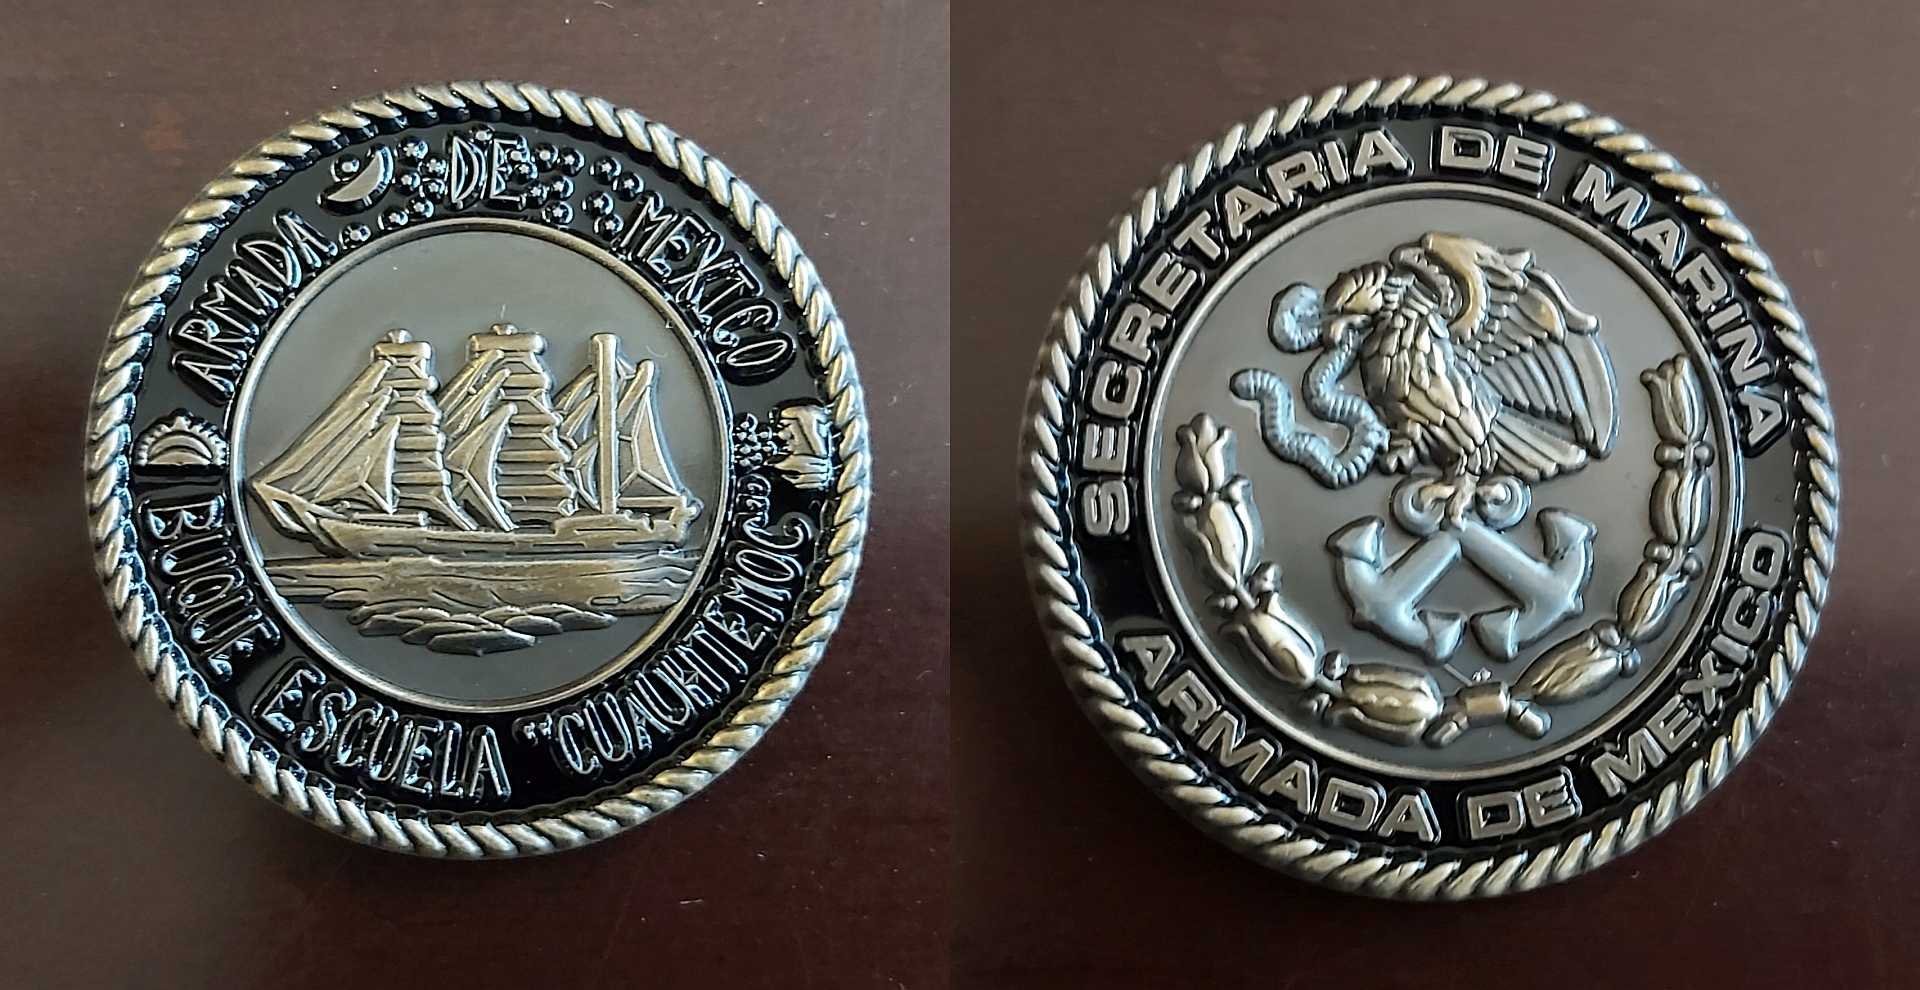
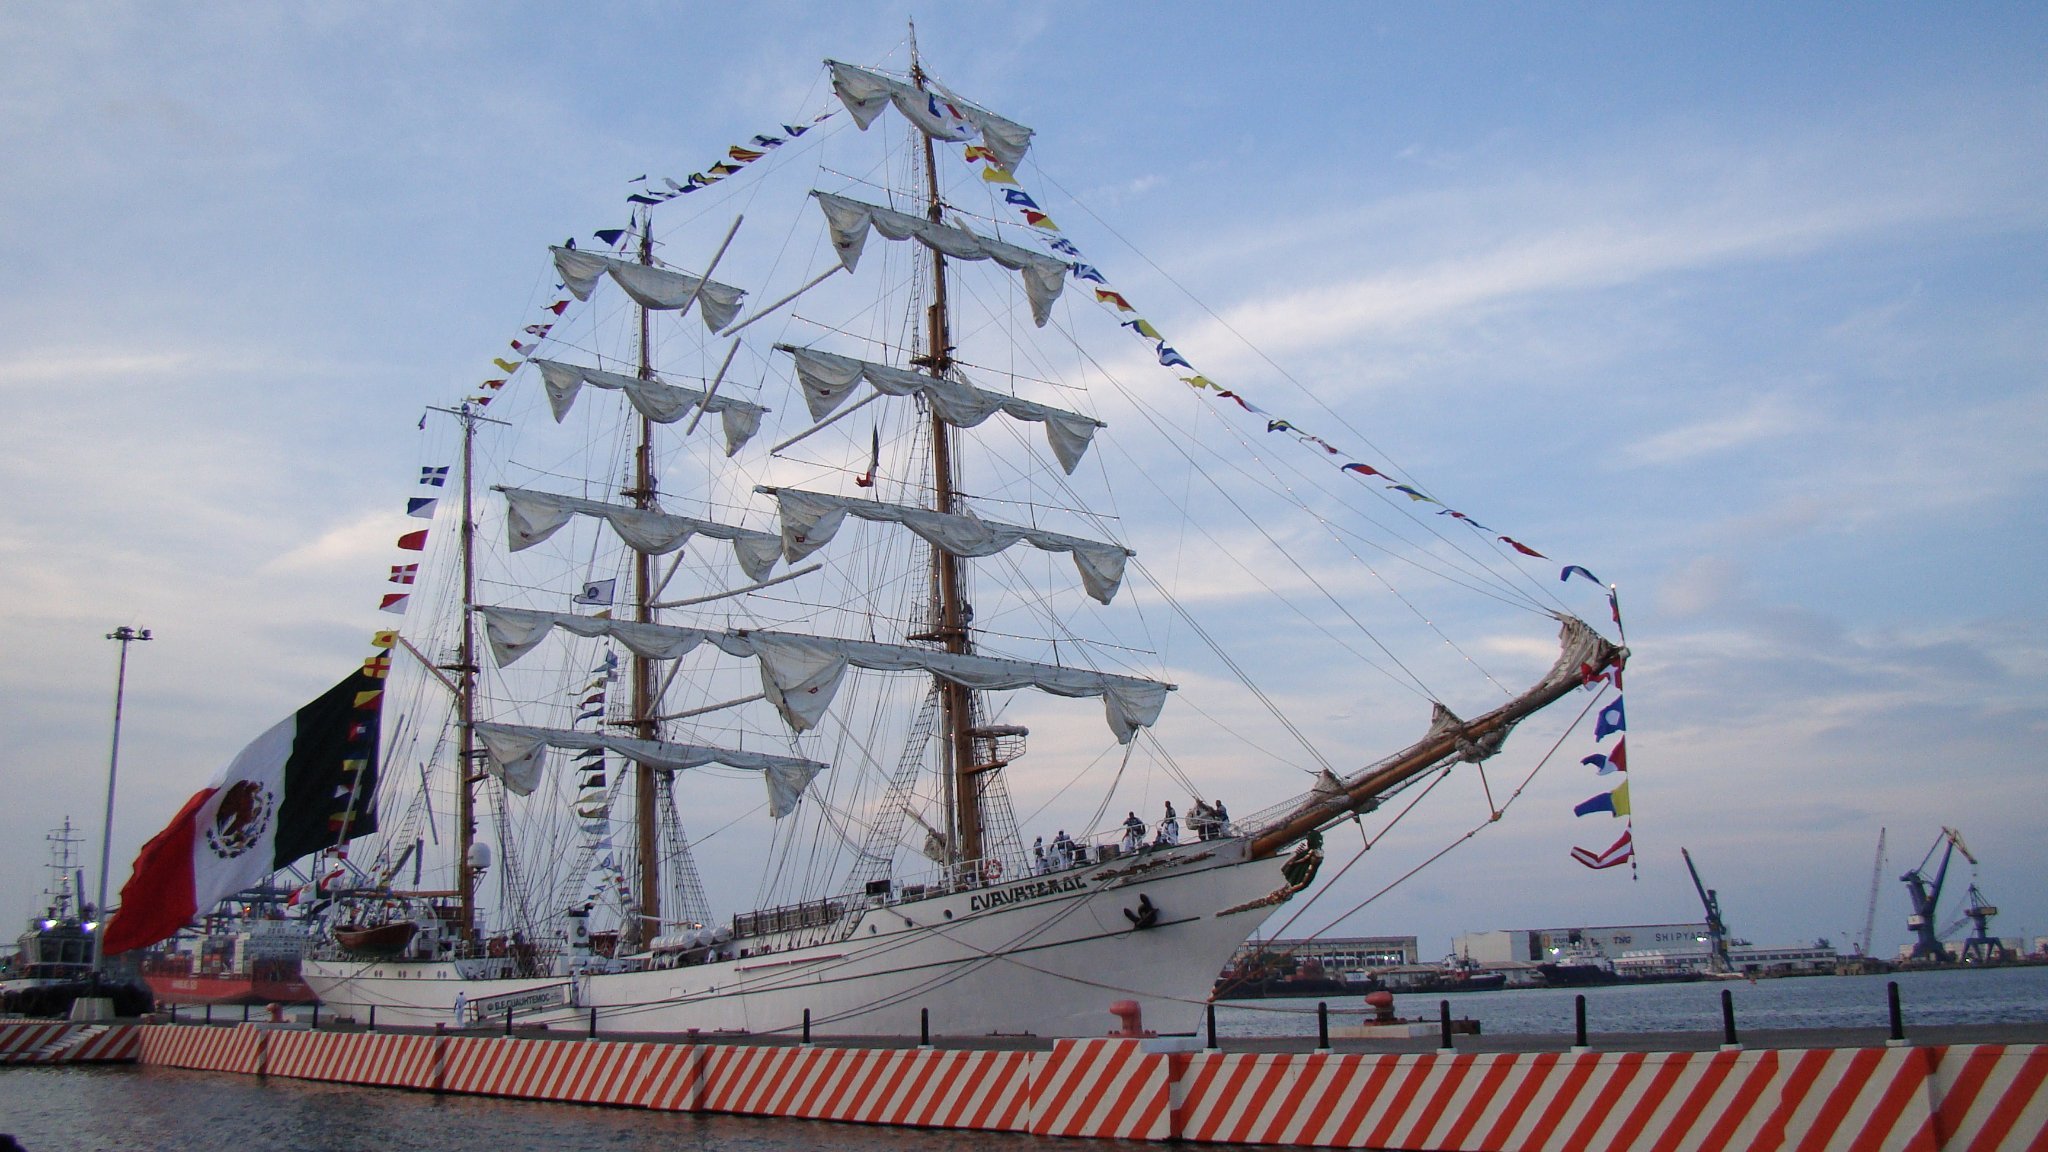
Hello, and welcome to my second build log in the MSW forums. The Ship The ARM Cuauhtémoc BE-01 is the Mexican Navy’s sail training ship. Her keel was laid in 1981, and she is still in service, sailing around the world every year in cruceros de instrucción—the last phase of the cadet training program which requires at least 20,000 nautical miles on board. She is also known as the Ambassador of the Seas and the Knight of the Ocean, and in her many years of service she has frequently participated in sailing races and other international events. Her mission and motto is “the exaltation of seamanship spirit”. The ARM Cuauhtémoc is named after the last emperor of the Mexícatl Empire (otherwise known as the Aztecs) of central Mexico, tortured and murdered by the Spaniards after the fall of his nation. To this day, he is honored and recognized and Cuauhtémoc is still a popular baby name in Mexico. Cuauhtémoc is a steel-hulled tall ship with a single-propeller auxiliary engine. Her sail plan is that of a bric-barca (three-masted barque). Her crew is comprised of 186 including officers, and up to 90 cadets. The Man I have extensively researched for this project. My sources range from informal chats with the ship’s crew and officers all the way to the Veracruz Naval Museum and the Secretariat of the Navy. All photographs in this log are my own, be it the real ship or the model. Over the last five years I have had the pleasure and honor to be on board the Cuauhtémoc several times, and I have witnessed various official events and ceremonies. On my seventh time aboard I got this coin from the crew. The Plan This is a 1:100 scale model kit of limited edition sold by Salvat and designed and manufactured by OcCre. It is based on the design and plans of the Deutsche Marine Gorch Foch. Like the real-life counterpart, both ships share the same heritage and blueprints. Among their notable relatives are the USCGC Eagle and the NE Sagres III. ARM Cuauhtémoc’s sister ships are ARC Gloria, BAE Guayas and ARBV Simón Bolívar. I am following the provided instructions around 50% of the time. The kit is really lacking in some aspects, and the instructions themselves are sometimes vague or ambiguous, sometimes inconvenient and sometimes outright wrong. It appears as if it was not thoroughly researched. In this respect, the similarities to the Gorch Foch show up and are not welcome. In order to keep this project as authentic as possible, a fair amount of kitbashing and adapting might be necessary.


.thumb.jpg.d0fb04b2dfc3b7e4b16324aa4c482dcd.jpg)
- 17 replies
-
- 10
-
-
- Cuauhtemoc
- Mexico
- (and 3 more)
-
Very beautiful indeed. Great job!
-
That book looks really interesting! Thank's for the recommendation. I will definitely add it to my reading list.
-
Hello Glen, and welcome to the MSW forums! We are in the same boat: I also built my first project and only afterwards I am reporting here how it went. I have lots of pictures, though, and have been documenting everything from memory. Thanks to this exercise I realize now that I learned much more than I initially thought. Maybe the same has happened to you. Overall, it was fun to build but turning the experience into a narrative has helped a lot too. On a side note, your build of the Alabama is fantastic. The ship's history is already interesting, and your pictures make me want to build my own. The Kearsarge will be no match for her!
-
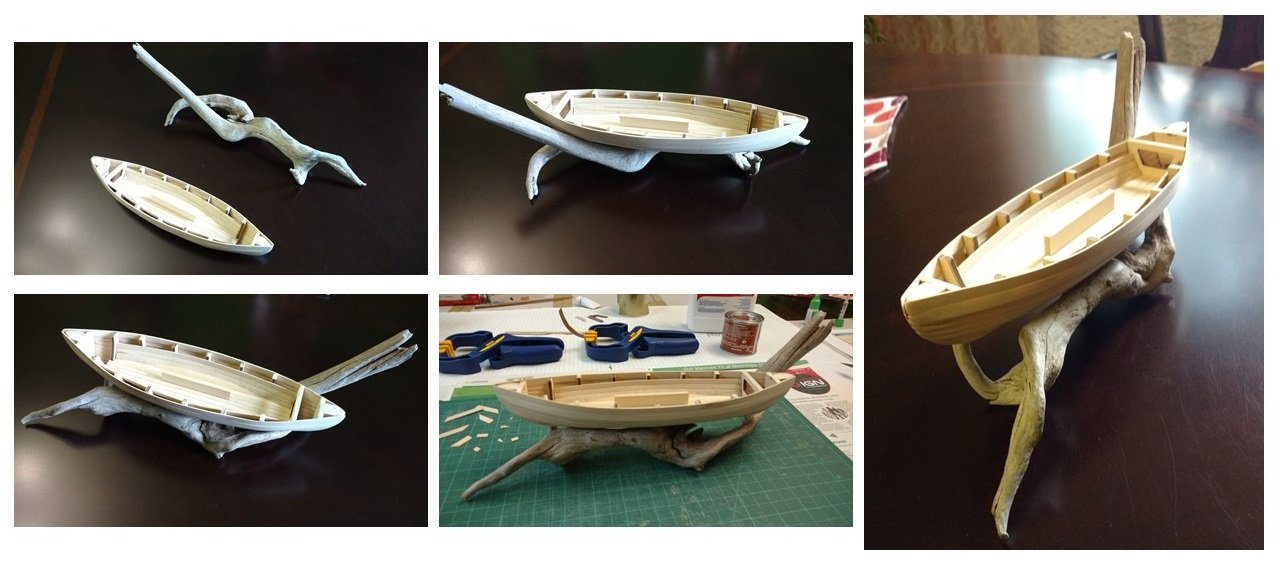
At the moment I knew I would sooner or later need a base or pedestal of some sort for the Providence, and I was considering the different options available. Artesanía Latina does not provide any solution in the kit, and to proper display the boat I would need to either buy or work something out from scratch. Over the Internet I found the picture of a model ship being displayed over a piece of driftwood. The boat itself was unremarkable, but the improvised pedestal looked beautiful and I instantly knew what I wanted. My secondary option was a piece carved from an actual whale bone—I have visited certain beaches where these are quite common. A tooth would be fantastic, I thought, but still would depend on luck. It was a cold January, and we decided to pay a surprise visit to the missus’ family in Veracruz over the weekend. Since we were going to a seaside town anyway, I thought I might as well take advantage of the opportunity, and asked them if they knew of a good spot for driftwood-hunting. As it happened, they did, and were even willing to help. The kids thought of it as some kind of adventure or treasure hunt, and took it very seriously. When we got to the beach, the team spread apart and began looking for interesting stuff. There had been a storm the previous night, and the beach was full with debris and a lot of wood was washed ashore that morning. I decided to walk along the surf, and it had not been five minutes since we arrived when I saw it: as a wave retreated in front of me it uncovered two capriciously-shaped wooden prongs. I reached down and pulled it from the sand: a small, crooked piece of driftwood, white as a bone. As I held it up to my eyes, I knew this was it. The search was over even before it had begun. Of course, I had to try it on the boat, but I had a sense that it would work. In the pictures you can see what I am talking about. I took the piece home and to my surprise it was a perfect fit. Not close: perfect. No further treatment was required at all—no sanding, polishing, painting, nothing. No adding or cutting, as the shape hugged the Providence’s hull snuggly and securely. Some cleaning was due to remove the sand and the salt and it was good to go. I took it as an auspicious signal: the God of the Seas smiled upon the project, and timely supplied what I needed. The hull was already completed and in its final shape, so it could provide a good reference as to how it would look once the boat was finished and atop the driftwood “pedestal”. Next stop: the gluing of the keel, and painting considerations.
- 33 replies
-
- 5
-
-
- Artesania Latina
- Whaleboat
- (and 3 more)
-
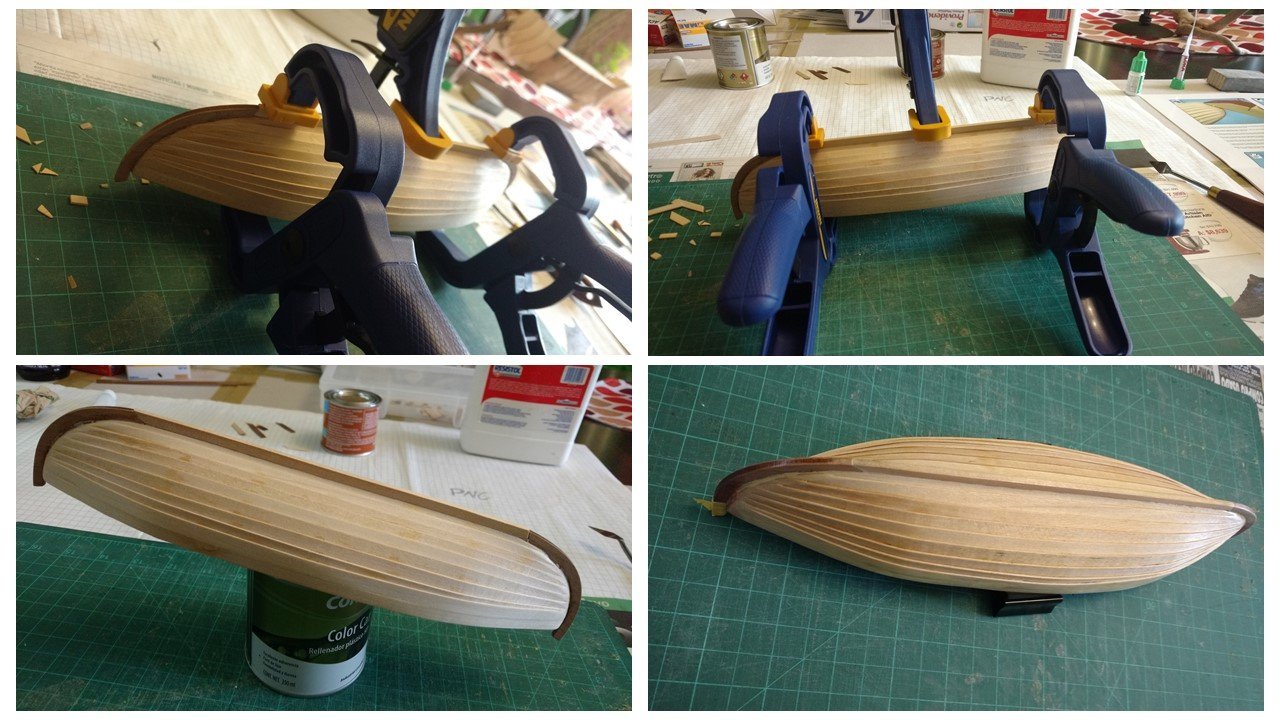
As promised, we continue with the hull of the Providence. Clinker-hulled vessels are wonderful to look at, and they evoke speed and agility in their beautiful, streamlined shapes. They remind us of precision work by the shipwrights of yore, curving materials into seemingly impossible positions—the wood appears to literally bend to their will. There’s a proper way to do this clinker-planking. Most amateurs tend to make a huge mess out of this. Fortunately, I’m not one of them. Armed with a ton of research and the image of the gorgeous ancient Viking hulls set firmly in my mind, I set on to tackle the next challenge. In the pictures: the process of gluing the hull’s planks in place. I had already experimented with soaked planks before to excellent results, so I repeated the procedure here. I bought a small soldering iron at a local electronics store to help with the plank bending without risking them breaking, but in the end I did not use it. However, it proved invaluable further on, as we shall later see. Just like before, all the planks were sanded to a smooth finish before soaking and gluing. This made all the difference. I tried to get the curvature right, and also symmetrical on both sides. Even with the soaked planks, achieving the correct shape was challenging. Thankfully, no broken planks, and no mistakes. Only instant cyanoacrylate glue proved powerful enough to keep these things in place. Thanks to this, I required very little clamping. Only the very first planks needed clothespins. Planks were cut to proper length along the process, to make it more manageable. I did not fuss about measures, since the planks were all the same length and considerably longer than needed. The small scraps left from the cutting were useful later for adapting and building new parts. In picture 9 you can see these scraps being put to use: the keel provided had an unmatching curvature and had to be “augmented” in order to fit correctly. In the end, this detail won’t be noticed, since proper sanding and later painting will make it invisible. We are not yet gluing the keels to the model, though: we are in for a surprise. In the next installment, a fortunate finding, and Poseidon himself displays his approval of the project. Stay tuned!
- 33 replies
-
- 2
-
-
- Artesania Latina
- Whaleboat
- (and 3 more)
-
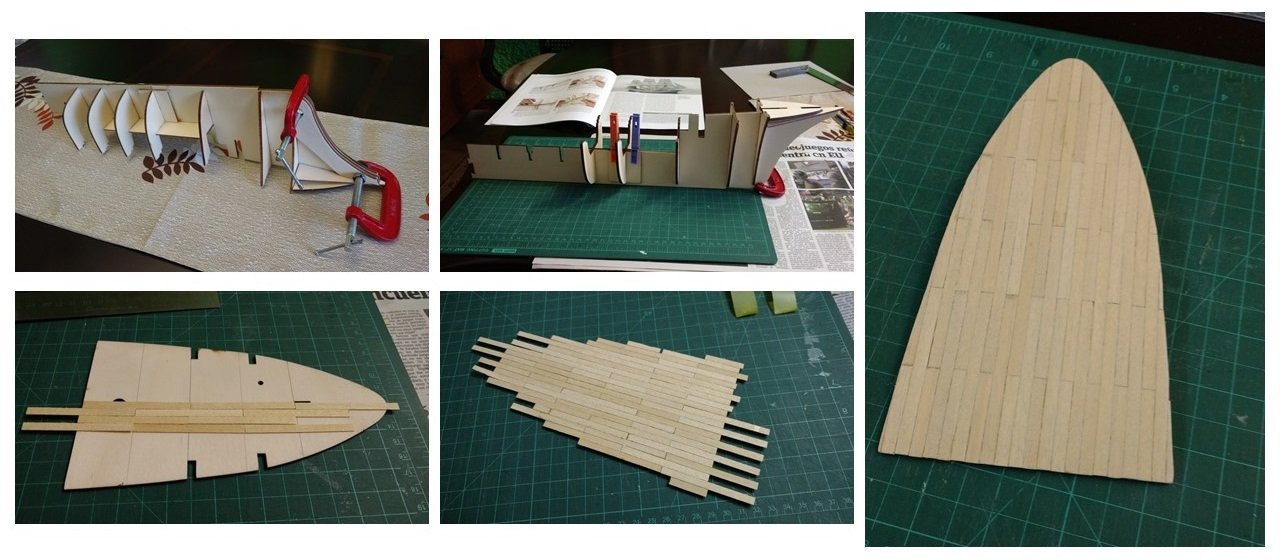
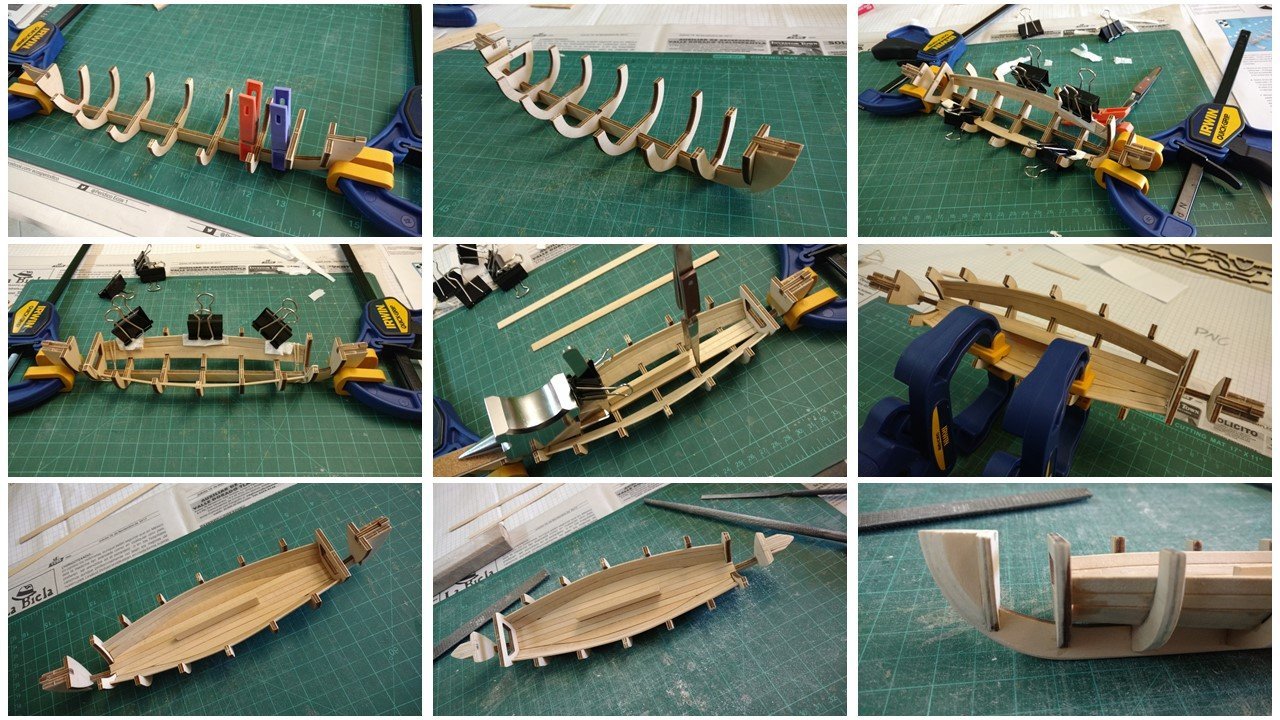
Hello, and welcome to my first build log in the MSW forums. This is a kit from the Spanish manufacturer Artesanía Latina. It is labeled as suitable for beginners, however, there are several details that increase the difficulty somewhat, mainly because of omissions or lack of clarity in the instructions. It is not too complex to build, but I still would not recommend it to a total noobie, unless they already have some experience with other kits—like plastic—or wood working in general. Some familiarity with nautical terms will surely help. I bought it from Amazon USA in 2018, but apparently all Artesanía Latina kits have become scarcer since. I picked it up for two main reasons: I wanted to practice my technique with something easy and cheap that I wouldn't mind too much if I botched something, and my love for 1800-era ships and the whaling industry in general. Since I have some experience with other engineering, hobby and DIY house projects, I already had most of the necessary tools and instruments. Without further ado, this is what happened: I will refer to the small pictures in a normal, Western-style reading order (left to right, top to bottom). In the first two pictures: frames and keel are fitted and glued. Some of them had to be properly aligned using clothespins. bow and stern reinforcements were glued in place too. The instructions are not too clear about these. Pictures 3 and 4 shows an ad hoc solution for holding the wooden parts in place: clothespins are too weak, but the foldback paper clamps are too strong and damage the soft wood. To prevent this, tissue paper is used over the contact surfaces. Some planks had to be soaked in warm water to allow for better shaping and curving. Five minutes submerged was enough, and the shaping was done by hand. All were previously cut to the proper size and sanded. If everything looks neat and clean that's because it is. Every part is first sanded to a smooth finish, and then glued to the kit. This proved useful later, saving time and unnecessary hassle. I carefully studied beforehand the whole instruction booklet, and every visible part will be given this special treatment from the beginning. In picture 5 some weight is added to keep the centerboard in place while the glue dries. The first floor planks have been glued too. Pictures 6 and 7 show the last planks being glued and the inner "tub" ready. In picture 8 you can see the sanding and shaping of the keel, bow and stern (close-up detail in picture 9). The tools used can be seen in the background. This particular kind of boat is designed to be highly manoeuverable and speedy, so both ends are symmetric in case a quick reversal of direction is needed. Up next: the clinker hull.
- 33 replies
-
- 4
-
-
- Artesania Latina
- Whaleboat
- (and 3 more)
-
I forgot to mention in that last post: the ARM Cuauhtémoc that I'm building is based on the OcCre kit for the Deutsche Marine's Gorch Fock, which can be found here: https://www.occre.com/model-ship/ships/gorch-fock.html It is a little-known (at least to me) Spanish manufacturer and after thoroughly reading MSW's guidelines I believe it is legit. It is not on the blacklist and apparently it is OK. Please don't ban me 😓
.jpg.fbbe2d0a65450214ebdf300ed405f067.jpg)