


Stockholm tar
-
Posts
866 -
Joined
-
Last visited
Content Type
Profiles
Forums
Gallery
Events
Posts posted by Stockholm tar
-
-
Hi Adeline,
I thought you might drop in.
I don't know about the mainsail being 'becoming', although I must admit it doesn't look too bad. As you'll appreciate, this 'log of sorts' (to steal a phrase from BE) is rather in retrospect, as I'm having to resort to my memory – not normally, I find, the best of work tools! However, there are problems I remember, and I'm just testing my powers of recall, in the hope that it may be of use to another Sherbourne (or other model) builder. My next offering should be up soon, together with a few photographs.
I've been following your log of the Fly. You're doing very well so far, but when will the next update be?
-
Since this log of the Sherbourne was started, rather belatedly, at the rigging stage rather than with the hull, I thought I should try and recall a few of the glitches that arose during earlier construction, that I remember. Hopefully, they may then become not be such a problem to current and future builders of this kit (although I am sure some have come across them already). These can lead to difficulties later in the build if one is not careful, but they can be avoided (or at least made good) with a little forethought. At the same time I shall mention where I altered, or made improvements, to the model.
The kit itself, by Caldercraft/Jotika, is a very suitable one for both the beginner and the more advanced modeller, and I can’t say that enough. At 1:64th scale, it is also a suitable size for the average home, and lends itself to further detailing if desired. I found two books very useful. The volume in the ’Anatomy of the Ship’ series, ’The Naval Cutter Alert, 1777’, by Peter Goodwin (former curator of the Victory) was a great help with the early construction, and is already proving to be so with the rigging. Lennarth Petersson’s book, ’Rigging Period Fore and Aft Craft’, has also been useful, although it should be pointed out that the rig he describes, and rather more uniquely draws, is that of a cutter of the 1780’s, rather than the markedly different one of the 1760’s (Sherbourne dates from 1763) so discretion is advised. There is also another volume available, entitled ’Super-detailing the Cutter Sherbourne: A Guide to Building the Caldercraft Kit’, by George Bandurek. I have read part of it and it looks interesting, particularly with the making of the furled sails, and it has many colour photographs. I do not have it – at least, not yet – but that may change!
Anyway, to begin. So far as I remember, the material was of a good quality: birch ply frames, with separate keel, bow and stern pieces, and two gun port strips; lime was used for the first planking, with walnut for the second, and there was a reasonable amount left over. The only real concern here was that the walnut strips had to be treated with care as they were somewhat brittle, and slivers tended to break off of them, particularly when being bent. The usual dowel rod was supplied for the masts and yards, but more of them later. The cast metal anchors were well made, with minimum flash, but the guns (both the 3pdrs and the swivels) needed rather more work with the file. A couple of them were also not so well cast, although I did use them since the damage was not that noticeable, particularly when painted. Tan and black thread for the rigging was included.
Fitting the frames to the keel was fairly straight forward and they were a good fit. Soaking and bending the gunport strips presented few problems, but the first real hurdle arose when I fitted that on the port side, the starboard one being fine. I have to say here that this was probably not the fault of the strip, but was entirely of my own doing in that I probably glued it a fraction too low, particularly at the stern. It didn’t look particularly noticeable, but it had an unfortunate knock-on effect further down the line, when the deck was laid, in that (and I am sure many will know what’s coming next) the two aftermost guns wouldn’t fit properly through the ports! I then spent some time in trying to make them do so by all the means I could think of – including filing the ports themselves, sanding the lower edge of the trucks, and lowering the holes for the trunnions – and all without making the guns appear ’odd’. At one stage, I was even thinking of having the aftermost gun run in to overcome the problem. Happily, the other measures were just about sufficient, and all the guns are now fully run out, even though the after pair are close to touching the top edge of the port. It is not particularly noticeable, but I hate to think of what would have happened on the actual cutter from the recoil, should these particular guns be fired! So the stricture here, for any building this kit, is obvious – make absolutely sure the strips are level fore-and-aft and glued in the correct position. You’ll save yourself a lot of heartache later on!
Next time, my clinker planking – and a few other problems.
-
BE, Ryland, Mark, Alasdair,
Thanks for the compliments.
BE,
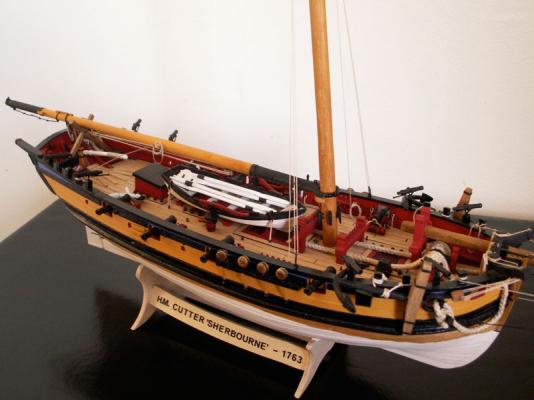
The sail was made from an old handkerchief, cut to about half the size of the actual sail. Equidistant strands (about 1cm apart) were then teased out, to represent the seams. It was fitted with reef points, reinforcing etc, finally stained in tea. It was laced to the gaff, which was then fitted to the mast. There are two brails each side, the upper ones pass through two small single blocks at about the mid point on the gaff, through a double block at the gaff throat, and down to a pin on the boom. The others run from the clew, to the double block and down to the same pin. You can see the pin and coiled brails in the top two photos. I'm quite pleased with the look of the sail myself although, with hindsight, I think the reinforcing patches are a little overlarge along the gaff. I shall have to watch that with the other sails!
Alasdair,
Yes, she has been around a little while – not only was she on the old MSW, she was also on the now-defunct Dry Dock Models in the early stages! You are right too in thinking she is clinker planked, which I think adds to her appearance.
-
-
Dirk, Tony,
Thanks for your compliments, much appreciated. She's beginning to look something now, with the furled mainsail and some of the rigging.
Dirk, I'm pleased I spent some time on the details, as I think they add something to her – for instance the two stern lockers, one with the lid open to reveal in one half, the balls for the swivel guns, the other holding the lead line. In my mind there's a similar arrangement for the opposite side box, one half containing the balls for the swivels, the other the log line. The boat was quite literally made out of scrap pieces (the oars are orange sticks) and the sail is an old handkerchief, stained with tea. Threads were pulled out to represent the seams and, although difficult to see, there are reef points.
Russ, just seen your post. Yes, I suppose I could do that, even though she didn't have a log to start with.
-
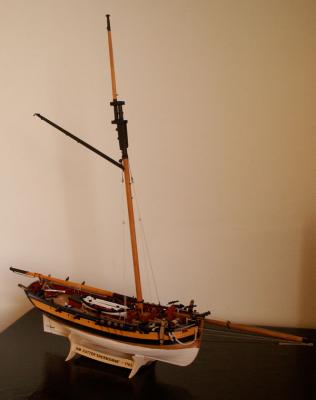
I thought you might like to see a few more pictures of the (slow) progress on my Sherbourne. The pictures were actually taken about a month ago, and my wife and I are now at our cottage, so work won't resume on her until the autumn.
I've now finished the shrouds apart from the ratlines, which I'm leaving off for access until later, and have in place some of the running rigging, including the burtons, top rope, boom topping lift, and throat and peak halliards for the mainsail. The latter is bent to the gaff and brailed into the mast:

- robin b, Papa, fnkershner and 18 others
-
 21
21
-
Georgek,
Absolutely magnificent, especially for a first build! Your furled sails look just right too, not bulky or distracting, which is just how it should be.
You asked about furling the spanker. I believe the practice was rather to furl the sail into the mast, leaving the gaff standing. I have a couple of prints which show the Victory at anchor, and the spanker is furled like this. One is by the late Derek Gardner, to my mind one of the best artists of the ships of Nelson's era. He meticulously researched his paintings, so I can't think he'd be wrong.
The sail was in any case loose-footed, ie it wasn't laced to the boom, so just letting off the sheet would free it. It could then be brailed into the mast, by three or four brails attached to the leech of the sail and running across it, then passing through small blocks situated on the mast in suitable places. There were even small blocks on the gaff to furl the top part. The brails were probably then belayed somewhere at the foot of the mizzen mast. Not being a square sail, the spanker wouldn't have had buntlines or leechlines.
I'm not exactly sure of the positioning of the brail blocks or the belaying points, but I am sure you could find this out.
-
Andy,
A very Happy Birthday from me too. Hope you have a good day.
I've just been looking at your Pegasus. She's looking brilliant, you're doing a good job.
So, it's back to work now – which probably means another bonus for us in that you'll be back with your maritime updates! Take care.

-
Floyd,
Well, thanks – but I like to think my life expectancy might have other things going for it than the fact that I might glow in the dark!
 (I don't.)
 -
I remember going aboard Savannah when she visited Southampton in the early sixties, although not a lot. She was a nice looking ship, even though she didn't have much of a funnel (it probably not being necessary).
Ps. I've felt strange ever since!

-
Hi Fam,
Nice to have you back, and I think your drawings help.
As Wayne mentioned, they would normally have changed the lateen yard over to the other side of the mast when there was little wind in it, probably when tacking. A large sail like that could 'take charge' otherwise. I sailed on the Golden Hinde replica many years ago, and remember doing this – which took quite a few crew! The idea is to get the yard as vertical as possible, so as to swing the heel around the mast to the correct side, and then set it up again.
Incidentally, it's interesting to note that the lateen became part of the rig of North European ships, when seamen from those parts traded to the Mediterranean and noted it on dhows and other craft from that area and the east. They would have realised it's close-to-the-wind qualities, and it thus became set up on the mizzen mast of European ships.
As has been said, it was the forerunner of the gaff, which most likely developed from the difficulties of operating the long yard. The part of the sail in front of the mast disappeared first, the yard remaining full length for some time afterwards. I think this was because the lateen yard could be used as a replacement for yards on the other masts, if any of them was damaged, or shot away. I seem to remember the Victory retained a lateen yard until about the 1790's.
-
A bottle of 5mm blocks? Sounds like meds for a ship modeller to me!
Which reminds me, I need some 5mm deadeyes to solve a 'headache'...

Btw, great idea.
-
Definitely a four master, Kester, but I don't think she's in the process of doing anything much at the moment, with three of the watch having a yarn and another with time to take a photo!
Maybe the braces are where they are because the mat'es going to 'sweat them up' at the end of the watch?
Yes, I'd agree on that.

Frankie,
Actually the course sheets do go to the rail, having passed through a sheave in the bulwarks, and these are normally belayed forward of the braces. This may equally be the line running in at the bottom left of the photo, to your 'cylinder sticking out sideways'. I would agree with John that it is a winch, which could be used to sweat up any of the lines belayed there.
Incidentally, I had a look through my books on late nineteeth/twentieth century sail, but couldn't see any photos which resembled yours. I did have a thought that it may have been one of those taken by Alan Villiers, but I'm not sure on that.
-
Frankie,
Nice photograph. It would be nice to know the vessel, but it looks like a four master, ship or barque.
I would suggest that the lines you mention are actually the fore mast braces, and that they might be laid out in such coils or flaked out, as the ship is in the process of either tacking or wearing. The sheets would normally come down the masts.
The structure you mention might be built over a hatch, since that looks like the coaming at deck level.
-
Each cannon was usually loaded through its own port, by rope slings from the appropriate yardarm or perhaps from sheerlegs, and then transferred to it's waiting carriage.
-
I have a book, 'Fighting Sail' in the Seafarer series, published in 1978, which has a section on Stanfield's painting. Besides showing the whole painting, in quite small scale, it also includes blow-up sections of it. One of them shows the area of the Victory in question and it does show, if you look closely, that she does indeed have an entry port on the middle gundeck, situated just forward of the main channel. The roof and support brackets are clearly visible. There would also appear to be a gun poking out of it – but that's another question!
I have never believed, heard or read, that the Victory's original entry ports were removed and then reinstated. To me that would seem pointless, and quite an uneccessary expense in time of war.
However, Stanfield's painting also shows the built up upper deck bulwarks, including that of the disputed fo'c's'le. I'm not sure about this however, and it might just be artistic licence. I tend to go with Peter Goodwin on this, that there is no actual evidence for the extension. It would seem strange too that there seems to be no written evidence about them, even from someone writing to say just how effective these bulwarks were over the old ones in preventing injuries, or otherwise. It would be interesting to know what Goodwin's successor as curator thinks on this point.
Chris, one final point. I was rather surprised at the colour scheme you have given the Victory, which is much lighter than on the actual ship. It has always been stressed that the Victory's appearance today is 'as she was' at Trafalgar, even down to the colour scheme, and the Admiralty paints sets have been devised for modellers who wish to get as close to that as possible. Are you now suggesting that this is wrong, or do you just think it's too 'heavy' for the model?
I have read that much of the upkeep of ship was down to the Captain, and how deep his pocket was, thus the variations in the basic colour scheme, from light to dark. Neither Nelson or Hardy were actually that well off, so they tended to go for darker colours which weren't so expensive, and this particularly shows in the yellow ochre. The blue of the beakhead bulkhead was I believe, and rather ironically perhaps, known as French Blue.
-
Paul,
I have to admit I'm not really into this period, although I find these big ships impressive. Certainly the German battleships of the Second World War were beautiful to look at, and I seem to remember reading that the crews of the RN ships which sank the Bismarck, for instance, as being first saddened by the number of German seamen that perished – and second, by the fact that they had to destroy such a beautiful ship.
I'm glad you have to begin again (!) – so that I can follow your build from the beginning.
-
Fortunately, the blocks I'm using are hand made from lemon wood, they don't have any bothersome coatings in need of removing.
Grant,
Good to hear.
Going by pictorial evidence, both in paintings and photographs, blocks were often painted white during the later nineteenth century on some clippers, probably for effect – so I imagine the owners or captains wanted them to be distracting!
-
Grant,
I agree, most blocks were usually left natural, which means they were different shades, probably depending on the wood from which they were made. However, blocks were sometimes painted, eg. I believe that in the RN blocks were usually painted black, as they are on Victory today.
When it comes to models I always stain purchased blocks where possible, as straight from the manufacturers they are usually much too light in colour. Very often too, they have some sort of patina which doesn't take stain easily, and which usually means that they have to be lightly (and laboriously) sanded first.

-
George,
The twist is usually inherant in the rope itself, but can be made worse by coiling in the wrong direction. One thing you can do is to cut the length you need for the job in hand, and pull it with one hand through the forefinger and thumb of the other, removing as much twist as possible. As has been suggested, you can also hang it by one end for a short while with a light weight attached, which should help in untwisting it. I'm not sure beeswax will help, but apply it after you have first tried to remove the twist by the other methods.
When you come to reeving the line through the blocks most of the twist should have disappeared, but there are ways to help the process further. Most rigging line is laid up or made right handed, which means the strands will run from bottom left to top right as you look at a length it. Therefore reeving it clockwise through the blocks, if possible, will help. Another tip is to try to prevent the blocks themselves from turning as much as possible, whilst reeving the line. It doesn't always work, but just occasionally you get a nice untwisted block and tackle!
Btw, you have a very nice looking model there.
-
Anja,
Very sorry to have missed your birthday!
I'm sure you had a great day, and thanks for all your work on the site.Enjoy your trip to England,the land of my birth.
-
Perhaps this might be a good point to bring up the health issues connected with our hobby particularly, as with Robbyn's case, the various glues that we might use and which are readily available these days. It is all too easy to just pick up a bottle of CA or whatever at our local store, without paying too much attention to what it contains, or what possible effects it might have on health. This is very likely one of the last things many think about, whereas it should be one of the first. There is probably also a tendency with some to not even read the label on the bottle, except to find out if it will do the job in mind.
I have ME/CFS, which affects the central nervous system. One of the symptoms is a reaction to strong and toxic odours, which often sets off an attack, so I am very wary of glues – especially when bonding wood to metal. A well ventilated area and a mask is a must, and even then I don't leave the bottle open for more than a few minutes, if I can avoid it. However, even following these precautions, I can end up feeling ill and with itchy skin, if not worse.
So, do take precautions whenever possible, also when sanding, to provide a flow of air and wear a proper mask. These precautions are not sissy, they're sensible!
-
Kester - remember that as the right side of the brain controls the left side of the body, only left handed people are in their right minds!!
As for ropes, if you coil a right handed rope anti-clockwise, it will kink when you run it out!
John
True - although my wife wouldn't neccessarily agree with the first assumption!
Andy,
It's even worse if the line doesn't reach the quay in the first place – and no searching is neccessary!
-


Sherbourne by Stockholm tar - Caldercraft - 1/64
in - Kit build logs for subjects built from 1751 - 1800
Posted
Bigcreekdad,
I'm sure you're Sherbourne is just fine!
As to the cottage, although it's just inland from the coast north of Stockholm, no, I'm not a fisherman. We're reminded on occasion of the proximity of the Baltic, such as the other night which was somewhat misty inland, and we could hear the ship's fog signals. If the wind is in the right direction, we often hear the ship's engines. There is a small harbour not far from us, and often the mere sight of the yachts there makes one want to go sailing again!
A summer cottage is quite a usual thing in Sweden, my wife's father constructing it around 1960, overlooking a small lake. We now have a couple of neighbours. We've made a few improvements to it, such as giving it a new roof and chimney a few years ago, and we normally spend the summer months here. It is, mercifully, fairly quiet but it is getting noisier. There is a motorway to the north of us running between Stockholm and Kapellskär, which is the ferry port to Mariehamn in the Åland Islands, and when the ferries come in it seems to become a race track. It's worse when the wind blows from that direction! Unfortunately, there are plans to enlarge the port. We'll probably be here until late September or early October.
Adeline,
Not particularly a funny way, although I think it's perhaps more apt when referring to people. Not to worry though!
I'll do my best to recall my recollections, and I look forward to your Fly update.