


Stockholm tar
-
Posts
866 -
Joined
-
Last visited
Content Type
Profiles
Forums
Gallery
Events
Posts posted by Stockholm tar
-
-
-
I actually built my Sherbourne with no other wood strips than those that came with the kit. They seemed perfectly adequate, although you have to be a little careful with the walnut second planking, as it is somewhat brittle.
As to whether she was clinker built or not is debatable. Chris Watton her designer said that she was carvel built, and this figures as she was built in the Naval Dockyard at Woolwich, where this type of construction was preferred. However, I wanted to try clinker building as an experiment, and because many other cutters were at that date, especially those built in private yards. I suppose it's up to the builder and what he prefers.
I don't see any reason for not using Sherbourne as a first kit. The build is quite straight forward, and you would still get difficulties with other models. The rig is also what you make of it, and it's not that difficult. Keeping it simple as per the instructions, or improving on it with the help of various publications, it's entirely up to you.
Tony makes a good point. Treat each stage as a project on it's own, and do the best job you can. the finished model will be all the better for it. As he implies, take your time. It's more important to make a good model, than to finish it quickly.
You've also the resources of MSW at your disposal!

-
-
Andy,
I have just caught up with this. So sorry to hear of your grandfather's passing.
Occasions like this are never easy, but I'm sure you will get through it. I'm sure also the words will come when you need them.
I'm sure we're all thinking of you.
-
Thank you gentlemen,
John,
If you are referring to the mast rigging, that's true. If you mean the whole model, there's still a little way to go yet.
Eamon,
Yes, there was a lot this time. Glad you like my 'practicum', and of course you can refer to it as much as you like. I will endeavour to keep up the good work!

Popeye,
Thank you. So, you thought her finished huh?
 Not to worry, there's still plenty to come...
-
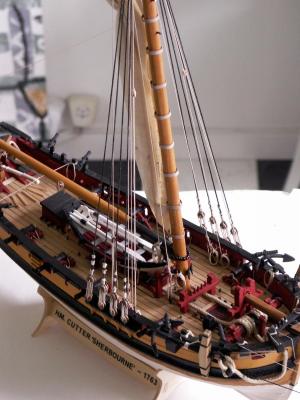
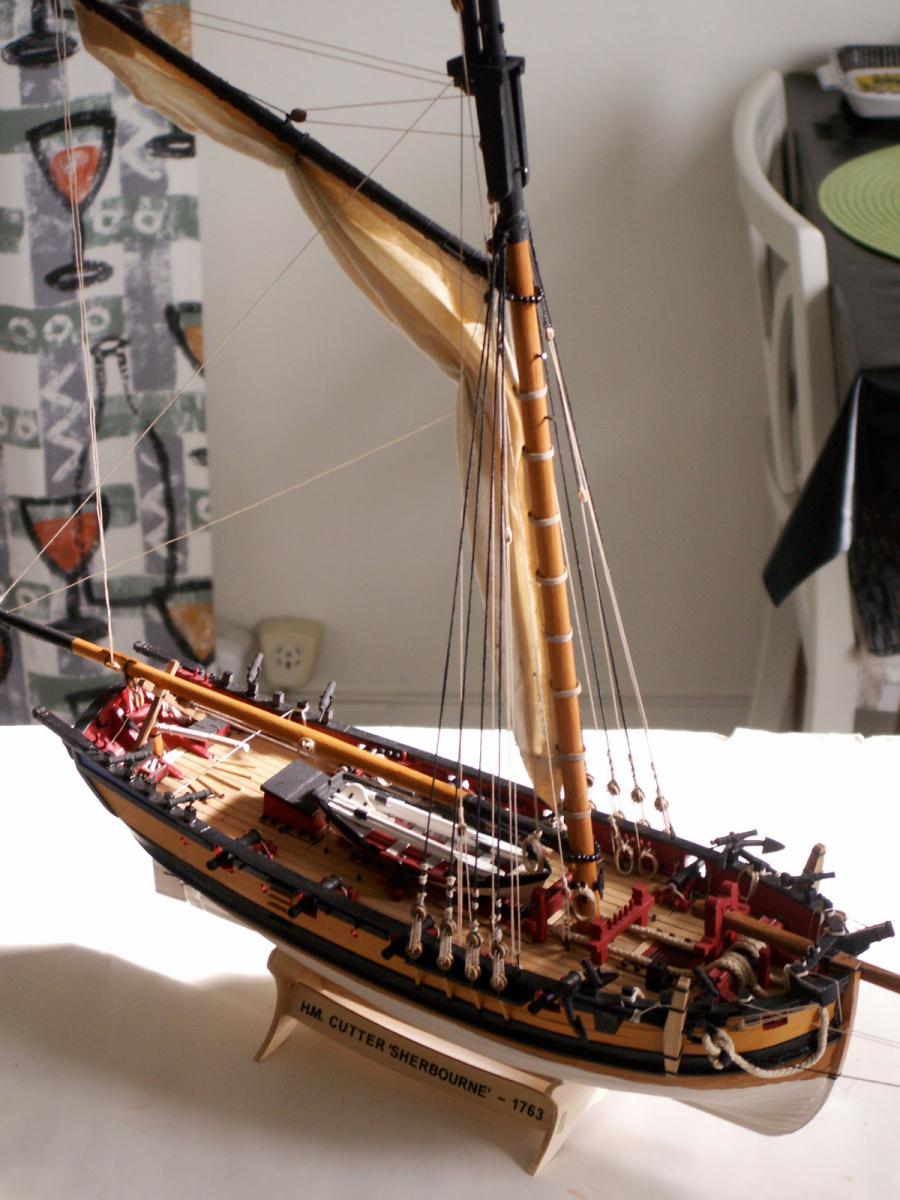
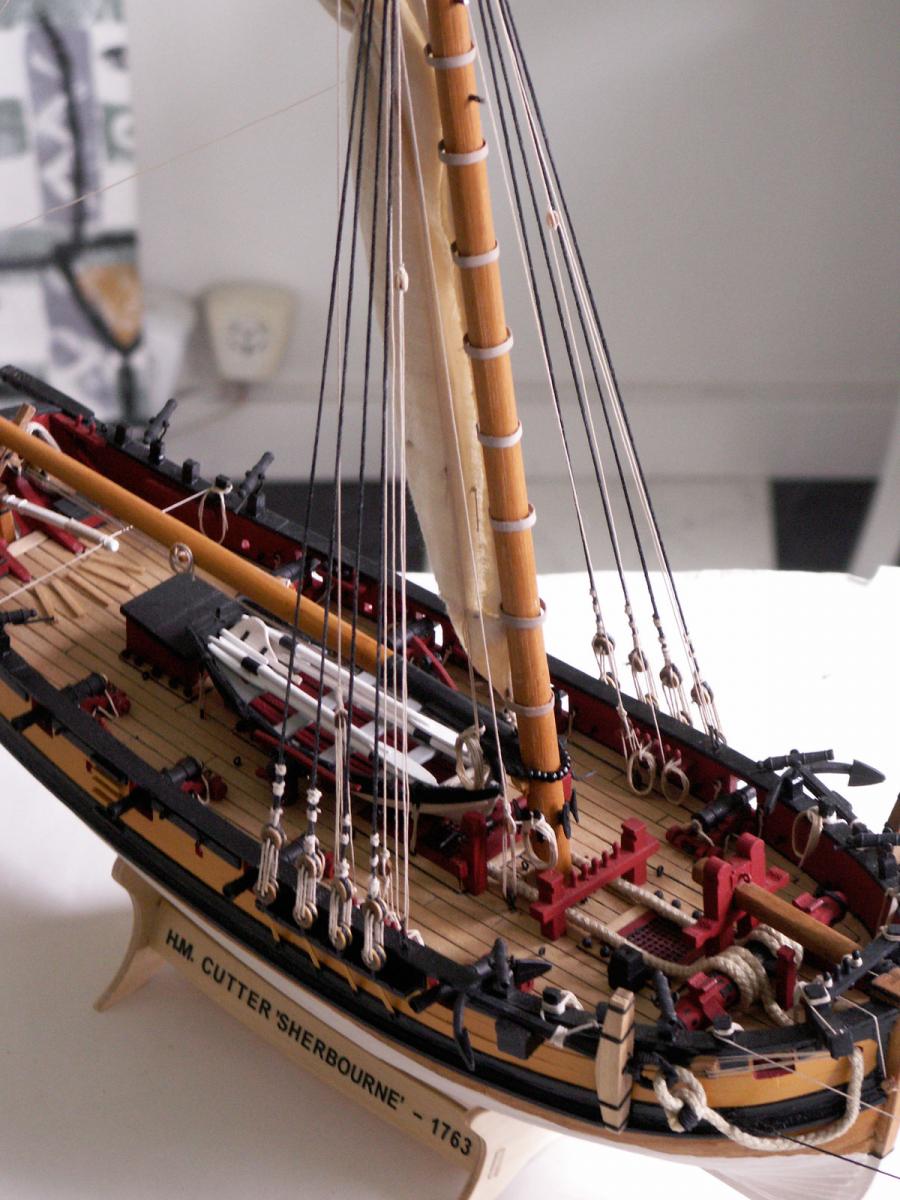
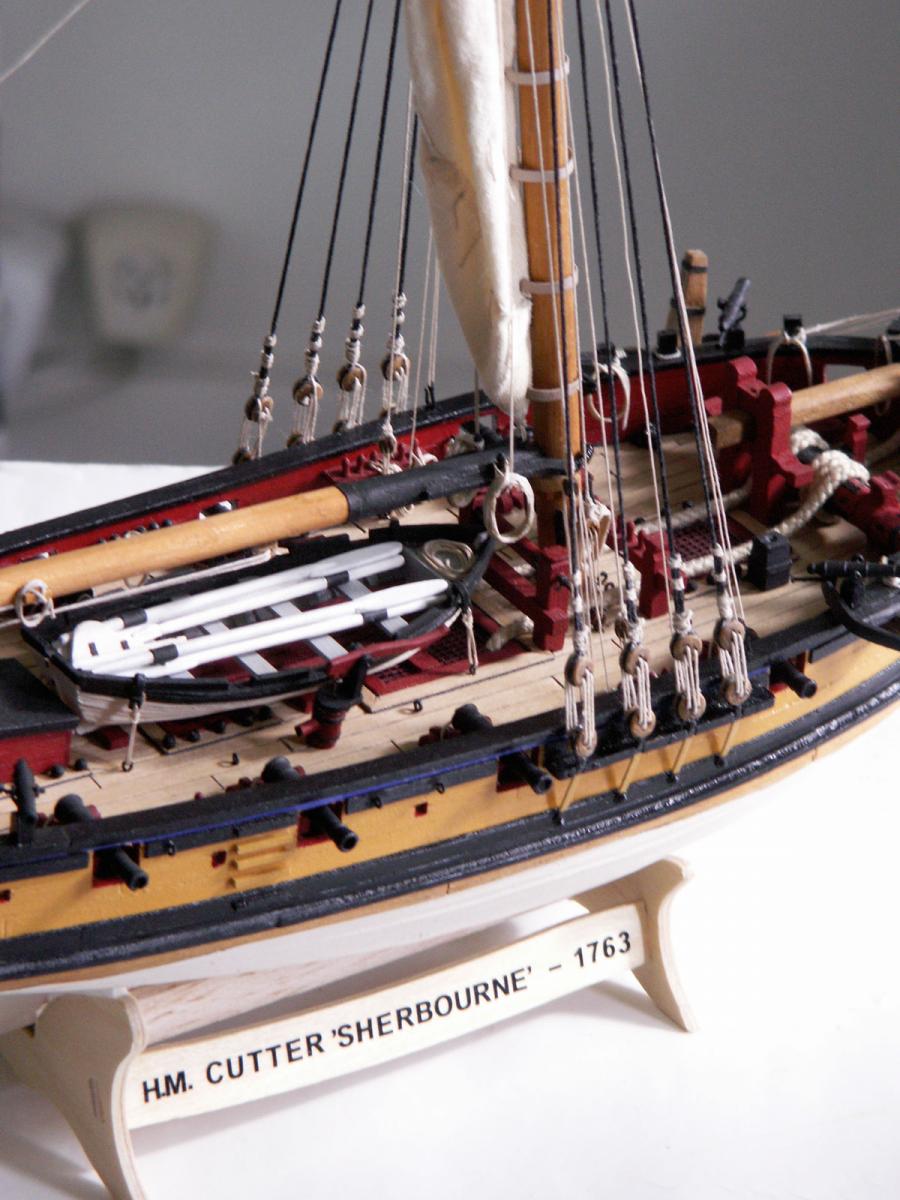
At this point I thought it a good time to fit some items of the running rigging – those which belay at the foot of the mast and the small pinrails inside the shrouds, access to these areas being much easier without the shrouds in place. These were the toprope, the throat and peak halliards, and the boom topping lift – all four lines being 0.50mm. in circumference, their purchases 0.25mm. Incidentally, the short pin rails inside the shrouds only contain six pins per side, which I estimate as not being enough for any additional rigging, and the foremost pin on each side already belays the rigged burton pendants. However I fitted them – and will probably resort to shroud cleats later in the build.
The first line to be rigged was the toprope, which was used to raise or lower the topgallant mast. There has been some debate as to whether this was actually left in place, but I decided to include it out of interest. Having treated the line with beeswax, I fastened one end to an eyebolt in the larboard (port) side of the mastcap, threaded it (to starboard) down and through the sheave hole in the foot of the topgallant mast, and then up and through a single 5mm block fastened to another similar eyebolt, on the starboard side mastcap. From there it runs down the mast and is seized to the upper 3mm double block of a purchase, a similar lower double block being fastened to the deck at the foot of the mast, just outboard of the anchor cable. The line was rove between both blocks, coming off of the top one and belaying to one of the mast cleats on the starboard side. (My favoured method for fixing the lower blocks to the deck is to twist some thin wire around the score in the block, forming a ’tail’ which can then be carefully be painted black, and glued into a hole drilled in the deck. When positioning, the block should ideally be orientated in the direction of pull towards the pin.

The throat halliard was seized to the upper of two double 5mm blocks, secured to an eyebolt in the aft side of the mast just above the shrouds. It then runs down and through a sheave of the lower block and is then rove until all the sheaves are taken up, finally coming off of the top block. It then runs down inside the starboard shrouds and again is seized to the upper 3mm double block of a purchase, the lower block being fastened to the deck close to the 4th pin in the rail, to which the fall was belayed.
The peak halliard runs through four 5mm single blocks, two being fitted to eyebolts on the after side of the mast, with two being attached to the gaff. The end of the halliard was first seized to the upper block of the two on the mast, situated just below the doubling. From there it runs to the block at the peak of the gaff, threads up through it from below and then runs back again to the upper block on the mast, reeves down through that and then runs to the second block on the span at mid-point on the gaff. It threads down through that and then reeves through the lower mast block, from where it runs to the deck on the larboard side, and is seized to the upper 3mm double block of the purchase. Again the lower 3mm block is fastened to the deck near the rail as previously described, and the fall rove between them, coming off the top block. It is belayed to the fourth pin in the rail.
The final piece of running rigging fitted at this stage was the boom topping lift. This simply runs from an eyebolt fitted at the end of the boom and reeves through a 5mm single block, which is bent to a strop fitted around the after end of the lower mastcap. From the block it runs down to the deck on the starboard side, and again is bent to the upper 3mm block of the purchase. The lower block is positioned at the after end of the rail, and the fall is belayed to the last pin.
There are, of course, other lines to be rigged inside the shrouds and to the foot of the mast, but these will have to be done when the shrouds are in place. With that in mind the fitting of the ratlines will, thankfully, be left until as late as possible!
The shrouds went next over the masthead in pairs – or rather in this case, around the mast below the doubling – following the burton pendants. There are four per side. I used 1mm black, waxed, thread and they followed in the normal way: the first and second to starboard, first and second to larboard, third and fourth to starboard, third and fourth to larboard.
The shrouds, and the other items of rigging, were set up with the model raised to a more comfortable working position – on top of a small work box, with a cloth on top to secure it from slipping! The approximate amount of thread required for each pair of shrouds, including an additional length for turning in the deadeyes, was then centred round the mast. To pass the seizing, I temporarily fixed the shroud ends by employing a drill stand – which was of a similar height – positioned a short distance from the model. Once fastened to this, the now near-horizontal shrouds were given some slight tension (but obviously not enough to pull the model off the box!) by carefully moving the stand.
This then left my hands free to attend to the seizing, using black 0.25mm thread. The seizing was merely a series of overhand knots close against each other, and passed alternately above and below each pair of shrouds, until a suitable length was produced. The ends were then cut short and fastened with a small drop of glue. The finished eye was then bedded down on the mast stop, the shrouds being lined up with the lower deadeyes on the channels.
When turning in the upper deadeyes the same procedure was followed with all four shrouds, beginning with the first pair to starboard. First, the distance between the upper and lower deadeyes for each shroud had to be gauged, and to do this I used a short piece of stiff wire of the appropriate length, the ends of which were bent at right angles. These ends were then passed through the centre (ie the upper and lower) hole of each deadeye, the wire being thick enough to be ’push fitted’.
With the upper and lower deadeyes thus connected by the wire ’spacer’, the groove in the upper deadeye was then smeared with glue and the end of the shroud passed around it from the fore side. It was then crossed over its standing part at the top of the deadeye, and held with self-closing tweezers. Following some slight adjustment, in which the shroud was worked taught (but not too tight), the glue was then left to dry. The end was then backed up the shroud, cut off at an appropriate length, and glued to the standing part – on the fore side of each shroud to starboard, and the after side to larboard. The wire spacer was then removed from the deadeyes, in order to to reeve the lanyards.

The lanyards for each pair of shrouds were rove as each was finished, using O.25mm tan, waxed thread. I gauged the length of each lanyard as being six times the distance between the holes in both deadeyes, with an additional length for fastening off on the shroud. Beginning with the first pair of shrouds to starboard, the lanyards were all rigged in the traditional way – starting from the right hand hole in the upper deadeye, the lanyard being passed from inboard. (Naturally I couldn’t use the traditional wall knot, so a simple overhand knot had to suffice!) With all the holes in both deadeyes taken up, the lanyard comes inboard off of the left hand hole of the lower deadeye, and then runs to the shroud above the upper deadeye, where it is fastened. Before I did this however I rigged all the shroud lanyards, leaving them with long ends, in order to be able to make final adjustments. As each was done, the lanyard could be finished off, the end being passed through the gap between the shroud and the upper deadeye (I used a needle for this) and then hitched to the former. The end was then cut off close and given a touch of glue.
The final job was to pass three small seizings around the lower shrouds, one just above the deadeye, another at the end of the tail length, and one in between, for which I used 0.25mm tan thread. With that done the shrouds were finished.
Next time: the standing backstays. The next will also be the first instalment in ’real’ time, rather than in retrospect, since work on the model is now up to date. I also have a suspicion that the captain may also be coming aboard...
- garyshipwright, Padeen, fnkershner and 6 others
-
 9
9
-
-
Anthony,
Just been catching up with your Victory cross section build – wow! She looks tremendous, such clean, precise work.
I'll certainly be watching this build as it progresses!
-
Pete,
Thank you for taking the time to tell us about the background behind your Victory website, and the reasons for the precautions you have taken. I think we can all understand that now. I apologise for my earlier contribution, but have to say that I was a little confused by the original post.
Good luck with your website, it looks interesting – the bit that I've seen that is!
-
Allan,
I agree with Ulises, about the daft questions.
As for the rig, if I read the question right, try square.
-
Tony,
Very nice work on your shot racks, swivel guns and jeer bitts!
Yes, I think the bitts were used to help with hoisting the yards, gaff etc. I have an idea my handles might be a little short, but also wondered if there was a removeable extension piece, both to obtain more purchase and to use more men. I don't really know though. I also have my handles set as you do, but have since thought they might be better set at a wider angle to each other, to maintain momentum?
I liked your changes to the swivel guns, especially the supports. They look really good. Have you any thoughts as to the number of the after swivels? I reduced mine to two, since I thought it looked a bit crowded with three.
-
Oh, and is this were we can find the origins of BOFORS and the inspiration for Alfred Nobel?.

Erik,
I guess you would know!
As has already been mentioned, ships often carried guns from different countries if they were thought suitable, and in the case of a pirate ship they would most likely have come from their captures – which would have been sensible.
So far as Swedish guns were considered, I believe they were thought superior to many in Europe. British guns were also well founded, but Swedish guns even have been found in the wrecks of RN ships.
-
Hi Jeff,
You're certainly going great guns with the build, and making a very good job of it.
I spotted the same areas for improvement too, such as the hatches down into the hold; the extension of the after bitts down into the bottom of the ship; balsa bow pieces; and the mast step. Regarding the last, you probably also spotted that it rested on the upward sloping keel piece, which to my mind didn't make for a satisfactory solution. However, your mast step is rather more 'picturesque' than mine – although it won't matter that much as it won't be visible!
Nice job on the planking too!
-
Spencer,
Regarding the mast 'rake' as it's called, most ships masts had this, not only Cutty Sark.
The foremast was normally the most upright, the main had rather more rake, and the mizzen the most of all. The amount of rake varied between ships and periods. In the book of his model of the Cutty Sark, Neapean Longridge gives the amount of rake for the CS as: 86° for the foremast, 85° for the main, and 84° for the mizzen. Incidentally, I believe the reason for rake is as Nenad suggests, rather than for any speed advantage as is often thought, which is probably minimal.
I'm not sure that fractional difference would show on a model, but the masts should have some approximation. It looks as though it's a little late to reverse your alterations, but you just might be able to alter the rake by means of slightly enlarging the after side of the holes where the masts pass through the deck, and then filling in the gaps.
As a general tip though, make absolutely sure that the kit construction isn't made that way for a reason, before you alter anything. As Bob suggests, it's a good idea to get a few books on the subject. The book I have 'The Cutty Sark' by Nepean Longridge, is also a good one to have. It's a little dated now, 1975, but he produced a first class model. You might be able to get it reasonably cheaply in a second hand shop or on-line.
-
Hi Popeye,
Good job on your Half Moon, and I agree that the side rails are better brown or natural. Black just wouldn't seem right.
However, I tend to agree with Andy, those cap and pin rails do seem a little wide. I guess you have to think, 'If I thinned them down a bit, would it affect anything else?', but you also have to consider how wide they're going to look with the coils attached. The crew won't quite be brushing against the mast, but...
-
Jeff,
I can understand your problems with the various fittings, as I have been pondering many of them myself – before I actually get to the construction stage.
I'm actually not too happy with the gunport pattern itself, as the ports are not that equally spaced, as on the ship. Therefore I'm actually contemplating not using it at all, due to the dust created as per the instructions. In any case I think the method of making the gun ports they contemplate will be impossible to implement, with all the details you've so carefully put into it. My idea is to build up the side planking from the lower gun deck up, piece by piece and deck by deck and including the gunports, after fitting out the interior. This will mean that most of the cutting will be done off the model. Good idea though to use it for spacing the guns, before planking.
You're right, the ringbolts for the gun tackles are not really far back enough. According to the drawings and photographs of the ship, they are right back against the centre line, butting up to hatches, shot garlands, etc. Any chance you can alter them at this stage without difficulty? If not perhaps you shouldn't worry too much. When she's finished they probably won't notice! You're adding some nice detail.
-
Daniel,
I also like your 'kebab' stick idea, to get the pricker and then the drill into tight spaces. I'll have to try that.
I'm also enjoying the 'drama' of your Victory build.
Incidentally, in his 'HMS Victory, Owner's Workshop Manual', Goodwin says that all 24 and 32 pdr guns were rigged with breeching and preventer ropes, due to their heavy recoil. Also that with a standard charge and rope restraints this could be up to 11'.
-
Popeye,
If you don't mind, I'll be staying in my hobby room…….
Otherwise I'll be sitting between those guys…


Sjors,
Don't think that'll help much, as we already have your number – and if we have...
In any case, you'll obviously be occupying that vacant space at the back.
Anja,
I'm not surprised that you haven't been posting in your build log lately, what with one thing and another...
. Great though what you have done. -
Mike,
Only to glad to help, and if you can make use of any of it you're welcome.
As I mentioned, I will probably furl my square sails off the model, much like you did. Come to think of it, I will no doubt be avidly reading your log again when the time comes for tips!
Jay,
Thank you. I had a very pleasant day, nice and quiet, just how I like it – apart from those people wishing me a Happy Birthday all the time! (Only kidding
)- fnkershner, Jay 1, Kurt Johnson and 2 others
-
5
-
Doug,
Good job on your masts and shrouds, where you certainly overcame a few problems! Your deadeyes look good too. I think Supply is going to be a first class model.
-
Hi Popeye,
Thanks for your Birthday wishes.
Actually you have just caught it, as it's not 'belated' quite yet... at least I don't think so... at least not over here... or is it?...have the clocks gone back... no, I don't think so, I'm pretty sure that's pretty near the end of the month... is it me? (well I am 64 now, you know).
Mike,
Thanks for your Birthday wishes too.
Thanks too for you kind words about my Sherbourne's furled mainsail. Yes, cutting back the sail back to around a third, seemed about right, although the shape was not quite triangular. The head and luff were of course full length, since these would show. The leech is similar but it tapers in towards the foreshortened foot, which as I said is about a third of its full length. I found that those proportions were about right. However, sorry, I don't have a picture I'm afraid.
I also found that just damping the sail a little before furling, also helped. I think it somehow compresses the material, and dries into the desired shape. You probably read that I bent the sail to the gaff before fitting the latter, so I actually furled it on the model, using the brails a little at a time and lifting with one hand. Going carefully, it worked quite well and I think looks reasonably realistic. I'll probably do the same for the staysail and jib, although the square sails will very likely be furled off of the model as you did it.
Btw, I've been looking at your Badger log, and your sails look very good. You seem to have a good method there.
Wayne, Augie,
Thanks for your Birthday wishes, much appreciated and, in the words of Clint Eastward, have helped to 'make my day'!
-
-
Jeff,
Looking very good, and I agree, your stanchions do look 'antiquey'. It'll be interesting to see how this develops, so keep up the good work.
-
Jeff,
Thanks for your Birthday wishes, I'm sure I will.
Now, I'm just going to have a look at your bow section buildlog...
HMC Sherbourne 1763 by tkay11 - FINISHED – Caldercraft – Scale 1:64 - A Novice’s Build
in - Kit build logs for subjects built from 1751 - 1800
Posted
Eamonn,
Perhaps that'll be your Sherbourne soon?