chris watton
-
Posts
2,339 -
Joined
-
Last visited
Content Type
Profiles
Forums
Gallery
Events
Everything posted by chris watton
-

Royal navy conversion of captured ships
chris watton replied to Aldaris's topic in Nautical/Naval History
As Kenchington says, it depends. Some were given just the basics, capstan and positions changed, top hamper, boat stowage and armament (?) Some were changed almost beyond recognition with stern and side galleries changed to have a more British navy aesthetic, even the figurehead, deck hatch changes, upper bulwarks usually berthed up (if we’re talking late 18th/early 19th Century) and upper deck armament changed to carronades. There are many plans showing the vessel ‘as built’ in the French yards and as rebuilt by British yards. -
Sorry, have been so busy, I have only just seen this. Duchess should be fine after Adder. Again, regarding Speedy, you do not have to add the sheets, clews, tacks, bowlines and buntlines. You can leave them off by omitting the blocks for them. You can make the rig the same as Adder if you so wish and it really will not detract so much from the overall finished of the completed model. And great job, by the way! ETA - Oh, I did reply! I am going mad....
- 146 replies
-
- 5
-

-

-
- Adder
- Vanguard Models
- (and 1 more)
-
Would the pump handles even be fitted when not in use? I would imagine not.
-
Yes, they are the Manger. described as such in the parts list
-
Problem is that I would need tens of thousands, like blocks and deadeyes.
-
I did in fact order 10's of 1000's of the smallest commercial belaying pins I could buy, thinking I would use them for my Surprise kit. However, when they arrived, I realised they still looked too thick when in place with the rest of the 'in-scale' surroundings, even though they are the smallest size. So, I had to revert back to PE versions. I know some do not like them, but I much prefer the more in-scale appearance, as over scale stuff just stick out way too much, always drawing your eye to that area. The lesser of two weavils! Am sure I shall use them for something one day, but certainly not for a 64th scale Surprise...
-
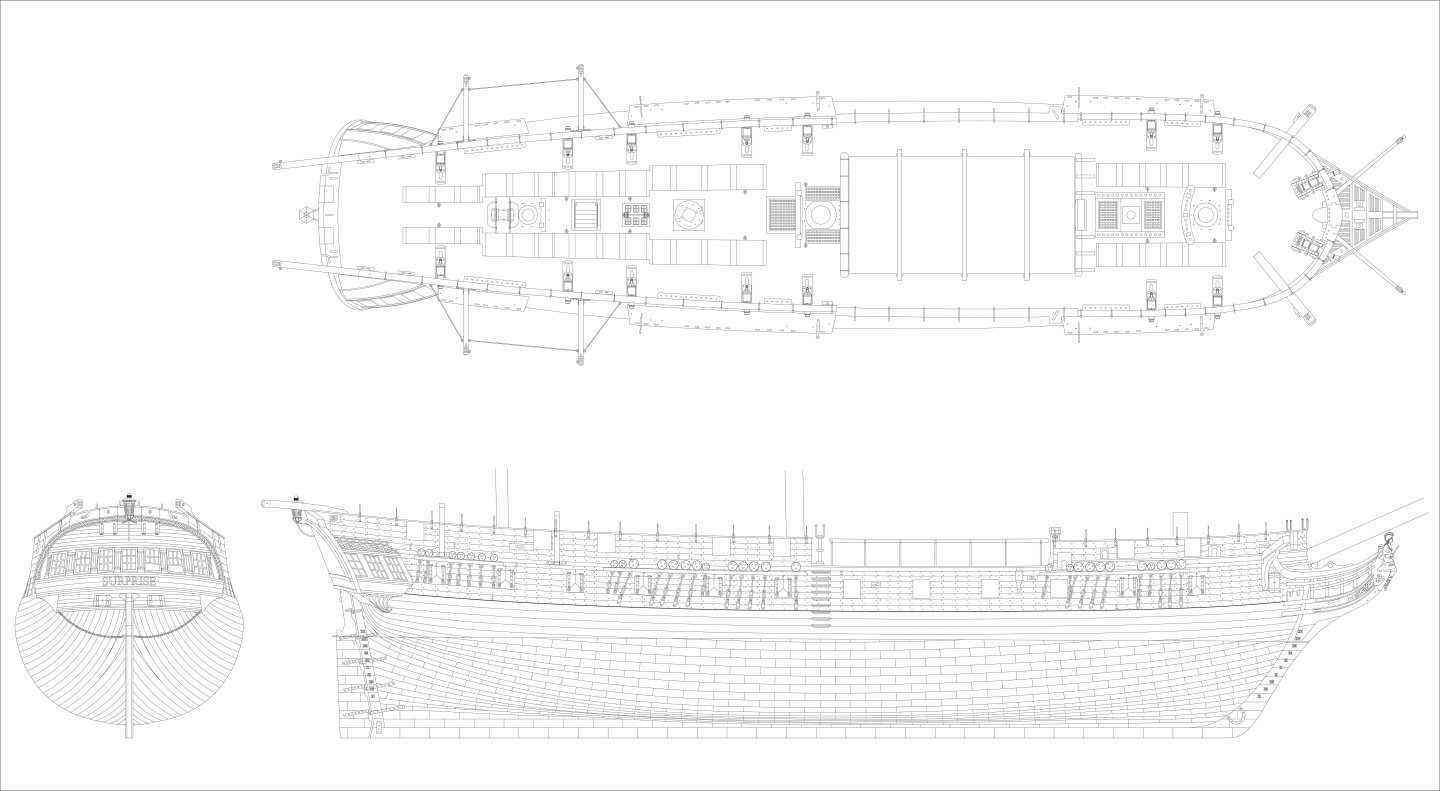
Thank you! I too love showing progress for new developments, I think I get just as excited as some of you! I have said many times, I really don't care what others are doing, I never even look or follow anyone else (except Chuck), so because I am not made that way, I am sometimes taken aback when I see certain things from others which appear to be so blatant. Designing these is a very personal thing and each developemnt takes a very long time, you know the exact times you thought of something new, or realised a solution to a particular problem and it works out well. I had assumed other 'designers' must share the same thoughts - so you know instinctively when and what some have used from your own designs for their own product. It is, this part of the development is hell for me! The worst is yet to come, masts and rigging, just hours upon days upon weeks of CAD work... But, it's gotta be done! OK, here is another drawing (still in progess, doing the cutaway view today), showing the gun deck and upper deck beams, and the main cutaway profile showing lower, main and upper decks.
-
I am currently working on the CAD drawings for Surprise, these take an absolute age to do - but profiles are almost complete (need to do all these before even starting on masts, yards and rig) But these three views should give a good impression of the hull and detail
-
Sorry to read this, Glenn, you have our thoughts and prayers.
-
The differences seem to be mainly on the upper deck arrangements, with hatches in different positions, and the upper bulwarks slightly different, too. For future developments, I shall not be so quick to plaster it all on here. Once a development is near completion, ony then shall I announce it. I would rather not do this as I too get excited telling you guys, but it seems I have little choice.
-
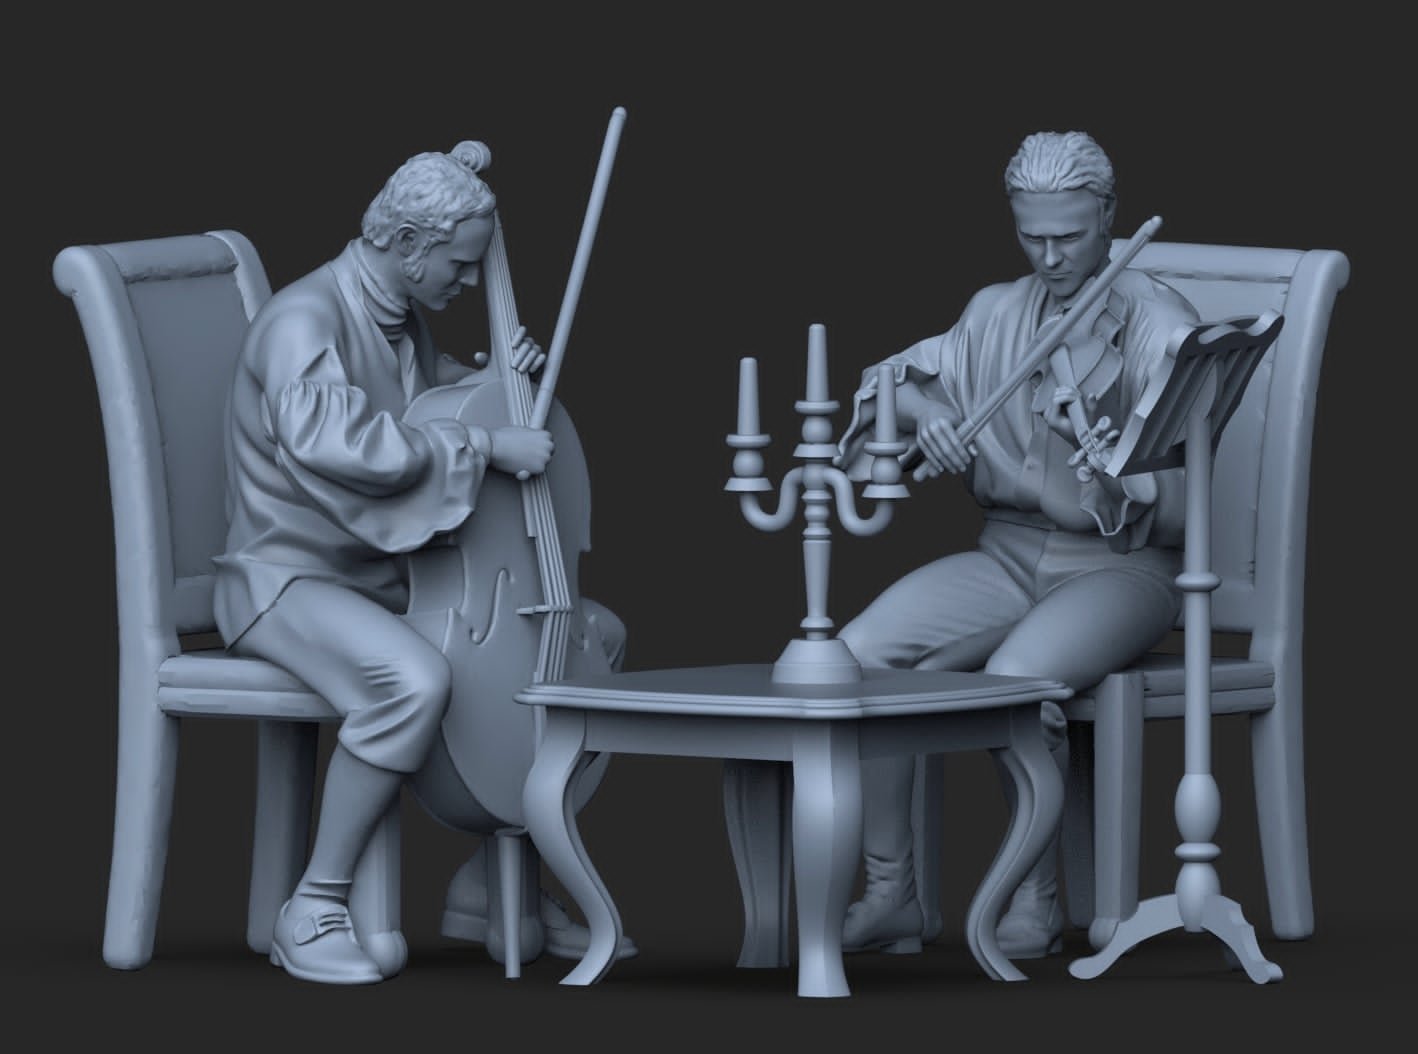
Igor's very first job for me was the Surprise lower drop, the rest of Surprise 3-d printed parts was done by another company (figureheads and the Aubrey/Maturin music scene) and a nice fellow from Canada (Lantern, boats, done previously, and stove), and a few things I did myself (like the new pump bodies, rudder fittings and carronade wheels) Igor's first big job for me will be the figurehead, decoration and a few other aspects for the new development of HMS Agamamnon. I suspect this will not be his last job for me.. Today I ordered and paid for the production photo etched brass sheets for Surprise, which are being done in Italy and will be ready well before kit release. In fact, all of the Surprise PE copper sheets will be with me this week (ordered those extra early in case there was any issues with supply).
-
OK, we now have Sherbourne's back in stock (keep running out...) Also, I have made up 5 Flirt Master Shipwright kits (boxwood), which are also in stock.
-
I will have other scales available at some point, but not for a while, as we are very snowed under right now.
-
And here is the full scene, Aubrey, Maturin, table with candles and music note stand - standard in all Surprise kits.
-
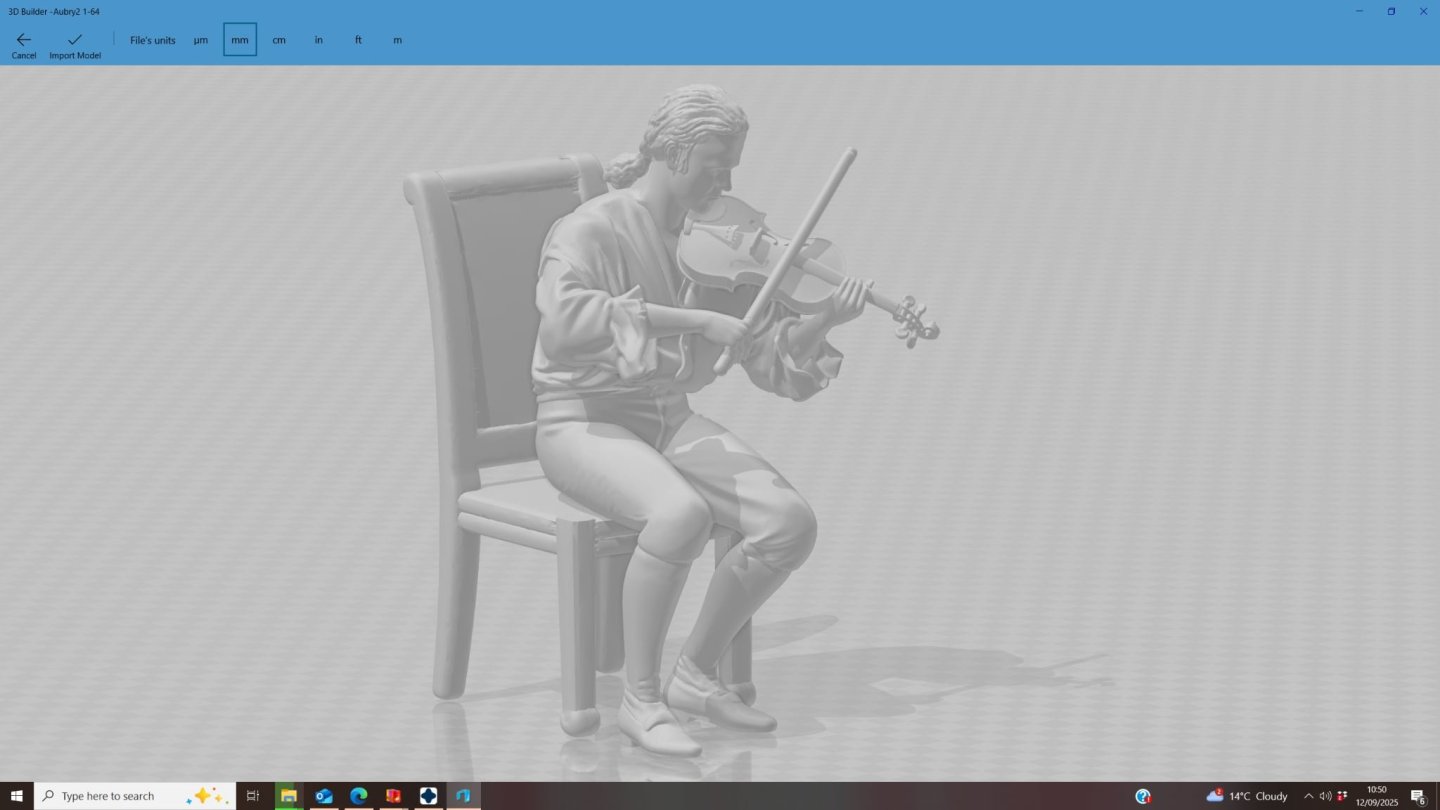
Here is the finished STL for Aubrey
-
Ab, was it my imagination, or did I see your good self in a You Tube doc relating to 17th Century sea warfare, which was quite excellent?
-
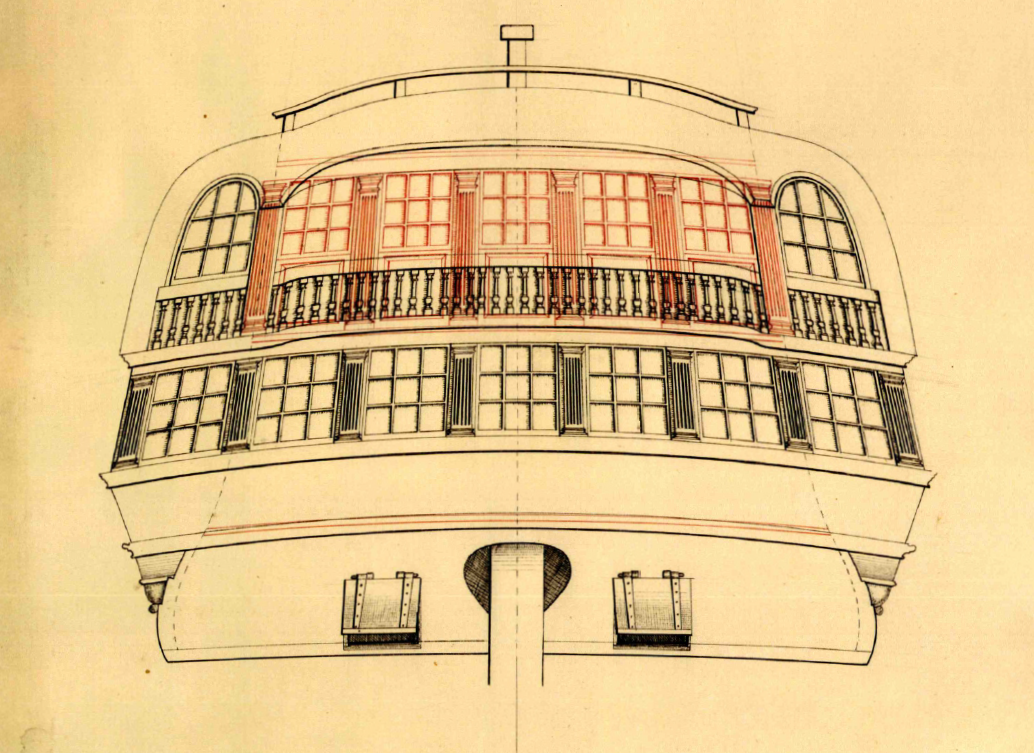
Regarding my research for Agamemnon, and the Ardent Class in general, I shall preempt any possible concerns regarding the stern and number of stern lights/windows. For me, it is settled that this is a true reflection of the Ardent Class, designed by Slade: Now, it is very easy to get confused with another HMS Ardent, a Crown Class 64 launched in 1782 , so two decades after Slade's Ardent, of which the plans do show the stern and with 8 windows on the lower tier. But it is NOT the Ardent of the early 1760’s, of which class the Agamemnon belonged. The only plans of all of the Ardent Class (I know this because I bought a copy of every single available plan just to make sure) that show the stern detail is that of the Indefatigable, as shown above, and it is this that I shall be working to. I do not care so much about what paintings show, they can be wrong and most times done many years later. So in lieu of anything more concrete than the actual plans of the original, which I am working to, the above stands. According to my research, Agamemnon, all of the Ardent Class, had 7 lower lights at the stern, and not 8, and the kit will be modelled/developed as such.
-
That is already done. We have sent small parcels via RM in the past couple of days to the US. The customer pays more in postage (done automatically on our 'Live' Royal Mail shipping system) to cover the new tax. We do not send kits with Royal Mail, however, they only ship via UPS, as most parcels for kits are too large for them to accept.
-
Development costs for Surprise are already very high, as I have ordered, and still ordering the materials for production, so no more figures at release. (costs of the large 0.8mm pear sheets for the engraved bulwarks and the 0.1mm PE copper plates in particular are very high). When I decided to develop Surprise, I envisioned from the start having an Aubrey and Maturin figure in the cabin, playing their instruments. I thought this would be a nice little touch, as you could see their silhouettes through the stern windows and upper deck beams. These figures are not cheap to commission (and lead times are very long), but I felt they would be worth the cost, as I always trust my initial decisions when working out how I want a new kit to be presented, and what's included as standard to enhance the experience for the modeller.
-
A mere trifle, I'll get right on it!
-
Ask again in a couple of months, as I am knee-deep in Surprise development right now, I would need to set up new files just for your scale.
-
Not as bad as an enquiry I just had, asking what stain I used for the pear colour on the pear wood I use for the kits to give that pear wood colour, as I don't mention the stain at all!
-
As I understand it, this figure is a work in progress, and sent to me just for comfirmation that the seating position is OK
-
And progress with the second Aubrey figure....