chris watton
-
Posts
2,334 -
Joined
-
Last visited
Content Type
Profiles
Forums
Gallery
Events
Everything posted by chris watton
-
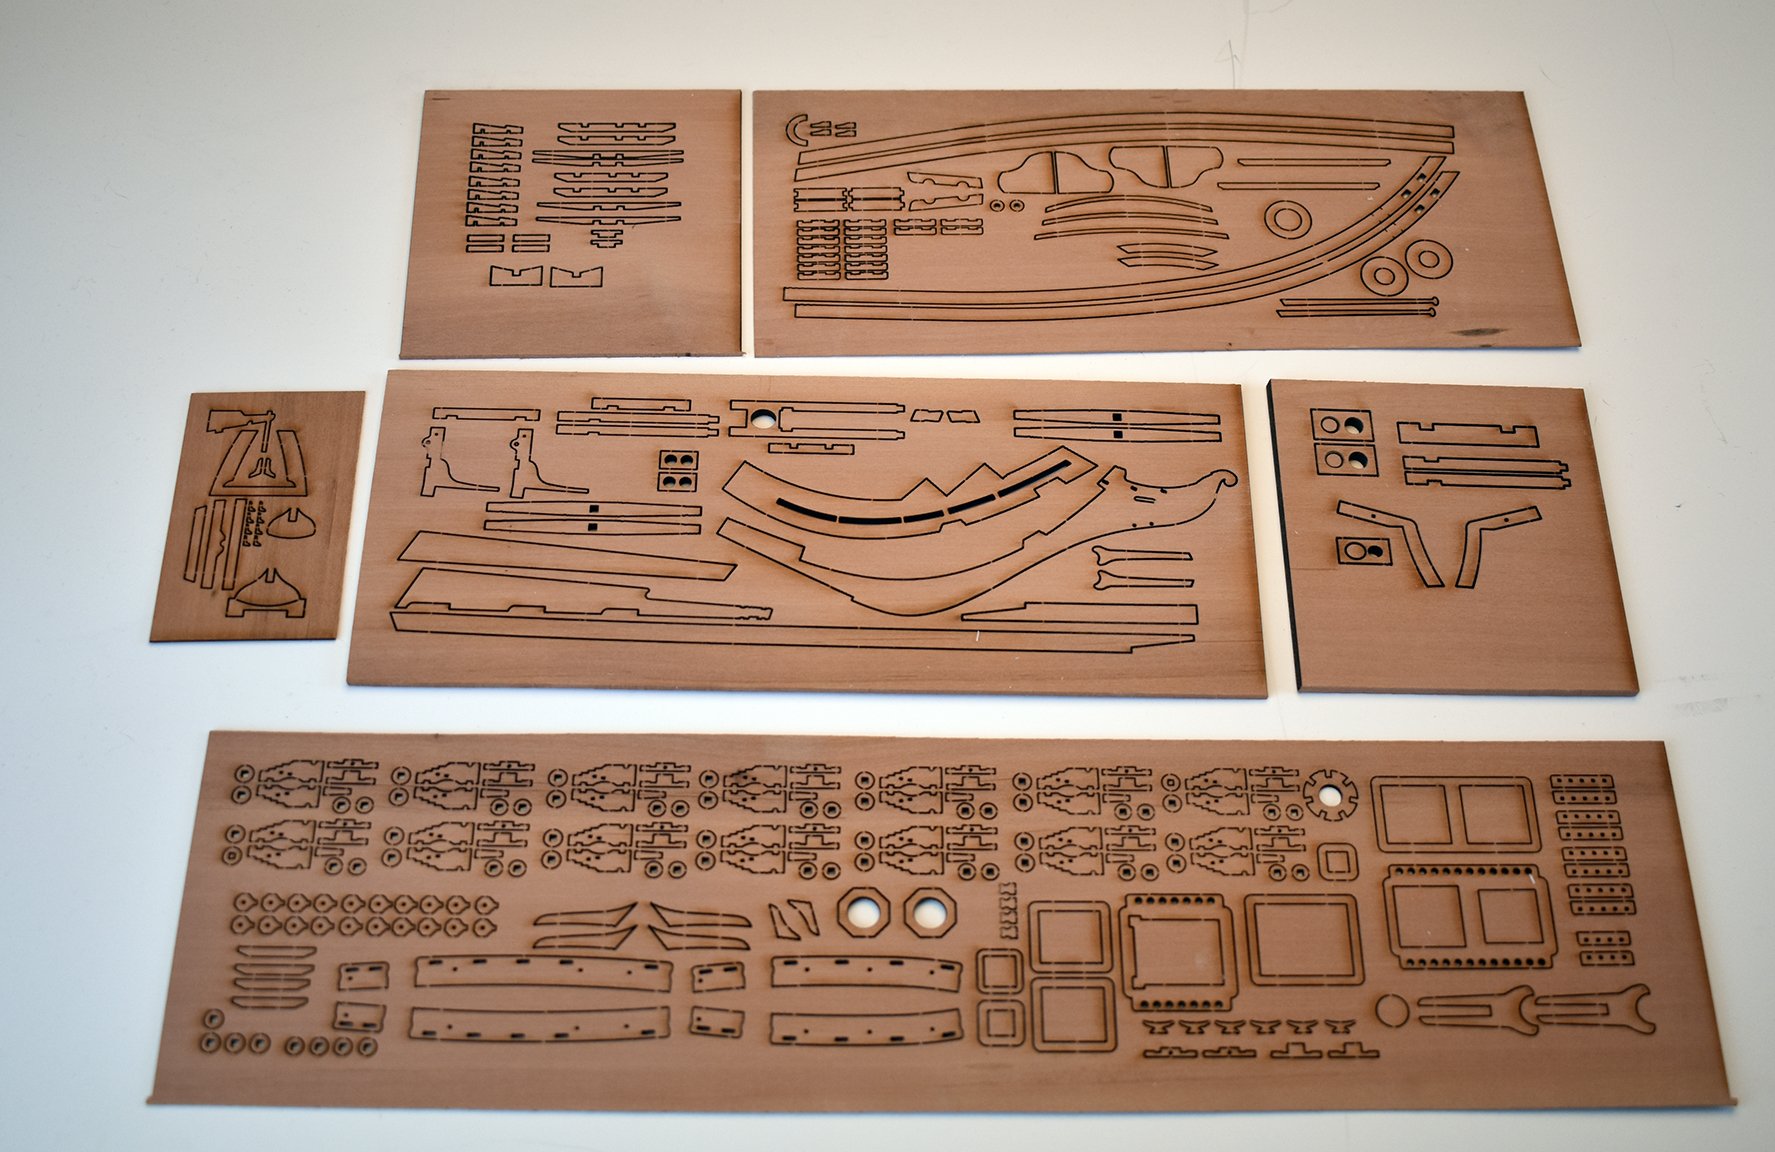
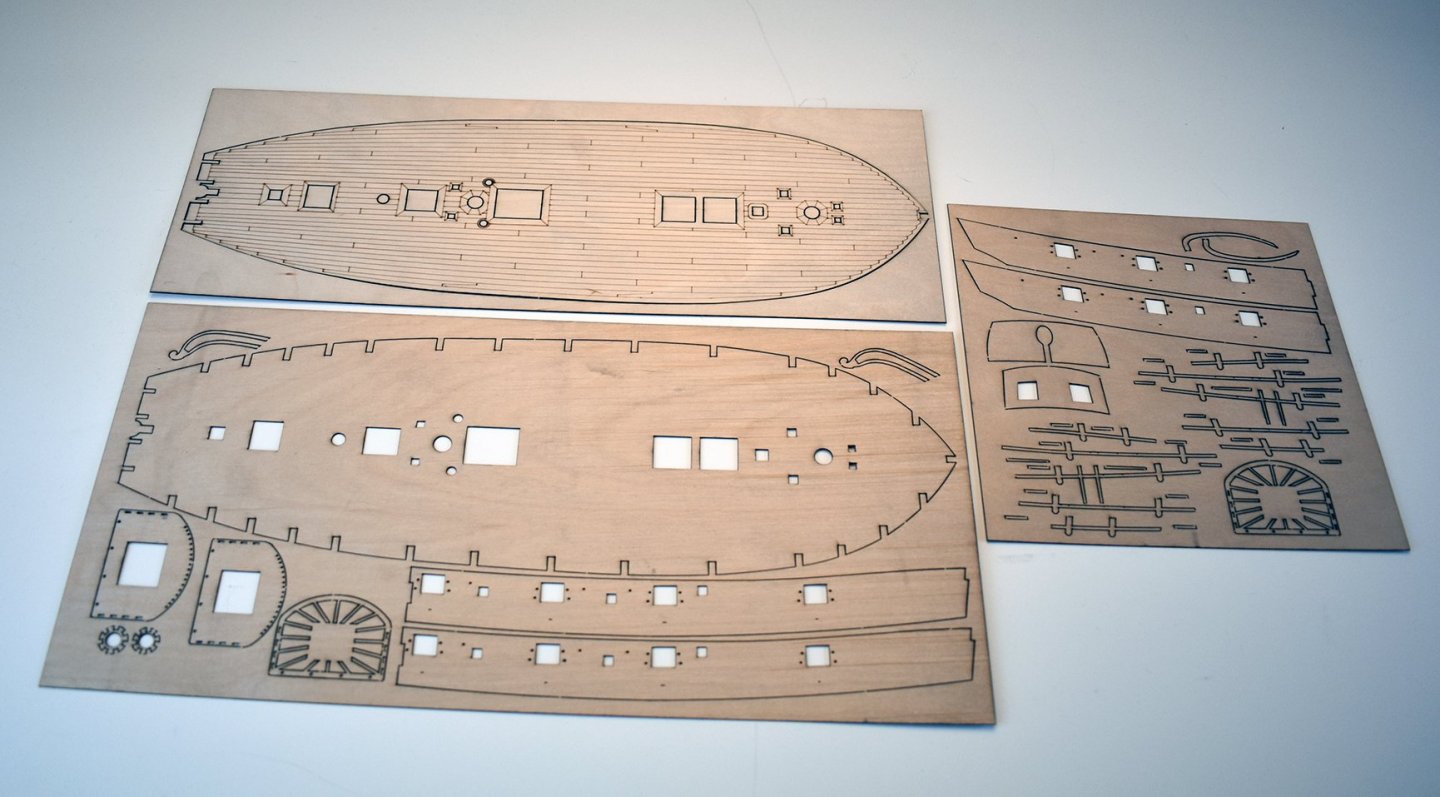
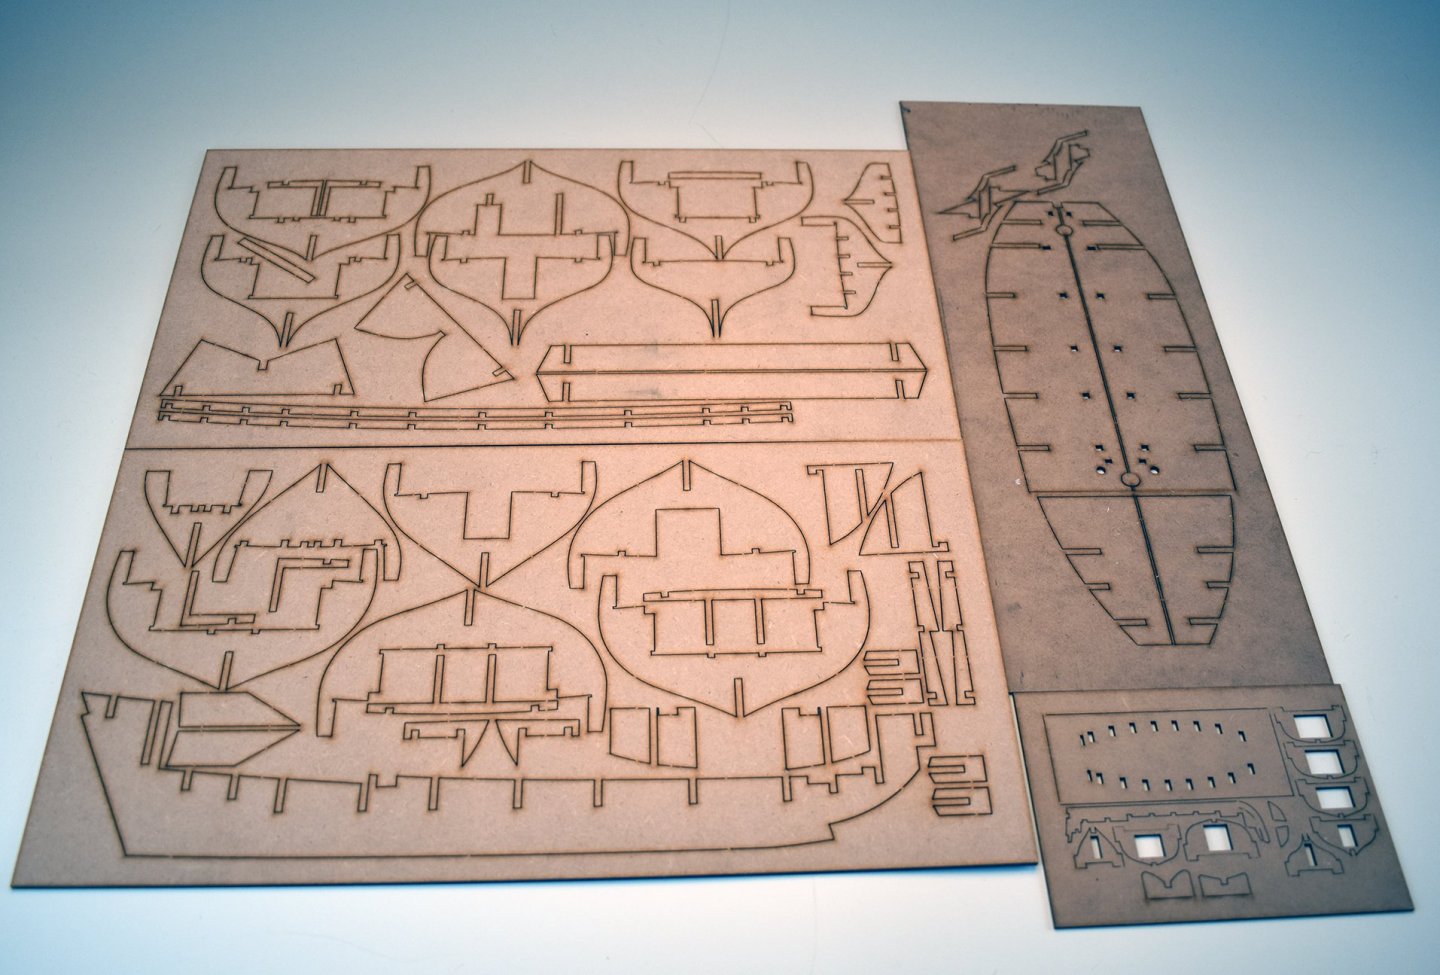
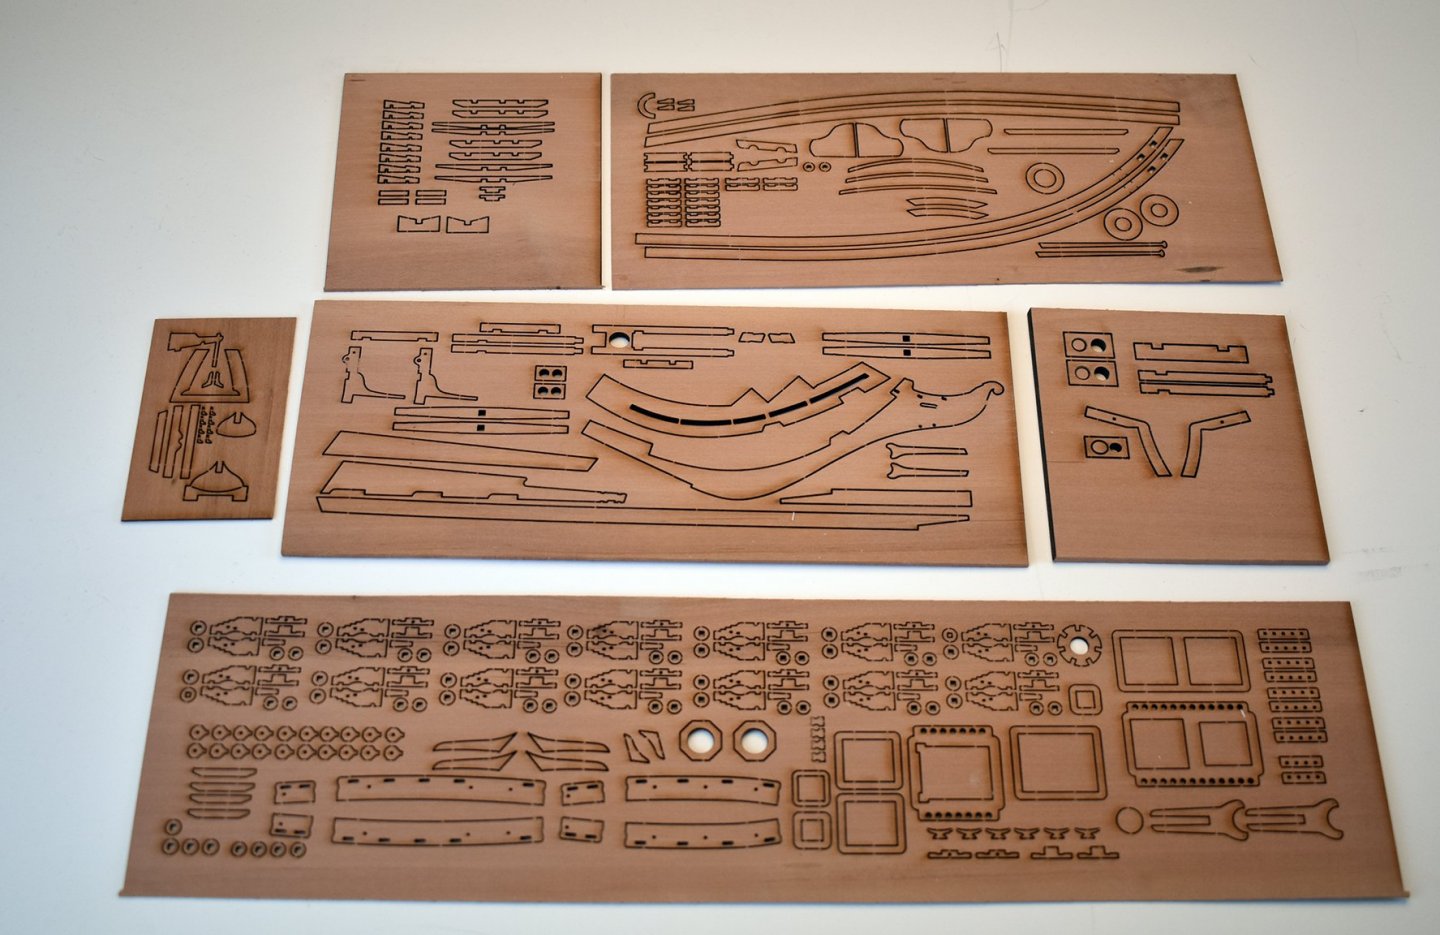
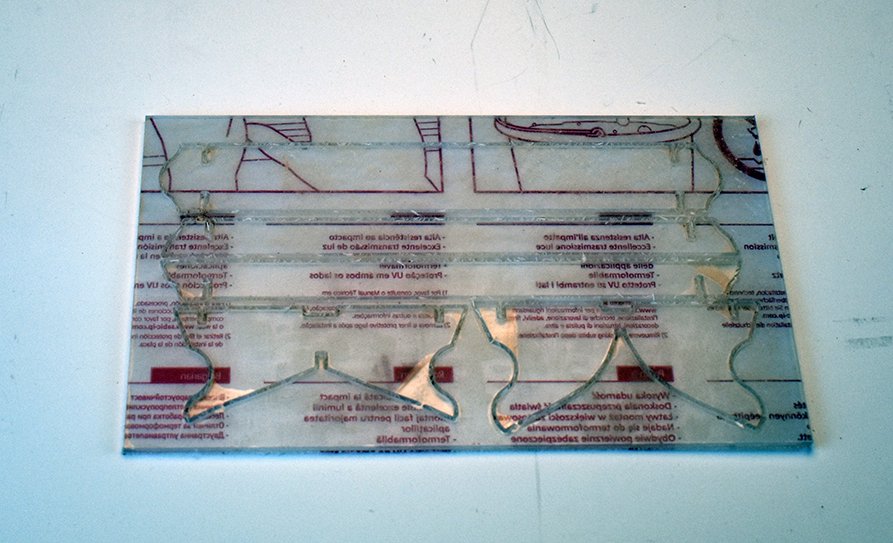
 OK, I just had the sheets for the pearwood laser cut version of the kit arrive, 14 separate laser cut sheets. I am just waiting for the photo etched parts to arrive, which is a little frustrating.. All parts, especially keel and bulkheads have a nice 'push fit'. I didn't sand the slight surface laser burn off because if I did, the parts could hardly been seen, the cutting is so fine. The clear stand was CNC cut and covered in protective film, to be peeled off when ready for assembly, and have included the complete cannon compliment, all resin castings and perfectly formed and smooth - and to scale. I will be getting 20 special Alert kits cut in the same manner with the new laser cut company and use pearwood with slightly altered designs and resin cast guns soon. ETA - materials: 0.8mm birch ply 1mm, 1.5mm, 2mm, 3mm and 4mm pearwood (or basswood) 2mm and 3mm MDF 3mm Clear acetate
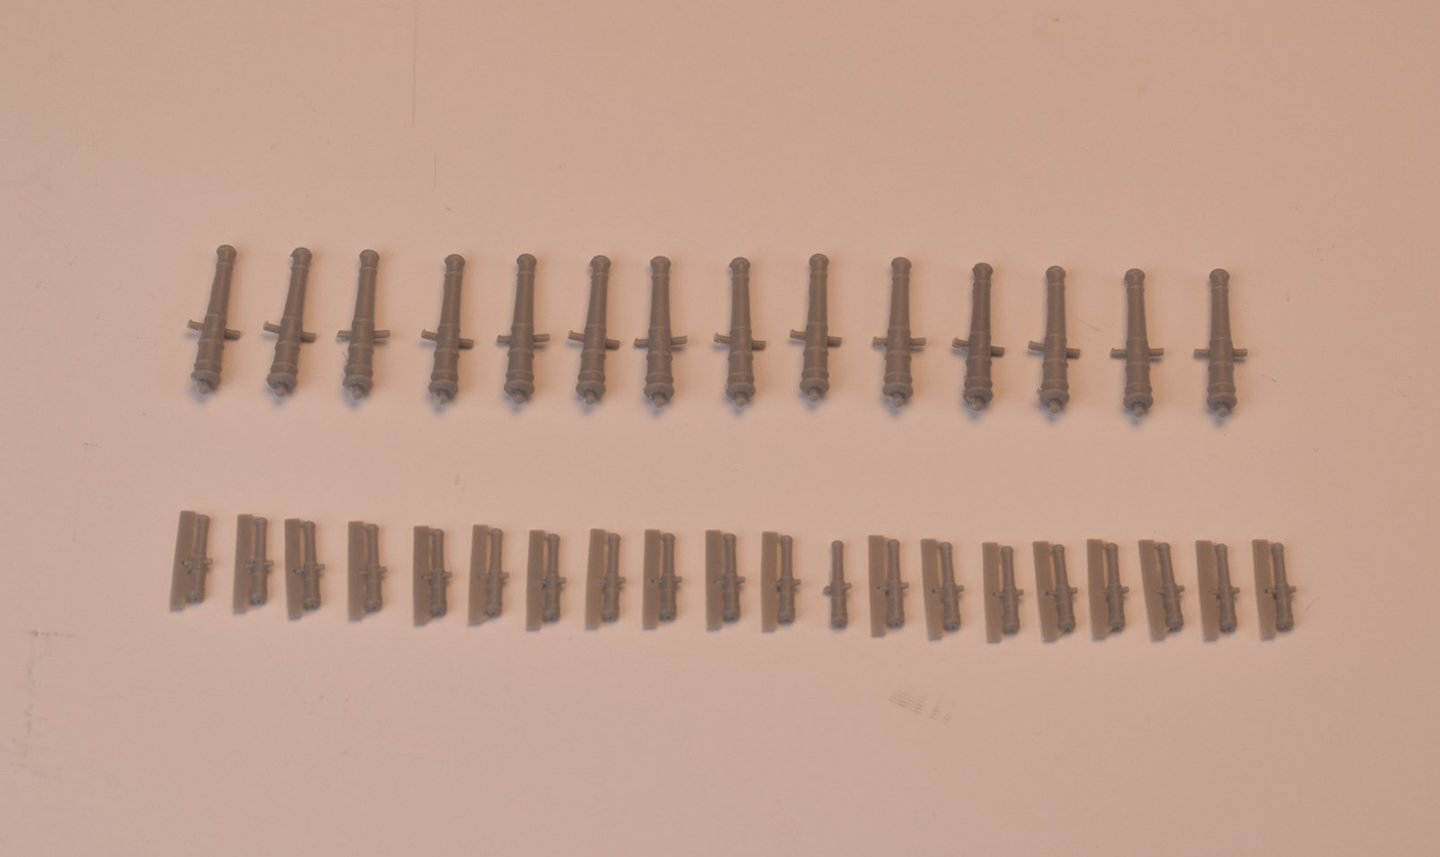
-
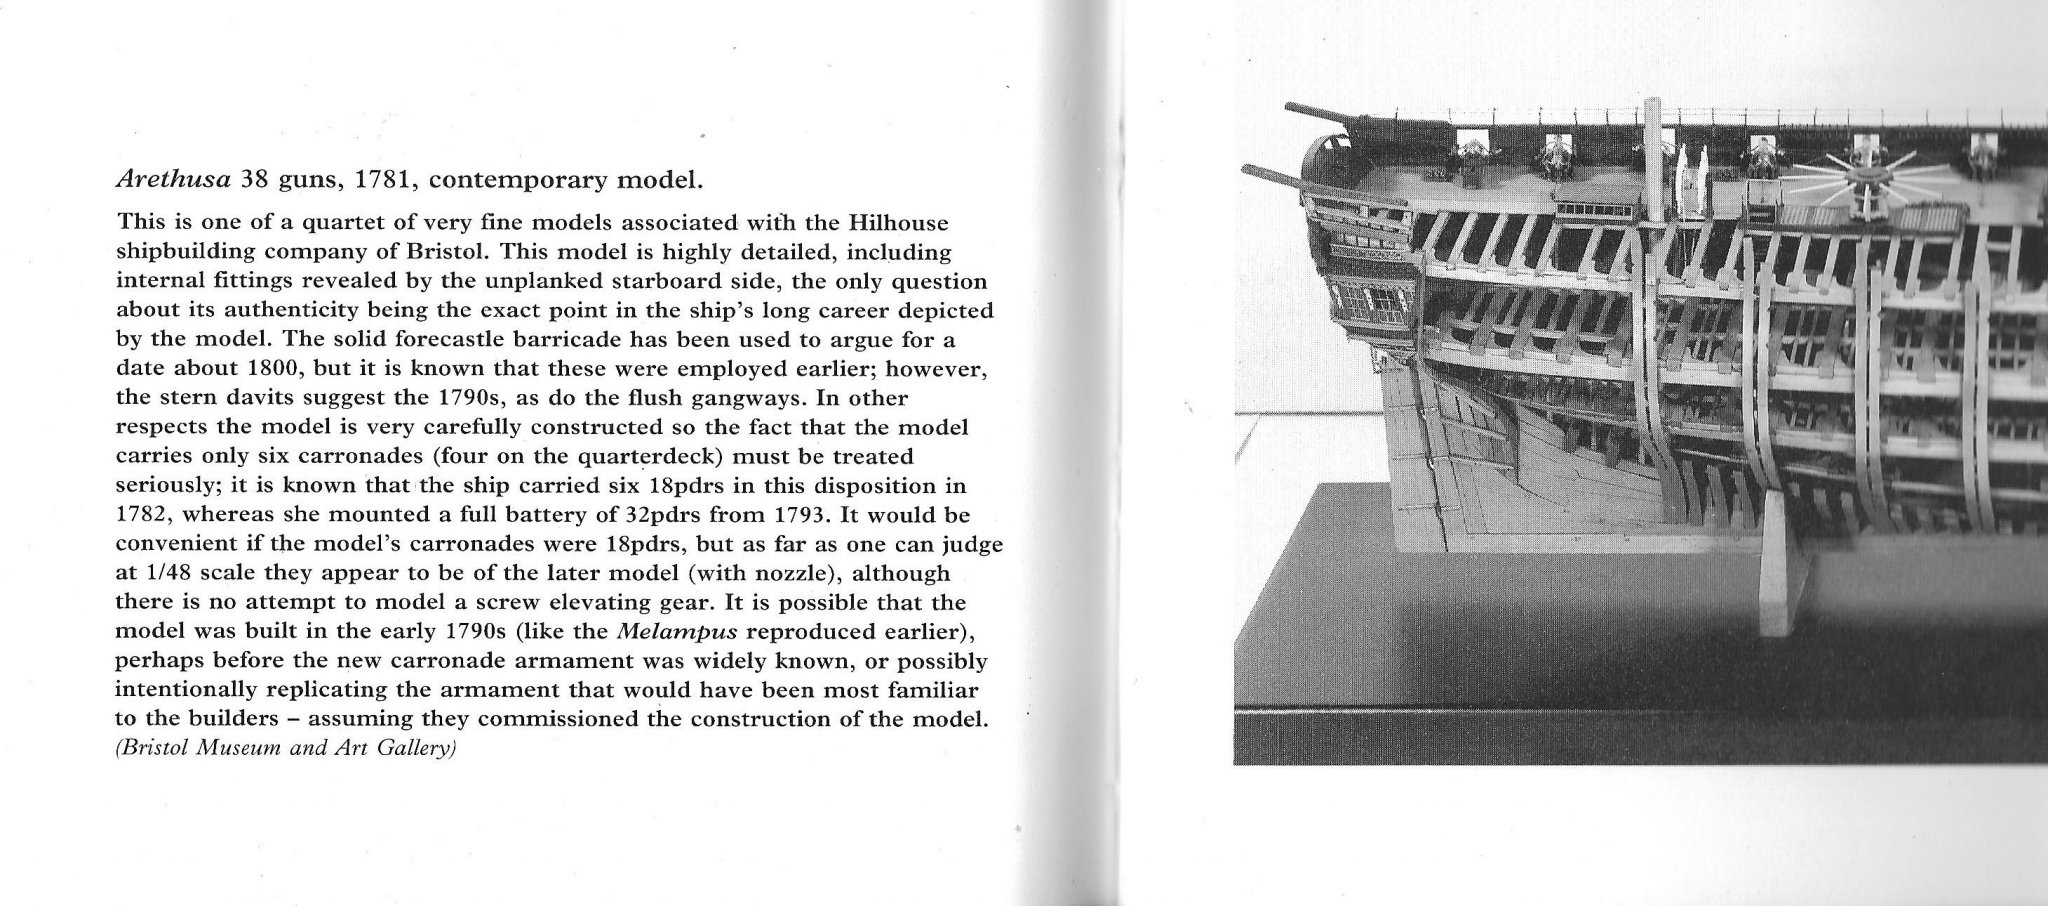
I posted the pics of Arethusa because I thought they may be of interest to you guys on here. I do plan to develop this, and, as with a lot of future developments, I try and get as much information on each subject wherever and whenever I can. For Arethusa, it was a chance email to the museum that has the model, asking if I could have access to it. I was given a date and time to visit. I figured it would be a shame to keep the pics to myself. I need to start small as the larger subjects cost a lot more to develop, although the smaller ones are not cheap to develop and get into production, not when ordering 100 sets of everything. More so for something like Speedy, which is a .'No holds barred' kit, with so many brass and copper PE sheets, resin cannon etc. If the smaller kits sell, I will be confident enough to move onto the bigger fish, and also invest in a proper laser machine which would give me a lot more freedom.
-
Hi ASAT, Nothing to tell regarding Arethusa right now, although I do desperately want to do it. Right now, I have started on the third kit, the last of the smaller range. As soon as the remaining Speedy kit parts arrive, I shall be busy checking through them. I have also been thinking seriously about obtaining my own laser machine, but this is a big investment, and have agreed with my wife to wait and see how things go for a few more months. Early days, but I may be working closely with Master-Korabel for a new range of cannon for the kits, as I am having no more white metal versions cast. In future, they will be either cast resin or cast metal care of MK.
-
Hi, Sorry for lack of updates, but have had to organise a lot over the past few weeks. I have now done all I can regarding Speedy, and am now waiting for all of the part to arrive. The plans and manual are now at the printers, and expecting these back in the next 7-10 days. The 'Master Shipwright' version of the laser cut parts will be with me by the end of the week, but the PE files and limewood laser cut files arrive together from Italy, and I have no date on this yet. Although I did tell them I plan to release the kit for mid November. Most of the fittings kits have been made up - the 34 barrels per kit which are cast resin, rigging thread, planking etc. I will add a link to the full manual. There will be 10 50x70cm plan sets too, which include all full size parts, various profiles and of course, masts and rigging https://www.dropbox.com/s/ymm73viw4su1c7j/Speedy construction manual 1.pdf?dl=0
-
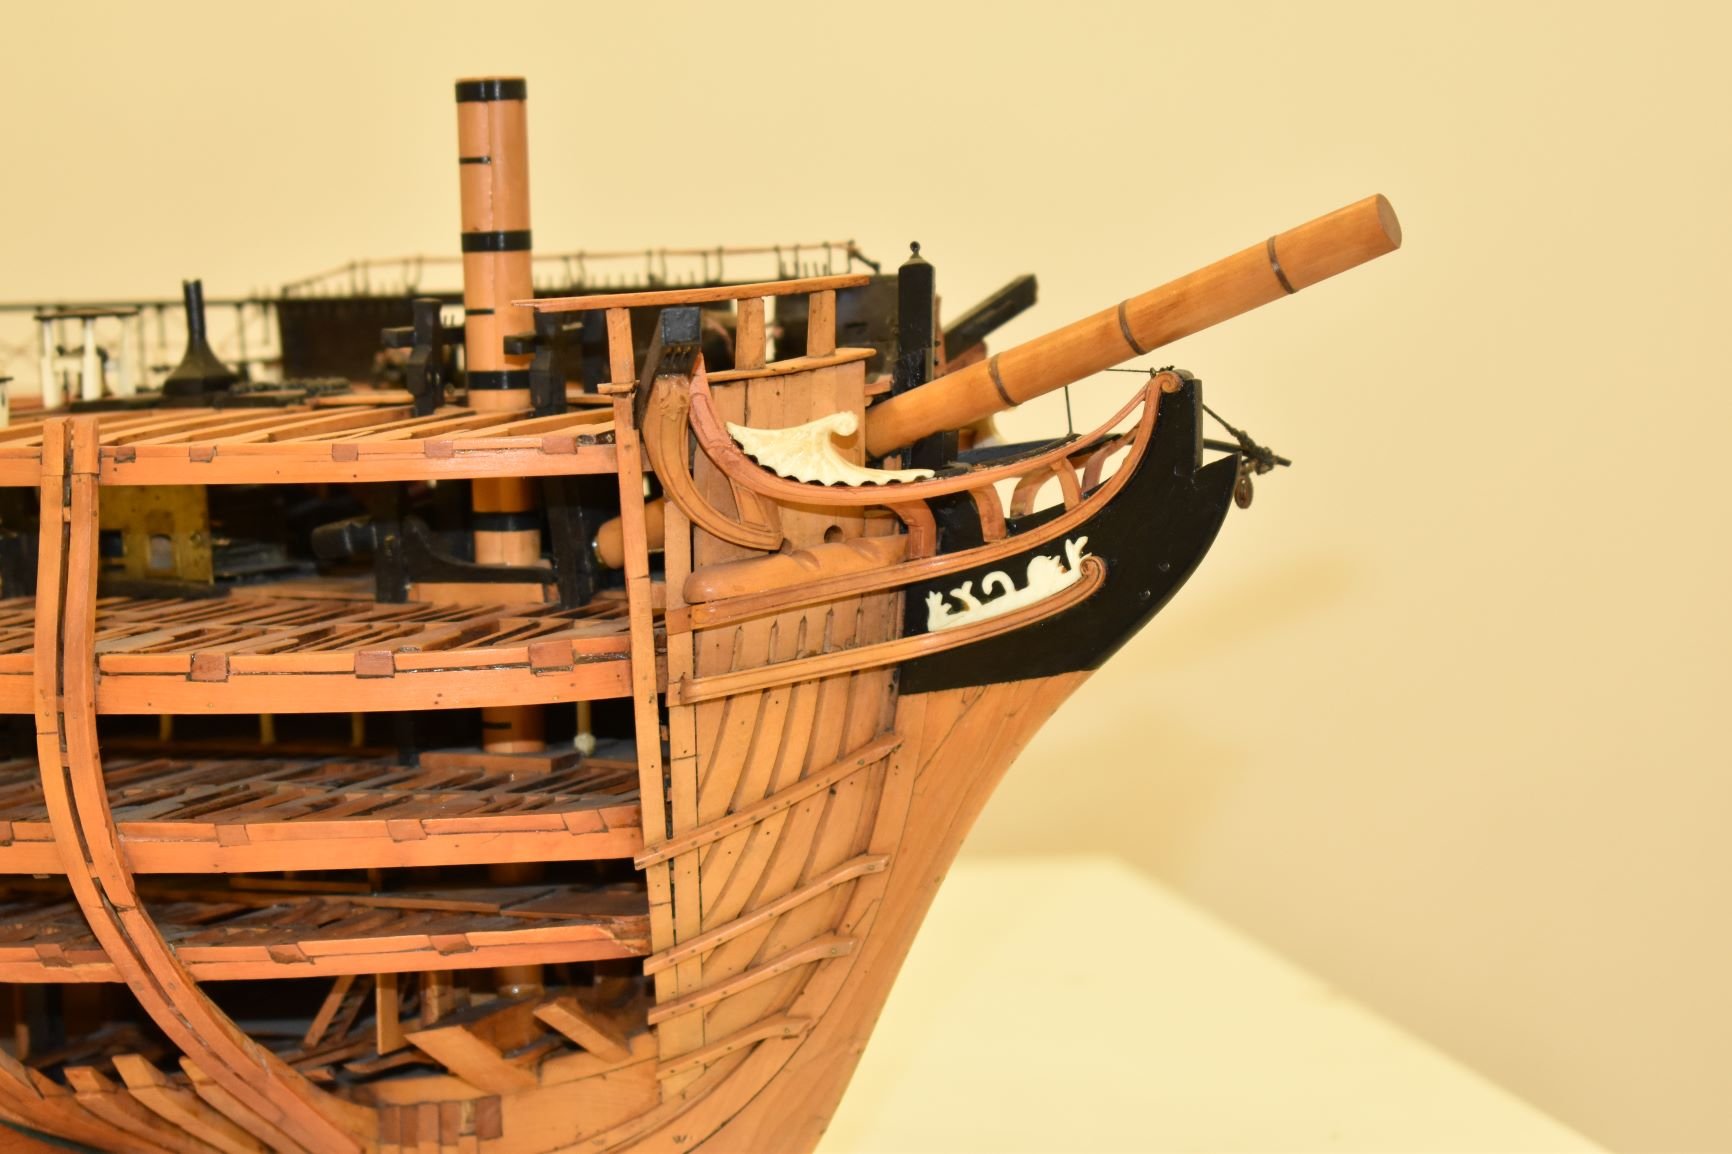
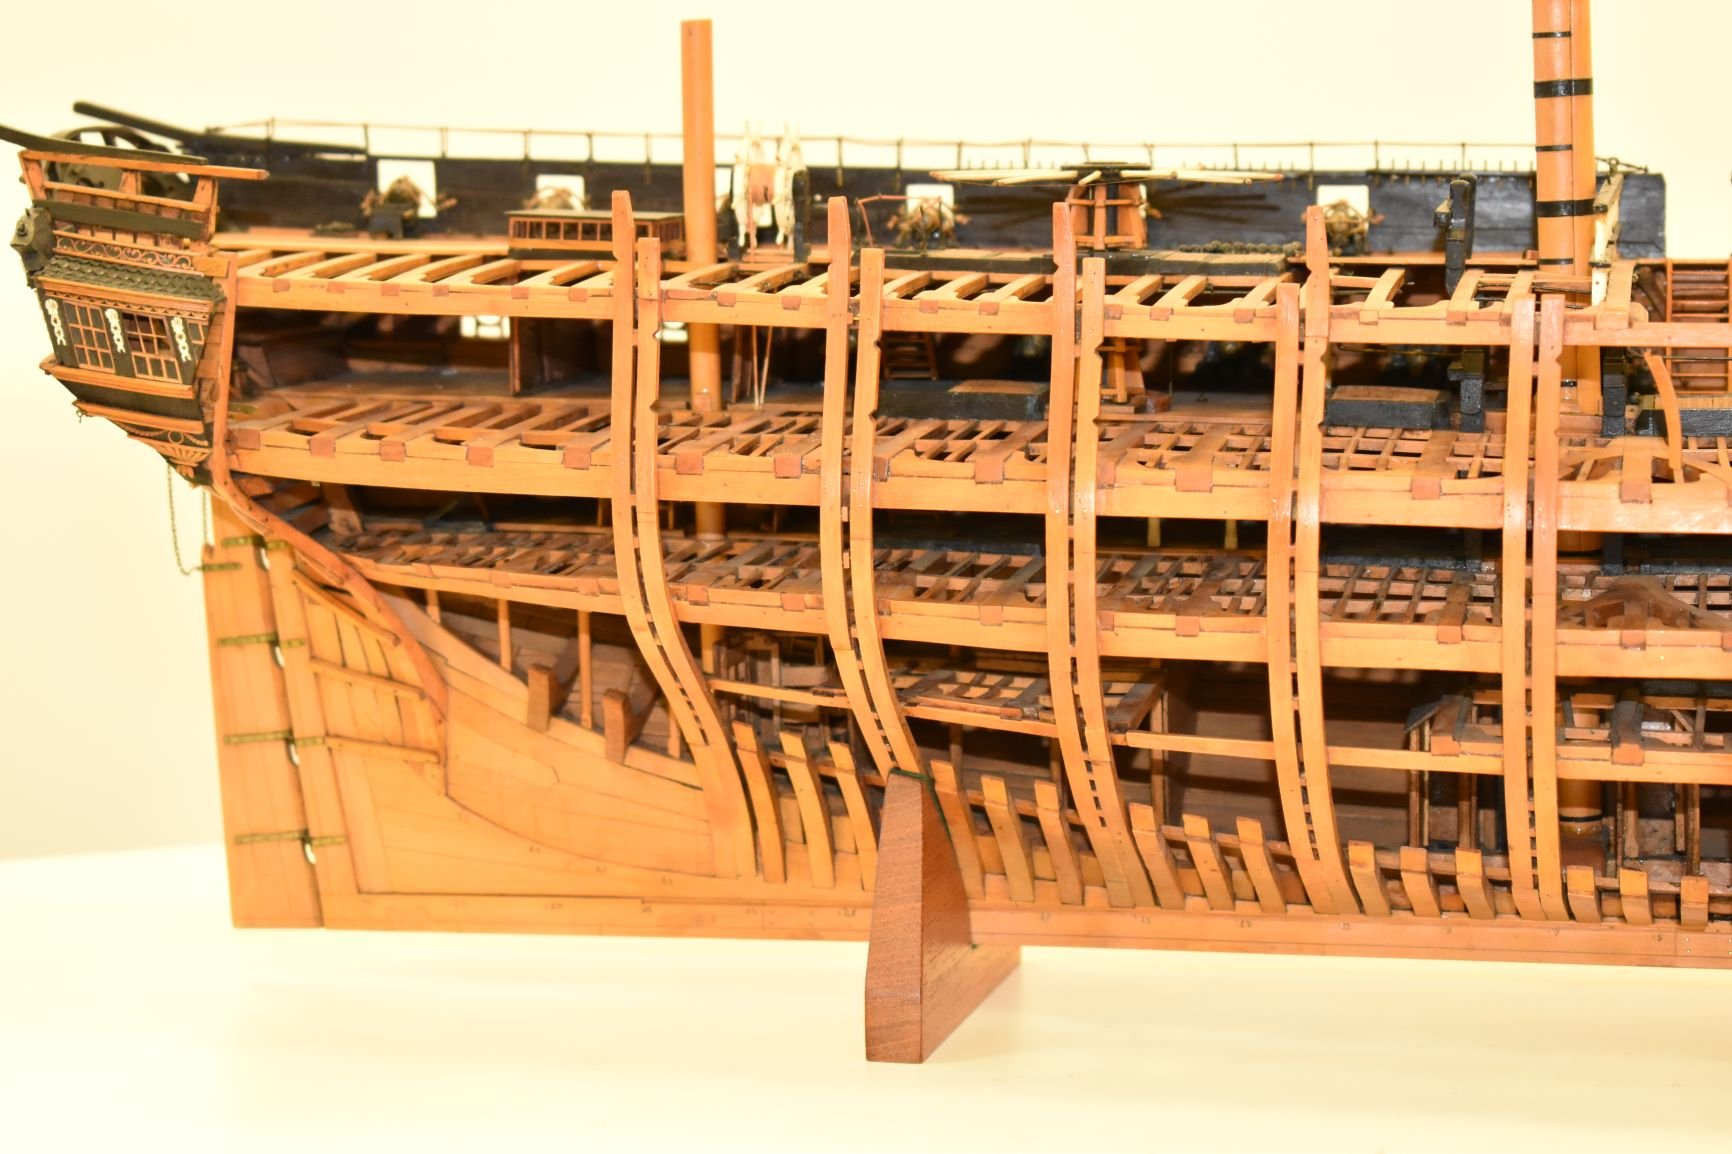
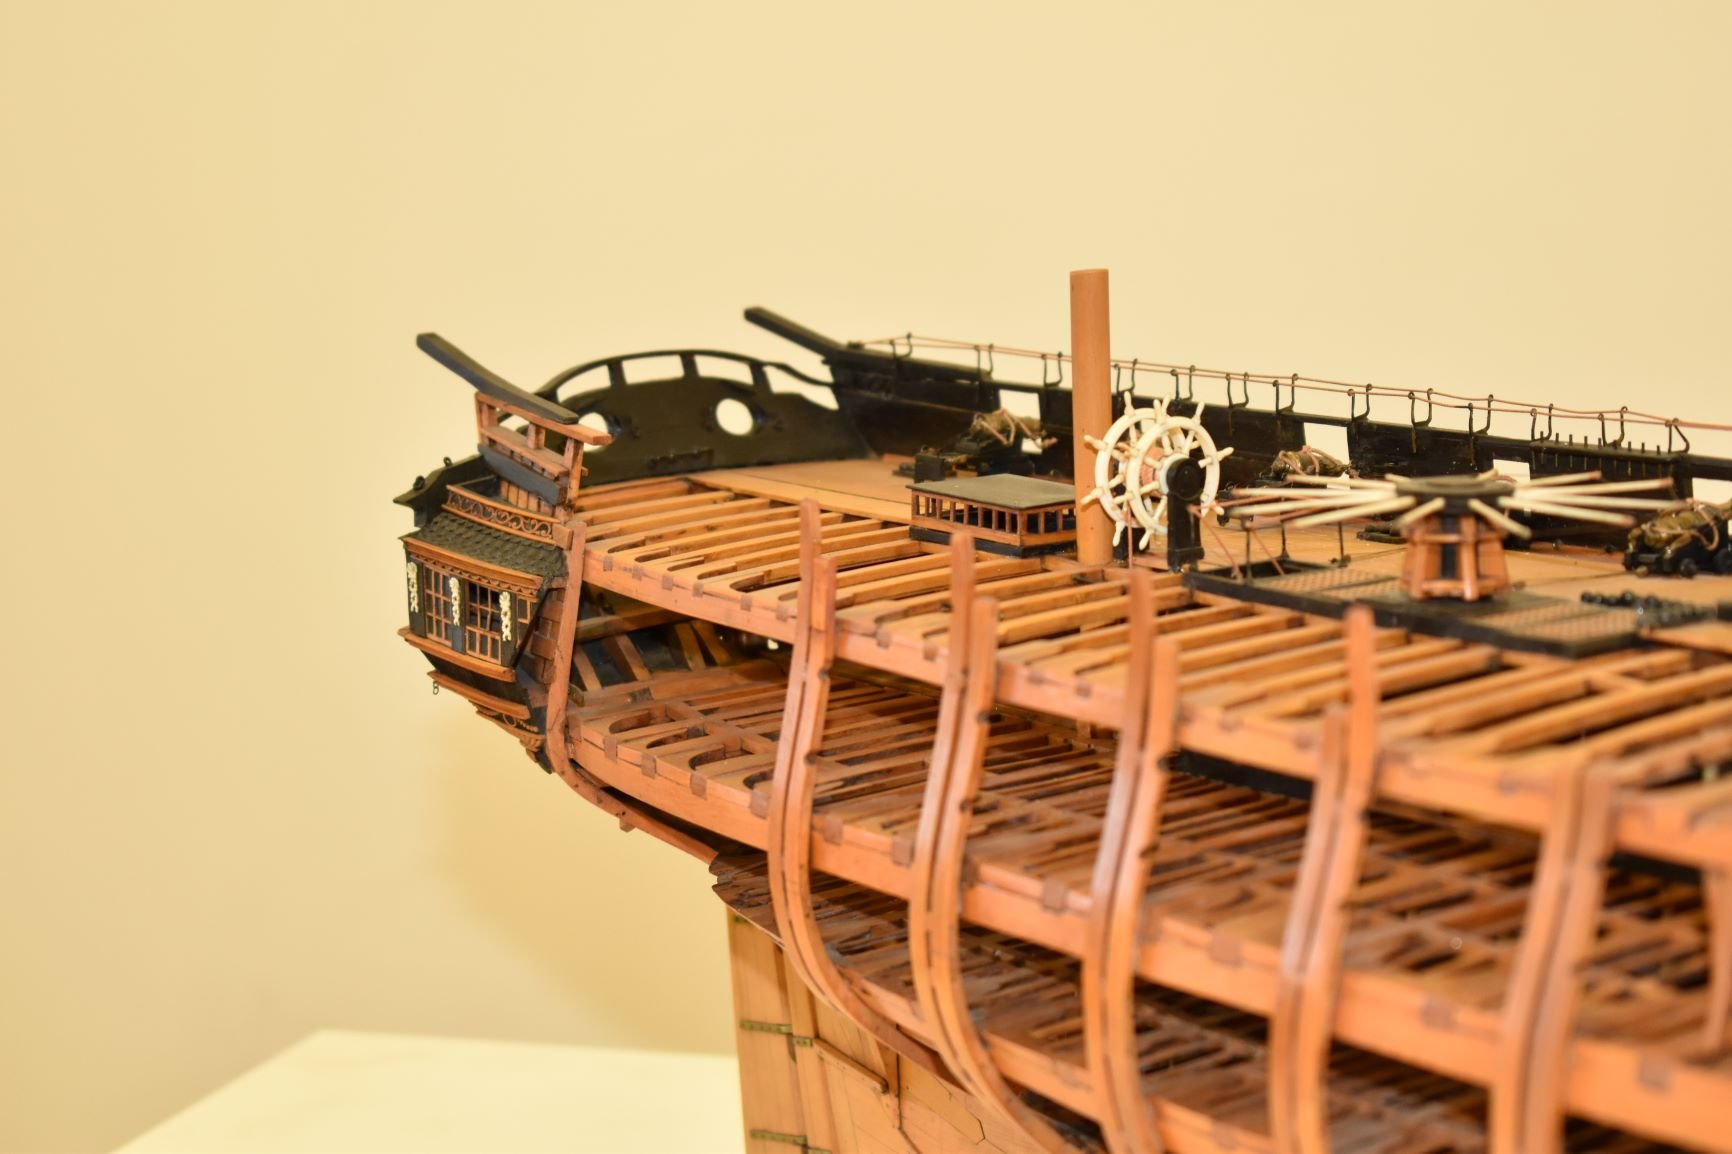
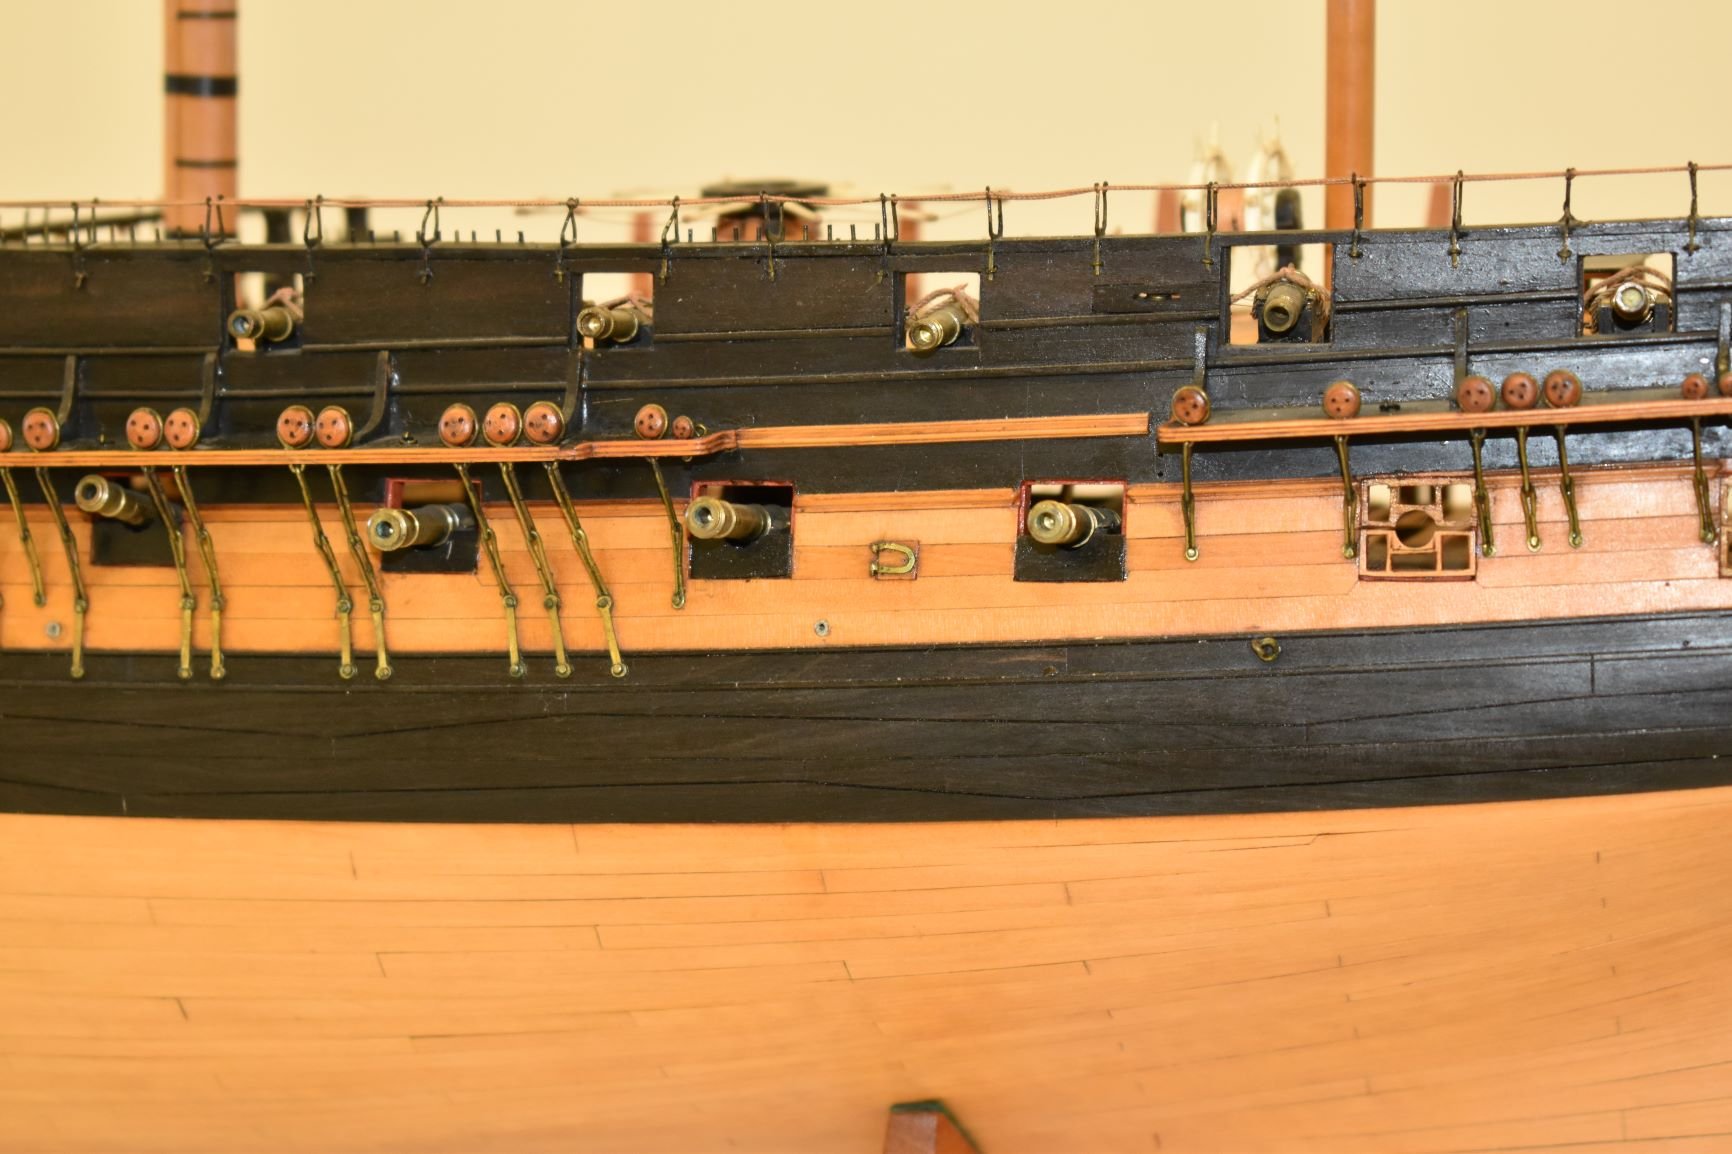
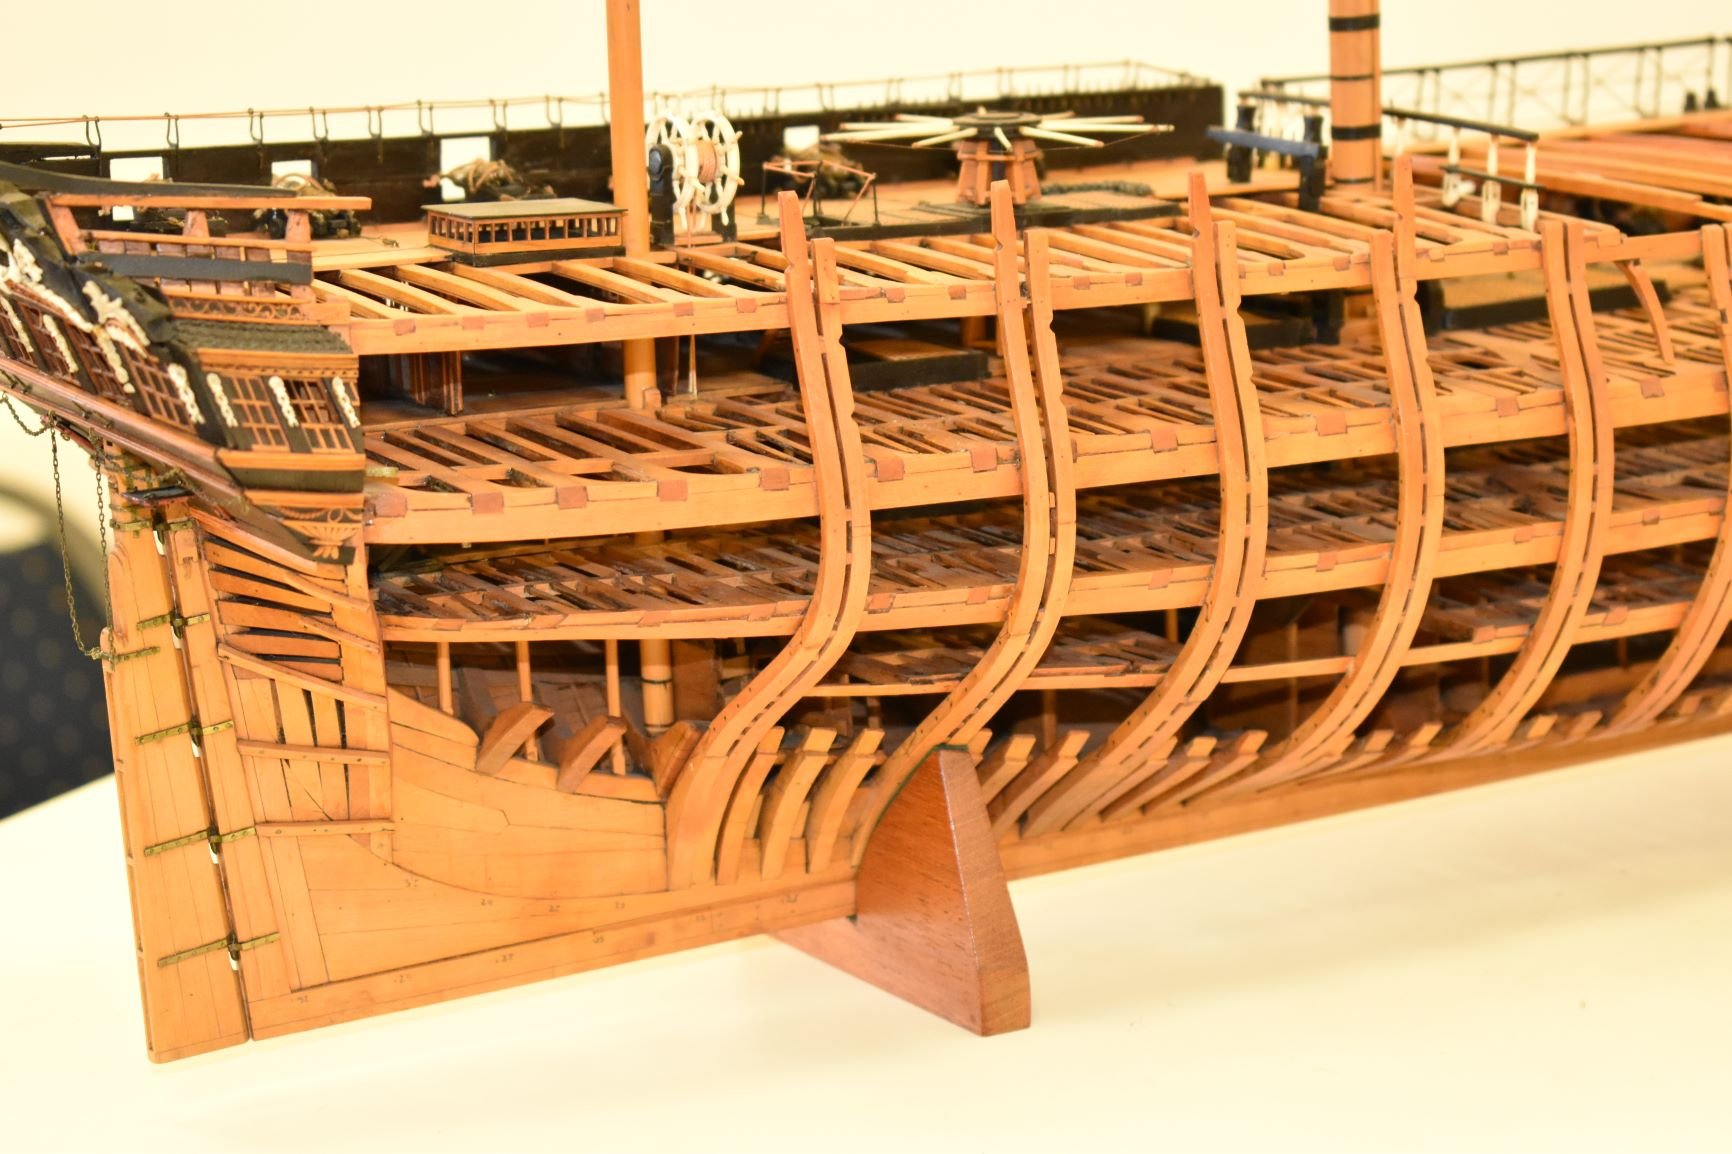
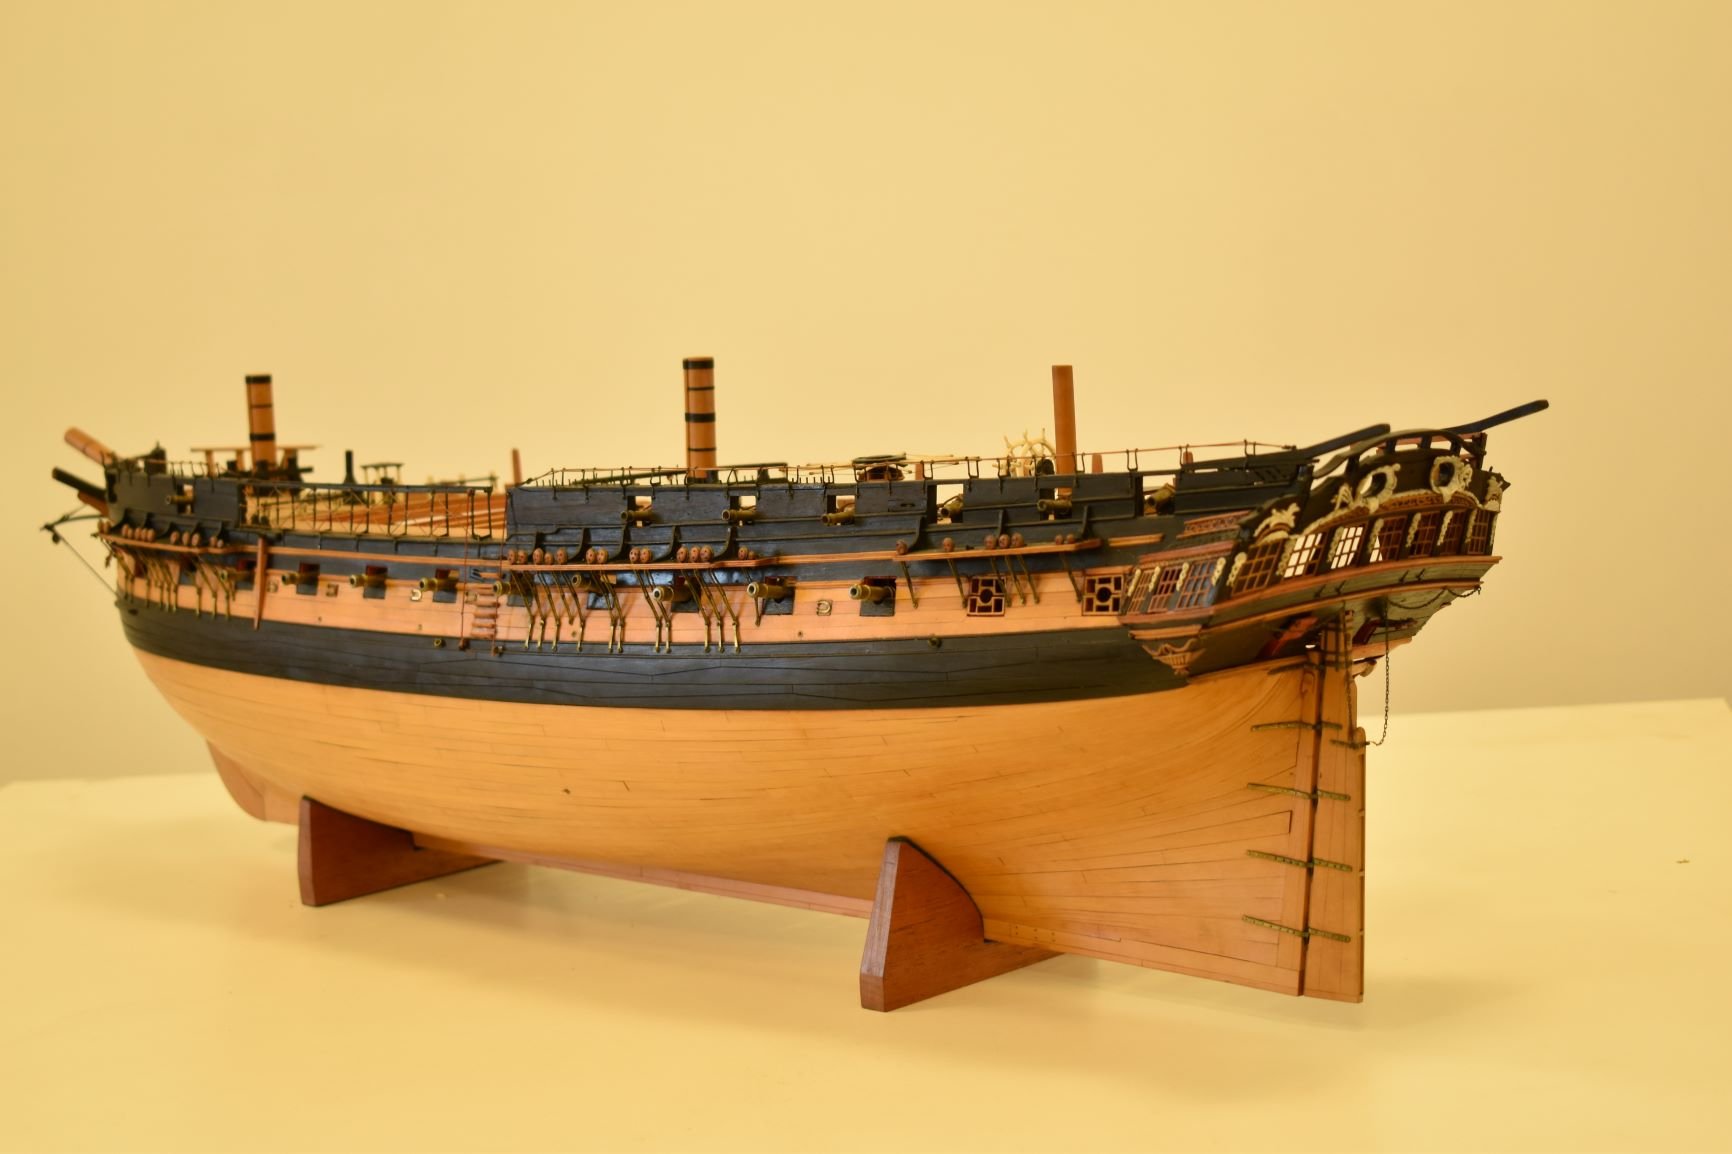
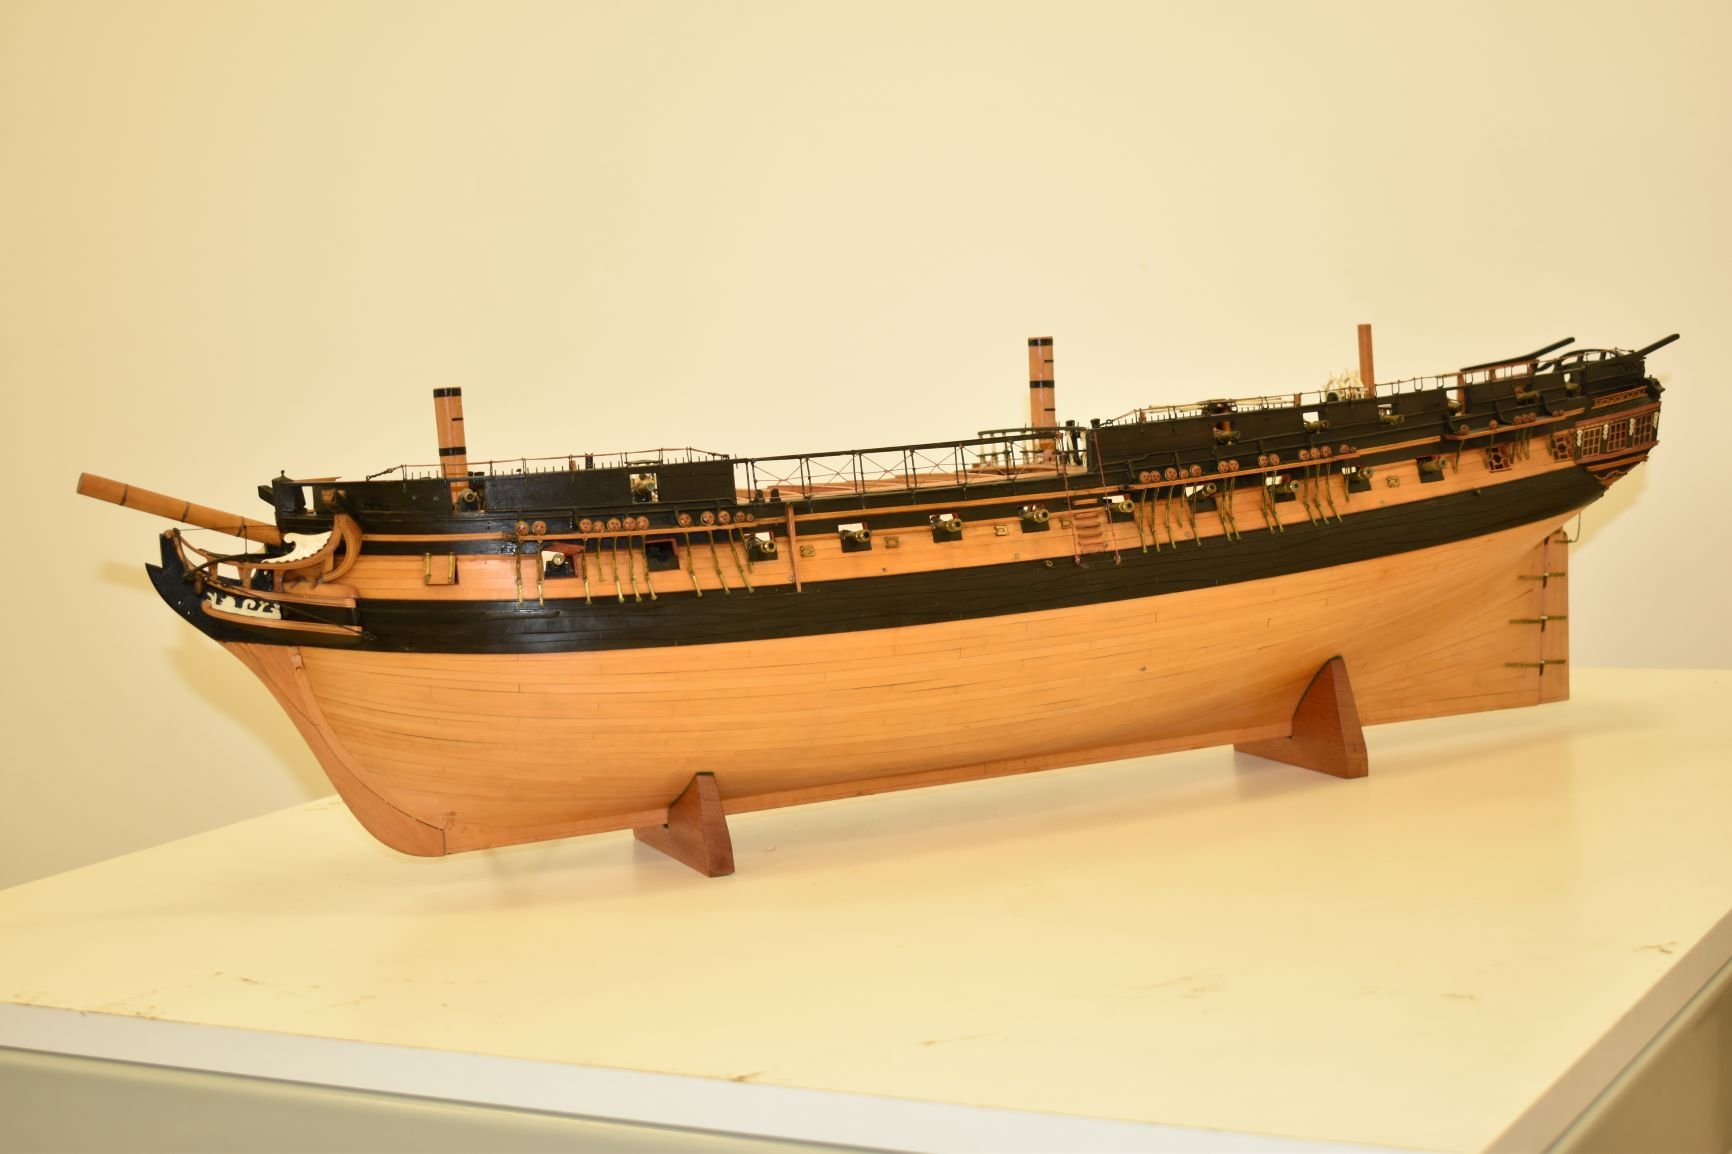
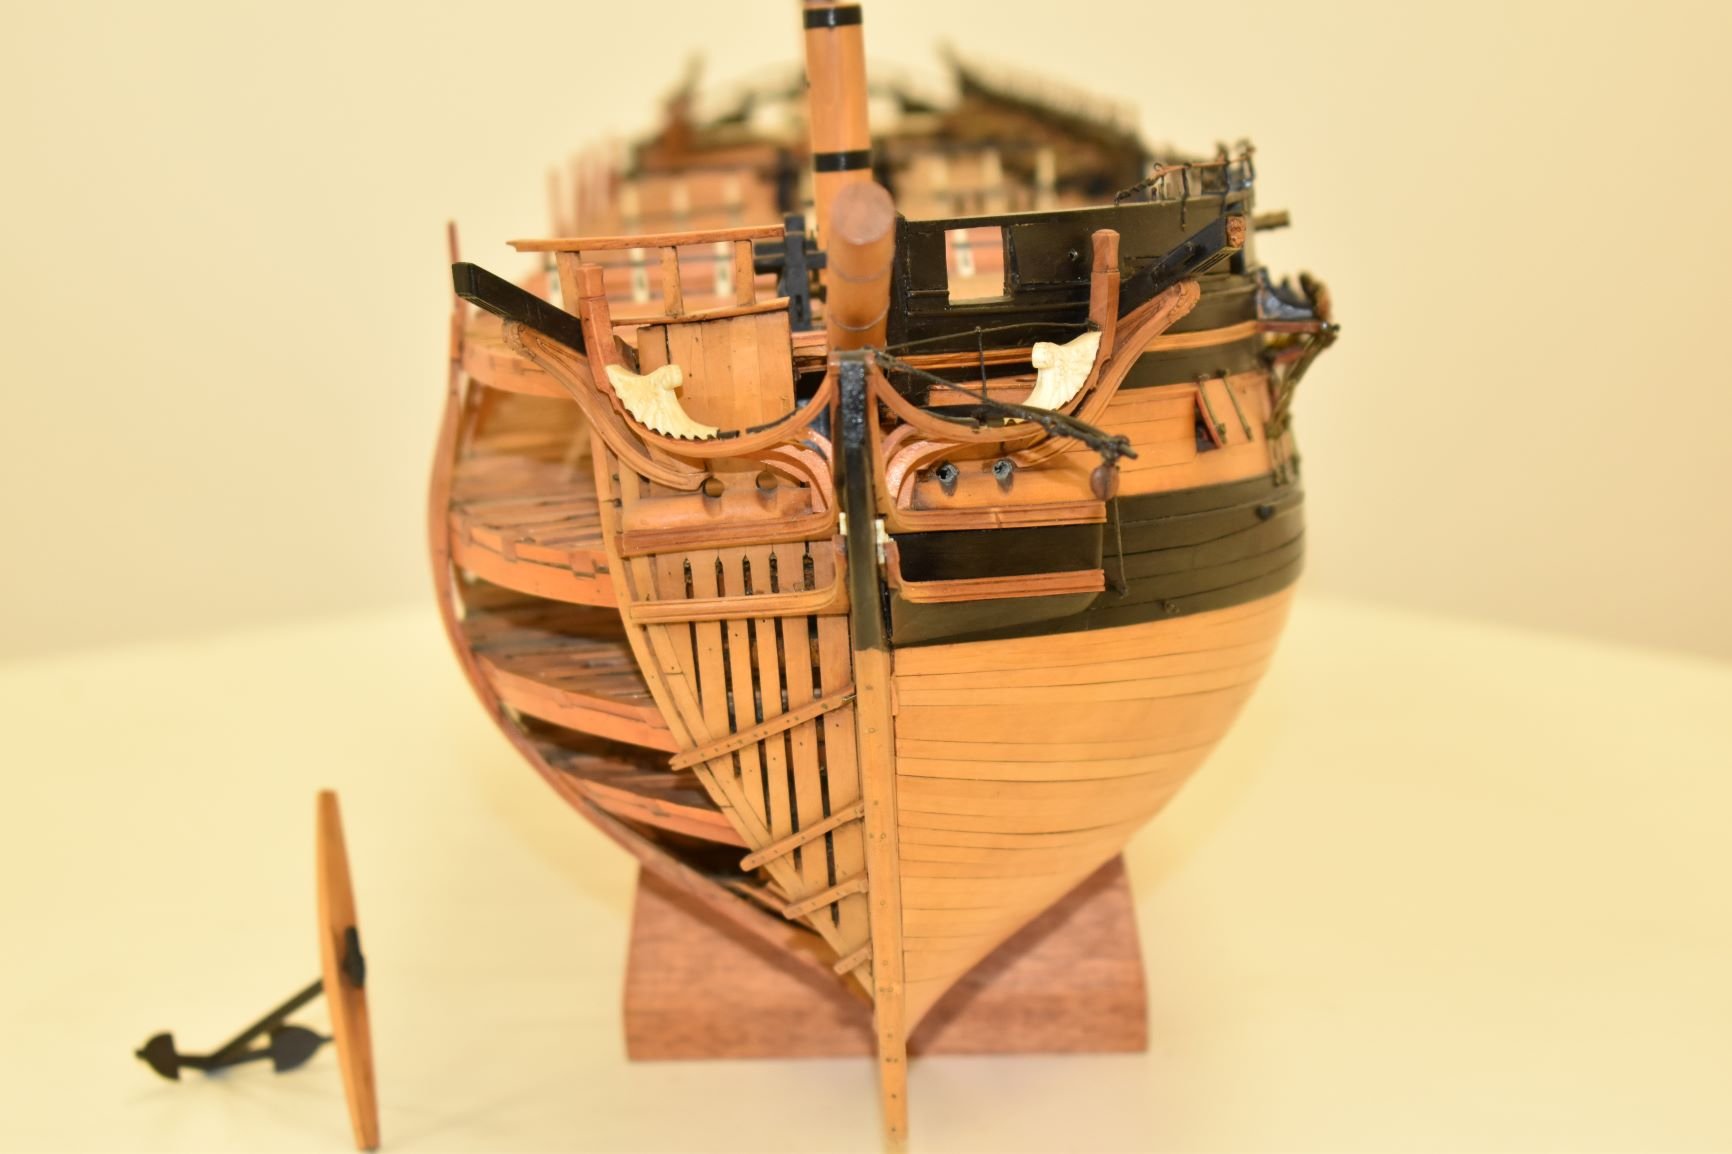
I have just scanned some text from the book 'The Heavy Frigate' by Robert Gardiner. It was from this I got the info for the whereabouts of the model, and realised it's only 25 miles away from me! ETA - The text states that the model is 48th scale, but it is in fact 1:64th.

-
Thanks Jim. All versions of Speedy will be released together. Manual is taking longer than I anticipated (due mainly to day job and lack of time), so no end of this month release, but probably early-mid November
-
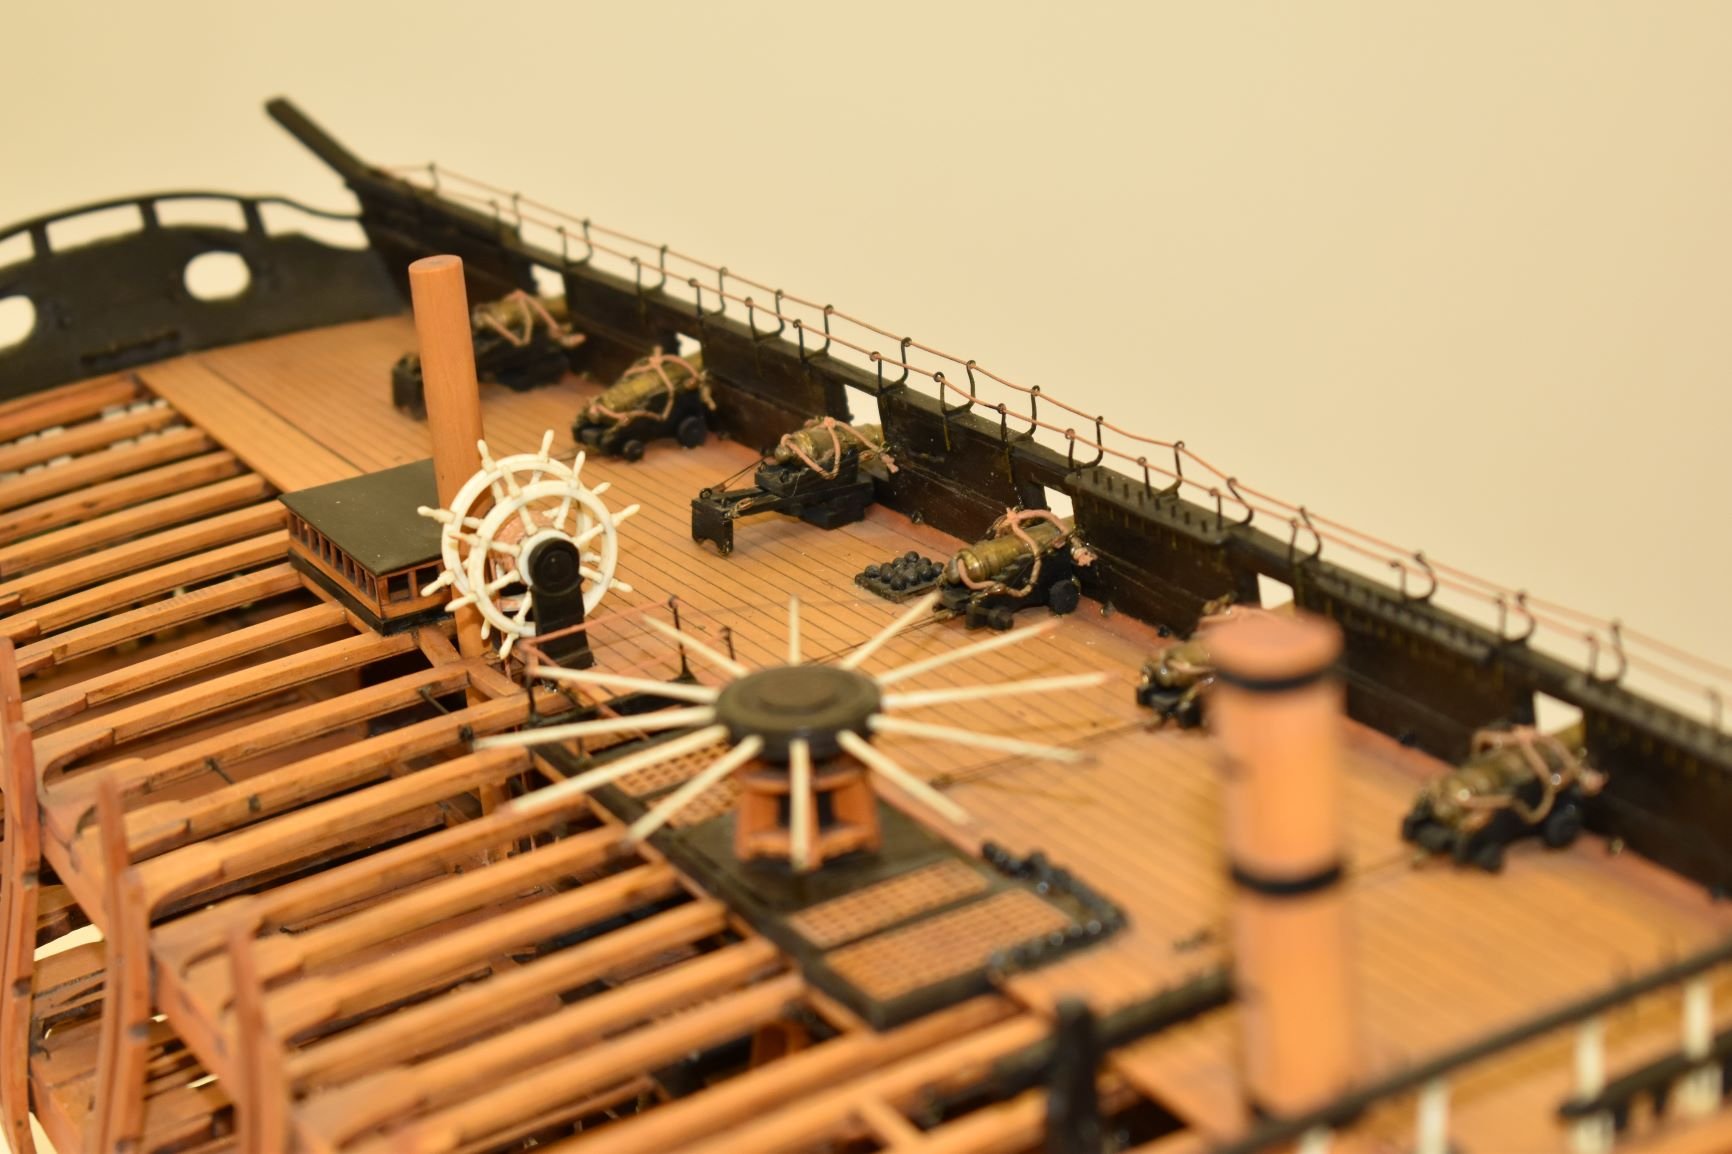
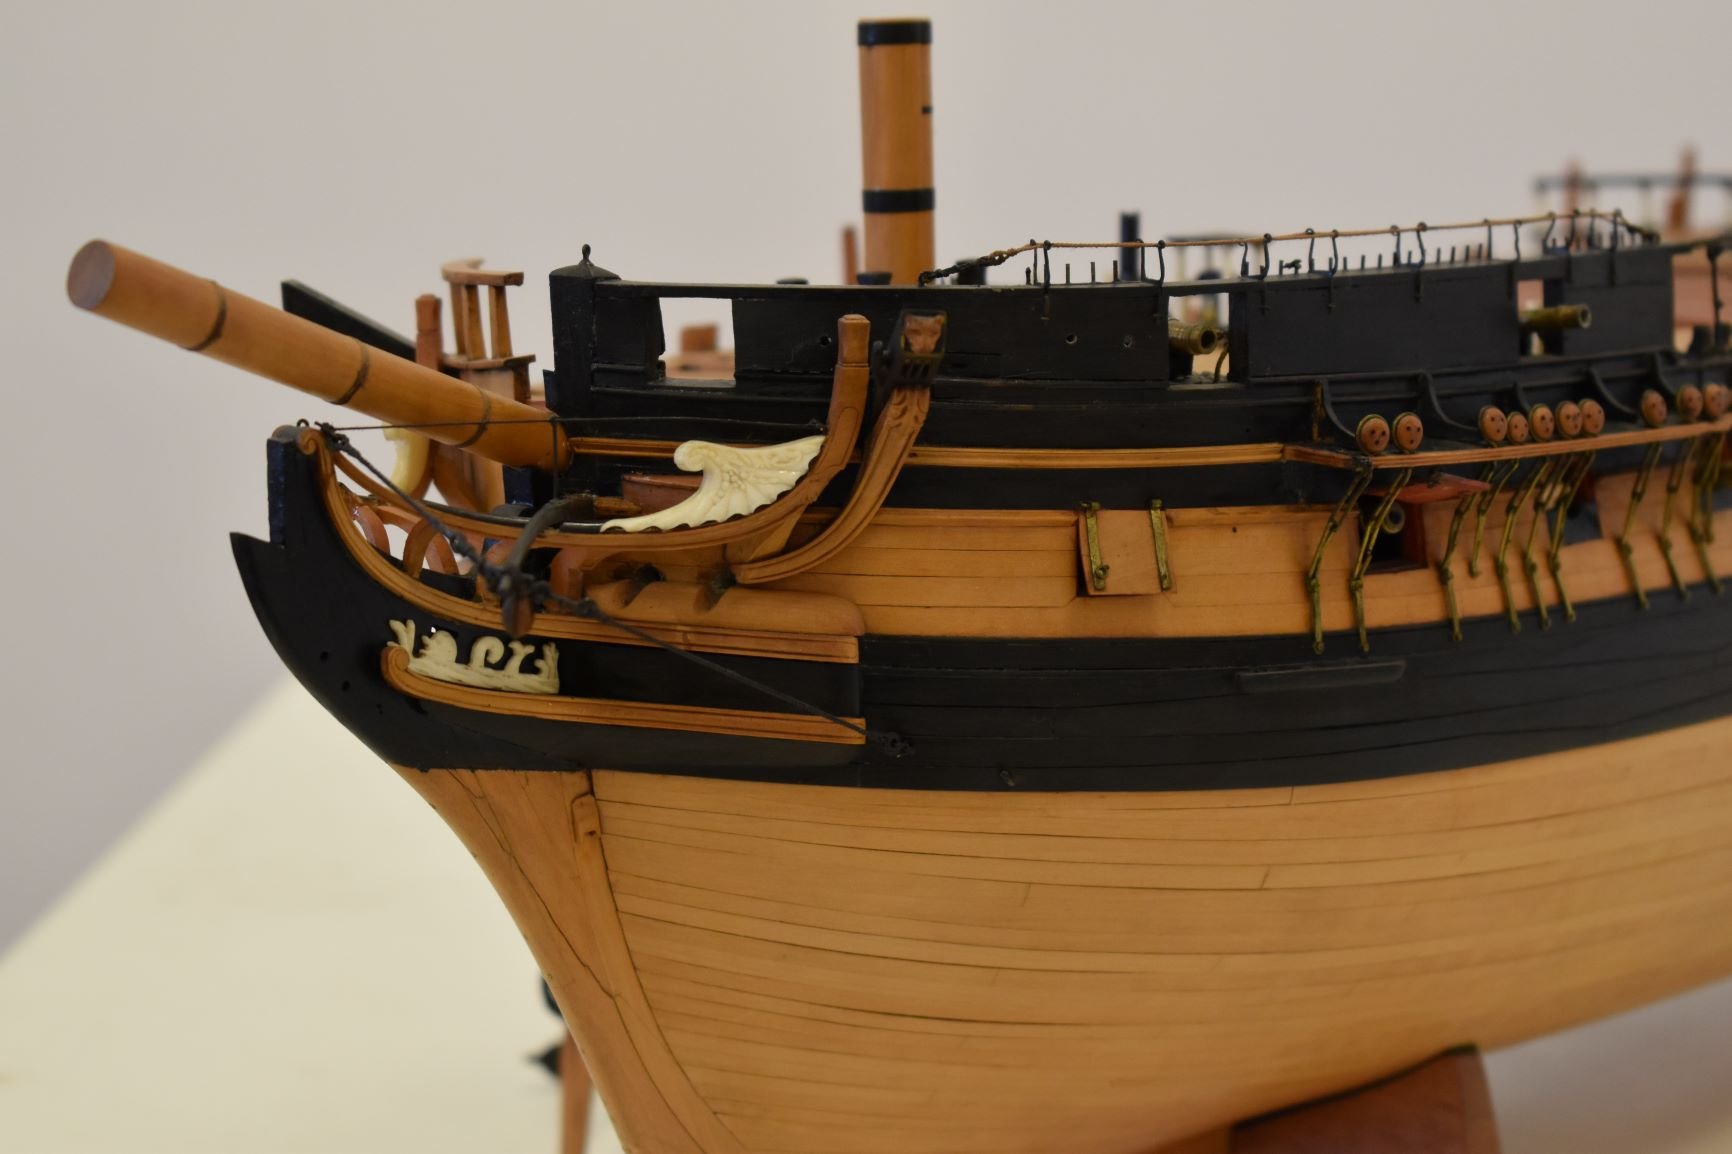
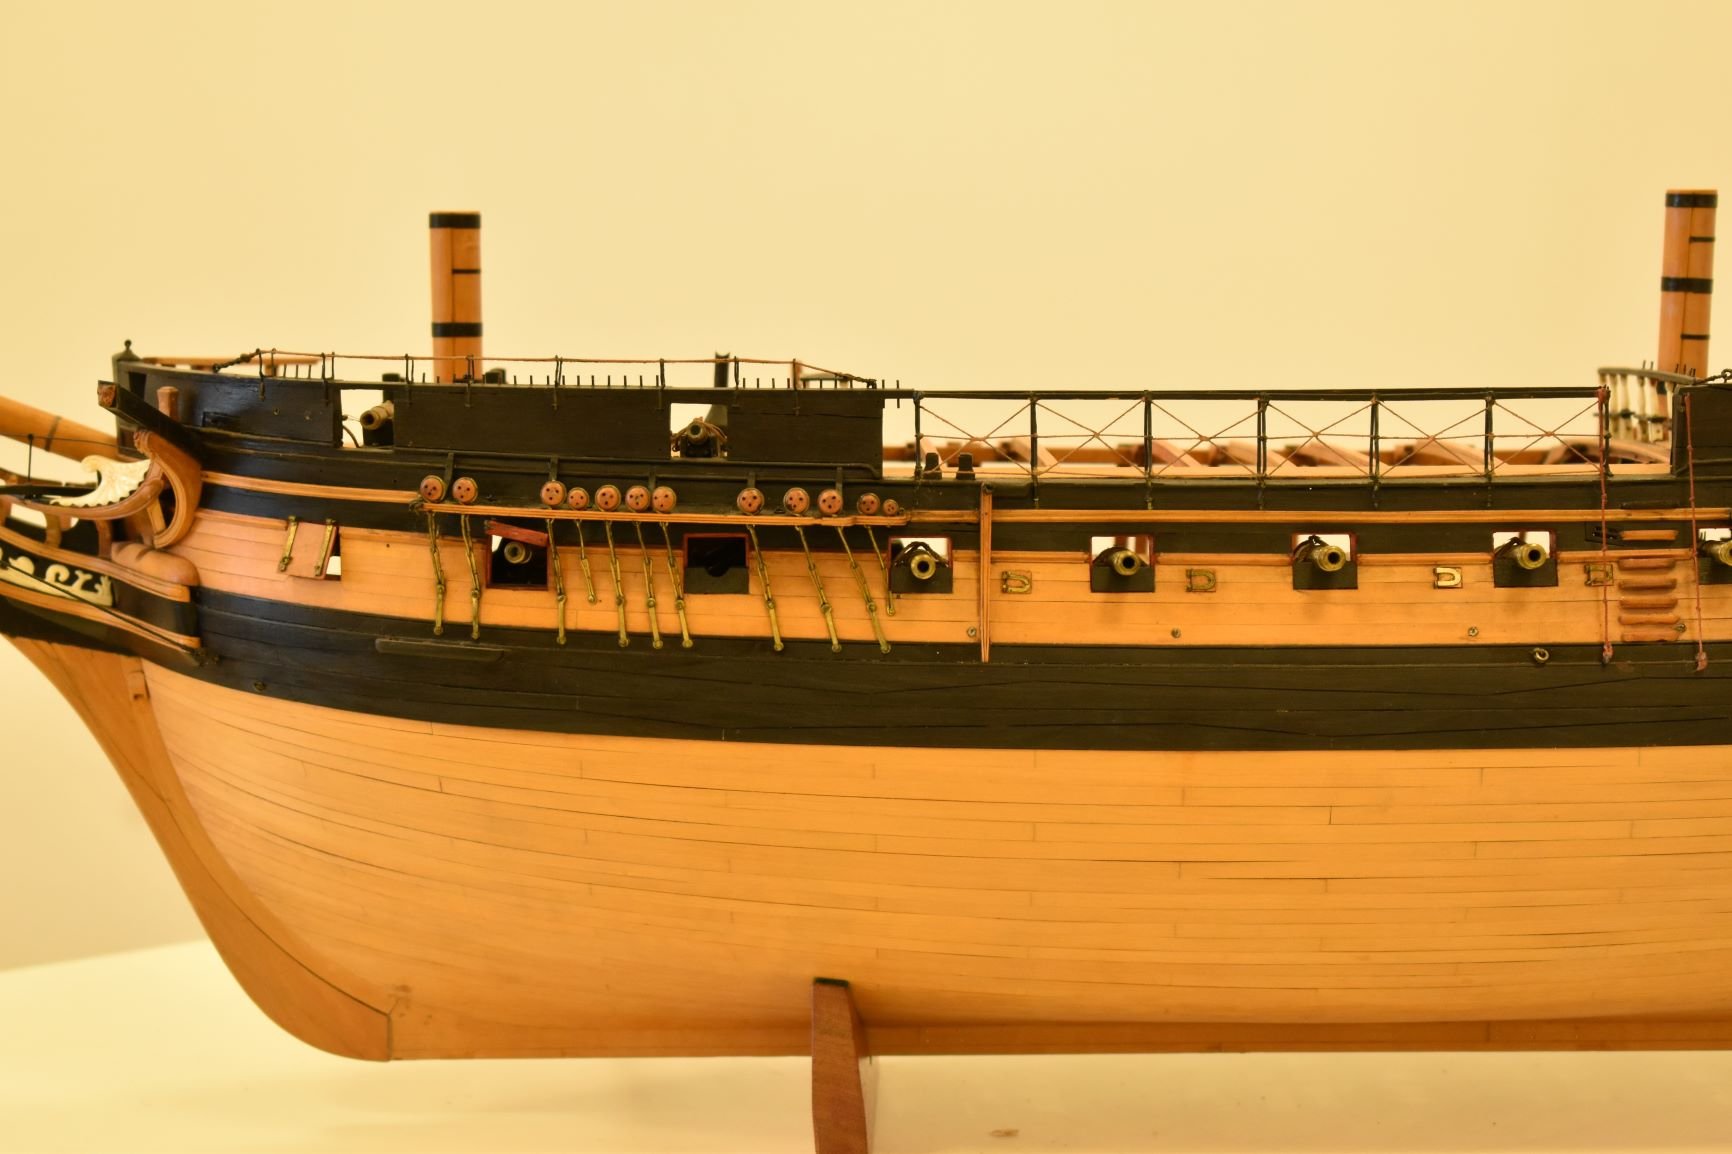
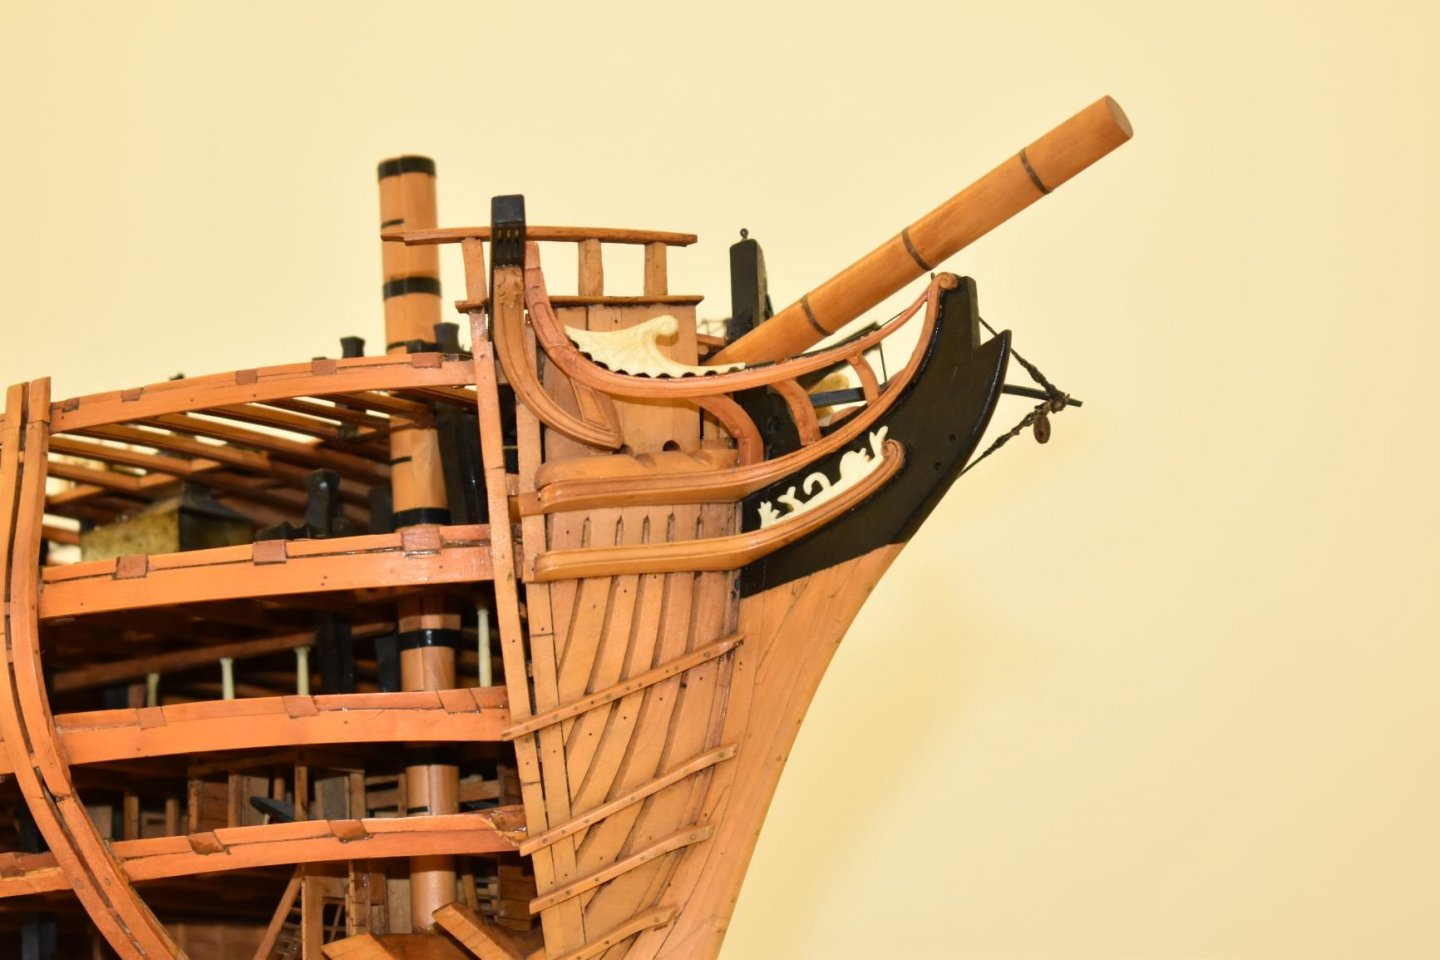
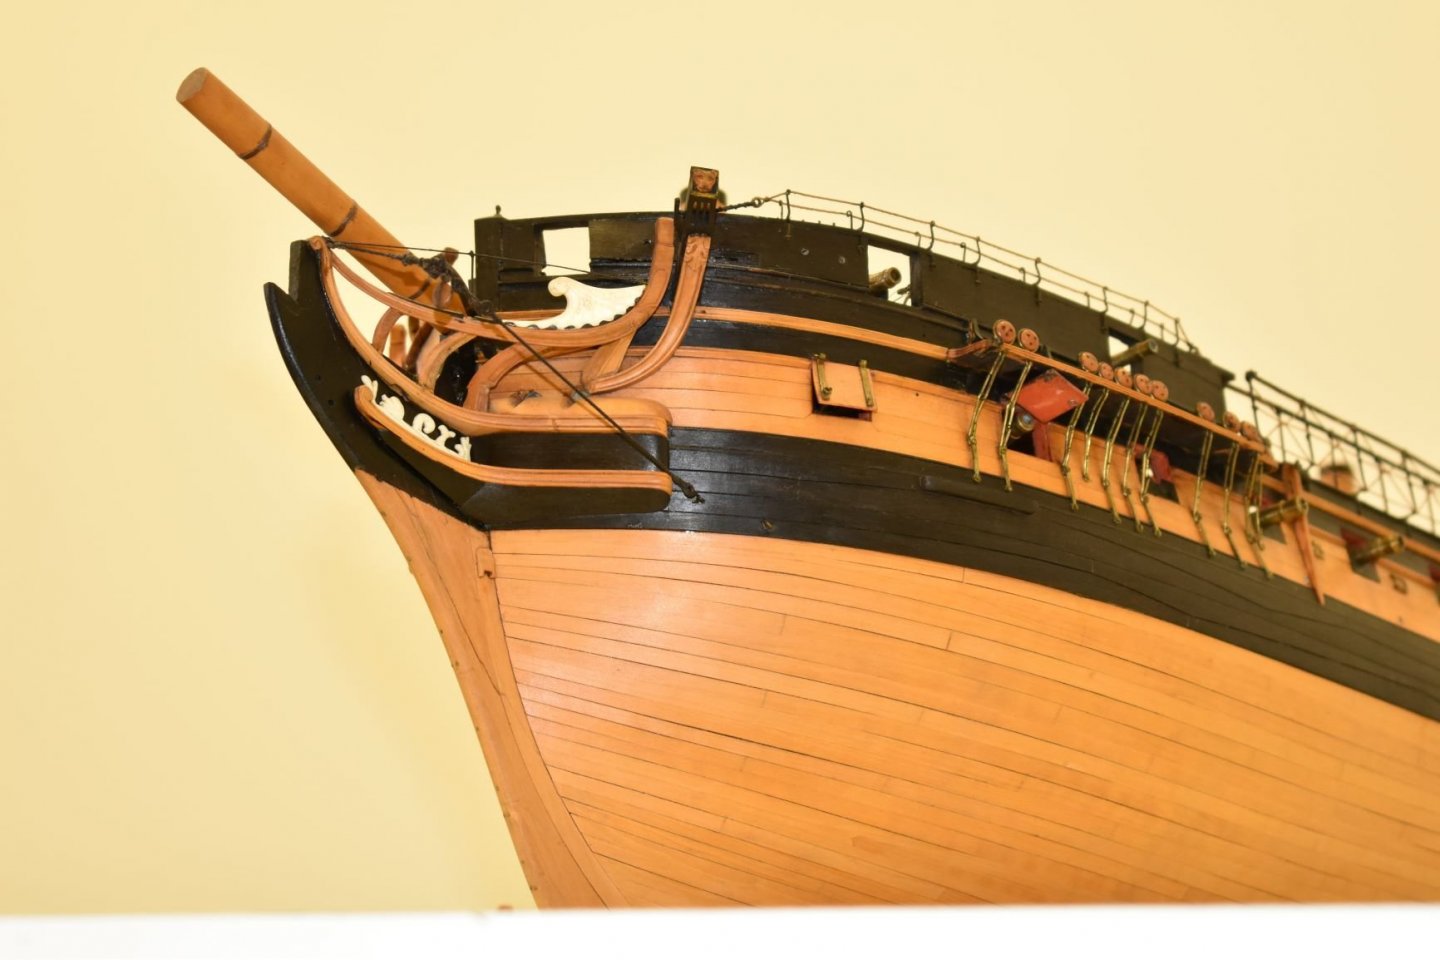
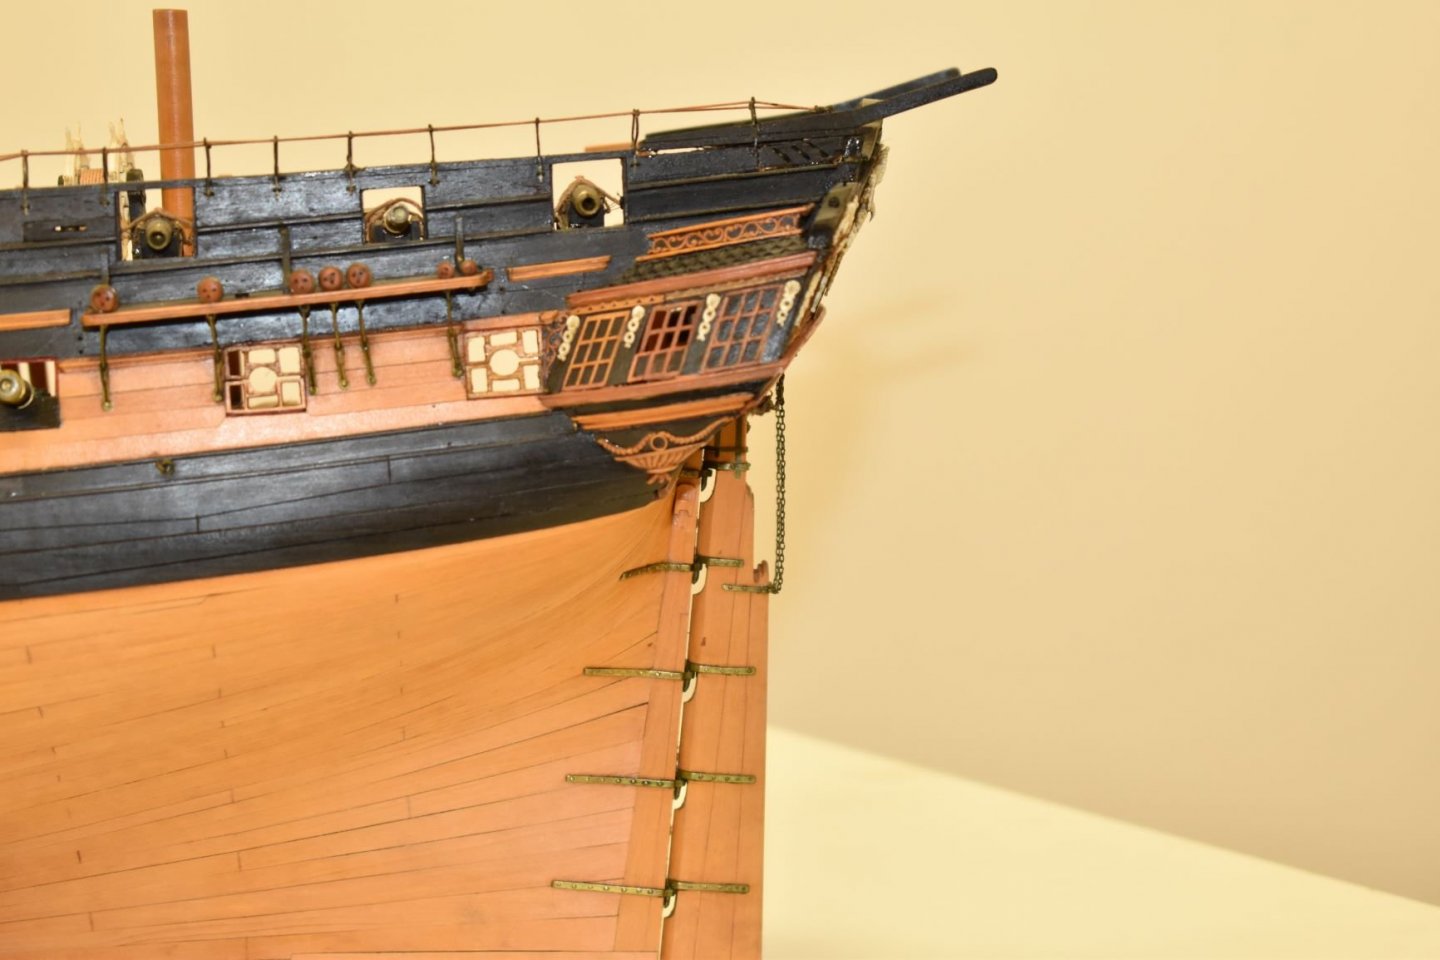
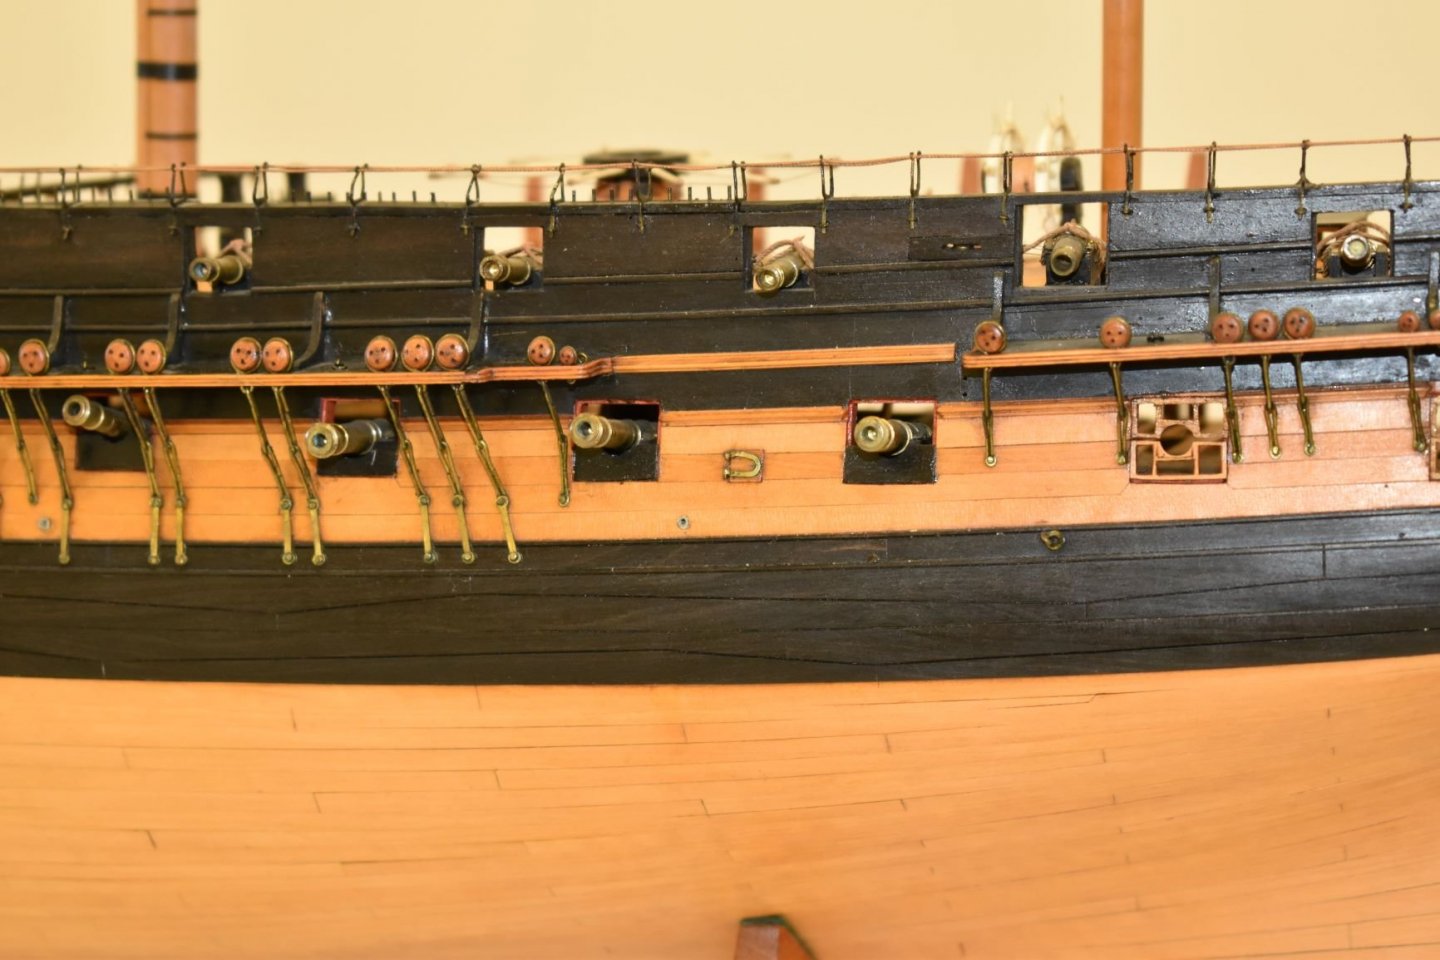
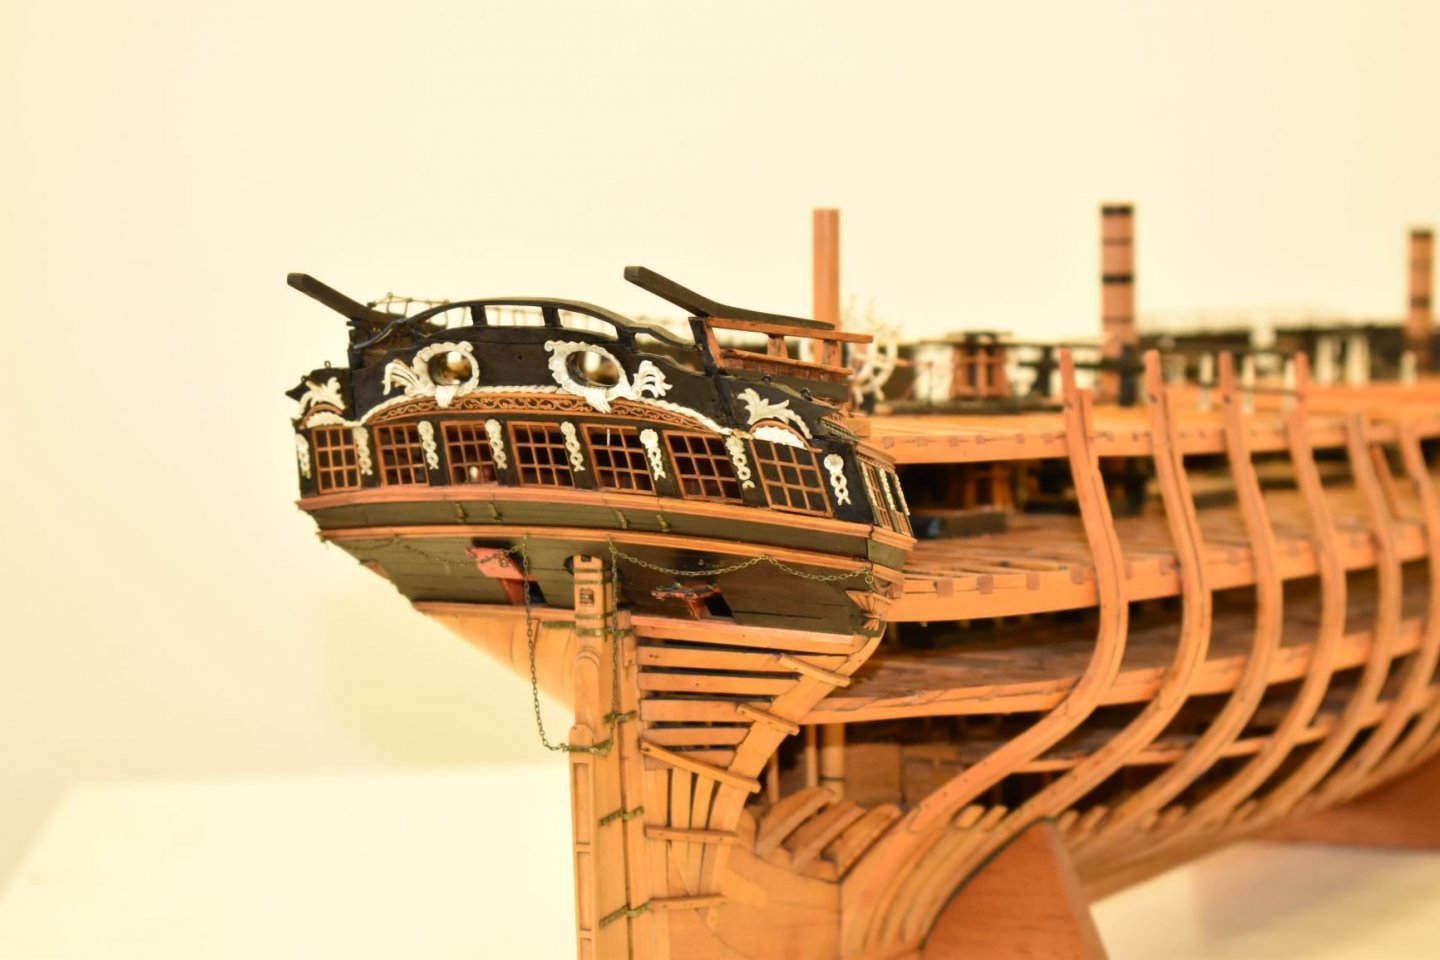
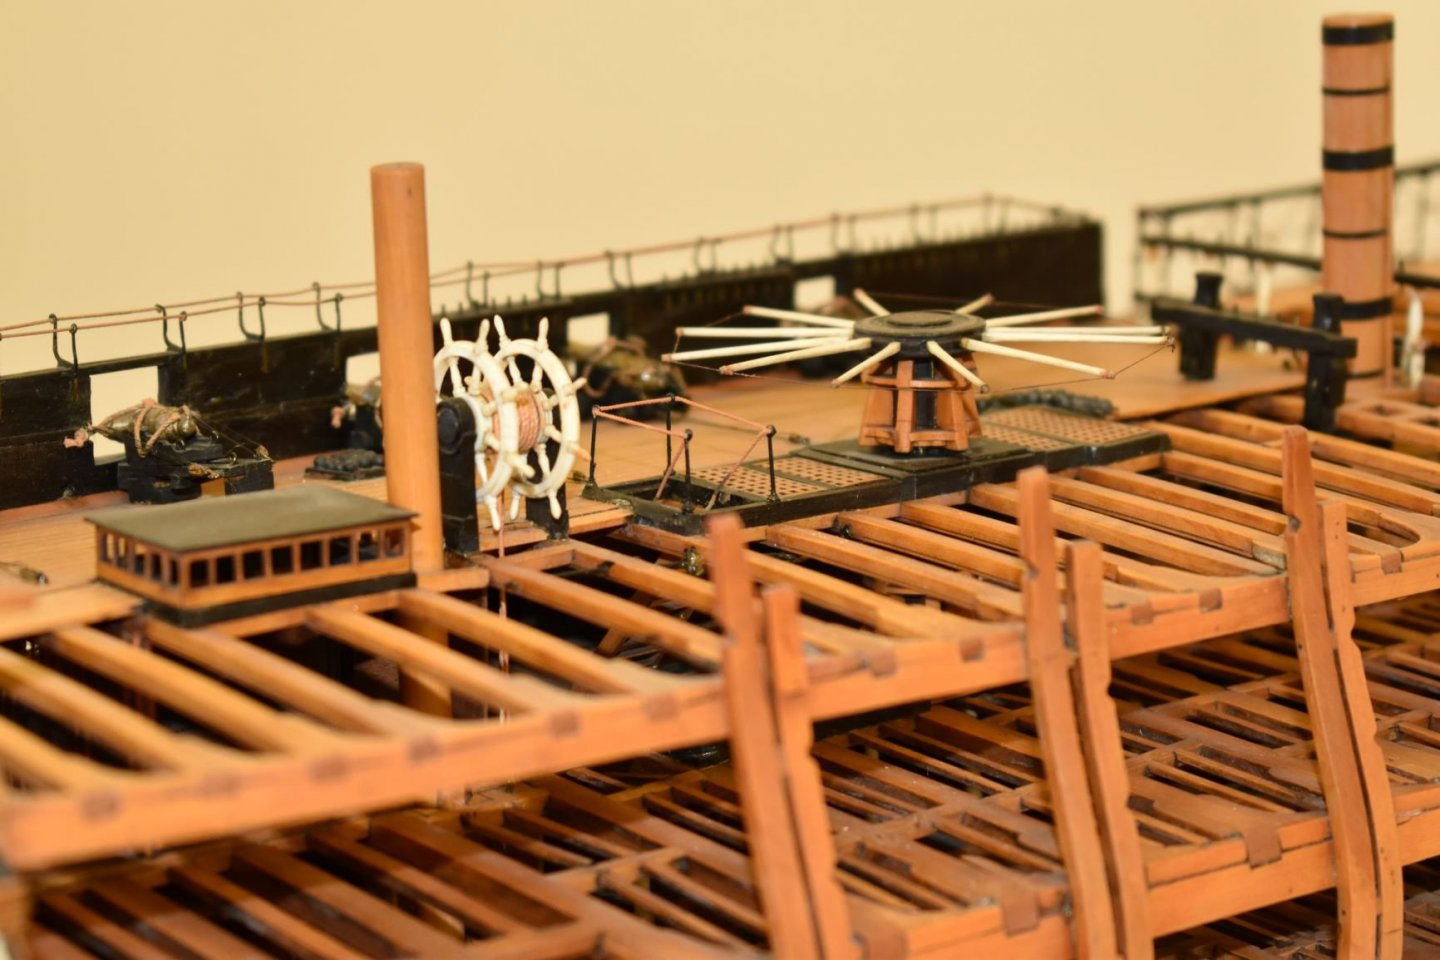
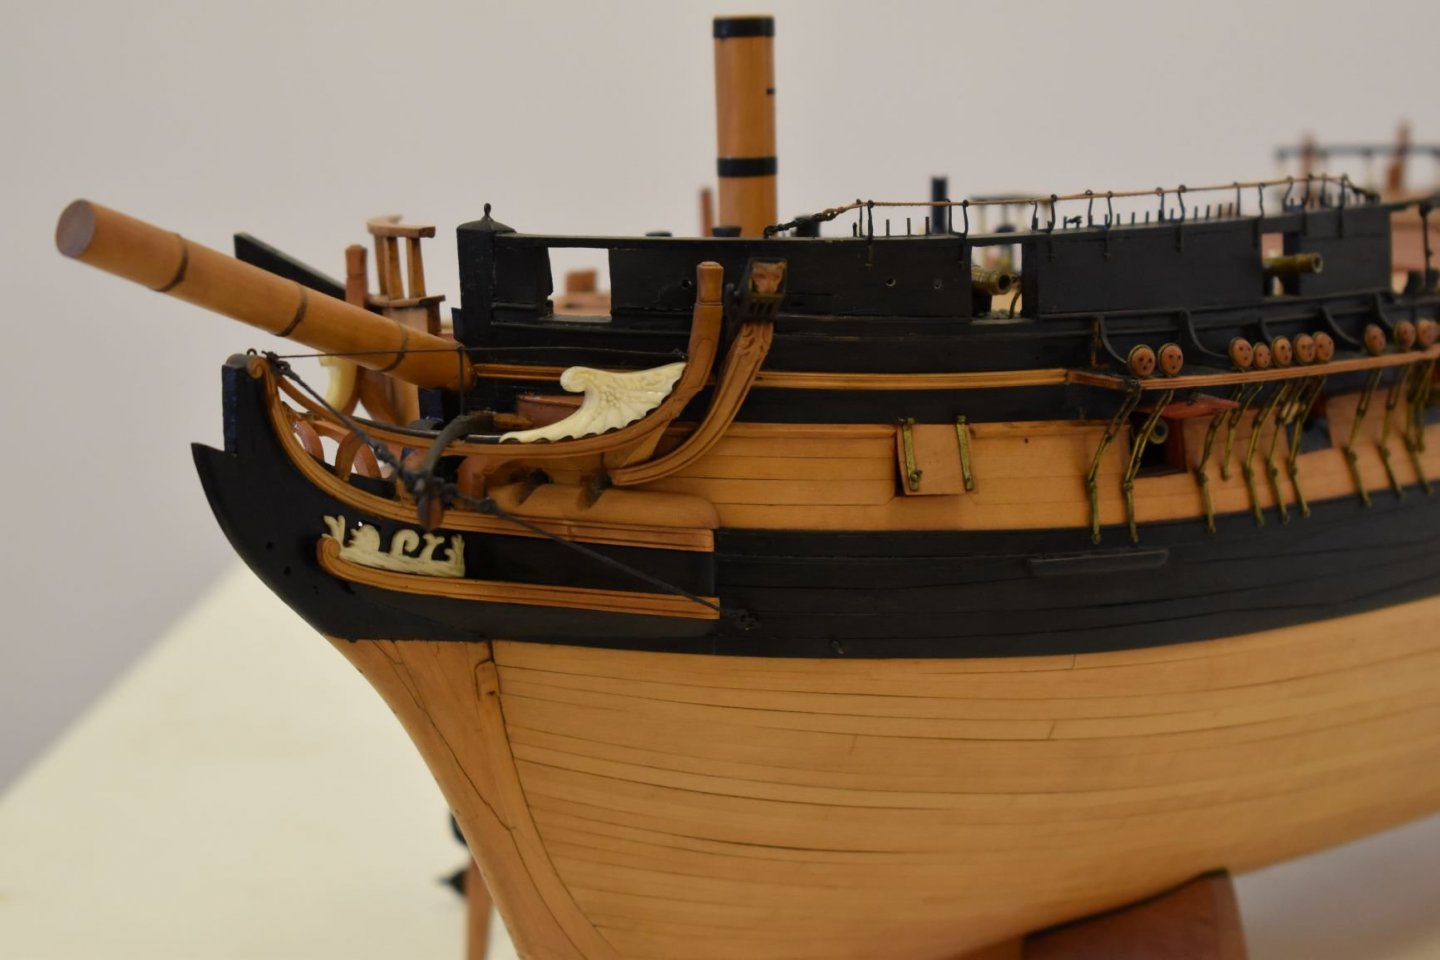
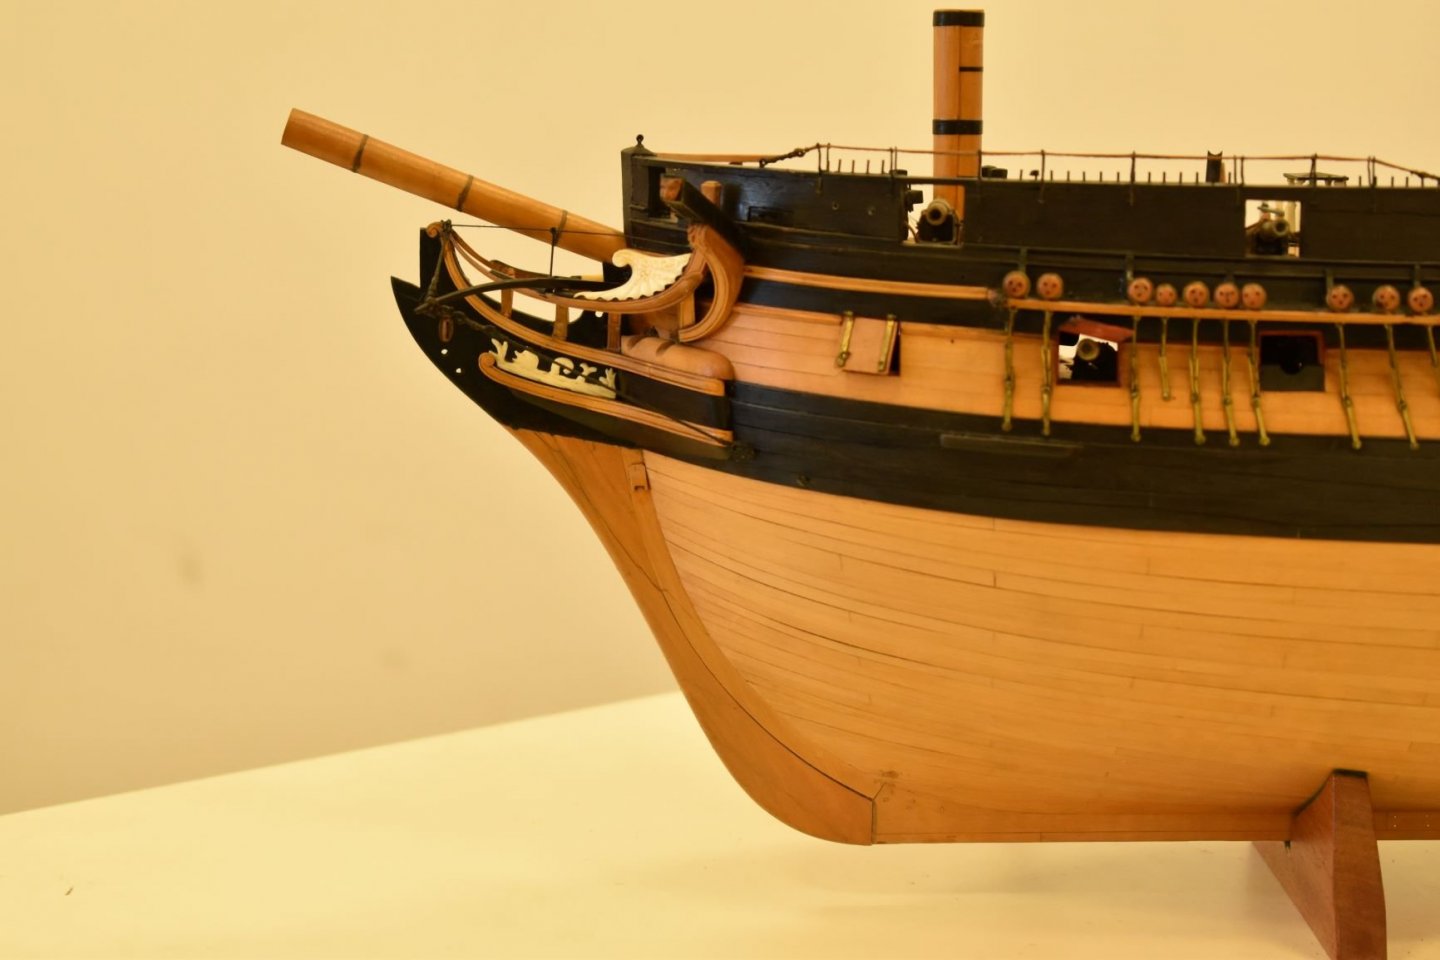
Had the Speedy boxes arrive yesterday. Today, no work on Speedy, but a trip to the Bristol Museum, which was a long arranged meeting with the curator of ship models. He very kindly took the contemporary model out of its case in storage, placed it on a sturdy table/stand on castors, and left me to it for however long I wished. I was in heaven! The scale is 64th, so the same as the kit it will be, although I may not include the berthed up forecastle bulwarks, I am sure these were a slightly later addition.. Arethusa, 1781, 18-pounder 38 gun frigate, one of the very first built for the Royal navy I thought I's share a few of the many pics I took (all straight off the camera with file size reduced, but no colour/contrast correcting) I didn't want to leave it, could have looked at it all afternoon...


-
OK, this week I have been mostly trying to sort out the specs for the top tier version of the Speedy kit, trying to put together a 'perfect' kit. I have mostly sorted and arranged everything for this now, the materials, cuttings, parts. It will not be cheap and strictly limited to 20 numbered kits due to the very high cost of materials. What I will include is the following: Pearwood laser sheets replacing all limewood laser cut parts Pearwood blocks and deadeyes (except the sister blocks, which I cannot get in pearwood) The book “Cochrane the Dauntless: The Life and Adventures of Admiral Thomas Cochrane, 1775-1860” Boxwood second planking This will be the 'Master Shipwright' version, which is a no expense spared limited edition.
-
You can have a set of re-worked stern frames. Just PM me your address (although I am sure I have it..) and I will arrange a set to be sent. Regarding the resin cannon, these will be an optional extra, as a set of resin cannons cost so much more. I am also looking for other sources to try and balance quality and sensible costs.
-
They will be an added option with the Alert kit, as per the standard versus premium wood. Not expecting them to be with me for a couple of months though, as more Speedy guns and figures and l decorative castings for third model are being done right now.
-
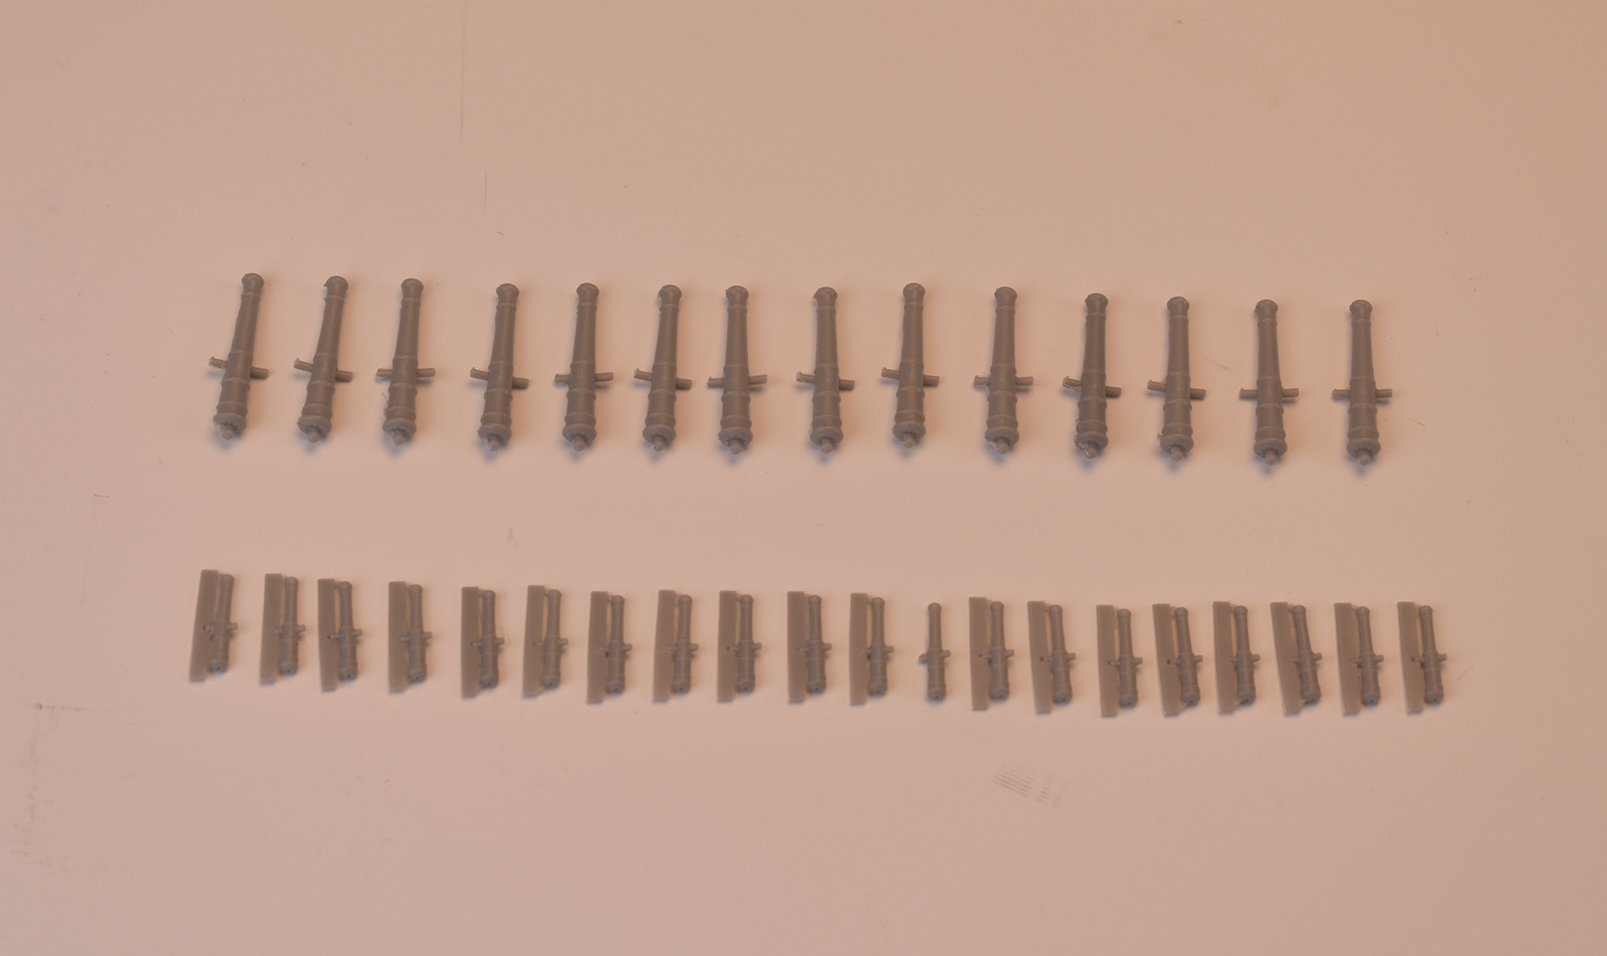
Just a little update, this week I finished the ten sheets of 50x70cm plan sets, and have now started the A4 building manual for Speedy. I anticipate just over two weeks work left on my part. After this, I will get the manual and plans printed, and hopefully, by that time, I will have had all other items relating to the kit delivered. (if my day job doesn't kill me in the meantime..). I did have the Pear, Tanganyika and Boxwood strip for Speedy arrive on Friday, all looks very good. I have decided that all future kits will have as little white metal castings as possible. I have ordered a set of 30 kits worth of Alert 6 pounder and half pounder barrels to be cast in black resin. These will be offered as an alternative to the metal version in the kit. I cannot replace the kit versions as the cast resin barrels are many times more expensive, and would put Alert cost over £200 (Just to have the 30 kits worth cast is more than a few hundred pounds cost to me) - but I also recognise that having the option of better quality cannon would be good. As mentioned before, the only cast white metal parts in Speedy is the anchor, the cannon being cast resin this time. (First 50 kits worth in grey resin, but all black after this).
-
I would say that is correct. What would be the point of a preventer stay if both were connected with the same rope!
-
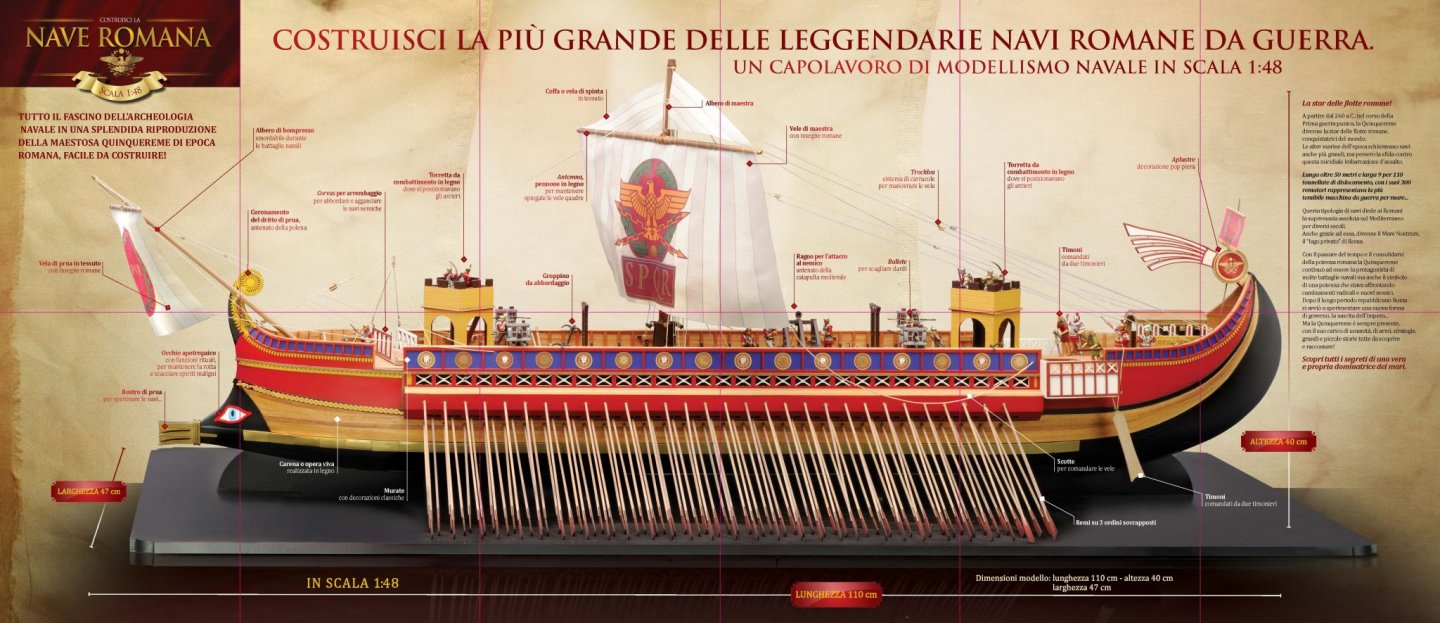
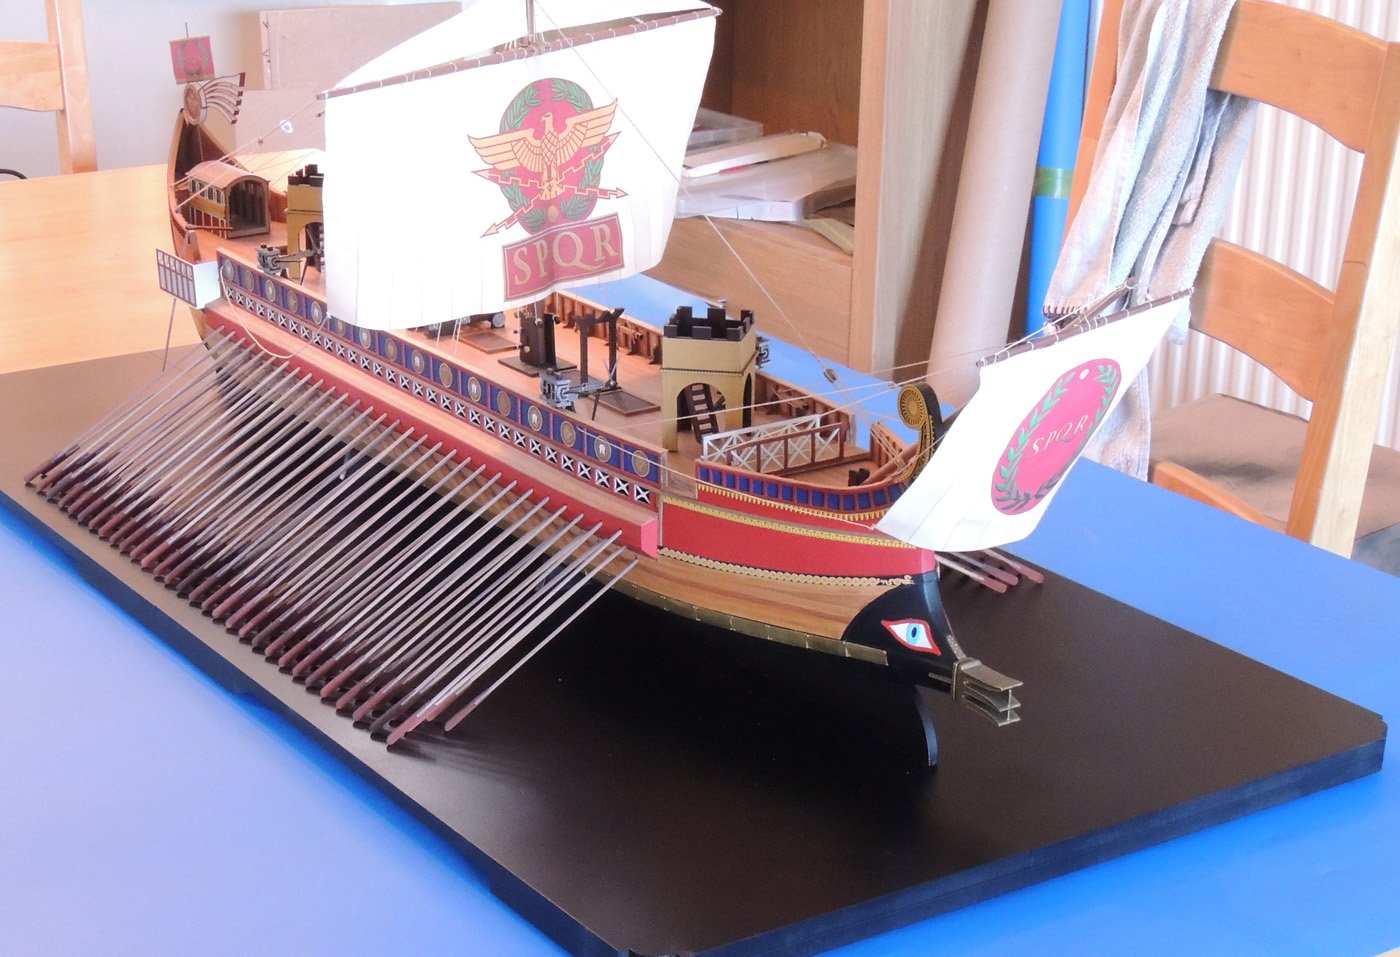
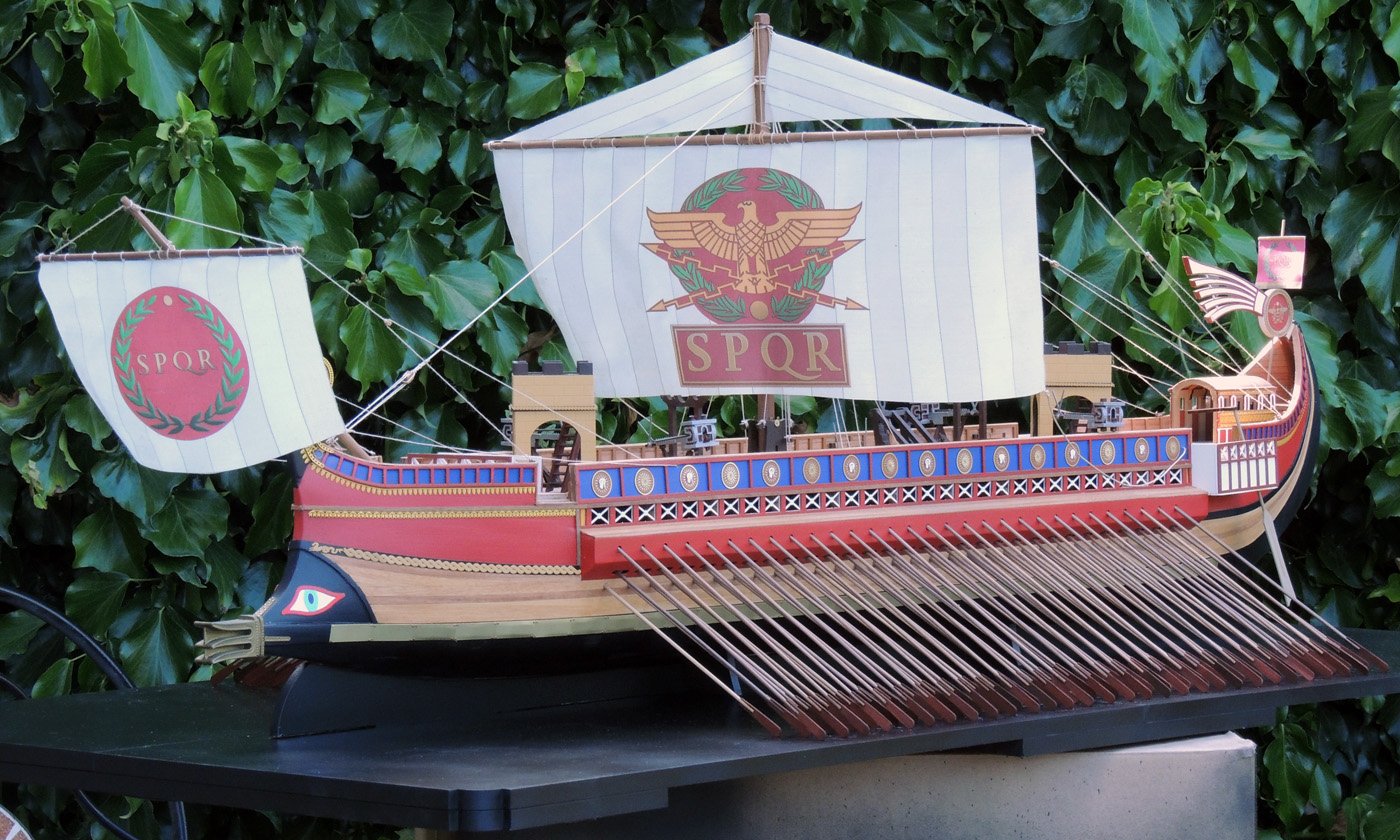
I think perhaps the Roman warship was specific to the Italian market. My files show I did this in early 2014, so well over 5 years ago. It is a shame, as that was quite nice (and well researched), and it had a lot of figures to go with it. I could do a completely new design for such a vessel, but it wouldn't be at the top of my list right now. I find the oars make the display a little too wide. The base for that model was huge, and very heavy!
-
Nice work! For those that are interested (as I am), there is to be a new book dedicated to SotS published early next year. I shall certainly be buying it: https://www.amazon.co.uk/Sovereign-Seas-1637-Reconstruction-Powerful/dp/1526766299/ref=sr_1_1?crid=3LWHAB7FJ4L2X&keywords=sovereign+of+the+seas&qid=1570292931&sprefix=sovereign+of+the+seas%2Caps%2C153&sr=8-1
- 192 replies
-
- 7
-

-
- sovereign of the seas
- sergal
- (and 1 more)
-
Ah, I remember those from when I was a kid! I had the Golden Hind and Victory, but never once seen a Shannon!
-
It may be worth contacting Hachette to see if this is still available? This was part of the proof advertising for it
-
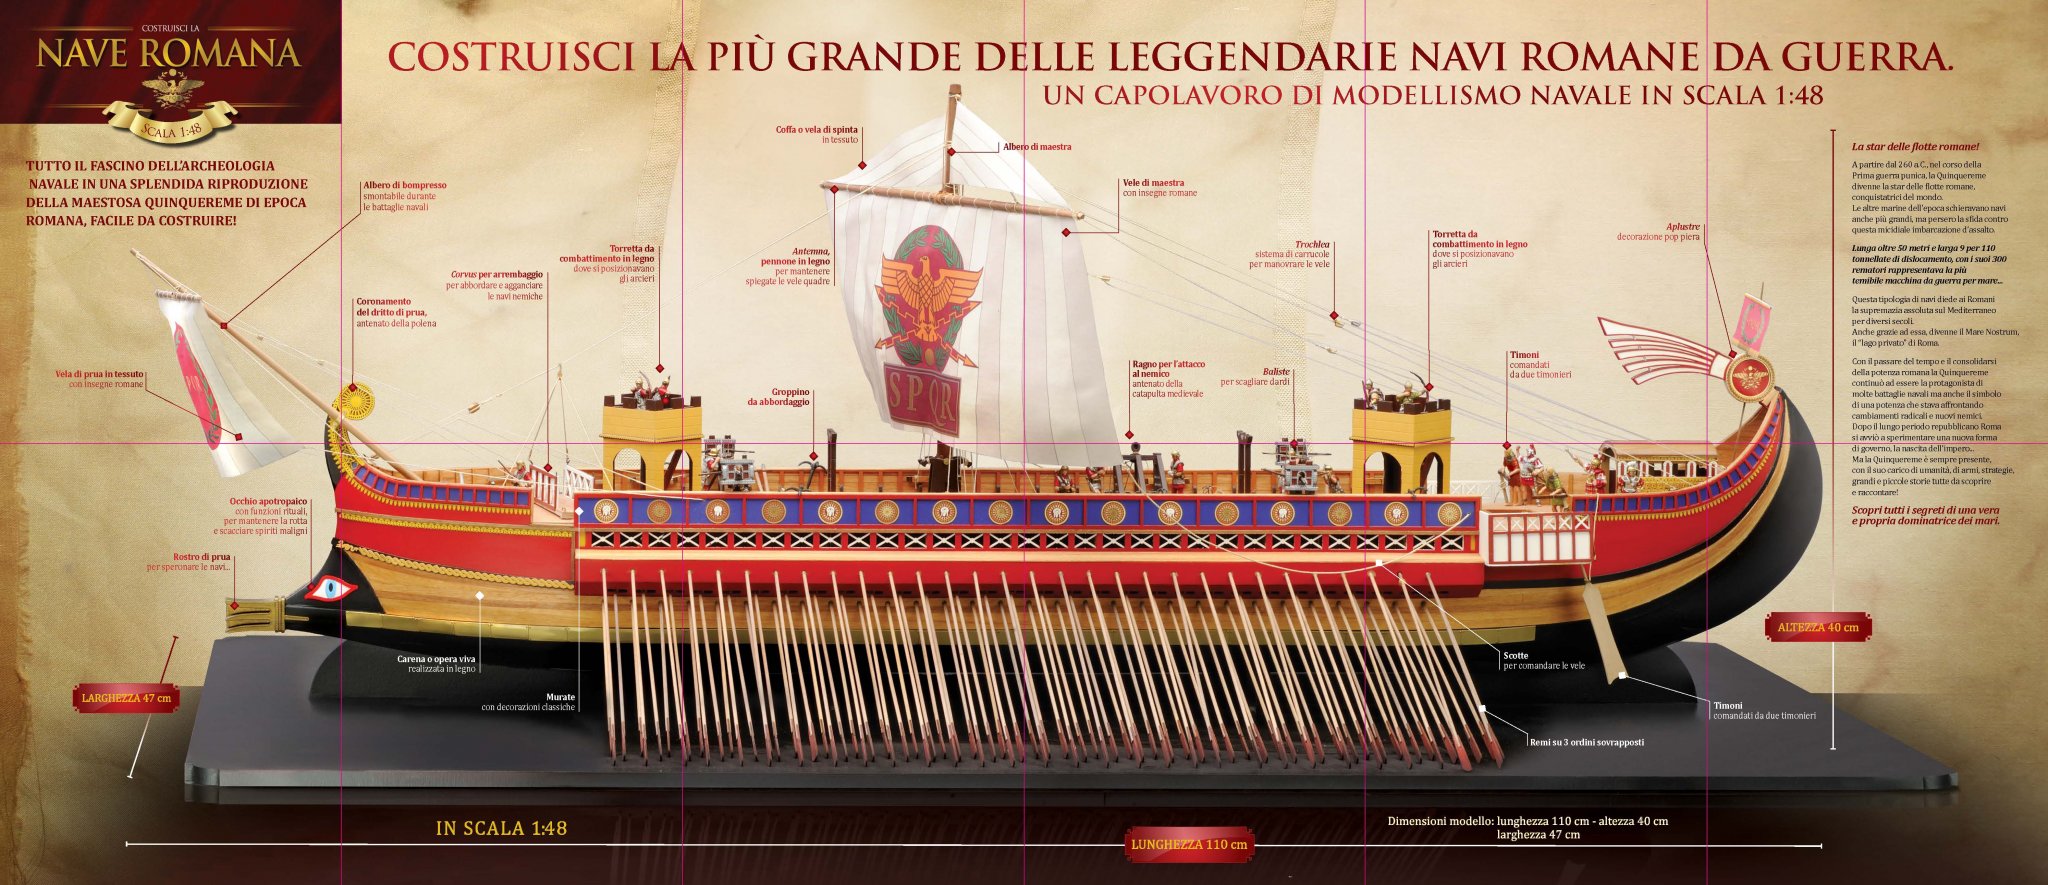
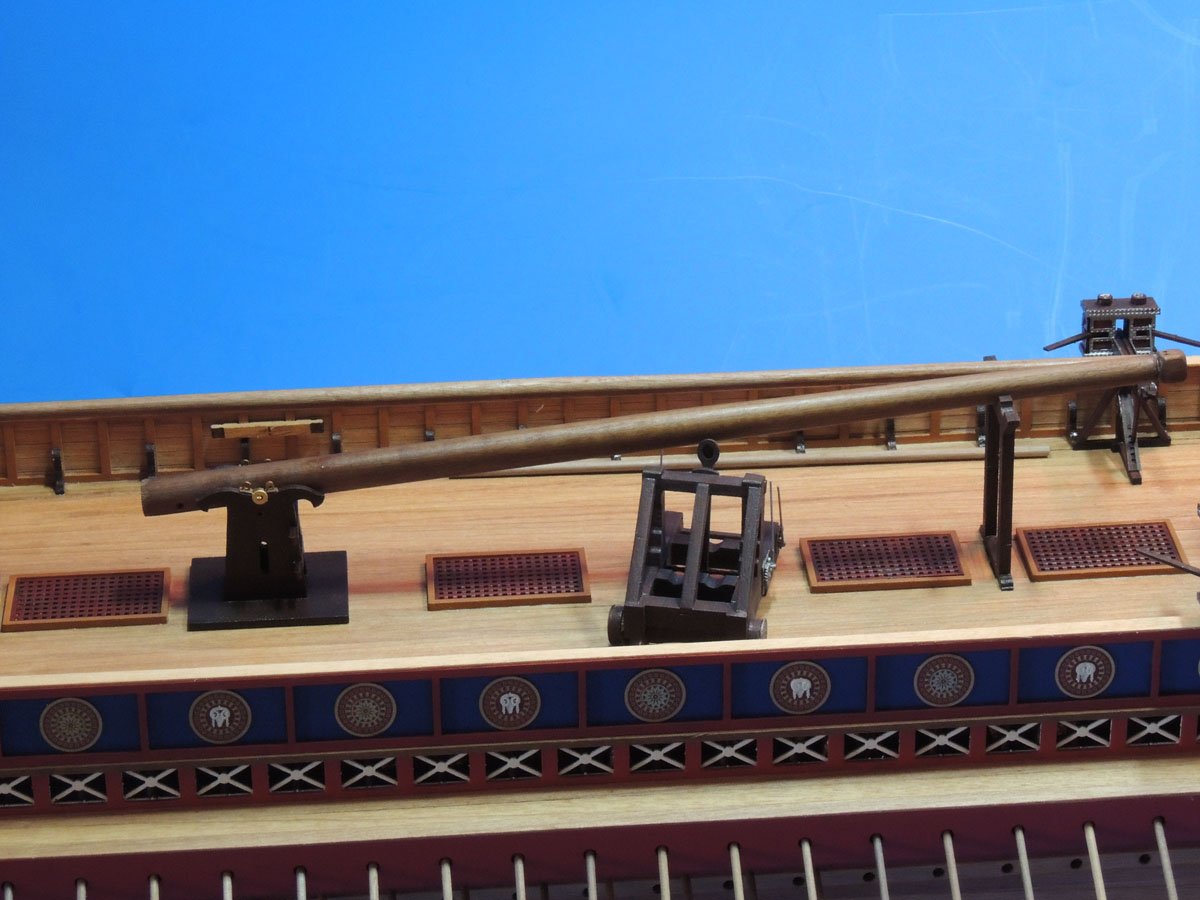
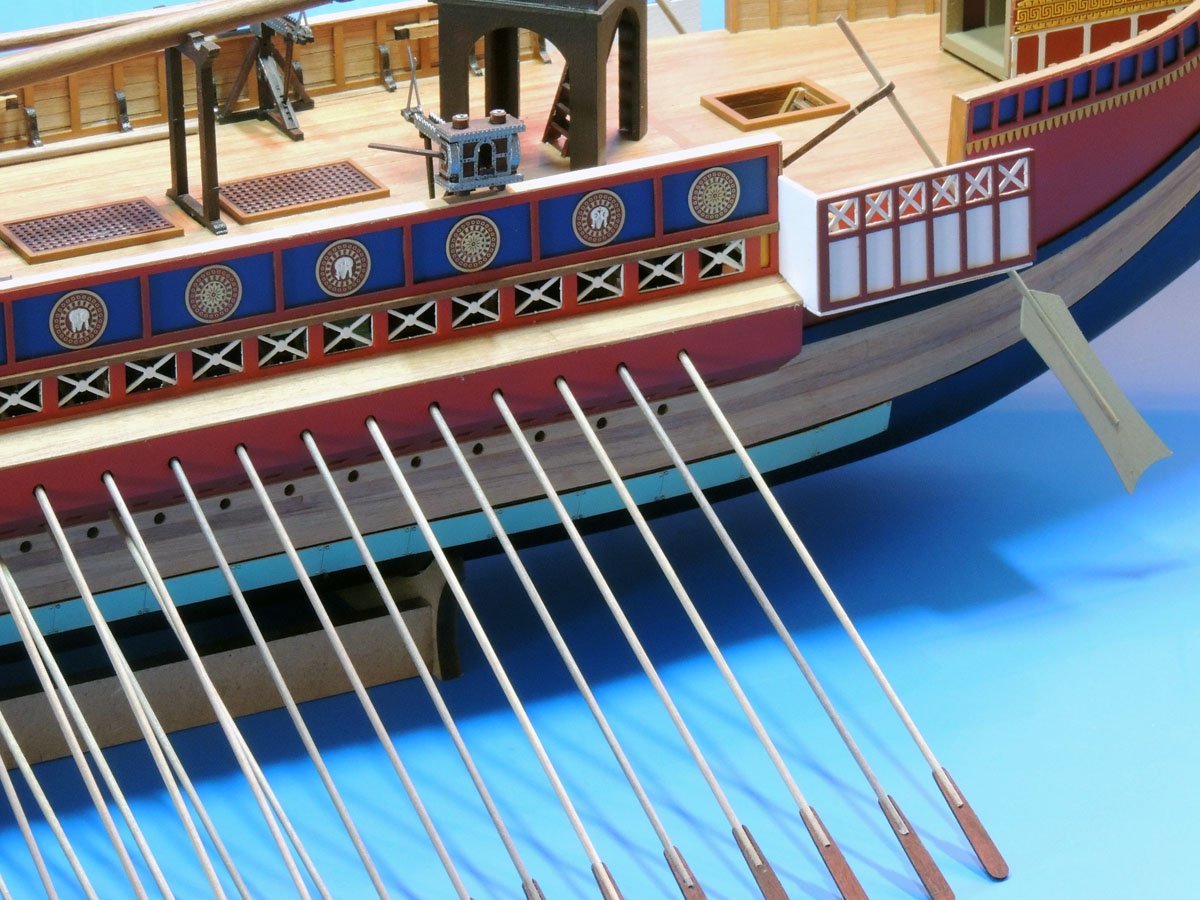
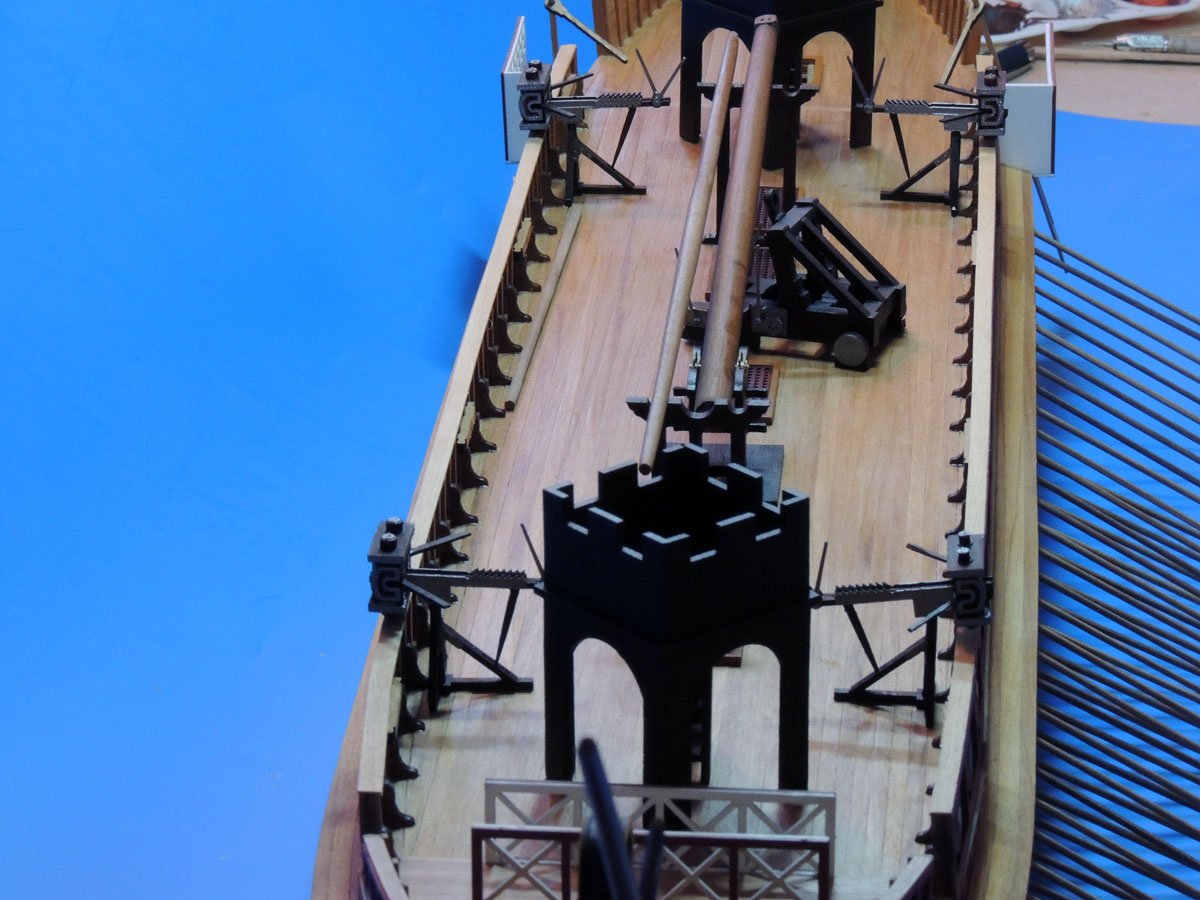
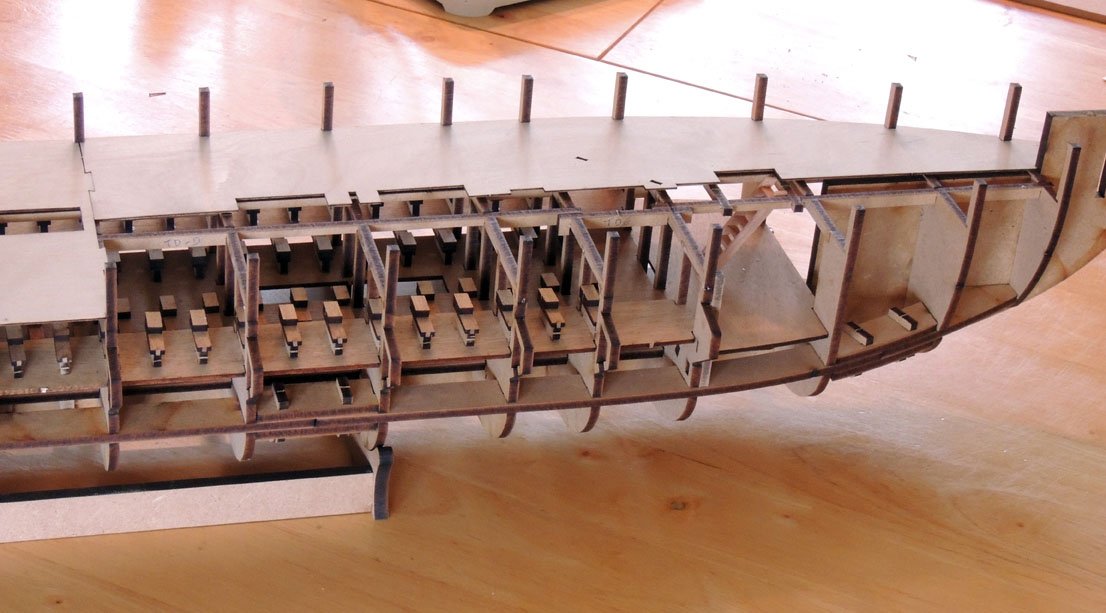
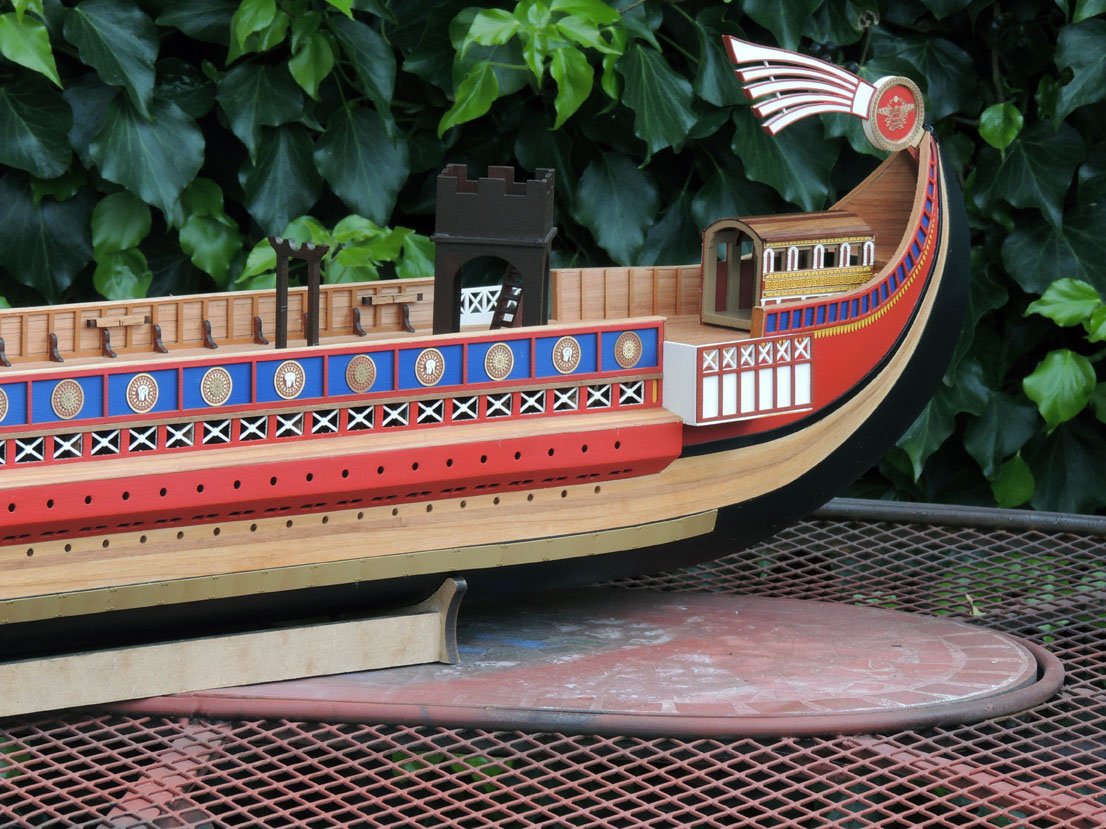
I have some more pics of the Roman warship, and a little text from some of the research I did, if you're interested: By the time of the beginning of the Punic Wars (264-146BC), the tried and tested Triremes were becoming too small to stand in the main battle lines. They were replaced by the Quinquereme or ‘Five’ – the ‘Five’ denoting the number of oarsmen at each section. More than any other type; the Quinquereme was the weapon with which the Roman navy became the dominant, and ultimately, the only Mediterranean naval power.(Much like the 74 gun Ship of the Line became the mainstay of the Napoleonic navies). It remained in widespread front-line service until the founding of the Imperial Navy in the 20’s BC. After this time, because Rome had effectively made the Mediterranean her own (Mare Nostrum), the large capitol ships were no longer needed and fazed out of service, and seemingly disappearing as a type by the late 1st century AD, after over three centuries of use. This model is based on a late Republic/early Empire vessel, which would have had an overall length of around 169 feet (51.5 m), making the model just over one metre long at 1:48 scale. The model depicts the ultimate version of a Quinquereme, which incorporates almost three centuries of design changes from lessons learned through combat. While researching, it became clear that the design of these vessels is very much still a subject of debate, most notably the oarsmen positioning. What is certain is that the Quinquereme was higher, wider and longer than the trireme. Most sources suggest that the most probable distribution of the team of five rowers has them working three banks of oars, two men on each side of the highest and middle bank and a single rower each side for the lowest bank of oars. This is how the oarsmen (and oars) are positioned on the Hachette model. Each bank or row has 30 oars, making 180 in total and 300 rowers. The Greek historian Polybius tells us that, as well as the 300 rowers, the vessels crew was about 20 men, to oversee the general operation of the ship and sails/rig, and carried 120 marines. Polybius wrote these figures down at the time of the third (and final) Punic War in 151-146BC, so it is very possible that later Quinqueremes carried more soldiers/marines as the vessels became larger. The earlier quinqueremes (Punic Wars) had an overall length of 154 feet (47m) and used a ‘Corvus’, or ‘Raven’, which was essentially a large boarding platform fitted with a large spike on one end to drop onto the enemy ship’s deck and secure the boarding platform while the superior Roman troops crossed onto the enemy vessel. Although very successful in combat, the Corvus proved to make the host vessel too unstable, and many Roman vessels were lost due to the high centre of gravity the platform caused – it is thought that more Roman losses at sea were caused by this than the actual enemy! The Corvus was removed and taken completely out of service by about 250BC, and replaced by a smaller, but more stable boarding bridge. Unfortunately, no detailed descriptions of this new bridge survive, although Vegitus, writing in the late forth century, does say ‘move out their warships alongside, throw out bridges and cross over to the enemy’s ship to fight it out’. Clearly, it was of much lighter construction than the Corvus. This is shown on the Hachette version. There is a break in the forward bulkhead on both sides that allows the boarding platform to be deployed left or right. It is suggested that grapnels were thrown to pull in the enemy vessel, and when close enough, the boarding bridge deployed. (Grapnels could even be deployed using the 4 ballistae, or ‘ harpaxes’, which were used at the time of Actium on 2 September 31 BC) The model is shown with a fore and aft tower. Only the largest vessels could mount two, with smaller vessels mounting one tower, probably in the centre of the deck. They were mounted either square to the centreline of the ship or, as the Hachette version, diagonally, as depicted in some contemporary paintings/carvings. Up to six archers and/or javelinmen could be placed in each tower, but not artillery due to weight and lack of working room (catapults could not be depressed downwards onto an enemy deck because of the design of their mountings) As well as the four ballista’s/harpaxes, the model is shown with an onagar, designed for ship board use. This heavy artillery would be used to throw heavy stone shot or Greek Fire at the enemy – making the Quinquereme an extremely effective long and close range fighting platform. The ram is designed using a contemporary marble carving (located at Ostia Antica, near Rome) as reference, and has horizontal and vertical vanes for effectively cutting into enemy hulls. The Admiral’s cabin aft of the deck is of a more sturdy construction and more heavily decorated than normal, as more befitting a Roman commander of high status. For example, Admiral Agrippa (Augustus’s close friend) at the Battle of Actium. All decoration shown has been designed using only contemporary sources as reference. Sails and Rig Roman warships are rarely shown under sail with their main mast erect, as the primary motive power for the ship were the oars, and the sails used only to supplement the oars when winds were favourable. Sails would certainly be not used in battle, and would be taken down and the main mast rested on the gallows, out of the way of the fighting deck before battle. Because of the large size of the Hachette Quinquereme, the main mast is set in what is known as a ‘tabernackle’, which is essentially a large bracket to which the lower mast can pivot and brought down to rest of the rear gallows – with all attached rigging being able to move with the mast and then detached. Roman vessels of this period had one large rectangular sail and, peculiar to the Roman vessels, also had additional triangular sails above the main sail called a ‘Supparum’, as is fitted to this model. The largest ships also had a type of bowsprit, or forward mast, mounted at the bows and raked forward, so that the sail was in front of the bow. The sail was smaller and called, or is known as an ‘Artemon’, although it is still not certain if this word relates to the mast, sail or whole arrangement.
-
I absolutely loved the development of that Roman quinquereme (being an avid fan of ancient history, and of the Rome:Total War games..). The research was quite long but very enjoyable. It was developed for a magazine part work model (like around 80% of my work in the latter days). I used researched modern drawings along with contemporary paintings and pictures of parts of wrecks (the ram was directly copied from a photo taken of one recovered from a Roman warship). the artillery was also painstakingly researched for the correct period. It was modelled on a late republic/early empire era vessel, as I was not sure if what era they would want. Unfortunalty, when I have completed these part work developments, I no longer know what happens to then, or what sales are like. I finish them, and then never hear about them ever again, all I have is the picture I had taken whilst building the prototypes (and the CAD designs, but they are not mine, as another company paid for them to be done)
-
It is a nice idea, and if things work out, I would do a Leda class 38. For now though, I already have 4 frigates lined up, including an earlier 38, three of them because of their fame and commanders, and one because it is just so damned nice looking. I never knew Airfix did a Shannon!
-
Thank you! I think the US (or any) ships from the 1770's are much better looking, having very pleasing rakes and curves, but the later ships are more well known, and the brigs always look nice anyway. I love the Oliver Cromwell thread, that is a lovely looking model. I did design a Surprise for Amati, and that isn't on my future projects lists, but many other frigates are. I want to avoid developing subjects I have already done or subjects that have already had a kit made for them - unless I can add to that subject in a unique way. Still plodding on with the plan sheets, I always forget how much of a time sink the plans and instructions are. However, presentation is important, and I do not include my development time in with kit prices, so no big deal. It's funny, when I am working all week, both on my kit projects and day job, I look forward to the weekend so I can spend all my time on the kits. but when the weekend comes, I feel so drained that it's difficult to concentrate.. I am negotiating with my pear and boxwood supplier for the possibility of pear sheet for the laser cut parts. I am awaiting a price. I would dearly love to include this material for the laser cut wood parts rather than the anaemic looking limewood, but it is all dependant of cost. It may well be too much, but worth an ask. If it is acceptable, this would go into my third kit, as Speedy is being laser cut as I type (as far as I know..)
-
I love drachinifel vids. I think this must be my favourite, as I laugh out loud everythime I watch it: https://www.youtube.com/watch?v=9Mdi_Fh9_Ag
-
No rabbet, like almost all European kits, Pegasus is double planked. Most US kits are single planked, which allow for a rabbet. There are patterns that glue to what would be the rabbet positions. A proper rabbet would not work so well with double planked kits, as the first planking would most likely take up all of the space in the rabbet slot, due to the angles and bevels involved.
-
You are quite right, sides not as pronounced as the earlier standard French frigates, but that gun deck length, almost 170 feet, only a few feet shorter than the large Americans. I think it was started as a 74 and then altered to a frigate? What an imposing model this would make in 64th scale.
-
Thank you! I guess I do it because a large part of it is love of the hobby and the look of the ships when complete and want to continue sharing in my enthusiasm. I think I mentioned before, but I haven't taken out a single penny from my kit sales, it all goes back into new and continuing developments (hence the day job..) Today I have been putting the Speedy 50x70cm plans together, still loads of work to do, mainly text using Adobe Illustrator and InDesign. from what I can tell, there will 10 sheets of 50x70cm plans (6 for masts, yard and rigging, one for full size hull and deck profiles, and 3 for laser and PE full size parts) and quite a thick colour manual in A4 format (a little more manageable..). Still so much to do all seems quite a way off from seeing the light at the end of the tunnel..
-
I may have to get this, I know this frigate was huge, and love the exaggerated tumblehome of the French frigates, if not the flatter sheer.