chris watton
-
Posts
2,334 -
Joined
-
Last visited
Content Type
Profiles
Forums
Gallery
Events
Everything posted by chris watton
-
 Nice job! I have always liked the Euromodel kits, one of the few European manufacturers that 'get' the graceful lines of period ships.
 -
Thanks guys! I did look into utilising the gun port framing for Speedy, but it would have left the bulwark sides too thick, being planked both sides. I could have reduced the thickness of the bulkheads above deck level, but we're talking less than 2mm thick, coupled with the fact that the horizontal;l and vertical frames need to slot into each other, meaning the thickness in the slotted areas would be around 1mm. This tolerance would be intolerable (!). I would get so many complaints and/or requests for replacement broken parts. So, the gun port/bulwark patterns are laser cut in ply, much stronger and safer in this instance, and better for scale appearance once they are planked inside and out. Bristol and all larger kits will have the new gun port designs incorporated into the hull framing, however. I did this for a 72nd development of Hermione around three years' ago, quite an enjoyable and easy build..
-
Another brave fool(from South Africa)
chris watton replied to The Bitter End's topic in New member Introductions
I usually only soak the planks for a few minutes, if you leave it too long, too much water soaks into the wood and as it dries out, the planks shrink and leave gaps between each. I have personally never used a heat gun for the limewood, as it's quite pliable anyway. However, everyone will have their own method for planking. -
Nice idea, but I have little interest in steam. If I do a US subject, due to the amount of time and money required for the development, it needs to be very well known, popular, and detailed. Three masts and no funnel. But this is in the future, I have another five kits lined up before that.
-
Another brave fool(from South Africa)
chris watton replied to The Bitter End's topic in New member Introductions
Congratulations! The Pegasus is a relatively easy build, as all major components are pre-cut, and the photo etched decoration will always fit perfectly and is very easy to apply. The most difficult part will be hull planking, but make sure you check in here for advice, all the planks need is a slight taper and perhaps a soak in water for extra pliability. -
Thank you. I know carronade ports were longer (vertically) than the standard carriage guns, and in the earlier days, they tended to avoid the channel/shroud areas due to the short muzzles of the carronades. I really do not want to 'berth up' the forecastle though, unless there is compelling evidence it was in fact berthed up (and in truth, it probably was). I think the lower forecastle with timberheads looks a lot nicer. Regarding Imperieuse (captured 1804, formerly Medea), have you link to the figurehead and stern, as all I can find is the main line drawings (just side and frames)? I have stated before that none of my kits will have dummy barrels, and I have already had the master 24 and 12 pounder cannon barrels 3-d printed and cast (these will be black resin). The gun port frames will be integrated into the bulkheads as Victory (and the French Hermione and Bellona I did). This will always be the case for those models that allow for such designs, as all guesswork on the part of the modeller is eliminated. I have never been a strong believer in having to mark out and cut the gun port openings after planking the hull, it assumes too much of the modeller, having paid a lot for a model kit. ETA - I have noticed most of my customers are from the US, I must think about doing a nice big 64th scale US frigate in future..
-
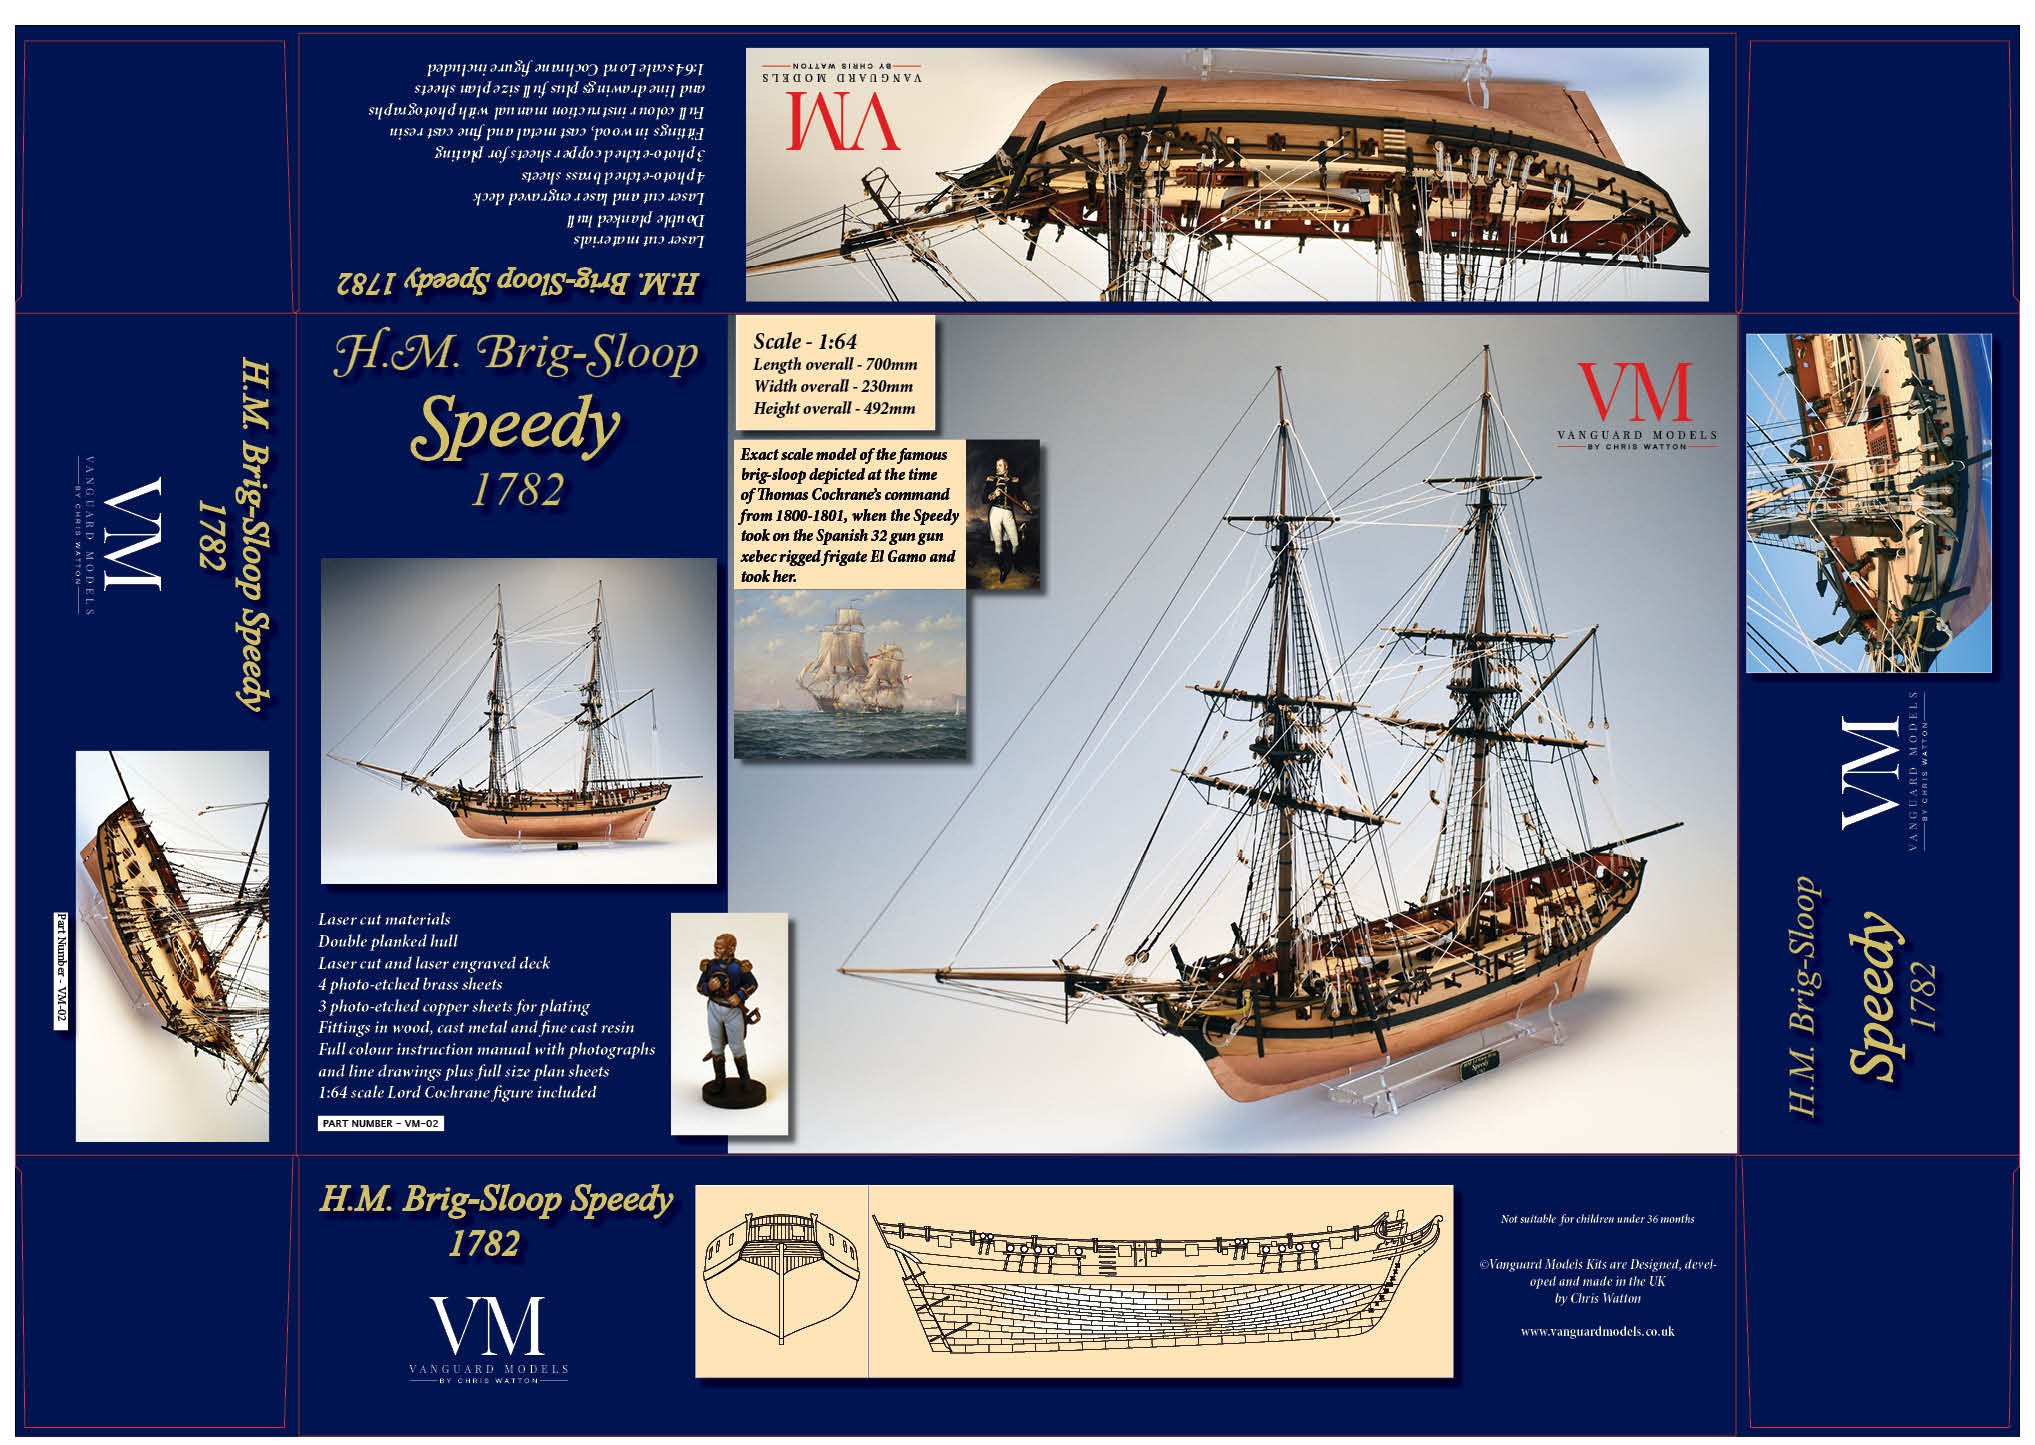
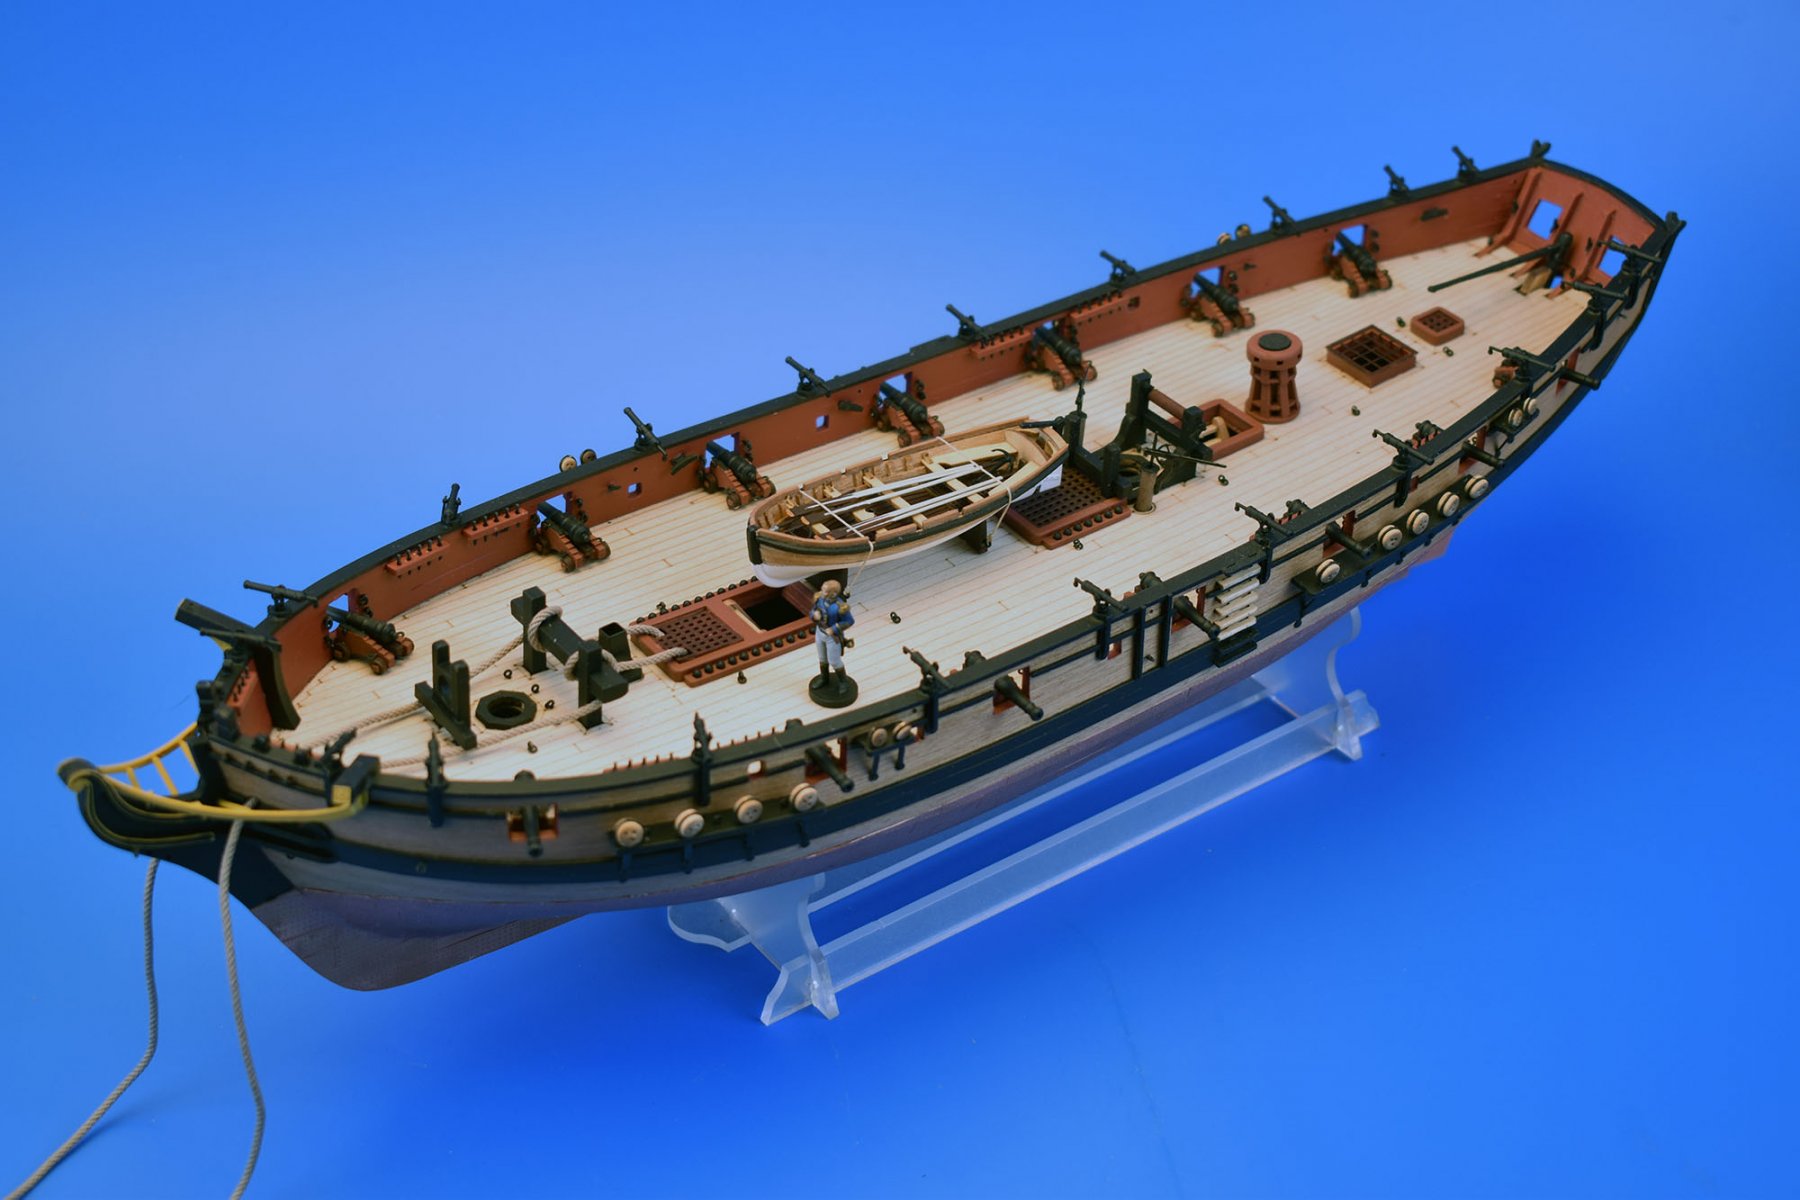
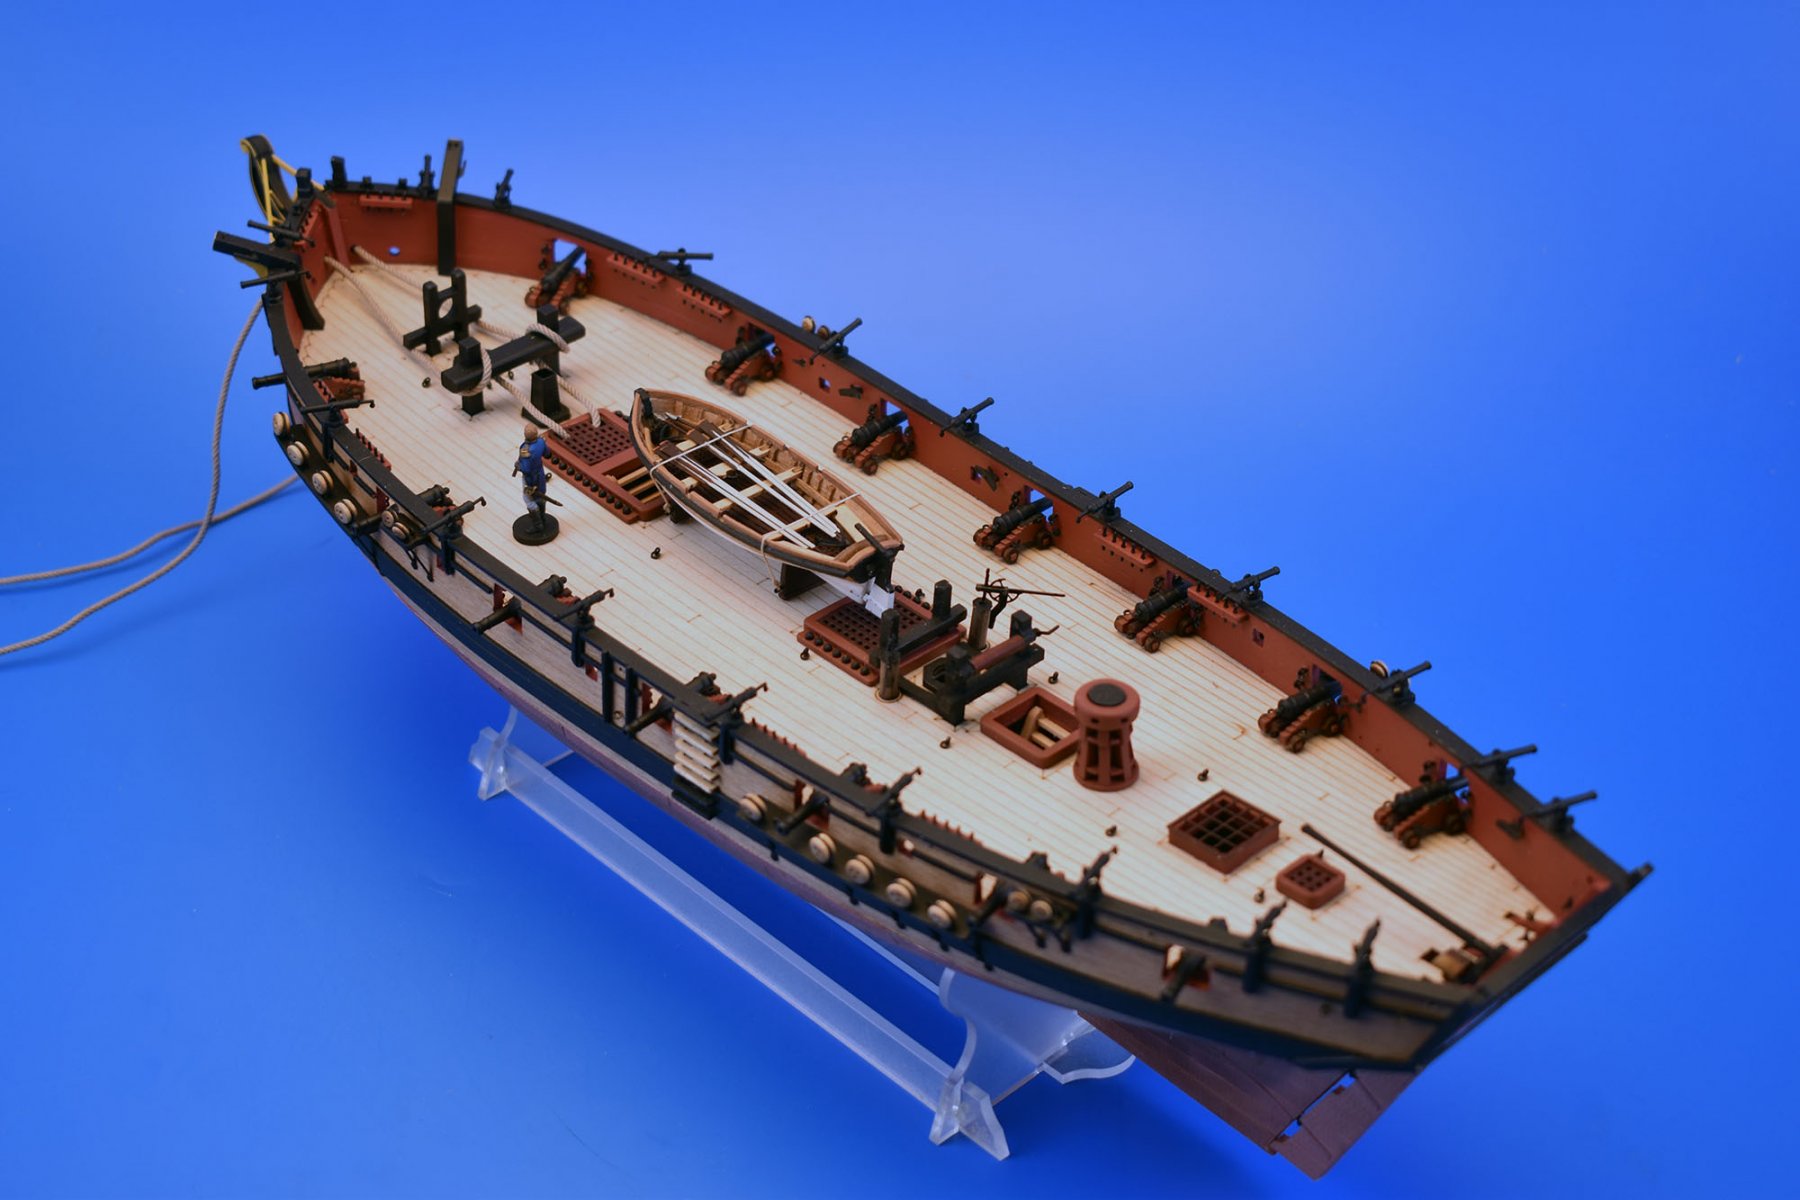
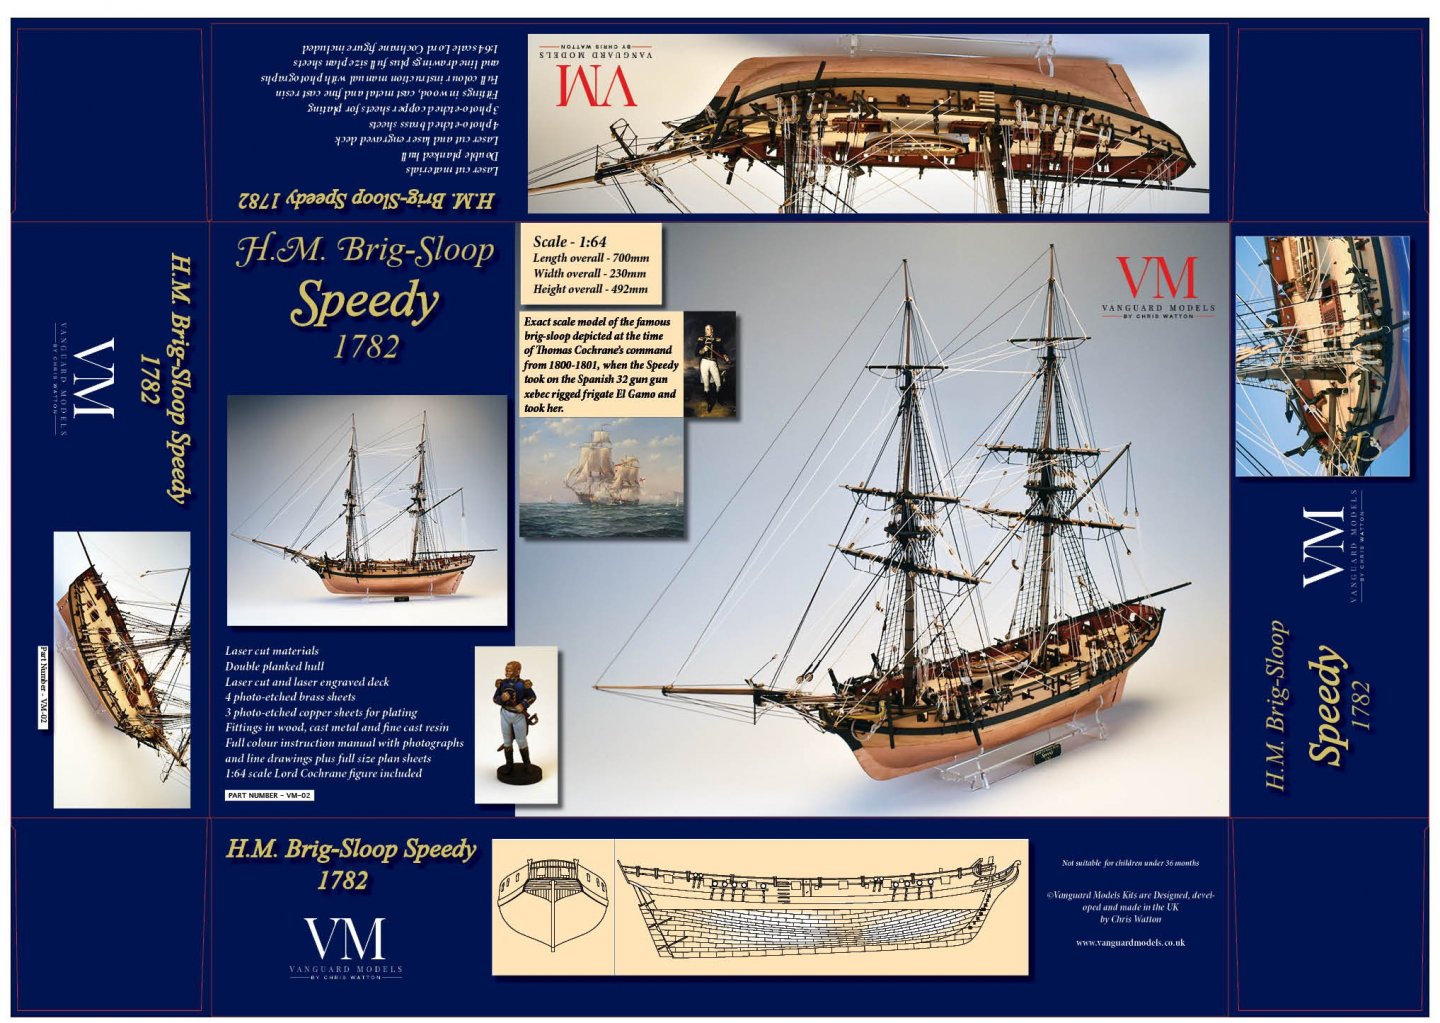
Thanks, guys, and for the likes. There are eleven separate laser cut sheets in various thickness's and six separate PE brass and copper sheets. I did mean for this to be a quick development, but as usual it didn't turn out to be so, as I knew such a vessel deserved more attention. I haven't compromised very much with this kit, and is as I would like it if I were to buy it. However, lack of compromise always equates to a higher price, but if the Alert sales have taught me anything, it's that people prefer quality materials over standard. This weekend I managed to write the complete parts list, take the main box art photos and then put the box art together. I have the manual and plan sheets to do next, but all pics and line drawings are already done, so I just need to make up the manual and add the text (which takes longer than it sounds, as it is just me doing everything....) There is only one metal casting in this kit (anchors), as I hate white metal. The 14 x 4-Pounder barrels are cast in resin (so perfect shape and scale), as are the 20 half-Pounder swivel guns. Having these done in resin is a lot more expensive than white metal, but I feel a lot better knowing the quality is perfect, and I do not think people will mind paying a little more for such fittings that require no finishing aside from perhaps scraping the smallest amount of easily removable flash. The guys that do the resin castings for me are experts in resin and injection moulding kits and well established, so quality is never an issue on that front. I think I already mentioned this, but I did add at the last minute an extra cradle on the 3mm MDF laser sheet, for use whilst building the model, leaving the clear acetate nice and clean for the finished model. I already have the Speedy resin castings done and here with me, plus the laser engraved decks. The final laser cut and PE have been given to my colleague in Italy to be done, and the pear wood strip ordered and on its way. For future gun resin castings, they will be cast in black - I didn't realise at the time that this was an option, dammit! I am aiming for a late October (possibly November if I have problems with getting final parts in time or finishing plans/manual take longer than I thought) for release. I cannot give a final price yet, as I still need to know the cost of the PE and laser cutting, but I am aiming for the following (all versions relate to secondary planking materials): Tanganyika version - £220 (as shown on prototype model) Pear or cherry - £245 Boxwood (limited to 15 kits) - £280 All versions will include the copper plating, Cochrane figure and 18 foot cutter.
-
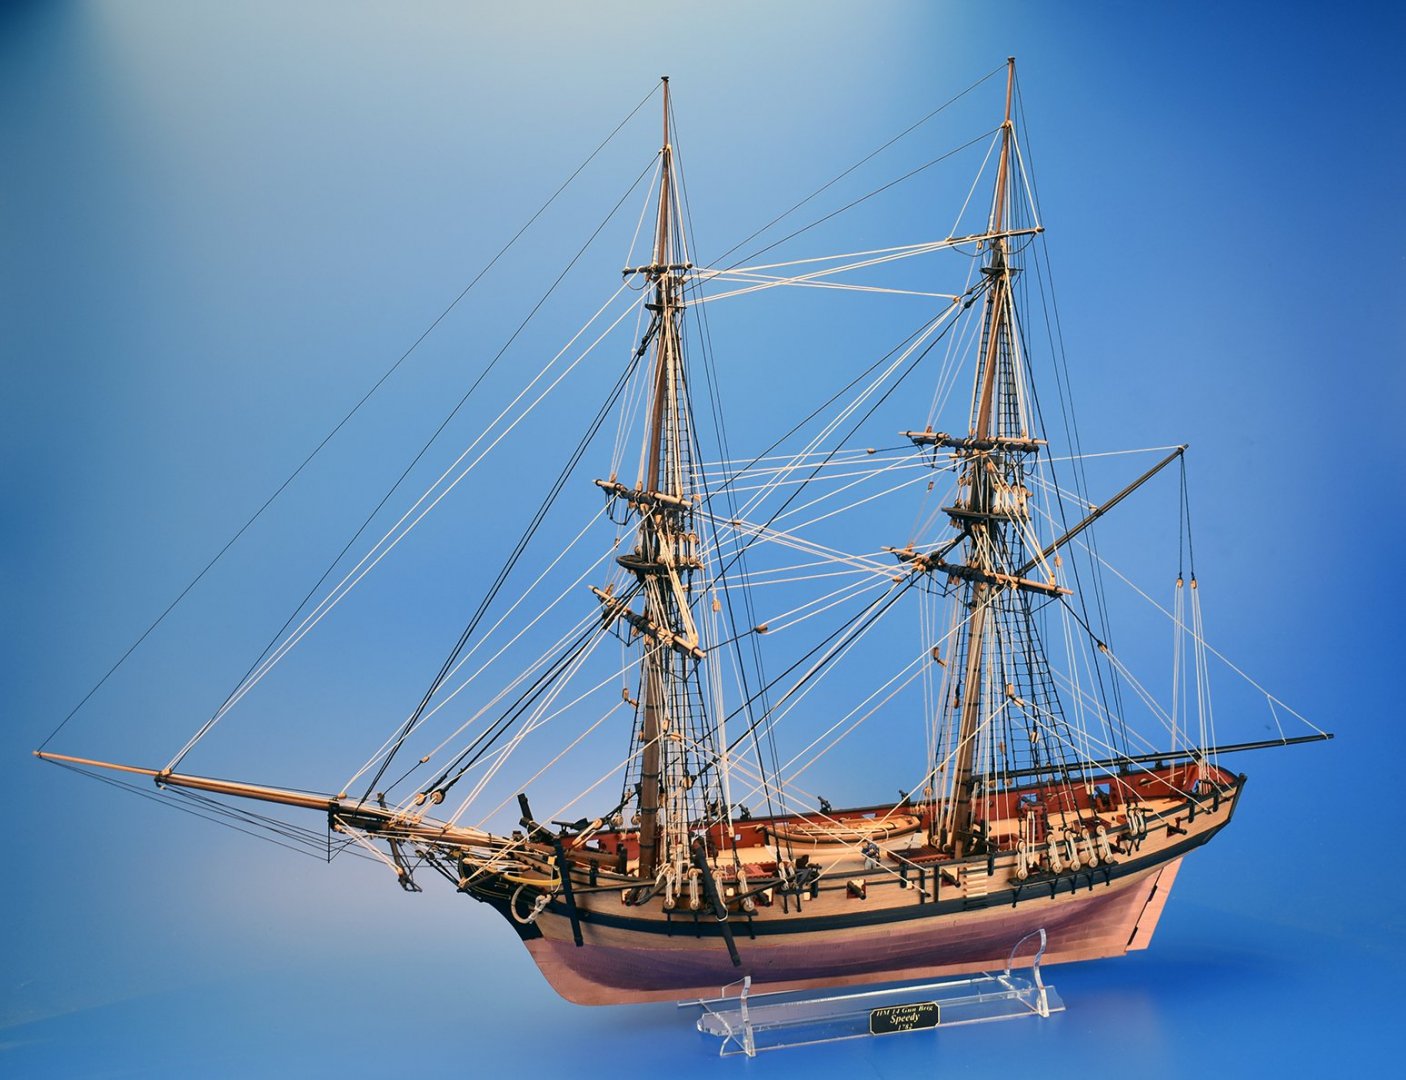
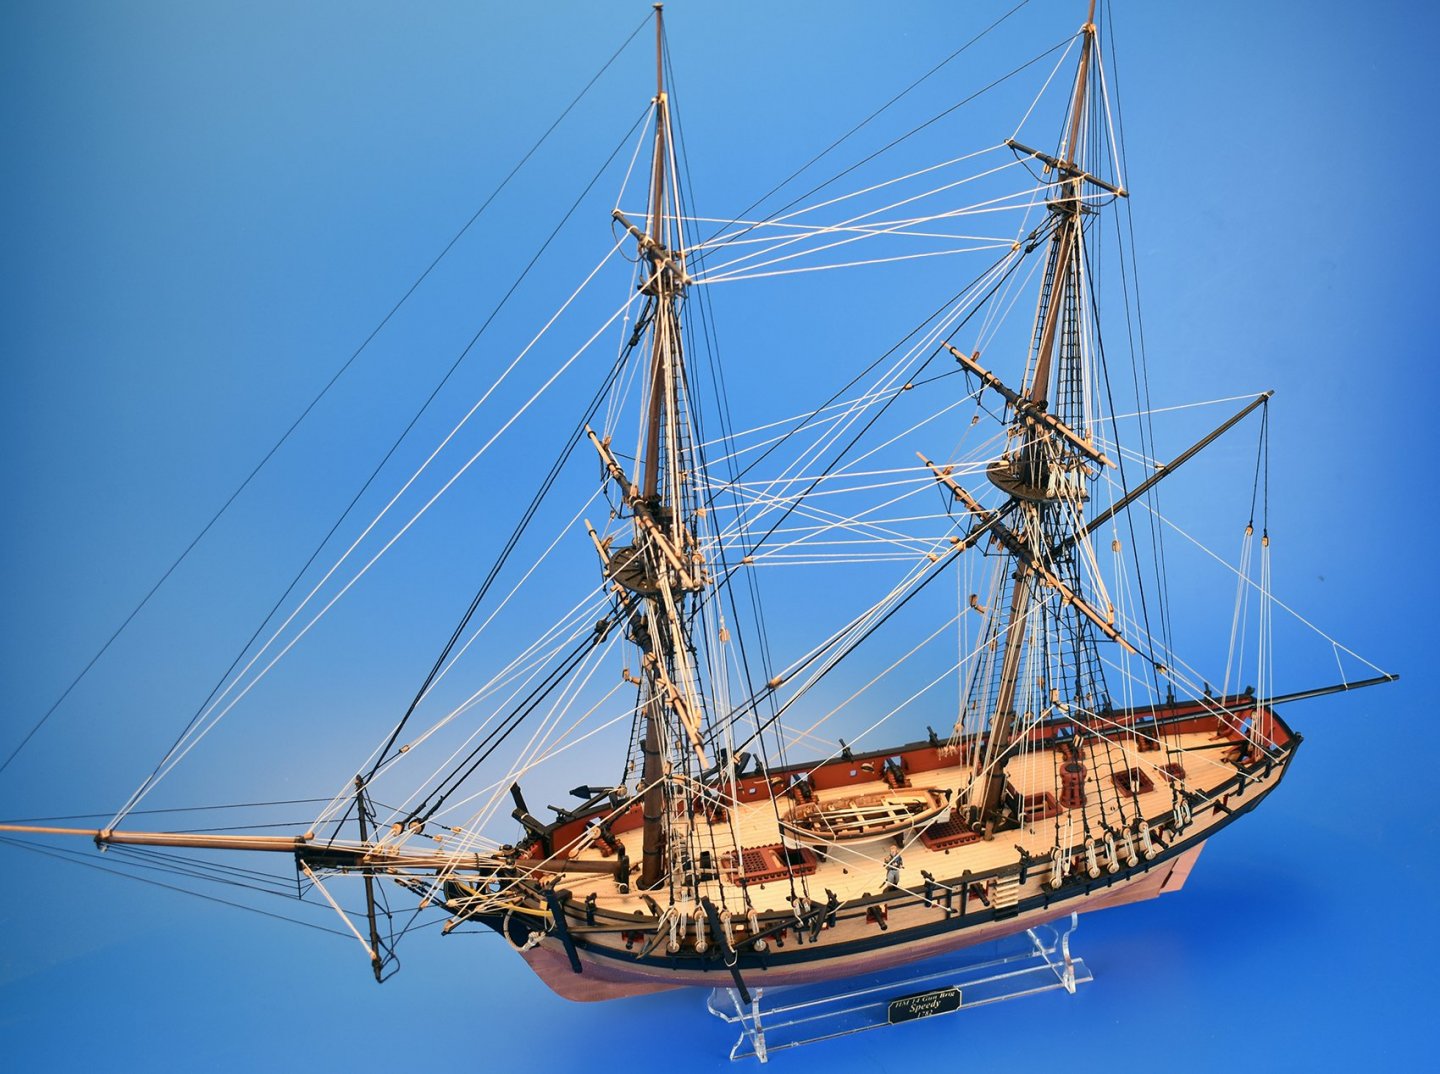
Today I took the Speedy box art shots and then put the box art together, does this look OK? Just have the manual and plans to put together now, all laser and PE have been sent for cutting/etching.
-
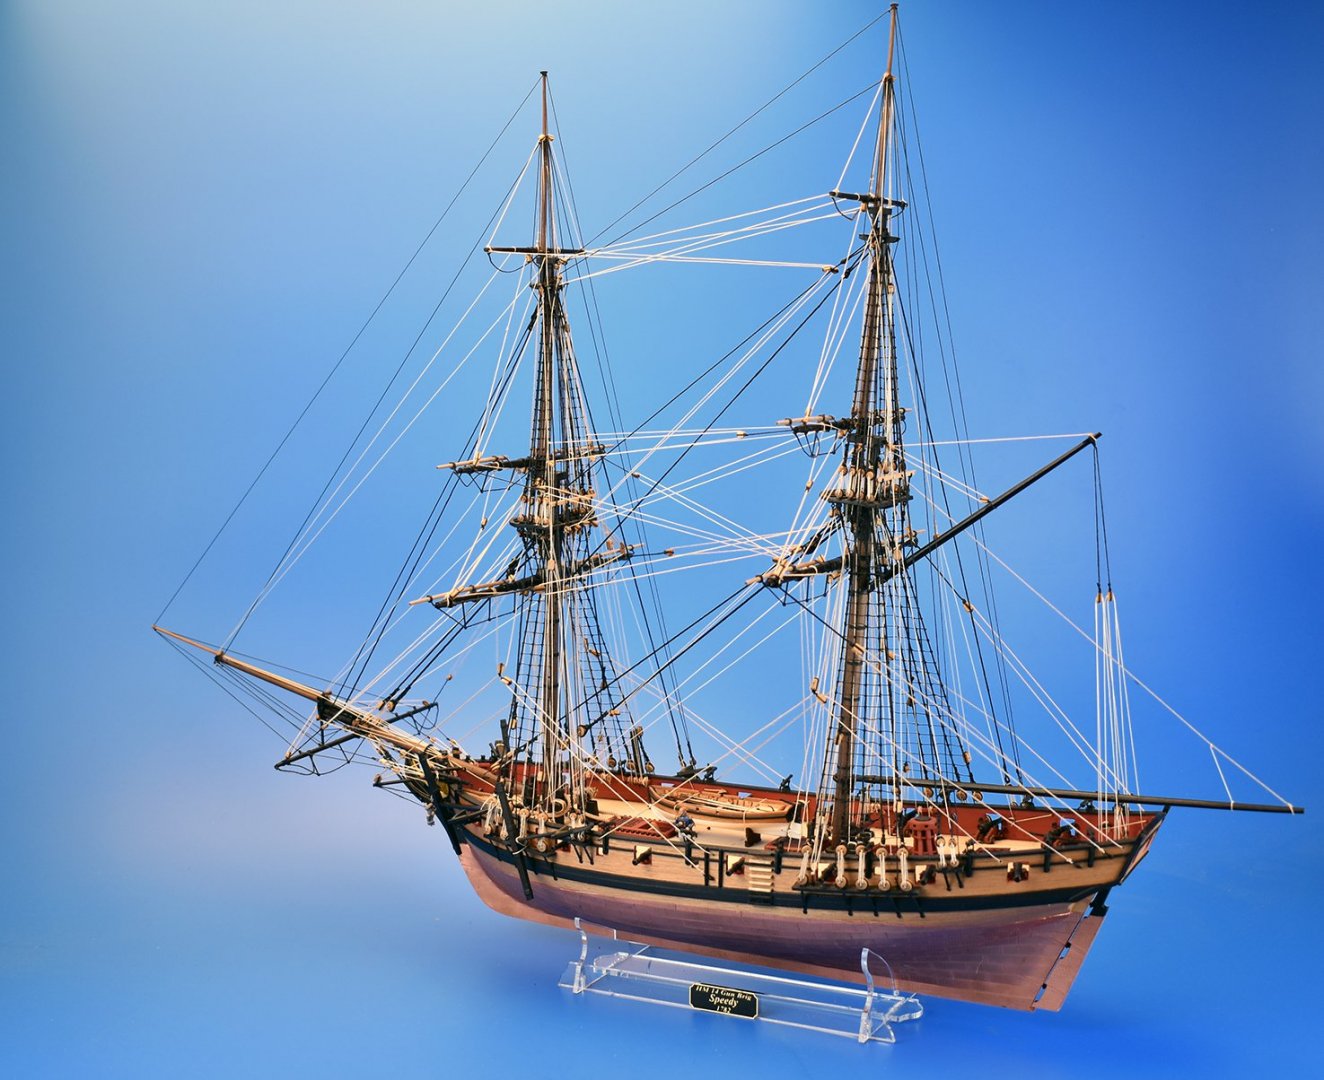
Black for the static standing rigging, as it was tarred, and natural for running rigging. Most times, the ratlines were also tarred, but not always. I believe that Nelson's preference was to not have ratlines tarred, so the shrouds should be black, but ratlines natural rigging thread.
-
It just makes it a little easier if all bulkheads are already glued in place, and the material is correct so stronger. That is all. The shape are exactly the same apart from the forward most slot, but they fit in exactly the same places.
-
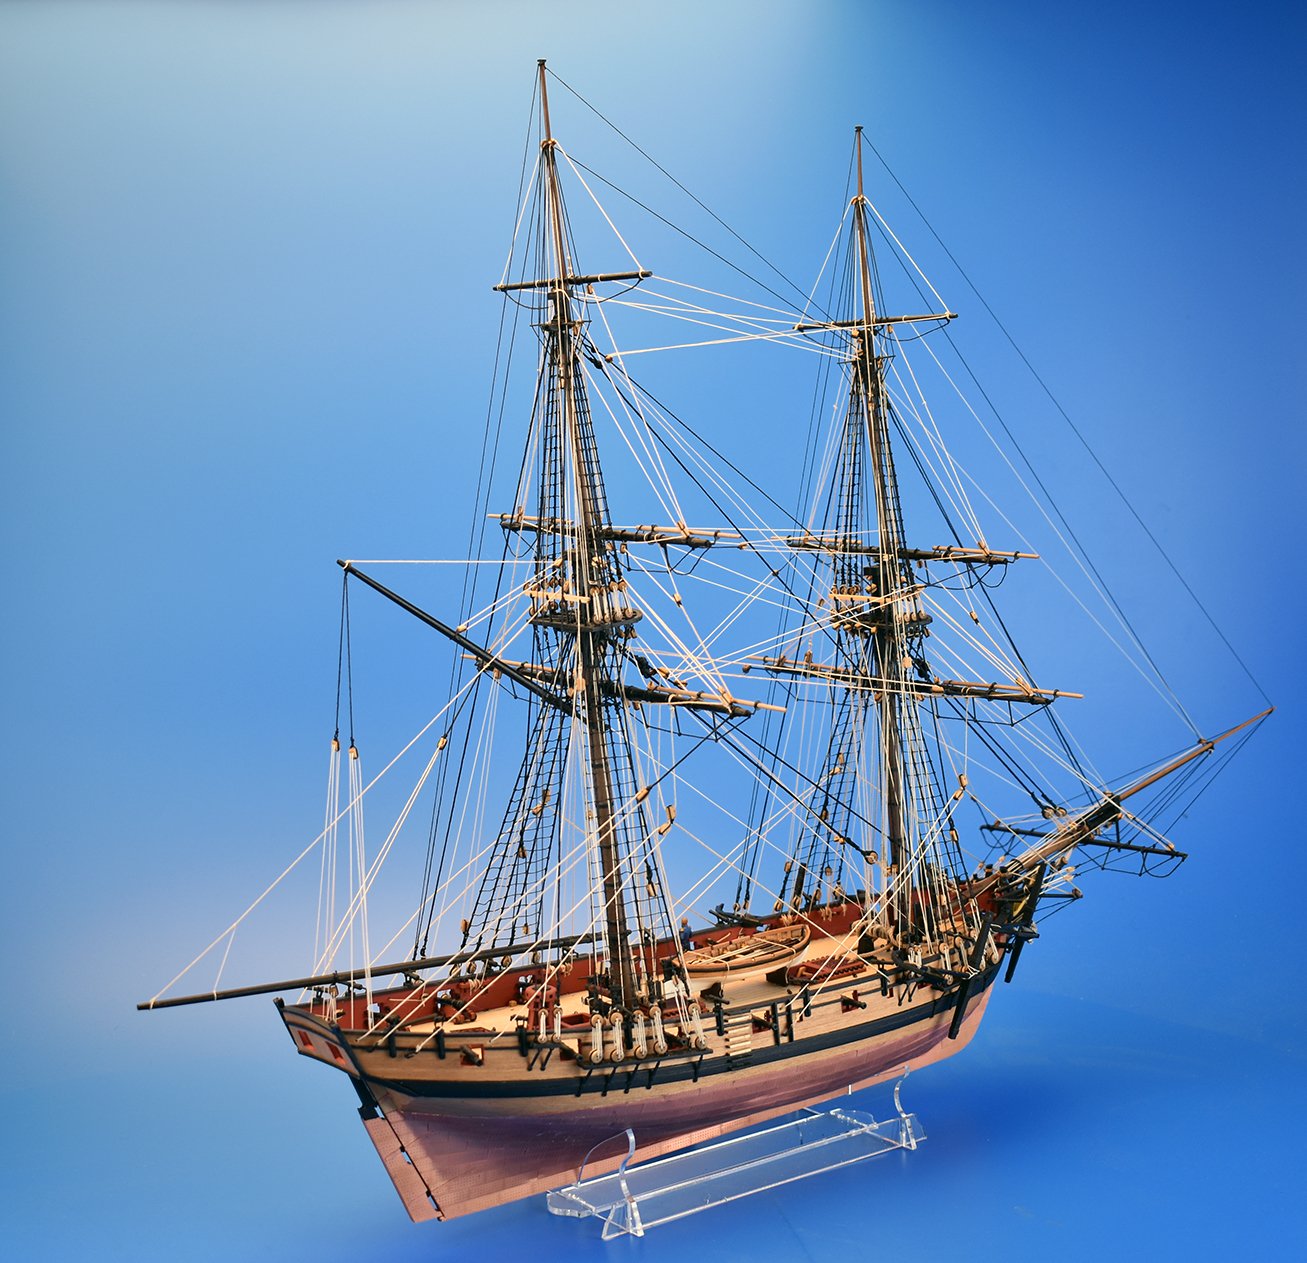
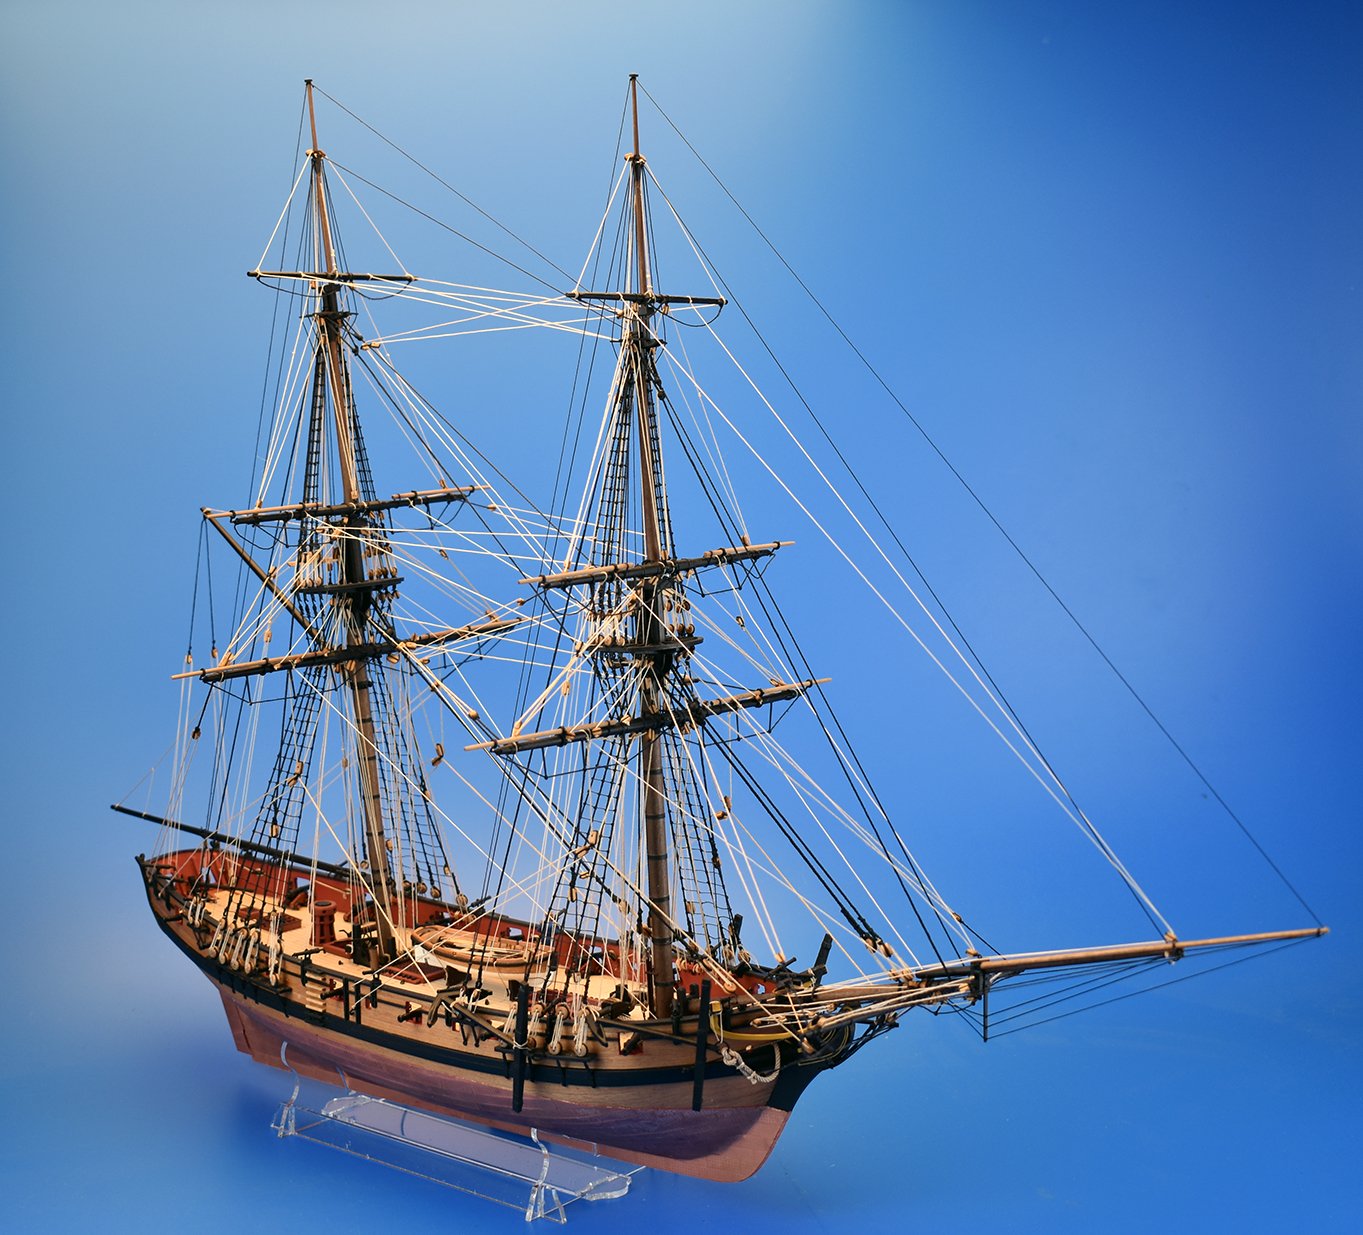
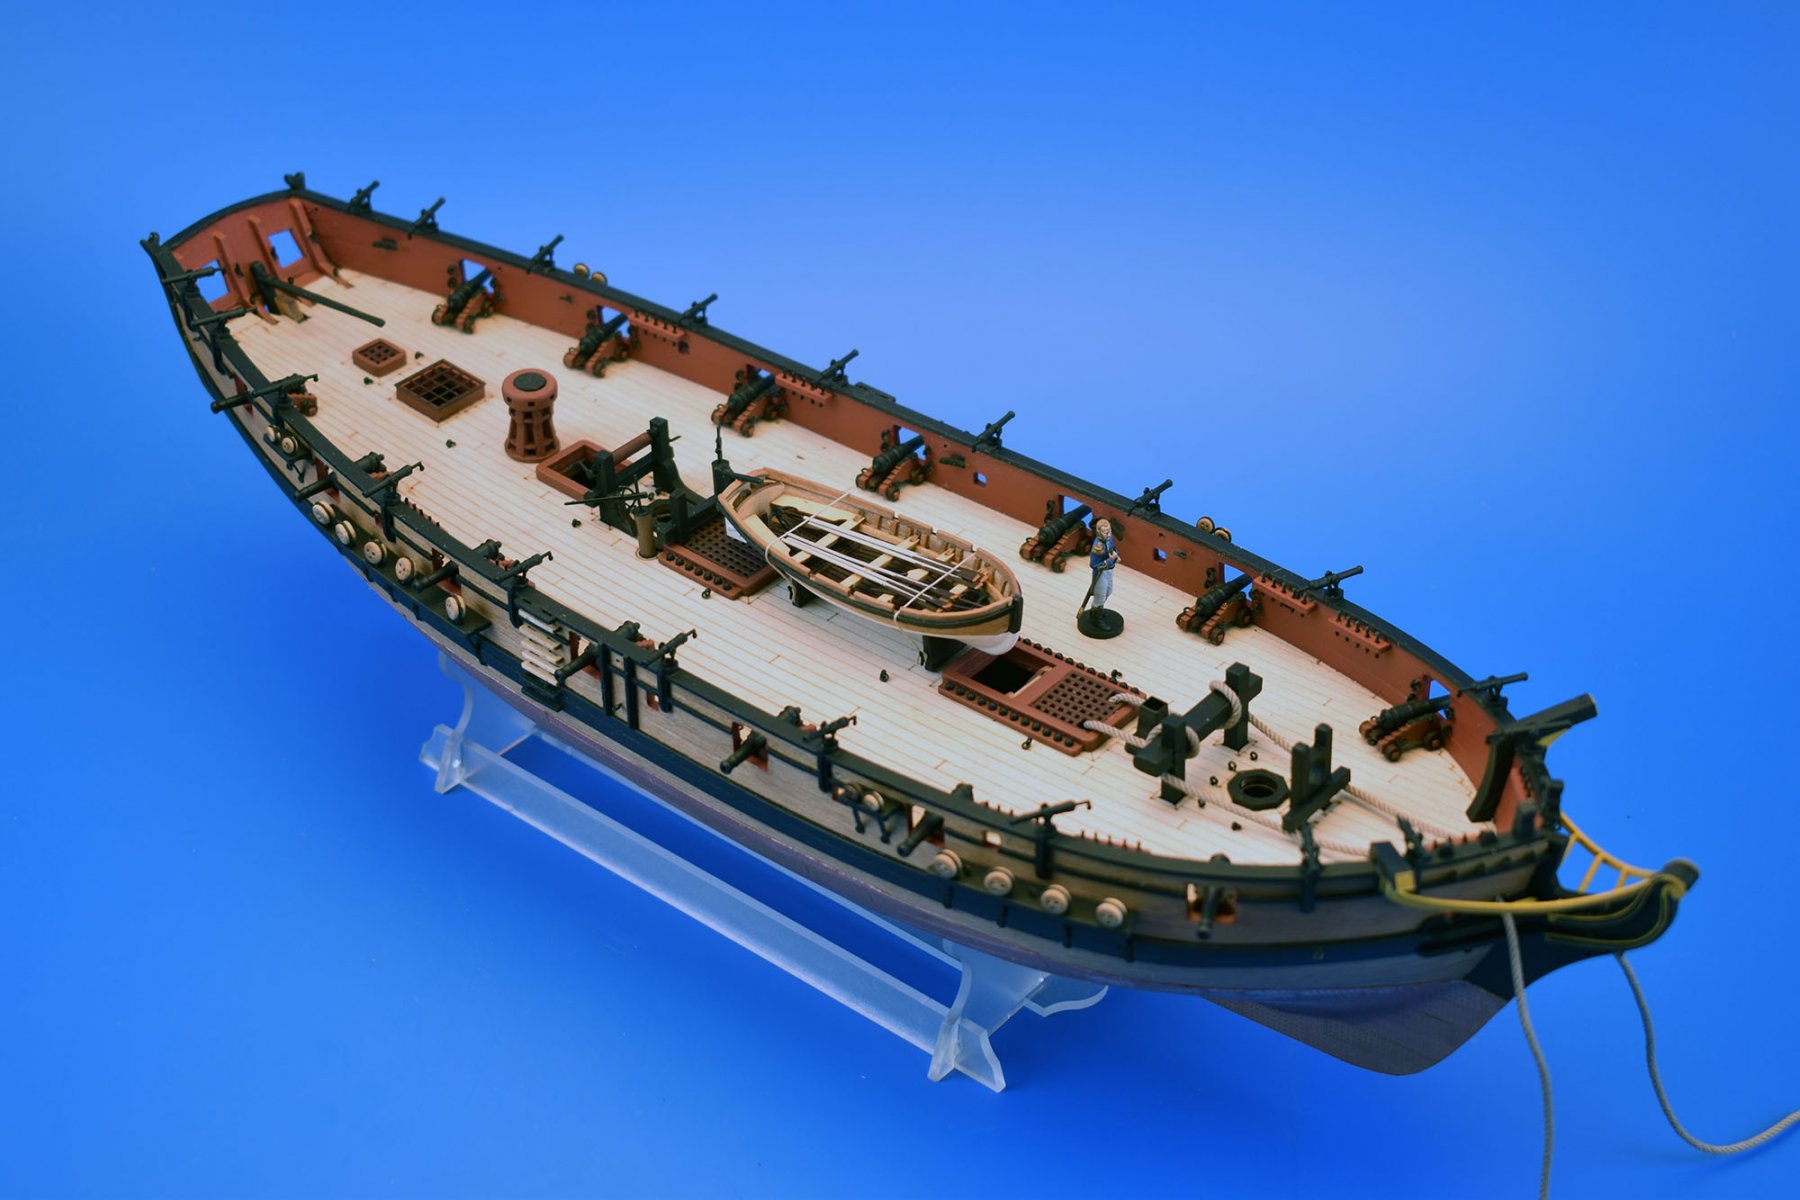
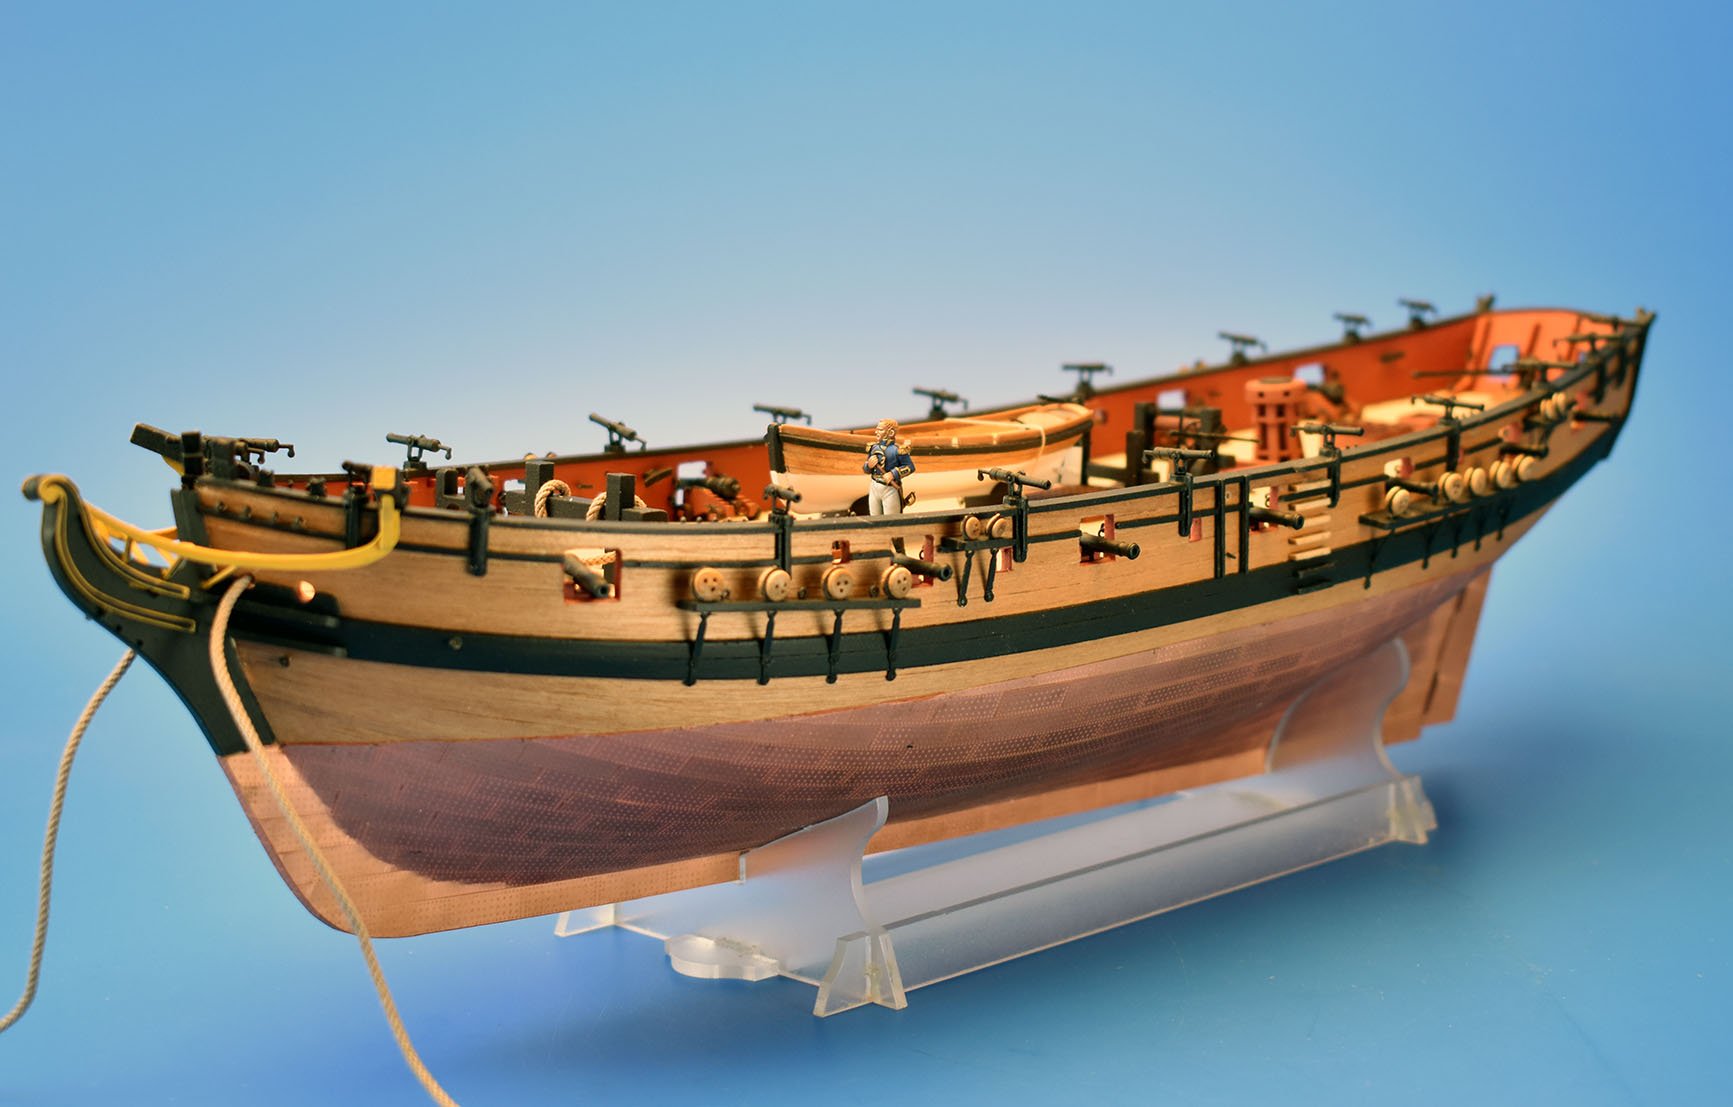
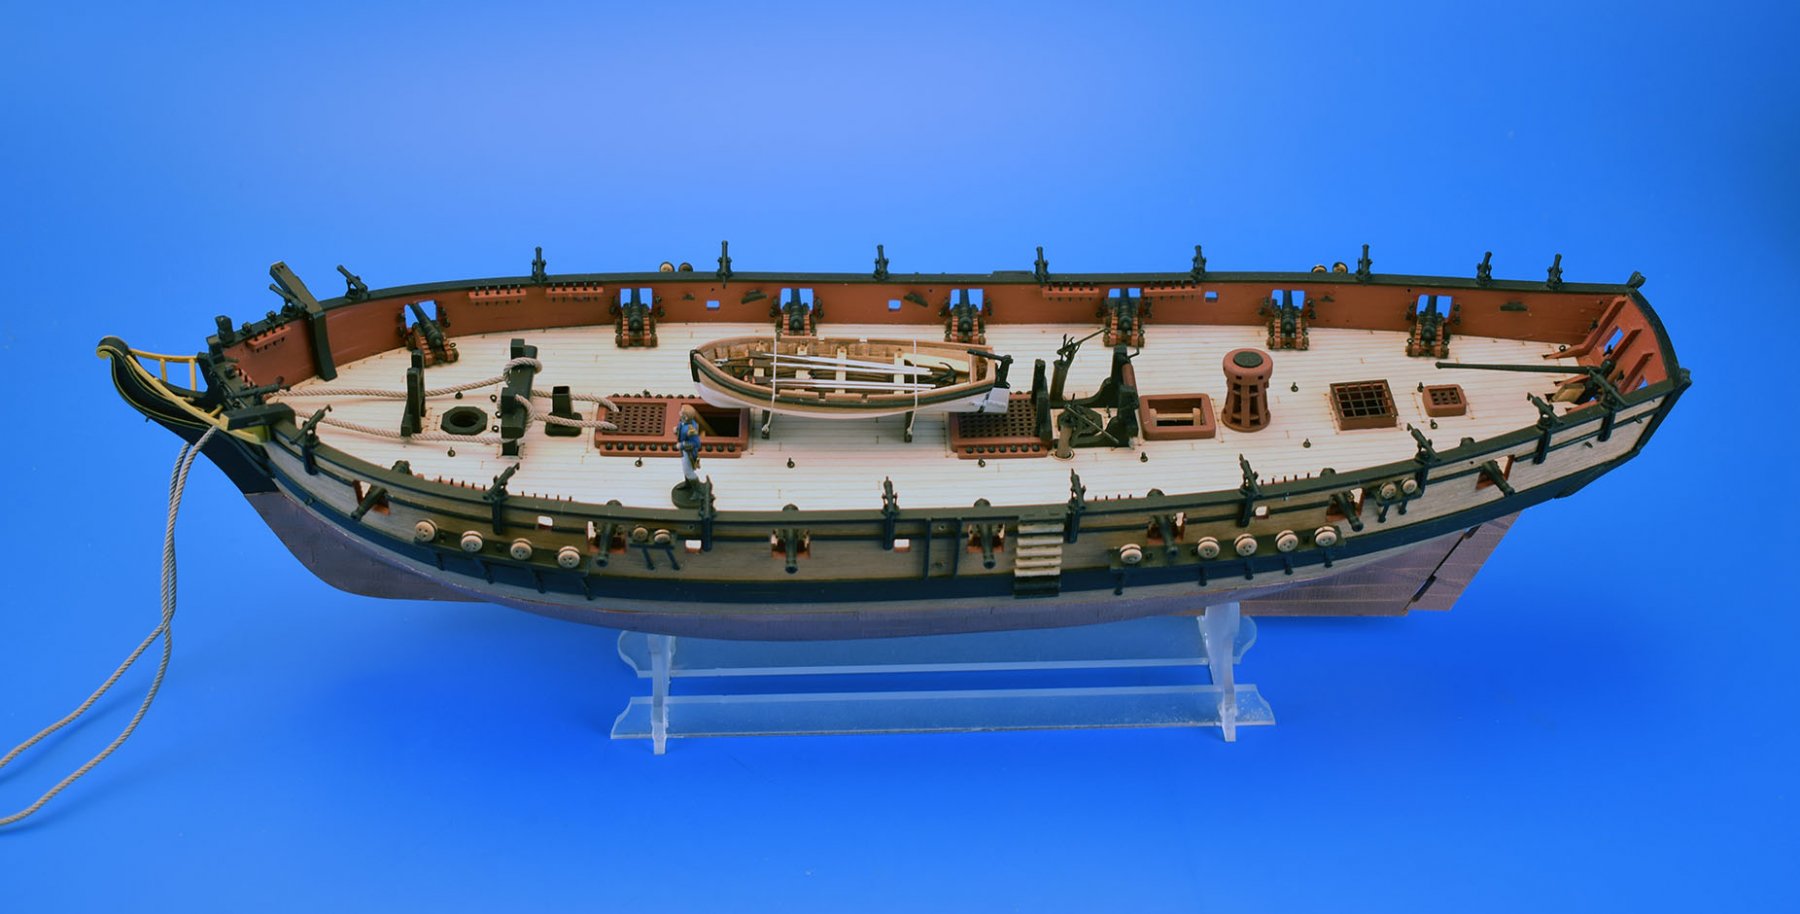
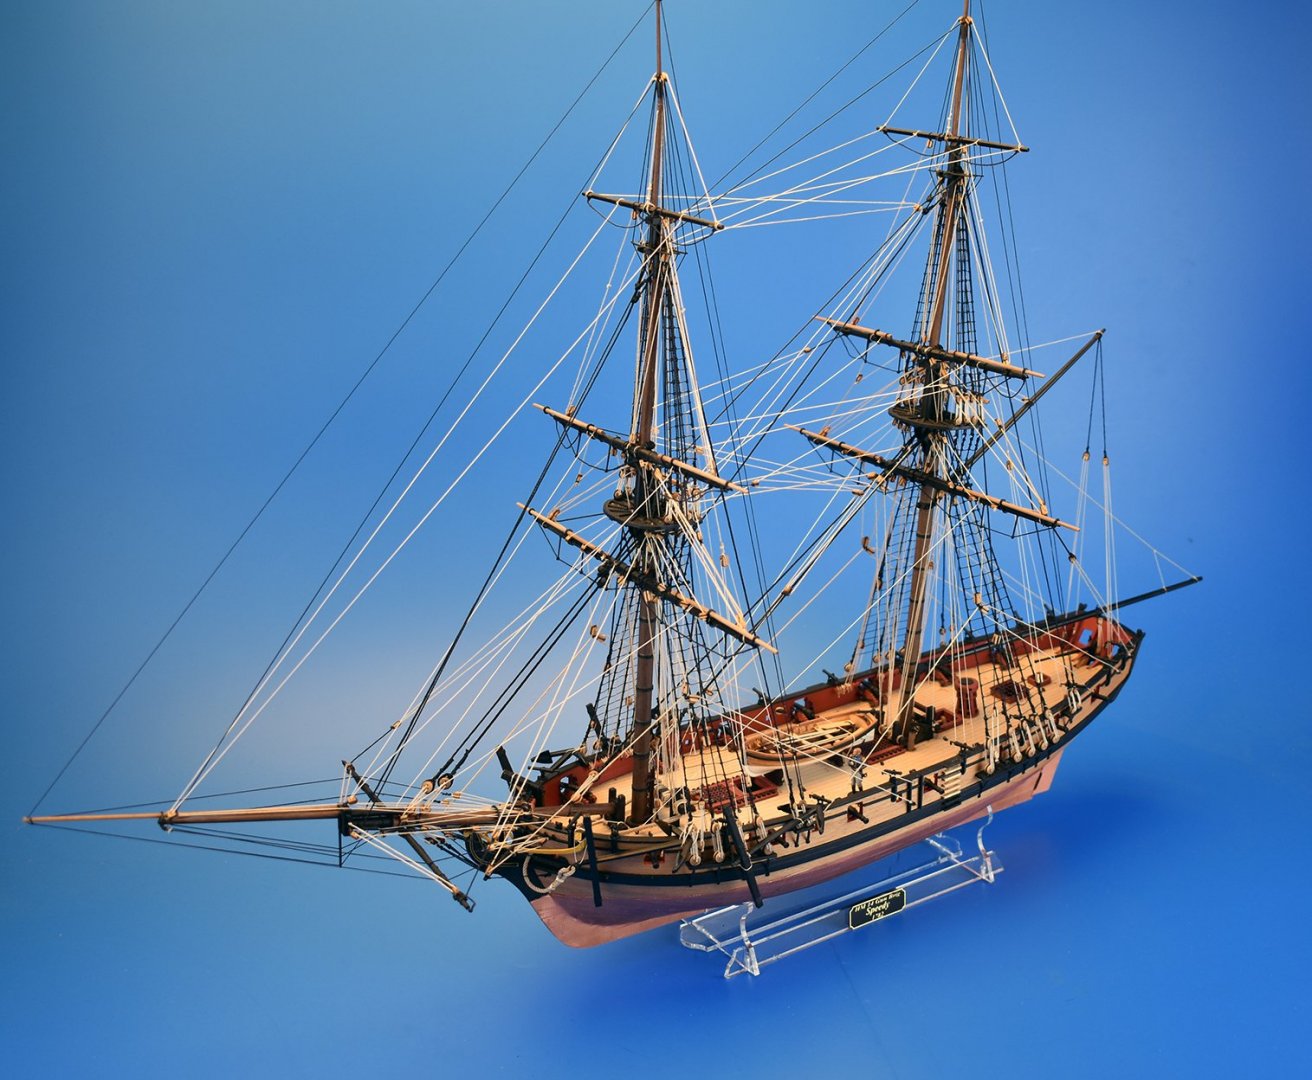
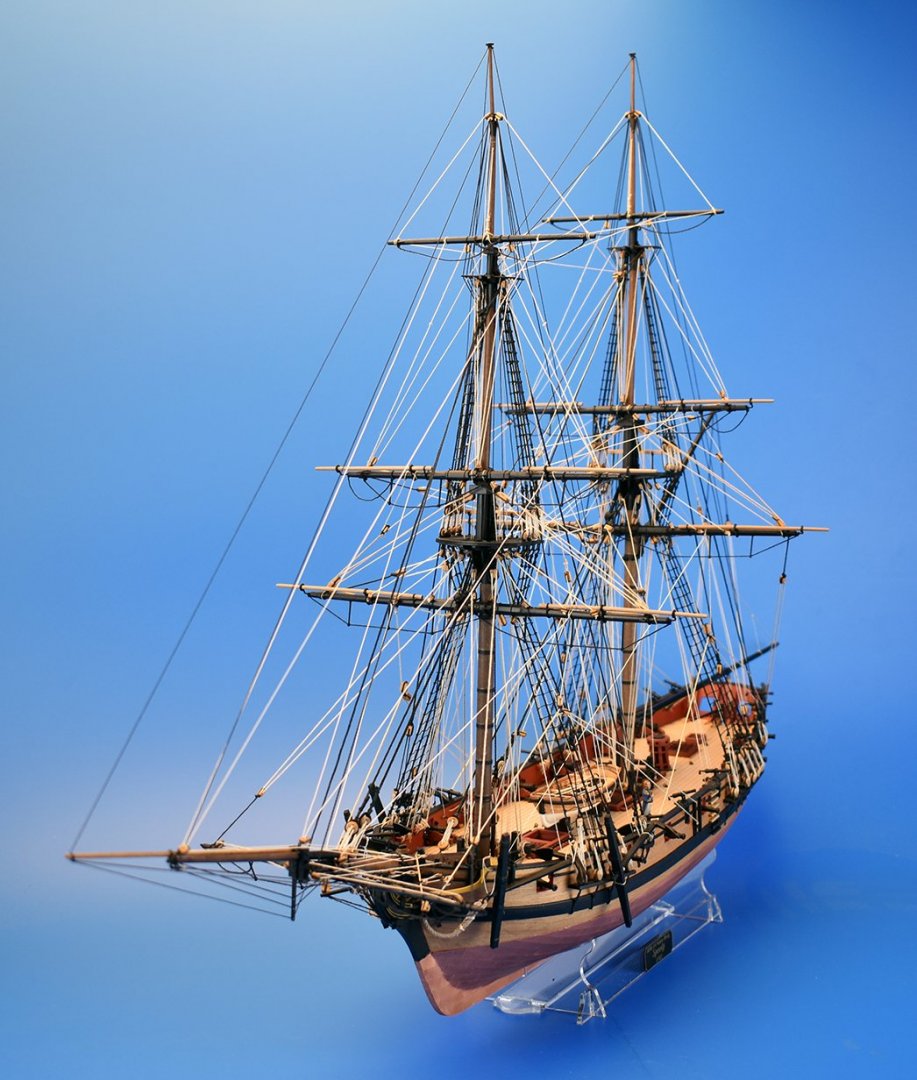
Thanks guys! Everything you see on the model will all be included in the kit (including the cast resin Cochrane figure). I do like the lines of this, much more graceful and nicer curves compared to the later versions. The 1770's and early 1780's seem to be the perfect sweet spot for these vessels (of all types) for curves and decoration. That dolphin striker is photo etched brass, by the way, as I know all too well how easy they are broken when laser cut in wood, even ply
-
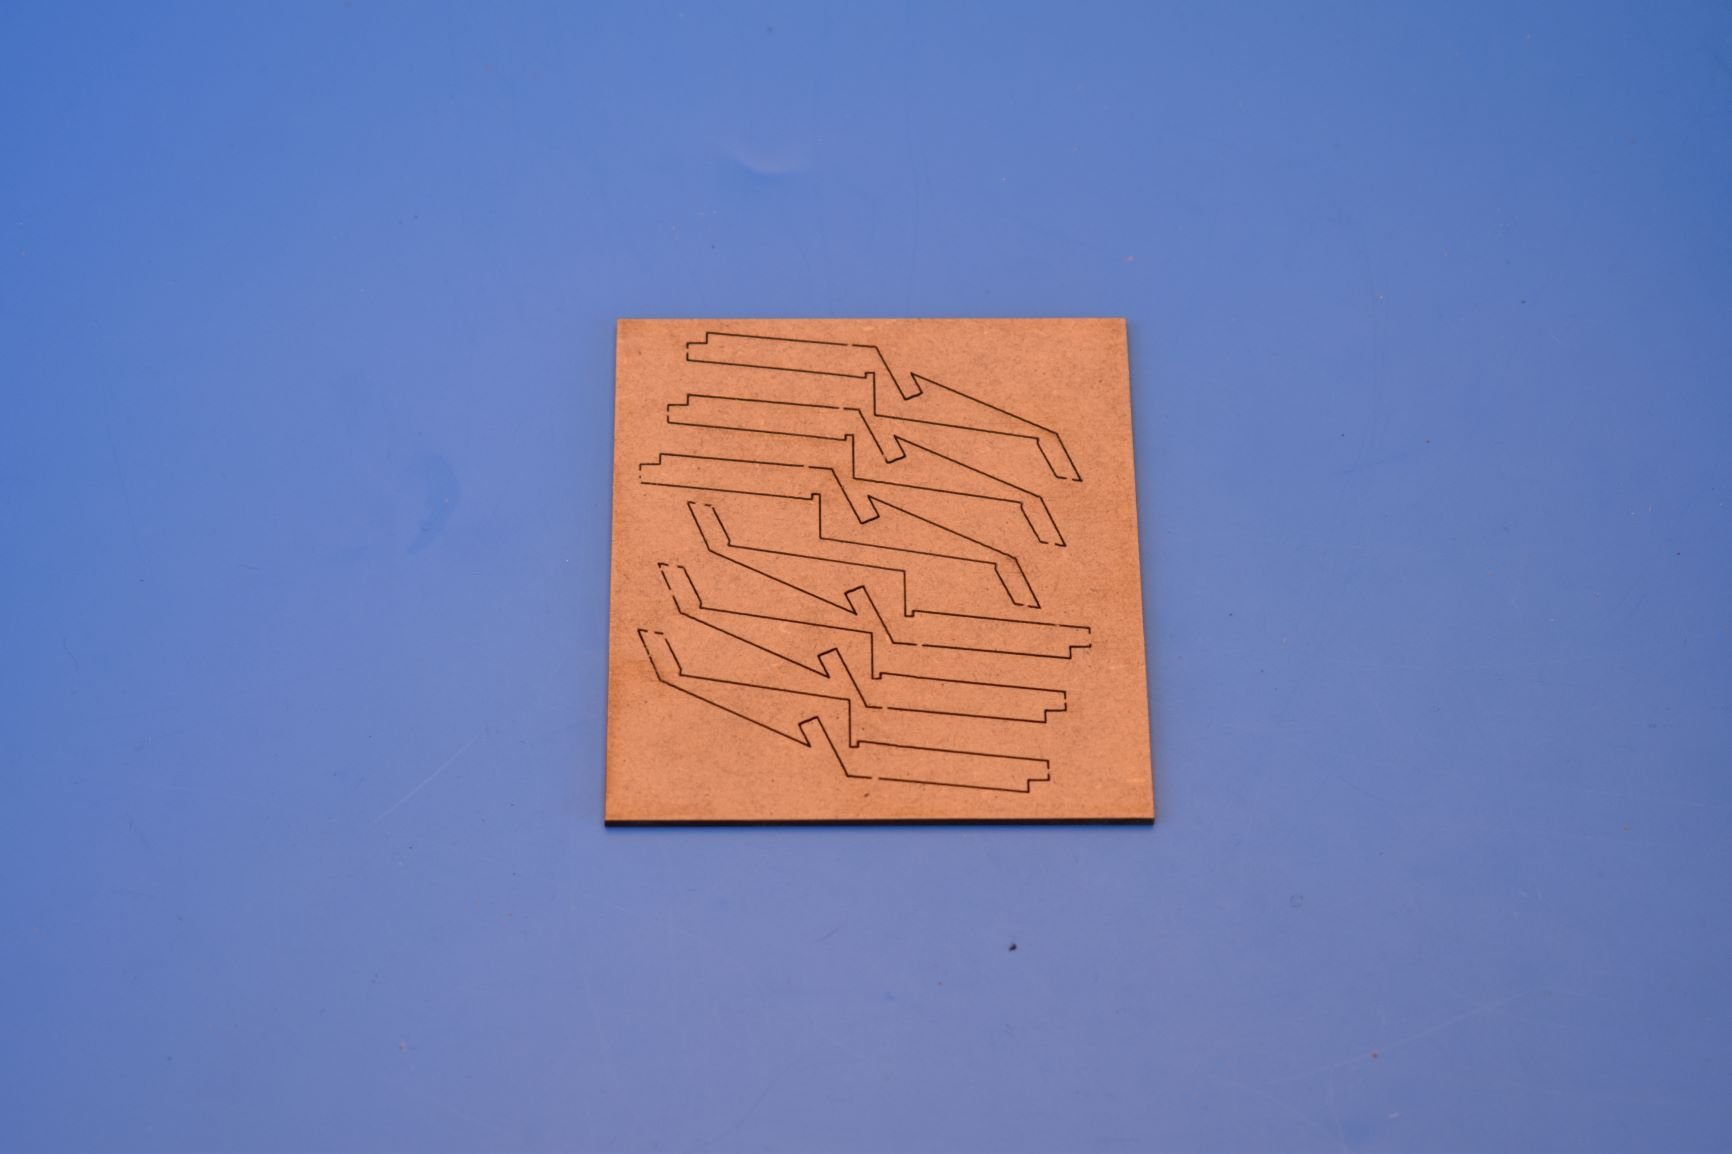
OK, I finished the Speedy prototype model half an hour ago, and have taken some quick pics. Now I have a lot of PC based work to do, box artwork, plans, instructions and parts list. I had the Alert stern patterns re-designed and re-cut, a pic of one set is included here, these will be included in all new kits.


-
A choice of Pear, Cherry or Tanganyika. I may add boxwood, but this would be a very expensive option. Just finished clews and sheets (apart from lower yards, which is done last), now have to get ready for work, dammit...
-
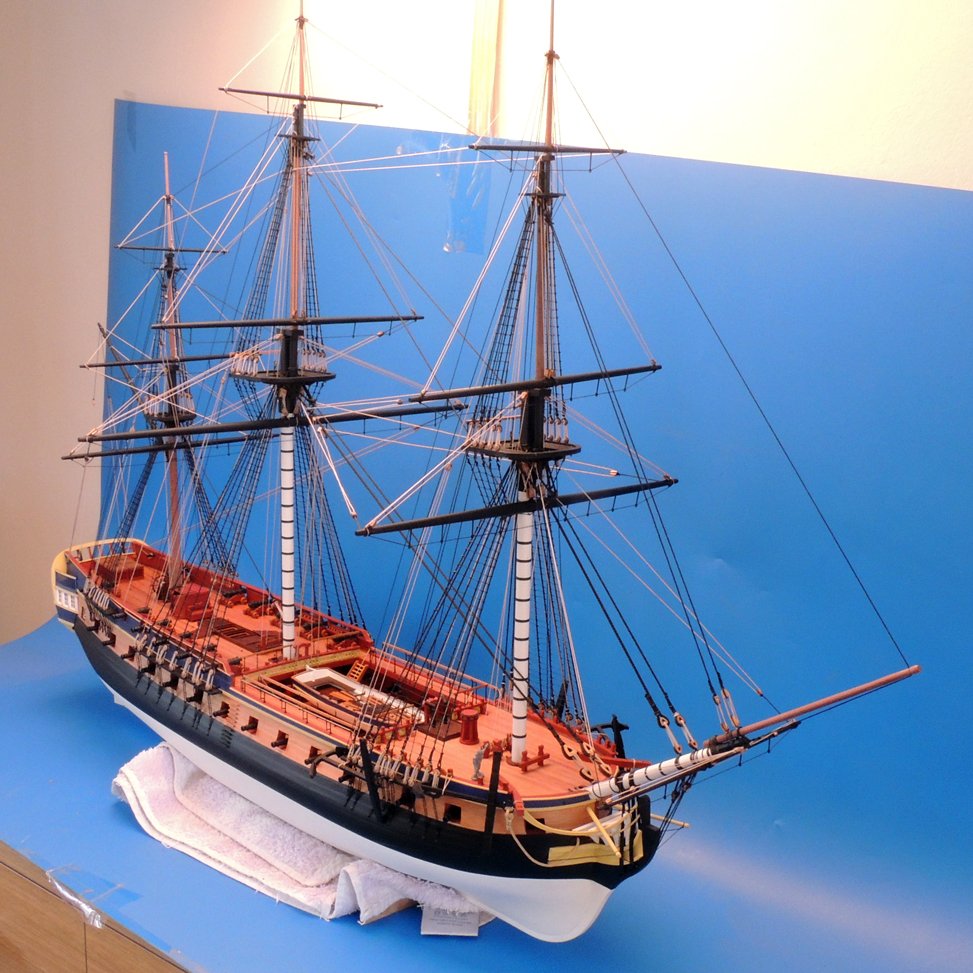
Thanks guys, your kind words are very much appreciated. I should have the Speedy prototype model fully complete by the end of the weekend. I do have another Speedy hull, with pear planking done, perhaps I will do another as Flirt in the future, with white hull below waterline and earlier rigging layout. I quite like frigates, and plan a 32 (Amazon), 38 (Saucy Arethusa) and 44 gun (Indie) after Bristol.
-
To be honest, for me at least there is nothing wrong with the Tanganyika, I wouldn't have chosen it if I didn't like it (I do know that some suppliers offerings of this wood is shockingly bad quality). Bellona, Alert and Speedy prototypes were all done using this wood, as I think the warm tone of the hull looks great. It is also a lot more pliable than pear, so perhaps easier to use than the more expensive main option. Having said that, the pear also looks great, and does have a much tighter grain.
-
Hi Guys, Thanks for the comments (I have just got back from work, (it is 1.07am). Speedy is coming on just fine, I am working on the prototype model. Masts and spars turned, blocked up, stepped and shrouds and ratlines added. Hundreds of construction pictures taken, which I will need to assemble into a manual once the model is finished. I have to complete the model first as I then need to get the box art done and sent off to the printers. Printing the box lids can take a while, so getting the model finished, and then box art, and then instruction manual is the order of priority. When building and taking pics, I am away from the PC. When at Amati, others sorted out putting the manuals together, box art and sorting materials. I have to do it all, as I am the only one... I have nothing to update when building the model, I have to spend a lot of time on it to make me look half decent for the pics, but rest assured, because I have been quiet on here doesn't mean I have been twiddling my thumbs. Also, I don't want to keep adding pics that look mostly the same, with one small part or a yard added, that would be boring. The next pics I put up will be of the completed, or very nearly completed model. I think it may be a good idea to offer the pearwood strip for the second planking as the primary material, rather than Tanganyika for Speedy. No one wants the Alert with the cheaper wood, so I assume Speedy (which is more expensive anyway) will be the same. There will be three options though, pear or cherry at the same price, or a cheaper Tanganyika version. I am about to order the 4 and 3mm wide pearwood for Speedy. Regarding Bristol, when I first started doing this, I really wanted Bristol as my second kit, and I do have some parts already made and cast for this model, plus I have drawn the bulkheads, keel and decks. However, a couple more smaller kits makes more economic sense, as Bristol is a big kit, and will take 6 months at least (full time). I want to start developing new kits full time as soon as possible. If I have three kits released and they sell well, I can give up my day job (safety net) and concentrate fully on Vanguard Models. A model like Bristol would prolong this - but the smaller models are taking 3-4 months each at the moment, even with my day job. But it is very long hours, hence the lack of updates on here. Saying that, I do not mind, as I chose to do this, I just wanted to try and explain what is going on right now. Cheers, Chris (Ready for bed...)
-
I have just realised, or just become made aware that my website has its own separate email address for the contact information, when you make queries from the website. To my utter horror, I realised just now that I have dozens of emails from customers asking questions and I have ignored them all, as I didn't know this separate email address existed! If any of you who contacted me via the website and I haven't replied, I am sincerely sorry, I really had no idea! I will work my way through them over the next couple of days, although some date back from June!
-
ancre La Belle 1684 by Oliver1973 - 1/36
chris watton replied to Oliver1973's topic in - Build logs for subjects built 1501 - 1750
Great subject, and great CAD work, too. -
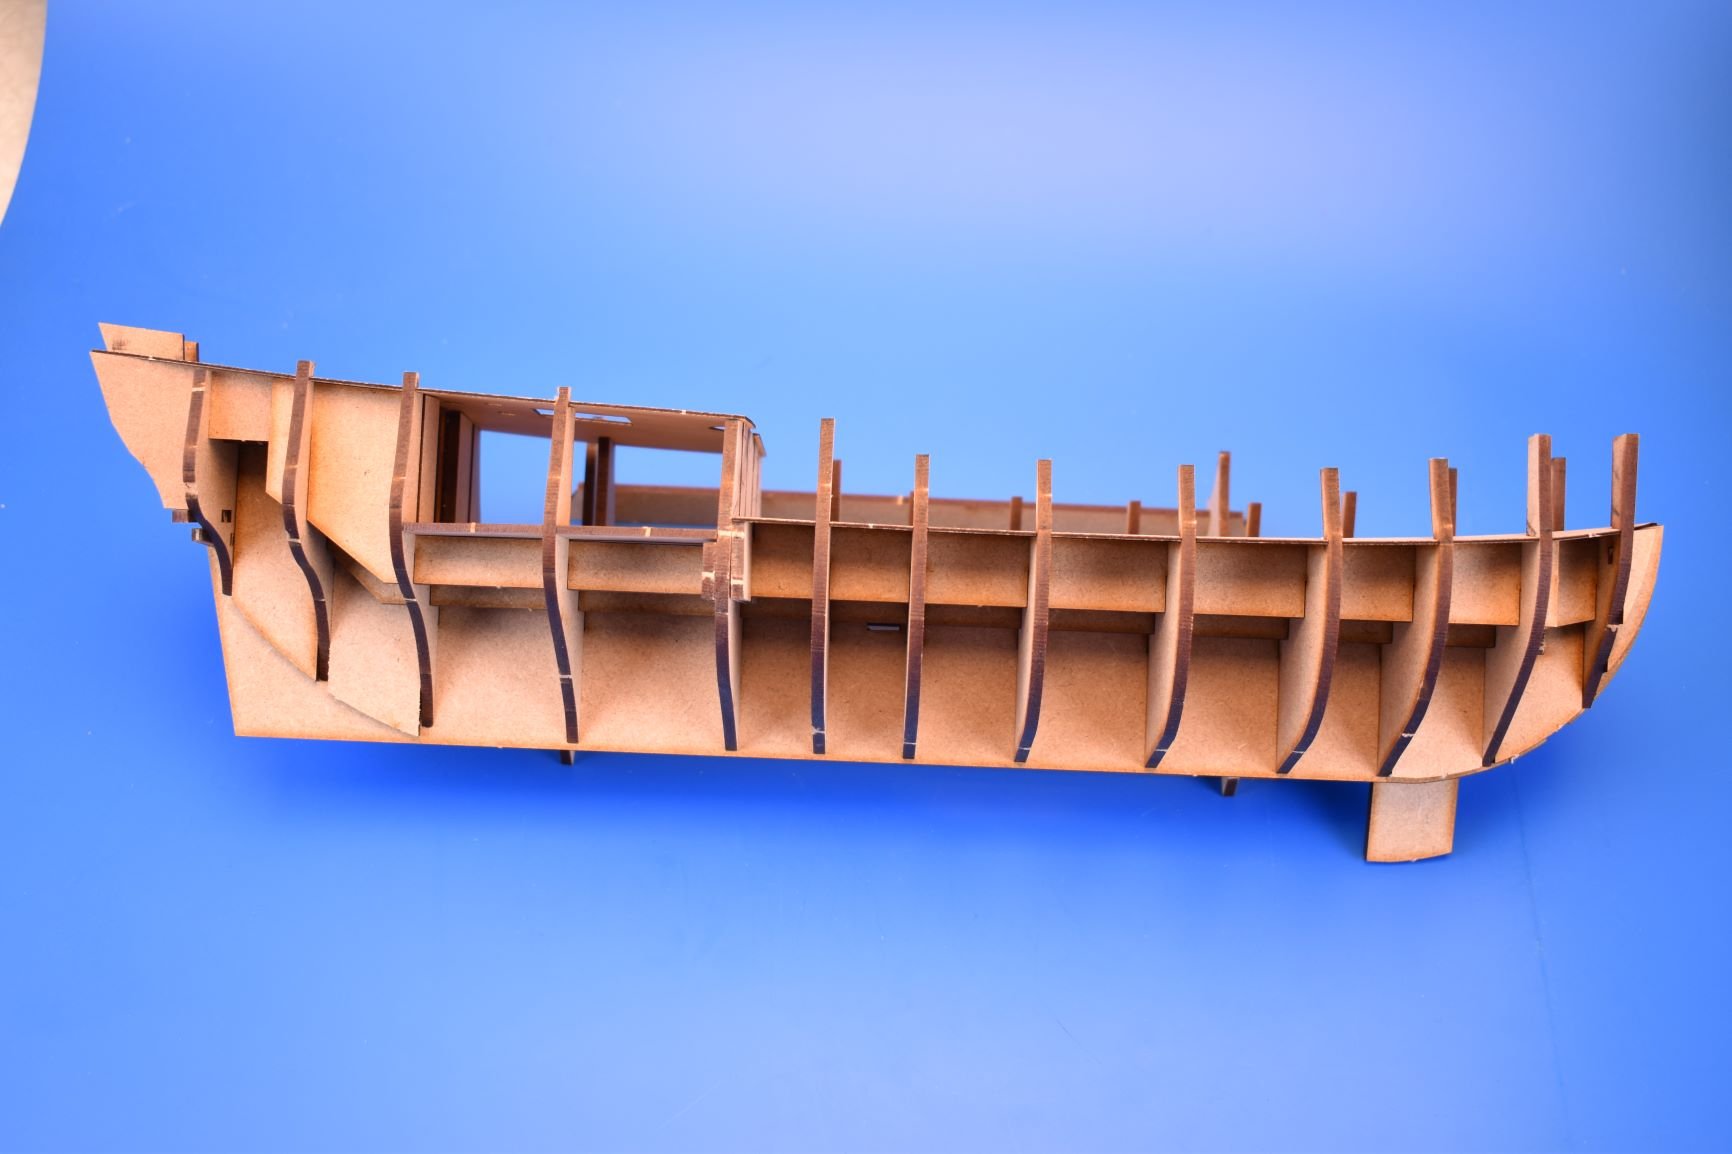
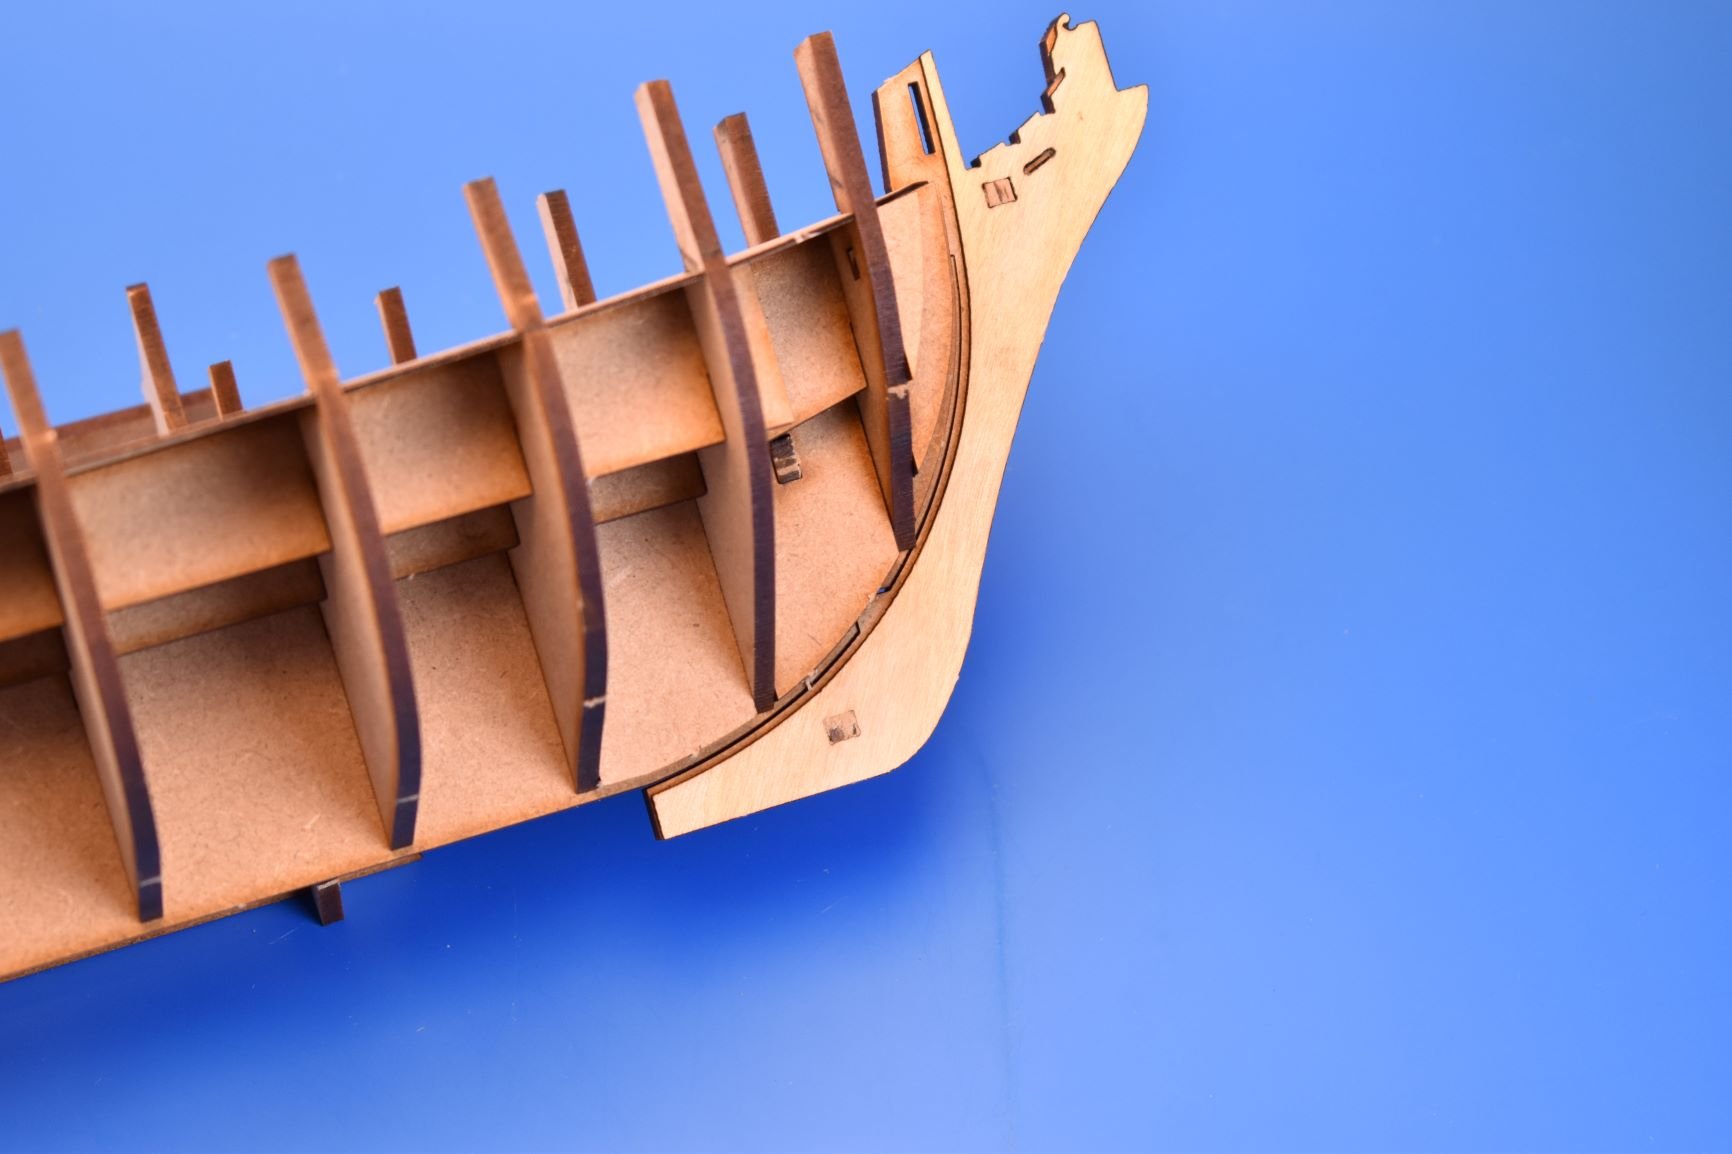
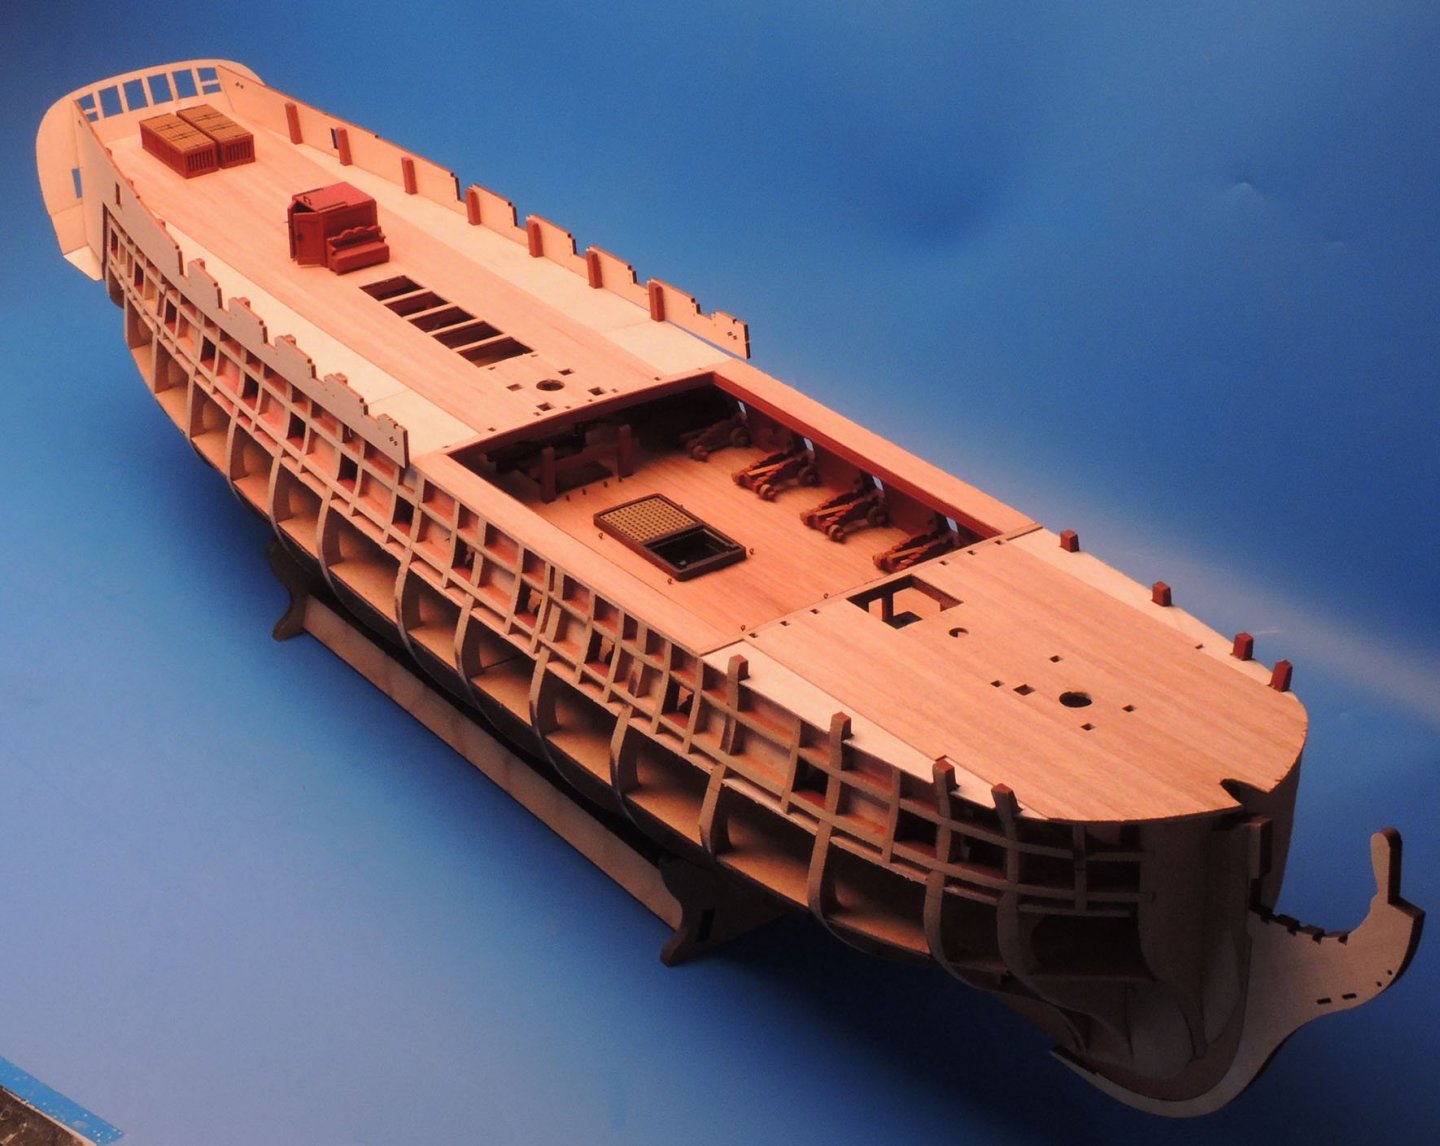
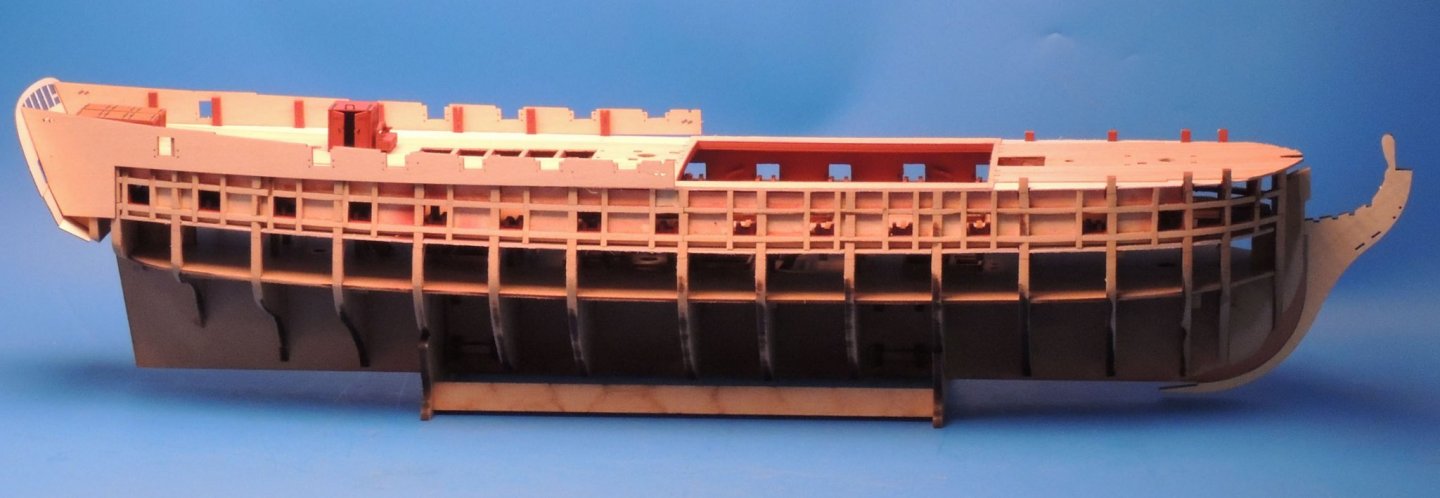
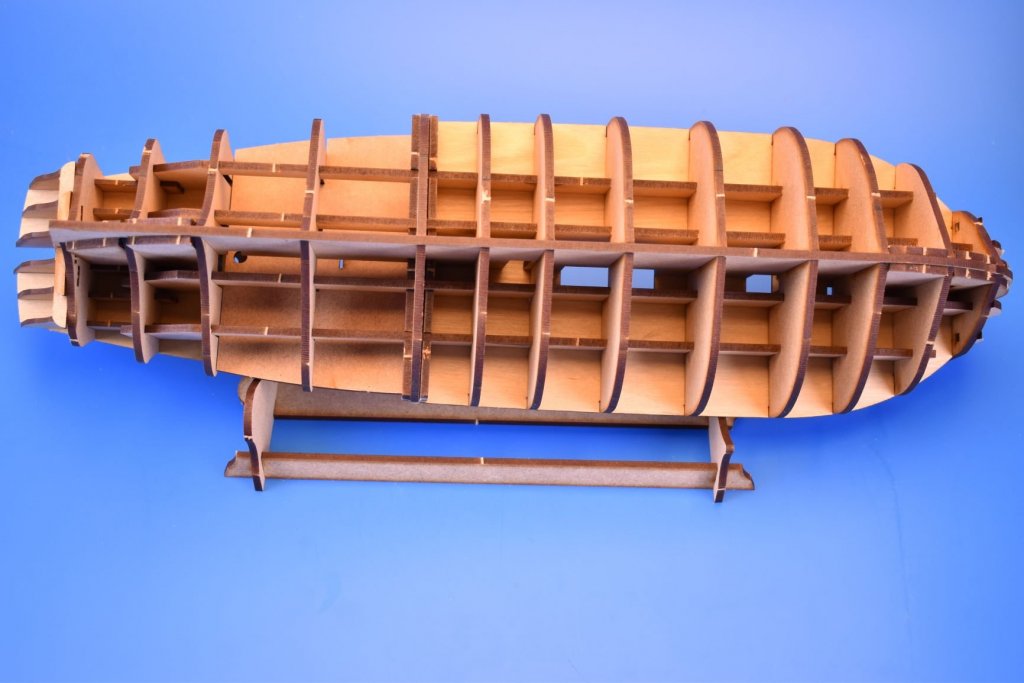
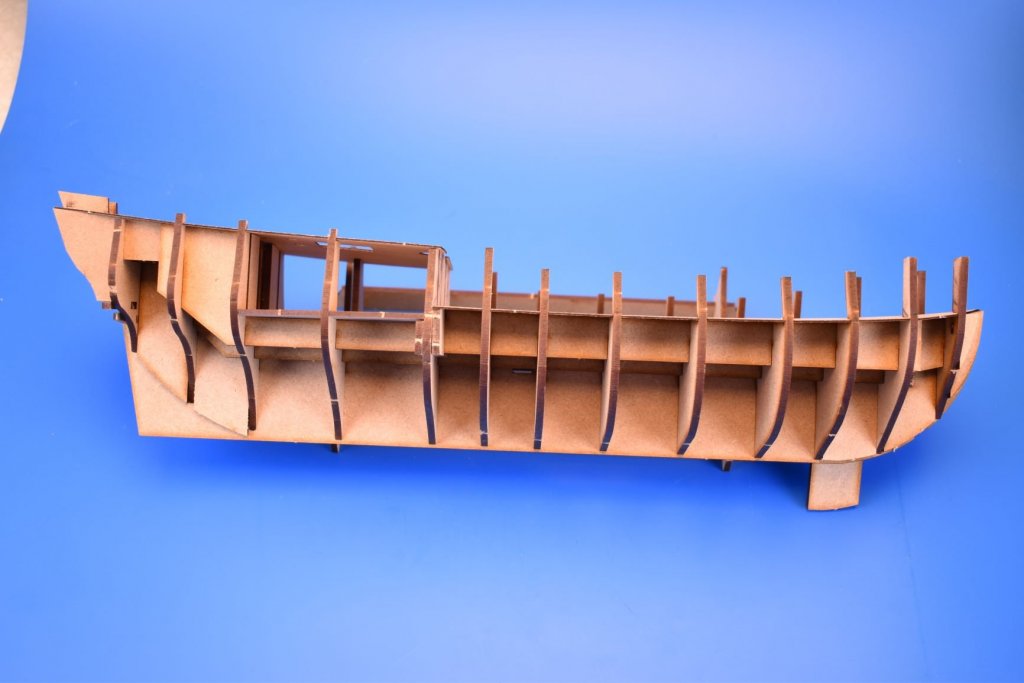
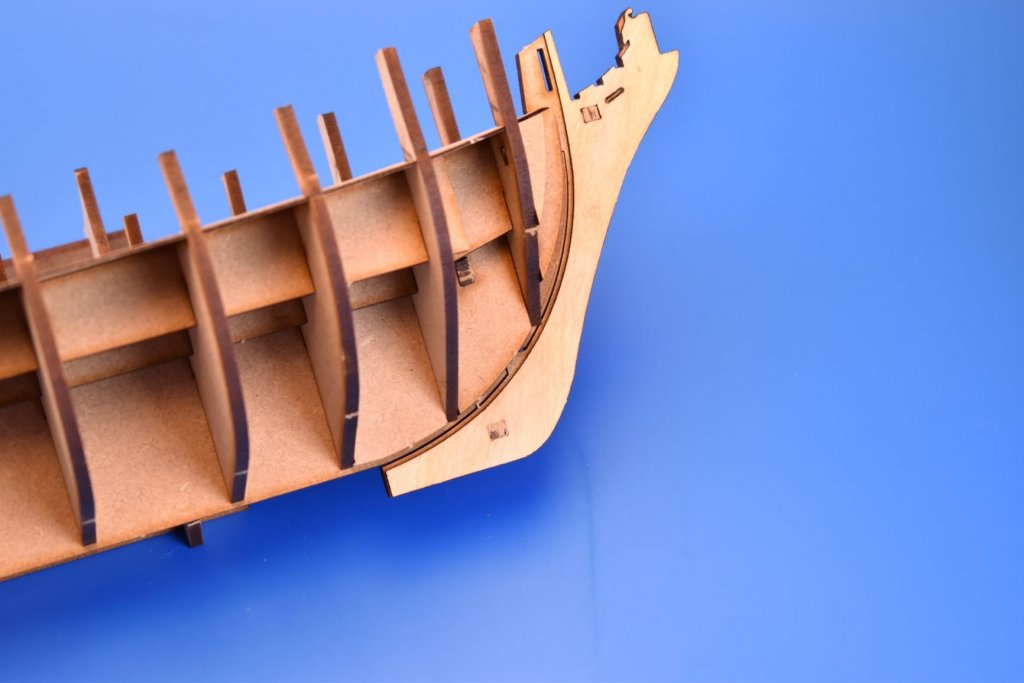
I had the amended 3 and 0.8mm laser cut parts for third kit arrive yesterday, just before I had to go to work, so couldn't do anything with them until this morning. Everything is just quickly dry-fitted, no glue or pins at all. I have gone to town regarding the structural rigidity, no balsa filling blocks required for this! The decks fit into slots located on the inner sides of the bulkhead tabs, so no pins required for the edges and impossible for the edges of the decks to move, so deck line always follows the correct positions. I am also trying out a new way to create a rabet, as you can see from the bow. This is a pre-prototype, it will not be used for building the model, it is just to check the critical hull assembly and making sure everything fits and interlocks as they should - and will be thrown away at some point..

-
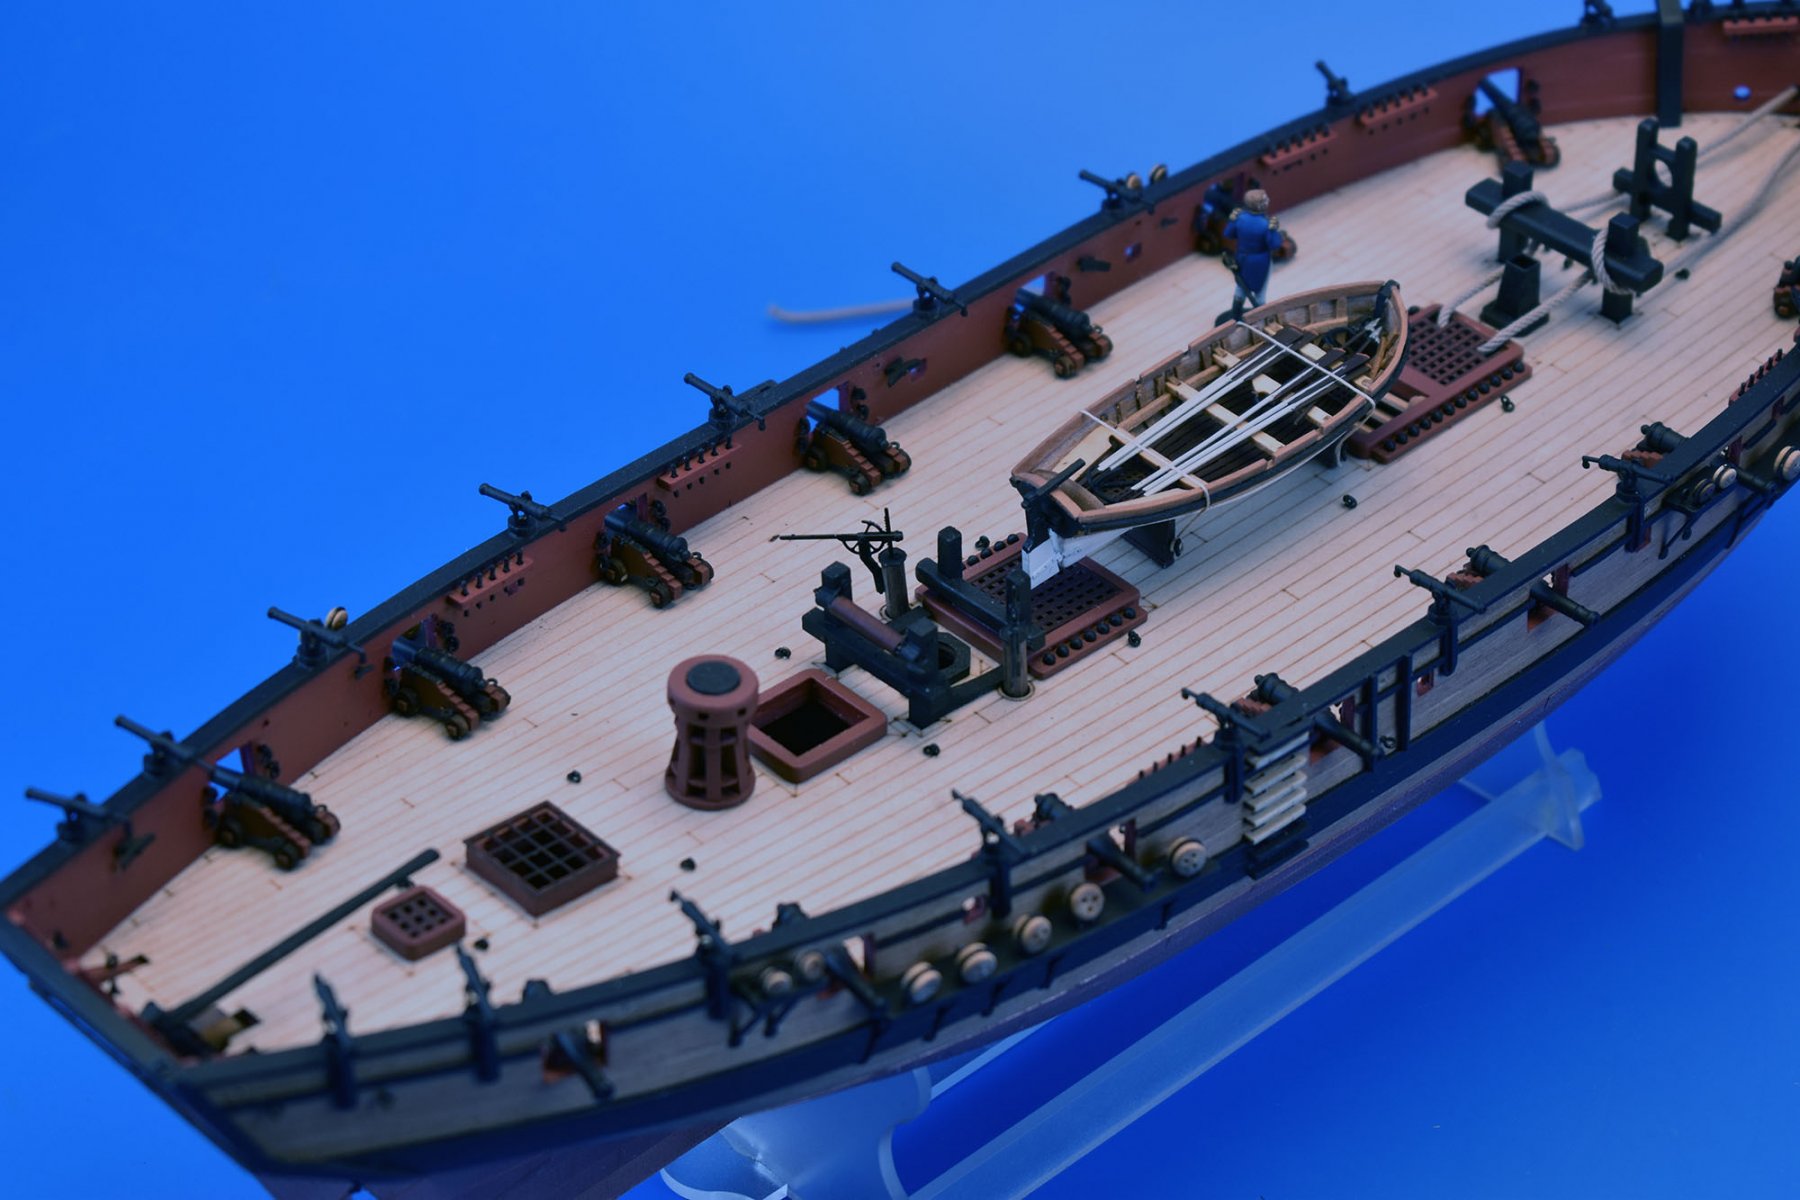
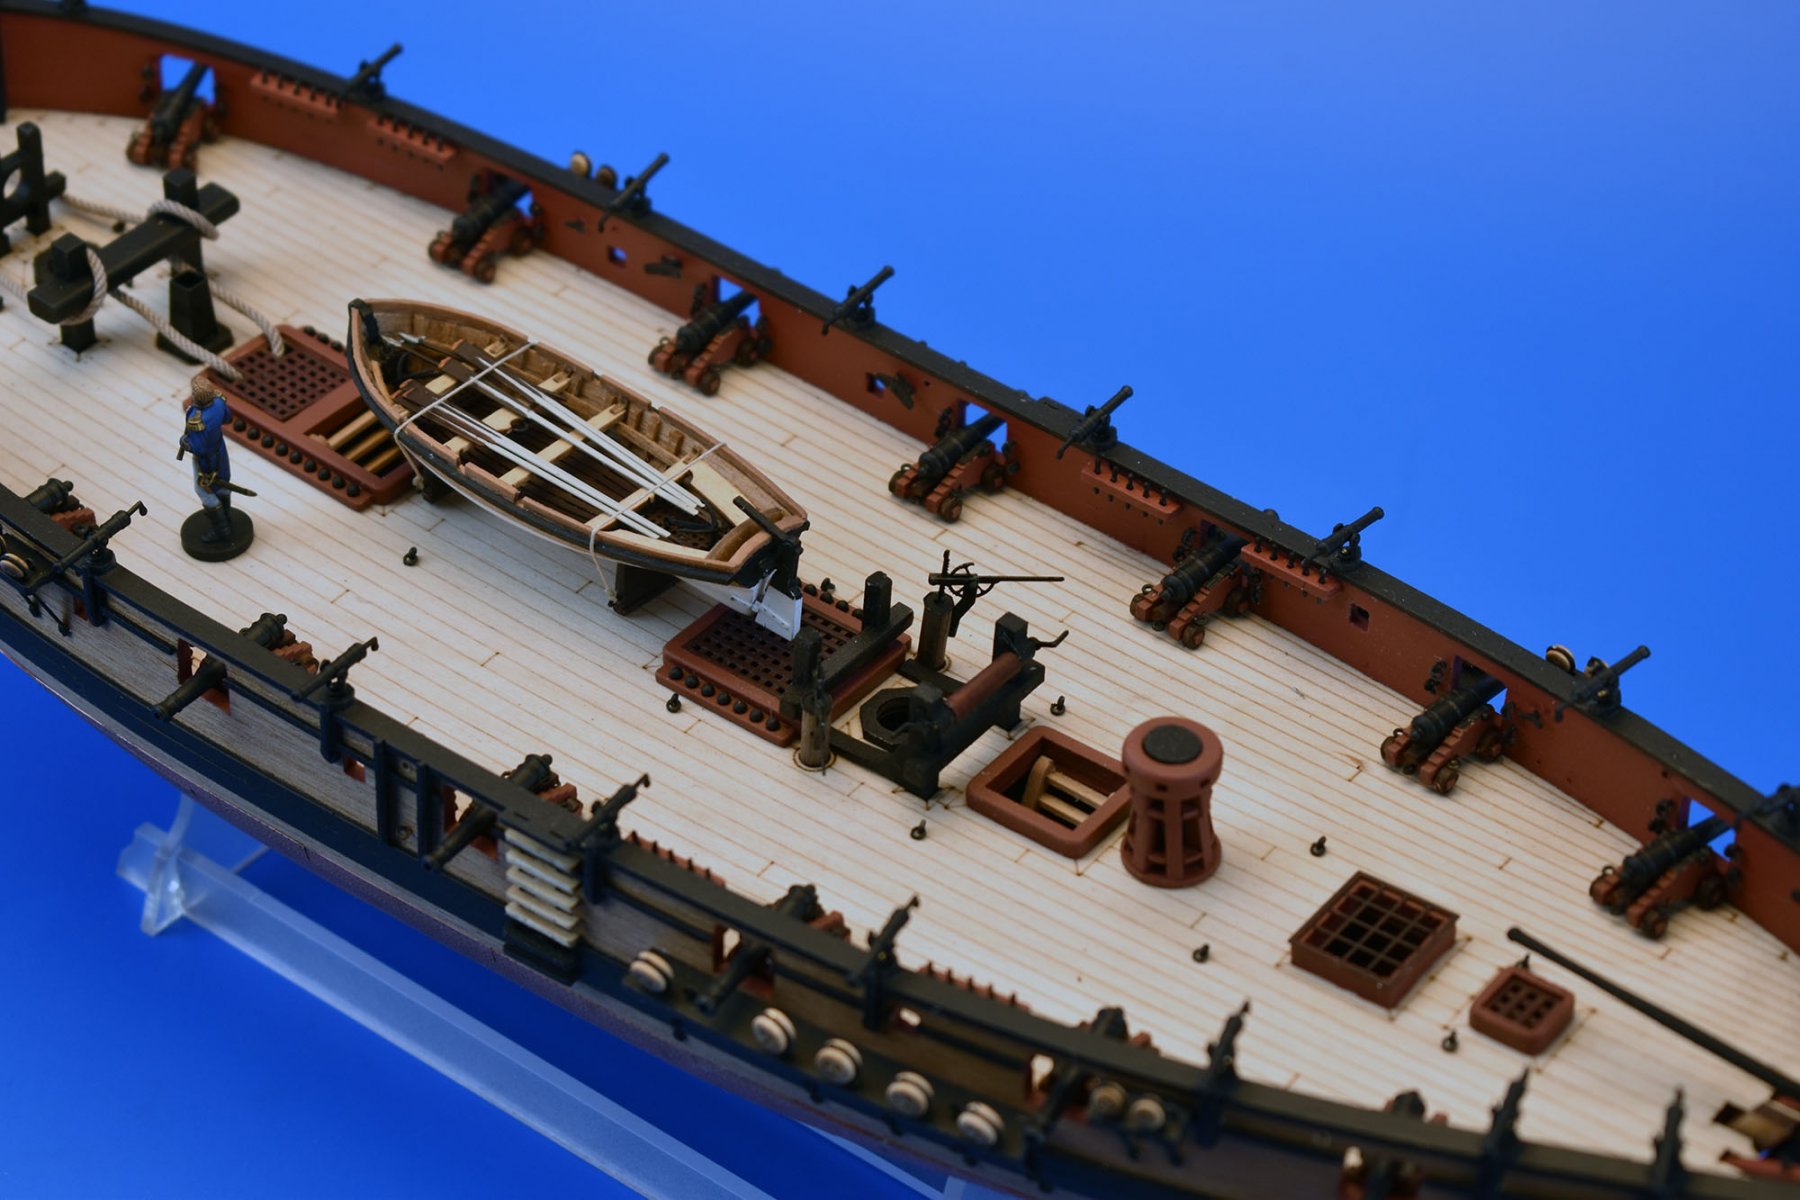
Thanks guys because I did the hand pump in PE, I thought I'd give it a more elaborate design, although still in keeping with the period. And I imagine Speedy's pumps were shot away and replaced or repaired more than a few times during her career...
-
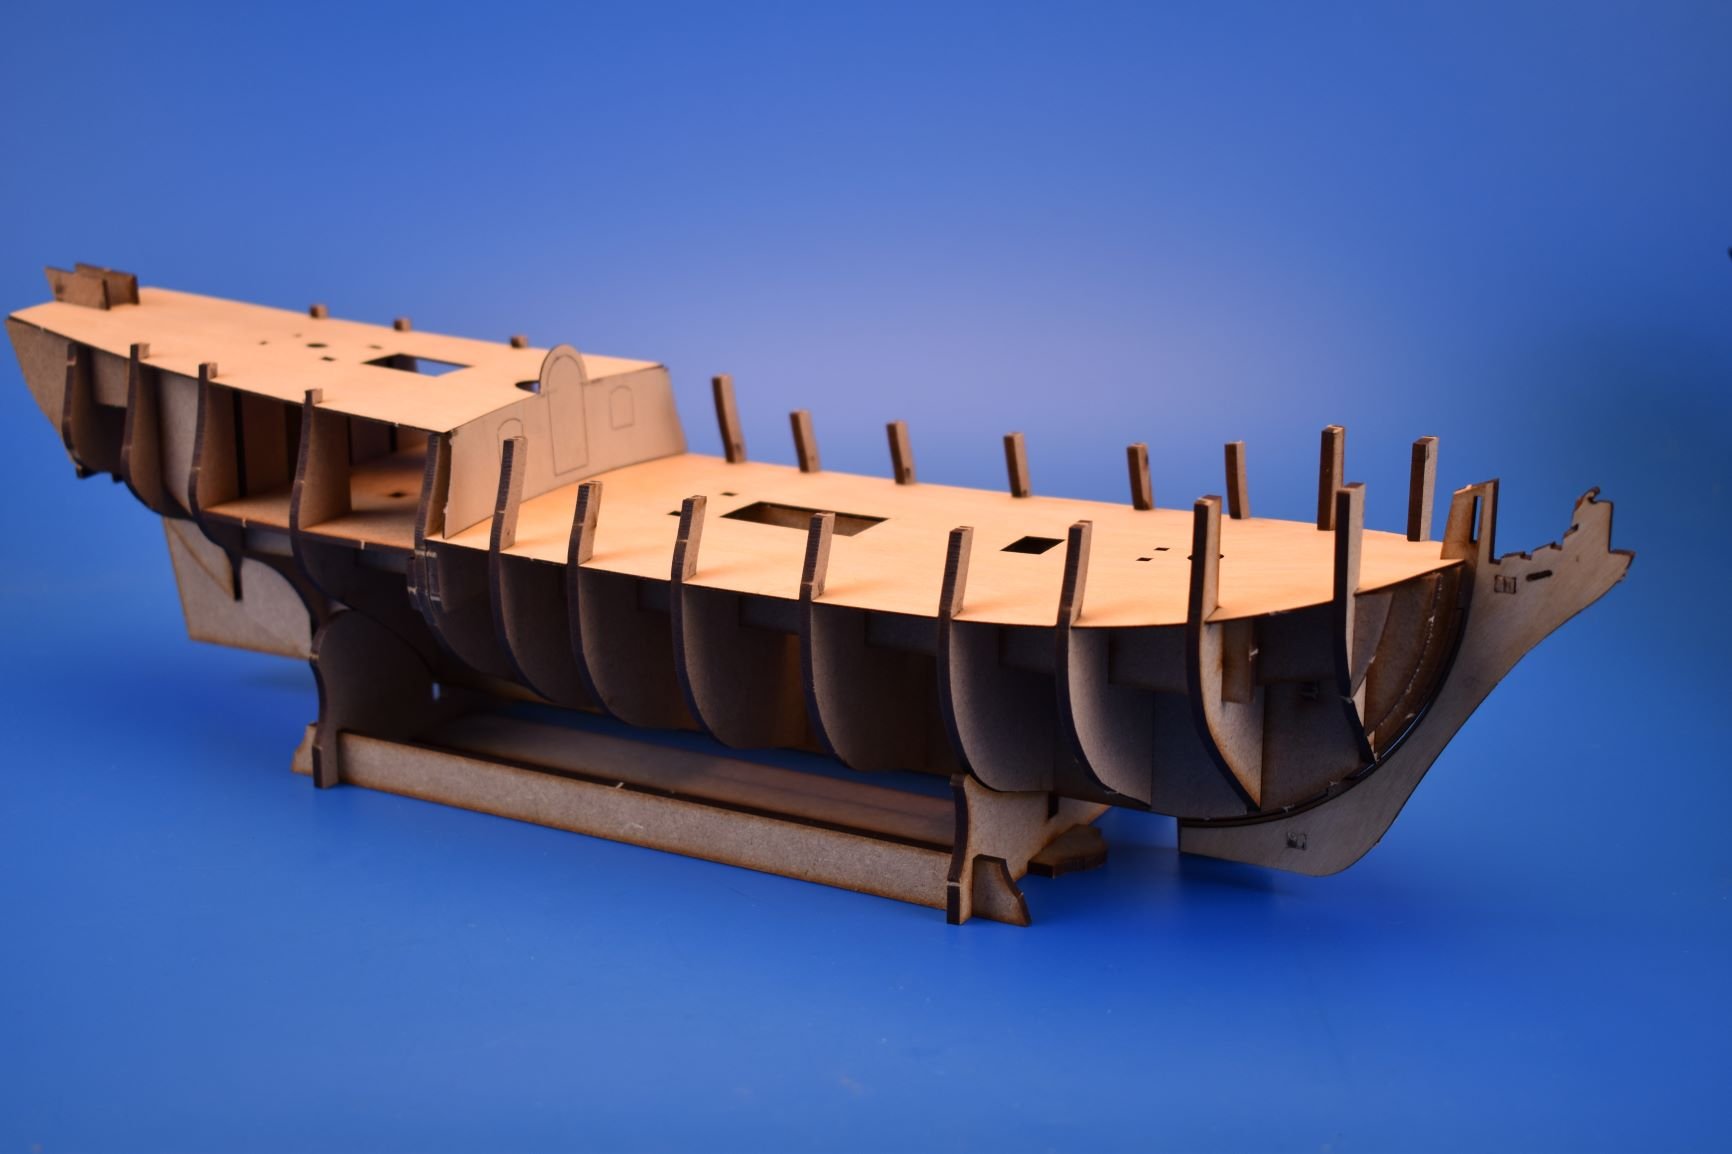
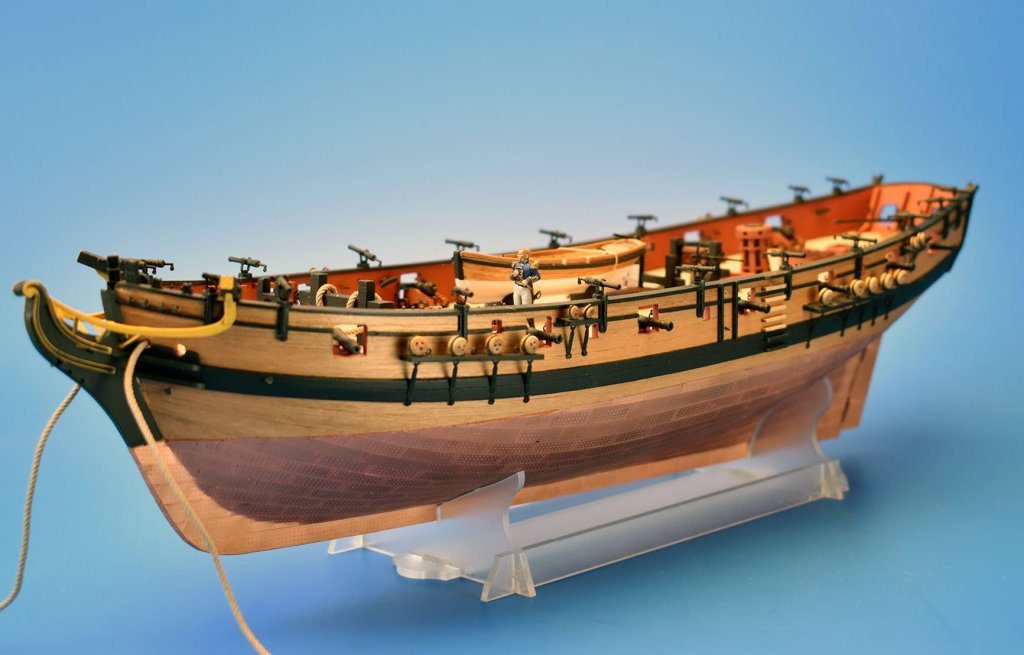
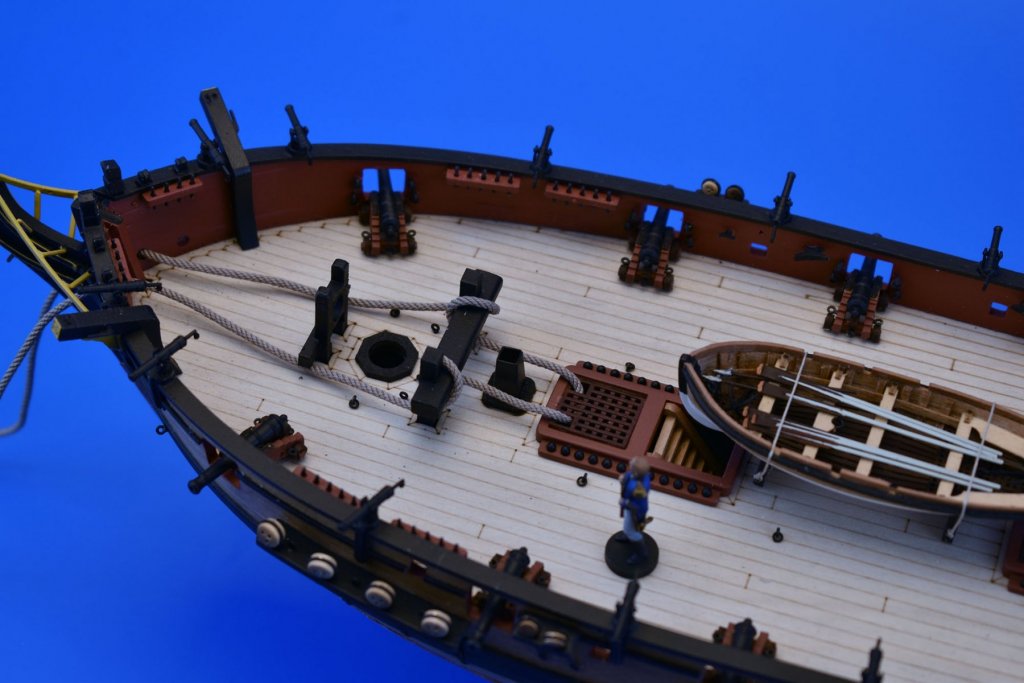
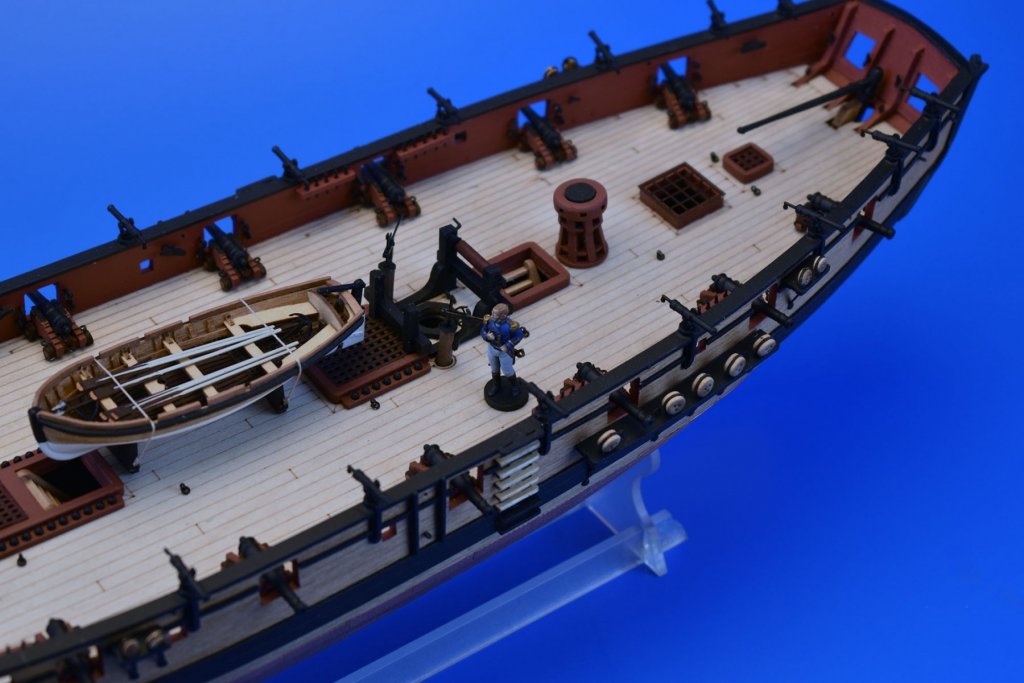
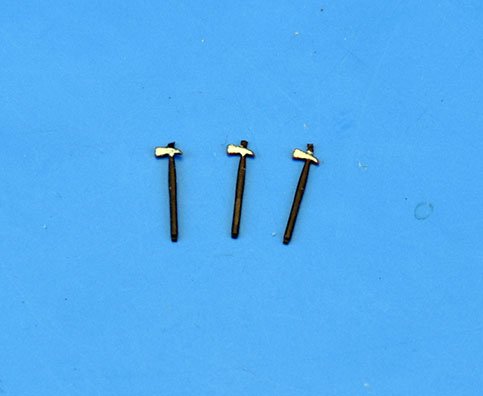
OK, Speedy hull now complete. I did have to reduce the length of the chainplates for the 5mm deadeyes by 2mm, as they should only be pinned to the main wale, so the ones shown are a little too low - but rectified for the kit. Hand pumps finally in place, nice easy builds with PE parts, and the stove chimney is PE this time, to give the correct scale appearance. Everything is now glued down apart from the boat, which is simply pinned in place at this time. Boomkins are missing, but they will be added once bowsprit gammoning is in place (experience...) I have also included half a dozen hatchets, which were used primarily to cut fouled rigging away.


-
ASAT, Bristol will be first half of next year. I had to take a step back and be realistic. I know that Bristol will have the same new design principals as the large Amati Victory I did. The Victory took me two years to design, build the model and picture taking, and plans and instructions. This almost killed me! Although part of the time was trying to perfect the designs, so now that I know what's required, the next will not be so bad. Although Bristol is not as large as Victory, it will have fundamentally the same designs in the way it is built, a cross between Victory and Prince. I want Bristol as the forth kit and a frigate (or Swan class Atalanta) for the fifth. There is some overlap between each kit development, though. For example, I already have the correct shapes and number of bulkheads, decks and deck levels for Bristol, and same for the third kit, as I need to ensure the decoration at the stern and figureheads are going to fit perfectly. the best way to do this is to have the parts to which they will be attached to already complete, so no nasty surprises if I left it all to the last minute, and realised that what's shown on the original plans doesn't quite tally with how things should be - this happens often.. If I can develop three smaller kits first (Alert, Speedy and the one shown above, which I do not want to name yet), and they end up being successful, I can perhaps think about leaving my day job (which is also killing and restricting me right now), and concentrate fully on the larger, more complex and expensive developments. If working on such projects full time, they should take no longer than the smaller kits are taking me now, as I have an extra 40 hours per week to spend on them. Although I did design/develop the kits at Amati, Amati did format the instruction booklets and sort out the box art. It is only me now that does everything, from sourcing parts, getting the master carvings sorted, putting the plans and instructions together for publishable format, and sorting every other of the seemingly hundreds of things required to get even these smaller kits together. I am still getting used to this heavier workload, and am sure than when I get more used to it, it will become easier. But with working full time as well as doing this, there are only a set amount of hours per day, and the kits are not simple 'block models' anymore, there is a lot more to them. As it stands at this moment however, I need my day job to pay the household bills and preserve my investment money. I am even putting some money into my business account from my wages each month, so every available Penny is being invested. I should finish the Speedy hull assembly today, if I manage that, I will take some pics and post them, I now have the missing 0.4mm PE sheet!
-
Very nice work, a true scale model. Regarding the cupola, was it common for these to be copper, or specific to this particular class, do you know?
- 345 replies
-
- 14
-

-
It is interesting, it caught my eye while perusing the NMM plans website. By pure fluke, it is exactly the same length (hull-wise), to the millimetre, as Speedy, so a little shorter than a Swan class vessel. After this one though, the next (50 gun two decker) will be double the size.