


oakheart
-
Posts
515 -
Joined
-
Last visited
Content Type
Profiles
Forums
Gallery
Events
Posts posted by oakheart
-
-
The serving of the blocks is getting better, latest at top 🙂
I spent the morning making a rough serving machine from scrap / parts found in the workshop.
It really does help. As usual there are loads of examples on machine right on this forum.
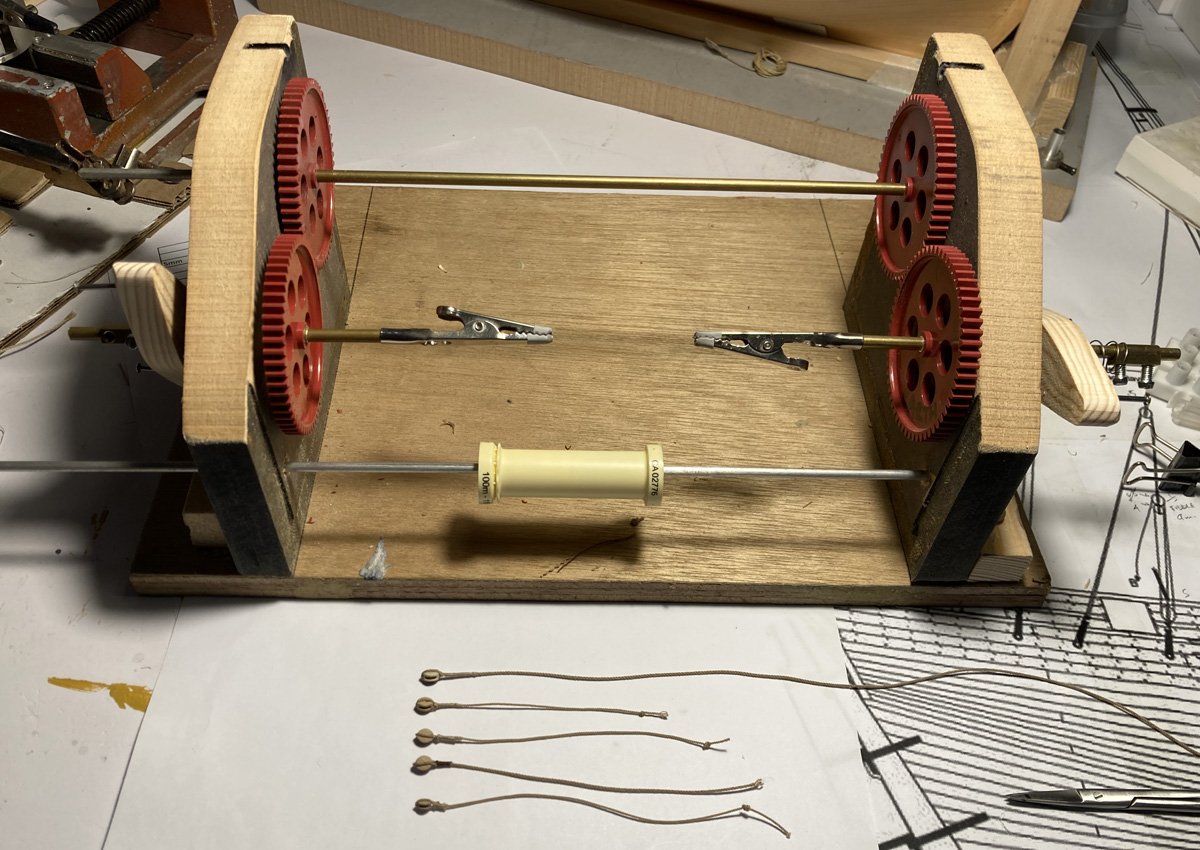
this rabbit hole just keeps getting deeper ..................
Tim
- Wintergreen, Gregory, iMustBeCrazy and 3 others
-
 6
6
-
5 hours ago, chris watton said:
The one with the rail is more of a pain to produce.
Just go with the one without rails and include a strip of styrene or wood for us to add, it is a kit after all, we need to have some work to do 🙂
Tim
- mtaylor, Nirvana, chris watton and 4 others
-
7
-
-
-
looking closer at the Science Museum Cutter model, the rope does not appear to be seized around the block and the length that is seized is much longer than what I have been trying to do, it looks very much like your example @Thukydides
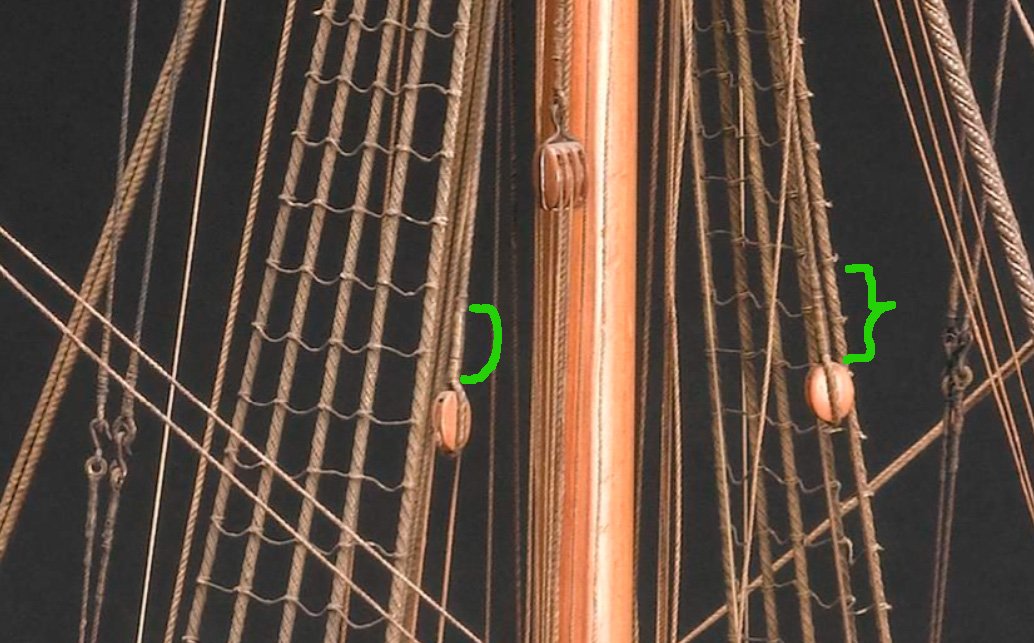
I think I will try and emulate this style on Speedy, I still have to go and find out how to do the fake splice.
Tim
- archjofo, Gregory and Thukydides
-
3
-
8 hours ago, Thukydides said:
If you would like a small suggestion
Thanks @Thukydides I need all the help I can get.
Your example helps a lot.
Thanks for the compliment too.
8 hours ago, Thukydides said:doing a false splice (take a look at my alert log for some ideas)
I will go and take a look at your alert log.
tim
-
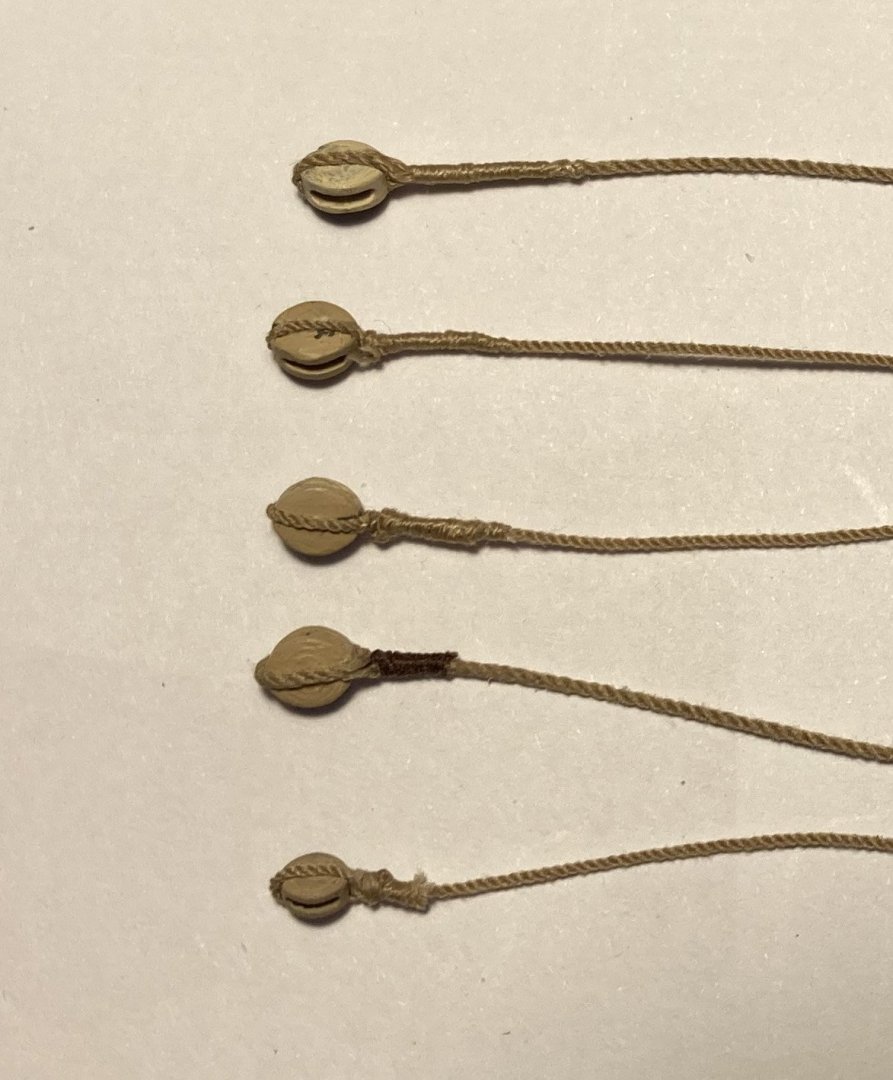
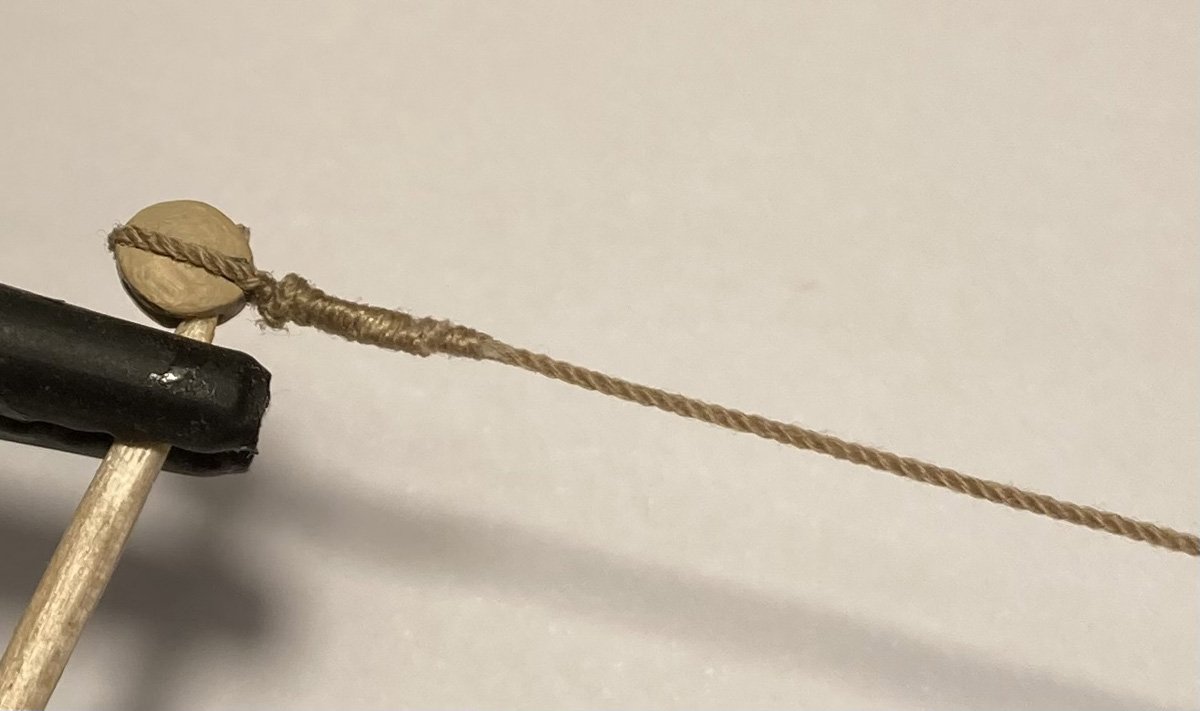
Here is yet more practice at stropping the blocks. This is a 5 and 4mm block with 0.5mm rope.
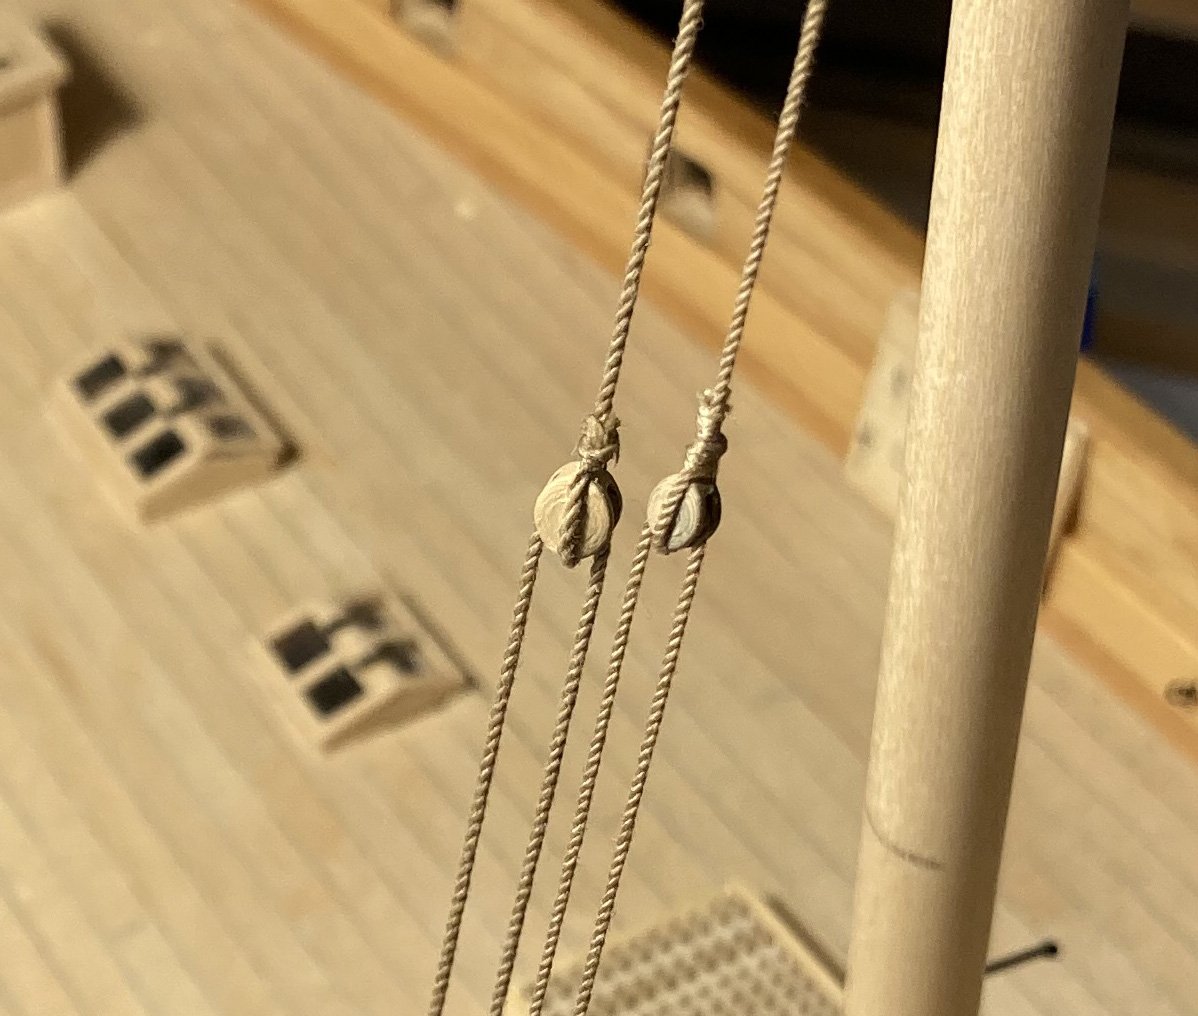
My seizing is getting a little better, still a long way to go.
Hope I am using all the correct terms here?
Tim
- davyboy, archjofo, Paul Le Wol and 2 others
-
5
-
Hi Paul
I made it over here and caught up on reading through the log.
Thanks for a brilliant build and log, it's an inspiration for me to finish my cutter speedy.Although "Speedy" is a different cutter they share a lot of similarities.
I shall certainly be using a few of the techniques you used on this build.
Tim
-
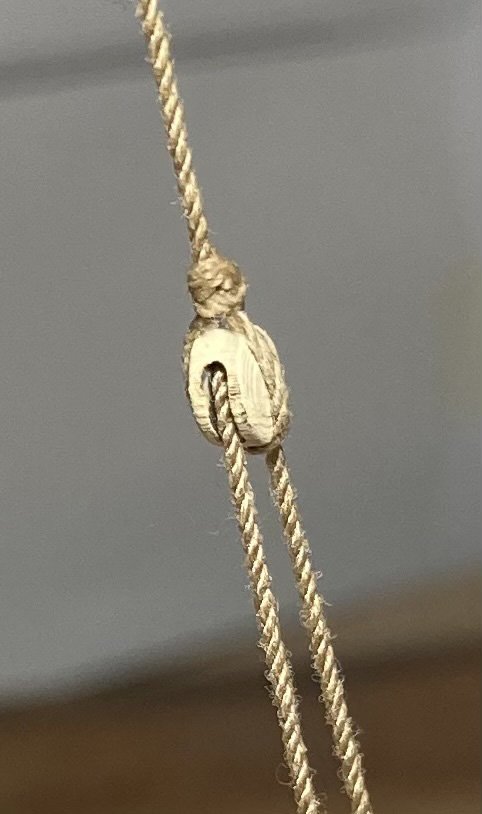
Mixed a better colour for the blocks, very happy now.

Tim
- archjofo, davyboy, vossiewulf and 2 others
-
5
-
2 hours ago, Paul Le Wol said:
Chuck has a Rope and Block list as part of Cheerful’s monograph
Thanks Paul, I will go and take a look at what he listed.
The compliment is most welcome , thank you.Tim
-
On 6/1/2024 at 12:42 PM, tkay11 said:
I’m just getting my head round stropping the 2mm (1.8mm) blocks; the grooves are a bit shallow
Hi Tony
I had to file a shallow groove top and bottom on my 5mm single blocks to make it work well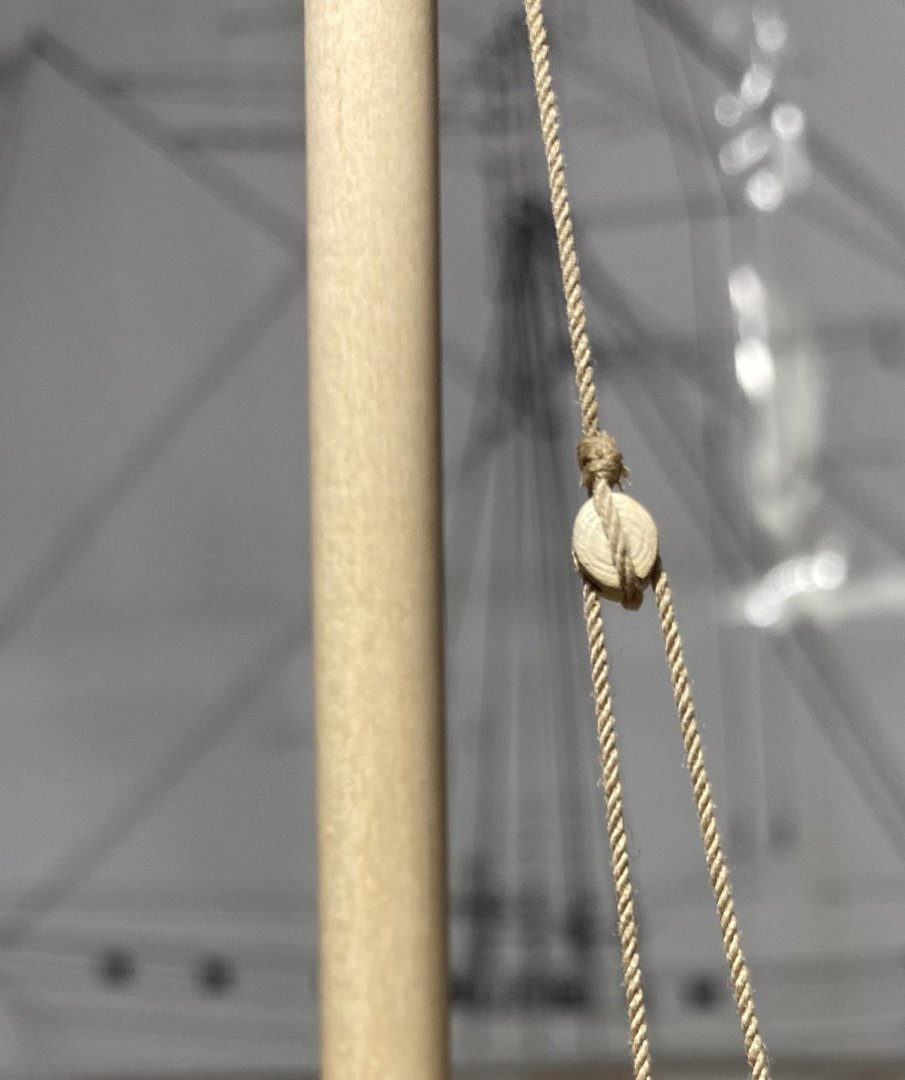
after much searching I am going to use these on my "Speedy"
Tim
-
On 5/21/2024 at 4:41 PM, georgeband said:
I have to commend Modelnet for rapid delivery of some Seahorse 3D printed blocks
I would have to second that, I too have just received some Seahorse 5mm single blocks from Modelnet and they are really very good.
I have painted mine to look more like boxwood.
Thanks for the recommendation George.
Don't you just love this place, where else could you find all of the information we have access to.
Tim
-
9 hours ago, Paul Le Wol said:
Did you have to shape them at all?
Hi Paul, Love your Cheerful build, many ideas there that will help me with speedy.
What sizes of blocks did you use?
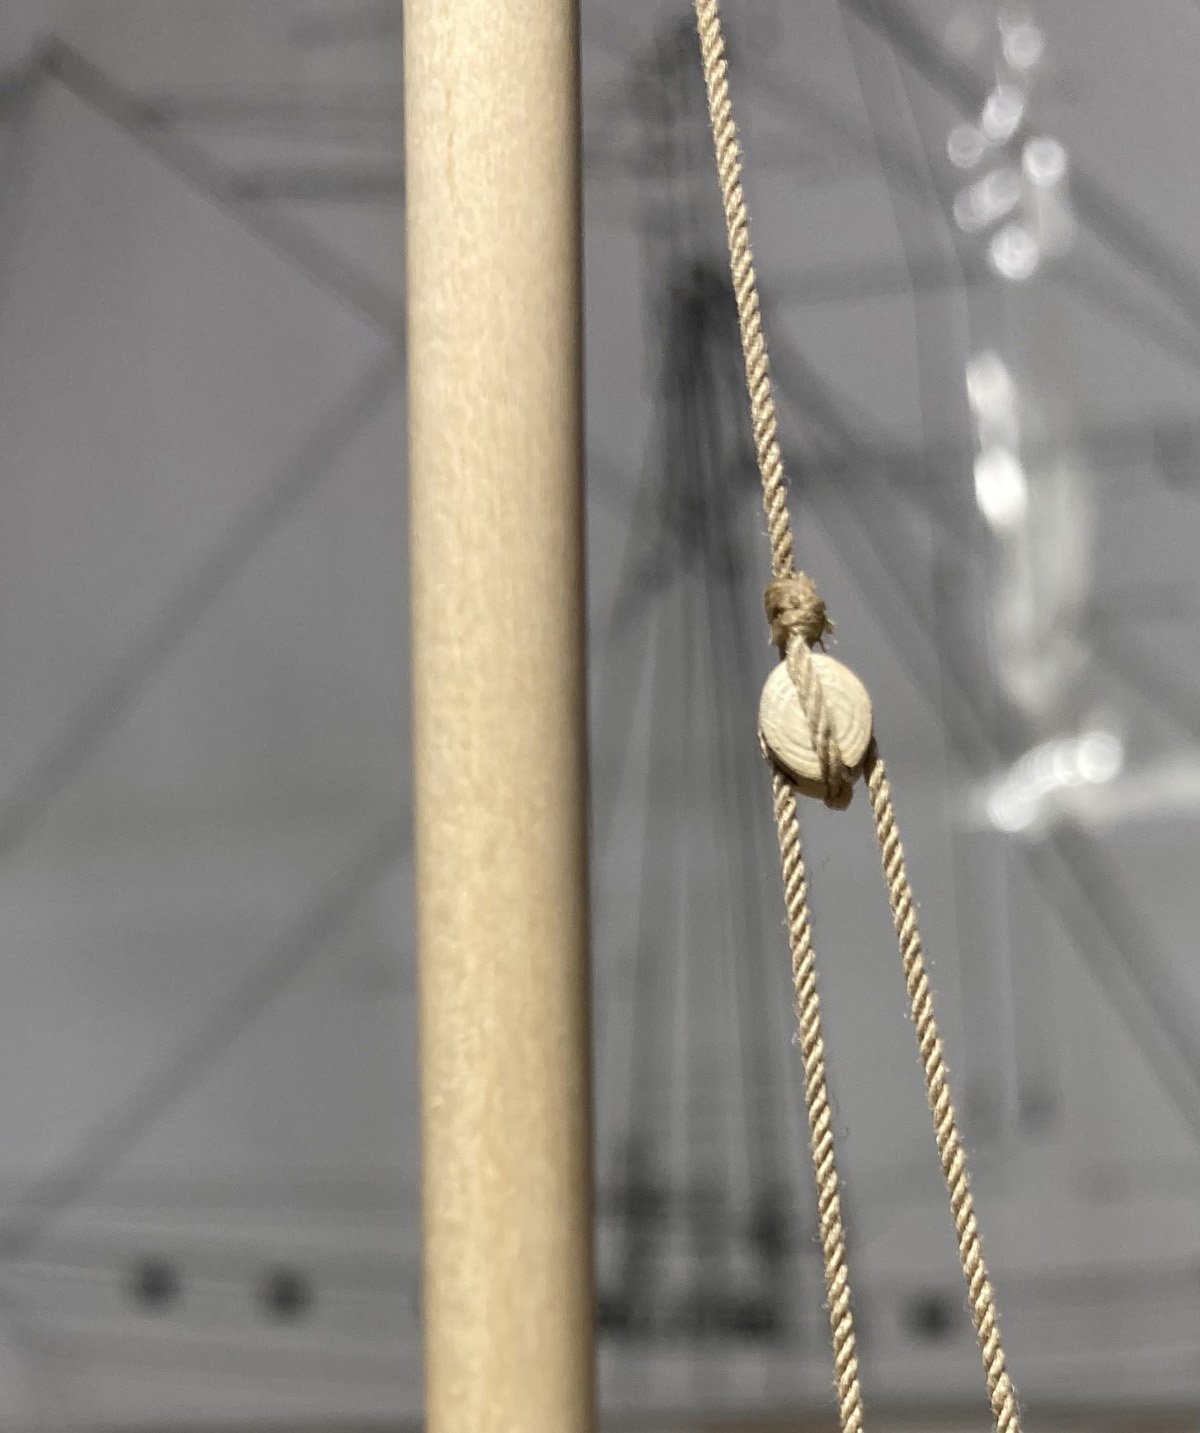
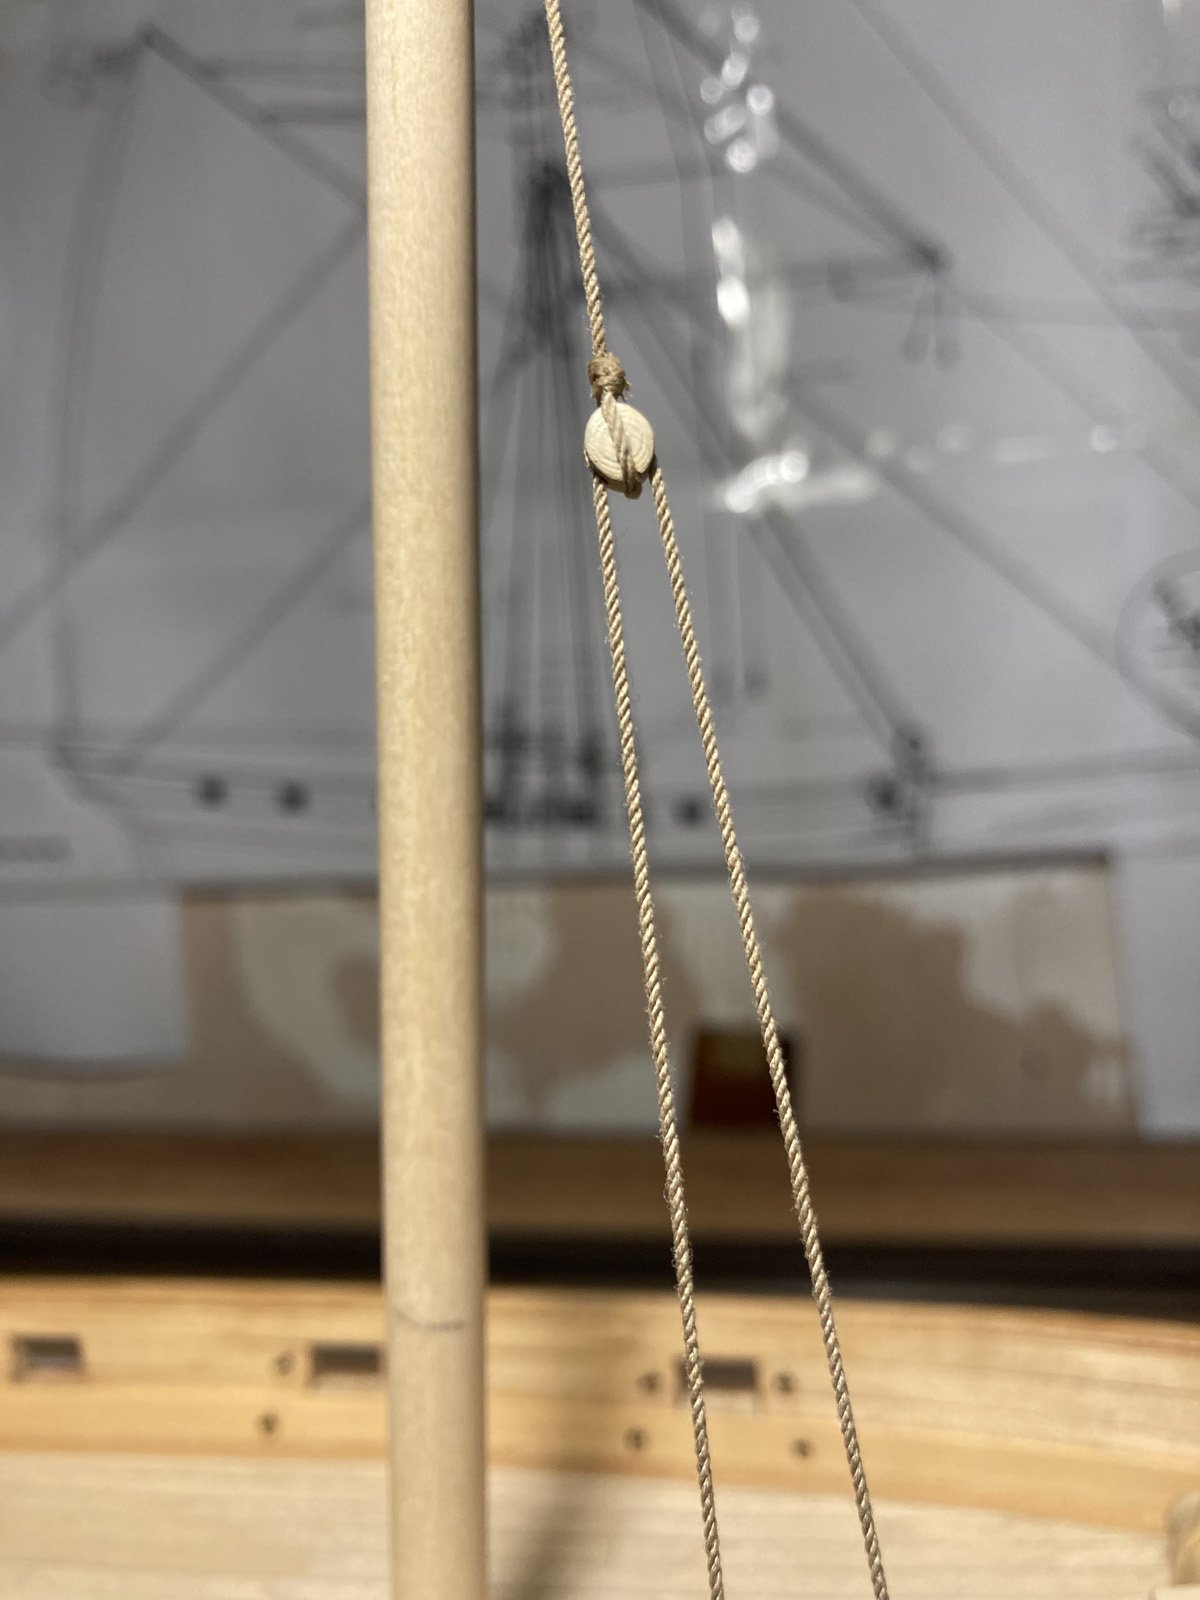
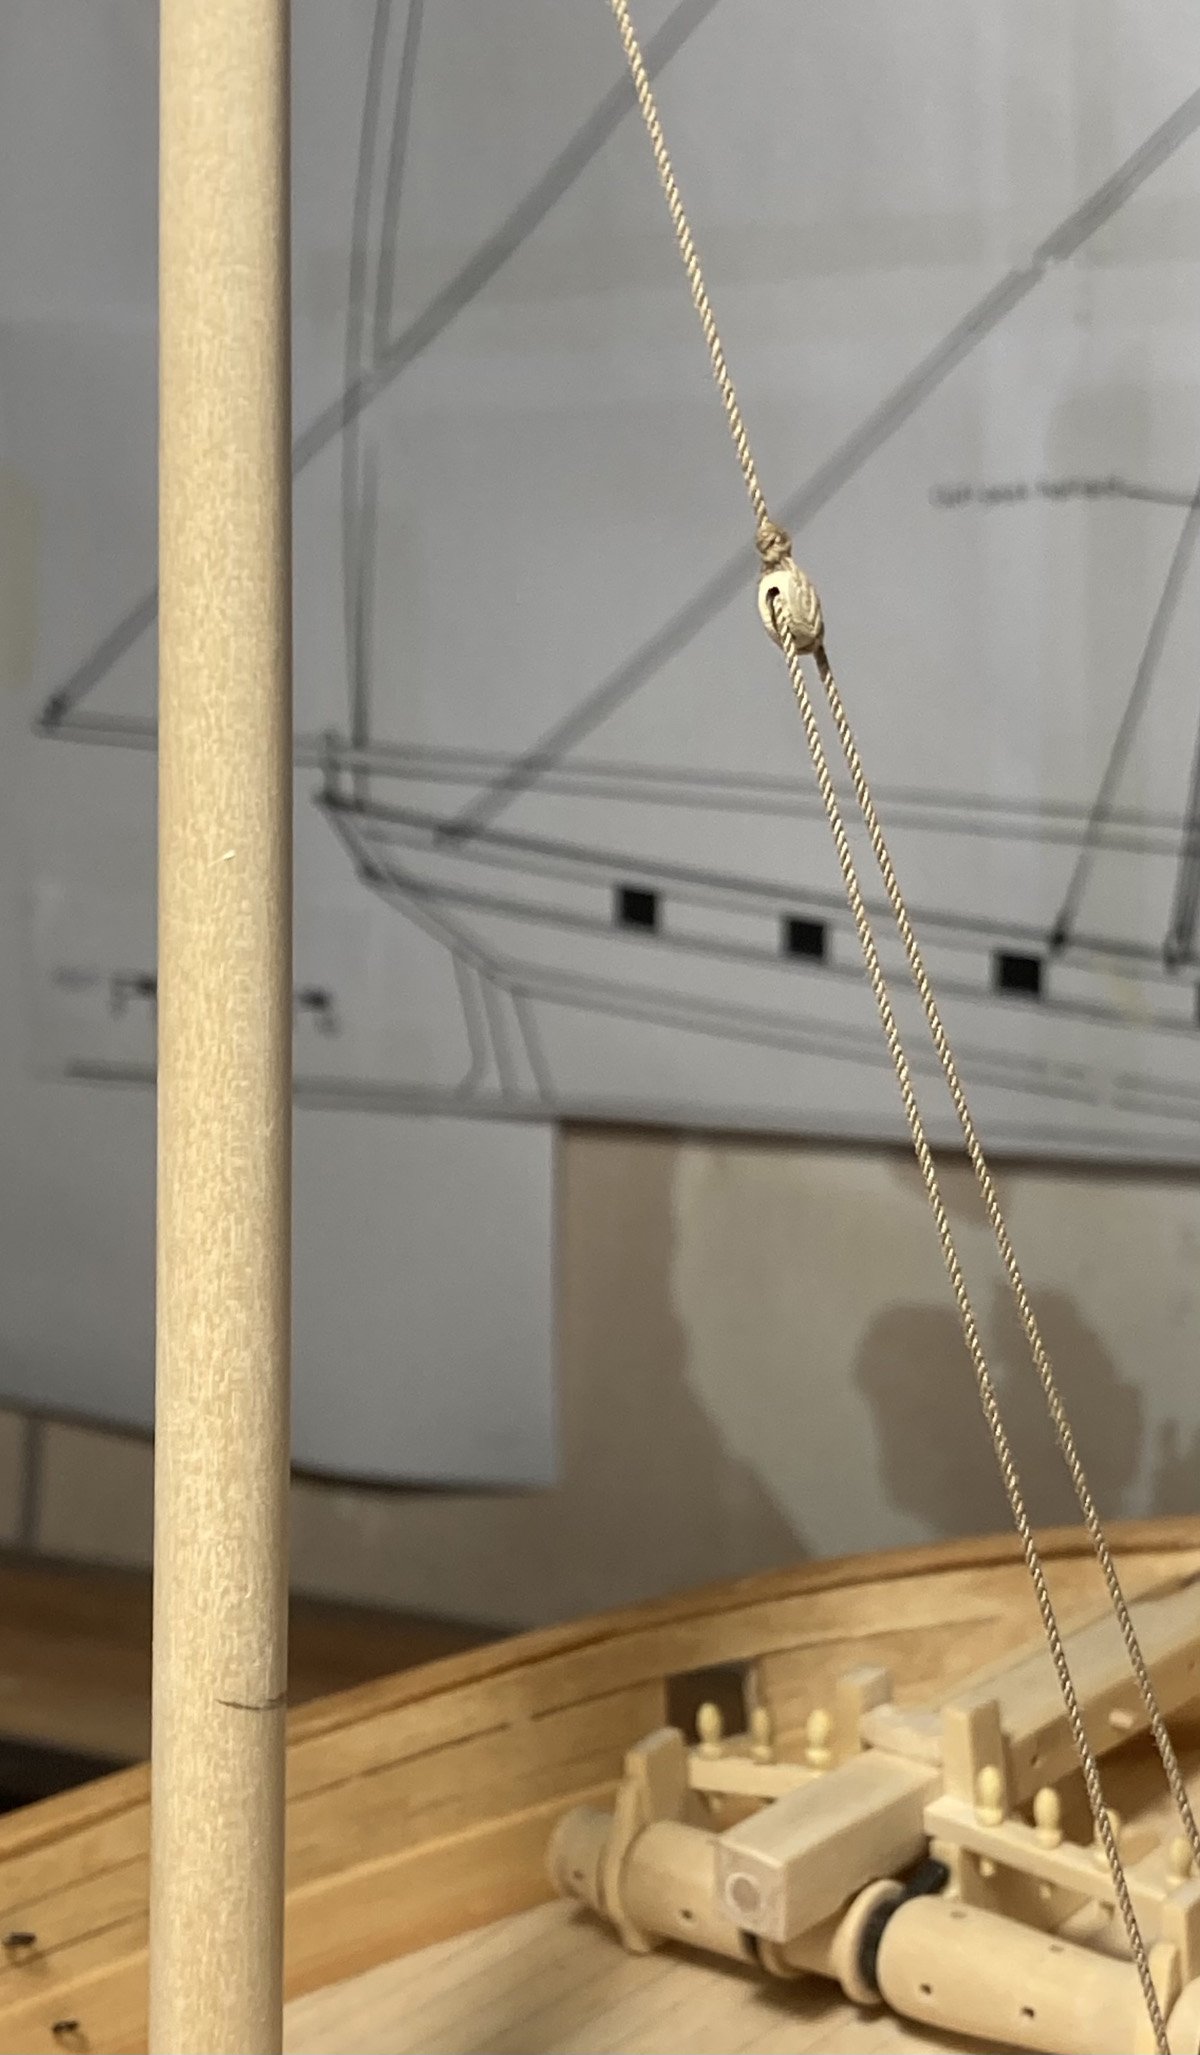
On these blocks no shaping was required at all.
I did add a slight groove with a triangle file across the top and bottom for the seized rope that runs across the face, then just gave them a lick of paint.Now I need to practice my seizing, that in the photo above makes me think I have a lot to learn.
I have been lent a "whip finishing tool" by a fly tying mate, so off to YouTube to find out how to use it.
Tim
-
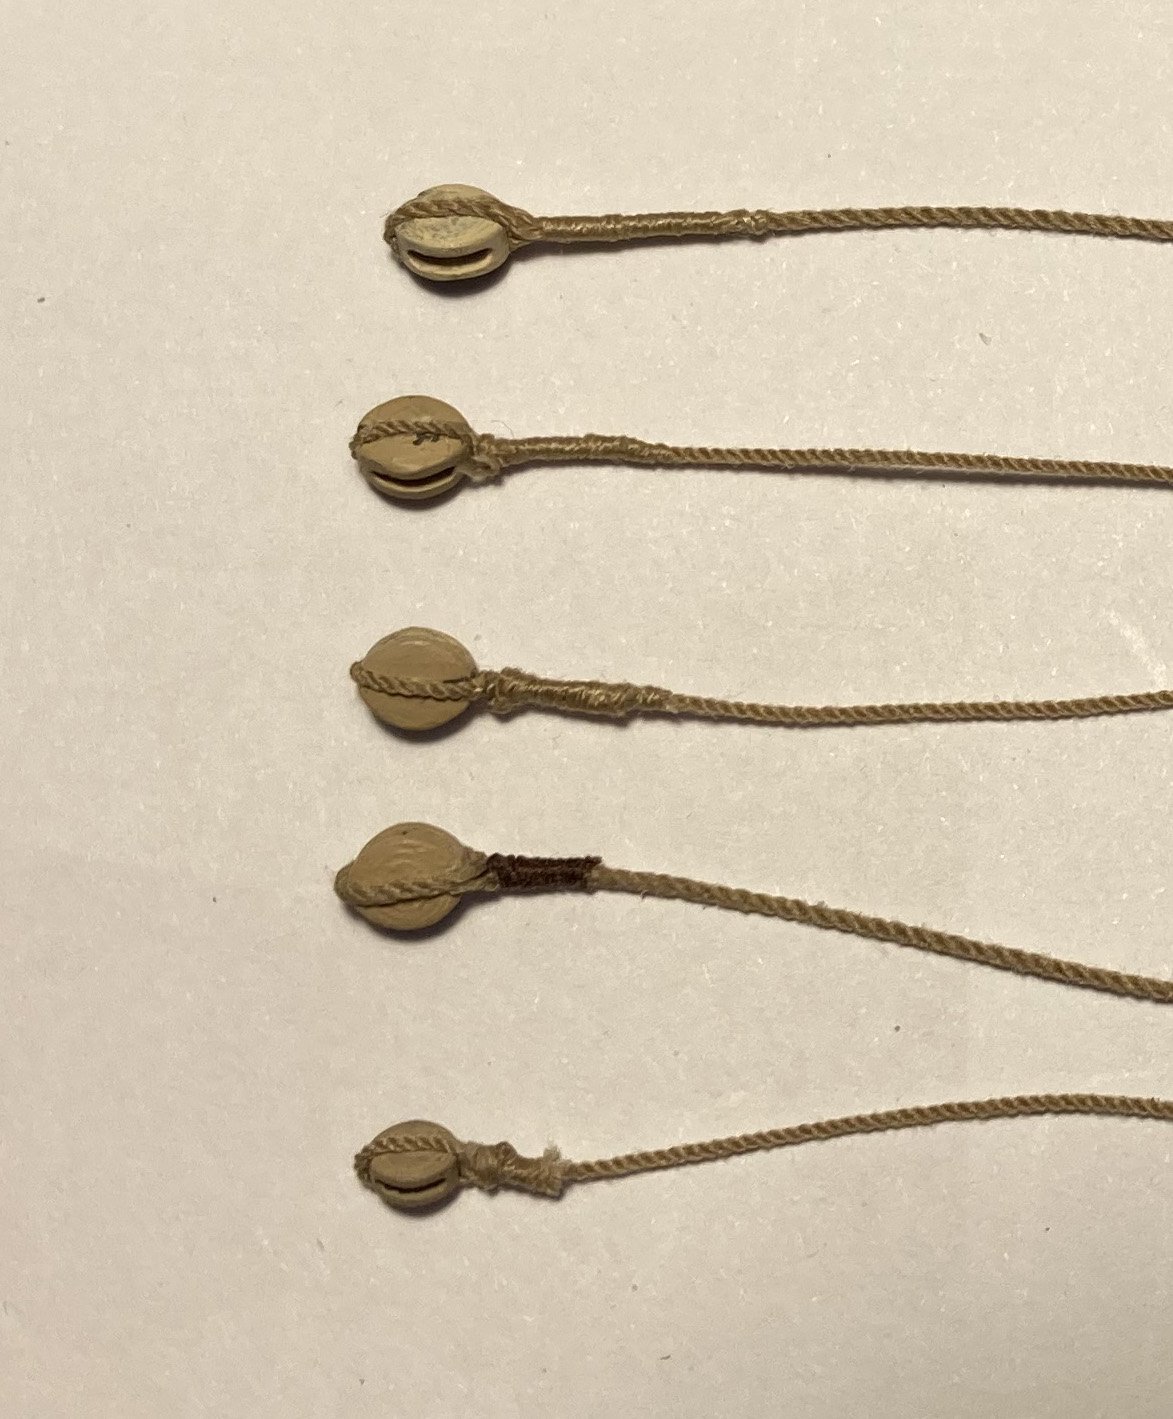
I got some Seahorse 3D printed blocks from ModelNet on eBay in the post today . see https://www.ebay.co.uk/itm/165760407676
I am really pleased, they are very good.
Did not like the dark brown they are printed, so painted it to be more like boxwood, not quite the right colour yet, but not bad.
They could maybe do with a quick sand down as well.But from a normal viewing distance you may not see the print lines

it looks worse from some angles

here are a couple very close up, warts and all.

I have to remember that nobody would ever see this kind of detail when viewing the model.
Tim
- vossiewulf, Paul Le Wol, CiscoH and 3 others
-
6
-
1 hour ago, Gregory said:
The other two images
This is like one those spot the difference games, the brass items on the lid of the companion way have also moved..........
The photos have got to be from different sessions / times
Tim
- vossiewulf, Gregory and mtaylor
-
3
-
Over my coffee this morning I went though all of the pages and counted up the blocks etc. that are required for the cutter rigging.
This will help when ordering parts.
From Fore and Aft book by Lennarth Pettersson ( note I have the Kindle version of the book so page numbering may be different from the print version )
page
name
single
single
double
triple
Fiddle
sheave
deadeyes
4mm
5mm
16
Channels
16
5mm
17
Shrouds
4
18
Toprope
4
2
19
Topmast shrouds
4
20
Forestay
1
21
Forestay
1
9.5mm
22
Backstay
1
3
1
1
23
bowsprit guys
24
Jib in/out
1
1
25
jib halliard
3
26
Lower yard sling
2
4
27
TS yard Halliard
2
1
28
Lifts
2
2
29
Clueline & sheets
4
30
lower yard braces
2
31
ts yard braces
2
32
throat halliard
2
33
Peak Halliard
6
1
34
topping lift
2
2
35
mainsheet
2
36
Jib
37
foresail
2
38
Hoists
1
1
totals
20
19
11
2
3
11
17
Tim
- mtaylor and vossiewulf
-
2
-
1 hour ago, vossiewulf said:
this cutter bears a rig almost identical to that captured by Petersson in his book.
On page 11 of his book he say's his drawings are based on the fully rigged model in the London Science Museum, which is the one featured on their website.
So I guess we can use the photos of the Science Museum model in conjunction with the drawings in the book to get a better understanding of the overall rigging.Tim
- mtaylor, Gregory and vossiewulf
-
3
-
10 hours ago, Gregory said:
The pictures are very high resolution and provide some interesting detail.
Hi Gregory @Gregory, thanks for sharing the link I just took another look at those images and they do show a lot of details that are hard to find elsewhere.
I just noticed the model has 5 shrouds and deadeyes, my Speedy and chucks Cheerful only have 4 ?
tim
-
7 hours ago, Gregory said:
if I've cluttered up your log too much
wow @Gregory, that is going to be really helpful, thanks so much. Not clutter just good research and explanation.
I will keep plodding away until I get to that point, then I'm sure there will be a few questions.
7 hours ago, vossiewulf said:I'd like to comment on it/ask questions,
@vossiewulf I am happy to host the discussion here if you like, but it might be better over in the other discussion as it would save that from becoming fragmented.
Having printed out Bill's rigging diagram full scale ( I did 12 A4 sheets and taped them together ), one thing is very apparent already,
I will have to extend my rope walk, I can only do about a 950mm, which for some of the 'lines' is too short.
Tim
-
3 hours ago, vossiewulf said:
Lennarth Petersson makes his own errors
Thanks @vossiewulf I will look out for those errors and take a look at Chucks Cheerful log, I have seen the Science Museum photos online of the Model that Petersson used for his book, I did not know we had other photos in the gallery.
Tim
-
2 hours ago, Thunder said:
Has put mine to shame
No, It was your model and log that inspired me in the first place, thank you.
Tim
-
25 minutes ago, Thunder said:
from here to completion
Hi Adrian
Thanks for the compliment, I am please with the way it's going.You may be in for a bit of a wait for completion, I really should finish the deck fittings before moving on to the rigging but as usual I get side-tracked....
Tim
-
Bowsprit shaped from square and placed on model, shown in front of Bill Shoulders rigging plan
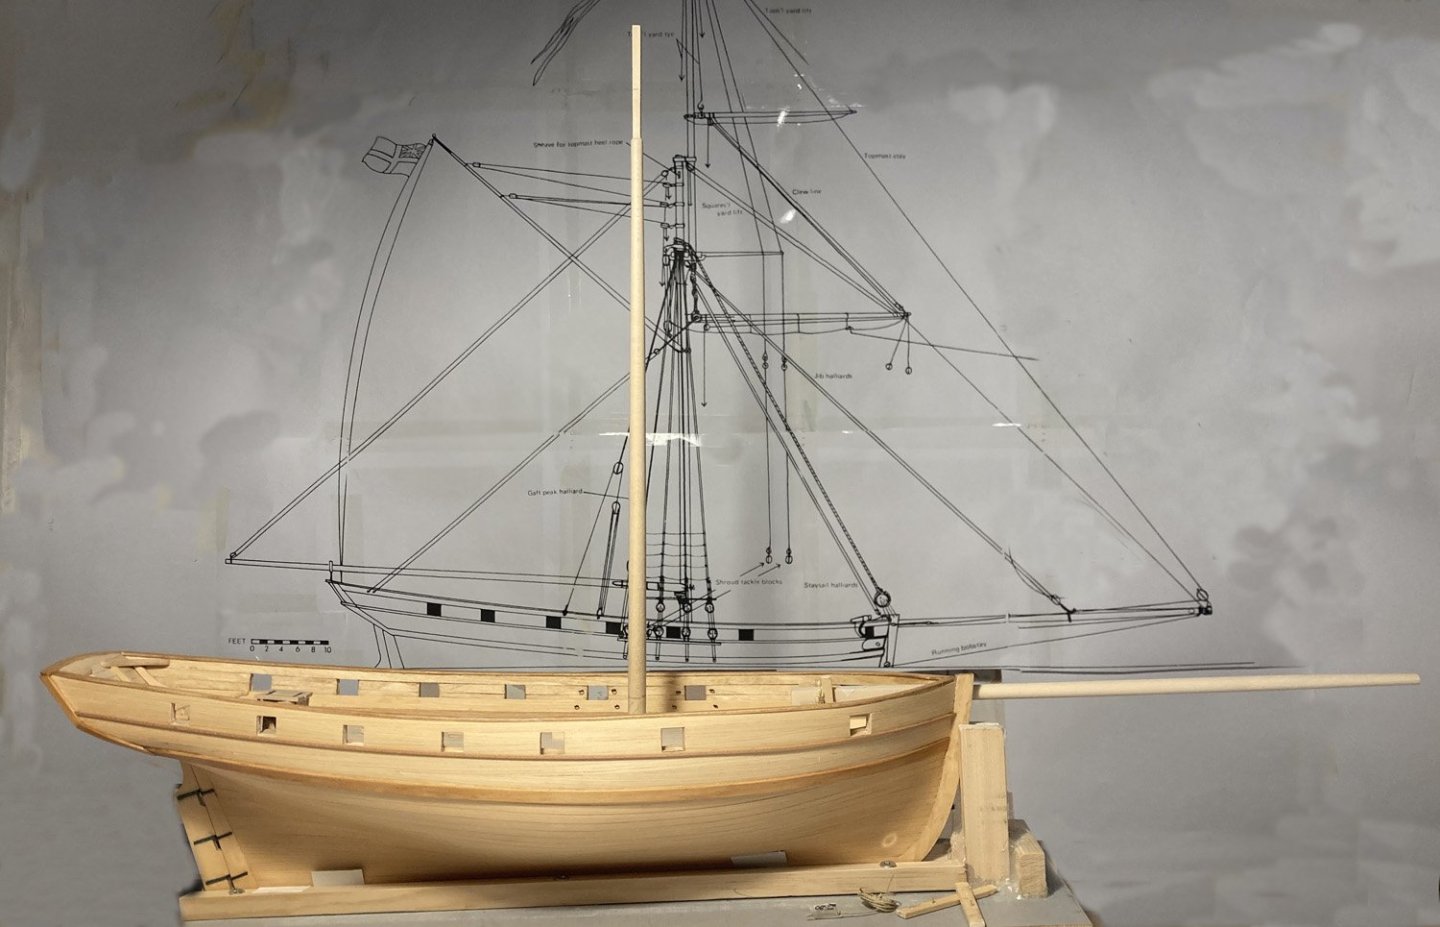
with main mast and bowsprit It all begins to take shape.
I have now got a copy of Lennarth Petersson's book rigging period fore and aft craft, which has all the details for rigging a cutter of this period so I will follow his drawings to do the rigging instead of Bills instructions / drawings.
Tim
- archjofo, Gregory and Thukydides
-
3
-
Thanks for all of the likes, it really helps to keep a body motivated.
Tim


HM Cutter Speedy 1828 by oakheart - from plans drawn by Bill Shoulders in 1972
in - Build logs for subjects built 1801 - 1850
Posted
I will watch out for that, thanks for the compliments.
Tim