


oakheart
-
Posts
412 -
Joined
-
Last visited
Content Type
Profiles
Forums
Gallery
Events
Posts posted by oakheart
-
-
8 hours ago, mtaylor said:
zu Mondeld's Historic Ship Models.
Thanks Mark @mtaylor, I happen to have purchased a copy from the famous Booths bookshop in Hay-on-Wye last summer. I often go there as it's only 40 mins down the road. I paid £5 which was a bargain looking at the prices online.
Now I have some non fiction bedtime reading.
Tim
-
11 hours ago, iMustBeCrazy said:
And the channel should follow the deck and or wale. That is, lower forward
Another thing I was not really aware of.
-
here is yet another revision of the chains mockup
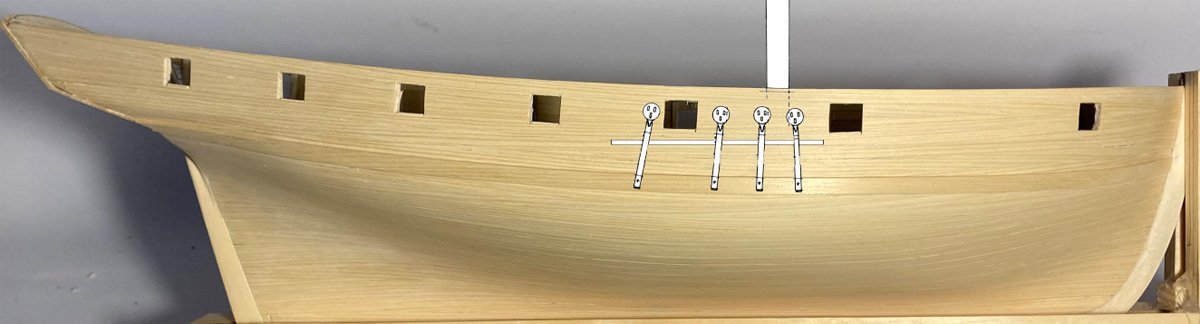
I have tried to incorporate the advice you have all given.
Tim
- CiscoH, GrandpaPhil, mtaylor and 1 other
-
 4
4
-
3 minutes ago, iMustBeCrazy said:
This gives a fairly clear example:
Thanks Craig @iMustBeCrazy that as you say gives a clear example, what a fantastic resource RMG is.
so now I have a couple of names, channel is the block of wood, chainplate is the metal strip. Is that correct?
Now I am thinking I will make mine like this, with a planted strip on the outside.
Tim
-
11 hours ago, druxey said:
(see bottom pic, post #114).
Talking about a lot to learn.
The drawings in post #105 and #114 show the deadeye straps passing though the board attached to the hull, other drawings show it on the outside?
OK now I think I need to do some more research on the names for the parts of what I believe are called the "channel" or "Chains"
I found this webpage useful even though it seems aimed at a more general audience
http://www.ageofsail.net/aostermi.asp
Is there a good reference I can refer too?
here comes yet another rabbit hole......................if I don't get too sidetracked I might get some ship building done.
Tim
-
-
25 minutes ago, iMustBeCrazy said:
Looks fine to me but the straps will all be pointing to a spot up the mast about 54 feet above the deck.
Thanks Craig @iMustBeCrazy, that will need to be worked out, but they should swivel on the bolt so I can adjust after they are fitted?
Tim
-
-
Thanks for the advice @druxey, @Thunder and @iMustBeCrazy.
have done a new profile view and think I will be able to make it work.
This model will not represent any particular cutter but should work visually.
I am not sure now if the straps ( don't know what their real name is ) should bolt into the wale?
Tim
-
24 minutes ago, Twokidsnosleep said:
Likely just delaying the process
I know the feeling. I am struggling with a scratch build of a cutter in wood, can't decide whether to rig or not.
You have inspired me with your excellent build, I will have to get and build this kit.
I need to watch the movies again to get in the mood.Tim
-
13 minutes ago, iMustBeCrazy said:
The forward three shrouds between the ports and the aft one moved a little further aft should work.
Thanks Craig
Using the side view helps to visualise how it might work. I will have another go at sorting it out in the morning.
Tim
- mtaylor and iMustBeCrazy
-
2
-
-
2 hours ago, Thunder said:
get away with just moving the belaying racks and then making sure you space the shrouds / deadeyes so they do not end up in front of the gun port
Thanks Thunder, I can see how that could work.
I have just been working up some drawings in photoshop.
The rigging would take me well outside my comfort zone at this time. Lets see how I feel when I have completed the hull.
Tim
-
1 minute ago, iMustBeCrazy said:
a coat of WOP then a coat of lightly tinted WOP.
Off to test this out.
I have plenty of time here as we are hemmed in by floods all round, can't get out of the village by road, I could do a 2 mile walk across the fields.
People are saying I should have built a full sized ship.................Tim
-
10 hours ago, iMustBeCrazy said:
very light stains to provide some contrast
Hi Craig
That is a nice idea.
I did do some tests earlier using a water based stain which worked well on the cedar.
But I am terrified that it will all go horribly wrong and I will end up with patchy tide marks all over the beautifully smooth hull.
Someone suggested spraying the stain using a hand spray bottle, not sure if this would work
I think more testing is required.
Tim
-
1 hour ago, Thunder said:
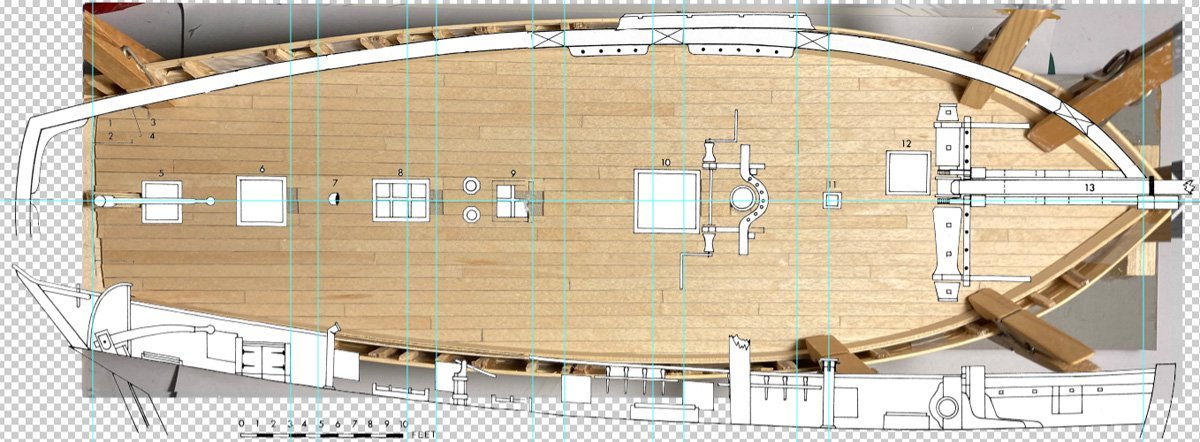
Are you going to make the deck layout match the gunports?
Thunder, welcome onboard, glad you like the build so far, it was your original build that inspired me to start this model.
Thanks for taking a look and for some very welcome advice.
You are right I will have to move everything to match the revised gun ports.
I had been considering doing a sort of "admiralty" style with a stub mast and bowsprit, so no rigging, it's above my current pay grade anyway.
Could I get away with just moving the things you mention.
The anchor will also need moving, that was a costly ( in effort ) mistake I made ..............
Tim
-
1 hour ago, iMustBeCrazy said:
I think she's going to look very nice.
Thanks for the encouragement.
1 hour ago, iMustBeCrazy said:remember you are working off different drawings:
I seem to have difficulty even following the ones I do have 🙂
Next jobs, glue down the deck, line the bulwarks, fit the spirketting and waterway, then frame the gunports.
I intend to leave it all natural wood so there will be no hiding any ( more ) mistakes..................
Tim
-
-
3 hours ago, kgstakes said:
I see what you mean by the blemish
thanks for the compliment @kgstakes.
Here it is with blemish removed, a bit more work than with photoshop, but worth doing.
a quick coat of WOP ( water based Tamiya matt, thinned). looks much crisper now.
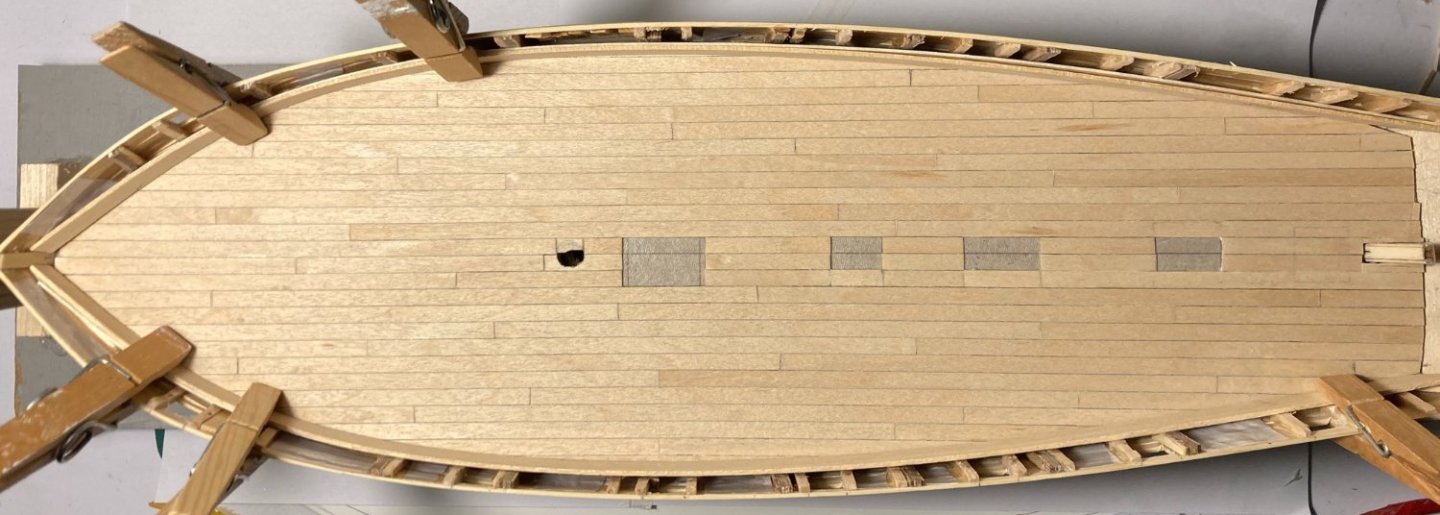
width of planks is 5mm which at 1:48 equates to about 9.5 inches.
the gap at the stern top right, will be covered by the pantry or the W.C. can't remember which goes on which side.
Tim
- Thukydides, mtaylor and kgstakes
-
3
-
Got quite a bit done yesterday, deck planked with 5mm white maple from Mantua Models.

I think it looks good, there are a couple of planks I may replace. I was not taking notice, the brown blemish shows now I have sanded it down.
here is a close up
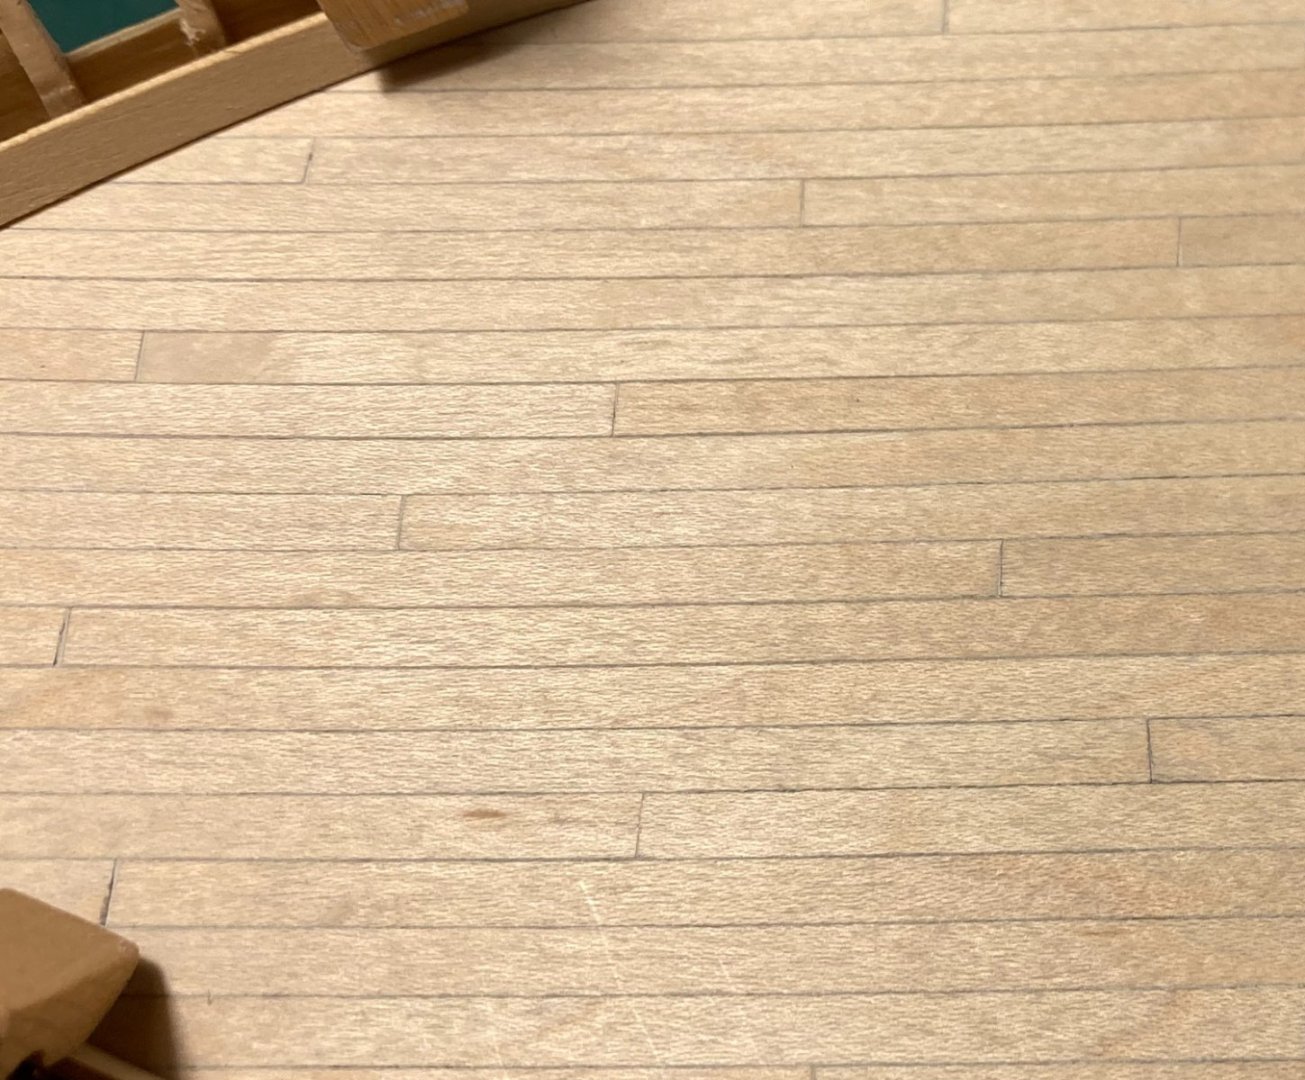
used the soft pencil for the caulking, it was glued to 1mm thick grey card, I have left it loose for the time so I can try other decking.
what does everyone think of the colour and width?
Tim
- Thukydides, mtaylor and kgstakes
-
3
-
Happy New Year to all onboard.
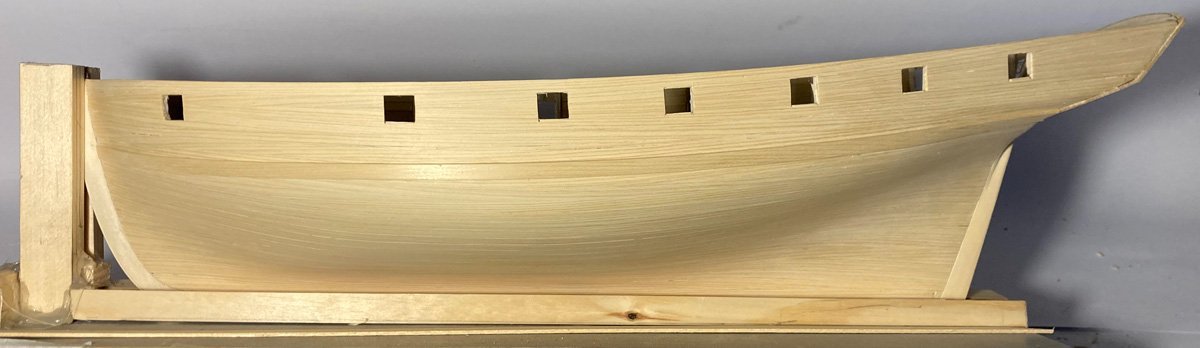
I managed to get the wales cut and glued in place, I was really happy with the result.
Then I went back to figuring out the deck.
I cut out the deck plan from the original design as drawn by Bill and laid it in place.
As I looked, the old saying of "measure twice and cut once" sprang to my mind.How did I managed to do that?
I had measured from the transom taking measurements from the side view drawing, it looks like I had got the stern all wrong, it's too long, so that threw out the gun ports.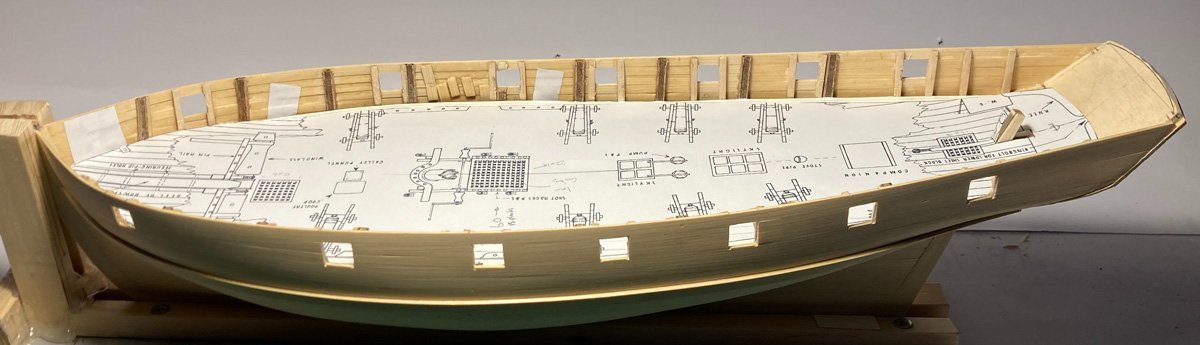
Not a lot I can do about it now, so I will crack on and finish this model knowing that it's wrong, I think it should make a nice looking model all the same.
I don't remember who said it, but apparently "we learn nothing from success."
Tim
- Paul Le Wol, mtaylor, CiscoH and 1 other
-
4
-
-
9 minutes ago, iMustBeCrazy said:
And since it's already Christmas morning here, Merry Christmas Tim.
Merry Christmas Craig, Hope Santa left some nice pressies !
I have to wait until tomorrow to see what I got..............
Thanks for the drawings they do help to get an idea of the difference, I may just stick with the 5mm planks I have already.
They are maple not holly ( wishful thinking ) and too late for the Santa list now.Tim
- iMustBeCrazy and mtaylor
-
2
-
On 12/22/2023 at 11:43 PM, iMustBeCrazy said:
Also consider how wide you think your planks should be.
I have been giving this some thought.
On the plan drawn by Shoulders the deck planks measure about 5mm wide ( the lines are thick and uneven)
At 1:48 scale that equates to a 9.5 inch plank is this too wide?
I can get thinner planks in stock sizes so 4 mm = 7.5 inches which would seem to be a bit more realistic
Dan Vadas said about his swan class sloop 'most of the planks (apart from the Kingplank) are no wider than 8 inches '
What would be the best for this model of a cutter, I did see another discussion about deck plank widths but can't find it again
Tim
Hope you all have a good Christmas, see you on the other side.


HM Cutter Speedy 1828 by oakheart - from plans drawn by Bill Shoulders in 1972
in - Build logs for subjects built 1801 - 1850
Posted
Thanks @druxey and I will make sure to follow the line of planking.
Tim