flyer
-
Posts
1,016 -
Joined
-
Last visited
Content Type
Profiles
Forums
Gallery
Events
Everything posted by flyer
-
 Well Spy, your aim is quite off the target - I'm so green, I'm almost black. A lovely vessel matching her surroundings. Do you know when she was built? I would like to see her underwater hull. If she has a fin, she should be able to counterbalance higher masts than an older building type which would have to rely more on the ballast. Anyway if I take rough measurements out of your pictures and compare the height of the mainmast to the length of the deck I get something between the proportions of the kit and my interpretation. No clear argument there. I love the pictures and thanks for the information. Cheers Peter
 -
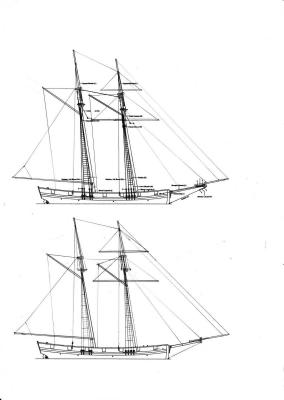
Between working on the deck furniture I was trying to find a suitable rigging plan for my pickle. I did question the height of the masts as well as several other issues B.E. already researched in his Pickle log. He also described the rig as quite lofty and I had myself the impression that the masts were quite tall for a schooner with that draft. Another point was the position of the fore gaff - above or below the yard. In the online collection of the National Maritime Museum I found several plans of schooner rigs and most of them had the gaff below the yard. Following B.E.'s discussion of that point I still tend to the kits position but as I intend to hoist sails I will have a look at the situation when the masts and spars are ready to mount and will decide then. For answers I mainly turned to four sources: 1) Sketches of the Adonis – class schooners in ‘The Global Schooner’ (TGS) 2) sail plan of an unnamed schooner from the collections of the Royal Museums Greenwich 3) the kits plans and manual 4) the excellent build log of B.E.'s Pickle To find my mast sizes I compared the rigs of the first tree sources. The hull in all 3 is of approximately the same length but the year of origin of 2) is unclear. Another source could have been Robert Dodds well known painting. But the rig there is even loftier than that of the kit and might have influenced the kit builders. I believe that generally contemporary artistic representations of sailing vessels - paintings or prisoner of war models - tended to exaggerate the already impressive height of the rig. This is understandable if you consider that a warships masts stood taller than most other manmade objects. 'My Pickle' shows the last of several tries. A rough sketch of the intended proportions was made in comparison to the kit for every try. Below is the final comparison with the kits proportions on top. As you can see in the table above the main changes were to reduce the heights of both masts and to decrease the length of the bowsprit while lengthening the (rather stumpy) jibboom. I find the new proportions look quite plausible but would very much appreciate any comments.

- 293 replies
-
- 3
-

-
- pickle
- caldercraft
- (and 1 more)
-
What an interesting and rewarding discussion! That picture alone of Victory's grating in Spyglass' link above is as good as a manual for the construction of hatches. The way the timbers overlap at the (lap) joints coincides also with W. zu Mondfelds book which I used as reference. Be aware Spy: Intuition is a tricky thing even for somebody who is a sailor salted to the bone. Take me for example - being married for umpteen years (always to the same wonderful woman) still leaves using intuition in homely matters a dicey business. Better use solid, verified facts. And remember that the sea as well as the ships are female... Cheers Peter
- 293 replies
-
- 2
-
-
- pickle
- caldercraft
- (and 1 more)
-
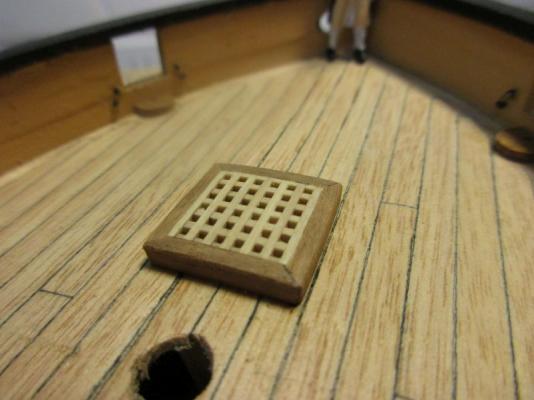
Hi Martin and Mobbsie Didn't know that it is called mitre - joint. This is a rather agnostic ship but I will use those joints anyway in the future. Making them is relative easily done: - prepare a grating of the required size - glue two pieces of the frame with enough over length onto the longer sides - file the top halves of the projecting parts away - flush with the short sides - prepare the short sides of the frame by filing the bottom halves of their ends back to the width between the existing parts - glue in place - sand all around flush (and the top convex as required) It's really faster and easier than matching four 45° joints around the gratings. My nimble fingers? I'm just tattering around until it fits - more or less. And my family hardly ever accuses me of being over patient ... Thank you all for the likes and positive feedback. Cheers Peter
-
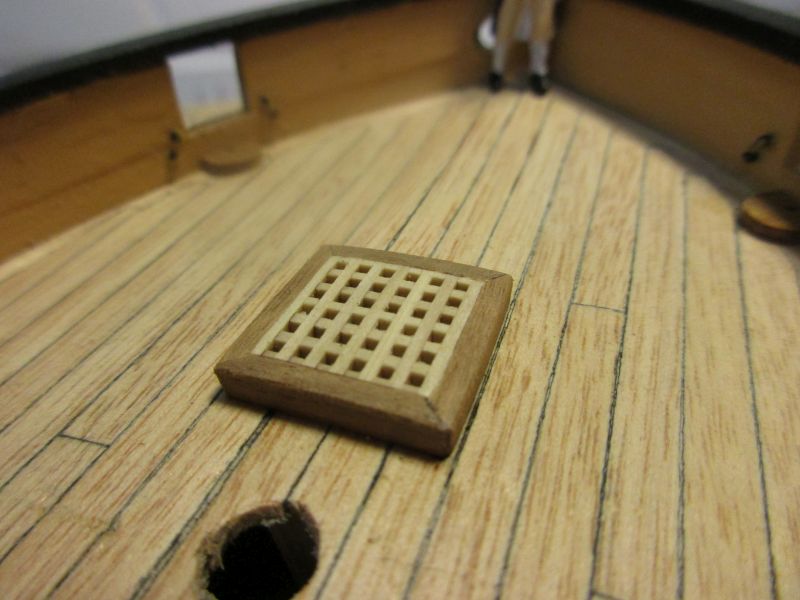
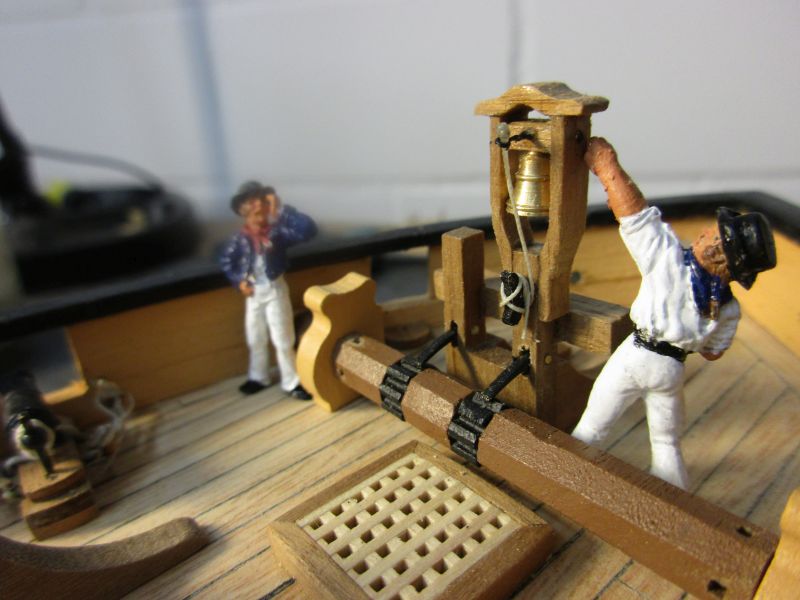
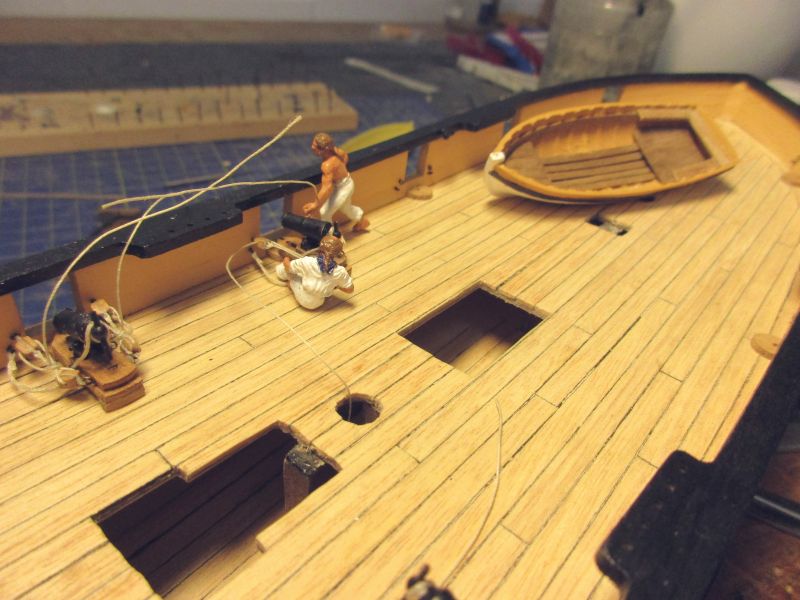
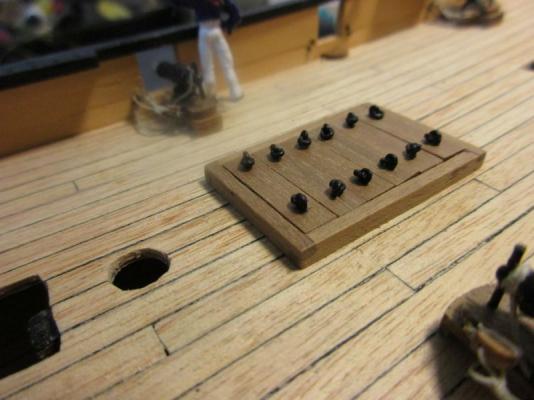
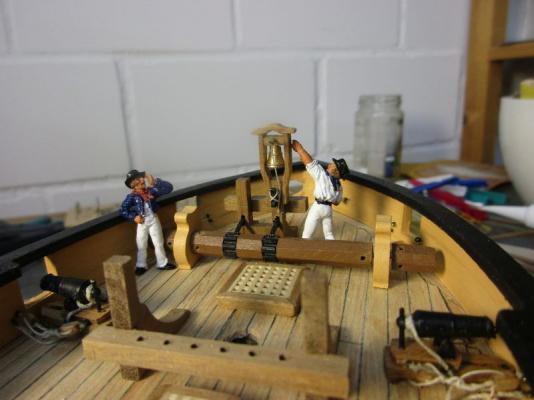
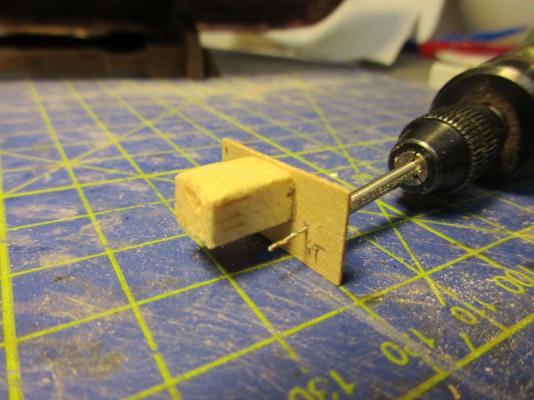
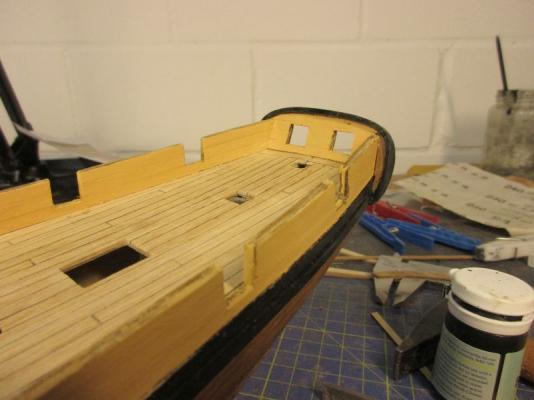
Initially I joined the hatch frame corners with 45° joints. I thought a decent carpenter would work like this. Then I found in the clever books that a completely and incidentally simpler solution was used which also took the strain on those corners better. So much for avoiding the easy way. Whom the bell tolls... As said before I constructed a belfry according to an illustration in 'The Global Schooner'. Sides and top were constructed with doubled and sanded 5x1mm walnut strips. The bell is from the shop and the small parts came from the kit. Most of the furniture on the deck is only provisionally fixed. Before putting it permanently in place I will have to go over the rigging plans to find out which additional belaying points I will have to construct for the running rigging with sails set. 45° joint. Not so easy to make joint according to several clever books finishing work on the belfry a simple but pleasing construction

- 293 replies
-
- 9
-
-
- pickle
- caldercraft
- (and 1 more)
-
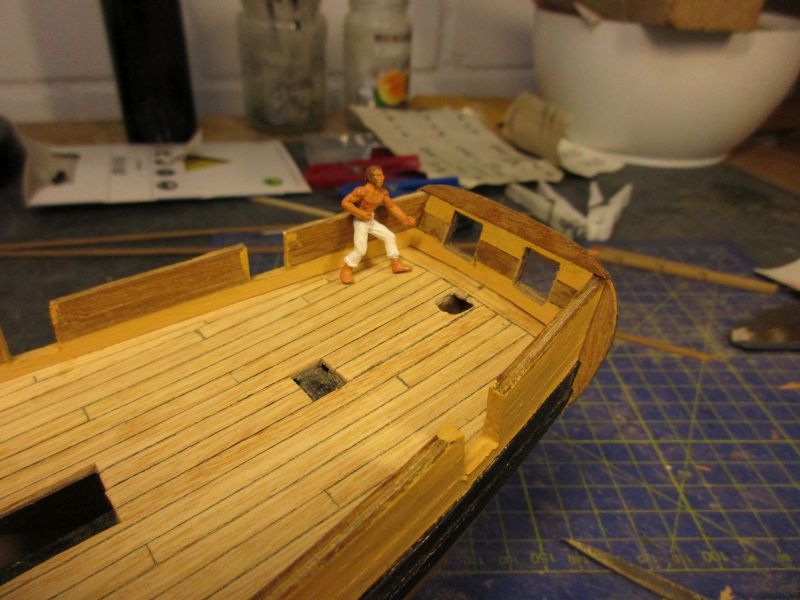
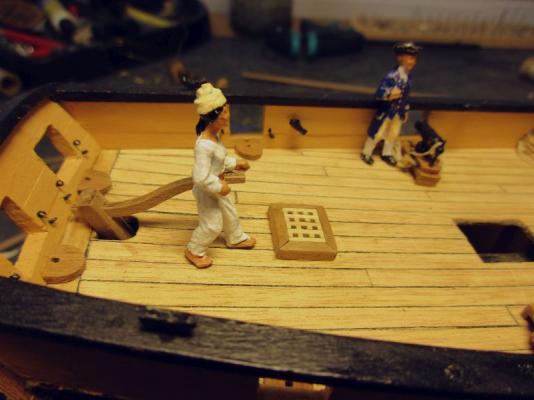
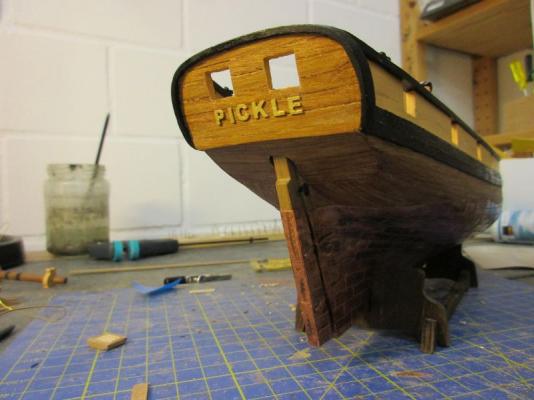
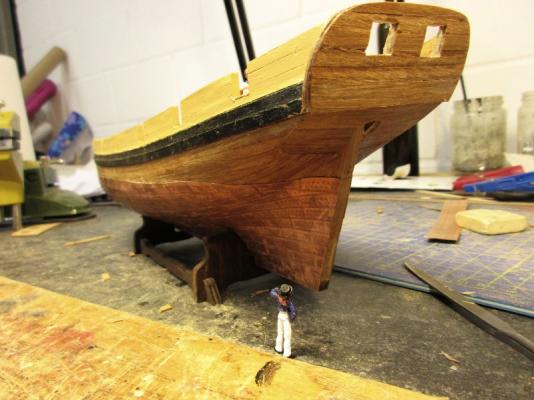
Hi B.E. Thank you. And you were right, of course, with your remarks about the carronades - although I must admit I never test fired them. But the relatively short muzzles were obviously always a risk to the sides and even more to the rigging. In the meantime I spied again on your pickle and strengthened the rudder top with iron bands. Thanks for all the useful tips in your log. Hi Martin Tried to have an interview but they never answer. On the other hand 'answering' is an offence under the articles of war. As long as they do any assigned duty to the best of their abilities, are willing to accept the wages (none, except some fleeting fame in a obscure webpage about model shipbuilding) and above all are within the required height limits (1/64) and are wearing some fitting clothes they have a good chance to get hired even if they are dumb. About that Dublin pub: It is great, gemuetlich(do you really use this German expression in English?), also serves a fine Irish coffee and was founded a good thirty years before Pickle was built! When I asked timidly for a beer which was not a Guinness (sorry) I got a very fine local lager although my daughter, checking it out, found that it was brewed somewhere in the Guinness empire anyway. The Pickles letters are etched brass letters provided with the kit and brushed with gold paint. Thank you Nils. In earlier builds I just had a dummy made of a length of dowel with a knob at the end depicting a 1,75m tall scale man. But using the figures is definitely more fun. The helmsman was a great help in adjusting the tiller. I would recommend any ship modeller to test his build occasionally with scale figures - I know you do the same and get absolutely stunning ships. Cheers Peter
- 293 replies
-
- 2
-
-
- pickle
- caldercraft
- (and 1 more)
-
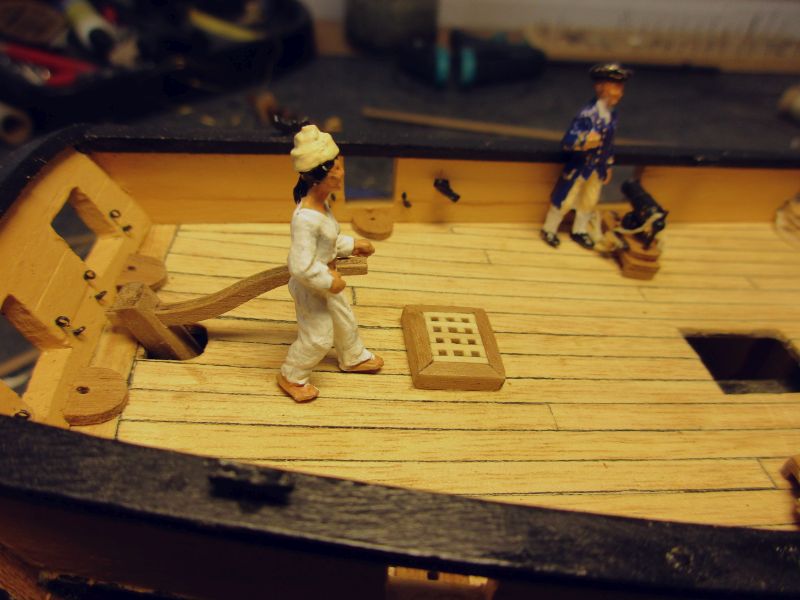
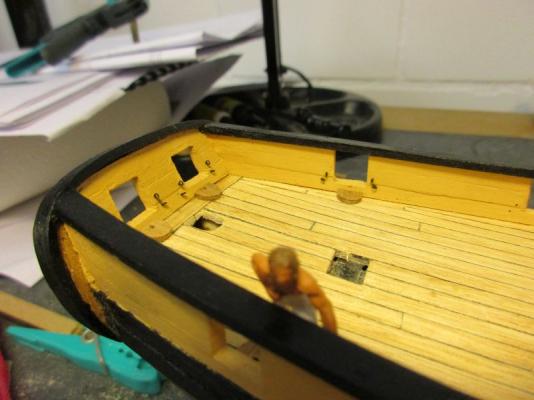
Work is going on. Pickle got her name on her transom (even gold plated, which might be a bit bouncy for her class but I like it). The carronades are stowed and the deck furniture is coming along quite nicely. Even a small belfry to be placed on top of the parrel bits is under construction. I thought that a ship with a gilded name should also have a ships bell and try to tinker a belfry according to an illustration in Karl Heinz Marquardt's book. A 5x1 mm walnut strip serves as a false keel and the rudder was provisionally hanged. A few more crew figures have been hired including one who can man the tiller. The 'I' and the 'C' need some adjustment the false keel The tiller must be reworked a bit there is still some work to do...

- 293 replies
-
- 7
-
-
- pickle
- caldercraft
- (and 1 more)
-
It's about time for a little update on Pickle. The work in the wharf went rather slowly lately. The weather was just too nice and part of the family spent a few days in Ireland where we also visited Trinity college and almost found traces of Steven Maturin there. At least the wonderful library still seems to be in about the same condition. (One pub or another was also visited and the good news are: there is really good beer beside Guinness!) The people are nice as well, their music is great and the weather was like an beautiful English summer: whatever you took along on your stroll, umbrella, pullover, windbreaker, nothing - you were always wrong. On Pickle the boat which was sawed in two is whole again and the fiddly work on the carronades rigging goes on. This Dublin pub opened in the year 1770! the launch is in one piece again rigging the carronades really is fiddly work...


- 293 replies
-
- 5
-
-
- pickle
- caldercraft
- (and 1 more)
-
Hi Michael "I hope that I'm not missing something that I don't yet see??" In my case this are usually the glasses... But generally I would like to introduce you to a certain Mr. Murphy, who says on such a subject: "The probability of a certain part to fail, get lost or missing is in reverse proportion to its accessibility!" That means that you only have to consider which areas are practically inaccessible after finishing your ship - that's where you have to look for forgotten details. Easy, isn't it? But in fact I just wanted to say: Outstanding, excellent, beautiful work. Cheers Peter
-
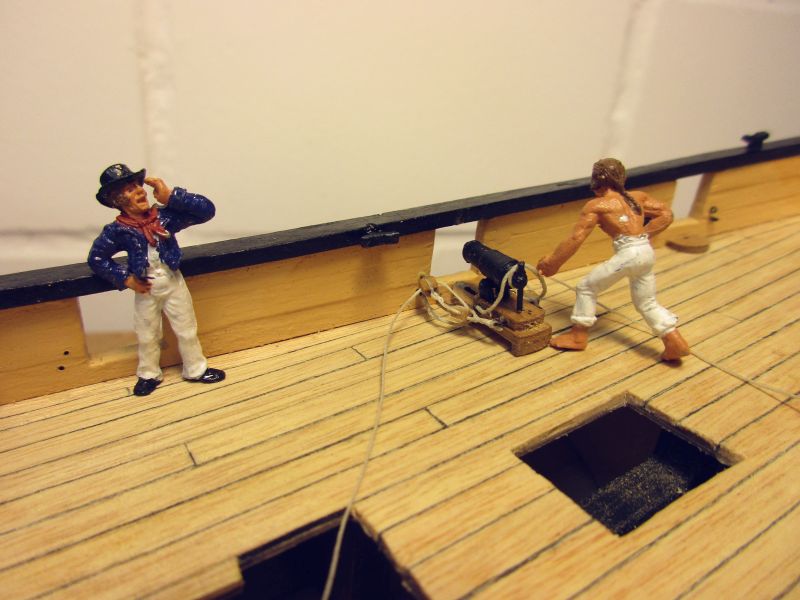
Hi Martin You're right about carronades being easier to handle than the same calibre long guns. However, if you check NRG's article Cathead is referring to below, you see that Pickles carronades still weighted about 300 kg (I assume that's just the iron weight) - yes that sailor better watches his toes. Hi Frank The coppery things are hidden in the basement - safe, so far. And yes, I'm quite confident now about the outcome of my boat-shortening-experiment. Hi Cathead That is a really very interesting article from NRG! Thank you. The carronade from the Model Shipways kit then weights about 870 kg and still doesn't have a train tackle - hmmm. Reloading after shooting that beast seems easy because the recoil puts it in the appropriate position. But I wonder how a dry gun drill was executed. You could always haul it back with handspikes but I think this could damage eventually the wooden surfaces where you put them in. I will leave train tackles to Pickles commander. He can do a retrofit if he needs it. Me, I take a rest. (I like your avatar.) Cheers Peter

- 293 replies
-
- 2
-
-
- pickle
- caldercraft
- (and 1 more)
-
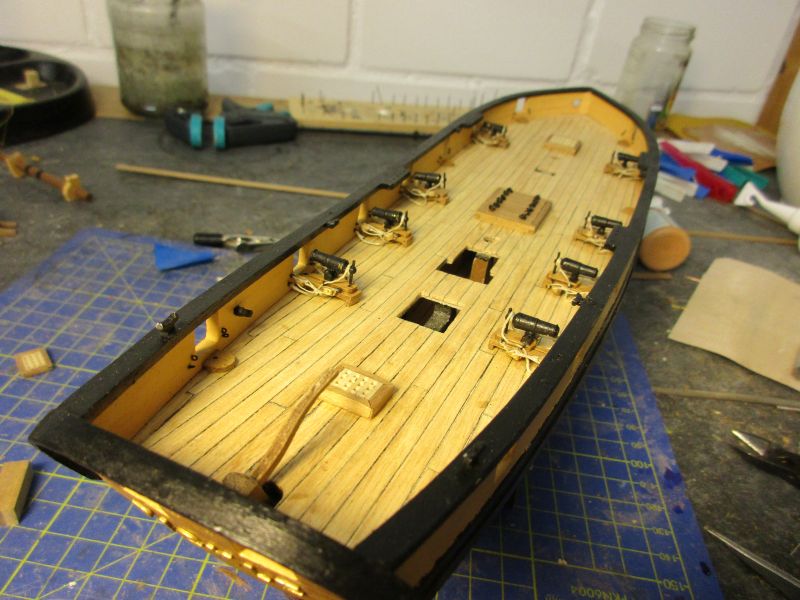
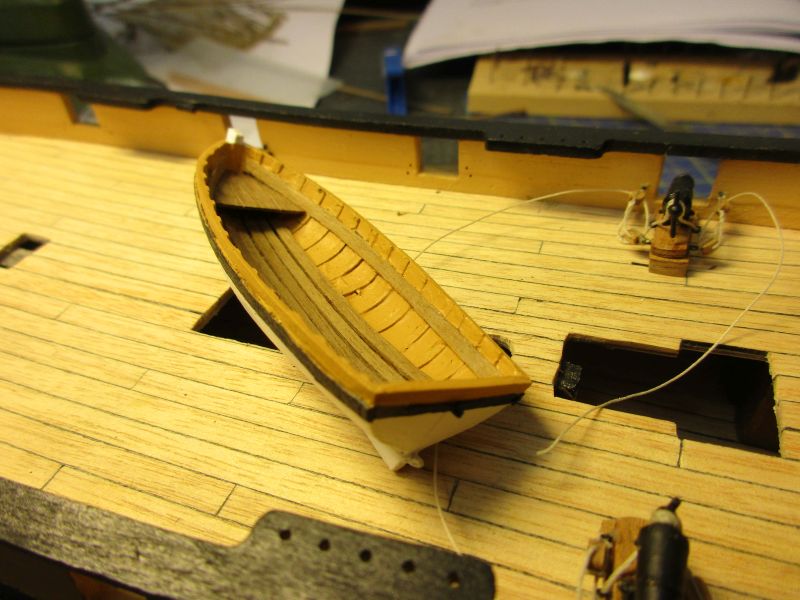
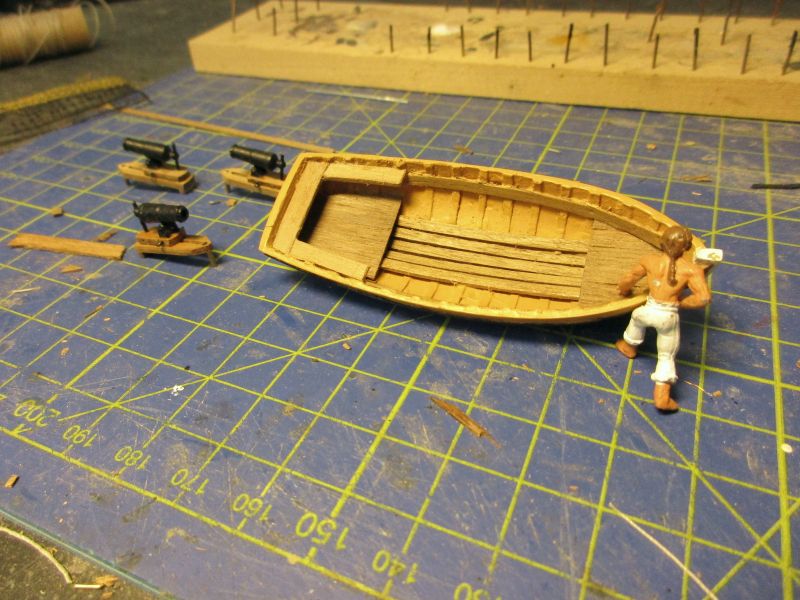
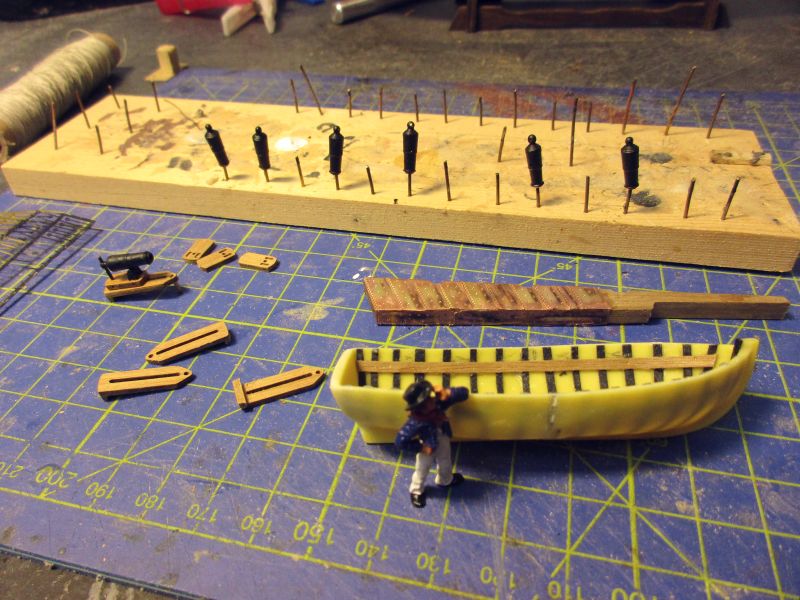
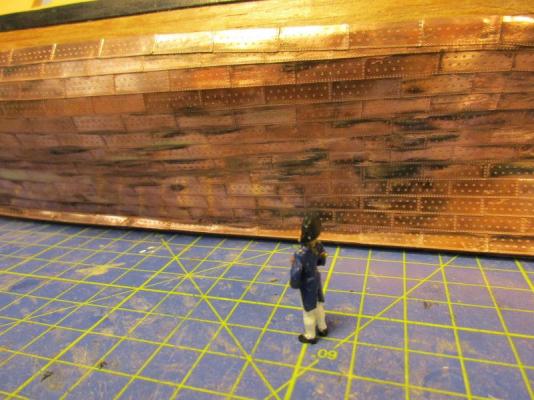
The coppering of the rudder is finished and the building of the boat goes on. Also the serial production of the carronades has started. As a trial I rigged the first carronade. Instead of using the kits blocks I ordered the smallest available from Cornwall model boats - again following B E's lead. While putting the tackles in place I found it strange that there was no train tackle. It would be used to pull an unfired gun inboard and to stop an unwanted running out of the piece. First reference was B.E.'s Pickle - no train tackle either. Searching further showed no train tackles on carronades with one exception and those suspicious train tackle eyebolts on the Constitution's and some other carronades. As earlier stated the Pickle's carronades are small and could probably be pulled back without tackles and the static friction of the slide could be enough to hold it in position. Furthermore I found one example where the carriage and the slide were lashed together with a few (7?) round turns, fixing it against unwanted movement. I decided to forego the train tackles and their eyebolts. work in progress The first carronade is rigged. It should be possible to move it inboard with the strength of two man without a tackle.


- 293 replies
-
- 3
-
-
- pickle
- caldercraft
- (and 1 more)
-
Hi Michael Your Wasa really is an outstanding beauty - almost more real than the real thing. However you could (and should) omit those unloved semi-nudes. Behind that wall but a deck lower was the rudder-stand where the helmsman was standing and steering with a whipstaff. He was completely enclosed and needed an opening just where your figures are placed to hear the commands of the responsible officer or pilot standing just in front of that place on the open deck where he could see the sails and the sea. You could take the figures away and create small rectangular opening. I didn't find out how it should look exactly but perhaps somebody else remembers from a visit in Stockholm. Kind regards Peter
-
Hi Nils Ok, you got me there. I cheated. The waterways aren't built exactly (they should be rounded out) and I omitted the inner end by drilling deliberately below deck level from the outside. To show both ends you would have to drill from both sides to the middle (and hope you meet there). The inner end would be located in a copper plate covering a rectangle in the waterways, it's width the height of the waterways. Hi Martin Well, I thought the wales must hold the hull together also lengthwise. The extent able to take the stress would be its smallest square section (the one reduced by the scuppers holes). This reduces the usable size of the wales by perhaps 20%. Of course there are some other planks holding the hull together as well but the wales seem to have to take the main force. Anyway, my Pickle didn't fall apart yet... Cheers Peter
- 293 replies
-
- 1
-
-
- pickle
- caldercraft
- (and 1 more)
-
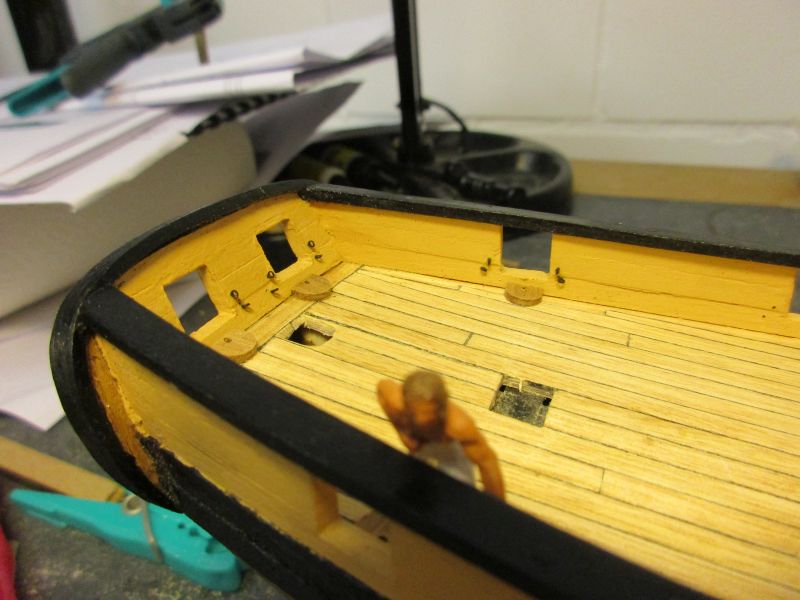
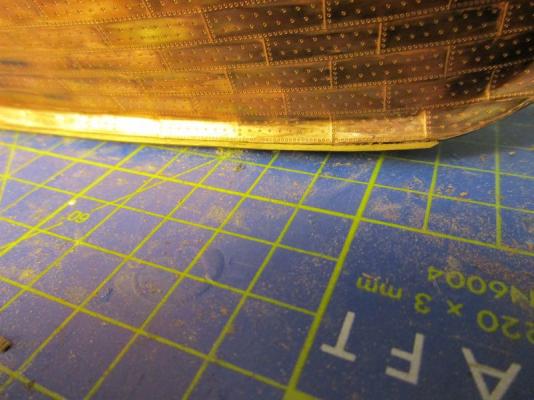
Work goes on in different positions. I made a simple template to drill the holes for the ringbolts for rigging the carronades and finished the empty gun ports. Also the coppering of the rudder goes on - it's a bit complicated because every plate is bent around the backside and must be cut to size. The Work on the boat continues as well. While touching up the paintwork of the hull I came across another problem: The scuppers. There are a bit too many on the plans. Comparable vessels in my clever book show only two to three per side. But the main problem is that they are positioned much too low - below the wales. The position is given by their function - they lead water from the waterways overboard. And in all examples I found in my sources they were always above the wales. Drilling an experimental hole from the waterways outboard ended in the upper, less prominent wale. I didn't want to weak a wale by drilling holes through it but I had no choice. But by having only two scuppers per side in approximately the right position seemed an acceptable compromise. I don't know if there are mistakes in the plans about the relative heights of deck and whales ( the deck should be 5mm higher over them) or if my solution is a correct one. Changing the build to have the scuppers completely above the wales would be very difficult and alter the whole hull. For scuppers I used again my 'Ader-Endhülsen' (wire-end-sleeves?) from the electric department. They are made from aluminium and painted copper. template finished empty gun ports scuppers
- 293 replies
-
- 4
-
-
- pickle
- caldercraft
- (and 1 more)
-
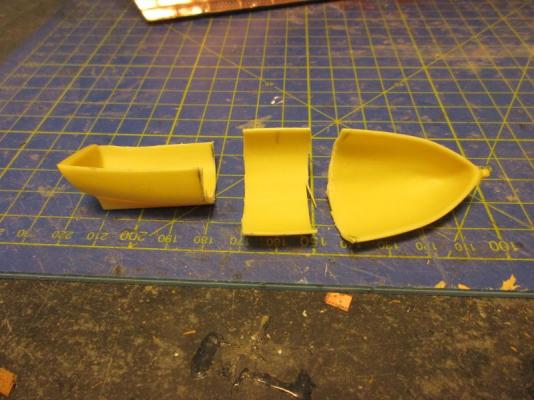
Hi Jason Thank you for your vote of confidence - fact is that I simply ignored the possible transition. By cutting a similar distance both sides of the widest part of the hull I hoped to reduce it to a minimum and fortunately resin is a great material. You can bend it, it holds epoxy - glue quite well and finally you can sand it into a smooth form. (Plan B was to leave the oversized launch on land and sail with the little skiff only.) Hi Martin Yes, we do have some copper thieves over here, the price for copper being as high as it is now. Sometimes they steal overhead traction wire or earth cables overnight of our railway system. You probably knew already that captain Jack is a deft hand with his fiddle or his sword. Now we know that he is quite fearless with a carpenters saw as well. Cheers Peter
- 293 replies
-
- 4
-
-
- pickle
- caldercraft
- (and 1 more)
-
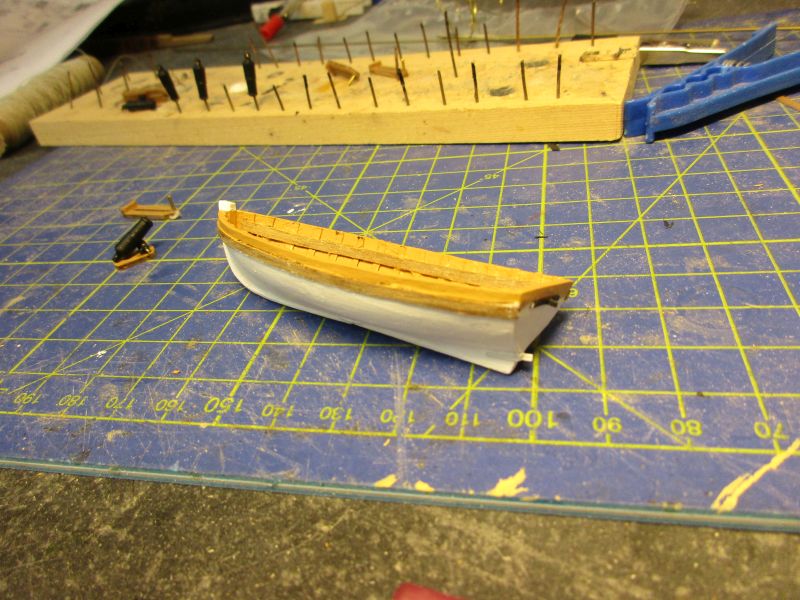
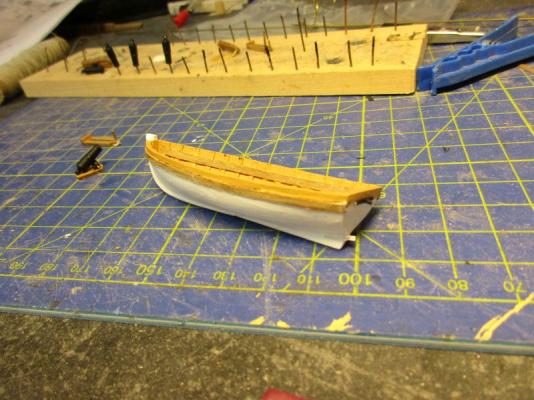
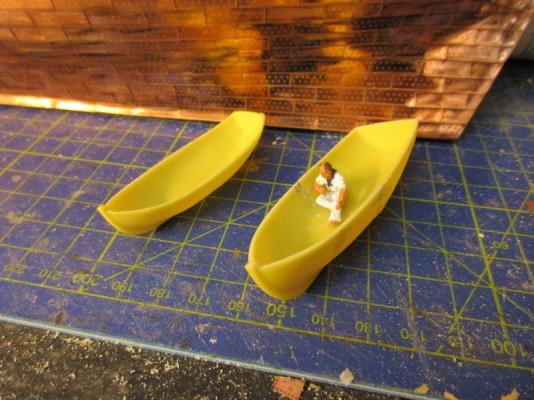
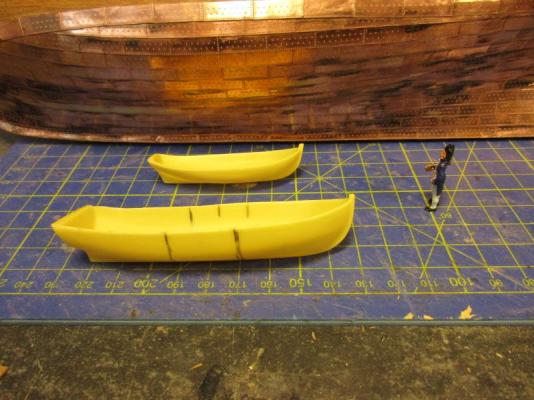
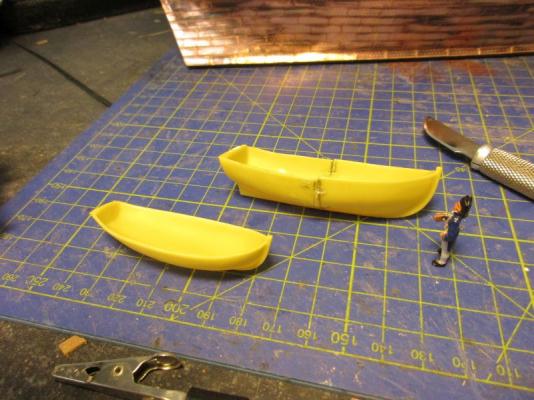
The future commander of Pickle was checking the polished copper. After a lengthy discussion he decided that that the 19' launch in the kit was too large to stow on board. I mentioned something Jack Aubrey once planned: To increase the capacity of his boat he wanted to saw it in two (at its widest beam) and to lengthen it by inserting several frames. I suggested to do same but the other way around. The decision was taken to try to alter the 19' launch into a 16' longboat by cutting out the mid section, gluing both ends together and adapting the remaining form to represent a longboat as depicted e.g. in Granados description. The commander thinks that we will have to put a guard on this. The shine could attract some copper thieves. jolly boat and 19' launch after the cut... much more work will be required, but the size looks promising
- 293 replies
-
- 4
-
-
- pickle
- caldercraft
- (and 1 more)
-
Hi Nils Thanks. I will then leave the color scheme as it is now. Thank you Mike The boxwood broke and splintered a bit in one of the tighter bends on both tries I did. Filler and paint cover this. Hi Mobbsie Yep. The lady still needs some make up. I would have to polish the plates anyway to get rid of the CA stains. However re-patination would be possible. Cheers Peter
- 293 replies
-
- 2
-
-
- pickle
- caldercraft
- (and 1 more)
-
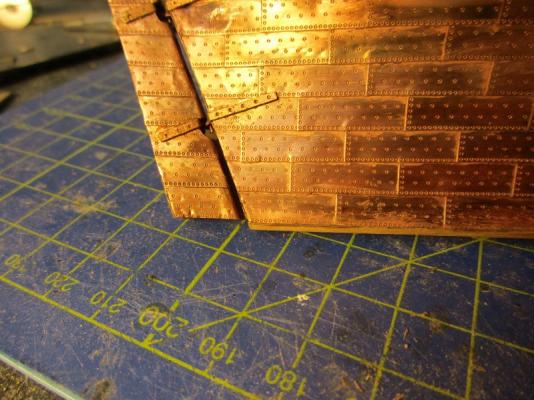
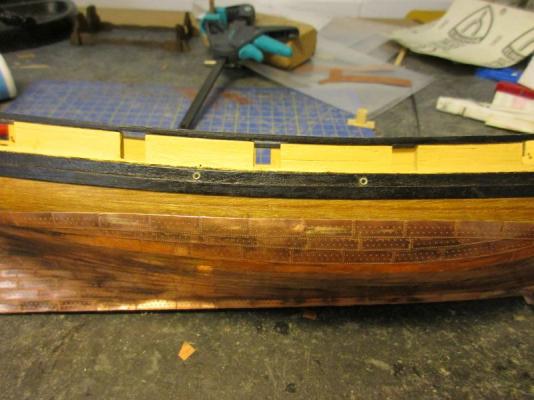
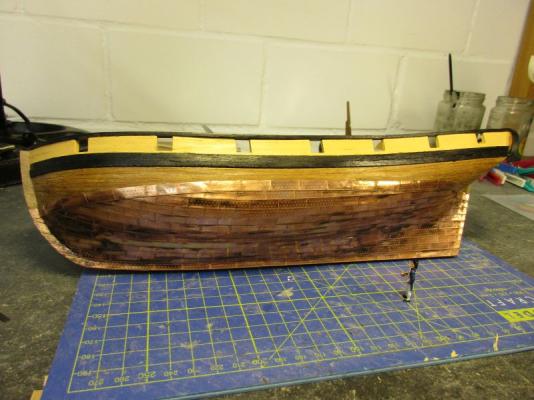
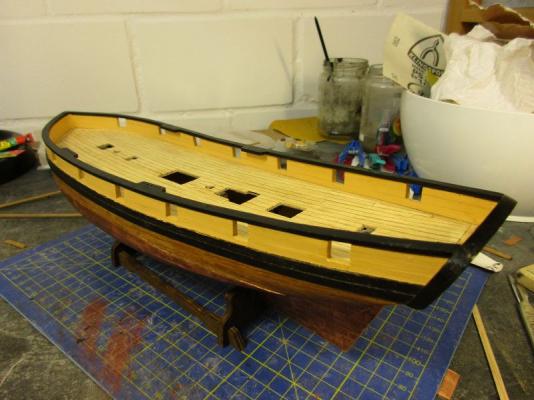
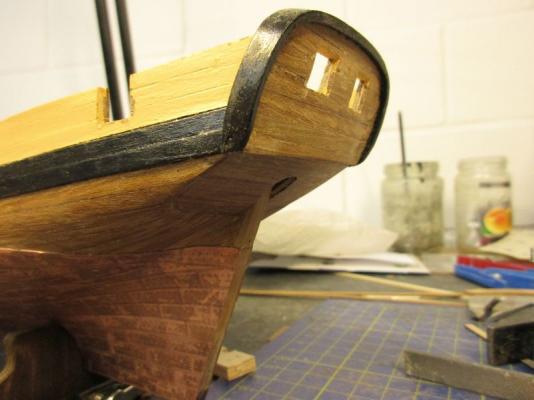
The capping rails were added and the taffrail was trimmed a bit, a bit of filler put in and all the rails painted black. The outline of the hull is now completed. It looks - in my opinion - at lot more like schooner from the early 19th century than the unchanged kit. The paintwork has now to be touched up in several places. The few missing copper plates are installed as well and the whole copper awaits some polish. I will remove the glue stains and any patina. Starting from shiny conditions it will get its own patina over the years.

- 293 replies
-
- 7
-
-
- pickle
- caldercraft
- (and 1 more)
-
Hi Nils Please be careful when using your high tech saw. I shudder when I see that arrangement. But be confident - I actually used to know a carpenter who still had all his digits after years on the job (he only cut some tendons on one of the fingers). Take care Peter
- 2,625 replies
-
- 4
-
-
- kaiser wilhelm der grosse
- passenger steamer
- (and 1 more)
-
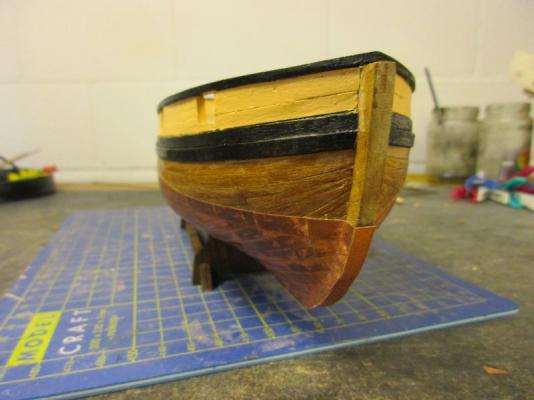
Somehow that carpenter in the last picture was able to go on board and start to work there. The taffrail was made by bending a 5 x 1 mm (the same profile as the capping rail) stripe of boxwood around the stern. Before fixing it with epoxy glue and nails it was painted. Then, after trimming the ends and repairing the damage done during bending and attaching it was sanded and painted again. It looks ok but a bit plump. I will fix the capping rails, check the overall picture and then decide if I need to trim the taffrail. The taffrail after gluing on... ...and after trimming to final size.
- 293 replies
-
- 7
-
-
- pickle
- caldercraft
- (and 1 more)
-
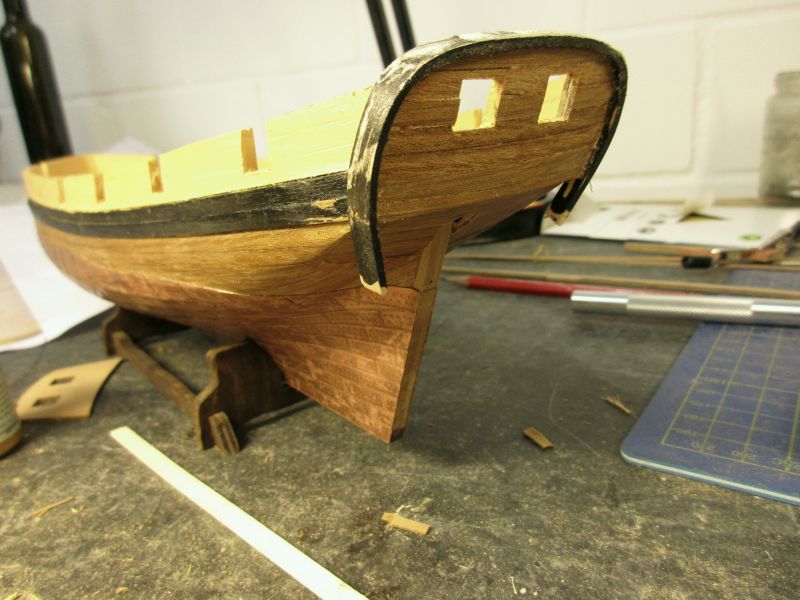
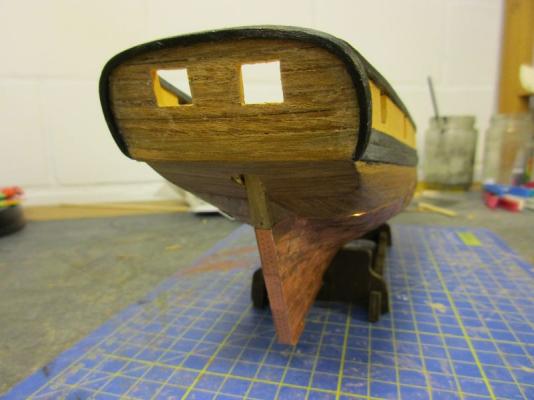
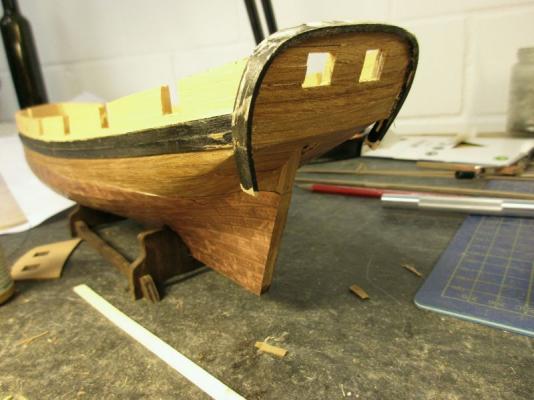
The transom has been planked, inside and out and the gun ports opened. The stern looks quite acceptable now but I'm afraid the taffrail will be tough to work out. still in need of some painting Presently only one carpenter is working on Pickle with one foreman. Slow...

- 293 replies
-
- 6
-
-
- pickle
- caldercraft
- (and 1 more)
-
There will be dozens of them sea cucumbers - but 20 fathoms below Pickles keel on the sea floor. Too bad we can't see them.
- 293 replies
-
- 2
-
-
- pickle
- caldercraft
- (and 1 more)
-
Hi Martin Actually it's not much larger - just overhanging a little bit to right and left. The available space will be filled by the gun ports and the name board. Decoration wise a capping rail around the transom as shown on the plan of Laura will have to do. Those small and fast vessels didn't probably stay in one place long enough for the bystanders to appreciate any fancy woodworks and I don't see any decorations in publications about vessels of that class. Pickle must shine solely with her functional design and the cleanliness of her deck. As I'm no riverboat, fortunately a romantic decoration with seaweed, clams and some dirt is also beyond my skills. Cheers Peter
- 293 replies
-
- 2
-
-
- pickle
- caldercraft
- (and 1 more)
-
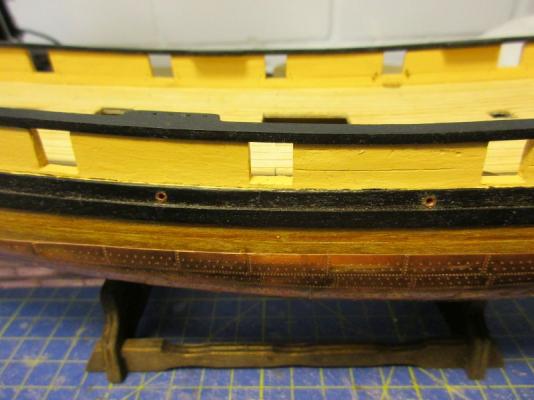
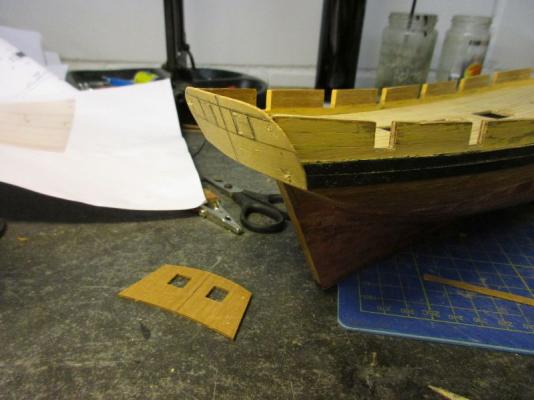
The inner bulwark planking was now glued on and the gun port openings were finished with knife and nail file. A template for the transom was made from 0.5mm ply wood and glued on. It will now be planked out- and inside. The kit's template compared to the new one The light yellow on the lowest plank on the bulwark will be the colour for bulwark and the stripe above the wales


- 293 replies
-
- 3
-
-
- pickle
- caldercraft
- (and 1 more)
-
Hi Jason Welcome aboard and thanks. Hi Martin Yes, now it seems a 12 lb ball had a diameter of 4.4 in or 12 cm. If you try to avoid capture of your small boat by a much larger enemy, those balls could give him something to think about while you make sail and escape as close to the wind as possible. Browsing the net I find, that the capture of USS Essex was the only documented case where an enemy stayed deliberately out of carronade range to reduce a prize to a hulk before actually capturing it. I guess I will have to live with those carronades and work on the sailing qualities of my Pickle (not very great yet). Cheers Peter
- 293 replies
-
- 1
-
-
- pickle
- caldercraft
- (and 1 more)