flyer
-
Posts
1,016 -
Joined
-
Last visited
Content Type
Profiles
Forums
Gallery
Events
Everything posted by flyer
-
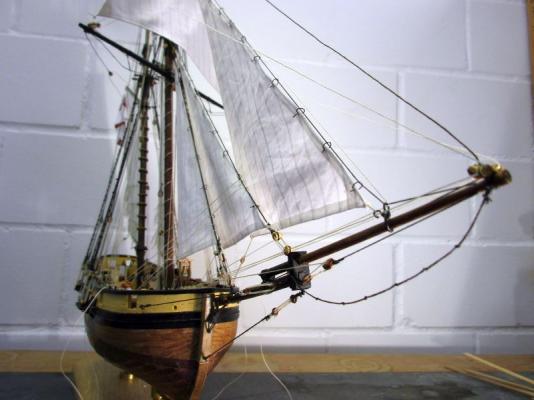
 Perhaps I should explain why I did only partly replace the keel and the sternpost with those 5mm walnut bits. The kit instructs to build up those parts from the 4mm plywood to the full 5 mm thickness by adding 0,5mm wood strips on each side. These will partly represent the copper plates and above them the keel itself. Originally keel and sternpost were massive timbers. A few years ago I built Mamoli's La Gloire where they do basically the same doubling up. The look of the finished keel is much less satisfying than that of Pegasus or Granado where a massive 5mm keel is used - even if you cover it with paint. The copper plates will mask the exact construction of the lower keel; so the kits way will do for this parts. Therefore only those parts above the copper were replaced. Additionally the whole rudder will be replaced. first planking A big question was how the planks should run on the stern. Unfortunately I didn't find any information on that for this or other vessels of the same time with a rounded stern e.g. Le Hussard. The kits plans look strange and I don't think the planks would have run vertical. I will try to form something like a convex, oval, rounded counter where the planks run horizontally with the planks from the ships side merging into it on an imaginary frame. It took some time to realise that the wood strips for the whale and upwards are made from a rather brittle walnut. I formed the stern with the filling parts and filler and let the walnut stripes run as far aft as possible. The definite form of the counter should become clear after the first planking is completed. There are several variants in the internet for the form of the bulwarks on the bow. The kit lets them merge in front of the bow but this looks rather strange. I will continue the line of the plank ends from the lower bow leaving a gap which should be filled by the bowsprit. It's quite some guesswork needed and some try and (hopefully not too much) error compared with the excellent instructions in a Caldercraft kit - but it's still fun. possible form of the lower counter very elegant lines and a rather low bulwark top
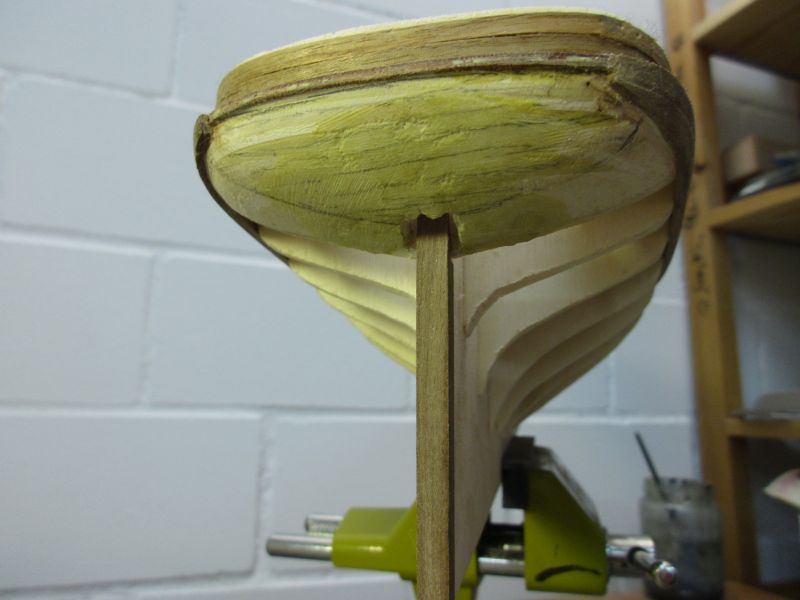
-
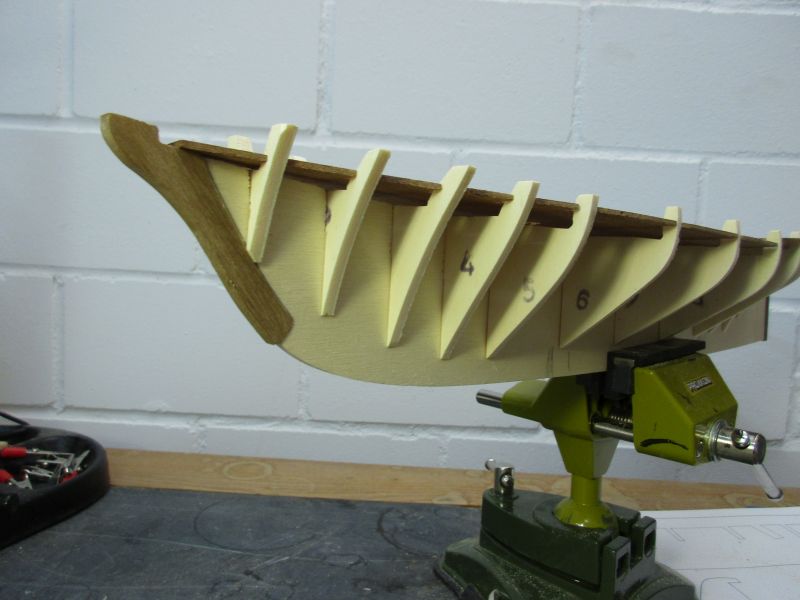
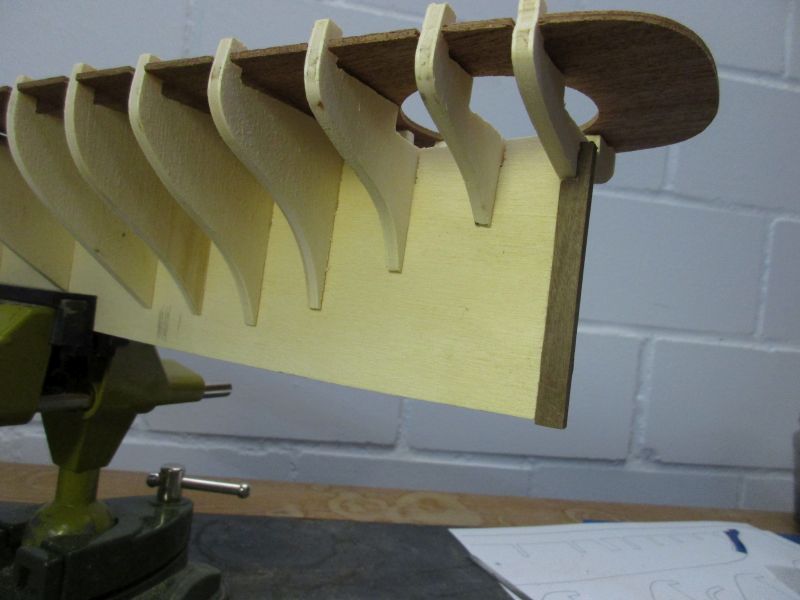
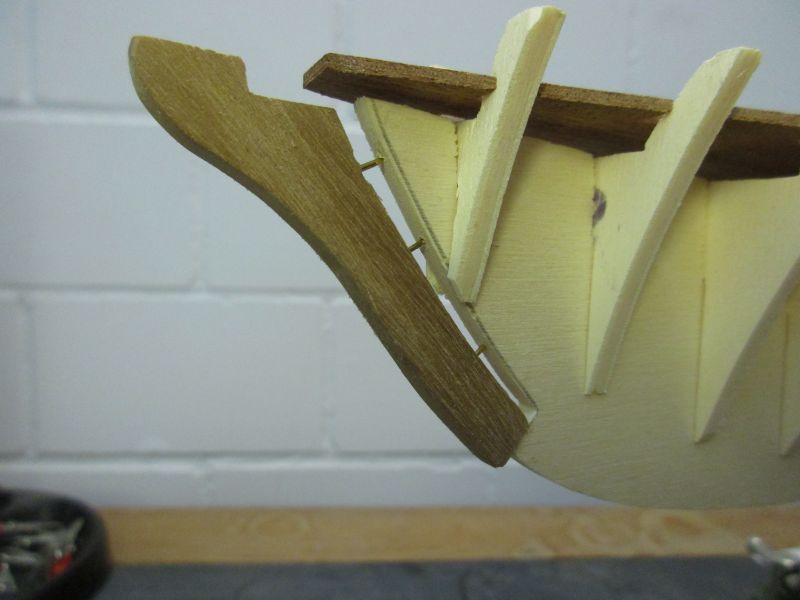
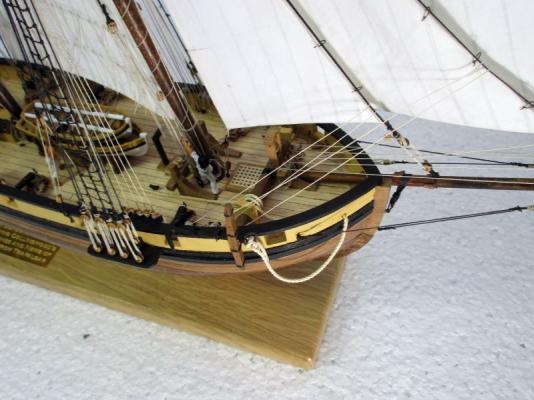
A piece each of stem and stern are cut out and replacement pieces, made from leftover 5mm walnut wood, fit into place. Fixation with a few nails is provisionally only to permit removal for sanding. Now the keel, bulkheads and deck as well as the filler pieces have been glued. I'm presently scratching away with sanding paper while trying to find out how that stern should look. There are different variations in the internet and the kits plans treat that problem with a certain Latin liberality. I should find a somehow sturdy and elegant form...
-
Hi Nils Did you notice? My projects are getting closer to the steam age! Hi Scott and Elijah Thanks for the visit. I'll do my very best to entertain you. Hi Tim Thank you. I'm aware of your and Hamilton's build and follow those logs, shamelessly profiting and hoping to avoid thus the largest blunders. Cheers peter
-
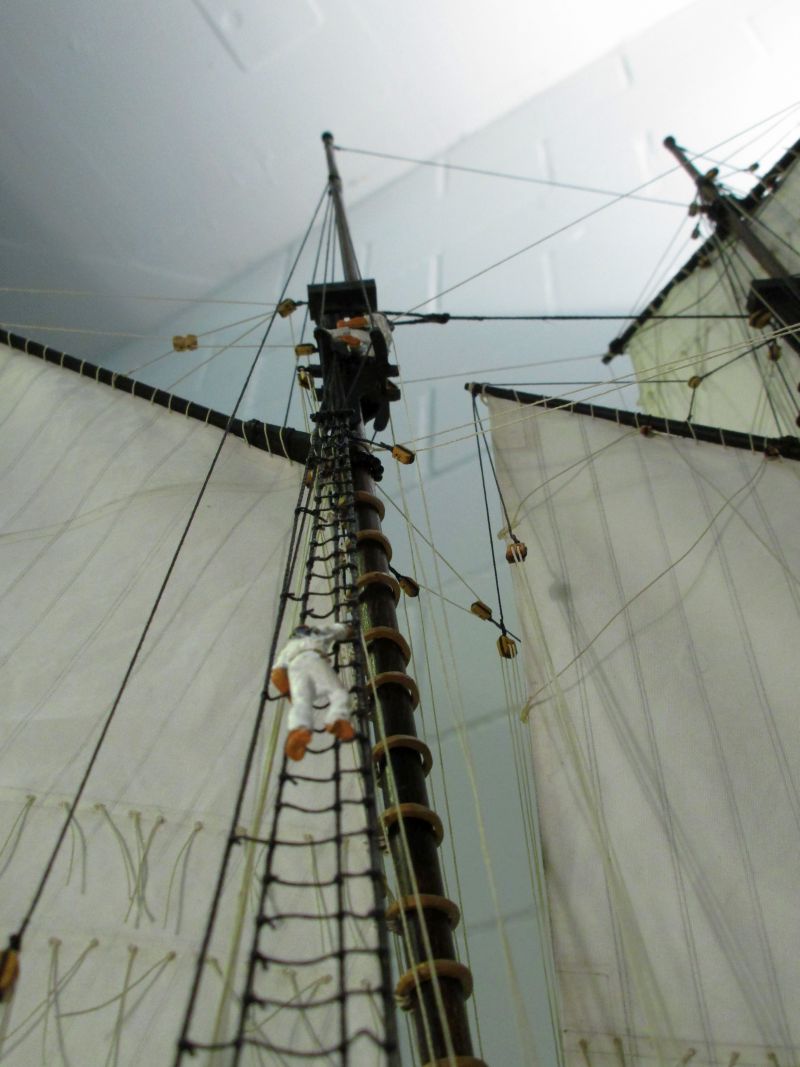
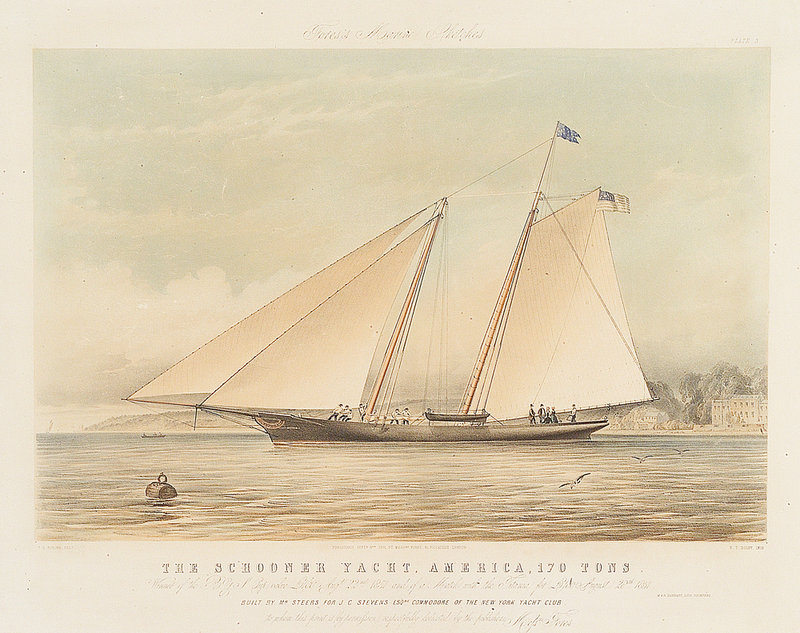
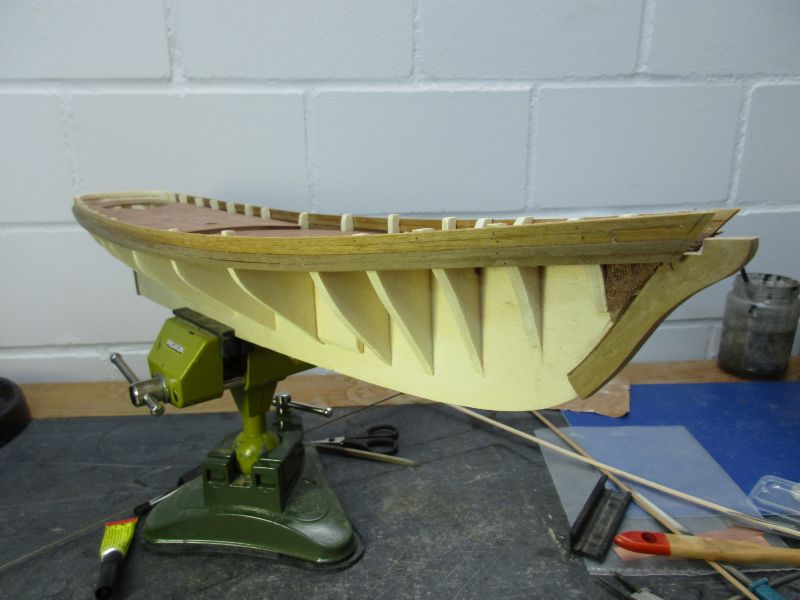
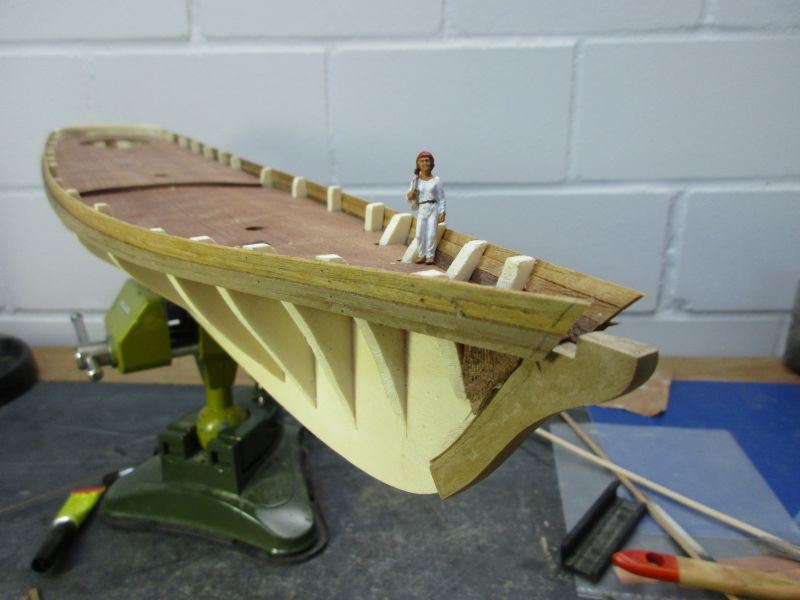
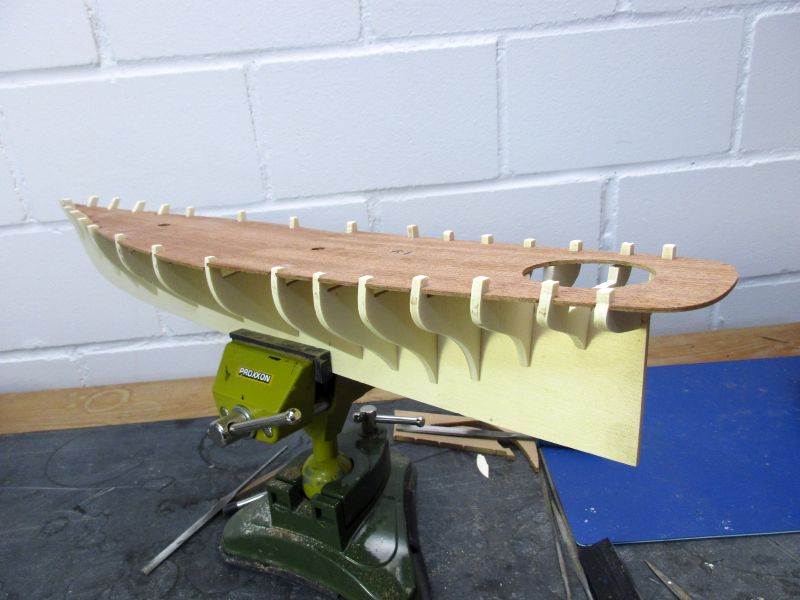
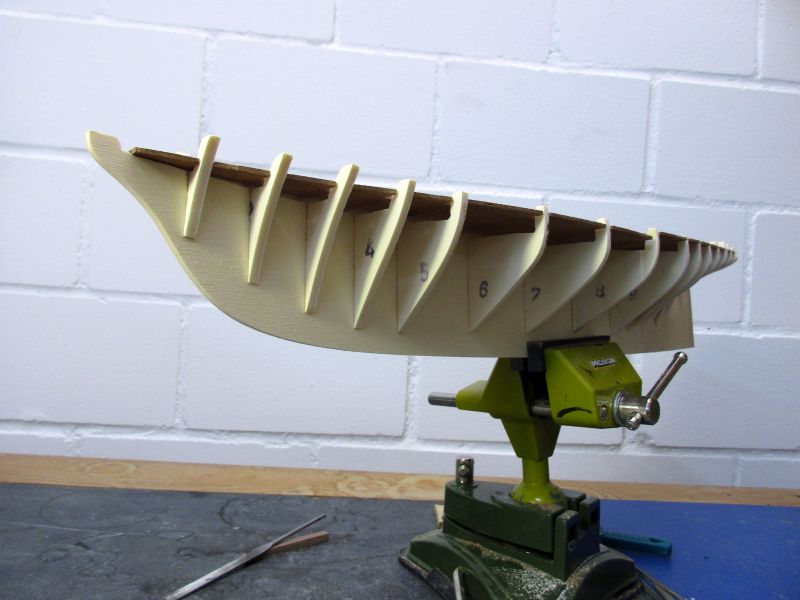
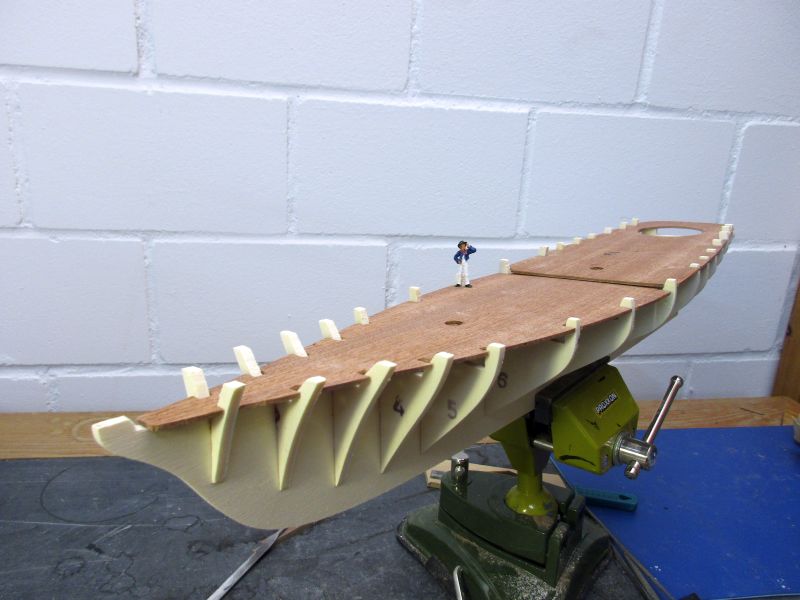
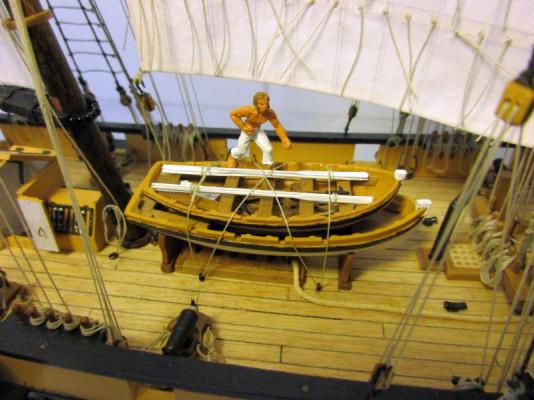
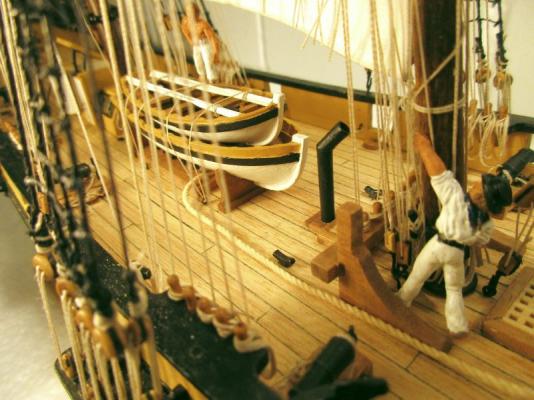
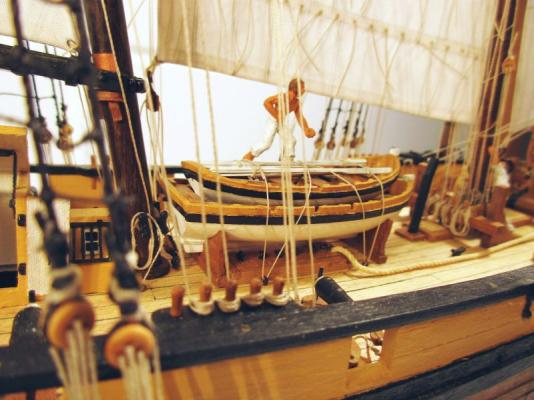
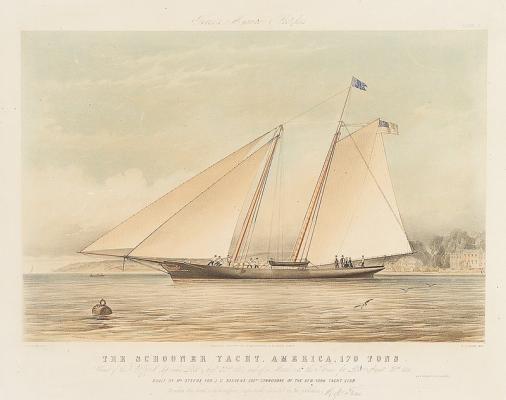
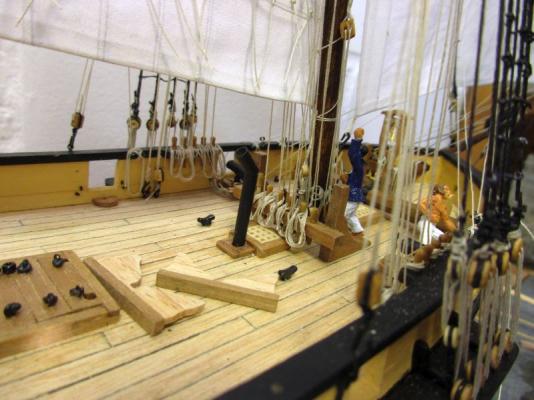
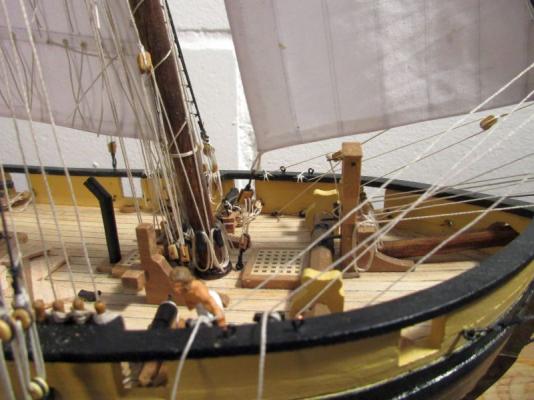
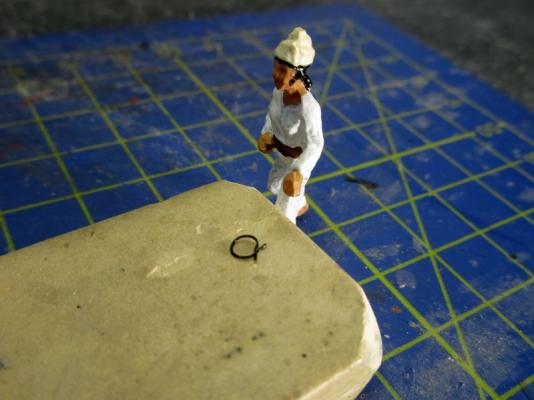
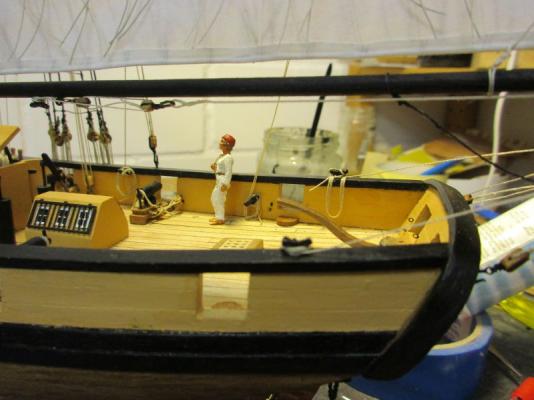
Build log schooner America While working on HM Schooner Pickle I started to look out for a next project. As I really did like the simple elegance of the schooner and a friend of mine had long reserved some space in his office for a dust catcher in form of a model ship the decision to build another schooner was taken. This friend has family connections to the US and I always liked the elegant, innovative design of America and so this vessel was chosen. Also the Mamoli kit comes in scale 1/66 which is close enough to 1/64 to make all fittings in this scale available for a bit of kit enhancement. A decade ago I had built Mamolis La Gloire and found the kit of good quality (...for that time - I had never seen a JoTiKa kit yet). Mamoli seems presently to be out of service but I was lucky to find a kit in a Swiss model shop. The Kit The first impression was quite good. A tidy box with cleanly separated parts in various compartments. The quality of the wood is only average but the cast parts look good. The plans seem to cover the whole build although the written instructions are meagre and sometimes a bit difficult to understand. The original is Italian, which I don't speak, but by combining English and German translations (by Google?) and some educated guess I should be able to get the meaning of it. The coppering Mamoli uses an ingenious simple way to imitate the coppering of the lower hull with small wooden tiles. The same method was used in Keith Juliers earlier books and looked to be an clever approximation. However as the excellent copper plates of Victory Models are available I will use them. This asks for some re-planning as 0,5mm strips will be replaced by thin copper. Therefore lower hull and rudder will have to be different. The skeleton Keel and frames are of quite soft 3,5mm plywood and need some reworking to fit. The two deck parts equally need a rework but altogether a skeleton is quite easily formed. The slender elegant lines are now visible and I'm definitely hooked - a beautiful design. Visible is also the that stem and sternpost need to be made as separate new parts with a strength of 5mm. Also the rudder will need a similar replacement. Some additional wood strips are necessary to cover the lower hull and at the same time I can adjust the deck planking. dry fit of the skeleton Pickle's bosun standing on Americas deck is a bit overwhelmed by the sheer size of this modern schooner
- 119 replies
-
- 10
-

-
Hi Nils Thank you very much. Quite flattering comment from the scratch-builder of such a beauty as 'SS Kaiser Wilhelm der Grosse'. :blush: peter
- 293 replies
-
- 2
-
-
- pickle
- caldercraft
- (and 1 more)
-
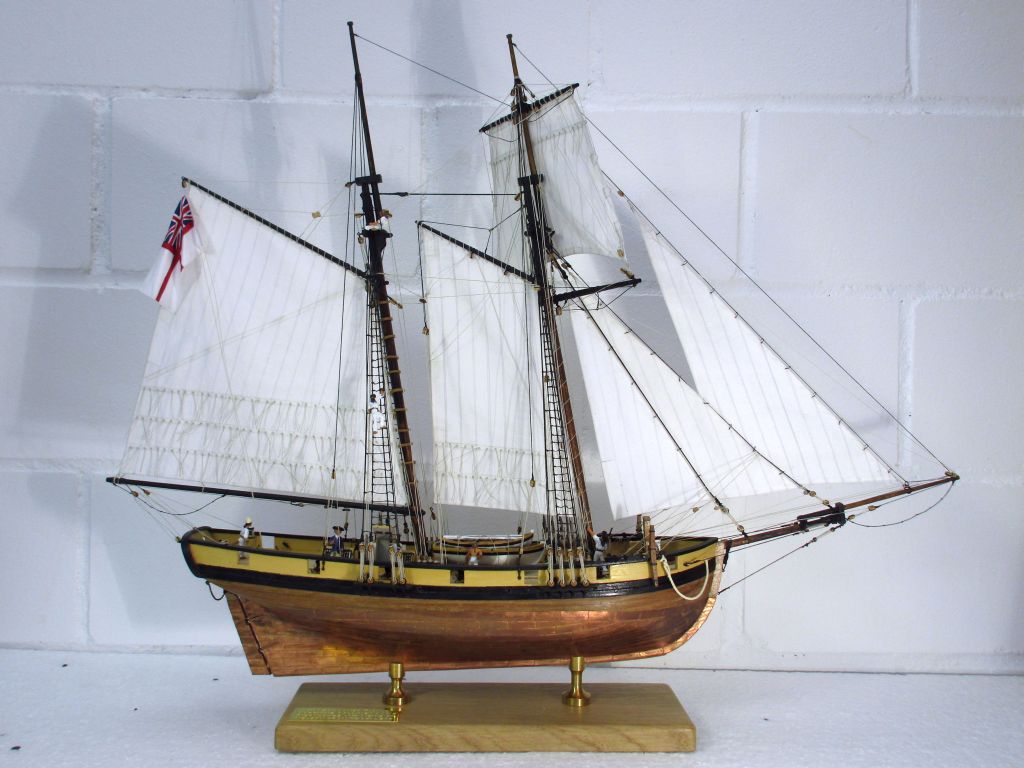
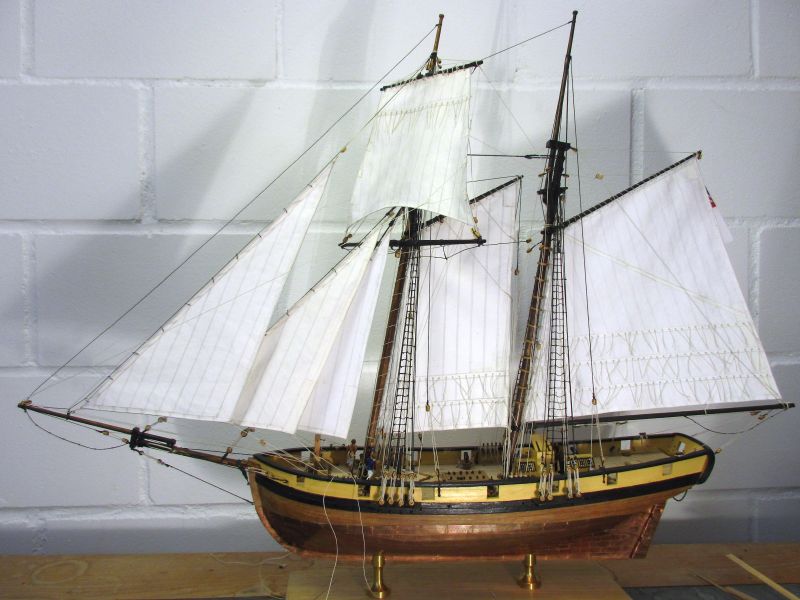
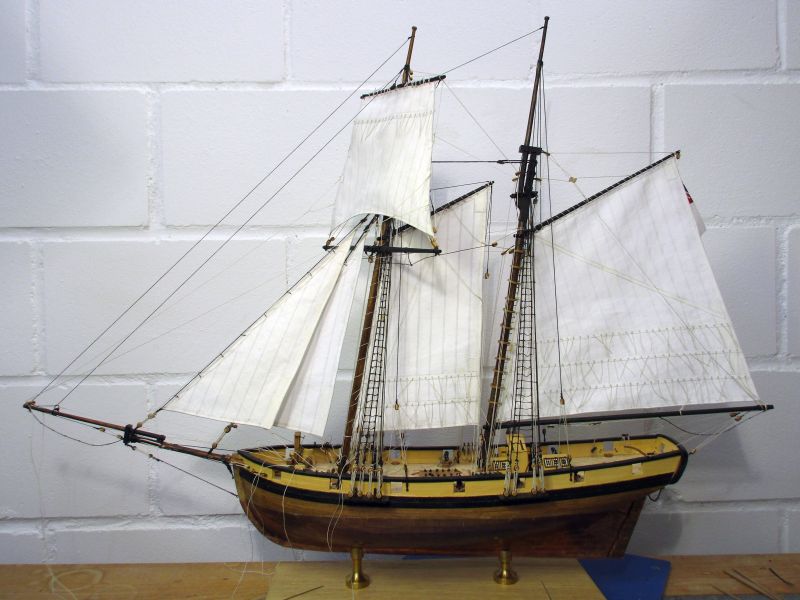
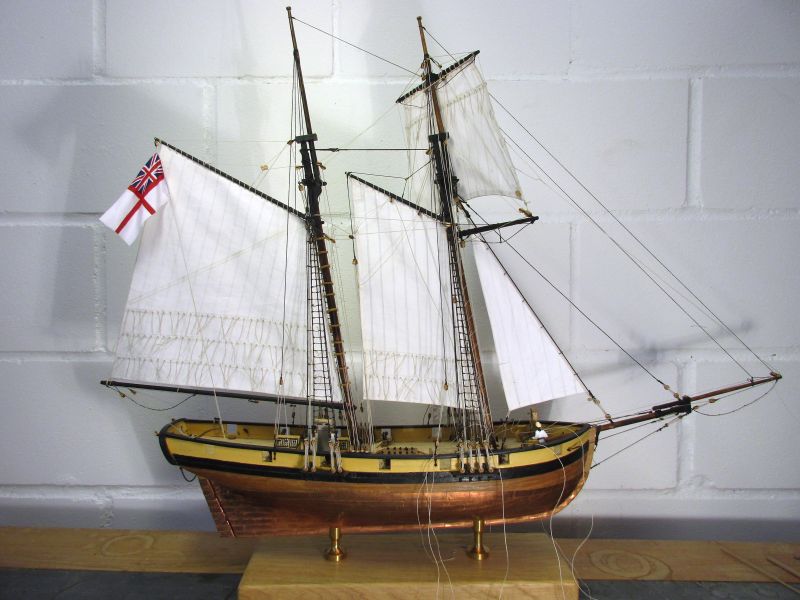
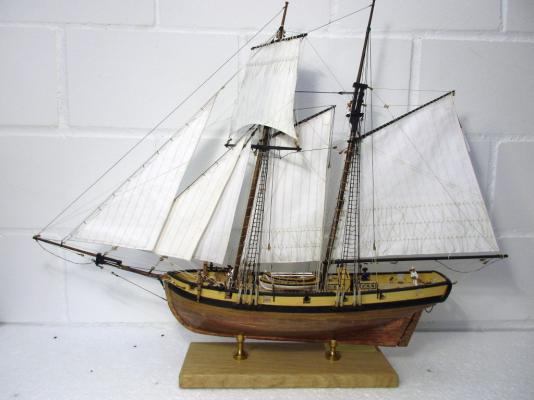
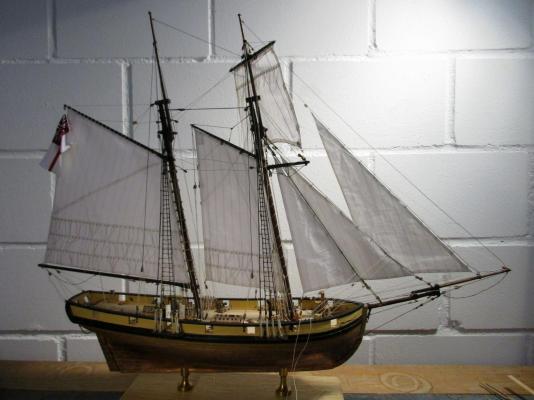
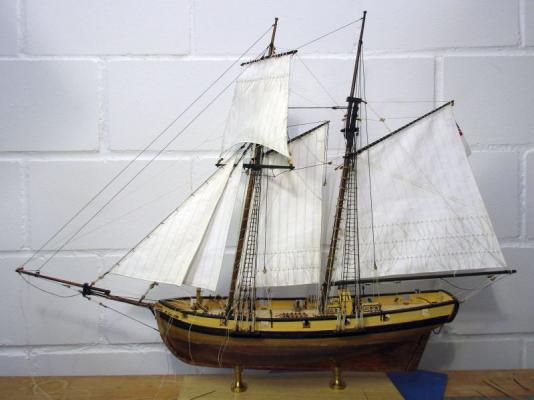
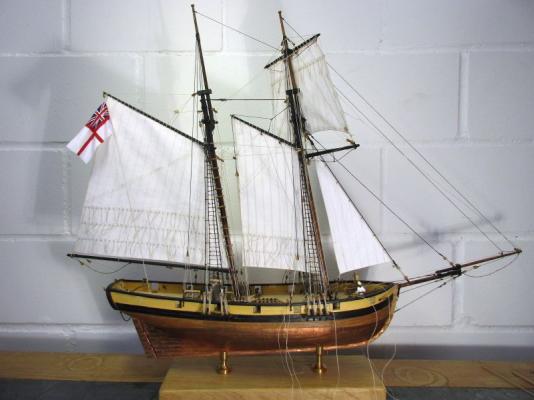
Pickle finished It was a pleasure to build that schooner. The kit has a great potential and is generally of good quality. Although I do not fully agree with Caldercraft's interpretation of that rather sparsely documented historical vessel I am glad for the great opportunities that kit presents. While shooting those pictures I had again a fight with my camera. The previous one broke halfway through the build and the replacement from the same company (starts with C...) is hardly usable - even when the pictures are reworked. I'm considering a replacement from another company.


- 293 replies
-
- 21
-
-
- pickle
- caldercraft
- (and 1 more)
-
Hi Martin Peas are ok but should I really spoil the crew with alcoholic drinks? Pickle will berth in a book case. Now I only have to find stowing room for the books - and Pickles hold is full... Cheers peter
- 293 replies
-
- 1
-
-
- pickle
- caldercraft
- (and 1 more)
-
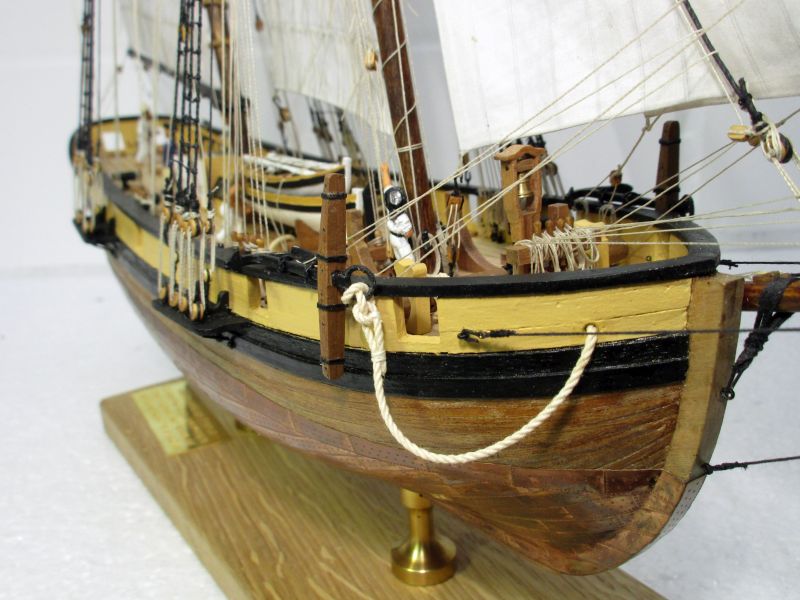
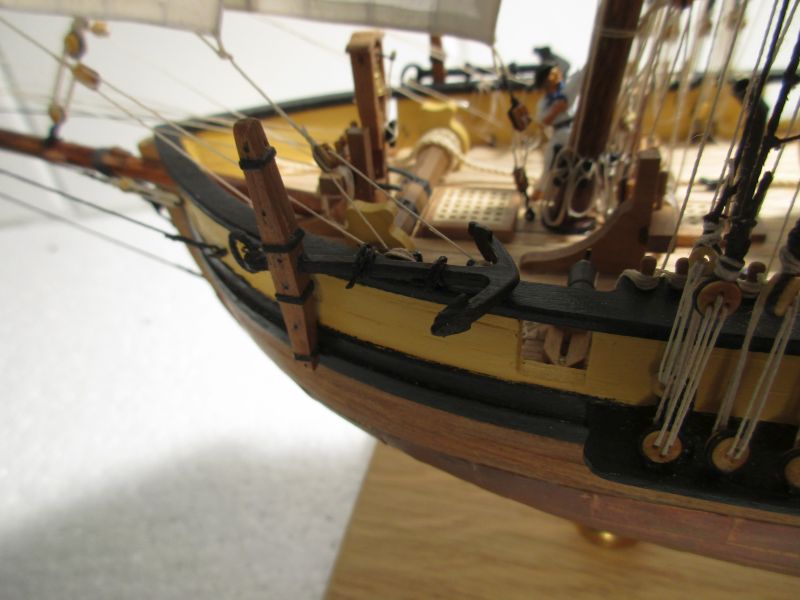
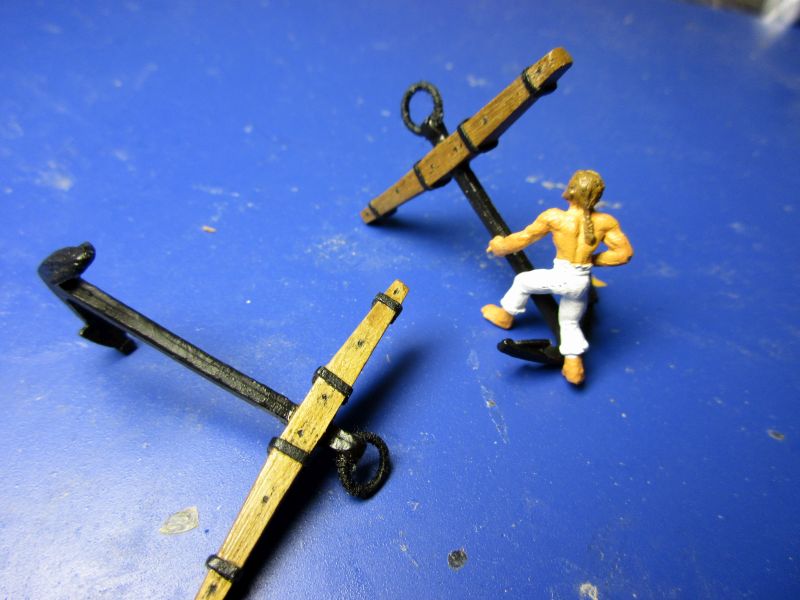
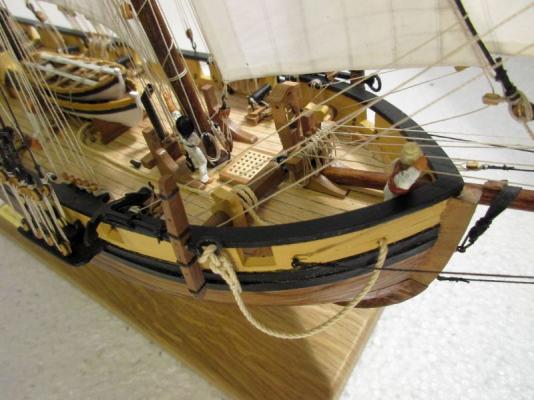
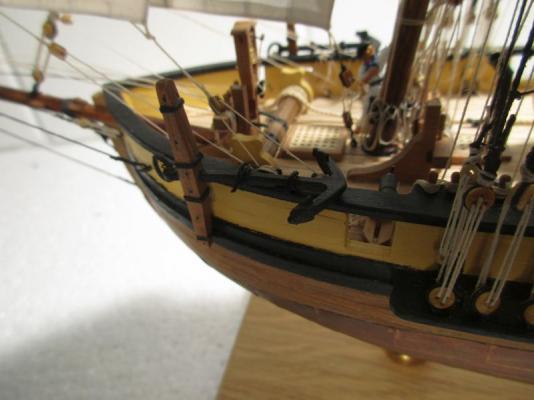
anchors I forgot to mention the anchors (I bought a second one from CC. No responsible skipper would sail with only one anchor. There is even a smaller third anchor but it's stowed below deck.). The anchor cable thread really was too bright. I dyed it with the same mixture of black and sage tea I use for the sails. Unfortunately it was only long enough to provide one anchor with it. The cable for the other one is stowed below deck and will be brought to the anchor when near land again. The anchors lie on the bulwark capping rail which carries the whole weight of 175kg (3,5 cwt) each. Therefore the two simple 0.25 mm threats should be able to hold one.
- 293 replies
-
- 10
-
-
- pickle
- caldercraft
- (and 1 more)
-
Hi Michael Thanks. Your spectacular Vasa would look fine with sails! Hi John If ever you need some additional information to help you to make the best of your limited time please feel free to ask. Cheers peter
-
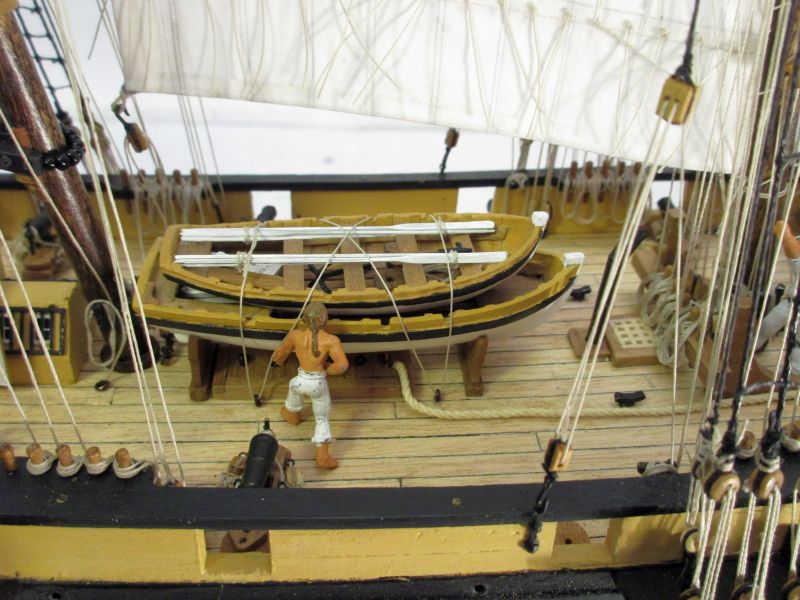
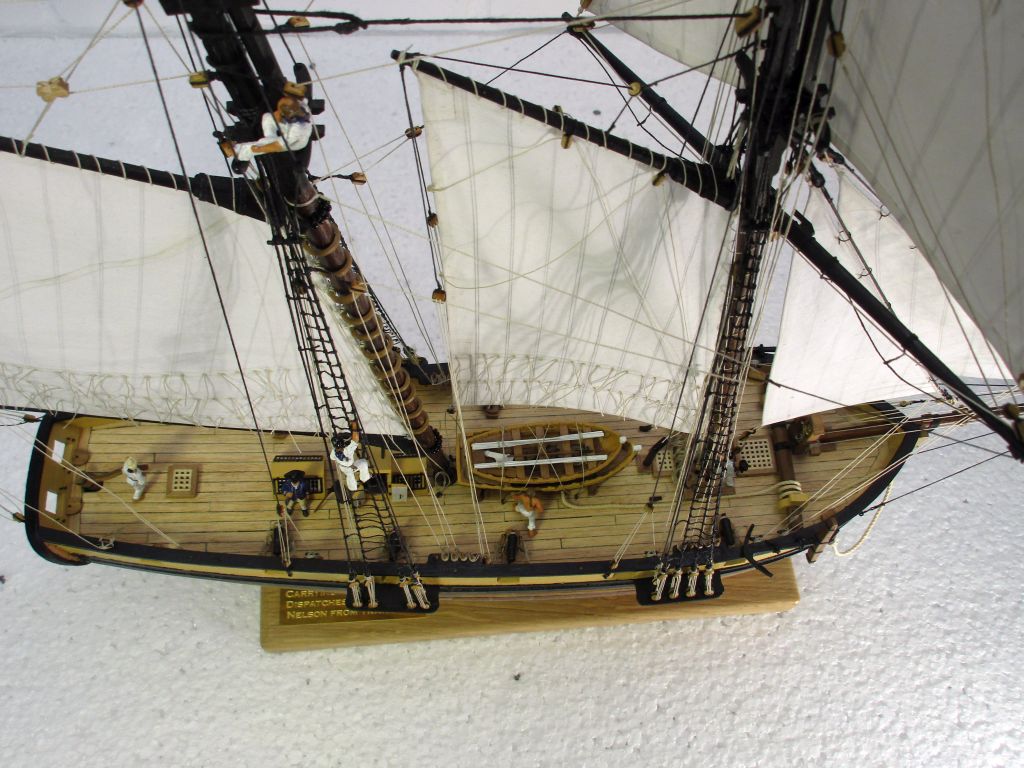
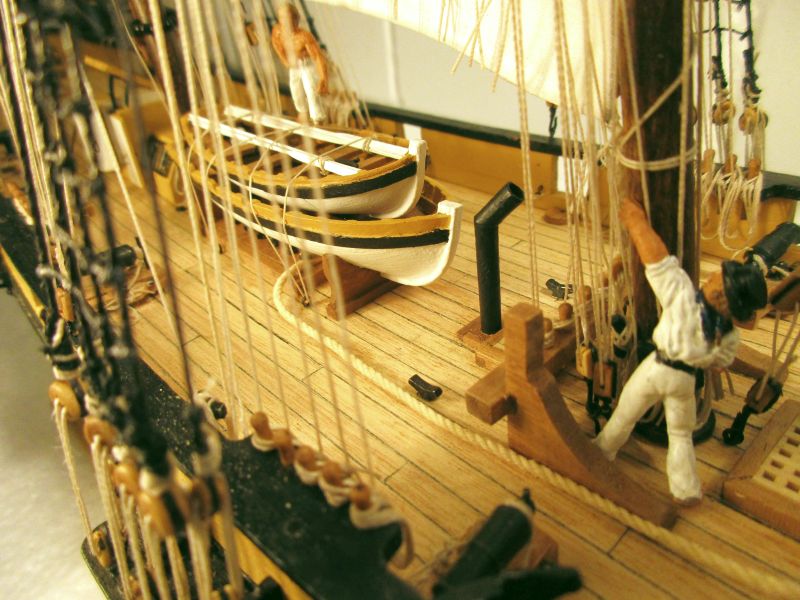
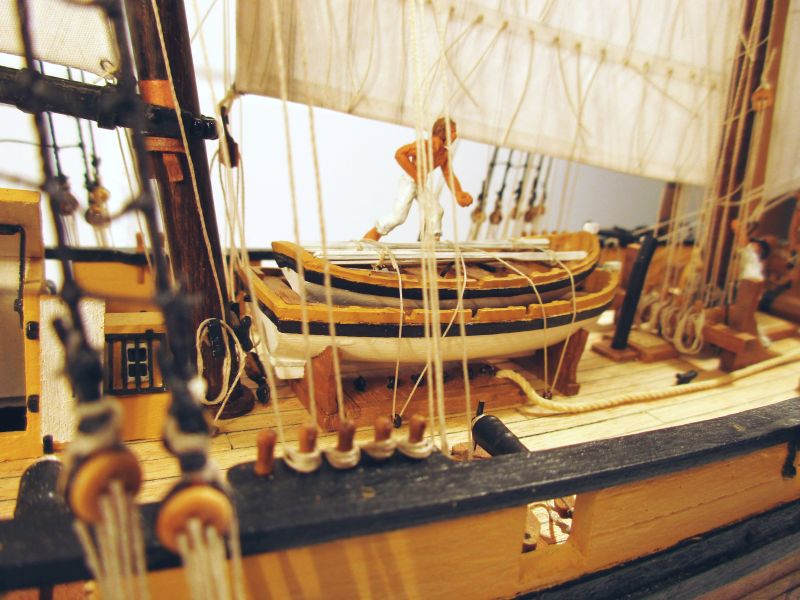
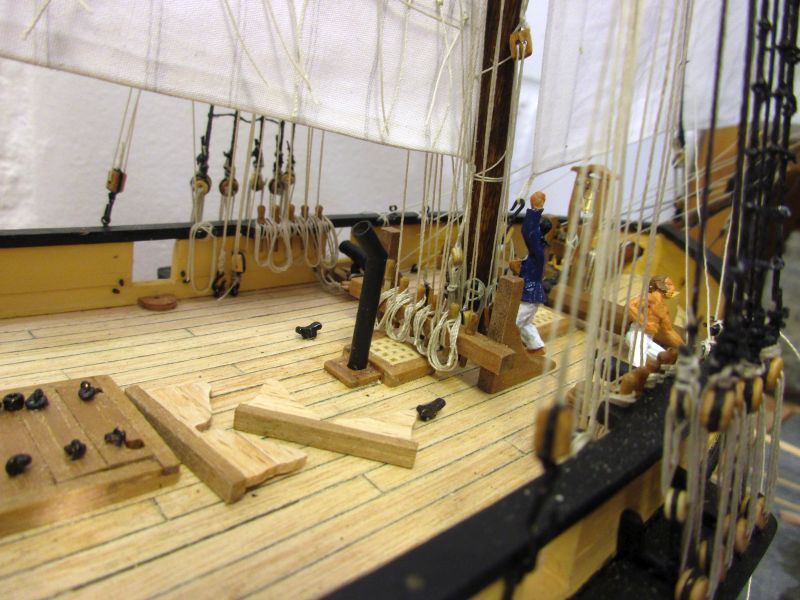
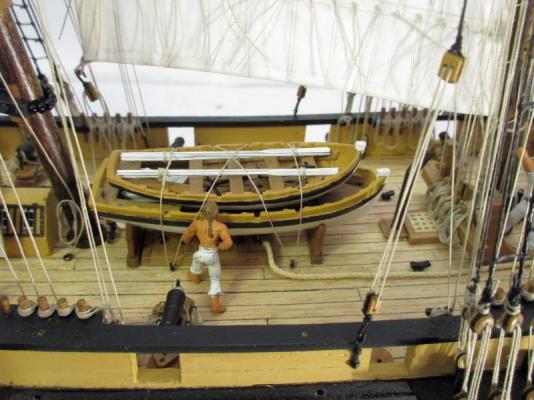
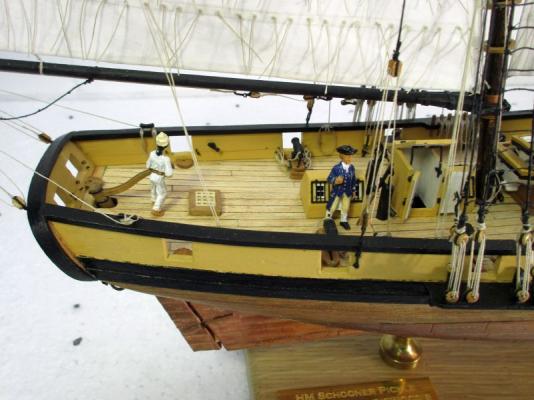
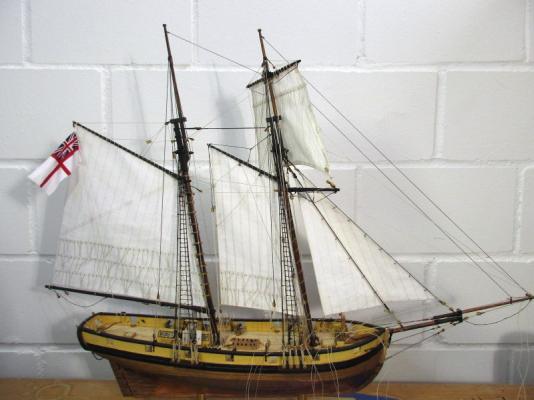
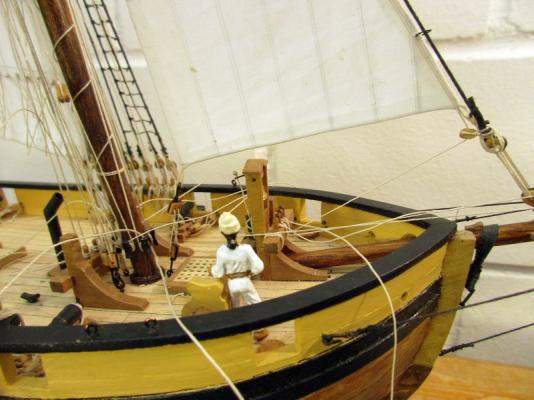
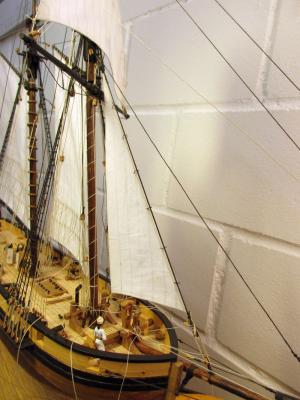
boat(s) Besides the details according to the manual the yawl got a more sophisticated floor. Row locks are on both sides and a mast bracket and clamp as well as a simple mast step are added. Two bundles of oars and the boats hook are stowed on the thwarts and the rudder and the grapnel below them. The yawl is stowed in the cutter and both are lashed to the deck. This should be more stable than a lashing to the boats stand as the manual suggests - I think the whole arrangement could then come adrift in just a lively sea. The anchor cable takes a small detour around the boat stand. This shouldn't be a problem as there is no tension in it aft of the windlass. Pickle is now finished. Those sailors are just tidying a few lines to make the schooner ready for the final shots.
- 293 replies
-
- 12
-
-
- pickle
- caldercraft
- (and 1 more)
-
Ah, I was a bit longwinded - as my daughters kindly keep telling me again and again. I think you mean in fact the sheets. They are doubled and because the sails overlap the windward sheet or better its tackle leads around the stay - the sheet itself remains hidden between the sails. Perhaps it's a bit clearer on that shot between the sails. peter

- 293 replies
-
- 3
-
-
- pickle
- caldercraft
- (and 1 more)
-
Thank you very much Nils, but the congratulations may be a bit premature. I still have to finish the little dinghy and then the boats must be stowed. But I'm really looking forward to 'go west', to America. peter
- 293 replies
-
- 2
-
-
- pickle
- caldercraft
- (and 1 more)
-
Hi John Galaxies aren't that far away anymore as they used to be! Who knows, you might find a suitable wormhole. Trying to understand rigging is almost as complicated as to understand women. The enormous difference however is that there are handbooks for rigging while on the other hand a working handbook for women..... Do you mean the bolt ropes around each sail? According to those rigging handbooks a boltrope was sewn around each sail to strengthen it and to provide means to attach ropes to the sail and the sail to the yards. The strength of the boltrope varies according to the size of the sail and the position on it (top, foot). You should find the details for example in Lees book. As an average value and because I had it and it looked right I took 0,5 natural thread for the boltropes on all of pickle sails. First the edges and all the seams of the sail were drawn with pencil onto both sides of the cotton. Then I gave an extra 3mm around it for the hem. This is too wide and out of scale but I wanted to be sure that the whole sail holds. The sail was now cut and the corners of the hem trimmed to allow it to lie flat. The hem was then folded over in a 'dry run' and the boltrope laid into the hem. The hem was now glued with a textile glue. Don't forget to give some extra rope length on the corners for the cringles. Now the linings or tablings were glued onto the sail and eventual reef lines added. Make sure the tablings are on the correct side. When the glue was dry the whole sail was ironed to fix the glue and straighten the sail. With this method a sail is rather easily done and quickly finished and it my opinion looks more to scale that those made painstakingly on a sewing machine where most of the time the seams are too prominent. Warning: While there is no question about the longevity of sewn sails I have no idea if and when glued hems may come apart again because glue may change with age. See also my post #215. This sail making method was found somewhere in the MSW techniques and research section. Cheers peter
- 293 replies
-
- 2
-
-
- pickle
- caldercraft
- (and 1 more)
-
Thanks everybody for the compliments. @B.E. Considering what an astonishing build you make of Pegasus I especially value your opinion. Pickles rig proportions are mainly those of the proposed rig for the Adonis class in Marquardts book. This book really is a great help. @Tony The next project will also have all sails set. I'm hooked. @Martin & John The next project is Mamoli's schooner yacht America. If the rumour sadly is true that Mamoli goes out of business I got probably one of the last kits. I like the graceful lines of that vessel as well as her history. I mean, she is not less than a forerunner of Alinghi. I will however try to improve the kit a bit. It comes in 1/66 which should be close enough to 1/64 to allow the use of Amati and Caldercraft parts on America. The coppering will be Amaty and from them and CC I hope to get metal davits and boats. Also rigging thread and other small parts may be replaced. I promised a friend to make a model for dust collection in his office. We choose this because, although he is no sailor at all, he has some family connections to the US. John - Diana is in fact on my list of probable next builds. If Surprise is still not on the market in a year or so, I might start on Diana. Fly on the other hand is no option as I have already her sister ship Pegasus collecting dust in the living room. Cheers peter
- 293 replies
-
- 2
-
-
- pickle
- caldercraft
- (and 1 more)
-
Hi Tim That's a very nice America you are building here. I also noticed your excellent coppering. Did you make your own copper plates? My kit has arrived today and the build will start in a few weeks after the completion of my Pickle. The point about the probably superfluous companionway forward of the fore mast is taken and I will check it. There are pictures of several scratch build Americas available in the internet and they all seem to miss that companionway. In the internet I also found that painting below of the original America with 2 boats stowed amidships with metal davits and plan to include them (Amati davits and Caldercraft boats). Did Mamoli really go out of business? This would be sad as their kits seem quite well done and of above average quality. Cheers peter
-
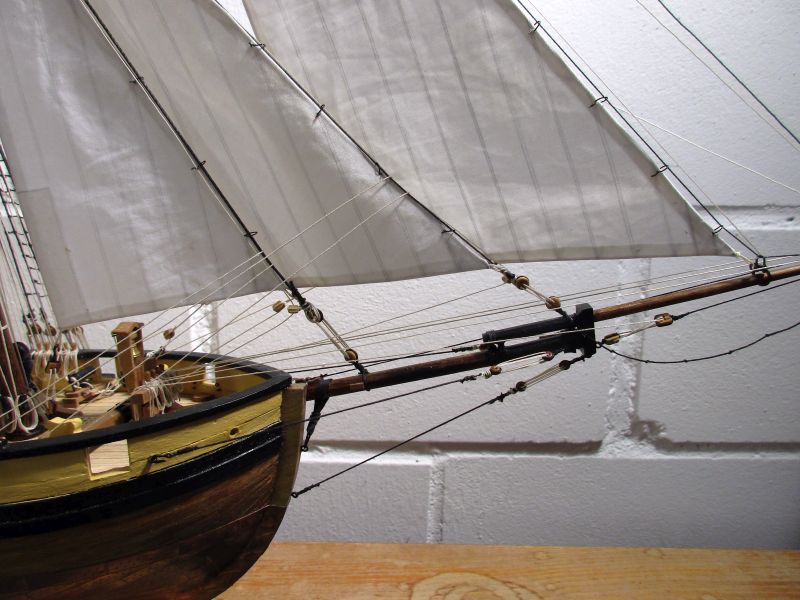
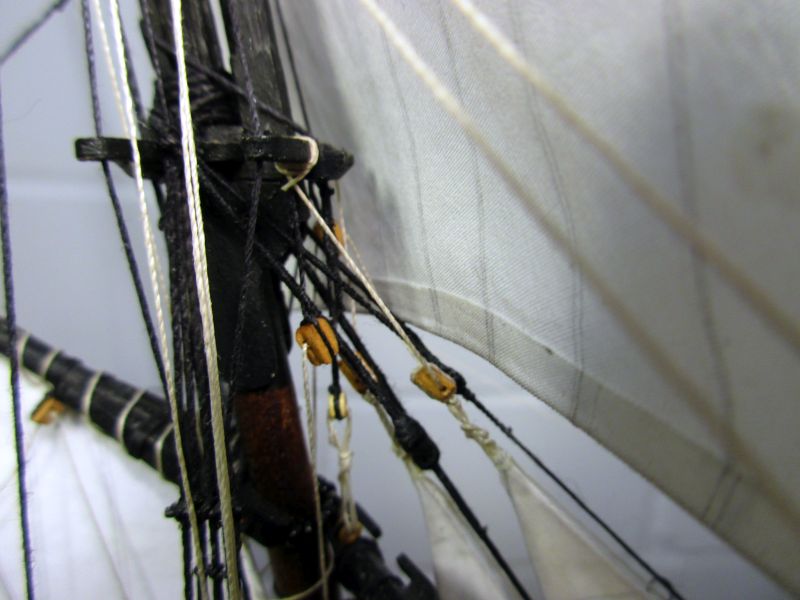
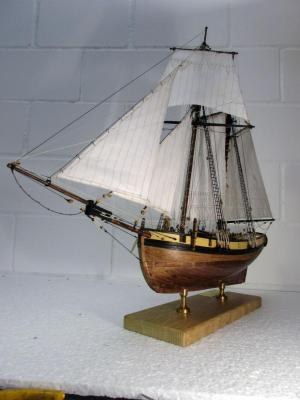
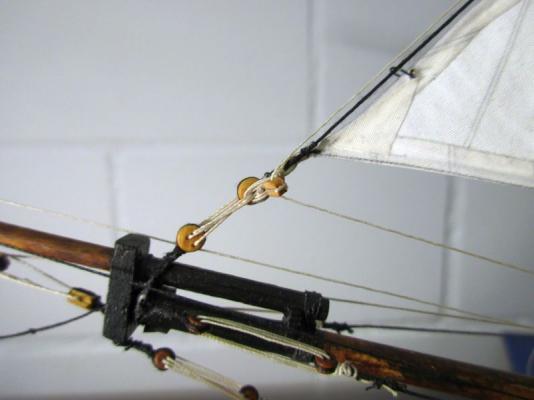
Outer jib Perhaps a bit regretful I took the last sail in hand. Working on that build really was fun and now the finish line is pretty close. The only problem this sail presented was to find out a fitting size for it. After trials with differently sized paper sails, I opted for a medium size with the peak reaching up to the height of the fore mast cap. The rope work is similar to the jib except that the tack is hooked to the traveller. While setting this up I found a remark in Lees' book that the down hauler of the outer jib has a second duty as in hauler of the traveller. This worked fine and I could remove the previously fixed in hauler. While working on the sheets I also started to clean up and belay all those loose ends as the completely set up jib sheets are restricting the access to the fore deck. The anchors - I bought a second identical one from Caldercraft - were completed while the glued sail was drying. To imitate the bolts holding the anchor stock together I just drilled small holes into the wood, smeared a mixture of black colour and glue over them and scratched the excess away. I've seen this method used to imitate treenails and it works fine. The iron bands are made from cartridge paper. Now the anchors have to be attached to the cable and stowed. Finally the small boat must be detailed and both boats must securely be stowed between the masts.


- 293 replies
-
- 7
-
-
- pickle
- caldercraft
- (and 1 more)
-
Thank you John. Those pictures are a great help. Mobbsie, thanks and the booze is no problem as long as I have enough and am still abble to hit allll the rigth keylkjbecfduzlvcgssssssssssss And yes, to the future and beyond - as Capt'n Jack Sparrow probably would declare. My mind is set for the Americas - in singular. Cheers peter
- 293 replies
-
- 1
-
-
- pickle
- caldercraft
- (and 1 more)
-
Hi John Of course you could learn to splice in 1/64 - and then possibly move on to a career in microsurgery. Or you could perhaps use the same 'false splice' I picked up in this forum (page 11 in this topic). I find it looks good enough and is quickly done. So, you already know and like the lizard wine! Now you only have to master fondue cooking, yodelling and money laundering and you're well on your way to become a honorary Swiss. Cheers peter
- 293 replies
-
- 2
-
-
- pickle
- caldercraft
- (and 1 more)
-
Hi Michael Excellent work on your Vasa. I very much like the look of that ropes and the way they are set up. If you ever consider to part with your bosun - I'll hire him on the spot. One thought (of a landlubber) about the setting up of the shrouds: In my opinion the placing of the upper deadeyes in an exact line is a bit overrated. In the prototype the most important thing would be the correct tension in each shroud. The ropes are working and change individually and are individually adjusted with their lanyards. I would expect a reset of the upper deadeyes only occasionally when they differ just too much in height. So go ahead with eyeballing. And I keep telling myself that a slight variation in the deadeyes heights just looks more natural. Cheers peter
-
Hi Martin Very considerate of your admiralty to allow you to reserve the safest place in your house for your ships! Well, my yard is in the basement as well but not in the shelter. My (compulsory) shelter is in my neighbours house. She uses it as a wine cellar which will be a great benefit if we ever have to sit out an air raid there. I hope you didn't have to drink that bottle entirely on your own - merlot or not. But you earned it with the jump from that bridge. (I couldn't do that with my fear of heights.) Thanks for the compliments - building Pickle really is much more fun than expected. Hi John No problem. Martin's jump was actually from an old bridge into an ice cold rivulet about 15m below it. Wow. And there would be much more fine Swiss wines to try! Yep - I forgot that picture. And the line is actually spliced to the ringbolt - the whole business with that special knot was not necessary. But I will repeat it for the outer jib and hope it's a valuable alternative. Cheers peter
- 293 replies
-
- 2
-
-
- pickle
- caldercraft
- (and 1 more)
-
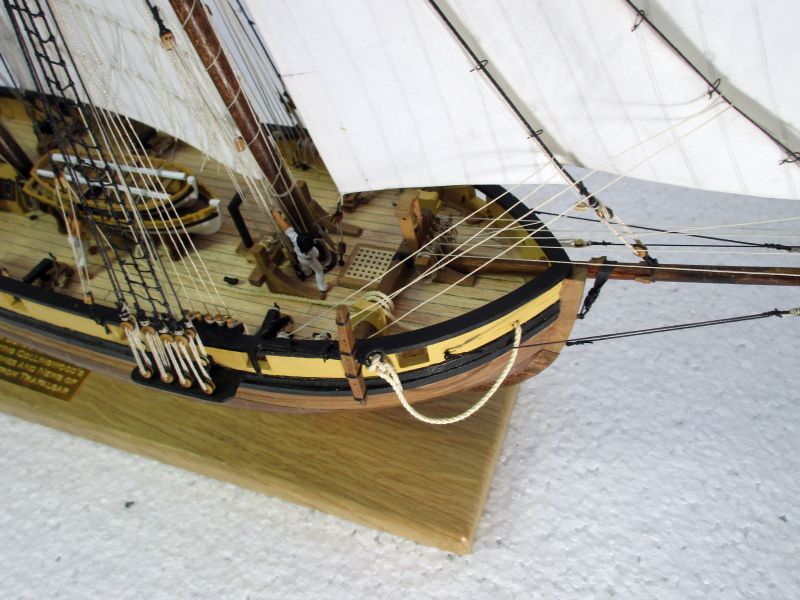
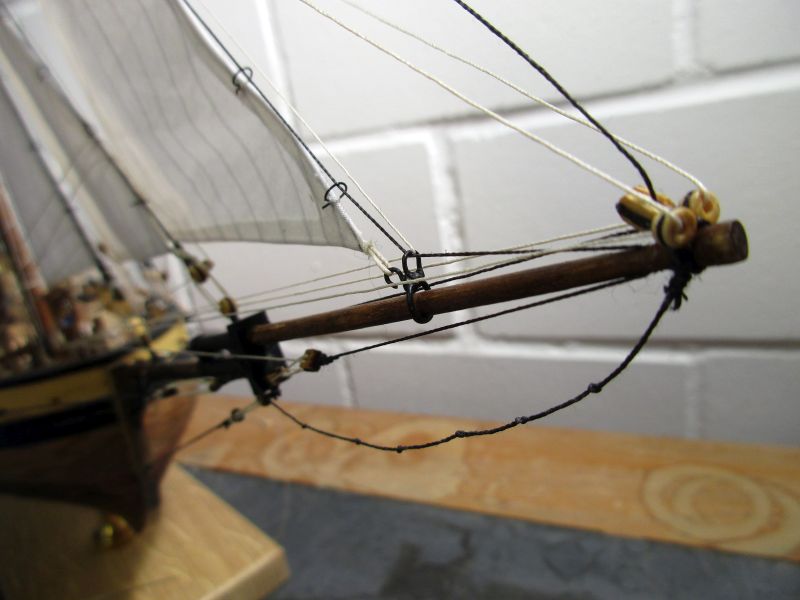
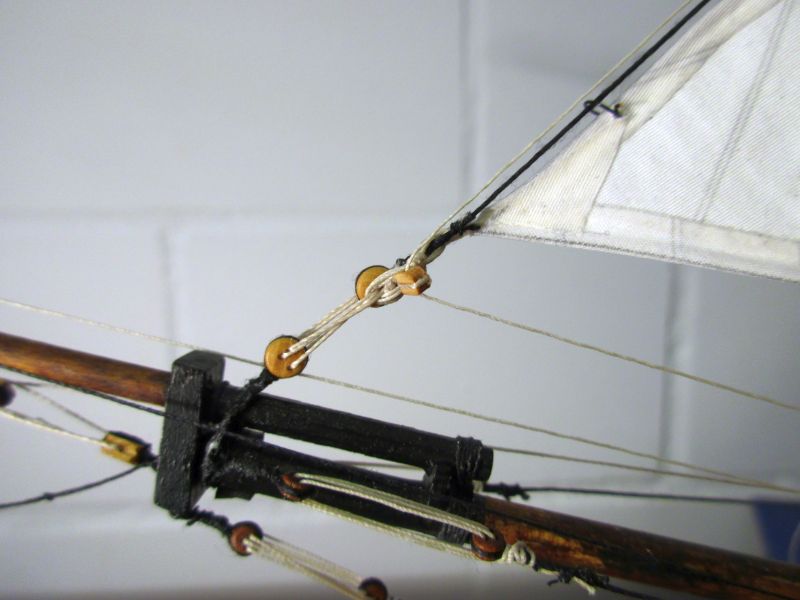
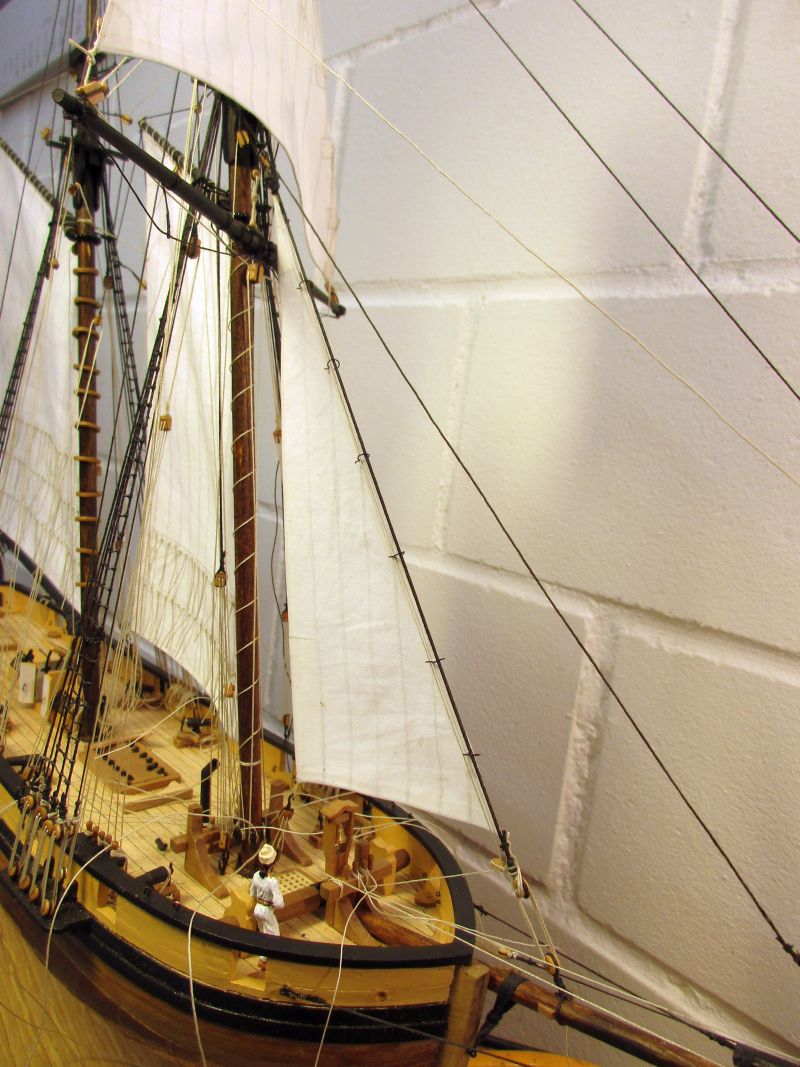
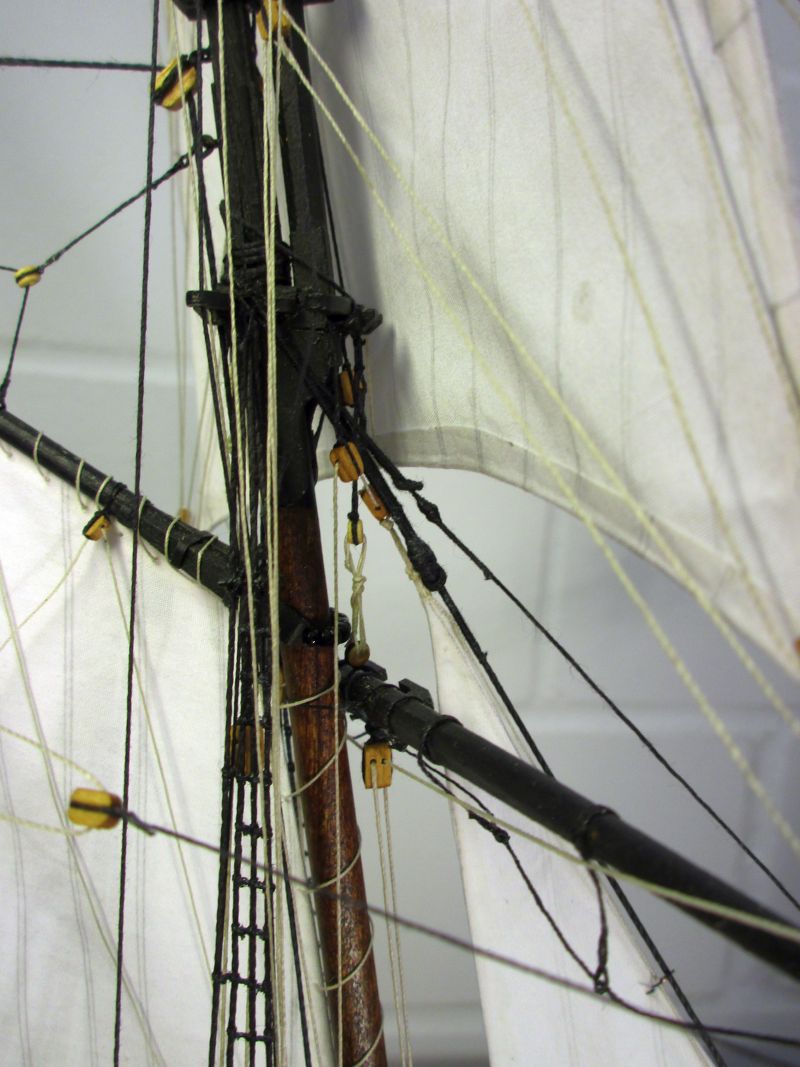
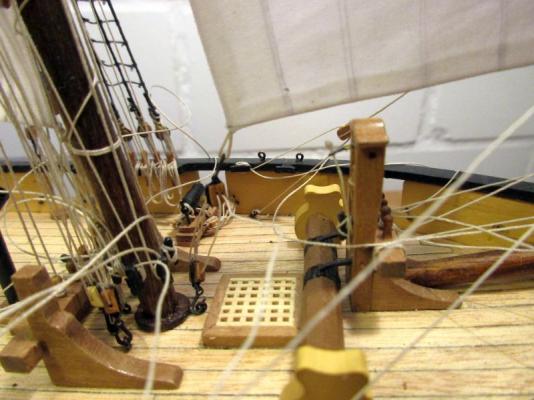
Jib The sail itself was rather quickly done. But when checking its size and form the jib stay parted at the eye and was beyond repair. A new one had to be made and put up through all the existing rope work. Fortunately that work could be done in the wharf and not on the open sea in some weather. The sail was made similar to the fore stay sail. The peak halyard was set up in a mirrored fashion. The way to attach the fixed end and the necessary block was not fully clear. They are either on the mast or somewhere under the crosstrees, depending on source. Finally I opted for a simple solution as Pickle should be an unpretentious ship. The standing part was simply hitched around the forward crosstree. The halyard then leads through the peak block and back through a block slung under the opposite crosstree leg and down to the pin rack behind the mast. the right block is the jib's peak block, the left one the fixed block for the fore stay sail halyard The down hauler was set up similar to the stay sail. The sheets however are double with a sheet block in each short end. How to set up the pendants was a tricky question. According Lees usually the knightheads on the bow were used but Pickle doesn't have any. In Lees' book a belaying plan of ship from 1850 shows some cleats on the inside of the capping rail in the bow. As such cleats were already used for the backstays I added four more forward of the fore mast. Ringbolts for the standing end are set into the waterways below those cleats. The pendant of the sheet is now hitched to the ringbolt(with a knot for attaching a line to a ringbolt I found in the internet - setting this up was the most difficult bit of the whole sail). Marquardt talks of splicing it but this seemed a bit too definite to me. cleat and ringbolt for the sheet pendant in front of the carronade There are still a lot of loose lines which I will definitely stow when also the remaining outer jib is in place.

- 293 replies
-
- 10
-
-
- pickle
- caldercraft
- (and 1 more)
-
Hi Martin I Just read, that Oklahoma lies in the tornado alley. Well, I'd rather have a little Föhn-induced headaches than a twister trying to screw the same off. Hi B.E. Good question about the strips. Checking Lees again, I found that indeed the standard width of the cloth was 24'' which results in my 9,3mm. But he also mentions that in the 19th century often 18'' strips were used for jibs and general for fore and aft sails. Changing the strip with for the fore stay sail would need 2 strips more and so provide room for 2 hanks more. I will change to 18'' strips but only for the next build. For Pickles jib and outer jib I will use up the 'existing' 24'' cloth. Hi John The connection between Föhn and headaches is still debated, however I wouldn't debate the quality of the Merlot del Ticino although merlot from the north is by all means drinkable. What a astonishing library you have! And if you check the last part of Lees you will find some helpful belaying plans there. Cheers peter
- 293 replies
-
- 2
-
-
- pickle
- caldercraft
- (and 1 more)
-
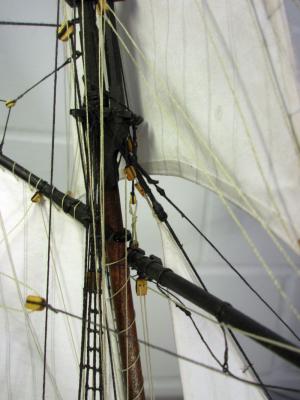
Fore stay sail One definition of insanity is that you do the same things again and again - and expect a different outcome every time. Although I made that sail more than once it seems that I'm not completely insane. For the first try I took measurements from the build again. For the length off the luff I took the distance between mouse and the upper deadeye of the forestay. The leach is parallel to the mast and the foot must run clear of the belfry and forms a right angle with the leach. A trial with a paper sail looked ok. But when hoisting the finished sail I got an impression of a small tablecloth acting as a sail with a huge gap between sail and mast. Checking different pictures and paintings I found that the peak was too low but as it was not fixed to the stay and only held up by the peak halyard I could pull it above the mouse. I'm not sure if this is correct but it works on the model. For the second try I increased thus the distance between peak and foot and gained 15 - 20% of sail area. It looked better and definitely different... the fore stay sail still seems a bit small the peak is above the mouse The next problem were the hanks to attach the sail to the stay. Originally they are iron or wooden open hoops, formed like an Ω where the open ends are connected with a lashing going through the sails eyelets. I thought that by putting a ring with overlapping ends through the eyelets and then bend the ends backwards I could imitate the Ω. It looks quite ok but I'm still asking myself if I should double the number of hanks. Initially I put one on each seam of the sail cloths as shown e.g. in Lees' book. a single hank perhaps I should double the number of hanks... The down hauler leads from the peak through a block on the stay to the on a pin below the belfry. Another problem was the sheet. Originally I thought that I must install double sheets as for the jib but didn't know how. But Marquardt simply states that '...the sheet belayed before the mast.' Therefore a sheet similar to the one of the fore gaff was rigged. Finally the tack was lashed to the upper deadeye of the fore stay. down hauler and single sheet
- 293 replies
-
- 8
-
-
- pickle
- caldercraft
- (and 1 more)
-
Hi John You have been there, I think. Yes the Föhn may give you a headache and he was also famous for helping to burn down whole villages in earlier times. Hi Nils Right. This one was a bit more complicated but manageable. I remember that you sort of printed yours but painting it was fun and quickly done. Hi Spy Thank you for your inputs. I fully agree with your solution of the problem with the two free ends. Only it would perhaps be a bit too straightforward and logical for the navy... In Marquardts book I found Johns ledges. They were used from the early 19th century, called reef combs and guided reef pendants. Those pendants were used to haul down the sail when taking in a reef. The holes therefore had to lie directly below the reef cringles. Thanks for all the likes peter
- 293 replies
-
- 2
-
-
- pickle
- caldercraft
- (and 1 more)
-
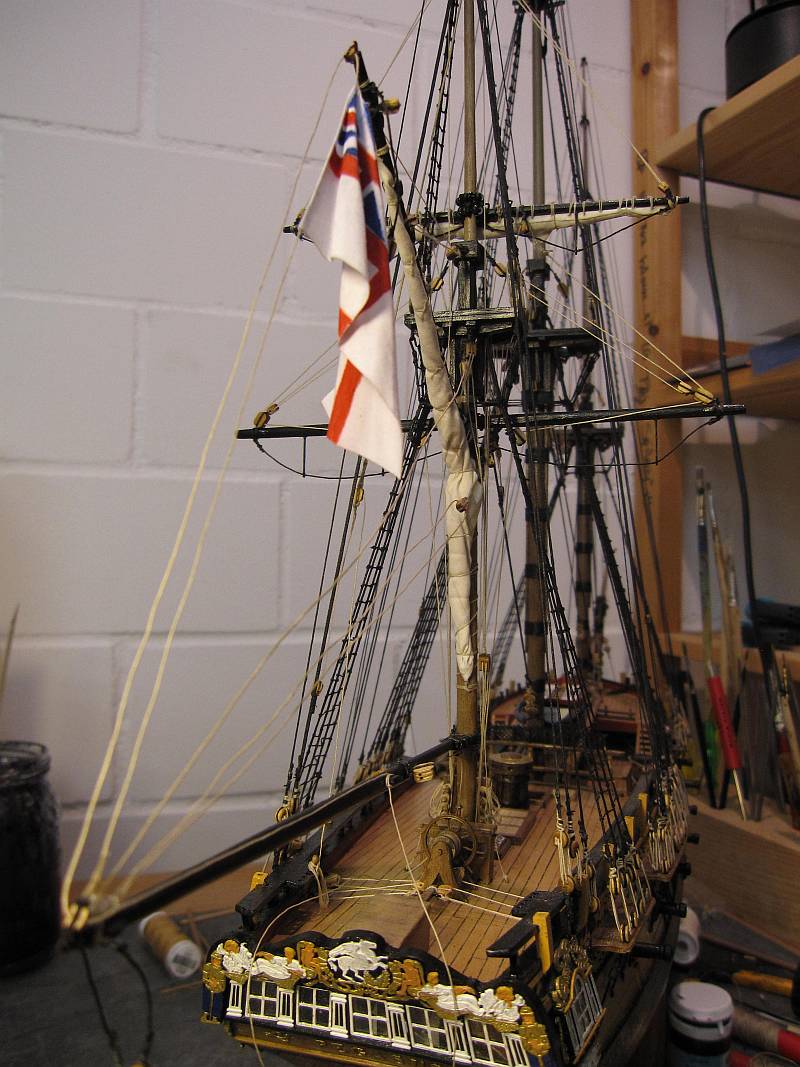
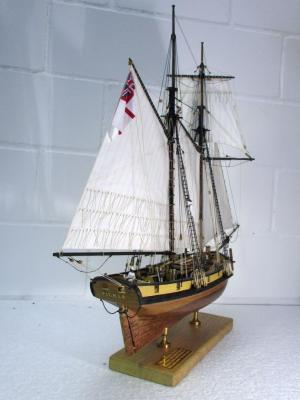
Hi Jonathan My first approach to this problem was with logic - as you did. You may see the result on Pegasus where I took the flag line through a block on the outer end of the boom and belayed it on a cleat, put into the side of the boom. However for some reason it seems that the usual solution was not logical. I believe it was Jack Aubrey who once stated that there were two ways to do something: The right way and the way the navy does it. In Pickles excellent building manual the rigging of the flag halyard is described in detail. The flag line block should be placed on the outer part of the gaff. However I placed it on an eyebolt in the end of the gaff as mentioned by Marquardt. The halyard now runs through that block with 2 free ends - one holding the flag. Both ends are belayed on the same cleat on the inner bulwark. An identical cleat would be available on the opposite bulwark. This arrangement seems to confirm several illustrations and paintings where the flag line leads from the tip of the gaff somewhere towards the bulwark some distance forward of the taffrail. You would have to rearrange that flag halyard frequently when tacking - but this was probably the navy way. And by the way - your Rattlesnake is a very impressive reptile. peter flag halyard arrangement on Pegasus - probably wrong that seaman stands just forward of the flag line cleat

- 293 replies
-
- 4
-
-
- pickle
- caldercraft
- (and 1 more)