HOLIDAY DONATION DRIVE - SUPPORT MSW - DO YOUR PART TO KEEP THIS GREAT FORUM GOING! (Only 20 donations so far - C'mon guys!)
×


flyer
-
Posts
1,016 -
Joined
-
Last visited
Content Type
Profiles
Forums
Gallery
Events
Everything posted by flyer
-
 Hi Nils You remember what I said about being an artist? Perhaps you could add to that definition, that a true artist creates pieces of art to the education or enrichment and to the delight of all beholders. :stunned: Jolly good show, mate! I’m also interested in your new ensign and the technique you will use to make it. What is transfer paper? Cheers Peter
 -
Thank you all for the positive feedback. You and your projects were a great inspiration and help during the build. As you can see, I already moved on to my next voyage – and I’m already in a Pickle… Cheers Peter
- 431 replies
-
- 1
-

-
- pegasus
- victory models
- (and 1 more)
-
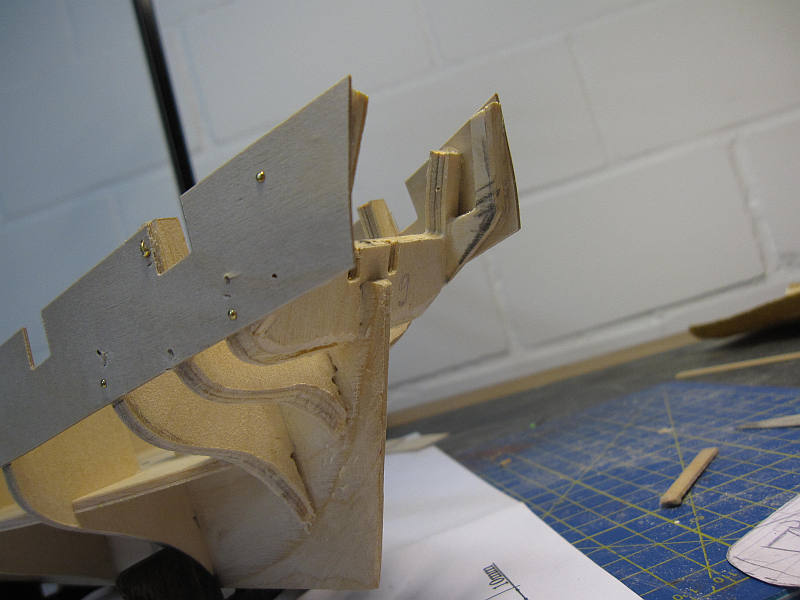
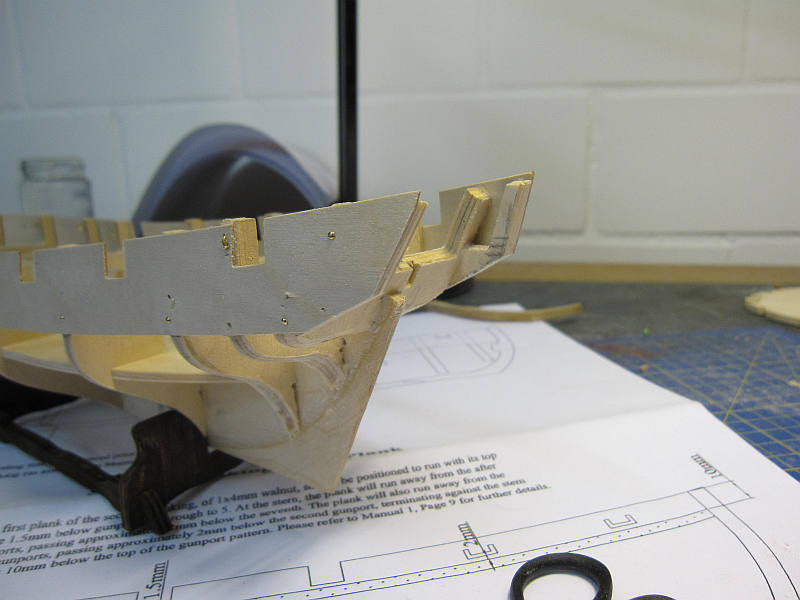
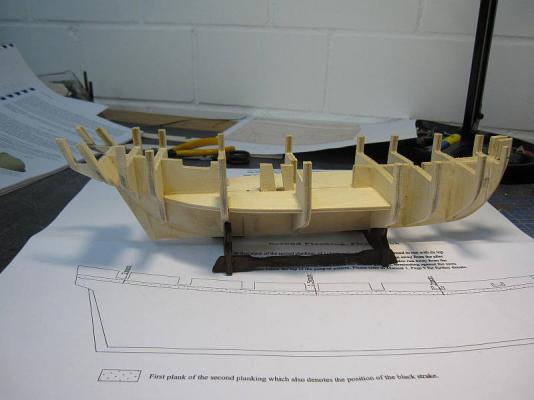
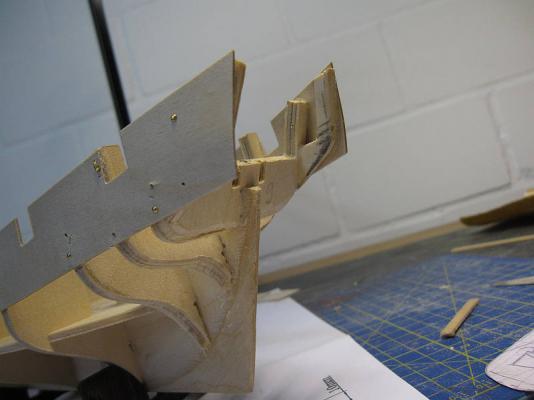
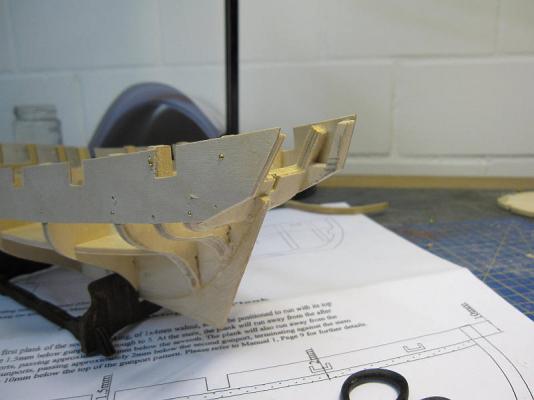
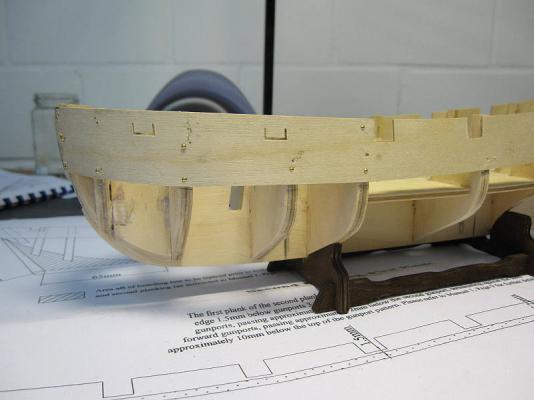
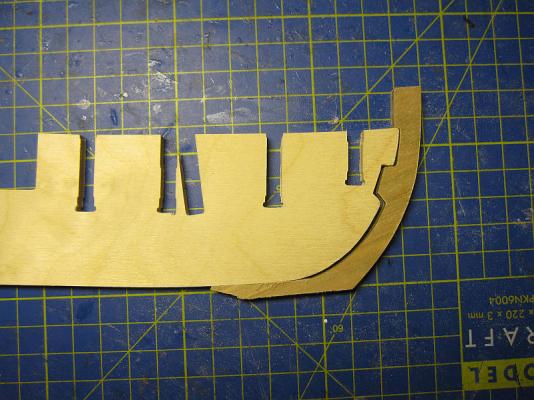
The bulkheads were glued in place. After a lot of sanding, doubling up and sanding again the skeleton of the ship was approximately what I had in mind. Then the gun port patterns were glued on and the stern trimmed back to the new form. Bulkheads and keel glued and sanded Gun port patterns out of the kit ...and trimmed to the new form bow

- 293 replies
-
- 9
-
-
- pickle
- caldercraft
- (and 1 more)
-
Hi Dave My research consists mainly of browsing the internet and looking at some books and plans; no big deal actually. The rest is guessing and trying to find a hull form which looks right. Hi Ken Well, I hope too it will be interesting. At least I hope to achieve a model which will look a bit more elegant than the one right out of the kit. After investing hundreds of hours I hope to get something which pleases the eye and is historically feasible. 100 % historical correctness seems to be impossible anyhow even if you take one of the surviving ships and try to construct the condition of 200 years ago – there will always be some guesswork. Don’t expect any new exotic techniques. Woodworking still is sanding, sanding, sanding, uttering some censored words and then trying again. By the way: your Fair American looks very good and I like the sails. On my Pickle I hope to be able to fully hoist some sails. Hi B.E. Welcome to the journey. I hope to steer clear of the shoals you mention also by respecting your experience. Cheers Peter
- 293 replies
-
- 1
-
-
- pickle
- caldercraft
- (and 1 more)
-
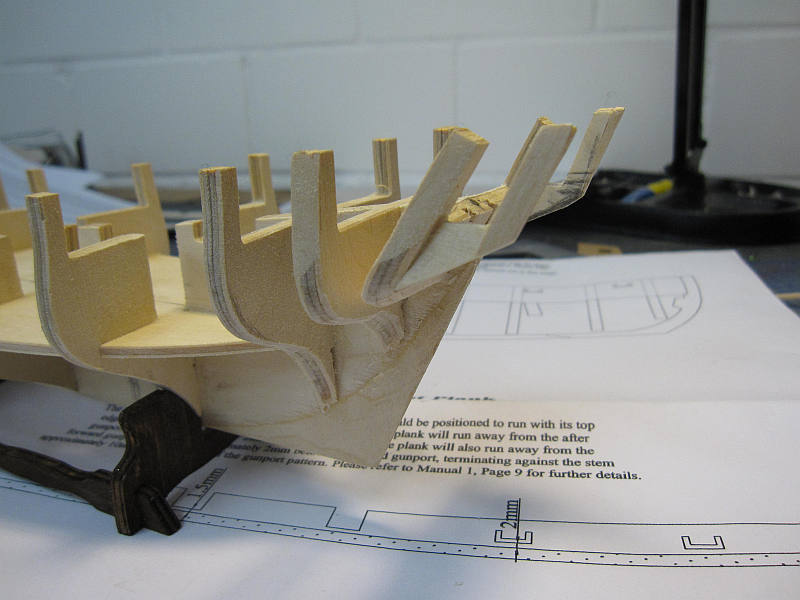
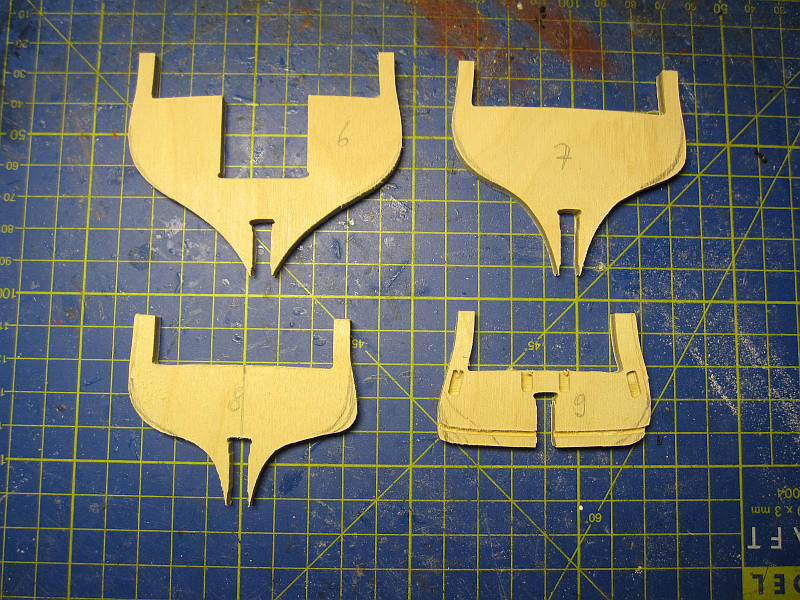
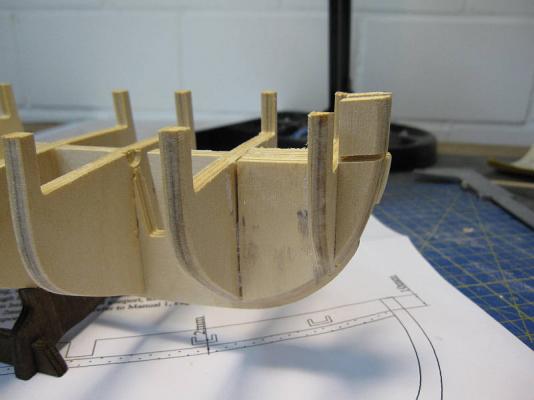
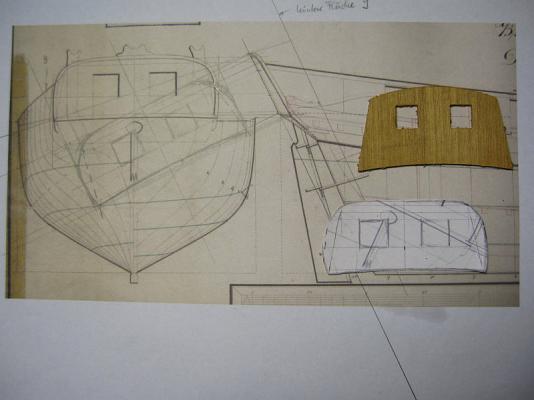
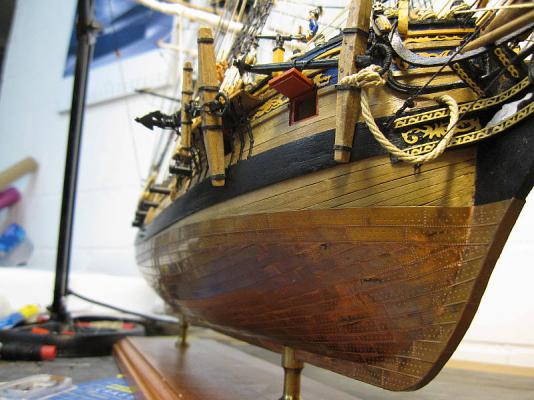
The first corrections were (rather timidly) made. I will not completely change the schooner but try to keep alterations to a minimum – just within the limits a shipwright probably had when interpreting the plans with his adze. The keel was sanded in order to stretch the bow a bit. Further corrections will be made step by step during the build. A template for a new transom was constructed with the help of the plans of the Adonis class. Also the last 4 sections were sanded to change the strange form of the rear hull to a more conventional one. The stern construction with that jutting nose near the waterline was in fact used for some schooners. As far as I found however mostly earlier (it resembles a more 17th century style of ship) and when the schooner was built with a small aft cabin with windows. I found no indication of a Bermuda schooner built that way. I hope to find the final form of the stern as I go. Slight correction on the bow One side of the aft hull sections sanded and upper part doubled up on 8 and 9 Real size of an Adonis transom constructed. Template of a possible new transom below the kit part.

- 293 replies
-
- 5
-
-
- pickle
- caldercraft
- (and 1 more)
-
How to tackle the different problems: Size According Wikipedia the length of the gun deck should be 34.8cm (in 1:64). The kit’s plan shows about 32.5 cm. As I’m unsure how to measure the gun deck exactly I compared the kit with the downscaled RMG plan of Laura from Adonis class. The Kit measures only about 92% of the Laura which however should be a little bit smaller than Pickle. The plan in TGS shows the same length of the gun deck but a different profile on the lower bow. The kit’s gun deck measuring 32.5 cm seems about 7% too small. Conclusion: use the kits overall length but adapt stern according RMG plan and bow according TGS. Sections The whole stern of the kits vessel is an ugly rectangular box and differs completely from the elegance of contemporary schooners. The RMG plan shows a more satisfying stern. The TGS plan however is a mix between both – however the transom is not clearly visible. Conclusion: The sections can be corrected according RMG. The form of stern and transom will be taken from RMG while the bow will be a blend of the kit and RMG, following more or less the plan in TGS. Mast position If the length of the main deck is taken as 1, the mast positions, measured from the bow, are: Kit: foremast 0,24 main mast 0,59 TGS Laura 0,25 0,58 RMG Subtle 0,23 0,61 Conclusion: The longitudinal position of the masts in the kit is OK. Although Pickles fore mast was probably stepped vertical I will keep the kits mast positions. Mast height Again the length of the deck is taken as 1. Then the heights of fore and main masts are: Kit: 1.03 1.10 TGS: 0.98 0.99 RMG rigging plan of unnamed schooner (fore mast perpendicular to the keel!) 0.89 0.93 This confirms the impression of a somewhat disproportional side view but the problem is not the masts position but that they are too tall. Conclusion: Change the masts (including bowsprit) to the proportions of TGS. Position of the boats Perhaps the boats were sometimes placed off centreline as in the kit. But for me it seems too unrealistic for several reasons. Not only would the trim of the schooner change noticeable every time you lower a boat, you also would have to shift carronades around constantly as the boats are blocking two gun ports amidships. Conclusion: I will strive to place the boat(s) in a traditional way.
- 293 replies
-
- 4
-
-
- pickle
- caldercraft
- (and 1 more)
-
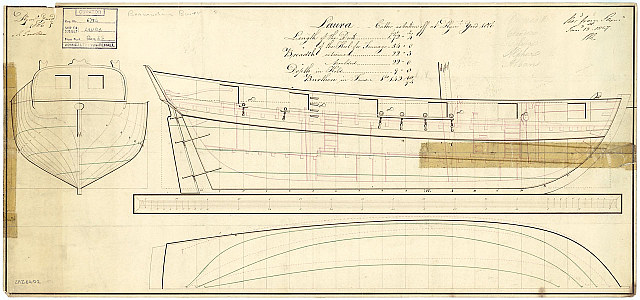
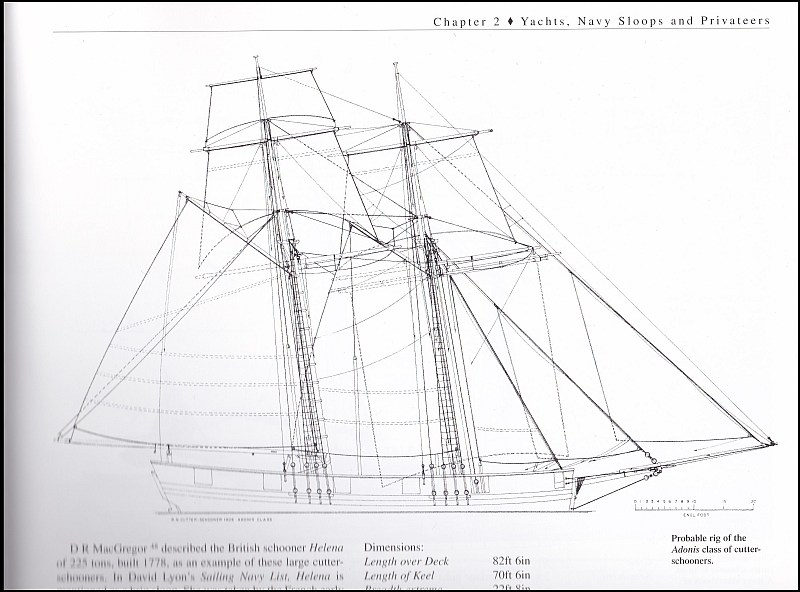
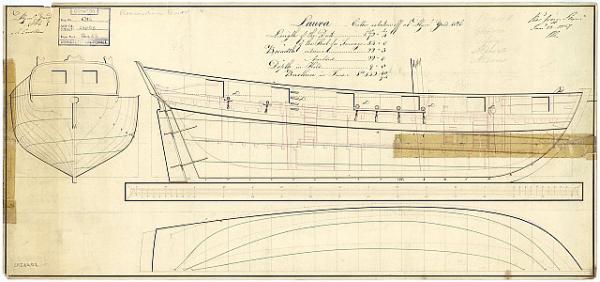
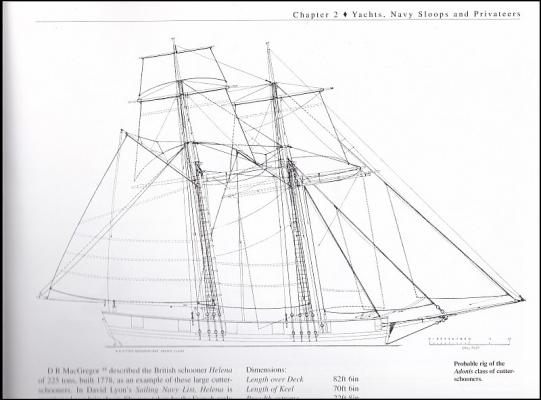
Build Log HMS Pickle The Caldercraft kit has arrived and seems of the same good quality as I could expect from Granado. However, before I start, I made a bit of research and will add a few corrections. I like Pickle as an example of those elegant schooners and for her role after Trafalgar. But – I find that the kit’s Pickle looks somewhat strange in some respects: The bow seems too bluff for the period The overall proportions of hull length, mast distance and mast height seems wrong The stern looks ugly and the taffrail is completely different from other schooners of the period. According to some correspondence with CC (I lost the copies, sloppy me) the kit is built according to plans found in the Bermudas which show an unnamed vessel of about the same size and specifications as Pickle built around 1800. It is however not confirmed to be Pickle. The plans are held back as somebody seemingly wants to write eventually a book about Pickle. They also referred to a contemporary sketch showing Pickle with seven gun ports per side and a rig according to the kit but with a vertical foremast which configuration was not adopted. To me the kit Pickles hull looks much more old fashioned and ungraceful than other contemporary schooners. As I have no access to the original plans used for the kit I will make some corrections based on different sources: Plan of the Royal Maritime Museum in Greenwich (RMG) of the Adonis – class cutter Laura Although the 12 Adonis – class vessels were ordered as cutters they were built as (or converted to) schooners. Their hull size is very similar to Pickle and the armament was with 10 instead of 8 12-pounder carronades although there were only 6 gun ports per side. They were built in the Bermudas in 1806 I bought a copy of that plan from RMG. It’s not only a plan full of information but a fascinating object of art. Sketches of the Adonis – class schooners in ‘The Global Schooner’ (TGS) Karl Heinz Marquarts book is a treasure of information about schooners and contains some small plans of the Adonis – class. Pictures of different plans from the collections of RMG J2147 sail J8265 unnamed 18-gun two-masted brig
- 293 replies
-
- 4
-
-
- pickle
- caldercraft
- (and 1 more)
-
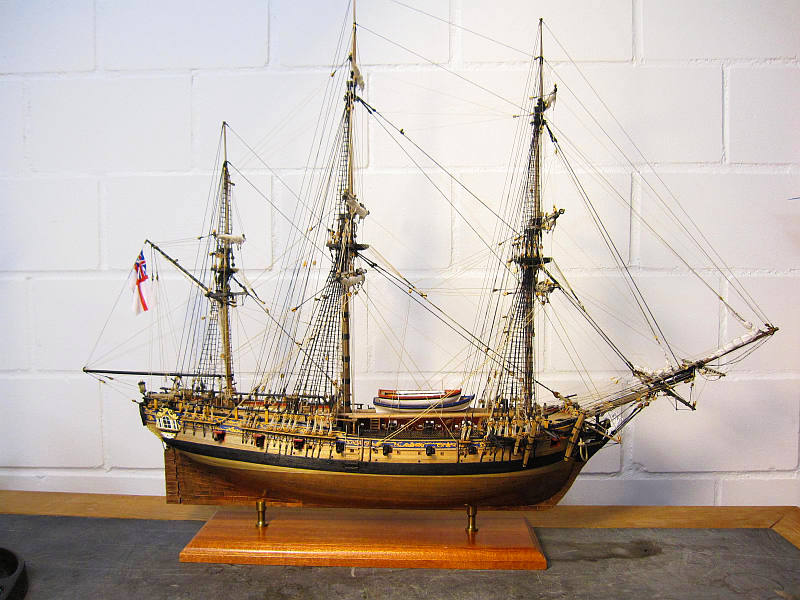
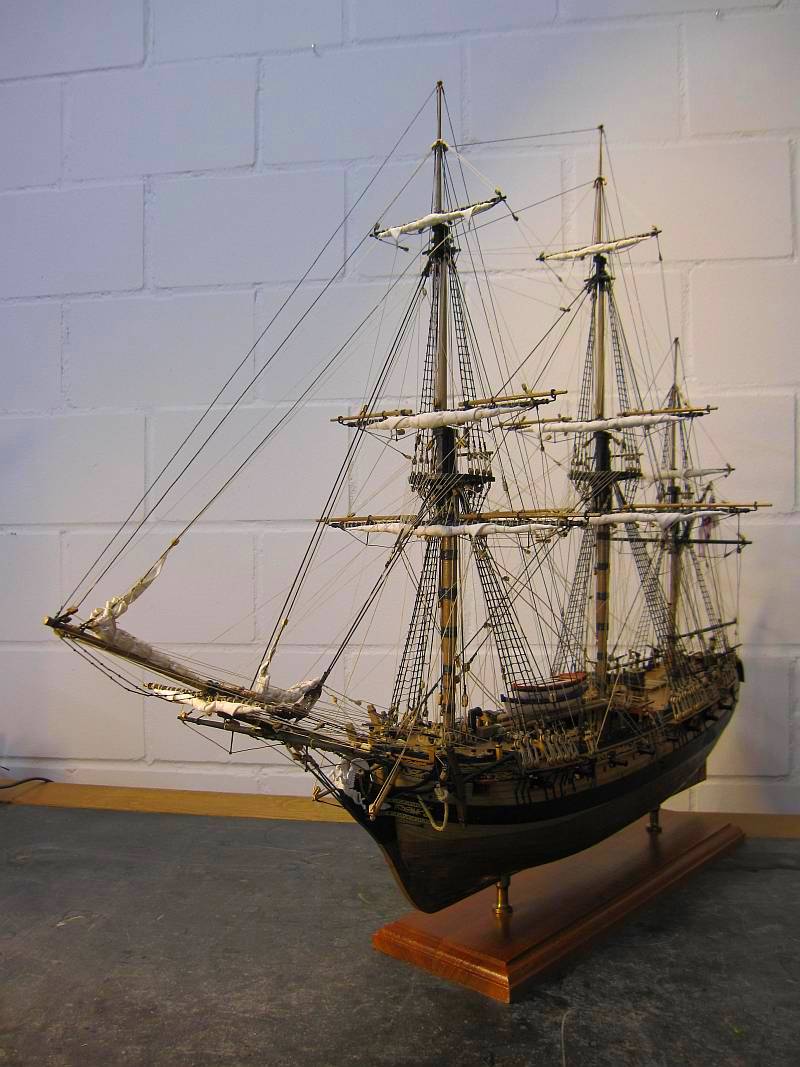
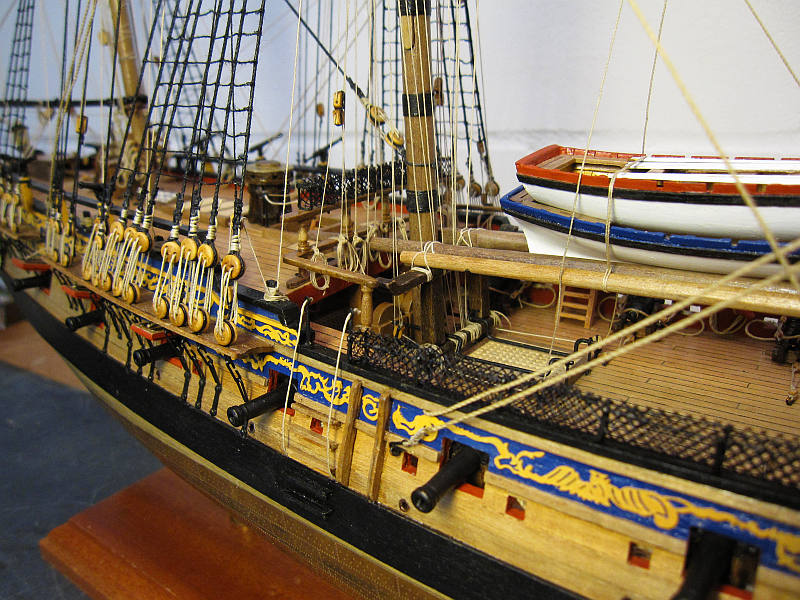
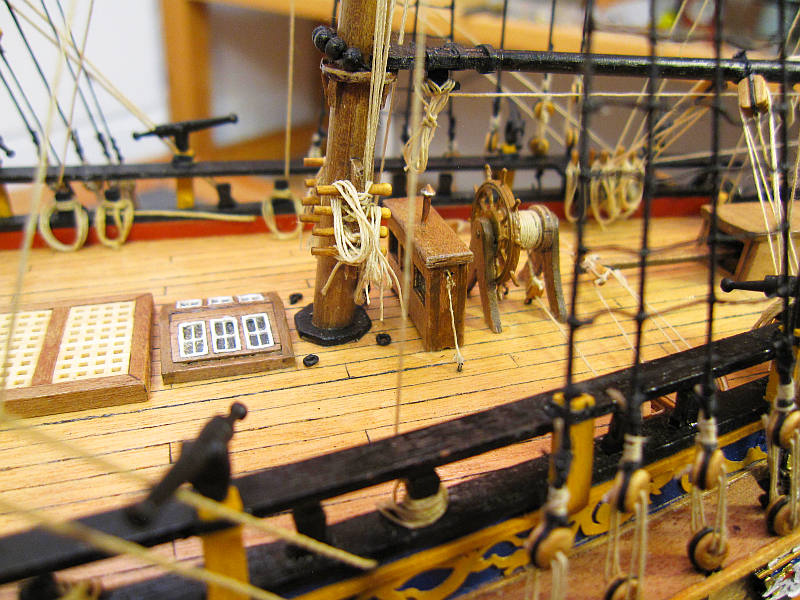
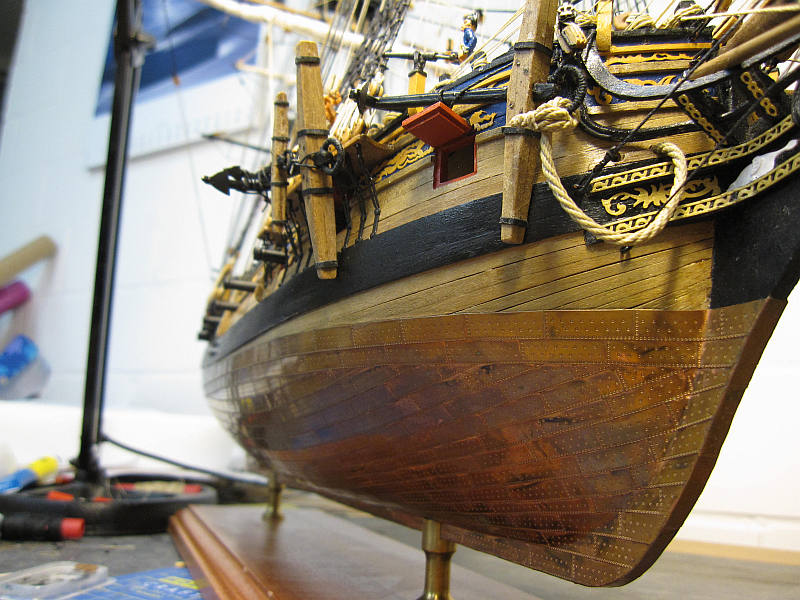
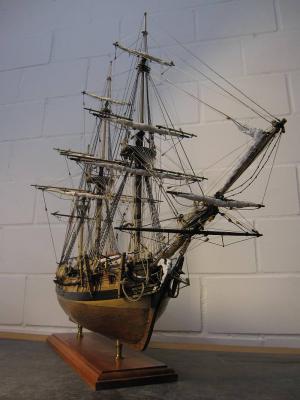
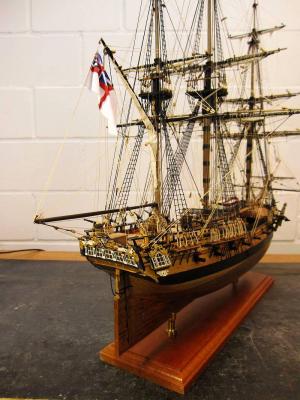
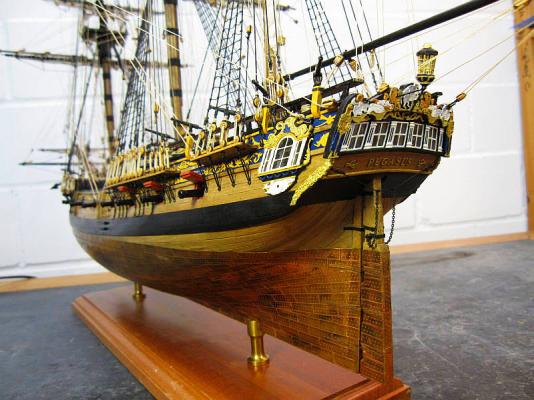
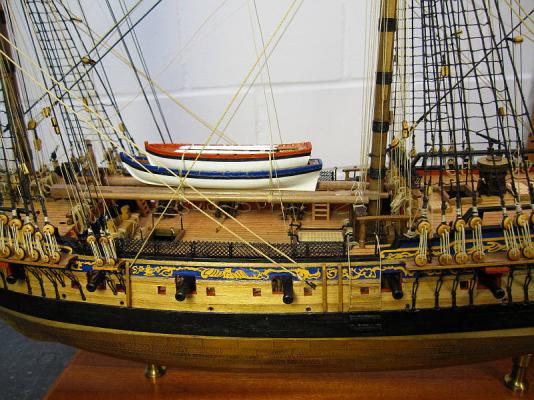
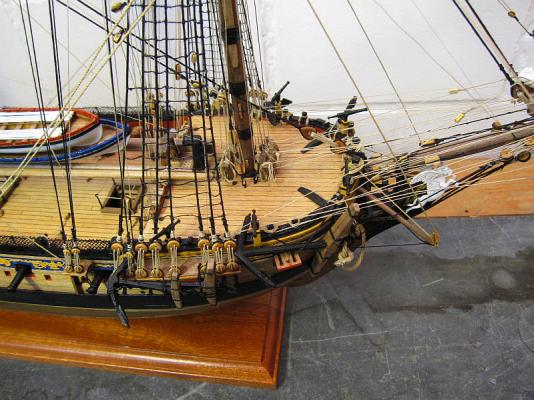
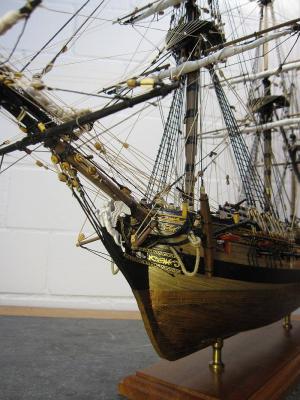
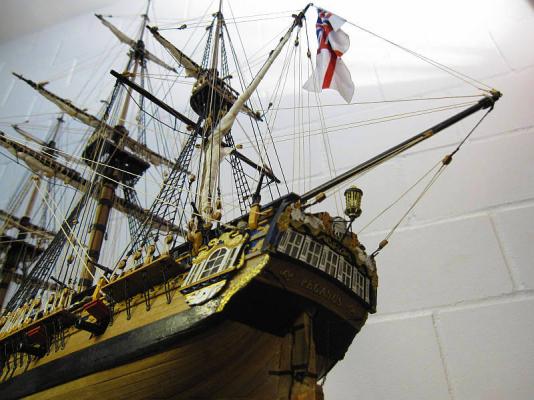
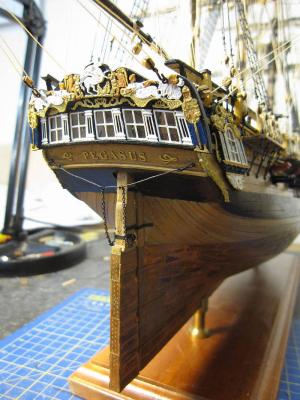
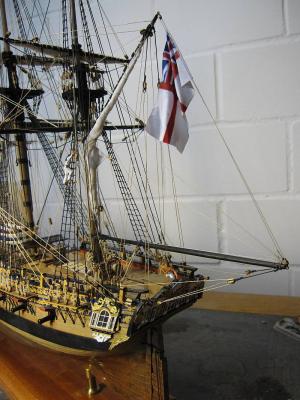
A few final impressions of the Pegasus ready to fly...


- 431 replies
-
- 18
-
-
- pegasus
- victory models
- (and 1 more)
-
Hi Nils Thanks a lot. I’m still trying to find a suitable spot to make some decent pictures. Hi B.E. You know, that I really appreciate your comments. But, should I in earnest be proud of a cross between a swan and a flying horse? This would be a rather shrewish and skittish beast - a hypposwan! I too look forward to get into a pretty pickle… Cheers Peter
- 431 replies
-
- 2
-
-
- pegasus
- victory models
- (and 1 more)
-
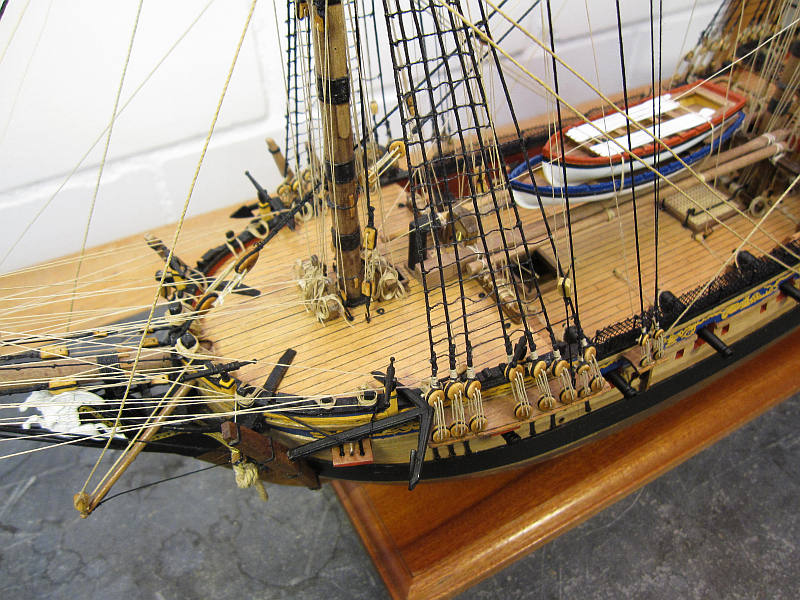
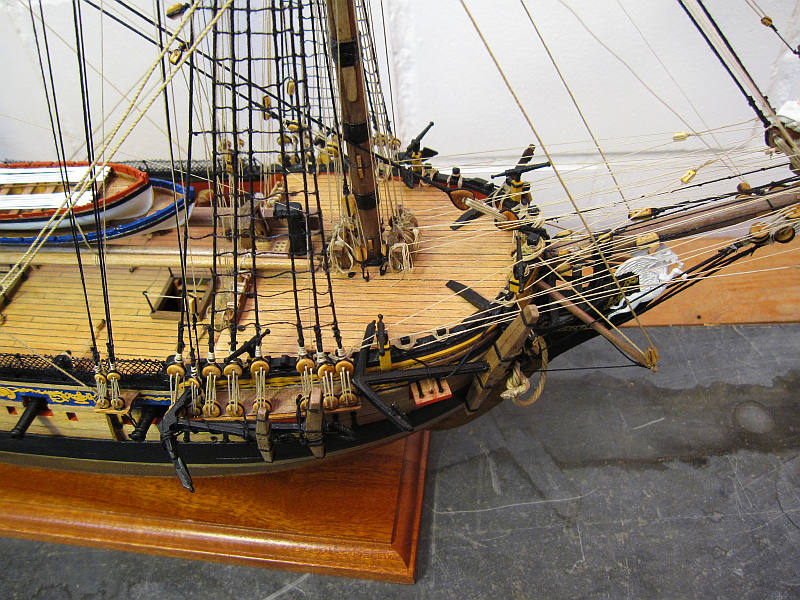
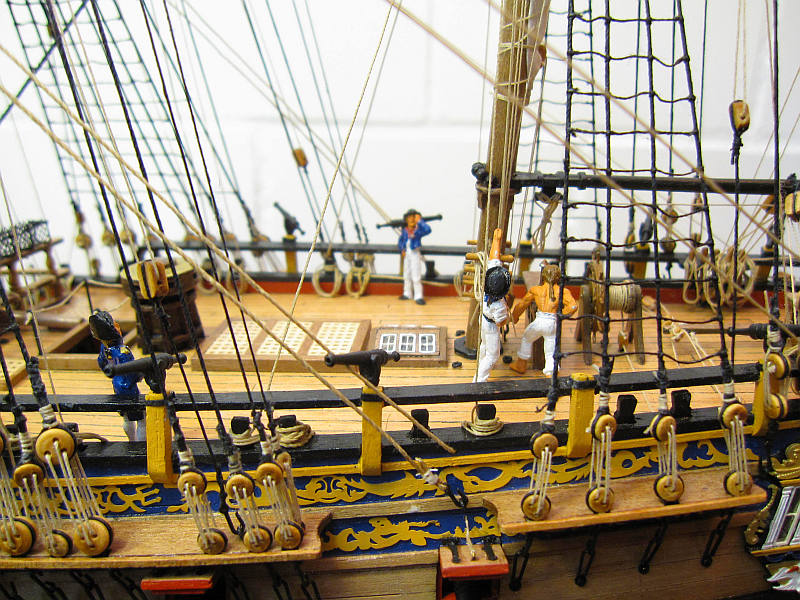
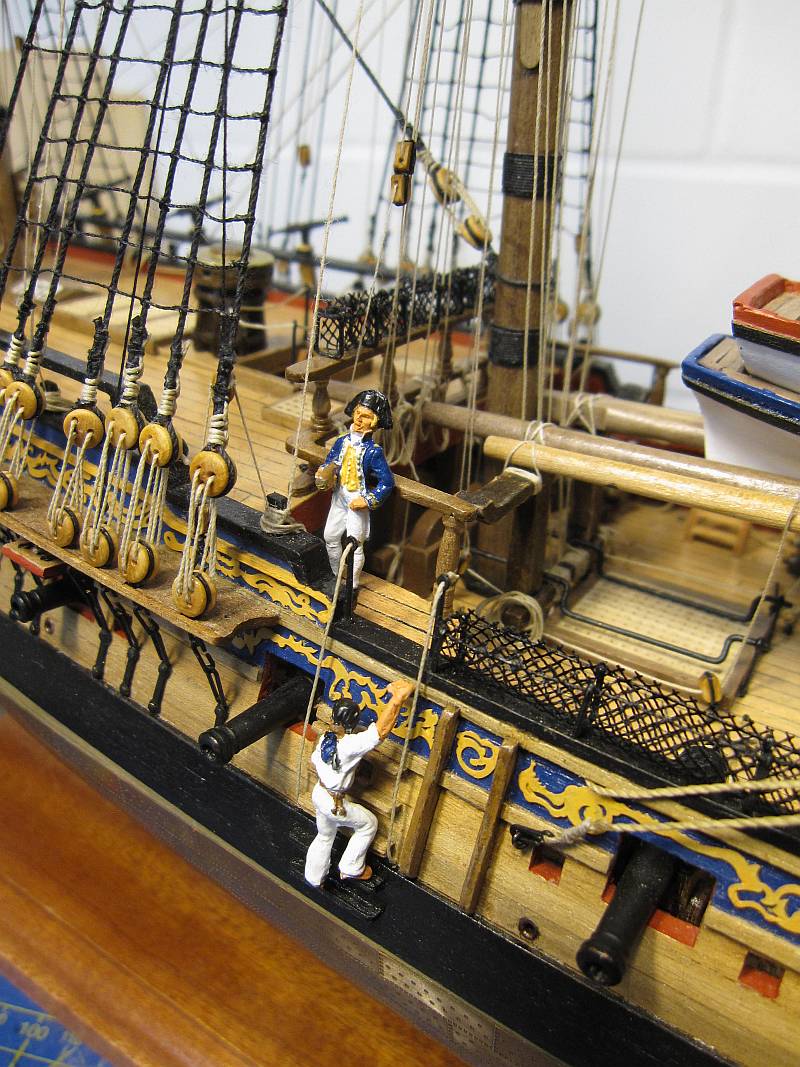
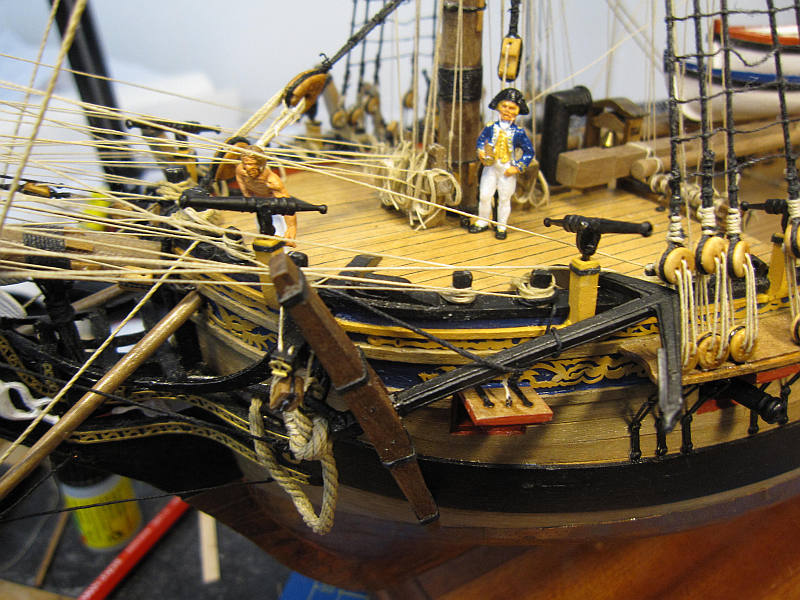
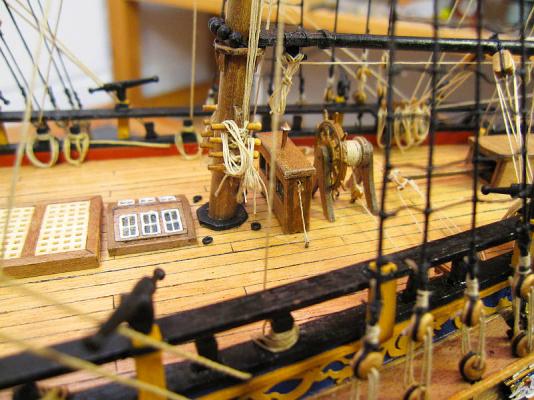
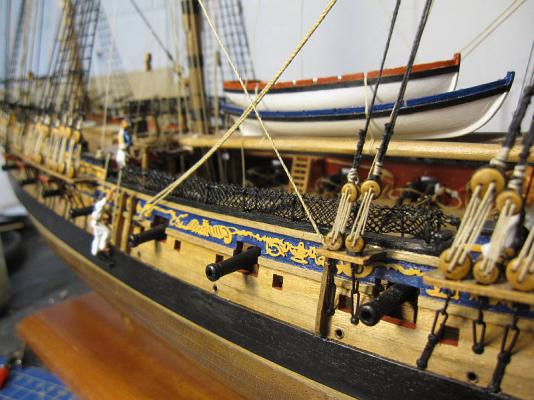
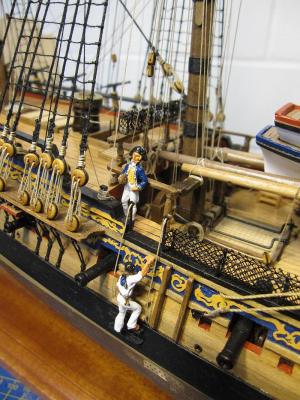
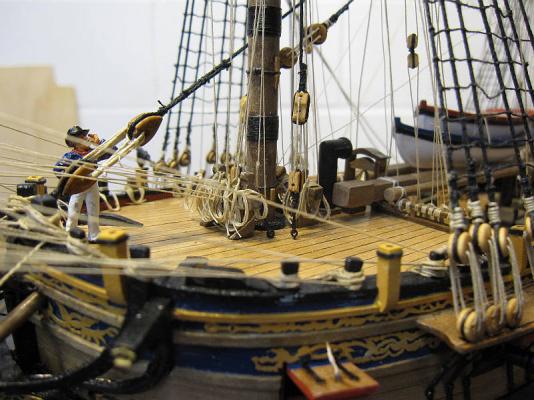
All the hammock netting is now finished. The anchors are in place as well as all the forgotten empty ringbolts I could find. I bent them to lie flat on the deck because somebody in this forum remarked rightly that normal ringbolts should unable to ignore gravity. That’s it! After some cleaning up there will be a photo session for some final impressions and for the gallery. And then all the ship models will have to be shifted around the house to put Pegasus in the favoured place. Hammock nettings are finished Captain Jack orders a sailor to check the new manropes Port bower anchor Starboard anchors Seen from below, the anchors seem huge

- 431 replies
-
- 15
-
-
- pegasus
- victory models
- (and 1 more)
-
Thank you Timmo I look forward to see your fantastic Granado setting some sails!
-
Hi Nils Thank you. I have to do my very best in order not to lapse too much behind the standard you are setting. Hi Martin Thank you. Wolfram zu Mondfeld is THE German authority on ship modeling. His book Historische Schiffsmodelle is one of my main reverences. There exists also an English version Historic Ship Models. It is still available in bookshops. Cheers Peter
- 431 replies
-
- 1
-
-
- pegasus
- victory models
- (and 1 more)
-
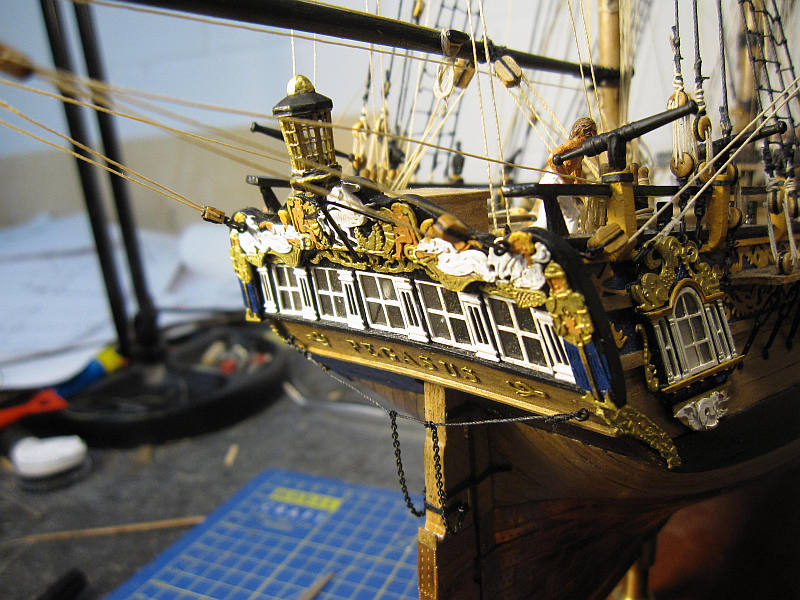
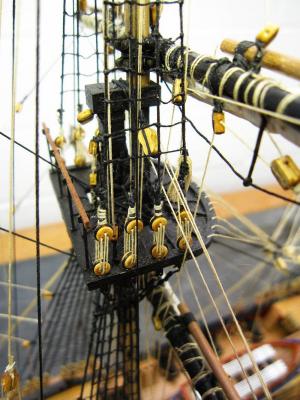
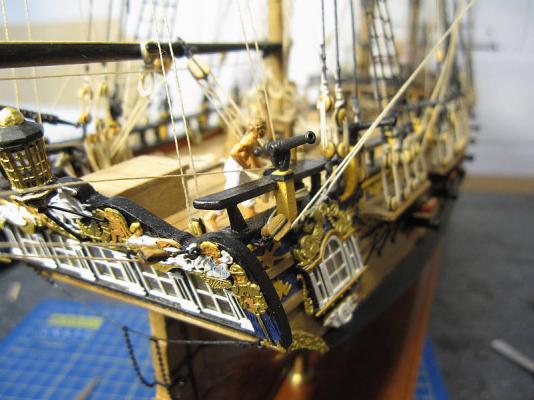
The rudder chains are in place. I used a simple arrangement which is depicted in W. Zu Mondfelds book as fitting for the period. The lantern was fixed with 2 additional diagonal struts in a way which I found in a book about HMS Pandora. I was thinking to rework the rather slim posts for the swivel guns into an octagonal shape but decided against it (out of sheer laziness). Instead I strengthened the tops with iron bands made of cartridge paper. Rudder chains in place Lantern added The tops of the swivel gun posts are strengthened with ‘iron’ bands

- 431 replies
-
- 8
-
-
- pegasus
- victory models
- (and 1 more)
-
Hi B.E. and Nils Thank you. :blush: Yes the end is near(!) but fortunately the next project is already waiting on the shelf. I did think of the Titanic as a change from all that knotting and splicing but after a comment of the admiralty about how plain such a steamer looks without any rigging (I took this as a hidden compliment for my rigging skills) I switched back to my idea of an improved Pickle. Cheers Peter
- 431 replies
-
- 2
-
-
- pegasus
- victory models
- (and 1 more)
-
Hi Martin Uups! Either it’s ‘déformation professionnelle’ or you are right. Cheers Peter
- 431 replies
-
- 1
-
-
- pegasus
- victory models
- (and 1 more)
-
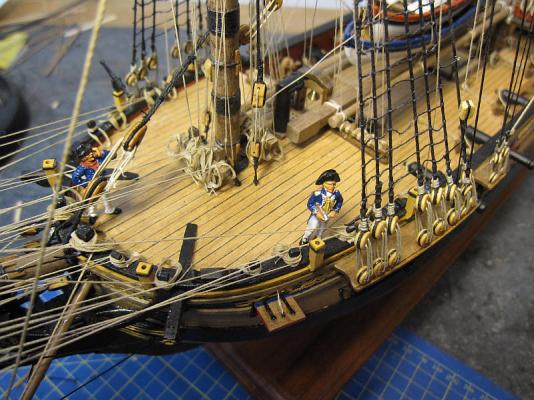
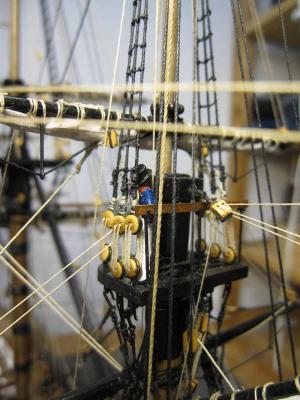
After cleaning up the forecastle the remaining braces and the missing lines on the gaff and boom of the mizzen were installed. After belaying all those lines – rigging was finished! There remains still a lot to do: More gun port lids are already installed but there are still two remaining to be made. Also the rails of the main and foretop are not yet there. The safety/emergency steering chains of the rudder must be fixed and the anchors are not yet stowed. Also the hammock netting is still partly missing. And finally the slightly reworked lantern still waits to be mounted. All the lines on the forecastle are belayed The remaining braces and other lines on the quarterdeck are in place The quarterdeck is cleaned up, but the rudder safety chain is not yet finished and the lantern is still missing The colour scheme on the foremost gun port lid follows the colour on the fuselage The rail of the mizzen top is in place The anchors are still missing but she already looks quite good

- 431 replies
-
- 10
-
-
- pegasus
- victory models
- (and 1 more)
-
Hi Frank Thank you. Of course my Pegasus looks much too clean, but those flying beasts never catch that much barnacles and fouling matter as your ships do. Cheers Peter
-
Hi Nils Those sails look great. The whole ship will be an absolutely spectacular beauty. As usual I also nag a bit. I like those shroud cleats – very ingenious. But, don’t they look a bit skeletal? I admit I don’t know if they were originally made of wood or cast-iron or whatever but I think they could use a bit more substance. Perhaps you could thicken the legs with some solder? Keep up the good work Cheerio Peter
-
Hi Martin I am astonished myself how some details suddenly can make sense (and therefore have to be added subsequently - much more tediously of course than it would be if you did it right the first time – but who said ship modeling is pure fun?). (Nevertheless – it is!) Hi B.E. As always your generous comments are highly appreciated. Yes, I even have my own way to make coils with the loose ends of the running rigging. Standard procedure for most modelers seems to be to cut the line near the belaying point and make separate coils to hang them over the belaying pin or knighthead. When I started ship modeling I was not aware of that technique and drudgingly made the coils out of the real end of the line by winding it around the belaying pin and the end of a needle file 3to 5 times. The coils were then fixed with diluted white glue which can be dissolved again with water in an emergency. Every now and then, when I have to reset a line which I thought was definitely fixed and trimmed, I was glad about the excess length. Without it I would have to completely remount the complete line. Therefore I stick to this technique, cumbersome as it is. Take care and enjoy a very happy new year, all of you Peter
- 431 replies
-
- 1
-
-
- pegasus
- victory models
- (and 1 more)
-
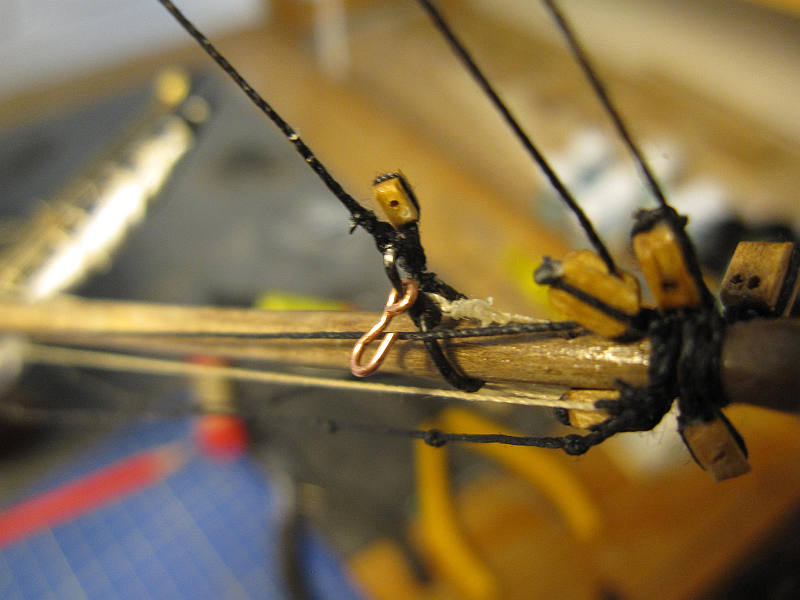
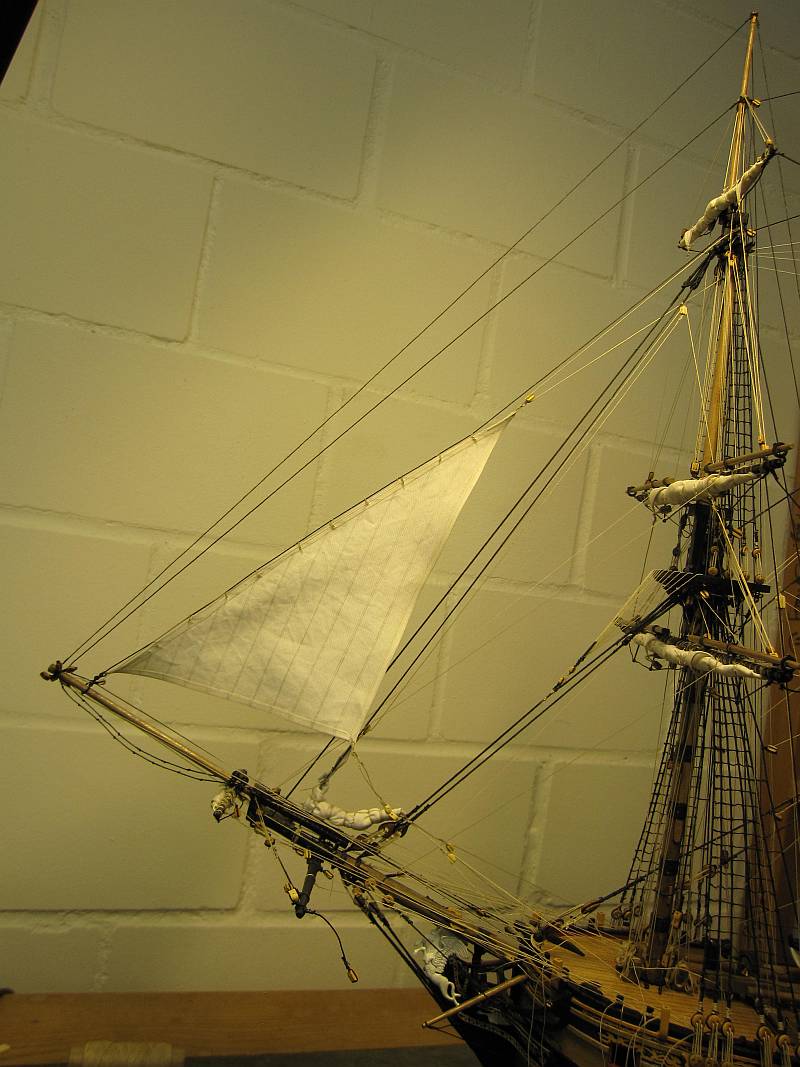
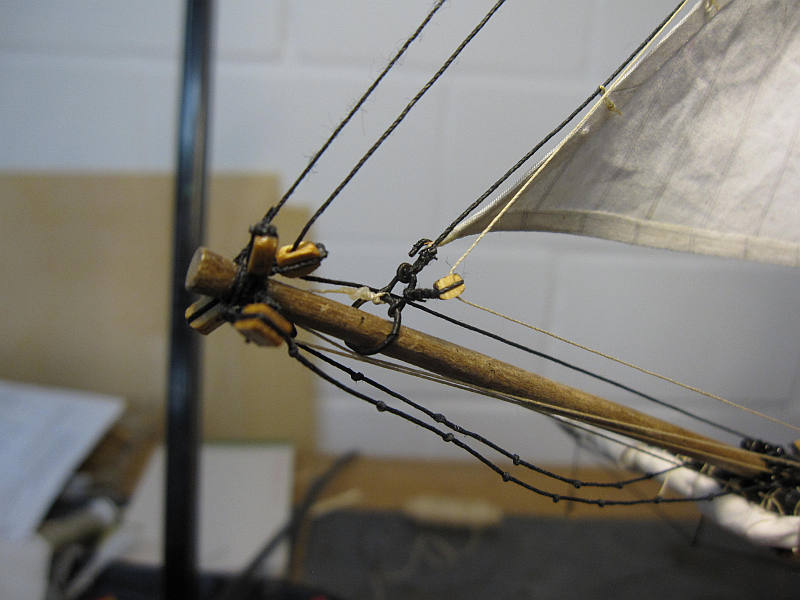
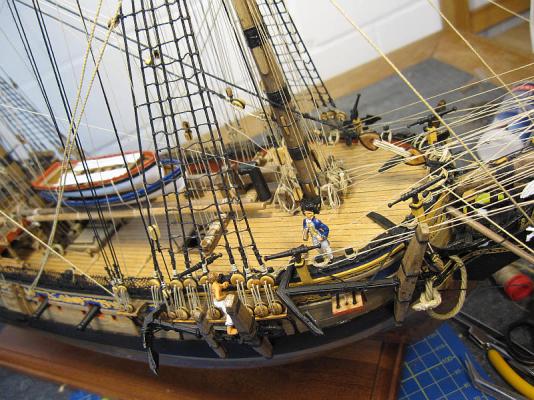
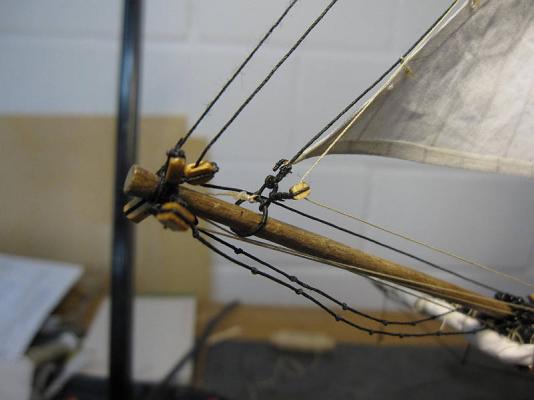
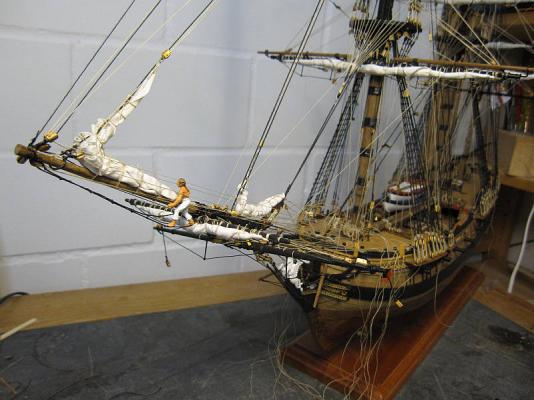
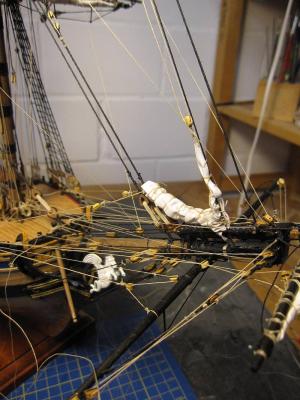
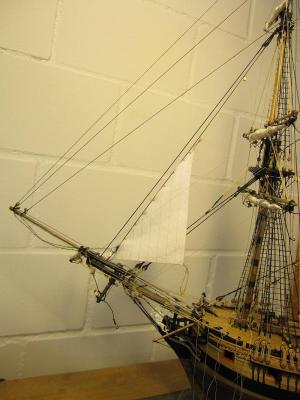
During the collection of facts about the jib sail I found that the traveller needs a hook for the sail. I amended one made of an eye pin. The sail was made in a similar way like the topmast staysail. It was bent to the jib stay and furled. Despite the by 40% reduced surface the furled sail still made quite a large packet. But the sail is quite large and I hope the proportions are correct. During the photo session I found that I forgot the sprit topsail yard lifts and installed them. Now just a few braces remain to be installed and the cleaning up of the forecastle cannot longer be postponed. By the way - during all that work on those sails I had to tighten several already installed lines and was glad that most of that installation was provisional only. The new hook on the traveller is not yet painted Jib is finished The jib is set Detail with the traveller The furled jib (and the missing sprit topsail yard lifts) The lifts are installed


- 431 replies
-
- 11
-
-
- pegasus
- victory models
- (and 1 more)
-
Hi Aldo Long time no see. It’s nice to have you back. Thank you for the comment. Cheers Peter
- 431 replies
-
- 1
-
-
- pegasus
- victory models
- (and 1 more)
-
Hi Martin Well, sails shouldn’t be too heavy but here I understand weight in a sense of substance and not just a whitish ornament somewhere on a yard. At least that’s what I want to create. Of course if I wanted real substance I would have to mount full sails – maybe I’ll try that with my next project. Hi Alistair But be warned: The more realistic you paint him, the louder he shouts! A real bosun could be quite deafening, I read somewhere. Cheers Peter
- 431 replies
-
- 1
-
-
- pegasus
- victory models
- (and 1 more)
-
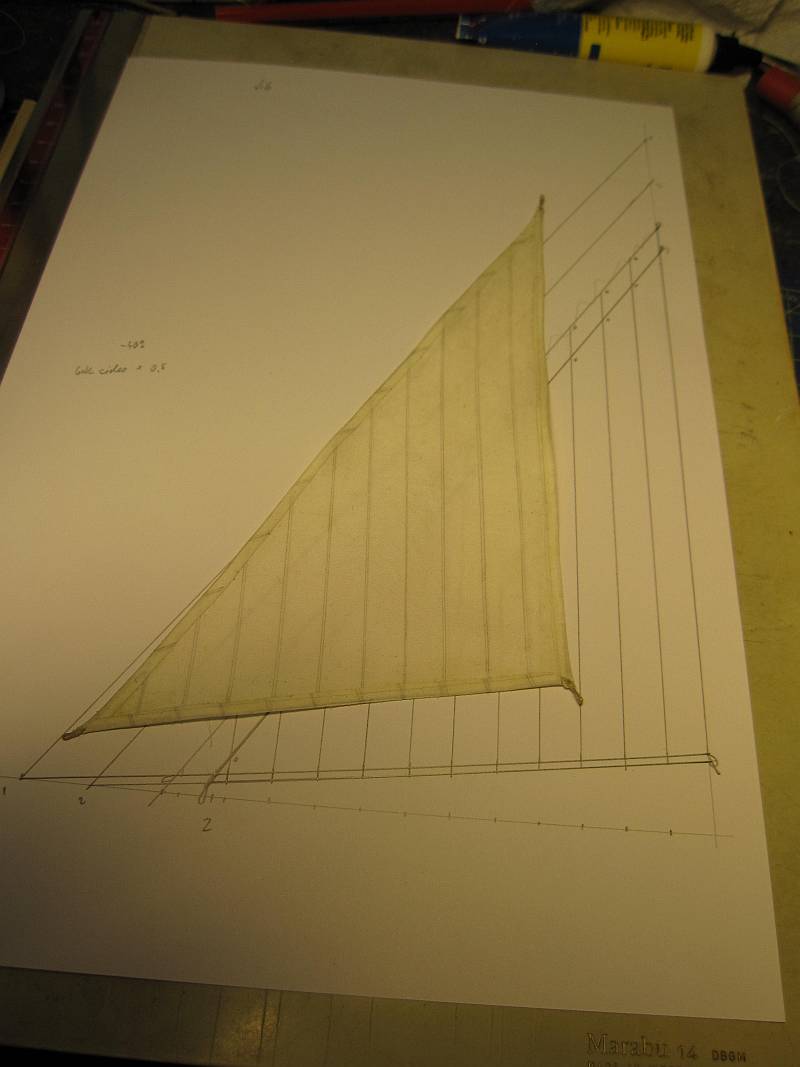
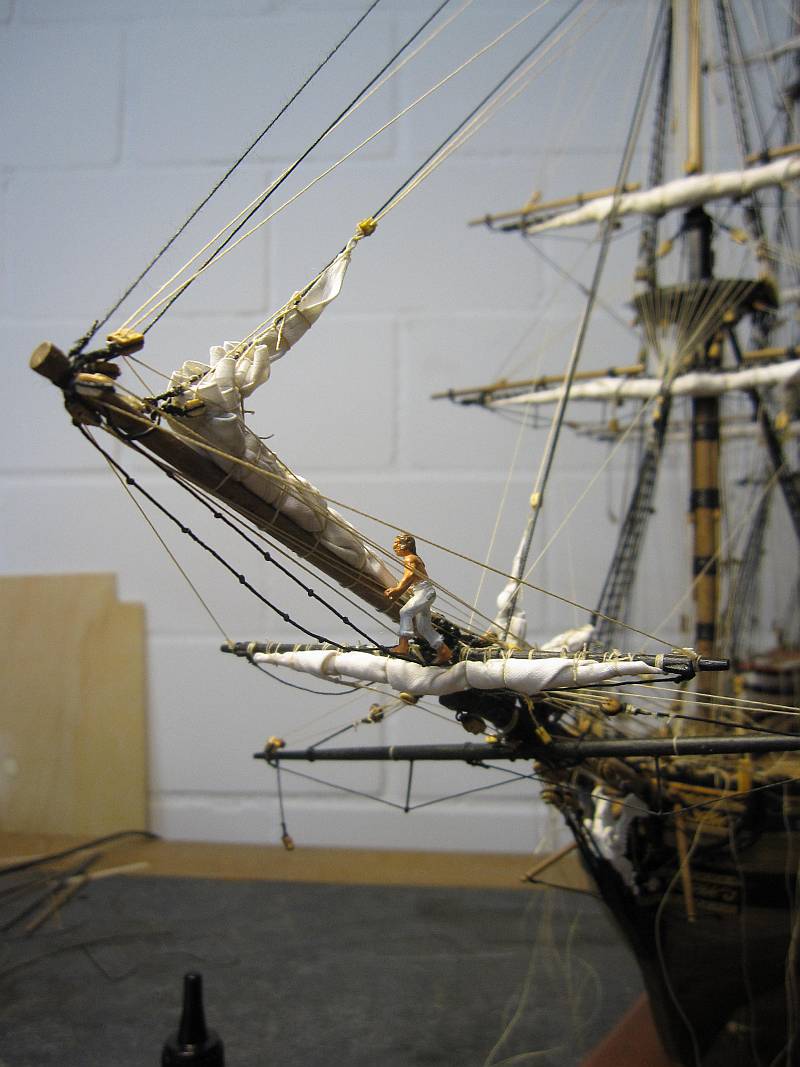
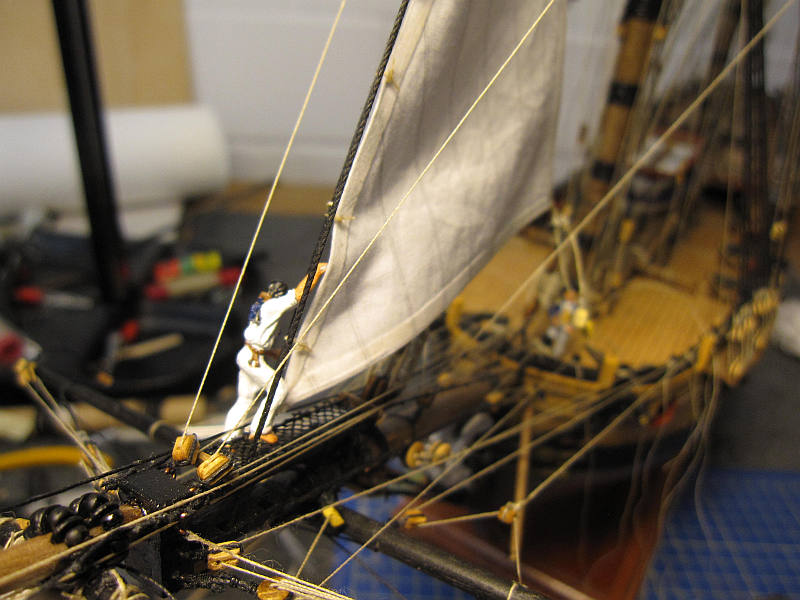
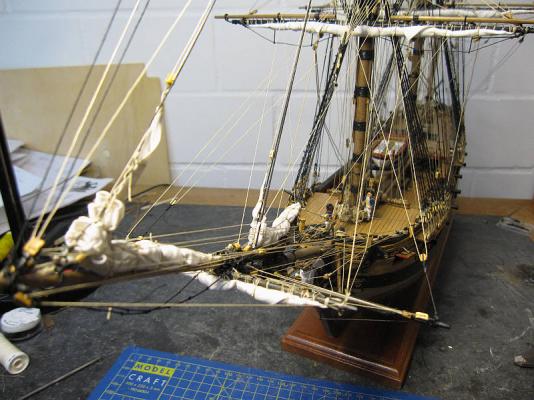
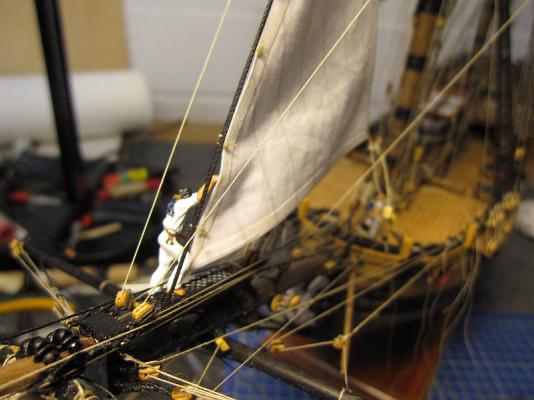
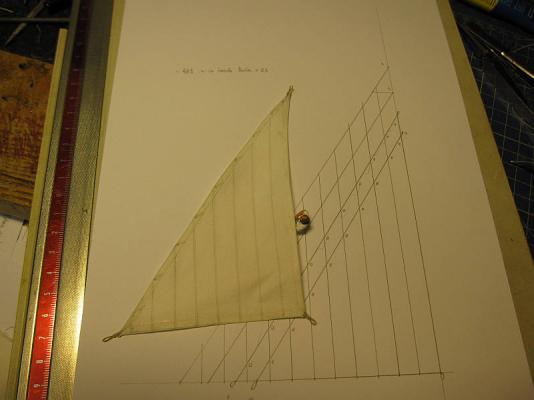
Now the first of the staysails, the fore topmast staysail was made. For the dimensions I used the data in Lees. The result was checked on Pegasus and in comparison to the proportions on HMS Pandora according to the book of the ‘Anatomy of the ship’ series. Both showed that the sail was too large. I corrected it according the proportions of Pandora’s sail. Then its size was reduced by about 40% (the sides were reduced by 20%) because the intention was again to show it furled. The sail was bent to the preventer stag and the necessary lines attached. Furling was quite tricky and after several tries the result seems acceptable for me, but I hope neither the bosun nor captain jack will have a closer look at that sail before it will be fully set the next time. The sail maker is putting in the last stitches. The four different sizes in the drawing are: First full size according Lees, full size according Pandora’s proportions, reduced first size, reduced smaller size – final version. The sail is being bent to the preventer stag The sail seems rather small but proved to be still quite large to be stowed... Stowed sail This is not a full harbour stow ready for an admirals inspection. The sail is supposed to be ready to be used on short notice.
- 431 replies
-
- 9
-
-
- pegasus
- victory models
- (and 1 more)
-
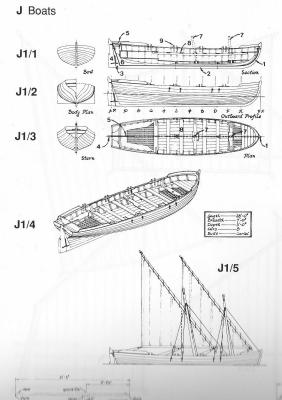
Hi Nils Your proposed sailing equipment for your boat looks good to me. In ‘Anatomy of the ship Pandora’ I found the following picture of a 28-foot pinnacle which confirms your disposition. Pandora was built in 1779 and I use her occasionally as reference for Pegasus. If you allow a small critical comment: I think the rudder looks a bit to heavy compared to the graceful rest of the boat. But perhaps it’s only a question of the perspective. Cheers Peter
-
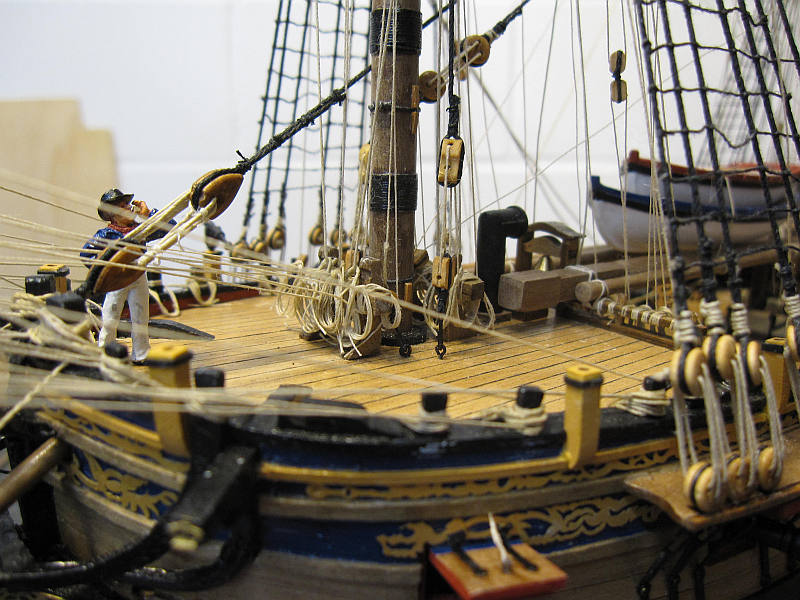
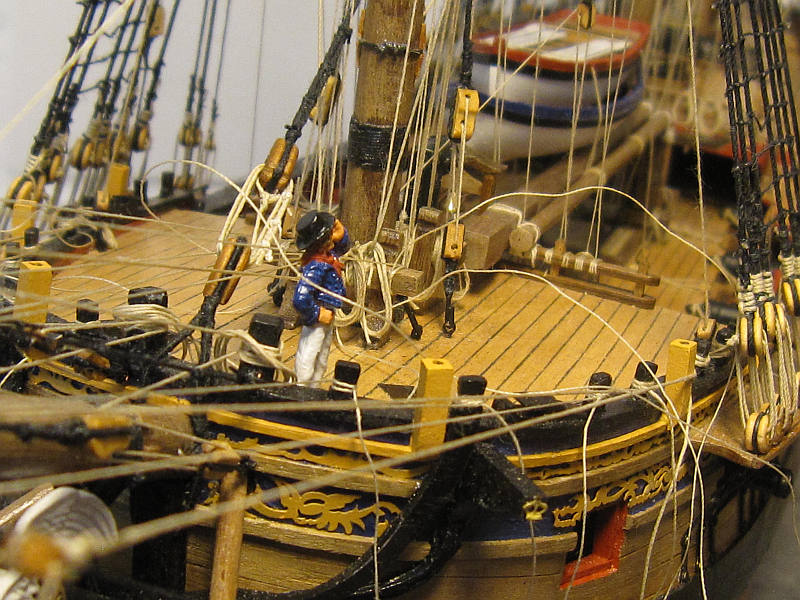
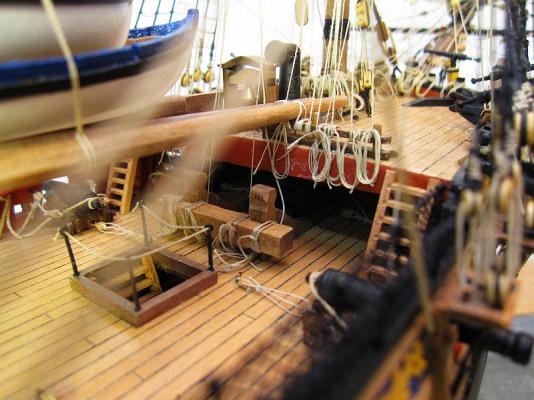
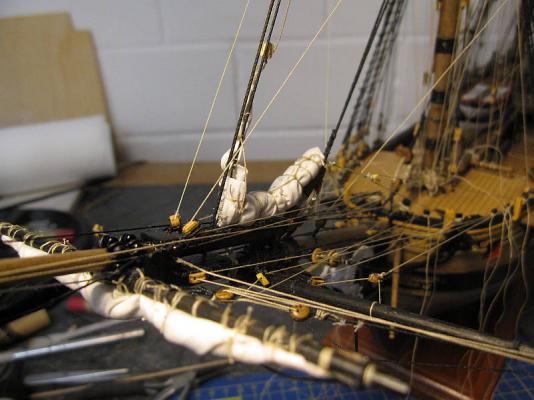
Hi B.E. Yes, your solution looks good – in every way. And all the best wishes for you and all in this forum. Thank you Nils. But those pictures only show half the truth. The other half looks like this… (No wonder the bosun is quite beside himself shouting for right seamen to clean up that mess.) Merry Christmas and a happy new year! Peter

- 431 replies
-
- 2
-
-
- pegasus
- victory models
- (and 1 more)