flyer
-
Posts
1,016 -
Joined
-
Last visited
Content Type
Profiles
Forums
Gallery
Events
Everything posted by flyer
-
Hi John From a complete landlubber to somebody who lives at least a lot nearer to a coastline: I understand you very well. But I'm afraid that you have to learn the ropes a bit. However it's made easier by the fact that it's actually a kind of a matrix: - you have the masts: fore, main mizzen - you have the floors: ground floor, topmast, topgallant mast, royal - you have sails: - square sails with top(head), sides(leach) and underside(foot) - fore-and-aft sails with uppermost corner(peak), head, upper corner on mast(throat), mast side(luff), lower corner on mast(tack), foot, lower aft corner(clew) and aft side(leech) - you have the yards: basically named as the sails On each yard and each sail you have the same kind of lines. - yards: lifts to hold them up, braces to turn them, truss and sling to fix them - square sails: sheets to hold the lower corners(clews), clew lines to pull the clews up, bowlines to pull the sides of the sail forward, reef tackles to lift the sail towards the yard for reefing - fore and aft sails: vangs to fix the gaff(replaces the yard), brails to pull the sail towards gaff and yard Of course there are about a zillion more but those above should cover the most important. And if you know one rig, you know them all. I often find the books of the 'Anatomy of the Ship' series quite helpful. If you find one of a vessel which is close to the one you are building (perhaps Alert or Granado) it may help to see how those lines work together on a specific ship. And if I'm completely desperate I find some solace in Patrick O'Brian's Stephen Maturin and his never ending struggle with the incomprehensible language of the sailors. Cheers peter PS Yes, Wolfram zu Mondfelds book is a gem. But I have the German original and therefore the happiness to struggle with those expressions in two different languages!
-
 Hi Nils I'm sorry to hear about your health problems. As you must avoid lifting heavy loads it will indeed be difficult to work on your iron behemoth. Another reason to get well soon. Gute Besserung! peter
- 2,625 replies
-
- 5
-

-
- kaiser wilhelm der grosse
- passenger steamer
- (and 1 more)
-
Jason and B.E. - thank you. Martin, don't underestimate sailing conditions in Switzerland. On some lakes they got winds up to 80 kts. Winds blowing across the alps and through the valleys can get quite strong, sometimes aided also by a Venturi effect caused by high mountains framing the lake. John and Spy, thanks for the compliments Looking through Lees' 'The Masting and Riggging of English Ships of War' and Harlands 'Seamanship in the Age of Sail' I find that furling the spanker or gaff by lowering the boom wasn't always practiced. Depending on size of the ship (and boom), the wind and how fast the sail should be available it seems they also could brail in a 'boomed' sail. (See Lees' page 113). Harland mentions the possibility to leave the gaff hoisted in harbour for example if you wanted to fly the ensign(!). John, thanks again for the picture but fortunately there is more than one way to furl a gaff sail. Spy, hoisting an ensign seems enough to justify a hoisted gaff. Thank you for the likes peter
- 293 replies
-
- 2
-
-
- pickle
- caldercraft
- (and 1 more)
-
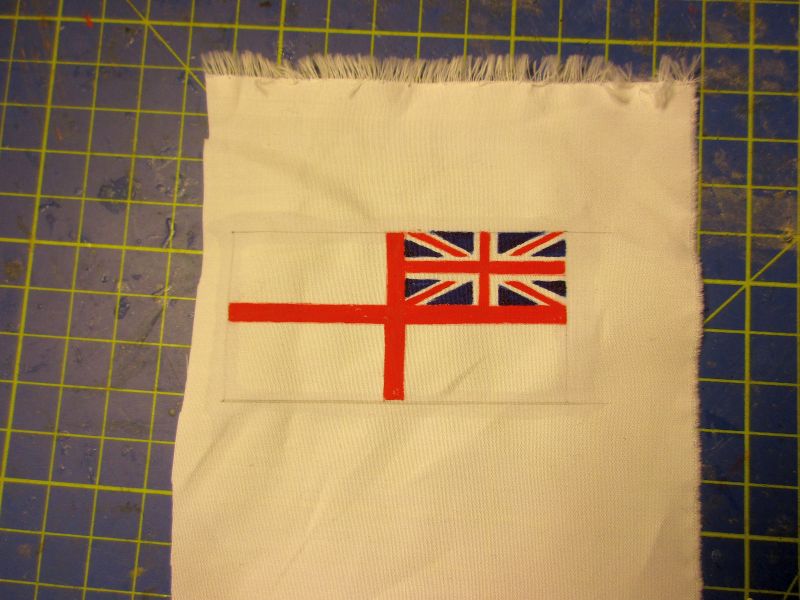
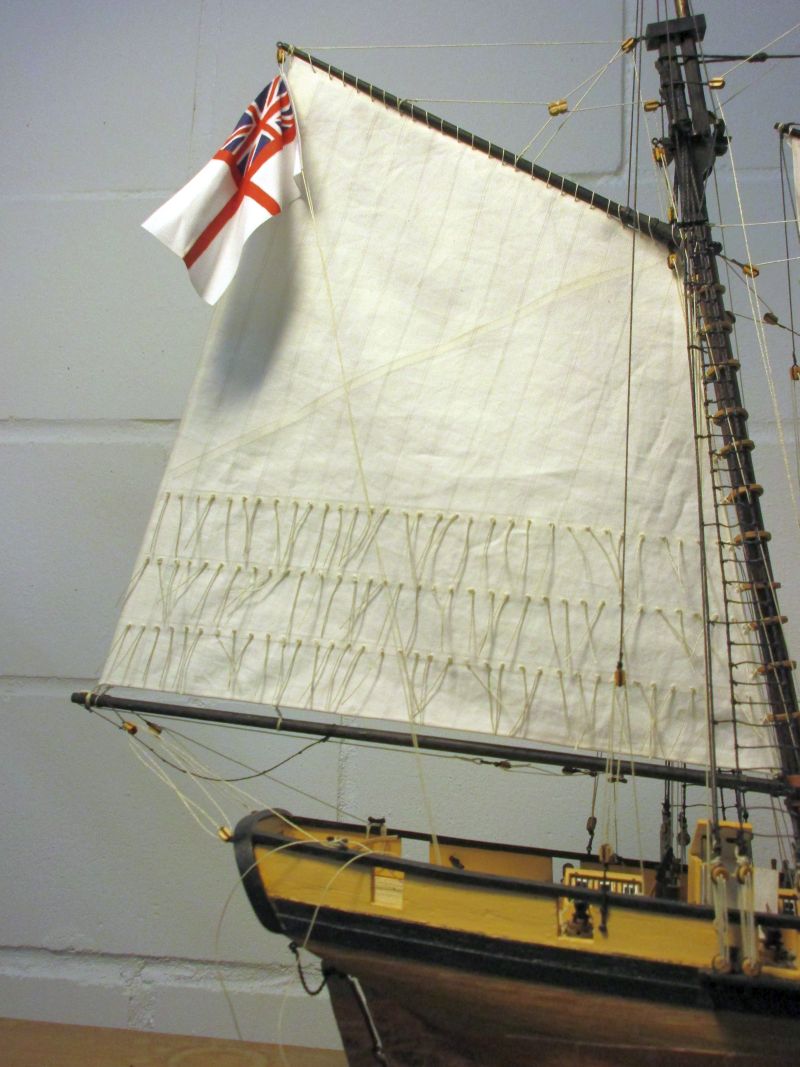
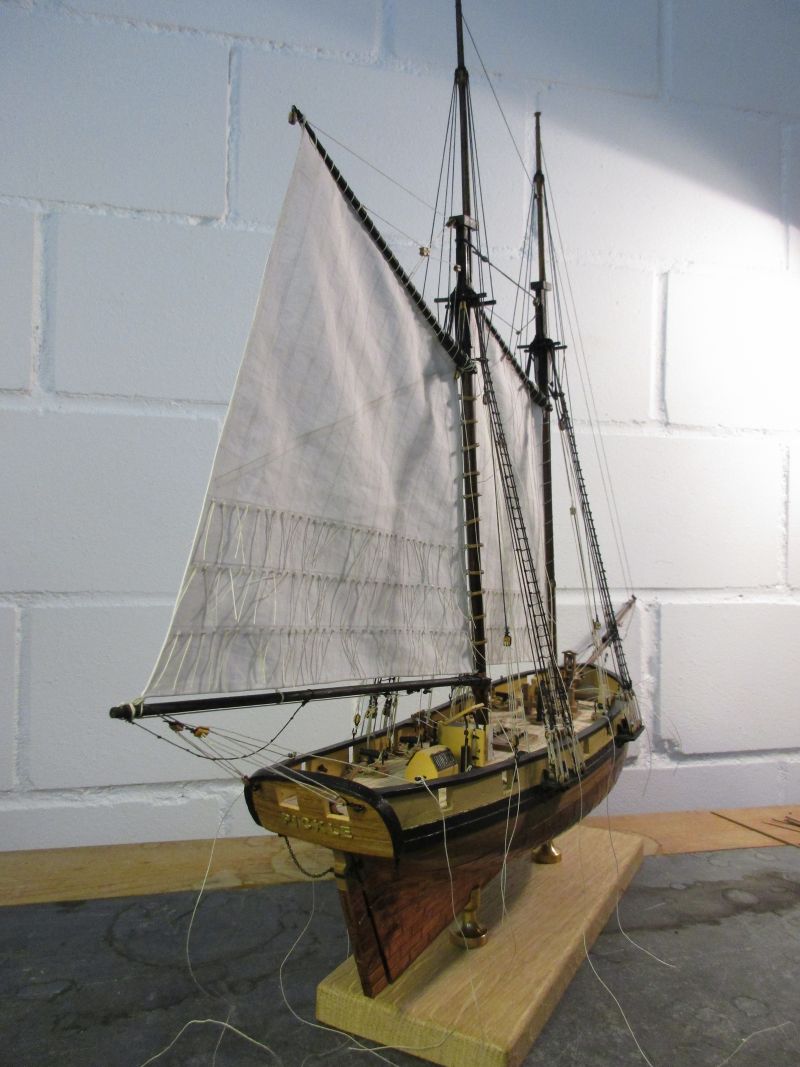
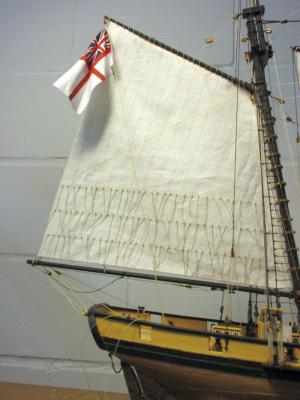
Showing the flag As a little brake in sail 'stitching' I made and set the flag. Pickle probably started her marine life under the blue ensign while being on the Jamaica station but apparently all ships present at Trafalgar flew a white ensign. So, a white ensign it had to be and of course the one used after 1800 with the cross of St Patrick included. I hand painted (here I really was glad that the Welsh dragon was never included in the union jack) the flag on the same but untreated cotton I use for the sails. The inaccuracies of the painter will hopefully be masked by the folds of the flag, hanging almost limp in a very light breeze. I wasn't sure if I would have to set it on the windward or lee side but opted for the first as the view onto starboard will be the favoured one with the sails set for the expected breeze from this side. Both running ends of the flag line are therefore belayed on the starboard side. both sides of the flag are hand painted

- 293 replies
-
- 10
-
-
- pickle
- caldercraft
- (and 1 more)
-
Congratulations Frank - very clean and crisp 'dirty' work created a beauty. BTW - how did you fix the staysails on the stays? Metal rings? Cheers peter
-
Hi B.E. Thank you. For the roach I just tried a depth of about 1,5 times the width of a cloth, an average value measured in several drafts of schooners under sail. This would be about 3 feet and coincides nicely with Lees' chapter about sail making. Trials with the paper sail showed that it works. The sail still would chafe a bit on the stay - something that would ask for crowfeet on a larger ship. Unfortunately the paper sail trials concealed the fact that the sail was a bit too long for the position of the already established crossjack and I had to re-rig it (or remake the sail). Congratulations on your new working space. I bet, a lot of modellers in this forum now know what to wish for next Christmas. But how you will bring yourself to make some dust there, I cannot imagine. BTW what did you use on the floor? In my workspace I have cork and I did swear a thousand times, while crawling on it and searching for a tiny dropped part, that the next floor would be in a smooth clinical white. peter
- 293 replies
-
- 1
-
-
- pickle
- caldercraft
- (and 1 more)
-
Hi Nils Thank you. Now, after setting up just one square sail with most of its lines, I really can appreciate the huge amount of sisyphusian work you did on your Pegasus while setting up dozens of them! Frank, Thanks a lot. Tony, Nice comment. Thank you. peter
- 293 replies
-
- 2
-
-
- pickle
- caldercraft
- (and 1 more)
-
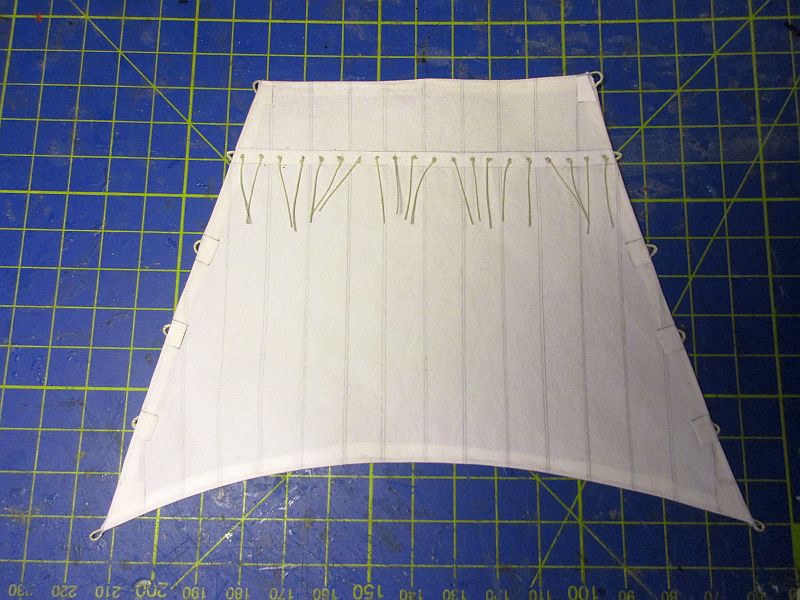
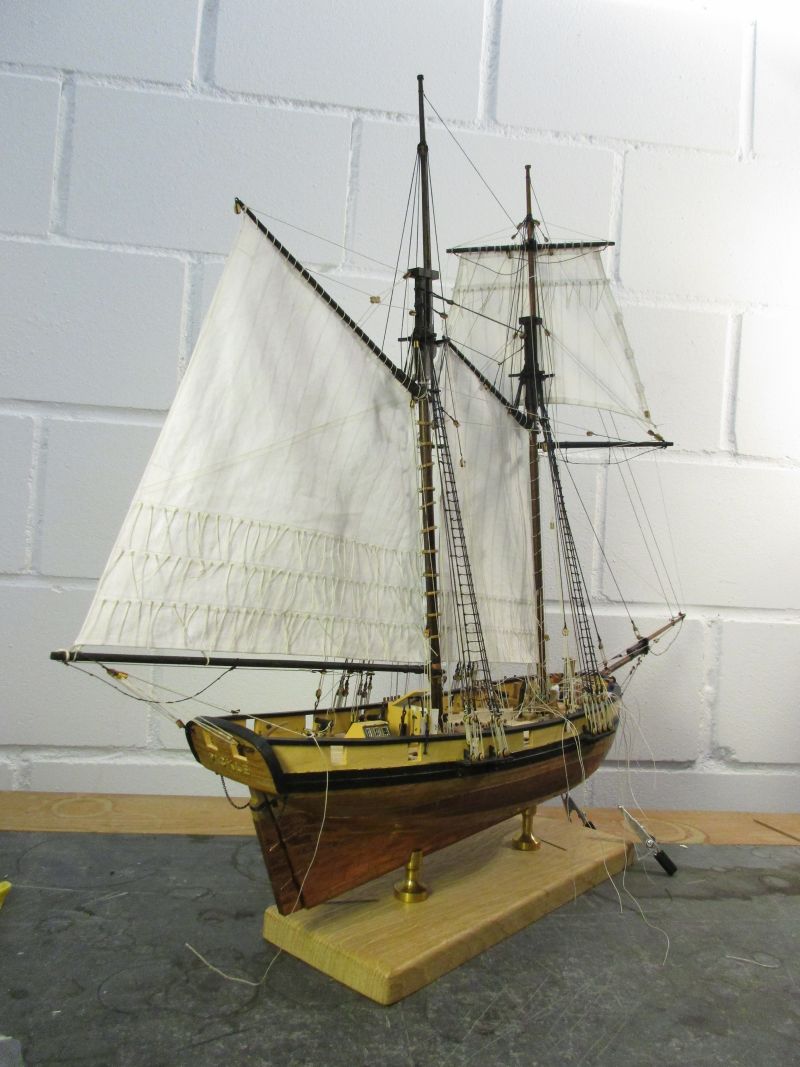
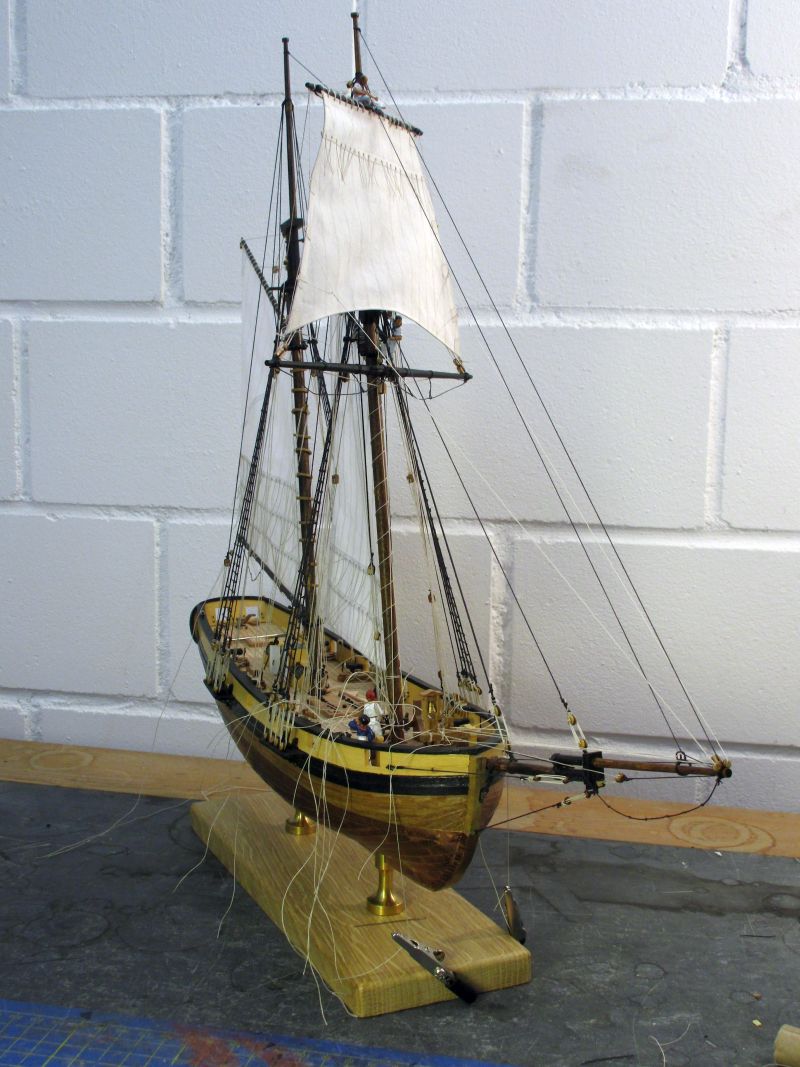
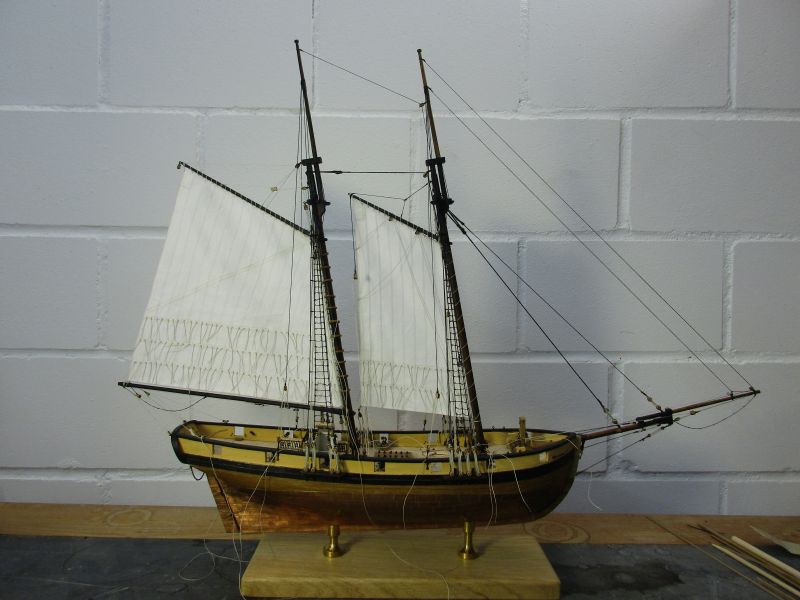
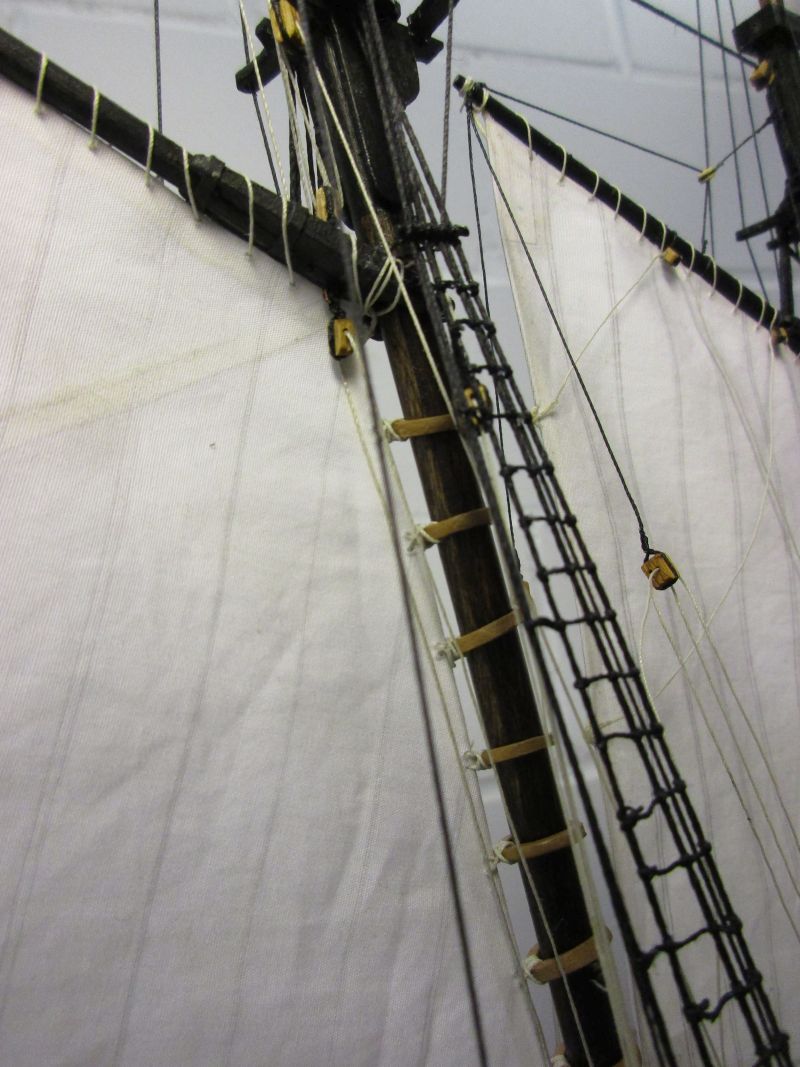
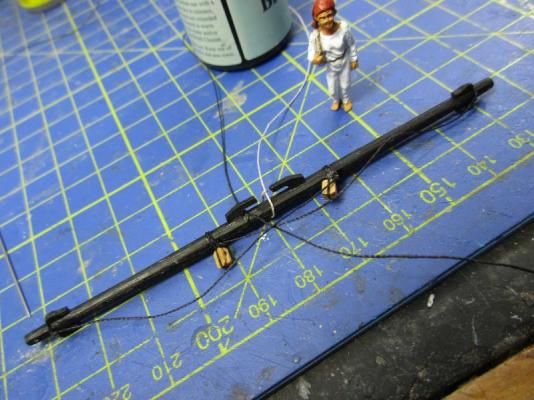
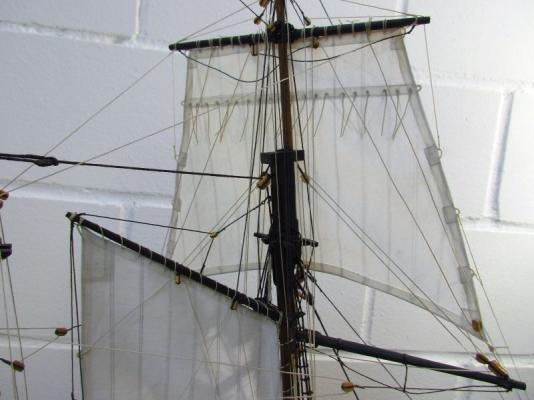
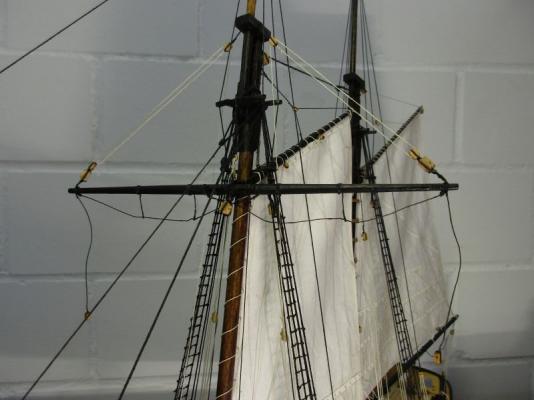
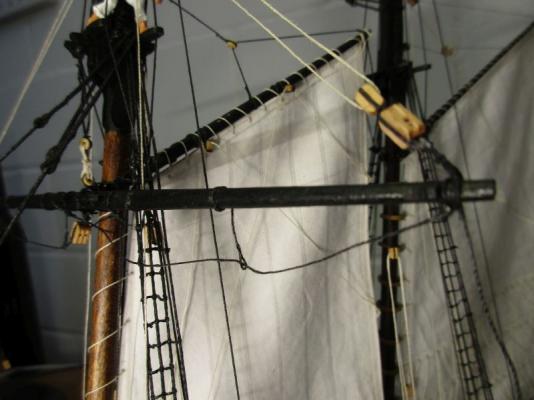
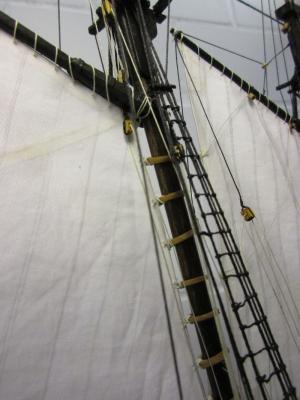
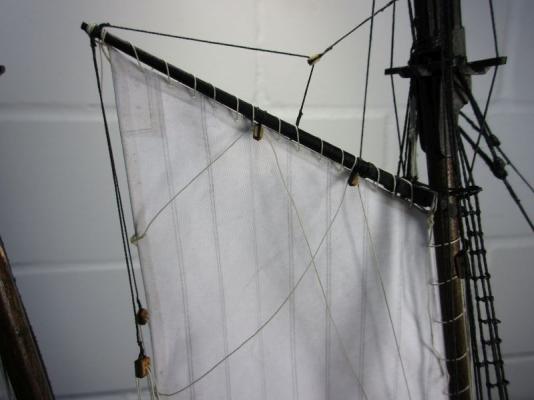
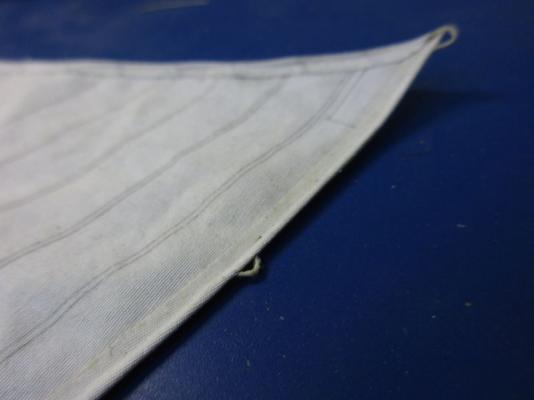
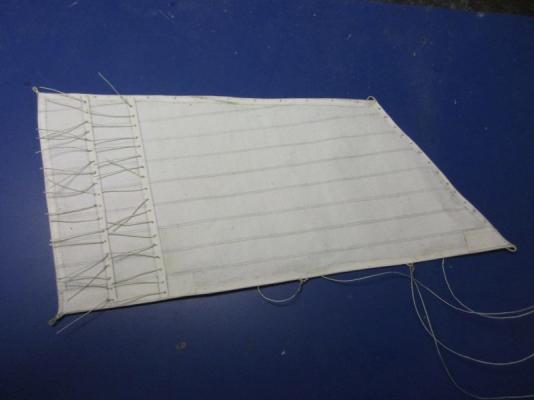
The topsail - a long story The topsail proved to be the most complicated sail to make so far. The concave foot of the sail was drawn free handed and the resulting glued seam shows it a bit. I added bowlines and reef tackles to the kits clew lines, sheets and braces. Lifts and tye were installed as per instructions. The strange parrel however was changed to double rows similar to those on Pegasus. The topsail yard got some simple horses and was, as far as possible, prepared with the necessary lines. The sail was bent to the topsail yard and hoisted - only to find that it was a bit too large. I had to lower the crossjack yard a few mm and to re-rig the sling , truss and the sheet and lift blocks in the process. The sail still looks a little large compared to the usual illustrations of schooners but for all that effort it needed to set up that piece of cloth, I want my skipper to really get some extra thrust out of it. The yards are braced to port a bit as explained above. The reef tackles lead up through holes in the outer yard ends, through small blocks in a span at the mast head and are belayed on the foremost capping pin rail. The bowlines presented a problem. One usual method was to lead them through the outer sheaves of a triple block on the jibboom end. My intention was to replace the kits single block with a treble one but several laborious attempts of my carpenter to make one failed spectacularly - mostly braking apart at the holes. Then the same carpenter reminded me of the alternative method to set up topgallant stay and bowlines via a treble thimble strap and we decided to combine the single block with a double thimble strap for the bowlines. My excuse for this perhaps unorthodox mix is Marquardt's statement that no other rig was as individual as that of the schooner. Double bridles were applied to the sail and the bowlines led via my reliable wooden thimbles to my pin rail on the bowsprit step. They will be definitely belayed only after setting up all the stay sails. There is still some stowing of loose ends to do before starting on those stay sails. I've got the feeling that the effort and time to set up the topsail was about three times that of any fore and aft sail. If this compares to the prototypes, I see now another good reason to rather use fore and aft sails on smaller vessels with a relatively small crew or on modern yachts. topsail the sailmaker sets the last few stitches topsail yard is ready block and thimbles arrangement on the jibboom end topsail hoisted Pickles topsail may be a bit large


- 293 replies
-
- 6
-
-
- pickle
- caldercraft
- (and 1 more)
-
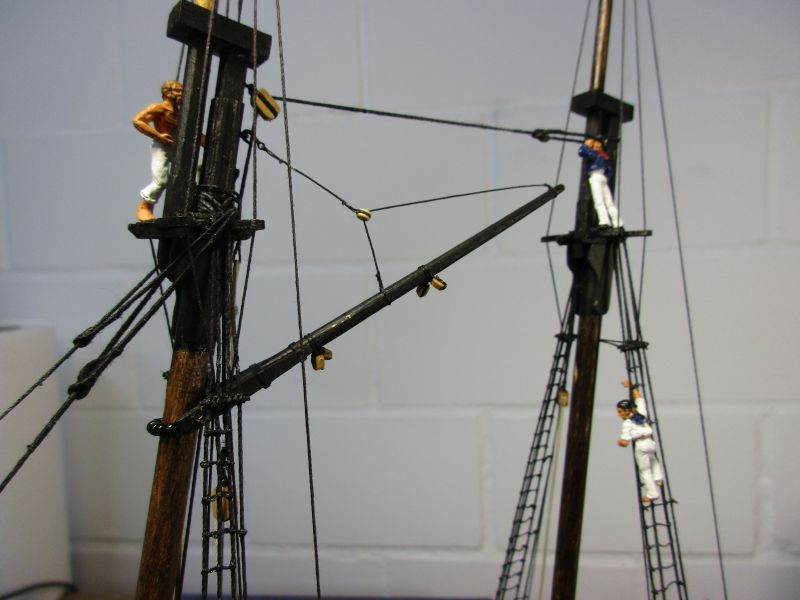
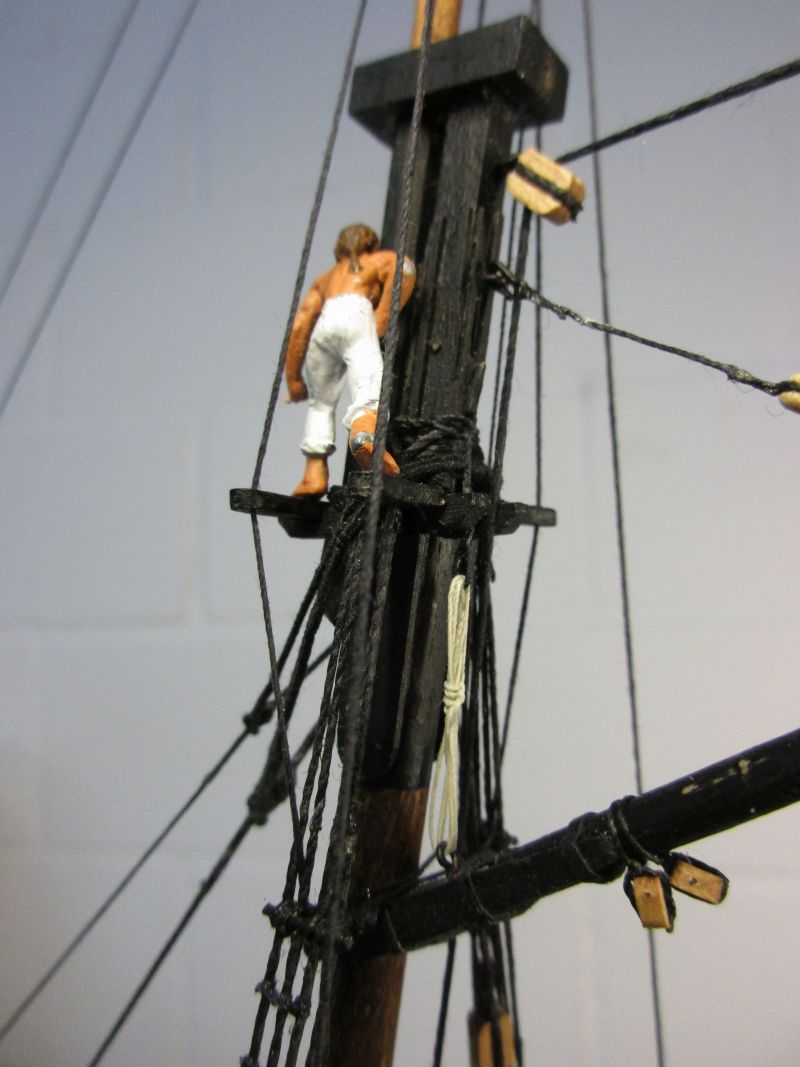
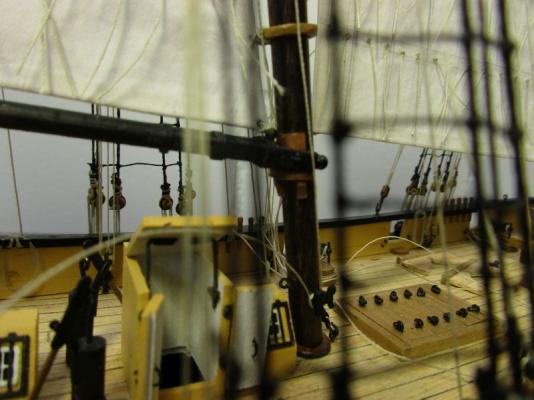
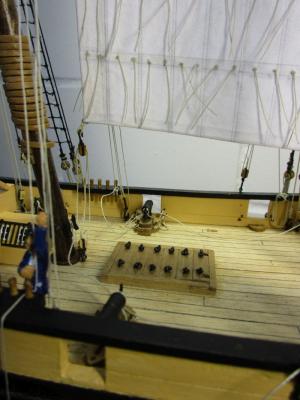
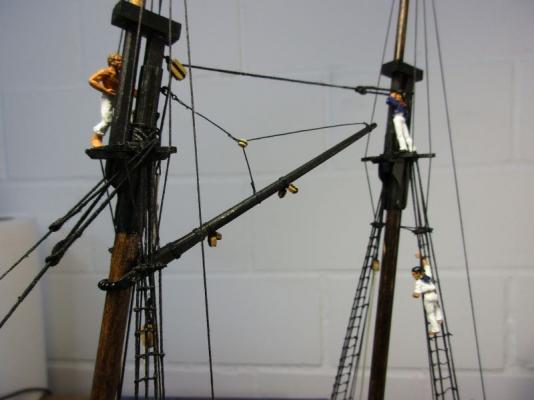
The fore yard (similar to a crossjack) was now prepared. Generally I followed the manual. Only for the lift I used two of my wooden thimbles to set up the lanyard. Sometimes I needed to check the setup in Lees' book. The manual could use some additional pictures here, e.g. for the sling. For the stirrups of the footropes I used the same 0,25 black thread as for the footropes themselves. The manual asks for some wire but I find B.E.'s solution much better - but definitely not easier to make. The yard will later be braced about 30° to port, depicting a situation of a becalmed Pickle ready to catch a breeze somewhere from the starboard. (The master said it will certainly come, he can feel it in his bones.) There is quite some fiddling work to do for the fore and the fore topsail yard. I only hope that bit of additional thrust Pickle will get from the fore topsail will be worth all that work for setting up, handling and maintaining those two yards. The yard is ready. The prepared sling lies on the left. yard installed detail with the sling
- 293 replies
-
- 9
-
-
- pickle
- caldercraft
- (and 1 more)
-
Hi Tony Truly great looking sail! As we are more or less at the same stage of our respective builds, it's quite interesting to compare modelspan and cotton sails. On my Pickle I was too lazy to form the lower edge of the main sail and the reef bands in a curve. I read somewhere that you hardly notice the difference once the sail is hoisted. I'm quite happy with the result of my shortcut but of course yours is the real thing. About your Sherbourne's windless sails: Sailing ships quite often were and are becalmed. While you could use engine power today you had just to wait it out then. So I imagine my Pickle on a beautiful Sunday morning, lying there on a calm empty sea, with all the sails ready to catch that breeze, the master said, he can feel in his bones to come up. No Elysium yet. Cheers peter
- 269 replies
-
- 2
-
-
- Caldercraft
- First build
- (and 3 more)
-
Trying to find out how to set all the jib sails I noticed that the fore stay seemed to lead too far out onto the bowsprit. When changing the bowsprit proportions I didn't change the fore stay accordingly. Moving the attachment point about 20mm inboard provided a better spread of the stays and their sails and also a more harmonic picture. old distribution of stays fore stay adjusted
- 293 replies
-
- 7
-
-
- pickle
- caldercraft
- (and 1 more)
-
John, some Swiss people are nice and peaceful. I do not yodel and neither do I practice any other of the martial arts. Thank you Martin. Looong time ago, during my 4 years training as a mechanic, I heard some quite different comments about my craftsmanship. But wood and fabric are more forgiving than iron and steel. And Yes, I definitely love the lines and proportions of my Pickle. It seems that relaying on the Adonis plans and Marquardt's book for improvements was a good idea. Cheers peter
- 293 replies
-
- 1
-
-
- pickle
- caldercraft
- (and 1 more)
-
Hi John Nice work. In my experience you don't need to make extra gaps between the planks. If you use a rather viscous, water - based paint, like Admiralty paint, you will still see the individual planks. peter
-
Thank you, Nils. Again I have to emphasize how much I could profit from ideas found in MSW. It's a great enhancement for our hobby to have such a great forum and I want to thank all those doing much good work behind the scenery. Hi Joe Thank you. I like them myself and only hope that textile glue will hold through all the storms lying ahead. Hi John Out of curiosity I translated wow with my online dictionary and got 'Tonhöhenschwankung' which could be translated back as pitch oscillations. Are you criticizing my singing? Seriously - I had the same question as you and therefore put that horse onto the boom. Do you have them on modern yachts? Cheers peter
- 293 replies
-
- 3
-
-
- pickle
- caldercraft
- (and 1 more)
-
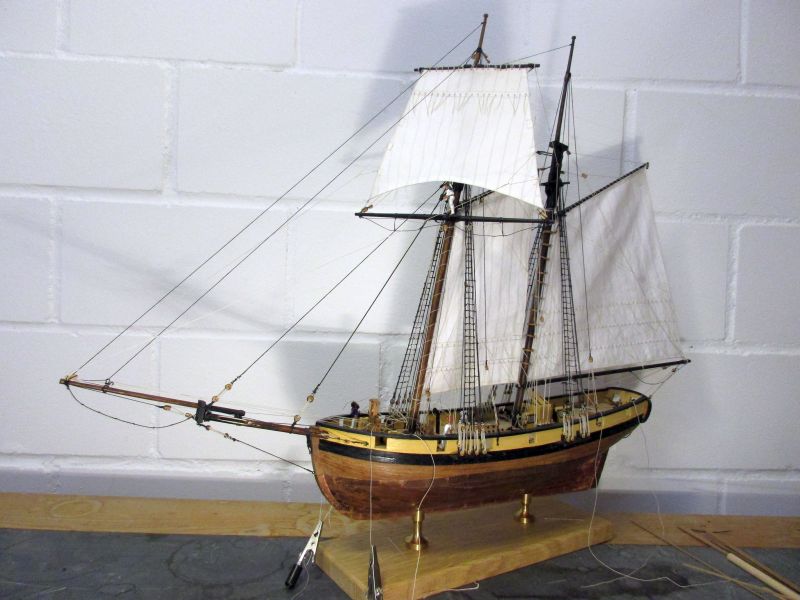
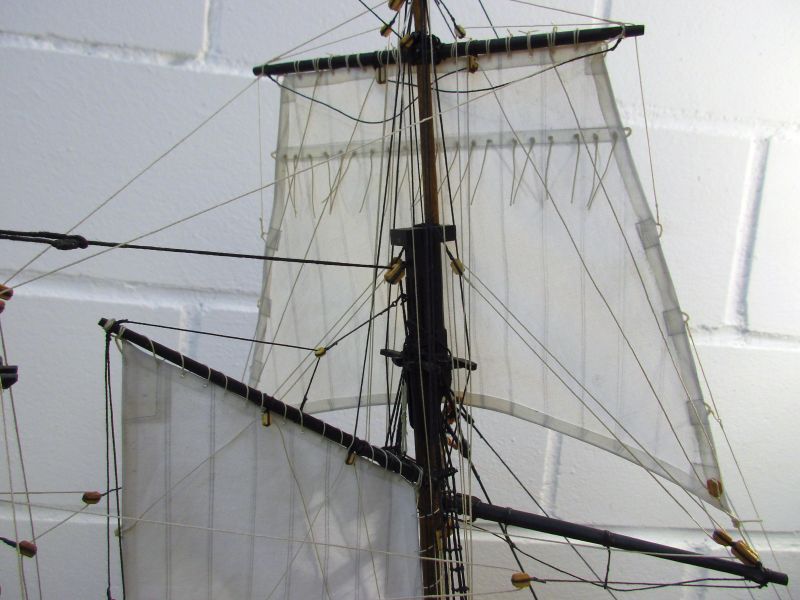
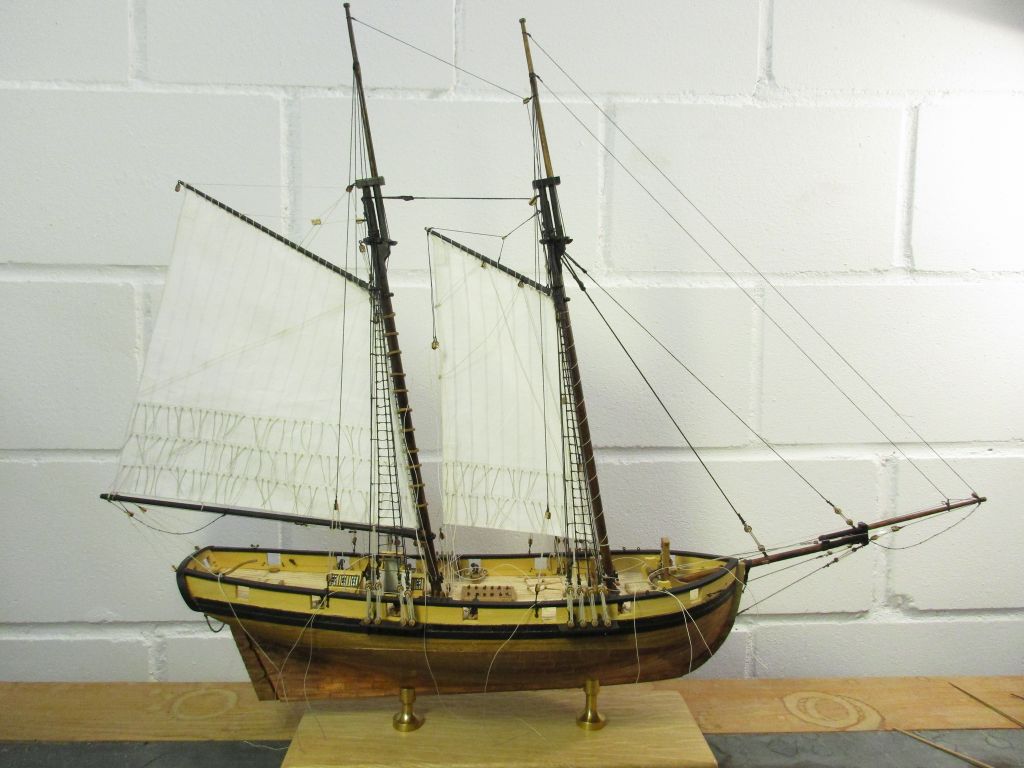
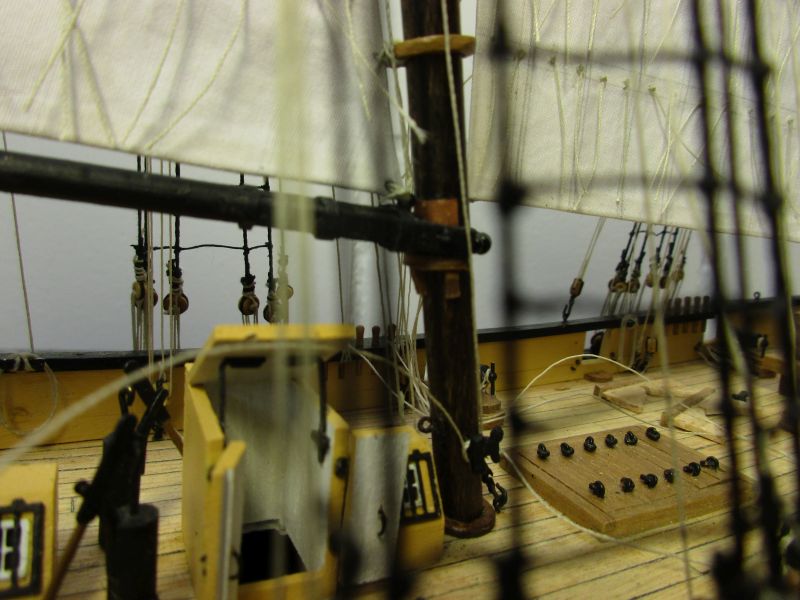
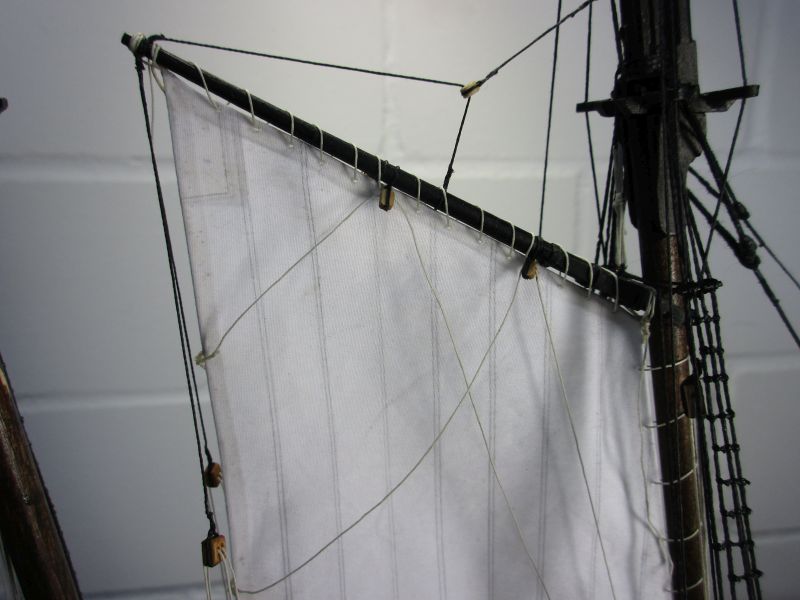
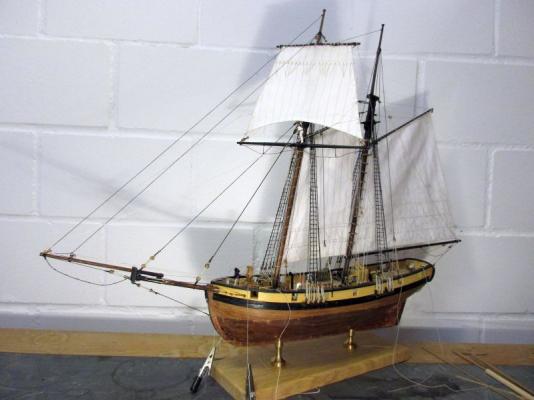
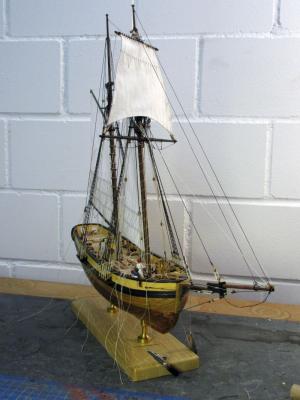
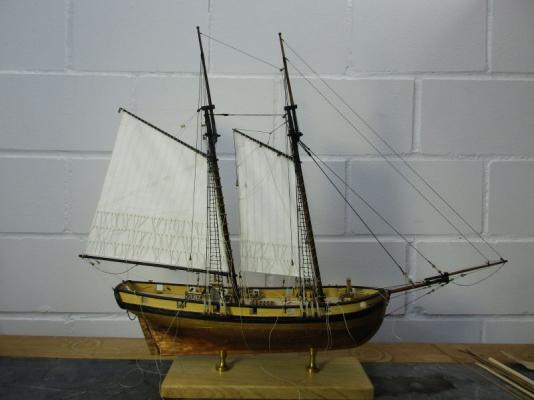
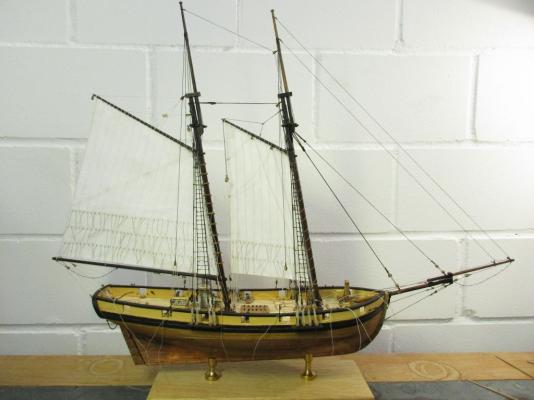
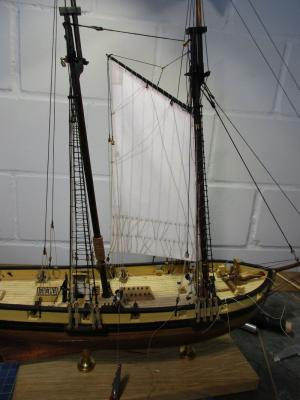
The gaff sail (I think in a schooner it's called main sail) is finished and installed. To find the correct size of the sail I had to install the gaff first and take measurements on the model. With a paper sail the size was then checked - and of course had to be corrected again. The sail itself was made similar to the fore gaff sail. I was a bit unsure about cringles on the reef bands, but I thought that reefing a 'boomed' gaff sail would simply be done by lowering the gaff according to the reduced sail size and binding the reef points around the boom. So, no special reef tackle would be needed. Attachment of the sails head to the gaff and of the leech to the mast hoops was done according Marquardt's book. The tack was lashed to the boom. The sheet is taken through a hole on the end of the boom and then fixed to a eyebolt on the underside of the boom with a hooked-in tackle. The running end of the tackle belays to a cleat on the underside of the boom. The boom has a horse on the part overhanging the taffrail. A simple down hauler, consisting of a block on the underside of the gaffs throat and a line leading from the eyebolt used to lash the tack through that block and to a cleat on the foot of the mast, helps with the lowering of the gaff. The block for the flag line is set with an eyebolt onto the end of the gaff. the large main sail is hoisted boom detail with horse boom with sheet tackle throat of boom and mast foot detail with mast hoops and down hauler


- 293 replies
-
- 8
-
-
- pickle
- caldercraft
- (and 1 more)
-
Just had a look on the situation on my Pegasus. It will be tricky with your larger (but beautiful pumps) but should be manageable with your nimble fingers. Cheers peter

- 467 replies
-
- 3
-
-
- fly
- victory models
- (and 1 more)
-
Thank you, B.E. Hi John Great link, great pictures and mouth-watering offers. Thanks. Hi Spy Thank you for your feedbacks regarding those CA - problems. My first idea was: Point taken. Be careful when talking about great children to your offspring - you could get what you're asking for. Thinking again I must say that you are right. Those are definitely no glass-case models and need dusting occasionally. But I'm afraid that PVA isn't strong enough to hold a simple knot around a block and that the strop may slip. Do you use any additional fixations with thin thread? I really appreciate the likes from all those accomplished model makers. peter
- 293 replies
-
- 1
-
-
- pickle
- caldercraft
- (and 1 more)
-
Most elegant. 75 years before 'Porsche design' was founded a masterpiece of function and design arises (and that's only the prototype).
- 2,625 replies
-
- 7
-
-
- kaiser wilhelm der grosse
- passenger steamer
- (and 1 more)
-
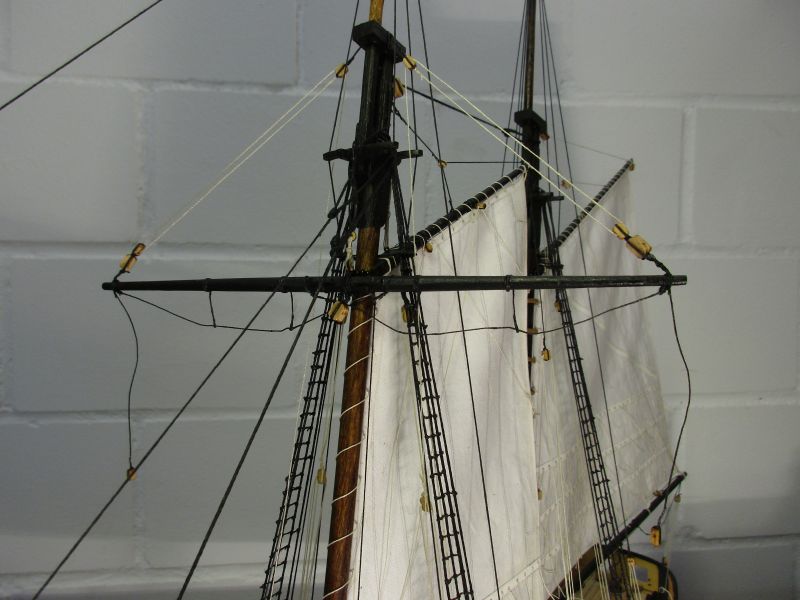
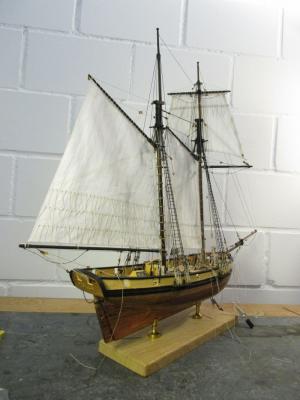
Following the hint of SpyGlass I will fix the future 'splices ' with PVA instead of CA glue. The sail is hoisted and looks approximately the way I hoped. Two pairs of brails are secured to two additional cleats on the fore mast. The tack is lashed to the centre ringbolt behind the fore mast with a thimble. The sheet consist of a tackle with a double and a single block, hooked into the clew and a ringbolt in front of the main mast. The vangs are set up as per manual. The gaff is positioned slightly to port, depicting a situation with a light breeze somewhere from the forward starboard quarter. Yards, boom and main gaff will be placed accordingly. fore gaff set the gaff is pulled to port by the vangs the running end of the sheet tackle belays to an additional cleat on the mainmast fore mast with tack lashing and provisionally belayed brails
- 293 replies
-
- 8
-
-
- pickle
- caldercraft
- (and 1 more)
-
Hi Spy Sure, I was stumbling over those abbreviations again. Thank you for the input regarding CA and rigging. Splices will be fixed with PVA. I tried and it really needs just a few minutes to be strong enough to permit continuation of your work. One place where I will continue to use CA is for the stropping of the blocks. I keep it simple by knotting the hook or ringbolt into the required black thread and the use one simple knot to tie the block in. That knot almost disappears in the furrow on the side of the block but needs a strong fix not to come apart. Discolouring is no factor with black thread and I hope neither will becoming brittle as that piece of rope should lie inert around the block. Hi Martin It will only be a very light breeze, hardly filling the sails. Sorry, but the crew is outright unwilling to move far inland into Oklahoma and I was unable to persuade them to leave that traditional great seafarer country, Switzerland. But I'll keep trying... On the other hand you describe your only crew member as a visually impaired butcher. But he is in fact doing very fine work on your Fly and you should perhaps consider a prolonged employment. Cheers peter
- 293 replies
-
- 1
-
-
- pickle
- caldercraft
- (and 1 more)
-
Hi Nils As I'm not such a excellent seamstress as you are I had to find another way. Hi Spy Thanks. I heard before that PA'ed ropes shall go brittle. Do have any actual experience of that problem? Certainly a bit of PVA would work as well and also has the advance that in an emergency in most cases it can be dissolved and taken apart again without too much damage to the rope. I'm sometimes asking myself how the PA will age and if someday all the PA-glued planks will come apart. Cheers peter
- 293 replies
-
- 2
-
-
- pickle
- caldercraft
- (and 1 more)
-
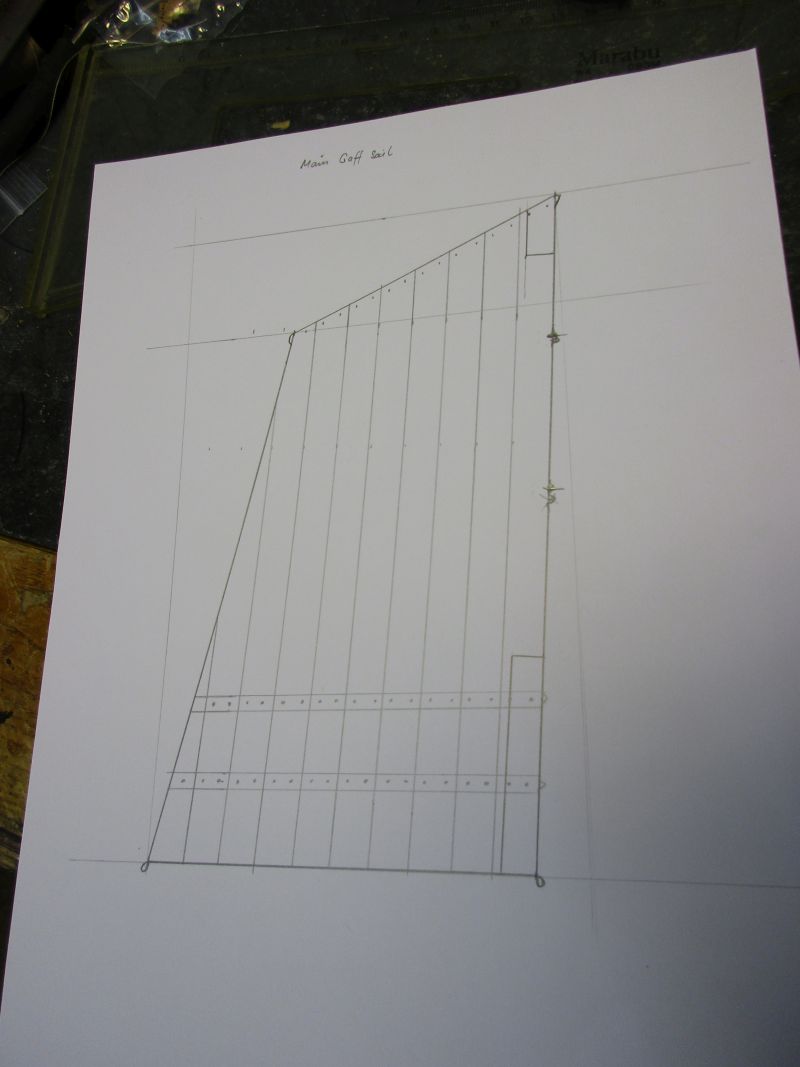
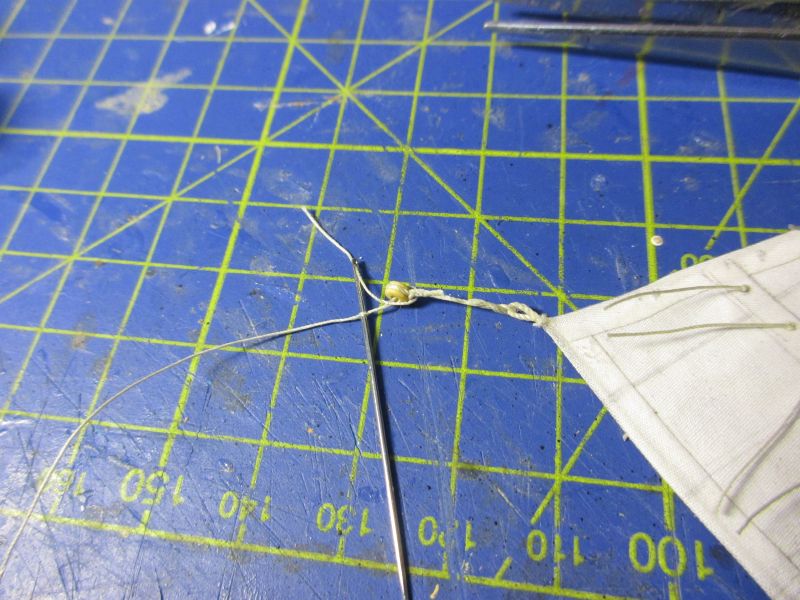
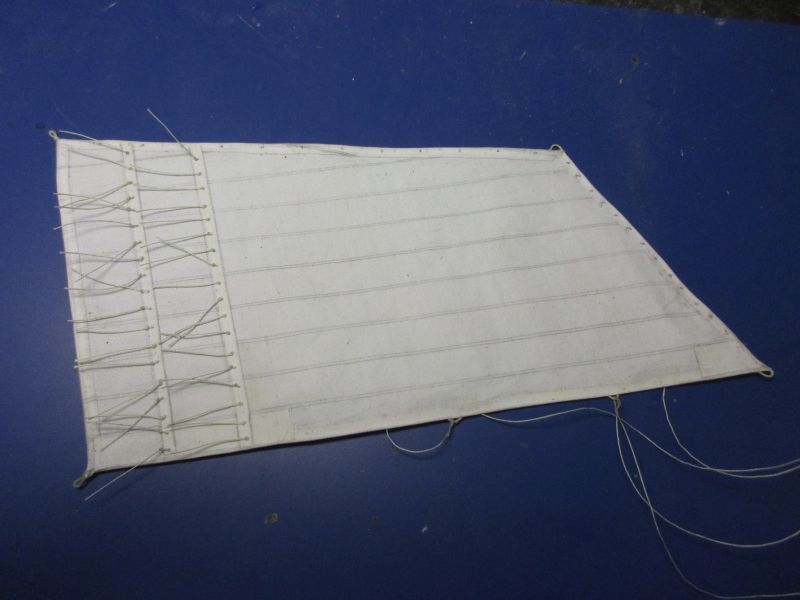
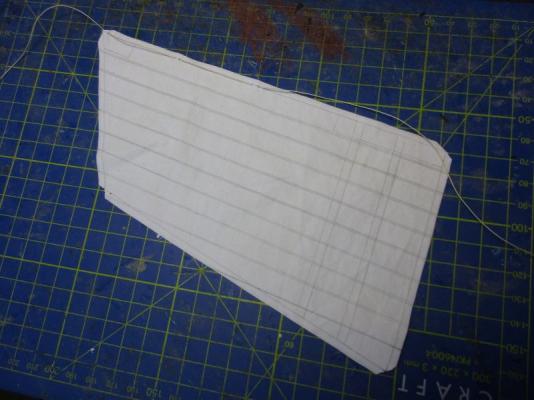
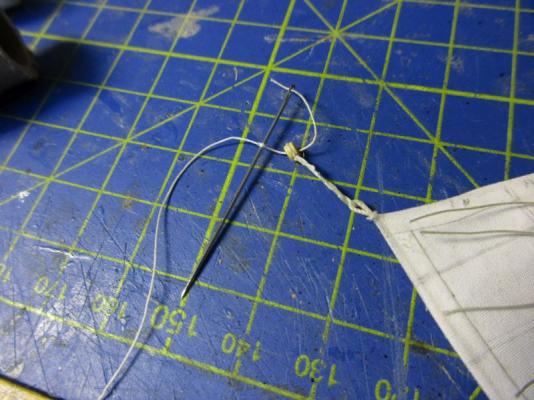
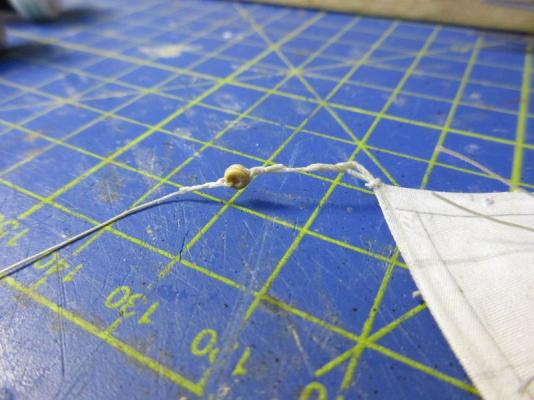
While checking the various lines on the gaff sail and their belaying points I decided to come back on that decision about the vangs. Marquardt himself isn't that clear about the Fitting of vangs with a slung gaff. In the illustrated example of a slung gaff he has vangs installed. As the manual asks for them as well and I think the whole handling of the gaff would be easier I decided to install them. vangs installed To get an attachment point for the tack lashings of the gaff sail I moved the schooner stay's tackle to the port ringbolt and prepared two more ringbolts on outboard of the three positions abaft the fore mast. gaff sail Following the positive experience I made with Pegasus' sails I will make those of Pickle the same way: - I use the finest cotton I can find. It is dyed a light brownish grey with a mixture of (very cheap) black and sage tea. Before cutting it, I brush the cutting lines with diluted glue to prevent unravelling of the edges. - Clothes seams are drawn as double lines with a sharp pencil onto the fabric. They probably will fade a bit but I think the sail maker used manila thread with a colour nearly matching that of the fabric. The seams probably did show much less than usually depicted in those laboriously stitched sails. - Doublings and reef bands are small stripes of the same fabric, glued on. - The bolt rope is glued into the seam. To form cringles and earrings I lead the boltrope through small holes out and back into in the seam in a small arc. Again the boltrope is less prominent than in other examples but when using a manila rope the colour should again blend in with the sailcloth. - The glue I use is a special textile glue which can be additionally fixed with a hot iron. -The reef lines are put on the usual way. (Hurrah, I found something nearly as tedious as knitting ratlines!) The making of that sail differs completely from the prototype, but I think the overall scaled down impression is as good as that of a stitched sail with its usually too coarse seams - and it's quite quickly and easily made. The gaff sail is now ready to hoist with brails and tack lashing attached. drawing of the sail with measurements taken from the model seams drawn, sail cut out, and first part of boltrope threaded in finished sail with brails attached detail with cringle splicing and knotting To secure all those blocks into rope ends and to secure lines around thimbles or ropes I use more and more a 'false splicing' according to a method I saw somewhere here in MSW. I pull the thread around the block or rope, thread it through itself with a needle, thread it back again a small distance farther out, adjust, fix all with a small drop of CA glue and trim the ends.


- 293 replies
-
- 5
-
-
- pickle
- caldercraft
- (and 1 more)
-
Thank you Mobbsie. Patience? What patience? Finding out how to make sails and trying new techniques while I go along is also very interesting - and sometimes even rewarding. I'm trying peter
- 293 replies
-
- 1
-
-
- pickle
- caldercraft
- (and 1 more)
-
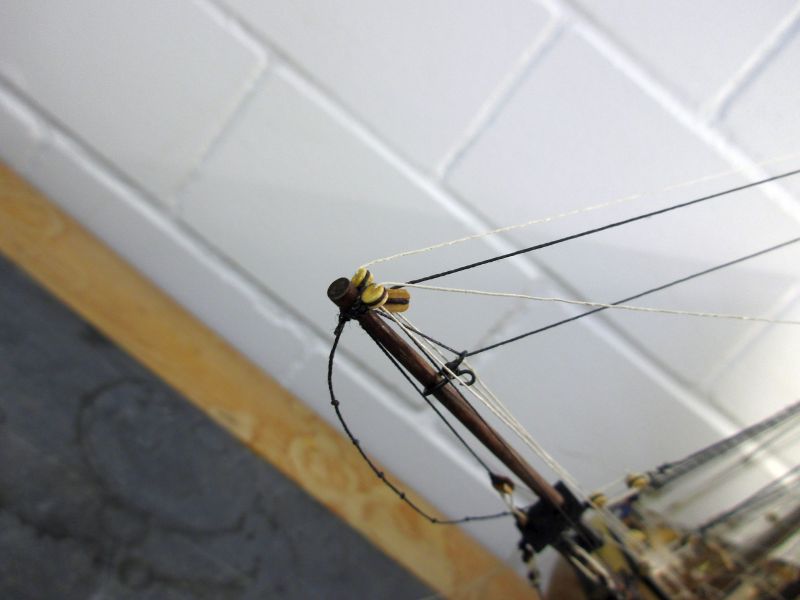
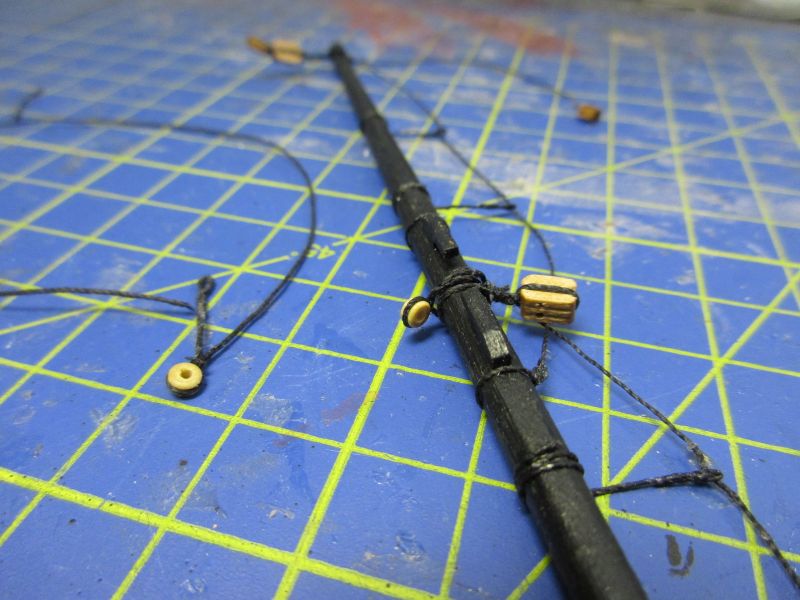
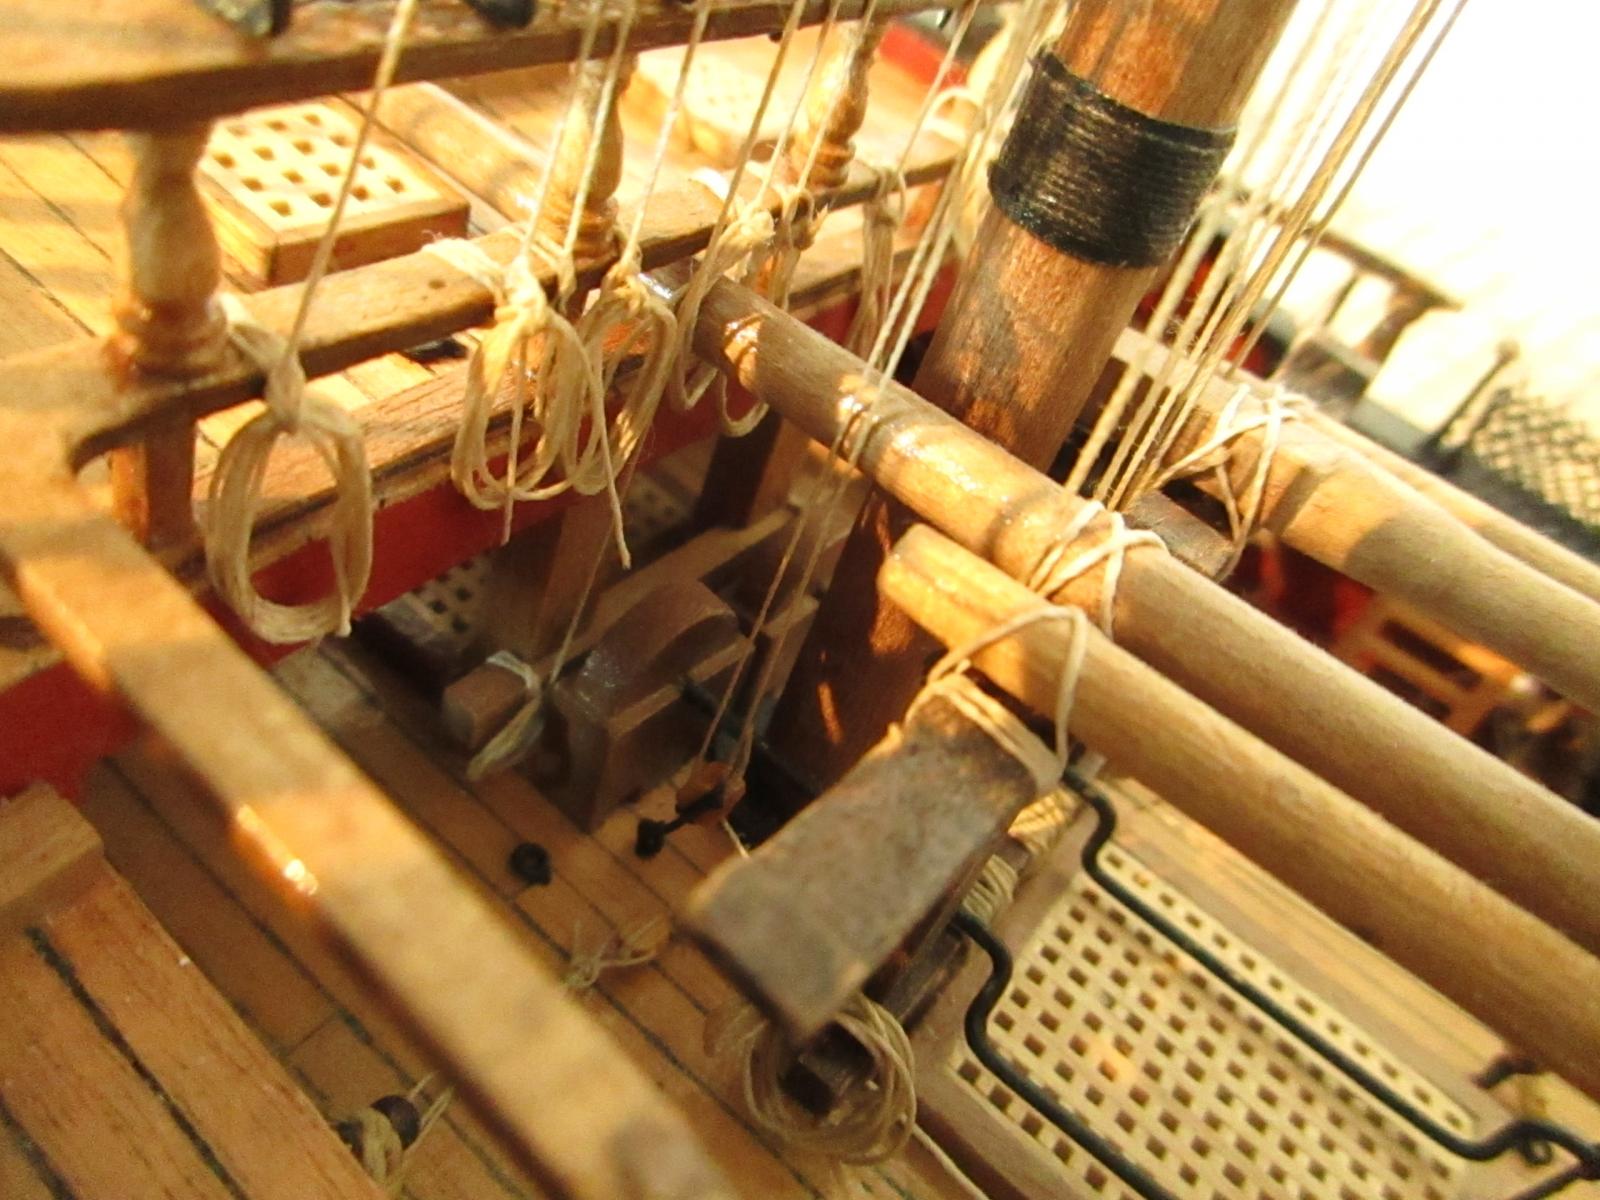
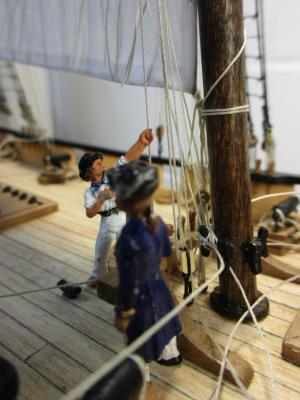
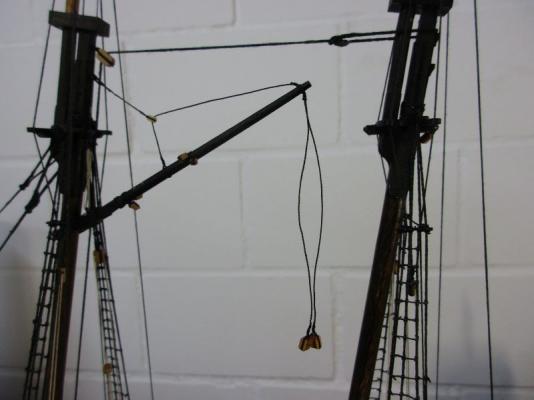
Running rigging As starting point of the running rigging I took the fore gaff and sail. I consider this the most enclosed part and difficult to get at after other parts are finished. Basically it is easier to bend the sails onto yards or gaffs and install as many lines as possible before putting them up, but I put the gaff up without sail, because I wanted to adjust the angle of the gaff by eye and take it from there for the cut of the sail. While preparing the gaff and checking Marquardt's book I decided for several changes. According to Marquardt you have to differentiate between slung gaffs and hoisted gaffs. The rigging for those is different. Pickle's plans show a mix-up between both. A slung gaff (as basically foreseen in the plan) seemed more convenient but those never have vangs. It seems plausible to fix a slung gaff above the fore yard. The sling was installed as descript in the manual, only the lanyard was made from natural thread. The descript topping lift however is one for a hoisted gaff. I changed it to a version out of Marquardt's book and as it is permanently installed I used black thread. Finally two pairs of 2,5mm blocks for the brails were put onto the gaff. The standing peak tye (which replaces the topping lift) needed a thimble (or a ring). I took again one of the 2,5 mm single hole deadeyes from Amati's fittings which I used also for backstays and other parts, where the manual requires a 'thimble' made by hardening a becket with super glue. Gaff with standing peak tye. It's great to have that much skilled help... detail with sling and lanyard

- 293 replies
-
- 4
-
-
- pickle
- caldercraft
- (and 1 more)
-
Hi Martin Shouldn't you watch your language? Murphy says that all the children reading this forum speak symbols fluently. Thanks Jason. Thank you Frank. I hope you are enjoying the 80ies! Dear John The sails! Be relaxed, if you don't hoist them, there isn't hardly any hard part. I still wonder how so many strops could break. Just try to bend it into the right form in the first try and don't bend it too sharp. I think that if you manage to put the open ends completely into the channels' slits and seal them all with a healthy dose of epoxy, it should hold. In the meantime I found that Granado uses the same kind of strops for the smaller deadeyes. I didn't have problems there. Regarding your pending decision: From Amati/Victory I only know the Pegasus kit. It's a marvellous one but not without difficulties. The big difference was the building manual. Caldercrafts manuals are, in my opinion, unsurpassed. Thank you bug. I'm also wondering about the life span of our models. If you keep them in a good, stable environment the first to give in could perhaps be the plastics parts and the CA glue. But I hope this will only be a problem for the next but one generation. Cheers peter
- 293 replies
-
- 2
-
-
- pickle
- caldercraft
- (and 1 more)