flyer
-
Posts
1,016 -
Joined
-
Last visited
Content Type
Profiles
Forums
Gallery
Events
Everything posted by flyer
-
 Hi Spy It seems they really used those tiny carronades. (Perhaps we shouldn’t think too much about that. Otherwise some remarks about men’s preoccupation with size could be provoked.) Hi Frank Thank you. That’s the kind of deck you get if you keep it out of the weather… Hi B.E. Thanks. I understand, a carronade is a gun where precision is traded for caliber. Probably we should compare this 12lb carronade to a 4lb cannon in the same scale. And I really would like it if Caldercraft could change the design of their copper plates. But perhaps they follow the look of the plates on the model of the Bellona while Amati could have taken Constitution’s plates as an example. Nevertheless I believe that in the 19th century they knew enough about hydrodynamics to avoid such protruding nailheads. Hi Mobbsie Welcome aboard! No log of your latest build? Hi Nils Thank you. Cheers Peter
- 293 replies
-
- 3
-

-
- pickle
- caldercraft
- (and 1 more)
-
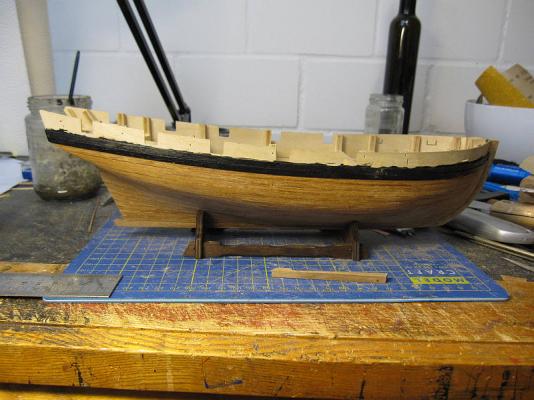
The deck planking has been laid but awaits some more sanding and scratching to bring it up to a standard any self-respecting bosun or first lieutenant would expect. In the meantime I started fumbling with the parts of the first two carronades and completed the assembly of the first one. I put it provisionally in place to check the gun ports. The weapon looks rather puny and the commander not too happy about his armament but that will be all he gets. At least I will put in additional two carronades to stock up to the eight mentioned in the web. Those six provided with the kit leave Pickle definitely too frail. Some additional sanding is required as the caulking seems to be spilling out of some seams... Carronage assembling reminds me of Swiss watch making Those seem rather small weapons.


- 293 replies
-
- 7
-
-
- pickle
- caldercraft
- (and 1 more)
-
Hi Michael Maybe you better go the hard way and replace the complete outer plank over that hole. Removing and replacing one plank should be manageable. Then you can move the knight head up to 1 plank towards the center line. And if you like to remove that framing – you could probably cut it away carefully with a knife lying as flat as possible. White glue doesn’t penetrate far into the wood and you could perhaps just scratch the remaining stains away with a knife (a sharp one like a scalpel with a round blade works fine). I really admire your dedication to details. Cheers Peter
-
Hi Nils This will be a beauty. I’m looking forward to a very interesting build and would like to thank you for sharing this experience. Cheers Peter
- 2,625 replies
-
- 2
-
-
- kaiser wilhelm der grosse
- passenger steamer
- (and 1 more)
-
Hi Nils You are right, of course. Above I tried to explain why I ordered some 38cm planks. Hi Martin Scarf joint would be the right thing but I tried to cheat a waterway without having to make those real complicated joints. Thanks for compliments. Cheers Peter
- 293 replies
-
- 2
-
-
- pickle
- caldercraft
- (and 1 more)
-
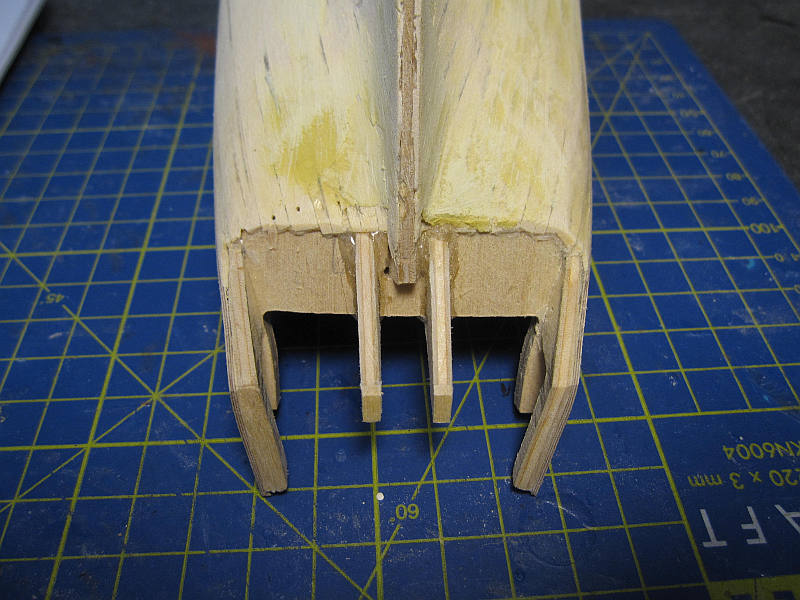
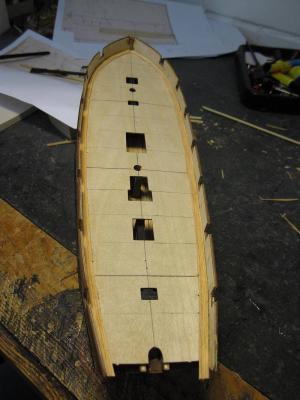
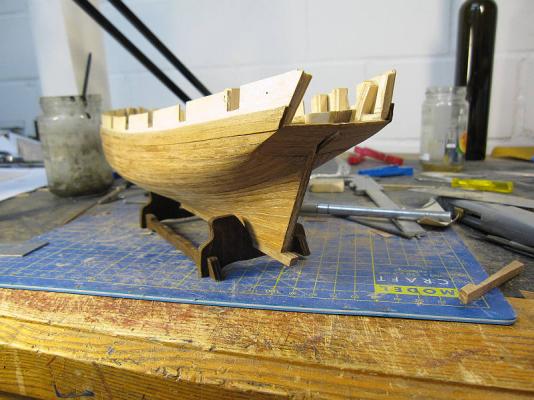
The waterways were puzzled together by irregular ‘scarf’ joints, then cut down to a width of 5mm freehanded with a scalpel. The joints are not caulked (in the prototype waterways and king planks are keeping the deck together in its length and need solid joints) and should be inconspicuous. Therefore I do not fumble with scarf joints true to original. The inner bulwark planking will cover the outermost mm of the waterways bringing their width down to 4 mm which corresponds to the kit supplied deck planking. Close look of first plank stepped into the waterways

- 293 replies
-
- 4
-
-
- pickle
- caldercraft
- (and 1 more)
-
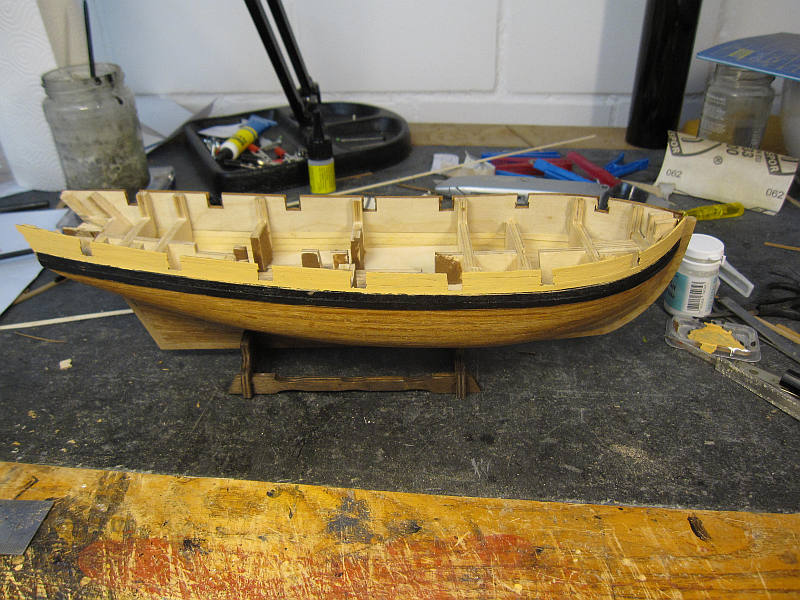
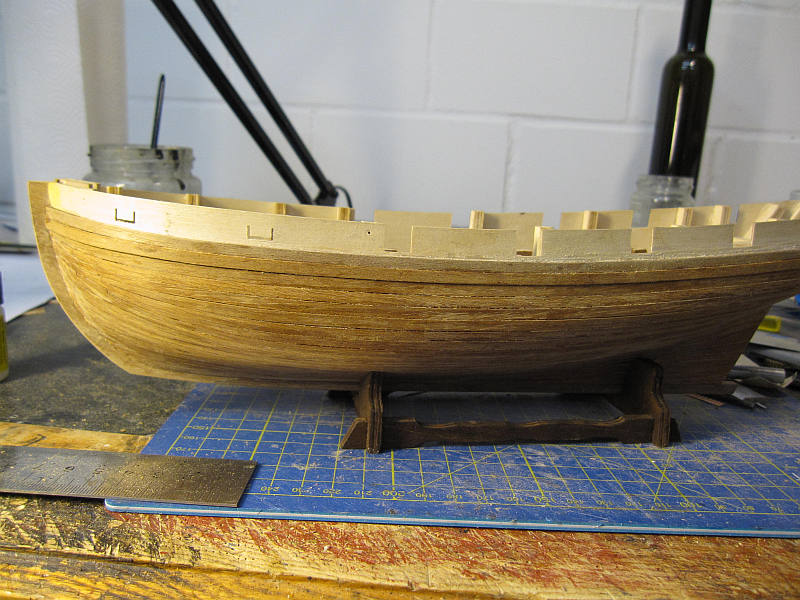
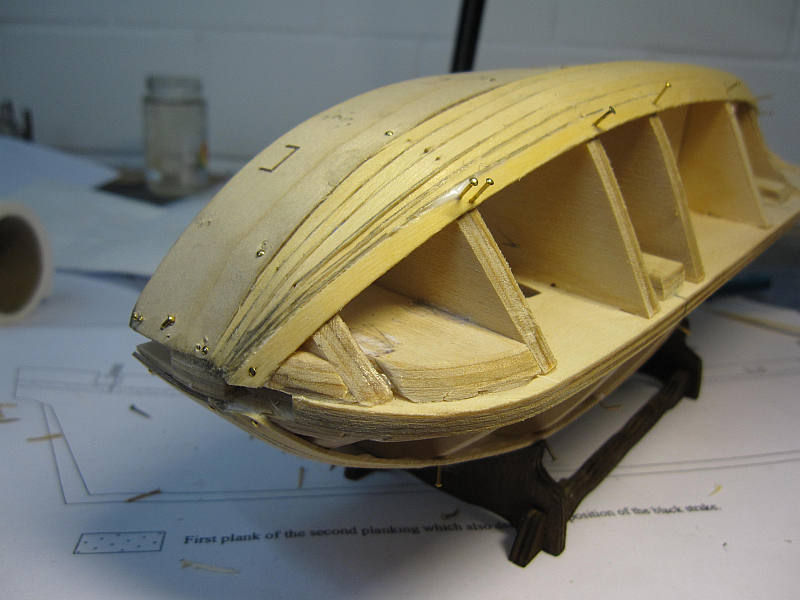
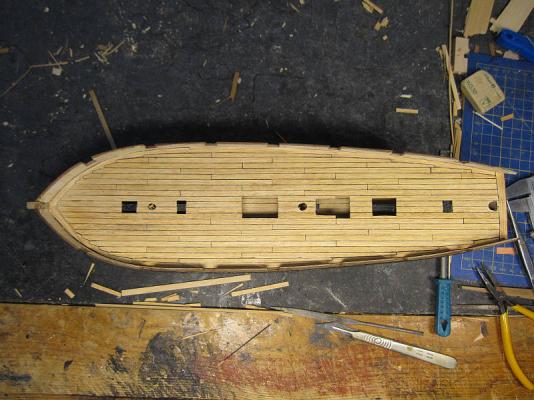
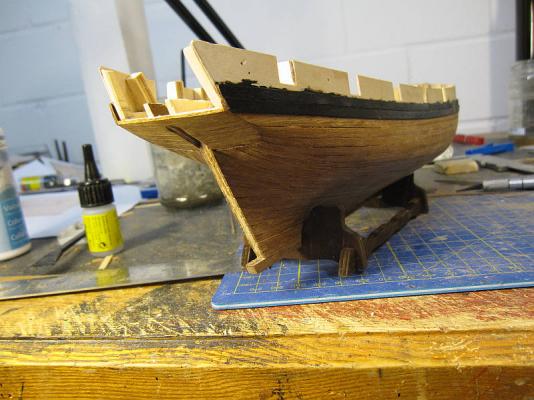
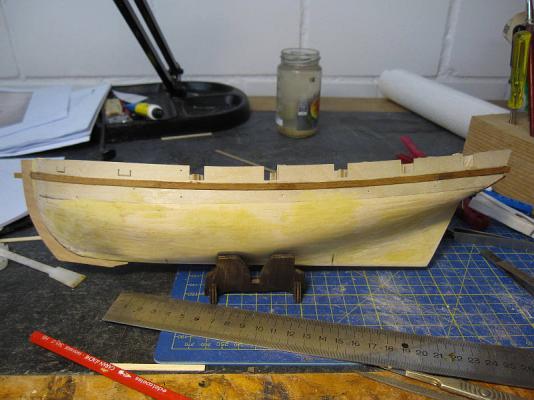
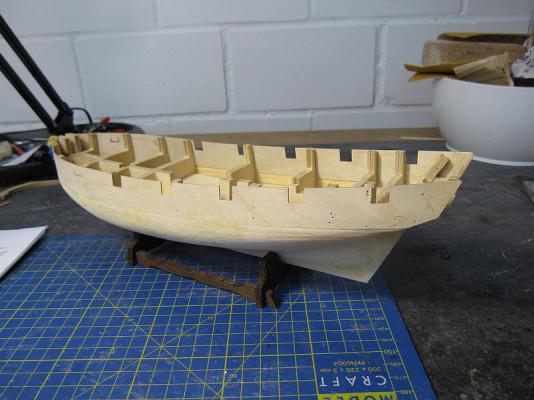
The deck planking has started. This time I try to get a bit more sophisticated deck. Waterways have been made by some additional 6mm wide stripes. Then king planks and uninterrupted binding strakes are laid. Now the ‘normal’ planks are being laid but they will be stepped into the waterway after the first 4 planks from the centre line. I also thought about tapering the planks but decided against it as not all sources show this and it would be very demanding as the 1mm thick stripes used in this kit can hardly be bent sideways. Caulking was again imitated by painting the edges with a black marker pen. Waterways are formed (in 3 parts) from 6mm wide stripes King planks and partners installed The definite form of the aft deck end will be found with the attaching of the transom


- 293 replies
-
- 5
-
-
- pickle
- caldercraft
- (and 1 more)
-
Hi Martin Making good wine on clay soil should be possible, I believe, as well as growing it with little water. California is basically a desert state and look at the wine they make. Thank you for complimenting my country. Oklahoma is unfortunately one of the blank spots on my personal map. Checking the web I found that there are some cows there – we do have something in common! You seem to have a special notion of heaven, if cowbells bring you there (Oklahoman paradise?) but I really hope there is also a heaven where they admit old swabs and where blues music is allowed and where a fine steak is available instead of the ever-present manna and perhaps even a fine drink and I hope I may also smoke a good cigar there! Take care. Hi Frank It’s nice to hear from you. As a brand new retiree I can now spend more time on useful things (like building little boats which even don’t swim properly) hence the faster progress. Cheerio Peter
- 293 replies
-
- 4
-
-
- pickle
- caldercraft
- (and 1 more)
-
Hi Martin Well… at least your summers seem to be hot and dry enough that you have a risk of forest fire – not much chance for that here. Only in that part of the country which is south of the Alps and in some deep valleys in the Alps the mixed pine forests burn occasionally – on the other hand they are also growing quite good wine there. The question is now: which side of the medal is front, which reverse? (To complicate things a bit – we grow some good wine also north of the Alps.) Cheers Peter
- 293 replies
-
- 1
-
-
- pickle
- caldercraft
- (and 1 more)
-
Hi Martin Interesting remark about your cedar wood… I came across that wood now and then while in the US but never thought much about it. As cedar forests are very rare in Europe nowadays (because a lot of trees were used for ship building (!)), I was intrigued by your remark. Larch and cedar belong to the same family of trees (pinaceae). So I was rather wrongly thinking that larch–like wood wasn’t used for ship building. What you use over there as cedar seems to be from quite different trees – in fact from juniper or thuja trees. Perhaps the close similarity of the color and texture of the wood is the reason for the denomination. Larch grows around here and in the near Alps up to 2000m and is quite common and is often used for decking if you want to use untreated wood. Cheers Peter
- 293 replies
-
- 1
-
-
- pickle
- caldercraft
- (and 1 more)
-
During rainy days work on Pickle continued and coppering is mainly completed. Just the keel and rudder remain. I’m still asking myself if I should leave the copper with that patina it was delivered with (perhaps a result of the etching process) or if I should polish it the way I did on Pegasus. A third option would be to polish and then tarnish it with salt and vinegar (Frank / riverboat would probably love that).


- 293 replies
-
- 6
-
-
- pickle
- caldercraft
- (and 1 more)
-
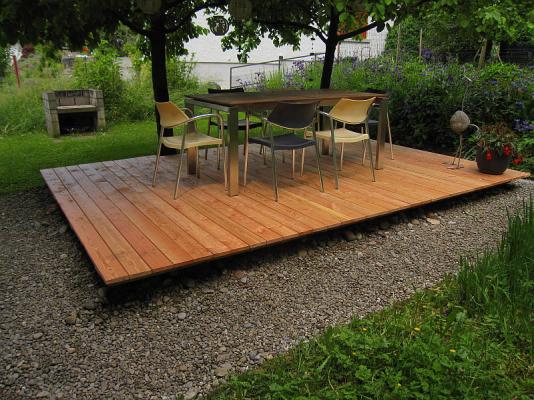
Progress lately was rather slow because the garden required some attention. However one of the tasks there was so to speak a preparation for the next step with my Pickle. I practised some deck laying (replacing a 10 years old very weathered one) in scale 1/1. Or – if you take the average dimensions of the ship’s deck planks it’s rather scale 1/2 as the dimensions are by chance just about half of it. Also the diameter of the screws heads is in proportion and I find it remarkable that they are hardly noticeable. I will again omit the treenails heads on Pickles deck. Fortunately my deck in the garden was required to leak and caulking was not necessary. The wood by the way is larch – hardly used in ship building but quite good in withstanding weather untreated because of its high natural resin content. Real deck laying... ‘Treenails’ (screws with 11mm head diameter) are hardly visible

- 293 replies
-
- 2
-
-
- pickle
- caldercraft
- (and 1 more)
-
Hi Nils Of course I would like very much to see you build another sailing ship of the era of the Napoleonic wars – putting that wealth of experience you have now to good use. On the other hand I did browse a bit to see what other four-stackers were there besides the well known Titanic and her sisters. And I must say those German liners like Deutschland, Kronprinz Wilhelm or Kronprinzessin Cecilie with her exceptional career were elegant and beautiful ships. That’s a tough choice for you. Cheers Peter
-
Hi Nils The follow up on the braced yards was not purely selfless – I’m tempted to follow your lead and do the same on my pickle. You are doing great. Oh, by the way, – do you already know how you will top your stunning Pegasus with a next project? With your building speed Pegasus will be finished in just a few weeks. Keep up the good work. Cheers Peter
-
Hi Nils Just had the opportunity to spend a few days at Venice and to visit the Museo Storico Navale there. (The admiralty including one of the junior admirals went shopping in the meantime – a somehow costly but altogether usable arrangement.) Among a lot of interesting ship models they had two with full sails and braced yards. One had the yards attached directly to the mast and therefore rather brutally distorted shrouds on the lee side. This did look unnatural. The other fine model had the yards away from the mast by at least one mast diameter and the lee side of the yard resting on the hardly displaced shrouds. This did look quite natural. I remember you raising the question how to do this and I tried to find out your solution in your pictures but got lost in the wealth of details. How do you fix the yards now? Regards Peter
-
Amatis copper plates have arrived and the tedious work of gluing plate by plate is going on. Caldercrafts plates delivered with the kit aren’t that bad but in my opinion they look too much like a badly shaved hedgehog. The nail heads protrude too much and Amatis solution looks better. Also it is possible to attach Amatis plates overlapping which seems the correct way do to it - and that way it is much easier to create a nice smooth run of the plate belts. Left: CCs plate, nail heads flattened Middle: Amati’s plate Right: CCs plate, out of the box Coppering in progress Close view of the overlapping plates


- 293 replies
-
- 6
-
-
- pickle
- caldercraft
- (and 1 more)
-
Hi Nils Thank you. They should be – ships are female, aren’t they? Hi Martin That’s not decided yet. However I think I will paint the inner bulwarks in yellow and therefore the inside of the gun ports as well. Hi Mike Thank you.
- 293 replies
-
- 1
-
-
- pickle
- caldercraft
- (and 1 more)
-
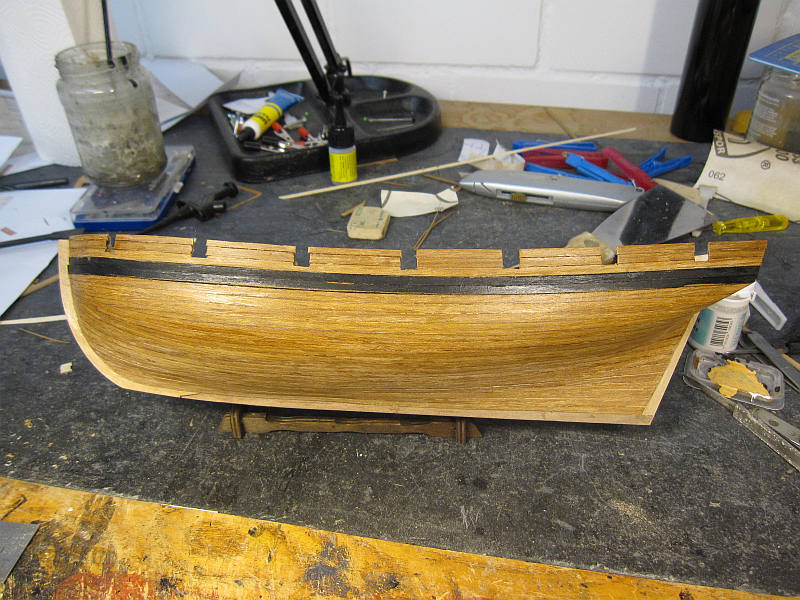
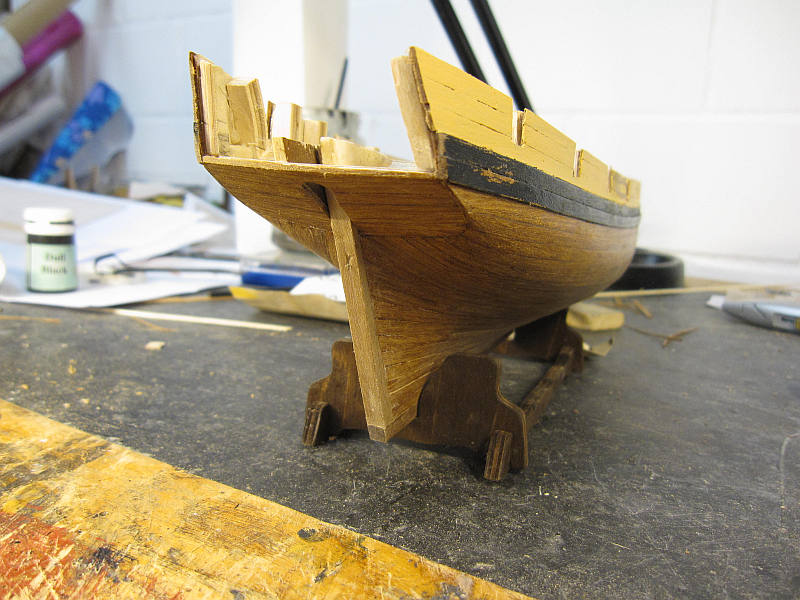
The second planking is now finished – except the stern counter which will be fixed later. First I will have to install the deck to find the right height for the 2 gun ports. As a trial for the colour scheme I painted one side above the wale in light yellow. I think it looks acceptable. Now I have to wait for the Amati cooper plates to arrive. They will replace the kits plates. Side view with finished second planking. Side with painted yellow band Stern view


- 293 replies
-
- 6
-
-
- pickle
- caldercraft
- (and 1 more)
-
Hi Nils Thank you. Compared to other projects the planking looks a bit rough due to the lower quality of the wood. But it’s OK. Hi Martin See above. Thank you. There aren’t many sources I know of. One is the model in the Royal Naval Museum (so far I only saw pictures of that). The color scheme of this model with its black hull and a yellow band between the wales and the rail could be the prototype for the kit as well as for modern paintings (Gordon Frickers and Geoff Hunt). Another source is Robert Dodd’s painting: ‘The defeat of the combined forces of France and Spain at the battle of Trafalgar in 1805’. The schooner in this painting could be Pickle. I have only seen reproductions of this painting in the internet in rather low quality. But most probably the wales are dark or black with the hull below black or perhaps dark oak left natural. Then there is a light band above. Its color is unclear because the whole scene is painted in a somewhat pinkish light (morning?), but it could be a light yellow or white. Interestingly there is a small dark stripe across the middle of the gun ports; a feature which is included in Geoff Hunts painting. Geoff Hunt has the inner planking painted in red, the same way as it is foreseen by the kit. In Frickers’ painting the inner bulwarks are hard to see but no red is visible in the gun port frames. The Royal Naval Model finally has the inner bulwarks as well as the deck furniture painted in light yellow which is a nice change to the usual red. As long as the captain of the schooner (me) is paying for the color out of his own pocket he has a certain freedom how to paint his vessel - as long as there is no objection from the admiral. After all I’m tempted to leave the hull between wale and copper natural, paint that yellow band above (probably with the small black stripe) and have the inner bulwark also in yellow. The rail will repeat the black of the wales and the counter will probably be natural. The final color scheme will be decided during the progress and could differ. Cheers Peter
- 293 replies
-
- 2
-
-
- pickle
- caldercraft
- (and 1 more)
-
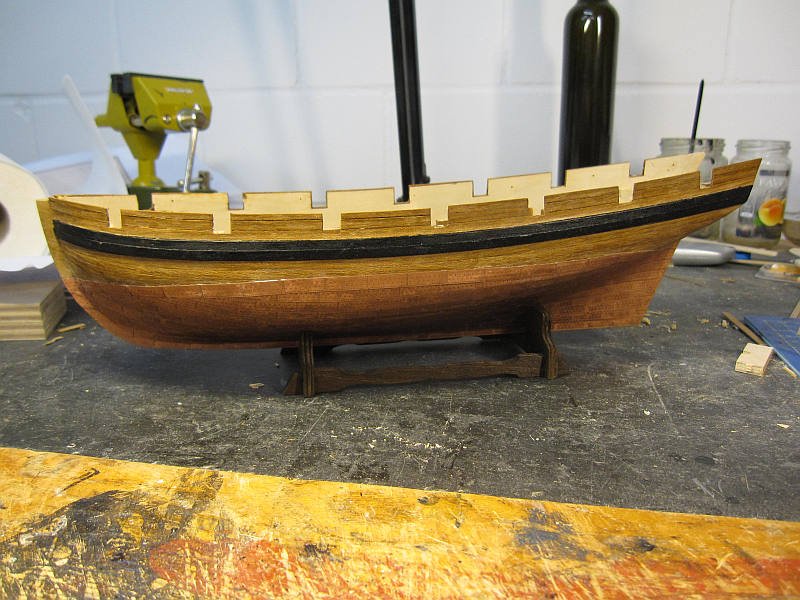
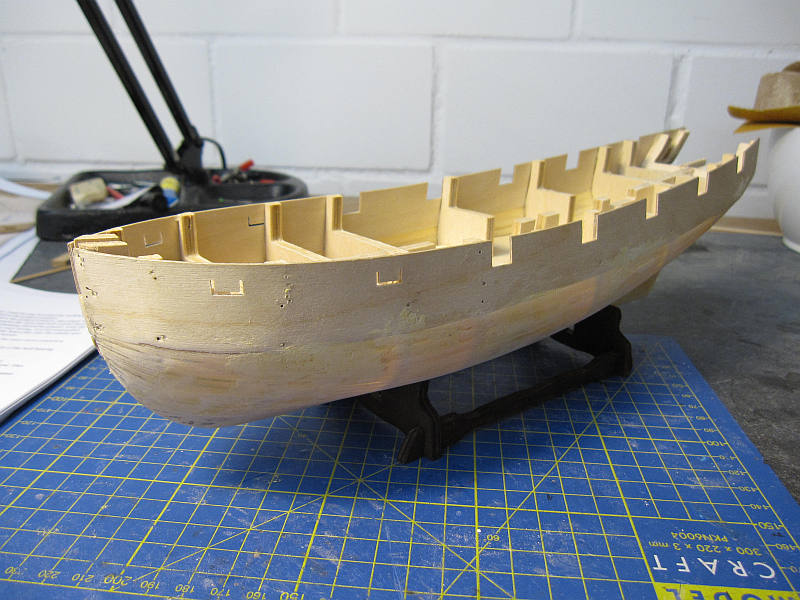
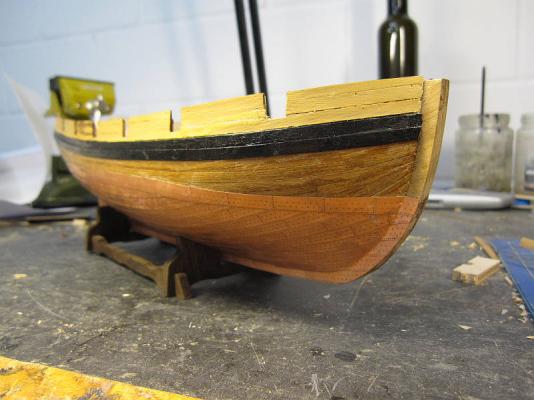
The lower part of the 2nd planking is done. I’m not yet sure how the final colour scheme will look but the whole hull painted black seems a bit gloomy. For now just the wale has been painted as a trial. Side view with painted wale The bow looks a bit more elegant than the kits version The stern starts looking good

- 293 replies
-
- 10
-
-
- pickle
- caldercraft
- (and 1 more)
-
Hi Spy Well, altering the shape of that stern is a bit of an issue with me. But the rather ugly one right out of the kit was a ‘no go’. I have my doubts about those plans used by JoTiKa. Talking of JoTiKa : The quality of the strips for the 2nd planking is not on the level I expected after the Granado kit. Generally one side of the strip is a bit frayed and when bending the planks at the bow sometimes the fibers come apart or the whole plank splinters despite the soaking. But I manage - and who ever said that shipbuilding resembles a bed of roses? No sir, there are always some splinters in it. I paid your Pickle a little visit. It comes along nicely. I never have the patience you have for preparing all the steps. Usually I just take a deep breath and plunge in – but of course sometimes the water is too shallow and I bang my head… Hi Nils Thank you. How you find the time to visit other build logs while putting that much detail into your absolutely great Pegasus is beyond me… Hi Martin Those stealers… I’m not sure if I really want to cover them with copper plates. At least I will not take the sheets out of the kit. The nail heads are much to prominent. Either I replace them with Victory Model parts or I find a way to flatten them or – if the planking goes very well – I could leave them off… Cheers Peter
- 293 replies
-
- 2
-
-
- pickle
- caldercraft
- (and 1 more)
-
The second planking is on its way. The final look of the lower counter is now visible and I think it comes along quite well. The alterations seem to work. Although it will most probably be covered by copper sheathing, in this build I try to use the correct form of stealers instead of just tapering to a too narrow plank. It seems you should never taper to less than half of the original width. The stern and especially the lower counter starts to look like a schooner of the early 19th century should.


- 293 replies
-
- 6
-
-
- pickle
- caldercraft
- (and 1 more)
-
Hi Martin Thank you. I have in fact hope that this will become a pretty pickle. BTW I found a remark in a book (The Ships of Trafalgar) about Pickle. Here is stated, that a first schooner named Sting was employed in Bermuda as a 6 gun tender and was perhaps built there. Another Sting was built at Plymouth. In 1802 one of those two was purchased by the navy and renamed Pickle. It seems that Pickles origin is as obscure as her true appearance. This means my interpretation of that schooner might not be completely unreasonable. Hi All Thank you for all the likes. That support is appreciated, especially while I try to get superglue off my fingers again and again – that seems to be the curse of the 2nd planking. Cheers Peter
- 293 replies
-
- 2
-
-
- pickle
- caldercraft
- (and 1 more)
-
Next step was the fixing trimming and planking of the lower counter. It starts to look a bit more elegant than the kit’s photos in the manual. Now the second planking could begin in earnest, with the first plank laid exactly according to the manual. First plank on the lower counter Lower counter Second planking started

- 293 replies
-
- 5
-
-
- pickle
- caldercraft
- (and 1 more)
-
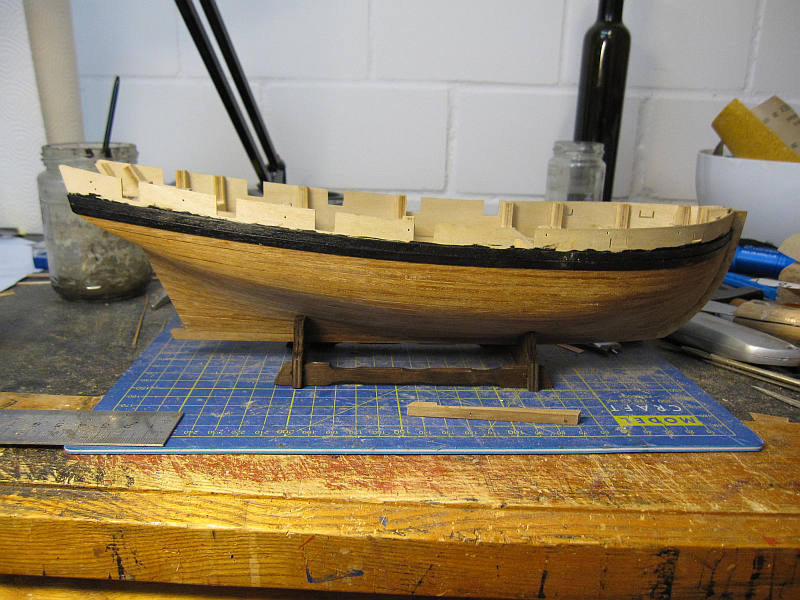
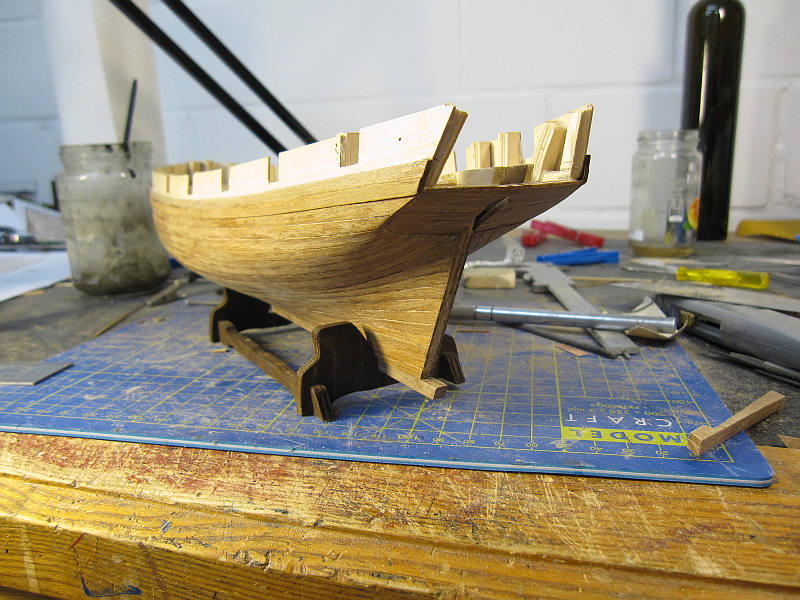
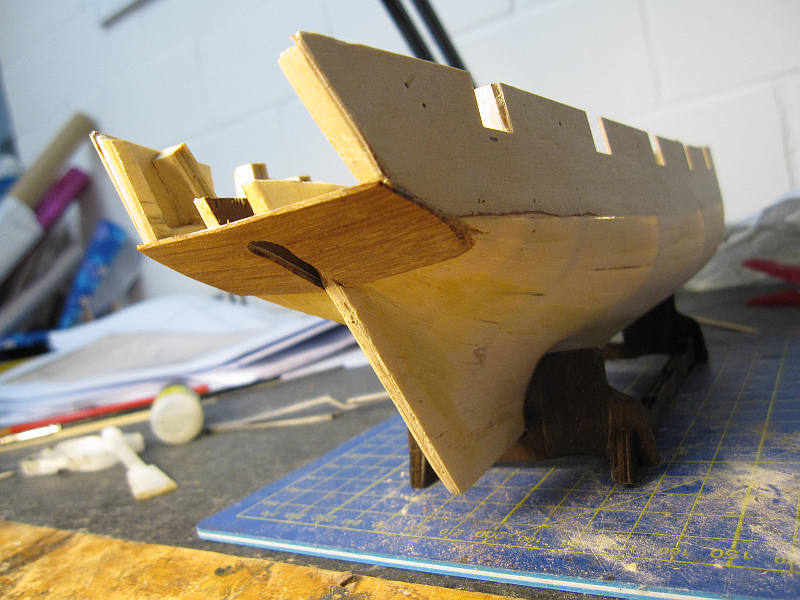
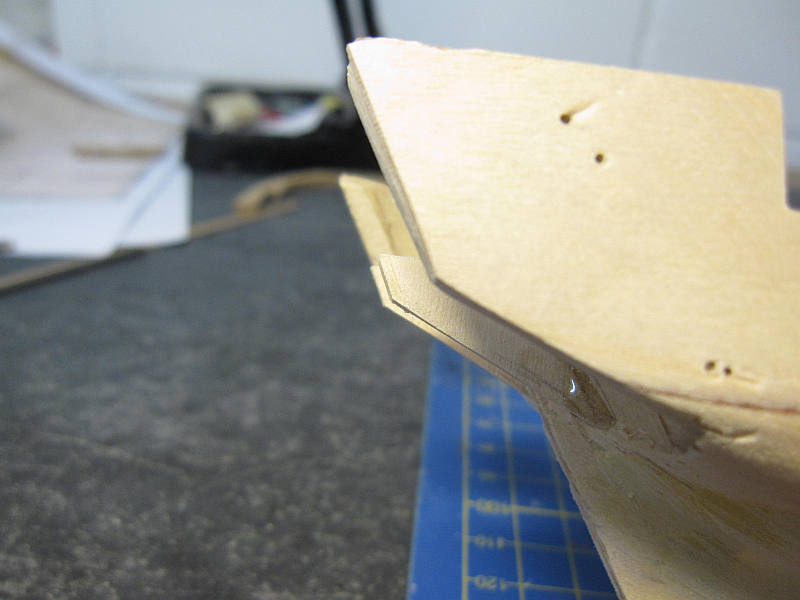
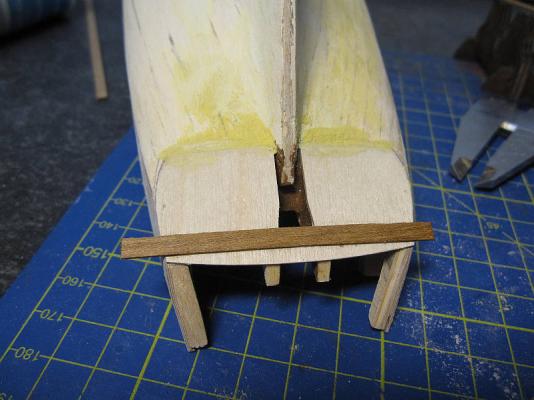
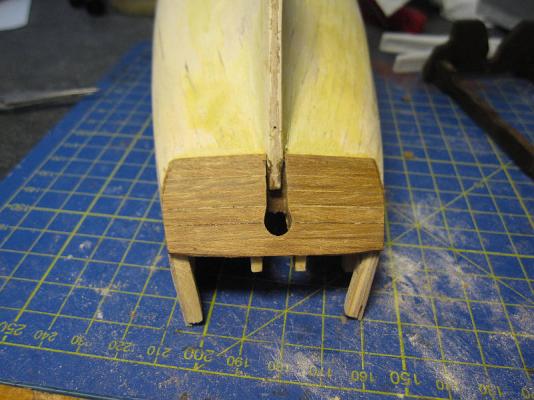
The first planking was now attached and then a lot of sanding, filling and sanding again had to be done to give the hull the intended form. The inner stern extensions were added in preparation for the attachment of the lower counter. Those inner extensions were extended a bit to help form a convex counter. So far I did not yet glue the keel yet in order to protect it during sanding. During the first planking I fix the whole plank onto the bulkheads and mark the areas to cut for trimming by laying the next plank over it in a dry run. The cutting is roughly done with a scalpel and then the next plank definitely fixed. The first planking looks rather coarse but it is only the fundament to work out the final shape of the hull with sanding, filling and sanding again. The central stern extensions are fixed and extended again. First planking finished The central stern extensions overlap those on the side to allow convex lower and upper counters


- 293 replies
-
- 4
-
-
- pickle
- caldercraft
- (and 1 more)