HOLIDAY DONATION DRIVE - SUPPORT MSW - DO YOUR PART TO KEEP THIS GREAT FORUM GOING! (Only 20 donations so far - C'mon guys!)
×


cookster
-
Posts
416 -
Joined
-
Last visited
Content Type
Profiles
Forums
Gallery
Events
Everything posted by cookster
-
All I can say is Damn Bob, this is really nice!!! One of my favorite MSW builds for sure. You guys who know how to rig sure make me jealous...
- 1,477 replies
-
- 1
-

-
- essex
- model shipways
- (and 1 more)
-
Looking good Mobbsie! Glad you got your gremlins worked out, at least you didn't have to break out the isopropyl.... I think fixing our errors (successfully) is sometimes more rewarding than when everything goes to plan. BTW, where do you get your "smashing little razor saw"?
- 255 replies
-
- 1
-
-
- granado
- bomb ketch
- (and 2 more)
-
Thanks Mobbsie She's right at 4 feet long (1219 mm), including the bowsprit. Widest point of the hull is 9 inches (228 mm). I haven'y done anything with rigging yet, so I have no idea yet of the mast height or spar width. I need to try and sweet talk Bob (rafine) into making a masting/rigging list for Essex.... I love his build and his rigging is 1st rate!
-
Bob, she's got some size to her for sure.... I wanted a larger model for lots of reasons and that;s what I got! Now that the top timbers are going on I will take another overall shot to show the scale.
-
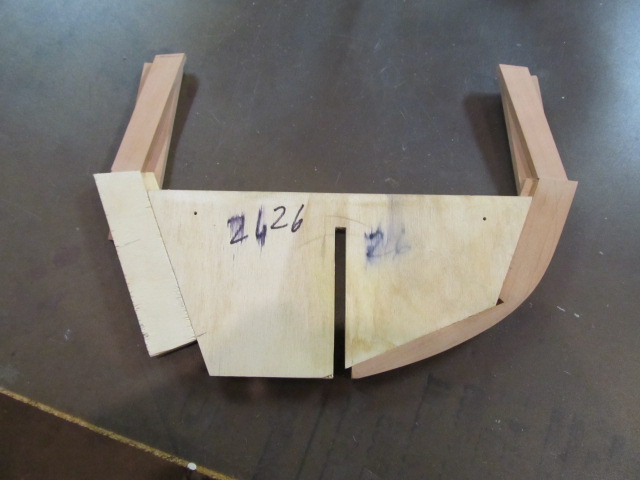
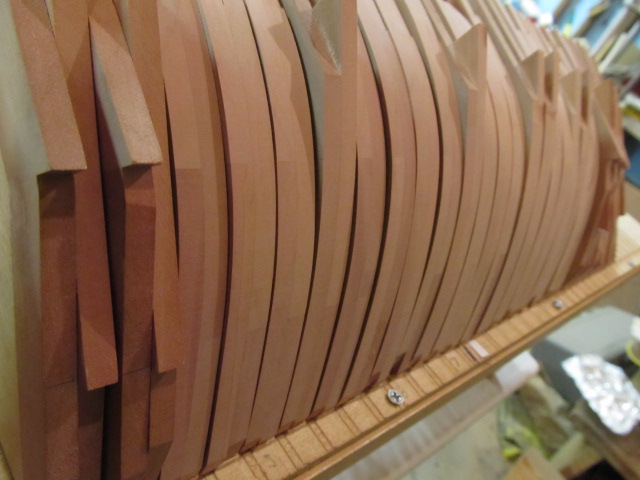
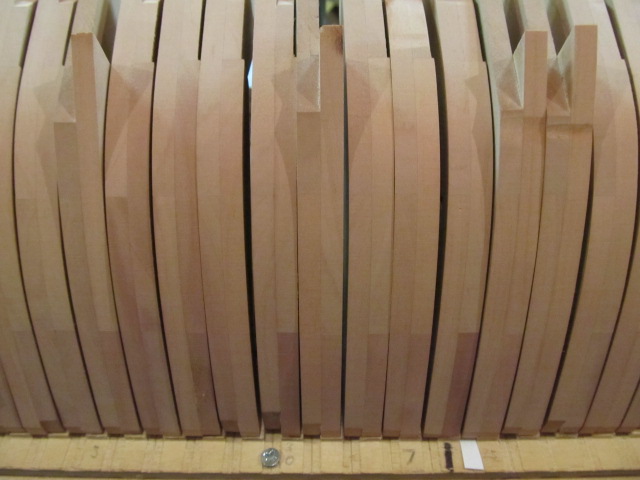
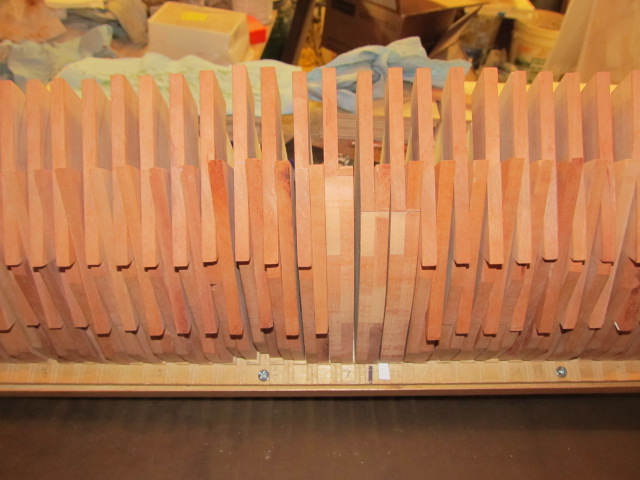
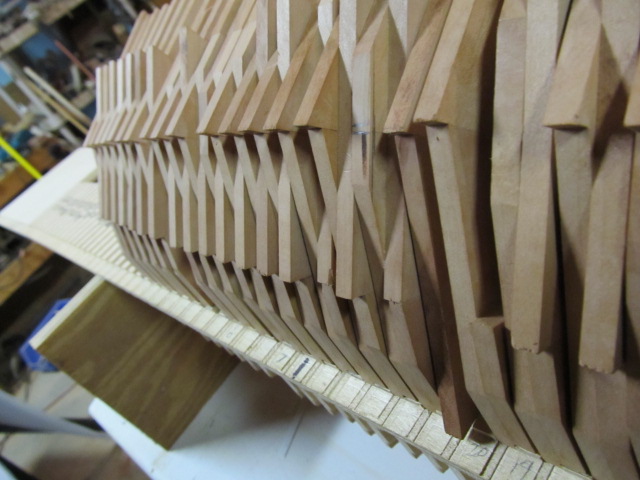
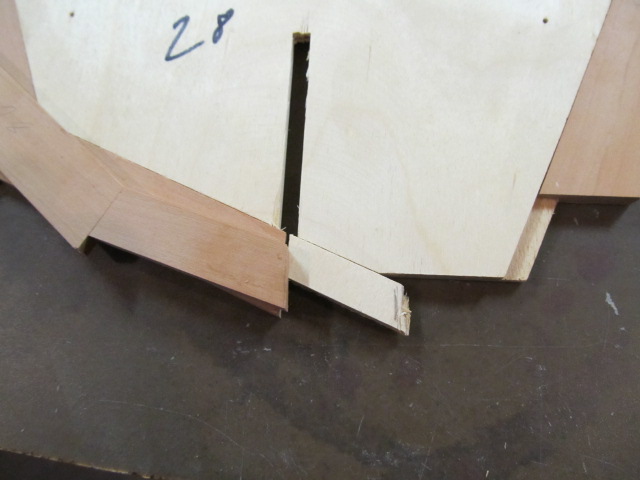
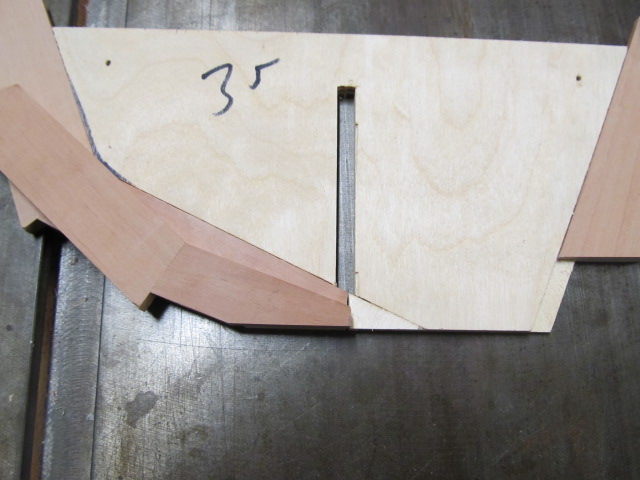
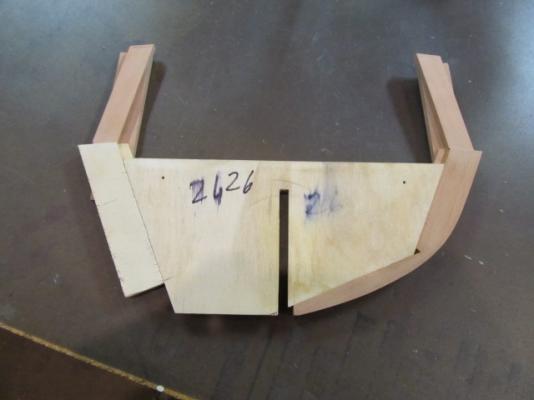
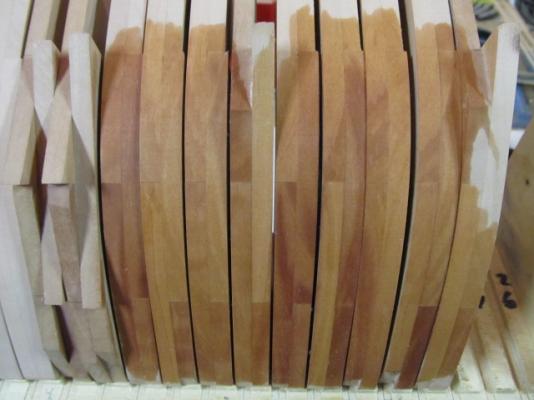
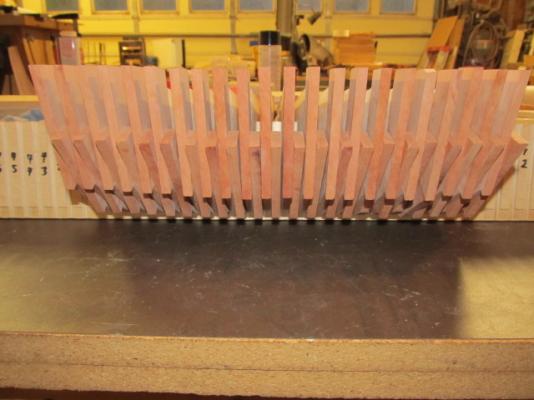
Here is a completed frame ready for final trimming and sanding. Here you can see all those miter joints sticking out, and what they look like after being trimmed and sanded. The "alligator skin look" is kind'a strange I know, I hope now that some are trimmed down the shape of the frames are starting to show. I wet the joints so they show up a little better...

-
Patrick, very nice build you have going. I salute you and the other Conny builders who are actually framing the gun deck, rear windows, transom etc. This is a much more accurate approach to what I've done, which is the MS kit way. I wish I had done what you're doing but I'm much to far along now to tear it out start over. The transom and windows on mine will never look quite right, no matter how hard I try... Keep up the good work!
-
David, pull up a chair, but, it's a S L O W process though - hope you don't get bored easily Thanks Augie and Frolick! I promise there is a method to my madness. Really... There is.... I swear....
-
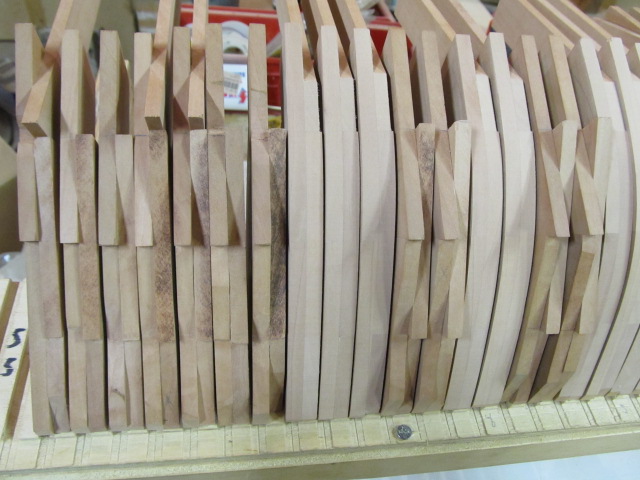
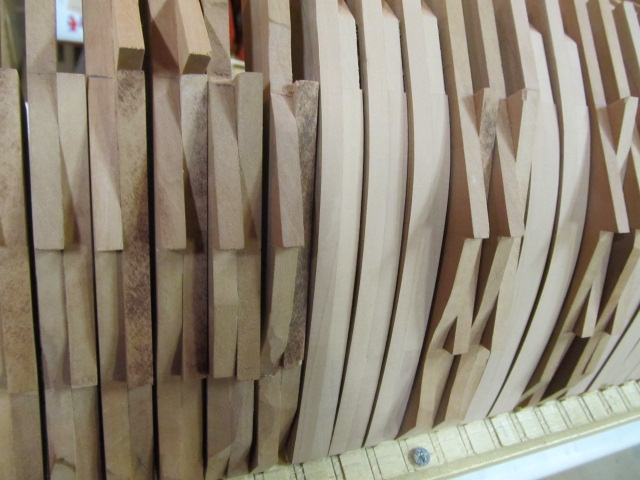
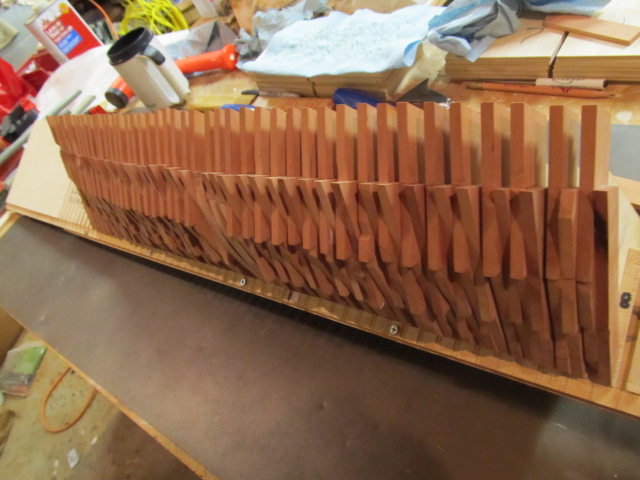
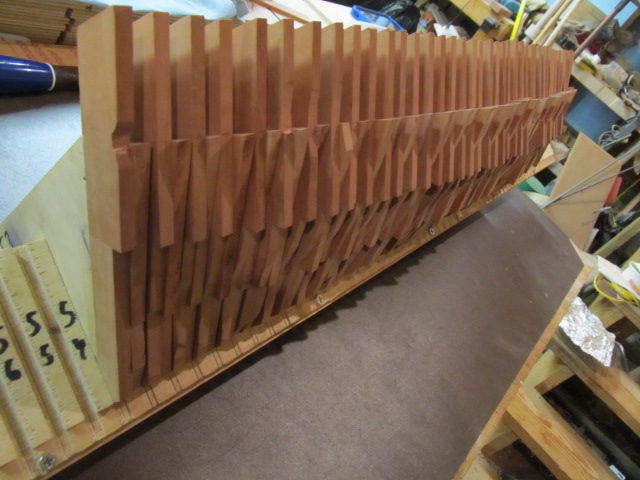
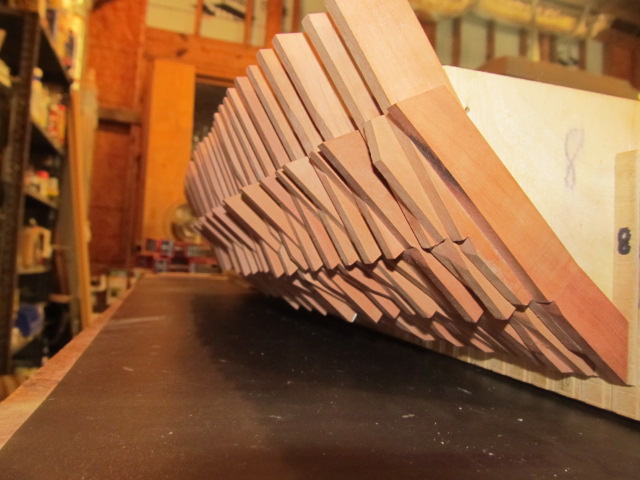
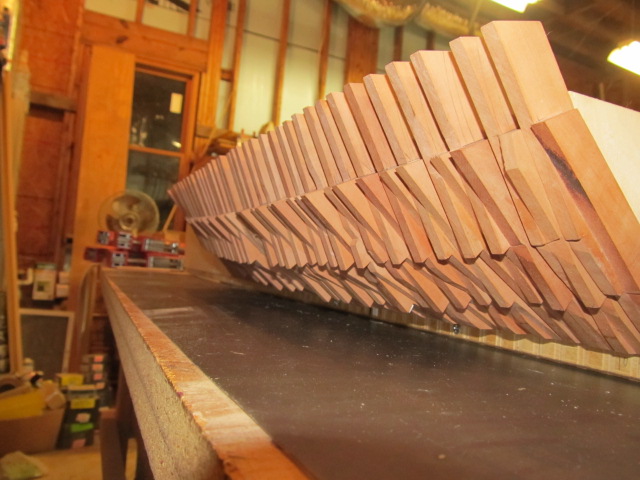
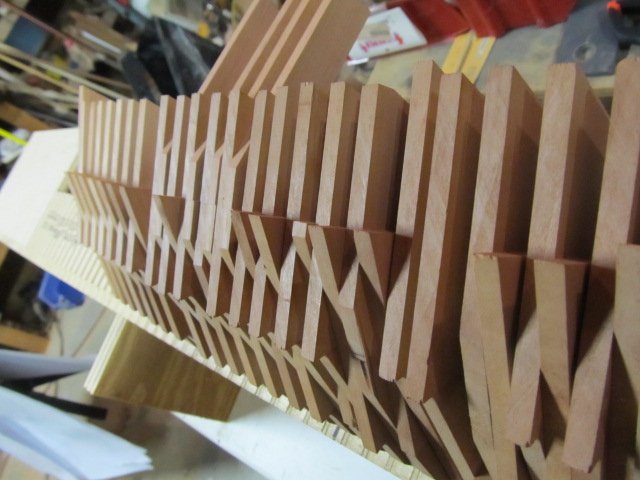
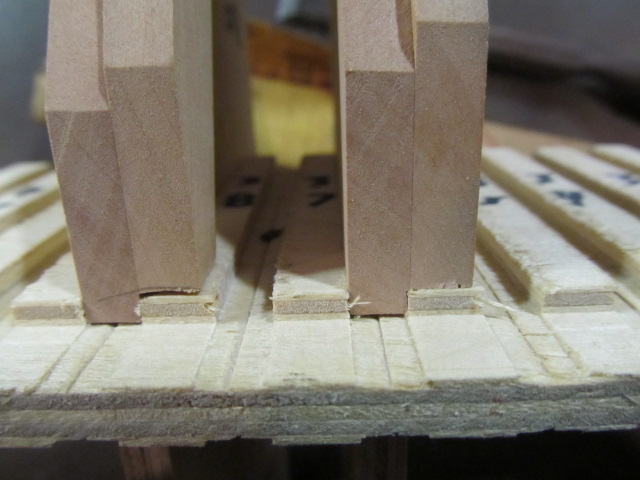
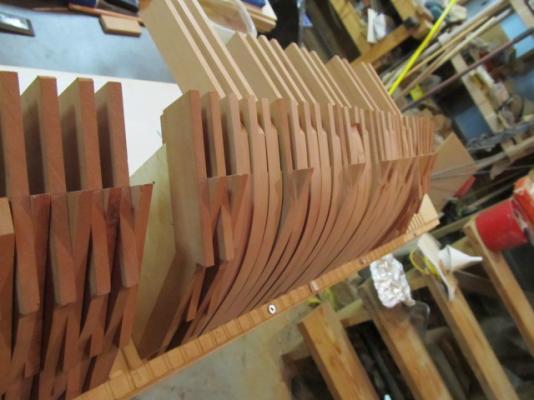
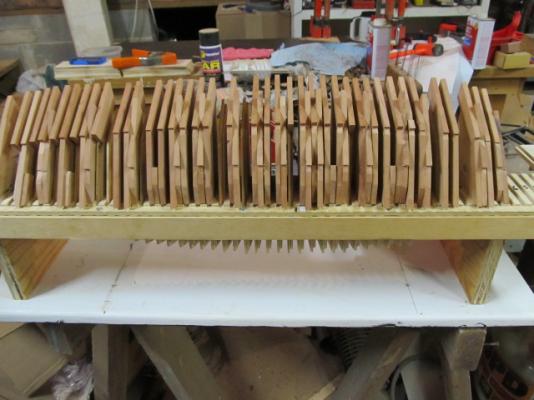
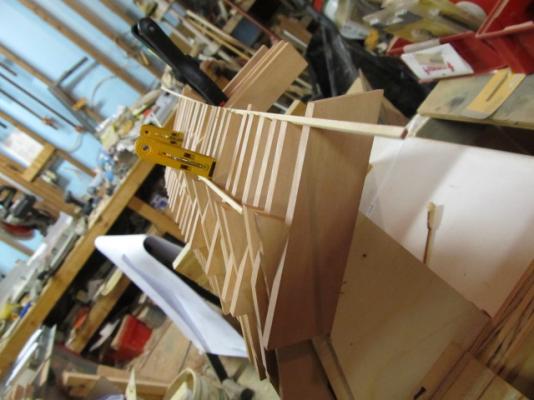
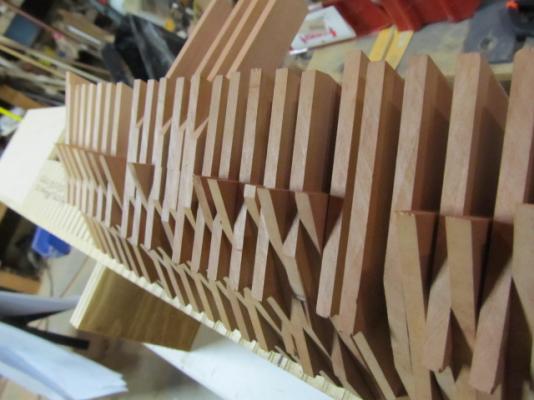
Hopefully in this update you can finally get a glimpse of what I'm trying to do. I'm now adding the upper timbers, and have done some initial trimming and rough sanding on some of the frames. Hopefully in these pics you can see a ship's hull starting to emerge, but there's still a long way to go. Here the futtock joints can be seen I'm not adding the upper timbers around and under the gun ports yet, I still have to decide how I'm going to handle those. Thanks again for looking in, I hope you can finally see there's a boat in there trying to get out...


-
Checking back in Bob, wonderful as usual. The figurehead's a great addition and a I must applaud Janos' generosity!
- 1,477 replies
-
- 1
-
-
- essex
- model shipways
- (and 1 more)
-
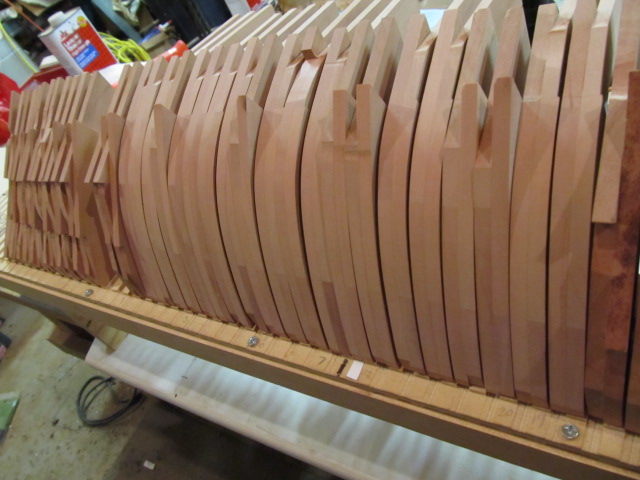
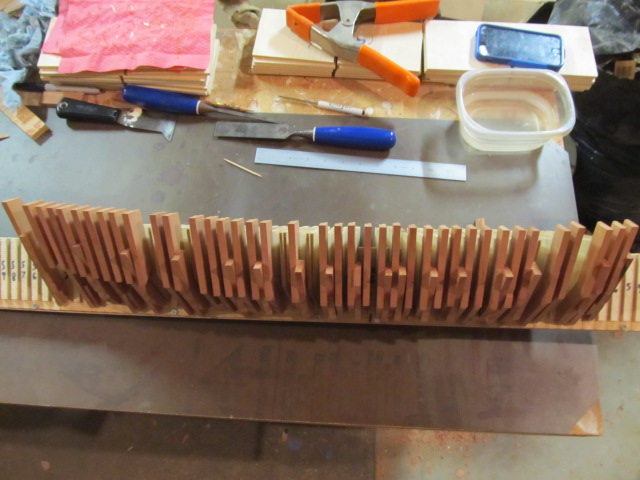
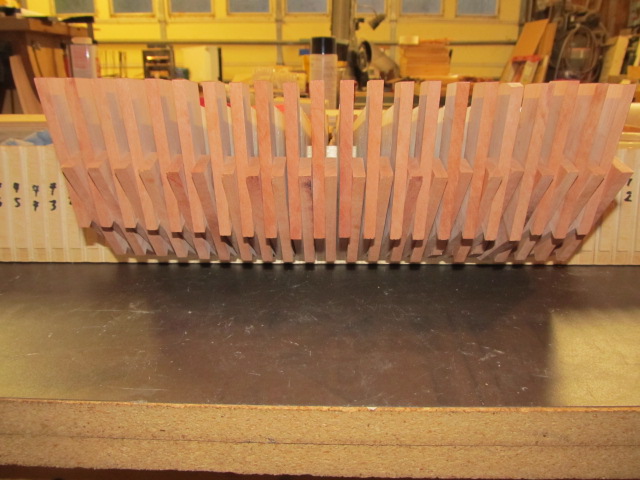
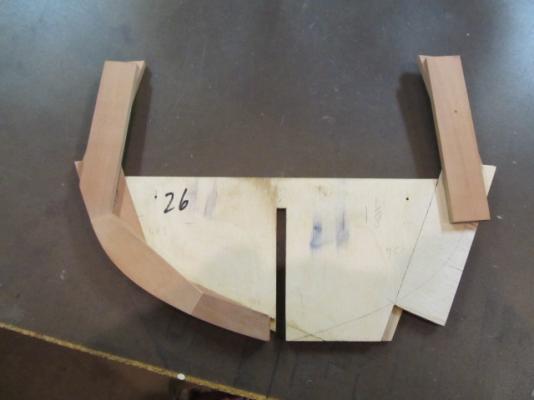
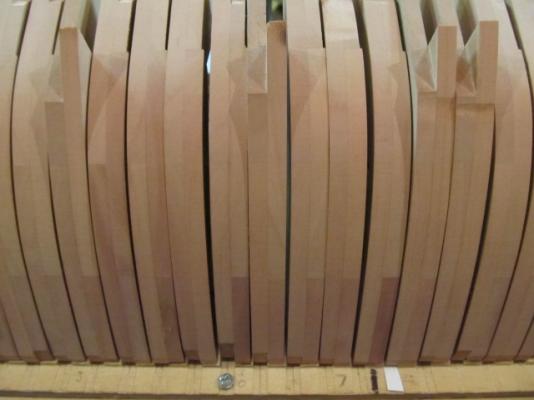
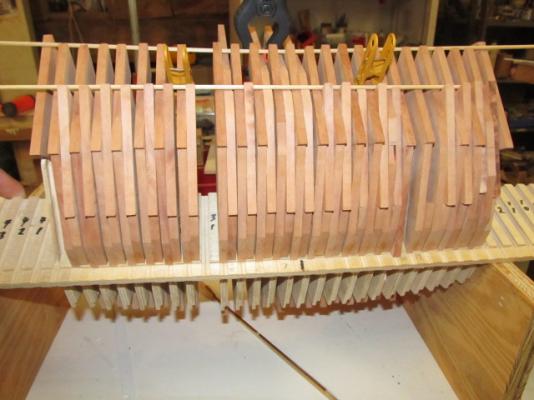
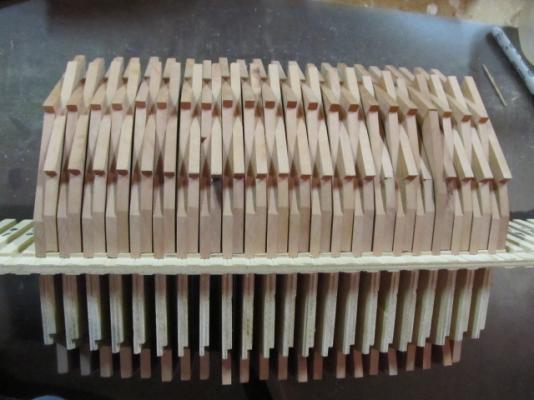
Well, I finally got all the floor timbers and lower futtocks done on the starboard side. Now I can start adding the upper timbers and work on the port side, I also did some rough trimming just to see some shape start.


-
Awesome Bob! And rigging! Can't wait to watch you rig Essex.
-
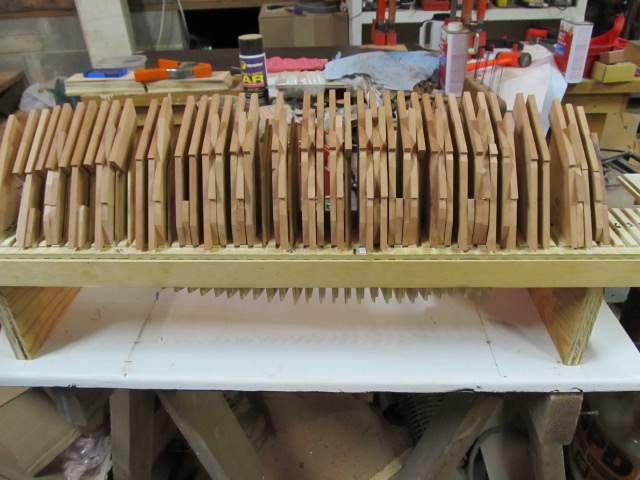
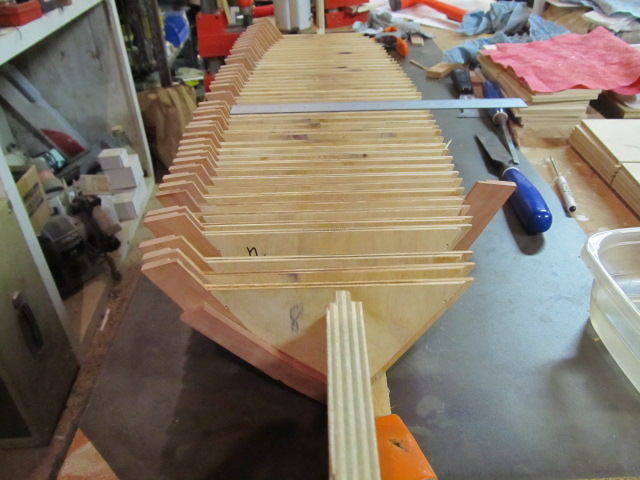
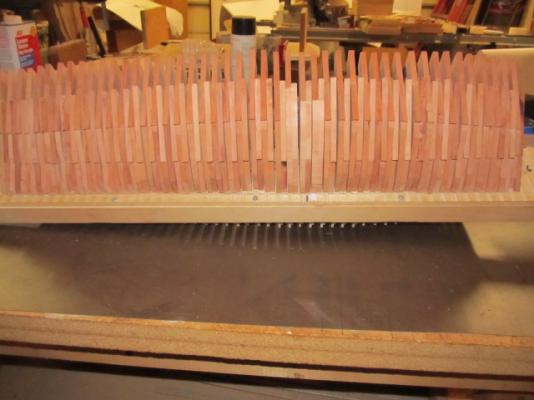
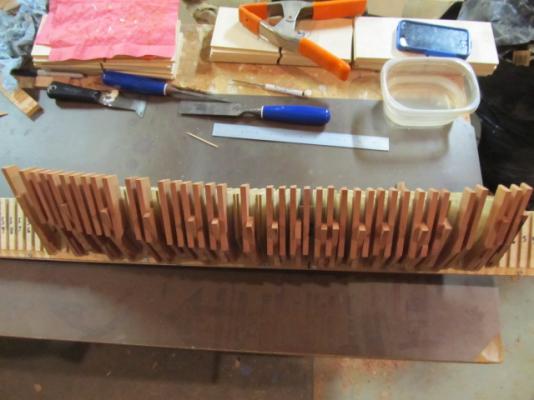
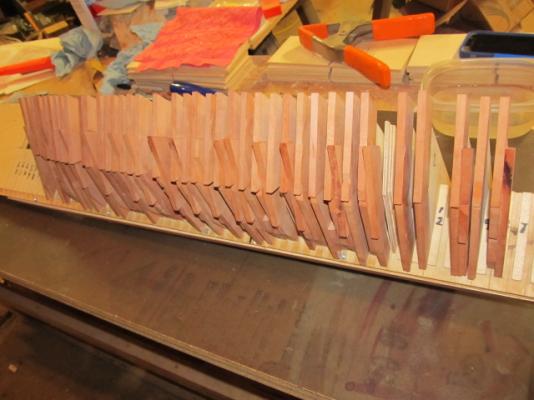
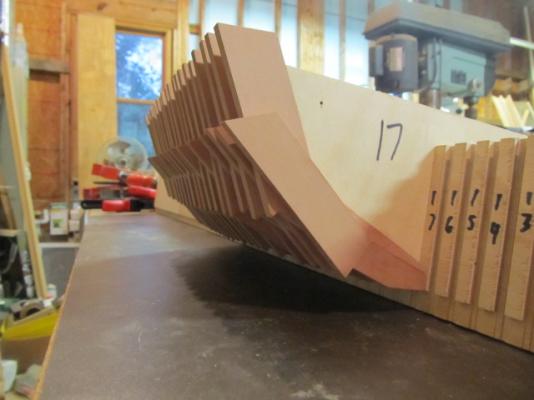
Hi all, I've been "off the grid" for a few weeks for the holidays. I have been working on Essex, but just haven't posted since not much has changed visually. Just a lot of rework, and then some more rework. To quote Dubz, "deconstruction..." I've been building, and rebuilding the same frames more than I want to admit. But I am learning and getting better as I go. All of the square frames are started now and her lines are starting to take shape, and are fair, unlike my first try. Acetone has become my new favorite tool while making these frames. I *hope* I'm done with that now, time will tell. And since I haven't made enough misery for myself, I'm thinking of making actual cant frames for the bow and stern, just to see if I can do it. I may regret that choice soon.... I can always fall back on square frames if that's fails miserably. Anyway here are a few pics. None of the profiles have been cut yet, and the top timbers (upper futtocks) still need to be added. The top line you see is just below the gundeck. But you can start to see her lines if you look hard enough.... Also, I've had her on her side so long I hadn't seen her right side up until I had to modify my build board. I set her down right side up and her scale hit me. That's a 12" steel rule, she's over 8 inches wide at the widest point! With that much room I should be able to rig some cannons - if I ever get that far....

-
Hi all, USS Frolick, aka, Steve, sent this to me with some other material and asked me to post it. Not sure if it should be here or one of the other research forums so if it needs to be moved - mods please do so. This article is from the old Model Shipwright Magazine, Steve could not provide the date so my apologies for that. It deals with interpreting the body line drawings of the Essex comparing Hackett's, Baker's and Chapelle's drawings. This was of particular interest to me since I am still working on my drawings of Essex for my scratchbuild. Thanks Steve! Hull Comparison Portia Takajian.pdf
-
Augie, it's the 91% stuff, I made sure. It's CVS brand (guess I can say that here?), it did occur to me that maybe that brand is watered down some. At some point I'll probably get a name brand and give that a try. David I'm actually submerging the parts in a large glass dish, so no evaporation problem there. I even considered that's part of the problem since there's NO evaporation - no air getting to the joints. Could that effect the chemistry of what's occurring? Anyway, I soaked 2 more frames last night, fully submerged in Acetone, and this morning they popped apart with only mild effort, so Acetone is the way for me. As long as it works I don't care why! Now I only have 10 or 12 more frames to soak, pop apart, and remake to correct the errors only I would ever see. I guess out of 60 once I'm done that's not too bad.... Yes, perfectionism is a curse AND a blessing... Sometimes I wish I'm the guy that can build a Lego model with a handful of pieces left over and not care. No wait, no I don't, never mind.
-
Quick update: First, had a computer crash last weekend so I've been dealing with that, so no pictures at the moment. I've been trying my hand a debonding the frames I've made that are wrong and my results are mixed at best so far. This is the first time I've tried this, and from reading other's comments in various logs Isopropyl alcohol seems the way to go for wood glue. So I picked some up and gave it a try. The wood did come apart, with some prying and wiggling and cussing on my part, but not easily. I let some soak for 8 hours and I could barely get it apart and I also broke a few pieces too. So it didn't seem to be working for me. After even 8 hours the wood under the joints was not wet, the isopropyl only attacked the glue on the very edges. I have pieces ranging from 1/2" to over an inch wide so not sure if that makes a difference or not. Also most of you seem to be using Titebond and I use Elmers Carpenters glue. So I read some more to see what other people are doing and some mentioned acetone. Figured it couldn't hurt to try, so I got some and proceeded to test. The results are much better. An overnight soak is still best, but the joints are much easier to get apart with minimal prying and prodding. So that's the method I'll use from now on. Either the Titebond reacts differently to Isopropyl than Elmers, or maybe the pharmacy brand Isopropyl I bought isn't that good? Either way I found what works so that's what I'm using. Once I get my computer issues sorted out I'll post some more pictures.
-
Thanks Mark, I had an idea that was what was being referred too, just wanted the experts to confirm for me. I've read several build logs of English 74s and 1st rates, but not any French 74s (that I remember). I'll definitely seek them out now. I'm really intrigued by this series, not sure why but I am! I think Santa needs to seek these out for me... Thanks again!
-
Hi guys, a couple dumb questions if you don't mind. First, this looks very interesting - like I need them but heck when did that matter? This is for a French 74, correct? I see a reference to books, what other documents besides these plans would I need to buy in order to build this model? Thanks!
-
Thanks all! I was really discouraged at first, but thankfully as Augie said I cleared my head before turning her into expensive firewood.... Bob, I think the glitch fairy can leave me alone for awhile now! I debated even posting my errors, but that would not be "The MSW way". Frolick, hmmm... not sure I need that pressure, but thanks for the kind words!! If this doesn't work out it'll be "The what not to do method" IF anyone else ever tries my method (that's scary) they need to know where the pitfalls are and why I did what I did - or didn't do. However I did not take pics of the rework. I didn't feel like documenting cutting and chiseling away my goofs. Maybe I should have, but I didn't. All I can say about that is use a sharp chisel and take your time. Tim, I haven't forgot about your drawings, I just need to regain confidence in my process before I share. Plus, there were errors so glad I caught them. I'm back in the shop today so hopefully there will be positive progress to report next update! "Now back to work"
-
Awesome Mobbsie!! She's a beautiful ship, you did a masterful job! Enjoy your trip to the dark side...
- 1,279 replies
-
- 1
-
-
- agamemnon
- caldercraft
- (and 1 more)
-
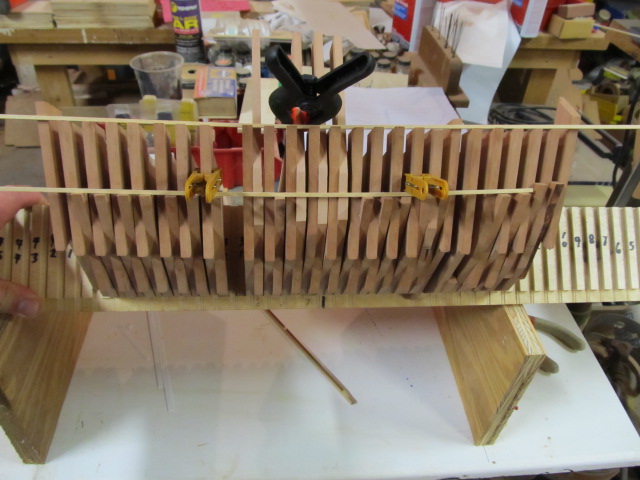
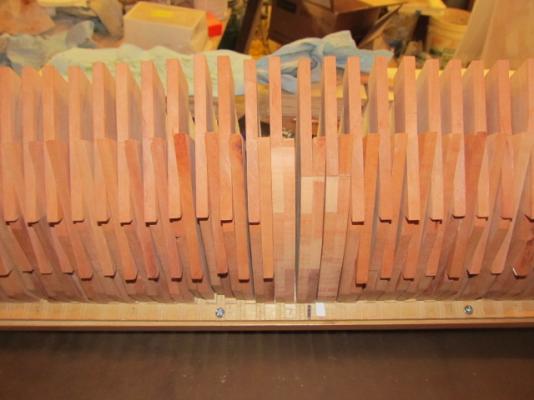
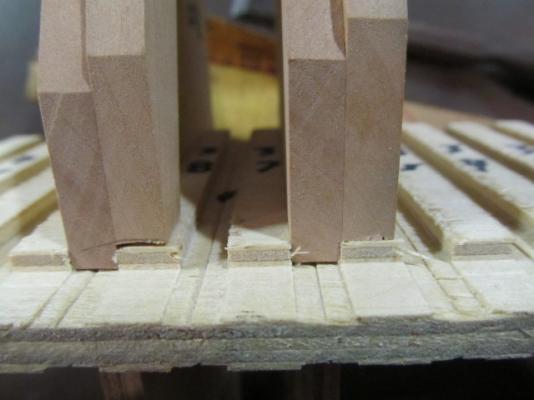
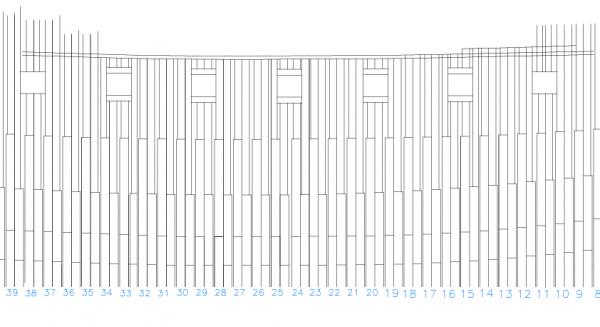
To correct my errors, I remade a couple frames by cutting off all the futtock sections and remaking them. This allowed me to reuse the plywood bulkhead. A few others I was able to keep the "odd" futtocks, and only remove the even ones using a chisel. I didn't taks pics of any of this rework. I also changed my method for making the frames. The ply bulkhead is cut the same as before. When adding the odd futtock sections I now start with the first futtock instead of the floor timber. This allows me to place it per the pattern, but then put the frame on the model and check it for being fair (the top is still left long for trimming later). This will add time to making each frame, but with the errors I made I'm now paranoid of making additonal errors blindly without checking first. If I put the floor timber on first as before I would have to cut the bottom (next to the keel) perfecty, then the top perfectly, and this would be very time consuming and tedious. By instead putting the first futtok on first I can get it fair, glue it, then add the floor timber (notched for the bulkhead). I will say, I'm pretty confident I would not have 90% of these errors if my pin drilling jig had been accurate from the start. That error I made caused most of the frame heads to be low. Some of the other futtock head errors - I'm not exactly sure how they crept in but they did, so from now on I'm going to check everytihing in advance. I'm in even more awe now of Ed Tosti's ability to make frames from his plans, with no back and forth checking, and have them fit perfeclty. I tried and just did't succeed.... Here's a new frame with the pattern cut for the first futtock. I place a witness mark on the frame, clamp it with a small clamp and place on the model for checking. I clamp temporay ribbands on to check each futtock head for fair as I make and attach it. If they need tweaking I move them, then make a new witness mark for alignment when gluing. Hopefully you can see by these pics the futtock heads are in a nice, fair line now. Well, the front 3 aren't but those are ones I need to remake and I left them in when taking these pics. Once I use this new process on a few more frames and get the errors all repaired, I'll take pics to better document the process. This has been a rather wordy explanation, pictures should tell the story much better. As usual thanks for the likes and for looking in!


-
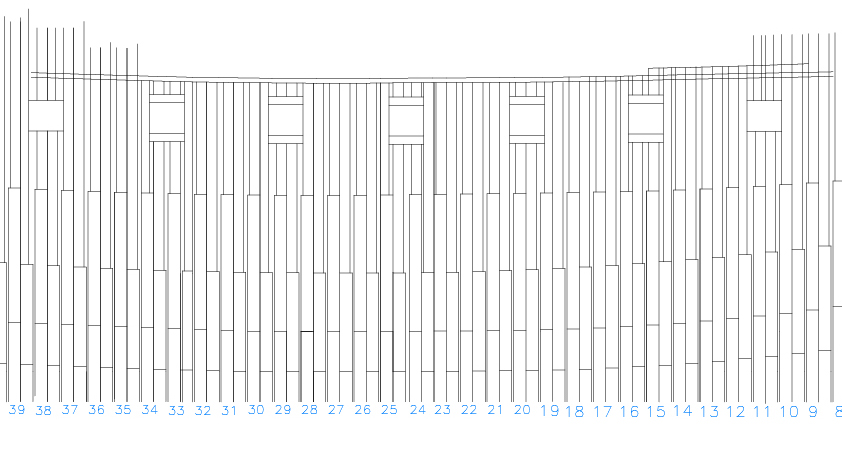
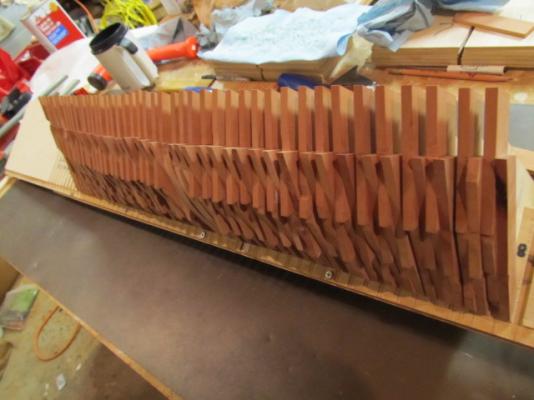
Last weekend I finally put these frame in position for the first time. This was a highly anticipated, but also scary moment to see if my process and methods were going to work. Here's a few pics. Overall I was pleased - as first. You can definately tell a ship's hull is trying to emerge. But after some detailed inspection my fears came true, the futtock heads were not fair. Well actually most were, but not all. This was of course disappointing. After much head scratching, fussing, and a few 4 letter words I was thoroughly disgusted to the point I thought of giving up. Wisely I left the shop and decided to approach the problem with a clear head, which for me is difficult. The urge to solve the problem immediately is tough for me to ignore. Anyway, I went back and checked my drawings, in detail, and discovered a few errors. This, for me is tough, I hate making mistakes, but we all do anyway. One of the errors caused most of my problems. The frame I randomly chose as the pattern for making my pin drilling jig was off. This was the only frame I found with that error, and Mr Murphy and his law certainly kicked me in the butt with that one when I selected a bad drawing to make a jig.... :angry: :angry: A couple other frame's futtock head locations were drawn wrong, just a stupid mistake - no excuses for that one. So how to proceed. Give up? Start over?? After clearing my head a few days I came back to see what could be done and I found if I shifted the offending frames up slightly most of the futtock heads would become fair. A few others were a total loss and could not be used so they will have to be redone. Several others could be salvaged by removing the even futtock sections, and remaking them. I can remove those sections with a sharp chisel so that's not too bad. Next post a few corrections and some changes to my process.

-
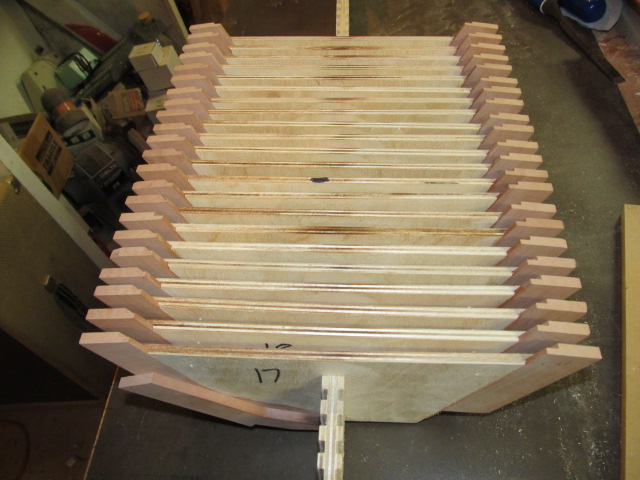
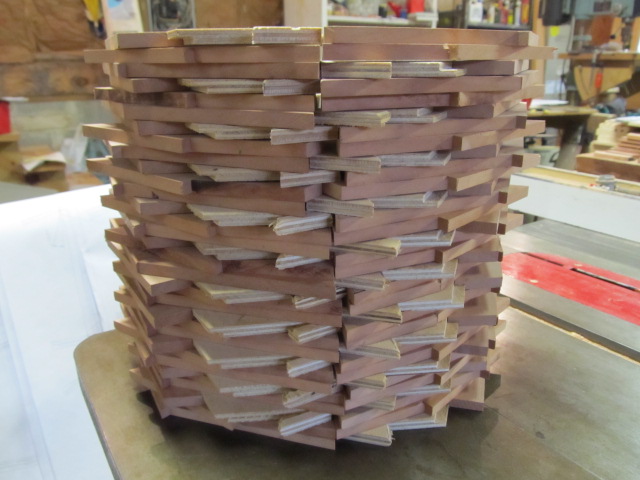
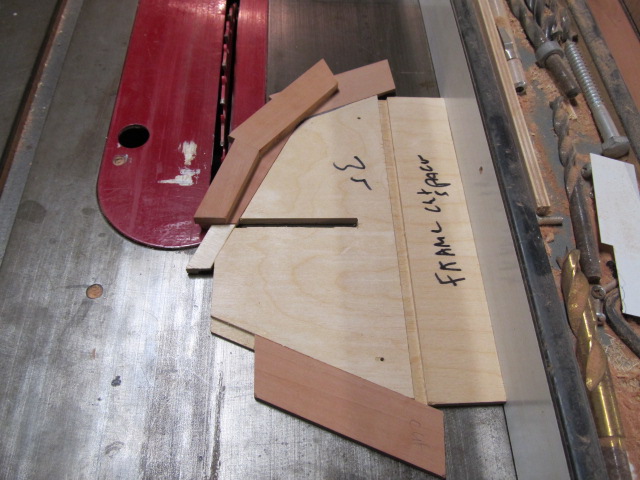
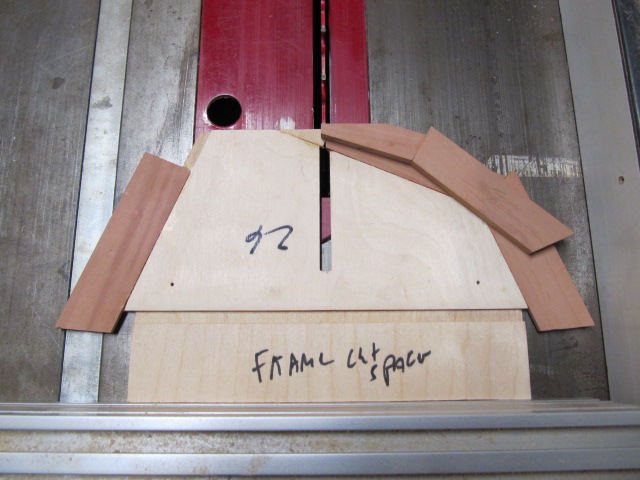
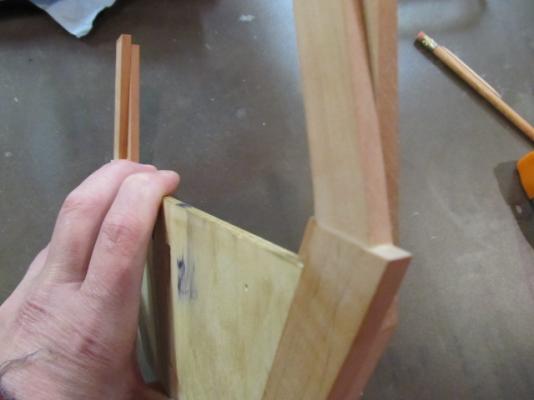
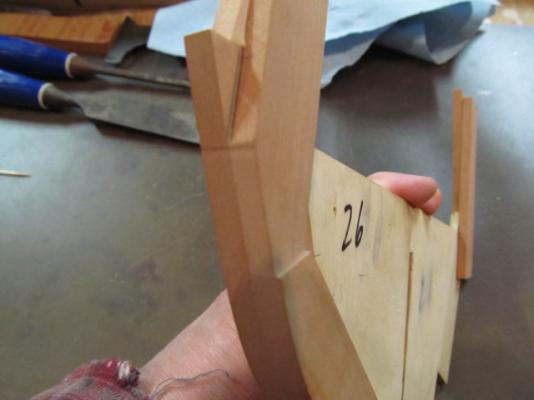
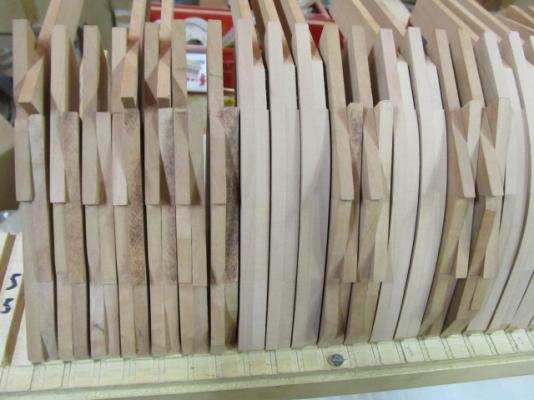
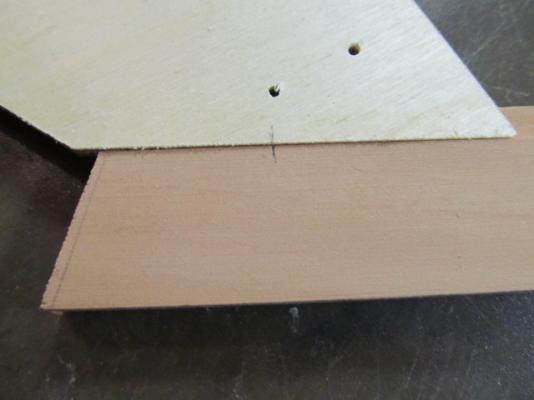
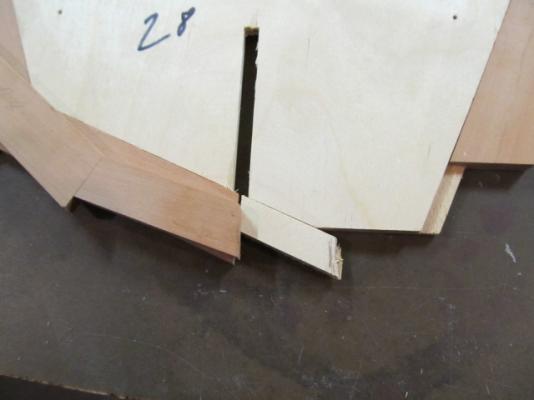
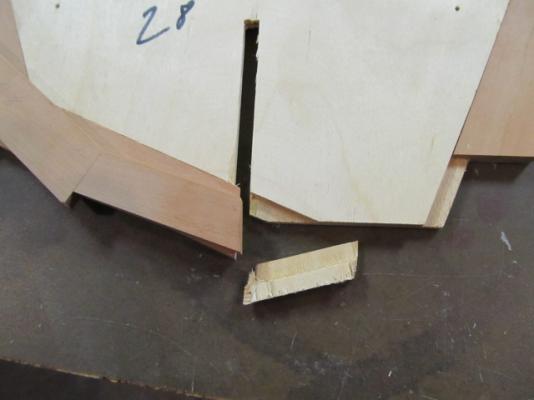
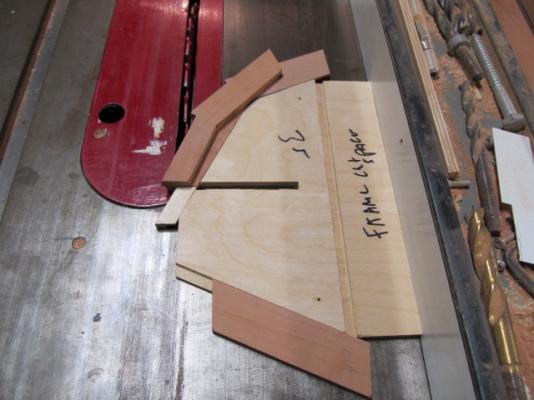
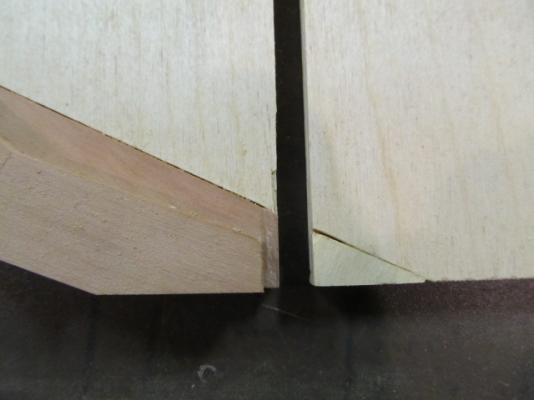
Time for an update. One thing I forgot to point out in my frame build process was the small filler I cut and glued into the dado that was cut into the plywood bulkhead. I need this gap filled in so the future planking would have a good face to glue to. Here's a stack of bulkheads ready for additonal work. Next step in the frame process, once the frame got to this point I trimmed off the excess at the bottom of the bulkhead. I did this on a table saw. I had to use a spacer between the ply and the fence since the heads of the futtocks were extended above the ply. Next I cleaned the dado back out using a miter gauge. (I have an extended miter fence on my miter gauge which makes this possible.) I had to notch the floor timber to clear the ply bulkhead. I did this with a chisel and razor knife, rather crudely since this joint will be covered up with a few strakes of planking. Definately not my best joinery work, but it won't show so I can live with it.


-
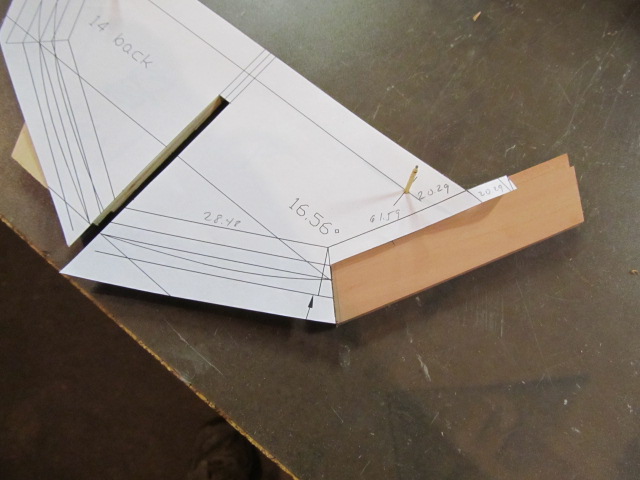
As I've mentioned a few times I'm still working on my drawings. I haven't shared much of them since they still aren't done, and I'm still a little unsure of my accuracy. I let USS Frolich Frolick (aka Steve) check out my framing plan and he gave the thumbs up, so that was a confidence builder. I will say the gun ports fit Baker's dwg exactly, and I spent a lot of time on that so I was relieved when Steve gave the OK. So, here's a bit of that dwg. I don't show the entire plan because it's still not finished. Right now I'm about to tackle the cant frames, both front and rear, and am finishing the frame dwgs for the individual full frames. I'm now building frames and was waiting on adding the 3rd and 4th futtocks until I settled on stepped - or not stepped. Now I can move forward on that! After a conversation with Steve I decided to move ahead with stepping the frames on the 3rd and 4th futtocks. I hope this is accurate, but it should give me the look I'm after. Also, I've settled on my naming convention of the floors and futtocks. It may not he historically accurate, but only I'll ever know it so it's not worth fretting over. I'm referring to frame parts as odd/even and front/back. As long as I keep that straight I'm good. A few items are still undecided. 1. Should the gun port sills and lintels follow the shear? At this point my answer is yes. I can't see notching the planking to fit the sills and lintels if I run the sills parallel to the keel. 2. Will the sills be mortised or bird mouthed? Don't think so. I *think* birdmouths were and English method, and frankly I hate the thought of cutting them. I don't think I will mortise them at all. 3. Pins, treenail, bolts etc. Ugh.... I can't decide. I honestly think treenails, for me, are an extra item I don't need. In real life they would be virtually invisible, and I'm not sure I like the look. Just my personal preference - you folks that add treenails have my admiration and respect!! As far as bolts and pins, I want to add them where strength is needed. Frames to gun port sills for example. BUT, if I add them in one place I'll have to add them everywhere, and that's a can I may not want to open. Ed Tosti for example has thousands of pins in his Young America. No way I can, or would attempt to do that. There's more questions but those will do for now... A couple folks have asked if I would be willing to share my dwgs, and the answer is yes. But, I need to finish them. I hate the thought of giving out unfinished or inaccurate work, so bear with me. I've been looking at books again, I was going to invest in the TFFM series after following several build logs of those ships - just to drool over the masters at work - BUT - I think I'm gonna get Ed T's Naiad book. I've browsed that log and his Young America so many times it's time to finally buy the book! Thanks for looking in! Pic:
-
Wonderful Augie. I'm jealous of those cannons.... Can't wait to see them finished and rigged.
- 2,191 replies
-
- 1
-
-
- confederacy
- Model Shipways
- (and 1 more)
-
Wondeful job Tony! Congrats on a fine build. I first read your comment on "no more big buids" as NO MORE builds - so glad I read it wrong... Your Aggy is one beautiful ship - you should be proud!!!
- 1,279 replies
-
- 1
-
-
- agamemnon
- caldercraft
- (and 1 more)